
English............ 1
Español..........25
2018.01.03
PORTABLE AIR CONDITIONER
ACONDICIONADOR DE AIRE PORTÁTIL
User Manual
Manual
del usuario

CONTENTS / ÍNDICE
Contents
Important safety information ................2
Operating conditions...........................2
Electrical requirements .......................3
Grounding instructions........................4
Safety precautions ..............................5
Installation instructions ........................7
Features .............................................7
Accessories ........................................8
Location ..............................................9
Tools for window kit installation ..........9
Window slider kit installation.............10
Double-hung sash window ............... 11
Sliding sash window .........................12
Water drainage .................................13
Operating instructions ........................15
Control panel instructions .................15
Timer operation.................................17
Remote control operation .................19
Replacing the remote batteries.........20
Remote control certifi cation ..............21
Care and maintenance ........................19
Air fi lter..............................................22
Cleaning ...........................................22
Long-term storage ............................23
Error codes .......................................23
Troubleshooting ..................................24
Warranty ............................................... 25

TO OBTAIN WARRANTY SERVICE YOU MUST
PROVIDE A VALID PROOF OF PURCHASE.
PLEASE STAPLE YOUR RECEIPT TO THIS
PAGE FOR FUTURE REFERENCE.
Model Number:
Serial Number:
Date of Purchase:
This product is factory equipped with a power
supply cord that has a three-pronged grounded
plug. It must be plugged into a mating grounding
type receptacle in accordance with the National
Electrical Code and applicable local codes
and ordinances. If the circuit does not have a
grounding type receptacle, it is the responsibility
and obligation of the customer to exchange
the existing receptacle in accordance with the
National Electrical Code and applicable local
codes and ordinances. The third ground prong
should not, under any circumstances, be cut or
removed. Never use the cord, the plug or the
appliance when they show any sign of damage.
Do not use your appliance with an extension
cord unless it has been checked and tested
by a qualifi ed electrician or electrical supplier.
Improper connection of the grounding plug can
result in risk of fi re, electric shock and/or injury
to persons associated with the appliance. Check
with a qualifi ed service representative if in doubt
that the appliance is properly grounded.
IMPORTANT - GROUNDING METHOD

Note
The instructions issued in this manual are not
meant to cover all possible conditions and
situations that may occur. Person(s) installing,
maintaining, or operating the appliance must
exercise caution and care. Failure to install,
maintain, and/or operate the equipment according
to the manufacturer’s instructions may result in
conditions which can produce personal injury and
damage to your unit and/or property damage.
Contact your dealer, service agent, and/or the
manufacturer about any problems or conditions
you do not fully understand.
For consumer service call (1-800-263-2629).
Operating conditions
Note: Performance may be reduced outside of
these operating temperatures.
2
Safety
!
MODE ROOM TEMPERATURE
Cool 62°F (17°C) ~ 95°F (35°C)
Dry 55°F (13°C) ~ 95°F (35°C)
Important safety information
Read and follow all safety instructions
To prevent injury to the user or other people
and to prevent property damage, the following
instructions must be followed.
Incorrect operation resulting from ignoring
these instructions may cause harm or damage.
SAVE THESE INSTRUCTIONS

3
Safety
Important safety information
Read and follow all safety instructions
Electrical requirements
To reduce the risk of fire, electric shock, or
personal injury, all wiring and grounding must
conform to the latest edition of Local and National
Electrical codes.
• It is the customer’s responsibility to have
the wiring and fuses checked by a qualified
electrician to make sure adequate electrical
power is available.
• This appliance is designed to operate on an
effectively grounded, separately branched,
polarized, 3-wire, 120 Volt 60 Hertz
(alternating current) circuit protected by a
15 ampere fuse, equivalent fuse or circuit
breaker. The three-prong grounding plug on
the power cord should be plugged directly into
the aforementioned receptacle rated 110/120
V.A.C.
• Do not connect the appliance to a multiple
socket outlet that is also being used for other
electrical appliances.
FOR YOUR SAFETY: To reduce the risk of fire
or explosion, do not store or use gasoline
or other flammable vapours or liquids in the
vicinity of this or any other appliance.
SAVE THESE INSTRUCTIONS
!

4
Safety
Important safety information
Read and follow all safety instructions
Grounding instructions
Improper connection of the equipment-grounding
conductor can result in a risk of electrical shock.
Check with a qualified electrician or service person
if you are in doubt as to whether your appliance
outlets are properly grounded.
• This appliance must be grounded. In the event
of malfunction or breakdown, grounding will
reduce the risk of electrical shock by providing
a path of least resistance for electrical current.
This appliance is equipped with a cord that
has an equipment-grounding conductor
and 3 prong grounding plug. The plug must
be connected into an outlet that is properly
installed and grounded in accordance with all
local codes and ordinances.
• Do not modify the plug provided with this
appliance. If it will not fit the outlet, have a
proper outlet installed by a qualified electrician.
• If the household electrical supply does not
meet the above specifications, or if you are not
sure your home has an effective ground, have
a qualified electrician or your local electrical
utility company check it and correct any
problems.
SAVE THESE INSTRUCTIONS
!

5
Safety
Important safety information
Read and follow all safety instructions
Safety precautions
When using this air conditioner, always follow
basic safety precautions, including the following:
• Use this appliance only for its intended
purpose as described in this Owner’s Manual.
• This appliance must be properly installed and
grounded as described in this manual before it
is used.
• Never operate this appliance in an area that
could collect stagnant water. If this condition
occurs, for your safety, disconnect the power
supply before stepping on the water.
• Never unplug your air conditioner by pulling on
the power cord. Always grip the plug firmly and
pull straight out from the receptacle.
• Replace immediately all electric service
cords that have become frayed or otherwise
damaged. A damaged power supply cord
must be replaced with a new power supply
cord obtained from the manufacturer and not
repaired. Do not use a cord that shows cracks
or abrasion damage along its length or at
either the plug or connector end.
SAVE THESE INSTRUCTIONS
!

6
Safety
Important safety information
Read and follow all safety instructions
Safety precautions
• If the unit is placed on its back or side, allow
the unit to remain upright and undisturbed
for a minimum of 2 hours to avoid damage to
internal components.
• Turn the unit OFF and unplug it before
cleaning.
• For your safety, do not store or use
combustible materials, gasoline or other
flammable vapours or liquids in the vicinity of
this or any other appliance.
• All air conditioners contain refrigerants, which
under federal law must be removed prior
to product disposal. If you are disposing of
a product with refrigerants, check with the
company handling disposal about what to
do. Check for local regulatory compliance
regarding the approved and safe disposal of
this appliance.
• This air conditioner is intended for indoor
residential applications only. This air
conditioner should not be used for commercial
or industrial applications. Do not use outdoors.
• Do not allow children to operate the air
conditioner unsupervised.
SAVE THESE INSTRUCTIONS
!

7
Installation
Front
Rear
Features

8
Installation
"74&2;&/.F >.;&;DF
.&;F 3;05F
C%?8;F08#F
&. 0AF
*
' #5F 3;15F
0+;F
&. 0AF,' #5FF
&. 0AF
*
' #5FF. FF
0-F#*FF %#9(@#F
0-F#*FF %#9(@#F
1-F#*FF1. %#9'@#F
$?6'<EF6)$=F.!FF6$B:F
4&.F
09#F
#-1;#F0.;50**#5F. F;;#5DF
Accessories
Ensure that all the accessories are included in the
package and refer to the installation instructions
for their usage.
Note: All the illustrations in this manual are for
explanatory purposes only. Your air conditioner
may be slightly different.

9
Installation
Location
The air conditioner should be
placed on a fi rm foundation to
minimize noise and vibration. For
safe and secure positioning, place
the unit on a smooth, level fl oor
strong enough to support the unit.
The unit has casters to aid
placement, but it should only be
rolled on smooth, fl at surfaces.
Use caution and protect fl oors when
rolling over wood fl oors. Do not
attempt to roll the unit over objects.
The unit must be placed within
reach of a properly rated grounded
socket.
Never place any obstacles around
the air inlet or outlet of the unit.
Do not use extension cords with this
appliance.
The appliance requires at least 20
inches (50 cm) of clearance on the
back.
Tools for window kit installation
1. Screwdriver (medium size, Phillips)
2. Tape measure or ruler
3. Knife or scissors
4. Saw (In the event that the window kit needs to be
cut down in size)
See www.danby.com for general instruction guide

10
Installation
Slide the exhaust hose unit adapter
into the air outlet opening in the
direction of the arrow.
Measure the window opening where the window kit
will be installed and extend the sliders to match the
measurement. If the length of the window opening
requires three window sliders, use the bolt to
fasten the sliders at the proper length.
If the window opening is less than the minimum
length of the window slider kit, use the single slider
that has the hole in it and cut it to the correct size.
Ensure that you do not cut the end of the slider
that has the hole in it, this will be necessary to
attach the exhaust hose assembly.
Window slider kit installation
Your window slider kit has been designed to fi t
most standard vertical and horizontal window
applications, however, it may be necessary for
you to modify some aspects of the installation
procedures for certain types of windows.
Visit www.danby.com for general instruction
videos.
Press the exhaust hose into
the window slider adapter and
unit adapter. The adapters
will automatically clamp to the
exhaust hose using internal
elastic buckles.
adapter

11
Installation
Installation in a double-hung sash window
adapter

12
Installation
Installation in a sliding sash window
adapter

13
Installation
Water drainage
When the internal drain pan
becomes full the unit will beep
8 times and the digital display
will show error code P1. The air
conditioning or dehumidifying
action will stop but the fan may
continue to operate.
Turn the unit off and unplug
it from the power source.
Carefully move the unit to a
location where the water can
be drained. Remove the bottom
drain plug and allow the water
to completely drain. Replace
the bottom drain plug, pressing
fi rmly to ensure a tight fi t and
no leaks. The P1 error symbol
will disappear and the unit will
resume regular function once
power is restored.
If the P1 error persists when the
unit has been drained of water,
turn the unit off and unplug it
from the power source for at
least 5 minutes. If the P1 error
persists after plugging the unit
back in, please call Danby
consumer care for further
troubleshooting options.

14
Installation
Continuous drain
During the DRY mode, you may wish to set up
the continuous drain option so that the unit will
automatically drain collected water.
Remove the exhaust hose during DRY mode, it is
not necessary. Ensure that the unit is turned off and
unplugged from the power source before setting up
the drain hose.
Remove the upper drain plug and attach a 3/4” drain
hose. Ensure that there are no kinks or bends in the
drain hose as this can stop water from draining.
Place the open end of the drain hose over the
receptacle that the unit will drain into; this could be a
basement fl oor drain, a sink or similar.
Remember that there is no drain pump in this unit,
the continuous drain is activated by gravity only.
Ensure that the drain hose goes straight down toward
the fl oor from the drain connection. If the hose is not
positioned directly downwards, water will not drain
correctly.

15
Operation
Cool
POWER
Fan
Dry
Mode button: Press to select the desired mode. Modes
will cycle in sequence with each press of the button;
COOL, DRY, FAN. Light will indicate current mode. Fan
speed can be chosen on COOL and FAN modes using
the remote control.
COOL mode
- Press the mode button until the COOL icon illuminates
- Press the UP or DOWN arrow buttons to select the
desired room temperature
- The temperature can be set within a range of 17-30°C
/ 62-86°F
Note: The hose should be exhausted during COOL
mode
FAN mode
- Press the mode button until the FAN icon illuminates
- Fan speed can be adjusted using the remote control
DRY mode
- Press the mode button until the DRY icon illuminates
- The display will show the current room temperature
- Fan speed and temperature cannot be adjusted in this
mode
Up and Down buttons: Used to adjust temperature
settings in COOL mode. Press and hold both Up and
Down buttons for 3 seconds to change the temperature
display from °C to °F.
Control panel instructions

16
Operation
Power button: Press to turn the unit on or off.
LED Display:
- While on COOL mode shows the set temperature in °C
or °F
- When on FAN and DRY mode shows the room
temperature
- Displays error codes
AUTO mode
- Can only be activated by remote control
- There is no AUTO mode display on the control panel
- Display will show COOL or FAN based on ambient
room temperature
SLEEP mode
- Can only be activated from the remote control
- Conserves energy during sleeping hours
- Once activated, SLEEP mode will increase the set
temperature by 1 degree for 30 minutes. The set
temperature will increase another degree in the next 30
minutes and then will maintain temperature for 7 hours
before returning to the original setting.
- The SLEEP function is only available in COOL mode
Follow Me Function
- Can only be activated from the remote control
- Available in Cool and Auto modes
- Keep the remote control with you and the appliance will
adjust the set temperature based on the temperature at
your current location
- The Follow Me light on the control panel will illuminate
for 5 seconds every three minutes to indicate that it has
received a signal from the remote. If the appliance does
not receive a signal from the remote during any 7 minute
interval, it will beep to indicate that the Follow Me mode
has ended.
Control panel instructions

17
Operation
Timer operation
Note: Timer function can only be activated by the remote
control.
This unit has two timer related functions:
- Timer on: sets the amount of time after which the unit
will turn on
- Timer off: sets the amount of time after which the unit
will turn off
Timer on function:
- Press the Timer On button on the remote control
- The last time period that was set will show on the display
- Press the Timer On button repeatedly to set the amount
of hours that should pass before the unit turns on
- Wait two seconds for the programming to be accepted
by the unit
Timer off function:
- Press the Timer Off button on the remote control
- The last time period that was set will show on the display
- Press the Timer Off button repeatedly to set the amount
of hours that should pass before the unit turns off
- Wait two seconds for the programming to be accepted
by the unit
Notes:
- Pressing the Timer On or Timer Off buttons will increase
the set time in 0.5 hour increments up to 10 hours and
then in 1 hour increments up to 24 hours
- The display will revert back to showing the previous
temperature setting if the unit does not receive a signal
within a 5 second period during programming
- Adjusting the timer setting to 0.0 hours will cancel the
Auto-timer settings

18
Operation
Timer functions
Using the Auto-on and Auto-off feature at the same
time
You can set the air conditioner to run the Auto-on and
Auto-off features at the same time. Keep in mind that the
hours displayed on the unit refer to the number of hours
that will pass from the current time before the action is
taken.
For example:
- First, set the Timer On or Timer Off function as per
above
- Wait three seconds for programming to be accepted by
the unit
- Set the Timer Off or Timer On function
- Wait three seconds for programming to be accepted by
the unit
Auto-Restart function
If the unit loses power unexpectedly, it will restart with the
previous function settings when power is restored.
Note: Once the unit has stopped, it cannot be restarted
for 3 minutes. Operation will resume after 3 minutes.
SHORTCUT function (only available on remote)
- Used to save a favourite setting
- Set the unit to the temperature and fan speed that you
would like to set as a favourite
- Press and hold the SHORTCUT button for 2 seconds
- Press the SHORTCUT button at any point in future to
return to the favourite setting
- If no favourite is set, pressing the SHORTCUT button
will cause the unit to run in AUTO mode at 79°F (26°C),
with fan speed set to AUTO

19
Operation
1. Power Button: Press to turn the unit
on or off.
2. Mode Button: Press to select the
desired mode.
3. Fan Button: Press to select fan
speed.
4. Sleep/Filter Button:
• Press to start the Sleep function.
• The fi lter light will illuminate after
250 hours of use as a reminder to
clean the fi lter; to reset the fi lter after
cleaning, hold the Sleep button for 3
seconds.
5. Follow Me Button: Press to activate
the Follow Me function.
6. LED Button: Press to turn the LED
display on or off.
7. Timer Off Button: Press to set the
Auto-off timer.
8. Timer On Button: Press to set the
Auto-on timer.
9. Shortcut Button: Press to set and
activate the short cut function.
10. Up and Down Buttons:
• Used to set the temperature and
timer.
• Press and hold both Up and Down
buttons for 3 seconds to change the
temperature display from °C to °F.
11. LED Display:
• Shows the set temperature in °C or
°F or the auto-timer settings.
• While on Dry mode shows the
relative humidity.
• When on Fan mode shows the room
temperature.
1
2
3
4 6
7
8
9
10
11
5
Remote control instructions

20
Operation
Your air conditioning unit comes with two
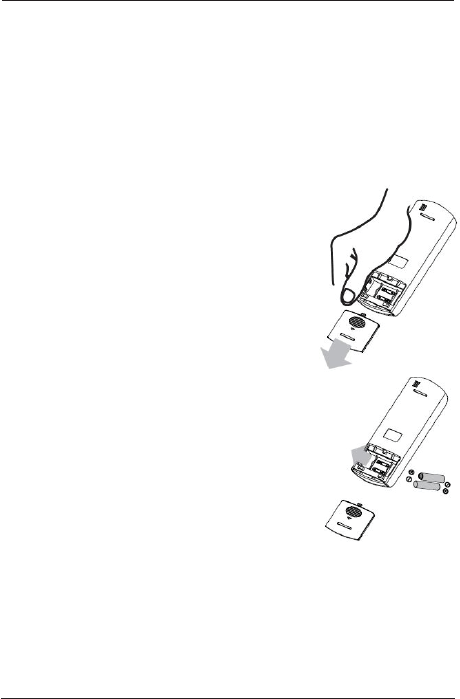
AAA batteries. Place the batteries in the
remote control before use.
1. Slide the back cover from the remote
downward to expose the battery
compartment.
2. Insert the batteries, ensure to match
the (+) and (-) symbols on the ends of the
batteries with the symbols inside the battery
compartment.
3. Slide the battery cover back into place.
Important: Do not dispose of batteries as
unsorted municipal waste. Refer to local
laws for proper disposal of batteries.
• The air conditioner will not respond if
curtains, doors or other materials block the
signal from the remote control to the unit.
• Prevent any liquid from contact with the
remote control. Do not expose the remote
control to direct sunlight or heat.
• If the infrared signal receiver on the indoor
unit is exposed to direct sunlight, the air
conditioner may not function properly. Use
curtains to prevent the sunlight from falling
on the receiver.
• Do not mix old and new batteries or
batteries of different types.
• Do not leave the batteries in the remote
control if it is not going to be used for more
than 2 months.
Replacing the remote batteries

21
Operation
Remote control certifi cation
NOTE: This equipment has been tested and found to comply
with the limits for a Class B digital device, pursuant to Part
15 of the FCC Rules. These limits are designed to provide
reasonable protection against harmful interference in a
residential installation. This equipment generates, uses and
can radiate radio frequency energy and, if not installed and
used in accordance with the instructions, may cause harmful
interference to radio communications. However, there is
no guarantee that interference will not occur in a particular
installation. If this equipment does cause harmful interference
to radio or television reception, which can be determined by
turning the equipment off and on, the user is encouraged to
try to correct the interference by one or more of the following
measures:
1. Reorient or relocate the receiving antenna
2. Increase the separation between the equipment and
receiver
3. Connect the equipment into an outlet on a circuit different
from that to which the receiver is connected
4. Consult the dealer or an experienced radio/TV technician
for help
Changes or modifi cations not approved by the party
responsible for FCC compliance could void the user’s authority
to operate the equipment. This appliance complies with Part 15
of the FCC Rules.
Operation is subject to the following conditions:
1. This device may not cause harmful interference.
2. This device must accept any interference received,
including interference that may cause undesired operation.
This device complies with Canadian CAN ICES-3 (B) / NMB-3
(B)

22
Care and maintenance
Air fi lter
• Clean the air fi lter every two weeks to ensure
optimal performance.
• In households with animals, you will need to
periodically wipe down the grill to prevent blocked
air fl ow due to animal hair.
• Be sure to unplug the unit before cleaning or
servicing.
• Do not use gasoline, paint thinner or other
chemicals to clean the unit.
• Do not wash the unit directly under a tap or using a
hose as it may cause electrical damage.
• If the power cord is damaged contact a service
depot immediately.

23
Care and maintenance
Unit enclosure
Use a lint-free cloth soaked with neutral detergent to
clean the unit enclosure, be sure to wring the cloth of
excess water. Finish by wiping with a clean dry cloth.
Long-term storage
• Remove the rubber plug at the back of the unit and
attach a hose to the drain outlet. Place the open
end of the hose directly over the drain area in your
basement fl oor
.
• Remove the plug from the bottom drain outlet, this
means that all the water in the bottom drain tray will
drain out.
• Keep the appliance running on FAN mode for half a
day in a warm room to dry the appliance inside and
prevent mold formation.
• Turn off the appliance and unplug it, wrap the cord
and bundle it with tape.
• Remove the batteries from the remote control.
• Clean the air fi lter and reinstall it.
Disposal
Check for local regulatory compliance regarding the
approved and safe disposal of this appliance.
Error codes
E1 - room temperature sensor error
E2 - evaporator temperature sensor error
E4 - display panel communication error
P1 - water tray is full - attach drain hose and drain
excess water

24
Troubleshooting
PROBLEM POSSIBLE CAUSE SOLUTION
Unit does not
start when
pressing on/
off button
• P1 appears in the
display window
• Room
temperature is
lower than the set
temperature.
• Drain the
water in the
bottom tray
• Reset the
temperature
Not cool
enough
• The windows or
doors in the room
are not closed
• There are heat
sources inside the
room
• Exhaust air hose
is not connected
or blocked
• Temperature
setting is too high
• Air fi lter is blocked
by dust
• Make sure all
the windows
and doors
are closed
• Remove the
heat sources
if possible
• Connect the
hose and
make sure it
can function
properly
• Decrease
the set
temperature
• Clean the air
fi lter
Noisy or
vibration
• The ground is not
level or not fl at
enough
• Place the
unit on a fl at,
level ground
if possible
Gurgling
sound
• The sound comes
from the fl owing
of the refrigerant
inside the air
conditioner
• It is normal
Consumer Service: 1-800-263-2629

Índice
Información de seguridad importante .............29
Condiciones de operación ..............................29
Requisitos eléctricos.......................................30
Instrucciones de conexión a tierra ..................31
Precauciones de seguridad ............................32
Instrucciones de instalación ............................34
Caracteristicas ................................................34
Accesorios ......................................................35
Ubicación ........................................................36
Herramientas necesarias para instalar el juego de
ventana ................................................................36
Instalación del juego de moldura para ventana 37
Ventana de guillotina vertical ..........................38
Ventana de guillotina horizontal......................39
Drenaje de agua .............................................40
Instrucciones de operación ..............................42
Instrucciones del panel de control ..................42
Funcionamiento del temporizador ..................44
Instrucciones del control remoto.....................46
Reemplazo de las pilas del control remoto.....47
Certifi cación del control remoto ......................48
Cuidado y maintenimiento ................................49
Filtro de aire....................................................49
Limpieza .........................................................50
Almacenamiento a largo plazo .......................50
Códigos de error .............................................50
Resolución de problemas .................................51
Garantía ..............................................................52

PARA OBTENER SERVICIO DE GARANTÍA,
DEBE PROVEER UN RECIBO ORIGINAL.
POR FAVOR ENGRAPE SU RECIBO A ÉSTA
PÁGINA EN CASO QUE NECESITE HACER
UNA RECLAMACIÓN.
Número de modelo:
Número de serie:
Fecha de compra:
Este producto viene equipado de fábrica con un
cable de alimentación que tiene un enchufe de tres
clavijas. Hay que enchufarlo en un tomacorriente
adecuado y con conexión a tierra, de acuerdo con las
Normas Eléctricas Nacionales y todas las normas y
regulaciones locales que correspondan. Si el circuito
no tiene un tomacorriente con conexión a tierra, el
cliente tiene la responsabilidad y la obligación de
reemplazarlo de acuerdo con las Normas Eléctricas
Nacionales y las normas y regulaciones locales que
correspondan. No debe cortar o quitar la clavija
de coneción a tierra bajo ninguna circunstancia.
Nunca use el cable, el enchufe o el aparato cuando
estén dañados. No utilice el aparato con un cable
de extensión, a menos que haya sido verifi cado y
probado por un electricista califocado o un proveedor
de servicios eléctricos. Una mala conexión de
la clavija de conexión a tierra podría causar un
incendio, una descarga eléctrica y/o lesiones a las
personas que manejen el aparato. Consulte con un
representante técnico califi cado si tiene dudas acerca
de la conexión a tierra del aparato.
IMPORTANTE - MÉTODO DE CONEXIÓN A TIERRA

Nota
Las instrucciones en este manual no tienen como
objetivo cubrir todas las posibles condiciones y
situaciones que puedan tener lugar. Las personas
que instalan, realizan el mantenimiento u operan
el aparato deben tener precaución y cuidado.
No instalar, realizar el mantenimiento u operar
el equipo de acuerdo con las instrucciones del
fabricante puede dar lugar a condiciones que
pueden producir lesiones personales y daño a su
unidad y/o daños materiales.Comuníquese con su
vendedor, agente de servicio o con el fabricante
ante problemas o condiciones que no comprende
totalmente.
Para comunicarse con el servicio de atención
al cliente de Danby, llame al (1-800-263-2629).
Condiciones de operación
El rendimiento puede reducirse fuera de estas
temperaturas de funcionamiento.
27
Seguridad
MODO TEMPERATURA AMBIENTE
Frío 62°F (17°C) ~ 95°F (35°C)
Seco 55°F (13°C) ~ 95°F (35°C)
Información importante de seguridad
Lea y siga todas las instrucciones de seguridad
Para evitar heridas al usuario u otras personas
y para evitar los daños materiales, deberá
seguir las siguientes instrucciones.
La operación incorrecta al ignorar estas
instrucciones podría causar lesiones o daños.
GUARDE ESTAS INSTRUCCIONES
!

28
Seguridad
Información importante de seguridad
Lea y siga todas las instrucciones de seguridad
Requisitos eléctricos
Para reducir el riesgo de incendio, descarga
eléctrica o lesión personal, todo la instalación
eléctrica y toda la conexión a tierra deben cumplir
con la última versión de los códigos locales y
nacionales de electricidad.
• El cliente es responsable de hacer que un
electricista calificado controle los cables y
fusibles para garantizar que se disponga la
energía eléctrica adecuada.
• Este aparato está diseñado para funcionar
en un circuito de 120 voltios y 60 hercios
(corriente alterna), de 3 cables, polarizado,
derivado de forma separada, con conexión
a tierra eficaz, protegido por un fusible de
15 amperios, un fusible equivalente o un
disyuntor. El enchufe de tres clavijas con
conexión a tierra en el cable de alimentación
debe enchufarse directamente a un
receptáculo como el antes mencionado con
potencia de 110/120 voltios de CA.
• No conecte el aparato a una salida de
tomacorriente múltiple que también se esté
utilizando con otros aparatos eléctricos.
PARA SU SEGURIDAD: Para reducir el riesgo
de incendio o explosión, no almacene ni
utilice gasolina ni otros vapores o líquidos
inflamables cerca de este ni de ningún otro
aparato.
GUARDE ESTAS INSTRUCCIONES
!

29
Seguridad
Información importante de seguridad
Lea y siga todas las instrucciones de seguridad
Instrucciones de conexión a tierra
Una conexión inadecuada del conductor de conexión
a tierra del equipo puede dar como resultado un
riesgo de descarga eléctrica. Verifique con un
electricista calificado o con personal de servicio si
tiene dudas respecto a si los enchufes de su aparato
tienen una buena conexión a tierra.
• Este aparato debe conectarse a tierra. En el caso
de un mal funcionamiento o avería, la conexión
a tierra reducirá el riesgo de descarga eléctrica,
ya que dará una vía de menor resistencia
para la corriente eléctrica. Este aparato está
equipado con un cable que posee un conductor
de conexión a tierra del equipo y un enchufe
de conexión a tierra de 3 clavijas. El enchufe
debe conectarse a un tomacorriente que esté
correctamente instalado y conectado a tierra en
cumplimiento con todos los códigos y ordenanzas
locales.
• No modifique el enchufe que se provee con este
aparato. Si no encaja en el tomacorriente, llame
a un electricista calificado para que instale un
tomacorriente adecuado.
• Si el suministro eléctrico del hogar no cumple
con las especificaciones antes mencionadas o
si no está seguro de que su hogar tenga una
conexión a tierra eficaz, llame a un electricista
calificado o a la empresa de servicios eléctricos
local para que lo verifiquen y lo corrijan en caso
de problemas.
GUARDE ESTAS INSTRUCCIONES
!

30
Seguridad
Información importante de seguridad
Lea y siga todas las instrucciones de seguridad
Precauciones de seguridad
Al usar este aparato, siga siempre las
precauciones de seguridad básicas, incluidas las
siguientes:
• Utilice este aparato solamente para su uso
previsto según se describe en este manual del
usuario.
• Este aparato debe estar correctamente
instalado y conectado a tierra según se
describe en este manual antes de su uso.
• Nunca haga funcionar este aparato en un
área que puedan acumular agua estancada.
Si se da esta condición, para su seguridad,
desconecte el suministro eléctrico antes de
pisar el agua.
• Nunca tire del cable de alimentación para
desenchufar el aparato. Agarre siempre el
enchufe con firmeza y tire de él en línea recta
para quitarlo del receptáculo.
• Reemplace de inmediato todos los cables
de servicio eléctrico que se hayan pelado
o dañado de alguna otra forma. Los cables
de alimentación eléctrica dañados deben
reemplazarse con cables nuevos obtenidos
del fabricante; no deben repararse. No utilice
un cable que presente grietas o daños por
abrasión en cualquier parte o en el extremo
del enchufe o del conector.
GUARDE ESTAS INSTRUCCIONES
!

31
Seguridad
Precauciones de seguridad
• Si la unidad se coloca sobre su parte posterior
o de costado, deje que la unidad permanezca
en posición vertical e inmovil durante un
mínimo de 2 horas para permitir que el líquido
refrigerante se asiente.
• Apague la unidad y desenchúfela antes de
limpiarla.
• Para su seguridad, no guarde ni utilice
materiales combustibles, gasolina u otros
vapores o líquidos inflamables cerca de este o
de cualquier otro aparato.
• Todos los acondicionadores de aire contienen
refrigerantes, que bajo la ley federal deben
ser eliminados antes de la eliminación del
producto. Si va a desechar un producto con
refrigerantes, consulte qué debe hacer a
la empresa encargada de la eliminación.
Compruebe la conformidad reglamentaria
local con respecto a la eliminación aprobada y
segura de este aparato.
• Este acondicionador de aire está diseñado
para aplicaciones residenciales en
interiores solamente. Este aparato de aire
acondicionado no debe utilizarse para
aplicaciones comerciales o industriales. No lo
utilice al aire libre.
• No permita que los niños operen el aire
acondicionado sin supervisión.
Información importante de seguridad
Lea y siga todas las instrucciones de seguridad
GUARDE ESTAS INSTRUCCIONES
!

32
Instalación
Vista frontal
Vista posterior
--%!-
! %!--$
«
-
-%!-!%-
--%!-
-)$!-!,%-
--%!-
-)$!-*!%-
-
!)-
)%!
$-
%!--!-
%!
$---!
J
-
%
--!-
$) !!-
$--!
J
$--!-
%--!-
!!-
$--
!
J
-
Caracteristicas

33
Instalación
.;& F
UD
UD
UD
UDS
UD
UD
UDS
UDS
UDS
JU
GO
UD
#85&2&
.F
2; /5F #F>.& F
-
.
G
>#5F #F#82#F
2; /5F #F@#.;.F
0
#5./F
0
.#+F/55# #5/F25F@#.;.FF
0
.#+#8F/55# #5/8F25F@#.;.FFDF
&.;F8#++ /5F #F
G
/-#82>-FF %#8&@F
&.;F8#++ /5F #F
G
/-#82>-FF %#8&@F
&.;F8#++ /5F #F
G
/-#82>-FF./F %#8&@
/2/5;#F #F8#
G
>5& FDFF;/5.&++/8F
-
.
G
>#5F #F 5#.
J
#F
/.;5/+F5#-/;/FDF2&+8
JU
GO
Accesorios
Verifi que que todos los accesorios estén incluidos
en la caja y consulte las instrucciones de
instalación para poder usarlos.
Nota: Todas las ilustraciones de este manual
son únicamente con motivos explicativos. Su
acondicionador de aire puede ser ligeramente
diferente.

34
Instalación
Herramientas necesarias para instalar el juego de ventana
1. Destornillador (mediano, Phillips)
2. Cinta métrica o regla
3. Cuchilla o tijera
4. Sierra (en caso de que sea necesario cortar el juego de
ventana)
Consulte www.danby.com para obtener una guía general de
instrucciones.
Ubicación
El acondicionador de aire debe
colocarse sobre una base fi rme para
minimizar el ruido y la vibración. Para
una colocación segura, coloque la
unidad en un piso liso y nivelado lo
sufi cientemente fuerte como para
soportar la unidad.
La unidad tiene ruedas para facilitar la
colocación, pero solo debe rodar sobre
superfi cies lisas y planas.
Tenga cuidado y proteja los pisos
cuando ruede sobre pisos de madera.
No intente hacer rodar la unidad sobre
los objetos.
La unidad debe colocarse al alcance de
una toma de tierra con la clasifi cación
adecuada.
Nunca coloque ningún obstáculo
alrededor de la entrada o salida de aire
de la unidad.
No use cables de extensión con este
electrodoméstico.
El aparato requiere al menos 50 cm (20
pulgadas) de espacio libre en la parte
posterior.

35
Instalación
Deslice el adaptador para la unidad
de la manguera de salida dentro de
la abertura de salida de aire en la
dirección indicada por la fl echa.
Mida la abertura de la ventana en donde instalará el
juego de moldura para ventana y extienda los paneles
correderos para igualar esa medida. Si el tamaño de la
abertura de la ventana requiere tres paneles correderos,
use el perno para sujetar los paneles correderos a la
medida adecuada.
Si la abertura de la ventana es menor que la longitud
mínima del juego de moldura para ventana, use el panel
corredero que tiene un orifi cio y córtelo a la medida
adecuada. Asegúrese de no cortar el extremo del panel
corredero que tiene el agujero. Lo necesitará para fi jar
la manguera de salida.
Instalación del juego de moldura para ventana
El juego de moldura para ventana fue diseñado para
adaptarse a la mayoría de las ventanas verticales y
horizontales estándar, sin embargo, podría tener que
modifi car algunos aspectos del proceso de instalación
para ciertos tipos de ventana. Visite www.danby.com por
instrucciones.
Presione la manguera de salida
dentro del adaptador de la moldura
para ventana y del adaptador para
la unidad. Los adaptadores se
engancharán automáticamente a
la manguera de salida mediante
trabas elásticas internas.
manguera de escape
conjunto de la
manguera de escape
adaptador
de unidad
adaptador deslizante
de ventana
pernoperno
Panel corredero
para ventana A
Panel corredero
para ventana B
Panel corredero
para ventana C

36
Instalación
Corte las cintas
selladoras adhesivas
de gomaespuma A y B a
las medidas adecuadas
y colóquelas en el
bastidor y en el marco
de la ventana como se
muestra.
Instale el panel corredero
de la ventana en la
abertura de la ventana.
Corte la cinta selladora
no adhesiva de
gomaespuma C a la
medida del ancho de la
ventana. Inserte el sello
entre el vidrio y el marco
de la ventana para evitar
que el aire y los insectos
puedan entrar al cuarto.
Si lo desea, instale el
soporte de seguridad
con 2 tornillos como se
muestra.
Instale el adaptador de la
moldura para ventana en
el orificio de la moldura
para ventana.
Cinta selladora de gomaespuma B
(tipo adhesivo; más corta)
Cinta
selladora de
gomaespu-
ma A
(tipo adhe-
sivo)
Panel corredero A
Paneles
correderos B y C
(si se necesitan)
Cinta selladora de
gomaespuma C
(tipo no adhesivo)
Soporte de
seguridad
2 tornillos
Instalación en una ventana de guillotina vertical

37
Instalación
Corte la cinta selladora
no adhesiva de
gomaespuma C a la
medida del alto de la
ventana. Inserte el sello
entre el vidrio y el marco
de la ventana para evitar
que el aire y los insectos
puedan entrar al cuarto.
Instale el panel corredero
de la ventana en la
abertura de la ventana.
Si lo desea, instale el
soporte de seguridad
con 2 tornillos como se
muestra.
Instale el adaptador de la
moldura para ventana en
el orificio de la moldura
para ventana.
Cinta
selladora de
gomaespu-
ma A
(tipo adhe-
sivo;)
Cinta selladora de gomaespuma B
(tipo adhesivo; más corta)
Panel corredero A
Paneles
correderos B y C
(si se necesitan)
Cinta selladora de
gomaespuma C
(tipo no adhesivo)
Soporte de
seguridad
2 tornillos
Corte las cintas
selladoras adhesivas
de gomaespuma A y B a
las medidas adecuadas
y colóquelas en el
bastidor y en el marco
de la ventana como se
muestra.
Instalación en una ventana de guillotina horizontal

38
Instalación
Tapón de
drenaje
inferior
Drenaje de agua
Cuando la bandeja interna de
drenaje se llena, la unidad emite
8 pitidos y la pantalla digital
muestra el código de error P1.
Se detendrá el funcionamiento
del acondicionador de aire
o del deshumidifi cador, pero
el ventilador puede seguir
funcionando.
Apague la unidad y desenchúfela
del tomacorriente. Mueva
cuidadosamente la unidad a un
lugar donde pueda drenar el
agua. Quite el tapón de drenaje
inferior y deje que salga todo el
agua. Vuelva a colocar el tapón de
drenaje, presionando fi rmemente
para asegurar un buen sellado y
que no tenga fugas. El símbolo de
error P1 desaparecerá y la unidad
seguirá funcionando normalmente
cuando se vuelva a encender.
Si sigue apareciendo el error P1
después de drenar el agua de
la unidad, apague la unidad y
desenchúfela del tomacorriente
durante 5 minutos como mínimo.
Si sigue apareciendo el error P1
después de volver a enchufar la
unidad, llame al servicio al cliente
de Danby para que le ayuden a
solucionar el problema.

39
Instalación
Drenaje continuo
En el modo DRY (deshumidifi cación), podría ser
conveniente instalar la opción de drenaje
continuo para que la unidad drene el agua
recolectada automáticamente al exterior.
Quite la manguera de salida en el modo DRY
(deshumidifi cación), no es necesaria. Verifi que
que la unidad esté apagada y desenchufada del
tomacorriente antes de instalar la manguera de
drenaje.
Quite el tapón del drenaje superior y coloque
una manguera de drenaje de 3/4”. Verifi que que
la manguera de drenaje no esté retorcida ni
presionada, ya que eso podría impedir el drenaje
del agua.
Coloque el extremo abierto de la manguera de
drenaje sobre el receptáculo en el que drenará
la unidad. Podría ser en un desagüe del piso del
sótano, de un lavabo o algo similar.
Recuerde que esta unidad no cuenta con una
bomba de drenaje. El drenaje continuo se basa
solamente en la gravedad. Verifi que que la
manguera de drenaje vaya directamente hacia el
piso desde la conexión de drenaje. Si la manguera
no queda orientada directamente hacia abajo, el
agua no drenará correctamente.
Manguera de
drenaje continuo
Quite el tapón de
drenaje

40
Operación
Cool
POWER
Fan
Dry
Botón MODE: Presionar para seleccionar el modo
deseado. El modo cambiará en secuencia con cada
pulsación del botón: COOL (enfriamiento), DRY
(deshumidifi cación), FAN (ventilador). La luz indicará
el modo actual. Se puede seleccionar la velocidad del
ventilador en los modos COOL y FAN con el control
remoto.
Modo COOL
- Presione el botón de modo hasta que se encienda el
ícono de COOL
- Presione los botones + o - para seleccionar la
temperatura deseada del ambiente.
- La temperatura se puede ajustar dentro de un rango de
17-30 °C / 62-86 °F
Nota: Hay que usar la manguera de salida para el modo
COOL.
Modo FAN
- Presione el botón de modo hasta que se encienda el
ícono de FAN
- Se puede ajustar la velocidad del ventilador con el
control remoto.
Modo DRY
- Presione el botón de modo hasta que se encienda el
ícono de DRY
- La pantalla mostrará la temperatura actual del ambiente.
- No se puede ajustar la temperatura ni la velocidad del
ventilador en este modo.
Instrucciones del panel de control

41
Operación
Botones + y -: Se usan para ajustar la temperatura en el modo
COOL. Mantenga presionados los botones + y - durante 3
segundos para cambiar la indicación de °C a °F.
Botón POWER: Presiónelo para encender y apagar la unidad.
Pantalla LED:
- En modo COOL indica la temperatura seleccionada en °C o °F.
- En los modos FAN y DRY indica la temperatura actual del
ambiente.
- Muestra códigos de error.
Modo AUTO
- Solamente se puede activar con el control remoto.
- El panel de control no tiene indicador para el modo AUTO.
- La pantalla mostrará COOL o FAN según la temperatura del
ambiente.
Modo SLEEP
- Solamente se puede activar con el control remoto.
- Ahorra energía mientras duerme.
- Una vez activado, el modo SLEEP aumentará la temperatura
seleccionada en 1 grado durante 30 minutos. Luego la
temperatura seleccionada volverá a aumentar en 1 grado por
otros 30 minutos y mantendrá esa temperatura durante 7 horas
antes de volver a la temperatura seleccionada originalmente.
- La función SLEEP solamente está disponible en el modo
COOL.
Sígueme Función
- Solo se puede activar desde el control remoto
- Disponible en los modos Cool y Auto
- Mantenga el control remoto con usted y el dispositivo ajustará
la temperatura establecida en función de la temperatura en su
ubicación actual
- La luz Sígueme en el panel de control se iluminará durante 5
segundos cada tres minutos para indicar que ha recibido una
señal del control remoto. Si el dispositivo no recibe una señal del
control remoto durante un intervalo de 7 minutos, sonará para
indicar que el modo Sígueme ha fi nalizado.
Instrucciones del panel de control

42
Operación
Funcionamiento del temporizador
Nota: El temporizador solamente se puede activar con el
control remoto.
Esta unidad tiene dos funciones relacionadas con el
temporizador:
- Encendido temporizado: fi ja el retardo de tiempo antes de
encender la unidad.
- Apagado temporizado: fi ja el retardo de tiempo antes de
apagar la unidad.
Función de encendido temporizado:
- Presione el botón de encendido temporizado del control
remoto.
- La pantalla mostrará el último retardo seleccionado.
- Presione varias veces el botón de encendido temporizado
para seleccionar la cantidad de horas que deberían pasar
antes de que se encienda la unidad.
- Espere dos segundos para que la unidad acepte la
programación.
Función de apagado temporizado:
- Presione el botón de apagado temporizado del control
remoto.
- La pantalla mostrará el último retardo seleccionado.
- Presione varias veces el botón de apagado temporizado para
seleccionar la cantidad de horas que deberían pasar antes de
que se apague la unidad.
- Espere dos segundos para que la unidad acepte la
programación.
Notas:
- Cada pulsación del botón de encendido temporizado o
apagado temporizado aumentará el tiempo seleccionado en
incrementos de 0.5 horas para las primeras 10 horas, y luego
en incrementos de 1 hora hasta las 24 horas.
- La pantalla volverá a mostrar el ajuste anterior de temperatura
si la unidad no recibe una señal por más de 5 segundos
durante la programación.
- Para cancelar el temporizador automático seleccione 0.0
horas de retardo.

43
Operación
Función del temporizador
Cómo usar las funciones de encendido y apagado
automático al mismo tiempo
Puede programar el acondicionador de aire para que utilice
las funciones de encendido y apagado automático al mismo
tiempo. Tenga en cuenta que las horas que indique la unidad
se refi eren a las horas que deberán pasar desde la actualidad
antes de tomar una acción.
Por ejemplo:
- Primero seleccione el encendido o apagado temporizado de
acuerdo con las instrucciones anteriores.
- Espere tres segundos para que la unidad acepte la
programación.
- Seleccione el encendido o apagado temporizado.
- Espere tres segundos para que la unidad acepte la
programación.
Función de continuación automática
Si la unidad se queda sin alimentación de forma inesperada,
volverá a encenderse en el modo anterior cuando vuelva a
recibir alimentación.
Nota: Una vez que la unidad se haya apagado, no se puede
volver a encender por 3 minutos. Seguirá funcionando luego de
3 minutos.
Función de memoria (disponible solamente en el control
remoto)
- Se usa para almacenar un ajuste favorito.
- Ajusta la unidad a la temperatura y velocidad del ventilador
que le gustaría defi nir como favoritas.
- Mantenga presionado el botón de memoria por 2 segundos.
- Presione el botón de memoria en cualquier momento en el
futuro para volver a su ajuste favorito.
- Si no defi nió ningún ajuste favorito, al presionar el botón de
memoria la unidad funcionará en modo AUTO a 26 °C (79 °F)
con la velocidad del ventilador en AUTO.

44
Operación
1. Botón de encendido: presione para
encender o apagar la unidad.
2. Botón de modo: presione para seleccionar
el modo deseado.
3. Botón de ventilador: presione para
seleccionar la velocidad del ventilador.
4. Botón de dormir / fi ltro:
• Presione para iniciar la función de dormir.
• La luz del fi ltro se iluminará después de
250 horas de uso como un recordatorio
para limpiar el fi ltro; Para restablecer el
fi ltro después de la limpieza, mantenga
presionado el botón de Suspensión durante
3 segundos.
5. Botón Sígueme: Presione para activar la
función Sígueme.
6. Botón LED: presione para encender o
apagar la pantalla LED.
7. Botón temporizador apagado: Presione
para confi gurar el temporizador de apagado
automático.
8. Botón temporizador encendido: Presione
para confi gurar el temporizador de encendido
automático.
9. Botón de acceso directo: Presione para
confi gurar y activar la función de acceso directo.
10. Botones arriba y abajo:
• Se usa para confi gurar la temperatura y el
temporizador.
• Mantenga presionados los botones Arriba y
Abajo durante 3 segundos para cambiar la
visualización de temperatura de ° C a ° F.
11. Pantalla LED:
• Muestra la temperatura confi gurada en °C
o °F o la confi guración del temporizador
automático.
• Mientras está en modo Seco muestra la
humedad relativa.
• Cuando está en modo Ventilador muestra la
temperatura ambiente.
1
2
3
4 6
7
8
9
10
11
5
Instrucciones del control remoto
45
Operación
Su acondicionador de aire viene con dos
pilas AAA. Coloque las pilas dentro del
control remoto antes de usarlo.
1. Deslice la cubierta posterior del control
remoto hacia abajo para abrir el
compartimiento de las pilas.
2. Inserte las pilas, verifi cando que los
símbolos (+) y (-) en los extremos de
las pilas coincidan con los símbolos del
interior del compartimiento.
3. Vuela a cerrar la tapa del receptáculo
de las pilas.
Importante: No deseche las pilas con la
basura normal de la casa. Consulte las
reglamentaciones locales acerca de la
correcta eliminación de las pilas.
• El acondicionador de aire no responderá
si hay cortinas, puertas u otros materiales
bloqueando la señal entre el control remoto
y la unidad.
• Evite que los líquidos entren en contacto
con en el control remoto. No exponga el
control remoto a la luz directa del sol o al
calor.
• Si el receptor de señal infrarrojo de la
unidad de interior está expuesto a la luz
directa del sol, la unidad puede no funcionar
correctamente. Use cortinas para evitar que
la luz del sol incida en el receptor.
• No mezcle pilas nuevas y viejas o distintos
tipos de baterías.
• No deje las pilas dentro del control remoto
si no lo utilizará por más de 2 meses.
Reemplazo de las pilas del control remoto

46
Operación
Certifi cación del control remoto
NOTA: Este equipo ha sido probado y cumple con los límites
de la Clase B de dispositivos digitales, de acuerdo con
la Parte 15 de las normas de la FCC. Estos límites están
diseñados para proporcionar una protección razonable
contra interferencia perjudicial en una instalación residencial.
Este equipo genera, usa y puede irradiar energía de
radiofrecuencia y, si no se lo instala y utiliza de acuerdo con
las instrucciones, puede causar interferencia perjudicial en
las comunicaciones de radio. Sin embargo, no existe garantía
de que no se produzca interferencia en una instalación
en particular. Si este equipo llegara a causar interferencia
perjudicial para la recepción de radio o televisión, lo que se
puede determinar apagando y encendiendo el equipo, se
recomienda que el usuario trate de corregir la interferencia
tomando una o más de las siguientes medidas:
1. Reorientar o cambiar de lugar la antena receptora.
2. Aumentar la separación entre el equipo y el receptor.
3. Conectar el equipo en un tomacorriente de un circuito
distinto que el que use el receptor.
4. Pedirle ayuda al distribuidor o a un técnico en radio /
televisión.
Los cambios o modifi caciones no aprobadas por la parte
responsable del cumplimiento con la FCC pueden hacer que
el usuario pierda el derecho de utilizar el equipo. Este aparato
cumple con la Parte 15 de las Normas FCC.
Su operación está sujeta a las siguientes condiciones:
1. Este dispositivo no debe causar interferencias
perjudiciales.
2. Este dispositivo debe aceptar cualquier interferencia
que pueda recibir, incluyendo aquella que impida su
funcionamiento.
Este dispositivo cumple con las normas canadienses CAN
ICES-3 (B) / NMB-3 (B).

47
Cuidado y mantenimiento
Filtro de
aire (sacar)
Filtro de aire
• Limpie el fi ltro de aire cada dos semanas para
asegurar el rendimiento óptimo.
• En las casas con animales, tendrá que limpiar
periódicamente la rejilla para evitar que los pelos de
los animales bloqueen el fl ujo de aire.
• Asegúrese de desenchufar la unidad antes de
limpiarla o repararla.
• No use gasolina, diluyente de pintura ni ningún otro
producto químico para limpiar la unidad.
• No lave la unidad directamente debajo de la llave
del agua o con una manguera, ya que podría
causar un daño al sistema eléctrico.
• Llame inmediatamente el servicio de reparaciones
si se daña el cable de alimentación.

48
Cuidado y mantenimiento
Carcasa de la unidad
Use un trapo que no deje pelusa humedecido con
detergente neutro para limpiar la carcasa de la unidad.
Asegúrese de escurrir el exceso de agua del trapo. Al
fi nal, repáselo con un trapo seco y limpio.
Almacenamiento a largo plazo
• Quite el tapón de goma de la parte de atrás de
la unidad y coloque una manguera en la salida
de drenaje. Coloque el extremo de la manguera
directamente sobre el área de drenaje del piso de
su sótano.
• Quite el tapón de la salida de drenaje inferior,
dejando salir toda el agua de la bandeja inferior de
drenaje.
• Mantenga la unidad funcionando en el modo
VENTILADOR (Fan) durante medio día en un
cuarto cálido para secar el interior del aparato y
evitar la formación de hongos.
• Apague el aparato y desenchúfelo, enrolle el cable
y fíjelo con cinta adhesiva.
• Saque las pilas del control remoto.
• Limpie el fi ltro de aire y vuelva a instalarlo.
Eliminación
Consulte las normas locales sobre la eliminación
correcta y segura de este aparato.
Códigos de error
E1 - error del sensor de temperatura ambiente
E2 - error del sensor de evaporación
E4 - error de comunicación de la pantalla
P1 - bandeja de agua llena - colocar la manguera de
drenaje y drenar el exceso de agua

49
Resolución de problemas
PROBLEMA CAUSA POSIBLE SOLUCIÓN
La unidad
no arranca
al pulsar el
botón de
encendido /
apagado
• La pantalla
muestra el
mensaje P1
• La temperatura
ambiente es
inferior a la
temperatura
ajustada.
• Drene el agua en
la bandeja inferior
• Restablecer la
temperatura
No lo
sufi ciente-
mente fresco
• Las ventanas
o puertas de la
habitación no
están cerradas
• Hay fuentes de
calor dentro de la
habitación
• La manguera de
aire de escape no
está conectada o
está bloqueada
• El ajuste de la
temperatura es
demasiado alto
• El fi ltro de aire está
bloqueado por el
polvo
• Asegúrese de que
todas las ventanas
y puertas están
cerradas
• Retire las fuentes
de calor si es
posible
• Conecte la
manguera y
asegúrese de que
puede funcionar
correctamente
• Disminuir la
temperatura
ajustada
• Limpie el fi ltro de
aire
Ruidoso o
vibración
• El suelo no está
nivelado o no es
lo sufi cientemente
plano
• Coloque la
unidad sobre una
superfi cie plana
y nivelada, si es
posible
Sonido de
gorgoteo
• El sonido proviene
del fl ujo del
refrigerante dentro
del acondicionador
de aire
• Es normal
Servicio al consumidor: 1-800-263-2629

DISTRIBUTED BY • DISTRIBUIDO POR:
ALDI INC., BATAVIA, IL 60510
WWW.ALDI.US
YEAR WARRANTY
AÑOS DE GARANTÍA
2
AFTER SALES SUPPORT •
SERVICIO POSVENTA
MODEL/NO DEL MODELO:
EPA080BAUW
49876
05/2018
consumerservice@danby.com
1-800-263-2629
Printed in China
Impreso en China

Description of malfunction:
Return your completed
warranty card to:
Danby Products Ltd
5070 Whitelaw Rd
Guelph, Ontario
Canada
N1H 6Z9
consumerservice@danby.com
Hotline: 1-800-263-2629
Call charges from your regular
landline operator.
Phone lines available:
Monday - Thursday
8:30 am - 6 pm EST
Friday - 8:30 am - 4 pm EST
2
YEAR
WARRANTY
WARRANTY CARD
PORTABLE AIR CONDITIONER
AFTER SALES SUPPORT
MODEL: EPA080BAUW
49876
05/2018
1-800-263-2629
Your Details
Name:
Address:
Date of Purchase:
*Keep the receipt with this warranty card
Location of Purchase:

ALDI INC. FULL WARRANTY CONDITIONS
Dear Customer:
The ALDI warranty is a full warranty offering you the following benefi ts:
Warranty Period: 2 years from date of purchase.
6 months for movable parts and consumables
under normal and proper conditions of use.
Costs: Free repair/exchange or refund at manufacturer’s
discretion. No transport costs.
After the expiration of the warranty period, you may wish to have your
product repaired at your own expense.
This warranty gives you specifi c legal rights, and you may also have
other rights which vary from state to state but this warranty is not
intended to exceed statutory minimum requirements beyond what is
included above.
This warranty does not limit the statutory obligation of the seller arising
from any implied warranties. The period of warranty can only be
extended in accordance with applicable law.
Neither the service company nor ALDI will assume any liability for data
or settings stored on any returned product.
In order to make a claim under warranty, you must be able to provide:
The faulty item with all the component parts, the original
receipt and the warranty card properly completed.
The warranty does not cover damage caused by:
Accident or unanticipated events (e.g. lightning, water, fire,
etc).
Improper use or transport.
Failure to follow the safety and maintenance instructions.
Other improper treatment or modification of the product.
ADVICE: Contact our service hotline by phone, e-mail or
fax for troubleshooting and service depot
information.

Descripción de la avería:
Devuelva su tarjeta de
garantía completada a:
Danby Products Ltd
5070 Whitelaw Rd
Guelph, Ontario
Canada
N1H 6Z9
consumerservice@danby.com
Línea directa: 1-800-263-2629
Llame a los cargos de su operador
de línea fi ja regular.
Líneas telefónicas disponibles:
Lunes - Jueves
8:30 am - 6 pm EST
Viernes - 8:30 am - 4 pm EST
2
AÑOS DE
GARANTÍA
TARJETA DE GARANTÍA
ACONDICIONADOR DE AIRE PORTÁTIL
SERVICIO POSVENTA
MODELO: EPA080BAUW
49876
05/2018
1-800-263-2629
Sus datos
Nombre:
Dirección:
Fecha de compra:
*Guarde el recibo con esta tarjeta de garantía
Lugar de la compra:

Después del vencimiento del período de la garantía, deberá hacer reparar
el aparato por su propia cuenta.
Esta garantía le otorga derechos legales específi cos, y usted puede
también tener otros derechos que varían de estado a estado, pero esta
garantía no pretende exceder los requisitos mínimos legales más allá de lo
mencionado anteriormente.
Esta garantía no limita la obligación legal del vendedor derivada de
cualquier garantía implícita. El período de garantía sólo puede extenderse
de acuerdo con la ley correspondiente.
Ni la empresa de reparaciones ni ALDI asumirán ninguna responsabilidad
por los datos o ajustes almacenados en cualquier producto retornado.
ALDI INC. CONDICIONES DE LA GARANTÍA
Estimado cliente:
La garantía de ALDI es una garantía completa que le ofrece los
siguientes benefi cios:
Período de garantía: 2 años a partir de la fecha de compra.
6 meses para piezas móviles y consumibles en
condiciones normales y adecuadas de uso.
Costo: Reparación / cambio o reembolso gratuitos a
discreción del fabricante.
Sin costos de transporte.
Para poder hacer una reclamación bajo esta garantía, deberá
proporcionar lo siguiente:
El artículo defectuoso con todos los componentes, el recibo
original y la tarjeta de garantía debidamente completados.
La garantía no cubre daños causados por:
Accidentes o eventos imprevistos (por ejemplo, rayos, agua,
fuego, etc.).
Uso o transporte inapropiado.
No seguir las instrucciones de seguridad y mantenimiento.
Otros tratamientos inadecuados o modificaciones del producto
AVISO: Póngase en contacto con nuestra línea directa de
servicio por teléfono, correo electrónico o fax para
la resolución de problemas y la información del
depósito de servicio.
