
167
Creating Tables
6
KEY TERMS
• ascending
• cells
• cell range
• descending
• fi eld code
• formulas
• header row
• merge cells
• Object Zoom
• Quick Tables
• sort
• split cells
• table
LESSON SKILL MATRIX
Skill Exam Objective Objective Number
Creating a Table Defi ne table dimensions.
Demonstrate how to use Quick Tables.
3.1.3
3.1.5
Formatting a Table Apply styles to tables.
Modify fonts within tables.
3.2.1
3.2.2
Managing Tables Set AutoFit options.
Modify table dimensions.
Sort table data.
Merge cells.
Confi gure cell margins.
Set a table title.
Convert text to tables.
Convert tables to text.
3.1.4
3.2.6
3.2.3
3.2.7
3.2.4
3.1.6
3.1.1
3.1.2
Using Formulas in a Table Demonstrate how to apply formulas to a table. 3.2.5
Using Object Zoom
© NathanGleave/iStockphoto
Co
Co
Co
nfi
nfi
nfi
gure
ce
ce
ce
ll m
ar
ar
ar
gi
gi
gi
ns.
Se
Se
Se
t
t
t
a
a
a
ta
bl
bl
bl
e
e
e
ti
ti
ti
tl
tl
tl
e.
Co
nv
nv
nv
nv
er
er
er
t
t
t
te
te
te
xt
xt
xt
xt
t
t
t
o
o
o
ta
ta
ta
ta
bl
es
.
.
.
Co
nv
nv
nv
er
er
er
t
t
t
ta
bl
bl
es
es
es
es
t
t
t
o text
.
.
3.2.
3.
3.3.
1.
1.
1.
3.
3.
3.
1.
3.1.

Lesson 6
168
Karen Archer is an executive recruiter. Many large companies hire her to
fi nd professional talent to fi ll communications and marketing executive
positions within their fi rms. You were recently hired as her assistant; and
although the business is small, you are expected to display a high degree
of professionalism, confi dentiality, and integrity. Because it is a small
business, you are asked to perform many different duties. One of your
main duties is to assist Ms. Archer with the constant updating of tables
that contain data related to current clients, potential clients, and potential
candidates for placement. Microsoft Word has table tools that can help
you successfully manage this information. In this lesson, you learn to format lists as well as create, format,
and manage tables, and use formulas within a table.
End of row markerColumns are vertically alignedThe cell connects
at the column and row
End of cell marker.
Use Show/Hide to display
Rows are
horizontally aligned
Figure 6-1
A table created in Word
CREATING A TABLE
A table , such as the one shown in Figure 6-1, is an arrangement of data made up of horizontal
rows and vertical columns. Cells are the rectangles that are formed when rows and columns
intersect. Tables are ideal for organizing information in an orderly manner. Calendars, invoices,
adding formulas to tables, and contact lists are all examples of how tables are used every day. Word
provides several options for creating tables, including the dragging method, the Insert Table dialog
box, table drawing tools, and the Quick Table method.
The Bottom Line
Inserting a Table by Dragging
In this exercise, you learn how easily and quickly you can create a table from the Table menu by
dragging the mouse pointer to specify the number of rows and columns. Using this method, you
can create a new empty table with up to eight rows and ten columns.
STEP BY STEP Insert a Table by Dragging
GET READY. Before you begin these steps, LAUNCH Microsoft Word and OPEN a new
blank Word document.
1. On the Insert tab, in the Tables group, click the Table button. The Insert Table menu
appears.
2. Point to the cell in the fi fth column, second row. The menu title should read 5x2 Table ,
as shown in Figure 6-2. Click the mouse button to create the table. Once the table is
inserted in the document, you are ready to begin entering text. Later in this lesson, you
enter data into the table.
© NathanGleave/iStockphoto
er
er
er
ti
ti
ca
ca
ca
l co
lu
lu
lu
mns.
Ce
Ce
Ce
lls
are the rectangles that are formed w
ab
ab
ab
le
le
le
s
s
s
are
id
id
id
ea
ea
ea
l
fo
fo
fo
r r
r
or
ga
ga
ga
ni
ni
ni
ni
zi
ng
ng
ng
i
i
i
nf
nf
nf
orma
ti
ti
ti
ti
on
on
on
i
i
i
n
n
n
an
an
an
o
rd
rd
rd
rd
er
er
er
er
ly
ly
ly
m
m
m
an
an
an
ne
mu
la
la
la
s
s
to
to
to
t
t
t
ab
ab
ab
le
le
le
le
s,
s,
s,
a
a
a
nd
ndnd
nd
c
on
on
on
ta
ta
ct l
is
is
is
ts
ts
ts
are all e
xa
xa
xa
mp
mp
mp
le
le
le
s
s
s
of h
ow
ow
ow
t
t
t
ab
ab
ab
le
le
le
s ar
eral
o
o
o
pt
pt
pt
io
io
io
ns
f
f
or
or
or
creat
in
in
in
g
g
tabl
es
es
es
,
,
,
includ
in
in
in
g
g
th
th
e
dr
dr
dr
ag
ag
ag
ging
m
m
ethod,
rawi
ng
ng
ng
tools
,
an
an
an
an
d
th
e
e
e
Qu
Qu
Qu
ic
k
k
k
Ta
Ta
Ta
bl
bl
bl
e
e
e
me
me
me
th
th
th
od
od
od
.
.
.

Creating Tables
169
3. Click below the table and press Enter twice to insert blank lines. When you insert more
than one table in a document, you should separate them with a blank line to avoid
joining the tables.
4. SAVE the document as Tables in the lesson folder on your fl ash drive .
PAUSE. LEAVE the document open to use in the next exercise.
Using the Insert Table Dialog Box
The Insert Table dialog box lets you create large tables by specifying up to 63 columns and thou-
sands of rows. Note that in the Insert Table dialog box, you can click the up and down arrows or
type in the number of columns and rows needed in a table. In this exercise, you use the Insert
Table dialog box to insert a table.
STEP BY STEP Use the Insert Table Dialog Box
USE the document that is open from the previous exercise.
1. On the Insert tab, in the Tables group, click the Table button to open the Insert
Table menu.
2. On the menu, just below the rows and columns, select Insert Table . The Insert Table
dialog box appears.
3. In the Number of columns box , click the up arrow until 9 is displayed.
4. In the Number of rows box, click the up arrow until 3 is displayed, as shown in
Figure 6-3. The AutoFit behavior is shown in the dialog box and is discussed later in
the lesson.
How do you create a table
using the dragging method?
3.1.3
Figure 6-2
Insert Table menu
Select columns and
rows with your mouse
Table menu
b
el
ow
ow
ow
t
he
t
ab
ab
ab
ab
le
a
nd
nd
nd
p
p
p
re
ss
ss
ss
En
En
En
te
te
te
r
r
r
t
t
t
wi
wi
wi
ce
ce
ce
t
t
t
o
o
o
in
in
in
se
se
se
rt
b
la
la
la
la
nk
nk
nk
l
in
es

Lesson 6
170
5. Click OK to insert the table. You inserted a new table with 9 columns and 3 rows.
6. Click below the table and press Enter twice to insert blank lines.
7. SAVE the document in the lesson folder on your fl ash drive.
PAUSE. LEAVE the document open to use in the next exercise.
Drawing a Table
Word provides the option to draw complex tables using the Draw Table command, which lets you
draw a table as you would with a pencil and piece of paper. The Draw Table command transforms
the mouse pointer into a pencil tool, which you can use to draw the outline of the table, and then
draw rows and columns exactly where you need them. In this exercise, you use the Draw Table
command from the Table menu.
STEP BY STEP Draw a Table
USE the document that is open from the previous exercise.
1. If your ruler is not displayed, on the View tab, in the Show group, click the check box to
display the Ruler.
2. Make sure your insertion point is at the bottom of the document; then use the scroll bar
to scroll down, so the insertion point is at the top of the screen.
3. On the Insert tab, in the Tables group, click the Table button to open the Insert
Table menu.
4. On the menu, just below the rows and columns, select Draw Table from the menu. The
pointer becomes a pencil tool.
5. To begin drawing the table shown in Figure 6-4, click at the blinking insertion point
and drag down and to the right until you draw a rectangle that is approximately
3
inches high and 6 inches wide. Notice that the Table Tools contextual Design and
Layout tabs automatically appears with the Layout tab active.
How do you create a table
using the Insert Table
dialog box?
3.1.3
Figure 6-3
Insert Table dialog box
a
Ta
Ta
Ta
bl
bl
bl
e
e
e
ides
t
t
hehe
he
o
o
o
pt
io
io
io
io
n
n
n
n
to
to
to
dra
w
w
w
co
co
mp
le
le
le
x
x
x
tables u
si
si
si
ng
ng
t
he
he
he
Draw
Ta
Ta
Ta
bl
bl
bl
e co
a
s
yo
yo
yo
u
u
u
wo
ul
d
d
d
d
wi
wi
wi
th
a
a
a
p
p
p
en
en
en
ci
l
an
an
an
d
d
d
pi
pi
pi
ec
ec
ec
e
e
e
of
of
of
p
p
p
ap
ap
ap
er
er
er
.
Th
Th
Th
Th
e
Dr
Dr
Dr
Dr
aw
aw
aw
Tab

Creating Tables
171
6. Starting at about 1 inch down from the top border, click and drag the pencil from the
left border to the right border to draw a horizontal line. Use your ruler as your guide.
7. Draw two more horizontal lines about 0.5 apart.
8. Starting at about 1 inch from the left border, click and drag the pencil from the top of
the table to the bottom of the table to create a column.
9. Move over about 1 inch and draw a line from the top of the table to the bottom. If you
drew a line in the wrong position, click the
Eraser button in the Draw group and begin
again. The Draw group is located on the Layout tab.
10. Draw three more vertical lines about 1 inch apart from the fi rst horizontal line to the
bottom of the table to create a total of six columns. Your table should look similar to
Figure 6-4.
11. Click the Draw Table button in the Draw group to turn the pencil tool off.
12. Click below the table and press Enter twice to create blank lines. If necessary, place
your insertion point outside the last cell, and then press
Enter .
13. SAVE the document in the lesson folder on your fl ash drive.
PAUSE. LEAVE the document open to use in the next exercise.
You have now seen three ways to insert a blank table. Text separated by commas, tabs, paragraphs,
or another character can also be converted to a table with the Convert Text to Table command on
the Table menu.
When drawing tables with the pencil tool, note that this tool will draw squares and rectangles
as well as lines. If you are trying to draw a straight line and you move the pencil off your straight
path, Word might think you are trying to draw a rectangle and insert one for you. If this hap-
pens, just click the Undo button on the Quick Access Toolbar and try again. It might take a bit
of practice to master the difference between drawing straight lines and drawing rectangles.
How do you create a
customized table?
3.1.3
Take Note
Troubleshooting
Figure 6-4
Draw a table
Use the horizontal and vertical
rulers as a guide to draw a table

Lesson 6
172
Inserting a Quick Table
Quick Tables are built-in preformatted tables, such as calendars and tabular lists to insert and
use in your documents. Word provides a variety of Quick Tables that you can insert into your
documents. The Quick Table calendar can be edited to refl ect the current month and year. In this
exercise, you insert a Quick Table calendar into a document.
STEP BY STEP Insert a Quick Table
USE the document that is open from the previous exercise.
1. On the Insert tab, in the Tables group, click the Table button to open the Insert
Table menu.
2. On the menu, just below the rows and columns, select Quick Tables from the menu.
A gallery of built-in Quick Tables appears, as shown in Figure 6-5.
Figure 6-5
Built-In Quick Table gallery

Creating Tables
173
3. Select Calendar 2 . The data in the calendar can be edited to display the current month
and year.
4. SAVE the document in the lesson folder on your fl ash drive.
PAUSE. LEAVE the document open to use in the next exercise.
A table can be moved to a new page or a new document by clicking the Move handle to select the
table and then using the Cut and Paste commands. You can also use the Copy command to leave
a copy of the table in the original location.
Inserting Text in a Table
To add text to a table, your insertion point must be placed in the table where the data will be added.
To move to the next cell, press the Tab key and to move to the previous cell, press Shift 1 Tab . In
this exercise, you learn to add text and move from cell to cell in a table.
STEP BY STEP Insert Text in a Table
USE the document that is open from the previous exercise.
1. Place your insertion point in the fi rst cell of the fi rst table that you created previously in
the lesson.
2. Type Inserting Tables in the fi rst cell.
3. Press the Tab key to move to the second column in the fi rst row.
4. Type Using the Insert Table dialog box in the second column. Notice how the text
wraps around the cell.
5. Press the Tab key to move to the third column in the fi rst row.
6. Type Drawing Tables in the third column.
7. Press the Tab key to move to the fourth column in the fi rst row.
8. Type Quick Tables in the fourth column.
9. You have now entered data in a table and advanced to the next cell by pressing the Tab
key. Press
Shift + Tab three times to move to the previous cell until you are positioned
at the fi rst cell. Using the keyboard command allows you to move through the table
quickly. Note, you can also use your mouse to point and click in the cell to enter text.
10. Place your insertion point in the Calendar 2 Quick Table that you inserted previously.
11. Select May and replace with June 20XX . Inserting a table using Quick Tables also
provides you an option to replace text.
12. SAVE the document in the lesson folder on your fl ash drive, and then CLOSE the fi le.
PAUSE. LEAVE Word open to use in the next exercise.
How do you create a table
using Quick Tables?
3.1.5
Take Note
ce
y
y
y
ou
ou
ou
r in
se
se
se
rt
rt
rt
ion
po
po
po
in
in
in
in
t
t
t
in
in
in
in
t
he
he
he
he
fi
fi
fi
rst c
el
l
of
of
of
of
t
t
t
he
he
he
fi
fi
fi
fi
fi
fi
r
r
r
st
st
st
t
t
t
ab
ab
ab
ab
le t
ha
ha
ha
ha
t
t
t
fi
fi
fi
le
ss
ss
ss
on
on
on
.
In
se
se
se
rt
rt
rt
in
in
in
g
Ta
Ta
Ta
bl
bl
bl
es
in
t
he
he
fi
r
st
st
st
c
c
el
l.
fi
ss the
Ta
Ta
Ta
b
k
ey
ey
ey
ey
t
t
t
o
mo
mo
mo
ve
ve
ve
t
t
t
o
th
th
th
e
e
e
se
se
se
co
co
co
nd
nd
nd
c
c
c
ol
ol
um
um
um
n
n
n
in
in
in
in
the
fi
fi
fi
r
r
r
st
st
st
row
fi
fi
fi

Lesson 6
174
FORMATTING A TABLE
Once a table is inserted into a document, a preformatted style can be applied using the Table Styles
gallery. These styles add a professional appearance to the tables in your documents with a variety
of selections to choose from. In the Design tab, Borders group, you can manually format a table’s
borders. The Borders group is new to the Table Tools and allows you to draw and apply styles to
the table.
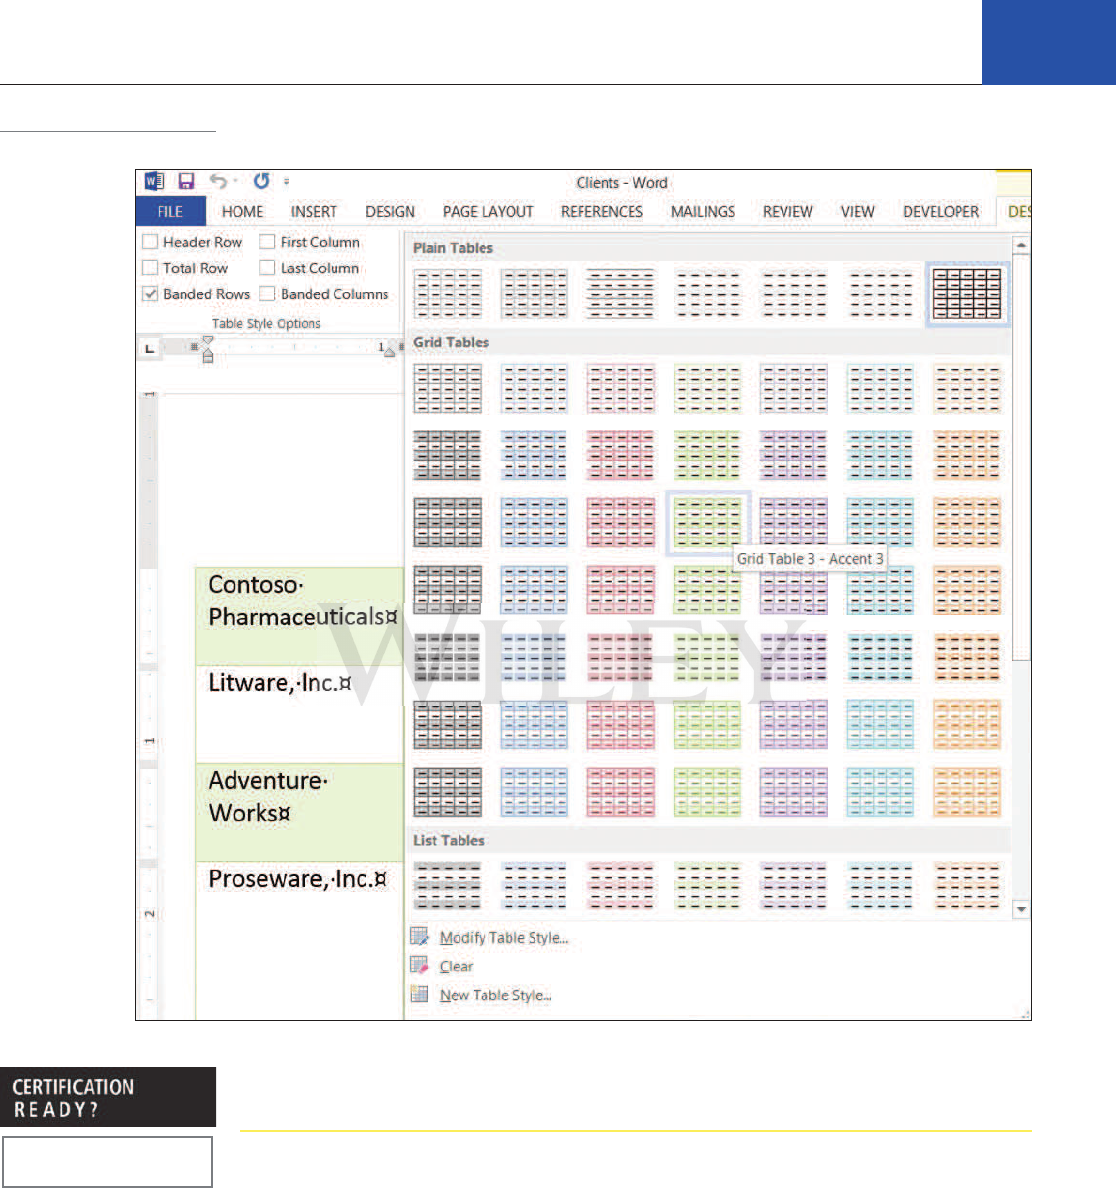
Applying a Style to a Table
With Table Styles, it is easy to quickly change a table’s formatting. You can apply styles to tables
in much the same way you learned to apply styles to text in previous lessons, by positioning the
insertion point in the table before selecting a style from the Table Styles gallery. You can preview
the style before applying it and change the style as many times as needed. You can modify an
existing Table Style or create a New Table Style and add it to the gallery, and then modify or delete
it, as appropriate. In this exercise, you apply a Table Style to a table in your Word document.
STEP BY STEP Apply a Style to a Table
OPEN Clients from the data fi les for this lesson.
1. Position the insertion point anywhere in the table.
2. On the Design tab, in the Table Styles group, click the More
button to view a gallery
of Table Styles. There are three options available: Plain Tables, Grid Tables, and List
Tables.
3. Scroll through the available styles. Notice that as you point to a style, Word displays a
live preview, showing you what your table will look like if you choose that style.
4. Scroll down to the third row under the Grid Tables and select the Grid Table 3 – Accent 3
style, as shown in Figure 6-7.
The Bottom Line
SOFTWARE ORIENTATION
Design Tab on the Table Tools Ribbon
After inserting a table, Word displays Table Tools in the Ribbon, as shown in Figure 6-6. It
is important to become familiar with the commands available on the Design tab under Table
Tools. Use this fi gure as a reference throughout this lesson as well as the rest of this book.
Figure 6-6
Design Tab on the Table Tools Ribbon
Table Style Options group Table Styles group Borders group is new
in the Table Tools
Table Tools are displayed on the Ribbon
when a table is inserted
Creating Tables
175
5. SAVE the document as Clients Table in the lesson folder on your fl ash drive.
PAUSE. LEAVE the document open to use in the next exercise.
Turning Table Style Options On or Off
Table Style Options enable you to change the appearance of the preformatted styles you apply to your
tables. Table Style Options are linked to the Table Style you have selected and will be applied globally
throughout the table. For example, if you select the Banded Columns option, all even-numbered
columns in the table will be formatted differently than the odd-numbered columns. In this exercise,
you learn to turn Table Style Options on or off by clicking each option’s check box.
Examples of Table Style Options include the following:
• Header Row: Formats the top row of the table to provide a descriptive name.
• Total Row: Formats the last row, which usually contains column totals.
How do you apply a style to
a table?
3.2.1
Figure 6-7
Table Styles gallery

Lesson 6
176
• Banded Rows: Formats even rows differently than odd rows to improve readability.
• First Column: Formats the fi rst column of the table, which usually contains the row headings.
• Last Column: Formats the last column of the table, which often contains row totals.
• Banded Columns: Formats even columns differently than odd columns to improve readability.
STEP BY STEP Turn Table Style Options On or Off
USE the document that is open from the previous exercise.
1. The insertion point should still be in the table. If you click outside the table, the Design
and Layout tabs will not be available.
2. On the Design tab, in the Table Style Options group, click the First Column check box.
Notice that the format of the fi rst column of the table changes and text is right-aligned
in the cell. Also, the Table Styles in the gallery changes when you select one of the
options within the group.
3. Click the Banded Rows check box to turn the option off. Color is removed from
the rows.
4. Click the Banded Rows check box to turn it on again. Color is reapplied to every
other row.
5. SAVE the document in the lesson folder on your fl ash drive.
PAUSE. LEAVE the document open to use in the next exercise.
Changes to Table Styles
Modifying styles in a table is similar to what you have already learned when modifying styles for
text. Changes to a table style can be applied to the document or as a new document based on a
template. You can apply the changes to the whole table or specifi cally to one of the Table Styles
options such as in the banded rows or columns. Formatting changes can be applied to the table
properties, borders/shading, banding, font, paragraphs, tabs, and text effects. In this exercise, you
learn to modify the font in a table style.
STEP BY STEP Modify the Table Styles
USE the document that is open from the previous exercise.
1. The insertion point should still be in the table. If you click outside the table, the Design
and Layout tabs will not be available.
2. In the Table Styles group, click the More
button.
3. Click Modify Table Style to open the Modify Style dialog box (see Figure 6-8). Notice
that in the Name box, Grid Table 3 – Accent 3 is applied from a previous exercise.
ro
ro
ro
w.
w.
w.
th
e
e
e
do
do
do
cu
me
me
me
nt
nt
nt
i
n
n
n
th
th
th
e
le
le
le
ss
ss
ss
on
f
f
ol
ol
ol
der on
y
y
y
ou
ou
ou
r
r
r
fl
fl
fl
a
a
a
sh
sh
sh
d
d
d
ri
ve
ve
ve
ve
.
fl
fl
fl
AV
E
E
E
thth
th
e e
e
do
cu
cu
cu
me
me
me
nt
o
o
o
pe
pe
n to u
se
se
se
in the
ne
ne
xt
xt
xt
e
e
e
xe
xe
xe
rcis
e.
e.
e.

Creating Tables
177
Figure 6-8
Modify Style dialog box
The Properties group
Font attributes
Determine where to apply
formatting by selecting
one of the options
Preview area
Border
Select how Table Style
should be applied
Format button contains
additional options
4. In the Apply formatting to box, click the drop-down arrow and select First column . For
this exercise, you apply changes only to the fi rst column.
5. Click the Format button in the Modify Styles dialog box and select Font to open the
Font dialog box. The Format button displays the menu of available options. Each menu
opens its own dialog box.
In Lesson 3, you learn different ways to apply fonts and styles to text. You also learn how to modify
a style to be applied only to that document.
6. With the Font dialog box open, type Garamond in the font box. Notice that when you
type the fi rst three characters, Word displays available fonts. Select
Garamond .
7. In the Font style group, select Bold Italic , 12 pt for Size, and Olive Green, Accent 3,
Darker 50%
for Font color.
8. Click OK to close the Font dialog box. Changing the attributes affect only the fi rst
column. You should be able to preview the changes before accepting.
9. Click OK to close the Modify Style dialog box.
10. SAVE the document in the lesson folder on your fl ash drive.
PAUSE. LEAVE the document open to use in the next exercise.
Cross
Ref
How would you modify the
font in a table style?
3.2.2

Lesson 6
178
MANAGING TABLES
As with any document that you edit, some adjustments are always necessary when you work
with tables. After you create a table, you can resize and move its columns; insert columns and
rows; change the alignment or direction of its text; set a header row to repeat on several pages;
organize data by sorting the text, number, or date; convert text and tables; merge and split cells;
add formulas in a table; and work with the table’s properties.
Using AutoFit
The AutoFit command enables you to adjust column widths to fi t the size of table contents, the
window, or to fi t all content to a fi xed column width. You can AutoFit a column a couple of ways,
using the mouse or using the command on the Ribbon. You can use commands in the Cell Size
group on the Layout tab, and then select the AutoFit command. In this exercise, you practice using
AutoFit in a Word table.
STEP BY STEP Use AutoFit
USE the document that is open from the previous exercise.
1. On the Table Tools Layout tab, in the Table group, click the View Gridlines button to
hide the gridlines. The gridlines are no longer displayed.
2. Click the View Gridlines button again to display gridlines and enable more precise editing.
3. On the Layout tab, in the Cell Size group, click the AutoFit button to open the drop-down
menu, as shown in Figure 6-10. On the drop-down menu, click
AutoFit Contents . Each
column width changes to fi t the data in the column.
The Bottom Line
SOFTWARE ORIENTATION
Layout Tab on the Table Tools Ribbon
When working with tables, Word displays a contextual Table Tools Ribbon that is only visible
when a table is in use. The Table Tools Ribbon has two tabs: the Design tab and the Layout
tab. The Layout tab, as shown in Figure 6-9, includes commands for changing the entire
format of a table as well as commands for changing the appearance of individual table com-
ponents, such as cells, columns, rows, and applying formulas. Use this fi gure as a reference
throughout this lesson as well as the rest of this book.
Figure 6-9
Layout Tab on the Table Tools Ribbon
Displays table gridlines
Options to select
parts of the table
AutoFit Options
Opens the Formula
dialog box
Convert table
to text button
Repeat Header
Rows button
Distribute
columns evenly
Adjust Height and
Width in table
Merge
group
Dialog box
launcher
Rows & Columns
group
Draw groupOpens the
Table Properties
dialog box
Distribute
rows evenly
Text Direction
button
The Sort button opens
the Sort dialog box

Creating Tables
179
Figure 6-10
AutoFit button and menu
Figure 6-11
Horizontal Ruler on the fi rst
column marker
Column marker on ruler.
Columns can be adjusted
manually by dragging
4. SAVE the document in the lesson folder on your fl ash drive.
PAUSE. LEAVE the document open to use in the next exercise.
Resizing a Row or Column
Word offers a number of tools for resizing rows or columns. You can resize a column or row using
the mouse or using the commands on the Ribbon. You can use commands in the Cell Size group
on the Layout tab to adjust height and width; or use the ruler to adjust the column width. In
addition, the Table Properties dialog box allows you to set the measurements at a precise height
for rows or ideal width for columns, cells, and tables. In this exercise, you practice using these
techniques to resize rows and columns in a Word table.
USE the document that is open from the previous exercise.
1. Click in the fi rst column and position the mouse pointer over the horizontal ruler on
the fi rst column marker (see Figure 6-11). The pointer changes to a double-headed
arrow along with the ScreenTip
Move Table Column .
How would you adjust
content in a table using
AutoFit?
3.1.4
2. Click and drag the column marker to the right until the contents in the cell extend in
a single line along the top of the cell. On the Table Tools Layout tab, in the Cell Size
group, the width automatically adjusts to 2.190. As the column is manually extended
so is the width. Just as columns can be adjusted manually, so can rows—the vertical
ruler is used to adjust the row markers.
3. Position the insertion point in the phone number column of the table. On the Layout
tab, in the Table group, click the
Select button, and choose Select Column from the
drop-down menu.
Another Way
Position the pointer
outside the table, above the
column containing the phone
numbers. The pointer changes
to a down selection arrow.
Click to select the column.
fe
fe
fe
rs
rs
a
a
a
num
be
be
be
r of
t
t
t
oo
oo
oo
ls for resizing rows or columns. You can res
e
or
or
or
u
u
u
si
ng
ng
ng
t
t
t
he
he
he
c
om
omom
ma
ma
ma
nd
nd
nd
s
on
on
on
t
t
t
he
he
he
Rib
bo
bo
bo
n.
n.
n.
Y
Y
Y
ou
ou
ou
c
c c
an
an
an
u
u
u
se
se
se
se
c
om
om
om
ma
ma
ma
ay
ou
ou
ou
t
t
t
ta
ta
ta
b
b
b
toto
to
a
dj
dj
dj
dj
us
us
us
t
he
he
he
ig
ig
ht
a
a
a
nd
nd
nd
width;
or
or
or
u
u
se
se
se
the r
ul
ul
ul
er
er
er
t
t
t
o
o
o
ad
the
Ta
Ta
Ta
bl
bl
bl
e
Pr
Pr
Pr
op
op
op
erti
es
es
es
d
d
ialo
g
g
g
bo
bo
bo
x allo
ws
ws
ws
y
y
ou to set th
e
e
me
me
me
asur
or
id
id
id
ea
ea
ea
l wi
dt
dt
dt
h
h
h
for
co
co
co
lu
lu
lu
mn
mn
mn
s,
s,
s,
c
c
c
el
el
el
ls
ls
ls
,
,
,
an
an
an
d
d
d
ta
ta
ta
bl
bl
bl
es
es
es
.
.
.
In
In
In
thi
s
s
s
ex
ex
ex
er
er
er
cise

Lesson 6
180
4. On the Layout tab, in the Cell Size group, click the up arrow in the Width box until it
reads
1.1 0 and the column width changes. The phone numbers now fi t on a single line.
5. Place the insertion point anywhere in the fi rst row. In the Table group, click the
Select button again, and then click Select Row from the drop-down menu. The fi rst
row is selected.
6. On the Layout tab, in the Cell Size group, click the dialog box launcher. The Table
Properties
dialog box appears.
7. Click the Row tab in the dialog box.
8. Click the Specify height check box. In the Height box, click the up arrow until the box
reads
0.5 0, as shown in Figure 6-12.
How would you adjust
the column width?
3.2.6
Figure 6-12
Table Properties dialog box
9. Click the Next Row button and notice that the changes are applied only to the fi rst row.
By clicking the
Next Row button, the selection moves down one row.
10. Click OK . In the Cell Size group, notice that the height for row 2 is at .190 and row 1 is at
0.50. You can also adjust the height of a row individually or by selection.
11. Click in any cell to remove the selection.
12. SAVE the document in the lesson folder on your fl ash drive.
PAUSE. LEAVE the document open to use in the next exercise.
Moving a Row or Column
When working with tables, it is important to know how to rearrange columns and rows to better
display your data. By selecting the entire column or row, drag and drop is used for moving data to
a new area in the table. The mouse pointer changes and resembles an empty rectangle underneath
with dotted lines. In this lesson, you practice moving rows and columns.
In Lesson 2, you learn to use the Cut and Paste commands with text. The same process can be
used with tables by selecting the column or row.
How would you adjust
the row height?
3.2.6
Another Way
The Table Properties
dialog box can be accessed
from the shortcut menu by
right-clicking anywhere in the
table and selecting Table
Properties or click Properties
in the Table group.
Cross
Ref

Creating Tables
181
STEP BY STEP Move a Row or Column
USE the document that is open from the previous exercise.
1. In the table, select the fourth row of data, which contains the information for
Proseware, Inc.
2. With the mouse over the selected text, hold down the mouse button and move the
mouse. Notice the mouse pointer changes to a move pointer with a rectangular-
shaped insertion point.
3. Drag the rectangular-shaped insertion point down and position it before the W in
Wingtip Toys .
4. Release the mouse button and click in the table to deselect. The row is moved to above
the
Wingtip Toys row.
5. Place the insertion point in the second column of the table, which contains fi rst
names. Click the
Select button, in the Table group, and then Select Column from the
drop-down menu.
6. Position the pointer inside the selected cells and right-click to display the shortcut
menu.
7. Select Cut to delete that column of text and move the remaining columns to the left.
8. Place the insertion point on the phone numbers column.
9. Right-click to display the shortcut menu under the Paste Options section. A new Paste
Options menu is displayed with the options Insert as New Column, Nest Table, Insert
as New Rows, and Keep Text Only.
10. Select the fi rst option, Insert as New Column ; the fi rst name column is pasted to the
left of the phone number column.
11. Click anywhere in the table to deselect.
12. SAVE the document in the lesson folder on your fl ash drive.
PAUSE. LEAVE the document open to use in the next exercise.
Instead of using the shortcut menu, you can also use the Cut and Paste commands in the Clipboard
group on the Home tab to cut and move rows and columns.
Setting a Table’s Horizontal Alignment
Tables inserted into a report should align with the document to maintain the fl ow of the report.
The horizontal alignment for a table can be set to the left or right margins or centered between
the margins. In this exercise, you practice using the Table Properties dialog box to set a table’s
horizontal alignment.
STEP BY STEP Set a Table’s Horizontal Alignment
USE the document that is open from the previous exercise.
1. Position the insertion point anywhere inside the table.
2. On the Layout tab, in the Table group, click the Select button, and then click Select
Table .
3. On the Layout tab, in the Table group, click the Properties button. The Table Properties
dialog box appears.
4. Click the Table tab to make it the active tab.
5. In the Alignment section, click Center , as shown in Figure 6-13.
Take Note
t-
t-
t-
cl
ic
ic
ic
k
to
di
di
di
spla
y
y
y
th
th
th
th
e shortcut menu under the Paste
Op
Op
Op
tion
on
on
on
s
s
s
me
me
me
nu
nunu
i
s
s
s
di
sp
sp
sp
la
ye
ye
ye
d
d
d
wi
th
th
th
t
t
t
he optio
ns
ns
ns
Ins
er
er
er
t
t
t
as
as
as
as
N
N
N
ew
ew
ew
C
C
C
ol
ol
ol
ew
R
R
R
ow
ow
ow
s,
s,
s,
a
a
a
a
nd
nd
nd
K
K
K
K
eep
Te
Te
xt Onl
y.
y.
ect th
e
e
e
fi
fi
fi
fi
rst
op
op
op
op
ti
ti
ti
on,
In
In
In
se
se
rt a
s
s
s
Ne
Ne
Ne
w
Co
Co
Co
lu
lu
lu
mn
mn
; t
he
he
he
fi
rst
n
n
n
am
am
am
e co
fi
o
f
th
e
ph
ph
ph
on
e
nu
nu
nu
nu
mb
er
er
er
c
c
c
ol
ol
ol
um
um
um
n.
n.
n.

Lesson 6
182
6. Click OK . The table is centered horizontally on the page.
7. Click anywhere within the table to deselect.
8. SAVE the document in the lesson folder on your fl ash drive.
PAUSE. LEAVE the document open to use in the next exercise.
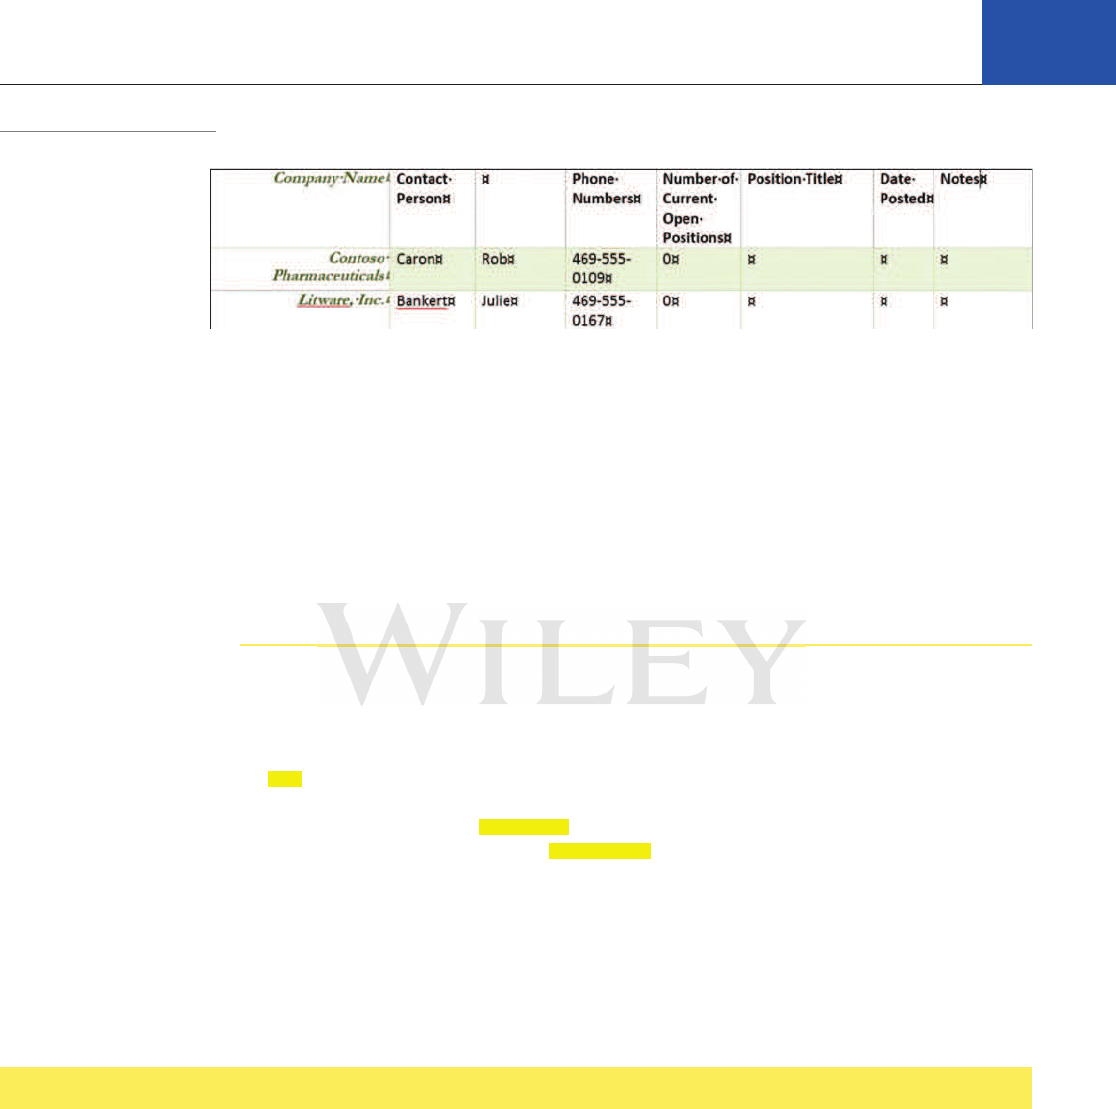
Creating a Header Row
Column headings are usually placed in the header row. A header row is the fi rst row of the table
that contains information that helps identify the content of a particular column. It is usually
formatted differently and should be repeated at the beginning of each new page for tables that
extend beyond one page. When you specify a header row in the Table Style Options group, the
row is distinguished from the entire table. In this exercise, you practice repeating header rows
for lengthy tables.
STEP BY STEP Create a Header Row
USE the document that is open from the previous exercise.
1. Position the insertion point anywhere inside the table. On the Layout tab, in the Table
group, click the
Select button, and then click Select Table .
2. Change the font size to 14 pt. By changing the font size in the table, the data extends to
the next page.
3. Place the insertion point on the fi rst row of the table.
4. On the Layout tab, in the Rows & Columns group, click Insert Above
. A new blank
row is inserted.
5. On the Design tab, in the Table Style Options group, click the Header Row check box to
apply a distinctive format to the header row.
6. Type headings in each cell within the fi rst row of the table, as shown in Figure 6-14.
Figure 6-13
Table Properties dialog box
OK
.
Th
Th
Th
e
e
e
ta
ta
ta
bl
e
e
e
is
is
is
c
c
ente
re
re
d ho
ri
ri
zo
zo
zo
ntal
ly
o
o
o
n the
pa
pa
ge
.
ny
wh
er
er
er
e wi
th
th
th
th
in
in
in
the
t
t
t
ab
ab
ab
le
le
le
t
o
o
o
de
de
de
se
se
se
le
le
le
ct
ct
ct
.
Creating Tables
183
Figure 6-14
Header row
7. On the Table group of the Layout tab, click the Select button and Select Row .
8. On the Layout tab, in the Data group, click the Repeat Header Rows button. Scroll
down and view the headings on the second page.
9. Click anywhere in the table to deselect.
10. Position the insertion point anywhere inside the table. On the Layout tab, in the Table
group, click the
Select button, and then click Select Table .
11. Change the font size to 12 pt. As long as the content extends to a new page, the
headings will appear regardless of the font size.
12. SAVE the document in the lesson folder on your fl ash drive.
PAUSE. LEAVE the document open to use in the next exercise.
Repeating rows are only visible in Print Layout view, Backstage view, or on a printed document.
Sorting a Table’s Contents
To sort data means to arrange it alphabetically, numerically, or chronologically. Sorting displays
data in order so that it can be located more quickly. Text, numbers, or dates can be sorted in as-
cending or descending order. Ascending order sorts text from beginning to end, such as from A to
Z, 1 to 10, and January to December. Descending order sorts text from the end to the beginning,
such as from Z to A, 10 to 1, and December to January. In this exercise, you practice sorting data
in a Word table using the Sort dialog box, which you access through the Sort command on the
Layout tab in the Data group.
You can sort by up to three columns of data in the Sort dialog box. Before beginning the sort
process, you must select the column (or columns) to be sorted.
STEP BY STEP Sort a Table’s Contents
USE the document that is open from the previous exercise.
1. Place the insertion point on the fi rst column to select the Company Name column. On
the Table group of the Layout tab, click the
Select button and Select Column .
2. On the Layout tab, in the Data group, click the Sort button. The Sort dialog box
appears, as shown in Figure 6-15. Because you selected the
Company Name column,
the Company Name data is listed in the Sort by text box, with Ascending order selected
by default. The column contains text; therefore, the type was listed as Text. The other
options under type are Number and Date.
Take Note
Take Note
LE
LE
LE
AV
AV
AV
E
th
th
th
e
e
e
do
do
do
cu
cu
cu
me
me
me
nt
nt
nt
o
o
o
pe
n
n
n
to
to
to
use in
th
th
th
e
e
e
ne
ne
ne
xt
xt
xt
e
e
xe
xe
xe
xe
rc
rc
rc
rc
ise.
ng r
ow
ow
ow
ow
s
ar
ar
ar
ar
e
on
on
on
on
ly
ly
ly
ly
visib
le
le
le
le
i
i
i
n Pr
in
in
in
t
t
t
t
La
yo
yo
yo
yo
ut
ut
ut
ut
v
v
v
ie
ie
ie
ie
w, B
ac
ac
ac
ac
ks
ks
ks
ks
ta
ge
ge
ge
ge
v
v
v
iew,

Lesson 6
184
3. Click OK . Note that the table now appears sorted in ascending order by company name.
4. SAVE the document in the lesson folder on your fl ash drive.
PAUSE. LEAVE the document open to use in the next exercise.
Merging and Splitting Table Cells
The ability to merge and split table cells provides fl exibility in customizing tables. To
merge cells means to combine two or more cells into one. Merging cells is useful for headings
that extend over several columns. To split cells means to divide one cell into two or more cells.
Cells might be split when more than one type of data needs to be placed in one cell. The Split
Cells dialog box enables you to split a cell into columns or rows. In this lesson, you practice using
commands in the Merge group on the Layout tab to merge and split cells.
STEP BY STEP Merge and Split Table Cells
USE the document that is open from the previous exercise.
1. Position the insertion point on the header row located on page 1. Select the cell that
contains the
Contact Person heading and the empty cell to the right of it.
2. On the Table Tools Layout tab, in the Merge group, click the Merge Cells button. The
selected cells merge into one cell.
3. In the Position Title column, on the Lucerne Publishing row, select the cell that contains
the text
Director Marketing VP Public Relations .
4. On the Table Tools Layout tab, in the Merge group, click the Split Cells button to open
the
Split Cells dialog box as shown in Figure 6-16.
How would you sort the
data in a table?
3.2.3
Figure 6-15
Sort dialog box
Figure 6-16
Split Cells dialog box
th
e
e
e
do
do
do
cu
me
me
me
nt
nt
nt
in
th
th
th
e
le
le
le
ss
ss
ss
on
on
onon
f
f
f
ol
ol
ol
der on
y
y
y
ou
ou
ou
r
r
r
fl
fl
fl
a
a
a
sh
sh
sh
d
d
d
ri
ri
ri
ve
ve
ve
.
fl
fl
fl
AV
E
E
E
E
th
th
th
e
e
e
do
do
do
do
cucucu
me
me
me
nt
o
o
o
pe
pe
n to u
se
se
se
in the
ne
ne
ne
xt
xt
xt
e
e
e
xe
xe
xe
rcis
e.
e.
e.

Creating Tables
185
5. Click OK to accept the settings as they are. A new column is inserted within the cell.
6. Select the text VP Public Relations and drag and drop text to the new column.
7. In the Company Name column, select the Woodgrove Bank cell.
8. Click the Split Cells button. The default setting for the Number of columns is 2,
whereas the Number of rows is 1. The Merge cells before split check box is checked.
The single cell will be split into two columns.
9. Change the Number of columns setting to 1 and the Number of rows setting to 2
to split the cell into a single column containing two rows, as shown in Figure 6-17.
Click
OK .
Figure 6-17
Cell split into two rows
10. Place the insertion point in front of Woodgrove Bank . Press and hold the mouse button
to select the two rows within the column.
Right-click, and then select Merge Cells . The
cell is now a single row.
11. Click the Undo button.
12. SAVE the document in the lesson folder on your fl ash drive.
PAUSE. LEAVE the document open to use in the next exercise.
Changing Cell Margins
Word provides an option to change the cell margins and spacing between cells—you can set the
margins for an individual cell or for selected cells. When changes are made in the cell, the appear-
ance of the cell in the table also changes. In this lesson, you practice changing the cell margins and
adding spacing between the cells.
STEP BY STEP Change Cell Margins
USE the document that is open from the previous exercise.
1. Position the insertion point in the Phone Numbers column. In the Table group, click the
Select button, and click Select Column .
2. In the Alignment group, click the Cell Margins
button. The Table Options dialog box
opens as shown in Figure 6-18.
Another Way
You can access the
Merge Cells command on the
shortcut menu. The Merge Cells
command is visible only when
you have multiple cells selected
in a table.
How do you merge cells?
3.2.7

Lesson 6
186
3. Change the top and bottom margins to 0.03 0 by clicking the up arrow to change the
dimensions.
4. Click OK . The phone numbers no longer fi t on one line.
5. With the Phone Numbers column still selected, click the Cell Margins
button.
6. Change the left and right margins to 0.03 0 by clicking the down arrow.
7. Click OK . By Changing the left and right margins automatically adjusted the phone
numbers, and now they fi t on one line.
8. With the Phone Numbers column still selected, click the Cell Margins
button.
9. Click the Allow spacing between cells check box and increase the cell spacing to 0.09 0.
You have changed the default cell spacing.
10. Click OK . Notice the difference in the spacing between the cells. By default the
Automatically resize to fi t contents option is turned on.
11. SAVE the document in the lesson folder on your fl ash drive.
PAUSE. LEAVE the document open to use in the next exercise.
Changing the Position of Text in a Cell
Word provides you with nine options for aligning text in a cell. These options enable you to
control the horizontal and vertical alignment of cell text, such as Top Left, Top Center, and Top
Right. To change cell text alignment, select the cell or cells you want to align, and click one of the
nine alignment buttons in the Alignment group on the Layout tab. In this exercise, you practice
changing the text alignment within a cell.
STEP BY STEP Change the Position of Text in a Cell
USE the document that is open from the previous exercise.
1. Select the table’s header row on page 1. On the Layout tab in the Table group, click the
Select button, and then click Select Row .
2. In the Alignment group, click the Align Center
button. The header row is centered
horizontally and vertically within the cells.
3. SAVE the document in the lesson folder on your fl ash drive.
PAUSE. LEAVE the document open to use in the next exercise.
Changing the Direction of Text in a Cell
Rotating text in a cell provides additional options for creating interesting and effective tables.
Changing the direction of text in a heading can be especially helpful. To change the direction of
text in a cell, click the button three times to cycle through the three available directions. In this
exercise, you practice changing the direction of text in a cell.
How do you change the
margins in a cell?
3.2.4
How do you increase the
spacing between the cells?
3.2.4
Figure 6-18
Table Options dialog box
er
er
er
s,
s,
s,
a
a
a
a
nd n
ow
ow
ow
the
y
y
y
fi
fi
fi
fi
t on one line.
fi
fi
fi
fi
he
Ph
Ph
Ph
on
e
Nu
Nu
Nu
mb
er
erer
s
c
c
c
ol
ol
ol
ol
um
um
um
n
n
st
st
st
il
il
il
l sele
ct
ct
ct
ed
ed
ed
,
cl
cl
cl
ic
ic
ic
k
k
k
k
th
th
th
th
e
e
e
s
Ce
Ce
Ce
ll
M
M
M
ar
ar
ar
he
Al
Al
Al
lo
lo
lo
w
w
w
sp
sp
sp
ac
ac
ac
in
in
in
g
g
g
be
tw
tw
een
ce
ce
ce
lls
chec
k
k
bo
bo
bo
x
x
x
a
a
a
nd
nd
nd
i
nc
nc
re
re
re
as
as
as
e
e
e
th
ve c
ha
ha
ha
ng
ng
ng
ed
ed
ed
t
he
he
he
def
au
au
au
lt
lt
cell
sp
sp
sp
acin
g.
g.
OK
No
No
No
ti
ti
ti
ce
t
he
he
he
d
d
d
if
fe
re
re
re
nc
nc
nc
e
e
e
in
t
t
t
he
he
he
s
s
s
pa
pa
pa
ci
ci
ci
ng
ng
ng
b
b
b
et
et
et
we
we
we
en
en
en
t
he
he
he
he
c
c
c
el
el
el
ls

Creating Tables
187
STEP BY STEP Change the Direction of Text in a Cell
USE the document that is open from the previous exercise.
1. Select the cell that contains the Company Name heading.
2. On the Layout tab, in the Alignment group, click the Text Direction button three times
to rotate the text direction to align to the right cell border, the left cell border, and then
back to the top cell border. As you click the
Text Direction button, the button face
rotates to match the rotation of the text direction in the selected cell.
3. SAVE the document in the lesson folder on your fl ash drive.
PAUSE. LEAVE Word open to use in the next exercise.
Splitting a Table
Previously, you learned to split cells where you divided one cell into two or more cells. Splitting
a table is dividing one table into two separate tables. In this exercise, you practice separating the
table into two tables.
STEP BY STEP Split Table Cells
USE the document that is open from the previous exercise.
1. Position the insertion point on page 2, and locate The Phone Company.
2. On the Layout tab, in the Merge group, click the Split Table button. The table is now
split and remains in the current page.
3. SAVE the document in the lesson folder on your fl ash drive.
PAUSE. LEAVE Word open to use in the next exercise.
Adding Alternative Text to a Table
Alternative text is a useful interpretation for tables, diagrams, images, and other objects. Alterna-
tive text is also used by web browsers—when you hover over the object, text appears describing the
object. The title and description that is added can be read to the individual with a disability. In this
exercise, you learn to add alternative text to a table.
STEP BY STEP Add Alternative Text to a Table
USE the document that is open from the previous exercise.
1. Place the insertion point anywhere in the table on page one. On the Tables Tools
Layout tab, in the Table group, click
Select, and then click Select Table .
2. Click the Properties button in the Tables group.
3. Click the Alt Text tab and in the Title box, type Listing by Company . In the Description
box, type
Contact listing of individuals by company. The listing includes phone
numbers, current positions that are open and titles for the contact person
. Click OK .
4. SAVE the document as Clients Table Final in the lesson folder on your fl ash drive, and
then CLOSE the fi le.
PAUSE. LEAVE Word open for the next exercise.
How would you add a title
and description as an
alternative text?
3.1.6
ab
ab
ab
le
le
le
C
el
el
el
ls
ls
ls
do
cu
cu
cu
me
me
me
nt
t
t
t
ha
ha
ha
t
t
t
is o
pe
pe
pe
n
n
fr
om
om
om
the pre
vi
vi
vi
ou
ou
s
ex
ex
ex
ercise.
it
io
n
th
th
th
e
in
se
rt
rt
rt
rt
io
n
po
po
po
in
in
in
t
t
t
on
p
p
p
ag
ag
ag
e
e
e
2,
2,
2,
a
a
a
nd
nd
nd
l
l
l
oc
oc
oc
at
at
at
e
e
e
Th
e
Ph
Ph
Ph
Ph
on
on
on
e
Co

Lesson 6
188
Converting Text to Table or Table to Text
Text separated by a paragraph mark, tab, comma, or other character can be converted from text to
a table or from a table to text. To convert text to a table, fi rst select the text, click the Insert tab ,
click the Table button, and fi nally select Convert Text to Table . The Convert Text to Table dialog
box appears, and Word determines the number of rows and columns needed based on how the text
is separated. After text is converted to a table, the Convert to Text button will be available in the
Layout tab in the Table Tools Ribbon. In this exercise, you practice using this technique to convert
Word text into a table.
STEP BY STEP Convert Text to Table
OPEN the Part Numbers document in your lesson folder.
1. Select the whole document.
2. On the Insert tab, in the Tables group, click the Table button. The Table menu appears.
3. Click Convert Text to Table . The Convert Text to Table dialog box opens. Word
recognizes the number of columns and rows and places the number 10 in the Number
of rows box—notice that it is shaded gray, making it unavailable to change (see
Figure 6-19). Keep the default settings.
Figure 6-19
Convert Text to Table
dialog box
4. Click OK . The selected text was separated by paragraph marks, and by selecting the
default of
one column , Word converts the text to a table as shown in Figure 6-20. The
Table Tools automatically opens.

Creating Tables
189
5. In the Table group, select the Table . Then in the Cell Size group, click the AutoFit
button and select AutoFit Contents .
6. On the Layout tab, click the Properties button in the Table group, and then select the
Table tab. Center the table. Click OK.
7. SAVE the document as Part Numbers Table in the lesson folder on your fl ash drive.
PAUSE. LEAVE the document open to use in the next exercise.
STEP BY STEP Convert Table to Text
USE the document that is open from the previous exercise.
1. Position the insertion point anywhere in the table and click the Layout tab.
2. In the Table group, click the Select button, and then click Select Table to select the
entire table.
3. In the Data group, click Convert to Text . The Convert Table to Text dialog box opens.
The default setting in the
Convert Table to Text dialog box is Paragraph marks. A table
can be converted to text and separated by paragraph marks, tabs, commas, and other
characters (see Figure 6-21).
How would you convert text
to a table?
3.1.1
Figure 6-20
Document converted from text
to a table
Figure 6-21
Convert Table to Text
dialog box
he T
ab
ab
ab
le
le
le
g
ro
up
up
up
, sele
ct
ct
ct
t
t
he
he
he
Ta
Ta
Ta
bl
bl
bl
e
e
e
.
Th
Th
Th
en
en
en
i
n
n
n
th
th
th
e
e
e
Ce
Ce
Ce
ll S
iz
iz
iz
iz
e
e
e
gr
gr
gr
ou

Lesson 6
190
4. Click OK . The document is converted to text separated by paragraph marks.
5. SAVE the document as Part Numbers Text in the lesson folder on your fl ash drive, and
then
CLOSE the fi le.
PAUSE. LEAVE Word open to use in the next exercise.
Inserting and Deleting a Column or Row
The Table Tools Layout tab in the Rows & Columns group makes it easy to modify a table by
inserting or deleting a row or column. In the exercise, you learn to insert a column and row and
delete a row.
STEP BY STEP Insert and Delete a Column or Row
OPEN the Part Numbers Table document in your lesson folder.
1. Place the insertion point on the fourth row.
2. On the Layout tab, in the Rows & Columns group, click the Insert Above
button; a
blank row is inserted above the fourth row.
3. The blank row is selected. Click the Delete button in the Rows & Columns group; then
click
Delete Rows from the drop-down menu. The blank row is deleted from the table.
4. Place your insertion point anywhere in the table, and in the Rows & Columns group,
click the
Insert Right
button. A new column is inserted to the right.
5. With the column still selected, move the insertion point to the right along the top
border of the table to the plus symbol.
6. Click the plus
symbol to insert a new column between the two original columns.
This is a
new table feature for Word 2013. The plus symbol also appears if you need to
insert a new row.
7. Right-click on the selected column and click Delete Columns .
8. Type the text as shown in Figure 6-22.
How would you convert
a table to text?
3.1.2
Figure 6-22
Sample of table document
9. SAVE the document as Part Numbers Table Update in the lesson folder on your fl ash
drive.
PAUSE. LEAVE Word open to use in the next exercise.
nk
nk
nk
r
r
r
ow
ow
ow
i
s
se
se
se
le
ct
ct
ct
eded
ed
.
Cl
ic
k
th
e
De
le
te
bu
tt
on
in the Rows &
le
le
le
te
te
te
R
ow
ow
ow
s
fr
fr
fr
om
om
om
t
t
t
he
he
he
d
d
d
ro
ro
ro
p-
do
do
do
do
wn
wn
wn
m
en
en
en
u.
u.
u.
T
T
T
he
he
he
b
b
b
la
la
la
nk
nk
nk
r
r
r
r
ow
ow
ow
i
s
s
s
de
de
de
yo
ur
ur
ur
i
ns
ns
ns
er
er
er
ti
ti
ti
on
onon
on
p
p
p
oi
oi
oi
nt
a
a
a
ny
ny
wh
er
er
er
e
e
e
in the t
ab
ab
ab
le
le
,
an
an
an
d in
t
t
t
hehe
he
he
R
R
R
R
ow
ow
ow
s
e
In
se
se
se
rt
rt
rt
Ri
gh
gh
gh
t
t
t
bu
bu
tt
tt
on
.
A
A
A
ne
ne
ne
w colu
mn
mn
mn
is
in
in
in
sert
ed
ed
ed
t
o
o
o
the
he
c
ol
um
um
um
n
st
il
il
il
il
l
l
l
se
le
ct
ct
ct
ed
ed
ed
mo
mo
mo
ve
ve
ve
t
t
t
he
he
he
i
i
ns
ns
ns
er
er
er
ti
ti
on
on
on
p
p
p
oi
oi
oi
nt
t
o
o
o
o
th
th
th
e
e
e
righ

Creating Tables
191
Using Formulas in a Table
As you learned previously, you can create tables in Word that contain data and numbers. Word
provides options to use formulas to calculate a total, calculate an average, determine the highest/
lowest number, and count values. These are simple functions that are used in Excel and can also
be used in Word. Just like in Excel, formulas begin with an equal symbol followed by the func-
tion that you want to perform, such as SUM, AVERAGE, MAX, MIN, and COUNT. You can
also use the math operators to perform addition, subtraction, division, and multiplication by the
cell range. A cell range is identifi ed by two or more cells within the table. The same rules that
you learned in your math class also apply here when using formulas in your table. If you want to
perform a certain action fi rst, set the order of operation.
Formulas in a table can also be written by cell address location. For instance, columns are identi-
fi ed by letters beginning with A and rows are identifi ed with numbers beginning with 1 . See the
sample table with column and row headings in Table 6-1. To begin a formula, you fi rst place your
insertion point in the cell location where you want the formula to appear. In Table 6-1, the fi rst
formula begins in a blank cell, E1, and the formula is written by cell address location where the
values appear 5 B1 1 C1 1 D1. The SUM function can be used to obtain the same result, and it is
displayed as 5 SUM(LEFT). Two different approaches can be used to add the values in the cell
range and get the same result. See Table 6-2 for descriptions of types of formulas and functions.
A number format can be applied to a selected cell. The available format options consists of a pound
symbol (#), zero decimal places, a comma, a currency system ($), two-decimal places, percentage
symbol (%), and parentheses ( ). Selecting any one of these changes the format of the number for
that cell.
Sometimes it is necessary to edit a value and update the fi eld with the new total, average, or
another function that was applied. To update a fi eld, select the fi eld, right-click, and then
select Update Field.
A fi eld code is a placeholder where the function appears—it appears as { 5 SUM(ABOVE)}. When
applying functions, only the result appears—by default, the fi eld codes are not displayed. The fi eld
codes can be turned on in Backstage, Options, and then select Advanced ; in the Show document
content section, click the check box by Show fi eld codes instead of their values. There are three
options on how a fi eld code appears in the table: Never, Always, and When Selected. Note that the
function is enclosed with curly brackets.
Table 6-2 describes each of the functions. Word provides many more functions—not all functions
are listed. In the exercise, you learn to apply a simple function to calculate values, apply a number
format, and display the fi eld codes.
A B C D E
1 Dresses 123 87 456
2 Pants 456 659 456
3 Skirts 987 456 78
Table 6-1
Sample of table columns
and rows
er
er
er
f
f
or
or
or
mat
ca
ca
ca
n
n
n
be
a
a
a
pp
pp
pp
pp
lied to a selected cell. The available format
#),
ze
ze
ze
ro
d
d
d
ec
ec
ec
im
im
im
al
p
p
p
la
la
la
ce
ce
ce
s, a c
om
om
om
ma
ma
ma
, a cu
rr
rr
rr
en
en
cy
s
s
s
ys
ys
ys
te
m
m
m
m
($
($
($
),
t
t
t
wo
wo
wo
%),
an
an
an
d
d
d
pa
pa
pa
re
re
re
re
nt
nt
nt
he
he
he
he
ses
(
(
(
).
).
Sel
ec
ec
ec
ti
ti
ti
ng any o
ne
ne
ne
o
o
o
f
f
f
th
th
th
ese
ch
ch
ch
anan
an
ge
ge
ge
s th
Lesson 6
192
STEP BY STEP Use Formulas in a Table
USE the document that is open from the previous exercise.
1. Place the insertion point on the last row.
2. In the Rows & Columns group, click Insert Below
. A new row is inserted below the
last row.
3. Type Total Cost in the fi rst column, last row. Bold the text and align right.
4. Position the insertion point in the second column, last row. You will calculate the total
using the
Formula dialog box.
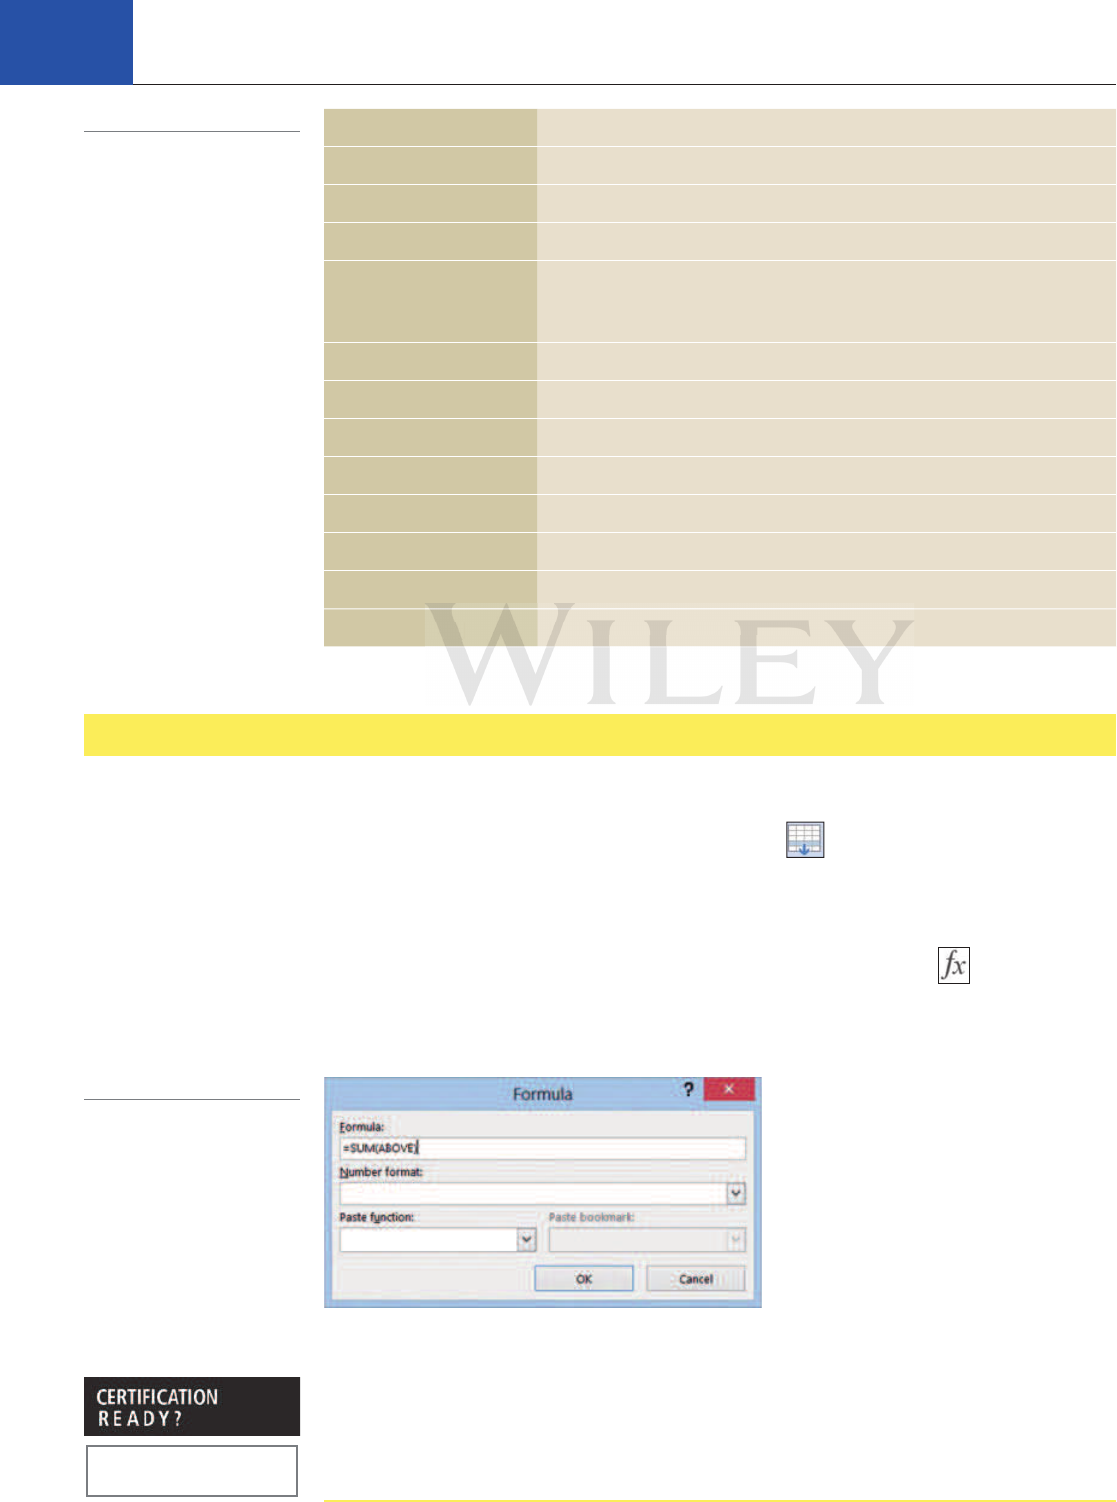
5. On the Table Tools Layout tab, in the Data group, click the Formula
button. The
Formula dialog box opens (see Figure 6-23). If you are familiar with Excel, then you will
notice the similarities in the Formula button. Refer to Table 6-2 for the formula
functions.
Table 6-2
Formula Functions
File Type Description
5SUM(ABOVE)
Adds the values in the range above cell.
5SUM(LEFT)
Adds the values in the range to the left of the cell.
5A11A21A31A4
Adds values by cell address location.
5SUM(A1:A4)
Adds the value by using the range arguments. The cell address to the left of
the colon is the beginning of the range, and the cell address to the right of
the colon is the last cell in the range.
5AVERAGE(ABOVE)
Averages values in the range above the cell.
5AVERAGE(LEFT)
Averages values in the range to the left of the cell.
5MAX(ABOVE)
Displays the highest value in the range above the cell.
5MAX(LEFT)
Displays the highest value in the range to the left of the cell.
5MIN(ABOVE)
Displays the lowest value in the range above the cell.
5MIN(LEFT)
Displays the lowest value in the rage to the left of the cell.
5COUNT(ABOVE)
Counts values above the cell.
5COUNT(LEFT)
Counts values to the left of the cell.
Figure 6-23
Formula dialog box
6. By default, the 5 SUM(Above) formula displays. This function totals the values listed
previously in the second column. Word automatically detects values in a table when
using the Formula button.
7. Click OK to accept the default and close the Formula dialog box.
8. SAVE the document as Part Numbers Update in the lesson folder on your fl ash drive.
PAUSE. LEAVE the document open to use in the next exercise.
How do you add a formula
to a table?
3.2.5
LE
LE
LE
FT
FT
FT
)
)
)
Co
Co
Co
un
ts
ts
ts
v
v
v
alue
s
s
s
to
to
to
the left
of
of
of
t
t
t
he
he
he
c
c
c
el
el
el
l.
l.
l.

Creating Tables
193
STEP BY STEP Apply a Number Format
USE the document that is open from the previous exercise.
1. Place the insertion point in the 470.5 value. By default, the cell value is shaded in gray.
This value appears with one decimal place. To change the formatting of the decimal
places, open the
Formula dialog box again by clicking on the Formula button.
2. Click the drop-down arrow in the Number format section and select the third option,
$#,##0.00;($#,##0.00) as shown in Figure 6-24.
Figure 6-24
Number format options
Available number
format options
3. Click OK . This option inserts a currency symbol, a comma (the thousand place
separator), and two decimal places.
4. Select all values in the second column and select Align Center Right from the
Alignment group on the Layout tab.
5. SAVE the document as Part Numbers First Update in the lesson folder on your fl ash
drive.
PAUSE. LEAVE the document open to use in the next exercise.
STEP BY STEP Update Fields
USE the document that is open from the previous exercise.
1. Select the 12.50 value and change the value to 15.40 .
2. Place the insertion point in the $470.50 value, right-click, and then click Update Field .
Notice that the total cost value has been updated.
3. SAVE the document as Part Numbers Final in the lesson folder on your fl ash drive.
PAUSE. LEAVE the document open to use in the next exercise.
STEP BY STEP Display Field Codes
USE the document that is open from the previous exercise.
1. Click the File tab, and then click Options .
2. Click Advanced .
3. Under the section, Show document content , click the check box by Show fi eld codes
instead of their values
. By the Field shading area, When selected is showing—leave the
default settings. The other options available are Never and Always.
4. Click OK to close the dialog box and accept the settings.
5. Your insertion point should be in the second column. In the Table group, click Select ,
and then click Select Column . Change the width to 2.7 0 in the Cell Size group (see
Figure 6-25).
OK
OK
OK
.
T
T
T
hi
hi
hi
s
s
s
opop
op
ti
on
onon
on
ins
er
er
er
ts a
c
c
c
ur
ur
ur
renc
y
sy
sy
sy
mb
mb
ol
,
,
,
a co
mm
mm
mm
a
a
a
(t(t
(t
he
ra
to
to
to
r)
r)
r)
,
,
,
an
an
an
d
d
d
tw
tw
tw
o
o
o
deci
ma
ma
l
pl
ac
ac
ac
es
es
.
ct all
v
v
v
al
al
al
ues
in
in
in
the
s
s
s
ec
ec
ec
on
on
on
d
co
co
co
lu
lu
lu
mn
mn
mn
a
a
a
nd
nd
nd
s
s
s
el
el
el
ec
ec
ec
t
t
t
Al
AlAl
ig
n
n
Ce
Ce
Ce
nter

Lesson 6
194
6. SAVE the document as Part Numbers Displaying Field Codes in the lesson folder on
your fl ash drive.
PAUSE. LEAVE the document open to use in the next exercise.
STEP BY STEP Disable Field Codes
USE the document that is open from the previous exercise.
1. Click the File tab, and then click Options .
2. Click Advanced .
3. Under the section, Show document content , click the check box by Show fi eld codes
instead of their values
to remove the check mark.
4. Click OK to close the dialog box. When disabling fi eld codes in a table, the value where
the formula was entered appears.
PAUSE. LEAVE the document open to use in the next exercise.
Using Object Zoom
In Lesson 2, you learn about the Zoom group and the new Read Mode view. Microsoft has
enhanced reading documents using the Object Zoom. Object Zoom is new in Read Mode and
allows you to zoom in on objects such as tables, charts, and images. In this exercise, you practice
using the Object Zoom in Read Mode.
STEP BY STEP Use Object Zoom
USE the document that is open from the previous exercise.
1. Click the View tab and select Read Mode to change the page layout of the document.
2. Double-click the table to zoom in on the table. The table appears with a magnifi er
beside it and a shadow background of the document appears behind the table.
3. Click the magnifi er button to zoom in to the table. The table fi lls the screen, which
makes it easier for reading.
4. Click the magnifi er button again to zoom out.
5. Click anywhere outside of the table to exit the object zoom feature and return to the
document in Read Mode.
Figure 6-25
Display of fi eld codes in table
ie
ld
ld
ld
ld
C
C
C
od
odod
es
es
es
nt
nt
nt
t
ha
t
is
is
is
is
fr
fr
t
he
he
vi
vi
ci
ci

Creating Tables
195
6. Click View on the menu, and then select Edit Document to return to the document screen.
7. SAVE the document with the same fi lename in the lesson folder on your fl ash drive.
CLOSE Word.
SKILL SUMMARY
In This Lesson, You
Learned To: Exam Objective
Objective
Number
Create a Table Defi ne table dimensions.
Demonstrate how to use Quick Tables.
3.1.3
3.1.5
Format a Table Apply styles to tables.
Modify fonts within tables.
3.2.1
3.2.2
Manage Tables Set AutoFit options.
Modify table dimensions.
Sort table data.
Merge cells.
Confi gure cell margins
Set a table title.
Convert text to tables.
Convert tables to text.
3.1.4
3.2.6
3.2.3
3.2.7
3.2.4
3.1.6
3.1.1
3.1.2
Use Formulas in a Table Demonstrate how to apply formulas to a table. 3.2.5
Use Object Zoom
Knowledge Assessment
Multiple Choice
Select the best response for the following statements.
1. Using the Sort feature in a table sorts selected content in what order?
a. Ascending
b. Descending
c. Alphabetical order
d. All of the above
2. Combining two or more cells into one cell uses a Word feature called:
a. Split Cells.
b. Merge Cells.
c. Merge All Cells.
d. Merge Selected Cells.
3. An arrangement of data made up of horizontal rows and vertical columns is called a:
a. menu.
b. heading.
c. table.
d. merge.
4. Built-in preformatted tables that can be inserted and used in your documents are called:
a. Table Style Options.
b. Tables.
c. Quick Tables.
d. Insert Tables.
5. The rectangles that are formed when rows and columns intersect are known as:
a. cells.
b. merged cells.
Another Way
You can also exit
from the object zoom feature
by pressing the Esc key once,
and exiting the Read Mode by
pressing the Esc key again.
Se
t
a
ta
bl
e
ti
tl
e.
Co
nv
nv
nv
er
er
er
t
t
te
xt
t
o
ta
ta
ta
bl
bl
bl
es
.
Co
nv
nv
nv
er
er
er
t
ta
bl
es
t
o
o
o
te
te
te
xt
xt
xt
.
.
.
rmul
as
as
as
i
i
i
n a
Ta
Ta
Ta
bl
bl
bl
e D
e D
e D
em
em
em
on
on
on
st
st
st
ra
ra
ra
te
te
te
h
h
h
ow
ow
ow
t
t
t
o
o
o
ap
ap
ap
pl
pl
pl
y
y
y
fo
rm
rm
rm
rm
ul
ul
ul
as
as
as
to

Lesson 6
196
c. split cells.
d. tables.
6. Which sort order sorts text from the end to the beginning?
a. Descending
b. Ascending
c. Plunging
d. Downward
7. Sorted data can consist of:
a. text.
b. numbers.
c. dates.
d. All of the above
8. Which option would you choose to arrange data alphabetically, numerically, or
chronologically?
a. Filter
b. Group
c. Sort
d. Category dialog box
9. When you create a table in Word, two new Ribbon tabs appear. Which of the following
is in the Table Tools tab?
a. Page Layout
b. Design
c. Insert
d. Merge Cells
10. The fi rst row of a table that is formatted differently than the rest of the table and
contains information to identify the data in the column is called a:
a. total row.
b. banded column.
c. header column.
d. header row.
True/False
Circle T if the statement is true or F if the statement is false.
T F 1. When you know how many rows and columns you need in a table, the quickest
way to create the table is by dragging over the grid in the Table menu.
T F
2. A formula can be applied by using only the functions that are available in Word.
T F
3. When Word converts text to tables, it uses paragraph marks, tabs, and commas
to determine how to organize the data within the table.
T F
4. You can move a column or row using Cut and Paste.
T F
5. S orting can only sort one column of data at a time.
T F
6. If a hyphen exists within a section of text, and you are converting that text to a
table, the hyphen will create a new column.
T F
7. Text can be a ligned both horizontally and vertically in a cell.
T F
8. Word provides four options for changing the direction of text in a cell.
T F
9. You can sort single-level lists, such as bulleted or numbered lists in a table.
T F
10. The Repeat Header Rows button is used for tables that extend to multiple pages.
Competency Assessment
Project 6-1:
Creating a Placements Table
Ms. Archer, the executive recruiter, asks you to start working on a placements table that will list
the candidates that have been placed, the companies that hired them, and the date of hire.
gn
gn
gn
rt
rge
CeCe
Ce
ll
ll
ll
s
st r
ow
ow
ow
o o o
f
f
f
a
ta
ta
ta
bl
bl
bl
e
e
e
that i
s
s
fo
rm
rm
rm
at
at
at
ted diff
er
er
er
en
en
tl
y
than t
he
he
he
rest
ns inf
or
or
or
mati
on
on
on
to id
en
en
en
ti
ti
ti
fy
fy
fy
t
he
he
he
d
d
d
at
at
at
a
a
a
in
in
in
t
t
t
he
he
he
c
c
c
ol
ol
ol
um
um
um
n is
c
c
c
c
al
al
al
le
le
le
d a:

Creating Tables
197
GET READY. LAUNCH Word if it is not already running.
1. OPEN Placements from the data fi les for this lesson.
2. SAVE the document as 6-1 Placements Table in the lesson folder on your fl ash drive.
3. Place the insertion point in the last column. On the Layout tab, in the Table group, click
the
Select button and Select Column .
4. On the Layout tab, in the Cell Size group, click the up arrow in the Width box until it
reads
1.3 0.
5. Select the fi rst column in the table.
6. On the Layout tab, in the Cell Size group, click the down arrow in the Width box until it
reads
.9 0.
7. Select the Company column and change the width to 1.5 0.
8. On the Design tab, in the Table Style Options group, click the Header Row check box
and
Banded Rows check box to enable. Place your insertion point within the table.
9. On the Design tab, in the Table Styles group, select the Grid Table 4 – Accent 4 style.
10. Select the last column in the table.
11. On the Layout tab, in the Data group, click the Sort button to open the Sort dialog box.
12. Under the My list has section, make sure the Header row option button is selected.
Click
OK . This sorts the column by date.
13. With the table selected, on the Layout tab, in the Table group, click the Properties
button.
14. In the Table Properties dialog box, click Center alignment in the Table tab.
15. Click the Alt Text tab and in the Title box, type Employee Placements . In the
Description box, type
Employees date of employment. Click OK .
16. Select the header row.
17. On the Layout tab, in the Alignment group, click Align Center .
18. SAVE the document in the lesson folder on your fl ash drive, and then CLOSE the fi le.
LEAVE Word open for the next project.
Project 6-2:
Quarterly Sales Data
Create a table showing the quarterly sales for Coho Vineyard.
GET READY. LAUNCH Word if it is not already running.
1. Create a new blank document.
2. SAVE the document as 6-2 Quarterly Sales in the lesson folder on your fl ash drive.
3. On the Insert tab, in the Tables group, click the Table button. Drag to create a table that
has 5 columns and 6 rows.
4. Enter the following data in the table as shown: Note: Press Shift + Enter to insert a line
break after typing
Vineyard .
Coho Vineyard 20XX
First Quarter Second Quarter Third Quarter Fourth Quarter
Mark Hanson 19,098 25,890 39,088 28,789
Terry Adams 21,890 19,567 32,811 31,562
Max Benson 39,400 35,021 19,789 21,349
Cathan Cook 34,319 27,437 28,936 19,034
5. Select the fi rst row. On the Layout tab, in the Merge group, click the Merge Cells
button.
t
t
he
he
he
he
table selec
te
te
te
te
d,
d,
d,
on the Layout tab, in the Table group,
on
on
on
.
e
Ta
Ta
Ta
bl
bl
bl
e
PrPr
Pr
opopop
er
er
er
ti
ti
ti
ti
es
es
es
di
di
di
al
al
og b
ox
ox
ox
, click
es
Ce
Ce
nt
nt
er
al
al
al
ig
nm
nm
nm
en
en
en
t
i
i
i
n
n
n
th
t
he
he
he
Al
Al
Al
t
t
t
Te
xt
xt
xt
ta
ta
ta
b
a
nd
nd
nd
i
i
n th
e
e
e
Ti
Ti
Ti
tle box, t
yp
yp
e
Em
Em
Em
ploy
ee
ee
ee
Pl
ac
ri
pt
io
io
io
n
n
n
box,
t
t
t
yp
yp
yp
e
Em
Em
Em
pl
pl
pl
oy
ee
ee
ee
s
s
s
da
da
te
te
te
o
o
o
f
f
f
em
em
em
pl
pl
oy
oy
oy
me
me
me
nt
.
.
.
C
C
li
li
li
ck
OK

Lesson 6
198
6. With the row still selected, center the title by clicking the Align Center button in the
Alignment group on the Layout tab.
7. On the Design tab, in the Table Style Options group, click the Last Column check box to
enable. The Header Row, First Column, and Banded Rows options should be turned on
already.
8. On the Design tab, in the Table Styles gallery, click the More button to display the
gallery. Under the List Table group, select
List Table 1 Light - Accent 6 .
9. Insert a column after Fourth Quarter by placing the insertion point above the end of
row markers, and then clicking the
plus
symbol.
10. Merge the last column with the title by selecting the fi rst row, right-click, and select
Merge Cells .
11. Type Total in last column. In the Alignment group, select Align Center .
12. Position the insertion point in the blank cell below Total . In the Data group, select
Formula . The Formula box displays 5 SUM(LEFT); this totals the values to the left.
13. In the Number format box, click the drop-down arrow and select the third option
$#,##0.00;($#,##0.00) .
14. Click OK .
15. Position the insertion point in the next blank cell and in the Data group, select Formula .
Edit the formula by double-clicking on the text
ABOVE and typing LEFT . Make sure you
type the function inside the parentheses.
16. Apply the same number format that you selected in step 13. Click OK.
17. Position the insertion point in the next blank cell and in the Data group, and
select
Formula.
18. In the Formula box, delete SUM(ABOVE) —do not delete the equal sign.
19. In the Paste function box, click the drop-down arrow and select SUM . Place the
insertion point inside the parentheses and type
LEFT .
20. Apply the same number format that you completed in step 13.
21. Click OK .
22. Position the insertion point in the last blank cell and in the Data group, select Formula .
23. Edit the formula by double-clicking on the text ABOVE and typing LEFT .
24. Apply the same number format that you completed in step 13.
25. Click OK .
26. SAVE the document with the same fi lename in the lesson folder on your fl ash drive.
27. On the Layout tab, click the Select button in the Table group, and then choose Select
Table
from the drop-down menu.
28. In the Data group, select Convert to Text , and then select Tabs . Click OK .
29. SAVE the document as 6-2 Quarterly Sales2 in the lesson folder on your fl ash drive,
and then CLOSE the fi le.
LEAVE Word open for the next project.
Profi ciency Assessment
Project 6-3:
Sales Table
Ms. Archer asks you to create a sales table including data from the past two years. She can use this
table to set goals and project future income.
GET READY. LAUNCH Word if it is not already running.
1. OPEN Sales from the data fi les for this lesson.
2. SAVE the document as 6-3 Sales Table in the lesson folder on your fl ash drive.
3. Select the column headings containing the months and change the text direction for all
the months so that they begin at the bottom of the column and extend to the top.
he
he
he
s
s
s
ame
nu
nu
nu
mb
er
er
er
f
f
f
or
or
or
ma
ma
ma
t
th
th
th
th
at
at
at
y
y
y
ou sel
ec
ec
ec
te
te
te
d
d
d
in
in
in
s
s
s
te
te
te
p
p
p
13
13
13
13
.
Cl
Cl
Cl
Cl
ic
ic
ic
k
k
k
on t
he
he
he
i
i
i
ns
ns
ns
er
er
er
ti
on
on
on
p
p p
p
oi
nt
nt
nt
i
n
n
the
ne
ne
ne
xt bla
nk
nk
nk
c
el
el
l
an
an
an
d in
t
t
t
hehehe
D
D
D
at
at
at
a
Fo
rm
rm
rm
ul
ul
ul
a
a
a
.
or
mu
mu
mu
la
la
la
box,
de
de
de
lete
SU
SU
SU
M(
AB
AB
AB
OV
OV
OV
E)
E)
E)
—d—d—d
o
o
no
no
no
t
t
t
de
de
de
le
le
le
te t
he
he
he
he
e
e
e
qual

Creating Tables
199
4. Increase the row height of the row containing the months to 0.9 inches so that the text
all fi ts on one line.
5. Use the AutoFit Contents for the selected months.
6. Make sure the Header Row , Banded Rows , and First Column Table Style Options are
the only ones turned on.
7. Merge all the cells in the fi rst row and align center the heading.
8. Increase the row height to 0.6 .
9. Merge all the cells in the second row and align center the subheading.
10. Choose the Grid Table 4 - Accent 2 Table Style format.
11. If necessary, select the heading in the top row and align center again.
12. Center the table horizontally in the Table Properties dialog box.
13. Select all values including the blank cells. Increase the Cell Margins to 0.08 0 for the top
and bottom of the cells.
14. Increase the spacing between cells to 0.04 0.
15. SAVE the document in the lesson folder on your fl ash drive.
PAUSE. LEAVE the document open for the next exercise.
Project 6-4:
Client Contact Table
Ms. Archer would like you to include the average projection in the project that you completed in
Project 6-3. After you save the document with the fi eld codes being displayed, return to Backstage
and disable.
GET READY. LAUNCH Word if it is not already running.
1. SAVE the document as 6-4 Sales Table in the lesson folder on your fl ash drive.
2. Replace the column heading Totals and type Average . Notice the column width
automatically adjusts because it has been resized to fi t content.
3. Press Tab to move the insertion point to the next blank cell.
4. Open the Formula dialog box and edit the formula in the Formula box, by deleting SUM
and typing
AVERAGE . Complete the same step for the remaining months.
5. SAVE the document in the lesson folder on your fl ash drive.
6. If necessary, display the fi eld codes. Click Advanced , and then under the section Show
document content
, click the check box by Show fi eld codes instead of their values.
Leave the Field shading as the default. Click
OK .
7. Select the table and change the page orientation to Landscape , font size 9 pt, alignment
left from the Paragraph group, and AutoFit Window .
8. SAVE the document as 6-4 Field Codes in Table in the lesson folder on your fl ash drive,
and then
CLOSE the fi le.
LEAVE Word open for the next project.
Mastery Assessment
Project 6-5:
Quarterly Sales Table Update
The Coho Winery’s Quarterly Sales Table includes some formatting mistakes. Find and correct
the four problems within this document.
GET READY. LAUNCH Word if it is not already running.
1. OPEN Problem from the data fi les for this lesson.
2. SAVE the document as 6-5 Fixed Quarterly Sales in the lesson folder on your fl ash drive.
6
6
6
-4
-4
-4
:
C
li
en
en
en
t
Co
nt
nt
nt
ac
ac
ac
t
Ta
bl
e
he
r
r
r
wo
wo
wo
ul
d
d
d
li
li
li
ke
ke
ke
y
y
y
ou
ou
ou
to
in
in
in
cl
cl
ud
e
e
e
th
th
th
e aver
ag
ag
ag
e
pr
pr
oj
ec
ti
ti
ti
on
on
on
i
i
i
n
n
n
th
e
e
e
pr
pr
pr
oj
6-3.
A
A
A
A
ft
ft
ft
er
er
er
y
ou
ou
ou
s
s
s
av
av
av
e the
do
do
cu
me
me
me
nt
nt
nt
with
th
th
th
e
fi
fi
fi
el
el
el
d
d
d
co
co
co
des
be
be
be
in
in
in
g
g
g
disp
ble.

Lesson 6
200
3. Find and correct four errors in the table.
4. Apply AutoFit Contents and center the table horizontally on the page.
5. Change the Table Styles and select Grid Table 5 Dark .
6. Insert a row after Cathan Cook .
7. Type Highest Sales in the fi rst column, last row.
8. Use the MAX function to calculate the highest sale for each quarter and apply the
number format by selecting the second option.
9. SAVE the document as 6-5 Fixed Quarterly Sales with Field Codes in the lesson folder
on your fl ash drive.
10. Turn the fi eld codes off.
11. SAVE the document as 6-5 Fixed Quarterly Sales in the lesson folder on your fl ash
drive, and then CLOSE the fi le.
LEAVE Word open for the next project.
Project 6-6:
Soccer Team Roster
As coach of your child’s soccer team, you need to distribute a roster to all your players with contact
information, uniform numbers, and assigned snack responsibilities. You received a rough list from
the league, and you would like to convert it to table form. You haven’t converted text to a table
before, but you’re confi dent you can do it.
GET READY. LAUNCH Word if it is not already running.
1. OPEN Soccer Team from the data fi les for this lesson.
2. SAVE the document as 6-6 Soccer Roster in the lesson folder on your fl ash drive
3. Select all the text.
4. Select Convert Text to Table from the menu in the Tables group.
5. In the Convert Text to Table dialog box, type 4 in the Number of columns box. Click the
Commas button under the Separate text at section and click OK .
6. Use what you learned in this lesson to format the table as shown in Figure 6-26. Start
by removing extra words, adjusting column widths for the last column to
1.82 0, and
aligning text. Sort the table by snack date in ascending order, insert a header row with
the following headings for each column (
Name , Uniform Number , Telephone Numbers ,
Snacks ) and choose the List Table 6 Colorful – Accent 3 Table Style. Change the header
row height to
0.5 0.
Figure 6-26
Soccer team roster
7. SAVE the document in the lesson folder on your fl ash drive, and then CLOSE the fi le.
STOP . CLOSE Word.
an
an
an
d
d
you
wo
wo
wo
uld
li
li
li
ke
ke
ke
to convert it to table form. You haven’t
yo
yo
yo
u’
u’
u’
re
re
re
c
on
on
on
fi
d
d
d
ent
yo
yo
yo
u
ca
ca
ca
n
n
n
do
i
i
i
t.
fi
Y.
LA
LA
LA
UN
UN
UN
UN
CH
Wo
Wo
Wo
rd if
it
it
it
i
s
s
not
al
al
al
ready
ru
ru
ru
nn
nn
in
g.
g.
So
cc
er
er
er
T
ea
m
fr
fr
fr
fr
om
t
he
he
he
d
d
d
at
a
a
a
fi
fi
fi
le
le
le
s
s
s
fo
fo
fo
r
r
r
th
th
th
is
is
is
l
l
l
es
es
es
so
so
so
n.
n.
n.
