Lab 2. Projectile Motion
Goals
• To determine the launch speed of a projectile and its uncertainty by measuring how far it
travels horizontally before landing on the floor (called the range) when launched horizontally
from a known height.
• To predict and measure the range of a projectile when the projectile is fired at an arbitrary
angle with respect to the horizontal.
• To predict the initial firing angle of the launcher for a prescribed range value.
• To determine quantitatively whether the measured ranges in (2) and (3) are consistent with
the desired range values.
Introduction
When objects undergo motion in two (or even three) dimensions rather than in just one, the overall
motion can be analyzed by looking at the motion in any two (or three) mutually perpendicular
directions and then putting the motions “back together,” so to speak. In the case of projectiles, the
horizontal and vertical directions are usually chosen. Why is this choice made? Ignoring the effects
of air resistance, an object moving vertically near the surface of Earth experiences a constant ac-
celeration. We know this by experiment. Likewise an object moving horizontally experiences zero
acceleration. Any other choice of perpendicular directions would have nonzero, constant values
of acceleration in both directions. When we write the descriptions of the motion in mathematical
terms, the horizontal/vertical choice of directions results in the simplest description.
Under what conditions can the effects of air resistance be ignored? One condition is that the
object’s speed is not too high, since the effect of the air resistance increases with speed. If two
objects are the same size and shape, the lighter one of the two will experience the larger effect on
its motion due to the air. (Imagine a ping-pong ball and a steel ball bearing of the same size.) In
designing this lab, care has been taken to ensure that air resistance has a negligible effect on the
trajectory of the projectile. When conditions are such that air resistance cannot be ignored, the
motion is more complicated.
15
16 CHAPTER 2. PROJECTILE MOTION
Mathematical preliminaries—Equation for range
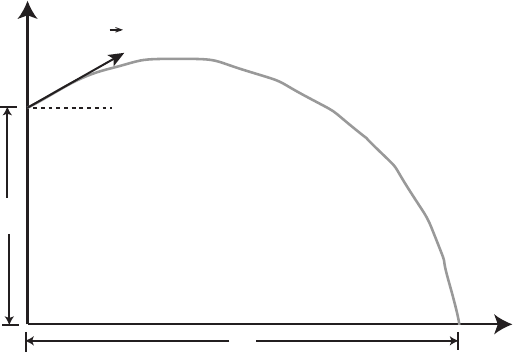
To accomplish the first two of our stated goals, we need a general mathematical relationship be-
tween the horizontal range of the projectile and the initial height, initial velocity, and launch angle.
See Figure 2.1. You will need to solve the appropriate kinematics equations for motion with con-
stant acceleration in the horizontal and vertical directions simultaneously. Rather than writing the
equations in terms of the angle, θ, it is suggested that you use the symbols v
0x
and v
0y
, where
v
0x
= v
0
cosθ and v
0y
= v
0
sinθ , to simplify the algebra. You need to solve for the range, R, in
terms of v
0x
, v
0y
, h, and g. The details of this derivation must be included in your lab notes.
v
0
h
R
x
y
Figure 2.1. Coordinate system for calculating the range, R.
Instructions and precautions for using the ball launcher
Warning: Never look down the barrel of a launcher. Wear eye protection until all the groups
have finished launching projectiles.
1. Make sure that the launcher is attached securely to the table so it does not move when the
launcher is fired. Make sure the launcher is at the proper angle by using the built-in plumb
bob on the side of the launcher. Note that the angle measured by this plumb bob is the angle
between the “barrel” of the launcher and the horizontal.
2. Since the projectiles will be hitting the floor, use a second plumb bob to locate and mark
the position on the floor (blue tape works) directly below the launch point of the projectile.
This indicates the initial horizontal position of the ball at floor level so the range (horizontal
distance traveled by the ball) can be measured later. You will have to measure the height to
get the vertical distance. Clearly indicate in a diagram how you measured the height (from
where to where). If you are not sure how the height should be measured, please discuss it
with your TA.
3. To launch the projectile, load the ball into the projectile launcher. Use the rod to push the
ball into the launch tube to one of the three preset launch positions (short, medium, or long
17
range). You will hear a click as you reach each position. Notify others nearby and across
the room before firing the ball. Stand out of the way and fire the launcher by pulling on the
string attached to its trigger on the top. To minimize the force applied by the string to the
launch tube, pull the string at right angles to the launch tube.
4. To record the position where the projectile strikes the floor, tape a white paper target to the
thin hard-board sheet (about 0.3 m × 0.5 m in size) at your lab station. Place the sheet and
target at the approximate place where the ball lands. When you are ready to record some
landing points, lay a piece of carbon paper (carbon side down) on top of the target. Do not
put tape on the carbon paper. The ball will leave a dark smudge on the white paper where it
lands. If necessary you can tape the hard-board sheet to the floor to keep it from moving, but
avoid the indiscriminate use of tape on the floors.
Determining the initial speed of the projectile
1. Simplify your general equation for the range for the case when θ = 0 (horizontal launch).
Then solve for v
0
in terms of R, h, and g.
2. Set the launcher to fire horizontally, that is, to launch at an angle of zero degrees. Care with
this angle setting can significantly improve your results later in the lab.
3. Starting with the medium range launch setting, fire the projectile (using the four steps in the
previous section) a couple times noting where the projectile lands. Center the paper target
as best you can where the ball will land. Now use the carbon paper to record the landing
position of four or five launches using the same initial conditions.
4. From your data determine the average range, R, of the ball. Use this average distance to
calculate the average initial speed of the ball as it was launched.
5. Repeat the same procedure for the short and long range settings on the launcher.
Range for nonzero launch angles
1. Choose a launch angle between 30° and 40°. Using the values of the initial speed of the ball
measured above and your general equation for the range, calculate the horizontal distance
(range) from the launch point to where the ball should land for the short and medium range
settings using the initial launch angle that you have chosen. (Do not use the long range
setting.)
2. For the short and medium range settings, place a paper target on the floor at the calculated
position and fire the projectile. If the projectile misses the target completely, check your
calculations and/or discuss it with your TA. If the projectile does hit the target, then repeat
several times to get a good average experimental range value and its corresponding standard
deviation to compare with your calculated range.
3. Compare your predicted range values with the experimental range values using your ex-
perimental standard deviations. Assume that your predicted range, R
predicted
has zero un-

18 CHAPTER 2. PROJECTILE MOTION
certainty. Then your measurement is consistent with your prediction if t
0
= |R
measured
−
R
predicted
|/σ(R
measured
) < 3. If you find that t
0
> 3, check your calculations and consider
carefully what systematic errors may be present in your experiment.
Launch angle to achieve a given range
1. Ask your TA to assign a value of horizontal distance (range) for your group.
2. Calculate a suitable angle at one of the range settings for launching the projectile to the target
set at the assigned distance. The relationship giving the initial launch angle in terms of the
other parameters is:
tanθ =
v
2
0
gR
±
"
v
2
0
gR
2
−1 +
2v
2
0
h
gR
2
#
1/2
(2.1)
3. Now set the target and do the experiment with your TA present to observe. Were you able to
hit the target? If you have trouble, check your calculations. Is your calculator in radian or
degree mode? Get assistance from your TA, if necessary. Again, compare your experimental
range value to the range value assigned by your TA. If not, check your calculations and your
procedure.
Conclusion
Summarize all your results, preferably in a table showing the measured and calculated quantities
with their uncertainties. Clearly display your comparisons between predicted values and experi-
mental values. Are you convinced that the theoretical predictions made by separating the horizon-
tal and vertical motions agree with experiment, at least within the calculated uncertainties of the
experiment? Your answers must be based on your experimental results and the calculated uncer-
tainties of the quantities you are comparing. Do not make vague statements that are not directly
supported by your calculations and measurements.
Before you leave the lab please:
Return the projectile and the carbon paper to the TA Table.
Remove all tape from the floor.
Wrap the plumb bob string around the cardboard spool.
Store the plumb bob and string in its plastic bag.
Return the goggles to their plastic bags.
Place the plumb bob, tape measure, goggles and rulers in your equipment basket.
Straighten up your lab station.
Report any problems or suggest improvements to your TA.
