
USER MANUAL
Wildlife Dominion Management LLC
(855) 464-3935
hogeyecameras.com
HogEye Camera System
HogEye Camera Application
Warning: Read this ENTIRE MANUAL prior to assembling or using the system. Failure to follow the
important safety instructions and warnings in this manual may result in serious injury or death.
Wildlife Dominion
Management LLC.

HOGEYE CAMERA SYSTEM USER MANUAL
©2020–22 WildLife Dominion Management LLC. All rights Reserved. Rev. 05 2022APR14
CONTENTS
Important Safety Information 1
List of System Components 2
Installing and Positioning the Camera 4
Mounting the Components 4
Attaching Cables and Battery 5
Adjusting the Camera Angle of View 6
Installing the HogEye Camera Management
Application 7
Create an Account 7
Download and Install the Software 7
Add a Camera 8
Camera Home Page 9
Camera View Screen 9
Streaming the Camera 9
Camera Settings Screen 10
Notication Screen 11
Deploying the Trap 11
Account Screen 12
Organization Screen 13
Inviting a User 13
Video Screen 14
Troubleshooting Your HogEye Camera System 15
Warranty and Support 16

1
USER MANUAL HOGEYE CAMERA SYSTEM
IMPORTANT SAFETY
INFORMATION
Warning
Failure to review and understand the entire
manual prior to assembly or use could result
in SERIOUS INJURY OR DEATH to you or
someone else.
This manual contains important instructions,
warnings, and safety procedures. Make sure
you read and understand all procedures
BEFORE assembling or using the HogEye
Camera System.
Warning
CRUSH HAZARD: This device may be used
to remotely trigger a gate, suspended trap,
swing door, or other heavy device, which can
cause serious injury or death. ALWAYS ensure
the area is clear BEFORE connecting the
wires and turning on the power.
CHILD SAFETY HAZARD: This product can
cause serious injury or death. Keep children
away from equipment at all times.
Always disconnect the battery from the charge
controller control box when the trapping system
is not in use.
Never transport with the battery inside the storage
box.
Keep the storage box clean and free of moisture
to prevent damage and ensure proper operation
of the HogEye Camera trapping system.
Always check the polarity of the battery when con-
necting it to the system.

2
HOGEYE CAMERA SYSTEM USER MANUAL
LIST OF SYSTEM
COMPONENTS
The following components are included with your sys-
tem and are illustrated in the photos that follow:
Camera System
Charge Controller
Omni-Directional Antenna
Solar Panel
Wrenches
IR Adjustment Wrench (2mm Allen wrench)
Camera Lens Ring Wrench (T20 security wrench)
Cables
Gate Cable
Battery Cable
Brackets
Solar Panel T-Post Bracket
Antenna T-post Bracket
Camera T-post Bracket
Pole Brackets for Antenna (optional) Camera system
Bluetooth-enabled charge
controller with Solarlife
battery monitoring app.
The Solarlife app is available
from Google Play, the Apple
Store, and lumiax.com.

3
USER MANUAL HOGEYE CAMERA SYSTEM
Solar panel
Omni-
directional
antenna
Antenna T-post Bracket
Gate cable
Battery cable
IR
adjustable
wrench
Solar panel T-post
bracket
Camera T-post
bracket

4
HOGEYE CAMERA SYSTEM USER MANUAL
INSTALLING AND
POSITIONING THE CAMERA
Mounting the Components
Mount the components to the T-post using the
brackets provided, as follows:
1. Attach the camera T-Post bracket to the back of
the camera using the mounting hardware pro-
vided. Do not over-tighten.
2. Attach the antenna T-post bracket to the
antenna.
3. Attach the brackets to the T-post in this order:
a. Place the solar panel bracket lowest on
the post.
b. Place the camera above the solar
panel.
c. Place the antenna at the highest point
on the post.
Solar panel, camera, and antenna on T-post
Camera attached to T-post bracket
Antenna
attached to
T-post bracket,
bottom view
5
USER MANUAL HOGEYE CAMERA SYSTEM
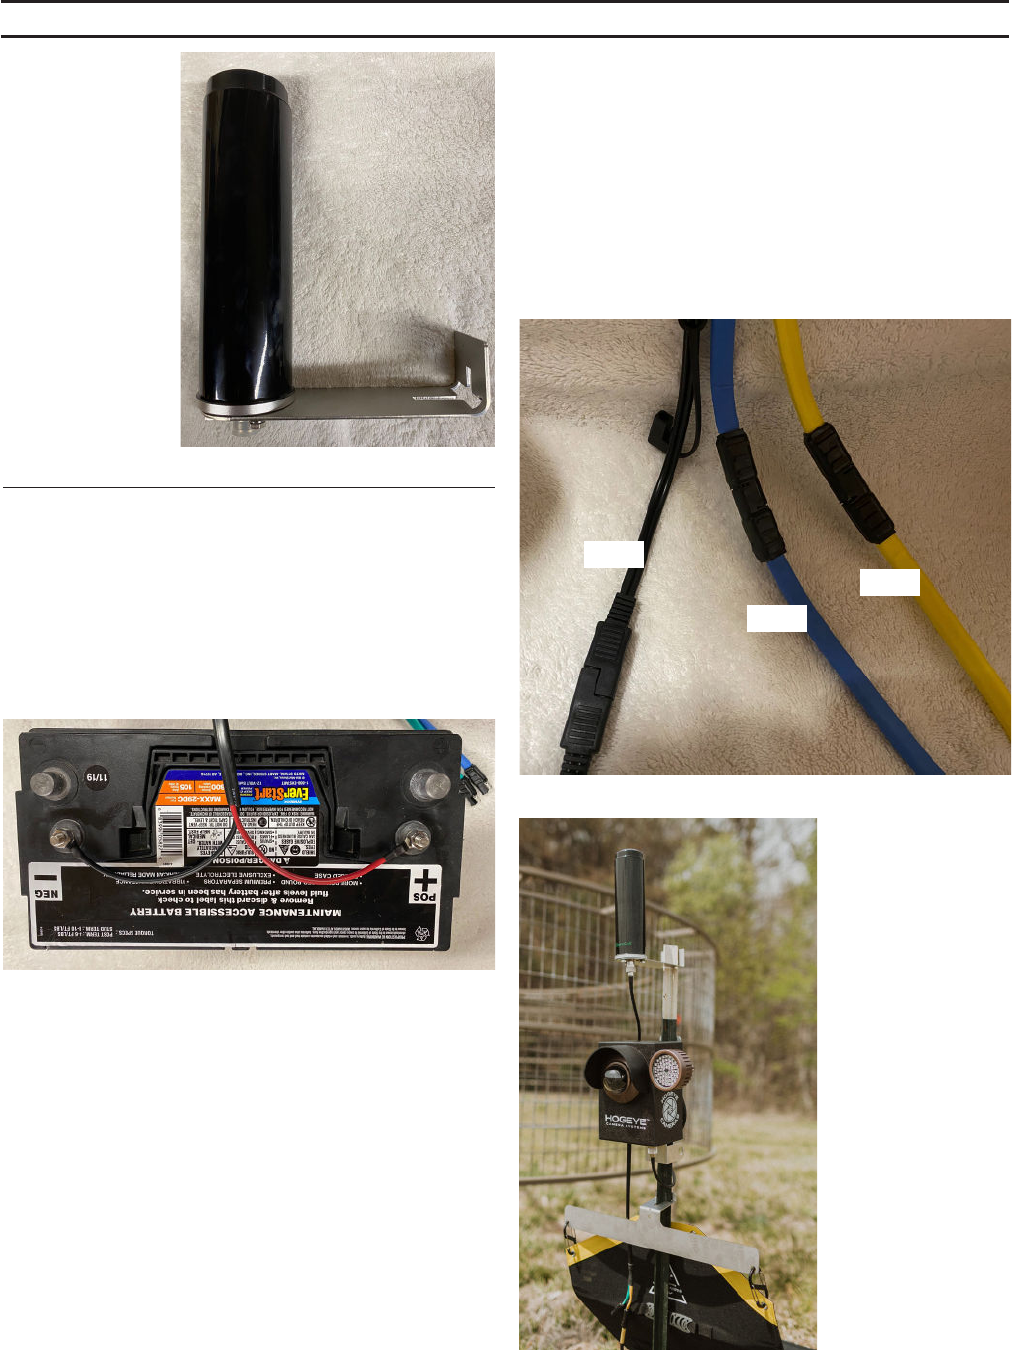
Attaching Cables and Battery
A Group 29 or 31 Deep Cycle Battery is recom-
mended to power the system. Please visit our web-
site and read the Battery FAQ for more information.
Connect the battery cable to the battery terminals.
Make sure they are tightly secured on the battery.
Antenna
attached to
T-post bracket,
side view
Battery with cable attached to terminals
Plug in the cables in this order:
a. Attach antenna cable to antenna
b. Blue (power)
c. Black (solar panel)
d. Yellow (camera)
e. Green (gate)
Finally, attach the gate cable to the camera and
the trigger.
b
d
c
Camera cable
T-post with
components
mounted
and cables
connected

6
HOGEYE CAMERA SYSTEM USER MANUAL
Adjusting the Camera Angle of View
To adjust the camera angle, you’ll rst need to
loosen and remove the lens cover.
Push the lens cover down and turn it one-half inch
counter-clockwise to release it.
With the cover removed, the camera head can
be adjusted up or down or rotated to achieve the
desired view.
To replace the lens cover, make sure the notch on
the cover faces the bottom of the camera. With
slight pressure, press down on the lens cover and
turn it clockwise until you hear it click into place.
Always replace the lens cover after adjusting the
camera angle.
With the lens cover removed, you can adjust the
camera head for the best view.
Push and turn the lens cover counter-clockwise to
remove it.
Make sure the notch on the lens cover faces the
bottom of the camera when you replace it.

7
USER MANUAL HOGEYE CAMERA SYSTEM
INSTALLING THE HOGEYE
CAMERA MANAGEMENT
APPLICATION
HogEye Camera Management software is available
for both Apple (IOS) and Android mobile devices.
More information is available online; please visit
hogeyecameras.com.
Create an Account
Go to signup.hogeyecameras.com to create an
account. After you create the account, you can
download the application.
Download and Install the Software
Download the “Hogeye Camera Management”
application on your IOS or Android device.
Install the app.

8
HOGEYE CAMERA SYSTEM USER MANUAL
Add a Camera
The rst time you log in, you’ll need to add one or
more cameras.
Click “Add” in the top right of your screen to add
a camera. Enter a camera name and ID. The ID is
provided on the sticker inside the camera storage
box. The camera name is your choice.
Once you have entered the information, click “Cre-
ate” (in the upper right corner of the screen) to add
the camera.
After installation, open the app. You’ll be directed
to the login screen.
Please note: If your device asks for access to the
microphone, notications, or photos, allow it or
the app will not function correctly.

9
USER MANUAL HOGEYE CAMERA SYSTEM
Camera Home Page
The next time you log into the app, if you have
added one or more cameras, you’ll be taken directly
to the the Camera Home Page. This is the screen
where you can select a camera to view.
Camera View Screen
The camera view screen has the following functions,
represented by icons:
Stream the camera
Change your camera settings
Turn notications off/on
Focus the camera
Deploy the trap
Streaming the Camera
Select the Stream icon to view live video.

10
HOGEYE CAMERA SYSTEM USER MANUAL
Camera Settings Screen
On the Camera Settings Screen, you can test noti-
cations, view and edit the motion box, and change
the camera name.
The motion box controls the area that will trigger a
motion alert. To adjust it, click inside the green box
and 4 dots will appear in the corners. Use your n-
ger to adjust the corners, which changes the size of
your motion box. Be sure to click Save (in the upper
righ corner) after you make any changes. Please
allow time for the settings to save to your device.

11
USER MANUAL HOGEYE CAMERA SYSTEM
Warning: Always ensure the area is clear
before deploying the trap. Failure to do so
could result in injury or death.
Deploying the Trap
From the Camera Screen, use the Deploy icon to
deploy the trap. A conrmation popup will appear
on the screen, asking “Are you sure you want to
drop the trap?” Select Yes to deploy the trap or
No to cancel.
Notication Screen
To access the Notications Screen,
click the Bell icon. You’ll nd a list
of all the notications received.
After you select a notication, tap
the icon in the top right to down-
load it to your photos.

12
HOGEYE CAMERA SYSTEM USER MANUAL
Account Screen
Select the Account icon to access the Account
Screen. It includes the following options:
You can edit the rst or last name associated with
the account.
You can view the email address associated with the
account.
You can toggle notications for the entire app. Click
on the slider to turn notications on or off. Green
indicates that notications are on, and gray indi-
cates that they are off.
Click “Contact Support” to access the chat feature
to contact tech support.
Click “Notication Sound” to change your noti-
cation sound.

13
USER MANUAL HOGEYE CAMERA SYSTEM
Organization Screen
Select the Organization icon to access the Organi-
zation Screen. On the Organization Screen, you can
view and add users to your account. You can also
change a user’s level of access.
There are two user levels: Admin and Member. An
Admin can do anything an owner can do, with the
exception of viewing or changing payment info. A
Member can only view the camera and download
videos.
Click on a user’s name to toggle them between
Admin and Member.
To toggle between organizations, click the icon in
the top left. If you are an invited user for another
organization, can select their account on this page.
Click the email/organization you wish to join and
choose “Select.”
Inviting a User
To add a user, they must rst create an account at
signup.hogeyecameras.com. This allows them to
download and install the application. The user will
then need to log into the application.
After the invited user has an account, click the
“Invite” tab in the top right and enter their email
address. Select their account to send them an
invite. They’ll receive a notication, which they can
accept from their Notication Screen. The invited
user must be logged into the app to receive the
invitation.

14
HOGEYE CAMERA SYSTEM USER MANUAL
Video Screen
Access the Video Screen using the Videos icon.
Videos are initially saved only to the camera. To
share or save videos, use the Video Screen to down-
load them.
The Video Screen shows the list of videos avail-
able on the camera (“On Camera”) or saved to your
account (“Complete”).
To download a video, select it and click “Request.”
The le will start downloading from the camera to
your account.
Once the le has been downloaded, the user will
receive a notication letting them know it’s available.
Select any video that says “Completed” to play,
share, or save it.

15
USER MANUAL HOGEYE CAMERA SYSTEM
TROUBLESHOOTING YOUR
HOGEYE CAMERA SYSTEM
Following are some troubleshooting steps for the
most common system issues.
See hogeyecameras.com/how-it-works for vid-
eos and troubleshooting tips.
Camera is listed as “Inactive”
When a camera on the Camera Screen is listed as
“Inactive” the camera missed the last health check.
This can be caused by a poor signal area, a dead
battery, or another issue that would cause the cam-
era not to check in.
Always verify that the camera can stream before
assuming there is an issue. Cameras with poor cell
service may go inactive but still have the ability to
stream. If you are unable to stream, please follow
the troubleshooting steps below or call Customer
Support.
Camera may not have power
Issue: System is not connected correctly
Unplug all connections, check for corrosion or
water, and reconnect according to the instructions
provided.
Issue: Battery is dying often
Ensure that you are using a true Deep Cycle 29 or
31 battery that has been load tested to conrm that
battery condition is not an issue.
Issue: Solar panels are shaded or not facing the
correct direction
All solar panels should be facing south and tilted to
27 degrees for best performance.
Solar panel output should be over 19 volts in full sun.
Trap is not dropping
When the trap doesn’t drop, there might be several
reasons. One is that the trap itself is blocked or
jammed. The other is that the camera is unable to
trigger it. Use the following troubleshooting steps
to determine the cause.
Issue: Trap is jammed or blocked
Check the trap operation to make sure nothing is
blocking or jamming the moving parts.
Issue: Camera does not have cell signal
Your camera will show 1-3 bars of signal strength.
These readouts are based on signal ranges.
1 bar = very poor service
2 bars= below average to good
3 bars= good to great
Ensure your antenna is connected securely and the
antenna cable is not damaged.
Placing your antenna at the highest point available
will often improve cellular signal.
Contact Customer Support for more information.
Issue: Gate is still not dropping
Contact Customer Support.

16
HOGEYE CAMERA SYSTEM USER MANUAL
4 Year Limited Warranty
Year 1 & 2
Wildlife Dominion Management LLC (WDM) war-
ranties the HogEye Camera (HE) for a period of 2
years from the date of purchase. It is the custom-
er’s responsibility to maintain and provide proof for
date of purchase. This warranty only covers man-
ufacturer’s defects and does not cover damage
caused by misuse or abuse to the product. Normal
wear and tear are not considered a manufactur-
er’s defect. If the product proves defective during
this period, WDM, at its option will: 1. Repair the
product by means of telephone support, email, or
via cellular network. 2. Replace the product with a
comparable product which may be new or refur-
bished. (Warranty is NOT extended beyond the
original purchase date.) 3. WDM recommends the
customer rst use the support materials shipped
with the product, product diagnostics, information
contained on the web, and email support. WDM will
issue RMA numbers that must accompany any cam-
era returned to WDM. The customer is responsible
for return shipping charges. WDM is not responsi-
ble for lost or damaged merchandise as a result of
shipping. Shipping insurance is the responsibility of
the customer, and shipping without insurance is the
liability of the customer.
Year 3 & 4
The HogEye Camera warranty covers the camera
component for a period of 4 years from the date
of purchase. It is the customer’s responsibility to
maintain and provide proof for date of purchase.
Customer will be responsible for all shipping and
labor charges during this time. Repair of a compo-
nent could mean: replace with a new or refurbished
part, repair the unit, or offer similar part. (Warranty is
NOT extended beyond the original purchase date.)
WDM reserves the right to charge for service in
exception cases. IF a unit needs to be returned,
WDM will issue an RMA number that must be
included with the camera shipment. Cameras
returned without the RMA will be returned or stored
without repair. All defective parts, assemblies, and
products become the property of WDM. Returns
and claims will be handled according to current
WDM procedures. Warranties shall not apply to
any defect, failure or damages caused by improper
use or improper or inadequate maintenance and/
or care. Warranty does not apply to battery or solar
components (including battery, solar panels and
charge controller). WDM warranty is NONTRANS-
FERABLE and is extended to the initial purchases
only.
WDM shall NOT be obligated under the following
warranties:
● To repair damage resulting from attempts by per-
sonnel other than WDM representatives to install,
repair or service the product unless directed by a
WDM representative.
● To repair damage, malfunction, or degradation
of performance resulting from improper use of
connection to incompatible equipment.
● To repair damage, malfunction, or degradation
of performance caused by the use of non-recom-
mended supplies of products.
● To perform user maintenance of cleaning or to
repair damage or malfunction.
● To repair damage, malfunction, or degradation
of performance resulting from failure to properly
prepare and transport the product.
● To repair damage, malfunction, or degradation
of performance resulting from use of the prod-
uct in an environment not meeting the operating
specications.
● To replace items that have been used up, abused,
misused, or tampered with in anyway.
● To support software not supplied by WDM.
WARRANTY AND SUPPORT

17
USER MANUAL HOGEYE CAMERA SYSTEM
Some states, provinces, and countries do not allow
the exclusion of limitation of incidental or conse-
quential damages of exclusions or limitation on the
duration of implied warranties of conditions, so the
above limitations or exclusions may not apply.
TO THE EXTENT ALLOWED BY LOCAL LAW
EXCEPT FOR THE OBLIGATIONS SPECIFICALLY
SET FORTH IN THIS WARRANTY STATEMENT, IN
NO EVENT SHALL WILDLIFE DOMINION MAN-
AGEMENT LLC (HOGEYE CAMERA) AND ITS
VENDORS BE LIABLE FOR ANY INDIRECT, SPE-
CIAL, INCIDENTAL OR CONSEQENTIAL DAM-
AGES (INCLUDING LOSS OF PROFITS), WHETHER
BASED ON CONTRACT, TORT, OR ANY OTHER
LEGAL THEORY AND IRRESPECTIVE OF WHETHER
WILDLIFE DOMINION MANAGEMENT LLC (HOG-
EYE) OR THE VENDOR HAD ADVANCE NOTICE
OF THE POSSIBILITY OF SUCH DAMAGES.
● To provide software or rmware updates or
upgrades to items not supplied by WDM.
● Power components subject to normal wear and
lifecycle, including battery and solar components.
Any service listed above and provided by WDM and
HogEye Cameras at the Customer’s request shall
be invoiced to the customer at the current rates for
parts, labor, and shipping.
THE ABOVE WARRANTIES ARE PROVIDED BY
THE HOGEYE WITH RESPECT TO THIS PROD-
UCT AND ITS RELATED ITEMS IN LEIU OF ANY
OTHER WARRANTIES, EXPRESSED OR IMPLIED.
WDM, HE AND ITS VENDORS DISCLAIM ANY
IMPLIED WARRANTIES OR MERCHANTABILITY
OF FITNESS FOR A PARTICULAR PURPOSE AND
SIMILAR STANDARD IMPOSED BY APPLICABLE
LEGISLATION. WDM RESPONSIBILITY TO REPAIR
OR REPLACE, OR FOR DEFECTIVE PRODUCTS
AND RELATED ITEMS IS SOLE AND EXCLUSIVE.
REMEDY PROVIDED TO THE INITIAL CUSTOMER
FOR BREACH OF THESE WARRANTIES.

Wildlife Dominion Management LLC
(855) 464-3935
hogeyecameras.com
Wildlife Dominion
Management LLC.
