

CMS Made Simple 1.6
Beginner's Guide
Create a fully funconal and professional website using
CMS Made Simple
Soa Hauschildt
BIRMINGHAM - MUMBAI
This material is copyright and is licensed for the sole use by Niels Vils on 17th August 2010
Thorsøhøjen 8, Silkeborg, 8600

CMS Made Simple 1.6
Beginner's Guide
Copyright © 2010 Packt Publishing
All rights reserved. No part of this book may be reproduced, stored in a retrieval system,
or transmied in any form or by any means, without the prior wrien permission of the
publisher, except in the case of brief quotaons embedded in crical arcles or reviews.
Every eort has been made in the preparaon of this book to ensure the accuracy of the
informaon presented. However, the informaon contained in this book is sold without
warranty, either express or implied. Neither the author, nor Packt Publishing, and its dealers
and distributors will be held liable for any damages caused or alleged to be caused directly or
indirectly by this book.
Packt Publishing has endeavored to provide trademark informaon about all of the
companies and products menoned in this book by the appropriate use of capitals.
However, Packt Publishing cannot guarantee the accuracy of this informaon.
First published: March 2010
Producon Reference: 1250210
Published by Packt Publishing Ltd.
32 Lincoln Road
Olton
Birmingham, B27 6PA, UK.
ISBN 978-1-847198-20-4
www.packtpub.com
Cover Image by Vinayak Chiar ([email protected])
This material is copyright and is licensed for the sole use by Niels Vils on 17th August 2010
Thorsøhøjen 8, Silkeborg, 8600

Credits
Author
Soa Hauschildt
Reviewers
Jeremy Bass
Yury V. Zaytsev
Acquision Editor
Sarah Cullington
Development Editor
Chaitanya Apte
Technical Editors
Gauri Iyer
Smita Solanki
Copy Editor
Leonard D'Silva
Indexer
Hemangini Bari
Editorial Team Leader
Aanchal Kumar
Project Team Leader
Lata Basantani
Project Coordinator
Srimoyee Ghoshal
Proofreader
Lesley Harrison
Graphics
Geetanjali Sawant
Producon Coordinator
Shantanu Zagade
Cover Work
Shantanu Zagade
This material is copyright and is licensed for the sole use by Niels Vils on 17th August 2010
Thorsøhøjen 8, Silkeborg, 8600

About the Author
Soa Hauschildt is a web mastering and web development tutor, who started designing
and developing professional websites in 1995 just before her graduaon in Computer
Science. With experience as a data warehouse developer and ERP consultant, she became
a self-employed tutor. During her career, she has been contracted by IT and management
academies, the German army, several city administraons, and internaonal companies
such as Siemens. Her work as a tutor is always focused on praccal training combined with
a theorecal background in order to get fast and handy results.
I would like to express my gratude to all those who gave me the possibility
to complete this book. I want to thank my husband Jens for invesng a
huge amount of me in the rst reviews of this book and his paent love.
Furthermore, I have to thank Yury V. Zaytsev for his smulang support and
interesng discussions.
A special thanks goes to my parents who encouraged me to go ahead with
this book and gave me incredible mental support.
This material is copyright and is licensed for the sole use by Niels Vils on 17th August 2010
Thorsøhøjen 8, Silkeborg, 8600

About the Reviewers
Jeremy Bass began learning web construcon at the age of 12 using the "view source" on
sites such as the young Yahoo and the late GeoCies. Armed with a computer and a talent
for the ne arts, he has been in computer-based graphics ever since. A few of the high points
are stents at an internaonal telescope (Gemini in Hawaii) and winning a Telly award for
3D animaon. Currently, Jeremy works with Digital Barn Producons in Idaho, and Dened
Clarity in Philadelphia along with freelancing and parcipaon in the CMSMS community.
I would like to thank my wife, Aimee, for understanding I work long hours
not just to grow, but for her and the kids. This was fun.
Yury V. Zaytsev has an advanced degree in physics from the Nizhny Novgorod State
University, Russia, and is currently working towards his doctorate in Computaonal
Neuroscience at the University of Freiburg, Germany. Yury's primary interests concern
scienc compung, modeling, and simulaon, parcularly of the complex dynamics
of large populaons of neurons.
Yury's rst contact with computers was at the age of 6 when he programmed his rst
text-based role-playing game in BASIC on a historical 80386 machine. This inspired a never
ending passion for programming, which also led to a brief career at the age of 17 in freelance
web development for companies in Russia, Europe, and overseas.
Having successfully implemented many commercial and hobby projects with CMS Made
Simple, Yury is happy to contribute to the widespread adopon of CMSMS for the benet
of both users and developers.
This material is copyright and is licensed for the sole use by Niels Vils on 17th August 2010
Thorsøhøjen 8, Silkeborg, 8600

This material is copyright and is licensed for the sole use by Niels Vils on 17th August 2010
Thorsøhøjen 8, Silkeborg, 8600

Table of Contents
Preface 1
Chapter 1: Building Websites with CMS Made Simple 7
What is a CMS? 8
A CMS versus a website builder 9
Why CMS Made Simple? 9
Case study website 10
Funconal specicaons 10
Preparing for installaon 11
Browser 11
FTP browser 12
File archiver 12
Uploading CMS Made Simple's les 12
Summary 18
Chapter 2: Geng Started 19
Installing CMS Made Simple step-by-step 20
Choosing a language 20
Step 1: Validang le integrity (oponal) 21
Step 2: Checking requirements 22
Step 3: Tesng le creaon mask (oponal) 25
Step 4: Admin account informaon 26
Step 5: Database informaon 27
Sample content and templates 28
Step 6: Creang tables 28
Step 7: Installaon is complete 29
Understanding the admin console 29
Finishing the installaon 33
Sending e-mails with CMS 33
Known issues 35
Summary 36
This material is copyright and is licensed for the sole use by Niels Vils on 17th August 2010
Thorsøhøjen 8, Silkeborg, 8600

Table of Contents
[ ii ]
Chapter 3: Creang Pages and Navigaon 37
Creang pages 39
Time for acon – adding a new page to the website 39
Eding pages 42
Time for acon – eding exisng pages 42
Previewing changes 43
Changing the page alias 43
Deleng pages 43
Formang page content 43
Conguring TinyMCE 45
Time for acon – acvang search and replace funcon 48
Adding meta tags 50
Time for acon – adding meta tags to pages 50
Adding global meta tags 52
Understanding page hierarchy 52
Time for acon – adding subpages to a website 52
Breadcrumbs 54
Search engine friendly URLs 54
Time for acon – creang search engine friendly URLs 55
Geng more success from hierarchy 56
Controlling the navigaon of the website 57
Time for acon – prevenng pages from displaying in the navigaon 57
What is your start page? 58
More navigaon control with content types 59
Ecient work with pages 60
Creang a new page as a copy of exisng one 60
Changing mulple pages at once 60
Creang pages and navigaon 63
Summary 64
Chapter 4: Design and Layout 65
Working with exisng templates 66
Time for acon – imporng a ready-made template 66
Creang a new template 67
Time for acon – creang a new template 68
Adding dynamic parts to templates 69
Time for acon – adding Smarty tags to a template 70
Having control over the output 72
Time for acon – adding Smarty parameters to the template 72
Using plugins in content 74
Adding stylesheets to the template 74
Creang a new stylesheet 75
This material is copyright and is licensed for the sole use by Niels Vils on 17th August 2010
Thorsøhøjen 8, Silkeborg, 8600

Table of Contents
[ iii ]
Time for acon – creang the stylesheet 75
Media types for stylesheets 78
Creang navigaon for the website 78
Time for acon – adding navigaon to the template 79
Designing navigaon—the pure CSS way 80
Time for acon – design navigaon with pure CSS 80
Adding sidebar navigaon 83
Porng a HTML template 84
Time for acon – porng a HTML template to CMS Made Simple 85
Learning Smarty basics 91
Working with Smarty variables 91
Time for acon – geng Smarty variables 91
Controlling output with the IF funcon 94
Time for acon – displaying tags in dependence of the page 94
Creang navigaon template with Smarty loop 96
Time for acon – creang a menu template 97
Exporng templates 101
Time for acon – displaying tags in dependence of the page 101
Summary 104
Chapter 5: Using Core Modules 107
Understanding global content blocks 108
Time for acon – adding a global content block to the website 108
Managing news arcles with module News 110
Displaying news on the website 111
Time for acon – displaying news on the page 111
Adding news 112
Time for acon – adding news items 112
News categories 114
Time for acon – creang news categories 114
Customizing news templates 116
Time for acon – creang a new summary template 117
Adding custom elds to the module News 119
Time for acon – adding custom elds 120
Using the news tle as the page tle 122
Using the search funcon with the module Search 122
Time for acon – adding a search form 123
Browsing les with File Manager 125
Using Image Manager 126
Time for acon – using the image editor 126
Using images in template and content 128
This material is copyright and is licensed for the sole use by Niels Vils on 17th August 2010
Thorsøhøjen 8, Silkeborg, 8600

Table of Contents
[ iv ]
Using Menu Manager in content 130
Time for acon – creang a sitemap 130
Prinng pages 133
Time for acon – adding a print link 133
Adding media type to stylesheets 135
Generang a PDF version of the page 136
Adding more modules to your website 136
Using the Module Manager 136
Installing addional modules 137
Time for acon – module installaon 137
Installing modules with XML le 139
Available upgrades 140
How to nd the best CMS Made Simple module for your purpose 140
Uninstalling and removing modules 140
Summary 142
Chapter 6: Users and Permissions 145
Understanding users and their roles 146
Time for acon – creang a new user 146
Time for acon – assigning a user to a group 148
Content permissions 150
Time for acon – creang an editor account 150
Addional editors 152
Creang new pages 153
Time for acon – adding page permissions 153
Designer permissions 155
Time for acon – creang a test area for the designer 156
Viewing the admin log 157
Archiving changes and restoring them 158
Time for acon – restoring changes made by an editor 159
Overview of all default permissions 160
Module permissions 162
User nocaons 163
Summary 165
Chapter 7: Using Third-party Modules 167
Creang a photo gallery 168
Time for acon – creang the rst gallery 168
Adding albums to a gallery 170
Using the gallery on other pages 170
Time for acon – adding random images to the template 170
Creang your own gallery template 172
This material is copyright and is licensed for the sole use by Niels Vils on 17th August 2010
Thorsøhøjen 8, Silkeborg, 8600

Table of Contents
[ v ]
Adding forms with the module Form Builder 174
Time for acon – adding a contact form to the website 174
Customizing the contact form 176
Adding new elds to the forms 178
Adding salutaon as a radio buon group 178
Adding department as a pulldown eld 180
Adding mulple choice selecon with the checkbox group 181
Adding a Captcha to the forms 182
Sending out newsleers 183
Time for acon – sending mails to registered customers 184
Displaying videos 188
Adding your own player 190
Summary 194
Chapter 8: Creang Your Own Funconality 195
Creang a product catalog 195
Creang a new catalog-like module 196
Step 1: Basic informaon about the module 197
Step 2: Creang levels 198
Step 3: Finishing creaon and module installaon 207
Conguring the new Products Catalogue module 208
Creang the product list template 209
Time for acon – creang a new list template 209
Implemenng service desk funconality 211
Managing visitors' logins 211
Time for acon – creang the rst user account 212
Useful sengs for module FrontEndUsers 214
Templates for the FrontEndUsers module 215
Creang protected pages 216
Time for acon – protecng the service desk 217
Creang user area for support requests 218
Adding answer elds to the ckets 222
Time for acon – creang new elds 222
Templates for cket list and cket detail view 223
Time for acon – customizing list of ckets 223
Enabling dialog within ckets 226
Summary 230
Chapter 9: E-commerce Workshop 231
Module Products 232
Time for acon – adding the rst product 233
Creang custom elds 234
Dene your own elds 235
Creang a product hierarchy 236
This material is copyright and is licensed for the sole use by Niels Vils on 17th August 2010
Thorsøhøjen 8, Silkeborg, 8600

Table of Contents
[ vi ]
Customizing product templates 237
Creang detail view for product 244
Module Cart 245
Time for acon – connecng products and cart 245
Module Orders 247
Time for acon – adding the checkout step 248
Integrang the login screen 250
Integrang customer registraon 252
Module Paypal Gateway 255
Time for acon – creang test accounts 256
Conguring PayPal's seller account 258
Payment Receiving Preferences 258
Instant Payment Nocaon 259
Language encoding 260
Oponal modules for the e-commerce suite 261
Summary 263
Chapter 10: Advanced Use of CMS Made Simple 265
Localizaon and translaon 265
Conguring dates 266
Making mullingual websites 267
Eding language entries 269
The hierarchy soluon 270
Adding ags as the language menu 270
Separate news arcles by language 271
CMS Made Simple translaon center 272
Translang modules in your installaon 273
Time for acon – custom translaon of the module 274
Addional content and controls for editors 274
Addional content blocks 275
Time for acon – adding a content block for subtles 275
Extra page aribute 276
Time for acon – using extra page aributes 276
Search engine opmizaon (SEO) 277
Title of your website 277
Meta tags 279
Meta tag keywords 280
Using SEO markup in templates 281
Using SEO markup in pages 282
Using keywords in page alias and image les 283
Search engine friendly URLs 284
Time for acon – turning on search engine friendly URLs 284
Avoiding duplicate content 286
This material is copyright and is licensed for the sole use by Niels Vils on 17th August 2010
Thorsøhøjen 8, Silkeborg, 8600
Table of Contents
[ vii ]
Consequently use domain with www or without www 286
Avoid publishing of print versions of your pages 287
Use tag for canonical URLs 288
Creang XML sitemaps for search engines 288
Visitor stascs 289
User-dened tags 289
How to make a user-dened tag 290
Time for acon – creang your own user-dened tag 290
Parameters for tags 291
How to get the page informaon in UDT 292
Understanding events 293
Time for acon – sending mails aer page update 293
Integrang jQuery in navigaon 294
Time for acon – integrang jQuery in navigaon 295
Summary 298
Chapter 11: Administraon and Troubleshoong 299
Geng system informaon 300
Backing up your website 303
Backing up website les 304
Time for acon – creang a backup with the module 304
Backing up database 306
Time for acon – creang a database backup 306
Manual backup 307
Backing up database with phpMyAdmin 307
Time for acon – creang a backup with phpMyAdmin 308
Move CMS Made Simple to another web hosng 309
Step 1 310
Step 2 310
Step 3 310
Step 4 310
Step 5 311
Upgrading CMS Made Simple 311
Opmizing (performance tuning) 314
Compression 314
Persistent connecons 315
CSS in global sengs and stac CSS 315
How to secure your installaon 316
System vericaon 317
Usernames and passwords 319
Hiding admin directory 320
File permissions 320
This material is copyright and is licensed for the sole use by Niels Vils on 17th August 2010
Thorsøhøjen 8, Silkeborg, 8600

Table of Contents
[ viii ]
CMS Made Simple and server version 322
Troubleshoong 323
CMS Made Simple Wiki 323
Help for modules 324
Built-in help 324
What does this do? 324
How do I use it? 324
Parameters 324
Forge (bugs and feature request) 325
How to get a quick answer in the forum 325
Using search 325
Finding the right board 326
Topic subject 327
Provide as much informaon as possible 327
Describe the problem step-by-step 328
Help others if you have been helped 328
Commercial support 329
Support contracts 329
Soware development 330
What about larger projects? 330
Is the development team a corporaon or company? 330
How do I contact you? 331
Summary 333
Appendix: Pop Quiz Answers 335
Chapter 3 335
Creang Pages and Navigaon 335
Chapter 4 336
Design and Layout 336
Chapter 5 336
Using Core Modules 336
Chapter 6 337
Users and Permissions 337
Chapter 7 337
Using Third-party Modules 337
Chapter 8 337
Creang Your Own Funconality 337
Chapter 9 338
E-commerce Workshop 338
Chapter 10 338
Advanced Use of CMS Made Simple 338
Chapter 11 338
Administraon and Troubleshoong 338
Index 339
This material is copyright and is licensed for the sole use by Niels Vils on 17th August 2010
Thorsøhøjen 8, Silkeborg, 8600

Preface
CMS Made Simple is an open source content management system that allows rapid website
development in a fracon of the normal me, while avoiding hours of coding by providing
modules and third-party add-ons. With this book in hand, you will be able to harness the
power of this modular and extensible content management system at your ngerps.
This guide for CMS Made Simple is based on praccal and working soluons allowing you to
understand how this powerful and simple applicaon can support you in your daily work.
The workshop helps you to create engaging, eecve, and easy-to-use CMS websites for
businesses, clubs, and organizaons.
This is a step-by-step case study, aimed at helping you to build a complete professional
website with CMS Made Simple. You can take a ready-to-use template or implement your
own custom design, enrich the website with features such as a photo gallery, an e-commerce
soluon with a PayPal checkout, and forms of any complexity or popular jQuery eects, and
nish it o by opmizing it for search engines. The useful HTML and CSS code snippets are
opmized and can be easily adapted for your own projects. Chapter-by-chapter, you will put
yourself into the role of a web designer, developer, administrator, and business manager,
thus learning every aspect needed for building rich websites that are very simple to manage.
What this book covers
Chapter 1, Building Websites with CMS Made Simple introduces the case study website with
its funconal requirements.
Chapter 2, Geng Started explains how to install CMS Made Simple, how its admin console
is organized, and how to congure CMS Made Simple for sending out e-mails.
Chapter 3, Creang Pages and Navigaon focuses on creang, eding, and organizing pages.
It introduces the page hierarchy and search engine friendly URLs. At the end of this chapter,
you will have the complete page structure for the case study website.
This material is copyright and is licensed for the sole use by Niels Vils on 17th August 2010
Thorsøhøjen 8, Silkeborg, 8600

Preface
[ 2 ]
Chapter 4, Design and Layout explains how to create a new template and how to port a
ready HTML/CSS design to CMS Made Simple. At the end of this chapter, you will be able
to implement an individual design for a website.
Chapter 5, Using Core Modules covers standard modules of CMS Made Simple, such as News,
Search, Image and File Manager, and Prinng (including built-in PDF output), and shows you
how to install addional modules such as FAQ.
Chapter 6, Users and Permissions explains how the permissions of dierent users can be
organized in the admin console.
Chapter 7, Using Third-party Modules explains how to implement a photo gallery with
an individual design, add a contact form with custom elds, install Captcha funconality,
manage newsleers, and implement YouTube videos on the website.
Chapter 8, Creang Your Own funconality introduces two approaches to creang your
own funconality. In the rst part, you learn how to use the module maker to create a
product catalog. In the second part, you learn how to create a service desk funconality
using a module.
Chapter 9, E-commerce Workshop covers a step-by-step workshop to see how an
e-commerce shop with a PayPal checkout can be realized with the e-commerce suite.
Chapter 10, Advanced Use of CMS Made Simple explains how to create mullingual websites,
make search engine opmizaons, and use jQuery plugins in the navigaon of the website.
The integraon of a visitor stasc and some advanced techniques enrich the funconality
of the case study website.
Chapter 11, Administraon and Troubleshoong explains how to keep your website
up-to-date and secure and how to do some performance tuning. At the end of the
chapter, you will get an answer to the queson "How can I get quick help in the forum?"
Appendix, Pop Quiz Answers contains the answers to the pop quizzes throughout the book.
What you need for this book
CMS Made Simple is a PHP applicaon that uses a MySQL database. This means that you
need a web hosng with PHP and MySQL to run CMS Made Simple. You can install a web
server on your local PC for tesng environments and/or on the remote web hosng for live
websites. The requirements for CMS Made Simple are as follows:
• Web server on Linux/Unix or Windows 2000/XP/ME/2003 or OS X
• PHP 5.2.x (NOT PHP 5.3)
o safe_mode should be o
o At least 16 MB of available memory for PHP
This material is copyright and is licensed for the sole use by Niels Vils on 17th August 2010
Thorsøhøjen 8, Silkeborg, 8600

Preface
[ 3 ]
o PHP tokenizer support enabled
o At least one of ImageMagick or GDlib enabled
• MySQL 4.1+ or PostgreSQL 7+
• Enough access to your server to upload les and change
some permissions
Who this book is for
This book is perfect for newcomers as well as webmasters who are looking for an
introducon to building powerful and professional websites with a content management
system. Basic knowledge of HTML and CSS is the only requirement. The workshop covers
all aspects of web publishing and is aimed for web designers, web developers, editors,
and web managers.
Conventions
In this book, you will nd several headings appearing frequently.
To give clear instrucons of how to complete a procedure or task, we use:
Time for action – heading
1. Acon 1
2. Acon 2
3. Acon 3
Instrucons oen need some extra explanaon so that they make sense, so they are
followed with:
What just happened?
This heading explains the working of tasks or instrucons that you have just completed.
You will also nd some other learning aids in the book, including:
Pop quiz – heading
These are short mulple choice quesons intended to help you test your own understanding.
This material is copyright and is licensed for the sole use by Niels Vils on 17th August 2010
Thorsøhøjen 8, Silkeborg, 8600

Preface
[ 4 ]
Have a go hero – heading
These set praccal challenges and give you ideas for experimenng with what you
have learned.
You will also nd a number of styles of text that disnguish between dierent kinds of
informaon. Here are some examples of these styles, and an explanaon of their meaning.
Code words in text are shown as follows: "Your root directory can be public_html (or
wwwroot or htdocs), please ask your provider if you are not sure where to upload the les."
A block of code is set as follows:
#top-navi ul
{
height: 22px;
padding: 0px;
margin: 10px 0;
border-top: 1px solid #e5e4e2;
border-bottom: 1px solid #e5e4e2;
}
When we wish to draw your aenon to a parcular part of a code block, the relevant lines
or items are set in bold:
{foreach from=$nodelist item=node}
<a href="{$node->url}">
<img src="uploads/design/{$node->alias}.jpg"
alt="{$node->menutext}" border="0" />
</a>
{/foreach}
New terms and important words are shown in bold. Words that you see on the screen, in
menus or dialog boxes for example, appear in the text like this: "Open My First Style Sheet
from the list of stylesheets (Layout | Stylesheets) for edit."
Warnings or important notes appear in a box like this.
Tips and tricks appear like this.
This material is copyright and is licensed for the sole use by Niels Vils on 17th August 2010
Thorsøhøjen 8, Silkeborg, 8600

Preface
[ 5 ]
Reader feedback
Feedback from our readers is always welcome. Let us know what you think about this
book—what you liked or may have disliked. Reader feedback is important for us to
develop tles that you really get the most out of.
To send us general feedback, simply send an e-mail to [email protected], and
menon the book tle via the subject of your message.
If there is a book that you need and would like to see us publish, please send us a note in the
SUGGEST A TITLE form on www.packtpub.com or e-mail [email protected]. If there
is a topic that you have experse in and you are interested in either wring or contribung
to a book on, see our author guide on www.packtpub.com/authors.
Customer support
Now that you are the proud owner of a Packt book, we have a number of things to help you
to get the most from your purchase.
Downloading the example code for the book
Visit http://www.packtpub.com/files/code/8204_Code.zip
to directly download the example code.
The downloadable les contain instrucons on how to use them.
In this book, you may occasionally come across a single line of code appearing on two
dierent lines. Please note that this has been done only for the purpose of indentaon due
to space constraints. When using such code make sure it's on one line in your script le.
Errata
Although we have taken every care to ensure the accuracy of our content, mistakes do happen.
If you nd a mistake in one of our books—maybe a mistake in the text or the code—we
would be grateful if you would report this to us. By doing so, you can save other readers from
frustraon and help us improve subsequent versions of this book. If you nd any errata, please
report them by vising http://www.packtpub.com/support, selecng your book, clicking
on the let us know link, and entering the details of your errata. Once your errata are veried,
your submission will be accepted and the errata will be uploaded on our website, or added
to any list of exisng errata, under the Errata secon of that tle. Any exisng errata can be
viewed by selecng your tle from http://www.packtpub.com/support.
This material is copyright and is licensed for the sole use by Niels Vils on 17th August 2010
Thorsøhøjen 8, Silkeborg, 8600

Preface
[ 6 ]
Piracy
Piracy of copyright material on the Internet is an ongoing problem across all media. At Packt,
we take the protecon of our copyright and licenses very seriously. If you come across any
illegal copies of our works, in any form, on the Internet, please provide us with the locaon
address or website name immediately so that we can pursue a remedy.
Please contact us at [email protected] with a link to the suspected
pirated material.
We appreciate your help in protecng our authors, and our ability to bring you
valuable content.
Questions
You can contact us at [email protected] if you are having a problem with any
aspect of the book, and we will do our best to address it.
This material is copyright and is licensed for the sole use by Niels Vils on 17th August 2010
Thorsøhøjen 8, Silkeborg, 8600

1
Building Websites with CMS
Made Simple
You already have some experience in creang websites with HTML and CSS
and you know that you do not need any special soware to create websites.
However, if the website starts growing or your customers have more and
more changes for the exisng homepage, you wish you could automate some
tasks like adding a new page to the website or slight changes in the design
without having to edit every HTML le. CMS helps you to apply any change
throughout the website with minimal eorts. It saves your me and reduces
repeang tasks.
If you're holding this book in your hand, then it means that you are going to build a website
with a CMS. A CMS is a complex applicaon that works in the background and helps to
separate dierent tasks while creang and running websites. Those tasks can include:
Designing and laying out the website
Implemenng dierent website funconalies
Wring and publishing content
Analyzing and promong the website
When creang websites with pure HTML and CSS, you usually mix logic, presentaon, and
content within the same code. However, this is me consuming and inexible. For example,
aer adding addional navigaon items or changing the year of copyright in the footer
secon of the page, you have to synchronize the changes made in every HTML le. Your
customers may not be able to manage the content of their websites by themselves, as they
would need HTML knowledge to do it. The soluon to all the issues listed is a step towards
content management system.
So let's get started with it...
This material is copyright and is licensed for the sole use by Niels Vils on 17th August 2010
Thorsøhøjen 8, Silkeborg, 8600

Building Websites with CMS Made Simple
[ 8 ]
What is a CMS?
CMS is an abbreviaon for content management system. Generally, it is an applicaon that
helps to create a website structure and manage its content. By content, we mean any type of
documents such as pages, images, structured data as products or users, and so on.
The most important goal of any CMS is the strict separaon of content, design, and
programming. You do not need to understand how a CMS is programmed when you write
and publish the content. You do not need to be a web designer to create new pages and
organize them into the navigaon of the website. A programmer creates funconalies. A
designer creates a layout without knowing how the program code is wrien and what exactly
the content of every page will be. The editor uses the funcons supplied by the programmer.
The wrien content is automacally pasted into the layout created by the designer. That's it!
Everyone does the job he/she can do best.
Typically, a CMS is used to oer the ability to manage the content of the website without
any programming knowledge. The webmaster uses the CMS to create websites for customers
who would like to manage their content by themselves. Once the design is made and the
funconality is implemented, the customer can start entering his/her content. He/she does
not care about anything else. He/she uses a graphical user interface to manage the content
that is wrapped into the design.
A CMS consists of les and, in the case of CMS Made Simple, a database. Files provide
funcons that can retrieve any data from the database: content, design, features, and so on.
The data retrieved is then wrapped as HTML and sent to the client (browser), because your
visitors do not care how your website is made.
Internet service provider (ISP)
Your web server
with installed CMS
CMSMS
requires
database
This material is copyright and is licensed for the sole use by Niels Vils on 17th August 2010
Thorsøhøjen 8, Silkeborg, 8600

Chapter 1
[ 9 ]
In the last image, you see a client-server structure. The server is your web space where the
CMS is installed along with the database. Clients are visitors to your website. This means that
to run a CMS, especially CMS Made Simple, you need some web space where you can create
a new database and install CMS Made Simple. We will install CMS Made Simple step-by-step
in the next chapter.
A CMS versus a website builder
A CMS is not a website builder. A website builder is used by people who would like to
build websites without learning the technical aspects of web page producon. They use
ready-made design templates and select from the limited funcons that the website builderdesign templates and select from the limited funcons that the website builder
oers. This kind of website producon is inexible and is oen used to build private pages.
A CMS caters to professional webmasters who create an individual website's layout and
integrate any features that a customer needs.any features that a customer needs. features that a customer needs.
Why CMS Made Simple?Simple??
You have decided to build a website with CMS Made Simple. Good choice! CMS Made Simple
has several advantages:
It's free for personal and commercial use.
It's simple. You won't need more than half an hour to introduce your customer to
the usage of the CMS. It is mostly intuive.
It's exible in design. Any design that is created in HTML and CSS can be ported to
CMS Made Simple. There are no restricons.
It's modular. The basic funconality of CMS Made Simple can be extended
by installing over 100 addional modules that are oered for free on the
ocial website.
It's popular. You are not alone. A large internaonal community helps you to solve
your individual issues. Thousands of websites are already built using CMS Made
Simple, so you are not going to be alone.
It's open source. You can create your own funconality the way you need.
You can avoid provider lock-in to a certain proprietary closed source CMS soluon. If a
provider of proprietary soware decides to charge you more, goes out of business, or does
not want to incorporate desired new funconalies, then there's nothing you can do. With
an Open Source CMS, if you face a problem that you can't solve on your own, you can at
least hire a programmer who will solve it for you.
This material is copyright and is licensed for the sole use by Niels Vils on 17th August 2010
Thorsøhøjen 8, Silkeborg, 8600

Building Websites with CMS Made Simple
[ 10 ]
Case study website
In this book, we will work on a case study website that will be completed at the end of
Chapter 8, Creang Your Own Funconality, and can be lled with content and published
at this point. Imagine that you have to create a business website for the company
businessWorld from scratch. businessWorld is a company that needs a website based on a
CMS, as the content of the website will be managed by the sta of the company. Our task is
to create a basic website structure, implement the custom layout delivered in HTML and CSS,
and provide the funconalies that the company describes in the funconal specicaons.
Functional specications
The total number of pages is not menoned. The sta will add any required pages in the
course of me. The new pages should automacally be added to the navigaon of the
website. The layout will be delivered as an HTML or CSS template and must be ported to
CMS Made Simple.
Besides the ordinary content pages, the website should also include the following:
A news secon, where news arcles are created, categorized, and published to the
website at the given date
A search funcon for content pages and news arcles
A prinng ability as PDF for all pages
A FAQ secon that can be consequently extended with new quesons and answers
A photo gallery, where products images and photos of the team members can be
organized in albums
A product catalog with custom elds and product hierarchy
A contact form to avoid direct e-mail communicaon and reduce spam
A newsleer with self-subscripon by the website visitor
A service desk for registered customers
Dierent editor permissions are required for each secon of the website. There will be some
sta members who are allowed to manage only news arcles. Others will be responsible
for the products catalog, but will not have access to the news area, and so on. The website
should be opmized for search engines. During the lifeme of the website, the webmaster
is required to regularly update the website if new releases of the modules or of core
CMS Made Simple are published. Now that we know the specicaons, let's move
on to preparing our system for installaon.
This material is copyright and is licensed for the sole use by Niels Vils on 17th August 2010
Thorsøhøjen 8, Silkeborg, 8600

Chapter 1
[ 11 ]
Preparing for installation
First of all, gather the details required for the installaon of CMS Made Simple. You will need
to know the following:
Data Your value
Domain (website address)
http://
FTP host
FTP user
FTP password
Database host address
Database port (oponal)
Database name*
Database username
Database password
*You have to create an empty database before you start the installaon. It depends on your
hosng as to how the new database can be created. Generally, a database can be created in
the admin panel of your web hosng. Ask your provider for help if you face any dicules.
All the informaon listed in the table should be available before you start the installaon.
Missing any of this informaon will make the installaon of CMS Made Simple impossible.
The informaon requested can be obtained from your hosng's support. Figure out and
write down all the required access data now. You will need it during the setup and
conguraon process.
To start with the setup of CMS Made Simple on your web hosng, your domain should be
registered and connected. Test it now. Open your browser, and give your domain name
in the address bar. OK? If not, your domain provider will help you to solve any issues.
Browser
You can use any browser to manage CMS Made Simple, except Internet Explorer 6. This
browser is prey old. It was released in August, 2001 and does not meet the requirements
of the modern Internet. Nevertheless, visitors of your website who use Internet Explorer 6
will not have any dicules viewing your pages. This restricon is valid only for you as the
webmaster of the website.
This material is copyright and is licensed for the sole use by Niels Vils on 17th August 2010
Thorsøhøjen 8, Silkeborg, 8600

Building Websites with CMS Made Simple
[ 12 ]
FTP browser browser
You will need FTP access to your website. This kind of access is available on almost every
web hosng. With the FTP connecon data (see the previous table), you can connect to the
hosng and upload all les that are required for installing and running CMS Made Simple.
There are many free FTP browsers that you can use. If you do not have an FTP browser,
then I recommend the open source soware FileZilla that is distributed free of charge
on http://filezilla-project.org/. Download and install FileZilla right now.
You need only FileZilla Client, not FileZilla Server!
File archiver
A le archiver is a program that you can use to extract the les of CMS Made Simple onto your
local disk. As the les of CMS Made Simple are distributed as archives, the program should
be able to handle tar.gz les. If you do not have a le archiver, then you can use the open
source applicaon 7-Zip that can be freely downloaded from http://www.7-zip.org.
Now that we have all the access informaon and required soware, we can start with
the installaon.
Uploading CMS Made Simple's les
The CMS Made Simple les can be downloaded from the ocial website of CMS Made
Simple. Open http://cmsmadesimple.org, and click on Downloads | CMSMS Releases
in the top main navigaon. You will see the list of les that are available for download, but
you do not need all of them.
This material is copyright and is licensed for the sole use by Niels Vils on 17th August 2010
Thorsøhøjen 8, Silkeborg, 8600

Chapter 1
[ 13 ]
For every release, there is a bunch of les. The newest release is placed at the very top
of the list. There are two dierent versions of CMS Made Simple—full version and base
version. There is no dierence in the funconality or features, just in the included languages.
The base version includes only English for the administraon console of CMS Made Simple,
whereas the full version includes all translaons of the admin console (over twenty
languages). So, when you need only the English language in the administraon console
of your website, you can take the base version. It is a bit smaller than the full version.
Find the le named cmsmadesimple-X.X.X-full.tar.gz or cmsmadesimple-X.X.X-
base.tar.gz (depending on the version you need). Here, X.X.X stands for the number of
the release. For example, for release 1.6.6 (displayed in the last screenshot), you will have to
download the le cmsmadesimple-1.6.6-full.tar.gz or cmsmadesimple-1.6.6-
base.tar.gz.
Click on the le to save it to your local disk. Then, using 7-Zip or any other le archiver
of your choice, extract it onto your local disk, so that you can see what is inside. To extract
using 7-Zip, right-click on the le, and select 7-Zip | Extract Here, as shown in the
following screenshot:
This will create a new le called cmsmadesimple.1.6.6-full.tar. The numbers
in the lename depends on the version and release number of CMS Made Simple that
you have downloaded. Right-click on this new le again, and select 7-Zip | Extract to
"cmsmadesimple-1.6.6-full\", as shown in the next screenshot:
This material is copyright and is licensed for the sole use by Niels Vils on 17th August 2010
Thorsøhøjen 8, Silkeborg, 8600

Building Websites with CMS Made Simple
[ 14 ]
This acon will create a new folder called cmsmadesimple-1.6.6-full on your local disk
(or similar depending on the version and release number). This folder contains all les that
you need to install CMS Made Simple. You have to upload them to your web space now.
Open FileZilla or an FTP browser of your choice. You have to connect to your web hosng to
upload the les. In FileZilla, click on File | Site Manager. In Site Manager, click the New Site
buon. You should see a dialog window, as shown in the following screenshot:
This material is copyright and is licensed for the sole use by Niels Vils on 17th August 2010
Thorsøhøjen 8, Silkeborg, 8600

Chapter 1
[ 15 ]
Enter your FTP host in the eld Host on the right-hand side. Then click on the eld
Logontype and select Normal from the list. Now, you can enter your FTP User and FTP
Password in the respecve elds below. Your FTP login details should have been provided by
your hosng company. Contact your hosng company's support if you encounter any issues.
Click on Connect. The connecon should be established, and you will see a screen similar to
the following:
On the le-hand side of the screen, you can see your local disk. Navigate to the folder where
you have extracted the installaon les of CMS Made Simple. On the right-hand side, you see
the remote folder of your web hosng.
This material is copyright and is licensed for the sole use by Niels Vils on 17th August 2010
Thorsøhøjen 8, Silkeborg, 8600

Building Websites with CMS Made Simple
[ 16 ]
You have to upload all les and folders from the local disk with exactly the same folder
structure to the root or to a subdirectory on the web space. Your root directory can be
public_html (or wwwroot or htdocs), please ask your provider if you are not sure where
to upload the les. Locang the les in the root directory will make your site available to
the users at http://www.yourdomain.com. If you create a subdirectory below the root
directory, for example, public_html/somename, then your website will be available only
in the subdirectory as http://www.yourdomain.com/somename. I recommend uploading
the les to the root directory, unless you have already installed other applicaons there.
To upload all folders and les of CMS Made Simple, select everything on the le-hand (local)
side, right-click, and select Upload.
This material is copyright and is licensed for the sole use by Niels Vils on 17th August 2010
Thorsøhøjen 8, Silkeborg, 8600

Chapter 1
[ 17 ]
Depending on your connecon, it may take more than een minutes to upload the les. As
the FTP browser creates some connecons to the server, it may happen that some les are
already being copied with other connecons. In this case, you will see a window similar to
the following:
Choose Overwrite as the acon, and check the box Always use this acon. Wait unl all the
les have been transferred to the web space and unl the upload is complete.
When the transfer is complete, you can start with the step-by-step installaon program of
CMS Made Simple. You start the installaon process for CMS Made Simple in the browser
by typing http://www.yourdomain.com in the address bar (you use your own domain
name). If you do not see any installaon screen, then you have uploaded the les into the
wrong folder on your web space. Ask your provider where the les should be located.
This material is copyright and is licensed for the sole use by Niels Vils on 17th August 2010
Thorsøhøjen 8, Silkeborg, 8600

Building Websites with CMS Made Simple
[ 18 ]
Summary
In this chapter, a brief introducon to the enre book has been made.
Specically, we covered the following:
CMSes in general and the advantages of CMS Made Simple
The funconal specicaons for the case study website that is used throughout
the book
Preparing our system for installing CMSMS.
We're now ready to start with the installaon of CMS Made Simple.
This material is copyright and is licensed for the sole use by Niels Vils on 17th August 2010
Thorsøhøjen 8, Silkeborg, 8600

2
Getting Started
Before you start creang a website with CMS Made Simple, you have to install
the applicaon on your web hosng and make some important conguraons
that will have an impact on everything you do with the website in future. To
install CMS Made Simple, you should understand what is web hosng. You
should be able to create an empty database in your web hosng account and
upload CMS Made Simple's installaon les through FTP.
In this chapter, we will:
Install CMS Made Simple
Learn about the admin console and how it is organized
Finish the installaon
Congure the e-mail sengs
CMS Made Simple is a PHP applicaon that uses a MySQL database. This means that
you need web hosng with PHP and MySQL to run CMS Made Simple. You can install a
web server on a local PC for tesng environments and/or on remote web hosng for live
websites. The requirements for CMS Made Simple are as follows:
Web server on Linux/Unix or Windows 2000/XP/ME/2003 or OS X
PHP 5.2.x (not PHP 5.3)
safe_mode should be o
At least 16 MB of available memory for PHP
PHP tokenizer support enabled
At least one of ImageMagick or GDlib enabled
MySQL 4.1+ or PostgreSQL 7+
Enough access to your server to upload les and change some permissions
This material is copyright and is licensed for the sole use by Niels Vils on 17th August 2010
Thorsøhøjen 8, Silkeborg, 8600

Geng Started
[ 20 ]
These requirements are not special and are covered by most hosng providers. To test CMS
Made Simple for free without any obligaon, you can even set up CMS Made Simple on free
web hosng that meets the requirements stated. If in doubt, ask on the CMS Made Simple
forum (http://forum.cmsmadesimple.org) for any hosng recommendaons.
Installing CMS Made Simple step-by-step
The CMS Made Simple installer is started automacally when you enter your domain name
in the address bar of the browser. The installer assists you step-by-step during the enre
installaon process.
Choosing a language
First you choose the installaon language. In the drop-down eld, you see all languages
available in the installaon package. In the base version of CMS Made Simple, you can
choose only English. The full version has more languages included.
Consider that the language you choose here is used only during the installaon. The
language of the website and admin console can be changed later on. Click on Submit.
This material is copyright and is licensed for the sole use by Niels Vils on 17th August 2010
Thorsøhøjen 8, Silkeborg, 8600

Chapter 2
[ 21 ]
Step 1: Validating le integrity (optional)
In the rst step, you can oponally validate the integrity of the installaon le. This will help
you idenfy potenal problems, for example if some les have been damaged during FTP
transfer or are incomplete due to network issues. If there were no issues while uploading the
les to the web hosng, then ignore this step and click on Connue. Validaon can also be
done any me aer the installaon is complete.
If you would like to validate, then you will need the checksum le corresponding
to your version: cmsmadesimple-1.6.6-full-checksum.dat or cmsmadesimple-
1.6.6-base-checksum.dat. This le is available for download from the ocial website.
Go to http://cmsmadesimple.org, click Downloads | CMSMS Releases, and save the
checksum le to your local disk. Choose the le in the eld above, and click on Test.
This step is oponal. Click on Connue.
This material is copyright and is licensed for the sole use by Niels Vils on 17th August 2010
Thorsøhøjen 8, Silkeborg, 8600

Geng Started
[ 22 ]
Step 2: Checking requirements
In the second step, the installaon program tests the sengs of your web hosng. Check the
Result column in the Required sengs secon. There should not be any failures or warnings.
The most common failure is:
File not writable! (/xxxx/htdocs/cong.php)
This means that the le config.php either does not exist in the root directory of the
installaon or there is no write permission for it.
This material is copyright and is licensed for the sole use by Niels Vils on 17th August 2010
Thorsøhøjen 8, Silkeborg, 8600

Chapter 2
[ 23 ]
If the le does not exist, create an empty le named config.php in a text editor (not a
word processor). In Windows, open Notepad (this text editor comes with Windows), and
without typing anything in the document, click on File | Save As. Choose a locaon to save
the le, and use "config.php" (including the quotes) as the lename to ensure that the
right extension (.php) is used. Upload that le via FTP to the folder where the CMS Made
Simple installaon les were uploaded. The config.php le should be in the same folder
as the index.php le, as shown in the following screenshot:
Check if the le you have created and uploaded has the le type PHP (some editors may
append .txt extension to the end of the lename). If necessary, rename the le to
config.php.
If the le already exists, open FileZilla or any other browser of your choice and right-click on
it. Choose File permissions and enter 777 in the Numeric value eld. Click on OK.
Go back to your browser, and click on Try again at the end of the sengs check; the failure
should disappear.
If you have other failures or warnings in the Required sengs secon and if you're unsure
how to handle them, then take a screenshot of the page, and send it to your provider.
He/she will help you to solve the problem.
This material is copyright and is licensed for the sole use by Niels Vils on 17th August 2010
Thorsøhøjen 8, Silkeborg, 8600

Geng Started
[ 24 ]
You can ignore warnings in the Recommended sengs secon. You most probably will not
encounter any problems while running your website even if you do not correct them. However,
if you can follow the recommendaons given to resolve the warnings, then please do it.
This material is copyright and is licensed for the sole use by Niels Vils on 17th August 2010
Thorsøhøjen 8, Silkeborg, 8600

Chapter 2
[ 25 ]
On some web servers, you have to change permissions of the uploaded folders. If you're
using FileZilla, then right-click on the remote folder, and select File permissions. In the dialog
window Change le aributes, enter 777 in the Numeric value eld. You should make those
changes to the following folders:
tmp/templates_c
tmp/cache
uploads
uploads/images
modules
Click on Connue.
Step 3: Testing le creation mask (optional)
In this step, you can oponally test if CMS Made Simple is allowed to create les on your
web hosng. Click on Test or just ignore this step and click on Connue.
This material is copyright and is licensed for the sole use by Niels Vils on 17th August 2010
Thorsøhøjen 8, Silkeborg, 8600

Geng Started
[ 26 ]
Step 4: Admin account information
Pay aenon to this step. You are going to create an administrator account for your website.
With this data, you gain access to the administraon console of your website aer it has
been installed. Remember or write down the administrator's username and password that
you enter in this step. Provide a valid e-mail address for your account. If you forget your
password someday, then a reminder will be sent to this e-mail address.
This material is copyright and is licensed for the sole use by Niels Vils on 17th August 2010
Thorsøhøjen 8, Silkeborg, 8600

Chapter 2
[ 27 ]
You can check the box for E-Mail Account Informaon. CMS Made Simple will try to send a
conrmaon mail to your e-mail account. However, do not rely on it due to the individual
hosng sengs. We will congure the e-mail sengs of CMS Made Simple later in this chapter.
Click on Connue.
Step 5: Database information
In this step, change the name of the website or leave it as it is. This informaon can be
changed any me aer the installaon.
This material is copyright and is licensed for the sole use by Niels Vils on 17th August 2010
Thorsøhøjen 8, Silkeborg, 8600

Geng Started
[ 28 ]
For the database informaon, use the access data for the database that you gained while
preparing for the installaon.
1. Replace Database host address with your individual data.
2. Replace Database name with the name of your database.
3. Enter the database Username.
4. Enter the database Password and oponally the Database port (if any).
These are the access credenals for your database. If you are not sure what to enter in these
elds, then ask your hosng provider.
Sample content and templates
In the last eld of this installaon step, you have to decide whether you would like to install
sample content and templates. Sample content is a useful resource for your rst introducon
to CMS Made Simple, as it includes more than twenty pages with an overview of what CMS
Made Simple is and how it works. However, the default templates are dicult for beginners
to understand, as they are complex and look overloaded.
For our website, we will not install any default content or templates.
Click on Connue.
Step 6: Creating tables
If the connecon to the database was successful and the tables in the database were created,
then you will see the message Success! at the end of this step, as shown in the next screenshot.
Leave all the values in the elds below the message as they are, and click on Connue.
This material is copyright and is licensed for the sole use by Niels Vils on 17th August 2010
Thorsøhøjen 8, Silkeborg, 8600
Chapter 2
[ 29 ]
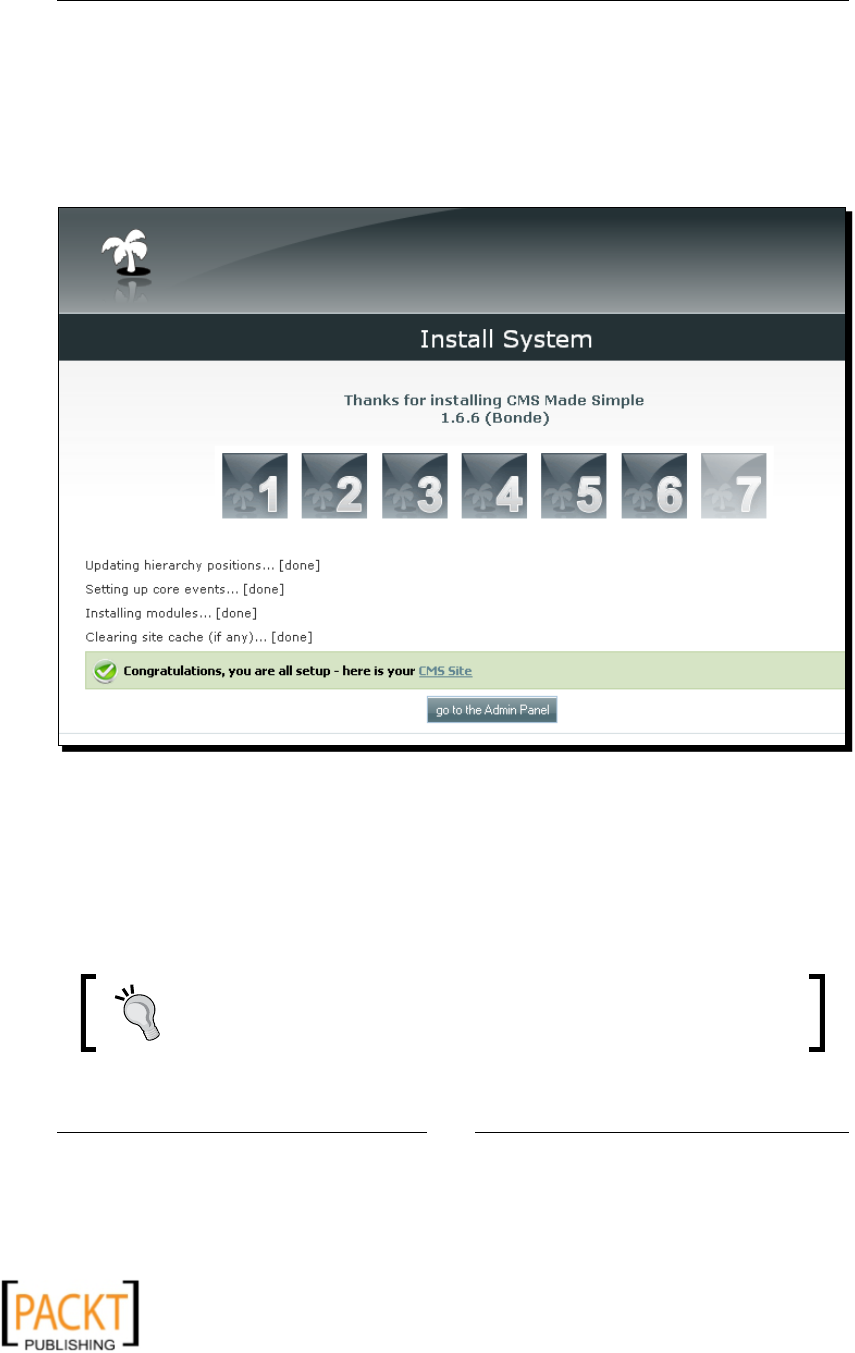
Step 7: Installation is complete
You're done! Congratulaons. You can access your website by typing the domain name in
the address bar of the browser, for example, http://www.yourdomain.com. The admin
console is placed at http://www.yourdomain.com/admin. Click on go to the Admin
Panel. Normally, you are already logged in to it. If not, then use the data that you entered
in step 4 of the installaon process.
Understanding the admin console
The admin console is the heart of CMS Made Simple. This is where the website administrator
(you) will work from. Here you add pages and ll them with content, choose the layout and
style of your pages, install extensions for extra funconality, set permissions for users and
groups, and congure the enre website.
The admin console is the backend; as opposed to the frontend, which is what
visitors to your site can see.
This material is copyright and is licensed for the sole use by Niels Vils on 17th August 2010
Thorsøhøjen 8, Silkeborg, 8600

Geng Started
[ 30 ]
Log in to the admin console with the address http://www.yourdomain.com/admin,
using the data from step 4 of the installaon process. The administrator of the website
can also add addional users (see Chapter 6, Users and Permissions).
Everything in the admin console is accessed through the main horizontal menu. When
you rst enter the admin area, you also see a sitemap of what can be accessed through
each menu.
This material is copyright and is licensed for the sole use by Niels Vils on 17th August 2010
Thorsøhøjen 8, Silkeborg, 8600

Chapter 2
[ 31 ]
In the sitemap for any menu item, when you click on the main horizontal menu
(CMS, Content, Layout, Users & Groups, and so on), all subitems of that menu
item are shown.
Let's take a quick walkthrough of what's in the admin console.
CMS: In the CMS menu, you can open the admin sitemap (see the next screenshot),
the frontend page (View Site) in a new window, or Logout.
Content: Here you can manage the content of your site. You can add and edit pages,
upload and manage images and les, and also add, edit, and remove news. If you
have installed addional content modules (such as a guestbook or FAQ), then they
appear in this secon as well. Lastly, in the content menu, you can create global
content blocks that will be used on the enre website in dierent places and edited
from one place.
Layout: Here you can style and format the look of your page in the way you want.
For the general layout, you use templates. In the layout menu, you can also access
the Stylesheets. Using stylesheets (CSS), you can style dierent elements of
your page.
This material is copyright and is licensed for the sole use by Niels Vils on 17th August 2010
Thorsøhøjen 8, Silkeborg, 8600

Geng Started
[ 32 ]
Users & Groups: With this menu item, you can add users that should have access
to the admin console of your website and select what permissions they will have.
You can put users in groups to easily select permissions for the whole group at the
same me.
Extensions: These are add-ons that give extra funconality to CMS Made Simple.
The standard installaon of CMS Made Simple includes only some basic features.
With extensions, you can add more or less any funconality to your site. Extensions
can be either modules or tags (also called plugins).
Site Admin: Here you can change the sengs and preferences for the enre
website, get system informaon, and verify the le's integrity. Any changes
made to your website by you or other users are tracked in Admin Log.
My Preferences: Here you can change your personal sengs. You can also manage
shortcuts to the pages that are most frequently used in the admin area. Click on My
Account, if you would like to change the username of the administrator account,
his/her password, or the e-mail associated with the account.
This material is copyright and is licensed for the sole use by Niels Vils on 17th August 2010
Thorsøhøjen 8, Silkeborg, 8600

Chapter 2
[ 33 ]
Finishing the installation
Immediately aer installaon, you see two unhandled nocaons in the dashboard
area below the main menu. Click on the sign + beside the nocaons to expand the
dashboard area.
The rst nocaon informs you that the install folder sll exists on the web server. This
folder contains the installaon program you have used to set up CMS Made Simple. Once
CMS Made Simple is installed and is running, you don't need this folder, and therefore, you
should delete it or at least rename it. If you do not, then everybody can start the installaon
program again and thus replace your website with a new installaon. This would be a big
security issue, so delete the folder right now.
Aer the folder is deleted (or renamed), refresh the admin console to see the rst
message disappear.
The second message deals with the e-mail sengs you should congure before running CMS
Made Simple.
Sending e-mails with CMS
CMS Made Simple sends e-mails with the module CMSMailer. The conguraon of the
CMSMailer module is very important. If you do not congure it, then you will not receive the
e-mail with new login informaon, should you ever forget your administrator password. This
module is also used by many other CMS Made Simple modules that send out e-mails such as
FrontEndUsers, Orders, or FormBuilder.
You will see this nocaon in the dashboard of CMS Made Simple ll you have congured
the module.
In the admin console, in the main horizontal navigaon, select Extensions | CMSMailer. Set
the Character Set to u-8. Then, choose sendmail in the Mailer method eld. Fill the eld
From address with an exisng e-mail address. When CMS sends e-mails, the recipient will
see this e-mail as the sender address. You have to enter an exisng e-mail address here, as
due to spam and security sengs on your web hosng, CMS Made Simple will probably not
be able to send out e-mails.
This material is copyright and is licensed for the sole use by Niels Vils on 17th August 2010
Thorsøhøjen 8, Silkeborg, 8600

Geng Started
[ 34 ]
Fill in the From Username eld. The name given here will be assigned to the mail address in
the recipient's mail client.
This material is copyright and is licensed for the sole use by Niels Vils on 17th August 2010
Thorsøhøjen 8, Silkeborg, 8600

Chapter 2
[ 35 ]
Click on Submit, and conrm the changes.
Test your sengs using the last eld on the same page. In the Test Email Address eld, enter
any e-mail address (not one from the eld From Address) where you have access to the mail
box. CMS Made Simple will send a test message to the e-mail address given in this eld. Click
on the Send Test Message buon, and control the incoming messages of the e-mail address
given in the eld Test Email Address. Did you receive the test message?
If not, wait for some me and then check your spam folder. Somemes test messages are
ltered out and treated as spam. If the test message has not been sent, then something is
wrong with the conguraon of the CMSMailer module.
Known issues
Check the Sendmail locaon eld (your hosng provider has to conrm that it is
right or he/she should provide you with your individual locaon).
Check the e-mail address entered in the From address eld. It must be an exisng
e-mail address, and it has to be located on your web hosng. If you enter any other
e-mail address, then your server will not be able to send out e-mails. To use e-mail
addresses of the public e-mail services such as Gmail or GMX, you have to congure
the module with SMTP as the Mailer method. This method requires that you ll in
the elds considering SMTP. SMTP sengs are individual for any e-mail provider.
Check the spam folder and lter of the Test Email Address, somemes test
messages are sorted out or immediately deleted.
This material is copyright and is licensed for the sole use by Niels Vils on 17th August 2010
Thorsøhøjen 8, Silkeborg, 8600

Geng Started
[ 36 ]
Summary
At the end of this chapter, you should have a clean installaon of CMS Made Simple.
Specically, we covered:
Installaon of the program: CMS Made Simple is delivered with a simple installaon
program that guides you step-by-step through the setup process. We have
performed the steps to get CMS Made Simple running.
Overview of the admin console: The admin console is like a cockpit in a plane. It is a
place from where you can control the enre website. In the course of this book, you
will learn every part in more detail.
Sending e-mails: You have congured CMS Made Simple so that it can send mails
from the admin console. If you forget your admin password, then you will receive
a reminder e-mail with instrucons on how to recover it. All core and most of the
third-party modules of CMS Made Simple rely on this funconality. Once congured,
you do not need to make it for each module separately.
In the next chapter, we will see how you create the website structure and build
website navigaon.
This material is copyright and is licensed for the sole use by Niels Vils on 17th August 2010
Thorsøhøjen 8, Silkeborg, 8600

3
Creating Pages and Navigation
In this chapter, you will learn how to create new pages, edit exisng pages,
control the navigaon of your website, and organize pages according to your
website's plan. As a result, you will get a complete website structure, a kind of
skeleton for your website.
Let's see how we can plan a website. Yes, we should plan before making anything material.
You have to spend me on this step because you will in fact save me aerwards by avoiding
the need to do some me-consuming rebuilding, recreang, or reorganizing of your website.
Take a piece of paper and write down the main parts of the website and its purpose. Write
down the main idea of the website, then add the main parts (building your navigaon
structure) and proceed unl you do not have any other ideas. Do not try to nd any soluon
or the right tool to create your website at this me. Do not ask: "How would I realize this or
that?". You have to hold everything you would like to see on the website without considering
the technical details. Plan as if you have a magic wand for creang websites.
For example, a company website needs a secon where the company is represented, a way
to display its products or services catalog, a client center, and a contact form; rene and
add each part. Refer to the example of the company website we create in this guide:
BUSINESS
WORLD
Client Center
Contact Us
Privacy Policy
Sitemap
Announcements / News
Company History
Team / Employees
FAQ / Glossary
Newsletter
Service Desk
Our Company
Products
Photo Gallery
This material is copyright and is licensed for the sole use by Niels Vils on 17th August 2010
Thorsøhøjen 8, Silkeborg, 8600

Creang Pages and Navigaon
[ 38 ]
Planning your website will also help us to choose the appropriate design for it. The best
design will fail if your website plan does not match the already created navigaon. In the
example website plan, you can easily indicate the main navigaon (marked in bold),
subnavigaon (marked in grey), and the common structure of the website. It is
important to have a rough plan and that we do not change it very oen.
It is likely that you will have more and more ideas while planning the website—write them
down! The advantage of planning in this way is that you are not restricted at all. You can note
down all your ideas now, select the feasible tasks, and concentrate on them. Later on, you
can add new parts that are not mandatory for the rst implementaon of your website. It is
important to dierenate between nice-to-have features and something that you cannot
live without.
If you create a website plan to keep all your ideas in mind, you can avoid creang pages that
contain only one sentence like "Under construcon". Good websites don't have any pages
that are not ready. If there are any, then they should not be shown to the visitor. Imagine
seeing a noce about personal style consultaon in the window of a clothes shop. You go
into the shop, but the clerk says: "Sorry! This service is sll under construcon." What was
the purpose of calling aenon to it? Some webmasters add such pages to the website just
"to keep them in mind". You can keep them in mind in a more ecient way if you write down
the main structure of your website in a separate place.
Ask your friends or family members what they plan to add to the website and
keep their ideas as well. Consider dierent age groups and interests while
planning to broaden the scope of your visitors.
If everything is perfect, then go through the main secons in your website plan and mark the
parts that can be done immediately (all the secons on the previously menoned website
plan will be discussed in this guide). Other parts should not be deleted from the plan but
marked as postponed. Normally, you have enough stu at the beginning. Concentrate on
these feasible points and keep the postponed points in mind.
When you are ready with the website plan, print it out, put it beside your PC, and start
working on your website.
In this chapter, we will:
Create and edit some pages
Learn about page hierarchy
Control the navigaon of the website
This material is copyright and is licensed for the sole use by Niels Vils on 17th August 2010
Thorsøhøjen 8, Silkeborg, 8600

Chapter 3
[ 39 ]
Creating pages
We will begin by creang a rough structure for our website. A website consists of pages,
which are linked to each other. The navigaon of the website helps the visitor to nd the
pages containing the requested informaon. A website must have at least one page and
therefore, the rst page is already created in your admin console aer installaon. It is the
start page of your website, and it is called Home.
Time for action – adding a new page to the website
Your website requires a page where informaon about the company is represented. It is the
page for the secon Our Company in the website plan. Let's create a new page as follows:
1. In the admin console of your website, click on Content | Pages and then on the
link Add New Content.
2. Fill in the elds Title and Content Type as shown in the following screenshot:
This material is copyright and is licensed for the sole use by Niels Vils on 17th August 2010
Thorsøhøjen 8, Silkeborg, 8600

Creang Pages and Navigaon
[ 40 ]
3. Click on Submit.
4. Click on the magnifying glass icon at the top-right of the admin console to view your
website and nd the new page added to the main navigaon of the website.
What just happened?
You have just added a new page to your website. The page has the tle Our Company
and is now listed in current pages of your website in the admin console. The page is
also automacally added to the main navigaon of the website. It has sample company
informaon in the content eld. This text is displayed on the Our Company page on the
website when you navigate to the page.
You have entered only a lile informaon to create a new page. However, other
things happened.
This material is copyright and is licensed for the sole use by Niels Vils on 17th August 2010
Thorsøhøjen 8, Silkeborg, 8600

Chapter 3
[ 41 ]
Menu text has been created from the tle of the page. A page address (URL) has
been created from the tle of the page. It is a part of the page link that is placed aer
index.php?page= in the address bar of the browser when you navigate to the page. In
CMS Made Simple, we call this part the page alias. The page alias is unique within your
website. You can have a lot of pages with the same tle and menu text, but all these pages
will have a dierent page alias. As the page alias is used to create a link to a specic page,
you cannot have two dierent pages with the same link, and logically you cannot have the
same page alias for two dierent pages.
You do not need to care about integrang the created page into the navigaon of
your website. All created pages will be displayed in the navigaon if you do not state
anything else.
Now, you can create all pages from the rst level of your website, thus creang the main
navigaon on the top of the website. Add the following pages:
Products
Client Center
Contact Us
Privacy Policy
Sitemap
Control the list of current pages in the admin console and on your website.
This material is copyright and is licensed for the sole use by Niels Vils on 17th August 2010
Thorsøhøjen 8, Silkeborg, 8600

Creang Pages and Navigaon
[ 42 ]
Editing pages
All pages can be edited at any me from the list of pages in the admin console.
Time for action – editing existing pages
We do not like the menu text for the page Home and would like to change it to Start.
We would also like to replace the tle and text on the page. In the admin console, open
Content | Pages, and click on the Home page.
1. Make changes to the Home page, as shown in the following screenshot:
2. Click the Apply buon to update the page.
3. Click the magnier icon beside the Apply buon to view the changes on the website.
What just happened?
You have changed the menu text shown in the navigaon of the website. You have also
replaced text on the page. At the end, you applied the changes and viewed the page in a
new window.
You used the Submit buon to save the changes and close the page in one step. The
Apply buon does not close the page. Applying changes allows you to edit the page
without closing it, and thus avoid needing to reopen it for eding aer each change. The
Apply buon appears only if you edit an exisng page. It is not available when you are
creang a new page.
This material is copyright and is licensed for the sole use by Niels Vils on 17th August 2010
Thorsøhøjen 8, Silkeborg, 8600

Chapter 3
[ 43 ]
Use the Apply buon frequently, especially if you are working with large
amounts of text, keep a copy of it in a separate editor window. If the connecon
is lost or me's out, then the page will fail to load in the browser and the
modicaons would be lost.
Previewing changes
If you would like to preview the changes before saving, switch to the Preview tab without
applying the changes. You can see the changes displayed in the preview window, but they
will not be visible to the visitors of your website at this moment. Once you have applied or
submied the edited page, the changes will be made visible to your site's visitors.
Changing the page alias
You can change the page alias of the page as well. Switch to the Opons tab while eding
the page, and enter the desired alias in the Page Alias eld. Think of page alias as the link
to the page. You are not allowed to enter special characters in this eld, so use spaces or
leave it empty. Choose the name entered here carefully as you will not be able to change it
easily aer your website is published online. Once your website is discovered by the search
engines, the pages will be displayed in the search results with links made from the page alias.
If you change the page alias, then the page will not be found and your visitors will see an
error message instead of the desired informaon.
Deleting pages
You can delete your pages from the list of current pages in the admin console (Content |
Pages). Find the page you do not need anymore, and click on the dust bin icon for that page.
Be careful! Deleted pages cannot be restored. If you would like to keep the page for personal
purposes only, then make it inacve (see the secon tled Control the navigaon of the
website for more informaon).
Formatting page content
You have already created some pages and edited them. Noce that the text you have
entered in the Content eld appears on the website in a certain place. The text is only a
fracon of the enre page. You cannot change the design of the navigaon, the header,
or the footer part from here.
This material is copyright and is licensed for the sole use by Niels Vils on 17th August 2010
Thorsøhøjen 8, Silkeborg, 8600

Creang Pages and Navigaon
[ 44 ]
If you were just an editor of the website (not a designer and not an administrator), then
you would create or edit your arcles here, but would not have the ability to change
anything else on the website. This is the most important principle of a content management
system (CMS). We separate design from content to separate dierent tasks that can be
accomplished by dierent persons. It also helps to separate the content of the layout and
design so that it allows for globally changing the appearance of the website without going
through all the circles of hell.
An editor needs to have the ability to format his wring by making some phrases bold and
creang lists or link to other pages of the website. Normally, HTML knowledge is required for
this, unless you use the WYSIWYG editor.
WYSIWYG means What You See Is What You Get and gives you the ability to format the text
of a page with a common word processing feature. Addionally, the text is displayed in the
editor in the same way that it will appear on the website.
Working with the WYSIWYG editor does not require any HTML knowledge to
create, edit, and format the text part of your website.
The WYSIWYG editor is the central and most important feature of every CMS. If you create a
website with CMS, then you are going to consequently add content to your website. It means
that apart from other modules, the WYSIWYG editor will be one of the most frequently used
features of your CMS. Therefore, it is important to understand how the editor can help you
and what you can do to make it suit your needs. There are some WYSIWYG editors available,
for CMS Made Simple, the editor called TinyMCE is the most well integrated one.
In the admin console, go to Content | Pages and select any page for eding. The Content
eld uses a WYSIWYG editor (you can see a toolbar above the content eld), which is shown
in the following screenshot:
This material is copyright and is licensed for the sole use by Niels Vils on 17th August 2010
Thorsøhøjen 8, Silkeborg, 8600

Chapter 3
[ 45 ]
The toolbar of the editor is self-explanatory and is similar to most popular word processing
programs. There are many more sengs that can simplify your life if you discover them.
Oen, a large amount of text is wrien in word processing programs like Microso Word. If
you copy the text from Word directly into the content of the eld, then it will cause a lot of
problems because of the bad HTML produced by Word. In the toolbar of the editor, there is a
special buon (the fourth in the rst line) to paste text from Word. Always use this buon to
copy text from Word as it will lter any messy code from your text.
Conguring TinyMCE
In the admin console, click on Extensions | TinyMCE WYSIWYG. You can change the width
and height of the editor eld here. By default, the size of the editor eld is set automacally;
change it according to your screen preference to gain more space to write and read.
Deselect the Auto eld, enter the desired width and height, and click on Save sengs.
There is a test eld below the sengs where you can immediately see the changes. This
eld allows you to preview changes so that you do not need to edit pages to control the
appearance of the editor.
On the Proles tab, you can add even more features. For the administrator of the website,
the changes have to be made in the Advanced backend prole sengs secon. Select the
Allow table operaons eld to be able to create and edit tables with the WYSIWYG editor.
Aer saving the prole, you will nd the third line in the toolbar of the editor that helps to
build HTML tables.
This material is copyright and is licensed for the sole use by Niels Vils on 17th August 2010
Thorsøhøjen 8, Silkeborg, 8600

Creang Pages and Navigaon
[ 46 ]
Check the Show le management opons eld if you would like to upload images directly
from the editor. Click on Save prole, and then click on the Insert/edit image icon in the
toolbar. A small window pops up where you can change an image URL. Click on it, and the
content of your images folder is displayed, as shown in the next screenshot. Normally, no
uploads are allowed from this window. However, as you have acvated the le management
opon, you will nd the File operaons secon above the image list where you can upload
your images.
Use folders to organize the images from the very beginning, or else you will end
up with hundreds of assorted images in no me, and it will be a big problem to
rearrange them, as they are already linked from various pages. Having a lot of
images in one folder will slow down the loading of the le picker and nding the
image you are looking for will become a challenging task.
Connue to customize the editor in the Plugins tab. There are some useful plugins that
are not acve by default, but can be acvated if needed. I recommend acvang the
following plugins:
print: Allows you to print the text from the editor
fullscreen: Adds a fullscreen eding mode
searchreplace: Adds search/replace dialogs for the text
This material is copyright and is licensed for the sole use by Niels Vils on 17th August 2010
Thorsøhøjen 8, Silkeborg, 8600

Chapter 3
[ 47 ]
Click on Save plugins. Only the icon for fullscreen is added to the second toolbar before the
help icon. The other two do not appear. Why? Let's take a step back and check the Proles
tab again. In the Advanced backend prole sengs secon, you can see three toolbar lines.
These lines control the order of the icons shown in the editor in the rst, second, and third
(yet empty) line. The single buons are represented with their names in the toolbar elds,
as shown in the following screenshot:
You can delete some of them, change the order, or add new ones. That is what we are going
to do.
This material is copyright and is licensed for the sole use by Niels Vils on 17th August 2010
Thorsøhøjen 8, Silkeborg, 8600

Creang Pages and Navigaon
[ 48 ]
Time for action – activating search and replace function
There is a useful plugin that can search the enre contents of a page and replace all
instances of a word or phrase with something dierent. Let's see how we can acvate
this plugin in TinyMCE.
1. In the admin console, click on Extensions | TinyMCE WYSIWYG.
2. Click the Plugins tab.
3. Select the checkbox beside the plugin called searchreplace, as shown in the
following screenshot:
4. Click the Save plugins buon.
5. Switch to the Proles tab.
6. In the Advanced backend prole sengs secon, add the words search, replace to
the Toolbar 3 eld, as shown in the following screenshot:
This material is copyright and is licensed for the sole use by Niels Vils on 17th August 2010
Thorsøhøjen 8, Silkeborg, 8600

Chapter 3
[ 49 ]
7. Click on the Save prole buon, and see the addional funcons added to the third
line of the toolbar, as shown in the following screenshot:
What just happened?
Firstly, you acvated the plugin in the Plugins tab. Acvang a plugin means that the plugin
is loaded with TinyMCE. But it is not enough to just acvate it. In the second step, you had
to customize the toolbar of TinyMCE to inform the editor where the buons for the plugin
should be shown.
You saw that a single plugin can provide two buons. Therefore, there were two words you
had to enter in the eld Toolbar 3. The rst one, search, was for the search buon, and the
second one, replace, was for the replace funcon. They must not be used together. You can
omit the rst or the second one if you do not need that specic funconality.
Add the plugin removeformat in the Toolbar 3 eld. This is a plugin that must
not be acvated rst as it belongs to standard. The plugin allows the removal of
any formang from the text without looking at the HTML.
This material is copyright and is licensed for the sole use by Niels Vils on 17th August 2010
Thorsøhøjen 8, Silkeborg, 8600

Creang Pages and Navigaon
[ 50 ]
There are more advanced sengs in the WYSIWYG editor. To understand them, you need to
know how CMS Made Simple works in general. I recommend referring to the sengs of the
WYSIWYG editor again and again while reading this book to make working with the editor
more ecient.
Adding meta tags
Meta tags contain addional informaon about your website. This informaon is not directly
displayed to the visitors of the website; as the purpose of meta tags is to supply addional
informaon about your website to search engines and web browsers. We have to disnguish
between meta tags that are the same on each page of your website and tags that are unique
to a specic page of your content.
Meta elements are HTML or XHTML elements that provide addional informaon for search
engines. They are not visible to the visitors of the website. Such elements must be placed
as tags in the head secon of the page. Meta elements can be used to specify the page
descripon, keywords, and any other metadata.
Meta element species name and the associated content describing the page. For example:
<meta name="keywords" content="business company,services" />
In this example, the meta tag idenes the page as containing keywords relevant to the
phrase business company and the word services.
Time for action – adding meta tags to pages
Let's add some specic meta tags to the start page of our website.
1. In the admin console, open Content | Pages.
2. Click on the start page Start to edit it.
3. Switch to the Opons tab.
4. In the eld Page Specic Metadata, add meta tags that are specic to the page.
This material is copyright and is licensed for the sole use by Niels Vils on 17th August 2010
Thorsøhøjen 8, Silkeborg, 8600

Chapter 3
[ 51 ]
5. Click on Apply at the boom of the page.
6. Click on the magnier icon beside the Apply buon.
7. See the head secon of the website in the source code of the page.
What just happened?
You have added meta tags in plain HTML to the start page of your website. These meta tags
appear only on this specic page. Generally, meta tags for the descripon and keywords
should be dierent on each page.
Any other tags (not only meta tags) for the head secon of the generated page
can be added here as well.
This material is copyright and is licensed for the sole use by Niels Vils on 17th August 2010
Thorsøhøjen 8, Silkeborg, 8600

Creang Pages and Navigaon
[ 52 ]
Adding global meta tags
Some global meta tags are already added to the standard installaon of CMS Made
Simple. You can see these meta tags in the source code of every page generated by
CMS Made Simple:
<meta name="Generator" content="CMS Made Simple - Copyright (C) 2004-9
Ted Kulp. All rights reserved." />
<meta http-equiv="Content-Type" content="text/html; charset=utf-8" />
To change or delete the tags, click on Site Admin | Global Sengs in the admin console. Find
the meta tags listed above in the eld Global Metadata. You can add your own meta tags in
this eld using plain HTML.
Any other tags (not only meta tags) for the head secon of all pages can be
added here as well.
Understanding page hierarchy
All pages you have added in the last step are now displayed in the main navigaon of your
website and can be found in the current list of the pages in the admin console. But there are
some more pages in our website plan that have to be added to the hierarchy.
With page hierarchy, you dene the pages as being above, below, or at the same level as
another page. If a page is not shown in the main navigaon, then we call it a subpage. It also
means that there is a parent page above the subpage.
Time for action – adding subpages to a website
Let's create four pages below the Our Company page according to the website plan.
1. In the admin console of your website, click on Content | Pages and then on the
Add New Content link.
2. Fill the elds Title and Content as shown in the following screenshot and choose the
page 2. -Our Company from the drop-down eld Parent.
This material is copyright and is licensed for the sole use by Niels Vils on 17th August 2010
Thorsøhøjen 8, Silkeborg, 8600

Chapter 3
[ 53 ]
3. Click on Submit.
4. Click on the triangle to expand the list of pages below the page Our Company and
to view the subpage created.
5. Click on the magnifying glass icon beside the just created page to view the page on
the website.
This material is copyright and is licensed for the sole use by Niels Vils on 17th August 2010
Thorsøhøjen 8, Silkeborg, 8600

Creang Pages and Navigaon
[ 54 ]
What just happened?
You have added a new page. This me you have selected a parent page placing the new page
in the hierarchy below the parent one. In the admin console, you can see that the page is
now indented under the parent page. It gets the number 2.1, saying that the page belongs
to the page with number 2 and is its rst child page. You will not nd the page in the main
navigaon of the website, however, you can see the page added to the subnavigaon, if you
move your mouse over Our Company in the navigaon.
We need the page hierarchy to organize our pages into main secons and to have the
subnavigaons built automacally.
If you would like to change the posion of the page in the hierarchy, you have to edit the
page by clicking on it in the page list. Select another parent page in the eld Parent and save
the changes. If you choose none in the drop-down list, then the page is moved to the rst
level and thus displayed in the main navigaon.
Use the Expand All Secons link at the boom of the list of current pages in order to show
all hierarchy levels. With Collapse All Secons, you can hide all subpages and show only the
rst level.
You can reorder the pages that are on the same level by using icons from the Move column
(down and up). However, if you have to move one or more pages from the very boom
to the top of the list, it can be hard to do it with move icons (especially if you have a large
number of pages). Use the Reorder pages link in this case. This feature allows you to
reorder pages by clicking on a page and dragging it to a dierent posion within the
same hierarchy level.
Reordering pages in the admin console will also change the order of appearance in the
navigaon of your website.
Breadcrumbs
Your hierarchy is also displayed in the so called breadcrumbs—navigaon aid displayed on
the website above the content. It starts with You are here, displays the trail of the page and
provides links back to the parent page(s) of the current one.
Search engine friendly URLs
While creang your website, you probably thought about how you would promote it in
search engines. Before you start to share the URLs of your website's pages, it is advisable
to set up search engine friendly addresses.
This material is copyright and is licensed for the sole use by Niels Vils on 17th August 2010
Thorsøhøjen 8, Silkeborg, 8600

Chapter 3
[ 55 ]
Search engine friendly URLs do not contain any dynamic components in them and are more
readable for visitors of your website and search engines. Compare the following two URLs:
http://yourdomain.com/index.php?page=products
http://yourdomain.com/products
Which page address is beer? Search engines index your website beer if your website uses
the second version. Some pages with dynamic query strings in the address (as in the rst
example) are never indexed, and some of them will take longer to get into the search results.
If you do not care about search engines, then think about the visitors of the website. How
easy is it to type or write down the address of the specic page if we do not use the second
rewrien version? Imagine your visitor would like to recommend the page. He would do it
without any dicules with search engine friendly URLs and may fail with the rst example.
However, aer installing your website with CMS Made Simple, you will nd that the URLs
of your pages are built in the rst way. You can easily change them to achieve beer results
with the website.
Time for action – creating search engine friendly URLs
To enable search engine friendly URLs on your website, perform the following steps:
1. Start FileZilla or any other FTP browser of your choice.
2. Connect to your hosng and select the le config.php for eding. (You can also
copy the le to your local disk for eding and upload it aer the following changes
have been made).
3. Search config.php for the secon "URL Sengs" and replace:
$config['url_rewriting'] = 'none';
with
$config['url_rewriting'] = 'mod_rewrite';
4. Close, save, and upload the le back to your web hosng.
5. Further, using FileZilla or any other FTP browser of your choice, open the
doc directory.
6. Move the htaccess.txt le found in the doc directory to the root directory of
your website (it is the same directory where the le config.php is present).
7. Rename the moved le to .htaccess (the period at the beginning belongs to the
new lename!).
8. View your website in a browser, click on the top navigaon area to see the new
addresses for each page.
This material is copyright and is licensed for the sole use by Niels Vils on 17th August 2010
Thorsøhøjen 8, Silkeborg, 8600

Creang Pages and Navigaon
[ 56 ]
What just happened?
I am not going to bother you with technical stu (please read about the mod_rewrite
module if you would like to know more). You now have some prey, clean URLs on
your website.
If you have received an internal server error, then please consider the following known issues:
Your hosng company does not support mod_rewrite (ask your hosng provider if
you are not sure).
You have installed CMS Made Simple into a subdirectory; for example,
http://yourdomain.com/mycms. In this case, you will have to edit the le
.htaccess and replace the line.
RewriteBase /
with
RewriteBase /mycms
Change the name aer the slash to your subdirectory's name.
Getting more success from hierarchy
Enabling search engine friendly URLs has another useful eect. The URL of the page now
contains the full path to the page including the parent page and not only the page alias.
Let's assume that you have created the page Philips TV (with page alias philips) and selected
the page Plasma TV (with page alias plasma-tv) to be the parent page for it. Without
rewring the URL of the page, Philips TV gets the following address:
http://yourdomain.com/index.php?page=philips
Aer rewring the URL of the page, we get:
http://yourdomain.com/plasma-tv/philips
The second version is cleaner, looks beer for visitors, can easily be wrien down or
remembered, and is beer for search engines as you also have more keywords in your URL.
Remember that page aliases have to be unique. For example, you cannot have this kind
of structure:
yourdomain.com/products/tv
yourdomain.com/news/products
The alias products can be used only once on the enre website.
This material is copyright and is licensed for the sole use by Niels Vils on 17th August 2010
Thorsøhøjen 8, Silkeborg, 8600

Chapter 3
[ 57 ]
If your hosng provider does not support mod_rewrite, then I recommend leaving them.
Seriously, most web hosts have got this feature enabled by default, even free web hosng.
There is no reason for not enabling it, unless the provider is not able to install it. Another
reason for disabling mod_rewrite is that the module is quite processor-intensive, so hosts
that put thousands of clients on one server would disable it to gain server performance.
These are the reasons why you would not consider such a host and look for another one.
Controlling the navigation of the website
You have seen that the navigaon is built automacally from the pages you have created.
However, you can interfere in this process and prevent specic pages from displaying the
main navigaon even if they are on the top level in the page hierarchy.
Time for action – preventing pages from displaying in the
navigation
In our company website, we would like to hide the pages Privacy Policy and Sitemap from
the main navigaon providing special links to these pages only in the footer navigaon
later on.
1. In the admin console, click on Content | Pages.
2. In the list of pages, click on the page Privacy Policy to open it for eding.
3. Switch to the Opons tab on the top of the eding window and deselect Show in
Menu, as shown in the following screenshot.
This material is copyright and is licensed for the sole use by Niels Vils on 17th August 2010
Thorsøhøjen 8, Silkeborg, 8600

Creang Pages and Navigaon
[ 58 ]
4. Scroll down to the boom of the page, and click on the Submit buon.
5. View your website with the magnier icon on the top right of the admin console.
Do the same for the Sitemap page.
What just happened?
You have deselected Show in Menu to hide the page from the main navigaon of your
website. The link to the page disappears from the top menu.
However, the page is not deacvated. You can sll view it if you enter the full address of the
page in the address bar of your browser or place a direct link to it from other pages of your
website. Normally you would use this feature to hide pages that are not important enough to
be shown in the main navigaon.
Another reason can be that specic pages have to be displayed only under certain
circumstances. An example for such a page can be a Thank you! page that has to be
displayed to the visitor when he sends us a message using the contact form on the
website. We speak about service pages in this case and will learn later on how to use
them on your website.
On the Opons tab, you may have noced another eld that can be deselected: Acve.
Deacvang a page makes it unavailable to the visitors of the website. Even if a direct link
is given to the page, the visitor will see an error message saying that the page could not
be found.
Think of pages that are not acve as pages that do not exist as far as
visitors are concerned.
You can use this feature to disable a page that you do not need any more. You can delete
such pages and lose the contents of them or just deacvate them, while sll being able to
see their content in the admin console of your website. In this case, you are the only person
who can see it. Some webmasters create inacve pages as a placeholder for future content.
What is your start page?
When your website is published online, individual pages can be reached through their links.
But what page is displayed to the visitor if only the domain name of your website is given?
This material is copyright and is licensed for the sole use by Niels Vils on 17th August 2010
Thorsøhøjen 8, Silkeborg, 8600
Chapter 3
[ 59 ]
In CMS Made Simple, we call this the default page. You can dene any page to be the default
one. In the admin console, open Content | Pages and nd the column Default in the list of
current pages. Only one page has a green ck in the column and the page marked in this
way is the start page of your website. You can choose another page to be the default page
by clicking on the red cross in the column. Before the default page is changed, you have
to conrm the queson Are you sure you want to set (Page name) as site default page?
See how the green ck is now moved from the previous default page to the new one. The
previous page shows a red cross automacally in the column. Logically, you can have only
one start page for your website.
More navigation control with content types
More control over your navigaon can be achieved with dierent content types. You have
surely noced the Content Type eld on the screen where the page is created or edited. The
standard choice in this eld is Content that is used to create an ordinary content page. You
use this type in most cases.
With dierent content types (refer to the following table), you can add links to your
navigaon and get other behavior than ordinary pages.
Content type Descripon
Internal page link Use this content type to create a link in navigaon to a specic page that is
actually at another level of hierarchy. This content type generates just a link
to the specic page that you select in the eld Desnaon page.
Separator Use this content type to internally separate dierent navigaon secons
from each other. This content type is mostly used to create sophiscated
navigaon structures or complex navigaon design.
External link As the name of the content type suggests, add an external link with
this content type to your navigaon. Enter complete URL starng with
http:// in the eld URL of the content type.
Error page This content type does not deal with navigaon. It is explained in detail in
Chapter 5, Using Core Modules.
Secon header With this content type, you create a header in the navigaon. This content
type is not a link itself. It just "holds" other pages placed below it in the
hierarchy. You use this content type to visibly divide your menu structure
into dierent parts.
Content This content type is used as standard for normal content pages of
your website.
This material is copyright and is licensed for the sole use by Niels Vils on 17th August 2010
Thorsøhøjen 8, Silkeborg, 8600

Creang Pages and Navigaon
[ 60 ]
Efcient work with pages
You have noced that if you create a new page some elds are predened; for example, the
new page is acve and shown in the menu. Page-specic metadata is prelled with a comment:
<!-- Add code here that should appear in the metadata section of all
new pages -->
You can change the predened values in the admin console. In the admin console, click on
Site Admin | Page Defaults and set the elds the way you would like them to be set if a new
page is created.
You can predene meta tags and even the content eld of the page. For example, you can
create empty meta tags, which are shown as follows:
<meta name="keywords" content="" />
<meta name="description" content="" />
Now, the editor of the content has to just ll the content aribute of the meta tags
(between the quotes) while creang or eding pages.
Creating a new page as a copy of existing one
You can create a new page as a copy of an exisng page. In the list of current pages in the
admin console (Content | Pages), you will nd an icon for copy on the le-hand side. Click
on the icon to see the next window. It is divided into two secons. The above secon called
Copy From shows the data of the page you are going to copy. You cannot change any data in
it. In the secon below (Copy To), you can enter the page alias, tle, and menu text. Select
another parent page for the copy if it diers from the original. Click on Submit and a new
page is created.
New pages created as a copy do not connect to the original page in any way. You can now
edit the new page the same way you would do it with other pages. You can also delete it
without aecng the original page.
Changing multiple pages at once
If you have a large number of pages and would like to change more than one page at once,
then you can use bulk acons in CMS Made Simple.
In the list of the current pages in the admin console (Content | Pages), select the checkboxes
on the right-hand side of each page that has to be changed, then choose the desired acon
in the With selected eld at the boom of the page. You can acvate them, show them in
menu, and perform some other acons that will be explained in the next chapters.
This material is copyright and is licensed for the sole use by Niels Vils on 17th August 2010
Thorsøhøjen 8, Silkeborg, 8600

Chapter 3
[ 61 ]
Pop quiz – creating pages and navigation
1. How do you create new pages in CMS Made Simple?
a. Site Admin | Page Defaults | Add new page.
b. Layout | Menu Manager | Add new page.
c. Content | Pages | Add New Content.
2. Where is the tle that you ll in when creang a new page shown on the website?
a. Title bar and menu.
b. Title bar and heading of the site.
c. Menu and submenu.
d. Menu and head of the site.
3. What are the right answers considering the buons Apply and Submit?
a. The Submit buon saves changes and closes the page in one step.
b. The Apply buon saves changes and closes the page in one step.
c. The Submit buon does not close the page; but saves the changes you
have made.
d. The Submit buon does not close the page and previews the changes in
the browser.
4. What will be aected if the page alias is changed?
a. Title
b. Keywords
c. Menu
d. URL
5. Where do you place the meta tags that are valid for all pages in the project?
a. Content | Pages | Page Title | Opons.
b. In the secon general meta tags of the stylesheet.
c. Site Admin | Global Sengs | General Sengs | Global Metadata.
d. Extensions | Module Manager | GenMetaMod.
This material is copyright and is licensed for the sole use by Niels Vils on 17th August 2010
Thorsøhøjen 8, Silkeborg, 8600

Creang Pages and Navigaon
[ 62 ]
6. Why should you use search engine friendly addresses?
a. The RAM memory of your computer gets an overload by opening more than
seven pages without search engine friendly URLs (they are too long).
b. The URL is opmized for search engines.
c. You should not use them at all, because you have to create a special one for
every search engine, and create some duplicate content.
d. The page is loaded much quicker.
7. If you would like to hide a page from visitors but do want to keep the content on the
page for internal needs, you should:
a. Delete the page.
b. Deacvate the page.
c. Assign another parent page.
d. Copy the page and delete the original.
8. All your pages are wrien in English. Where would you put the meta tag for the
language?
a. In global sengs.
b. In every single page.
9. One of your pages has been linked to another website. What happens if you change
the page alias?
a. Old link will be redirected to the new page alias automacally.
b. An error message that the page cannot be found appears aer clicking on
the link.
Have a go hero – create all pages for company website
Before proceeding with the next chapter, where the design and layout is explained, create all
the pages you need for your website. You do not need to write the enre text for each page.
The next secon will simply be about preparing the structure of the website.
This material is copyright and is licensed for the sole use by Niels Vils on 17th August 2010
Thorsøhøjen 8, Silkeborg, 8600

Chapter 3
[ 63 ]
Use your own website plan or the sample one:
BUSINESS
WORLD
Client Center
Contact Us
Privacy Policy
Sitemap
Announcements / News
Company History
Team / Employees
FAQ / Glossary
Newsletter
Service Desk
Our Company
Products
Photo Gallery
Creating pages and navigation
First add pages that are on the rst level in your hierarchy (marked in bold in the preceding
diagram). Then add the pages from the second level (marked in grey). You can adjust the
page alias and menu text.
Add some sample text to the pages or write down what each single page will contain. If
you have some ideas that are nice but should not be available on the website from the very
beginning, then create some inacve pages holding these ideas.
Do not create more than two levels at the beginning. Even though it is possible to create a
large number of levels, your visitors will nd the navigaon of the website more user friendly
if they do not have to click 5 or 6 mes to reach the desired informaon. It is beer to start
with two-level navigaon to simplify learning layout and design in the next chapter.
The result of the website structure presented above is as follows:
Please note that the Start page has been renamed to Our Company.
This material is copyright and is licensed for the sole use by Niels Vils on 17th August 2010
Thorsøhøjen 8, Silkeborg, 8600

Creang Pages and Navigaon
[ 64 ]
Summary
In this chapter, you learned how easily pages can be created and managed. You saw that the
navigaon of your website is built automacally from the exisng pages.
Specically, we covered the following:
Creang pages: You can create new pages from scratch or as a copy of an
exisng page.
Eding pages: You can change everything on the page aer it has been created, such
as tle, content, menu text, or page alias.
Adding meta tags: Meta tags can be dened globally, if they are the same for each
page. For individual meta tags on each specic page, you use the eld Page Specic
Metadata in the Opons tab.
Page hierarchy: Pages can be organized in a tree hierarchy. It helps to keep your
pages structured and control the top and subnavigaon of the website intuively.
Search engine friendly URLs: You modied the URLs for your pages. It gives you
clean and prey URLs that are quite noceable for the visitors too.
Navigaon control: Pages are displayed automacally in the navigaon. You can
control this behavior by hiding the pages from navigaon (they are sll accessible by
the visitors with direct links). You can also set the page to inacve so that only you,
as the website administrator, are able to see the content of the links.
We also discussed how you create or change the start page of your website, gain more
control by using dierent content types, or change mulple pages at once to save me.
Now that we've created the website structure, we're ready to start with the design and
layout of our company website.
This material is copyright and is licensed for the sole use by Niels Vils on 17th August 2010
Thorsøhøjen 8, Silkeborg, 8600

4
Design and Layout
In this chapter, we will learn what templates are. The strength of CMS Made
Simple is its exibility of design. Once you have understood how you can
combine your stac HTML with the dynamic parts of the website and format
them with CSS, you will never lose control of your design or layout in CMS.
In this chapter, we will:
Work with exisng templates
Create our own template from scratch
Add and organize stylesheets
Create and format navigaon
Port HTML templates to CMS Made Simple
Learn the basics of Smarty
Learn about exporng templates
CMS Made Simple uses various templates to display the content of your website. To
understand templates, think of them as predened layouts. Every me you create a new
page, you choose a layout to dene how this page should look.
You can easily imagine a template as a wrapper for your content. The wrapper (layout) is
always the same; the content changes from page-to-page. The editor of the website just
adds content to the page and chooses a template. CMS Made Simple will automacally
display the page content for the visitors within a chosen layout. Thus, the design and
content are enrely separated in CMS.
This material is copyright and is licensed for the sole use by Niels Vils on 17th August 2010
Thorsøhøjen 8, Silkeborg, 8600

Design and Layout
[ 66 ]
Working with existing templates
You will nd all exisng templates in your CMS in the admin console. Click on
Layout | Templates to see all templates available in your installaon. If you did not install
any sample content, then only one template is available.
In the strictest sense, we have to dierenate between templates and themes. A template
is just a part of a theme. A theme consists of one or more templates and one or more
stylesheets. Some themes oponally include menu templates as well. So if you talk about
the complete design of your website, you should think about themes. Dierent page layouts
(1-column, 2-column, or others) within one theme are called templates in CMS Made Simple.
You can easily add ready-to-use templates to your website without any HTML or CSS
knowledge by using some resources for the themes:
http://themes.cmsmadesimple.org
http://www.icms.info/cmsms-templates
Time for action – importing a ready-made template
Let us see how to import a ready-made template into your installaon.
1. Download an XML le for your template from one of the addresses given above
and save this le to your local disk.
2. In the admin console, click on Layout | Theme Manager.
3. Switch to the tab Import and choose the XML le from step 1 in the eld
Upload Theme.
4. Click on Import.
5. Go to Layout | Templates and nd the new imported template in the list
of templates.
6. Click on the icon with a red cross in the Acve column (the icon should change to a
green ck).
What just happened?
You have imported a new theme into your CMS Made Simple installaon. A theme contains
one or more templates (Layout | Templates), one or more stylesheets (Layout | Stylesheets)
and somemes menu templates as well (Layout | Menu Manager).
This material is copyright and is licensed for the sole use by Niels Vils on 17th August 2010
Thorsøhøjen 8, Silkeborg, 8600

Chapter 4
[ 67 ]
To test the template, open a page that you would like to see within the new template for
eding (Content | Pages). Switch to the Opons tab, and select the newly created template
in the eld Template. The screen is automacally redirected to the Main tab. Click on Apply
and then on the icon with the magnifying glass icon beside the buon Apply to see the
changes on the page. Compare this page to other pages that use dierent templates.
This wonderful principle of CMS Made Simple allows you to give each page its own look and
feel. You can use dierent templates to separate some parts of your website. For example,
you could use one template for the company website and a completely dierent template
for the shop if you like. Designers oen use dierent templates to enable one, two, or three
columns layouts on dierent pages.
To see which page uses what template, open the list of the current pages in the admin
console (Content | Pages) and see the column Template.
If you would like to use one template on all pages of your website, you can assign it to all
pages at once. This funcon is especially useful if you already have a great number of pages.
In the admin console, open the list of exisng templates (Layout | Templates) and click the
Set All Pages link beside the name of the template. This way, the template is assigned to all
pages of your website with just one click.
In the list of templates, you can also see that one template is set as default. When you
create a new page, CMS Made Simple will automacally take the default template for the
new page. Click on the icon with the red cross in the column Default beside the template
name that you would like to use as the standard template.
Creating a new template
Surely, it is easier to use ready-made templates for the website. However, you oen need
your own style for the website. In this secon, we will learn how to create a new template
from scratch.
Templates in CMS Made Simple contain pure HTML. For dynamic parts of the layout, such
as navigaon or content, special placeholders are used. These placeholders are realized with
the Smarty web template system. You use simple Smarty tags in your template to mark the
places where dynamic parts in the pages are required. Smarty tags are placeholders that are
substuted with simple text or even other HTML templates when the website is displayed in
the browser. In contrast to HTML tags, Smarty tags are always enclosed in curly brackets.
This material is copyright and is licensed for the sole use by Niels Vils on 17th August 2010
Thorsøhøjen 8, Silkeborg, 8600

Design and Layout
[ 68 ]
Time for action – creating a new template
Let us see how you can easily create a new HTML template in CMS Made Simple:
1. In the admin console of your website, select Layout | Templates.
2. Click on Add New Template at the boom of the list.
3. On the next page, type the name of the new template, My rst template.
4. Add HTML source code to the Content eld, as shown in the following screenshot:
5. Click on Submit.
6. In the list of templates, nd your new template My rst template, click on Set All
Pages in the same line where your template name is, and conrm the message:
This material is copyright and is licensed for the sole use by Niels Vils on 17th August 2010
Thorsøhøjen 8, Silkeborg, 8600

Chapter 4
[ 69 ]
7. The message All pages modied! appears above the list of templates.
8. Click on the magnifying glass icon in the top-right corner of the admin console to
see the result (Google Chrome was used as the web browser in this example):
What just happened?
You have created a new template with some simple HTML tags. You have then instructed
CMS to use this newly created template on all pages of your website. In your browser, you
see the exact output of the HTML code you have added to the Content eld of the template.
Your template is stac now. It means that no individual part of the page, such as tle of the
page or content, is displayed on the website. To mark the places where dynamic content
should be displayed, you have to use Smarty tags. These tags will be substuted with an
actual tle or content when the page is loaded and displayed in the browser.
Adding dynamic parts to templates
Let us substute the stac page tle and content with individual content of the page.
This material is copyright and is licensed for the sole use by Niels Vils on 17th August 2010
Thorsøhøjen 8, Silkeborg, 8600
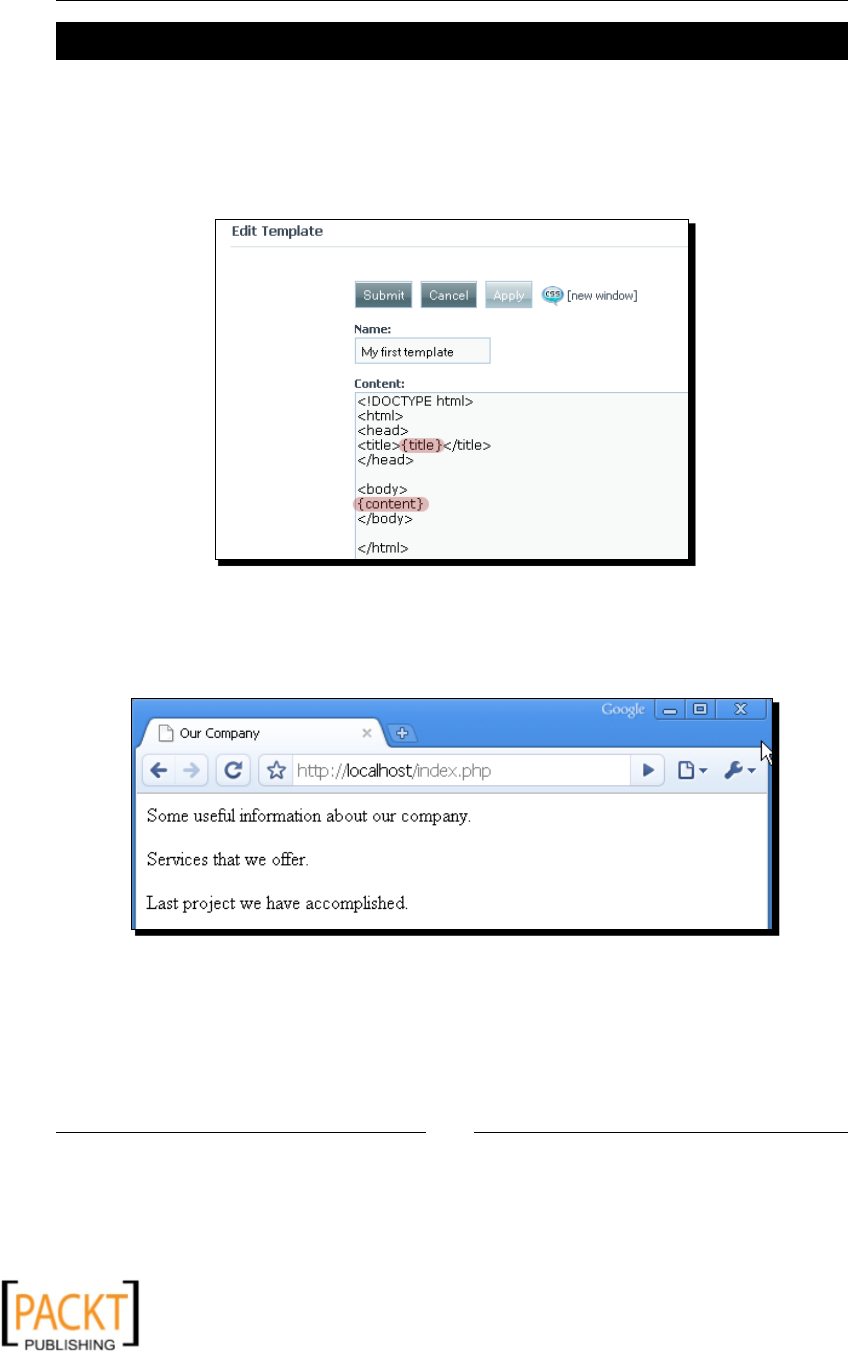
Design and Layout
[ 70 ]
Time for action – adding Smarty tags to a template
1. In the admin console, click on Layout | Templates, and click on My rst template
to open it for eding.
2. Replace the stac text for tle and content with Smarty tags, as shown in the
following screenshot:
3. Click on Apply and then click on the magnifying glass icon in the top-right corner
of the admin console to see the results of your changes. It should look as shown
in the following screenshot:
What just happened?
You have replaced the stac text in your template with placeholders called Smarty tags.
These special tags are enclosed in curly brackets. When you see the page in your browser,
the places where you have added Smarty tags in the HTML code are now replaced with
actual content and the tle of the page.
This material is copyright and is licensed for the sole use by Niels Vils on 17th August 2010
Thorsøhøjen 8, Silkeborg, 8600

Chapter 4
[ 71 ]
To conrm that changes were made for each page and not only for the start page, open the
current list of the pages (Content | Pages) in the admin console, and click on the magnifying
glass icon beside some of the pages to display them in the browser. You should see that
every page gets an individual tle. The page content is displayed in the place where the tag
{content} was added in the template.
{title} and {content} are only two examples for custom CMS Smarty plugins that you
can use in your template. Try out some of them from the following table to see what is
displayed at the place where these Smarty tags are added.
Tag Descripon
{breadcrumbs}
Prints a breadcrumb trail.
{created_date}
Prints the date and me when the page was created.
{last_modified_by}
Prints the ID of the user who has last edited the page.
{menu_text}
Prints the text entered in the eld Menu Text for the page.
{modified_date}
Prints the date and me the page was last modied.
To try the plugins, just add the name of a plugin in the curly brackets to the template of your
website in any place you like.
The preceding tags hold dierent informaon about the actual page. There are also tags
that hold global informaon about your website, such as the website's name or the version
of CMS Made Simple that is installed. They do not depend on the page where they are
displayed and are the same on each page. Try them as well to see what informaon is
displayed at the place where the tag is added.
Tag Descripon
{cms_version}
Prints the current version number of your CMS.
{cms_versionname}
Prints the current version name of your CMS.
{current_date}
Prints the current date and me.
{root_url}
Prints the URL locaon of your website.
{sitename}
Prints the website name. The informaon can be changed in
the admin console (Site Admin | Global Sengs | Site Name).
With Smarty tags, you see the main principle of the separaon of the code from design. As a
designer, you do not need to know how the date of the last page modicaon is stored in the
database ({modified_date}) and how exactly the locaon of the website is retrieved from
the address line of the browser ({root_url}). You can just use the plugins declared above
to retrieve the needed informaon.
This material is copyright and is licensed for the sole use by Niels Vils on 17th August 2010
Thorsøhøjen 8, Silkeborg, 8600

Design and Layout
[ 72 ]
Having control over the output
If you have already tried some of the preceding tags, then you have probably noced that
somemes the output is not exactly what you need. You can control the output of the tags
using Smarty parameters (also called aributes).
Parameters can be compared to HTML aributes. You can use parameters to rene the
output of the Smarty tags. Parameters can be used to:
Change date formats displayed by a tag
Add supplementary parts to the output of the tag
Remove some parts from the output
Replace specic text in the output of the tag
Time for action – adding Smarty parameters to the template
Let us say you have added the tag {last_modified_by} to your template. However,
you do not like the ID of the user, and you would like the username or his full name to be
displayed instead of the user ID.
1. In the admin console, select your template for edit
(Layout | Templates | My rst template).
2. Add the {last_modified_by} tag with the format parameter, as shown in the
following screenshot:
3. Click on Apply and then click on the magnifying glass icon in the top-right corner of
the admin console to see the result of your template changes.
This material is copyright and is licensed for the sole use by Niels Vils on 17th August 2010
Thorsøhøjen 8, Silkeborg, 8600

Chapter 4
[ 73 ]
What just happened?
You have added a tag {last_modified_by} to the template in order to display the name
of the user who made the last modicaon to the page. Normally, if you do not say anything
else, the ID of the user is displayed at the place where the tag is added. By adding a format
parameter to the tag, you can now control what exactly should be shown.
As templates in CMS Made Simple consist of a mixture of HTML and Smarty, you need to
understand the denion of tag, plugin, parameter, and parameter values. The tags we used
in the example are Smarty plugins. Smarty plugins are custom funcons dened for your
convenience. Almost every plugin can take parameters (somemes also called aributes).
You add parameters to the plugin name separated with a space. The parameter name is
followed by an equals sign and parameter value enclosed in double or single quotes.
See the following image to understand the anatomy of the Smarty tag:
Now, how do you know what parameters you can use with what plugin and what
parameter values are allowed? You will nd a complete list of custom CMS plugins
in the admin console of your website. These plugins are called tags in CMS Made Simple.
Click on Extensions | Tags to see the complete list of plugins that you can use in the
template right now.
If you click on the name of the tag, you will get help on it. You will nd a short descripon
what this tag does in general, and then see an example of how you can use it in your
template. You will also see a list of available parameters (if any) and the values you can
use for them.
Similar to HTML aributes, you can use more than one parameter in a tag. The order of the
parameters is not important.
For the tag {last_modified_by}, only one parameter is listed in the Help secon. There
are three values that are accepted by this parameter—id, username, and fullname, so
that you can use another parameter value to display the full name of the person who has
edited the page last:
{last_modified_by format="fullname"}
This material is copyright and is licensed for the sole use by Niels Vils on 17th August 2010
Thorsøhøjen 8, Silkeborg, 8600
Design and Layout
[ 74 ]
The full name of the user is shown if it is given in the user's
account. In the admin console, open Users & Groups | Users and
click on the username that you would like to modify. Enter the
First Name and the Last Name of the user.
Using plugins in content
In the last secon, you added Smarty plugins to the template. However, it is also possible to
add them directly into the content of the page. You use the tags in the content in the same
way that you used them in the template. Write the name of the plugin enclosed in curly
brackets in the eld Content of a specic page. Try it out now. Open any page for eding
(Content | Pages) and add one or more tags in the eld Content. You can mix tags and
stac text in the same way you did in the template.
A small example for the start page of your website can be:
Welcome! Today is {current_date}.
The preceding code will automacally display the current date on the start page of
your website.
You should add plugins that need to be displayed on every page of your
website to the template. If you need a special plugin on only one page
(for example, the start page), then you should add the plugin into the
eld Content of this page.
Adding stylesheets to the template
Nowadays, designing websites requires not only pure HTML, but also CSS. The most
professional websites use HTML to structure the website and CSS to style them. CSS gives
you full control over your layout. With CSS you can easily change the complete look and feel
of your website without changing any HTML. You can see some good examples of CSS layouts
based on the same HTML at http://www.csszengarden.com.
CMS Made Simple takes pure CSS code for your page layout and saves it in the database. In
this secon, you will learn how you can create a new stylesheet, add your styles to it, and
aach it to the template.
This material is copyright and is licensed for the sole use by Niels Vils on 17th August 2010
Thorsøhøjen 8, Silkeborg, 8600

Chapter 4
[ 75 ]
Creating a new stylesheet
To create a new stylesheet, you have to accomplish three simple steps:
1. Create and save the new stylesheet containing your CSS code.
2. Aach the stylesheet to the template.
3. Add a special tag in the template that will be replaced by an HTML tag <link>
poinng to the stylesheet.
Time for action – creating the stylesheet
Normally, in stac HTML pages, you create a CSS le and aach it to your template using
an HTML <link> tag. In CMS Made Simple, stylesheets are saved in the database, and
therefore cannot be linked directly. Let us see how stylesheets can be created and
aached to the templates.
1. In the admin console, click on Layout | Stylesheets.
2. Click the Add a Stylesheet link at the boom of the list.
3. Type in the name of the new stylesheet and enter the CSS code in the Content eld,
as shown in the following screenshot:
4. Click on Submit. The new stylesheet is added to the list of stylesheets.
5. To aach the new stylesheet to your template, in the admin console, click on
Layout | Templates.
This material is copyright and is licensed for the sole use by Niels Vils on 17th August 2010
Thorsøhøjen 8, Silkeborg, 8600

Design and Layout
[ 76 ]
6. In the list of templates, click on the blue CSS icon, as shown in the
following screenshot:
7. Select My First Style Sheet from the drop-down eld, and click on Add a Stylesheet.
8. The last step is to add a Smarty plugin that will call the aached stylesheet in the
template. In the admin console, click on Layout | Templates, and select your
template for eding.
9. Add the {stylesheet} tag to the template, as shown in the following screenshot:
This material is copyright and is licensed for the sole use by Niels Vils on 17th August 2010
Thorsøhøjen 8, Silkeborg, 8600

Chapter 4
[ 77 ]
10. Click on Apply and then click on the magnifying glass icon in the top-right corner
of the admin console to see the result of your template changes. It should look
as shown in the following screenshot:
What just happened?
You have created a new stylesheet that contains pure CSS code. Then, you have aached this
stylesheet to your template. By aaching the stylesheet, you have stated which stylesheet
is relevant for your template. The {stylesheet} tag that you added to your template, is
substuted by the HTML <link> tag when the page is displayed in the browser.
Open the page source in the browser to see what is set at the place where the
{stylesheet} tag has been added to the template. In my example, it looks like:
<link rel="stylesheet" type="text/css" href="http://www.yourdomain.
com/stylesheet.php?cssid=51" />
In your special installaon, the name of the domain will be dierent, and the last number in
the URL of the stylesheet is also likely to be dierent. The tag is formed automacally, and
you do not need to care how it is made technically.
You can dene and aach more than one stylesheet to the template. For example, you can
dene a stylesheet with general styles and then add another one containing print styles.
We will create and add more stylesheets in the course of the book so that you can see how
it works later on. For each stylesheet, a separate HTML link tag is added at the place where
the {stylesheet} tag is added. There is no need to add the tag twice or more if you have
aached more stylesheets, as this plugin will create as many links as there are stylesheets
aached to the template.
This material is copyright and is licensed for the sole use by Niels Vils on 17th August 2010
Thorsøhøjen 8, Silkeborg, 8600

Design and Layout
[ 78 ]
Media types for stylesheets
While creang a stylesheet, you have probably seen the area Media Type with some
checkboxes at the boom of the page where stylesheet code is added. You can see the
area if you open your stylesheet for eding in the admin console (Layout | Stylesheets)
and scroll down. It appears as shown in the following screenshot:
The media type corresponds to the HTML aribute media and is automacally added to the
HTML <link> tag (if you select any type here):
<link rel="stylesheet" type="text/css" media="screen" href="http://
www.yourdomain.com/stylesheet.php?cssid=51" />
<link rel="stylesheet" type="text/css" media="print" href="http://www.
yourdomain.com/stylesheet.php?cssid=52" />
The styles from the rst stylesheet are used to display your website in the browser. However,
the browser will use the print stylesheet if your page is printed:
If you use any CSS framework with more than one CSS le, then you can copy
the content of each CSS le into a separate stylesheet in CMS Made Simple and
then aach them all to your templates. You can also change the order of the
stylesheets while assigning them to the template.
Creating navigation for the website
The heart of each website is surely the navigaon. The navigaon consists of links to the
pages and is oen divided into main navigaon and sidebar navigaon. In CMS Made Simple,
the navigaon is automacally built from the list of acve pages. You can create navigaon of
any complexity grade in CMS Made Simple due to the very powerful concept explained in the
following secons.
This material is copyright and is licensed for the sole use by Niels Vils on 17th August 2010
Thorsøhøjen 8, Silkeborg, 8600

Chapter 4
[ 79 ]
Time for action – adding navigation to the template
Let us add navigaon links to the website.
1. In the admin console, click on Layout | Templates, and select My rst template
for edit.
2. Add a special tag for navigaon before the {content} tag, as shown in the
following screenshot:
3. Click on Apply and then click on the magnifying glass icon in the top-right corner
of the admin console to see the result of your template changes. It should look as
shown in the following screenshot:
This material is copyright and is licensed for the sole use by Niels Vils on 17th August 2010
Thorsøhøjen 8, Silkeborg, 8600

Design and Layout
[ 80 ]
What just happened?
With the custom CMS tag {menu}, a complete structure of the website is displayed at
the place where it is added in the template. Each acve page is displayed according to its
posion in the hierarchy and order in the list of pages.
The {menu} tag is very powerful. You can use numerous parameters that help you to create
navigaon of any complexity grade. For example, you can limit the navigaon to only one
level, so that only pages from the rst hierarchy level are shown:
{menu number_of_levels="1"}
Try the preceding code to create some navigaon limited to the main pages. This is a
common way to create the main navigaon for the website; normally placed at the top of
each page. The subpages are not shown with this parameter but we can display them in the
sidebar navigaon later on.
We will learn more parameters for the {menu} tag and see more examples on how it can be
customized later on. In this chapter, our main subject is design and layout. That is why we
will now learn to customize the look and feel of top navigaon.
Designing navigation—the pure CSS way
With the simple plugin {menu} the navigaon of the website is displayed on every page.
CMS Made Simple creates a simple unordered HTML list for the navigaon as you can see
in the source code of the page. Let us see how you can easily style a top navigaon bar with
pure CSS.
Time for action – design navigation with pure CSS
We are now going to style the top navigaon so that it looks like buons displayed beside
each other instead of below each other.
1. In the admin console, click on Layout | Templates, and open My rst template
for edit.
2. Add the HTML <div> tag around the {menu number_of_levels="1 "} tag,
as shown in the following screenshot:
This material is copyright and is licensed for the sole use by Niels Vils on 17th August 2010
Thorsøhøjen 8, Silkeborg, 8600

Chapter 4
[ 81 ]
3. Click on Submit.
4. Open My First Style Sheet from the list of stylesheets (Layout | Stylesheets)
for eding.
5. Add style formats for the container top-navi at the end of stylesheet, as shown
in the following code snippet:
#top-navi ul
{
height: 22px;
padding: 0px;padding: 0px;
margin: 10px 0;
border-top: 1px solid #e5e4e2;
border-bottom: 1px solid #e5e4e2;
}
#top-navi li
{
list-style: none;
float:left;
#top-navi li a
{
color: #a2a2a2;
text-decoration: none;
display: block;
padding: 5px 15px;
}
This material is copyright and is licensed for the sole use by Niels Vils on 17th August 2010
Thorsøhøjen 8, Silkeborg, 8600

Design and Layout
[ 82 ]
#top-navi li a:hover
{
color: #ffffff;
background: #3d648a;
}
6. Click on Apply and then click on the magnifying glass icon in the top-right corner of
the admin console to see the result of your changes. It should now look as shown
in the following screenshot:
What just happened?
You have limited the output of the navigaon to the rst level by adding the parameter
number_of_levels to the {menu} tag. Then you have placed an HTML <div> tag around
the Smarty plugin {menu}. With the last step, you have added some CSS styles to give the
top navigaon the desired look and feel. Noce that you do not need any special "CMS
design" knowledge to add styles to your navigaon. You have used pure and common
CSS to format the navigaon.
If you click on each page in the browser and see how the navigaon is displayed on other
pages, you will noce that there is some addional formang which CMS uses to display
acve pages. For example, <h3> is used to display the name of the acve page within
navigaon. Open the page source in your browser to see the formang of acve pages.
You can add more styles to change the formang of <h3> tag. On the other hand, to
save your me you can reduce all these special formats to pure ordered lists by using the
built-in template minimal_menu.tpl. This template is automacally provided with a
standard installaon of CMS Made Simple. To use it, add another parameter to the tag
{menu}, as shown in the following line of code:
{menu number_of_levels="1" template="minimal_menu.tpl"}
This material is copyright and is licensed for the sole use by Niels Vils on 17th August 2010
Thorsøhøjen 8, Silkeborg, 8600

Chapter 4
[ 83 ]
In this way, all addional tags are deleted from the navigaon and a clear unordered list is
displayed on each page.
If you look into the page source of the website, you will noce that there were also some
special class aributes added to the menu. CMS knows what page is actually shown and
adds a special class to the HTML tag <a> of the acve page:
<li><a href="http://www.yourdomain.com/" class="currentpage"> Our
Company </a>
You can use this informaon to give another style to the navigaon item of the page that is
currently displayed. The easiest method is to combine the a:hover and a.currentpage
classes to give them the same style.
#top-navi li a:hover, #top-navi li a.currentpage
{
color: #ffffff;
background: #3d648a;
}
If you can design websites with CSS, you are now able to design simple navigaon of the
website without any special coding knowledge.
Adding sidebar navigation
However, this is only half of the story. The pages displayed in the top navigaon are limited
to the rst level. We need some sidebar navigaon to display the list of subpages belonging
to the parent page.
We have to discuss another important parameter of the plugin {menu}. With the parameter
number_of_levels, you set how many levels from your page hierarchy are to be shown.
For the sidebar navigaon, you do not need to limit the number of levels, but to dene a
start level for your navigaon. As the rst level is added to the top navigaon already, for
the sidebar, you start with the second level:
{menu start_level="2" template="minimal_menu.tpl" }
With parameter start_level, you say from what level the pages are shown in the menu.
Second level means that pages with a minimum of two numbers in the hierarchy are shown,
for example, 1.2, 2.3, or 4.2. CMS Made Simple also knows what page is selected in the
top navigaon and displays in the sidebar only pages that are children of the page selected
above. This means that if the page with number 3 is selected in the top navigaon, the
sidebar will only contain the children of this page: 3.1, 3.2, 3.3, and so on.
With the parameter template, you again reduce the output of the navigaon to the pure
HTML unordered list to make formang easier at this point.
This material is copyright and is licensed for the sole use by Niels Vils on 17th August 2010
Thorsøhøjen 8, Silkeborg, 8600

Design and Layout
[ 84 ]
An interesng and popular parameter is collapse, for example, {menu collapse="1"}.
This parameter allows the collapsing of sub items in the menu, so that only the sub items
of the current menu item are shown. It should have at least three levels in the page
hierarchy to see how automac collapse hides menu items that do not belong to the
currently displayed page.
We have learned the most important parts of a template: tle, content, and menu. This is
enough informaon to be able to port ready-made HTML template to CMS Made Simple.
Porting a HTML template
Normally, you do not design a complete template from scratch in CMS Made Simple. You can
use any HTML/CSS editor to create a design outside of CMS Made Simple. It is also possible
that you have downloaded or purchased a ready-made HTML template or you work with a
designer who has created the design for your website. In all the cases listed above, you get
an HTML le, CSS le, and one or more images. In this secon, we learn to port an HTML
template to CMS Made Simple.
Imagine, you get an HTML template that looks like the following screenshot.
This template consists of three les: HTML, CSS, and a logo image in the upper-right corner.
Noce that there is nothing but pure HTML and CSS at this point. Let us create a new CMS
Made Simple template from the preceding template.
This material is copyright and is licensed for the sole use by Niels Vils on 17th August 2010
Thorsøhøjen 8, Silkeborg, 8600

Chapter 4
[ 85 ]
Time for action – porting a HTML template to CMS Made Simple
1. In the admin console, click on Layout | Templates, and click on Add New Template.
2. Enter Business World as Name of the template, and replace the whole suggested
Content with the HTML code of the example template given in the preceding
screenshot. The HTML code for the template is:
<!DOCTYPE html>
<html>
<head>
<title>Our Company</title>
<link rel="stylesheet" type="text/css" media="screen"
href="style.css" />
<meta name="description" content="" />
</head>
<body>
<div id="container">
<div id="header">
businessWorld
</div>
<div id="top-navi">
<ul class="clearfix">
<li><a href="#"> Our Company </a></li>
<li><a href="#"> Products </a></li>
<li><a href="#"> Client Center </a></li>
<li><a href="#"> Contact Us </a></li>
<li><a href="#"> Sitemap </a></li>
</ul>
</div>
<div id="content">
<h1>Our Company</h1>
<p>
Lorem ipsum quo ea eruditi epicuri dolores, mea no
delicata reprehendunt. Mea possit aperiri iracundia in, ad
veri ocurreret scribentur his, justo qualisque adipiscing
pro an. Has congue dissentiunt an, ea summo simul
repudiandae sit. Omnium aliquam disputationi est no, etiam
deleniti eos in, te pro reque torquatos. Adhuc ceteroAdhuc cetero
alienum te mei, nec id solum partem populo.
</p></p>
<p>
Sit putent fabulas complectitur ne, pro te velit viris
ocurreret. Eam dico habeo aeterno ei, ut deserunt
eloquentiam pri. Vim ad alii populo expetendis, et pro
dolorum scaevola partiendo. Mea te timeam delicata
This material is copyright and is licensed for the sole use by Niels Vils on 17th August 2010
Thorsøhøjen 8, Silkeborg, 8600

Design and Layout
[ 86 ]
deterruisset, ius no molestie lobortis definiebas, etiam
inciderint eos ea. Ea sit fugit audiam, nec clita alterum
intellegebat cu, nonummy fuisset id mel. Eam ut amet
sensibus consequat, erant legimus vim id.
</p>
</div>
<div id="sidebar">
<ul class="clearfix">
<li><a href="#"> Announcements </a></li>
<li><a href="#"> History </a></li>
<li><a href="#"> Team </a></li>
<li><a href="#"> Photo gallery </a></li>
</ul>
</div>
<div id="footer">
2009 businessWorld
</div>
</div>
</body>
</html>
3. Click on Submit.
4. In the list of templates (Layout | Templates), click on Set All Pages and conrm
the message: Are you sure you want to set all pages to use this template?
5. Click on the icon with the red cross in the column Default to set the template as
the standard template for all new pages.
6. Now, create a new stylesheet. In the admin console, open Layout | Stylesheets, and
click on Add a Stylesheet.
7. Enter Business World Style Sheet as Name, and paste the CSS code from the
example template above into the Content eld. The CSS code for the template is:
body
{
background:#ebebeb;
font-family:sans-serif;
font-size:12px;
}
#container
{
width:800px;
margin:15px auto;
}
This material is copyright and is licensed for the sole use by Niels Vils on 17th August 2010
Thorsøhøjen 8, Silkeborg, 8600

Chapter 4
[ 87 ]
#top-navi ul
{
height:22px;
padding:0px;
margin:10px 0;
border-top:1px solid #e5e4e2;
border-bottom:1px solid #e5e4e2;
}
#top-navi li
{
list-style:none;
float:left;
}
#top-navi li a
{
color:#a2a2a2;
text-decoration:none;
display:block;
padding:5px 15px;
}
#top-navi li a:hover
{
color:#ffffff;
background:#3d648a;
}
#header
{
height:105px;
background:#a83b06 url(logo.jpg) top right no-repeat;
color:#fde5d9;
font-size:90px;
padding-top:20px;
font-family:serif;
padding-left:15px;
letter-spacing:-3px;
border:1px solid #c48769;
}
#content
{
width:540px;
float:left;
background:#ffffff;
padding:10px;
margin-bottom:20px;
This material is copyright and is licensed for the sole use by Niels Vils on 17th August 2010
Thorsøhøjen 8, Silkeborg, 8600

Design and Layout
[ 88 ]
}
#sidebar
{
width:200px;
float:right;
background:#ffffff;
padding:10px;
margin-bottom:20px;
}
#footer
{
clear:both;
width:780px;
background:#a83b06;
padding:10px;
font-size:11px;
color:#ffffff;
font-weight:bold;
}
#footer a
{
color:#eeeeee;
text-decoration:none;
font-weight:normal;
}
h1
{
color:#062d53;
font-size:20px;
}
8. Click on Submit.
9. In the list of stylesheets (Layout | Stylesheets), click on the blue CSS icon in the
same line where a new stylesheet is.
10. Select template Business World from the drop-down eld, and click on Aach to
this Template.
11. Click Business World to open the template for eding and replace the stac link
to the stylesheet with the Smarty placeholder shown as follows:
<!DOCTYPE html>
<html>
<head>
This material is copyright and is licensed for the sole use by Niels Vils on 17th August 2010
Thorsøhøjen 8, Silkeborg, 8600

Chapter 4
[ 89 ]
<title>Our Company</title>
{stylesheet}
<meta name="description" content="" />
</head>
<body>
<div id="container">
<div id="header">
businessWorld
</div>
12. Click on Apply and see the new template on the website.
What just happened?
You have created a new HTML template and a new stylesheet. You aached the stylesheet
to the template, so that CMS Made Simple knows what stylesheet has to be loaded with
the template. Normally, you would use an HTML <link> tag to point to style.css. In our
case, we do not really have a le, as the stylesheet is saved in database. Therefore, we have
replaced the HTML <link> tag in the head secon of the HTML template with the Smarty
plugin {stylesheet}.
The image used as the background in the CSS stylesheet is not found.
background:#a83b06 url(logo.jpg) top right no-repeat;
With any graphics eding program, create an image of 215 x 125 pixels and name it
logo.jpg. Create a new folder under the folder uploads in your installaon, name the
folder design, and upload the image logo.jpg to this folder. You can upload it with
FileZilla or any other FTP client of your choice. Then replace the path to the image in
your stylesheet (Layout | Stylesheets), as follows:
background:#a83b06 url(uploads/design/logo.jpg) top right no-repeat;
The path to the images is relave to the currently displayed page. Wring uploads/
design/logo.jpg tells CMS to look for the image in http://www.youdomain.com/
uploads/design/logo.jpg. However, you do not need to add a domain name to the
path. If you export your template later on and use it on another domain, it is beer to use
relave paths without a domain name in front of them.
This material is copyright and is licensed for the sole use by Niels Vils on 17th August 2010
Thorsøhøjen 8, Silkeborg, 8600

Design and Layout
[ 90 ]
Now, you can start replacing the stac text in your template with Smarty tags. Find and
replace tle, content, and menu in HTML. Open your template in the admin console and
make the following changes:
<!DOCTYPE html>
<html>
<head>
<title>{title} - {sitename}</title>
{stylesheet}
{metadata}
<meta name="description" content="" />
</head>
<body>
<div id="container">
<div id="header">
businessWorld
</div>
<div id="top-navi">
{menu number_of_levels="1" template="minimal_menu.tpl"}
</div>
<div id="content">
<h1>{title}</h1>
{content}
</div>
<div id="sidebar">
{menu start_level="2" template="minimal_menu.tpl"}
</div>
<div id="footer">
2009 businessWorld
</div>
</div>
</body>
</html>
Below the Smarty {stylesheet} plugin, you can add the {metadata} plugin. This plugin
will add global metadata (Site Admin | Global Sengs) and the Page Specic Metadata
from the tab Opons of the page. It will also set the HTML <base> tag with the aribute
href to the root of your installaon. In this way, all images can be dened in relaon to
the root folder.
Congratulaons! Your template is now ported to CMS Made Simple.
This material is copyright and is licensed for the sole use by Niels Vils on 17th August 2010
Thorsøhøjen 8, Silkeborg, 8600

Chapter 4
[ 91 ]
Learning Smarty basics
You have learned how to use Smarty tags and rene them with a parameter so far. You have
also ported an enre HTML template to CMS Made Simple. However, if you would like to
create professional sophiscated designs, you will need more knowledge about Smarty. With
the powerful combinaon of Smarty and HTML, there are no limits to the exibility of the
sites you design.
Working with Smarty variables
Smarty variables are much simpler than complex Smarty plugins. They are placeholders that
contain plain informaon about the actual page ID, page alias, or posion of the page in
the hierarchy. Some Smarty variables that you are not aware of, are already dened in your
template. You do not need to know or remember all of them if you know how you can gure
out their names and values.
Time for action – getting Smarty variables
We are going to get the number of the page in the page hierarchy to integrate this
informaon into the design of the page tle. How do we gure out the name of the
Smarty variable that contains this informaon? We can get it from the template as follows:
1. In the admin console, click on Layout | Templates.
2. Open the Business World template for edit and add the plugin
{get_template_vars} just before the last </div> tag, as shown
in the following code snippet:
<!DOCTYPE html>
<html>
<head>
<title>{title} - {sitename}</title>
{stylesheet}
{metadata}
<meta name="description" content="" />
</head>
<body>
...........
{get_template_vars}
</div>
</body>
</html>
This material is copyright and is licensed for the sole use by Niels Vils on 17th August 2010
Thorsøhøjen 8, Silkeborg, 8600

Design and Layout
[ 92 ]
3. Click on Apply and then click on the magnifying glass icon on the top-right corner of
the admin console to see the result. It should now look like the following screenshot:
What just happened?
With the Smarty {get_template_vars} plugin, you displayed all Smarty variables
available in your template. In the list of variables on each line, one variable is displayed with
its name and its value separated by an equals sign. These values change from page to page.
For example, the variable with the name friendly_position contains the posion of the
page in the page hierarchy. If you navigate to other pages, you will see that the value of this
variable is dierent on every page.
How do you add a variable in your template? Smarty variables are enclosed in curly
brackets as well, but unlike the Smarty plugins, they have a dollar sign at the beginning. To
use the variable friendly_position, you just need to add the following Smarty tag to
your template:
{$friendly_position}
This material is copyright and is licensed for the sole use by Niels Vils on 17th August 2010
Thorsøhøjen 8, Silkeborg, 8600

Chapter 4
[ 93 ]
You can delete the {get_template_vars} plugin now. It is helpful for you to see which
Smarty variables exist and what values are stored there. You can add this plugin again, when
you need to look for another variable.
Let us use the informaon we have learned about Smarty plugins and Smarty variables
by combining them both to create a tle of the page. Open the template Business World
(Layout | Templates) for eding and change the tle of the page between the body tags
and before the tag {content} shown as follows:
<h1><span>{$friendly_position}</span> {title}</h1>
Then open Business World Style Sheet for eding (Layout | Stylesheets), and add a CSS
style to format the tle of the page:
h1 span
{
color: #ffffff;
background: #cccccc;
padding: 0 5px;
}
The result of the above formang should look as shown in the following screenshot:
You can use any Smarty variable from the template, except for variables with the value
Array(). We will look at these special variables in the following secon.
This material is copyright and is licensed for the sole use by Niels Vils on 17th August 2010
Thorsøhøjen 8, Silkeborg, 8600

Design and Layout
[ 94 ]
Controlling output with the IF function
You can create numerous templates for your website and assign dierent templates
to dierent pages. This is useful if you use layouts with a dierent number of columns.
However, somemes there is only a ny dierence between the templates, and it is not
ecient to create a new template each me you need only slight changes.
For example, imagine you would like to display the last editor of the page, as we did with the
{last_modified_by} tag. It is a useful piece of informaon on most pages but we would
like to hide it on the contact page. You do not need to create a new template where this tag
is not added. For such slight changes, it is beer to know how to control the output in the
same template with an IF structure.
Time for action – displaying tags in dependence of the page
We are going to hide the {last_modified_by} tag on the page Contact Us. However, it
has to be sll displayed on all other pages.
1. Open the template Business World for eding (Layout | Templates).
2. Add the Smarty IF code around the {last_modified_
by…} tag, as shown in the following code snippet:
<!DOCTYPE html>
<html>
<head>
<title>{title} - {sitename}</title>
{stylesheet}
{metadata}
<meta name="description" content="" />
</head>
<body>
<div id="container">
<div id="header">
businessWorld
</div>
<div id="top-navi">
{menu number_of_levels="1" template="minimal_menu.tpl"}
</div>
<div id="content">
<h1>{title}</h1>
{content}
{if $page_alias neq "contact-us"}
<p>Last modified by {last_modified_by format=
"fullname"}</p>
This material is copyright and is licensed for the sole use by Niels Vils on 17th August 2010
Thorsøhøjen 8, Silkeborg, 8600

Chapter 4
[ 95 ]
{/if}
</div>
<div id="sidebar">
{menu start_level="2" template="minimal_menu.tpl"}
</div>
<div id="footer">
2009 businessWorld
</div>
</div>
</body>
</html>
In this book, you may occasionally come across a single line of code
appearing on two dierent lines. Please note that this has been done
only for the purpose of indentaon due to space constraints. When
using such code make sure it's on one line in your script le.
3. Click on Apply and then click on the magnifying glass icon in the top-right corner of
the admin console to see the result.
What just happened?
The IF code that you have added around the paragraph containing the last modicaon
causes CMS to check the page alias of the displayed page. If the page alias is equal to
"contact-us", then everything between the IF structure is not shown, otherwise the
informaon about the last modicaon is displayed.
You have seen from the previous secon that CMS knows what page of our website is
currently being displayed. This informaon is stored in the Smarty variable {$page_alias}.
With the built-in IF funcon, you can compare the page alias of the actual page with the
page alias of the page Contact Us. If the value of the variable {$page_alias} is NOT equal
to contact-us, then everything between the IF tags is displayed. If the page alias is equal
to contact-us, then nothing is displayed. In this way, you can control the output of the
template depending on the page alias.
The abbreviaon neq (meaning not equal) between the variable {$page_alias} and the
value contact-us is called a Qualier. Qualiers are used to build a logical condion in
the IF code. The result of the logical condion can be true or false. If the result of the
IF condion is true (and it is true if the page alias IS NOT EQUAL to contact-us), then
everything placed in between the IF tags is displayed. If the result of the IF condion is
false (and it is only false if the page alias IS EQUAL to contact-us), then everything
between the IF tags is suppressed.
This material is copyright and is licensed for the sole use by Niels Vils on 17th August 2010
Thorsøhøjen 8, Silkeborg, 8600

Design and Layout
[ 96 ]
There are more qualiers that can be used to build logical condions in Smarty. Some of
them are listed in the following table:
Qualier Meaning Example
eq
equals
$page_alias eq "contact-us"
neq
not equal to
$page_alias neq "contact-us"
gt
greater than
$friendly_position gt 2
lt
less than
$friendly_position lt 3
gte
greater than or equal
$friendly_position gte $count
lte
less than or equal
$friendly_position lte 5
not
negaon
not $lang
(Negaon can be used to check if a variable
contains any value or if it is empty. If no value is
given, then the result of the condion is true,
or else the result of the condion is false).
mod
modulo
$count mod 2
The modulo operaon nds the remainder of
division of one number by another. You can use
the above example to gure out if the number
of pages in the rst hierarchy level is even or odd.
The IF structure is a useful tool for handling slight changes in one template depending on the
page name or the posion in the hierarchy. In the preceding example, you saw that you can
use every variable from the template to build a logical condion.
Creating navigation template with Smarty loop
You can also change the HTML markup of the navigaon. In this chapter, the great principle
of a "template in template" giving you full control of your design is explained. Before you can
learn this principle, you have to understand some Smarty basics.
When we added the top navigaon to the website, we used a standard template for the
navigaon. It displays the navigaon as an unordered HTML list. Imagine that you need a
kind of footer navigaon where all the links from the top navigaon are shown. You do not
need an unordered HTML list in this case. You just would like to show all links in one line
separated by a pipe (|) shown as follows:
Our Company | Announcements | History | Team | Photo gallery ……
This material is copyright and is licensed for the sole use by Niels Vils on 17th August 2010
Thorsøhøjen 8, Silkeborg, 8600

Chapter 4
[ 97 ]
This means that you need a completely dierent HTML markup for this kind of navigaon.
The great advantage of CMS Made Simple is the ability to display a template in template.
While you can use the main template to dene the whole layout for the page, the HTML
markup of the navigaon is saved in its own template. This navigaon template is just a
piece of the HTML code that is added to the main template at the place where the tag
{menu} is placed.
The menu template contains some HTML markup for the navigaon. Let us see how you can
create a fully new template for the menu and add your individual HTML markup.
Time for action – creating a menu template
We need a simple footer navigaon where all pages of the website are listed, separated by a
pipe (|) sign, as shown earlier.
1. In the admin console of the page, click on Layout | Menu Manager.
2. Click on Add Template.
3. Fill in the elds for New Template Name and Template Content, as shown in the
following screenshot :
4. Click on Submit to save the new menu template.
5. Open the Business World template for eding (Layout | Templates).
6. Add footer navigaon with the {menu} tag, and provide the name of the menu
template, as shown in the following code snippet:
<!DOCTYPE html>
<html>
<head>
<title>{title} - {sitename}</title>
{stylesheet}
{metadata}
<meta name="description" content="" />
</head>
<body>
This material is copyright and is licensed for the sole use by Niels Vils on 17th August 2010
Thorsøhøjen 8, Silkeborg, 8600

Design and Layout
[ 98 ]
<div id="container">
<div id="header">
businessWorld
</div>
<div id="top-navi">
{menu number_of_levels="1" template="minimal_menu.tpl"}
</div>
<div id="content">
<h1>{title}</h1>
{content}
{if $page_alias neq "contact-us"}
<p>Last modified by {last_modified_by
format="fullname"}</p>
{/if}
</div>
<div id="sidebar">
{menu start_level="2" template="minimal_menu.tpl"}
</div>
<div id="footer">
<p>{menu template="footer_menu"}</p>
2009 businessWorld
</div>
</div>
</body>
</html>
7. Click on Apply and see the footer navigaon on your website. It should look
as shown in the following screenshot:
This material is copyright and is licensed for the sole use by Niels Vils on 17th August 2010
Thorsøhøjen 8, Silkeborg, 8600

Chapter 4
[ 99 ]
What just happened?
You have just created a new menu template. In the menu template, you have used some
Smarty code that needs to be explained. The most important part in the code is the Smarty
variable $nodelist. It is not an ordinary Smarty variable like the ones we have already
learned. This variable is an array. It means that more than one value is saved in it. This
variable contains all the informaon, such as menu texts or URLs of all acve pages of our
website. With the built-in Smarty funcon foreach, we can run through all the values of
this variable and display the same piece of HTML code for each page. Let us see exactly how
a loop works.
foreach goes through every single page saved in the variable {$nodelist} and prints
the HTML code placed between the foreach tags as many mes as there are pages found
in the variable. For each run, the values for the single page are saved in the variable $node.
We name and create this variable with parameter item=node in the foreach tag. The
loop starts its run with the rst menu item—the page Our Company. At this point, the
menu text and URL are saved in the variable $node. We can reach the required informaon
with {$node->menutext} and {$node->url} and use the tags in the HTML code. With
the next (second) run, the next page is saved in the variable $node. So beginning with the
second run, another menu text and URL is pasted into the same HTML code. The foreach
loop runs through every page and stops automacally when no more pages are found.
Footer navigaon displays all pages independent of their posion in the hierarchy. You
can limit the footer navigaon only to the rst level as well. Do it the same way you did
it with the top navigaon. Use parameter number_of_levels in the tag {menu} shown
as follows:
{menu number_of_levels="1" template="footer_menu"}
foreach loops are a powerful way to construct any form of navigaon you can imagine. This
way, you can use images instead of text in your navigaon.
One more example, how a graphical navigaon can be created, is as shown:
{foreach from=$nodelist item=node}
<a href="{$node->url}">
<img src="uploads/design/{$node->alias}.jpg"
alt="{$node->menutext}" border="0" />
</a>
{/foreach}
To understand what HTML is produced by the preceding Smarty code, in your mind, replace
the bold Smarty tags with the actual values of a page, for example, Contact Us:
<a href="contact-us">
<img src="uploads/design/contact-us.jpg" alt="Contact Us" />
</a>
This material is copyright and is licensed for the sole use by Niels Vils on 17th August 2010
Thorsøhøjen 8, Silkeborg, 8600

Design and Layout
[ 100 ]
As the previous code is placed in the foreach loop, the markup will be repeated for every
page. You can see that for the graphical example to work, you will need to create a JPG le
for every page. The name of the les has to correspond to the page alias. In our example,
for the top navigaon, you will need ve images:
our-company.jpg
products.jpg
client-center.jpg
contact-us.jpg
sitemap.jpg
Create the images (buons) in the graphics eding program of your choice and upload them
to the uploads/design directory on your web server. Create a new menu template with the
name graphical_menu, and add the Smarty foreach code into it, as shown earlier. Then
replace the top navigaon in the main template (Layout | Templates) with the following line:
{menu number_of_levels="1" template="graphical_menu"}
Now, the navigaon is made of graphics instead of text.
There is even more informaon about each page available in menu template which is given
in the following table:
Variable Explanaon
$node->pagetitle
Title of the page
$node->depth
Number of levels in the page hierarchy
$node->prevdepth
Number of levels of the previous page in the page hierarchy
$node-
>haschildren
Prints 1 if the page has child pages
$node->target
The target of the page can be set by the editor from the
drop-down menu. In your template, you use it in the following way, as
shown in the following example:
<a href="{$node->url}" target="{$node->target}">
$node->alias
Prints the alias of the page
$node->current
Prints 1 if the page is currently displayed
$node->type
The type of the page. Possible values are:
sectionheader (Secon header)
separator (Separator)
content (Content)
pagelink (Internal page link)
link (External link)
This material is copyright and is licensed for the sole use by Niels Vils on 17th August 2010
Thorsøhøjen 8, Silkeborg, 8600

Chapter 4
[ 101 ]
With the informaon given, you can now enhance your navigaon. For example, you can add
the HTML aribute target to consider if the link should open in the same window or in the
new one.
If you would like to add a special CSS class to the current page, then you will use an IF code
within the foreach tags. See how you can combine both structures:
{foreach from=$nodelist item=node}
<a href="{$node->url}" {if $node->current}class="current"{/if}
>{$node->menutext}</a> |
{/foreach}
This IF code will add class="current" to the HTML tag <a> only to the link of the page
that is currently displayed.
If you would like to know more about Smarty, use the documentaon and support forum at
http://www.smarty.net.
Exporting templates
Once your theme is nished, you can export it from CMS Made Simple. Exporng a theme
means making an XML le containing template(s), aached stylesheets, and oponally menu
templates. It also includes all images used in HTML or CSS. This XML le can be saved as a
backup of your design, http://themes.cmsmadesimple.org, or to hand it over to
your customer.
Time for action – displaying tags in dependence of the page
1. In the admin console, click on Layout | Theme Manager.
2. Select the checkbox on the line where the Business World template is, and
enter a name in the eld Export Theme As:
This material is copyright and is licensed for the sole use by Niels Vils on 17th August 2010
Thorsøhøjen 8, Silkeborg, 8600

Design and Layout
[ 102 ]
3. Click on Export.
4. In the download window of the browser, choose where on your hard drive this
XML le should be saved.
You can either open the XML le or save it as backup for your design.
Pop quiz –testing what you have learned
1. Where in the admin console can you nd all the templates, which you have at your
disposal in your project?
a. Layout | Templates
b. Layout | Stylesheets | Templates
c. Content | Pages | Main | Templates
d. Extensions |Templates
2. How can you replace stac text with dynamical components?
a. Integrate Smarty tags like {content} in the template.
b. Integrate Smarty tags like <content> in the template.
c. Integrate modules like 'DynTxt' in the CSS stylesheet.
d. Integrate a Smarty tag like <breadcrumbs> in the content eld
of the page.
3. If you have a closer look at the Smarty tag {last_modified_by
format="username"}, which part of it is the "name" of the parameter?
a. last_modified_by
b. format
c. username
d. by format
4. What do you do if you want to have special and dynamic informaon on every page?
a. Add Smarty plugins directly into the content of the page by using the
content eld.
b. Add Smarty plugins directly into the content of the page by using the
stylesheet.
c. Add Smarty plugins directly into an inacve template, because you can t
the output easier in the layout of the site.
d. Add Smarty plugins directly into the acve template, because this is the
only way to display it.
This material is copyright and is licensed for the sole use by Niels Vils on 17th August 2010
Thorsøhøjen 8, Silkeborg, 8600

Chapter 4
[ 103 ]
5. Where do you place the {stylesheet} tag in the template?
a. Head
b. Keywords or descripon
c. Title
d. Body
e. Footer
6. How many stylesheets can be dened for one template?
a. Just one stylesheet for each template.
b. It depends on the number of themes in the template, you can dene as
many stylesheets as you have themes for it.
c. Maximum seven, because of program restricons.
d. As many as you want.
7. How can you generate the navigaon?
a. The main menu and the sidebar navigaon have to be connected in the
admin console Content | Pages and the drop-down menu parent.
b. The sites have to be connected to the whole navigaon at once with a
Smarty tag.
c. The navigaon is generated automacally.
d. The main menu is generated automacally, the sidebar menu has to be
integrated by using the module 'SideNav3.1'.
8. What is the meaning of the plugin menu in combinaon with the parameter
start_level set to 2 ({menu start_level="2"} )?
a. The menu is only shown when you click twice on the buon.
b. The value 2 depends on the number of the line of the code in the template
where it is integrated.
c. When you set the value 2, there will only be 2 navigaon links shown, when
you set all instead of 2, the whole navigaon structure is displayed.
d. The value 2 is responsible for the rst level not being shown in
the navigaon.
9. What is the special feature of an array like $nodelist, which is a Smarty variable?
a. There is more than one value saved in it.
b. There is exactly one value saved in it.
c. Arrays only contain numeric values.
d. Arrays only contain text values.
This material is copyright and is licensed for the sole use by Niels Vils on 17th August 2010
Thorsøhøjen 8, Silkeborg, 8600

Design and Layout
[ 104 ]
10. What is the right denion for a custom CMS plugin (funcon)?
a. It is a built-in funcon, which is the inner working of Smarty.
b. Custom plugins are addional funcons.
c. It is everything that is placed between the curly brackets.
d. It starts with a $ sign and contains simple values or a number of values
called array.
Have a go hero – creating custom templates
Now, it is your turn to create a design for your website of any complexity. If the design can
be sliced into HTML and CSS templates, then it can be converted to CMS Made Simple.
There are no restricons in using technologies such as JQuery, Flash, or even frames.
Summary
We learned a lot in this chapter about templates and design with CMS Made Simple.
Specically, we covered:
Working with exisng templates: You learned how to import templates into your
installaon and assign them to one or more pages.
Creang a new template and stylesheet from scratch: You started to create a simple
template with CMS Made Simple to see how stac HTML interacts with dynamic
Smarty tags. You also learned how to aach stylesheets to a template.
Creang navigaon: It was very important to see how easily the navigaon of
the website can be created. You created a top navigaon and a sidebar with only
one Smarty plugin {menu}. You also saw how you can control the output of your
navigaon with some simple parameters. Later on, you created your own template
to see how the principle of "template in template" is covered in CMS Made Simple.
Porng templates: You created your HTML and CSS template in any editor of your
choice. Once the template was nished, you could port it to CMS Made Simple.
Learning Smarty Basics: You learned a lot about Smarty tags. You saw how this easy
and powerful language can help you to customize your template. Understanding
Smarty means that you can get complete exibility with your design. You also
learned some Smarty terms that are important for understanding how Smarty
can be used. See the following table to reect on what you have learned so far:
This material is copyright and is licensed for the sole use by Niels Vils on 17th August 2010
Thorsøhøjen 8, Silkeborg, 8600

Chapter 4
[ 105 ]
Denion Explanaon
Smarty tag Everything that is placed between the curly brackets
Smarty built-in funcons Built-in funcons are the inner workings of Smarty, such
as {if} and {foreach}. A reference of them can be
found on http://smarty.net
Custom CMS plugins (funcons) Custom plugins are addional funcons. {content}
and {menu} are examples of custom funcons.
The list of them can be found in the admin console
Extensions | Tags.
Parameters/Aributes Most of the plugins above take parameters that specify or
modify their behavior.
Smarty variables Template variables start with the dollar sign, like
{$page_alias} or {$friendly_position}.
They contain simple values or a number of values (array).
This material is copyright and is licensed for the sole use by Niels Vils on 17th August 2010
Thorsøhøjen 8, Silkeborg, 8600

This material is copyright and is licensed for the sole use by Niels Vils on 17th August 2010
Thorsøhøjen 8, Silkeborg, 8600

5
Using Core Modules
We have learned how to set up a website, plan and create a complete website
structure, and design the website. These were the rst steps we had to take
before wring content and implemenng addional features such as news
arcles or search funconality.
What are core modules?
Core modules are a few basic modules that oer important features and
are shipped with CMS Made Simple. They are installed by default and
are supported by the ocial development team of CMS Made Simple.
These modules are not essenal, and your CMS website will work well
without them. You can use them if you need funconality such as news
management, search funcon, or custom navigaon.
In this chapter, we will:
Create global content blocks
Implement news arcle and categorize them
Add a search funcon
Use a built-in Image Manager and File Manager
Create a sitemap with Menu Manager
Create a print version of the content pages or news arcles
Learn how to install addional modules that are not included in the standard
installaon of CMS Made Simple
This material is copyright and is licensed for the sole use by Niels Vils on 17th August 2010
Thorsøhøjen 8, Silkeborg, 8600

Using Core Modules
[ 108 ]
In the following examples, I assume that you have a template like the one which was created
in the last chapter and that your website structure is built according to the one shown at the
end of Chapter 3, Creang Pages and Navigaon. However, you can sll proceed with this
chapter if your structure or design is dierent.
Understanding global content blocks
You can use global content blocks to add some repeated parts containing text and/or images
in your website. These blocks contain the same informaon and can be used at any place in
your template or in the content of any page. For example, you can create a contact box with
the address and phone number of your company as a global content block and then add it at
mulple places in your website.
Sure, you can design the contact box every me you need it and add the contact informaon
individually for each page. You can even copy the box from one page and paste it into
another. It works unl the phone number of your company changes. Now, you have to open
each page where the contact box is added and change the phone number. Depending on the
number of the pages, you could spend hours changing every page. Using the global content
block, you can edit all the informaon in one place and just call the same content from any
place on your website. If the phone number of the company has changed, then you adjust it
in the global content block, and it is automacally changed on each page that uses this global
content block.
Let's see how to use global content blocks on your website.
Time for action – adding a global content block to the website
Let's say that we need a contact box as described earlier on some of the pages placed
somewhere in the content.
1. In the admin console, click on Content | Global Content Blocks.
2. Click on Add Global Content Block.
This material is copyright and is licensed for the sole use by Niels Vils on 17th August 2010
Thorsøhøjen 8, Silkeborg, 8600

Chapter 5
[ 109 ]
3. Enter the Name of the block and then the contact informaon in the eld Content,
as shown in the following screenshot:
Use Shi + Enter on your keyboard to add line breaks.
4. Click on Submit.
5. In the list of the global content blocks, copy the Smarty tag from the column Tag to
Use this Block to the clipboard.
This material is copyright and is licensed for the sole use by Niels Vils on 17th August 2010
Thorsøhøjen 8, Silkeborg, 8600

Using Core Modules
[ 110 ]
6. In the admin console, open a page of your choice (Content | Pages) for eding and
paste the tag at the place where the contact box should be shown.
7. Click on Apply, and see the result on your website.
What just happened?
For the contact informaon, you have created a new global content block. Every me you
need to display contact informaon on your website (whether in the page or in a template),
you add the Smarty tag instead of the complete informaon. From now on, you make your
changes only in the global content block, and each page and template using it will display the
same informaon.
Try it out. Add a new global content block to another page and see the result on both pages.
Then in the admin console, open Content | Global Content Blocks, choose the content block
with your contact informaon, and change something in it. Save it, and see the changes on
both pages using it.
Managing news articles with module News
Unl now, we have added content pages which are under the control of the hierarchy
manager of CMS Made Simple. For announcements or events in your company, you use the
core module News. This module allows you to create quick, short statements, and then place
them at any place on your website, templates, or pages. Your news should be really new.
Nothing is as disappoinng as websites containing news dated a year ago. "Aged" news
gives a website an abandoned look.
This material is copyright and is licensed for the sole use by Niels Vils on 17th August 2010
Thorsøhøjen 8, Silkeborg, 8600

Chapter 5
[ 111 ]
For your company website, you can announce the last project the company accomplished
or any customer events. With the news secon, you can also adverse the new products or
services that your company oers. You can present your new customers or partners and wish
your customers on holidays. When the visitors of the website nd news arcles dated just
some days ago, they know that your website (and your company) is alive.
If you cannot imagine what could be announced on the website, then skip this module.
Do not place it only because it is standard and easy to use and other websites have news
on them.
Displaying news on the website
The News module is very exible and can be displayed in many dierent ways. Let's see how
you can add news to the page Announcements. I assume that you have created this page
already. If not, then you can put the news on the start page of your website as well. The
next step will work on every page.
Time for action – displaying news on the page
1. Open the page Announcements for eding (Content | Pages).
2. Add the Smarty tag {news} at the place where news arcles should be displayed,
as shown in the following screenshot:
This material is copyright and is licensed for the sole use by Niels Vils on 17th August 2010
Thorsøhøjen 8, Silkeborg, 8600

Using Core Modules
[ 112 ]
3. Click on Apply, and see the result of this Smarty tag on your website. It should
look as follows:
What just happened?
With only one short Smarty tag, you can display the rst news arcle on your website. This
arcle is already added with the standard installaon of CMS Made Simple. But where can
this arcle be edited and how can new arcles be created?
Adding news
All news that has ever been created can be found in the admin console. Open
Content | News. You see the admin area of this module with many sengs. On the
rst tab, Arcles, you can search through the news if you have got lots of them. But at this
point, you have just one news arcle that is displayed below the list and called News Module
Installed. This news arcle is created automacally during installaon of CMS Made Simple
and is also shown on the page where the tag {news} has been added.
Let's add a new arcle to the list of news and see what can be changed to suit
your requirements.
Time for action – adding news items
1. In the admin console, click on Content | News.
2. Click Add Arcle.
3. Enter the Title of the news arcle, Summary text, and Content of the arcle.
This material is copyright and is licensed for the sole use by Niels Vils on 17th August 2010
Thorsøhøjen 8, Silkeborg, 8600

Chapter 5
[ 113 ]
4. Click on Submit.
5. Open the page Announcements to see the new arcle published. It should look as
shown in the following screenshot:
What just happened?
You have published a new announcement in the admin console of your website. For
the summary and content elds, the WYISWYG editor was automacally displayed. The
dierence between the rst arcle added during installaon and the arcle published by you
is the link More at the end of the arcle. This link is only shown if the Summary eld of the
news arcle is lled. In this case, only the summary text of the arcle is shown on the page.
If you click the More link, you can read the complete text of the news arcle. However, if you
do not use the Summary eld, then the whole Content of the news item is displayed in the
summary view, and there is no link More at the end of the arcle. Normally, you would
not use the eld Summary for short arcles, so that the enre text can be read in the
summary view.
Let's see what elds can be changed while eding and adding news arcles.
Open the last edited arcle by clicking on it in the list of arcles (Content | News). The
author name is added automacally. It is your username. The eld Category shows all
categories available. In the standard installaon, there is only one category General. We
will see how to add new categories later on. Below the eld Content, you see the eld Extra.
This eld can be used for any addional informaon. However, the eld is not shown in the
template automacally. The eld Post Date shows the publishing date of the arcle and can
be changed to whatever you like. While adding new arcles, the eld is automacally lled
with the actual date.
This material is copyright and is licensed for the sole use by Niels Vils on 17th August 2010
Thorsøhøjen 8, Silkeborg, 8600

Using Core Modules
[ 114 ]
Status is a very important eld. You can choose between Published and Dra. Dras are
never displayed on the website. In this way, you can work on your arcle as long as you
need it. Save it as dra and change the status to Published, once the arcle text is ready.
News arcles can also have a start and expiraon date. Normally, if no expiraon date is set,
the arcle is published on your website forever. But what if you just would like to wish your
visitors Merry Christmas? It would look strange if the arcle is sll published some weeks or
even months aer December 25th. In this case, you select the eld Use Expiraon Date, and
choose the date when the arcle expires. Expired arcles are automacally removed from
your website, but they can sll be found in the list of arcles in the admin console. If you
add a date in the future in the eld Start Date, the arcle will be published on the website at
the given date. In this way, you can set the exact date and me for your announcements to
appear on the website.
Keep in mind that dates are saved according to the local me zone dened on
your server. If you develop the website on a dierent server and then transfer
the nished version to another one, you have to double check that both the
servers are congured with the same me zone.
News categories
You can categorize your news by adding new arcles and assigning news to the dierent
categories. This feature will not only allow you to sort and display news arcles in the admin
console, but also gives you power to display news from dierent categories on dierent
pages or even in the same page on dierent locaons. Categories can be created as a tree,
so that there are parent and child categories. The tree structure of news categories is very
similar to the page hierarchy of the content pages.
Open the Categories tab in the admin area of News module (Content | News) and create a
new category. Once created, the category can be used for new arcles. The old arcles can
be assigned to this category as well.
By using categories, you can publish any sort of informaon with this module, not only
announcements. For example, you can publish job opportunies at your company as well.
Time for action – creating news categories
We are going to create a new category that will contain job oers and then show the list of
jobs on the start page.
1. In the admin console, click on Content | News.
2. Under the Categories tab, click on Add Category and create a new category with the
name Vacancies, as shown in the following screenshot:
This material is copyright and is licensed for the sole use by Niels Vils on 17th August 2010
Thorsøhøjen 8, Silkeborg, 8600

Chapter 5
[ 115 ]
3. Click on Submit.
4. Under the Arcles tab, click Add Arcle and create a new arcle with the
following informaon:
a. Category: Vacancies
b. Title: Markeng Manager
c. Content: We are looking for an excellent person who will be able to
develop the European market for our company. Please contact our human
resources department.
5. Click on Submit
6. Open the start page of the website for eding and add the Smarty tag somewhere in
the Content eld, as shown in the following screenshot:
This material is copyright and is licensed for the sole use by Niels Vils on 17th August 2010
Thorsøhøjen 8, Silkeborg, 8600

Using Core Modules
[ 116 ]
7. Save the page, and see the changes on the website.
What just happened?
You have used the News module to display job opportunies on the start page. You
have used the parameter category to limit the shown items to only one category.
Therefore, only the items assigned to this category are shown at this place. On the page
Announcements, all news are sll displayed (including job opportunies), as there was no
limitaon to one category. If you would like to limit announcements on this page to the
items assigned to the category General, then you would modify the Smarty tag, which is
shown as follows:
{news category="General"}
You see that you can display news arcles at dierent locaons of your website and limit
them to one category. You can use the News module for anything that you would like to
categorize. Another example is the list of last accomplished projects. Even a company blog
can be realized with this module.
Customizing news templates
Remember how you have customized the menu template in the previous chapter. The
principle of "template in template" is valid for each module in CMS Made Simple. It means
that all module templates can be edited separately from the main layout to t in the enre
website. At the place where the Smarty tag for the module is placed (in the content page
or in the template), the template of the module is shown. It is just like using one template
inside another template, so is using module templates in the main templates.
There are dierent templates for the news arcle of your website:
Summary Templates: The list of news with the summary elds and links for
further reading
Detail Templates: The complete text of the news arcle
Browse Category Templates: The list of all news categories
Form Templates: Used when User Management is installed, and will be
discussed later
This material is copyright and is licensed for the sole use by Niels Vils on 17th August 2010
Thorsøhøjen 8, Silkeborg, 8600

Chapter 5
[ 117 ]
Each template can be created or modied by using a combinaon of Smarty variables and
HTML. If you call the module with the Smarty tag {news}, then the sample template for
news summary is called. If you add the aribute action to the Smarty tag {news}, then
another template according to the following list is called:
Acon Template
{news action="default"}
Summary Templates
{news action="detail"}
Detail Templates
{new action="browsecat"}
Browse Category Templates
{news action="fesubmit"}
Form Templates
You will nd templates in the admin console (Content | News) on the tabs next to Arcles
and Categories. For each acon, more than one template can be created, but only one
template can be set as the default one.
Now, let's see how you can create and use a new summary template in your website.
Time for action – creating a new summary template
Assume that you need just a list of the news arcles without their summary text and date.
The tles of the news items should be linked to the full news arcle (detail view).
1. In the admin console, open Content | News, and select the tab
Summary Templates.
2. Click on Create A New Template.
3. Enter NewsList as the Template Name and replace the Template Source with the
following code snippet:
<ul>
{foreach from=$items item=entry}
<li><a href="{$entry->moreurl}"
title="{$entry>title|cms_escape:htmlall}">
{$entry->title|cms_escape}</a>
</li>
{/foreach}
</ul>
4. Click on Submit. The template appears in the list of the summary templates.
5. Open the page template Business World (Layout | Templates) and add the list of
news arcles below the sidebar navigaon, as shown in the following code snippet:
<!DOCTYPE html>
<html>
<head>
This material is copyright and is licensed for the sole use by Niels Vils on 17th August 2010
Thorsøhøjen 8, Silkeborg, 8600

Using Core Modules
[ 118 ]
<title>{title} - {sitename}</title>
{stylesheet}
{metadata}
<meta name="description" content="" />
</head>
<body>
<div id="container">
<div id="header">
businessWorld
</div>
<div id="top-navi">
{menu number_of_levels="1" template="minimal_menu.tpl"}
</div>
<div id="content">
<h1>{title}</h1>
{content}
{if $page_alias neq "contact-us"}
<p>Last modified by {last_modified_by
format="fullname"}</p>
{/if}
</div>
<div id="sidebar">
{menu start_level="2" template="minimal_menu.tpl"}
<hr />
{news summarytemplate="NewsList"}
</div>
<div id="footer">
<p>{menu template="footer_menu"}</p>
2009 businessWorld
</div>
</div>
</body>
</html>
6. Click on Submit, and view the result on the page. Your sidebar should look similar to
the following screenshot:
This material is copyright and is licensed for the sole use by Niels Vils on 17th August 2010
Thorsøhøjen 8, Silkeborg, 8600

Chapter 5
[ 119 ]
What just happened?
You have created a new summary template for the news arcles. The summary template
includes an ordered list of the news arcles, and each arcle is linked to the detail view.
Then, you have added a Smarty tag in the template below the sidebar menu. You have used
the parameter summarytemplate to specify exactly what template should be used to
display the summary view of the news arcles in this place. If you do not use the parameter,
then the default template is used. In the standard installaon of CMS Made Simple, the
Sample template is taken by default. You can change the default template by clicking on
the icon with the red cross in the column Default in the list of templates (Content | News |
Summary Templates).
You can edit exisng templates or create new custom templates. If you use the module
for dierent tasks such as job opportunies, announcements, and company blog, you can
create as many templates as you need. You can also specify which template should be used
to display the output of the module at the place where the tag is called. An example call for
displaying job opportunies on the website can be:
{news summarytemplate="Jobs" detailtemplate="Job"
category="Vacancies"}
For the preceding example, you should create a summary template with the name Jobs and
a detail template with the name Job. You also need a Vacancies category where you add at
least one job opportunity.
Adding custom elds to the module News
Somemes, you need custom informaon to be displayed in the announcements. For
example, you would like to add a department or a special locaon, or you would like to
associate les with the news announcing new products. In this case, you would have to
dene custom elds in the News module.
Let's see how the locaon of the news can be added in the special eld.
This material is copyright and is licensed for the sole use by Niels Vils on 17th August 2010
Thorsøhøjen 8, Silkeborg, 8600

Using Core Modules
[ 120 ]
Time for action – adding custom elds
1. In the admin eld, open Content | News and select the tab Field Denions.
2. Click Add Field Denion and enter the elds, as shown in the following screenshot:
3. Click on Submit.
4. Open the last arcle item you have added, for example, Markeng Manager
(Content | News), and you will nd the new eld Locaon at the boom
of the page.
5. Enter Washington in the eld Locaon, and click Submit.
6. Open your page and you can nd the locaon added below the news arcle.
(Aenon: This works only with Sample templates or templates based on default
templates!). It should look similar to the following screenshot:
This material is copyright and is licensed for the sole use by Niels Vils on 17th August 2010
Thorsøhøjen 8, Silkeborg, 8600

Chapter 5
[ 121 ]
What just happened?
You have added a new custom eld to the news arcles. As the eld is marked as Public,
it will be displayed on the website. The eld is automacally added to the news eding
window. If you like to change the posion of the eld, you should edit the template. In the
default template Sample, all addional elds are added at the boom of the news arcle.
In your own template, you can get any custom eld value with the following line of code:
Location: {$entry->fieldsbyname.location->value}
The previous line will display the value saved in the eld Locaon. You can use this line in the
summary and detail template.
There are even more parameters that you can use to rene the output of the Smarty plugin
{news}. For each module, the list of parameters can be found in the Help secon of the
module. In the admin console, open Content | News, and click on the Module Help link to
the right of the module name.
There are some useful parameters for the News module, as listed in the following table:
News parameter Descripon
browsecat="1"
Shows a browseable category list.
showall="1"
Shows all arcles, irrespecve of the end date.
showarchive="0"
Shows only expired news arcles.
sortasc="true"
Sort news items in an ascending date order rather
than descending.
sortby="news_title"
Field to sort by. Opons are: news_date, summary,
news_data, news_category, news_title,
news_extra, end_time, start_time, and random.
Default is news_date.
moretext="more..."
Text to display at the end of a news item if the eld Summary
is not empty. By default, it is set to "more..."
start="0"
Starts the list of arcles with the item number given.
If you would like to display a detailed view of the news arcle in another
page template other than your main template, then create a new
page template (Layout | Templates), create a new page, and assign
the new template to the page. Call the News module with {news
page="alias"} where the alias is the name of the page where a
detailed view of every news item should be displayed.
This material is copyright and is licensed for the sole use by Niels Vils on 17th August 2010
Thorsøhøjen 8, Silkeborg, 8600

Using Core Modules
[ 122 ]
You can even allow your site visitors to add news arcles to your module if you install the
module FrontEndUsers which will be described in Chapter 7, Using Third-party Modules. The
news arcles submied by the website's visitors will be saved as dras, and you can publish
them aer approving them in the admin content page.
Using the news title as the page title
Pay aenon to the tle bar of the browser on the page where the full arcle is displayed.
You discover that the tle tag will be the same for each item, as there is only one real page
to display each news arcle. However, search engine opmizaon requires a unique tle
for every page. You can customize the tle of the generated pages with a small trick. Open
Content | News in the admin console, and choose the Detail Templates tab. At the very top
of the template, add the following line:
{assign var="pagetitle" value=$entry->title|escape}
This line will generate the Smarty variable {$pagetitle} containing the tle of
the news arcle. To add the variable to the main template, open it, and add the tag
{process_pagedata} at the very top of your template and replace the tle tag with
an IF structure, as shown in the following code snippet:
{process_pagedata}
<!DOCTYPE html>
<html>
<head>
{if isset($pagetitle) && !empty($pagetitle)}
<title>{title} - {sitename}</title>
{else}
<title>{sitename} - {title}</title>
{/if}
...
This piece of code checks if the variable {$pagetitle} is dened and is not empty. If the
variable exists, then the news tle is used for the tle tag and is displayed in the tle bar of
the browser. If not, then the ordinary page tle is taken.
Using the search function with the module Search
The next standard feature that should be explained is a Search module. It is installed by
default and allows the visitors of the website to search the content pages and the news
arcles on your website. Normally, you add the search eld to your template rather than
to every single page.
Let's add the search feature to the template at the top of the website.
This material is copyright and is licensed for the sole use by Niels Vils on 17th August 2010
Thorsøhøjen 8, Silkeborg, 8600

Chapter 5
[ 123 ]
Time for action – adding a search form
1. Open the template Business World (Layout | Templates)
2. Add the Smarty tag {search} to the sidebar, as shown:
<!DOCTYPE html>
<html>
<head>
<title>{title} - {sitename}</title>
{stylesheet}
{metadata}
<meta name="description" content="" />
</head>
<body>
<div id="container">
<div id="header">
businessWorld
</div>
<div id="top-navi">
{menu number_of_levels="1" template="minimal_menu.tpl"}
</div>
<div id="content">
<h1>{title}</h1>
{content}
{if $page_alias neq "contact-us"}
<p>Last modified by {last_modified_by
format="fullname"}</p>
{/if}
</div>
<div id="sidebar">
{search}
{menu start_level="2" template="minimal_menu.tpl"}
<hr />
{news summarytemplate="NewsList"}
</div>
<div id="footer">
<p>{menu template="footer_menu"}</p>
2009 businessWorld
</div>
</div>
</body>
</html>
This material is copyright and is licensed for the sole use by Niels Vils on 17th August 2010
Thorsøhøjen 8, Silkeborg, 8600

Using Core Modules
[ 124 ]
3. Click on Submit and view your page in the browser, it should look as shown in the
following screenshot:
What just happened?
You have added the search feature to your website. It works out of the box if you try to
search in the content of your pages or news arcles.
You can dene the list of Stop Words in the admin console (Extensions | Search | Opons).
These words are excluded from the search index, and there is also a predened list of
common stop words for your convenience. Normally, you would add your company name or
any word that can be found on every page or in templates. To avoid that, search funcons
show all pages in the found results. You can add your custom words separated by a comma
at the end of the list or dene your own list. Do not forget to click on the buon Reindex
All Content aer saving the list of stop words. It would create a new search index for
your website.
If your website is in English, you can use a word stemming search. This means that the
words in the search index are reduced to their stem, base, or root form. For example, you
have a content page where the word steps is found and indexed. However, the visitor of
your website searches for step. Without acvang the stemming feature, nothing is found
as literally step is not the same as steps. With stemming search, all forms of the search
word are considered, such as "step", "steps", and even "stepped".
Excluding pages from search
If you would like some pages, like Policy or Disclaimer to be excluded from
search, then open the page that you would like to exclude in the admin console
(Content | Pages) and select the Opons tab. Deselect the eld This page is
searchable, and save the page. Now the page is not found even if the searched
word appears on this page.
This material is copyright and is licensed for the sole use by Niels Vils on 17th August 2010
Thorsøhøjen 8, Silkeborg, 8600

Chapter 5
[ 125 ]
You can customize the template of the search template (search eld itself) and search result
template in the admin console (Extensions | Search). As usual, you use a mix of HTML and
Smarty tags to change the order of the elements. Use stylesheet to change to suit the form
into your layout.
If you would like to output search results in the template dierent from the main one, you
have to create the desired template yourself (you have learned how to create templates in
the previous chapter) and assign the template to the page where the search results should
be shown. The alias of this page should be passed to the parameter resultpage as shown
in the example. Modify the Smarty tag {search} by adding the parameter resultpage
as follows:
{search resultpage="search-result"}
You have to assign the alias of the page created previously to the parameter resultpage,
so that the search results are always shown on this page now.
The search feature also tracks the search acvity on your website and allows you to gure
out what the visitors of your website need or miss. You can track single search words or
phrases to see how oen they have been used by the visitors. In the Opons tab of the
Search module (Extensions | Search), you can select Track Search Phrases, not Individual
Words to enable stasc for phrases.
The Search module of CMS Made Simple is not as sophiscated as large search engines. You
can use customized Google search for your website if you would like to show the searched
words in the text and have stemming features for languages other than English. But if your
website is not indexed in Google, then you do not have any other opon but to use the
standard search feature of CMS Made Simple.
Browsing les with File Manager
You can upload any les in CMS Made Simple with File Manager. File Manager is like a
built-in FTP browser where you can upload, move, delete, and copy les or directories. In the
admin console, open Content | File Manager, and nd the list of all the les that are saved
in the folder uploads on your web hosng.
On the Upload les tab, you can upload more than one le or even an archive le that will
be unpacked aer uploading in this folder.
On the Sengs tab, you can enable the advanced mode that will let you gain access to the
whole le structure of your CMS Made Simple website so that File Manager is no longer
restricted to the folder uploads. Be careful with this seng, as you can easily move and
delete core les of CMS Made Simple, and as a result, damage your enre website.
If you would like to upload and edit images, then you should use Image Manager.
This material is copyright and is licensed for the sole use by Niels Vils on 17th August 2010
Thorsøhøjen 8, Silkeborg, 8600

Using Core Modules
[ 126 ]
Using Image Manager
Surely, you would like to add images to your website. Whether they are placed in the content
of your pages or used in templates or photo galleries, they have to be uploaded to your web
host rst. You should opmize your images before displaying them on your website. Do not
upload images that are larger than 200KB. This restricon is not from CMS Made Simple. You
can upload and display even larger images with Image Manager. The restricon is suggested
in consideraon of your visitors who want your website to load quickly. If you use large
images, your website will load very slowly, and a certain percentage of your visitors will
close the browser before they have seen what you oer on the website.
The rule of thumb
One image should not be larger than 20KB and all images on one page
together should not account for more than 200KB.
Resize your images with graphics program before using them on the website. Or, use the
built-in image editor in CMS Made Simple to resize, crop, rotate, and ip your images.
Let us upload some images to CMS Made Simple, edit, and display them on the page or in
the template. There are three formats that can be displayed by any browser—JPG (or JPEG),
GIF, and PNG. No other graphics should be used on the websites, because some browsers
on some operang systems will not display BMP, TIFF, PSD, or other les. Prepare one image
that you will use for the next step on your local disk with any graphics applicaon.
Time for action – using the image editor
Assume we have an image that is too large for the page. Ideally, you have to create images
with a graphics applicaon before uploading them to your web hosng. But if you have no
graphics applicaon or would just like to make few quick changes, you can use the built-in
Image Manager for the task.
1. In the admin console, open Content | Image Manager.
2. Choose the image you would like to upload in the eld Upload File at the boom
of the page, and click on Send.
3. When the image is uploaded, click on the edit icon below the image to start the
image editor.
This material is copyright and is licensed for the sole use by Niels Vils on 17th August 2010
Thorsøhøjen 8, Silkeborg, 8600

Chapter 5
[ 127 ]
4. Resize the physical size of the picture to the required width and height in pixels
by clicking on Resize in the le control panel and giving the desired dimensions
in the elds above the image.
5. Click on the icon with a green ck mark above the image to apply the changes.
6. Click on the Save icon in the le control panel, and choose the image format for
the resized image, as shown in the following screenshot:
This material is copyright and is licensed for the sole use by Niels Vils on 17th August 2010
Thorsøhøjen 8, Silkeborg, 8600

Using Core Modules
[ 128 ]
7. Click on the green ck mark again to apply the changes. When the image has been
saved, you can close the window.
8. Refresh the page with the image thumbnails or open Image Manager again
(Content | Images). The new version of the image with the changes applied is
now shown in the list of available images.
What just happened?
You have uploaded a new image to CMS Made Simple. Aer uploading, a 96x96 pixels
thumbnail (small version of the picture used for previewing) is automacally created by CMS.
You have changed the size of the image and then saved it at a lower quality to reduce the
weight in kilobytes as well. Choosing a quality of 60 percent to 85 percent for JPEG images
will not cause any visible quality loss. Try it out. Your original image will not be changed aer
saving, but a new version of the image will be created. You can delete the new version at any
me and start with the original picture once again if you have made a mistake.
For more advanced graphical work, you can use special graphics applicaons such as the free
GIMP or the commercial Adobe Photoshop.
With an FTP browser, you can nd your image les and automacally created thumbnails
in the directory /uploads/images. If you have a lot of images, you can upload them to
this directory using an FTP browser in this directory as well. However if you do this, the
thumbnails are not created automacally. Aer uploading through FTP, you have to open
Content | Image Manager. The Image Manager will discover the newly uploaded les and
then create the missing thumbnails.
Thumbnails' lenames are prexed with thumb_. For example, the image le city.jpg will
get an automacally generated thumbnail with the name thumb_city.jpg in the same
folder where the original image was uploaded.
Using images in template and content
The uploaded images can be used in the content of the pages with the WYSIWYG
editor (refer Chapter 3, Creang Pages and Navigaon). Normally, the editor of the
content does not have the ability to change the template of the website. But there is
also a funconality that can help him/her to assign an image to the page and display it
anywhere in the template.
Consider that the design (template) and the text can be strictly separated from each other in
CMS Made Simple. In order to give a lile more responsibility for the appearance of the site
to the editor, you can allow him to change the pictures of the template in a dened way.
This material is copyright and is licensed for the sole use by Niels Vils on 17th August 2010
Thorsøhøjen 8, Silkeborg, 8600

Chapter 5
[ 129 ]
Let's create a new image that can be chosen by the editor of the page to be displayed above
the navigaon. First of all, create two images having a width of 800 pixels and height of
about 100 pixels. Name them pageimage1.jpg and pageimage2.jpg. Upload the images
with Image Manager to CMS Made Simple. Do not upload them to subfolders, but directly to
the start folder of Image Manager (uploads/images).
In the admin console, open any page (Content | Pages). Choose the Opons tab, and in the
Image eld, select the picture you would like to associate with this page, as shown in the
following screenshot:
Do the same with other pages and assign other images to them.
If you cannot see the image in the drop-down eld, then it is not uploaded into
the right folder. Page images have to be found in Content | Image Manager or
/uploads/images (not subfolder) on the web server.
Then add the image to the template. Open the Business World template (Layout |
Templates), and add the page image to display it:
<!DOCTYPE html>
<html>
<head>
<title>{title} - {sitename}</title>
{stylesheet}
{metadata}
<meta name="description" content="" />
</head>
<body>
<div id="container">
<div id="header">
businessWorld
</div>
This material is copyright and is licensed for the sole use by Niels Vils on 17th August 2010
Thorsøhøjen 8, Silkeborg, 8600

Using Core Modules
[ 130 ]
<img src="uploads/images/{page_image}" width="800" height="100"
alt="{title}" />
<div id="top-navi">
{menu number_of_levels="1" template="minimal_menu.tpl"}
</div>
<div id="content">
<h1>{title}</h1>
{content}
...
Now the editor of the page can select from the predened images to display them in the
template without having to modify the template itself.
Using Menu Manager in content
You have already worked with the Menu Manager to create top, sidebar, and footer
navigaon for the website. Top navigaon displays pages that are placed on the rst level of
the page hierarchy. Sidebar navigaon automacally displays only the children of the page
selected in the top navigaon. Navigaon in the footer includes all pages independent of
their posion in the hierarchy.
Addionally, you can display the complete website structure (or some parts of it) in the
Content eld as well. In this way, you can easily output a sitemap that helps your visitors
to nd the required informaon on your website.
Time for action – creating a sitemap
Let's create a sitemap in the page Sitemap that we had created in Chapter 3, Creang Pages
and Navigaon. If you do not have the page, then please create it now.
1. In the admin console, open the page Sitemap (Content | Pages).
2. Add the Smarty tag {menu template="minimal_menu.tpl"} to the content of
the page.
This material is copyright and is licensed for the sole use by Niels Vils on 17th August 2010
Thorsøhøjen 8, Silkeborg, 8600

Chapter 5
[ 131 ]
3. Click on Apply, and use the magnifying glass icon beside the buon Apply to see the
result on the website. It should look as shown in the following screenshot:
What just happened?
Using the already known Smarty tag {menu}, you have added a sitemap to the website. It
displays the complete structure of the website with all pages that are marked as Shown in
Menu (tab Opons). You can rene the output of the {menu} tag with further parameters:
show_all="1": This opon will show all pages even if they are set to not be shown
in the menu. However, it sll will not display inacve pages.
number_of_levels="1": This seng will help to limit the output to a certain
number of levels.
You can combine as many parameters as you like. For example, to display all acve pages and
to limit the hierarchy by two levels, you would add the following line:
{menu show_all="1" number_of_levels="2"}
This material is copyright and is licensed for the sole use by Niels Vils on 17th August 2010
Thorsøhøjen 8, Silkeborg, 8600

Using Core Modules
[ 132 ]
Another example of the use of an addional navigaon opon in the content is the list
of pages (not news arcles) on the start page independent of their actual posion in the
hierarchy. Assume that you would like to create some kind of quick navigaon on your start
page giving the visitor the possibility to access some pages directly from the start page.
To create a list of subpages, use one of the following parameters in the content of the
start page:
start_element="1.2": Displays the list of pages starng at the given
start_element (posion in the hierarchy) and shows that element and
its children only
start_page="home": Displays the list of pages at the given start_page
(alias of the page) and shows that element and its children only
It's up to you, which of the two parameters you prefer to use. Surely you can simply create
the list of links to the pages manually. But in this case, the list is not dynamic. If new pages
are added, then you have to add them manually to the link list as well. If you use the Smarty
tag {menu} instead, it automacally displays all new pages as well.
Another useful parameter is:
show_root_siblings="1": This opon only becomes useful if the
start_element or start_page parameters (as shown previously) are used.
It will display pages in the same level as the selected start page or element.
See the following example for page structure and how it can be outpued on every page
with dierent parameters:
This material is copyright and is licensed for the sole use by Niels Vils on 17th August 2010
Thorsøhøjen 8, Silkeborg, 8600

Chapter 5
[ 133 ]
If your website structure looks like the preceding screenshot, then you will get the output
shown in the second column by using the tag from the rst column.
Smarty tag Output
{menu start_
element="3"}
{menu start_
element="1.1" show_
root_siblings="1" }
{menu start_
element="1.1" show_
root_siblings="1"
number_of_levels="1"}
You can see how exible the navigaon layout can be on CMS Made Simple. On every page,
you can precisely dene your navigaon structure and even create a kind of arcles' catalog
by adding arcle category rst and then assigning arcles to the categories and displaying
them with Menu Manager on the website in any page or in the template.
Printing pages
With CMS Made Simple, every page and news arcle can be automacally prepared for print
preview with the built-in Prinng module.
Time for action – adding a print link
Let's see how you can add a link to the print version of every page or news arcle.
1. In the admin console, open the template Business World for edit
(Layout | Templates).
2. Add the Smarty plugin {print} above the {content} tag in the template,
shown as follows:
...
<div id="content">
<h1><span>{$friendly_position}</span> {title}</h1>
{print}
{content}
...
3. Click Apply, and see the changes in your website.
This material is copyright and is licensed for the sole use by Niels Vils on 17th August 2010
Thorsøhøjen 8, Silkeborg, 8600

Using Core Modules
[ 134 ]
What just happened?
With the custom Smarty tag {print}, you use the core module Prinng. At the place where
you have added the tag, a link Print this page is displayed. When you click on the link, a new
page is opened with a print friendly version of the page. It does not have any special styles in
it, and it does not display a main template but only the content of the page.
There are some useful parameters that help you to customize the link Print this page and
its behavior.
text="Print this page": Overrides the default text for the print link.
popup="false": Set this to true and the page for prinng will be opened in a new
window. Be careful, some browsers block popup windows!
script="false": Set this to true and the print version will automacally open
the print dialog of the browser.
includetemplate="false": If this is set to true, not only the content of the
page, but the whole page template including the content of the page, header,
navigaon, and footer area will be displayed.
showbutton="false": Set this to true to show a graphical buon instead of the
text Print this page.
If the preceding parameters do not oer enough ways for you to customize the look and feel
of the print link and print view, you are free to customize the module in the admin console
(Extensions | Prinng). There are four tabs:
Link template: The template that is used to display the link to the print (or PDF)
version of your website.
Print template: The template that is used to display the print version. You can add
your own HTML markup here, like URL of the website, website company, or contact
details, so that this informaon is automacally displayed in the print version of
the website.
Override print stylesheet: Gives you the possibility to insert your own, custom CSS
to the print version. Normally, you would use it to dene the font size and set it in
points as oen used in print works.
PDF sengs: We will discuss this tab later in the secon Generang a PDF version of
the page.
This material is copyright and is licensed for the sole use by Niels Vils on 17th August 2010
Thorsøhøjen 8, Silkeborg, 8600

Chapter 5
[ 135 ]
Adding media type to stylesheets
Somemes a visitor of the page does not use the special print buon but the default print
dialog of the browser. In this case, the whole page is printed out, as shown on the screen.
You can use media type for the stylesheets to customize the printed version in this case as
well. In pure CSS, you can dene dierent media types as HTML aributes in the link tags
as follows:
<link rel="stylesheet" type="text/css" media="screen" href="sheet.
css">
<link rel="stylesheet" type="text/css" media="print" href="print.css">
In CMS Made Simple, you add the Smarty tag {stylesheet} to the template that generates
the HTML link tags automacally, so that you cannot add HTML aribute media to it.
Nevertheless, you can aach two dierent stylesheets to your template and mark them
as screen, print, or any other allowed type.
In the admin console, open your stylesheet (Layout | Stylesheets) for eding and scroll
down to the Media Type secon:
Select the media types that you would like to serve with this stylesheet, for example, screen.
To add a special stylesheet containing formang for the print view of your page, create a
new stylesheet with print formats. Select print as the media type in the Media Type secon
(see the preceding screenshot), then aach this stylesheet to the template. CMS Made
Simple will automacally add the HTML aribute media to the link tags generated at the
place where {stylesheet} was added to the template.
This material is copyright and is licensed for the sole use by Niels Vils on 17th August 2010
Thorsøhøjen 8, Silkeborg, 8600

Using Core Modules
[ 136 ]
Generating a PDF version of the page
You can produce a PDF output of the page with the Prinng module. Acvate PDF sengs
to allow PDF generaon for the website. On the PDF Sengs tab (found at Extensions |
Prinng), select the opon Enable PDF-generaon. Then add a PDF print link or buon
to the template or page as follows:
{print pdf="true"}
The Generate PDF link is displayed wherever the preceding tag is added. Customize the PDF
sengs (Extensions | Prinng) such as the header, font size, font type, or page orientaon.
If PDF generaon is enabled, you can also see an addional tab for the PDF template so that
you can enhance it to meet your needs.
Adding more modules to your website
Addional features, such as News, Search, File Manager, Menu Manager, and Prinng
are found in the core modules of CMS Made Simple. These modules are installed with
CMS Made Simple by default. These modules are developed by the CMS Made Simple
development team.
In the admin console, click on Extensions | Modules and nd a list of all the modules that
are available on your installaon, their versions, and addional informaon. You will also nd
a Help link beside each module that helps you to understand how the module can be used
and what parameters are available. Installed modules have a green ck in the Acve column
and their Status is Installed.
You can enrich your website with more features by installing addional modules that are
developed and supported by third-party developers. There are over 300 modules available
for CMS Made Simple. Just to name some of the oponal features that you can add to your
website: login funconality for your visitors, creaon, and automac update of the Google
sitemap according to the website page structure, photo gallery, e-commerce funcons,
discussion board, products catalog, feedback form, and more.
Most of the modules can be easily installed and used without any special knowledge by using
the Module Manager.
Using the Module Manager
To choose and install new modules, click on Extensions | Module Manager in the
admin console. Noce that the modules listed here are not standard modules of CMS
Made Simple, and therefore not all of them have got the same good quality as the core
modules. Therefore, you see the Use at Your Own Risk message above the list of modules.
Nevertheless, there are a lot of modules that are very useful and sophiscated, and are
thoroughly supported by their developers.
This material is copyright and is licensed for the sole use by Niels Vils on 17th August 2010
Thorsøhøjen 8, Silkeborg, 8600

Chapter 5
[ 137 ]
The Available Modules tab is your research centre for available modules. The modules are
sorted alphabecally by their names and have mostly good explanaons which can be found
by clicking on the Help link beside the module name.
There is no possibility to search for a module funconality by keywords in Module Manager.
However, you can use the search feature in CMSMS Forge. CMSMS Forge is a hub for
all features such as modules, plugins, or translaons. It can be found at http://dev.
cmsmadesimple.org. Enter the search word or phrase in the top-right corner in CMSMS
Forge and nd the list of modules, plugins (also called tags), or translaons that match your
search criteria. If you are interested in any module found in the list; note its name, return
to the admin console in Extensions | Module Manager, and search in the alphabecal
list for the module name in queson. Read the Help secon to see if the module suits
your requirements.
Installing additional modules
Before installing a module, you should check the Dependencies link beside it in the list of
modules in the Module Manager. Some modules depend on other modules in order to
funcon, so you have to install the other modules rst.
Time for action – module installation
Let's install an addional module that allows us to manage FAQ on the website.
1. In the admin console, click on Extensions | Module Manager, and choose the tab
Available Modules tab.
2. In the list of modules, select the leer Q, and nd the module Quesons.
3. Click on the Dependencies link to see what modules have to be installed rst.
4. Return to the list of available modules (Extensions | Module Manager) and select
the leer C. Find the module CGExtensions, and click on the Download & Install
link. The module CGExtensions will be installed.
5. Return to the list of available modules (Extensions | Module Manager), and select
the leer Q again. Find the Quesons module.
This material is copyright and is licensed for the sole use by Niels Vils on 17th August 2010
Thorsøhøjen 8, Silkeborg, 8600

Using Core Modules
[ 138 ]
6. Click on Download & Install. The module Quesons will be installed.
7. Open the page FAQ for edit (Content | Pages).
8. Add the Smarty tag in the page, as shown in the following screenshot:
9. Click on Apply, and then click the magnifying glass icon beside the Apply buon to
see the changes on the page. It should look as shown in the following screenshot:
This material is copyright and is licensed for the sole use by Niels Vils on 17th August 2010
Thorsøhøjen 8, Silkeborg, 8600

Chapter 5
[ 139 ]
What just happened?
You have installed a new module. The Quesons module is now available on every page or
template of your CMS Made Simple website. You will nd the Quesons module in the list
of installed modules in the admin console (Extensions | Modules) as well.
Each module that you have installed can be used in the content of a page or template by
using the Smarty tag {cms_module …}. This tag has a required parameter module that
is set to the name of the module, as shown in the module list (Extensions | Modules).
Generally, all modules can be used with this tag:
{cms_module module="MODULE_NAME"}
Just replace MODULE_NAME with the name of the installed module to see how the module acts
by default. The Quesons module displays the FAQs which can be created, edited, deleted,
and categorized in the admin console (Content | Quesons and Answers). It is self-explaining
how the FAQ can be built (use the link Add New Queson to add a new pair of quesons and
answers). Please use the Help link in the list of installed modules (Extensions | Modules) to
nd some usage examples and an addional parameter for the module Quesons.
For example, if you do not like the lter form in the list of quesons and answers, remove it
with the parameter nofilter shown as follows:
{cms_module module="Questions" nofilter="yes"}
Some modules have a short version and can be called only by their names.
Short notaon Long notaon
{news} {cms_module module="News"}
{search} {cms_module module="Search"}
{menu} {cms_module module="MenuManager"}
Not available
{cms_module module="Questions"}
There is no dierence in funconality. Every module can be used with long notaon and only
some of them have short notaon implemented. Please see the Help module to determine
whether or not short notaon is available.
Installing modules with XML le
On some web hosng, there is no possibility to connect to external resources (such as
CMSMS Forge). In this case, you will not see any module in the list of available modules.
Nevertheless, you can install modules manually as well, if you download the XML installaon
le for them.
This material is copyright and is licensed for the sole use by Niels Vils on 17th August 2010
Thorsøhøjen 8, Silkeborg, 8600

Using Core Modules
[ 140 ]
To nd the module installaon le, open CMSMS Forge (http://dev.cmsmadesimple.org)
and search for a desired module. Click on the module name, and select the Files tab to the
right of the module name. Find the newest XML le in the list of les shown, and save it to
your local disk. In the admin console, click on Extensions | Modules, and select the saved XML
le in the eld Upload, below the list of the modules. Click on Submit, and the module will be
shown in the list of modules. However, it is not installed yet. Click the Install link beside the
module to complete its installaon. You can now use it the same way as if it had been
installed automacally with the Module Manager.
Available upgrades
From me to me, new versions with new features or bug xes are released. In the Available
Upgrades tab, you can see which of your installed modules have newer versions compared
to the version installed on your system.
To upgrade modules, search for their names in the list on the Available Modules tab
and click the Upgrade link that is shown at the place of Download & Install link. Before
upgrading, make a backup of your website so that you have the ability to roll back if
something goes wrong.
How to nd the best CMS Made Simple module for your purpose
There are a lot of modules for CMS Made Simple, but not all of them are of the same quality.
The version of the module normally indicates how mature it is. Module versions that start
with 0, like 0.3 or 0.5, are alpha versions. This means that these modules are in the rst
phases of tesng and could exhibit some errors or unexpected behavior. Use these modules
with cauon if you are not a technical person.
The About link beside the module name in the list of Available Modules (Extensions |
Module Manager) will inform you when the latest version of the module was released. A last
release date of 2006 or 2007 could indicate that there is no scope for development for the
module anymore, and it has been abandoned by its developer. In this case, it is beer to look
for another module or use this one at your own risk.
The Help link gives you extended informaon about the module funconality. See the
parameter secon to gure out if your requirements can be solved with the module
in queson.
Uninstalling and removing modules
All modules that you do not need can be uninstalled from the list of modules (Extensions |
Modules). If you do not need the module and uninstall it, then all data that is saved in it
will be lost. The module itself will be inacve but sll shown in the list of modules. By
removing modules from the list, you also physically remove the associated module les
from your website.
This material is copyright and is licensed for the sole use by Niels Vils on 17th August 2010
Thorsøhøjen 8, Silkeborg, 8600

Chapter 5
[ 141 ]
You cannot remove core modules as they are a part of the standard installaon of CMS
Made Simple.
Pop quiz – using core modules
1. What is the main feature of a global content block?
a. It can add repeated texts and pictures to your website.
b. It can place dierent company addresses (HQ and subsidiaries) on
dierent pages.
c. The Smarty tag has to be added to the template.
d. The global content block has to be installed with the Module Manager.
2. What happens if the summary text in the news is not wrien?
a. You can only place it in the category General.
b. The whole text is shown on the website in the news secon.
c. The news will not be displayed on the website in the news secon.
d. You cannot save the news without the summary.
3. Which is the standard folder that the File Manager uses to store the les?
a. uploads
b. downloads
c. images
d. There is no standard folder.
4. Which image format should not be used in websites?
a. JPEG
b. GIF
c. TIFF
d. PNG
5. In order to print out PDF Documents, you have …
a. to use the Smarty tag {pdf_onpage pdf="true"}.
b. to rst download Adobe Reader.
c. to be sure that your visitors have got Acrobat.
d. to use the Smarty tag {print pdf="true"}.
This material is copyright and is licensed for the sole use by Niels Vils on 17th August 2010
Thorsøhøjen 8, Silkeborg, 8600

Using Core Modules
[ 142 ]
6. How can you nd the best CMSMS module?
a. Be sure that it is an alpha version, because alpha is a synonym for high
quality every me.
b. Be sure that the last release is not too long ago because you can be sure
that the developer keeps the module alive.
c. Be sure that the last release is at least 18 months ago because you can be
sure that the developer made a stable module.
d. Be sure that the module's version starts at least with a 0.5, because 0.3 or
further versions are not stable.
Have a go hero – applying customization to the core modules
You can integrate news, search, and prinng features on your website according to your
individual requirements. Use the Help secon for each module to gure out how you
can customize it. Use module templates to suit the layout of each module according to
your design. When nished, the result will be a rudimentary website build with CMS
Made Simple. If you do not have any addional requirements, you can stop at this point.
Congratulaons! You are almost ready with the website that can now be lled with content
and published.
Summary
In this chapter, you have learned how to use and customize standard modules
(core modules) installed with CMS Made Simple.
Specically, we covered:
How to use global content blocks in the pages. A global content block is not really a
module, but an addional feature that can be used to display the same content in
dierent locaons on your website.
Using news feature for adding news arcles to the website, placing them in dierent
categories and displaying them, depending on the category at dierent locaons on
your website.
Using and customizing a search feature for the content of the pages or news arcles
on the website.
Using the Image Manager to upload images to your website, edit them online, and
using them in the content or in the template of the website.
Using the Menu Manager to display any part of your website structure in the
content. You learned how a sitemap or any dynamic list of pages can be created.
This material is copyright and is licensed for the sole use by Niels Vils on 17th August 2010
Thorsøhøjen 8, Silkeborg, 8600

Chapter 5
[ 143 ]
Using the Prinng module to create a print version of the website pages or even to
create a PDF version of the website without any special knowledge.
Using the Module Manager to install third-party modules, and thus add new
features to the website like the FAQ feature. We will learn addional modules in
Chapter 7, Using Third-party Modules.
For each module, you saw how the powerful concept of "template in template" allows you to
fully customize the look and feel of each module template. By combining Smarty tags, HTML,
and CSS, you do not have any design restricons and can use a design of any complexity on
your website.
Now that we've learned about modules, we're ready to learn about roles and permissions
that users with access to the admin console of your website can have—which is the topic of
the next chapter.
This material is copyright and is licensed for the sole use by Niels Vils on 17th August 2010
Thorsøhøjen 8, Silkeborg, 8600

This material is copyright and is licensed for the sole use by Niels Vils on 17th August 2010
Thorsøhøjen 8, Silkeborg, 8600

6
Users and Permissions
This chapter is important to read if you are going to grant access to the admin
console of your website to other users. Users with access to the admin console
of CMS Made Simple are dierent from standard visitors to the website. In this
chapter, we are talking about users involved in the development of the website.
We speak about editors, who write content, create and edit pages; designers,
who edit templates and stylesheets; and administrators, who manage website
modules, other users, and their permissions in the admin console.
You do not need to read this chapter if you are the only person who develops the website
and thus has an unrestricted administrator account. However, if you (or your customer)
have a team where dierent tasks are shared between the team members, then you have to
understand how you can grant dierent permissions to dierent users. It will safeguard your
website and makes it simpler for a CMS Made Simple novice to concentrate on the features
that they are allowed to access.
In this chapter, we shall look into:
Roles, users, and groups
Permissions on content
Special designer permissions
Archiving and restoring dierent versions
Overview of all default permissions
User nocaons
This material is copyright and is licensed for the sole use by Niels Vils on 17th August 2010
Thorsøhøjen 8, Silkeborg, 8600

Users and Permissions
[ 146 ]
Understanding users and their roles
A role is a collecon of permissions grouped by general tasks that the user has to be able
to perform on the website. An editor may be responsible for creang, reorganizing, and
eding pages. A designer does not need to have any permission for page operaons, but for
creang and eding templates (including module templates). An administrator is a person
who has all permissions in the admin console and has unrestricted access to the enre
admin console.
In CMS Made Simple, three roles are suggested by default—editor, designer, and
administrator. The rst user created during installaon of CMS Made Simple gets the
administrator role by default. This user cannot be deleted, deacvated, or removed from
the administrator group, as it would mean that there is no administrator for the website at
all. You should choose the name of this user and pay aenon to the password strength.
Members of the administrator group automacally get all the permissions.
Let's see how you can create a new user and learn about the minimum features that every
user has, independent of his/her role.
Time for action – creating a new usercreating a new user a new user
1. In the admin console, click on Users & Groups | Users.
2. Click on Add New User, and ll in the elds, as shown in the following screenshot:
This material is copyright and is licensed for the sole use by Niels Vils on 17th August 2010
Thorsøhøjen 8, Silkeborg, 8600

Chapter 6
[ 147 ]
3. Click on Submit.
4. Log out (CMS | Logout) and log in as Peter. The admin console should now look as
shown in the following screenshot:
What just happened?
You have created a new user without assigning him to any group. This user can log in to
the admin console. There are only two main menu items that the user can access—CMS
and My Preferences. The user can change his name, password, and e-mail address in the My
Account secon. He can dene his personal preferences such as language, admin template,
set default start page for the admin console, and more. He is also able to manage his
personal shortcuts.
It is important to dene an e-mail address for every user, as this e-mail is used to recover
the password, in case the user forgets it. On the login screen of the admin console of CMS
Made Simple (when you are not logged in), you will nd the link Forgot your password.
Click it, enter Peter in the Username eld, and click on Submit. An e-mail will be sent to
the e-mail address associated with this user. If no e-mail address has been set for this user,
then automac password recovery is not possible. In this case, only the administrator of the
website can reset the user's password.
This material is copyright and is licensed for the sole use by Niels Vils on 17th August 2010
Thorsøhøjen 8, Silkeborg, 8600

Users and Permissions
[ 148 ]
The administrator of the website can set any user as inacve by clicking the icon with a
green ck in the column Acve (Users & Groups | Users). The user account is not deleted,
but the user is not able to log in to the admin console unl his account has been acvated
again. If you delete the user, all permissions and personal user preferences will be
irrevocably removed.
If the user is not assigned to any group, then he is not allowed to do anything other than
changing his personal sengs. Let's assign the user Peter to the editor group to see what
tasks he will be allowed to perform as an editor.
Time for action – assigning a user to a groupgroup
1. In the admin console, click on Users & Groups | Users.
2. Select the user Peter for edit by clicking on his username.
3. Select the Editor checkbox at the boom of the screen, as shown in the
following screenshot:
4. Click on Submit.
This material is copyright and is licensed for the sole use by Niels Vils on 17th August 2010
Thorsøhøjen 8, Silkeborg, 8600

Chapter 6
[ 149 ]
5. Log out (CMS | Logout) and log in as Peter. The admin console should look as shown
in the following screenshot:
What just happened?
You have given the user addional permissions. Now, he can access a new menu item
called Content. There are no content pages, but only News that Peter can submit. Let's see
what permissions Peter has now. In the admin console, click on Users & Groups | Group
Permissions. In the rst column, all available permissions are listed. To the right of the
permission, there are three columns, one for each group—Admin, Editor, and Designer. You
can limit the view to only one group by selecng the group at the top of the table from the
drop-down list.
Find all selected checkboxes in the Editor column to see what permissions the user assigned
to this group gets. You can see that only the Modify News permission is checked for the
group. This means that the user can create news arcles and edit exisng news. When
the user creates a new item, the news is automacally saved as a dra, so that only the
administrator of the page or a user who has the Approve News For Frontend Display
permission can publish the arcle on the website.
This material is copyright and is licensed for the sole use by Niels Vils on 17th August 2010
Thorsøhøjen 8, Silkeborg, 8600

Users and Permissions
[ 150 ]
Peter is not allowed to delete news arcles (permission Delete News Arcles) and has no
access to the content pages (permission Modify Any Page or Manage All Content).
Content permissions
As the target goal of CMS Made Simple is content management, the permissions on eding
content are the most exible. You can create and manage as many editors for the website
as you like. Moreover, you can create editors with dierent access levels thus thoroughly
separang who is allowed to do what on your website.
For example, the permission Manage All Content will give the group full access to all
the features that are available with the administrator account in Content | Pages.
A user assigned to this group can:
Create new pages
Reorder and move them through the hierarchy
Make pages inacve or prevent them from showing in the navigaon
Change the default page of the website
Delete pages
Edit pages including all the informaon placed in the Opons tab
To restrict the features menoned above, you can grant the permission Modify Any Page.
This permission allows us to edit the content only. The Opons tab is not shown for the users
with this permission, so that any informaon placed in the Opons tab cannot be changed.
In addion to the last permission, you can allow some elds from the Opons tab, so that
the editor is able to change the template or mark the page as inacve.
Time for action – creating an editor account
The company page will be edited by the oce assistant Mary. The oce assistant must be
able to edit exisng pages, edit meta tags, assign templates, and set the page as inacve.
1. In the admin console, create a new user (Users & Groups | Users), and assign the
user to the group Editor, as shown in the following screenshot:
This material is copyright and is licensed for the sole use by Niels Vils on 17th August 2010
Thorsøhøjen 8, Silkeborg, 8600

Chapter 6
[ 151 ]
2. Click on Submit.
3. Modify the permissions of the group Editor (Users & Groups | Group Permissions),
and check the box for Modify Any Page.
4. Click on Submit.
5. In the admin console, click on Site Admin | Global Sengs, and choose the
Advanced Setup tab.
This material is copyright and is licensed for the sole use by Niels Vils on 17th August 2010
Thorsøhøjen 8, Silkeborg, 8600

Users and Permissions
[ 152 ]
6. In the Basic Properes eld, choose opons Template, Acve, and Page Specic
Metadata , as shown in the following screenshot (hold the Ctrl key to mark three
opons at the same me):
7. Click on Submit.
8. Log out (CMS | Logout) and log in as Mary. Check that all of the required features
are available when the page is opened for eding.
What just happened?
You have created a new user and assigned the user to the group Editor. The group is allowed
to edit any page of the website. Addionally, the elds Template, Acve, and Page Specic
Metadata are available to Mary when she edits the content.
Your template should have a Smarty plugin {metadata} in the head secon,
so that Page Specic Metadata can be placed in the source code of the page.
Note that the permission Modify Any Page does not give you the possibility to restrict access
to certain pages. If Mary is not allowed to edit every page on the website, but only some of
them, then you should switch to the concept of addional editors, which will be described in
the next secon.
Additional editors
For every content page, addional editors can be dened. You can add addional editors to
a certain page in the Opons tab in the eld Addional Editors (you must be logged in as the
administrator to do it). The addional editor of the page will be able to see and edit only the
pages that he is assigned.
This material is copyright and is licensed for the sole use by Niels Vils on 17th August 2010
Thorsøhøjen 8, Silkeborg, 8600

Chapter 6
[ 153 ]
To explain it in our example and make it more praccal, assume that Mary is not allowed
to edit all the pages but only pages History, Team, and Contact Us. Remove Mary from
the group Editor (Users & Groups | Group Assignments) by deselecng the group in line
with Mary's account. Then open the three pages listed earlier, and assign Mary in the eld
Addional Editors, in the Opons tab for every page. Now, log in as Mary, and open the list
of content pages (Content | Pages).
Addional editors automacally get the permission Modify Any Page, but are restricted
to the pages where they have been set as addional editors. You do not need any special
group or permissions for such users. Mary, as with every addional editor, is not allowed to
create new pages.
Creating new pages
The Add Pages permission depends upon other permissions that the user has. It is not
enough to add the permission Add Pages for the editor. This is because creang new pages
will automacally impact the whole website structure. Remember that the navigaon is built
enrely of the exisng pages.
Only those groups having the Manage All Content permission are allowed to create pages
at every level of the website structure. Beware that these users will not only be able to
create new pages, but also modify the whole website structure by reordering or even
deleng pages.
Time for action – adding page permissions
Assume that Mary was not only allowed to edit some pages, but also to create pages at
certain places in the hierarchy. However, Mary is sll not allowed to create pages at the top
level of the website. In the last example, we added Mary as an addional editor to some
pages. Let's give her the right to create new pages.
1. In the admin console, click on Users & Groups | Groups, and create a new group
named Addional Editors.
This material is copyright and is licensed for the sole use by Niels Vils on 17th August 2010
Thorsøhøjen 8, Silkeborg, 8600

Users and Permissions
[ 154 ]
2. Click on Users & Groups | Group Permissions, and assign the permission Add Pages
to the group Addional Editors, as shown in the following screenshot:
3. Click on Submit.
4. Assign Mary to the group Addional Editors (Users & Groups | Group
Assignments).
5. Log out (CMS | Logout) and log in as Mary.
6. Click on the link Add New Content (Content | Pages), and see the opons in the
Parent eld, as shown in the following screenshot:
What just happened?
Mary is an addional editor of the pages History, Team, and Contact Us. Assigned to the
group with the permission Add Pages, Mary can now create new pages under the pages in
which she has permission to. However, she is not able to create pages in other secons of
the website. For all pages that she creates, Mary will be set as the owner of the page.
This material is copyright and is licensed for the sole use by Niels Vils on 17th August 2010
Thorsøhøjen 8, Silkeborg, 8600

Chapter 6
[ 155 ]
If you would like to approve pages created by editors before showing them in
the menu of the website, click on Site Admin | Page Defaults and deselect the
eld Show in Menu. This way, all newly created pages are not shown in the
navigaon. By default, the editor cannot change these sengs. He/she has to
wait for the administrator of the website or for the user with the permission
Manage All Content for the page to be shown in menu.
In the same manner, you can grant the permission Remove Pages. Assign the permission to
the group Addional Editors, so that they can delete only those pages where they have been
assigned as editors.
Designer permissions
If you have a user with strong HTML and CSS knowledge who is able to make reasonable
changes to the enre layout of the website or just to the module templates, then you can
assign that user to the group Designer.
A designer must have the following set of permissions:
Add Stylesheet Associaons
Add Stylesheets
Add Templates
Manage Menu
Manage Themes
Modify Files
Modify Stylesheet Associaons
Modify Stylesheets
Modify Templates
Remove Stylesheet Associaons
Remove Stylesheets
Remove Templates
View Tag Help
This set of permissions allows the designer of the website to perform any task related to the
design of the template. However, the designer will not be able to edit the content, submit
news, or set any site preferences.
This material is copyright and is licensed for the sole use by Niels Vils on 17th August 2010
Thorsøhøjen 8, Silkeborg, 8600

Users and Permissions
[ 156 ]
The designer sll needs a content page that he can use for design or layout tests. In order
to prevent the test page being shown in the menu or in the sitemap, you should do the
following trick.
Time for action – creating a test area for the designer
1. In the admin console, click on Content | Pages.
2. Click on Add New Content and create an inacve Secon Header named Design
Test as shown:
3. Click on Submit.
4. Click on Add New Content again, choose the secon header Design Test (created in
step 2) in the eld Parent. Select the Opons tab, scroll down, and select the user or
the whole group Designer in the eld Addional Editors.
5. Click on Submit.
6. Log out and log in again as Designer. Click on Content | Pages to see the test page.
What just happened?
You have created a new page and placed it below an inacve Secon Header. The pages
placed below inacve pages cannot be displayed in the website structure. Even if you use
the parameter show_all with the Smarty plugin menu (for example, in the sitemap) the
page will not be displayed. However, it is acve, and it can be accessed directly through the
magnifying glass icon, and can be used by the designer as a test area.
This material is copyright and is licensed for the sole use by Niels Vils on 17th August 2010
Thorsøhøjen 8, Silkeborg, 8600

Chapter 6
[ 157 ]
In the admin console (Site Admin | Global Sengs), under the Advanced Setup tab, you can
dene Basic Properes for the addional editors such as Image. We used this eld in the
last chapter. Here, the editor can choose an image from a drop-down list and thus assign an
image to a certain locaon in the template dened by the designer.
There is a useful third-party module called Template Externalizer. It allows
you to use any external editor to edit your templates and stylesheets. Aer
installing and turning on Development Mode, the module automacally
extracts all stylesheets and templates into the specied directory.
If you modify templates in this external directory, changes are automacally
detected, imported to the database, and take eect immediately. When the
module is installed, there is the permission Template Externalizer that can be
granted to the group Designer.
Viewing the admin log
The admin log records the details of the changes made to the site by all users. This log can
be found in the admin console (Site Admin | Admin Log) and includes records about the
creang, deleng, and changing of:
Pages and global content blocks
Templates and stylesheets
Users, groups, and permissions
Site preferences
Modules
At the top of the log, you will nd a navigaon secon providing links to the rst, next,
previous, and last pages of the log. There is also a link to download the complete log as a tab
separated text le. At the boom is the Clear Admin Log link. This will clear the enre log.
Important! You won't be asked to conrm the Clear Admin Log, and this acon
cannot be undone once completed.
Once the admin log is cleared, there is no evidence of who has changed anything on the
website and what the changes were. Therefore, there is even a separate permission called
Clear Admin Log that is granted separately from the permission Modify Site Preferences.
This material is copyright and is licensed for the sole use by Niels Vils on 17th August 2010
Thorsøhøjen 8, Silkeborg, 8600

Users and Permissions
[ 158 ]
There are ve columns in each log entry, which are as follows:
User: This shows the username of the user who performed the acon. Even if the
user is deleted later, the username is sll saved in the log.
Item ID: This shows the database ID of the aected item. Note that item IDs are
only unique to the Item Name shown in the next column and not across the whole
database, so the same item ID may appear repeatedly.
Item Name: This shows the name of the item aected.
Acon: This describes the type of change made to the item.
Date: This saves the date and me the change was made.
If you have novice users with access to the admin console, then you probably would like to
keep all versions of the content to be able to restore them if something goes wrong. There
is no such feature in the standard installaon of CMS Made Simple, but there is a nice
third-party module that you can install addionally.
Archiving changes and restoring them
Once the Archiver module is installed, it keeps a copy of every content page, global content
block, stylesheet, or template that is edited or deleted. It also provides the possibility to
restore anything in the archive to the current state. This means that your users can edit
various aspects of the site, and you can reverse their changes later.
To install the Archiver module, open the admin console, and click on Extensions | Module
Manager. Click on the Available Modules tab, and then click the Download & Install link
which can be found in the same line as the module name. The module is installed.
Aer installaon, the module will automacally start saving changes into the archives. For
example, if you would like to track the changes of the start page, open the page, and save it
without any changes, so that the rst version of the page is created. This version will be used
as a base for future restoraons.
This material is copyright and is licensed for the sole use by Niels Vils on 17th August 2010
Thorsøhøjen 8, Silkeborg, 8600

Chapter 6
[ 159 ]
Time for action – restoring changes made by an editor
Assuming that you have installed the Archiver module, as just described, you can restore the
changes made by the editor as follows:
1. Log in as the editor and edit any page that you are allowed to.
2. Log out and then log in again with the administrator account.
3. Click on Content | Archive Manager Module.
4. Search for the name of the page that has been edited in step 1, and click on it.
5. In the Expanded Archive View, nd the second last version (revision) of the page
and click on the last icon in the column Operaon.
6. View the page.
What just happened?
You have restored the older version of the content and made it to the current one. The
editor's version is not deleted but just replaced, so that you can restore it any me.
You can automacally purge archives either by the number of stored versions for each
item (that is, keep only the last ve versions of each page, global content block, stylesheet,
or template) or by date (that is, keep the versions of the last seven days only). For automac
purge setup, click the Archive Preferences link in the admin area of the module (Content |
Archive Manager Module).
You do not have to purge archives, though you can keep accumulang all changes. However,
if you have a lot of changes made daily, you must purge your archive to prevent an overow
of the database.
This module is not a substute for the regular osite database backups. The
data is sll stored in the same database, which might render the archives
useless upon a database crash. Read the appropriate secon in Chapter 11,
Administraon and Troubleshoong to learn how to create database backups.
This material is copyright and is licensed for the sole use by Niels Vils on 17th August 2010
Thorsøhøjen 8, Silkeborg, 8600

Users and Permissions
[ 160 ]
Overview of all default permissions
Permissions are always given to the group and are shared by all users assigned to this group.
In the following table, the rst column is the name of the permission, the second column is
a suggeson as to what role the permission can be granted to, and the third column advises
you if there are some precondions for the permission to take eect.
Permission Suggeson for
the role
Descripon
Add Global
Content Blocks
Editor The group is allowed to create new global content blocks
(Content | Global Content Blocks). Depends upon the
permission Modify Global Content Blocks.
Add Groups Admin The group is allowed to create user groups (Users & Groups |
Groups). Depends upon the permission
Modify Groups.
Add Pages Editor The group allows the creaon of children content pages
below the pages where the user is an owner or an addional
editor. The user must be set as Owner of the page or an
Addional Editor.
Add Stylesheet
Associaons
Designer The group is allowed to associate stylesheets with templates.
Add Stylesheets Designer The group is allowed to create new stylesheets.
Add Templates Designer The group is allowed to create new templates.
Add Users Admin The group is allowed to create new users with access to the
admin console.
Allow usage
of advanced
prole in
TinyMCE
Editor Users in this group will automacally get advanced prole
sengs made for the TinyMCE module. However, they are not
able to change the prole itself.
Approve News
For Frontend
Display
Editor Allows changing the Status eld of the news item from Dra
to Published. The user in this group is also able to edit news
arcles.
Clear Admin
Log
Admin Clear the history in Site Admin | Admin Log. Depends upon the
permission Modify Site Preferences.
Delete News
Arcles
Editor The group is allowed to delete news arcles. Depends upon the
permission Modify News.
Manage All
Content
Editor The group is allowed to create, move, and delete pages. The
group is allowed to access the Opons tab while eding the
pages and change anything that can be found on the tab in
contrast to the permission Modify Any Page.
Manage Menu Designer The group can modify menu templates and create new menu
templates.
This material is copyright and is licensed for the sole use by Niels Vils on 17th August 2010
Thorsøhøjen 8, Silkeborg, 8600

Chapter 6
[ 161 ]
Permission Suggeson for
the role
Descripon
Manage
Themes
Designer The group is allowed to export themes. If dependant
permissions are available, the user is also able to import
themes.Depends upon the permissions Add Stylesheet
Associaons, Add Stylesheets, and Add Templates.
Modify Any
Page
Editor The group is allowed to edit content pages. There is no Opons
tab while eding the content for this group. However, some
elds from the Opons tab can be added from Site Admin |
Global Sengs (tab Advanced Setup, eld Basic Properes).
Modify Events Admin The group is allowed to add and reorder events (refer to
Chapter 8).
Modify Files Editor Allows using File and Image Manager, thus giving full access to
the /uploads folder of your installaon.
Modify Global
Content Blocks
Editor Allows eding and deleng of global content blocks.
Modify Group
Assignments
Admin Allows assigning users to dierent groups.
Modify Groups Admin Allows changing group names.
Modify
Modules
Admin Allows managing of Extensions | Modules and Extensions |
Module Manager, thus installing, upgrading, uninstalling, and
removing modules.
Modify News Editor Allows eding news and creang new arcles with status Dra.
Modify
Permissions for
Groups
Admin Allows modifying permissions for the group.
Modify Site
Preferences
Admin This is a set of mulple permissions including the tabs
Preferences, Sengs, or Opons in dierent modules. For
example, the user is able to access the Opons tab on the
News module, the Sengs tab in File Manager, CMSMailer,
the Opons tab in the Search module, and so on.
Modify
Stylesheet
Associaons
Designer Allows aaching stylesheets to the templates and resolving the
aachment as well.
Modify
Stylesheets
Designer Allows eding exisng stylesheets.
Modify
Templates
Designer Allows eding exisng templates including templates in
modules News, Search, and Prinng.
Modify User-
dened Tags
Admin Allows adding user dened tags to the website (refer to
Chapter 10).
This material is copyright and is licensed for the sole use by Niels Vils on 17th August 2010
Thorsøhøjen 8, Silkeborg, 8600

Users and Permissions
[ 162 ]
Permission Suggeson for
the role
Descripon
Modify Users Admin Allows eding the user with the excepon of the administrator
user account.
Remove Global
Content Blocks
Admin Allows eding the global content blocks. Depends upon the
permission Modify Global Content Blocks.
Remove Groups Admin Allows deleng user groups.
Remove Pages Editor Allows deleng content pages where the user is an Owner or
Addional editor.
Remove
Stylesheet
Associaons
Designer Allows removing stylesheet associaons.
Remove
Stylesheets
Designer Allows removing stylesheets.
Remove
Templates
Designer Allows removing layout templates, but not the module
templates.
Remove Users Admin Allows removing users with excepon of the own account and
the administrator account.
Advanced
usage of the
File Manager
module
Admin Allows viewing the complete structure of the website and not
only the /uploads directory. For this permission to work, the
advanced mode seng should be enabled in File.
View Tag Help Editor Allows reading help for the custom smarty plugins.
Module permissions
Not only can the core funcons and core modules of CMS Made Simple have permissions,
but every third-party module you have installed on your page can add the module's specic
permissions to the list. If you sll have the Quesons & Answers module installed, as
described in the last chapter, you will nd the permissions Manage Quesons , Can Answer
Quesons, and Can Approve Quesons in your list of permissions (Users & Groups |
Group Permissions).
The Archiver module has the permission Manage Archives that can be granted to advanced
users with access to the admin console or to the main editor with the permission Manage
All Content.
This material is copyright and is licensed for the sole use by Niels Vils on 17th August 2010
Thorsøhøjen 8, Silkeborg, 8600

Chapter 6
[ 163 ]
User notications
There is a nocaon area in the admin console of CMS Made Simple located below the
main menu.
You saw the message just aer the installaon of CMS Made Simple advising you about the
next steps to secure and congure the system. Later on, this area is used to nofy us when
a new version of CMS Made Simple is released. The News module uses the area to nofy
when there are some unpublished news arcles that must be approved and published.
Normally, each user logged into the admin console is able to read these nocaons even if
it is something that is not devoted to him.
You can disable nocaons in the admin console. Click on Site Admin | Global Sengs, and
select the tab Advanced Setup. Deselect the eld Allow users to view nocaons and the
messages will disappears.
Pop quiz – users and permissions
1. What is a role?
a. A bunch of permissions.
b. Another term only for editors.
c. A term for a special visitor group.
d. A term for visitors, whose permissions to read special contents can
be dened.
This material is copyright and is licensed for the sole use by Niels Vils on 17th August 2010
Thorsøhøjen 8, Silkeborg, 8600

Users and Permissions
[ 164 ]
2. Who has the right to change or delete the administrator account?
a. Absolutely nobody—an administrator cannot be deleted.
b. Each user, who is an administrator, can delete all other administrators.
c. Addional editors can edit the admin accounts.
d. Only the user who owns the rst created administrator account can delete
and edit all other admin accounts.
3. Which user group is not created by default?
a. Administrator
b. Designer
c. Addional editor
d. Editor
4. Why is it important to create an e-mail address for each user?
a. Because the CMS does not work properly without an e-mail address.
b. Because the administrator can contact the other users easily.
c. Because the e-mail is needed to recover a forgoen password by the
user himself.
d. Because the e-mail address is a check for the existence of the user.
5. What can an editor who has the permission Modify Any Page do?
a. Edit all pages.
b. Delete all pages.
c. Change the alias of all pages.
d. Change the owner of all pages.
6. What can an editor who has the permission Manage All Content not do?
a. Set pages as inacve or prevent showing them in the navigaon.
b. Delete pages.
c. Edit pages including all informaon placed on the Opons tab.
d. Change the owner of the pages.
7. What is the most important fact concerning an addional editor?
a. He can create only one page per secon.
b. He can only administrate his own pages.
c. He gets more rights than an editor with default permissions.
d. There can be an unlimited number of addional editors in contrast to
standard editors.
This material is copyright and is licensed for the sole use by Niels Vils on 17th August 2010
Thorsøhøjen 8, Silkeborg, 8600

Chapter 6
[ 165 ]
Have a go hero – users and permissions
Analyze how many persons will get access to your website. Separate them in dierent groups
according to their tasks. Create the groups and assign permissions to the group. It is beer
if you give minimum set of permissions to each group then ask the person assigned to the
group to log in and see whether he/she is able to accomplish his/her tasks in the admin
console. If there are some undesired restricons, add more permissions. Consider that
giving more access would make your system more vulnerable. Be careful and apply
permissions sparingly.
Summary
In this chapter, we learned how teamwork can be eecvely managed with access to the
admin console.
Specically, we covered:
Standard user roles in CMS Made Simple
Permissions for the editors
Permissions for the designers
Viewing the admin log and working with the Archiver module to be able to restore
older versions of the content
Now that we've learned about permissions, we're ready to enrich the website with
addional features typically found on business websites, which will be discussed in
the next chapter.
This material is copyright and is licensed for the sole use by Niels Vils on 17th August 2010
Thorsøhøjen 8, Silkeborg, 8600

This material is copyright and is licensed for the sole use by Niels Vils on 17th August 2010
Thorsøhøjen 8, Silkeborg, 8600

7
Using Third-party Modules
CMS Made Simple has only some basic features that belong to the standard
installaon. Any addional funconality can be installed with other modules.
Think of CMS Made Simple modules as Lego bricks. Modules can be installed
in any combinaon you choose. Some modules are combinable with or even
dependant on other modules. Modules are addional features that anyone can
put on their website.
To choose and install new modules, click on Extensions | Module Manager in the admin
console. Noce that the modules listed here are not standard modules of CMS Made Simple
and therefore not all of them are of the same high quality as the core modules. That is why
you see the message "Use at Your Own Risk" above the list of modules. Nevertheless, there
are many modules which are very useful, sophiscated, and were thoroughly tested by
their developers.
The Available Modules tab facilitates the installaon of packages you already know about.
The modules are sorted alphabecally by their names and a good explanaon about them
can be found by clicking on the Help link beside the module name.
In this chapter, we shall install and use the following:
Gallery
Form Builder
Newsleer
YouTube videos
So, let's get started with it...
This material is copyright and is licensed for the sole use by Niels Vils on 17th August 2010
Thorsøhøjen 8, Silkeborg, 8600

Using Third-party Modules
[ 168 ]
Creating a photo gallery
The most popular feature for websites is a photo gallery. Photo galleries are popular parts of
private porolios, music bands', or company websites. On a business website, photo galleries
are oen used to display oce buildings or photos of the team members. Products, samples,
or results of the projects are oen implemented as photo galleries as well.
If you are not using any special module for gallery, you could upload all images in one folder
on your web hosng and manually add each image to the content page. This kind of stac
gallery is dicult to maintain and design. It is not exible enough and requires deep HTML
knowledge from the page editor.
A beer soluon is to use a special module that will read a folder on the web host and
display all images from this folder using some impressive blending eects. The module will
oer a special admin area where each image's capon can be entered.
To install the Gallery module, log in to admin console and click on Extensions | Module
Manager. On the Available Modules tab, click the leer G in the alphabecal navigaon,
and nd the module called Gallery. Click the Download & Install link in line with the module
name. The module will be installed.
Aer installaon of the Gallery module, a new folder called uploads/images/Gallery
will be automacally created on your web hosng. This folder is empty by default, so you
have to upload some images into it. You can upload images with Image Manager or File
Manager or even with an FTP browser if you have a lot of images to upload.
Time for action – creating the rst gallery
Let's see how images from the folder uploads/images/Gallery can be displayed on the
Photo Gallery page. Perform the following steps:
1. In the admin console, open the Photo Gallery page for eding (Content | Pages).
2. Enter the Smarty plugin in the Content eld, as shown in the following screenshot:
This material is copyright and is licensed for the sole use by Niels Vils on 17th August 2010
Thorsøhøjen 8, Silkeborg, 8600

Chapter 7
[ 169 ]
3. Click on Apply and then on the magnifying glass icon beside the Apply buon to see
the rst gallery on the website.
What just happened?
You have uploaded some images into the folder /uploads/images/Gallery. This folder
was automacally created aer the module installaon. Your rst gallery is displayed on the
Photo Gallery page.
You will nd the admin area of the Gallery module in the admin console (Content | Gallery).
Open the admin area, and click on the folder named Gallery to see what you can change in
the module output. Change Gallery Title and Comment to suit your needs. Choose another
Template for dierent blending eects in the gallery. If no template is specied for the
gallery, then the default template (Content | Gallery, tab Templates) is used.
The size of thumbnails (small preview versions of the images) is set to 96x96 pixels (standard
thumbnail size in CMS Made Simple). In the photo gallery, you can enter your own thumbnail
size and then choose any of the following resize methods:
crop: Crops the original image to the thumbnail size taking smaller detail of the
image. Proporons of the original image are ignored.
scale: This will resize the original image to the custom thumbnail size. The
proporons of the original image are held, so that only the width or height
can be taken into account while resizing.
zoom & crop: This is the same as 'crop', but the details of the image are slightly
zoomed. Crops the original image to the thumbnail size while taking zoomed details
of the image. The proporons of the original image are ignored.
zoom & scale: The same as 'scale crop', but the thumbnail is slightly zoomed.
Resizes the original image to the custom thumbnail size. The proporons of the
original image are held, so that only the width or height can be taken into account
while resizing.
When the thumbnail size is changed, you have to click on the link (Re)Create Thumbs for the
new thumbnails to be created.
At the boom of the screen, a list of the images that are uploaded into the folder uploads/
images/Gallery are displayed. For each image, you can enter a Title (image capon) and
a Comment (is not shown in any template by default). You can deacvate images rather
than delete them. In this case, the image is not shown in the gallery, but the capon and
comment will be kept.
The images in the gallery are sorted alphabecally by their lenames.
This material is copyright and is licensed for the sole use by Niels Vils on 17th August 2010
Thorsøhøjen 8, Silkeborg, 8600

Using Third-party Modules
[ 170 ]
Adding albums to a gallery
New albums are created from new folders. Create a new folder below the folder uploads/
images/Gallery with File Manager or Image Manager. Upload your images into the new
folder. In the admin area of the Gallery (Content | Gallery), nd the new folder, and edit it
the same way as your main album.
To display images from one or more directories, use the parameter dir. This parameter
species the directory (or directories) where the images are uploaded. For example, if
you have created two folders below the /uploads/images/Gallery and named them
buildings and projects, then to display images from the folder buildings only, use
the Smarty tag as shown:
{Gallery dir="buildings"}
You can override the template for the gallery directly in the Smarty tag by adding the
parameter template to it. If this parameter is not specied, then the template assigned
to the directory will be used, or else the default template will be used.
Using the gallery on other pages
Use images from the gallery on other pages and not only in the page Photo Gallery. For
example, display recently added images from your gallery on the start page and link them
to the page where the enre gallery can be found.
Time for action – adding random images to the template
Let's add two recently added images from the gallery to the start page of the website.
1. In the admin console, click on Content | Gallery, and choose the Templates tab.
2. Click the Create a new template link. Enter Latest as the template name and in the
Template Source eld add the following Smarty code:
{foreach from=$images item=image}
<a href="{cms_selflink href="photo-gallery"}" title="{$image-
>title}"><img src="{$image->thumb}" alt="{$image->title}" />
</a>
{/foreach}
You should replace photo-gallery in the example with the alias of the page
where the whole image gallery can be found.
3. Delete everything from the elds Template CSS-stylesheet and Template JavaScript.
4. Click on Save.
This material is copyright and is licensed for the sole use by Niels Vils on 17th August 2010
Thorsøhøjen 8, Silkeborg, 8600

Chapter 7
[ 171 ]
5. In the admin console, open the start page for eding (Content | Pages).
6. Add the Smarty tag to display the latest images from the gallery, as shown in the
following screenshot:
7. Click Apply and see the result on the start page.
What just happened?
You have created a new template for the Gallery module. This template displays two recently
added images from the gallery. Each image is linked to the Photo Gallery page ({cms_
selflink href="photo-gallery"}). Then, you have added the Smarty tag {Gallery
action="showlatest" number="2" template="Latest"} to the start page. There are
three parameters, which are as follows:
action="showlatest": Displays the most recently added images (by default, it
displays a total of six images). Subdirectories are automacally included.
number="2": The maximum number of images to display. All images will be
displayed if the value for this parameter is not specied.
template="Latest": Uses a separate database template for displaying the photo
gallery. This template must exist. However, it does not need to be set as default. If
this parameter is not specied, then the default template will be used.
This material is copyright and is licensed for the sole use by Niels Vils on 17th August 2010
Thorsøhøjen 8, Silkeborg, 8600

Using Third-party Modules
[ 172 ]
If you do not want to display recently added images, but some random images from the
gallery, then set the parameter action to showrandom.
Addional parameters for each module can be found in the Help module (see the link
Module Help to the right of the module name in the admin area of the module).
Creating your own gallery template
It is possible to implement any template in your gallery. I would like to show you how it
works with the AD Gallery plugin (http://coffeescripter.com/code/ad-gallery/).
AD Gallery is a jQuery plugin and consists of HTML, CSS, JavaScript, and images. We have to
put all these components in the right order to use the plugin as a gallery template.
Open the link http://coffeescripter.com/code/ad-gallery, and scroll down to the
Downloads secon. Save the le placed under The whole kit and kaboodle to your local disk
and unzip it.
On your web hosng, create a new folder adgallery in modules/Gallery/templates.
Upload the le jquery.ad-gallery.js into this folder. Then upload all images (PNG and
GIF les) from the same folder to modules/Gallery/images.
In the admin console, create a new template for gallery (Content | Gallery, tab Templates).
Enter Ad Gallery as the Template Name, and replace the Template Source with the following
code snippet:
<div id="gallery" class="ad-gallery">
<div class="ad-image-wrapper"></div>
<div class="ad-controls"></div>
<div class="ad-nav">
<div class="ad-thumbs">
<ul class="ad-thumb-list">
{foreach from=$images item=image} {if !$image->isdir}
<li>
<a href="{$image->file}">
<img src="{$image->thumb}" title="{$image->title}"
longdesc="{$image->comment}" class="image0">
</a>
</li>
{/if} {/foreach}
</ul>
</div>
</div>
</div>
This material is copyright and is licensed for the sole use by Niels Vils on 17th August 2010
Thorsøhøjen 8, Silkeborg, 8600

Chapter 7
[ 173 ]
This code was taken from the le example.html and was modied to use the Smarty tag
foreach to take all images from the gallery.
Proceed with the stylesheet. On your local disk, open the le jquery.ad-gallery.css.
This le has to be slightly modied for the images to be found on the server. Find any
occurrences of:
background: url(
and replace them with:
background: url(../../images/
Then, in the rst line, adjust the width of the enre gallery:
ad-gallery {
width: 500px;
}
Copy the enre contents of the modied stylesheet, and replace the content of the eld
Template CSS-stylesheet with it.
In the last step, copy the following code, and replace the enre content in the eld
Template JavaScript:
<script type="text/javascript"
src="modules/Gallery/templates/jquery/jquery.js"></script>
<script type="text/javascript"
src="modules/Gallery/templates/adgallery/jquery.ad-gallery.js">
</script>
<script type="text/javascript">
$(function() {
var galleries = $('.ad-gallery').adGallery();
$('#switch-effect').change(
function() {
galleries[0].settings.effect = $(this).val();
return false;
}
);
$('#toggle-slideshow').click(
function() {
galleries[0].slideshow.toggle();
return false;
}
);
});
</script>
This material is copyright and is licensed for the sole use by Niels Vils on 17th August 2010
Thorsøhøjen 8, Silkeborg, 8600

Using Third-party Modules
[ 174 ]
Click on Save, and nd the new template in the list of templates. Set the template as Default
and see your photo gallery on the website. Your gallery is now using the AD Gallery plugin.
In the same way, you can use any plugin for your gallery. Separate HTML, images, CSS, and
JavaScript from each other and place them in the appropriate elds so that all required parts
are composed on the website in the right order as before.
Adding forms with the module Form Builder
Almost every business page has a contact, feedback, or inquiry form. The Form Builder
module helps you to create forms with any level of complexity without wring any HTML.
You can add dierent input elds to it, set validaon rules, and dene how the data from
the form must be stored and/or sent by e-mail.
Install the Form Builder module in the same way as you installed other third-party modules
on the website (for example, Quesons or Gallery). Aer installaon, the admin area of the
module can be found in Extensions | Form Builder.
Before you start conguring the module, ensure that the module CMSMailer is properly
congured (refer Chapter 2, Geng Started) and you are able to send e-mails from your
CMS Made Simple website.
Time for action – adding a contact form to the website
Let's add a simple contact form to the Contact Us page and send the submied content of
the form to our e-mail address.
1. In the admin console, click on Extensions | Form Builder.
2. Click the Contact Form link.
3. Scroll down to Form Fields, and click the Send To link.
4. Replace the e-mail address in the elds "From address" for email and Desnaon
Email Address with your real e-mail address, as shown in the following screenshot:
This material is copyright and is licensed for the sole use by Niels Vils on 17th August 2010
Thorsøhøjen 8, Silkeborg, 8600

Chapter 7
[ 175 ]
5. Click on Update to save the changes.
6. Click on Save below the form elds.
7. Copy the Smarty tag from the column Form Alias in the line Contact Form, as shown
in the following screenshot:
8. Open the page Contact Us for eding (Content | Pages) and add the copied Smarty
tag into it.
9. Click Apply and view the page. It should look as follows:
10. Fill out the form, and click Submit Form, you should get an e-mail sent from this
contact form to the e-mail address given in step 4.
What just happened?
You have added a simple contact form to the page. This contact form consists of the eld
set (a border around all elds), ve visible elds, and the Submit Form buon. You have
changed the e-mail address to be sure that the results from the form are sent through
e-mail to the right address. This contact form can be fully customized to suit your needs.
This material is copyright and is licensed for the sole use by Niels Vils on 17th August 2010
Thorsøhøjen 8, Silkeborg, 8600

Using Third-party Modules
[ 176 ]
Customizing the contact form
Let's see exactly what the contact form is made up of and how you can customize its
appearance, the text of the e-mail message sent, and the conrmaon message shown
to the visitor aer subming the form on the website. In the admin console, click on
Extensions | Form Builder and choose Contact Form. Scroll down to the secon Form
Fields where all elds for the contact form can be customized.
You can reorder, delete, and add new elds in this secon. Contact Fieldset is an opcal
border around the elds. You can delete it (using the dustbin icon at the end of the line), if
you do not like it. In this case, do not forget to remove eldset end (the last line) as well.
To edit labels in front of the elds on the page, edit the eld (click on it in the list) and
change the Field Name. Check the box for Required, if the eld must be lled, so that
if it is empty, the form is not sent, and an error message is shown to the visitor.
This material is copyright and is licensed for the sole use by Niels Vils on 17th August 2010
Thorsøhøjen 8, Silkeborg, 8600

Chapter 7
[ 177 ]
Edit the eld Your Email Address. Set it to Required, and select Email Address in the
Field Validaon opon. This will ensure that visitors must provide a valid e-mail address,
otherwise an error message will be displayed. Set the value in the eld Send User a Copy
of Submission to Never. If you send a copy of the message to the visitor, you reveal the
desnaon e-mail address, and probably get undesired communicaon bypassing the
feedback form. Update the eld and return to the list of elds in the form.
The Email Again eld is oponal. You can remove it if you like.
The Message eld is dened as a Text Area. This means that more than one line can be
entered in the eld by the website visitor. The height and width of this eld can be changed
by seng the number of Rows (number of lines shown without scroll bar) and Columns
(number of characters shown in one line before line break). The size of the eld can also be
customized using CSS.
For each form, dierent types of template can be dened and congured. You can use a
combinaon of HTML and Smarty tags as you learned in Chapter 4, Design and Layout.
Template Descripon
Form Template This template denes how the form should look. Open the Contact
Form (Extensions | Form Builder), and click on the Form Template tab.
Some default templates can be chosen from the Load Template
drop-down list. You can also create your own template by using
instrucons and variables shown in the secon Form Template
Variables. The default Form Template is very complicated. The
reason for it is that it includes everything that you can customize
for the single elds.
Submission Template This template denes how the response message should look like
aer the form is submied. Open the Contact Form (Extensions |
Form Builder), and click on the Submission Template tab. Customize
the message in the eld Response to display. You don't need to use
any variables in this eld. I also recommend removing the part Other
informaon as it is too technical for website visitors.
Email Template This template denes how the e-mail message should look. Open the
Contact Form (Extensions | Form Builder), and click on the eld Send
To in the list of elds. Choose the Advanced Sengs tab, scroll down,
and click on the buon Create Sample HTML Template. Now, you can
edit the e-mail message in eld Email Template.
Form Builder not only oers default templates, but oers default stylesheets as well. The
stylesheet is automacally added aer installaon to Layout | Stylesheets. Aach the
FormBuilder Default Style to the Business World template by clicking on the blue CSS icon in
the list of stylesheets if you would like to use it. You can customize the aached stylesheet to
suit the form to your individual page layout.
This material is copyright and is licensed for the sole use by Niels Vils on 17th August 2010
Thorsøhøjen 8, Silkeborg, 8600

Using Third-party Modules
[ 178 ]
Adding new elds to the forms
The contact form can be enriched with more elds. Let's see how you can add a radio buon
group, drop-down group, and checkbox group to the form. New elds are created in the
admin area of the Form Builder (Extensions | Form Builder). Open the Contact Form for
eding, and click the Add New Field link below the list of elds. Then you have to select
the Field Type you would like to add.
Every me you add a new eld to the form, you must adjust the Email Template and
Submission Template. New elds are added automacally to the form but not to
other templates.
To update the Email Template, open the Send To eld for eding, and select the Advanced
Sengs tab, scroll down the page, and click the Create Sample HTML Template buon.
In the eld Email Template above you will see the sample template that will be used for
sending out messages. Edit the template if needed and click Update to save it. This would
automacally add new elds to the e-mail message. On the Submission Template tab, you
can edit the message that the visitor sees aer the form is sent. You can create a sample
HTML template here as well, and then alter it according to your needs.
In the following three secons, we will add three new elds to the contact form, so that it
looks like the following screenshot:
Adding salutation as a radio button group
For salutaon elds, you create a new eld with radio buons that are grouped so that only
one radio buon in the group can be selected at any me. Select Radio Buon Group in the
Field Type and enter the elds as shown:
This material is copyright and is licensed for the sole use by Niels Vils on 17th August 2010
Thorsøhøjen 8, Silkeborg, 8600

Chapter 7
[ 179 ]
The Radio Buon label is what visitors of the website see while lling in the form. The Value
when checked is what will be sent to you when they submit the form. Here you can enter
dierent values if you like. Inially, you see only one opon that you can ll, so click the Add
More Opons buon to add more radio buons to the group.
Click Add when you are ready, and the eld will be added to the list of elds. Below the list
of elds, you will nd the Reorder Fields link where you can easily drag-and-drop the elds
to adjust their appearance order on the page. Place Salutaon at the very top of your form
so that it appears before the Your Name eld.
Do not forget to update the Email and Submission templates aer
adding the eld to the form.
This material is copyright and is licensed for the sole use by Niels Vils on 17th August 2010
Thorsøhøjen 8, Silkeborg, 8600

Using Third-party Modules
[ 180 ]
Adding department as a pulldown eld
Another type of eld that you can easily add to the form is a drop-down eld, which is called
pulldown in CMS Made Simple. Click on the Add New Field link, and select Pulldown as the
Field Type. Enter the elds as shown in the following screenshot:
Just as in radio buons, here you can dierenate between what the visitor sees while lling
in the form (Opon Name) and the value of the eld sent to you (Value Submied).
Do not forget to update the Email and Submission templates aer
adding the eld to the form.
This material is copyright and is licensed for the sole use by Niels Vils on 17th August 2010
Thorsøhøjen 8, Silkeborg, 8600

Chapter 7
[ 181 ]
Adding multiple choice selection with the checkbox group
In contrast to radio buons, the checkboxes in a group can be checked without changing the
state of other checkboxes, so mulple choices are possible. It would not make any sense for
the salutaon eld, but for elds where the visitor can request dierent types of informaon
this can be useful. Click on the Add New Field link, and select Check Box Group as Field
Type. Enter the elds as shown in the following screenshot:
Checkboxes can have dierent states—checked and not checked. Depending on the state,
dierent values will be sent to you aer subming the form. You can leave the Value when
not checked eld empty. No values are sent if the boxes are not checked.
Keep the number of mandatory entries to the bare minimum, if you actually
want people to write to you. The best clients are busy people who won't spend
hours on lling in pedanc forms in the rst place, but rather choose a provider
that spares their me.
This material is copyright and is licensed for the sole use by Niels Vils on 17th August 2010
Thorsøhøjen 8, Silkeborg, 8600

Using Third-party Modules
[ 182 ]
Adding a Captcha to the forms
A Captcha is a type of test used in forms to ensure that the form is not lled in by a
computer. It is an acronym for Completely Automated Public Turing Test To Tell Computers
and Humans Apart. The process usually involves the page asking a user to enter some
characters in the special eld. Computers mostly are not able to solve the captcha test,
so any user entering a correct soluon is presumed to be a human being. You can acvate
captcha in all CMS Made Simple forms.
Install the Captcha module (Extensions | Module Manager). In the admin console, choose
Extensions | Catpcha. There are some opons you can use to generate a captcha image. The
captcha library hn_captcha is used by default. To change the default sengs of the image,
click on the opons link beside the eld Captcha Library to use.
To give your captcha strong security, change the values in the elds—chars, minsize,
maxsize, maxrotaon, and secretposion. Add a secret string (something that one
cannot guess).
This material is copyright and is licensed for the sole use by Niels Vils on 17th August 2010
Thorsøhøjen 8, Silkeborg, 8600

Chapter 7
[ 183 ]
The strength of the captcha will grow depending on how many changes you have made.
Some spam programs can read captcha images generated with default values. However, they
fail if you place any individual values here. Be sure that you make only slight changes in the
elds minsize, maxsize, and maxrotaon, so that the captcha will sll be readable to human
users. Note that the changes are valid for all forms and modules in CMS Made Simple that
use the Captcha module.
To acvate the captcha for the contact form, open the form in Extensions | Form Builder.
Choose the Captcha Sengs tab, and select the box Use Captcha to protect form
submissions. See the captcha image added to the boom of the contact form.
reCAPTCHA has some advantages. This library is supported by a crew responsible for keeping
it up-to-date, it is accessible for disabled persons, and it helps to recognize texts of scanned
books thus making them available in electronic formats. If you would like to use reCAPTCHA
you should sign up at reCaptcha.com and add your website so that you can get public and
private keys for it. You cannot reuse the same keys for sites on other domains, so you have to
add every new site to your account to get a new set of keys.
Sending out newsletters
With CMS Made Simple and the Newsleer Made Simple (NMS) module, you can send
out newsleers to your customers or any visitors of your website who have subscribed to
the newsleer.
You can dene one or more user lists, thus separang your customers from the visitors and
being able to send dierent newsleer to each user list. One user can be assigned to one
or more lists. You create a template that contains the e-mail subject and text, so you don't
need to start each message from a blank page, you can use a template that has already been
created. However, you can write newsleers without templates as well.
To send out a newsleer, you will choose an exisng message and a list of users that are
going to get this message. This will be called a Job. The job will be processed manually
at the me you acvate it.
Install the NMS module from the list of available modules in the admin console (Extensions
| Module Manager). Pay aenon to the modules found on the Dependencies link before
installing the module. These modules should be installed before you aempt to install
Newsleer Made Simple.
This material is copyright and is licensed for the sole use by Niels Vils on 17th August 2010
Thorsøhøjen 8, Silkeborg, 8600

Using Third-party Modules
[ 184 ]
Time for action – sending mails to registered customers
Let's create our rst newsleer that will be sent to the visitors of the website. You have to
create one or more test users with dierent valid e-mail addresses to be able to control how
the messages will be delivered. Do not use real e-mail addresses, unless you want them to
get test messages at this point.
1. In the admin console, click on Extensions | Newsleer Made Simple.
2. Click on the Create a List link, and enter the elds, as shown in the
following screenshot:
3. Click on Submit.
4. Switch to the Users tab. At the boom of the page, click on the Add User link, and
add two or more users. Assign them to the group Public Newsleer, as shown:
This material is copyright and is licensed for the sole use by Niels Vils on 17th August 2010
Thorsøhøjen 8, Silkeborg, 8600

Chapter 7
[ 185 ]
5. Click on Submit.
6. Switch to the Messages tab, and click on the Compose Message link. Enter the
Subject of the mail. Choose Yes in the eld This message contains only text. Select
the Newsleer page in the list of pages and select No for showing in the public
archive lists. Enter the Text Message that should be sent to the users in the user
list for the Public Newsleer. You can use placeholders in the e-mail text; these
are shown in the Message Authoring secon.
7. Click on Submit.
8. Switch to the Jobs tab, and click on Create Job link.
9. In the list of messages, select the message you would like to send. Then select the
list that contains the users who should get this message.
10. Click on Submit.
11. Switch to the Preferences tab, and enter the Admin Email Address (valid e-mail
address) and the Administrator Name (the name newsleer's sender).
12. Click on Submit.
13. Below the list of the jobs, click on the Process Jobs link, and conrm the message
that you are going to send the newsleer.
14. Do not close the new window unl all messages are sent out. Close the window
when you see the message You can now close this window, as shown in the
following screenshot:
This material is copyright and is licensed for the sole use by Niels Vils on 17th August 2010
Thorsøhøjen 8, Silkeborg, 8600

Using Third-party Modules
[ 186 ]
What just happened?
You have just created a new list of users in the Newsleer Made Simple module. This was a
public list; it means that the administrator of the website is not the only person who can add
users to this list. Making the group public means that any visitor of the website, whether he
is a customer or not, can subscribe himself to the list, if the subscripon form is added to
the website.
Then you created some test accounts. When you compose a new message for the newsleer,
you can choose if the message should be sent as HTML or as plain text. If you need any
special HTML formang such as hyperlinks, lists, tables, or images, then you must compose
an HTML mail. In this case, you should also compose an alternave text message that will be
shown to the customers who are not able to see HTML e-mails in their mail clients. Do not
use any HTML tags in the Text Message eld, just plain text.
For HTML e-mails, you can create templates that contain your company logo and contact
informaon, so that you do not need to add it to each message separately.
In the text message, you can use the following Smarty tags linking to your website:
{$unsubscribe}: A URL that can be used to display a page for unsubscribing
{$preferences}: A URL that can be used to display a user preferences page
{$confirmurl}: A URL that can be used to conrm subscripons
For these links to work, you have to choose a Return Page in the list of pages while
composing a message. This page should contain the Smarty tag {NMS}.
You can also display the sent messages as newsleer archive on your website. Any message
marked as public will be displayed in this public archive and can be read by every visitor
of your website. Please read the next secon to see how a public subscriber form for the
newsleer can be added to the page or template.
Creang jobs means pung a message and a list of users together. You do not send
messages but just create a task. This task will be started when you process the job.
Public newsleer means that every user of your website can subscribe
to the newsleer.
This material is copyright and is licensed for the sole use by Niels Vils on 17th August 2010
Thorsøhøjen 8, Silkeborg, 8600

Chapter 7
[ 187 ]
Template Descripon
Subscribe The subscribe form, acvaon e-mail sent to the subscriber to conrm his
e-mail address and message displayed aer subscribing on the page.
Conrm Subscribe The conrmaon e-mail sent to the subscriber aer he/she has conrmed
his e-mail address and message showed on the page when the e-mail is
conrmed.
Unsubscribe The unsubscribe form, subject, and text of the e-mail sent to the user aer
he has unsubscribed from the newsleer. Text shown on the page aer
the unsubscribing form is sent and the conrmaon e-mail sent to the
user when the unsubscribing process is nished.
User Sengs If you have more than one newsleer list that the visitor can subscribe to,
then you can also oer a link where he/she can manage his subscripon
lists. Forms and messages needed for managing these preferences are
found on this tab.
Archive Templates If you would like to display a newsleer archive on the website, you can
use the Smarty tag {NMS action="archivelist"} on the page.
There are two templates that can be used to display an archive: list view
and detail view. You can modify the templates to suit your design on
this tab.
Open the Newsleer page and place the Smarty tag {NMS} into the content of the page. Edit
the appearance of the forms in the admin area of the Newsleer Made Simple module.
You can adjust the delay between each message that is sent. Messages are grouped into
batches (50 messages per batch). Aer each batch is sent, there is a larger delay. The delays
are very important to preserve your web hosng's performance. Sending out many mails has
a heavy impact on your web server. The more mails you send at once, the more crical the
server performance. You can change the delay on the Preferences tab. Use it with care; ask
your provider how many mails you are allowed to send per hour and how you can be sure
that your mails will not be implied to be spam. To get even beer performance, use
the sendmail method in the module CMSMailer.
This material is copyright and is licensed for the sole use by Niels Vils on 17th August 2010
Thorsøhøjen 8, Silkeborg, 8600

Using Third-party Modules
[ 188 ]
Displaying videos
Videos have become more and more popular on websites. Everyone can upload videos
to YouTube, but only some people know that any of these videos can also be seamlessly
integrated into websites. Open any video on YouTube website and look on the panel to the
right of it.
There are two elds with the names URL and Embed. The rst eld contains the plain link to
the video. The second eld contains HTML code to display it.
Which eld to use depends upon the place of the video on your website. If the video should
be shown on every page of your website, you have to copy the HTML code from the eld
Embed, open your page template (Layout | Templates), and add the code at the place where
the video should be shown on every page.
If the video should be shown in the page content on the single page, you have to open a
page for eding in the admin console, and click on Turn WYSIWYG on/o below the Content
eld. Find the place in HTML source of the page where the video should be displayed, and
add the code from the eld Embed to this place. Not so comfortable, right? You can work
this way if you have HTML knowledge, but what about the editors of the website who do not
have any HTML knowledge?
In the WYSIWYG editor, you can acvate a simple plugin that helps to implement any video
without looking into the HTML source.
This material is copyright and is licensed for the sole use by Niels Vils on 17th August 2010
Thorsøhøjen 8, Silkeborg, 8600

Chapter 7
[ 189 ]
In the admin console, click on Extensions | TinyMCE WYSIWYG, and choose the Plugins tab.
Select the plugin with the name media, and click Save plugins. Then switch to the Proles
tab. There are three secons:
Backend prole sengs: Sengs for editors of the website
Advanced backend prole sengs: Sengs for the administrator of the website
Frontend prole sengs: Sengs for the usage of the WYSIWYG editor on the
frontend, for example, if your visitors can add news arcles to the website
The buon for inserng embedded media is called media and can be added to any
Toolbar of any prole depending on your individual needs. For example, to make the buon
available to the editor of the website and to the administrator in the rst line of the toolbar,
add the word media at the very end of the eld Toolbar 1 in both proles, as shown in the
following screenshot:
This material is copyright and is licensed for the sole use by Niels Vils on 17th August 2010
Thorsøhøjen 8, Silkeborg, 8600

Using Third-party Modules
[ 190 ]
Save each prole and see the buon at the end of the rst line in the TinyMCE editor.
Now you or the editor can add any video from YouTube by clicking on the buon. The
Type of the le should be Flash; in the File/URL eld, copy the link from YouTube, as
shown in the URL eld:
The dimensions of the video will be set automacally. Addionally, a preview of the video
is shown below. Click on Insert, and the video will be added to the page. Now, your editor
should only know the link to the video; the rest will be done by the WYSIWYG editor.
You do not need any addional module to insert the video on the page. A lot of funconality
is covered by the core CMS Made Simple. Its just waing to be discovered!
Adding your own player
The method described in the last secon would help if you uploaded your videos to YouTube
rst. But somemes you would like to upload videos to your own hosng and display them,
bypassing services like YouTube or Google Video.
This material is copyright and is licensed for the sole use by Niels Vils on 17th August 2010
Thorsøhøjen 8, Silkeborg, 8600

Chapter 7
[ 191 ]
In this case, you have to provide your own video player to be able to display any video to
most visitors. If you just uploaded an AVI or MPEG video to the website, you would have
to rely on your visitors having the correct browser sengs to be able to play the les.
Depending on the browser, the visitors may have to decide themselves what program to
use to display the video. It is also important to understand that most video programs you
use to create or edit your les use decoders (so called codecs). If the visitor of your website
is missing the decoder, he will not be able to see the video unl he has installed it. Most
visitors would not install anything and just leave your website.
To serve most browsers and visitors to your website, you should convert your videos to FLV
les and play them with a ash player. The only requirement that the visitor has to fulll to
see the video is the installed ash plugin—no decoders, no other special programs.
There are some free players such as neolao that can be found at flv-player.net. This
video player is free and customizable, but its integraon into a CMS Made Simple website
can be a bit dicult. Luckily, you have another excellent third-party module that is delivered
with the player neolao. The module in queson is calledplayer neolao. The module in queson is called The module in queson is called Play.
Aer installing the module from the Module Manager, you will nd its administraon areayou will nd its administraon area
in Content | Mulmedia Player. The video les for the module must be uploaded with File
Manager and should be available in the directory uploads. On the Records tab, you can, you canyou can
then assign and group uploaded videos to display them on the website. You can display
one le using Tag to insert in your content to insert in your content, as shown:
{Play record="1"}
You will nd this Smarty tag beside the name of the le in the admin area of the
Play module.
To display a list of les, you have to skip the parameter record from the above example and
just use the Smarty tag {Play}. You can also group your videos and display only videos that
are assigned to the same group as follows:
{Play group="myvideos"}
You can play only FLV les with this player. As explained, you have to convert your AVI les to
FLV. If FFmpeg is available on your host, then you can use extra features like video conversion
from AVI and also automacally created thumbnail pictures from videos. Please contact your
provider to gure out if you can use FFmpeg.
You can also create and upload your own thumbnails for each video. They should be
uploaded in the same folder as the video le. The name of the thumbnail le should
correspond to the name of the video le prexed by thumb_ and ending with .jpg. For
example, for the video le name video.flv, you can create and upload the thumbnail le
with the name thumb_video.jpg to the same folder. Alternavely, you can customize the
template of the neolao FLV player (Content | Mulmedia Player, tab Players) or create your
own customized template.
This material is copyright and is licensed for the sole use by Niels Vils on 17th August 2010
Thorsøhøjen 8, Silkeborg, 8600

Using Third-party Modules
[ 192 ]
Pop quiz – using third-party modules
1. Where do you nd the admin area for the Photo Gallery?
a. Content | Image Manager
b. Content | Gallery
c. Extensions | Modules | Photos
d. Extensions | Modules | Images
2. What extension is not allowed in the Gallery module?
a. .jpeg
b. .eps
c. .png
d. .jpg
3. Which module should be installed rst in order to send e-mails with a form created
in Form Builder?
a. Newsleer Made Simple
b. CTLModuleMaker
c. CMSMailer
d. File Manager
4. When you are eding your contact form, why should you set the value in the eld
Send User a Copy of Submission to Never?
a. The user knows best what he/she wrote, so he/she does not need any
noce about that stu.
b. Because e-mail submissions can run the web server to its capacity.
c. Because this will cause an endless loop and can run your web server to its
capacity.
d. Because the user gets your e-mail address and could start a communicaon
bypassing the feedback form.
5. What does the Submission Template in Form Builder dene?
a. The appearance of the response message aer the form was sent.
b. The appearance of the Email Template which is responsible for the look of
the sent e-mails.
c. The appearance of the form before subming a message.
d. The appearance of the personal admin area for creang the templates.
This material is copyright and is licensed for the sole use by Niels Vils on 17th August 2010
Thorsøhøjen 8, Silkeborg, 8600

Chapter 7
[ 193 ]
6. What is the right statement according to a group of radio buons and a group
of checkboxes?
a. In a combined group of checkboxes and radio buons, all alternaves can
be acvated.
b. In a group of checkboxes, all alternaves can be acvated, in a group of
radio buons, only one can be acvated.
c. In a group of radio buons, all alternaves can be acvated, in a group of
checkboxes, only one can be acvated.
d. In a group of checkboxes, a drop-down menu has to be integrated,
otherwise you cannot hear music by handling the radio buons.
7. What is a Job in the Newsleer Made Simple module?
a. Everything you are doing in order to send e-mails.
b. Sending out the prepared e-mails to a mailing list.
c. Choosing an exisng message and an exisng list of users that are going to
get the message.
d. Thinking about the dierent possibilies you have for combining mailing
lists and planned messages.
Have a go hero – installing other modules
Now, if you require other features for your website, you should look at the available
modules and try them out. Use each module's Help to gure out whether you can solve your
requirements with it. Do not forget about plugins. They give you small but useful features in
cases where the modules will be too much overhead.
A good website is mostly never ready, and you work on it again and again; hide unnished
parts now, and present the rst version of your website online, while working on unnished
parts in the development environment.
This material is copyright and is licensed for the sole use by Niels Vils on 17th August 2010
Thorsøhøjen 8, Silkeborg, 8600

Using Third-party Modules
[ 194 ]
Summary
We learned a lot in this chapter about how dierent modules in CMS Made Simple extend
the features of your website.
In this chapter, we covered:
Gallery: How to create a photo gallery and create a custom template for the gallery
from scratch.
Form Builder: How to create and customize forms like contact or feedback forms on
the page, without any deep programming knowledge.
Newsleer: How to import e-mail addresses to the user list of the module
Newsleer Made Simple and send out messages to exisng e-mail lists.
YouTube videos: How to embed YouTube videos in the website. You do not need any
special module to show single videos on the page. Discover the core funconality
before looking for add-ons.
In this chapter, only some modules were explained. There are many more modules that
have very sophiscated funconality and oer extended features for your website. Every
week, new modules are developed for CMS Made Simple and updates are made to the
exisng ones.
In the next chapter, you will learn how to build more funconality from exisng modules and
even create your own funconalies from scratch.
This material is copyright and is licensed for the sole use by Niels Vils on 17th August 2010
Thorsøhøjen 8, Silkeborg, 8600

8
Creating Your Own Functionality
CMS Made Simple has only some rudimental features that belong to the
standard installaon. Any addional funconality can be installed with other
modules, as you have learnt from the previous chapter. However, you oen
need your own funconality that is not covered by any exisng module.
In this chapter, we will:
Create a product catalog with custom elds and an individual hierarchy
Use the funconality of a module in a way that it was not developed for
So let's get started...
Creating a product catalog
In this secon, we will learn how to create a new module. As an example, the product
catalog will be created, but in the same way, you can create any kind of catalog such as
services, courses, real estate adversements, or freelancer directory.
Before you create your own catalog module, you should plan its structure very thoroughly.
First of all, reect on the number of levels. Write down how many levels (product categories,
subcategories, and so on) you need. For my example, I will create a simple oce furniture
catalog. I need the following three categories to which the products can be assigned
during creaon:
Desks
Chairs
Bookcases
This material is copyright and is licensed for the sole use by Niels Vils on 17th August 2010
Thorsøhøjen 8, Silkeborg, 8600

Creang Your Own Funconality
[ 196 ]
This means that for the furniture catalog, a two-level structure is required, such as categories
and products. Each product will belong to only one of the categories listed previously.
In the next step, you have to gure out what elds you need to create for one item (product)
in your catalog. This is like making a table from your product's list. What columns do you
need to separate dierent informaon? For my example, I need the following four elds:
Product tle
Descripon
Image
Price
Now, you can start creang your own module. You are not going to use any special dedicated
modules, but you will learn how to create an individual module perfectly ed for your
individual needs. This can be done with CTLModuleMaker module that allows the creaon
of any fully funconal catalog-like module.
The example structure of the new product catalog is as follows:
Desks
Computer desk
Execuve desk
Chairs
Execuve chair
Guest chair
Bookcases
…..
Install the CTLModuleMaker module from the list of available modules (Extensions |
Module Manager). When the module is installed, its admin area can be found in the admin
console (Extensions | CTLModuleMaker).
Creating a new catalog-like module
We will now start to create a new individual module. In the admin console, go to the admin
area of CTLModuleMaker (Extensions | CTLModuleMaker), and click on the link Create a
new module.
This material is copyright and is licensed for the sole use by Niels Vils on 17th August 2010
Thorsøhøjen 8, Silkeborg, 8600

Chapter 8
[ 197 ]
Step 1: Basic information about the module
The module wizard will take you through all steps needed to create a new module. In step 1
you are asked to dene basic informaon about the new module.
In the rst eld, enter the name of the module. This name will appear in the list of
modules (Extensions | Modules). It will also be used in the Smarty tag {cms_module
module="NAME_OF_MODULE"} later on. It's beer to choose a unique prex for the module
name, as shown in the previous example. Do not name it just Products (there is a third-party
module called Products), but BWProducts. BW stands for Business World in my example
(sure you can use your own prex).
The rst eld is also used to generate URLs for the module items later on.
For example, the detailed view of the product will display http://www.
mydomain.com/nameofmodule/detail/nameofproduct/5/.
The descripon of the module will appear on the module Help in the secon What Does
This Do?
The friendly name of the module will be shown in the admin menu when the module
is installed. In the previous example, the module will be installed in Content | Products
Catalogue.
We have gured out that we need a two-level structure: categories and products. If you
need more levels, then change it here. However, I recommend starng with a simple
two-level structure at the beginning and then, if the principle is clear, creang one or
more addional levels.
This material is copyright and is licensed for the sole use by Niels Vils on 17th August 2010
Thorsøhøjen 8, Silkeborg, 8600

Creang Your Own Funconality
[ 198 ]
Click on Next and proceed with step 2.
Step 2: Creating levels
The products in the module will be assigned to dierent categories. Categories will help to
group dierent products and make the navigaon within the product list easier
Creating the rst level (categories)
This step helps you to dene categories for the new module, so that the items can be
assigned to later on.
This material is copyright and is licensed for the sole use by Niels Vils on 17th August 2010
Thorsøhøjen 8, Silkeborg, 8600

Chapter 8
[ 199 ]
The rst and the fourth elds require a technical name and a prex for the categories.
Technical names are not shown to the visitors of the website and should not contain any
special characters. On the contrary, the second and the third eld is user friendly and can
contain special characters. These elds will be used in the admin console. For example, the
plural form of the level name will appear on a tab in the admin area of the module, as shown
in the following screenshot:
The h eld deals with the exibility of the hierarchy. Can a product belong to only one
category or to many categories? As an example, imagine a book catalog where a book can
belong to more than one category. Historical crime logically belongs to crimes and historical
literature at the same me. For the furniture catalog, we do not need such exibility. In our
example, the products can only belong to one category.
In the sixth eld, you enter number of elds that are required addionally to the elds
automacally added to each level. You can read from the comment of the eld what elds
will be created. This means that we do not need any extra eld for the category tle as we
will use the eld name for it. Addionally, we need the eld that stores the descripon of the
category. Therefore, you enter 1 in this eld.
The seventh eld is not important for the level 1 in the catalog structure as there are no
parent elements for the categories.
Where should new categories appear in the list of categories (in the admin area and on
the website) by default? Note that you can always reorder the appearance of the category
manually in the admin area of the module later on.
The last eld is not important for level 1 and can be le as it is. Click on Next.
This material is copyright and is licensed for the sole use by Niels Vils on 17th August 2010
Thorsøhøjen 8, Silkeborg, 8600

Creang Your Own Funconality
[ 200 ]
On the last screen, you dened the number of addional elds (see the sixth eld in the rst
image under step 2) that the category should have. Now, you have to give more informaon
about this eld on the next screen, as shown in the following screenshot.
The rst eld contains the technical name of the eld for internal use only. The second eld
is the friendly name which will be visible to the editors of the catalog in the admin console.
Choose Short text(255 chars.) for the eld type if you feel that 255 characters will be enough
for the category descripon. Seng a eld to be mandatory means that you won't be able to
create a new category without giving it a descripon.
Should the content of the eld be indexed in the Search module of CMS Made Simple? This
module is a standard module and was explained in Chapter 5, Using Core Modules.
Every module created with CTLModuleMaker will get an addional advanced search
funcon, as shown in the following screenshot:
This material is copyright and is licensed for the sole use by Niels Vils on 17th August 2010
Thorsøhøjen 8, Silkeborg, 8600

Chapter 8
[ 201 ]
In the last eld of the eld denion, you can dene whether or not you would like to
see the eld in the advanced search. In the previous example, the eld is searchable and
therefore displayed at the top of the search funcon. Click on Next.
In the next step, you dene what elds will be displayed in the list of categories in the admin
area of the future module. The eld name is mandatory, you cannot delete it from the list,
but you can add any other elds from the list of Possible elds. Add the eld nbchildren to
the list, as shown in the following screenshot:
With the elds dened previously, the list of categories in the admin console of the module
will look as shown in the following screenshot:
This material is copyright and is licensed for the sole use by Niels Vils on 17th August 2010
Thorsøhøjen 8, Silkeborg, 8600

Creang Your Own Funconality
[ 202 ]
Click on Next and proceed with the denion of the products (level 2 in the
catalog structure).
Creating the second level (products)
In the following steps, you will be asked for informaon about your products. You will see
that the denion of each level is similar. There are the same elds as for categories where
you now provide informaon about products.
For the products, we need three addional elds:
Descripon
Price
Image
This material is copyright and is licensed for the sole use by Niels Vils on 17th August 2010
Thorsøhøjen 8, Silkeborg, 8600

Chapter 8
[ 203 ]
The product tle will be saved in the mandatory eld Name and should not be planned here.
The seventh eld, which could be ignored for the category level, gets some meaning in
the second level. How the products should be displayed in the list of products, whether
categorically or alphabecally, and whether they should be displayed independent of the
category they are placed in or not.
By category Alphabecally
Execuve Desk
Computer Desk
Execuve Chair
Guest Chair
Computer Desk
Execuve Chair
Execuve Desk
Guest Chair
In the last eld, you can dene whether there can be only one default product for the whole
product list, or one default product for each category. In our example, we do not need any
default products, so you can leave the eld as it is.
Click on Next.
Similar to the denion of the addional eld descripon for the category, you are now
asked to dene the three addional elds for the products.
The rst eld required for the product is Product Descripon. This eld is dened in the
same way the category descripon was dened. I have chosen the eld to be Long text so
that there is no limit to the descripon length of the product. The eld should be searchable
both ways, from the standard search eld of CMS Made Simple and from the advanced
search feature of the module itself.
This material is copyright and is licensed for the sole use by Niels Vils on 17th August 2010
Thorsøhøjen 8, Silkeborg, 8600
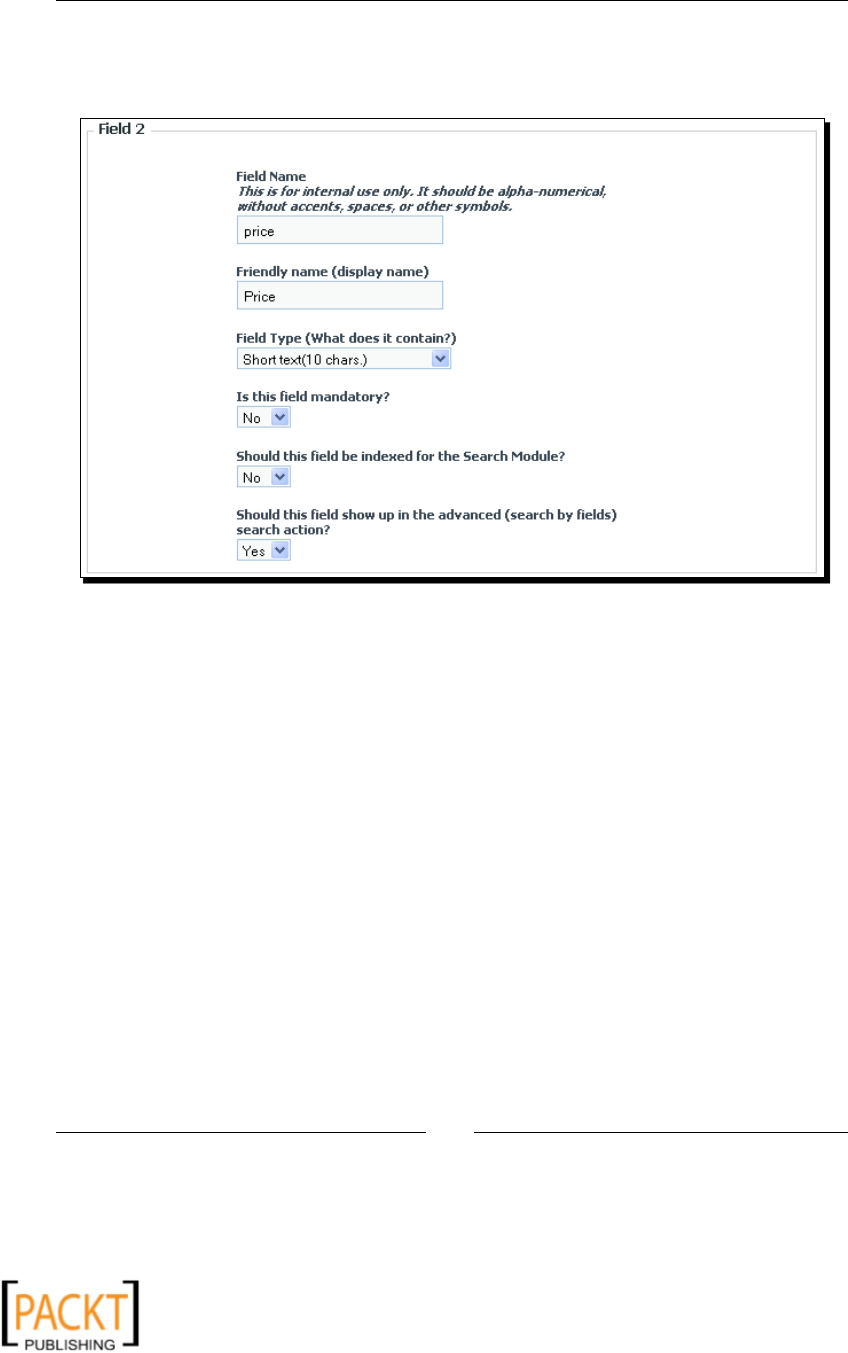
Creang Your Own Funconality
[ 204 ]
In the next eld, the price of the product should be stored. The eld must be dened as
Short text(10 chars.). If you choose Number in the Field Type, then no decimal numbers
can be stored in it.
The third eld will allow you to upload product images. Once you have changed
the Field Type to Image, addional informaon will be displayed as shown in the
next screenshot:
This material is copyright and is licensed for the sole use by Niels Vils on 17th August 2010
Thorsøhøjen 8, Silkeborg, 8600

Chapter 8
[ 205 ]
This material is copyright and is licensed for the sole use by Niels Vils on 17th August 2010
Thorsøhøjen 8, Silkeborg, 8600

Creang Your Own Funconality
[ 206 ]
The informaon in the last six elds is only required for the elds where images can
be uploaded.
You should enter the name of the folder where the images will be saved aer upload. This
folder will be created automacally below the uploads folder on your web hosng. You can
use the images folder and then the custom name of the module folder. This will ensure that
the images are automacally saved in the images folder and thus can be edited online with
Image Manager.
In the next eld, enter the maximum size of the product image to what the image will be
resized if it is larger than the size given here. However, somemes it is not possible to resize
the image precisely to the size given in the eld without changing the image's proporon. In
this case, either width or height will be considered. If you would like to keep the exact size,
then the module has to crop the image. If you crop an image, it would mean that a part of
the image will be cut o. You can choose the resize method in the eld below.
In the same way, you can dene the size of the thumbnails. The best resize method depends
on your source images and design so a general recommendaon cannot be made.
In the last eld, you give the extensions that are allowed for the upload. Note that only GIF,
JPEG, JPG, and PNG les can be displayed as images in all browsers. Do not allow any other
format so that the editors of the products will not be able to upload other les in this eld.
Click on Next, and dene what elds should be shown in the admin console for the list
of products:
This material is copyright and is licensed for the sole use by Niels Vils on 17th August 2010
Thorsøhøjen 8, Silkeborg, 8600

Chapter 8
[ 207 ]
If you dened the elds as shown in the preceding screenshot, your admin console will look
as shown in the following screenshot when the module is in use.
Click on Next and answer the nal quesons before the module is created.
Step 3: Finishing creation and module installation
To display a list of categories or products on your website, the editor of the product catalog
will have the possibility to choose between dierent templates. The queson here is about
the template for the product detail view.
We have three dierent categories. If products of the category Desk must be displayed in a
dierent way than products of the category Chairs, then you need category as a template
level. This means that each category must have its own template for the product display. If
the template for the product doesn't depend on its category, then leave the value Only one
template in this eld.
This material is copyright and is licensed for the sole use by Niels Vils on 17th August 2010
Thorsøhøjen 8, Silkeborg, 8600

Creang Your Own Funconality
[ 208 ]
Click on Next. You have reached the last step and are close to the nish and installaon of
the new module.
Leave the values in the last step as they are. They deal with le elds (we do not have any),
languages (we learn more about translaons in Chapter 10, Advanced Use of CMS Made
Simple), and the module version. The module version is used for revision control and is used
to manage changes made to the module aerwards. For example, an inial conguraon of
the module gets the version 1.0. When the rst change to the module is made, the resulng
conguraon will be marked as version 2.0, and so on. We do not allow visitors to the
website to add products, so leave the Frontend User Management set to No as well.
Click on Next. The CTLModuleMaker module starts to create all required folders and les.
Click on the Install module link, and the new custom module will be installed. You can now
nd it in the admin console Content | Products Catalogue.
Addionally, the module can be found in, removed, and installed from the list of modules in
Module Manager (Extensions | Modules).
Conguring the new Products Catalogue module
Add some categories and some products in the admin area of the new module.
Then, open the page Products (Content | Pages), and add the following Smarty tag to call
your module:
{cms_module module="bwproducts"}
Replace the name in the parameter module by the name of your module. This name can be
found in the list of installed modules (Extensions | Modules). Open the page, and see the list
of products on the page.
The new module also has a Module Help secon where all parameters that you can use with
this module are listed. The help secon can be accessed from the Module Help icon placed
in the module admin area at the top-right of the page.
This material is copyright and is licensed for the sole use by Niels Vils on 17th August 2010
Thorsøhøjen 8, Silkeborg, 8600

Chapter 8
[ 209 ]
For more help, you may take a look at the FAQ. The link to the FAQ can be found in the
module help above the Copyright and License secon.
Creating the product list template
For modules created with CTLModuleMaker, some sample templates are created
automacally. However, for each level, you can create an unlimited number of templates
by yourself.
Time for action – creating a new list template
Let's customize the appearance of the product list and add products' images as thumbnails
to this list.
1. In the admin console, click on Content | Products Catalogue, and choose the
Templates tab.
2. Below the secon Default Templates, you will nd a list of sample templates. Click
on the Add template link.
3. For the product list with thumbnails, enter the following code snippet in the
Template eld:
{if $itemcount > 0}
<ul>
{foreach from=$itemlist item="item"}
<li style="list-style-type:none; float:left;
margin: 20px;"><a href="{$item->detailurl}">
<img src="uploads/{$item->image->thumbnail}"
alt="{$item->name}" /></a>
<br/>
{$item->detaillink}<br/>{$item->price} USD</li>
{/foreach}
</ul>
{/if}
4. Click on Submit.
This material is copyright and is licensed for the sole use by Niels Vils on 17th August 2010
Thorsøhøjen 8, Silkeborg, 8600

Creang Your Own Funconality
[ 210 ]
5. In the Default templates secon, choose the template you just created to be the
Default list template for level "product". The list of products should look as shown
in the following screenshot:
What just happened?
You have created a new template for the list of the products. This template shows not only
the products' name but also the small version of the products' image. The small version
of the image is represented as Smarty variable {$item->image->thumbnail} in the
template. All Smarty variables that you can use in the template can be found on the tab
Template variables (Content | Products Catalogue | Templates) when the template is
open for edit. Consider that the elds containing images have even more variables. They
are explained in the FAQ for the module in the secon tled How can I retrieve images in
the display templates?
The inline CSS added to the template is not the proper way to implement styles.
It has been made to simplify the example. You should create a new CSS class and
store the style denions in the main stylesheet.
This material is copyright and is licensed for the sole use by Niels Vils on 17th August 2010
Thorsøhøjen 8, Silkeborg, 8600

Chapter 8
[ 211 ]
In the same way, you can modify or create a new template for the Default detail template
that is used to display the detailed view of one product.
With the CTLModuleMaker module, you can create any kind of catalog such as products,
services, real estate adversements, courses, and more. Everything that you can categorize
can be put in a custom catalog-like module. Remember, that you create an ordinary
module that can be removed from the list of modules, exported as XML, and imported
into another installaon.
Implementing service desk functionality
There are over 300 third-party modules in CMS Made Simple, and this number grows weekly.
Some modules do not work as expected, as there is no quality assurance for the third-party
modules. However, somemes you do not need to use a dedicated module to solve your
requirements. With some creavity you can divert modules from its intended use to create
your own funconality.
There is no sophiscated module for the service desk in CMS Made Simple. However, if you
need it to handle support ckets, then you can use the module CGFeedback; which was
originally created to handle comments for the pages or news arcles. Although this module
has not been developed to handle support ckets, it can be used to solve the required
features with some advanced customizaon.
Managing visitors' logins
Before you set up the service desk feature on your website, you have to install the module
FrontEndUsers. The FrontEndUsers module is a kind of membership management facility for
your website. In our case, members are the customers who can authorize with their access
data on the website and the protected content or communicate with you through their
personal member area.
Generally, FrontEndUsers can be integrated with many other modules such as:
News (Registered visitors can add news to the website)
DownloadManager (Registered visitors can download protected les from
the website)
Forum (Registered users can communicate on the boards)
NMS (Mass mail for registered users)
Website members are not the same as the admin users of your website, which
were described in Chapter 6, Users and Permissions. They have nothing to do
with your admin console (hopefully!).
This material is copyright and is licensed for the sole use by Niels Vils on 17th August 2010
Thorsøhøjen 8, Silkeborg, 8600

Creang Your Own Funconality
[ 212 ]
The module FrontEndUsers has a dependency on the module CMSMailer. It means that you
have to congure e-mail sengs, as described in Chapter 2, Geng Started, before installing
member management on the website. Otherwise, features like sending out forgoen
passwords will not work.
To install the module in the admin console, click on Extensions | Module Manager, and
choose the leer F from the Available modules tab above the alphabecal module list.
Find the FrontEndUsers module, and click the Download & Install link. The module will be
installed and can now be congured.
Open the page Service Desk (Content | Pages), and add the login form into the Content eld
of the page, shown as follows:
{cms_module module="FrontendUsers"}
Now, you can see the login form on the page. Let's create a rst customer account and log in
to the page so that you can test the funconality of the module.
Time for action – creating the rst user account
We are going to add the rst customer account to the website.
1. In the admin console, click on Users & Groups |Frontend User Management.
2. Click on the User Properes tab.
3. Click the Add Property link and ll in the form, as shown in the
following screenshot:
This material is copyright and is licensed for the sole use by Niels Vils on 17th August 2010
Thorsøhøjen 8, Silkeborg, 8600

Chapter 8
[ 213 ]
4. Click on Submit.
5. Open the Groups tab, and click on the Add Group link.
6. Fill in the elds, and assign the e-mail eld created above to the group, as shown in
the following screenshot:
7. Click on Submit.
8. Click on the Users tab and then on the Add User link.
9. Fill in the elds, as shown in the following screenshot (provide a valid e-mail
address!), and assign the user to the Customers group:
This material is copyright and is licensed for the sole use by Niels Vils on 17th August 2010
Thorsøhøjen 8, Silkeborg, 8600

Creang Your Own Funconality
[ 214 ]
10. Click on Next, and enter the e-mail address of the customer again.
11. Click on Submit.
12. Log in with the customer data (Username = Email Address of the customer) on the
page Service Desk to see how it works. If you are logged in, the page should look as
shown in the following screenshot:
What just happened?
You have created the rst customer account. You have started by adding the user property
(a eld that contains a customer's e-mail address). This eld will be used for sending
e-mails such as if the customer forgets his password. By default, this eld is also used as
the username (you can change it later on). The Type of the eld must be set to Email
Address, so that anything entered in this eld must be a valid e-mail. You do not need to
dene user properes such as username or password. These two properes are already
provided for you and cannot be changed or deleted.
Never use any special characters like dashes in the eld Name while
adding user properes!
You have already created a new user group (Customers in our example). The e-mail eld has
been assigned to the group Customers as a required eld (Field Status), which means that
each customer must have a valid e-mail address.
At this point, you have congured the module so that the rst customer could be added. All
customer accounts have their expiraon date, so they are disabled automacally if the date
is in the past. The new user has been assigned to the Customer group and is now shown in
the list of users on the Users tab (Users & Groups | Frontend User Management).
Useful settings for module FrontEndUsers
As the administrator of the website, you can adjust the sengs of the FrontEndUsers
module. In the admin console of your website, click on Users & Groups| Frontend User
Management, and select the Preferences tab. The following sengs should be made:
This material is copyright and is licensed for the sole use by Niels Vils on 17th August 2010
Thorsøhøjen 8, Silkeborg, 8600

Chapter 8
[ 215 ]
Email address is username: Deselect this if the username should be dierent from
the e-mail address. It is beer not to use the e-mail address as the username, so the
customer can change his username and e-mail address separately.
Allow users to login more than once: This should be selected. If the user is currently
logged in to your website and the session expires in the browser but not on the
server, then the user will not be able to log in again. By selecng this box, you allow
your customers to log in at any me, even if their session is sll open.
Allow duplicate "forgot password" reminders?: I recommend selecng this as well.
Otherwise, if the e-mail with the new password does not reach the user because of
mail delivery failure, he will not be able to get a new e-mail.
Use cookies to remember login details: Select the box if you would like the
member to remember his passwords for the website and be automacally logged
in each me he visits your website. If you select this box, then you should also ll
The name of the cookie. Use only English leers and no special characters for the
cookie name. This feature requires the PHP funcon mcrypt to be installed on your
web hosng. If you see the noce This uses the mcrypt funcons for encrypon
purposes, and they could not be detected on your install. Please contact your
server administrator below the eld, then this feature will not work. You must
enable or install the PHP funcon mcrypt on your web hosng rst, then contact
your provider to get further informaon.
Save the sengs, and add another customer to see how the above sengs aect the
behavior of the module.
Templates for the FrontEndUsers module
Six templates can be fully customized to suit your design and layout requirements.
Template Descripon
Login Template The default template if the user is NOT logged in.
Logout Template The default template if the user is logged in.
Change Sengs
Template
If the user is logged in, then a link Change My Sengs is shown. Customize
this template to change the sengs area of the customer.
Forgot Password
Templates
If the user is not logged in, there is a link Forgot Your Password?. Customize
this template to change the form for password recovery.
Lost Username
Template
If the user is not logged in, a link Forgot Your Login Details? is shown.
Customize this template to change the form for the username recovery.
View User
Template
This template is used to show user details on the website.
This material is copyright and is licensed for the sole use by Niels Vils on 17th August 2010
Thorsøhøjen 8, Silkeborg, 8600

Creang Your Own Funconality
[ 216 ]
You can nd all the templates listed in the table in the admin console (Users & Groups|
Frontend User Management) on the corresponding tabs. Forgot Password Templates and
Lost Username Templates include vericaon forms as well.
To see the vericaon form for Forgot Password, click on the link Forgot Your Password?
below the login form on the website, enter the Username, and click on Submit. Check
incoming mails for the subject Lost Password sent out from your website. If you do not
get an e-mail (has your customer entered a real e-mail?), then you have to check the
conguraon of the CMSMailer module, as explained in Chapter 2, Geng Started.
The text of e-mail messages sent by the FrontEndUsers module cannot be changed in the
admin area of the module. These messages are stored in the language les and can be
edited with Translaon Manager, which will be explained in Chapter 10, Advanced Use
of CMS Made Simple.
Creating protected pages
Protected pages can be viewed only by registered members, and as you have already
installed the FrontEndUsers module, you can connue with creang protected pages.
To protect content pages, you have to install the module called CustomContent. The
module CustomContent, in conjuncon with the module FrontEndUsers, allows creang
protected pages that will be accessible only by logged users. Open Extensions | Module
Manager, and click on the tab for available modules with the leer C, search for the module
CustomContent, and click on the link Download & Install. The module is installed. This
module does not have any admin area. Nevertheless, you can access the module help from
the list of installed modules (Extensions | Modules) by clicking on the module name.
You will nd an example in the How Do I Use It secon, that we are going to alternate for
our purpose. The smarty IF condion checks if the user is logged or not and displays dierent
content depending on it.
{if $customcontent_loggedin > 0}
Welcome <b>{$customcontent_loginname}</b><br/>
{else}
<h1>You are not authorized to view this data</h1>
{/if}
If the Smarty variable $customcontent_loggedin is greater than 0, then the user is
authorized to see the content, otherwise a message that the user is not authorized is
displayed. We are going to protect the Service Desk page. If the user is not logged in,
then no content should be shown on the page except the login form.
This material is copyright and is licensed for the sole use by Niels Vils on 17th August 2010
Thorsøhøjen 8, Silkeborg, 8600

Chapter 8
[ 217 ]
Time for action – protecting the service desk
Now, let us protect the Service Desk page so that its main content can only be viewed by
registered members. If the user is not logged in, only the login form should be shown.
1. In the admin console, open the Service Desk page for eding (Content | Pages).
2. Click on the Opons tab, and mark the page to be not cachable and not searchable,
as shown in the following screenshot:
3. Switch to the Main tab, and ll in the content eld, as shown in the
following screenshot:
4. Click on Apply.
5. View the page as a logged in user as well as a logged out user.
This material is copyright and is licensed for the sole use by Niels Vils on 17th August 2010
Thorsøhøjen 8, Silkeborg, 8600

Creang Your Own Funconality
[ 218 ]
What just happened?
You have protected a part of the page content from being viewed by an unauthorized user.
You have set the page as not cachable rst. It is important to do it with every page that
should be protected or every page that contains the login form. Cached pages would also
cache the login status of the user and show him as logged in even if he is logged out.
The page should not be searchable as it would not make sense to show it in the search
results to the non-authorized users.
In the Content eld, the login form (if the user is not logged in) or logout form (if the user is
logged in) is displayed. The form will automacally change depending on the user's status.
Everything passed between the smarty tags IF is only shown to the logged in users.
In this way, you can protect every page or only a part of the content depending on whether
the user is authorized or not.
Creating user area for support requests
A support cket system is an area where your customers can place their quesons about
your products or services. This area is private and cannot be seen by website visitors or other
customers. When the queson is placed in the support cket area, the support sta can
give the customer an answer to it. If the issue is not resolved by an answer, the customer
can respond to the answer and the sta answers again. This dialog (quesons and answers)
is organized as one cket. If the customer has another queson, then he can open another
cket. In the private service desk, the customer can always see the list of his ckets and read
the answers given from the sta. A support cket system is oen used in the professional
customer care.
To create a support cket system, you do not need a special support cket module. Let us
see how you can use the feedback module to create service desk funconality. The name of
the module in queson is CGFeedback. This module is developed to allow website visitors
to provide comments on individual pages, news arcles, products, or other items on your
website. We will use the funconality of this module to create a rudimentary support
cket system.
In the admin console, click on Extensions | Module Manager, and search on the Available
Modules tab for the module CGFeedback. Click on the Dependencies link to gure out what
modules should be installed rst. You will see the following modules:
CGExtensions
CGSimpleSmarty
This material is copyright and is licensed for the sole use by Niels Vils on 17th August 2010
Thorsøhøjen 8, Silkeborg, 8600

Chapter 8
[ 219 ]
Install these modules rst, and then install the CGFeedback module. The simplest way to use
the module is to include the following Smarty tag at the boom of any page content:
{CGFeedback}
This will create a comment form and allows visitors to enter comments and rangs about
that parcular page. To display those comments, you would add another tag below the
preceding tag:
{CGFeedback action="summary"}
These tags can be oponally placed in page templates or in module templates. If nothing
else is dened, then the comments are automacally aached to the page where they have
been made. If you would like to allow comments on module items like news arcles, you
should use two addional parameters:
{CGFeedback key1="News" key2=$entry->id}
There are two parameters, key1 and key2. Each parameter can be lled with dierent
values. In the preceding example, the parameter key1 is lled with the value News so that
ordinary page comments can be diered from the comments on news arcle. The second
key saves the number ($id) of the news arcle to be sure that a comment is only shown on
the page with this parcular news item displayed in detailed view.
When comments are added, they are saved in the database with the values given in both
parameters (key1 and key2) like "comment for the news arcle with parcular ID". Why
should we not use this funconality to manage comments that are aached to one parcular
logged user? The rst parameter, key1, will separate page comments from ckets. From
Chapter 4, Design and Layout, we know that there are some Smarty variables that exist in
every page. One of those variables is provided by the module FrontEndUsers and is called
$userid. This variable exists only if the user is logged in and contains the user ID. By placing
the following two lines into the page content, you say "save and display comments for the
parcular logged in user":
{CGFeedback key1="Ticket" key2=$userid}
{CGFeedback key1="Ticket" key2=$userid action="summary"}
This material is copyright and is licensed for the sole use by Niels Vils on 17th August 2010
Thorsøhøjen 8, Silkeborg, 8600

Creang Your Own Funconality
[ 220 ]
These two lines would show the comment form and the summary view of all comments
wrien by one user. When the user is not logged in, he cannot see the comments, as the
variable $userid does not exist for users not logged in. Another user would not see these
comments as well, as he has another user ID. Test it by placing these two Smarty tags into
the page Service Desk. As there is a login form on the page, the complete content should
look similar to the following screenshot:
A logged in user can now create comments or, let's say, support ckets, which can only be
viewed by himself on the page or by the support sta in the admin console of CMS Made
Simple. You can fully customize the template with the comment form, as shown in the
following screenshot:
This material is copyright and is licensed for the sole use by Niels Vils on 17th August 2010
Thorsøhøjen 8, Silkeborg, 8600

Chapter 8
[ 221 ]
You can delete or replace the legend Add a Review. Remove the Nofy me of new
comments to this page checkbox, and rename the eld Addional Comments eld to
Your queson or Your request.
To create a new Comment Form Templates in the admin console, click on Content | Calguys
Feedback Module. Select the Comment Form Templates tab, and click on New Template.
Enter NewTicket as the Template Name and the following code snippet in the
Template Text eld:
{if isset($message)}
<p class="success">{$message}</p>
{else}
{if isset($error)}
<p class="error">{$error}</p>
{/if}
{$formstart}
<p><label>Title:</label>
<input type="text" name="{$actionid}title" value="{$title}"/></p>
<p><label>Your name:</label>
<input type="text" name="{$actionid}author_name"
value="{$author_name}"/></p>
<p><label>Your e-mail:</label>
<input type="text" name="{$actionid}author_email"
value="{$author_email}"/></p>
<p><label>Question:</label>
<textarea name="{$actionid}comment" cols="40"
rows="5">{$comment}</textarea></p>
<p><input type="submit" name="{$actionid}submit" value="Send"/></p>
{$formend}
{/if}
Click on Submit. Open the page Service Desk (Content | Pages), and modify the Smarty tag
of the comment form as shown in the following code snippet:
{cms_module module="FrontEndUsers"}
{if !empty($customcontent_loggedin)}
{CGFeedback key1="Ticket" key2=$userid commenttemplate="NewTicket"
policy="session"}
{CGFeedback key1="Ticket" key2=$userid action="summary"}
{/if}
This material is copyright and is licensed for the sole use by Niels Vils on 17th August 2010
Thorsøhøjen 8, Silkeborg, 8600

Creang Your Own Funconality
[ 222 ]
Now, the comment form is displayed with the template NewTicket. Addionally, the
form is redirected to the same page aer the queson has been submied due to the
parameter policy.
To test the module, create some new ckets with two dierent customers to see how exactly
they are separated, depending on which customer is currently logged in. We will customize
templates for summary and detail view later on.
Now, let's see how we can implement the possibility of answering the ckets from the admin
console by the support sta.
Adding answer elds to the tickets
We are now going to create two custom elds in the module CGFeedback. The rst one
will contain the name of the support sta answering the cket. The second eld will contain
the answer.
Time for action – creating new elds
Support sta should be able to answer to the support ckets and store their names to each
answer as well. Let's create the new elds that will contain this informaon.
1. In the admin console, click on Content | Calguys Feedback Module, and select the
Fields tab.
2. Click on Add a new eld, which contains the names of the support sta as shown in
the following screenshot:
3. Click on Submit.
This material is copyright and is licensed for the sole use by Niels Vils on 17th August 2010
Thorsøhøjen 8, Silkeborg, 8600

Chapter 8
[ 223 ]
4. Then, add another eld that will contain the answer text from the support sta, as
shown in the following screenshot:
5. Click on Submit.
6. In the admin console, open an exisng cket (Content | Calguys Feedback Module)
for edit and nd both custom elds at the edit screen.
What just happened?
You have added two custom elds. From now you can enter an answer to the cket in the
admin console as if you were a support sta. The answer will appear on the website when
the detail view template is customized properly. This will be described later in this chapter.
Templates for ticket list and ticket detail view
Before customizing a detail view, let's create a new summary template. The summary view is
used below the cket submission form to show a list of all ckets submied by one customer
on the page Service Desk. The tle of each cket is linked with the detailed view of the
cket, where the answer from the sta is shown.
Time for action – customizing list of tickets
The appearance of the list of ckets created by the customer and shown to him should be
changed to meet our needs.
1. In the admin console, click on Content | Calguys Feedback Module, and choose the
Summary Templates tab.
2. Click on New Template, and enter TicketList as the Template Name.
This material is copyright and is licensed for the sole use by Niels Vils on 17th August 2010
Thorsøhøjen 8, Silkeborg, 8600

Creang Your Own Funconality
[ 224 ]
3. Add the following code into the Template text eld:
{if isset($comments)}
{foreach from=$comments item="one"}
<p><strong>Ticket No {$one.id}: <a href="{$one.detail_url}"
title="{$one.title}">{$one.title}</a></strong><br/>
<small>{$one.created|date_format:"%a %d %b %H:%M"} |
<a href="mailto{$one.author_email}">{$one.author_name}</a>
</small>
</p>
<div class="feedback_item_data">
{$one.data}
</div>
{/foreach}
{/if}
4. Click on Submit.
5. To use this template for the list of ckets, open the page Service Desk (Content |
Pages), and modify the Smarty tag for the summary view of ckets, as shown in the
following code snippet:
{cms_module module="FrontEndUsers"}
{if !empty($customcontent_loggedin)}
{CGFeedback key1="Ticket" key2=$userid commenttemplate=
"NewTicket"
policy="session"}
{CGFeedback key1="Ticket" key2=$userid summarytemplate=
"TicketList"
action="summary"}
{/if}
6. Click on Submit.
7. The template displays a list of all ckets with their number, tle, and content, as
shown in the following screenshot:
This material is copyright and is licensed for the sole use by Niels Vils on 17th August 2010
Thorsøhøjen 8, Silkeborg, 8600

Chapter 8
[ 225 ]
What just happened?
You have created a new template for the list of ckets in the customer area. To keep the
example clean, I have removed the page navigaon from the summary template, but you can
copy it back from the Sample template if you like.
In the next step, change the detail template for the cket detail view. In the admin console,
click on Content | Calguys Feedback Module, and choose the Detail Templates tab. Click
on New Template, and enter TicketDetail in the Template Name eld. In the Template Text
eld, enter the code suggested as follows:
<h3>Ticket No. {$onecomment.id}: {$onecomment.title}</h3>
<p>{$onecomment.created|date_format:"%a %d %b %H:%M"} |
<a href="mailto:{$onecomment.author_email}">
{$onecomment.author_name}
</a></p>
<div class="feedback_item_data">
{$onecomment.data}
</div>
{if isset($onecomment.fields)}
{foreach from=$onecomment.fields key="name" item="field"}
{assign var=$name value=$field.value}
{/foreach}
{if !empty($Answer)}
<p><strong>Staff Answer</strong><br/>
<small>{$onecomment.modified|date_format:"%a %d %b %H:%M"} |
{$Staff}</small></p>
<div>
{$Answer}
</div>
{/if}
{/if}
Click on Submit. To use the created template for displaying ckets with sta answers, you
have to set the template as default. Open the list of detail templates (Content | Calguys
Feedback Module, Detail templates tab) and click the icon with a red cross in the Default
column to use the template TicketDetail by default.
This material is copyright and is licensed for the sole use by Niels Vils on 17th August 2010
Thorsøhøjen 8, Silkeborg, 8600

Creang Your Own Funconality
[ 226 ]
This template will display the customer's queson and the answer of the sta (if any) in the
detailed view of the cket, as shown in the following screenshot:
Enabling dialog within tickets
At this point, the customer can submit his queson and wait for the response from the sta.
But what happens if the cket is answered and the customer would like to reply to this
answer? There is no possibility of doing it at this point. However, this feature can be easily
added as well.
What we need is another comment form placed in the detailed view of the cket. It is usually
possible to place Smarty tags in the module templates as well, so that the detail template for
the cket calls another form template of the same module and another summary template.
Edit the template TicketDetail to add another comment form and another summary list to it
at the very boom of the template.
{CGFeedback key1="Dialogue" key2=$userid key3=$onecomment.id
action="summary" sortorder="ASC"}
<hr/>
{CGFeedback key1="Dialogue" key2=$userid key3=$onecomment.id
policy="session"}
Save the template, and see the detail view of the cket on the page. Now the customer can
reply to answers given by the support sta or just add some more informaon missed in
his queson.
This dialog form has three keys: key1, key2, and key3. The rst key separates ckets
(1. level) from the dialog within the cket, the second key sll tracks the user ID, and the
third key has got a reference to the cket. In this way, you say "save the comment as an
answer from the parcular customer to the parcular cket".
This material is copyright and is licensed for the sole use by Niels Vils on 17th August 2010
Thorsøhøjen 8, Silkeborg, 8600

Chapter 8
[ 227 ]
To give a nishing touch, create a template for the dialog form and a template for the dialog
summary view. The dialog form does not need any special tle as it will get the tle of the
cket and gets Re: as prex for the cket tle. It will also be prelled with the values from
the cket. Create a new comment form template, and add the following code snippet
into it:
{if isset($message)}
<p class="info">{$message}</p>
{else}
{if isset($error)}
<p class="error">{$error}</p>
{/if}
{$formstart}
<input type="hidden" name="{$actionid}title" value="Re:
{$onecomment.title}"/>
</p>
<p><label>{$mod->Lang('prompt_your_name')}:</label>
<input type="text" name="{$actionid}author_name"
value="{$onecomment.author_name}"/>
</p>
<p><label>{$mod->Lang('prompt_your_email')}:</label>
<input type="text" name="{$actionid}author_email"
value="{$onecomment.author_email}"/>
</p>
<p><label>Question:</label>
<textarea name="{$actionid}comment" cols="40"
rows="5">{$comment}</textarea></p>
<p><input type="submit" name="{$actionid}submit" value="{$mod
>Lang('submit')}"/>
</p>
{$formend}
{/if}
Save the template with the name TicketDialogue. In the detail view of the cket (template
TicketDetail), adjust the Smarty tag at the boom to use the new form template as shown in
the following code snippet:
{CGFeedback key1="Dialogue" key2=$userid key3=$onecomment.id
action="summary" sortorder="ASC"}
<hr/>
{CGFeedback key1="Dialogue" key2=$userid key3=$onecomment.id
policy="session" commenttemplate="TicketDialogue"}
This material is copyright and is licensed for the sole use by Niels Vils on 17th August 2010
Thorsøhøjen 8, Silkeborg, 8600

Creang Your Own Funconality
[ 228 ]
With the last step, you show answers from the sta to the customer, so that the enre
conversaon within the cket is displayed. Create a new summary template (Content |
Calguys Feedback Module, tab Summary Templates) with the following code snippet:
{if isset($comments)}
{foreach from=$comments item='one'}
<p><strong>{$one.title}</strong><br/>
<small>{$one.created|date_format:"%a %d %b %H:%M"} | <a
href="mailto:{$one.author_email}">{$one.author_name}</a>
</small>
</p>
<div class="feedback_item_data">
{$one.data}
</div>
{if isset($one.fields)}
{foreach from=$one.fields key='name' item='field'}
{assign var=$name value=$field.value}
{/foreach}
{if !empty($Answer)}
<p><strong>Staff Answer</strong><br/>
<small>{$one.modified|date_format:"%a %d %b %H:%M"} |
{$Staff}</small>
</p>
<div>
{$Answer}
</div>
{/if}
{/if}
{/foreach}
{/if}
Save the template with the name DialogueList. In the detail view of the cket (template
TicketDetail), adjust the Smarty tag at the boom to use the new summary template as
shown in the following code snippet:
{CGFeedback key1="Dialogue" key2=$userid key3=$onecomment.id
action="summary" sortorder="ASC" summarytemplate="DialogueList"}
<hr/>
{CGFeedback key1="Dialogue" key2=$userid key3=$onecomment.id
policy="session" commenttemplate="TicketDialogue"}
Now, the basic service desk funconality is complete. The customer can submit his quesons
in his private area, the quesons can be answered by the support team from the admin
console of CMS Made Simple, and the customer can reply to the answers.
This material is copyright and is licensed for the sole use by Niels Vils on 17th August 2010
Thorsøhøjen 8, Silkeborg, 8600

Chapter 8
[ 229 ]
Use the funconality for the Admin Nocaons already implemented in the module, so
that the support sta are informed if a new cket is opened or a new reply is added.
In the admin area of the module Calguys Feedback Module (tab Fields), you can create a
new custom eld that allows one of the following values: Opened, Waing for Response,
or Closed. Use the eld type Dropdown to dene it. This eld can be set by the support
sta while working on the cket and shown in the summary view of the ckets, so that
the customer can see what the current status of the cket is.
You have seen how you can use the module that is not dedicated for creang a service desk
to set up the required features. Be open-minded and experiment with the modules. Even if
their descripon is not exactly what you need, you can use it in your way, as shown in
this secon.
Pop quiz – creating your own functionality
1. Why should the Allow users to login more than once box be selected when seng
preferences in the FrontEndUsers module?
a. When the user is currently logged in and the session expires in the browser
and not on the server, the user would not be able to log in again.
b. You should give users with a dual personality a chance to log in at least
twice at the same me.
c. A lot of users are working on dierent computers (private, oce, and so
on), so they can log in from more than one computer.
d. When this box is not checked, it is not possible to generate a new password
(or regenerate the username) when the user once forgets it.
2. What is the right statement according to the following Smarty tags used in
protected pages?
{CGFeedback key1="Ticket" key2=$userid}
{CGFeedback key1="Ticket" key2=$userid action="summary"}
a. These tags show the summary view of all comments wrien by all
registered users.
b. These tags show the comment form and the summary view of all comments
wrien by one user.
c. These tags show the summary view of all comments wrien by all users,
who are currently vising the website.
d. These tags show the comment form and the summary view of all
summaries of professional books wrien by all users having the same ID.
This material is copyright and is licensed for the sole use by Niels Vils on 17th August 2010
Thorsøhøjen 8, Silkeborg, 8600

Creang Your Own Funconality
[ 230 ]
3. What is the advantage of using a support cket system?
a. The website will get more visitors because of the fact that cket systems are
modern and the users are projecng this fact to your whole site.
b. The user can have a non public discussion with the service sta concerning
his/her needs and problems.
c. The user gets ckets for the champion league for a special price.
d. The user can have a public discussion in the forum concerning his needs
and problems.
Have a go hero – creating your own functionality
Before you say that there is no module that can cover my requirements and start to develop
one, try to gure out if your requirements can be solved with on-board means. A lot of
modules are just categorized catalogs of something, so they can be created with help of
the module CTLModuleMaker. And, as you have seen, try to see your requirements more
abstractly and reect on using other modules to solve your funconality before starng to
develop from scratch.
Summary
We learned a lot in this chapter about implemenng our own funconality not covered by
any ready-made module of CMS Made Simple.
Specically, we covered:
Module Maker: Creang some enrely new custom modules with
catalog-like content.
Custom Area: Enabling the login funconality on the website and creang
rudimentary service desk funconality with the feedback module.
Now that we've learned about how to create our own funconality, you can follow a
workshop on how to realize basic e-commerce soluon with CMS Made Simple. If you do not
need any e-commerce funconality, you are now ready to place your website online because
by this me, your website is fully funconal.
This material is copyright and is licensed for the sole use by Niels Vils on 17th August 2010
Thorsøhøjen 8, Silkeborg, 8600

9
E-commerce Workshop
CMS Made Simple is, as its name suggests, a content management system. In
a CMS, data can be dened as almost anything—documents, movies, pictures,
phone numbers, scienc data, and so on. CMS is generally used for storing,
controlling, revising, and publishing content. They are not explicitly designed
for e-commerce or community needs. For sophiscated online shops without
any content management features, it is beer to get a dedicated e-commerce
applicaon. The same applies to the typical community features like forum
or chat.
However, if your website is heterogenic, then it is not just a content
management system and has a mix of various features. You can use addional
modules for basic funconality of other applicaons. In CMS Made Simple,
there are some community modules such as Forum Made Simple (FMS)
and Shootbox Made Simple, and a number of modules that cover basic
e-commerce features.
A number of addional e-commerce modules for CMS Made Simple can be
confusing at the beginning. Actually, there are dierent soluons such as
e-commerce suite, Shop Made Simple (SMS), and the Cataloger. These
dierent soluons are not compable with each other in any way and
cannot be used together on one website.
In this chapter, you will learn about a soluon made of nine modules that oers the widest
funconality. This suite can be enriched by a number of addional modules to get even more
features. Oen users of CMS Made Simple wonder why there are so many modules that are
required to get a basic online shop. It is a philosophy of CMS Made Simple to act like a Lego
system, where you can build your required soluon without installing a big package having a
bunch of features that you will never use.
This material is copyright and is licensed for the sole use by Niels Vils on 17th August 2010
Thorsøhøjen 8, Silkeborg, 8600

E-commerce Workshop
[ 232 ]
This soluon is made of nine modules that are listed as follows:
CGExtensions
CGSimpleSmarty
Products
Cart
FrontEndUsers
SelfRegistraon (oponal)
CGPaymentGatewayBase
Orders
PaypalGateway (oponal)
Two of them are oponal. The SelfRegistraon module will allow your buyers to register
with the website during the checkout process. The last module, PaypalGateway, should be
installed if you use PayPal service to instantly collect payment from the website. For this
workshop, I will use products from the ocial CMS Made Simple shop that can be found at
http://www.cafepress.co.uk/cmsmadesimple. I also assume that you already know
how to install modules and customize module templates with HTML, CSS, and Smarty.
Module Products
The Products module will be the heart of your e-commerce soluon . This module is the
place where products that you would like to sell in your shop are saved. Generally, it is
possible to use any other module for the soluon, but this would imply that you have
to make some heavy modicaons to your templates and, probably, the PHP code of
the modules.
With the Products module, you can manage:
Products
Product aributes that will have an impact on the price (like size or color)
Categories
Product hierarchy
Custom elds
This module is the basis for all other modules that you will use later on. Aer all, you cannot
start a shop if you do not have any place to store the products.
This material is copyright and is licensed for the sole use by Niels Vils on 17th August 2010
Thorsøhøjen 8, Silkeborg, 8600

Chapter 9
[ 233 ]
Install the Products module with the Module Manager. Pay aenon to the
Dependencies secon of the module before installing it. There are two (CGExtensions and
CGSimpleSmarty) modules that provide convenience APIs, reusable forms, and Smarty tags
for use in other modules. If you are not a programmer, you probably will not need to do
anything with these modules besides adjusng some preferences if you ever need them.
In the workshop described here, you just need to install them.
Time for action – adding the rst product
Aer the Products module is installed, we will display it on the page Shop and add the rst
product to it as follows:
1. Create a new content page Shop (Content | Pages | Add New Content).
2. Add the Smarty tag {Products} into the eld Content of the page. If you see the
page in browser, it will not show anything at this me as you have not added any
product to the shop so far.
3. In the admin console of CMS Made Simple, click on Content | Product Manager.
4. Under the Products tab, click on the Add A Product link and add your product as
shown in the following screenshot:
5. Click on Submit and see the Shop page on your website.
This material is copyright and is licensed for the sole use by Niels Vils on 17th August 2010
Thorsøhøjen 8, Silkeborg, 8600

E-commerce Workshop
[ 234 ]
What just happened?
You have added the rst product to the Products module. This product is displayed on
the page with the Price and Weight (we can delete this eld later on). Click the product
link to see the detailed view of the product. The template looks very technical, but with
some HTML, CSS, and Smarty knowledge you can change its look and feel later on. Let's
concentrate on the funconality of the module rst and not on the design.
Add some more products in the Product Manager and see the list of products on the Shop
page. Pay aenon that the detailed view of every product is displayed in the same way. In
the Products module, there are some elds like Price and Weight already dened. But you
will need to add your own elds.
Creating custom elds
Usually one or more pictures of the product can be found in an online shop. However, there
is no special image eld where you can upload the product picture. Luckily, you can add as
many custom elds as you need. In the next step, you will create a custom eld, where the
image of the product can be uploaded. In the admin area of the Product Manager, choose
the tab Field Denions and click on the link Add A Field.
Name is a kind of technical eld that is not displayed to your visitors. You should not use
any special characters or spaces in the name of the eld. Use only leers and numbers, no
dashes, slashes, or anything else non-alphanumeric.
This material is copyright and is licensed for the sole use by Niels Vils on 17th August 2010
Thorsøhøjen 8, Silkeborg, 8600

Chapter 9
[ 235 ]
The Prompt eld is the label of the eld that you will see in the admin area of the Product
Manager during adding or eding products. You can use any characters in this eld.
The Type of the eld should be Image. By selecng this type you ensure that the eld is
displayed as a eld for le uploads in the admin area. This eld will also be validated, so that
only images can be uploaded here. Addionally, thumbnails for the uploaded images (small
preview versions) will be created automacally aer upload.
Let the eld be public by selecng the checkbox for Is this a public eld? It means that
the content of the eld (the image itself) will be shown to the visitors of your shop. If you
make it private, only the administrator of the website can see the eld in the admin area
of the module.
Save the eld. This eld is automacally added to the detail template on the page and the
eding view of the product in the admin area of the Product Manager. To test the eld, open
any product for eding in the admin area, nd the eld Product image (Prompt), and upload
an image for the product using this eld.
Control the display of the eld in the detailed view of the product on the website. The small
preview version of the product is added to the secon Custom Fields of the detailed view.
We sll do not care of how it looks like, but how it works. We will change the detailed view
of the product when we are ready with all the custom elds and the product hierarchy.
Image already exists
When you try to upload the same image twice you will get an error saying
that the image has been already uploaded. To control what images are
already saved for the product and delete them, open Content | File Manager
in the admin console. Find the folder Products and then the folder name
product_[ID]. The ID of the product is displayed in the list of products
in the admin area. Click on this folder and remove the images already
uploaded. Now, you can upload the same image in the admin area of the
Product Manager.
Dene your own elds
Create as many custom elds as you need to display and manage the product. With the Type
of the eld you decide how the eld is displayed in the admin area. The output of the eld
on the page can be fully customized and does not depend on the type.
If you need a Product Number eld, create a new custom eld (Text Input) with maximum
length of 12 characters and make the eld public. Then edit each of your products and enter
a number in this eld. You can adjust the order of the elds under the Field Denions tab.
Again, this order only applies to how the admin area for the product management looks; the
output on the page can be completely dierent.
This material is copyright and is licensed for the sole use by Niels Vils on 17th August 2010
Thorsøhøjen 8, Silkeborg, 8600
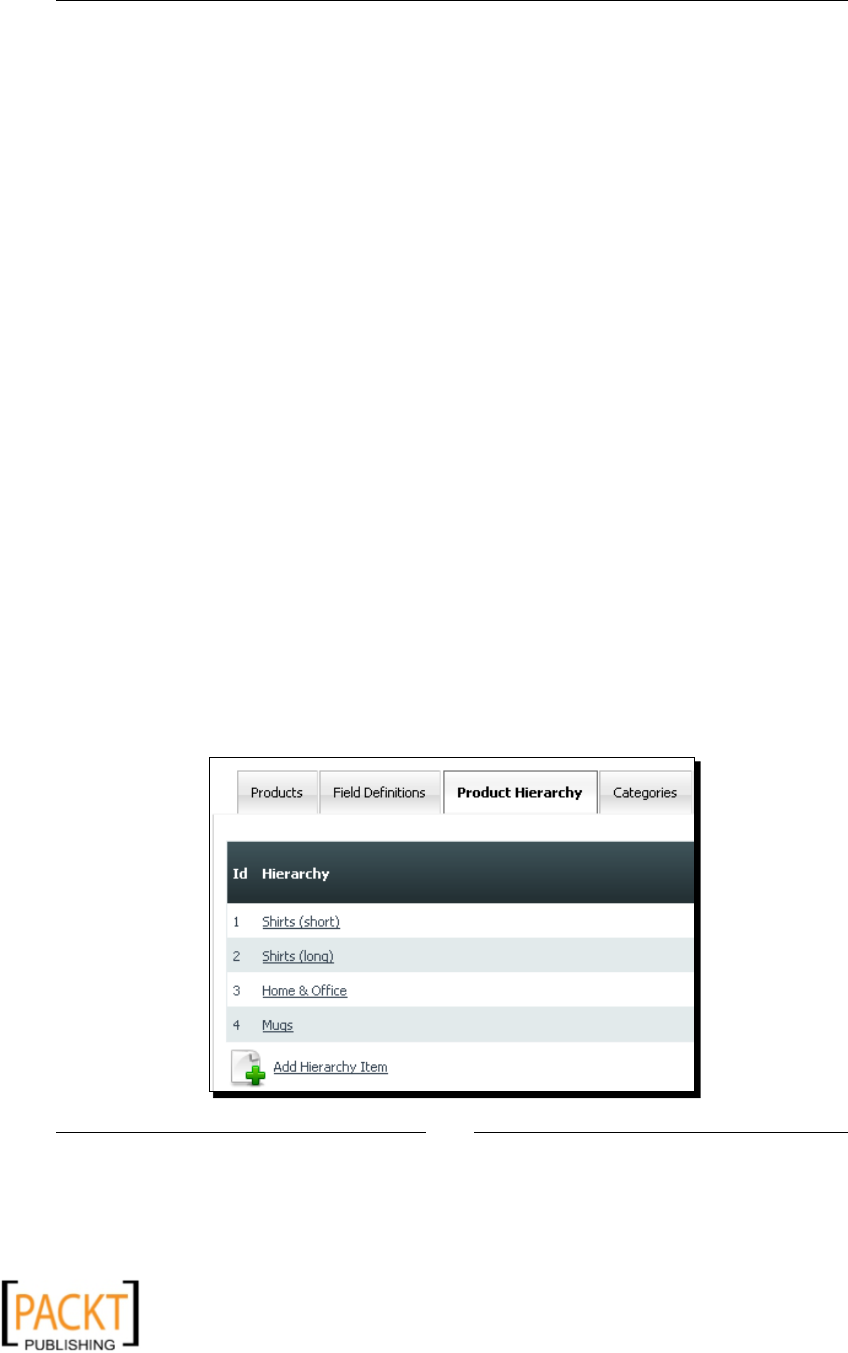
E-commerce Workshop
[ 236 ]
Creating a product hierarchy
Next, let us create a product hierarchy. In the ocial shop that I am trying to reproduce here,
there are four hierarchy items:
Shirts (short)
Shirts (long)
Home & Oce
Mugs
You should understand the dierence between product categories and product items in
the Product Manager module. Product categories are kind of tags for the products. It is
not possible to arrange them in the hierarchy. However, you can assign one product to
mulple categories if you like. In contrast to the categories, a product can belong to only
one hierarchy item. That means the structure above should be implemented as a hierarchy
and not as categories. One product cannot be a shirt and a mug at the same me.
We will use categories later on to mark the products as:
New
Popular
Discounted
Categories will allow you to make one product both new and discounted at the same me. A
hierarchy would not, as mulple assignment is not possible.
In the admin area of Product Manager, click on the Product Hierarchy tab and create four
hierarchy items displayed in the rst list. It is your choice if you want to add any descripon
or image to the hierarchy or leave it empty.
This material is copyright and is licensed for the sole use by Niels Vils on 17th August 2010
Thorsøhøjen 8, Silkeborg, 8600

Chapter 9
[ 237 ]
Once the hierarchy is created, go through your already created products and assign them
to the proper hierarchy item. The hierarchy can now be displayed in the sidebar navigaon
on the page. Open the main page template (Layout | Templates) and nd the secon with
sidebar navigaon. Add the Smarty tag for the product hierarchy shown as follows:
{Products action="hierarchy"}
Customizing product templates
The display of the product hierarchy template is very technical. Let's customize all the
templates for the module. There are three of them:
Summary Templates
Detail Templates
Hierarchy Report Templates
Let's start with the Hierarchy Report Templates. This template denes how the hierarchy in
the sidebar is displayed. In the admin area of the Product Manager, click on the Hierarchy
Report Templates tab and nd the list of exisng templates for the hierarchy. The template
Sample is the one that is used by default. You can customize this template or create your
own by clicking on the New Template link. I choose the second way. It is generally advisable
not to change sample templates, but create your own and set them as default. This way you
can delete anything from the custom template and use the Sample template for reference
if you need parts removed from the custom template. For the template name, I chose My
Shop. However, you can use any name you wish.
In the Template Text eld, the sample template code is already suggested. Leave this code as
it is and submit the new template. Now you see two templates in the list. Make the template
My Shop the default one by clicking on the red cross in the Default column. Let's see what
we have in the template and what we actually need. Open the new template for eding:
Smarty variable Descripon
{$hierarchy_item.name}
The name of the hierarchy item.
{$hierarchy_item.id}
The ID of the hierarchy item.
{$upurl}
The URL to the parent hierarchy item. Only applicable if
there are more than one hierarchy levels.
{$mod}
The object containing all the informaon about the
module Products. In the template the object is used to get
translaons:
{$mod->Lang('parent')} returns the translaon for
the key parent from the translaon le.
You can replace this variable with your custom text if your
website is monolingual and the language of the website will
be never changed.
This material is copyright and is licensed for the sole use by Niels Vils on 17th August 2010
Thorsøhøjen 8, Silkeborg, 8600

E-commerce Workshop
[ 238 ]
Smarty variable Descripon
{$parent}
This array supposes to hold the informaon about the
parent item. However, it is not assigned in the current
version of the module and cannot be used.
{$child_nodes}
The array that contains informaon about all child hierarchy
items. The informaon in this array is:
• {$child_nodes.id}: ID of the hierarchy item
• {$child_nodes.name}: Name of the
hierarchy item
• {$child_nodes.description}: Descripon of
the hierarchy item
• {$child_nodes.parent_id}: ID of the parent
hierarchy item
• {$child_nodes. image }: The name of the
image le for the hierarchy item
• {$child_nodes. thumbnail}: The name of
the thumbnail le for the hierarchy item
• {$child_nodes. long_name}: The full name
of the hierarchy item (including the names of
all parents)
• {$child_nodes. extra1}: The value saved in
the Extra Field 1
• {$child_nodes. extra2}: The value saved in
the Extra Field 2
• {$child_nodes. downurl}: The URL for this
hierarchy item
{$hierarchy_image_
location}
Path to the folder where images for the product are saved.
{$hierarchy_item}
An array that contains the ID of the actual item hierarchy.
From the preceding table, you can now combine the HTML and Smarty tags and create your
own template. Create a list of hierarchy items for the sidebar with the sample template as
shown in the following code snippet:
{if isset($child_nodes) && count($child_nodes)}
{foreach from=$child_nodes item='node'}
<h3>
{if isset($node.downurl)}
<a href="{$node.downurl}
title="{$node.name}">{$node.name}</a>
{else}
This material is copyright and is licensed for the sole use by Niels Vils on 17th August 2010
Thorsøhøjen 8, Silkeborg, 8600

Chapter 9
[ 239 ]
{$node.name}
{/if}
</h3>
{if !empty($node.description)}
<div>{$node.description}
</div>
{/if}
{/foreach}
{/if}
<!-- This tag will be automatically added to the page content.
It uses the default summary template for products. -->
{Products hierarchyid=$hierarchy_item.id}
This template goes through each hierarchy and displays its name as a HTML heading <h3>.
It will also show a descripon eld of the hierarchy item below the heading. The last Smarty
tag in the template shows the summary list of the products limited to the hierarchy item
selected in the sidebar. The template of this summary list is the default summary template.
The products summary list will automacally replace the page content.
Before you customize the summary template, open it (Content | Product Manager, tab
Summary Templates, template Sample) and nd out what the major parts of this template
are. It consists of:
Drop-down list of categories
Page navigaon
List of products with the add-to-cart funconality for each product
At present, you can see only the list of products, no categories, no page navigaon, and no
cart funconality.
Displaying the drop-down list of the categories does not work in the actual version of the
module the way it is added to the sample template:
{if isset($catformstart)}
{$catformstart}
{$catdropdown}{$catbutton}
{$catformend}
{/if}
It is sll possible that this funconality will be added in a later release of the module.
At present, you can completely delete this part or replace it with the Smarty tag shown
as follows:
{Products action="categorylist"}
This material is copyright and is licensed for the sole use by Niels Vils on 17th August 2010
Thorsøhøjen 8, Silkeborg, 8600

E-commerce Workshop
[ 240 ]
The output of the category list can be changed by customizing the CategoryList Templates in
the admin area of the Products module. In my example, I have added the categories to the
sidebar just above the hierarchy item as shown in the following code snippet:
{Products action="categorylist"}
{Products action="hierarchy"}
The second line of code in the last example already exists in your template. The rst line adds
the links to the dierent categories that have assigned products. In the brackets behind the
name of the category, the number of assigned products is shown. If you have assigned some
products to categories, it should look as shown in the following screenshot:
To dene how many products should be shown on one page and to see how the page
navigaon for the product list looks like by default, add the parameter pagelimit="" to the
Smarty tag {Products}. We have placed this tag in the page Shop at the very beginning of
the workshop. Open the page (Content | Pages) and add the parameter to the tag as shown
in the following code:
{Products pagelimit="2"}
Be sure that the whole number of products is greater than the value set here. Otherwise,
you will not see the page navigaon and cannot customize it. The page navigaon in the
module Products does not support SEO friendly URL, so if you do not have many products,
you can completely delete the navigaon from the template and do not limit the number
of products per page. The number of products shown on one page is limited to 100000
products, if you do not limit it explicitly. But I would not recommend displaying more
than about 20 products per page. It is not user friendly and will signicantly impact the
performance of your shop.
The last part in the template is the cart funconality. The Products module does not contain
any cart funconality. There is another module that is perfectly integrated into it. The
module in queson is called Cart and will be installed in the next step. We cannot change
the display of the Cart module at this me, so we will leave the tag as it is.
This material is copyright and is licensed for the sole use by Niels Vils on 17th August 2010
Thorsøhøjen 8, Silkeborg, 8600

Chapter 9
[ 241 ]
The last queson is how to display the product image in the summary list of products. In the
Summary template, you will nd a Smarty comment made by the developer of the module
saying The summary template has access to custom elds via the $entry->elds. The values
of the custom elds can be generally accessed by the following lines of code:
{$entry->fields.image->value}
{$entry->fields.number->value}
The part of the code in bold corresponds to the technical name of the eld. To get
thumbnails of the images automacally created by the module during the upload use:
{$entry->fields.image->thumbnail}
So let's put it together and create a complete template for the summary view of products
including custom eld containing the thumbnail of the product. Create a new summary
template and name it My Shop. Add the template code as shown in the following
code snippet:
{Products action="categorylist"}
<ul class="products-summary">
{foreach from=$items item=entry}
<li>
<a href="{$entry->detail_url}">
<img src="{$entry->file_location}/{$entry->fields.image
>thumbnail}" alt="{$entry->product_name}"/></a>
<br/>
<a href="{$entry->detail_url}">{$entry->product_name}</a>
<br/>
{$currency_symbol}{$entry->price}
</li>
{/foreach}
</ul>
Save the template and set it as default. The variable in bold in the template is the custom
eld containing the image of the product. I have named the eld image as I have created it. If
you have chosen another name, you have to adjust it here.
The list of products can be styled with CSS. To display the products one by one, open the
stylesheet used in your main template (Layout | Stylesheets) and add the following style
denions to it:
ul.products-summary
{
list-style: none;
}
ul.products-summary li
This material is copyright and is licensed for the sole use by Niels Vils on 17th August 2010
Thorsøhøjen 8, Silkeborg, 8600

E-commerce Workshop
[ 242 ]
{
float: left;
padding: 15px;
text-align: center;
}
This is just an example; you are free to add any styles that will t into your own design.
The size of the thumbnails created while uploading product images can be changed in the
tab Preferences (Content | Product Manager). On this page, scroll down to the secon
Image Handling Sengs and adjust the values as you like.
If you have used my templates so far, your summary template and hierarchy should look as
shown in the following screenshot:
The last step will be customizaon of the detailed view of the product. Create a new
template called My Shop under the Detail Templates tab in the admin area of the Products
module. Then set the template as default.
In the detail template, you will nd a secon for the product aributes. We did not discuss
it so far. The products can have dierent aributes, like size or color for the t-shirts. These
aributes may or may not have an impact on the price. For each product, the aributes are
added separately. It does not make sense to add size or color to the mouse pad, if we have
only one model.
This material is copyright and is licensed for the sole use by Niels Vils on 17th August 2010
Thorsøhøjen 8, Silkeborg, 8600

Chapter 9
[ 243 ]
Let's create the aribute for the color of the long t-shirt. Assume that we have two colors
available: white and grey. The color does not change the price of the product. In the admin
area of the Products module, click on the Products tab. In the list of products, at the end of
each line there is an icon for Edit Aribute Sets. Click on this icon in line with the product to
which you would like to add aributes.
On the next screen, click on Add Aribute. Enter the name of the aribute. This name
contains the generic term like Color. In the Label eld enter the name of the aribute in the
same way as it should appear on the website. As the color of the t-shirt does not change the
price of the product, enter 0 in the eld Price Adjustment and click on Update. Add another
label for the color Grey. It should look as shown in the following screenshot:
Click on Submit once you have entered all possible values for this aribute. See the detailed
view of the product with dened aributes. All possible values are listed in the template.
When you install the Cart module later on, you will not only be able to display the aributes,
but add them to the cart as well. The price will be automacally adjusted in the cart view.
You should now be able to customize the detail template yourself.
Follow these steps:
1. Create a new template and do not overwrite the sample one. The Sample template
can be used for future reference if you delete any part from your custom template.
2. Analyze the template. Try to gure out its major parts and usage of other modules
in it.
3. Write down all the Smarty variables used in the templates in a table as shown
previously for the Hierarchy Report Templates.
This material is copyright and is licensed for the sole use by Niels Vils on 17th August 2010
Thorsøhøjen 8, Silkeborg, 8600

E-commerce Workshop
[ 244 ]
4. Figure out, what values are saved in these variables. If the variable contains an
array, use the Smarty modier print_r to get all array values from it. For example,
{$entry|print_r} will output all the values contained in this variable.
5. Use HTML and Smarty to markup the template.
6. Add stylesheet denions to change the appearance.
Creating detail view for product
Follow the list above and create your own template for the detailed view of the product.
Delete everything you do not need in the template; for example, the Weight eld. Assign
custom elds (Product image and Product number) the same way you did in the summary
template. Check the values of the variables with the modier print_r if you are not sure
what you have to use.
My detail template looks as shown in the following screenshot:
The template code I have used for the detailed template is shown in the following
code snippet:
<div class="products-detail">
<img align="left" src="{$entry->file_location}/{$entry
>fields.image->value}" alt="{$entry->product_name}"/>
<h1>{$entry->product_name}</h1>
<h2>{$currency_symbol}{$entry->price}</h2>
<div>{$entry->details}</div>
This material is copyright and is licensed for the sole use by Niels Vils on 17th August 2010
Thorsøhøjen 8, Silkeborg, 8600

Chapter 9
[ 245 ]
{* print out attributes *}
{if isset($entry->attributes)}
{foreach from=$entry->attributes key='name' item='attribset'}
<p><strong>{$name}:</strong>
{foreach from=$attribset key='label' item='adjustment'}
{$label} ({$currency_symbol}{$adjustment}),
{/foreach}
</p>
{/foreach}
{/if}
{* include the cart *}
{if isset($cart_module_tag)}
{eval var=$cart_module_tag}
{/if}
</div>
You are now ready to add cart funconality to your soluon.
Module Cart
This module will add simple cart funconality to the Products module. Once installed, the
Cart module will be automacally displayed in the detailed view of the product. The visitor
of the website will then be able to put one or more products in the basket along with the
desired quanty. There are other modules that you can use instead of the Cart module,
like GiBaskets. For our example Shop, it is enough to use the simple funconality of the
Cart module.
Install the module Cart from the list of available modules in the Module Manager. The
admin area of this module will be added to Extensions | Cart in the admin console of CMS
Made Simple.
Time for action – connecting products and cart
If you now look at your Shop page and open a detailed view of any product, you will
discover that there is sll no cart funconality in it. The reason for it is that the Products
module does not know that the Cart module has been installed and is ready for use. Let's
connect two modules.
1. Open the admin area of the Products module (Content | Product Manager).
2. Click on the Preferences tab.
3. Select the Cart module from the eld Cart Module.
This material is copyright and is licensed for the sole use by Niels Vils on 17th August 2010
Thorsøhøjen 8, Silkeborg, 8600

E-commerce Workshop
[ 246 ]
4. Click on Submit and open detailed view of any product. You should see the buon
Add to My Cart in the detailed view of the product. If the product has some
aributes addionally to the quanty eld, then the aributes are displayed
in a drop-down eld besides it.
What just happened?
You have told the Products module what module has to be used for cart funconality. Test
it and add some products to the cart right now. The products will be added, but there is no
possibility to display the content of the cart for the visitor yet.
Create a new content page called Cart and add the following Smarty tag as the content of
the page:
{Cart action="viewcart"}
Save the page, then open the admin area for the Cart module (Extensions | Cart) and switch
to the Preferences tab. Select the newly created page in the list of pages, so that the visitor
is automacally redirected to the page aer he has added the product to it.
There are four templates that you can customize for the module:
Template Descripon
AddToCart This template controls how the quanty eld, the buon Add To My Cart
(shown in the previous screenshot) and oponally product aributes
with price adjustment will look.
MyCart This template is used to display the cart status. It is displayed at the place
where the Smarty tag {Cart action="mycart"} is placed. It shows the
number of items currently saved in the cart and a link to the cart page.
Viewcart This template is used for extended display of all products saved in the cart. It
shows all products with their quanes and prices and the total order price.
Addionally it oers the possibility to start the checkout order process if the
module Orders is installed.
Product Summary This template is used to format the output used for each product summary in
the Viewcart template. It allows you to customize the product label based on
the aributes, product name, and price.
This material is copyright and is licensed for the sole use by Niels Vils on 17th August 2010
Thorsøhøjen 8, Silkeborg, 8600

Chapter 9
[ 247 ]
The Smarty tag {Cart action="mycart"} can be added to the navigaon of the
website, like the link to the Basket in the ocial shop (http://www.cafepress.co.uk/
cmsmadesimple) we are trying to reproduce. It would appear as shown in the
following screenshot:
There is nothing else you should know about the Cart module. The next step will be to
integrate the checkout process.
Module Orders
This module is designed for processing orders from the cart. This module handles billing and
shipping addresses from the customer and either uses an external payment gateway (such
as PayPal) to handle the payment process or performs manual e-mail-based invoicing. This
module can also oponally collect credit card informaon and store it in the database for
later oine processing.
Even if the module oers the possibility, never collect credit card
informaon in a low security shared hosng environment!
The Orders module keeps track of all orders, and allows for the specicaon of items like
tracking numbers and conrmaon numbers and sending e-mails to the customers related to
a parcular order.
The funconality of the module can be extended with even more modules that allow
conguring dierent taxes, shipping costs, and promoon acons (like discount or
promoon coupons).
This module has a lot of dependencies:
CGExtensions
FrontEndUsers
Products
CGSimpleSmarty
CMSMailer
CGPaymentGatewayBase
This material is copyright and is licensed for the sole use by Niels Vils on 17th August 2010
Thorsøhøjen 8, Silkeborg, 8600

E-commerce Workshop
[ 248 ]
From this list of dependencies, you can learn that it is based on the funconality of the
module FrontEndUsers. This means that your website's customers must register before they
can start the payment process on your online store. There is no possibility to turn o this
registraon process and it is required for the checkout step.
Install all modules listed in the preceding dependencies list, then install the Orders module.
Time for action – adding the checkout step
To enable the checkout process provided by the Orders module follow these steps:
1. Create a new content page (Content | Pages | Add New Content) and name
it Checkout.
2. Add the following Smarty tag to the Content eld of the Checkout page:
{Orders}
3. Save and view the page in the browser. This page will display either the billing form
if the user is logged in or the warning message if the user is not logged in or does
not belong to special user group.
4. To connect the Cart module with the new Checkout page, in the admin console click
on Extensions | Cart.
5. Select the tab Viewcart Form Templates and click on the Sample template
(or your own template, if you have created one).
6. At the very end of the template in the Template Text eld, add the following line
of code:
{cms_selflink page="checkout"}
The parameter page should contain the page alias of the page
where the Smarty tag {Orders} has been added to the content.
7. Open your shop and add one or more products to the cart, nd a link to the page
Checkout at the very boom of the screen.
What just happened?
You have connected the module Cart with the module Orders by placing a link from the cart
view to the checkout process. To test the link, add some products to the cart and click the
Checkout link at the boom of the cart view. If you are not logged in, you will see
the following message:
This material is copyright and is licensed for the sole use by Niels Vils on 17th August 2010
Thorsøhøjen 8, Silkeborg, 8600

Chapter 9
[ 249 ]
The user is not logged in (or not a member of the required group)
This message can be found in the template of the Orders module. But rst, let's see an
overview of the templates delivered with this module. In the admin console, click on
Content | Order Manager and nd the Templates link above the list of orders:
Template Descripon
Billing Form This template controls the rst step in the order processing. It
displays the form where the customer can enter billing address and
one or more shipping addresses.
Payment Form This template controls the second step in the order processing
and is used to display the payment form for manual e-mail-based
checkout process. You will need this template if you do not use any
payment services such as PayPal, EMoney, eWay, or Authorize.Net.
Conrm Order This template controls the third step in the order processing and is
used to display any informaon the customer entered in the rst
and oponally second step, so that the customer can conrm the
shipping and invoice addresses or go back and correct them.
Invoice This template is used in the admin area of the Orders module to
print out the invoice or to send it via e-mail to the customer.
Gateway Complete This template is used to display the status message aer the
payment has been made with any third-party service such as
PayPal, EMoney, EWay or Authorize.net.
User Email This template is used to customize the e-mail with order
conrmaon sent to the customer when the new order has been
submied.
Admin Email This template controls the layout and content of the e-mail that is
sent to the authorized administrator of the store when a new order
is submied.
Message There is no sample template for the messages. Here you can dene
your custom e-mail nocaons that can be manually sent to the
customers from the admin area of the module. An example of such
message can be an e-mail nocaon that is sent when the order
is shipped.
Now, we know where to start and how to proceed with customizing of the templates according
to our requirements and payment conguraons. Let's give the customer the possibility to
register with or login to the website to be able to complete the checkout process.
This material is copyright and is licensed for the sole use by Niels Vils on 17th August 2010
Thorsøhøjen 8, Silkeborg, 8600

E-commerce Workshop
[ 250 ]
Integrating the login screen
The message that indicates that the customer is not logged in is saved in the template
Billing Form (the rst step in the checkout process).
The user is not logged in (or not a member of the required group).
This is not very user friendly. Whether the user is registered or not we should give him a
possibility to log in or to register on this page as shown in the following screenshot:
The login form for registered customers can be displayed with the module FrontEndUsers.
This module was discussed in the secon Managing visitors' logins in Chapter 8, Creang
Your Own Funconality. If you have not installed the module yet, use the Module Manager
to do so and see the login form on the website. The link to the page where the customer can
register will be provided with the SelfRegistraon module discussed further.
In the admin area of the Orders module, click on the Templates link and create a new
template with the name My Shop on the Billing Form tab. Scroll down to the very boom
of the suggested template text and nd the last ELSE condion:
...
{else}
{* user is not logged in, gotta make him *}
<h3 style="color: red;">{$Orders
>Lang('error_notloggedin')}</h3><br/>
{/if}
This material is copyright and is licensed for the sole use by Niels Vils on 17th August 2010
Thorsøhøjen 8, Silkeborg, 8600

Chapter 9
[ 251 ]
This is the place where the message that the user is not logged in is shown. Replace this
secon with the login screen of the module FrontEndUsers, as shown in the following
code snippet:
...
{else}
<h1>Already registered?</h1>
{FrontEndUsers}
{/if}
Save the template and do not forget to set it as Default to see changes on the website.
Registered customers can now log in to start the checkout process.
But, what about customers who do not have an account? They should be able to
register themselves with our website. As it gets a bit complicated I have created the
following owchart:
The billing form checks if the visitor is logged in or not. If yes, he can ll in the billing
informaon; if not, the login form of the FrontEndUsers module (step 3) is displayed. The
steps 4 and 5 in the workow should assist new customers by allowing them to register.
These steps can be accomplished with the SelfRegistraon module. Read the next secon
to see how the module can be congured.
This material is copyright and is licensed for the sole use by Niels Vils on 17th August 2010
Thorsøhøjen 8, Silkeborg, 8600

E-commerce Workshop
[ 252 ]
Before you connue be sure that:
The CMSMailer module is congured and is able to send out messages (refer to
Chapter 2, Geng Started).
There is a user property of type Email Address in the module FrontEndUsers
(Users & Groups | Frontend User Management, tab User Properes).
There is a user group that has the above user properes associated as Required
(Users & Groups | Frontend User Management, tab Groups).
You can read how to congure the FrontEndUsers module in Chapter 8, Creang Your
Own Funconality.
Integrating customer registration
This module is designed to allow visitors of the website to register themselves. It oponally
sends a conrmaon e-mail with an acvaon link that must be clicked before the
registraon is complete. Once the registraon is complete, a user account is created in
the module FrontEndUsers.
Install the SelfRegistraon module from the list of available modules in the Module
Manager. For the registraon page, create a new content page Register and add the
following Smarty tag into the content of the page:
{SelfRegistration group="Customers"}
Pay aenon to the part in bold in the above code. The value of the parameter group
should exactly reect the name of user group in the module FrontEndUsers (Users &
Groups | Frontend User Management, tab Groups). Please read Chapter 8, Creang Your
Own Funconality to see how the FrontEndUsers module should be congured if you do
not have any user groups so far.
Open the Register page of your website and sign in yourself as a new customer with
the SelfRegistraon module to see how the module works by default. There are some
preferences in the module that can make the registraon process user friendly. In the admin
area of the Self Registraon module (Users & Groups | Self Registraon Module), click on
the Preferences tab.
This material is copyright and is licensed for the sole use by Niels Vils on 17th August 2010
Thorsøhøjen 8, Silkeborg, 8600

Chapter 9
[ 253 ]
The SelfRegistraon module oers registraon with an e-mail vericaon step or oponally
single-step registraon without any conrmaon. If you do not need the e-mail vericaon,
you should deselect the opon Require the user to conrm registraon via email on the
Preferences tab of the module. The three sengs considering the nal message work
dierent depending on what registraon method you have chosen.
Seng With vericaon Without vericaon
Don't display the
nal message aer
registraon
Prevents the registraon
form to be replaced by the
conrmaon message aer
the form is submied.
Prevents the registraon form to be
replaced by the nal message aer
the form is submied.
PageID/Alias to redirect
to aer registraon is
complete
N/A Redirects to the given page, but
replaces the whole content of the
page with the nal message.
PageID/Alias to redirect
to aer vericaon step
is complete
Redirects to the given page,
but replaces the whole
content of the page with the
nal message.
N/A
According to the workow, let's add a link to the registraon page for the new customers
(step 4). In the billing template of the Orders module, open the template for the Billing Form
again, scroll down and add a link to the registraon page for the new customers as shown in
the following code snippet:
...
{else}
<h1>Already registered?</h1>
{FrontEndUsers}
<h1>New Customer?</h1>
{cms_selflink page="register"}
{/if}
This material is copyright and is licensed for the sole use by Niels Vils on 17th August 2010
Thorsøhøjen 8, Silkeborg, 8600

E-commerce Workshop
[ 254 ]
Pay aenon to the parameter page. It should contain the alias of the page where the
registraon form is displayed. Customize the Registraon Template 1 of the SelfRegistraon
module that displays the registraon form. Generally, there are two templates. The rst one
is for the registraon form and the second one (Post Registraon Template) contains the
message informing the customer that his registraon should be conrmed through a link
sent to his e-mail address. Other templates that you can customize are as shown in the
following table:
Templates Descripon
Registraon Template 2 This template contains the form where the username, vericaon
code, and password will be added to complete registraon.
Conrmaon Email Contains the subject of the vericaon e-mail, the plain text
and the HTML version of the e-mail sent out aer the customer
has registered.
Final Message The message is shown to customer aer the registraon process
is completed. To build the workow suggested previously (step 5)
add link to the billing form in this template, so that the user can
carry on with the checkout process. It is also advisable to ck the
opon Login user aer registraon, so that the login step can be
skipped aer registraon.
Lost Email This template contains a form for the customers who
have registered but did not get vericaon e-mail. This
template is shown at the place where the Smarty tag
{SelfRegistration mode="sendmoremail"} is shown.
When the user registers with the website and e-mail vericaon is required, the temporary
user account is saved in the SelfRegistraon module (not FrontEndUsers!). Aer e-mail
vericaon is complete, new user account is automacally moved to the FrontEndUsers
module. At the same me the temporary account is deleted from the SelfRegistraon module.
There is a limit of 250 temporary accounts in the SelfRegistraon module. When the
number of 250 non-veried accounts is reached, no registraon is possible. Therefore you
purge from the SelfRegistraon module by using the opon on the Preferences tab.
Aer the module SelfRegistraon is congured and all required templates are customized,
you can go through the whole manual e-mail-based checkout process.
I suggest that you use the workow to test all three cases:
The visitor is registered and logged in
The visitor is registered, but not logged in
The visitor is not registered
This material is copyright and is licensed for the sole use by Niels Vils on 17th August 2010
Thorsøhøjen 8, Silkeborg, 8600

Chapter 9
[ 255 ]
I recommend that you customize the nal message in the SelfRegistraon module and add
two links to assist the user in his further steps. Link to the Checkout page to connue the
checkout process and to the Shop page to connue shopping.
Module Paypal Gateway
This module is used by the Orders module to checkout orders using PayPal Website
Payments Standard mechanism. In other words, this module allows the order to be paid
through the PayPal website. This payment opon can be used either addionally to the
manual e-mail-based invoicing delivered with the Orders module or as a substute for
manual processing.
Using this module the customer will be redirected to the PayPal website where the order
and all payment details are displayed. He has to log in to his PayPal account to conrm the
payment. Aer the payment is made, the PayPal will automacally redirect to your website.
There are several ways PayPal returns payment data to you aer the payment is completed.
The Paypal Gateway module supports two methods:
Payment Data Transfer (PDT)
Instant Payment Nocaon (IPN)
PDT is a way to conrm the payment with the redirecon URL from the PayPal website aer
the payment is complete. However, the payment can be conrmed in the Orders module this
way only if the customer is paent and does not close the browser or navigate away before
redirecon is completed. If the redirect breaks for some reasons, you won't know about
the payment and will have to complete the order manually in the admin console of CMS
Made Simple.
IPN is independent of the customer's acon. It communicates with your website in the
backend. If the customer closes the browser or navigates away, you will sll receive
nocaons from PayPal about the payment. IPN also has a built-in retry mechanism. If
there's a problem reaching your website, PayPal will retry to inform you about payments for
several days. IPN works parallel to the order process and can be slightly desynchronized. It is
possible that the customer may return to your page before IPN informs you that the order
is paid.
These two methods can be used together to combine their advantages.
This material is copyright and is licensed for the sole use by Niels Vils on 17th August 2010
Thorsøhøjen 8, Silkeborg, 8600

E-commerce Workshop
[ 256 ]
Install the module Paypal Gateway from the list of the available modules in Module
Manager. The admin area of the module is placed in Extensions | Paypal Gateway.
Click on the Preferences tab. There are some elds that are required for module usage,
which are shown in the following screenshot:
While tesng e-commerce soluons you are naturally not going to use your real PayPal
account. The suggested Paypal URL points to the ocial tesng environment of the
PayPal service. This environment simulates the payment process without making real
money transfers.
This environment can be found on http://sandbox.paypal.com. It acts the same way as
the real PayPal website does.
Time for action – creating test accounts
Before you use this environment, you have to register a developer account on
http://developer.paypal.com and create two test accounts.
1. Open http://developer.paypal.com in your browser and click on
Sign Up Now.
2. Fill in the elds and click Agree and Submit.
3. Log in to your developer account with your e-mail and password.
4. Click on Create a precongured buyer or seller account.
5. Select Buyer (Use to represent your customer's experience) and ll in the eld with
any test data. Click Create Account.
6. Create another account, but this me choose Seller (Use to represent yourself as
the merchant) as the Account type.
This material is copyright and is licensed for the sole use by Niels Vils on 17th August 2010
Thorsøhøjen 8, Silkeborg, 8600
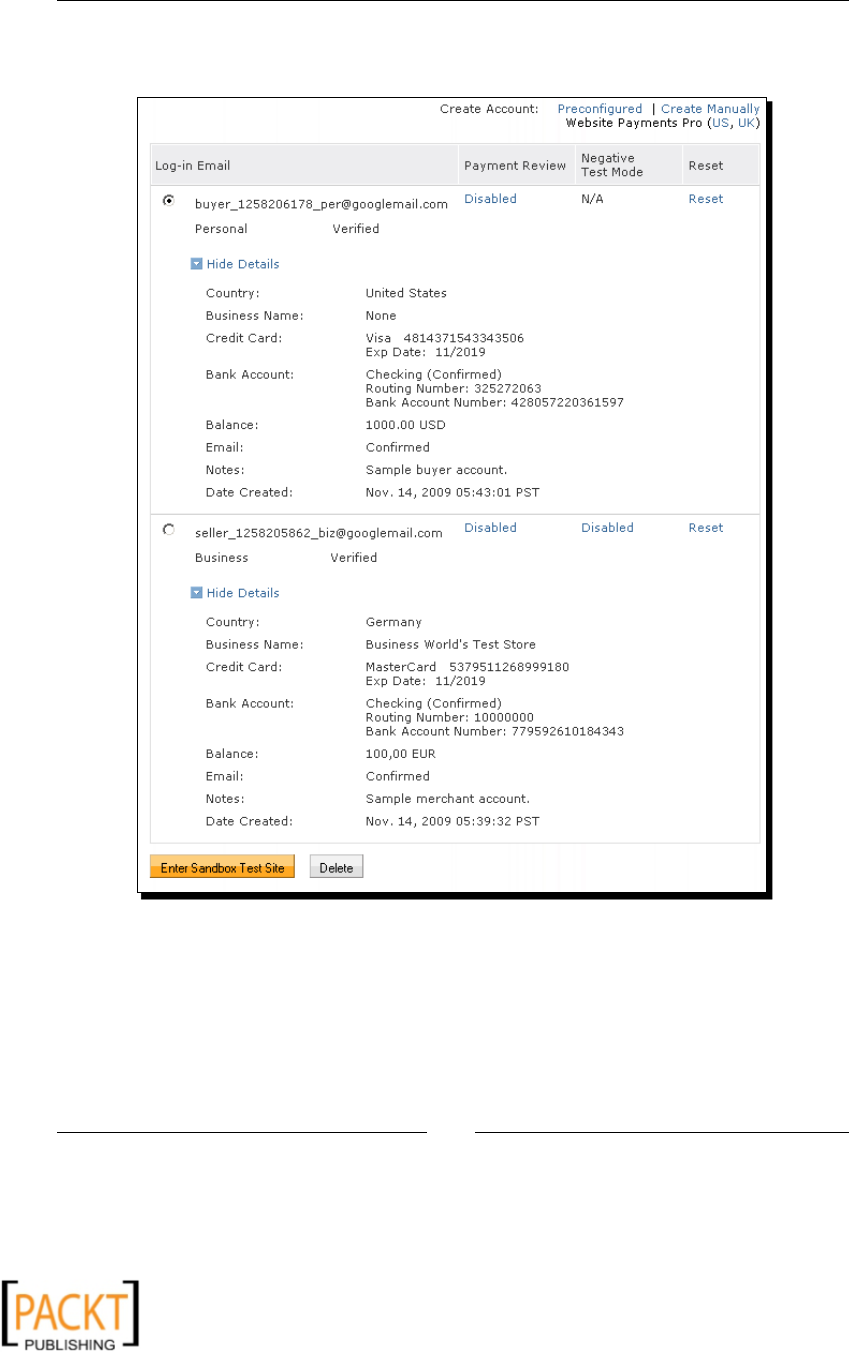
Chapter 9
[ 257 ]
7. Aer both accounts are created, click on Test accounts on the le hand side. You
should see an overview of the test accounts as shown in the following screenshot:
What just happened?
You have created two test accounts, one for the buyer and one for the seller. The easiest way
to create such accounts is to choose the precongured ones. Now, you can log in with the
buyer account on http://sandbox.paypal.com and act as if you were your own client.
You can purchase anything without having to pay real money.
This material is copyright and is licensed for the sole use by Niels Vils on 17th August 2010
Thorsøhøjen 8, Silkeborg, 8600

E-commerce Workshop
[ 258 ]
You can also log onto http://sandbox.paypal.com with the seller account to congure
it. You have to acvate the PDT and IPN features for the account, get your PDT identy token,
and make some more sengs on your PayPal account, so that instant payment works with
the module PayPal Gateway.
Conguring PayPal's seller account
Click on the Prole link in the seller account. There are four secons that you have to
customize to set up PayPal payment with the website.
Payment Receiving Preferences
First of all, decide if you would like to manually accept payments made in other currencies.
This applies only if the default currency of your PayPal account is dierent to the currency set
in the Products module on the Preferences tab. For example, if your PayPal currency is Euro
but on your webpage you oer the products in USD. Generally, PayPal does not convert any
currency automacally. This means that all payments made in other currencies are on hold
unl you accept them in your PayPal account manually. Once the payment is accepted the
order status is set to Paid. If you would like to convert currencies automacally and accept
payments in any currency, you have to deselect the seng Block payments sent to me in a
currency I do not hold.
Secondly, you can block all payments with the status Pending. This will reject all payments
that are not completed instantly aer the payment conrmaon. Consider that the Paypal
Gateway module is able to handle pending payments if IPN is acvated.
This material is copyright and is licensed for the sole use by Niels Vils on 17th August 2010
Thorsøhøjen 8, Silkeborg, 8600

Chapter 9
[ 259 ]
Instant Payment Notication
We remember that instant payment nocaon is able to communicate with the website in
the backend. It noes the Orders module about payment, even if the payment was pending
rst and accepted later. All that PayPal needs to know is the nocaon URL. This URL waits
for the instant payment nocaon, handles the answer from the PayPal website and
updates the order status automacally.
This nocaon URL is concealed in the module Paypal Gateway. To get it, perform the
following steps:
Add a product to your cart.
Click on Checkout and ll the billing form.
Click on Submit.
At the boom of the conrmaon page you see the buon Checkout w/Paypal.
Open the source view of this page in your browser and look for the hidden input
eld with the name notification_url that looks like the following code snippet:
<input name="notify_url" value="http://yourdomain.com/index.php?
mact=PaypalGateway,cntnt01,ipn,0&cntnt01order_id=15&cntnt0
1mycustom=05db2efd49ce4195d97efe01d4df00f4&cntnt01returnid=59"
type="hidden">
6. You have to copy the value of the eld and paste this URL to the PayPal
merchant account.
7. Click on Instant Payment Nocaon in the Prole of the seller account in PayPal
and edit the IPN Sengs. Enter the nocaon URL you have copied from the
hidden eld above and click on Receive IPN messages (Enabled). Save the sengs.
Website Payment Preferences
Click the Website Payment Preferences link, turn on the Auto-Return opon, and enter any
URL of your website in the eld Return URL. It does not maer what you enter here as this
URL will be overridden by the Paypal Gateway module. Then turn on Payment Data Transfer
and save.
Pay aenon to the yellow informaon message at the top of the PayPal website aer you
have changed the above seng:
You have successfully saved your preferences. Please use the following
identy token when seng up Payment Data Transfer on your website.
XXXXXXXXXXXXXXXXXXXXXXXX-XXXXXXXXXXXXXXXXXXXX
1.
2.
3.
4.
5.
This material is copyright and is licensed for the sole use by Niels Vils on 17th August 2010
Thorsøhøjen 8, Silkeborg, 8600

E-commerce Workshop
[ 260 ]
This is your generated PDT identy token that you need to save in the Paypal Gateway
module on the Preferences tab.
Language encoding
On this page you should adjust the language encoding. CMS Made Simple uses UTF-8
encoding by default. Click on the More Opons buon and select UTF-8 in the Encoding
eld. Leave the same encoding for IPN and save.
Now you have all the informaon required to congure the Paypal Gateway module. In the
admin area of the Paypal Gateway module, click on the Preferences tab and enter your
custom values gained from PayPal sandbox environment. The Business Email eld in the
Paypal Gateway module contains the generated e-mail address of the seller account. The
following screenshot shows my custom values:
Next, connect the Orders module with the Paypal Gateway module. In the admin area of
the Orders module, click on the Preferences tab and scroll down to the Payment Gateway
Sengs secon. Choose the Paypal Gateway module in the list of payment modules and
click Submit.
Test your order process now. Pay aenon to the Email eld in the billing form, it must be
lled in for the PayPal payment. Aer the payment is made, you have to control the payment
status in the seller PayPal account. It should be completed. In the admin console of CMS
Made Simple, click on Site Admin | Admin Log and see the communicaon protocol with the
PayPal website. For each order completed with PDT and IPN you should have ve messages,
as shown in the next screenshot:
This material is copyright and is licensed for the sole use by Niels Vils on 17th August 2010
Thorsøhøjen 8, Silkeborg, 8600

Chapter 9
[ 261 ]
The reason for the order being pending is the acvated IPN feature. The module sets the
order to pending status unl the IPN message is received from the module. So, the result
of these ve messages above is a completed and paid order in the admin console of CMS
Made Simple.
Once you have tested the module, you should congure your real PayPal account as
explained previously, gather all required informaon like PDT identy token from the real
account, and change the PayPal URL to https://www.paypal.com/cgi-bin/webscr.
Optional modules for the e-commerce suite
There are some more modules that you can use together with this e-commerce suite to
enrich the funconality:
Flat Rate Taxes: Allows you to apply at rate taxes to any or all products in the
module Products.
warehouse taxes: Calculates taxes for a product based on the US state the
warehouse is in, and the US state the customer is situated.
FlatRateShipping: Provides an interface to set up some simple weight shipping rules,
and to calculate the cost of shipping based on its total weight.
Desnaon Based Shipping: Allows the calculaon of at shipping costs based
on desnaon country, and number of items. It does not consider weight in
calculaons.
PriceBasedShipping: Allows the calculaon of shipping costs based on the pre-tax
total order price.
This material is copyright and is licensed for the sole use by Niels Vils on 17th August 2010
Thorsøhøjen 8, Silkeborg, 8600

E-commerce Workshop
[ 262 ]
Promoons: Allows you to create and manage promoons/sales in the order
process. A sale will consist of a start date, end date, a discount or oer, and a set
of condions. Condions can include total order amount, coupon code, subset of
products based on category or hierarchy or user group. Oers can be a percentage
o the total order price or a product item, a x amount reduced from total order
price, or a free product given with the order. Discounts will be applied in the order
process and shown up as a line item in the invoice.
GiBaskets: This module is another Cart module for the e-commerce suite. You
can use it instead of the standard Cart module. This module allows the creaon of
many dierent gi baskets, with dierent shipping addresses, and allows you to add
dierent items in each.
EMoney Payment Gateway: This is a payment processing gateway
module which works with the ETS Corporaon payment authorizaon system
(https://www.etsms.com/ASP/home.htm).
Authorize.Net AIM: A payment gateway that interacts directly with Authorize.net
using their AIM protocol.
Aachments: This module requires some programming knowledge to create
funconality like related products, so that you can aach some products to others
and display them as related products on the detailed view of the product.
Pop quiz – e-commerce workshop
1. CMS Made Simple is a content management system and cannot be used as e-
commerce soluon.
a. True
b. False
2. The Products module allows you to …
a. Manage products on the website
b. Add order funconality to the website
c. Create customer accounts and track their orders
3. To track the orders in the admin console of CMS Made Simple, you need
the module:
a. Cataloger
b. Orders
c. Users
d. Paypal Gateway
This material is copyright and is licensed for the sole use by Niels Vils on 17th August 2010
Thorsøhøjen 8, Silkeborg, 8600

Chapter 9
[ 263 ]
4. If you would like to test PayPal funconality on your website, you can use a so called
sandbox environment. What is true about the PayPal sandbox?
a. It charges your real PayPal account.
b. It can be used to create a seller account for tesng purposes.
c. It can operate only with USD as currency.
d. It is not free
5. E-commerce soluon described in this chapter requires that the customer creates an
account before purchasing:
a. True
b. False
Summary
In this chapter, you learned how to set up basic e-commerce funconality with CMS Made
Simple. Even if CMS Made Simple does not pretend to oer fully sophiscated e-commerce
features, it oers the most wanted features with delivered modules.
Be sure that you do not use CMS Made Simple for pure e-commerce websites. It is beer
to use a dedicated e-commerce soluon for an online shop rather than CMS Made Simple.
However, if your website has a mix of features such as a blog, a shop, a forum, and so on,
then you can use third-party modules to implement these features.
Specically, we covered:
The Products module that allows you to create and edit products for the online
shop. This module is a basis for the e-commerce suite.
The Cart module that adds simple cart funconality to the Products module. It
saves its data in the browser session and connects the module Product with the
module Orders.
The Orders module that starts the checkout process for the items added to the cart.
This module saves all orders in the admin area and allows tracking and updang
order status for the administrator of the website.
The SelfRegistraon module that allows your website's visitors to register with your
website before making payment. We have also created a small workow to see how
the module is integrated in the checkout process.
The PayPal Gateway module that accepts instant payments from the PayPal website
and keeps you informed about the status of the payment.
This material is copyright and is licensed for the sole use by Niels Vils on 17th August 2010
Thorsøhøjen 8, Silkeborg, 8600

E-commerce Workshop
[ 264 ]
Now that we've learned how to realize a complete website including e-commerce
funconality, we're ready to proceed with advanced topics that require basic PHP
knowledge, which is the subject of the next chapter. By this me your website is fully
funconal and can be published, so that you do not need any extended topics from the
next chapter to have a complete website.
This material is copyright and is licensed for the sole use by Niels Vils on 17th August 2010
Thorsøhøjen 8, Silkeborg, 8600

10
Advanced Use of CMS Made Simple
This chapter includes some ps for advanced webmasters who are creang
websites with CMS Made Simple. You do not need to read the enre chapter;
you can just pick up the secons that are most important to you.
In this chapter, we will:
Learn how to develop mullingual websites with CMS Made Simple
Create addional layout control possibilies for the editors of the website
Make some search engine opmizaons
Work with user-dened tags and the event manager to implement our own
funconality or dene custom workows
You will need basic PHP knowledge to follow instrucons in this chapter. So let's get
on with it.
Localization and translation
The admin console of CMS Made Simple is translated in over 20 languages. As you already
know from Chapter 2, CMS Made Simple is distributed in two versions. The base version
contains just the English language les, while the full version includes all language les.
This material is copyright and is licensed for the sole use by Niels Vils on 17th August 2010
Thorsøhøjen 8, Silkeborg, 8600

Advanced Use of CMS Made Simple
[ 266 ]
If you need only one language in addion to English (English cannot be uninstalled), you
can download the base package and then the required language les. Language les can be
found on the ocial CMS Made Simple website (http://www.cmsmadesimple.org/),
in the Downloads | CMSMS Release secon at the boom of the page (you will only need
the le corresponding to your release). To include any language in the base installaon,
download and unpack the base installaon le rst, then download the required language
le corresponding to the base release number and unpack it as well. Merge the contents of
the base folder with the contents of the language le folder by copying the language folder
over the base les. Then install CMS Made Simple as usual.
Users with access to the admin console of the website can select their preferred language
in their personal accounts (My Preferences | User Preferences). For the base installaon,
only English is shown in the eld. If you have installed any addional language, then it will
be shown in the drop-down eld Language as well. This seng does not aect the website
language used for visitors to the website.
To set up the website language, in the admin console, click on Site Admin | Global Sengs,
and change the Default language for the frontend. If no language is set there, then CMS
Made Simple uses English as the default language (en_US). This seng will automacally
change the default text for some modules on the website, for example, the label of the
search buon in the Search module or some labels in the News module.
English German
In the preceding screenshot, see the dierence between the labels for Category (Kategorie
in German), Posted by (Erstellt von in German), and so on. This will help to dene most
labels displayed by the modules that are translated into your language. However, this would
only help if your website is not mullingual and uses only one language.
Conguring dates
From me to me, CMS Made Simple must output dates and mes. Especially, for news
arcles, the proper date format is important.
This material is copyright and is licensed for the sole use by Niels Vils on 17th August 2010
Thorsøhøjen 8, Silkeborg, 8600

Chapter 10
[ 267 ]
The general date format can be changed in the admin console (Site Admin | Global Sengs)
in the eld Date Format String. The date format should be entered according to the PHP
format funcon strftime (http://www.php.net/manual/en/function.strftime.
php). There are some examples shown in the following table:
Date format string Output
%Y-%m-%d
2009-05-20
%a %d %b %Y
Wed 20 May 2009
%a %d %b %H:%M:%S %Y
Wed 20 May 15:53:40 2009
The rst column is built according to allowed parameters (please see the last link for an
explanaon). The second column shows the result on the page. Enter parameters from the
rst column in the Date Format String eld to get the results shown in the second column.
The month and weekday names depend on the locale seng of your server. On some
servers, you can change the language used to output dates. Seng the locale will also aect
currency, decimal separators, and other outputs dependent on the language. In CMS Made
Simple, open the config.php le and nd the line with $config['locale']. It depends
on your server, what value you enter here. For German month names on a Linux server, try
changing the line as shown:
$config['locale'] = 'de_DE.UTF8';
Making multilingual websites
Mullingual websites are created in more than one language. Every language has its own
translated navigaon, content, and probably translated news arcles. We do not speak about
automac translaon of the websites that are made by Google or any other tool. Automac
translaons are awful. They are oen not readable by human beings and make no sense. In
this secon, you will learn how to create a real mullingual website where the enre content
is translated by human translators.
You can use the Babel module to manage mulple languages for the website and
navigaon. Install the module the same way you install other modules for your website
(Extensions | Module Manager).
Aer installaon of the module, set up the page structure for the website to suit your
desired languages, for example:
1. English
1.1. Our company
1.2. Announcements
1.3. Contact Us
This material is copyright and is licensed for the sole use by Niels Vils on 17th August 2010
Thorsøhøjen 8, Silkeborg, 8600

Advanced Use of CMS Made Simple
[ 268 ]
2. German
2.1. Unternehmen
2.2. Aktuelles
2.3. Kontakt
The root language pages (1. and 2.) should be dened as pages with the content type
Secon Headers. You can give them any tle you want. For the page alias, I suggest using
the two-leer ISO 639-1 code system such as en (for English), de (for German), and fr (for
French). The page alias will be used in the website URL like http://www.yourdomain/en/
our-company or http://www.yourdomain/de/kontakt.
In order to display the menu correctly (that is, not to display language header pages and
pages belonging to other languages), you have to add the parameter start_level="2"
to your top menu tag in the main template (Layout | Templates). Open the template, and
adjust your top navigaon, as shown in the following code snippet:
{menu number_of_levels="1" start_level="2"}
This would ensure that only second level pages belonging to the selected language are
displayed in the top navigaon. If you use the sidebar navigaon, you should change
the number of levels here as well by reducing the number of the start level:
{menu start_level="3"}
When the page structure is created, click on Extensions | Babel: Mullingual site in the
admin console. For each language you have integrated in the page structure, click on the link
Add Language, and enter the appropriate informaon, as shown in the following screenshot:
This material is copyright and is licensed for the sole use by Niels Vils on 17th August 2010
Thorsøhøjen 8, Silkeborg, 8600

Chapter 10
[ 269 ]
The Root page associated with the language should be one of the secon headers you have
created for each language. The Default page for redirecon to this language should be
the start page for each language (not the secon header from the preceding eld). For the
Language code, you can use any ve character code, but in order to provide good compability
with the modules, you should use the same language codes as CMS Made Simple. Use the
drop-down list on the top-right of the admin area to prell the form with default values.
Click Submit, and be sure that you have acvated the language in the Acve column. Add all
desired languages the same way.
To display a language menu, use the following tag in the main template at the place where
the links to dierent languages should be displayed:
{babel action="menu"}
Editing language entries
In the admin area of the Babel module, you will nd a link for eding the language entries
for each language. Language entries are strings that exist for each language but hold
dierent text (or HTML code). For the label of the search buon in the Search module,
you would denitely like to have dierent descripons such as:
Search for English
Suche for German
Recherche for French, and so on.
Open the Babel: Mullingual Site module in the admin console, and click on the Edit
language entries link. Click on the Add a new language entry link at the top-right corner of
the module's admin area. This is the place where you can dene your personal translaon
for each language. The entry name is a general key that will be used to get the right
translaon. In our example, we would like to translate the label of the search buon, so the
key for the translaon can be search buon. In the elds below, enter the translaon for
each dened language, and click on Submit.
Customize the label for the search buon in the template of the module Search (Extensions
| Search, tab Search Template), and replace the tag {$submittext} with {babel
show="search button"}, as shown in the following code snippet:
{$startform}
<input type="text" class="search-input"
id="{$search_actionid}searchinput"
name="{$search_actionid}searchinput" size="18" maxlength="50"
value="{$searchtext}" {$hogan}/>
<input class="search-button" name="submit" value="{babel show="search
button"}" type="submit" />
{if isset($hidden)}{$hidden}{/if}
{$endform}
This material is copyright and is licensed for the sole use by Niels Vils on 17th August 2010
Thorsøhøjen 8, Silkeborg, 8600

Advanced Use of CMS Made Simple
[ 270 ]
This would show the proper label translaon on the search buon considering the currently
selected language. You can replace the variable {$searchtext} the same way. Create a
new language entry in the Babel module for the search text, translate it, and then replace
the variable {$searchtext} in the search template with the corresponding tag {babel
show="[KEY]"}.
The hierarchy solution
The Babel module uses the page hierarchy to know which page is equivalent in other
languages. In our example, the page 2.2. Aktuelles is the German equivalent of the English
page 1.2. Announcements, as it has the same posion in the hierarchy of the German branch.
In other words, should the pages in other language be ordered dierently, all would be
messed up.
1. English
1.1. Our company
1.2. Announcements
1.3. Contact Us
2. German
2.1. Aktuelles
2.2. Unternehmen
2.3. Kontakt
In this example, the Aktuelles page has the rst posion within the German branch, so it is
the equivalent of the rst page in English, even if it is not logically.
The page structure must be idencal for each language. This means that all pages must be
an equivalent in other languages or the link to the other language will not be shown in the
language menu on this specic page. If your structure is not idencal and some pages are
not translated, then use the method displayed below.
Adding ags as the language menu
You can add small ag images for each language on your website. Free images can be
downloaded from http://www.famfamfam.com/lab/icons/flags/. Upload the
required images into the folder /uploads/flags/. In the main page template (Layout |
Templates), insert links to the start pages of each language as small ag icons, as shown in
the following code snippet:
This material is copyright and is licensed for the sole use by Niels Vils on 17th August 2010
Thorsøhøjen 8, Silkeborg, 8600

Chapter 10
[ 271 ]
{cms_selflink page="our-company" image="uploads/flags/lang_en.gif"
alt="English" imageonly=1}
{cms_selflink page="unternehmen" image="uploads/flags/lang_de.gif"
alt="Deutsch" imageonly=1}
{cms_selflink page="enterprises" image="uploads/flags/lang_fr.gif"
alt="Français" imageonly=1}
You can replace the tag {babel action="menu"} with the last code snippet. In this case,
you do not need to have the same structure for each language. However, the above ags
always point to the start page of another language and not to the page equivalent in the
other language, whether it exists or not.
Separate news articles by language
In our example, not only the labels must be translated. In the page templates, we show
news arcles on each page. It does not make sense to display news arcles in English to
the German visitors of the website and vice versa. It would be beer to separate the news
automacally by language.
The easiest way is to create new categories in the News module and to change them
depending on the language. With the Babel module, a new Smarty variable $page_lang
is added to each page, so you can create Smarty condions with this variable as follows:
{if $page_lang == "en_US"}
{news category="General" number="5"}
{elseif $page_lang == "de_DE"}
{news category="Allgemein" number="5"}
{/if}
The last code snippet assumes that two news categories were created, namely, General and
Allgemein. Depending on the language the visitors choose, the news arcles from only one
or another category is shown in the template. The editor of the news only needs to choose
the right category while adding news arcles in the admin console.
Use the language entries of the Babel module to replace language strings such
as Category and Posted by in the news templates according to the currently
displayed language.
This material is copyright and is licensed for the sole use by Niels Vils on 17th August 2010
Thorsøhøjen 8, Silkeborg, 8600

Advanced Use of CMS Made Simple
[ 272 ]
CMS Made Simple translation center
Translaons for CMS Made Simple, core modules, and third-party modules are made in the
Translaon Center, which is the ocial translaon tool for modules and for the core CMS
Made Simple. All translaons are made by the users of CMS Made Simple and everyone can
parcipate in translaon projects by placing a request to join the project in the CMS Made
Simple Forge (http://dev.cmsmadesimple.org). Register with CMS Made Simple Forge,
search for the language in queson, and click on the Request to Join Project link or contact
one of the Project Admins.
When your applicaon is approved, you can enter the Translaon Center
(http://translations.cmsmadesimple.org). You will see your language on
the rst screen. Click on it, and you will nd a list of modules on the le-hand side.
Choose the module that you would like to translate, and a new page will be opened
where translaons can be made. You do not need any special knowledge to take part.
An example for the Russian Translaon Center is as shown in the following screenshot:
This material is copyright and is licensed for the sole use by Niels Vils on 17th August 2010
Thorsøhøjen 8, Silkeborg, 8600

Chapter 10
[ 273 ]
On the le-hand side, you see English words and phrases that have to be translated.
Translaons are made on the right-hand side of the window. If the translaon has not been
made, then both columns are idencal and contain English. You can replace the English text
in the right column by the translaon into your language and submit. That's all! The more
the users parcipate in translaons, the beer the translaon will be.
If you want to parcipate and your language doesn't exist in the Forge, create a
project and inform the CMS Made Simple Forge admin, then the language will be
added to the Translaon Center.
The translaons made here will be available to all users with the next release of CMS
Made Simple or with the next release of the core or third-party modules. If you need the
translaon right now or if you would just like to customize the exisng language to your
needs, then you have to add or change the language les manually on your server.
Translating modules in your installation
Language les for the modules are always saved in the same folder /modules/MODULE_
NAME/lang/ext. Only the default English translaon is placed directly in modules/
MODULE_NAME/lang in the le en_US.php. Open the le to see how it is organized.
All language les are built the same way for each language. They consist of a single PHP
array $lang.
$lang['key'] = 'Custom language translation';
Search for the le with the required language in /modules/MODULE_NAME/lang/ext,
and open it for eding. If the le is not there, then it means that the module has not been
translated yet. In this case, you can just copy the le en_US.php into the folder /modules/
MODULE_NAME/lang/ext and rename it to the language you need. For German, you would
name the le de_DE.php, for French fr_FR.php, and so on.
The le can be edited with a simple text editor like Notepad or WordPad. However, this way
of translaon requires some basic PHP knowledge. Be aware that the custom changes made
in these les may be overwrien with the next release of the module or CMS Made Simple,
so be sure that you create a backup le with the changes made somewhere apart from your
installaon.
Let's see how you can translate your own module, BWProducts (created in Chapter 8,
Creang Your Own Funconality with CTLMakerModule), into other languages.
This material is copyright and is licensed for the sole use by Niels Vils on 17th August 2010
Thorsøhøjen 8, Silkeborg, 8600

Advanced Use of CMS Made Simple
[ 274 ]
Time for action – custom translation of the module
You have created a new module and need a German translaon for it.
1. With an FTP browser of your choice, for example, FileZilla, connect to your web
hosng.
2. In the modules folder, look for the folder that contains your module; in our
example, it is bwproducts.
3. Download the le en_US.php from the folder modules/bwproducts/lang to
your local disk.
4. Rename the le to de_DE.php, and make your translaon with any text editor.
5. Upload the translated le de_DE.php to the folder
modules/bwproducts/lang/ext.
What just happened?
The language of the module is taken from the global sengs of the website (Site Admin |
Global Sengs, eld Default language for the frontend). If the language le for the module
is not found, then CMS Made Simple will automacally use the le en_US.php.
You have created a new le for your language, renamed it according to the ISO language
naming convenons, translated it into your language, and uploaded it to the right folder.
That's it. You do not need to translate everything in the le. Set your custom translaon to
some keys and see how the translaons are overtaken in the module.
In the same way, you can adjust exisng language les if you like.
Additional content and controls for editors
Oen websites are edited by people who are not well-versed in HTML. However, you
would like to give them as much control as possible, even if they do not have any special
knowledge. There are some concepts in CMS Made Simple that help you and your editors.
You can add more than one content block to the website if your layout requires physical
separaon of the content on one page. And you can use page aributes to give editors
more control over the layout and the style of the website as well.
This material is copyright and is licensed for the sole use by Niels Vils on 17th August 2010
Thorsøhøjen 8, Silkeborg, 8600

Chapter 10
[ 275 ]
Additional content blocks
A page can have one or more content areas or content blocks. The rst one must be
{content}, otherwise there will not be any content area for the editors in the admin
console. To add more content blocks to your template, use the Smarty tag {content
block="block name"}. This block will appear as a text area when you edit a page,
and its content will be shown at the same place when the page is displayed to the visitor.
You can also make a content block with only one line, instead of a full text area, by using the
parameter oneline=true.
Time for action – adding a content block for subtitles
Let's see how you can dene an addional content block for subtles.
1. Open the main template of your website (Layout | Templates).
2. Add the following code between the tle and content of your page:
<h1>{title}</h1>
<h2>{content block="Subtitle" oneline="true" wysiwyg="false"}</h2>
{content}
3. Open any page based on this template (Content | Pages), and nd the Subtle eld
above the Content eld.
4. Enter the subtle, save the page, and view the page in the browser. You should see
the text entered as a subtle below the page tle.
What just happened?
You have added an addional content block to the template. In this way, the editor of
the page can enter structured data that is exactly placed in the template. The tag for the
addional content block is shown as an input eld in the admin console, and its content is
displayed on the website at the place where it is dened in the main template.
You can read about more parameters in the Help secon for the tag {content} in the
admin console (Extensions | Tags).
This material is copyright and is licensed for the sole use by Niels Vils on 17th August 2010
Thorsøhøjen 8, Silkeborg, 8600

Advanced Use of CMS Made Simple
[ 276 ]
Extra page attribute
Another way to give more control over the layout of the page to the editor without any
special knowledge is using extra page aributes. When you open any page for eding, you
will nd three elds on the Opons tab, which are as follows:
1. Extra Page Aribute 1
2. Extra Page Aribute 2
3. Extra Page Aribute 3
These elds can hold any informaon and can be evaluated and used in templates. For
example, if you would like to hide the news summary on some pages, you can use one of
these elds, ll it with dened values, and then check the eld value in the template.
Time for action – using extra page attributes
Let's see how you can hide the news summary on the Contact Us page.
1. Open the Contact Us page (Content | Pages) for eding.
2. Switch to the Opons tab, and enter nonews into the eld Extra Page Aribute 1.
3. Save the page.
4. Now in the admin console, open your main template (Layout | Templates).
5. Find the Smarty tag {news}, and add an IF funcon as shown:
{if $node->extra1 != "nonews"}
{news ...}
{/if}
6. Check the Contact Us page to see the changes.
What just happened?
Extra page aributes are a simple way to give addional control over the layout of the
website to the editor of the website. He should only know what he must enter into the eld
Extra Page Aribute 1. In the template, you evaluate whether any value is saved in the eld
and control what content should be shown or not on this specic page.
The values entered in the extra page aributes can be retrieved in the template with
$node->extra1, $node->extra2, and $node->extra3.
This material is copyright and is licensed for the sole use by Niels Vils on 17th August 2010
Thorsøhøjen 8, Silkeborg, 8600

Chapter 10
[ 277 ]
The elds can also be used to display any addional informaon on the website like the
arcle author or anything else that you would like to handle in your template separately
from the main content. In this case, you can use the following Smarty tag:
{page_attr key="extra1"}
Search engine optimization (SEO)
Nowadays, it is not enough to have a website alone. Even the most beauful and useful page
is meaningless, if it cannot be found in search engines. And just being present in the search
engines does not answer a purpose of geng new customers. You should care about the
ranking (the place) your page has in the search results, when the most important key words
or phrases represenng your business are entered.
In this secon, you will nd important informaon that will help you to improve your search
ranking and get the most from your website.
Before you start to opmize your website made with CMS Made Simple, you should know
that search engines are greedy for any kind of text on your website. They are not interested
in CSS, JavaScript, or any other beauful technology. The most important point to start with
is wring good unique content. If you copy content from other pages, you will not succeed.
Having unique content is the key for search engine opmizaon. Unique content is also very
important for the visitors of your website. The more interesng the content, the higher is the
possibility that the visitor will turn to a customer and the visitor may probably recommend
your website to other people.
Title of your website
The most important part of your website in the eyes of a search engine is the tle of the
page. It is the text that is found between the HTML tags title. In Chapter 4, Design and
Layout, you had created a new template and had added the tle, as shown in the following
code snippet:
<head>
<title>{title}- {sitename}</title>
The Smarty tag {title} is exactly what you enter in the eld Title while creang or eding
the page. The tle must be short enough (not more than 70 characters) and should include
search keywords and phrases that match this parcular page (not the enre website). The
tle should be unique for every page that you create in your website.
This material is copyright and is licensed for the sole use by Niels Vils on 17th August 2010
Thorsøhøjen 8, Silkeborg, 8600

Advanced Use of CMS Made Simple
[ 278 ]
This last requirement is easy to follow with content pages, but what about generated pages
like news arcles or products? If you examine the URLs of the detailed view of news, you will
see that that the tle does not match the news arcle, but holds the tle of the page where
it is displayed.
You can customize the tle of the generated pages with a simple trick. In the admin console,
click on Content | News, and choose the tab Detail Templates. Open the template for edit,
and at the very top of the template, add the following line of code:
{assign var="pagetitle" value=$entry->title|escape:'html':'utf-8'}
This line will generate the Smarty variable $pagetitle that contains the tle of the news
arcle. To add the customized tle to the main template, open it (Layout | Templates), and
replace the enre HTML tle tag with the following code snippet:
{if isset($pagetitle) && !empty($pagetitle)}
<title>{sitename} - {$pagetitle}</title>
{else}
<title>{sitename} - {title}</title>
{/if}
This piece of code checks if the Smarty variable $pagetitle is dened and is not empty.
If so, then the news tle is used within the HTML tag tle. If not, then the normal page
tle is taken. You should ensure that the very rst line in your main template contains the
following line:
{process_pagedata}
Without this line, the trick will not work. In this way, the tle of every generated page can be
changed. From now on, you should customize the detail templates of each module, and add
the following line of code at the very top of the module's detail template:
{assign var="pagetitle" value=PAGE_TITLE}
Replace PAGE_TITLE with the Smarty variable that contains the desired page tle. In the
News module, this was $entry->title. In the modules created with CTLModuleMaker,
the line will look like:
{assign var="pagetitle" value=$item->name}
Dierent tles on every page of your website are very important for the search engine
opmizaon. They are also important for the visitors of your website, as the tle of the page
is used on the browser tab and as a descripon of the website when the visitor adds the
page to their favorite links or bookmarks it.
This material is copyright and is licensed for the sole use by Niels Vils on 17th August 2010
Thorsøhøjen 8, Silkeborg, 8600

Chapter 10
[ 279 ]
Meta tags
Meta tags used to be a very important part of the search engine opmizaon. Nowadays, the
only important tag is the meta tag for descripon:
<meta name="description" content="Find the best tips on this website"
/>
Descripon meta tags must include a readable descripon of the actual page (not of the
whole website). It can contain any words or sentences and is displayed in search engines
below the page tle in the search results.
The descripon has to be aracve to the visitor, encouraging him to visit your website and
not the one above or below yours in the search results.
There are two places where you can add meta tags to your website. In the admin console
(Site Admin | Global sengs, eld Global Metadata), you add meta tags that will appear
on every page. Be careful! Do not add a meta tag for the descripon here. This tag must be
unique for every page if you would like to achieve the best search engine ranking.
This material is copyright and is licensed for the sole use by Niels Vils on 17th August 2010
Thorsøhøjen 8, Silkeborg, 8600

Advanced Use of CMS Made Simple
[ 280 ]
To add a specic descripon to one page, open the page for eding in the admin console
(Content | Pages), and switch to the Opons tab. Add the descripon meta tag into the eld
Page Specic Metadata, the same way you would do it in plain HTML.
Do not copy the same meta tag to every page, it does not make any sense for search engine
opmizaon. The descripon meta tag should be dierent in every page.
The method just described is suitable for editors with some basic HTML knowledge.
However, if the editor of your website does not have any HTML knowledge, you beer give
him a special eld where the descripon of the page can be added and then automacally
pasted into the template at the right place.
Open your main template (Layout | Templates). Add the following line of code into the head
secon of the template, right below the Smarty tag {metadata}:
<meta name="description" content="{description}" />
Then, open any page for eding, and switch to the Opons tab, ll in the descripon of the
website in the eld Descripon (tle aribute), and the meta tag will be generated the
right way.
If you have a lot of pages and would like to have a descripon generated automacally,
then you can also use the special third-party tag called autometa (http://dev.
cmsmadesimple.org/projects/autometa). This tag creates meta tags for keywords and
descripons on the y, if they are not found in the page metadata eld. Keywords are taken
from the Search module, which should be installed. The meta tag descripon includes the
rst characters of the page content.
Meta tag keywords
There is a discussion on the use of meta tag keywords sll being important or not. I do not
add any keywords to my websites anymore, as I cannot see any dierence in the ranking of
websites with or without keywords. However, they cannot do any harm, and if you would
like to use meta keywords, then add the following lines in the head of your main template
(Layout | Templates), below the Smarty tag {metadata}:
<meta name="keywords" content="{content block='Keywords'
oneline='true' wysiwyg='false'}" />
This material is copyright and is licensed for the sole use by Niels Vils on 17th August 2010
Thorsøhøjen 8, Silkeborg, 8600

Chapter 10
[ 281 ]
This code uses addional content blocks described in the previous secon, and adds a new
eld named Keywords to the page eding window in the admin console. The eld can then
be lled by the editor of the website and will be automacally placed at the right place in
your template.
Using SEO markup in templates
This is not really a CMS Made Simple trick. However, this p is very important for search
engine opmizaon. Use the HTML tag <h1> in your template, and pay aenon to the
words you use in your tle. The best way is to place the tle of every page within an <h1>
tag in your main template, as shown in the following code snippet:
<h1>{title}</h1>
{content}
Do not use any other HTML tag for the tle, as the search engine will not pay enough
aenon to tles formaed like:
<div class="title">{title}</div>
{content}
Use words and search phrases that are relevant and important for your business in <h1>
tags, especially on the start page. If you use a tle like Welcome! on the start page, then you
say to the search engine that the word Welcome is extremely important for your business.
You see, that does not make sense, as you would not like to be found if someone searches
for Welcome, but for the products or services you oer.
Use headings in the module templates as well, for example, for the detailed view of news
arcle. The best way is to place the news tle in <h1> or <h2> tags as well:
<h1>{entry->title}</h1>
This material is copyright and is licensed for the sole use by Niels Vils on 17th August 2010
Thorsøhøjen 8, Silkeborg, 8600

Advanced Use of CMS Made Simple
[ 282 ]
It is recommended that you have at least one <h1> tag and some <h2>-<h6> tags in one
page. In the WYSIWYG editor, you can use the format drop-down to automacally select
headings 1 to 6, as shown in the following screenshot:
Using SEO markup in pages
While wring content for your website, use HTML strong tags to emphasize words or
phrases relevant to your business, products, or services. The more text you have, the beer
for search engines. However, a search engine does not use any logic and is not human. If it
sees 800 words on the page, it can not dierenate between important and unimportant
words. To help it idenfy, place important words in between strong tags. But do not use a
lot of them. One per paragraph is more than enough; do not exaggerate, as it would harm
your search engine ranking rather than help. In the WYSIWYG editor, you can use the B
buon to format anything in strong tags:
This material is copyright and is licensed for the sole use by Niels Vils on 17th August 2010
Thorsøhøjen 8, Silkeborg, 8600

Chapter 10
[ 283 ]
Use internal links in your text to other pages. It means, link your own pages if it makes sense.
You should link search words and phrases instead of phrases like click here.
When adding images to your website, never forget to ll in the HTML aributes alt and
title. Search engines use these aributes for nding and matching pictures in the special
image search. With a WYSIWYG editor, the two elds are shown right below the Image
URL tag:
Using keywords in page alias and image les
Using keywords in page aliases that are used to create unique URLs for the website is a
simple way to improve its search ranking. A page alias is generated by default from the tle
of the page, but you can change it aerwards. In the admin console, open any page for
eding, and switch to the Opons tab. Find the Page Alias eld, and change it to suit
your desired search words or phrases.
This material is copyright and is licensed for the sole use by Niels Vils on 17th August 2010
Thorsøhøjen 8, Silkeborg, 8600

Advanced Use of CMS Made Simple
[ 284 ]
Do not change the alias oen, especially if the page is already linked to other
websites. If you change the alias, the page will not be found. If you sll need
to change the alias of a good linked page, without losing references, change it.
Then create a new page with the content type Internal Page Link, give the page
the old alias, and choose as the desnaon the page with the new alias. Do not
show this page in the menu. The old link will sll work and redirect the user to
the new page alias.
It is also beer to use search keywords in the names of the image les.
Search engine friendly URLs
Search engine friendly URLs are website addresses that do not contain any dynamic
components in them, and thus are beer readable for humans and search engines. Compare
the following two URLs:
http://youdomain.com/index.php?page=products
http://yourdomain.com/products
Which is beer? A search engine will nd the second version more aracve and will beer
index your website. Some pages with query strings in the address (as in the rst example) are
never indexed, while some will take longer to be indexed. Aer seng up your website with
CMS Made Simple, you will nd that the URLs of your pages are built in the rst way. We
should rewrite them to achieve beer results with the website.
The search engine friendly URLs are also beer readable by people. If you do not care about
the search engines, then think about the visitors of the website. How easy is it to type or
write down the address of the specic page if we do not use the second rewrien version?
Imagine your visitor would like to recommend the page. He/she would do it without any
dicules with search engine friendly URL and may fail with the rst example.
Time for action – turning on search engine friendly URLs
Let's see how search engine friendly URLs can be enabled in CMS Made Simple.
1. Open an FTP browser of your choice (for example, FileZilla), and nd the folder doc
in your installaon.
2. Copy the htaccess.txt le from the doc folder into the root directory of your
CMSMS website (at the same level as the config.php le).
3. Rename the le htaccess.txt to .htaccess (pay aenon to the period at the
front of the lename).
This material is copyright and is licensed for the sole use by Niels Vils on 17th August 2010
Thorsøhøjen 8, Silkeborg, 8600

Chapter 10
[ 285 ]
4. In the next step, open the config.php le for eding, and nd the secon
URL Sengs.
5. Change the line for rewring URLs, as shown:
$config['url_rewriting'] = 'mod_rewrite';
6. Open your website, and see how the links in the navigaon look. They should be
search engine friendly now.
What just happened?
To enable search engine friendly URLs on your website, you had to complete two steps. In
the rst step, you moved the le htaccess.txt into the root directory of your website.
You then renamed the moved le to .htaccess (period at the beginning belongs to the
lename). .htaccess is the name of a conguraon le that allows you to control the web
server. The le is placed in the root directory and overrides some of the default sengs of
your server.
The default htaccess.txt is suitable for most servers. However, somemes you
may encounter dicules. For example, not all web hosng providers accept the
following seng:
Options +FollowSymLinks
In this case, you will get an error 500 (internal server error) aer turning on search engine
friendly URLs. To solve the issue, comment out the following opon as shown:
# Options +FollowSymLinks
If your website is placed in a subfolder, like http://www.yourdomain.com/folder, then
you have to adjust the .htaccess le. Find the line RewriteBase /, and change it to the
name of the folder where your website is placed. In our example, it would be:
RewriteBase /folder
In the second step, you modied the le config.php. With these changes, you have told
CMS Made Simple that .htaccess is placed in the root directory, and you are going to use
these new sengs to rewrite URLs.
With CMS Made Simple, you can even simulate a stac address like http://www.
yourdomain.com/products.html. In this case, the address of the pages will look like
stac HTML les. Open config.php, and nd the line $config['page_extension'] =
'';. If you change it to $config['page_extension'] = 'html';, then all URLs of your
website will look like stac HTML pages.
This material is copyright and is licensed for the sole use by Niels Vils on 17th August 2010
Thorsøhøjen 8, Silkeborg, 8600

Advanced Use of CMS Made Simple
[ 286 ]
If you sll get an internal server error (error 500), please check the following known issues:
Your hosng company does not support mod_rewrite. Ask your provider if the
module mod_rewrite is available on your web hosng.
You have installed CMS into a subdirectory, for example, http://yourdomain.
com/mycms. In this case, you have to edit the .htaccess le, and replace the line
RewriteBase / with RewriteBase /mycms (change the name aer the slash to
your subdirectory).
Avoiding duplicate content
Duplicate content refers to the pages whose content completely matches other pages.
Normally, you do not create such pages consciously. However, there are some examples
for non-malicious duplicate content:
Printer-only version of the page
Pages that are linked using mulple URLs
Mobile versions of the website, and so on.
CMS websites with generated pages are extremely vulnerable to being penalized by search
engines for duplicate content.
Google says: As a result, the ranking of the site may suer, or the site might be
removed enrely from the Google index, in which case, it will no longer appear
in the search results.
There are some steps you can take to prevent duplicate content issues that have been
described in the following secons.
Consequently use domain with www or without www
Normally, your website can be reached at http://yourdomain.com or http://www.
yourdomain.com. Even if the same content is shown on both addresses, it is technically
possible to serve dierent contents on both addresses. Search engines know it, and can skip
your website from the index if both versions are reachable and serve the same content.
First of all, decide what your preferred domain version is. Then check what address has been
given during the installaon of your website. Open the le config.php in your FTP browser,
and search for the following line:
$config['root_url'] = 'http://yourdomain.com';
This material is copyright and is licensed for the sole use by Niels Vils on 17th August 2010
Thorsøhøjen 8, Silkeborg, 8600

Chapter 10
[ 287 ]
Adjust the line to your preferred domain version if it does not match, and save the le on
your web hosng. In the next step, open the le .htaccess, and add the marked lines as
shown in the following code snippet, if your preferred domain name includes www:
RewriteEngine on
RewriteBase /
# Redirect to canonical domain name with www
RewriteCond %{HTTP_HOST} ^yourdomain\.com$ [NC]
RewriteRule ^(.*) http://www.yourdomain.com/$1 [L,R=301]
In the other case (your preferred domain name is without www), add the lines as shown in
the following code snippet:
RewriteEngine on
RewriteBase /
# Redirect to canonical domain name without www
RewriteCond %{HTTP_HOST} ^www\.yourdomain\.com$ [NC]
RewriteRule ^(.*) http://yourdomain.com/$1 [L,R=301]
Now, all links in your website navigaon should point to the correct version. If you enter
a wrong version in the address bar of the website, it would immediately redirect to the
right one.
Avoid publishing of print versions of your pages
If you use the Prinng module on your website to oer a printer friendly version of your
content, then you should block it from search engines.
In the admin console, click on Extensions | Prinng, and click on the Print template tab. Add
the following meta tags to the head secon of the template:
<meta name="robots" content="noindex,nofollow" />
This meta tag can control the behavior of search engine crawling and indexing and applies to
all search engines. noindex prevents the page from being indexed, and nofollow prevents
the search engine from following links from this page.
This material is copyright and is licensed for the sole use by Niels Vils on 17th August 2010
Thorsøhøjen 8, Silkeborg, 8600

Advanced Use of CMS Made Simple
[ 288 ]
Use tag for canonical URLs
If you use search engine friendly URLs, then the pages of your website are available through
dierent URLs. Say you have a page called FAQ placed under the page Client Center. This
page can be accessed through three dierent URLs:
http://www.yourdomain.com/client-center/faq
http://www.yourdomain.com/index.php?page=faq
http://www.yourdomain.com/faq
All these URLs actually call the same page. How can we inform the search engine that there
is only one "main" URL that should be considered? There is a link tag, which can be placed in
the head secon of HTML:
<link rel="canonical" href="http://www.yourdomain.com/client-
center/faq">
This tag tells the search engine what the main or canonical URL of the page is. All other
versions of the page would be treated as non-canonical and thus not considered by the
search engines. In CMS Made Simple, you can generate a canonical URL in your main page
template (Layout | Templates) as shown in the following code snippet:
{if isset($canonical)}
<link rel="canonical" href="{$canonical}" />
{elseif isset($content_obj)}
<link rel="canonical" href="{$content_obj->GetURL()}" />
{/if}
Place the code in the head secon of your HTML template and save it. From now on, the
canonical URL of every page will be generated automacally in CMS Made Simple.
Creating XML sitemaps for search engines
Sitemaps are a way to tell search engines about the pages on your website which otherwise
they might not discover. In its simplest terms, an XML sitemap—usually called a sitemap—is
a list of the pages on your website. Creang and subming a sitemap makes sure that search
engines know about all the pages on your site, including URLs that may not be discoverable
by a normal crawling process.
XML sitemaps can be created with the SiteMapMadeSimple module. Aer installaon, this
module creates a le called sitemap.xml in the root of your website and tells the search
engine which pages can be found on the site and when the page was last changed. An
XML sitemap is automacally updated every me you make changes to the pages or
page structure.
This material is copyright and is licensed for the sole use by Niels Vils on 17th August 2010
Thorsøhøjen 8, Silkeborg, 8600

Chapter 10
[ 289 ]
You can submit your sitemap to major search engines such as Google, Yahoo!, Bing, or Ask.
For minor search engines, you can extend the robots.txt le placed in the root directory
of your website. Add the following line at the very boom of the le:
Sitemap: http://www.yourdomain.com/sitemap.xml
Adjust your domain name in the example.
Visitor statistics
Now, when the website is published, you would probably like to know how many visitors
you get per day, week, and month. In this way, you can control your eorts in search engine
opmizaon and gain addional informaon about what the visitors of your website look for
or which content is the most interesng to them. The module provides informaon on how
the visitors nd your website and where they come from. You can also see what browser and
screen resoluon the visitor used.
There are a lot of web analysis tools that you can use on the website. There is even a special
third-party module that you can install to see the stasc of your website directly in the
admin console. The module is called Stascs. This module not only makes the visitor
stascs available in your admin console, but also shows a visible counter on the website.
You can also use external website analysis tools such as Google Analycs or even both (the
module Stascs and Google Analycs) if you want to compare the results. Google Analycs
provides you with special JavaScript code that you must add to the main template of your
website (Layout | Templates). It is important to know that only pages that include this code
are tracked in the stascs. By placing it in the main template, the code is automacally
called with every page, and thus the enre website is covered.
Always include JavaScript code in the Smarty tag {literal} to avoid the code being
interpreted as Smarty code. For example:
{literal}
alien JS code
{/literal}
User-dened tags
User-dened tags are a simple way to insert some PHP code into your site. With the
default installaon of CMS Made Simple there are two example tags already created,
which are as follows:
{custom_copyright}
{user_agent}
This material is copyright and is licensed for the sole use by Niels Vils on 17th August 2010
Thorsøhøjen 8, Silkeborg, 8600

Advanced Use of CMS Made Simple
[ 290 ]
You will nd them in the admin console. Click on Extensions | User Dened Tags, and then
on one of the tags displayed there to see simple PHP code implemented.
To use a user-dened tag in the page, just put its name enclosed in curly brackets into the
page content or template. For example, you can add the tag {custom_copyright} to the
footer secon of your template, as shown in the following code snippet:
{custom_copyright} businessWorld
The tag will automacally display the year 2004, a dash, and then the actual year, so that you
do not need to change the template to adjust the year aerwards.
To create a new user-dened tag, you need some basic PHP knowledge. Write your code in any
PHP editor, create a new user-dened tag, and paste your PHP code into it (leaving <?php and
?> out). Then call the user-dened tags with Smarty tag in your page or templates.
How to make a user-dened tag
Like most things in CMS Made Simple, adding a new user-dened tag is simple, if you have
some PHP knowledge. Let's create a simple PHP countdown script.
Time for action – creating your own user-dened tag
Imagine you would like to countdown the number of days ll the New Year on the start page.
The days should be counted automacally and displayed at the place where the user-dened
tag is added in the content.
1. In the admin console, click on Extensions | User Dened Tags.
2. At the boom of the page, click on Add User Dened Tag.
3. Enter countdown as the name of the new user-dened tag and the following code
snippet into the eld Code:
$target = mktime(0, 0, 0, 1, 1, 2011);
$diff = $target – time();
$days = floor($diff/86400);
echo $days;
4. Click on Submit.
5. Open any page of your website, and add the user-dened tag, shown as follows:
It is {countdown} days until 1. January 2011
6. Click on Apply, and see the result on the page.
This material is copyright and is licensed for the sole use by Niels Vils on 17th August 2010
Thorsøhøjen 8, Silkeborg, 8600

Chapter 10
[ 291 ]
What just happened?
You have created your own user-dened tag (UDT) in CMS Made Simple. This tag
automacally shows the number of days unl the date given in the rst line of the PHP
script (January 1, 2011).
Then, you have used the tag in a sentence on the page. Instead of the tag {countdown}, the
number of days is shown at the place where you have added the tag.
The name of the tag is technical informaon and can only contain leers, numbers, and
underscores, just like the names of PHP variables. The name is what you will have to type in
curly brackets to add it into a page. So be descripve, but do not make it too long.
You do not need any <? or <?php tags when you paste the code into UDT, just skip them.
If you make a syntax mistake in your PHP code, then you will not be able to save the code.
However, the following error will be displayed, so that you know you have to correct your
PHP code.
Invalid code entered.
Parse error: syntax error, unexpected '}' in /var/www/ html/businessworld
/admin/edituserplugin.php(103) : eval()'d code on line 5
Parameters for tags
User dened tags get really useful when you start to add parameters to them. You can pass
parameters to the PHP code this way:
{countdown date='05-01-2011'}
In this way, you can specify the countdown date directly in the UDT instead of wring it in
the code, so that that there is no need to customize PHP code again and again.
In PHP code, you can get the parameter with the help of the special array $params, which
is always dened and contains all parameters passed. In the next example, the passed
parameter date is used in the countdown script:
$date = explode('-', $params['date']);
$target = mktime(0, 0, 0, $date[0], $date[1] , $date[2]);
$diff = $target - time();
$days = floor($diff/86400);
echo $days;
Test this tag the same way as before, but instead of using {countdown}, use {countdown
date='05-01-2011'} or any other date in the format MM-DD-YYYY.
This material is copyright and is licensed for the sole use by Niels Vils on 17th August 2010
Thorsøhøjen 8, Silkeborg, 8600

Advanced Use of CMS Made Simple
[ 292 ]
These are basic principles of wring user-dened tags. You can do some useful things with a
lile imaginaon, so just think about what you can do if you know a lile PHP.
How to get the page information in UDT
You can pass any variable to the UDT including objects created by CMS Made Simple. You can
show variables and objects that exist in the page with the following code:
{get_template_vars}
If you add the above tag to the template, then you will nd out that the page has an object
called $content_obj. This object contains all the informaon about the actual page and
can be passed to UDT as well.
Let's assume we need some addional navigaon that looks like the tracing path of the
visitor on the website. It means that we would like to display the last three pages that the
visitor has seen. This navigaon has to be built automacally and saved in the visitor session.
Create a new user-dened tag and call it trace. Add the PHP code shown in the following
code snippet:
$pagetitle = $params['page']->Name();
$pageurl = $params['page']->GetURL();
$_SESSION['trace'][$pagetitle] = $pageurl;
if (sizeof($_SESSION['trace']) > 3) {
array_shift($_SESSION['trace']);
}
$trace = array_reverse($_SESSION['trace']);
foreach ($trace as $title => $url) {
echo '<a href="'. $url .'">'. $title . '</a><br />';
}
This code assumes that the parameter page has been passed to it ($params['page']) and
this parameter contains the page object. We can call the user-dened tag as shown in the
following code snippet:
<h4>Last 3 pages you have visited</h4>
{trace page=$content_obj}
I suggest that you add the tag to the page template below the site navigaon. Every me the
user opens a new page, the informaon about it is passed to the UDT. The page parameter
contains the page object, and can be used with page content methods (Name() and
GetURL()). Please see CMS Made Simple API for more informaon.
This material is copyright and is licensed for the sole use by Niels Vils on 17th August 2010
Thorsøhøjen 8, Silkeborg, 8600

Chapter 10
[ 293 ]
The last three pages that the visitor has seen are saved in the session variable and are now
temporarily displayed below the sidebar menu.
Understanding events
In the last secon, you learned to create user-dened tags. To execute the PHP code in the
tags, you had to place it in the page or the template. With Event Manager, you can execute
the code when certain events occur. An event can be the creaon of a new page or even
deleng a user in the admin console. There are over 50 events already dened in CMS Made
Simple, and every module can have addional events.
Examples for execung user-dened tags on events are as follows:
Sending an e-mail to the administrator of the website if any page is updated
Replacing certain parts of the page before displaying it on the website
Deleng associated stylesheets if the template is deleted
CMS Made Simple triggers events such as ContentEditPost or DeleteTemplatePre, when the
specied acon occurs. You create one or more user-dened tags with custom funconality
and assign them to the event. This means that the assigned funconality will be executed
when the event is triggered. The event sends the actual data to the user-dened tag (if there
is any), and this data can now be used in any way in your PHP code.
See the list of events already added to CMS Made Simple in the admin console (Extensions |
Event Manager). For every event, there is a brief descripon of when the user-dened tags
appended to it will be executed.
This funconality allows anybody with a bit of PHP knowledge to extend core or module
funconality. For example, it should now be easy to send an e-mail to the administrator if
the page is modied by the editor. For the next example, the CMSMailer module should be
congured properly, as explained in Chapter 2, Geng Started.
Time for action – sending mails after page update
To enable CMS Made simple to send e-mails to the administrator when a content page is
updated, perform the following steps:
1. In the admin console, click on Extensions | User Dened Tags.
2. Click on the Add User Dened Tag link.
This material is copyright and is licensed for the sole use by Niels Vils on 17th August 2010
Thorsøhøjen 8, Silkeborg, 8600

Advanced Use of CMS Made Simple
[ 294 ]
3. Name the new tag buzzer and the code as shown:
global $gCms;
$cmsmailer = $gCms->modules['CMSMailer']['object'];
$cmsmailer->AddAddress($cmsmailer->GetFrom(),$cmsmailer-
>GetFromName());
$cmsmailer->SetSubject('Admin buzzer');
$cmsmailer->SetBody('The page <i>' .$params['content']->mName.'</
i> has been changed.');
$cmsmailer->IsHTML(true);
$cmsmailer->Send();
4. Click on Submit.
5. In the admin console, click on Extensions | Event Manager.
6. Find the event called ContentEditPost, and click the edit buon on the same line.
7. Select the buzzer tag from the drop-down eld, and click Add.
8. Now, change any page to test the admin buzzer funcon. You should receive an
e-mail nocaon with the page name changed.
What just happened?
We have used the CMSMailer module of CMS Made Simple to send an e-mail nocaon. In
this way, we consider all individual sengs made in the module and ensure that e-mails are
sent properly.
The PHP code added to the tag is a slight modicaon of the sample code added to the
Help secon of the CMSMailer module. It sends mails to the e-mail address congured in
the module in the eld From address. We have also used the name of the changed page
in the e-mail nocaon. This was possible because an event provides us with the object
$params['content'] that contains a reference to the aected page and all informaon
about the page.
Then, you have assigned the user-dened tag to the event ContentEditPost. This event is
sent aer the page is edited and submied (it is not enough to just Apply changes, you
must Submit them).
Integrating jQuery in navigation
CMS Made Simple uses plain HTML, CSS, and Smarty in all templates. This means that you
can use any jQuery eect in your templates as well. jQuery is a JavaScript framework and has
a lot of plugins.
This material is copyright and is licensed for the sole use by Niels Vils on 17th August 2010
Thorsøhøjen 8, Silkeborg, 8600

Chapter 10
[ 295 ]
To use the plugins, you have to separate HTML, CSS, and JavaScript and put them at the
appropriate place in CMS Made Simple. HTML markup is saved in templates, whereas CSS
is saved in stylesheets and then assigned to the template. JavaScript can be placed globally
(Site Admin | Global Metadata), so that it is available on the whole page. Alternavely, it
can be placed in the page template. In this case, it will be available in all pages using this
template. If you need JavaScript only in one page, then you can add it to the Page Specic
Metadata eld in the Opons tab.
Let's see how you can integrate a jQuery drop-down menu on your website. Examples and
instrucons for this eect can be found at http://www.dynamicdrive.com/style/
csslibrary/item/jquery_multi_level_css_menu_horizontal_blue/.
Time for action – integrating jQuery in navigation
The instrucon on the link above explains how you can use this jQuery plugin in the pure
HTML website. Let's see how you can integrate the plugin in CMS Made Simple.
1. Save the les jquerycssmenu.css and jquerycssmenu.js from the address
given above to your local disk.
2. Upload the le jquerycssmenu.js into the folder uploads on your web hosng.
3. In the admin console Add a Stylesheet (Layout | Stylesheets), call it
JQueryCSSMenu, and copy the whole content from the le jquerycssmenu.css
into the Content eld.
4. Click on Submit.
5. In the list of stylesheets, click the blue CSS buon beside the new created stylesheet.
6. Select your main template from the drop-down eld, and click on Aach to
this Template.
7. Open the main template of your website, and add the following code snippet in the
head secon:
{literal}
<!--[if lte IE 7]>
<style type="text/css">
html .jquerycssmenu{height: 1%;} /*Holly Hack for IE7 and below*/
</style>
<![endif]-->
{/literal}
<script type="text/javascript" src="http://ajax.googleapis.com/
ajax/libs/jquery/1.2.6/jquery.min.js"></script>
<script type="text/javascript" src="uploads/jquerycssmenu.js"></
script>
This material is copyright and is licensed for the sole use by Niels Vils on 17th August 2010
Thorsøhøjen 8, Silkeborg, 8600

Advanced Use of CMS Made Simple
[ 296 ]
8. Create or replace the top navigaon in the main template with:
<div id="myjquerymenu" class="jquerycssmenu">
{menu template="minimal_menu.tpl"}
<br style="clear: left" />
</div>
9. Click on Apply, and see the drop-down menu of your website.
What just happened?
This was a very basic example of how to integrate jQuery into your website. First, you have
to gure out what JavaScript les are needed for the plugin and upload them to your web
hosng. Then create a new stylesheet, copy all styles into it, and aach the new stylesheet to
the template. If images are used in the stylesheet, then upload them to the web hosng as
well and adjust the image path in the stylesheet.
Then open your template and add JavaScript to the head secon of the template. Any scripts
should be enclosed in the Smarty tags {literal}{/literal}. This tag allows a block
of data to be taken literally. This is typically used around JavaScript or stylesheet blocks
where curly braces would interfere with the curly braces of Smarty tags. Anything within
{literal}{/literal} tags is not interpreted, but displayed as it is.
In the last step, you add the required CSS classes and IDs to the HTML markup of the
template. This method works for any jQuery plugin you would like to integrate. Another
example for integrang jQuery into the Gallery module was explained in Chapter 7, Using
Third-party Modules.
Pop quiz – advanced use of CMS Made Simple
1. If you change the language of the admin console, it would have an impact on:
a. All user accounts in CMS Made Simple.
b. On the language displayed to the visitors of the website.
c. Only to this user account.
d. Nothing. You have to choose the language once during installaon and
cannot be changed later.
2. If you would like to parcipate in making translaons for CMS Made Simple, you
have to:
a. Join the ocial developer team of CMS Made Simple.
b. Join the translaon project of your language in Forge.
c. Translate on your local installaon and upload translaons to CMS Made
Simple forum.
d. Pay the community to get needed translaons.
This material is copyright and is licensed for the sole use by Niels Vils on 17th August 2010
Thorsøhøjen 8, Silkeborg, 8600

Chapter 10
[ 297 ]
3. Meta tags are important for search engines. What meta tags are used by the major
search engines like Google, Yahoo and Bing?
a. descr<meta name="iption" content="" />
b. <meta name="refresh" content="" />
c. <meta name="robots" content="" />
d. <meta name="author" content="" />
4. Assume you use the tag{title} in the tag <title> in your template. What will be
aected if the tle of the page is changed?
a. Alias of the page
b. Menu text of the page
c. Heading of the page
d. The name in the tle bar of the browser
5. How can you prevent dierent URLs of the same page being treated as
duplicate content?
a. Consequently use domain with or without www.
b. Avoid publishing print version of your websites.
c. Use canonical tag for canonical URLs.
d. Use <meta name="robots" content="noindex" /> in all your pages.
6. Why should you use search engine friendly addresses?
a. The RAM memory of your computer gets overloaded by opening more than
seven pages without friendly URLs (they are too long).
b. The URL is opmized for search engines.
c. You should not use them at all because you have to create for every search
engine a special one and so create duplicated content.
d. The page is loaded much quicker
7. User-dened tags are wrien in:
a. Pure HTML
b. Pure HTML and CSS
c. JavaScript
d. PHP
8. Some jQuery plugins cannot be integrated in CMS Made Simple:
a. true
b. false
This material is copyright and is licensed for the sole use by Niels Vils on 17th August 2010
Thorsøhøjen 8, Silkeborg, 8600

Advanced Use of CMS Made Simple
[ 298 ]
Have a go hero – make search engine optimization
Make search engine opmizaons for your website before you publish it. It is beer to
start with a clear and opmized website from the very beginning. Double-check page tles,
menu texts and words represented as internal links in the content of the page. Control if one
page can be reached with dierent URLs and use a canonical tag to help the search engines
to understand which URL is the main one. Create an XML sitemap for search engines and
monitor the stascs of your visitors to gure out what pages are the most popular, thus
guring out what contents of your page can be extended.
Consider that your website is made primarily for visitors and not for search engines. Search
engines are just carriers that bring visitors to your website. And whether the visitor likes your
website or not lies in your responsibility.
Summary
In this chapter, we learned advanced subjects that are not necessarily a part of every website.
Specically, we covered the following topics:
Localizaon and translaon: You need this secon if the primary language of the
website is not in English or if you are going to create a mullingual website.
Addional content and controls for editors: This secon helps to understand what
you can do if you have a sophiscated layout or would give website 'editors'
more control.
Search engine opmizaon: You learned how you can opmize the website for
search engines.
User-dened tags and Event Manager: If you have some basic PHP knowledge, you
can even implement your own PHP scripts into CMS Made Simple and sll
stay upgradable.
Implemenng jQuery eects: You learned how you can implement simple jQuery
funconality into the top navigaon of the website.
Now that we've learned how to realize these sophiscated features, read the next chapter to
see what tasks you have as a website administrator during the lifeme of the website.
This material is copyright and is licensed for the sole use by Niels Vils on 17th August 2010
Thorsøhøjen 8, Silkeborg, 8600

11
Administration and Troubleshooting
Once the website you have created is ready and running, you have to take a
closer look at the tasks you have as a webmaster during the lifeme of the
website. Depending on the nature of the website, you must regularly make
backups if you or your customer connuously add and edit the content or
change the design. It is also recommended to watch the development of CMS
Made Simple and make updates to keep the website secure and be able to use
the newest features.
This chapter helps you administer your CMS Made Simple website once it is running. In this
chapter, we will see how to:
Take a backup of your website
Move it to another web host
Upgrade your installaon or modules
Opmize the performance
Secure and protect your website in the most ecient way
Get help from the community
You are not supposed to read the whole chapter. You can start reading from any secon, as
they do not depend on each other. Upgrading CMS Made Simple is the part that you will
probably need when a new release of CMS Made Simple is published.
I strongly recommend that you read the Troubleshoong secon and devote 10 minutes of
your me to the queson How can I get a quick answer in the free support forum? There are
some useful ps on how to get the best answer in the shortest period of me.
This material is copyright and is licensed for the sole use by Niels Vils on 17th August 2010
Thorsøhøjen 8, Silkeborg, 8600

Administraon and Troubleshoong
[ 300 ]
Getting system information
As the website administrator, you should know how to get the system informaon for your
website or your customer's installaon. This informaon helps you to understand how the
server, where CMS Made Simple is installed and congured, gives you the rst indicators
when you encounter problems while running CMS Made Simple or any of its modules.
In the admin console, click Site Admin | System Informaon. The informaon page is
divided into three secons:
CMS Install Informaon
PHP Informaon
Server Informaon
In the rst secon you see the version of CMS Made Simple installed and all enabled
modules with their versions as well.
This material is copyright and is licensed for the sole use by Niels Vils on 17th August 2010
Thorsøhøjen 8, Silkeborg, 8600

Chapter 11
[ 301 ]
Below the list of modules, you will nd the Cong Informaon secon that gives you an
overview of all values set in the le config.php. Any value that you see in this secon
can be changed in this le, except the le permissions.
Behind the paths' values, you see a green ck or red cross. CMS Made Simple checks the
permissions of your les and informs you if the permissions are not set properly. You should
adjust the le permissions if you encounter any issues with CMS Made Simple or any of its
modules. Seng permissions is dependent on the installed operang system. If you are
not sure how to do it, then ask your hosng provider or use a common search engine to
gure it out. File permissions are not something specic to CMS Made Simple, but to the
operang system.
In the second secon, you will nd individual PHP sengs on your server. Pay aenon to
any seng that is followed by a red cross (failure) or a yellow exclamaon mark (warning).
This material is copyright and is licensed for the sole use by Niels Vils on 17th August 2010
Thorsøhøjen 8, Silkeborg, 8600
Administraon and Troubleshoong
[ 302 ]
Failures should be corrected as soon as possible. Warnings can be ignored if you do not have
any issues when running CMS Made Simple, but you should correct them if something does
not work as expected. In the following table, you will nd some required and recommended
sengs for CMS Made Simple. Required sengs are mandatory. Recommended sengs can
make your system run smoother and solve some issues.
Seng Minimum and recommended values
Current PHP Version (phpversion) 5.0.4 or greater
GD version (gd_version) version 2
Magic quotes in runme (magic_quotes_runme) On (True)
PHP Eecve Memory Limit (memory_limit) minimum 16 MB
recommended 24 MB or greater
Maximum Execuon Time (max_execuon_me) minimum 30
recommend 60 or greater
PHP Safe Mode (safe_mode) O (False)
Session Save Path (session_save_path) This path should be writable (green ck)
PHP register_globals (register_globals) O (False)
Maximum Post Size (post_max_size) minimum 2M
recommend 10M or greater
Maximum Upload Size (upload_max_lesize) minimum 2M
recommend 10M or greater
The third secon on the System Informaon page gives you an overview of your server's
conguraon. If you are the website administrator, then you should be able to answer at
least three quesons about your system:
What operang system is used on your server?
What server soware (and which version) is installed on your server?
What database (and which version) is used for a CMS Made Simple installaon?
This material is copyright and is licensed for the sole use by Niels Vils on 17th August 2010
Thorsøhøjen 8, Silkeborg, 8600

Chapter 11
[ 303 ]
All these quesons can be answered if you look at the informaon given here thoroughly.
From the preceding screenshot, I can say that this installaon of CMS Made Simple is
installed on Linux (Server Operang System), Apache server version 2 is installed (Server
Soware), and this server uses the database MySQL 5.0.32 (Server Database + Server
Database Version).
It is important to know how your server is congured to be able to get help if you encounter
issues. There are a lot of variees of applicaons' versions and conguraons, so nobody can
guess exactly how your individual hosng is congured. Keep that in mind while geng free
help from the community.
Backing up your website
Backing up means making copies of your les and database. You need to backup regularly
in case something goes wrong on your web hosng. Your data could be lost due to some
hosng issues or through webmaster mistakes. Therefore, it is important to have backup les
to be able to restore your website.
To backup a website made with CMS Made Simple, it is not sucient just to copy all the les
found on the server with FTP. Those les are only a small fracon of your website. The most
important part is the database where all your text and designs (except image les) are stored.
In CMS Made Simple, you have two modules (one is used for le backups and one for
database backups). You would probably not be able to use the modules on free web hosng
or on the hosng with strong restricons. To check if an easy backup of your website with
the following described modules is possible, try to install the rst module to backup les.
This material is copyright and is licensed for the sole use by Niels Vils on 17th August 2010
Thorsøhøjen 8, Silkeborg, 8600

Administraon and Troubleshoong
[ 304 ]
Backing up website les
Website les are the les that you upload to your FTP directory. Most of them are delivered
from the team of developers and have been copied to your web space before installaon.
In the uploads directory, you will nd les, like images, that have been uploaded by the
editors. If you have installed addional modules, then you will nd les for these modules in
the modules folder.
To backup les, you can download everything from your FTP to the local disk. However,
depending on your connecon and the total number of les, this can take a lot of me.
Time for action – creating a backup with the module
If you would like to archive the les before downloading them, then you can use the
FileBackup module.
1. In the admin console, select Extensions | Module Manager.
2. Click on the Available Modules tab, and look for the leer F above the alphabecal
module list.
3. Find the FileBackup module, and click on the Download & Install link in the same line.
If there are restricons on your web hosng, then you will see the following error:
You cannot use this module, since you don't have the
tar command installed on your server.
In this case, you will have to backup your website manually. If the installaon of the
module FileBackup was successful, then you can start conguring it.
4. In the admin console, go to Site Admin | File Backup.
5. Click on the Preferences tab. In the admin area you see the following message:
Please check and save the path to tar binaries before
using FileBackup.
6. Click Save. (This module tries to recognize the required path automacally).
If the message does not disappear, then you have to ask your hosng provider
what the path to tar binaries on your web hosng is and enter the path into
the eld Path to tar binaries.
This material is copyright and is licensed for the sole use by Niels Vils on 17th August 2010
Thorsøhøjen 8, Silkeborg, 8600

Chapter 11
[ 305 ]
7. Switch to the Backup Files tab.
8. Click on Backup Files.
9. Wait unl the complete list of folders is displayed and you see the message Task
completed at the end of the list. Below this message, you will see the backup le
containing all your website les.
10. Click on the backup le, and save it to your local disk.
What just happened?
You have created an archived backup of all website les and have saved the archive to
you local disk. You should create a new backup le and save it separately from the current
installaon. For example; on the local disk, anyme you install a new module, upgrade the
whole system or one module or upload new images. Do it regularly. You will save a lot of
me in case of emergency.
All backup les will also be saved in your installaon. You will nd them using any FTP
browser (for example, FileZilla) in the folder /admin/backups on your web hosng.
Make sure you delete the backup les aer downloading to your local disk.
Otherwise, anybody could go to http://www.yourdomain.com/admin/
backups/ and download your backup, containing the le config.php with
your database sengs and password.
It is recommended to clear the cache folder before creang a le backup as CMS Made
Simple creates a lot of temporary les to speed up the website. These les must not to be
saved with the backup as they will be generated automacally once CMS Made Simple is
installed and running. To clear the cache folder in the admin console, click on Site Admin |
Global Sengs, select the Advanced Setup tab, and click the Clear buon below the Clear
Cache label.
In fact, the best soluon would be to set up some automaon if the les are changed
frequently. You should contact your ISP to determine whether it is possible to backup the
le automacally.
This material is copyright and is licensed for the sole use by Niels Vils on 17th August 2010
Thorsøhøjen 8, Silkeborg, 8600

Administraon and Troubleshoong
[ 306 ]
Backing up database
With the next step, you backup your database. In other words, you create a dump of the
database. Dumps hold all the actual data of the installaon: page structure, page content,
complete design, and any data saved in the modules like News.
A database backup has the same importance as a backup of the les. If you just backup
the les, then you do not backup any changes on the website such as new pages or
new modules.
Time for action – creating a database backup
Let's see how to create a backup of the database along with the le backup. You need the
MysqlDump module to create a database dump from within your admin console in CMS
Made Simple.
1. In the admin console, click on Extensions | Module Manager
2. Click on the Available Modules tab, and then the leer M above the alphabecal
module list.
3. Find the module MysqlDump, and click on the Download & Install link in the same
line. If there are any restricons on your web hosng, then you will see the
following error.
You cannot use this module, if don't have MySQL installed
on your server.
This error means that you cannot use the module to create a database dump this
way and should do it manually (refer to the next secon). If the module installaon
was successful, then you can create a database dump right now.
4. In the admin console, click on Site Admin | MySQL Dump
5. Switch to the Preferences tab.
6. Click Save. (Usually the path to mysql binaries is recognized automacally.)
If you sll see the message Invalid path to MySQL ulies, then you have
to ask your hosng provider for the proper path to mysql binaries on your
web hosng, and enter the path into the eld Path to mysql binaries.
7. Switch to the Backup Database tab.
This material is copyright and is licensed for the sole use by Niels Vils on 17th August 2010
Thorsøhøjen 8, Silkeborg, 8600

Chapter 11
[ 307 ]
8. Click the Backup database buon. Wait ll a list of tables appears, and nd the
link to create a database dump at the end of the list.
9. Save the le to your local disk.
What just happened?
You have created a backup of your database. This backup includes all your database tables
and should be made regularly, ideally every me changes are made to the site's pages or
the modules.
Similar to the le backup, you will nd all database backups with any FTP client (for example,
FileZilla) in the folder /admin/backups on your web hosng.
Manual backup
If you are not allowed to install the modules on your web hosng due to some restricons
(oen made on the free web hosng), then you should backup you les manually.
For the le backup, open any FTP browser (for example, FileZilla), navigate to your
installaon folder, and copy all the les from the web hosng to your local disk. Remember
that the les contain only a small part of your website. You should create a database dump
to save all your content, design, and module data.
Backing up database with phpMyAdmin
phpMyAdmin is a free open source tool intended to handle the administraon of MySQL
databases. It is normally installed on every web hosng. Contact your provider to gure out
the link to phpMyAdmin on your web hosng, and your login credenals if you are not sure.
This tool helps you to create database backups.
This material is copyright and is licensed for the sole use by Niels Vils on 17th August 2010
Thorsøhøjen 8, Silkeborg, 8600

Administraon and Troubleshoong
[ 308 ]
Time for action – creating a backup with phpMyAdmin
The steps described here are only needed if you have no possibility to backup the database
with the module described previously.
1. Log in to phpMyAdmin on your server (contact your provider to gure out the
details as they can dier between web hosts).
2. Upon login, select Databases on the major screen:
3. Select the database used for a CMS Made Simple installaon. If you are not sure,
then open the config.php le and nd the line $config['db_name'] that
contains the name of the database.
4. Click on the database name in the list.
5. On the next screen, you will see the list of all tables in this database. Click on
the Export tab at on the top of the list, as shown in the following screenshot:
This material is copyright and is licensed for the sole use by Niels Vils on 17th August 2010
Thorsøhøjen 8, Silkeborg, 8600

Chapter 11
[ 309 ]
6. In the le box, you can see all the tables selected. At the top of the screen, nd the
checkbox Save as le, and select it. Click the Go buon.
7. You will be prompted to download a le. Save the le to your computer. Depending
on the database size, this may take a few moments.
What just happened?
You have manually created the backup le (or dump) of your database. Ensure that you
create a new backup of the database every me you make changes to the page structure,
install new modules, and add new content to the pages or the modules.
Make a backup regularly; you will need it in the case of an emergency. This backup can also
be used if you move your installaon from one server to another.
In fact, just making regular backups is not enough. Ideally, you should test the recovery
scenario at least once because many things can go wrong:
Incomplete copies of les
Incomplete database backup
Corrupted backups
It's catastrophic when your website crashes and you end up with a useless pack of les you
believed to be backups.
Move CMS Made Simple to another web hosting
This secon helps you understand how to move an enre CMS Made Simple applicaon to
another hosng service.
This material is copyright and is licensed for the sole use by Niels Vils on 17th August 2010
Thorsøhøjen 8, Silkeborg, 8600

Administraon and Troubleshoong
[ 310 ]
Step 1
Consider this step for busy websites that accept data from visitors, like Comments or
FrontEndUsers. Enable the Site Down Message to prevent somebody from using the
website while you are moving it to another hosng service. In the admin console, click on
Site Admin | Global Sengs, and select the Sitedown Sengs tab. Write the message that
the visitors to the website will see if they try to use your website during the transfer, then
ck the Enable Site Down Message checkbox, and click Submit. From now on, visitors to the
website will see the Site Down Message instead of the website.
Step 2
Clear the cache folder. CMS Made Simple creates a lot of temporary les to speed up
the website. These les must not be saved with the backup as they will be generated
automacally once CMS Made Simple is installed and running. To clear the cache folder in
the admin console, click on Site Admin | Global Sengs, select the Advanced Setup tab,
and click the Clear buon below the Clear Cache label.
Step 3
Create a database backup, as described in the preceding secon. Import the database on
the new host using phpMyAdmin. Log in to phpMyAdmin on the new host, and select the
database intended for use of CMS Made Simple. Click on the Import tab, and select the le
with the database backup in the eld Locaon of the text le. Click Go. The database is
imported to the new host.
Step 4
Copy all the les from your old site to your new site using an FTP client (for example,
FileZilla). Aer the les are transferred, remember to check the permissions for the
folders on the new site to ensure that they are set correctly. Check the permissions
on the following folders:
/tmp/templates_c
/tmp/cache
/uploads
/uploads/images
/modules
They should be writable. Contact your provider if you are not sure how to do it.
This material is copyright and is licensed for the sole use by Niels Vils on 17th August 2010
Thorsøhøjen 8, Silkeborg, 8600

Chapter 11
[ 311 ]
Step 5
In the last step, you have to open and modify the les config.php and .htaccess.
In the le config.php, check and adjust the following secons:
Database Sengs
Path Sengs
Image Sengs
Update them with the database access credenals and paths applicable to the new server.
The path sengs are not always that obvious. In your FTP browser, it might
show something like /cmsmadesimple. However, the real path on the
server might be something like /home/user/html/cmsmadesimple.
If you have the wrong path, then look at the error messages when you try to
access your site aer transfer. This message will give you a hint as to the real
path sengs. Contact your provider for help if it is sll unclear.
The .htaccess le should only be modied if you change the domain name. However,
if you did not make any changes to the le due to the search engine opmizaon, leave it
as it is.
Try to log in to the admin console of CMS Made Simple on the new hosng. If everything
looks good, then disable the Site Down Message and see the page up and running.
Upgrading CMS Made Simple
The CMS Made Simple development team improves the applicaon constantly; therefore
new versions are released regularly. You should ensure that you upgrade your system
consequently. Upgrades are important for several reasons.
Free community support: You will probably get no help for old releases, as there
are only a few users who will sll be working with the old version. The development
team will not x any issues in old versions, as a lot of issues are already solved in
newer releases, and you are always encouraged to install the latest version.
Features: In new releases, new features are implemented. If you work with an
old version, then you have to reinvent the wheel if you need something already
developed and exisng.
This material is copyright and is licensed for the sole use by Niels Vils on 17th August 2010
Thorsøhøjen 8, Silkeborg, 8600

Administraon and Troubleshoong
[ 312 ]
Third-party modules: Developers of addional modules release new versions,
including new funconality and corrected bugs. Newer versions of the modules
oen assume that the newest version of CMS Made Simple is installed. Somemes,
the feature you need is already implemented in the last version of the module, but
you are not able to install it due to the outdated version of CMS Made Simple.
Security releases: Not only are errors corrected in new releases and new funcons
added, but from me-to-me, security holes are discovered. In this case, exploits
are quickly spread throughout the internet. Exploits are generally sequences of
commands that take advantage of a bug in order to take control over your system.
If you do not upgrade, then your system becomes extremely vulnerable, your data
could be damaged or lost, and nobody would take responsibility for it except you.
Stability and performance: New releases oen include improvements in
performance. Even if you are not interested in the features included in new
releases, your website can gain speed just by upgrading.
If a new version has been released, then you will see a message saying You have 1 unhandled
nocaon in the admin console below the main menu. The message appears only once a
day! Click on the plus sign beside the message, as shown in the following screenshot:
Let's see how to upgrade your installaon to the newer version.
It is important to create a backup of your database and all the les on the web hosng
before every upgrade (please refer to the secon Backup your website). If something goes
wrong, you can always return to the previous version and start upgrading again. Having no
backup means having no possibility to go back in case of an emergency.
Open the link http://cmsmadesimple.org in the browser, and select Downloads | File
Releases in the main menu on the top of the page. The list of releases is shown. If you are
not sure what version of CMS Made Simple is currently installed on your web hosng, then
open the admin console; you can see in the footer area at the very boom of the page what
version is used on your website.
In the downloads secon, nd the newest release, and choose the le named
cmsmadesimple-full-diff-[YOUR.CURRENT.VERSION]-[NEW.VERSION].
tar.gz. For example, to upgrade from version 1.6 to 1.6.5, you have to choose the le
cmsmadesimple-full-diff-1.6-1.6.5.tar.gz. Save the le to your local disk and
extract it.
This material is copyright and is licensed for the sole use by Niels Vils on 17th August 2010
Thorsøhøjen 8, Silkeborg, 8600

Chapter 11
[ 313 ]
If you cannot nd the upgrade le from exactly your version to the current one, then
you will have to download the last full version above the one installed (for example, 1.6) and
proceed with these instrucons using that version rst.
Before copying the les to the web server, you should probably set up a Site Down Message
(Site Admin | Sitedown Sengs). Now open any FTP browser, and upload all the les from
the extracted folder to your web hosng. Overwrite the exisng les and directories. You
have to overwrite these exisng les with the newer versions.
Aer uploading the new les, check if a folder called /install has been created
in the folder where CMS Made Simple is installed. If so, then enter in your browser
http://www.yourdomain.com/install/upgrade.php (substute the domain with
yours). This will automacally update your database to the newest version. Do not forget to
delete the install folder aer upgrade. If a folder named install was not created, then
you have nished the upgrade at this point.
Check the version in the footer area of the admin console. It should display the new
version now.
You then have to upgrade the modules. In the admin console, click on Extensions | Module
Manager, and see if some modules have to be upgraded on the Available Upgrades tab.
If there are some upgrades shown, then look for the modules on the Available Modules tab,
and click on the Upgrade link beside the module name.
Somemes, the nocaon for the new version is not displayed in the admin
console. This is due to the security sengs of your web hosng. Another
possible way of being informed about a new version in this case is subscribing
to the ocial RSS feed from the CMS Made Simple blog or (if you are a
registered member in CMS Made Simple Forum) to subscribe to the board
Announcements.
This material is copyright and is licensed for the sole use by Niels Vils on 17th August 2010
Thorsøhøjen 8, Silkeborg, 8600

Administraon and Troubleshoong
[ 314 ]
Remember that upgrading your system is not dicult if you do it regularly. Go with the
development to get the best free support and to be sure that your system is secure
and stable.
Optimizing (performance tuning)
Like every system, CMS Made Simple can be opmized and tuned for the best performance.
The ps described in this secon can signicantly speed up your system. However, I
recommend applying these instrucons only if you encounter any performance issues.
Before you start to opmize your system, you should know how the system performs
without any opmizaon. CMS Made Simple has built-in performance measurement. If you
open any page generated by CMS Made Simple in a browser and then see the source code of
the page, you will nd HTML comments at the end of every page, shown as follows:
<!-- 0.267839 / 38 / 5834456 / 6113588 -->
This comment can be broken into four parts:
1. The page was generated in 0.267839 seconds by CMS Made Simple.
2. 38 SQL queries were needed to generate pages.
3. 5834456 bytes of memory were used.
4. The peak memory usage was 6113588 bytes.
You should save this comment to control the amount of resources that can be saved using
opmizaon ps, given in the following secons. Every me you make an opmizaon,
compare the new numbers on the same page with the previous ones.
Compression
This opon allows the output from your server to be compressed before being sent to
the browser. In simple words, the page is zipped, and instead of sending HTML, the server
sends a much smaller ZIP le. The smaller the le, the faster the website can be loaded. The
browser is able to decompress the zipped page automacally, so that neither you nor your
visitor should care about it.
Compression can be turned on in the le config.php. Open the le and nd the line:
$config['output_compression'] = false;
Turn on the compression by seng it to true:
$config['output_compression'] = true;
This material is copyright and is licensed for the sole use by Niels Vils on 17th August 2010
Thorsøhøjen 8, Silkeborg, 8600

Chapter 11
[ 315 ]
This may provide a signicant performance increase on some sites. However, it is not needed
for Apache servers that have mod_deate enabled. Please contact your provider if you are
not sure. Consider that enabling this feature will signicantly increase the CPU and RAM
usage on the server side, and this can even slow down the website if the server is very busy.
Persistent connections
CMS Made Simple is based on the database. Therefore, for each page loaded in the browser,
a connecon to the database is needed. There are two concepts on how CMS Made Simple
connects to the database. Normally, for each page, the new connecon to the database
has to be established. A persistent connecon is a concept which is designed to improve
performance for some applicaons. Instead of the connecon being established for each
page, it is opened once and then kept for the applicaon's lifeme.
In the le config.php, you can dene how CMS Made Simple should connect to the
database. Open the le and search for the following line:
$config['persistent_db_conn'] = false;
Change the line to:
$config['persistent_db_conn'] = true;
This would ensure that the connecon to the database is not closed aer the page is loaded
but is kept open. The next me the page is requested, the server checks whether there is an
opened connecon and uses it for the new page. In this way, the me for establishing the
new database connecon is saved.
This seng is not allowed by all providers. Please contact your provider to gure
out if you can use persistent connecons on your web hosng.
CSS in global settings and static CSS
Another place where you can save me is in the generaon of the stylesheet for the page. If
you open your page in the browser and see the page source, then you will see that the links
to stylesheets are actually references to the PHP le stylesheet.php:
<link rel="stylesheet" type="text/css" href="http://yourdomain.com/
stylesheet.php?cssid=59" />
However, it is not necessary to generate stylesheets with every page again and again. You
can cache them when you are ready with the design of the website and do not plan to
change it.
This material is copyright and is licensed for the sole use by Niels Vils on 17th August 2010
Thorsøhøjen 8, Silkeborg, 8600

Administraon and Troubleshoong
[ 316 ]
In the admin console, click on Site Admin | Global Sengs, and switch to the tab Advanced
Setup. Find the eld Maximum amount of me (seconds) stylesheets can be cached in the
browser, and enter any value other than 0, as shown in the following screenshot:
It depends on how oen you will update the stylesheet in the future. If you do not plan to
change it in the future, then go for a high value like 2592000 seconds. This means that the
stylesheet will be cached for a month.
1 hour = 3600 seconds
1 day = 86400 seconds
1 week = 604800 seconds
Be sure that you change the value back to 0 if you change the stylesheet, as you will not see
any changes on the page with the old cached version.
These performance ps can speed up CMS Made Simple. However, you will get more
eecve results if you tune the server where CMS Made Simple is installed and not only CMS
Made Simple itself. Server tuning assumes that you have full access to the server and basic
Linux administrator knowledge.
How to secure your installation
In this secon, you learn how to secure your CMS Made Simple installaon. We will not
discuss how to secure the web hosng server as this is a stu for the web hosng provider.
If you host your website on your own, then you should know how to secure the server in
general. If you host on a shared hosng or a managed server, then your provider would do
it for you and you don't need to worry about it. Let's see what the provider will not do
for you.
The rst rule for a secure website is to upgrade CMS Made Simple and its modules regularly.
Every me a new version of CMS Made Simple is released, run the upgrade as soon as
possible. It is especially important for security releases that we close security holes.
Upgrading is very easy. Please refer to the secon Upgrading CMS Made Simple to read
about how to perform upgrades.
This material is copyright and is licensed for the sole use by Niels Vils on 17th August 2010
Thorsøhøjen 8, Silkeborg, 8600

Chapter 11
[ 317 ]
System verication
A CMS Made Simple installaon consists of its les and a database. The database holds page
structure, page content, design, and any module data and can change daily on busy websites.
In contrast to the database, les are a kind of stac part of the website. They are changed
only if you:
Upgrade CMS Made Simple
Upgrade any module
Install new modules
Remove modules from the installaon
Intenonally or unintenonally make changes to the les on your own
Somemes les can be changed by malicious programs or hackers if you do not secure your
system enough. So how can you be sure that the system les are not changed and everything
is sll okay.
CMS Made Simple uses a checksum vericaon to prove that the les on your web hosng
have not been changed. A checksum is a text string computed from a le for the purpose
of detecng accidental changes that may occur during its transmission or storage. These
checksum strings are generated for each le that originates from the core CMS Made Simple
and can be downloaded from http://dev.cmsmadesimple.org/project/files/6. A
checksum le is generated for each release of CMS Made Simple.
Depending on your version (base or full, and release), choose the right checksum.dat le,
and save it to your local disk. Open it in a text editor to see what is inside.
3ad39cc13942818630935b56dc8af619 *./index.php
6f8ae75cfde0c5a81dc09f35ea40f7a6 *./preview.php
d53ee56d1c123a1ed04326ca3406e744 *./favicon_cms.ico
...
You will nd a long list of checksum strings followed by the lenames and their paths. In
CMS Made Simple, you can automacally validate all les in the admin console (Site Admin
| System Vericaon). This funcon will compare the checksum strings of the original les
with the les on your installaon. Normally, your les should not have any changes if you
have not made any upgrades to the system so far.
The only acceptable errors are missing les from the install folder, as you had to delete
this directory for security reasons. You may also be told that various index.html les in
the tmp folder are missing or invalid. This is not crical. Missing the le SITEDOWN is also
not crical.
This material is copyright and is licensed for the sole use by Niels Vils on 17th August 2010
Thorsøhøjen 8, Silkeborg, 8600

Administraon and Troubleshoong
[ 318 ]
Every me you run an upgrade of CMS Made Simple or any of its modules, you should create
a new checksum le. In the admin console, open Site Admin | System vericaon, and
click the Submit buon in the Download Checksum File secon. This funcon allows you to
generate a checksum le for the current installaon and save it on your local computer to
be veried later. This should be done just prior to rolling out the website, and/or aer any
upgrades or major modicaons. The integrity of the data can be checked at any later me
by comparing the checksum le with the stored les.
Using this funcon can assist in nding problems with uploads, or exactly what les were
modied if your system has been hacked. If you suddenly encounter strange issues and
suspect that your system has been aacked, then you should make a system vericaon rst
to see whether there are any changed les. If the checksums do not match, then the data
was certainly altered (either intenonally or unintenonally).
The original checksum le from http://dev.cmsmadesimple.org only
veries the core CMS Made Simple and the core modules that are delivered with
CMS Made Simple. Any addional modules that you've added are not veried.
You can see the errors, as shown in the following screenshot:
According to the preceding explanaon, these errors are not crical. If you get other failures,
it is up to you to interpret what has happened. If you are sure that you have not changed any
les, then somebody else has done it to damage your website. In this case, download the
original release from CMS Made Simple, extract it, and replace the changed les with
the original.
Replacing the les is the rst step. If your system has been hacked, it means that there is sll
a security hole that can be used again and again to damage your system. Please read and
implement the following secons to see how you can protect your system.
This material is copyright and is licensed for the sole use by Niels Vils on 17th August 2010
Thorsøhøjen 8, Silkeborg, 8600

Chapter 11
[ 319 ]
Usernames and passwords
Check how strong the combinaon of administrator's username and password on your
installaon is. Do not use admin, administrator, or any other simple words like these for
the username, as they are very easy to guess. Secondly, use strong passwords for the
administrator account. Password strength esmates how many trials an aacker of your
website would need on an average to guess your password.
There are some ps for choosing good and secure passwords:
Include numbers, special characters, upper and lowercase leers, and punctuaons
in the password
The password length should be around 12 to 14 characters
Avoid any password made of a word that can be found in the diconary
Avoid using relave or pet names or biographical informaon like your own birth
date or a wedding date
Pay aenon to an editors' username and passwords as well. Assist them in choosing strong
passwords and advise them to keep the passwords in mind and never write them down. You
and your users should not use the same password on other websites on the internet.
If you post some news arcle with the admin account on the website, then the username
is revealed on the website in the default news template. It would be beer not to show the
username at all or replace it with the user's rst and last name.
To replace the username with real name, create a new user-dened tag (Extensions | User
Dened Tags), call it realname, and add the following code snippet:
global $gCms;
$db = $gCms->db;
$query = "select first_name, last_name from ". $gCms->config['db_
prefix'] . "users where user_id =?";
$row = $db->GetRow($query, array($params['user']));
echo $row['first_name'].' '.$row['last_name'];
This code will return the user's rst and last name from the user account. It assumes that the
parameter user with the user ID is provided. To use the user-dened tag in the template,
in the admin console, click on Content | News, and switch to the Summary Templates tab.
Open the template for eding, and search for the Smarty variable {$entry->author}.
Replace the variable with the Smarty tag {realname user=$entry->author_id}.
Save the template, and see the changes on the website. Apply the same changes to the
Detail Templates.
This material is copyright and is licensed for the sole use by Niels Vils on 17th August 2010
Thorsøhøjen 8, Silkeborg, 8600

Administraon and Troubleshoong
[ 320 ]
Hiding admin directory
Every CMS has an admin URL. In CMS Made Simple, this URL is http://www.yourdomain.
com/admin. This URL is dened by default, so that any experienced CMS Made Simple user
can get the login screen to your admin console. The more informaon you reveal to the
hacker, the more vulnerable your system is. In CMS Made Simple, you can easily change the
URL of the admin console, so that one cannot guess where the "entrance" is.
Open your FTP browser and rename the folder admin to something that cannot be guessed
easily (for example, private4me or hide2safe). Then, open the le config.php with any
FTP browser of your choice and nd the line
$config['admin_dir'] ="admin";
Change the line to the name you have given to the folder admin. If your admin directory is
now named private4me, then change the line shown as follows:
$config['admin_dir'] ="private4me";
From now on, the URL to your admin console will be http://www.yourdomain.com/
private4me. If you enter the standard admin URL in the browser now, then you will get
the error 404 (Page not found) instead of the login screen. In combinaon with a strong
username and password, this would give addional protecon to your admin area. An
aacker must guess the admin URL rst, before he tries to manipulate the username or
password informaon.
When you rename the admin folder to something else, the default vericaon checksum le
will not work. This le will sll look for the admin folder, will not nd it, and then give you an
error for each le within this no longer exisng folder. Therefore, directly aer renaming of
the admin folder, create a new custom vericaon le (Site Admin | System Vericaon),
and save it to your local disk. In this way, you hold the current status of the system,
considering the renamed admin directory.
When upgrading CMS Made Simple, before copying upgrade les to your current installaon,
rename your folder back to admin, perform the upgrade, and restore the custom name of
the folder again.
File permissions
If your installaon is on Linux server (please check Site Admin | System Informaon, Server
Operang System if you are not sure), then you should know how le permissions can be
congured to secure your system. A Linux server needs to know two things about the le:
What can be done to a le?
Who can do it with the le?
This material is copyright and is licensed for the sole use by Niels Vils on 17th August 2010
Thorsøhøjen 8, Silkeborg, 8600
Chapter 11
[ 321 ]
The rst queson can be broken down to three acons: read, write, and execute. Reading a le
means just opening the le and looking at its contents. Wring means changing, replacing, or
deleng the le. The last opon checks if programs or scripts are allowed to be executed.
The second queson can be broken into three types of user: owner, group, and public. The
owner of the le is the user who has inially created it. The group is not important for our
needs and will be treated the same way as public. Public is every other user on our server
who is not the owner of the le.
With Linux permissions, we combine the preceding informaon and say who is allowed to
do what with each le. You can imagine a permission matrix shown as follows:
Permission Owner Group Public
Read 4 4 4
Write 2 2 2
Execute 1 1 1
You see that there are theorecally 27 possible combinaons for the permissions of only
one le. Any combinaon can be expressed by the sum of the numbers in the preceding
table and changed with the Linux command chmod (change mode). However, you do not
need to know exactly how this command is executed as every FTP browser lets you dene
the permissions intuively.
Let's see and understand some examples for the permission sets:
777 (1+2+4 for each column) means that everybody (all three groups) is allowed to
read, write, and execute the le.
755 means that the owner is allowed to do everything with the le, but group and
public users are only allowed to read and execute the le. They are not allowed to
change it.
644 means that the owner is allowed to execute and read the le, others are only
allowed to read it.
There is a very important le in your installaon that is worth securing with Linux
permissions addionally. This le contains the database’s connecon data and is called
config.php. It is like the heart of your installaon.
While installing or upgrading, the le must be writable at least by the owner of the le, so
its permissions must be set to at least 644. As soon as the installaon or upgrade is nished,
you should lower the permissions of this le to 444 (everyone can read the le, but nobody
can execute or change it).
This material is copyright and is licensed for the sole use by Niels Vils on 17th August 2010
Thorsøhøjen 8, Silkeborg, 8600

Administraon and Troubleshoong
[ 322 ]
In an FTP browser like FileZilla, you can right click on the le and select the opon File
permissions. The next dialog looks like the following screenshot:
Generally, avoid seng any les to 777 if it is not absolutely needed. This permission allows
the reading, changing, and deleng of the le by every user on your server.
CMS Made Simple and server version
In the default template of CMS Made Simple, the version is shown in the footer area
as follows:
This site is powered by CMS Made Simple version 1.6.6
This informaon is provided in the template with the Smarty plugin {cms_version}. Delete
it and do not use it in your templates at all. You should avoid revealing the exact CMS Made
Simple version you use. The reason for this recommendaon is the following scenario.
You use an actual version of CMS Made Simple. One day, a security issue is discovered in this
version. The development team of CMS Made Simple reacts and publishes a security release.
If you do not upgrade your system immediately, your website would be extremely vulnerable
as everybody knows exactly what version you use on the website.
For the same reason, delete the doc folder from your installaon. This folder contains the
le changelog.txt which will reveal the actual version of CMS Made Simple as well. A
malicious person just has to enter in the address bar of the browser the following line:
http://www.yourdomain.com/doc/changelog.txt
This material is copyright and is licensed for the sole use by Niels Vils on 17th August 2010
Thorsøhøjen 8, Silkeborg, 8600

Chapter 11
[ 323 ]
Backup all your les and your database again and again. If something is
damaged or lost, then you can save your me and nerves by replacing the
damaged version with the last backup.
Troubleshooting
While designing and conguring websites, you will surely encounter some issues. There is a
soluon for each problem if you know how and where to get help.
If you install CMS Made Simple with sample content and templates, then you will get the
well documented content pages, templates, and stylesheets with a new installaon of
CMS Made Simple. They are an invaluable way of introducing yourself to the applicaon
and geng to know how it works. Read all these pages thoroughly and save them for
future reference.
CMS Made Simple Wiki
The purpose of this Wiki is not only to allow the CMS Made Simple community to collaborate
in the documentaon process, but to also give you an appropriate and easy way to nd
informaon. This documentaon is made by CMS Made Simple users and partly covers more
languages than just English. However, a major part of the Wiki sll remains in English. You
will nd the documentaon on http://wiki.cmsmadesimple.org.
You can search this documentaon to nd answers to your quesons. A search buon is at
the top-right of every page for your convenience. You can read this manual page-by-page or
pick the pages you like. In the Table of Contents at the right-hand side, you can see where
you are (the tle of the page you are reading is black).
In the admin console of CMS Made Simple, you will see the Community Help link at the
top-right of every page (below the main navigaon). This link will take you directly to the
Wiki page dealing with the funcon or the module you currently open in the admin console.
However, there are sll pages that are not wrien yet.
The more users parcipate in wring documentaon, the more answers can be found in it.
CMS Made Simple really needs everyone's assistance to make the documentaon accurate,
user friendly, and understandable. If you want to help, then please register as an editor on
the Wiki site and start to help improving and enhancing the documentaon for your own
reference as well.
This material is copyright and is licensed for the sole use by Niels Vils on 17th August 2010
Thorsøhøjen 8, Silkeborg, 8600

Administraon and Troubleshoong
[ 324 ]
Help for modules
While trying to solve issues with the modules, you should dierenate between core
modules of CMS Made Simple and third-party modules. The core modules are installed
with CMS Made Simple, such as News, Menu Manager, Prinng, Search, and so on.
Third-party modules are installed manually. The help for third-party modules is not provided
by the development team of CMS Made Simple but by the module's developer. Therefore,
the quality of the third-party module's help depends on the developer of the module and
cannot be managed by the ocial development team.
Built-in help
Each module installed in a CMS Made Simple website includes basic help and examples to
assist you in ulizing the funconality. With CMS Made Simple, you get the built-in help in
the admin console. Open any module, and nd the link Module Help at the top right below
the main navigaon. The help secons of all modules look mostly similar and contain the
following secons.
What does this do?
This secon explains the purpose of the module and describes the available funconality.
Read this secon thoroughly before starng to use the module. Are all the funcons you
need covered? Will the module solve all your requirements? There are some third-party
modules with very similar funconality. Read this secon for each module in queson,
compare them, and decide which one to use. Also see the Parameters secon (described
as follows) for the advanced funconality.
How do I use it?
This secon is aimed to introduce you to the module's usage. It is a wonderful possibility
to quickly get the rst impression of how the module works by following some simple
instrucons. Depending on the module, this secon is more or less complete and
somemes contains sophiscated usage examples or useful hints as well.
Parameters
This secon contains all the Smarty parameters you can use with the module. There
are required parameters that you must use and some oponal parameters. There is an
explanaon for each parameter with default value (value used if nothing is specied) and
allowed values. The list of parameters will also give you a complete overview of what the
module can do.
This material is copyright and is licensed for the sole use by Niels Vils on 17th August 2010
Thorsøhøjen 8, Silkeborg, 8600

Chapter 11
[ 325 ]
Forge (bugs and feature request)
If you use some third-party modules and encounter problems, then you can also
check the bug tracker for the module. The bug tracker is a list of known issues
with each module and is provided by CMS Made Simple in the developer secon
(http://dev.cmsmadesimple.org/). It includes not only a list of known problems
but somemes the soluons. Module developers are supposed to check the bug list
regularly and to update their module with new versions.
If you encounter errors with third-party modules, then create a bug report to inform the
developer of the module about the issue and use the support board to get help from the
module's users. The bug tracker is a place where the developer can track the list of errors.
However, it is not the place to raise support requests for the module.
How to get a quick answer in the forum
Using support forums is something that you probably do everyday. So, you may wonder why
this secon is so long. Well, there are some rules that you should follow while asking for free
support in the forums. If you have ever had some quesons unanswered in any forum, then
you should go through the rules given below to see what the developers want from you to
be able to help you.
If you do not follow these rules, then you are not going to get quick answers. Moreover,
your quesons may be completely ignored. Consider that the forum oers support for free.
The developer team and many other volunteers on the forum really want to be helpful and
make things work for you. But remember that they all have jobs, families, friends, and other
responsibilies. None of them are geng paid for the work they do on the forum. You can
buy their me with commercial support or help them to help you by giving them everything
they need.
Using search
Search in the forum for your queson before asking. Remember that a lot of quesons are
already answered and you will get the answer quicker. Use the search buon in the forum
and try dierent spellings, synonyms, and abbreviaons. For example, if you search for any
issue dealing with the module FrontEndUsers and login funconality, try:
Front End Users login
FrontEndUsers login
FEU login
Front End Users sign-in, and so on
This material is copyright and is licensed for the sole use by Niels Vils on 17th August 2010
Thorsøhøjen 8, Silkeborg, 8600

Administraon and Troubleshoong
[ 326 ]
Somemes, it is advisable to search the enre CMS Made Simple project including the
forum, bug tracker, and documentaon with Google. Open the search engine and enter your
search phrase followed by site:cmsmadesimple.org, as shown in the following screenshot:
This would bring up search results from all secons of the CMS Made Simple website and not
only the forum.
Finding the right board
If you did not nd the answer by searching, then use community help. First of all, nd the
right board on the forum for your queson. The important boards on the CMS Made Simple
forum are:
Installaon and Setup: Oers help with geng the core CMS Made Simple up and
running. Once you have successfully installed CMS Made Simple, you should choose
another forum for your support request.
Product Support: Oers help for quesons and problems with the core CMS
Made Simple aer you have nished installing. This board is not for anything that
has not been distributed with the CMS Made Simple package itself.
This material is copyright and is licensed for the sole use by Niels Vils on 17th August 2010
Thorsøhøjen 8, Silkeborg, 8600

Chapter 11
[ 327 ]
Layout and Design (CSS & HTML): Is intended for discussion and quesons related
to CMS Made Simple templates, stylesheets (CSS), and themes or layout issues.
Modules / Add-ons: Is intended to assist if you have a queson or problem with any
third-party module or plugin that was not included in the standard package of CMS
Made Simple.
Developers discussion: Is for talking about programming with and for CMS
Made Simple.
Internaonal Discussions: Includes boards in other languages. If your problem is
related to any language other than English, you can discuss it here.
Choosing the right board from the very beginning will ensure that you cover the widest
group of users who are able to help you.
Topic subject
Aer you have gured out the correct board for the request, think about the right topic tle
or subject. Let's see some bad examples:
Urgent help needed!
Big issue
Something goes wrong
Give a good summary of your problem as the topic tle. If you encounter a problem with the
login funconality in the module FrontEndUsers, then you should name your topic. Login
issues in Front End Users. Although a lot of people do know the answer to your problem,
they do not have me to look through each topic that is urgent or has a big issue. They
would only pick up the topics with the subjects that they believe they know the answer to.
Provide as much information as possible
Make sure that you provide all the version informaon you can think of. It is beer to include
irrelevant data than to omit useful data. The easiest way to get the required informaon is to
use the page Site Admin | System Informaon in the admin console of CMS Made Simple.
This page includes everything you and someone who will help you should know. But do not
just copy the enre page into the forum. There is a special text version of it. In the
top-right corner of the page (below the main navigaon), you will nd the link View Text
Report (suitable for copying into forum posts). Click on it, copy it, and include it in your
forum post.
This material is copyright and is licensed for the sole use by Niels Vils on 17th August 2010
Thorsøhøjen 8, Silkeborg, 8600

Administraon and Troubleshoong
[ 328 ]
Describe the problem step-by-step
Describe the problem, including as much detail as possible (especially including error
messages exactly as they are presented to you). It is not enough to say "If I sign in with the
module FrontEndUsers I get some weird errors."
If nobody knows what the errors are, then nobody will help you. There are no visionaries in
the forum, just developers. Imagine you have a problem with your car. You call the garage
and say "My car does not drive. Help!". If you do not provide more informaon on the exact
behavior of your car, then the garage will not be able to help you. The same will happen in
the support forum.
If the error can be reproduced, then detail the steps that one can follow to repeat the issue
on their own installaon. This is a very good method; somemes by wring step-by-step
what you are doing, you are able to gure out the issue yourself.
Be polite. Do not demand anything as there is no guarantee for a free product. Do not
threaten to use another CMS if your problem is not solved instantly. If you do not like CMS
Made Simple, then you are free to use any other system and claim free instant support
there. However, I assume that you will not get free support this way anywhere. Do not insult
the developers by saying the code of CMS Made Simple is bad or inecient. You are not
going to get any answers this way as in this case the developer team will assume that you
are able to write your own beauful and ecient code and do not need any help.
Be paent. If there is a soluon to your issue, then you will get it. It does not make the
process quicker if you hourly "bump" the topic to appear at the top of the board. On the
contrary, this can be another reason for being ignored.
Help others if you have been helped
Once your queson is answered and you have got your soluon, open your rst post for
eding and add [SOLVED] in front of the topic subject. The developers can then concentrate
on unsolved topics rather than looking into your topic again and again. If you feel that there
is a bug and not a handling issue, then le a bug report for it in the development Forge
(http://dev.cmsmadesimple.org) in addion to posng about it in the forum.
This will help the developers to manage the process of tracking and xing it.
If the queson could not be answered in the forum, but you have found the soluon
yourself, or someone has given the soluon to you by another way, then post it in the
forum so that other people can benet from it. Someday, you will be happy if someone
posts his soluon for an issue you have in your installaon as well.
This material is copyright and is licensed for the sole use by Niels Vils on 17th August 2010
Thorsøhøjen 8, Silkeborg, 8600

Chapter 11
[ 329 ]
If you follow these steps, then you will save a great deal of me for yourself and the
developers. Geng quick answers is simple.
Commercial support
So you've got CMS Made Simple up and running and you like what you see. However, your
project requires some funconality that isn't yet available for the CMS or doesn't quite
work the way you want it to. For that, the CMS Made Simple development team oers
independent contracng services. Their in-depth knowledge of the tool and experience in
building the package and addional modules can ensure that you get a working, well ng,
and quality tool.
Paid support is available to those people with an important project that are concerned about
the turnaround me that may be related to geng an issue solved. Addionally, if you would
like to have somebody to call for problems that you just can't x, upgrade issues, backups, or
any other concern, then commercial support may be an opon for you.
The CMS Made Simple development team oers various professional services for the web
developer that needs a bit more support or needs something a lile bit dierent.
Support contracts
So, you are creang a new CMS Made Simple website for a very important customer, and
you are concerned about "what if something goes wrong". For example, if the host changes
something, or the site gets hacked, or some unexpected thing happens. You will need to x it
quickly and properly, and you are not sure how you can do this.
It is for such purposes that various members of the development team oer support
contracts. A support contract assures your client that if something unexpected pops up, a
professional and experienced programmer with inmate knowledge of CMS Made Simple
will be available within a reasonable me to either take care of the problem personally, or to
assist you via telephone, video chat, and so on in resolving the issue.
Support contracts are nominally priced, are usually on a per-site basis, for a xed number of
"ckets" and for a limited me period (like one year). Think of it like an insurance policy. If
something goes wrong that you don't know how to x, somebody is there for you.
Your clients will probably feel more secure knowing that there is ongoing technical support
for their business-crical website.
This material is copyright and is licensed for the sole use by Niels Vils on 17th August 2010
Thorsøhøjen 8, Silkeborg, 8600

Administraon and Troubleshoong
[ 330 ]
Software development
So you have a number of websites running CMS Made simple already, and all of them are
working well. However, this new site that you are working on is a bit dierent, and you're
going to need some funconality that CMS Made Simple doesn't have yet. You may need
some slight changes to the behavior of some of the exisng funconality. Where can you go?
The CMS Made Simple development team can work with you to determine a soluon to your
problem, either by modifying some exisng code, or by wring something new.
The developer team has a vast amount of experience working with CMS Made Simple and
developing the CMS Made Simple Framework (aer all, they wrote it).
Most of the development team members work on a pay for me mechanism. For a nominal
fee, you can probably get one of the development team members to adjust their schedule to
help you out.
What about larger projects?
The developer team can handle that too. Many of the modules that are available for CMS
Made Simple were sponsored by members of the community who love CMS Made Simple
and its exibility, but needed some funconality that was not yet available. Maybe you can
become another valued sponsor.
You can contact a development team member, and work with them to sponsor a project on a
contract basis. Usually the fees for these contracts are based on a regular consulng rate.
Is the development team a corporation or company?
Actually, no; they are a loosely coupled group of independent contractors that work
together. They collaborate and contribute to CMS Made Simple, to the various add-ons,
and work on issues like support contracts.
They work independently because they are in many dierent locaons spread around the
world, and it is just easier that way. However, they are always ready to help each other, and
spell o each other for various reasons, for example, if one of them is going on vacaon,
the other members are willing to cover for him/her for support contract issues. Similarly,
if somebody is just too busy with other projects, they would be more than happy to
recommend another appropriate development team member to help you.
This material is copyright and is licensed for the sole use by Niels Vils on 17th August 2010
Thorsøhøjen 8, Silkeborg, 8600

Chapter 11
[ 331 ]
How do I contact you?
Well, you can read more informaon about the development team on
http://www.cmsmadesimple.org/about-link/about-us/ and decide
which member(s) you would like to contact. If you have further quesons that you
would like to ask, but don't want to contact anybody directly yet, then you can feel
free to ask a queson on the Help Wanted (commercial) board.
Pop quiz – administration and troubleshooting
1. What is included in the database backup?
a. The enre website including page structure, languages, modules and
templates.
b. Only page structure, sengs, and templates.
c. Only page structure and design is saved in the les.
d. Database does not include anything that is important to backup the
website.
2. How oen should you backup the website?
a. Everyday.
b. Depending on how oen the changes are made to the content
of the website.
c. Depending on how oen you would like to restore the website.
d. You do not need to care about the backup. This will be done automacally.
3. Why should you regularly upgrade your websites that are run with CMS
Made Simple?
a. To keep the changes made during the whole lifecycle of the page.
b. To inform visitors of your website that you use the newest version of CMS
Made Simple.
c. To keep the installaon secure and avoid vulnerability.
d. To be informed about the new features oered and be able to select
those you need.
This material is copyright and is licensed for the sole use by Niels Vils on 17th August 2010
Thorsøhøjen 8, Silkeborg, 8600

Administraon and Troubleshoong
[ 332 ]
4. What name would be the best for the admin account?
a. admin
b. ro0t6i2go
c. webmaster
d. test
5. Where do you nd free help when you encounter issues?
a. Any HTML or CSS reference.
b. Ocial help board of CMS Made Simple.
c. Personal message to one of the CMS Made Simple developer.
d. Comments in the installaon les and database.
6. How can you stay informed about any updates of CMS Made Simple?
a. You will be e-mailed automacally if an update is available.
b. You have to look up in the ocial board daily.
c. You will see the appropriate message in the admin console of CMS
Made Simple.
d. CMS Made Simple does not oer any updates for free.
Have a go hero – congure backup and stay up-to-date
Congure the backup for your website right now. If something goes wrong, you will not
be able to recover the website without a backup. Double-check that your backup les
include les and database as both of them are important. Play a recover scenario in case of
emergency, so that you can be sure that backup is not corrupted or incomplete.
Stay up-to-date. Sign in with the ocial forum of CMS Made Simple and subscribe for new
topics in the board Announcements (also RSS Feed is available for your convenience).
This material is copyright and is licensed for the sole use by Niels Vils on 17th August 2010
Thorsøhøjen 8, Silkeborg, 8600

Chapter 11
[ 333 ]
Summary
In this chapter, you have learned a lot of stu concerning the administraon of CMS Made
Simple. As menoned at the beginning of the chapter, you do not need to read all of the
secons in this chapter. But I strongly recommend going through the secons on How to
secure your installaon and Troubleshoong.
Specically, we covered:
How to backup a CMS Made Simple website in case of an emergency. You have
learned that the website consists of two parts, its les and the database. It is
important to create backups for both the parts. Two ways of creang a backup were
discussed, that is, third-party modules and manual backups for people who have
hosng with restricons.
How to move the website from one hosng to the other. You have to move your
website if you change the hosng provider.
How to upgrade CMS Made Simple and its modules. We have learned why it is so
important to upgrade the system regularly. You gain not only new features, but
improved performance and security. It is your responsibility to upgrade the system
and stay up-to-date with CMS Made Simple's development.
How to secure the installaon. There were some useful ps on how you can quickly
secure your system and protect it from hacking, aack, and damage. Remember that
if you spend some me learning how to secure the website from the very beginning,
then it can save you days and weeks of geng your website backup and running, if it
gets aacked.
How to get a quick answer in the support forum. You got some ps on how to get
the best answers from the free support forums of CMS Made Simple. Reading this
secon will save you a lot of me while solving issues with the installaon.
This material is copyright and is licensed for the sole use by Niels Vils on 17th August 2010
Thorsøhøjen 8, Silkeborg, 8600

This material is copyright and is licensed for the sole use by Niels Vils on 17th August 2010
Thorsøhøjen 8, Silkeborg, 8600

Pop Quiz Answers
Chapter 3
Creating Pages and Navigation
1 c
2 b
3 a
4 c
5 c
6 b
7 b
8 a
9 b
This material is copyright and is licensed for the sole use by Niels Vils on 17th August 2010
Thorsøhøjen 8, Silkeborg, 8600

Pop Quiz Answers
[ 336 ]
Chapter 4
Design and Layout
1 a
2 a
3 b
4 d
5 a
6 d
7 c
8 d
9 a
10 b
Chapter 5
Using Core Modules
1 a
2 b
3 a
4 c
5 d
6 b
This material is copyright and is licensed for the sole use by Niels Vils on 17th August 2010
Thorsøhøjen 8, Silkeborg, 8600

Appendix
[ 337 ]
Chapter 6
Users and Permissions
1 a
2 d
3 c
4 c
5 a
6 d
7 b
Chapter 7
Using Third-party Modules
1 b
2 b
3 c
4 d
5 a
6 b
7 c
Chapter 8
Creating Your Own Functionality
1 a
2 b
3 b
This material is copyright and is licensed for the sole use by Niels Vils on 17th August 2010
Thorsøhøjen 8, Silkeborg, 8600
Pop Quiz Answers
[ 338 ]
Chapter 9
E-commerce Workshop
1 b
2 a
3 b
4 b
5 a
Chapter 10
Advanced Use of CMS Made Simple
1 b
2 d
3 a
4 a
Chapter 11
Administration and Troubleshooting
1 b
2 b
3 c
4 b
5 b
6 c
This material is copyright and is licensed for the sole use by Niels Vils on 17th August 2010
Thorsøhøjen 8, Silkeborg, 8600

Index
Symbols
{breadcrumbs} 71
{cms_version} 71
{cms_versionname} 71
{created_date} 71
{current_date} 71
{last_modied_by} 71
{menu_text} 71
{modied_date} 71
{root_url} 71
{sitename} 71
A
addional content blocks
about 275
adding, for subtles 275
addional editors 152, 153
addional modules
installing 137-139
add to my cart template 246
AD Gallery 172
admin console, CMS Made Simple
about 29-31, 300
CMS menu 31
content menu 31
extensions menu 32
layout menu 31
logging in 30
my preferences 32
site admin menu 32
system informaon 300
users & groups menu 32
admin email template 249
administrator 146
admin log
viewing 157
Archiver
about 158
installing 158
B
billing form template 249
breadcrumbs 54
browsecat parameter 121
built-in help, troubleshoong
about 324
funcons 324
parameters 324
working 324
C
canonical URLs
tags, using for 288
Captcha
about 182
acvang 183
adding, to forms 182
installing 182
cart module
about 245
add to my cart template 246
installing 245
my cart template 246
products and cart, connecng 245, 246
product summary template 246
view cart template 246
case study website
about 10
funconal specicaons 10
This material is copyright and is licensed for the sole use by Niels Vils on 17th August 2010
Thorsøhøjen 8, Silkeborg, 8600

[ 340 ]
Cataloger 231
chmod 321
CMS
about 8
exisng templates, working with 66
structure 8
versus, site builder 9
CMS Made Simple
about 9
addional content blocks 274
addional modules, installing 137
admin console 29
advanced uses 296, 297
advantages 9
advantages, of upgrading 311
case study website 10
dates, conguring 266
e-mails, sending 33
FMS 231
images, uploading 126
installaon, securing 316
installing 20
issues 35
localizaon 265, 266
Module Manager, using 136
modules, adding to website 136
modules, installing with XML le 139, 140
modules, translang 273
module upgrades 140
moving to another hosng 309-311
mullingual websites, making 267
opmizing 314
page alias 41
requisites 11
roles 146
SEO 277
Shootbox Made Simple 231
SMS 231
translaon 272
troubleshoong 323
upgrading 311, 312, 313
user-dened tags 289
CMS Made Simple, requisites
browser 11
CMS Made Simple les, uploading 12-17
le archiver 12
FTP browser 12
CMS Made Simple les
uploading 12-17
CMS Made Simple installaon
about 20
admin account, creang 26, 27
database informaon, changing 27, 28
le creaon mask, tesng 25
le integrity, validang 21
language, selecng 20
requirements, checking 22-25
sample content 28
tables, creang 28
templates 28
CMS Made Simple Wiki, troubleshoong
about 323
third-party modules help 324
CMSMS Forge 137
commercial support, troubleshoong
about 329
larger projects 330
soware development 330
support contracts 329
conrmaon email template 254
conrm order template 249
contact form
adding, to website 174, 175
Captcha, acvang 183
Captcha, adding 182
customizing 176, 177
elds, adding 178
mulple choice selecon eld, adding with
checkbox group 181
pulldown eld, adding 180
salutaon elds, adding 178, 179
templates 177
content pages
changes, archiving 158
changes, restoring 158, 159
content permissions
about 150
addional editors 152
add pages permission 153, 154
editor account, creang 150-152
new pages, creang 153
content types
about 59
content 59
This material is copyright and is licensed for the sole use by Niels Vils on 17th August 2010
Thorsøhøjen 8, Silkeborg, 8600

[ 341 ]
error page 59
external link 59
internal page link 59
secon header 59
separator 59
core modules
about 107
customizaon, applying 142
File Manager 125
Menu Manager 130
news module 110
prinng module 133
search module 122
using 141
custom elds
adding, to news module 119
custom elds, products module
creang 234
dening 235
Is this a public eld 235
name 234
prompt 235
type 235
D
database, back up
making, with module 306
dates
conguring 266
date format string 267
examples 267
format 267
default permissions
add global content blocks 160
add groups 160
add pages 160
add stylesheet associaons 160
add stylesheets 160
add templates 160
add users 160
advanced usage of the File Manager module
162
allow usage of advanced prole in TinyMCE 160
approve news for frontend display 160
clear admin log 160
delete news arcles 160
manage all content 160
manage menu 160
manage themes 161
modify any page 161
modify events 161
modify les 161
modify global content blocks 161
modify group assignments 161
modify groups 161
modify modules 161
modify news 161
modify permissions for groups 161
modify site preferences 161
modify stylesheet associaons 161
modify stylesheets 161
modify templates 161
modify user dened tags 161
modify users 162
overview 160
remove global content blocks 162
remove groups 162
remove pages 162
remove stylesheet associaons 162
remove stylesheets 162
remove templates 162
remove users 162
view tag help 162
descripon meta tags 279
designer 146
designer permissions
about 155
set of permissions 155
test area, creang 156, 157
detail templates
about 242
customizing 242-244
duplicate content
avoiding 286
prevenng steps 286-288
E
e-commerce suite
oponal modules 261
e-commerce workshop 262
This material is copyright and is licensed for the sole use by Niels Vils on 17th August 2010
Thorsøhøjen 8, Silkeborg, 8600

[ 342 ]
e-mails, CMS
sending 33
editor 146
email template 177
events
about 293
mails, sending aer page update 293, 294
triggering 293
exisng templates
ready-made template, imporng 66, 67
working with 66
extra page aribute
about 276
using 276
F
FFmpeg 191
elds
adding, to forms 178
File Manager 125
les
browsing, File Manager used 125
nal message template 254
Forge, troubleshoong 325
FormBuilder
about 174
Captcha, adding to forms 182, 183
contact form, adding to website 174, 175
contact form, customizing 176, 177
elds, adding to forms 178
installing 174
form template 177
G
gallery
creang 168
images, uploading 168, 169
gallery module
installing 168
gateway complete template 249
global content blocks
about 108
adding, to website 108-110
global meta tags
adding 52
H
hierarchy report templates
about 237
customizing 237, 239
HTML template
porng 84
porng, to CMS Made Simple 85-90
I
IF code 94
IF structure 96
Image Manager 126
images
uploading, image editor used 126, 128
using, in content 128, 129
using, in templates 128, 129
includetemplate parameter 134
installaon security, CMS Made Simple
admin directory, hiding 320
le permissions 320, 321
password, checking 319
securing 316
server version 322
simple version 322
system vericaon 317, 318
username, checking 319
Instant Payment Nocaon. See IPN
invoice template 249
IPN 225
J
job 183
jQuery
integrang, in navigaon 294-296
K
keywords
using, in image les 283
using, in page alias 283
L
link template 134
localizaon 265, 266
lost email template 254
This material is copyright and is licensed for the sole use by Niels Vils on 17th August 2010
Thorsøhøjen 8, Silkeborg, 8600

[ 343 ]
M
manual back up, website
about 307
database, backing up with phpMyAdmin
307-309
Mary 153, 154
Menu Manager 130
menu template
creang 97-99
message template 249
meta elements 50
meta tags
about 50, 279
adding, to pages 50, 51, 279, 280
descripon meta tags 279
keywords 280
mod_deate 315
module FrontEndUsers sengs
about 214
adjusng 215
preferences 215
Module Manager
about 136
using 136
module permissions 162
modules
custom translaon 274
installing, with XML le 139, 140
removing 140
translang 273
uninstalling 140
mullingual websites
about 267
ags, adding as language menu 270
hierarchy soluon 270
language entries, eding 269
making 267, 269
news arcles, separang by language 271
mulple choice selecon eld
adding, to forms 181
mysql binaries 306
my cart template 246
N
navigaon
adding, to template 79, 80
creang 63, 78
designing 80
designing, with pure CSS 80-82
sidebar navigaon, adding 83
navigaon control, website
about 57
content types, used 59
default page 58
pages, hiding 57, 58
navigaon template
creang, with Smarty loop 96, 97
menu template, creang 97-99
neolao 191
new products catalog module
basic informaon 197
creang 196
nal step 207, 208
rst level (categories), creang 198-201
second level (products), creang 202-207
new products catalog module conguraon
about 208
product list template, creang 209, 210
news
displaying, on website 111, 112
news categories
about 114
creang 114, 116
Newsleer Made Simple. See NMS
news module
about 110, 111
custom elds, adding 119
news, adding 112
news items, adding to page 112, 113
news arcles, managing 110
news categories 114
news templates, customizing 116
news tle, using as page tle 122
news templates
browse category 116
customizing 116
detail 116
form 116
new summary template, creang 117-119
summary 116
NMS
about 183
installing 183
This material is copyright and is licensed for the sole use by Niels Vils on 17th August 2010
Thorsøhøjen 8, Silkeborg, 8600

[ 344 ]
mails, sending to registered customers 184-186
templates 187
O
opmizaon, CMS Made Simple
about 314
compression 314
CSS, in global sengs 315, 316
persistent connecon 315
orders module
about 247
admin email template 249
billing form template 249
checkout step, adding 248
conrm order template 249
customer registraon, integrang 252, 254
gateway complete template 249
invoice template 249
login screen, integrang 250-252
message template 249
payment form template 249
user email template 249
output, Smarty basics
controlling, with IF funcon 94
tags, hiding 94
override print stylesheet tab 134
P
page alias 41
page content
formang 43, 45
formang, WYSIWYG editor used 44
page hierarchy
about 52
breadcrumbs 54
search engine friendly URLs 54
search engine friendly URLs, enabling on
website 55
sub pages, adding to website 52-54
pages
adding, to website 39, 40
changes, previewing 43
creang 39, 63
deleng 43
eding 42
exisng pages, eding 42
global meta tags, adding 52
meta tags, adding 50
mulple pages, changing 60
new page, creang as copy of exisng page 60
page alias, changing 43
prinng 133
parameters, news module
browsecat 121
showall 121
Payment Data Transfer. See PDT
payment form template 249
Paypal Gateway module
about 255
installing 256
PayPal returns payment data methods 255
test accounts, creang 256, 257
PayPal returns payment data methods
about 255
IPN 255
PDT 255
PayPal seller account
conguring 258
instant payment nocaon 259
language encoding 260, 261
payment receiving preferences 258
website payment preferences 259
PDF sengs tab 134
PDT 255
photo gallery
albums, adding 170
creang 168
custom gallery template, creang 172-174
images, uploading 168, 169
images, using on other pages 170
random images, adding to template 170, 171
resize methods 169
PHP code
execung, in tags 293
phpMyAdmin 307
popup parameter 134
printed version, webpage
customizing 135
prinng module 133
print link
adding 133
customizing 135
media type, adding to stylesheets 135
This material is copyright and is licensed for the sole use by Niels Vils on 17th August 2010
Thorsøhøjen 8, Silkeborg, 8600

[ 345 ]
PDF version of page, generang 136
print template 134
print versions, pages
avoiding 287
product catalog
about 195
creang 195, 196
examples 196
new catalog-like module, conguring 208
new catalog-like module, creang 196
product hierarchy, products module
categories 236
creang 236
products module
about 232
advantages 232
custom elds, creang 234
rst product, adding 233, 234
product hierarchy, creang 236
product templates, customizing 237
product summary template 246
product templates, products module
customizing 237
detail templates 242
hierarchy report templates 237
summary templates 239
protected pages
creang 216
service desk, protecng 217
pulldown eld
adding, to forms 180
Q
Qualier 95
Qualiers, Smarty
eq 96
gt 96
gte 96
lt 96
lte 96
mod 96
neq 96
not 96
queson module
installing 137, 139
R
reCaptcha
about 183
advantages 183
registraon Template 1 254
registraon template 2 254
resize methods, photo gallery
crop 169
scale 169
zoom & crop 169
zoom & scale 169
roles
about 146
administrator 146
designer 146
editor 146
Russian Translaon Center example 272
S
salutaon elds
adding, to forms 178, 179
sample website 62
script parameter 134
search engine friendly URLs 284
search engine friendly URLs
about 54, 284
enabling, on website 55
example 56
Search engine opmizaon. See SEO
search module
about 122
search form, adding 123-125
selfregistraon module
about 252
conrmaon email template 254
nal message template 254
installing 252
lost email template 254
methods 253
registraon template 1 254
registraon template 2 254
SEO
about 277
duplicate content, avoiding 286
keywords, using in image les 283
This material is copyright and is licensed for the sole use by Niels Vils on 17th August 2010
Thorsøhøjen 8, Silkeborg, 8600

[ 346 ]
keywords, using in page alias 283
meta tags 279
page tle 277, 278
search engine friendly URLs 284
SEO markup, using in pages 282, 283
SEO markup, using in templates 281
visitor stascs 289
XML sitemaps creang 288
SEO markup
using, in pages 282, 283
using, in templates 281
service desk funconality
custom funconality 229
implemenng 211
module frontend users, sengs 214, 215
protected pages, creang 216
support cket system, creang 218
templates, FrontendUsers module 215
visitors logins, managing 211
Shop Made Simple (SMS) 231
showall parameter 121
showbuon parameter 134
sidebar navigaon
adding 83
sitemap
creang 130-132
sitemaps 288
Smarty basics
learning 91
navigaon template, creang with smarty loop
96, 97
output, controlling with IF funcon 94
Smarty variables, working with 91
Smarty parameters 72
Smarty plugins
about 73
using, in content 74
Smarty tags
about 67
adding, to templates 70
Smarty variables
about 91
geng 91-93
working with 91
Smarty web template system 67
Smarty plugins 73
Smarty tags
{breadcrumbs} 71
{created_date} 71
{last_modied_by} 71
{menu_text} 71
{modied_date} 71
adding, to templates 71
stylesheets
adding, to template 74
creang 75-77
media types 78
submission template 177
sub pages
adding, to website 52
summary templates
about 239
creang 117, 118
customizing 239-241
support forums, troubleshoong
helping others 328, 329
problem, describing 328
right board, nding 326, 327
search, using 325, 326
topic subject 327
version informaon, providing 327, 328
support cket system
about 218
answer elds, adding 222, 223
creang 218
creang, CGFeedback module used 218-221
dialogue, enabling 226-229
summary template 223
cket list, customizing 223-225
system informaon
CMS Install Informaon 300
PHP Informaon 300, 301
Server Informaon 300-303
T
tags output
controlling 72
Smarty tags, adding to template 72
template
creang 67-69
dynamic parts, adding 69
exporng 101
output, controlling 72
This material is copyright and is licensed for the sole use by Niels Vils on 17th August 2010
Thorsøhøjen 8, Silkeborg, 8600

[ 347 ]
Smarty tags, adding 70
Smarty tags, adding 71
stylesheets, adding 74
Template Externalizer 157
templates, FrontendUsers module
change sengs template 215
forgot password template 215
login template 215
logout template 215
lost username template 215
view user template 215
templates, NMS
archieve templates, 187
conrm subscribe, 187
subscribe, 187
unsubscribe, 187
user sengs, 187
text parameter 134
third party modules 192, 193
TinyMCE
conguring 45, 46, 47
replace funcon, acvang 48, 49
search funcon, acvang 48, 49
translaon 272
Translaon Center
about 272
Russian Translaon Center example 272, 273
troubleshoong, CMS Made Simple
about 323
built-in help 324
CMS Made Simple Wiki 323
commercial support 329
forge 325
support forums, using 325
U
upgrade, CMS Made Simple
about 311-313
advantages 311
user
assigning, to group 148, 149
creang 146, 147
user-dened tags
about 289
creang 290
custom user-dened tag, creang 290, 291
page informaon, geng in UDT 292
parameters, adding 291
user email template 249
user nocaons 163
V
videos
displaying 188
own video player, adding 190, 191
view cart template 246
visitors login
managing 211, 212
user account, creang 212-214
visitor stasitcs 289
W
website, back up
database, backing up 306
manual backup 307
website les, backing up 304
website, CMS Made Simple
backing up 303, 304
les, backing up 304
website les, back up
making, with module 304, 305
WYSIWYG editor 44
X
XML sitemaps
creang 288
Y
YouTube videos
embedding 188-190
This material is copyright and is licensed for the sole use by Niels Vils on 17th August 2010
Thorsøhøjen 8, Silkeborg, 8600

Thank you for buying
CMS Made Simple 1.6: Beginner’s Guide
Packt Open Source Project Royalties
When we sell a book written on an Open Source project, we pay a royalty directly to that
project. Therefore by purchasing CMS Made Simple 1.6: Beginner’s Guide, Packt will have
given some of the money received to the CMS Made Simple project.
In the long term, we see ourselves and you—customers and readers of our books—as part of
the Open Source ecosystem, providing sustainable revenue for the projects we publish on.
Our aim at Packt is to establish publishing royalties as an essential part of the service and
support a business model that sustains Open Source.
If you're working with an Open Source project that you would like us to publish on, and
subsequently pay royalties to, please get in touch with us.
Writing for Packt
We welcome all inquiries from people who are interested in authoring. Book proposals
should be sent to [email protected]. If your book idea is still at an early stage and you
would like to discuss it rst before writing a formal book proposal, contact us; one of our
commissioning editors will get in touch with you.
We're not just looking for published authors; if you have strong technical skills but no writing
experience, our experienced editors can help you develop a writing career, or simply get some
additional reward for your expertise.
About Packt Publishing
Packt, pronounced 'packed', published its rst book "Mastering phpMyAdmin for Effective
MySQL Management" in April 2004 and subsequently continued to specialize in publishing
highly focused books on specic technologies and solutions.
Our books and publications share the experiences of your fellow IT professionals in adapting
and customizing today's systems, applications, and frameworks. Our solution-based books
give you the knowledge and power to customize the software and technologies you're using
to get the job done. Packt books are more specic and less general than the IT books you have
seen in the past. Our unique business model allows us to bring you more focused information,
giving you more of what you need to know, and less of what you don't.
Packt is a modern, yet unique publishing company, which focuses on producing quality,
cutting-edge books for communities of developers, administrators, and newbies alike. For
more information, please visit our website: www.PacktPub.com.
This material is copyright and is licensed for the sole use by Niels Vils on 17th August 2010
Thorsøhøjen 8, Silkeborg, 8600

Building Powerful and Robust
Websites with Drupal 6
ISBN: 978-1-847192-97-4 Paperback: 380 pages
Build your own professional blog, forum, portal or
community website with Drupal 6
1. Set up, congure, and deploy Drupal 6
2. Harness Drupal’s world-class Content
Management System
3. Design and implement your website’s look
and feel
4. Easily add exciting and powerful features
5. Promote, manage, and maintain your
live website
Alfresco 3 Enterprise Content
Management Implementation
ISBN: 978-1-847197-36-8 Paperback: 600 pages
How to customize, use, and administer this powerful,
Open Source Java-based Enterprise CMS
1. Manage your business documents with version
control, library services, content organization,
and advanced search
2. Create collaborative web sites using document
libraries, wikis, blogs, forums, calendars,
discussions, and social tagging
3. Integrate with external applications such as
Liferay Portal, Adobe Flex, iPhone, iGoogle,
and Facebook
4. Automate your business process with the
advanced workow concepts of Alfresco 3
Please check www.PacktPub.com for information on our titles
This material is copyright and is licensed for the sole use by Niels Vils on 17th August 2010
Thorsøhøjen 8, Silkeborg, 8600
