
Adobe Dreamweaver Guide
© 2012 Adobe Systems Incorporated How to use CSS text styles 1
This document requires Adobe Dreamweaver CS6. Technical instructions may differ depending on your version.
How to use CSS text styles
Web typography is an important creative tool web designers use to express style and emotion that enhances the goal
and overall message of a website.
Image-based text gives you control of your web typography, but several limitations have led to the decline of this
approach: increased file size, decreased accessibility, problems with search engine discoverability, and practical
limitations on the amount of text.
Cascading Style Sheets provide a higher level of styling control over web typography, without the drawbacks of
image-based test. With CSS, web page text results in smaller file size, greater accessibility, and improved usability
across devices, browsers, and platforms. CSS specifies a series of font properties for a web browser to use when
displaying text in a web page.
Web designers seeking a broader font selection or more expressive typography (Figure 1) may choose to use web
fonts. Web fonts are temporarily downloaded to display text in fonts that site visitors don’t need installed on their
computers.
Figure 1 Example of a website using web fonts: http://lostworldsfairs.com/moon/

Guide Adobe Dreamweaver
2 How to use CSS text styles © 2012 Adobe Systems Incorporated
This document requires Adobe Dreamweaver CS6. Technical instructions may differ depending on your version.
Changing text styles
To understand web fonts betters, consider how fonts are defined by using CSS. CSS font properties define the font
family, boldness, size, and style of text. A font declaration for an HTML paragraph tag looks something like this:
Changing text styles for web pages is easy in the CSS Styles panel.
To change text styles:
1. Start Dreamweaver.
2. Open a document in which you want to edit a CSS font
property.
3. Open the CSS Styles panel (Window > CSS Styles), if it
isn’t already open (Figure 2).
4. Double-click an existing rule or property in the top pane
of the CSS Styles panel.
The CSS Rule Definition dialog box appears (Figure 3).
5. Change or specify any of the following properties in the
dialog box. If a property is not important to you, don’t
select or enter a value for that property.
Font-family sets the font family (or series of families) for
the style. Browsers display text in the first font in the
series that is installed on the viewer’s system.
Font-size defines the size of the text. You can choose a
specific size by selecting the number and the unit of
measurement, or you can choose a relative size.
Font-style provides the options Normal, Italic, and
Oblique.
Line-height sets the height of the line on which the text is
placed. This setting is traditionally called leading.
Text-decoration adds an underline, overline, or line-
through to the text, makes the text blink, or removes any
decoration set elsewhere.
Font-weight applies a specific or relative amount of
boldface to the font. Normal is equivalent to 400; Bold is
equivalent to 700.
Font-variant sets the small caps variant on text.
Dreamweaver does not display this attribute in the
Document window.
Text-transform capitalizes the first letter of each word in
the selection or sets the text to all uppercase or lowercase.
Color sets the text color.
6. When you have finished, click OK. Observe the effect of
your changes in Design view.
Figure 2 CSS Styles panel
Figure 3 CSS Rule Definition dialog box
Adobe Dreamweaver Guide
© 2012 Adobe Systems Incorporated How to use CSS text styles 3
This document requires Adobe Dreamweaver CS6. Technical instructions may differ depending on your version.
Using web fonts
By using the CSS @font-face embedding technique, modern web browsers download and use a wide range of font
styles. There are two methods for delivering web fonts to site visitors: subscription-based hosted services that license
fonts for use and free open-source fonts.
Most subscription-based, third-party services host fonts on their servers and deliver specific fonts whenever a website
is viewed. This often requires adding code to your site, and the service instructs you on how to do so. Examples of
subscription-based services are Adobe’s Typekit (www.typekit.com), Kernest, and Typotheque.
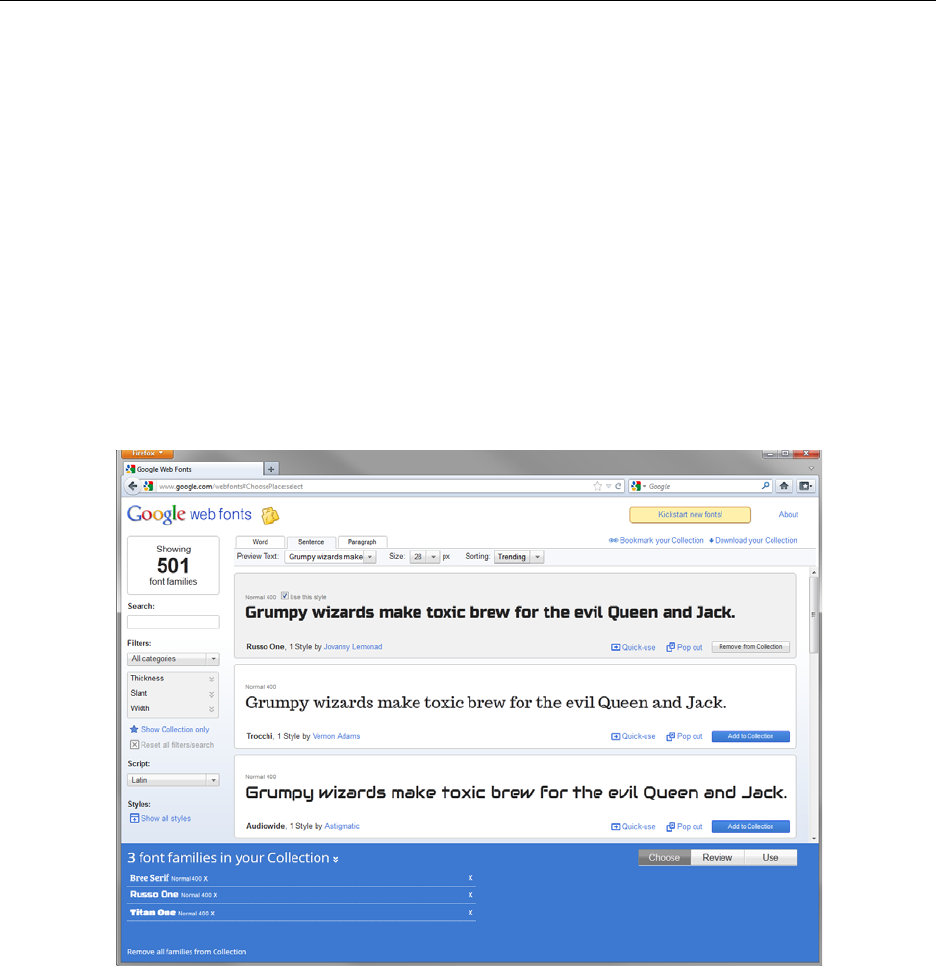
Google web fonts is the service of choice for free open-source web fonts. Like subscription-based font services,
Google offers a hosted web font service, as well as letting you download font collections for saving to a web server.
To use Google web fonts, you must first visit the Google web fonts website and choose one or more font styles,
review your selection, and integrate web fonts into your CSS (Figure 4). Use one of the following procedures:
• Remote web fonts: Copy the provided link code into the
<head> section of your HTML document.
• Embedded web fonts: Download the collection as a ZIP file and save to your web server.
Figure 4 Google web fonts website
In this section, you learn how to use the Google remote web font service and how to download and use Google web
fonts.
To use remote Google web fonts:
1. Visit the Google web fonts site at www.google.com/
webfonts.
You may be required to register.

Guide Adobe Dreamweaver
4 How to use CSS text styles © 2012 Adobe Systems Incorporated
This document requires Adobe Dreamweaver CS6. Technical instructions may differ depending on your version.
2. Search or browse the selection of font families; then click
the Add To Collection button next to each font you want
to use.
3. Click the Review button to compare and refine your
collection and to see the styles in a customizable sample
layout.
4. Click the Use button, and verify the settings.
5. In Step 3 on the Use page, copy the Standard link code
(Figure 5).
The code is saved to the clipboard.
6. Open a Dreamweaver HTML document in which you
want to add Google web fonts.
7. Select Split view in the Document toolbar (Figure 6).
Code view and Design view are visible in the Document
window.
8. Locate the opening
<head> tag of the document, and
place the insertion point immediately after the closing
bracket of the tag.
9. Press Enter (Windows) or Return (Mac OS) to create a
line break.
10. Select Edit > Paste to add the saved clipboard code to the
head section of the document (Figure 7).
11. Open the CSS Styles panel (Window > CSS Styles), if it
isn’t already open, and select All at the top of the panel.
12. Click an existing rule or style in the All Rules pane of the
CSS Styles panel to display its properties in the
Properties pane.
13. Return to the Google web fonts Use page, and copy the
name of the font family you want to use in your web page
from the list in Step 4 (Figure 8).
14. Return to Dreamweaver. In the CSS Styles panel, double-
click the rule to which you want to apply the Google web
font.
The CSS Rule Definition dialog box appears.
15. Paste the copied font-family name into the Font-Family
text box (Figure 3).
16. Select File > Save All.
17. Select File > Preview In Browser, and then select a
browser where you can preview the remote Google web
font (Figure 9).
Figure 5 Step 3 of the Use page, Google web fonts
Figure 6 Document toolbar in Dreamweaver
Figure 7 Link to Google web fonts in the head
section
Figure 8 Step 4 of the Use page, Google web fonts
Figure 9 Google web fonts used in headings

Adobe Dreamweaver Guide
© 2012 Adobe Systems Incorporated How to use CSS text styles 5
This document requires Adobe Dreamweaver CS6. Technical instructions may differ depending on your version.
To dowload and embed Google web fonts:
1. Visit the Google web fonts site at www.google.com/
webfonts.
2. You may be required to register
.
3. Search or browse the selection of font families; then click
the Add To Collection button next to each font you want
to use.
4. Click the Review button to compare and refine your
collection and to see the styles in a customizable sample
layout.
5. Click the Use button, and verify the settings.
6. Click the Download Your Collection link in the upper-
right corner of the Use page (Figure 10).
The Download The Fonts In Your Collection dialog box
appears (Figure 11).
7. Click the Download The Font Families In Your
Collection As A Zip-file link to download the files to
your computer.
8. Unzip the file and save to the location of your choice.
9. Open the folder containing the downloaded font and
make note of the file type.
It will have one of four types of web font extensions:
EOT, WOFF, TTF, or SVG. You will need this
information in the next few steps. The font in the
example folder is Bree Serif, Regular, and it is a TTF
font.
10. Switch to Dreamweaver.
11. Select Modify > Web Fonts.
The Web Fonts Manager dialog box appears (Figure 13).
Figure 10 Download your Collection link
Figure 11 Download The Fonts In Your Collection
dialog box
Figure 12 Downloaded fonts
Figure 13 Web Fonts Manager dialog box

Guide Adobe Dreamweaver
6 How to use CSS text styles © 2012 Adobe Systems Incorporated
This document requires Adobe Dreamweaver CS6. Technical instructions may differ depending on your version.
12. Click the Add Font button.
The Add Web Font dialog box appears (Figure 14).
13. Click the folder icon beside the file type of your
downloaded font, navigate to the location of the saved
font, and select it.
14. Click Open in the Open dialog box.
The font is added to the Add Web Font dialog box.
15. Click OK to close the Add Web Font dialog box.
The font is added to the Web Fonts Manager dialog box.
16. Click Done to close the Web Fonts Manager dialog box.
17. Open the CSS Styles panel (Window > CSS Styles), if it
isn’t already open, and select All at the top of the panel.
18. In the All Rules pane, double-click the rule to which you
want to apply the Google web font.
The CSS Rule Definition dialog box appears.
19. In the Font-Family menu, select the Google web font that
you downloaded and added.
20. Select File > Save All.
21. Select File > Preview In Browser, and then select a
browser where you can preview the embedded Google
web font (Figure 9).
Figure 14 Add Web Font dialog box
