
Oracle Financial Services Customer
Screening
Administration Guide
Release 8.0.8.2.0
September 2021
F22546-01

CUSTOMER SCREENING ADMINISTRATION GUIDE | 2
Customer Screening Administration Guide
Copyright © 2024 Oracle and/or its affiliates. All rights reserved.
This software and related documentation are provided under a license agreement containing
restrictions on use and disclosure and are protected by intellectual property laws. Except as expressly
permitted in your license agreement or allowed by law, you may not use, copy, reproduce, translate,
broadcast, modify, license, transmit, distribute, exhibit, perform, publish, or display any part, in any
form, or by any means. Reverse engineering, disassembly, or decompilation of this software, unless
required by law for interoperability, is prohibited.
The information contained herein is subject to change without notice and is not warranted to be error-
free. If you find any errors, please report them to us in writing.
If this is software or related documentation that is delivered to the U.S. Government or anyone
licensing it on behalf of the U.S. Government, then the following notice is applicable.
U.S. GOVERNMENT END USERS: Oracle programs, including any operating system, integrated
software, any programs installed on the hardware, and/or documentation, delivered to U.S.
Government end users are “commercial computer software” pursuant to the applicable Federal
Acquisition Regulation and agency-specific supplemental regulations. As such, use, duplication,
disclosure, modification, and adaptation of the programs, including any operating system, integrated
software, any programs installed on the hardware, and/or documentation, shall be subject to license
terms and license restrictions applicable to the programs. No other rights are granted to the U.S.
Government.
This software or hardware is developed for general use in a variety of information management
applications. It is not developed or intended for use in any inherently dangerous applications,
including applications that may create a risk of personal injury. If you use this software or hardware in
dangerous applications, then you shall be responsible to take all appropriate fail-safe, backup,
redundancy, and other measures to ensure its safe use. Oracle Corporation and its affiliates disclaim
any liability for any damages caused by use of this software or hardware in dangerous applications.
Oracle and Java are registered trademarks of Oracle and/or its affiliates. Other names may be
trademarks of their respective owners.
Intel and Intel Xeon are trademarks or registered trademarks of Intel Corporation. All SPARC
trademarks are used under license and are trademarks or registered trademarks of SPARC
International, Inc. AMD, Opteron, the AMD logo, and the AMD Opteron logo are trademarks or
registered trademarks of Advanced Micro Devices. UNIX is a registered trademark of The Open Group.
This software or hardware and documentation may provide access to or information about content,
products, and services from third parties. Oracle Corporation and its affiliates are not responsible for
and expressly disclaim all warranties of any kind with respect to third-party content, products, and
services unless otherwise set forth in an applicable agreement between you and Oracle. Oracle
Corporation and its affiliates will not be responsible for any loss, costs, or damages incurred due to
your access to or use of third-party content, products, or services, except as set forth in an applicable
agreement between you and Oracle.
For information on third party licenses, click here.

CUSTOMER SCREENING ADMINISTRATION GUIDE | 3
Document Control
Table 1: Document Control
Version Number
Revision Date
Change Log
8.0.8.2.15
April 2023
• Added chapter Configuring New Watchlist Summary Field
Name.
• Added security standards reference link for CS
screening in Real-Time Screening section.
• Added Reviewer user role information.
• Added Appendix O: Function Codes for User Groups
section.
• Added procedural step to change Customer Screening
Application URL in Real Time Screening in Configuring
the EDQ URL section.
8.0.8.2.13
March 2023
• Added Fix for Primary Key Constraints section.
8.0.8.2.9
May 2022
• Added Appendix N: User Group Customization section.
• Added Appendix M: Mapping the PMF Workflow for
Different Jurisdiction and domain section.
• Added Appendix L: Time Zone Configuration section.
• Added Appendix K: Invoking the PMF Workflow from
backend section.
• A new attribute value
ZP_POA_LOGGED_USER_ACTED_FIRST details to
the Appendix J: PMF Configurations for Pool of Analyst
section and removed the ZP_LOGGED_USER_ACTED
attribute.
8.0.8.2.7
April 2022
• Added the Attribute to Configure the Auto Refresh in
Queue Management, Data Quality Check and Sorting
Real-Time Watchlist Details sections.
8.0.8.2.6
March 2022
• Added the Appendix J: PMF Configurations for Pool of
Analyst section.
8.0.8.2.1
October 2021
• Added the Archiving a Queue section under the Queue
Management section.
• Added the Appendix H: Out Of Box process to move
Alerts from CS_ALERTS of one DB instance to
FCC_ZCS_ALERTS of another DB instance and Appendix
I: API to create the Alerts in the Zipper Alerts table
(FCC_ZCS_ALERTS) sections.
• Added the Appendix J: PMF Configurations for Pool of
Analyst section.

CUSTOMER SCREENING ADMINISTRATION GUIDE | 4
Version Number
Revision Date
Change Log
8.0.8.2.0
September 2021
• Added the new sections as mentioned below:
▪ Queue Management
▪ Due Date and Time Configuration
▪ Setting the Priority
▪ Security Mapping
▪ Generating Sanctioned Alerts
• Added the new batch name
Oracle_CS_Zipper_Processing and Description
in Table 3: Sequence of Batches to be Run. For more
information, see Scheduling the Customer Screening Run
Job.
• Added the 4
th
and 5
th
steps related to Customer
Screening Alert Management (CSAM) and Enterprise
Case Management (ECM) information in the Configuring
the EDQ URL section. For more information, see
Configuring the EDQ URL.
• Updated the screenshots and the content in the
Screening Watch List Records in Real-Time section.
8.0.8.1.8
February 2021
• Added the new field called identification Numbers to the
section 6.2.1.1 Field Descriptions under the Real-Time
Screening section.
8.0.8.1.4
December 2020
• Added steps to generate the bearer token in Appendix F:
Configurations for the Bearer Token.
8.0.8.1.0
October 2020
• Updated steps to configure watch list data for Dow Jones.
• Added steps to download watch list data for World-
Check.
8.0.8.1.0
November 2019
• Added an appendix which shows how to add a new field
in a web service.
8.0.8.1.0
August 2020
• Added an appendix which mentions the steps to split jobs
across multiple servers.
• Added an appendix which mentions the steps to view a
snapshot of a table in Enterprise Data Quality (EDQ).
8.0.8.0.4
April 2020
• Updated the Take Action screen in the Taking Action on
Customer Screening related Cases in Oracle Financial
Services ECM section.
8.0.8.0.1
February 2020
• Added a section that shows how database connections
can be done through WebLogic in the Establishing a
Database Connection using WebLogic section.
8.0.8.0.0
August 2019
• Added a note which mentions the users who must be
mapped to the Real-time access group in the Real-Time
Screening section.
8.0.8.0.0
July 2019
Created the guide.

CUSTOMER SCREENING ADMINISTRATION GUIDE | 5
Table of Contents
1 About This Guide .................................................................................................................. 10
1.1 Intended Audience ............................................................................................................................................................. 10
1.2 Access to Oracle Support ................................................................................................................................................. 10
1.3 How this Guide is Organized ........................................................................................................................................... 10
1.4 Where to Find More Information..................................................................................................................................... 11
1.5 Conventions Used in This Guide ..................................................................................................................................... 11
2 Introduction........................................................................................................................... 12
2.1 Architecture Overview ........................................................................................................................................................ 12
3 Getting Started ...................................................................................................................... 13
3.1 Accessing the Financial Services Analytical Applications Customer Screening Home Page ........................... 13
3.2 Managing the Oracle Financial Services Analytical Applications (OFSAA) Page ............................................... 14
3.3 Queue Management.......................................................................................................................................................... 14
3.3.1 List View .......................................................................................................................................................................... 15
3.3.2 Grid View ........................................................................................................................................................................ 16
3.3.3 Archiving a Queue ........................................................................................................................................................18
3.4 Troubleshooting Your Display .........................................................................................................................................19
3.4.1 Enabling JavaScript ..................................................................................................................................................... 19
3.4.2 Enabling Cookies .......................................................................................................................................................... 20
3.4.3 Enabling Temporary Internet Files ........................................................................................................................... 20
3.4.4 Enabling File Downloads ............................................................................................................................................ 20
3.4.5 Setting Printing Options ............................................................................................................................................. 20
3.4.6 Enabling the Pop-Up Blocker ..................................................................................................................................... 21
3.4.7 Setting Preferences ...................................................................................................................................................... 21
4 General Configurations ........................................................................................................ 23
4.1 Due Date and Time Configuration ................................................................................................................................. 23
4.2 Setting the Priority ............................................................................................................................................................. 26
4.3 Security Mapping ............................................................................................................................................................... 26
4.4 Preparing Watch List Data ............................................................................................................................................... 27

CUSTOMER SCREENING ADMINISTRATION GUIDE | 6
4.4.1 Example - Preparing the Accuity List ...................................................................................................................... 28
4.4.2 Example - Enable Phases for Download and Staging ......................................................................................... 28
4.5 Private Watch List Set Up ................................................................................................................................................. 29
4.6 Showing the Hidden Watch List Staged Data or Snapshots in the Server Console Interface ......................... 29
4.7 Analyzing Watch List Data ............................................................................................................................................... 30
4.7.1 Analyzing Data Quality............................................................................................................................................... 30
4.8 Configuring Match Rules and Clusters for Customers and External Entities ...................................................... 30
4.9 Real-Time and Batch Screening Set Up ......................................................................................................................... 31
4.10 Extracting the Output of Matches into CSV Files ........................................................................................................ 31
4.11 Filtering Watch List Data .................................................................................................................................................. 32
4.11.1 Enabling Watch List Filtering .................................................................................................................................... 32
4.11.2 Configuring Watch List Filtering ............................................................................................................................... 32
4.11.3 Primary Filters, Secondary Filters, and Filters for Linked Profiles .................................................................... 35
4.11.4 Setting Multiple Values for Primary and Secondary Filters ................................................................................ 36
4.11.5 Screening All Sanctions Data .................................................................................................................................... 41
4.11.6 Match Persistence and Flag Keys............................................................................................................................. 41
4.12 Risk Scoring in Watch Lists .............................................................................................................................................. 42
4.12.1 Adjusting the Risk Scores ........................................................................................................................................... 42
4.12.2 Editing the Risk Element Scores ............................................................................................................................... 43
4.13 Scheduling the Customer Screening Run Job............................................................................................................. 48
4.14 Loading Data ........................................................................................................................................................................ 51
4.14.1 Loading Data into the Customer Tables (Full Load) ............................................................................................. 51
4.14.2 Loading Data into the Customer Tables (Delta Load)......................................................................................... 52
4.14.3 Creating and Running Parallel Batches .................................................................................................................. 55
4.15 Configurations for General Data Protection Regulation (GDPR) ........................................................................... 60
4.16 Optional Configurations ................................................................................................................................................... 63
4.16.1 Data Quality Check ...................................................................................................................................................... 63
4.16.2 Sorting Real-Time Watchlist Details ........................................................................................................................64
5 Integrations with Enterprise Case Management ............................................................... 66
5.1 Case Class in ECM .............................................................................................................................................................. 66
5.2 Case Types under Case Class .......................................................................................................................................... 67
5.3 Case Correlation, Linked Cases, and Searching for Cases ....................................................................................... 67
5.4 Creating Workflows for Case Types ............................................................................................................................... 68

CUSTOMER SCREENING ADMINISTRATION GUIDE | 7
5.5 Workflow Diagrams ........................................................................................................................................................... 68
5.5.1 SAN and PRB Workflow .............................................................................................................................................. 68
5.5.2 PEP and EDD Workflow .............................................................................................................................................. 69
5.6 Taking Actions on Customer Screening-related Cases ............................................................................................ 69
5.7 Setting Thresholds for Case Priorities........................................................................................................................... 70
6 Real-Time Screening ............................................................................................................ 71
6.1 Configuring the EDQ URL ................................................................................................................................................ 73
6.2 Screening Watch List Records in Real-Time ................................................................................................................ 76
6.3 Running the Real-Time Screening Job .......................................................................................................................... 81
6.4 Adding a New Field in a Webservice .............................................................................................................................. 82
7 Batch Screening ................................................................................................................... 87
7.1 Configuring the EDQ URL ................................................................................................................................................ 87
7.2 Staging Database Connection Details ........................................................................................................................... 88
7.3 Enabling Customer and External Entity Tables ...........................................................................................................91
7.4 Data Preparation in FCDM ............................................................................................................................................... 92
7.4.1 Establishing a JDBC Database Connection using WebLogic ............................................................................. 92
7.5 Analyzing the Data Quality of Customer Data and External Entity ........................................................................ 95
7.5.1 Data Quality Errors ...................................................................................................................................................... 99
7.6 Extract Transform Load (ETL) Database Connection Details ................................................................................ 100
7.7 Running the Batch Screening Job ................................................................................................................................ 103
7.8 Generating Alerts ............................................................................................................................................................. 104
8 Appendix A: Screening Non-Latin Character Sets ........................................................... 107
8.1 Original Script Matching ................................................................................................................................................. 108
9 Appendix B: Reference Data Tables for Watch Lists ........................................................ 109
10 Appendix C: Preconfigured Watch List Information ......................................................... 111
10.1 HM Treasury Watch List ................................................................................................................................................... 111
10.2 OFAC Watch List ................................................................................................................................................................. 111
10.3 EU Watch List ..................................................................................................................................................................... 112
10.4 UN Consolidated Watch List ........................................................................................................................................... 112
10.5 World-Check Watch List .................................................................................................................................................. 112
10.6 Dow Jones Watch List ...................................................................................................................................................... 113

CUSTOMER SCREENING ADMINISTRATION GUIDE | 8
10.7 Dow Jones Anti-Corruption Watch List ....................................................................................................................... 116
10.8 Accuity Watch List ............................................................................................................................................................. 119
10.8.1 Using the Accuity Group File ................................................................................................................................... 120
10.8.2 Configuring the .sh File .............................................................................................................................................. 122
10.9 Delta Watch List Configurations for the Dow Jones Watch List ............................................................................ 125
10.9.1 Configurations for the Full and Delta Watch Lists ............................................................................................. 126
10.9.2 Running the Full Watch list ...................................................................................................................................... 126
10.9.3 Running the Delta Watch List ..................................................................................................................................127
10.9.4 Merging the Delta Watch List to the Full Watch List ..........................................................................................127
10.10 Delta Watch List Configurations for the World-Check Watch List ....................................................................... 128
10.10.1 Configurations for the Full and Delta Watch Lists ............................................................................................. 129
10.10.2 Running the Full Watch list ...................................................................................................................................... 129
10.10.3 Running the Delta Watch List ................................................................................................................................. 130
10.10.4 Merging the Delta Watch List to the Full Watch List .......................................................................................... 131
11 Appendix D: Splitting Jobs Using Multiple EDQ Servers ................................................. 132
11.1 Adding Input Parameters for the CallEDQ Task ........................................................................................................ 141
12 Appendix E: Viewing Snapshots of Tables in EDQ ........................................................... 146
13 Appendix F: Configurations for the Bearer Token ........................................................... 149
13.1 Generate User Password ................................................................................................................................................ 149
13.2 Change Token Validity ..................................................................................................................................................... 151
13.3 Generate Token ................................................................................................................................................................. 152
13.4 Send Requests .................................................................................................................................................................. 154
14 Appendix G: Error Logs ...................................................................................................... 156
14.1 EDQ Failure ........................................................................................................................................................................ 156
14.2 Data Model Failure ........................................................................................................................................................... 156
14.3 Batch Failure ...................................................................................................................................................................... 156
14.4 DM Utility Failure .............................................................................................................................................................. 156
15 Appendix H: Out Of Box process to move Alerts from CS_ALERTS of one DB instance to
FCC_ZCS_ALERTS of another DB instance .............................................................................. 157
16 Appendix I: API to create the Alerts in the Zipper Alerts table (FCC_ZCS_ALERTS) ..... 160

CUSTOMER SCREENING ADMINISTRATION GUIDE | 9
17 Appendix J: PMF Configurations for Pool of Analyst ...................................................... 161
17.1 List of Attributes Passed to Workflow ......................................................................................................................... 169
17.2 Attribute to Configure the Auto Refresh in Queue Management ......................................................................... 171
18 Appendix K: Invoking the PMF Workflow from backend ................................................ 172
19 Appendix L: Time Zone Configuration .............................................................................. 174
20 Appendix M: Mapping the PMF Workflow for Different Jurisdiction and domain ....... 188
21 Appendix N: User Group Customization ........................................................................... 189

ABOUT THIS GUIDE
INTENDED AUDIENCE
CUSTOMER SCREENING ADMINISTRATION GUIDE | 10
1 About This Guide
This guide explains the concepts of Oracle Financial Services Customer Screening (OFS CS) and
provides step-by-step instructions to navigate to the Customer Screening web pages, analyzing,
acting on, and researching the business information.
1.1 Intended Audience
The instructions in this guide are written with the assumption that the user has a good understanding
of Enterprise Case Management (ECM), Financial Crime Data Model (FCDM), Oracle Enterprise Data
Quality (OEDQ) and has knowledge of Sanctions (SAN), Politically Exposed Persons (PEP), Enhanced
Due Diligence (EDD), and Country Prohibition Screening (PRB). The Customer Screening User Guide is
designed for the following users:
• Analyst: This user works on the alerts within the application frequently. This user’s specific role
determines what they can view and perform within the application.
• Supervisor: This user works on the alerts within the application daily and is typically a higher-
level Analyst or Compliance Officer.
1.2 Access to Oracle Support
Oracle customers have access to electronic support through My Oracle Support (MOS). For
information, visit http://www.oracle.com/pls/topic/lookup?ctx=acc&id=info
Or visit http://www.oracle.com/pls/topic/lookup?ctx=acc&id=trs if you are hearing-impaired.
1.3 How this Guide is Organized
The Customer Screening User Guide includes the following chapters:
• Introduction provides an overview of Customer Screening and the architecture used.
• Getting Started explains common elements of the interface and how to configure the Financial
Services Analytical Applications Customer Screening home page.
• General Configurations provides information on how to prepare watch list data, configure the
different property files in Customer Screening, how to download the full and delta watch lists,
how to filter watch list data, and how to configure General Data Protection Regulations (GDPR)
for users.
• Integrations with Enterprise Case Management provides information on the different cases
classes used for Customer Screening in Enterprise Case Management, view the correlation
rules, what cases are linked to the case being investigated, and the workflows used for the
different case types.
• Real-Time Screening shows the real-time user interface used for Customer Screening and how
to run the real-time screening job using the Financial Data Crime Model (FCDM).
• Batch Screening provides information on how to prepare and analyze data and how to run the
batch screening job using the Financial Data Crime Model (FCDM).

ABOUT THIS GUIDE
WHERE TO FIND MORE INFORMATION
CUSTOMER SCREENING ADMINISTRATION GUIDE | 11
• Appendix A: Screening Non-Latin Character Sets provides information on how to perform
matching for non-Latin data.
• Appendix B: Risk Scoring Reference Data shows the different reference data tables used to
calculate risk scores in Customer Screening.
• Appendix C: Preconfigured Watch List Information provides information on the different watch
lists used in Customer Screening.
1.4 Where to Find More Information
For more information about Oracle Financial Services Customer Screening, see the following
Customer Screening application documents, which can be found on the Oracle Help Center page:
• Oracle Financial Services Customer Screening Matching Guide
• Oracle Financial Services Customer Screening Data Interfaces Guide
To find additional information about how Oracle Financial Services solves real business problems, see
our website at Oracle for Financial Services home page.
1.5 Conventions Used in This Guide
The following table mentions the conventions used in this guide.
Table 2: Conventions Used
Conventions
Meaning
Italics
Names of books as references
Emphasis
Substitute input values
Bold
Menu names, field names, options, button names
Commands typed at a prompt
User input
Monospace
Directories and subdirectories
File names and extensions
Code sample, including keywords and variables within text and as separate paragraphs,
and user-defined program elements within text
Hyperlink
Hyperlink type indicates the links to external websites, internal document links to
sections.
Asterisk (*)
Mandatory fields in User Interface
<Variable>
Substitute input value
INTRODUCTION
ARCHITECTURE OVERVIEW
CUSTOMER SCREENING ADMINISTRATION GUIDE | 12
2 Introduction
Oracle Financial Services Customer Screening (OFS CS) enables organizations to effectively and
efficiently screen their customers so that they can successfully meet anti-bribery, anti-corruption,
export control, and other legal regulations as well as to meet anti-money laundering and counter-
terrorist financing legislations. Screening customers enables organizations to keep track of and avoid
the risk of being exposed to suspicious or sanctioned individuals and organizations. Customer
Screening uses the Oracle Enterprise Data Quality (OEDQ) platform to manage watch list data and
apply match rules, Process Modelling Framework (PMF) to generate alerts, and Enterprise Case
Management (ECM) to investigate cases generated from the alerts based on the match rules.
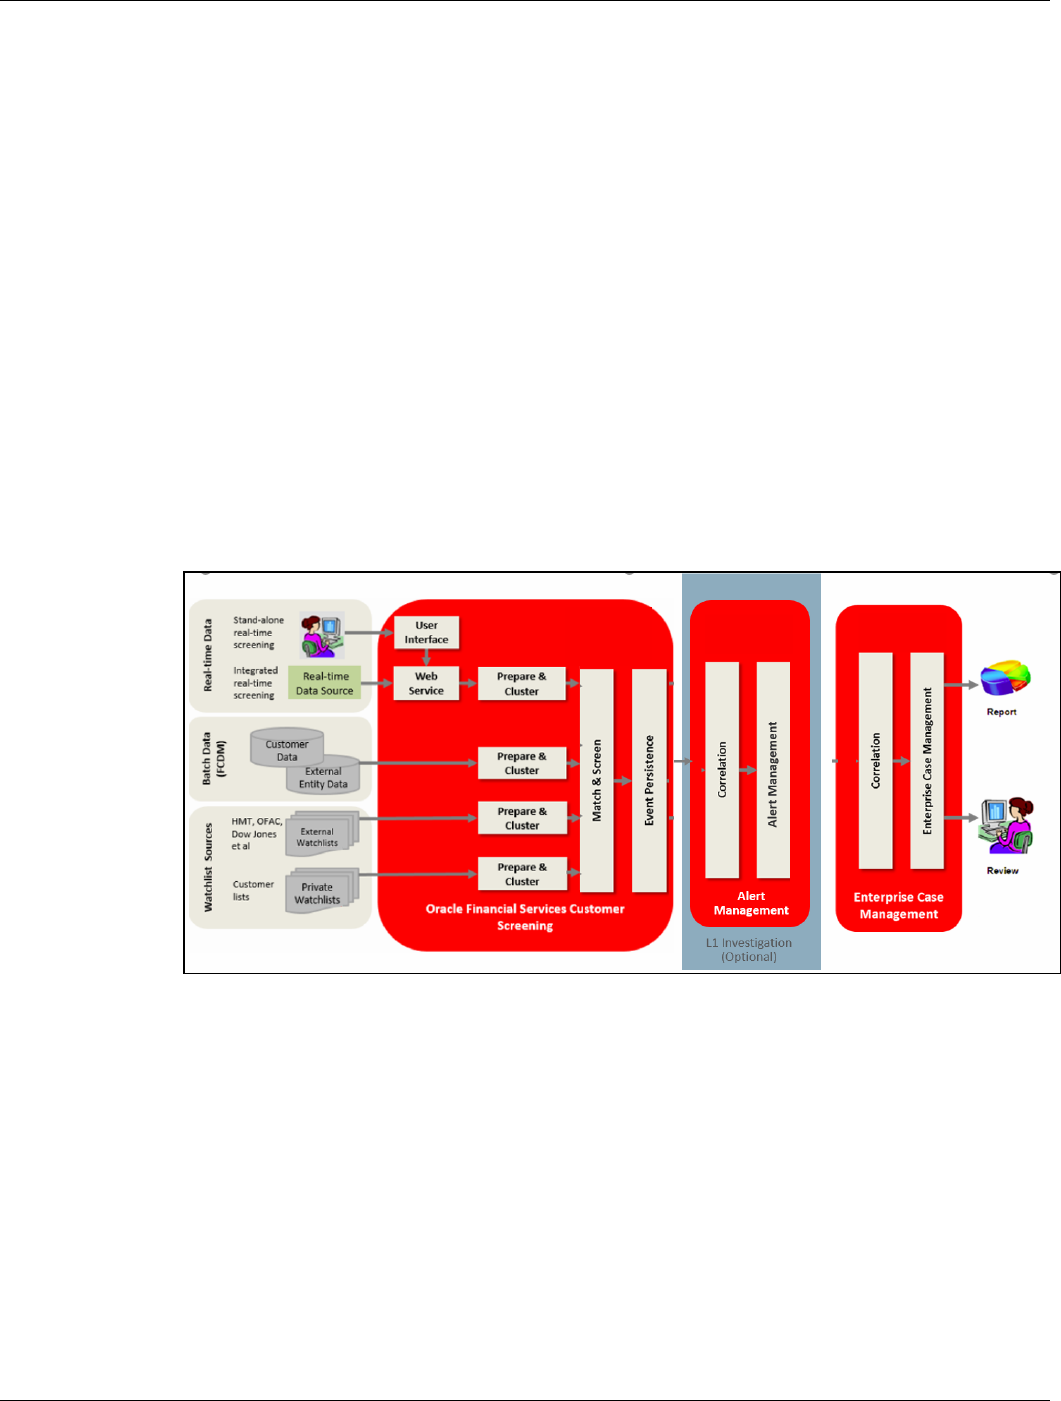
2.1 Architecture Overview
This image shows the movement of data from a real-time data source, data from watch list sources
such as OFAC, HM Treasury, and Dow Jones. This data then moves to the Customer Screening user
interface where it is prepared and screened. Finally, cases are generated based on the matches in
Enterprise Case Management (ECM). We have also introduced Alert Management for L1 investigation
for rapid dispositioning of Alerts (optional).
Figure 1: Customer Screening Architecture
GETTING STARTED
ACCESSING THE FINANCIAL SERVICES ANALYTICAL APPLICATIONS CUSTOMER SCREENING HOME PAGE
CUSTOMER SCREENING ADMINISTRATION GUIDE | 13
3 Getting Started
This chapter provides step-by-step instructions to login to the Oracle Financial Services Customer
Screening (OFS CS) application and the different features of the application.
3.1 Accessing the Financial Services Analytical Applications
Customer Screening Home Page
Access to the Customer Screening application depends on the Internet or Intranet environment. The
system administrator provides the intranet address uniform resource locator (URL), User ID, and
Password.
NOTE
The first time you log in, you will be prompted to change your
password.
To access the Oracle Financial Services Analytical Applications Customer Screening home page,
follow these steps:
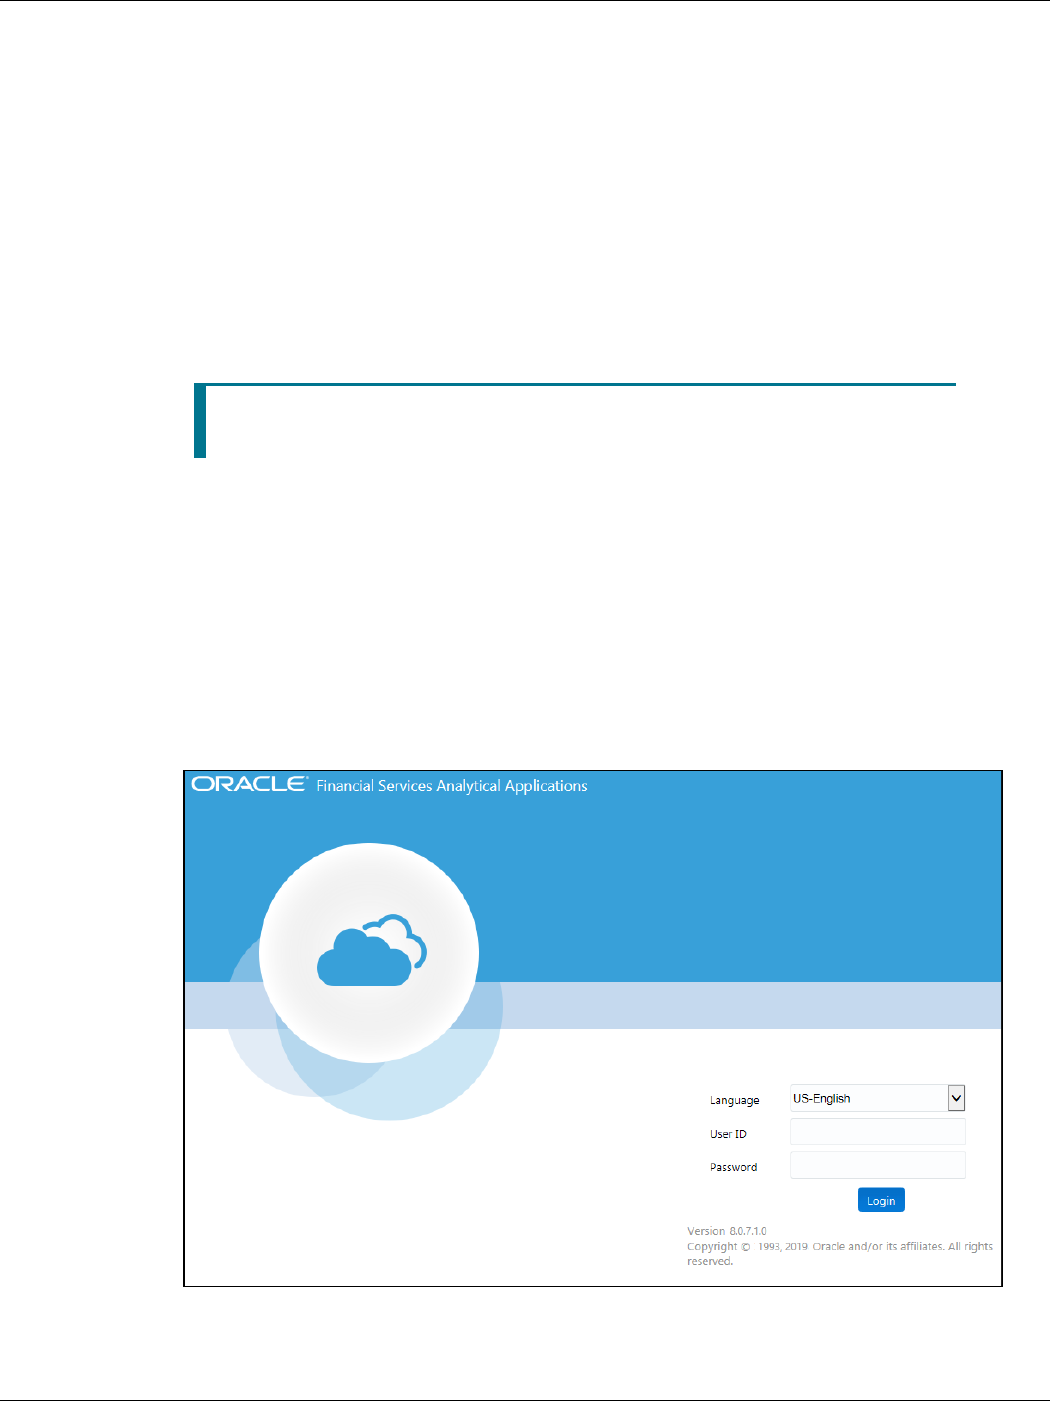
1. Enter the URL into your browser using the following format:
<scheme/ protocol>://<ip address/ hostname>:<port>/<context-
name>/login.jsp
For example: https://myserver:9080/ofsaaapp/login.jsp
The Oracle Financial Services Analytical Applications (OFSAA) login page is displayed.
Figure 2: Oracle Financial Services Analytical Applications (OFSAA) Login Page

GETTING STARTED
MANAGING THE ORACLE FINANCIAL SERVICES ANALYTICAL APPLICATIONS (OFSAA) PAGE
CUSTOMER SCREENING ADMINISTRATION GUIDE | 14
2. Select the language from the Language drop-down list. This allows you to use the application
in the language of your selection.
3. Enter your User ID and Password in the respective fields.
4. Click Login. The Financial Services Analytical Applications Customer Screening home page
is displayed.
Figure 3: Financial Services Analytical Applications Customer Screening Home Page
Click the Financial Services Analytical Applications Customer Screening tile to open the OFS CS
home page.
3.2 Managing the Oracle Financial Services Analytical
Applications (OFSAA) Page
From the OFSAA application page, you can access the menus for the different message
configurations. For information on the different menus, see Oracle Financial Services Analytical
Applications Infrastructure Administration and Configuration Guide.
NOTE
To create, edit user definitions, view, manage, modify, and
delete user information, see the User Maintenance section in
the Oracle Financial Services Advanced Analytical Applications
Infrastructure User Guide 8.1.1.0.0.
3.3 Queue Management
Queue Management is a common dashboard where the following users can see queues related to CS
and TF that are created by the Queue Administrator and the system (Out Of Box):
• Reviewer

GETTING STARTED
QUEUE MANAGEMENT
CUSTOMER SCREENING ADMINISTRATION GUIDE | 15
• Analyst
• Supervisor
• Senior Supervisor
• Queue Administrator
You can view the Queue details in the following formats:
• List View
• Grid View
By default, queue details are displayed in the List View. Only queue admin can assign the user groups
for the queues in the Grid View.
For more information on Queue Administrator, see the OFS Sanctions Queue Management User
Guide.
3.3.1 List View
1. Log in to the application as Reviewer, Analyst, Supervisor, or Senior Supervisor.
2. Select the Financial Services Analytical Applications Transaction Filtering.
3. From the Application Navigation List, select Queue Management.
You can select the hamburger icon to view the Queue List for All Teams in List View.
By default, queue details are displayed in the List View.
Queue List displays the queues assigned to all user groups and the value. All Team is selected in the
drop-down list and is disabled. It is displayed as the title for Queue List.
Figure 3: Queue List in List View
The following details are displayed in the List View for All Team:
• Queue Name
• User Group names (that are assigned by the Queue Administrator)
• Date Time Created By (For example, 09/09/2021 14:06:39 by QADMIN/SYSTEM)
• Queue Action
You can view ten queues in Queue List and use the navigation to view the next set of queues.

GETTING STARTED
QUEUE MANAGEMENT
CUSTOMER SCREENING ADMINISTRATION GUIDE | 16
You can perform the following actions on each queue:
• +Add Queue: Click button top-right in the Queue List to add a new queue. (only for
Queue Admin.)
• Delete: Click the Ellipsis menu and then select Delete and click Yes to delete the queue.
• Edit: Click the Ellipsis menu and then select Edit to edit the queue details and click Finish.
• Open: Click the Ellipsis menu and then select Open to open the queue to see its details.
• Assign: Click the Ellipsis menu and then select Assign to assign the queue to Groups. (only for
Queue Admin)
▪ Select the Groups to assign the queue.
▪ Click Assign.
You can change the order of queues are as follows:
• According to your requirement, you can select the Queue to change the order, drag and drop in
the list.
• Perform the following steps:
Select the Queue and right-click. The menu options are displayed as Cut, Paste Before, and Paste
After. The only Cut is enabled.
Select Cut.
Locate the cursor wherever it needs to be added and right-click. The menu options are Cut, Paste
Before, and Paste After. Only Paste Before and Paste After are enabled.
Select the Paste Before or Paste After to place the Queue.
3.3.2 Grid View
You can select the thumbview icon to view the Queue List for All Teams in Grid View.
Queue List displays the queues assigned to all user groups and the value. All Team is selected in the
drop-down list and is disabled. It is displayed as the title for Queue List.
Figure 4: Queue List in Grid View

GETTING STARTED
QUEUE MANAGEMENT
CUSTOMER SCREENING ADMINISTRATION GUIDE | 17
NOTE
Only Reviewer/Analyst/Supervisor/Senior Supervisor can view
the number of alerts details in each Queue.
The Queue List appears in doughnut charts displays each cell's data as a slice of a doughnut. A pie
chart data visualization uses a single circle divided into "slices," each slice representing a numerical
proportion of the whole circle's value. Hover over the slices to see the details of the Series and the
Value of the queue.
By default, the color-coding displayed for three priorities of the alerts and the Total numeric value
indicates the number of alerts in that Queue.
The following are the only available priorities in the application:
• High
• Medium
• Low
And also priority configuration for all the alerts to be defined before customer screening.
You can view six queues in Queue List and use the navigation to view the next set of queues.
You can perform the following actions on each queue:
• +Add Queue: Click button top-right in the Queue List to add a new queue. (only for
Queue Admin.)
• Delete: Click the Ellipsis menu and then select Delete and click Yes to delete the queue.
• Edit: Click the Ellipsis menu and then select Edit to edit the queue details and click Finish.
• Open: Click the Ellipsis menu and then select Open to open the queue to see its details.
• Assign: Click the Ellipsis menu and then select Assign to assign the queue to Groups. (only for
Queue Admin)
▪ Select the Groups to assign the queue.
▪ Click Assign.

GETTING STARTED
QUEUE MANAGEMENT
CUSTOMER SCREENING ADMINISTRATION GUIDE | 18
3.3.3 Archiving a Queue
To archive inactive queues, follow these steps:
1. Log on to the Customer Screening application.
2. Click Common Tasks, then click Rule Run Framework, and then click Process. The Process
page appears.
3. Search for Queue in the Code field and select QueueArchive.
Figure 36: Process Page
4. Click Edit . The Process page opens in Edit mode.
Figure 37: Process Definition (Edit Mode)
5. Select the QueueArchival object and then select Component.
6. In the Parameters window, select the QueuArchival task and then click drop-down list .
By default the parameter value will be selected as “TF”. Change the parameter to “CS”.
Figure 40: Component Selector Window

GETTING STARTED
TROUBLESHOOTING YOUR DISPLAY
CUSTOMER SCREENING ADMINISTRATION GUIDE | 19
7. Click OK to close the Parameters window.
8. Click OK.
9. Click Save.
A confirmation message appears, click Yes to save the definition as a new version. A successful
message appears, click Close.
3.4 Troubleshooting Your Display
If you experience problems logging into Oracle Financial Services Customer Screening or with your
display, the browser settings may be incompatible with running OFSAA applications. The following
sections provide instructions to set your Web display options for OFSAA applications.
3.4.1 Enabling JavaScript
This section describes how to enable JavaScript using the Scripting setting. To do this, follow these
steps:
1. Navigate to the Tools menu.
2. Click Internet Options. The Internet Options dialog box is displayed.
3. Click the Security tab and then click Local Intranet.
4. Click Custom Level. The Security Settings dialog box is displayed.
5. In the Settings list and under the Scripting setting, enable all options.

GETTING STARTED
TROUBLESHOOTING YOUR DISPLAY
CUSTOMER SCREENING ADMINISTRATION GUIDE | 20
6. Click OK, then click OK again to exit the Internet Options dialog box.
3.4.2 Enabling Cookies
Cookies must be enabled. If you have problems troubleshooting your display, contact your System
Administrator.
3.4.3 Enabling Temporary Internet Files
Temporary Internet files are pages that you view on the Internet and store in a folder for quick viewing
later. You must adjust this setting to always check for new versions of a stored page.
To enable Temporary Internet Files, follow these steps:
1. Navigate to the Tools menu.
2. Click Internet Options. The Internet Options dialog box is displayed.
3. In the General tab, click Settings. The Settings dialog box is displayed.
4. Select Every visit to the page. Selecting this option ensures that the temporary files are
cleared every time.
5. Click OK, then click OK again to exit the Internet Options dialog box.
3.4.4 Enabling File Downloads
This section describes how to enable file downloads with the following steps:
1. Navigate to the Tools menu.
2. Click Internet Options. The Internet Options dialog box is displayed.
3. Click the Security tab and then click Local Intranet.
4. Click Custom Level. The Security Settings dialog box is displayed.
5. In the Downloads section, ensure that the Enable check box is selected for all options.
6. Click OK, then click OK again to exit the Internet Options dialog box.
3.4.5 Setting Printing Options
This section explains how to enable printing background colors and images with the following steps:
1. Navigate to the Tools menu.
2. Click Internet Options. The Internet Options dialog box is displayed.
3. In Settings, click the Advanced tab.
4. In the Printing tab, click Print background colors and images.
5. Click OK to exit the Internet Options dialog box.
NOTE
For best display results, use the default font settings in your
browser.
GETTING STARTED
TROUBLESHOOTING YOUR DISPLAY
CUSTOMER SCREENING ADMINISTRATION GUIDE | 21
3.4.6 Enabling the Pop-Up Blocker
You may have trouble running the Customer Screening application when the IE Pop-up Blocker is
enabled. It is recommended to add the URL of the application to the list of allowed sites in the Pop-up
Blocker Settings in the IE Internet Options.
To enable the Pop-up Blocker, follow these steps:
1. Navigate to the Tools menu.
2. Click Internet Options. The Internet Options dialog box is displayed.
3. Click the Privacy tab. In the Pop-up Blocker setting, select Turn on Pop-up Blocker.
4. Click Settings to open the Pop-up Blocker Settings dialog box.
5. In the Pop-up Blocker Settings dialog box, enter the URL of the application in the text area.
6. Click Add. The URL appears in the Allowed Sites list.
7. Click Close, then click Apply to save the settings.
8. Click OK to exit the Internet Options dialog box.
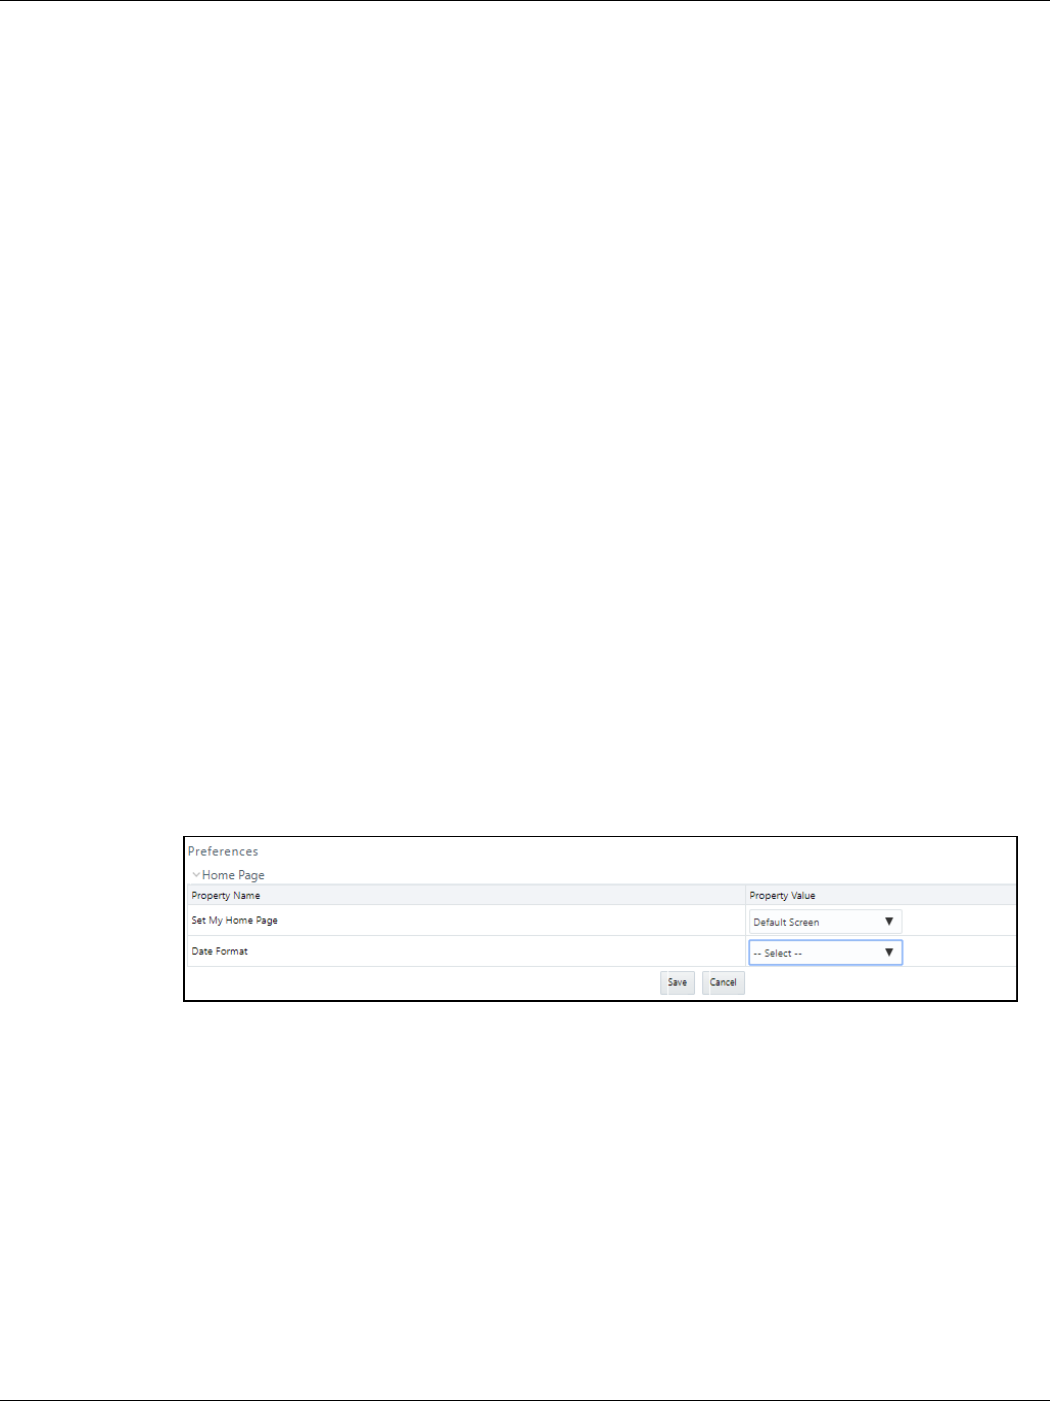
3.4.7 Setting Preferences
Use the Preferences section to set the Financial Services Analytical Applications Customer
Screening home page.
To access this section, follow these steps:
1. In the Financial Services Analytical Applications Customer Screening home page, select
Preferences from the user name drop-down list to open the Preferences page.
Figure 5: Preferences Page
2. In the Set My Home Page drop-down list, select the window that you want to view when you
log in.
When a new application is installed, the related window for that application is found in the drop-
down list.
3. In the Date Format drop-down list, select the date format that you want to see. The options
available are dd/mm/yyyy or mm/dd/yyyy.
4. Click Save to save your preferences.

GETTING STARTED
TROUBLESHOOTING YOUR DISPLAY
CUSTOMER SCREENING ADMINISTRATION GUIDE | 22

GENERAL CONFIGURATIONS
DUE DATE AND TIME CONFIGURATION
CUSTOMER SCREENING ADMINISTRATION GUIDE | 23
4 General Configurations
Some configurations must be done before screening customer or external entity data, such as
configuring run profiles to control elements of the watch lists and how screening is performed,
preparing private watch lists using the Private List Interface (PLI) and use them for screening,
analyzing watch list data, configuring match rules and clusters, configuring real-time and batch
screening, configuring risk scores in watch lists and scheduling the Customer Screening run job. You
can also configure the delta watch lists for the Dow Jones watch list, enable the General Data
Protection Regulation (GDPR), and enable or disable the Data Quality (DQ) check.
The Watch List Management, Customer Screening, External Entity, and Real-time screening property
files can be configured using run profiles in the FICDB/conf directory. You can use run profiles to
specify the configuration settings that will override the default settings.
The following run profiles are available in the
<domain_name>/edq/oedq.local.home/runprofiles/ directory when you log in to the
WinSCP server:
• watch list-management.properties
• customer-screening.properties
• external-entity-screening.properties
• customer-screening-real-time.properties
The watch list-management.properties run profile controls the following attributes:
• which watch lists are downloaded
• how filtering is applied to the watch lists
• how to apply the Data Quality check to the watch lists
The customer-screening.properties and external-entity-screening.properties run
profiles control the screening of customers and external entities respectively in batches.
The customer-screening-real-time.properties run profile controls the screening of
customers in real-time.
4.1 Due Date and Time Configuration
Users with the Customer Screening Administrator role can use the Due Date and Time Configuration
section to set the alerts' due date and time. The alerts will be prioritized based on these configuration
values.
NOTE
The Due Date and Time Configuration is applicable only for
Alert Management in the L1 investigation.
To access Due Date and Time Configuration section, follow these steps:
1. Click the hamburger icon to view the Application Navigation List.

GENERAL CONFIGURATIONS
DUE DATE AND TIME CONFIGURATION
CUSTOMER SCREENING ADMINISTRATION GUIDE | 24
2. From the Application Navigation List, select Due Date and Time Configuration. The Due
Date and Time Configuration page appears.
Figure 6: Due Date and Time Configuration
3. Provide details in the following mandatory fields in Table 3:
Table 3: Conventions Used
Fields
Description
Jurisdiction
Select the jurisdiction value from the drop-down list.
Business Domain
Select the business domain to which the individual or entity belongs to.
Entity Type
Select the Entity Type as Customer, External Entity or Real-Time from the drop-down
list.
Alert Type
Select the Alert Type value from the drop-down list. The values appear based on the
selected entity type.
Priority
Select the alert priority value from the drop-down list.
Due Date
Select the due date values for the alert.
4. Click Add. The Due Date Configuration is added to the list.
▪ Click Reset if you want to clear all the fields and enter new values.
Figure 7: Due Date and Time Configuration

GENERAL CONFIGURATIONS
DUE DATE AND TIME CONFIGURATION
CUSTOMER SCREENING ADMINISTRATION GUIDE | 25
5. You can perform the following actions on the existing configurations:
▪ Update: Select the configuration from the list, change any field values, and then click
Update.
▪ Remove: Select the configuration from the list and then click Remove.
▪ Reset: Select the configuration from the list and then click Reset to reset the given field
values.
NOTE
If the Due Date is not configured, the alerts will be prioritized
based on the default configuration with Due Date as 120 days.
You can reset the default Due Date with the
CS_appln_params table.
6. To change the Default Due Date configuration, you have to access the Atomic Schema and
access the CS_appln_params table and change the ZCS_DEFUALT_DUE_DATE parameter
value.
Figure 8: CS_appln_params table

GENERAL CONFIGURATIONS
SETTING THE PRIORITY
CUSTOMER SCREENING ADMINISTRATION GUIDE | 26
4.2 Setting the Priority
The Setting the Priority section describes how to set the alert priority as per your requirement. To set
the priority of the alert, follow these steps.
1. Access the Atomic Schema and access the FCC_ZCS_ALERT_PRIORITY_CONF table.
2. Change the following parameter values:
NOTE
Setting the Priority is applicable only for Alert Management in
the L1 investigation.
▪ n_alert_priority_min_score
▪ n_alert_priority_max_score
▪ v_jrsdcn_cd
▪ v_bus_dmn_list_tx
Figure 9: FCC_ZCS_ALERT_PRIORITY_CONF table
4.3 Security Mapping
The Security Mapping section describes how to change the security mapping. To change the security
mapping, follow these steps.
1. Access the Atomic Schema and access the FCC_ZCS_SECURITY_ATTR_GRP_MAP table.
2. Provide the values for the following columns:
NOTE
The Security Mapping is applicable only in the L1 Investigation
for Alert Management.
▪ V_GROUP_CODE
▪ V_JRSDCN_CD
▪ V_BUS_DMN_LIST_TX
▪ V_ALERT_TYPE

GENERAL CONFIGURATIONS
PREPARING WATCH LIST DATA
CUSTOMER SCREENING ADMINISTRATION GUIDE | 27
▪ V_STATUS
The sample data is provided in the installer.
Figure 10: FCC_ZCS_SECURITY_ALERT_GRP_MAP table
4.4 Preparing Watch List Data
Customer Screening is preconfigured to handle reference data from the following sources:
• HM Treasury
• OFAC
• EU consolidated list
• UN consolidated list
• World-Check
• Dow Jones Watch list
• Dow Jones Anti-Corruption List
• Accuity
You can also use your private watch list using the Private List Interface (PLI). For more information,
see The Private List Interface (PLI) chapter in the Oracle Financial Services Data Interfaces Guide.
NOTE
1. Watch lists can be downloaded automatically by setting
the appropriate values in the run profile, or by
downloading the watch list from the watch list provider’s
website. For information on downloading the watch lists,
see Appendix C: Pre-Configured Watch List Information.
2. The first time a watch list is downloaded, the staging value
must be set to Y. This ensures that data in the staging
tables is refreshed every time the watch list is
downloaded.
3. The Accuity, Dow Jones, Dow Jones Anti-Corruption, and
World-Check watch lists are provided as paid services. To
use a watch list, you must register for an account on the
watch list provider’s website.

GENERAL CONFIGURATIONS
PREPARING WATCH LIST DATA
CUSTOMER SCREENING ADMINISTRATION GUIDE | 28
4.4.1 Example - Preparing the Accuity List
This example describes how to edit the watch list-management.properties run profile to allow
you to download and configure the Accuity list. The run profile is available in the
<domain_name>/edq/oedq.local.home/runprofiles/ directory when you log in to the
WinSCP server.
NOTE
You can also use the steps provided to download and
configure the other watch lists.
4.4.2 Example - Enable Phases for Download and Staging
This example describes how to edit the watch list-management.properties run profile to allow
you to download and configure the Accuity list.
To automatically download the Accuity list, set the following values in the watch list-
management.properties run profile:
phase.ACY\ -\ Download.enabled = Y
phase.ACY\ -\ Stage\ reference\ lists.enabled = Y
To manually download the Accuity watch list using the Oracle Enterprise Data Quality (OEDQ) server,
you must first set phase.ACY\ -\ Download.enabled and phase.ACY\ -\ Stage\
reference\ lists.enabled = N and click
sftp://username:pass[email protected]/PIDGWL.ZIP to connect to the WinSCP client. Enter
your user name and password and download the watch list from the
config/landingarea/Accuity directory.
If the OEDQ server is connected to the internet through a proxy server, you must provide values for
the following attributes in the proxy server:
• proxy_host. For example, proxy.example.microsoft.com.
• proxy_port. For example, 80.
• proxy_username. For example, username.
• proxy_password. For example, password.
4.4.2.1 Filtering
To prepare the Accuity list without filtering, set the following value in the watch list-
management.properties run profile:
phase.ACY\ -\ Prepare\ without\ filtering.enabled = Y
To prepare the Accuity list with filtering, set the following values in the watch list-
management.properties run profile:
phase.ACY\ -\ Prepare\ with\ filtering\ (Part\ 1).enabled = Y
phase.ACY\ -\ Prepare\ with\ filtering\ (Part\ 2).enabled = Y

GENERAL CONFIGURATIONS
PRIVATE WATCH LIST SET UP
CUSTOMER SCREENING ADMINISTRATION GUIDE | 29
4.5 Private Watch List Set Up
Oracle Financial Services Customer Screening is preconfigured to work with commercially-available
and government-provided watch lists. However, you can also screen data against your private watch
lists. Sample private watch lists are provided in the config/landingarea/Private directory for
individuals and entities in the privateindividuals.csv and privateentities.csv files
respectively.
NOTE
OEDQ release 12c has a base config folder and a local config folder.
The base config folder is called oedqhome and the local config
folder is called oedqlocalhome. The names can differ in some
cases. For example, dots or underscores can be used in the names,
such as oedq_local_home.
To screen data against a private watch list, you must first replace the data in the ready-to-use files
with your data and then enable the private watch list properties in the watch list-
management.properties run profile.
To replace the data, replace the data in the privateindividuals.csv and
privateentities.csv files with your private watch list data.
NOTE
The files must be saved in UTF-8 format.
To enable the staging and preparation of the private watch list in the watch list-
management.properties run profile, follow these steps:
1. Set phase.PRIV\ -\ Stage\ reference\ lists.enabled = Y to move your private
watch list data to the staging tables.
2. Set phase.PRIV\ -\ Prepare\ without\ filtering.enabled = Y to prepare the
private watch list without filtering.
3. Set phase.PRIV\ -\ Prepare\ with\ filtering\ (Part\ 1).enabled = Y and
phase.PRIV\ -\ Prepare\ with\ filtering\ (Part\ 2).enabled = Y to prepare
the private watch list with filtering.
4.6 Showing the Hidden Watch List Staged Data or
Snapshots in the Server Console Interface
The following staged data and snapshots are hidden in the Server Console interface by default:
• Watch list snapshots
• Intermediate filtered watch list staged data
• Centralized Reference Data staged data or snapshots
To show this data, set the corresponding visibility property value in the run profile to Y.

GENERAL CONFIGURATIONS
ANALYZING WATCH LIST DATA
CUSTOMER SCREENING ADMINISTRATION GUIDE | 30
For example, to view all Accuity watch list snapshots generated during Watch list Management, set the
following properties in the watch list-management.properties run profile. The run profile is
available in the <domain_name>/edq/oedq.local.home/runprofiles/ directory when you log
in to the WinSCP server.
stageddata.ACY\Sources.visible = Y
stageddata.ACY_All.visible = Y
stageddata.ACY_Sources.visible = Y
4.7 Analyzing Watch List Data
Customer Screening has a process called Data Quality (DQ) that checks the quality of the downloaded
watch list data which is later used for screening. This process can be run independently of the watch
list screening process.
4.7.1 Analyzing Data Quality
Before you analyze your watch list data, follow these steps:
1. Ensure that your data is loaded into FCDM and the watch list-screening project has the
correct database parameters.
2. Run the CS_EDQ_Watch list_Analyze job. The job checks your watch list data for any
quality issues that affect have a negative impact on the screening process.
To analyze the data for watch lists, set the following properties in the watch list-
management.properties run profile:
NOTE
The attributes shown are for the Accuity watch list. You must
set the corresponding properties for the watch list for which
you want to analyze data.
• phase.DQ\ -\ Stage\ ACY\ reference\ lists.enabled = Y
• phase.DQ\ -\ ACY\ reference\ data\ quality\ analysis.enabled = Y
• stageddata.DQ\ ACY\ -\ Invalid\ Standard\ Country\ in\ Accuity\
Nationality\ to\ Standard\ Country.visible = Y
• stageddata.DQ\ ACY\ -\ Missing\ Source\ in\ Accuity\ Source\ Risk\
Scores\ Reference\ Data.visible = Y
• stageddata.DQ\ ACY\ -\ Obsolete\ Source\ in\ Accuity\ Source\ Risk\
Scores\ Reference\ Data.visible = Y
4.8 Configuring Match Rules and Clusters for Customers
and External Entities
You can configure match rules and clusters by adding a property value to the customer-
screening.properties and external-entity-screening.properties run profiles.

GENERAL CONFIGURATIONS
REAL-TIME AND BATCH SCREENING SET UP
CUSTOMER SCREENING ADMINISTRATION GUIDE | 31
For example, to disable the Exact name only rule, that is, [I010O], for batch and real-time sanctions
screening, add the following property value in the customer-screening.properties and
external-entity-screening.properties run profiles:
phase.*.process.*.[I010O]\ Exact\ name\ only.san_rule_enabled = false
The * character denotes a wildcard, which indicates that the following rule applies to all phases and
processes. If the [I010O] rule is disabled for batch screening only, the following is the new property
value:
phase.Batch\ screening.process.*.[I010O]\ Exact\ name\ only.san_rule_enabled
= false
NOTE
The property value is case-sensitive.
For information on the match rules and clusters used in Customer Screening, see the Oracle Financial
Services Customer Screening Matching Guide.
4.9 Real-Time and Batch Screening Set Up
By default, real-time and batch screening is enabled for SAN (sanctioned), PEP (Politically Exposed
Persons), and EDD (Enhanced Due Diligence) records. This is controlled by the real-time and batch
screening properties in the customer-screening.properties, Customer-Screening-real-
time.properties , and external-entity-screening.properties run profiles. You can use
these run profiles to enable or disable real-time or batch screening for all records or a specific record
type.
For example, to run real-time screening for PEP and EDD individual and entity records, disable the
following property values in the customer-screening.properties and external-entity-
screening.properties run profiles:
phase.Start\ Batch\ Screening.enabled = N
phase.Real-time\ Screening.process.Individual\ Real-time\
Screening.san_enabled = N
phase.Real-time\ Screening.process.Entity\ Real-time\ Screening.san_enabled
= N
Ensure that all other real-time screening properties are set to Y.
4.10 Extracting the Output of Matches into CSV Files
Customer Screening identifies possible relationships or matches between individuals and entities in
your customer data and the external entities on watch lists. These matches form the basis of the cases
that are investigated in Enterprise Case Management. When you perform batch screening and move
these matches into the Customer Screening data layer, you can extract the output into the.csv files.
This is useful if you want to use Customer Screening to identify the matches or if you want to review
the matches using another case management system.
To extract the output of the matches into the.csv files, set the following values in the Batch
Screening Setup section of the customer-screening.properties and external-entity-

GENERAL CONFIGURATIONS
FILTERING WATCH LIST DATA
CUSTOMER SCREENING ADMINISTRATION GUIDE | 32
screening.properties run profiles. The run profiles are available in the
<domain_name>/edq/oedq.local.home/runprofiles/ directory in the WinSCP server.
phase.*.process.*.output_relationships = Y
phase.Export\ Batch\ Relationships.enabled = Y
When you run Customer Screening with these run profile parameters enabled, two files are created:
• relns-ent-batch.csv. This file holds the match data for entities.
• relns-ind-batch.csv. This file holds the match data for individuals.
4.11 Filtering Watch List Data
The following sections provide information about how to enable watch list filtering, configure watch
list filtering, how to use primary filters, secondary filters, linked records, and how to screen all watch
list records.
4.11.1 Enabling Watch List Filtering
To enable filtering for a specific watch list, set the Prepare with Filtering phase in the
appropriate run profile to Y, and the Prepare Without Filtering phase to N. For more
information, see the example provided in Setting Filtering Options in the Run Profiles.
4.11.2 Configuring Watch List Filtering
Watch list filtering is controlled by configuring reference data in the watch list projects.
NOTE
1. The reference data sets in the Watch list Management
and Customer-Screening projects are identical. This is
to support installations that require filtering at different
stages. For example, if a company wants to initially filter
the prepared watch list data and then run several
screening projects to filter specific parts of the data.
2. Once data is filtered out from the watch list, it is not
possible to view the filtered data in another project. If, for
example, all entities are filtered out in the Watch list
Management project, then the Customer-Screening
project will not display the entities in the screening results.
The first level of filtering is controlled by editing the following filters in the Watch list Management
project:
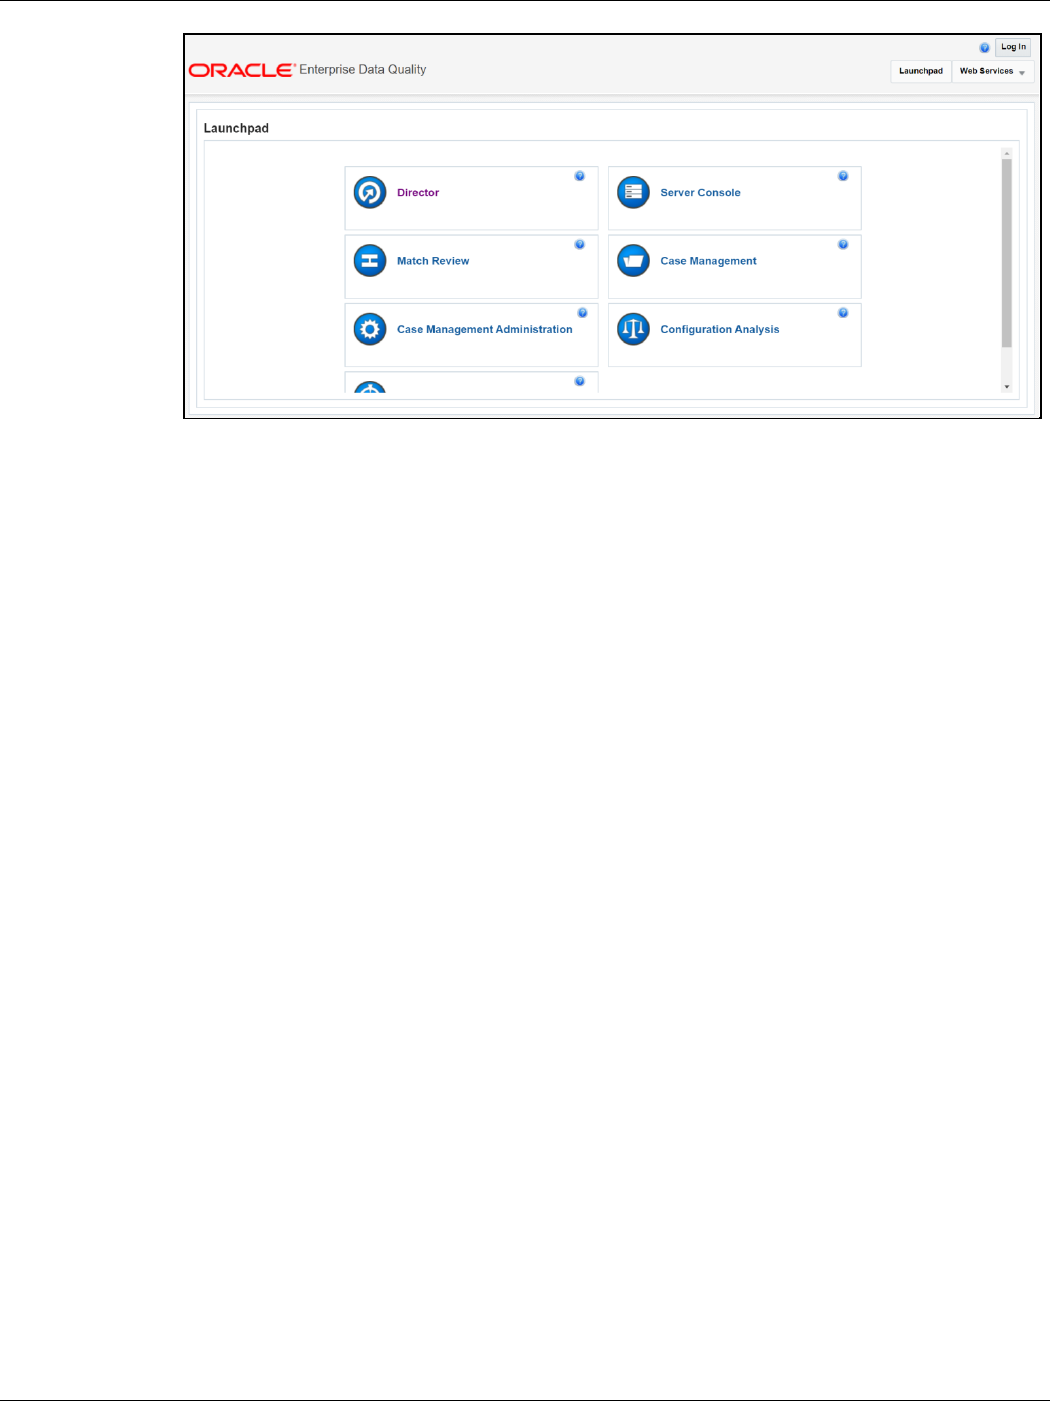
1. Go to the EDQ URL and open the Director menu. The Director landing page appears.
Figure 11: Director Menu in EDQ
GENERAL CONFIGURATIONS
FILTERING WATCH LIST DATA
CUSTOMER SCREENING ADMINISTRATION GUIDE | 33
2. In the Director landing page, expand the Watch list Management project in the Project
Browser pane.
Figure 12: Project Browser Pane

GENERAL CONFIGURATIONS
FILTERING WATCH LIST DATA
CUSTOMER SCREENING ADMINISTRATION GUIDE | 34
3. Expand the Reference Data node and open Filter - Settings. The Reference Data Editor –
Filter - Settings window appears.
Figure 13: Reference Data Editor – Filter - Settings Window

GENERAL CONFIGURATIONS
FILTERING WATCH LIST DATA
CUSTOMER SCREENING ADMINISTRATION GUIDE | 35
All the reference data filters except the Linked Profiles filter is set to Y by default. Unless these settings
are changed, no actual filtering is performed on the watch list data. In the filter settings, a value of Y
indicates that all records are included, that is, no filters are applied.
Watch list filtering falls into four categories:
• By list and list subke y
• By list record origin characteristics
• By list profile record characteristics
• By linked profiles
For more information, see the example provided in Setting Primary Filters and Linked Profiles in the
Watch list Management Project.
4.11.3 Primary Filters, Secondary Filters, and Filters for Linked
Profiles
Primary filters are filters that are used to display all profiles that match the criteria specified. Filters for
linked profiles are used to display profiles that are linked to the primary filter.
NOTE
You can filter linked profiles only for the World-Check and Dow
Jones watch lists.
An example of a primary filter is a filter that is configured to capture all sanctions data. For the primary
filter, a filter is configured for the related PEP data.

GENERAL CONFIGURATIONS
FILTERING WATCH LIST DATA
CUSTOMER SCREENING ADMINISTRATION GUIDE | 36
Secondary filters are applied to filter data that is displayed for linked profiles. For example, the
secondary filter for PEP data is occupation or nationality.
Primary and secondary filters are set in one project (Watch list Management/Customer-
Screening), and secondary filters are set in another project (Watch list
Management/Customer-Screening).
4.11.4 Setting Multiple Values for Primary and Secondary Filters
Further configurations must display the following records:
• Origins
• Origin Regions
• Origin Statuses
• Primary and Secondary Name Qualities
• Primary and Secondary Name Types
• Primary and Secondary PEP Classifications
To filter data using one or more of these options, set the relevant value in the Filter - Settings
reference data to N, and then make further changes to the corresponding reference data. When
you set the value in the Filter - Settings reference data to N, only the records that match
these values are included.
For example, if you set the value of the All name qualities (Primary)? filter to N, then you can
determine which name qualities must be included for each watch list in the Filter - Primary
Name Qualities reference data. Suppose you include a row for high-quality names in the EU watch
list, but you do not include rows for medium-quality and low-quality names in this watch list, then only
records with high-quality names are included in the watch list data.
NOTE
Some reference data sets are prepopulated with rows that
usually contain data which is supplied by each watch list
provider and can be viewed in the Watch List Management
project. For example, to view all possible stop keywords for
World-Check data, open the WC Keyword reference data in the
Watch list Management project as mentioned in the
following section.
4.11.4.1 Example - Filtering World-Check Data
This example describes the configurations which must be done to use primary and linked profile filters
in the World-Check watch list in the Watch list Management project and how to set secondary
filters in the Customer-Screening project. The following tasks are described:
• how to enable filtering in the watch list-management.properties run profile. For more
information on enabling filtering, see Setting Filtering Options in the Run Profiles.
• how to configure the primary filters and enable the filters for linked profiles in the Watch list
Management project to return the active records for sanctioned individuals originating from the

GENERAL CONFIGURATIONS
FILTERING WATCH LIST DATA
CUSTOMER SCREENING ADMINISTRATION GUIDE | 37
EU list. For more information, see Setting Primary Filters and Linked Profiles in the Watch list
Management project.
• how to configure the secondary filters in the Customer-Screening project to filter out all the
Linked Profiles of deceased individuals. For more information, see Setting Secondary Filters in
the Customer Screening project.
4.11.4.1.1 Setting Filtering Options in the Run Profiles
In the watch list-management.properties run profile, set the World-Check filtering phases as
follows. This file is available in the <domain_name>/edq/oedq.local.home/runprofiles/
directory in the WinSCP server.
• phase.WC\ -\ Prepare\ without\ filtering.enabled = N
• phase.WC\ -\ Prepare\ with\ filtering\ (Part\ 1).enabled = Y
• phase.WC\ -\ Prepare\ with\ filtering\ (Part\ 2).enabled = Y
• phase.WC\ -\ Load\ without\ filtering.enabled = N
• phase.WC\ -\ Load\ with\ filtering\ (Part\ 1).enabled = Y
• phase.WC\ -\ Load\ with\ filtering\ (Part\ 2).enabled = Y
4.11.4.1.2 Setting Primary Filters and Linked Profile Filters in the Watch list Management Project
Follow these steps to set primary filters and linked profiles in the project:
1. Go to the EDQ URL and open the Director menu. The Director landing page appears.
Figure 14: Reference Data Filters
2. In the Director landing page, expand the Watch list Management project in the Project
Browser pane.
Figure 15: Reference Data Filters

GENERAL CONFIGURATIONS
FILTERING WATCH LIST DATA
CUSTOMER SCREENING ADMINISTRATION GUIDE | 38
3. Expand the Reference Data node and open Filter - Settings. The Reference Data Editor –
Filter - Settings window appears.
Figure 16: Reference Data Filters

GENERAL CONFIGURATIONS
FILTERING WATCH LIST DATA
CUSTOMER SCREENING ADMINISTRATION GUIDE | 39
4. In the Reference Data Editor – Filter - Settings window, configure the following parameters.
Double-click a value to update it.
1. Set the List/sub-list (Primary?) value in the WC-SAN row to Y.
Set the Entities (Primary)? value in the WC-SAN row to N.
Set the Inactive (Primary)? value in the WC-SAN row to N.
Set the All Origins (Primary)? value in the WC-SAN row to N.
Set all other values in the WC-SAN row to Y.
Add a new row with the following values:
i. List Key - WC
ii. List Sub Key - WC-SAN
iii. Origin - EU
Set the Linked Profiles? value in the WC-SAN row to Y.
5. Click OK to close the window and save your changes.
4.11.4.1.3 Setting Secondary Filters in the Customer Screening project
Follow these steps to set secondary filters in the project:
1. Go to the EDQ URL and open the Director menu. The Director landing page appears.
Figure 17: Reference Data Filters

GENERAL CONFIGURATIONS
FILTERING WATCH LIST DATA
CUSTOMER SCREENING ADMINISTRATION GUIDE | 40
2. In the Director landing page, expand the Watch list Management project in the Project
Browser pane.
Figure 18: Reference Data Filters
3. Expand the Reference Data node and open Filter - Settings. The Reference Data Editor –
Filter - Settings window appears.

GENERAL CONFIGURATIONS
FILTERING WATCH LIST DATA
CUSTOMER SCREENING ADMINISTRATION GUIDE | 41
Figure 19: Reference Data Filters
4. In the Reference Data Editor – Filter - Settings window, Set the Deceased (Secondary)?
value in the WC-SAN row to N.
5. Click OK to close the window and save your changes.
4.11.5 Screening All Sanctions Data
By default, data is routed from the Watch list Management project to the different screening
processes depending on their record type, which can be Sanctions (SAN), Politically Exposed Persons
(PEP), or Enhanced Due Diligence (EDD) records. This allows different rules to be applied according to
the risk appetite of the record that is being screened.
However, if you want to use the same screening logic for all watch list records and do not want to
maintain separate rulesets, you can move all watch list records to the SAN screening processes. To do
this, set phase.*.process.*.Screen\ all\ as\ SAN? value in the customer-
screening.properties = Y. This file is located in the
<domain_name>/edq/oedq.local.home/runprofiles/ directory in the WinSCP server.
4.11.6 Match Persistence and Flag Keys
Customer Screening parses all customer records against all watch list records daily. This allows new
alerts to be created due to changes in either the customer or the watch list data. When there is no
change to the customer or the watch list record and the match is identical to a previously generated
relationship, no new alerts are created.
Many attributes can change on a customer or watch list record but not all changes result in a new
alert. These attributes are controlled based on the flag key value.
NOTE
If a new alias name that matches the customer record is added
to a watch list, then this results in a new alert.

GENERAL CONFIGURATIONS
RISK SCORING IN WATCH LISTS
CUSTOMER SCREENING ADMINISTRATION GUIDE | 42
An example of a flag key is date of birth. Some potential matches are eliminated because the
value the customer has provided and the value in the watch list records are different. So, if the value
changes, then any potential matches related to the date of birth must be rereviewed. An example
of a field that is not included in the flag key is account balance. This value changes frequently and
does not impact the match decision. Flag keys are set in individual match processes, and a hash value
is generated which is used for comparison.
NOTE
The order of fields in the flag key is important. If the order
changes, this will result in a new alert.
4.12 Risk Scoring in Watch Lists
Customer Screening includes a feature to estimate the relative risk of doing business with a given
entity or individual. For each watch list, a risk score is calculated for an individual or entity based on
various attributes such as country of residence, operating country, and associated regime. The risk
scores for watch lists are available in the reference data tables for the specific watch list. For more
information, see Appendix B: Reference Data Tables for Watch Lists.
NOTE
The risk scores must be evaluated and tuned by a risk and
compliance expert with knowledge of your business
requirements and the relevant legislation.
4.12.1 Adjusting the Risk Scores
Customer Screening calculates a risk score and a Politically Exposed Person (PEP) risk score for every
alert created during screening. The risk score is a relative measure of the risk posed by an individual or
entity out of a maximum score of 100. The PEP risk score identifies the relative risk of the individual or
entity when the individual or entity is considered as a PEP. Since the risk score can be different from
the PEP risk score, the same algorithm is used to derive the risk score and PEP risk score but the
underlying scores and weightings on which the calculations are based are different.
The overall risk score of a potential match is calculated as a weighted average of the risk scores
generated for the watch list, customer, and external entity records in the match. The risk scores for the
watch list, customer, and external entity records are calculated as a weighted average of the risk
scores of the contributing risk elements. A risk element is a data field, such as Country of Operation or
Occupation, and a risk score is assigned to the risk elements based on its value.
You can adjust the following attributes to customize the overall risk score:
• Risk scores and relative weightings of the risk elements.
• Relative weight of the watch list risk score, customer risk score, and external entity risk score.
• Reference data tables of the specific watch list used in the screening process.
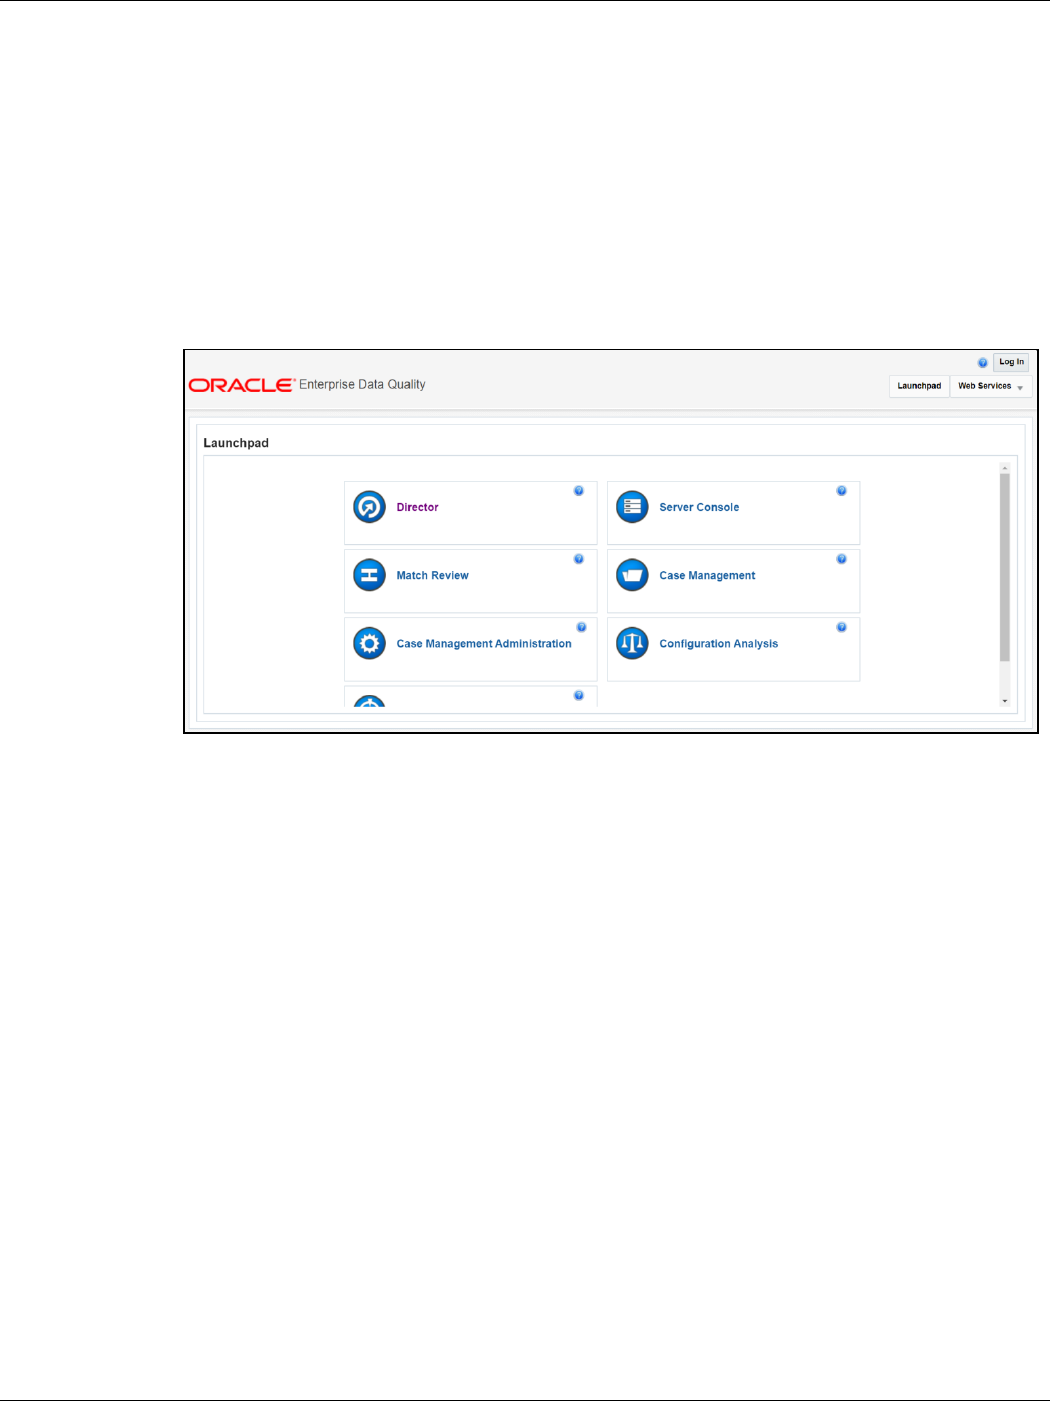
GENERAL CONFIGURATIONS
RISK SCORING IN WATCH LISTS
CUSTOMER SCREENING ADMINISTRATION GUIDE | 43
4.12.2 Editing the Risk Element Scores
You can adjust the risk element scores by editing the risk element in Enterprise Data Management
(EDQ). The risk elements that are considered during the risk score calculation depend on the fields
that are present in the watch list or customer record.
4.12.2.1 Example – Accuity Watch List
The following steps explain how to edit the risk element scores for the Accuity watch list:
1. Go to the EDQ URL and open the Director menu. The Director landing page appears.
Figure 20: Director Menu in EDQ
2. In the Director landing page, expand the Watch list Management project in the Project
Browser pane.
Figure 21: Project Browser Pane

GENERAL CONFIGURATIONS
RISK SCORING IN WATCH LISTS
CUSTOMER SCREENING ADMINISTRATION GUIDE | 44
3. Expand the Reference Data node.
4. Right-click Accuity Source Risk Scores and select Edit data.
Figure 22: Accuity Source Risk Scores

GENERAL CONFIGURATIONS
RISK SCORING IN WATCH LISTS
CUSTOMER SCREENING ADMINISTRATION GUIDE | 45
5. In the Reference Data Editor – Accuity Source Risk Scores window, the risk score appears in
editable mode.
Figure 23: Reference Data Filters for Accuity

GENERAL CONFIGURATIONS
RISK SCORING IN WATCH LISTS
CUSTOMER SCREENING ADMINISTRATION GUIDE | 46
NOTE
If you edit the risk scores, you must rerun the Download,
Prepare, Filter and Export All Lists jobs in the
Watch list Management project and the MAIN job in the
Customer-Screening project in EDQ. Until this is done, the
generated matches will not show the new risk scores. For more
information on how to view the jobs, see Analyzing the Data
Quality of Customer Data and External Entity.
4.12.2.2 Editing the Risk Element Weightings
You can edit the default weightings assigned to each risk element in the Reference Data Editor – Risk
– Risk Element Weightings window. This reference data set specifies which fields in that record
contribute to the risk score calculation for each type of record and to what degree (weightage).
The following steps explain how to view the risk element weightings for all watch lists:
1. Go to the EDQ URL and open the Director menu. The Director landing page appears.
Figure 24: Director Menu in EDQ
2. In the Director landing page, expand the Watch list Management project in the Project
Browser pane.
Figure 25: Project Browser Pane

GENERAL CONFIGURATIONS
RISK SCORING IN WATCH LISTS
CUSTOMER SCREENING ADMINISTRATION GUIDE | 47
3. Expand the Reference Data node.
4. Right-click Risk - Risk Element Weightings and select Edit data.
Figure 26: Reference Data Filters for Risk Element Weightings

GENERAL CONFIGURATIONS
SCHEDULING THE CUSTOMER SCREENING RUN JOB
CUSTOMER SCREENING ADMINISTRATION GUIDE | 48
The format for the value in the RecordType column is the watch list and a suffix specifying whether
the record represents an individual (_I) or an entity (_E). For example, HMT_I.Customer data have a
record type of CUST_I for individual records and CUST_E for entity records.
The higher the weighting number, the more the corresponding risk element contributes to the overall
risk score. The weighting scores for each row must add up to 1.
The overall risk score calculation for a record containing n elements is as follows:
Risk Score = E1w1 + E2w2 + …+ Enwn
Where the risk element score for element x is represented by Ex and the weighting for element x is
represented by wx.
The total of all weightings must add up to 1, that is, (w1 + w2 + …+ wn = 1).
NOTE
If there is no data for a risk element, it must not be included in the
risk score calculation.
4.13 Scheduling the Customer Screening Run Job
To execute a Customer Screening Run job, follow these steps:
1. Navigate to the FCI_DB_HOME/bin directory.
2. Execute the command /EDQInsert.sh <INFODOM NAME>. This step is used to register the
EDQ server details. You must replace the INFODOM NAME placeholder with your domain name.
3. Enter the following details in the console where the command is run:

GENERAL CONFIGURATIONS
SCHEDULING THE CUSTOMER SCREENING RUN JOB
CUSTOMER SCREENING ADMINISTRATION GUIDE | 49
▪ EDQ Server IP
▪ EDQ Server Direct Port number (JMX port number). This value must be 8090.
▪ EDQ Server User Name
▪ EDQ Password details
Figure 27: EDQ Details
4. Create and authorize a new ECM user who has no case privileges. For example, CSConnect.
For information on how to create or add and authorize a user, see the User Administrator
section in the Oracle Financial Services Analytical Applications Infrastructure User Guide.
NOTE
In the first login as a new user, you are prompted to change the
password.
5. Execute the command /EDQInsert.sh <INFODOM NAME> again only if you are doing a
pack-on-pack installation of Enterprise Case Management (ECM) on Sanctions and the ECM
URL is unavailable. An entry is made in the ATOMIC schema in the cs_appln_params table.
6. Copy the following run profiles from the <domain_name>/edq/oedq.local.home
/runprofiles/ directory in the WinSCP server to the FIC_DB_HOME/conf directory:
▪ watch list-management.properties
▪ customer-screening.properties
▪ external-entity-screening.properties
▪ customer-screening-real-time.properties

GENERAL CONFIGURATIONS
SCHEDULING THE CUSTOMER SCREENING RUN JOB
CUSTOMER SCREENING ADMINISTRATION GUIDE | 50
7. Load the stage table data for the customer-related tables. For more information, see Loading
Data into the Customer tables.
8. In the Run page, select the CS_Data_Load_Event_Generation run and click Fire Run
. The batches must be run in the order mentioned in the following table. It is not
mandatory to run all the batches.
Table 4: Sequence of Batches to be Run
Sequence
Batch Name
Description
1
CS_EDQ_Watch list_Management
This job is used to run the watch list management
project and start real-time screening in EDQ based on
the run profile parameters.
This job must be run daily.
2
CS_EDQ_Watch list_Analyze
This job is used to check the data quality of the
downloaded watch list.
3
CSBusinessDataLoad
This job is used to load data from the staging tables to
the business tables.
4
CS_Data_Load_Event_Generation
This job is used to match customer data with the
downloaded watch list data and to generate alerts.
5
Oracle_CS_Zipper_Processing
This job will move the data from the source database to
the consolidated database and create an alert based on
the Customer.
NOTE
The
Oracle_CS_Zipper_Processing
batch is only applicable in the L1
Investigation.
Figure 28: Run Page

GENERAL CONFIGURATIONS
LOADING DATA
CUSTOMER SCREENING ADMINISTRATION GUIDE | 51
4.14 Loading Data
This section explains how to load customer data from staging tables to the business table.
The following are the types of data loading:
• Loading Data into the Customer Tables (Full Load)
• Loading Data into the Customer Tables (Delta Load)
4.14.1 Loading Data into the Customer Tables (Full Load)
The full load allows you to move the complete list of data from the staging table to the business table.
To load data into the Customer tables, follow these steps:
9. Log on to the Customer Screening application.
10. Click Common Tasks, then click Rule Run Framework, and then click Run. The Run page
appears.
Figure 29: Run Page

GENERAL CONFIGURATIONS
LOADING DATA
CUSTOMER SCREENING ADMINISTRATION GUIDE | 52
11. In the Run page, select the CSBusinessDataLoad checkbox and click Fire Run. Select the
Date and click OK.
4.14.2 Loading Data into the Customer Tables (Delta Load)
The delta load allows you to move only the changed or enhanced data from the staging table to the
business table.
If any customer data is changed in stage data only those data is moved in business. Based upon the
date you run the batch.
For example, if any new entry has come for the same customer ID on a different date. Only those
customer details are pushed to the business table.
The following workflow explains the external entity data movement from stage tables to business
tables.
Figure 30: Delta Load Workflow
To load data into the Customer tables, follow these steps:
1. Log on to the Customer Screening application.
2. Click Common Tasks, then click Rule Run Framework, and then click Run. The Run page
appears.
Figure 31: Run Page

GENERAL CONFIGURATIONS
LOADING DATA
CUSTOMER SCREENING ADMINISTRATION GUIDE | 53
3. In the Run page, select the CSBusinessDataLoad checkbox and click Edit . The Run
page appears in edit mode.
Figure 32: Run Definition (Edit Mode)
4. Click Selector and then select Job . The Component Selector window appears.
5. Select the Truncate_Tables task and then click drop-down list .
Figure 33: Component Selector Window

GENERAL CONFIGURATIONS
LOADING DATA
CUSTOMER SCREENING ADMINISTRATION GUIDE | 54
6. Change the parameter value to N and click OK to close the Parameters window.
Figure 34: Parameters Window
NOTE
By default it is “N”, if delta mode to be supported, update from “N”
to “D”.
7. Click OK to close the Component Selector window.

GENERAL CONFIGURATIONS
LOADING DATA
CUSTOMER SCREENING ADMINISTRATION GUIDE | 55
8. Click Next.
9. Click Save.
4.14.3 Creating and Running Parallel Batches
Parallel batches can be run in CS if you want to run batches with different jurisdictions at the same
time. To run parallel batches, run the CS_Data_Load_Event_Generation task for each jurisdiction.
To create parallel batches, follow these steps:
4.14.3.1 Create a process
To create a process, follow these steps:
1. Make an entry in the cs_processing_group table in the N_GROUP_ID and V_GROUP_NAME
columns. For ex, 102 and GROUP_US.
Figure 35: Developer Window
2. Log on to the Customer Screening application.
3. Click Common Tasks, then click Rule Run Framework, and then click Process. The Process
page appears.
4. Search for Start in the Code field and select CS_E2E_Start_Batch.
Figure 36: Process Page

GENERAL CONFIGURATIONS
LOADING DATA
CUSTOMER SCREENING ADMINISTRATION GUIDE | 56
5. Click Copy . The Process page opens in Copy mode.
Figure 37: Process Definition (Copy Mode)
6. In the Folder field, click Folder and then select TFLSEGMENT.
Figure 38: Folder Selector
7. In the Name field, change the job name to include the Jurisdiction Code. For example,
CS_Data_Load_Event_Generation_US.
8. Select F_CS_BATCH_RUN.
Figure 39: Process Definition (Copy Mode)

GENERAL CONFIGURATIONS
LOADING DATA
CUSTOMER SCREENING ADMINISTRATION GUIDE | 57
9. Select Component.
10. In the Parameters window, select the F_CS_BATCH_RUN task and then click drop-down list
. Change the parameter ORACLECS to the entry made in the cs_processing_group table
and the parameter CS to the Jurisdiction Code. For example,
"GROUP_US","","ALL","START","US".
Figure 40: Component Selector Window
11. Click OK to close the Parameters window.
12. Click OK.
13. Click Save.
14. Search for End in the Code field and select CS_End_To_End_End_Batch.
15. Click Copy . The Run Page opens in Copy mode.
16. In the Folder field, first click Folder and then select TFLSEGMENT.
17. In the Name field, change the job name to include the Jurisdiction Code. For example,
CS_Data_Load_Event_Generation_US.
18. Select F_CS_BATCH_RUN.
19. Select Component.
20. In the Parameter field, change the parameter ORACLECS to the entry made in the
cs_processing_group table, for example, GROUP_US, and the parameter CS to the
Jurisdiction Code, for example, US.
21. Click OK.
22. Click OK.
23. Click Save.

GENERAL CONFIGURATIONS
LOADING DATA
CUSTOMER SCREENING ADMINISTRATION GUIDE | 58
A confirmation message appears. The new parameter is now displayed in the Run page.
NOTE
In the example shown, the new processing batch name has been
changed from CS to US. If this change is not made, no data is loaded
in the tables.
4.14.3.2 Creating a Run
To create a run, follow these steps:
1. Log on to the Customer Screening application.
2. Click Common Tasks, then click Rule Run Framework, and then click Run. The Run Page
appears.
Figure 41: Run Page
3. Search for Start in the Code field and select CS_End_To_End_Start_Batch.
4. Click Copy . The Run Page opens in Copy mode.
Figure 42: Run Definition (Copy Mode) Page

GENERAL CONFIGURATIONS
LOADING DATA
CUSTOMER SCREENING ADMINISTRATION GUIDE | 59
5. In the Folder field, click Folder and then select TFLSEGMENT.
Figure 43: Folder Selector
6. In the Name field, change the job name to include the Jurisdiction Code. For example,
CS_Data_Load_Event_Generation_US.
7. Click Selector list and select Job.
8. In the Component Selector page, first select the CS_End_To_End_Start_Batch,
CS_End_To_End_End_Batch, and Truncate CS Tables tasks (in that order) from the
Tasks table and then click to move them to the List table. The tasks are moved to the
Processes node.
Figure 44: Component Selector

GENERAL CONFIGURATIONS
CONFIGURATIONS FOR GENERAL DATA PROTECTION REGULATION (GDPR)
CUSTOMER SCREENING ADMINISTRATION GUIDE | 60
WARNING
Ensure that you remove the Truncate CS Tables job to prevent
the removal of data. If, by mistake, you run the Truncate CS
Tables job, you can run the CSBusinessDataLoad job to reload
data in the table.
9. Replace these tasks with the task created in step 17, that is,
CS_Data_Load_Event_Generation_US. If you do not make this change, no data is loaded
in the tables.
10. Click OK.
11. Click OK.
12. Click Save.
The new job is displayed in the Run page.
NOTE
These steps must also be done in the ECM setup. The processes
and runs created in Customer Screening create alerts, and the
processes and runs created in ECM fetch the alerts. Cases are
generated from these alerts. An example of a process created for
ECM is Oracle_CS_Event_Processing and an example of a run
created for ECM is Oracle_CS_Event_Processing_US.
4.15 Configurations for General Data Protection Regulation
(GDPR)
GDPR is a set of data protection rules. The main aim of GDPR is to give control to individuals over their
data.
To enable GDPR, perform the following configurations:
1. Create a user who will do the GDPR configurations in the same database, for example, GDPR.
2. Assign the OFS_NOSEC_DATA privilege to the user by executing the following grant:
GRANT OFS_NOSEC_DATA to GDPR
3. Follow these steps to connect to the user:
1. Create a synonym called cs_customer for the user by executing the following command:
CREATE PUBLIC SYNONYM cs_customer FOR {dbname}.cs_customer
{dbname} is the user for whom the CUST data and GDPR is applied
Go to the EDQ URL and open the Director menu. The Director landing page appears.
Figure 45: Director Menu in EDQ

GENERAL CONFIGURATIONS
CONFIGURATIONS FOR GENERAL DATA PROTECTION REGULATION (GDPR)
CUSTOMER SCREENING ADMINISTRATION GUIDE | 61
In the Director landing page, expand the Customer-Screening project in the Project Browser pane.
Figure 46: Project Browser Pane
Expand the Data Stores node and open FCDM Batch Data. The Edit Data Store window appears.
Figure 47: Edit Data Store Window

GENERAL CONFIGURATIONS
CONFIGURATIONS FOR GENERAL DATA PROTECTION REGULATION (GDPR)
CUSTOMER SCREENING ADMINISTRATION GUIDE | 62
In the Edit Data Store window, enter the Database host, Port, Database name, User name, and Password.
Figure 48: Edit Data Store for Staging Database Connection
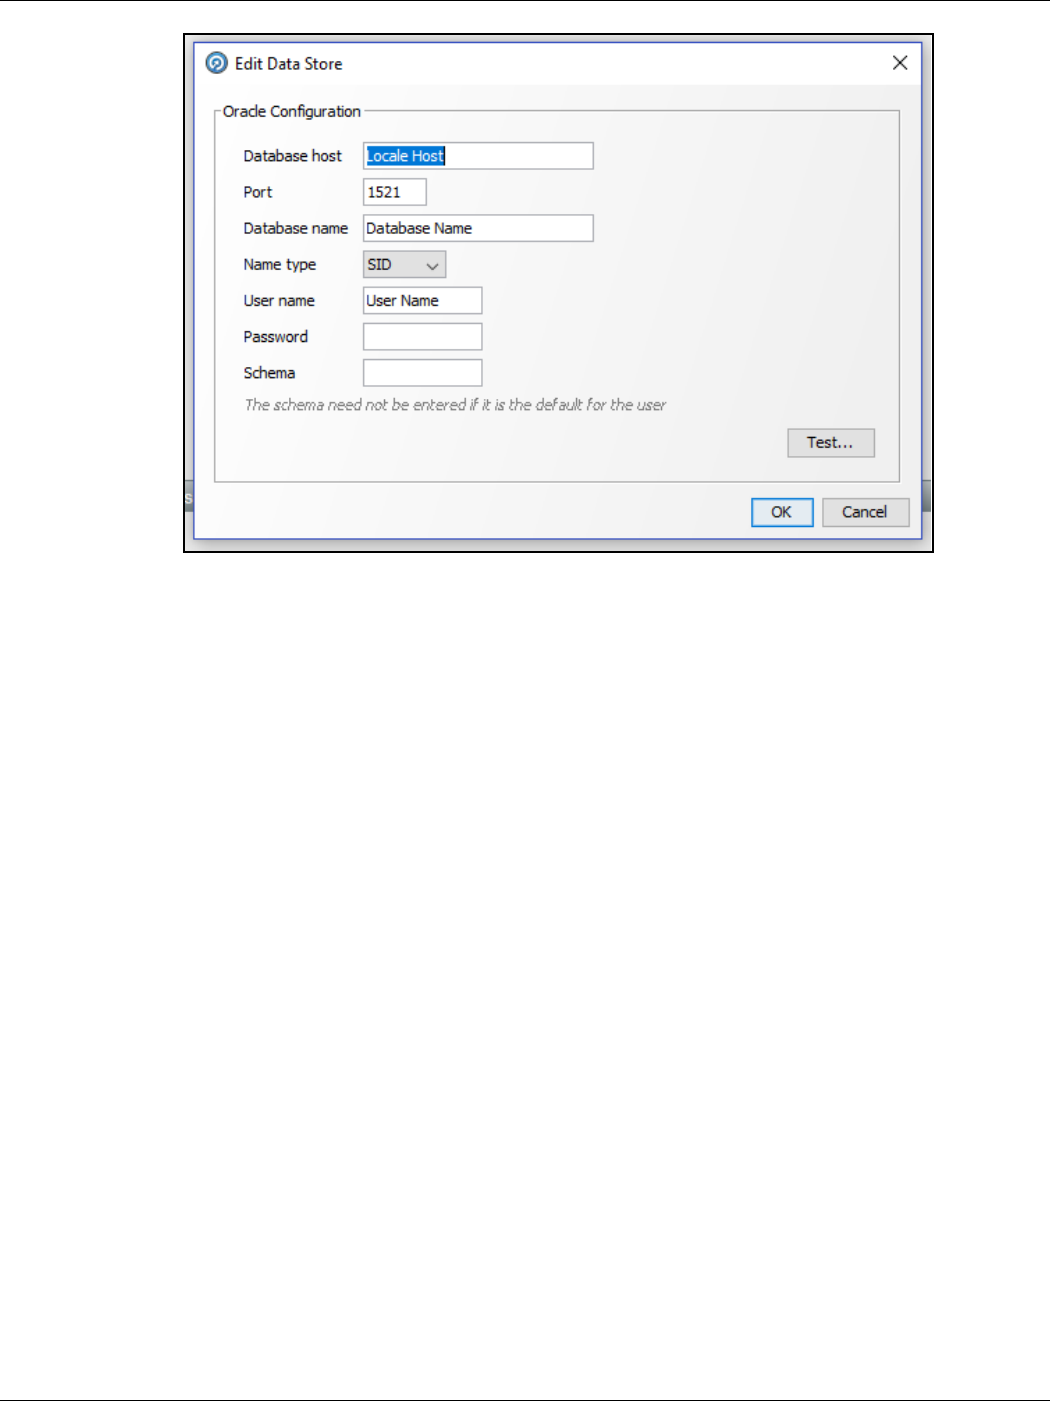
GENERAL CONFIGURATIONS
OPTIONAL CONFIGURATIONS
CUSTOMER SCREENING ADMINISTRATION GUIDE | 63
The GDPR configurations are now enabled for the GDPR user. You can view the applicable data
in the CUST table.
4.16 Optional Configurations
You can perform the following optional configurations:
4.16.1 Data Quality Check
• To run the Data Quality (DQ) check, set the following values in the watch list-
management.properties file. This file is located in the
<domain_name>/edq/oedq.local.home/runprofiles/ directory in the WinSCP server.
▪ phase.DQ\ -\ Stage\ DJW\ reference\ lists.enabled = Y
▪ phase.DQ\ -\ DJW\ reference\ data\ quality\ analysis.enabled = Y
▪ stageddata.DQ\ DJW\ -\ Invalid\ Standard\ Country\ in\ DJ\
Country\ to\ Standard\ Country.visible = Y
▪ stageddata.DQ\ DJW\ -\ Missing\ Category\ in\ DJW\ SI\
Category.visible = Y
▪ stageddata.DQ\ DJW\ -\ Missing\ Category\ in\ DJW\ SI\ Category\
Description.visible = Y
▪ stageddata.DQ\ DJW\ -\ Missing\ DJW\ Country\ in\ DJ\ Country\
to\ Standard\ Country.visible = Y
▪ stageddata.DQ\ DJW\ -\ Missing\ Name\ in\ DJW\ List\ Provider\
Reference\ Data.visible

GENERAL CONFIGURATIONS
CONFIGURING NEW WATCHLIST SUMMARY FIELD NAME
CUSTOMER SCREENING ADMINISTRATION GUIDE | 64
▪ stageddata.DQ\ DJW\ -\ Missing\ Occupation\ Name\ in\ DJW\
Occupation\ Category.visible
▪ stageddata.DQ\ DJW\ -\ Obsolete\ Category\ in\ DJW\ SI\
Category.visible
▪ stageddata.DQ\ DJW\ -\ Obsolete\ Category\ in\ DJW\ SI\ Category\
Description.visible
▪ stageddata.DQ\ DJW\ -\ Obsolete\ DJW\ Country\ in\ DJW\ Country\
to\ Standard\ Country.visible
▪ stageddata.DQ\ DJW\ -\ Obsolete\ Name\ in\ DJW\ List\ Provider\
Reference\ Data.visible
▪ stageddata.DQ\ DJW\ -\ Obsolete\ Occupation\ Name\ in\ DJW\
Occupation\ Category.visible
• To move data from the Windows batch file to the Linux shell script, follow these steps in the
watch list-management.properties file:
▪ Comment out phase.DJW\ -\ Download.externaltasks.Download\ Dow\
Jones\ Watch list.command = download-djw.bat
▪ Uncomment phase.DJW\ -\ Download.externaltasks.Download\ Dow\
Jones\ Watch list.command = download-djw.sh
4.16.2 Sorting Real-Time Watchlist Details
The order of Watchlist details displayed on the UI for Real-Time Screening alerts in CSAM or Case in
ECM can be configured in this table:
cs_rt_watchlistdetails_order
The Order can be defined for Individual and Entity separately.
NOTE
If you want to insert any new field in between the order list,
make sure N_ORDER column is properly sorted.s
This change gets reflected in the following UIs:
• On click of Watchlist ID in Real-time Screening UI
• Watchlist Details in Alert Details page in CSAM
• Watchlist Details in Case Details page in ECM
4.17 Configuring New Watchlist Summary Field Name
To configure or add new watchlist field name to display in the watchlist summary details follow the
subsequent steps:
1. Access the Config schema and access the messages_en_US table.

GENERAL CONFIGURATIONS
CONFIGURING NEW WATCHLIST SUMMARY FIELD NAME
CUSTOMER SCREENING ADMINISTRATION GUIDE | 65
2. Map the new field names in messages_en_US table as below:
▪ msg_identifier as ZCS_WATCHLIST_<field_Name>
▪ msg_package as RENDERER
NOTE
The remaining parameter entries can be the same as other
entries in the table.
For Example:
insert into messages_en_us (MSG_PACKAGE, MSG_IDENTIFIER, MSG_CODE,
MSG_DESCRIPTION,MSG_TYPE) values
('RENDERER','ZCS_WATCHLIST_ADDRESS_COUNTRY_CODE','80808','Address Country
Code','L');

INTEGRATIONS WITH ENTERPRISE CASE MANAGEMENT
CASE CLASS IN ECM
CUSTOMER SCREENING ADMINISTRATION GUIDE | 66
5 Integrations with Enterprise Case Management
Customer Screening uses the Enterprise Case Management (ECM) application to investigate and
manage cases generated by the matching process in Customer Screening.
The following sections describe the default case types and workflows provided with Oracle Financial
Services Enterprise Case Management. For more information, see Oracle Financial Services Enterprise
Case Management Admin Guide.
5.1 Case Class in ECM
For Customer Screening Application, the following case classes have been added in the Oracle
Financial Services Enterprise Case Management Application:
• CS
• CS_EE
• CS_RT
To add new case classes, follow the steps in the Adding Case Class section in the Oracle Financial
Services Enterprise Case Management Admin Guide.
Figure 49: Case Designer Page
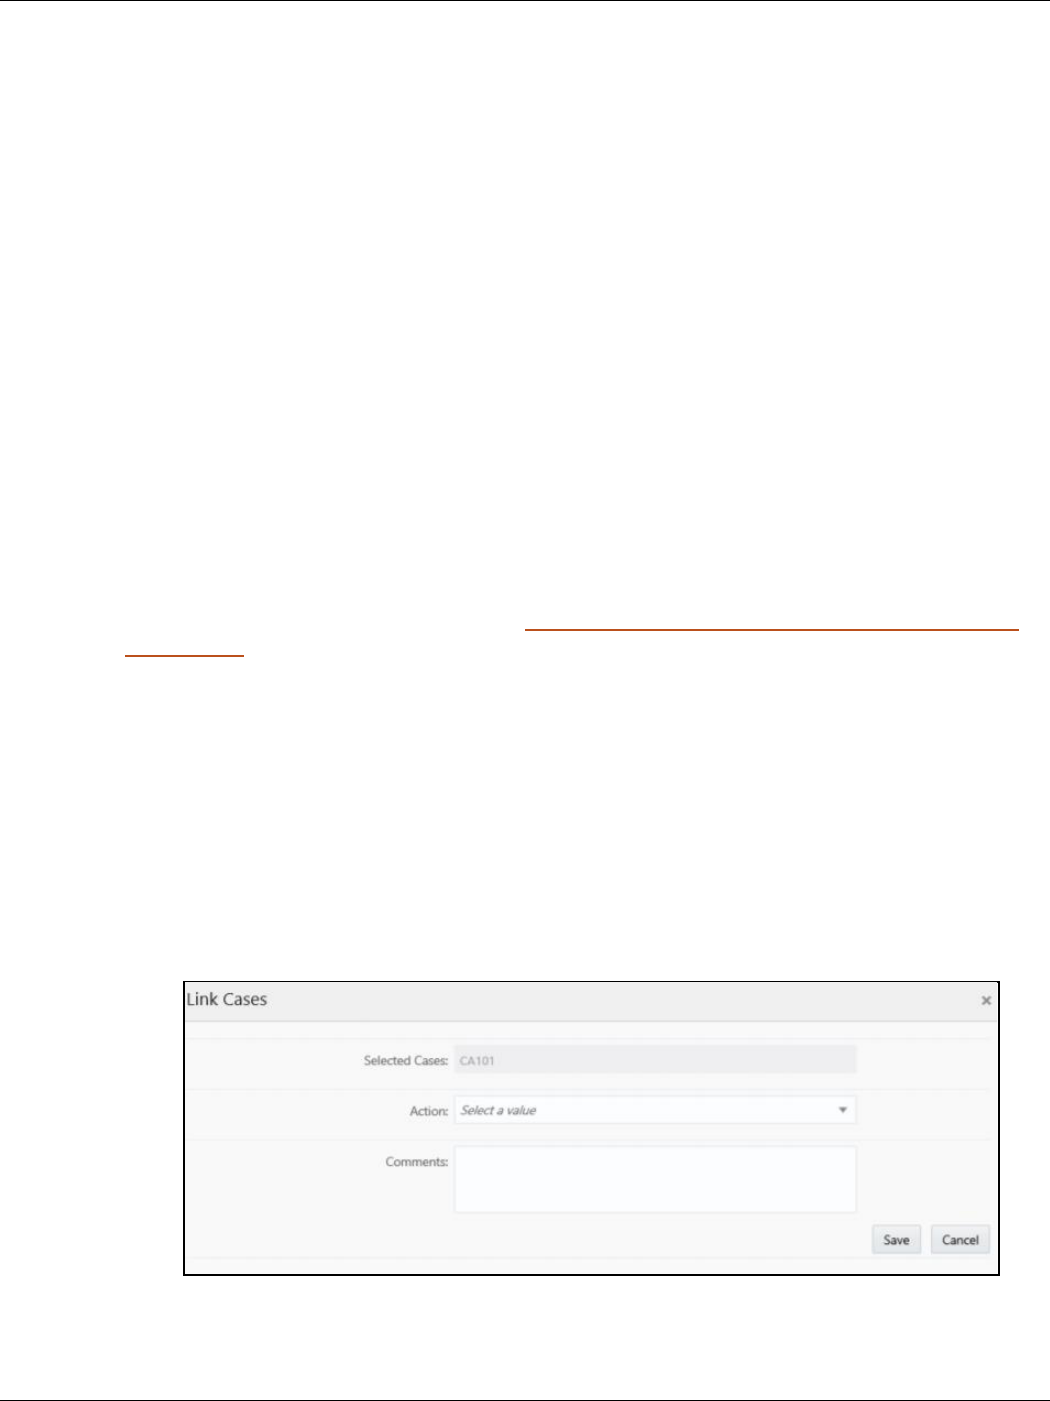
INTEGRATIONS WITH ENTERPRISE CASE MANAGEMENT
CASE TYPES UNDER CASE CLASS
CUSTOMER SCREENING ADMINISTRATION GUIDE | 67
5.2 Case Types under Case Class
The following case types are created for the CS case class:
• CS_EDD: Enhanced Due Diligence (EDD)
• CS_PRB: Prohibition (PRB)
• CS_SAN: Sanctions (SAN)
• CS_EE_EDD: Enhanced Due Diligence (EDD) for External Entity screening
• CS_EE_PEP: Politically Exposed Person (PEP) for External Entity screening
• CS_EE_PRB: Prohibition (PRB) for External Entity screening
• CS_EE_SAN: Sanctions (SAN) for External Entity screening
• CS_PEP: Politically Exposed Person (PEP)
• CS_RT_EDD: Enhanced Due Diligence (EDD) for Real-Time screening
• CS_RT_PEP: Politically Exposed Person (PEP) for Real-Time screening
• CS_RT_PRB: Prohibition (PRB) for Real-Time screening
• CS_RT_SAN: Sanctions (SAN) for Real-Time screening
For each Case Type, default Entities are mapped. If additional Entities are required, see the Adding
Optional Entities to the Case Type section in Oracle Financial Services Enterprise Case Management
Admin Guide.
5.3 Case Correlation, Linked Cases, and Searching for
Cases
After the Customer Screening batch is run, alerts are correlated into cases based on the watch list
record type. More than one case can be generated for a single alert, one each for Sanctions (SAN),
Country Prohibitions (PRB), Politically Exposed Persons (PEP), and Enhanced Due Diligence (EDD).
You can view the case which is linked with the case being investigated. The following image shows the
fields:
Figure 50: Link Cases Window

INTEGRATIONS WITH ENTERPRISE CASE MANAGEMENT
CREATING WORKFLOWS FOR CASE TYPES
CUSTOMER SCREENING ADMINISTRATION GUIDE | 68
You can configure the correlation rules for an alert in the Correlation tab, or view the cases linked to
the case being investigated in the Relationship tab. For more information, see the Using Operational
Data Tabs section in Oracle Financial Services Enterprise Case Management User Guide.
There are certain ready-to-use Customer Screening case type search criteria. They can be viewed in
the Search Cases tab in ECM. For more information, see the Searching Cases section in Oracle
Financial Services Enterprise Case Management User Guide.
Figure 51: Search Cases Window
5.4 Creating Workflows for Case Types
Each of the Sanctions (SAN), Country Prohibitions (PRB), Politically Exposed Persons (PEP), and
Enhanced Due Diligence (EDD) cases go through a workflow. The SAN and PRB cases have the same
ready-to-use workflow, and the PEP and EDD cases have the same workflow.
5.5 Workflow Diagrams
The following diagrams represent the workflows for the Sanctions (SAN), Politically Exposed Persons
(PEP), Country Prohibition (PRB), or Enhanced Due Diligence (EDD) records:
5.5.1 SAN and PRB Workflow
The workflow for the sanctions and country prohibition records are as follows:
Figure 52: SAN and PRB Workflow
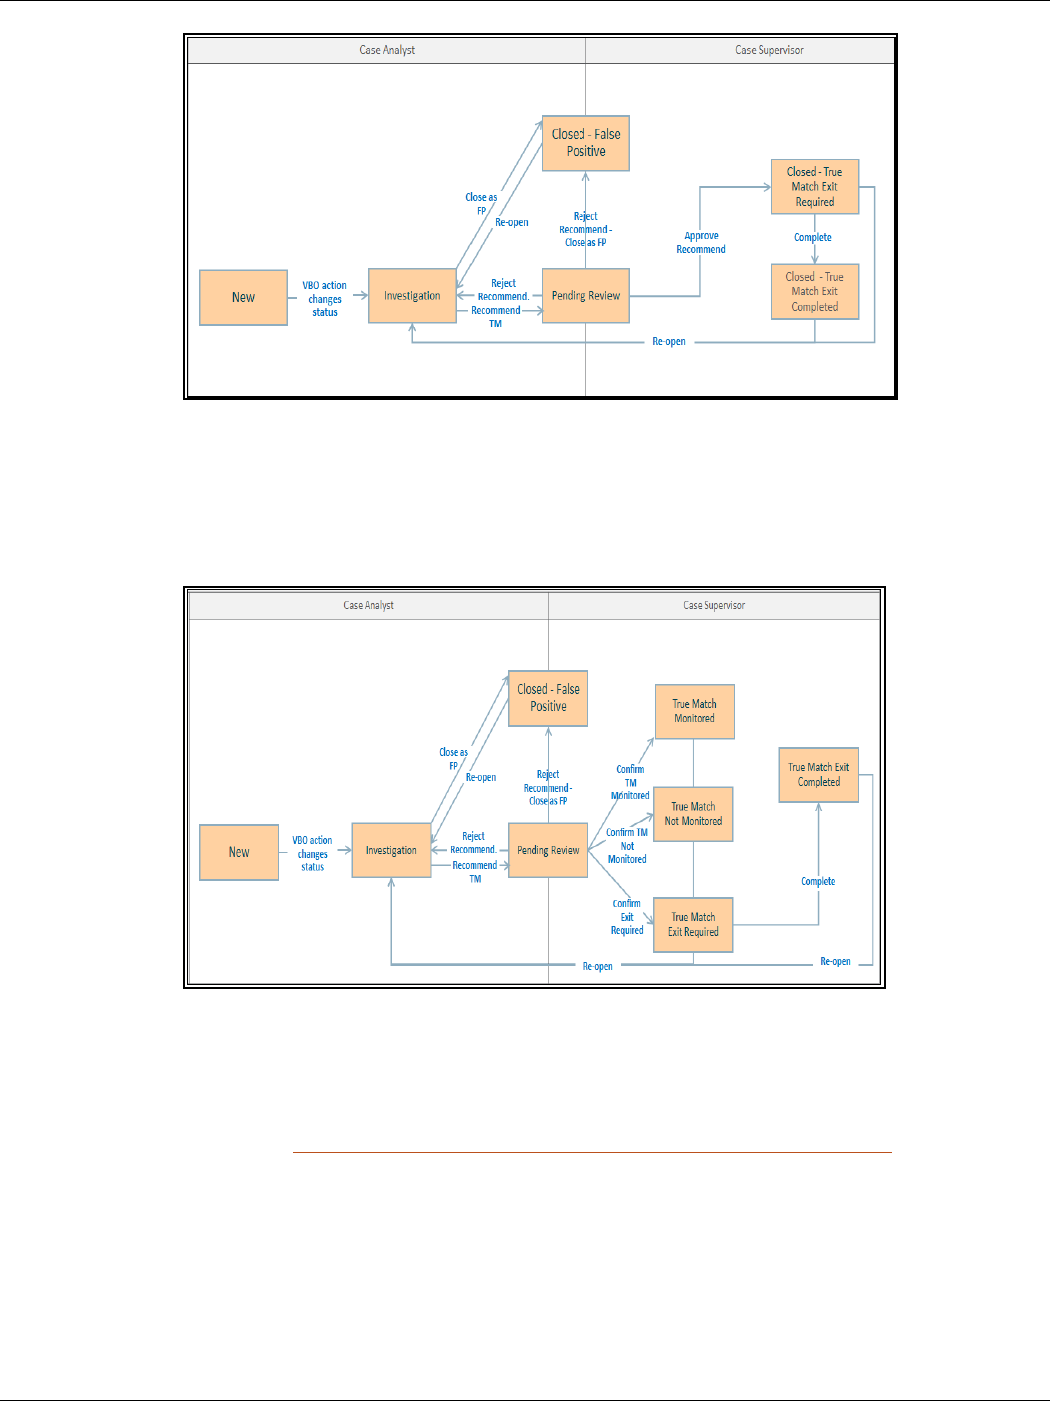
INTEGRATIONS WITH ENTERPRISE CASE MANAGEMENT
TAKING ACTIONS ON CUSTOMER SCREENING-RELATED CASES
CUSTOMER SCREENING ADMINISTRATION GUIDE | 69
5.5.2 PEP and EDD Workflow
The workflow for the Politically Exposed Persons and Enhanced Due Diligence records are as follows:
Figure 53: PEP and EDD Workflow
5.6 Taking Actions on Customer Screening-related Cases
You can take an action on a case depending on the workflow status, case type, and user. You can also
add a comment and attach a document To take an action on a case, see the Using Take Action
Window section in Oracle Financial Services Enterprise Case Management User Guide.
The following figure shows a sample of an EDD workflow that has a Pending Review status and
Supervisor user.
Figure 54: Take Action Window

INTEGRATIONS WITH ENTERPRISE CASE MANAGEMENT
SETTING THRESHOLDS FOR CASE PRIORITIES
CUSTOMER SCREENING ADMINISTRATION GUIDE | 70
NOTE
When a match decision is taken for an alert, you can make the
comments mandatory or optional.
1. To make comments mandatory, set the values of the
REQ_CMNT_FL column in the KDD_ACTION table to Y.
Run select t.action_cd,t.action_nm from
kdd_action t and update the value. You cannot
take an action until you provide a comment.
2. To make comments optional, set the values of the
REQ_CMNT_FL column in the KDD_ACTION table to N.
You can take an action even if you do not provide a
comment.
5.7 Setting Thresholds for Case Priorities
The case priority is based on the case type and risk score. You can set the case priority in the
FCC_CASE_PRIORITY table. By default, if you do not set the case priority, it is set to High.

REAL-TIME SCREENING
SETTING THRESHOLDS FOR CASE PRIORITIES
CUSTOMER SCREENING ADMINISTRATION GUIDE | 71
6 Real-Time Screening
There are two ways to perform screening in the Customer Screening application: real-time screening
and batch screening.
Real-time screening is the screening of individuals and entities that occur when you enter data in the
Real-Time Screening page and click Scan (Analyst & Supervisor) and Scan & Investigate (Analyst &
Supervisor) to see the screening results and details of Alert generation or Case creation. You can also
view the Alert details or Case details from screening results. For more information, see Running the
Real-Time Screening Job. To enable scan & Investigate, map the role Scan & Investigate to CSRTGRP
group.
Batch screening is the screening of individuals and entities that occur when you run the batch
screening job. Before you run the job, you must first configure the Enterprise Data Quality (Director)
details and then prepare and analyze the customer screening and external entity data in the Financial
Crime Data Model (FCDM). For more information, see Running the Batch Screening Job.
For information about security standards followed by CS application for real-time screening and batch
screening, see https://owasp.org/www-project-top-ten/.
The following image shows the different components involved during the Real-time screening
process:

REAL-TIME SCREENING
SETTING THRESHOLDS FOR CASE PRIORITIES
CUSTOMER SCREENING ADMINISTRATION GUIDE | 72
Figure 55: Real-Time Screening Workflow
After you provide data on the Real-Time Screening page, a REST call is made to the individual or
entity being screened in the real-time screening user interface. The call is then routed to the
Enterprise Data Quality (EDQ) system through the Process Modelling Framework (PMF)
application. The information is then matched against the watch list data. Data is also persisted as
external entities in the FCT_RTSCR_REQUEST table.
If a match is found, the matches are aggregated. The aggregated matches are used to create alerts
and cases for external entities in Financial Crime Data Model (FCDM) and Analytical Application
Infrastructure (AAI) and generate responses in PMF. The alerts or cases are displayed in the Case
Summary page in L1 Alert Management or Enterprise Case Management (ECM) for investigation.

REAL-TIME SCREENING
CONFIGURING THE EDQ URL
CUSTOMER SCREENING ADMINISTRATION GUIDE | 73
NOTE
3. Real-time screening can be performed only when the
real-time screening job in EDQ is running.
4. To cancel the real-time screening process, select
Shutdown web services in the Cancel Individual
Real-time Screening web services dialog box.
5. The Real-time access group must only be mapped to
the case supervisor or the case analyst users and must
not be mapped to the admin user.
6.1 Configuring the EDQ URL
The Configuring the EDQ URL section describes the detailed process to configure the EDQ URL in
Real-Time Screening with Customer Screening Alert Management (CSAM) and Enterprise Case
Management (ECM) in the server.
To configure the EDQ URL for Real-time screening, follow these steps:
1. Navigate to the FCI_DB_HOME/bin directory.
2. Execute the command /EDQInsert.sh <INFODOM NAME>. This step is used to register the
EDQ server details. You must replace the INFODOM NAME placeholder with your domain name.
3. Enter the following details in the console where the command is run:
▪ EDQ server IP: An example of the EDQ URL is <Host Name>:Port. Replace this with
your EDQ server’s URL.
▪ EDQ Server Direct Port number: This is the JMX port number. This value must be 8090.
▪ EDQ Server User Name: An example of the EDQ server user name is weblogic. Replace
this with your EDQ server’s user name.
▪ EDQ Password: An example of the EDQ password is weblogic1. Replace this with your
EDQ server’s password.
4. Enter CSAM for alert management if the Customer Screening Alert Management (CSAM) is as
L1 investigation for Real Time Screening.
a. If the Customer Screening Alert Management application is in the same server, see
Figure 56. If not, see Figure 57.

REAL-TIME SCREENING
CONFIGURING THE EDQ URL
CUSTOMER SCREENING ADMINISTRATION GUIDE | 74
Figure 56: Configure the EDQ URL in Real-time Screening with Customer Screening Alert
Management (CSAM) in the same Server
Figure 57: Configure the EDQ URL in Real-time Screening with Customer Screening Alert
Management (CSAM) in different Server
5. Enter ECM for case creation if the Enterprise Case Management (ECM) is as L1 investigation for
Real Time Screening.
a. If the Enterprise Case Management application is in the same server, see Figure 58. If
not, see Figure 59.
Figure 58: Configure the EDQ URL in Real-time Screening with Enterprise Case Management (ECM)
in the same Server

REAL-TIME SCREENING
CONFIGURING THE EDQ URL
CUSTOMER SCREENING ADMINISTRATION GUIDE | 75
Figure 59: Configure the EDQ URL in Real-time Screening with Enterprise Case Management (ECM)
in the different Server
6. You can configure the Customer Screening Application URL in Real-time Screening with
Enterprise Case Management (ECM) or Customer Screening Alert Management (CSAM) in the
different Server. Replace the existing URL with URL where you are doing the Real-time
Screening. Once executed, it will create an entry in CS_APPLN_PARAMS table.
Figure 60: Configure the CS Application URL in Real-time Screening with Enterprise Case
Management (ECM) in the same Server
7. Configure the EDQ URL in the CONFIG schema. To do this, run the following script and replace
the placeholders in the v_method_name and v_param_1 columns with the EDQ URL, EDQ
user name, and EDQ password respectively:
select t.*,t.rowid from aai_wf_application_api_b t where
t.v_process_id='CSRT' and t.v_app_api_id in
('1521535704140','1521535760435')
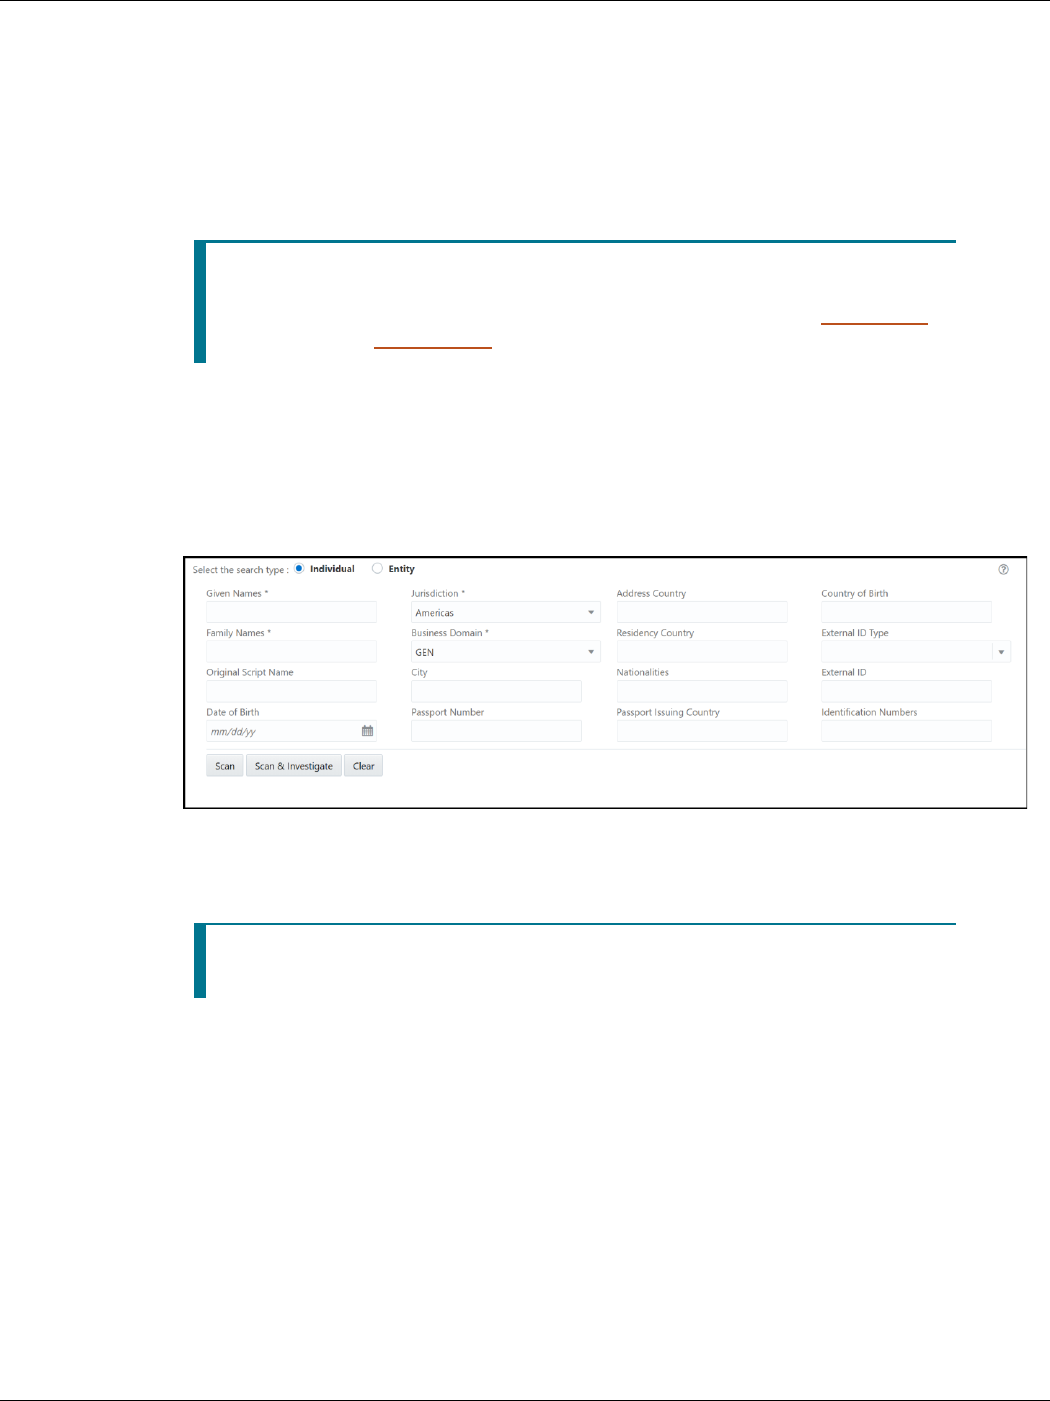
REAL-TIME SCREENING
SCREENING WATCH LIST RECORDS IN REAL-TIME
CUSTOMER SCREENING ADMINISTRATION GUIDE | 76
6.2 Screening Watch List Records in Real-Time
Real-time screening is the screening of individuals and entities that occur when you enter data in the
Real-Time Screening page and click Scan (Analyst & Supervisor) and Scan & Investigate (Analyst &
Supervisor) to see the screening results and details of Alert generation or Case creation. You can also
view the Alert details or Case details from screening results.
NOTE
Creating an Alert or Case is configurable. The Alert or Case will
be generated when you select CSAM or ECM, respectively,
while configuring EDQ URL. For more details, see Configuring
the EDQ URL section.
To screen watch list records, follow these steps:
1. Log on to the Customer Screening application.
2. Click Real-Time Screening is displayed.
Figure 60: Real-Time Screening Page
3. In the Real-Time Screening page, select the search type as Individual or Entity.
NOTE
To populate the business domain and jurisdiction, the ECM
security mapper batch must be executed.
4. The following fields appear if the search type is Individual.
Figure 61: Individual Search Type

REAL-TIME SCREENING
SCREENING WATCH LIST RECORDS IN REAL-TIME
CUSTOMER SCREENING ADMINISTRATION GUIDE | 77
Enter/Select values for the Individual Search Type fields:
▪ Given Names
▪ Jurisdiction
▪ Business Domain
▪ Family Names
▪ Address Country
▪ Country of Birth
▪ Residency Country
▪ External ID Type
▪ Original Script Name
▪ City
▪ Nationalities
▪ External ID
▪ Date of Birth
▪ Passport Number
▪ Passport Issuing Country
▪ Identification Numbers
NOTE
The combination of Given Name and Family Name or Original
Script Name or Passport Number along with Jurisdiction and
Business Domain must provide to scan.
5. The following fields appear if the search type is Entity.
Figure 62: Entity Search Type

REAL-TIME SCREENING
SCREENING WATCH LIST RECORDS IN REAL-TIME
CUSTOMER SCREENING ADMINISTRATION GUIDE | 78
Provide details in the following mandatory fields:
▪ Entity Name
▪ Jurisdiction
▪ Business Domain
▪ Address Country
▪ Operating Countries
▪ Registration Country
▪ External ID Type
▪ Original Script Name
▪ City
▪ External ID
▪ Identification Numbers
NOTE
The combination of Entity Name or Original Script Name along
with Jurisdiction and Business Domain must be provided to
Scan.
For more details on fields, see the Field Descriptions section.
6. Perform the following for Individual or Entity:
7. Click Scan. The screened watch list records are displayed.
a. For Analyst & Supervisor:
Click Scan. The screened watch list records are displayed without creating an Alert in
the L1 Investigation or case in ECM.
Figure 63: Scanning Real-time Screening Records Table

REAL-TIME SCREENING
SCREENING WATCH LIST RECORDS IN REAL-TIME
CUSTOMER SCREENING ADMINISTRATION GUIDE | 79
b. For Analyst & Supervisor:
Click Scan. It displays the screened watch list records.
Click Scan & Investigate. It generates an alert in the L1 Investigation or case in ECM
based on the configurations.
The alert ID or Case ID results are displayed.
Figure 64: Scanning Real-time Screening – Individual (Supervisor)
c. You can view generated alert ID or Case ID in the results and click Alert ID or Case ID to
view the Alert Details or Case Details page, respectively.
Figure 65: Alert Details

REAL-TIME SCREENING
SCREENING WATCH LIST RECORDS IN REAL-TIME
CUSTOMER SCREENING ADMINISTRATION GUIDE | 80
8. Click Clear to clear the field data and re-enter.
6.2.1.1 Field Descriptions
▪ Given Name: Enter the first name of the Individual.
▪ Entity Name: Enter the entity name.
▪ Family Name: Enter the family name of the Individual.
▪ Jurisdiction: Select the Jurisdiction to which the Individual or Entity belongs.
▪ Business Domain: Select the business domain to which the Individual or Entity belongs.
You can also provide details in the following optional fields:
▪ Address Country: Enter the current address of the Individual or Entity.
▪ Country of Birth: Enter the country code in which the individual was born or the Entity
originated. This field is applicable only when you select the search type as Individual.
▪ Residency Country: Enter the country code of residence of the Individual or Entity. This
field is applicable only when you select the search type as Individual.
▪ Operating Countries: Enter the country codes the Entity operates in. To add more than one
country code, add a comma between the countries. For example, the US, IN. This field is
applicable only when you select the search type as Entity.

REAL-TIME SCREENING
RUNNING THE REAL-TIME SCREENING JOB
CUSTOMER SCREENING ADMINISTRATION GUIDE | 81
▪ Registration Country: Enter the country code the Entity is registered in. This field is
applicable only when you select the search type as Entity.
▪ External ID Type: Select the external ID type of the Individual or Entity.
▪ External Type: Select the external type of Entity.
▪ Original Script Name: Enter the Individual or Entity's name in the original script if the script
is a non-Latin script.
▪ City: Enter the city of residence of the Individual or Entity.
▪ Nationalities: Enter the nationality country code of the Individual. This field is applicable
only when you select the search type as Individual.
▪ External ID: Enter the external ID unique to the Individual or Entity.
▪ Date of Birth: Enter the Date of birth of the Individual. This field is applicable only when you
select the search type as Individual.
▪ Passport Number: Enter the passport number of the Individual.
▪ Passport Issuing Country: Enter the country code in which the passport is issued.
▪ Identification Numbers: Enter the identification numbers of the Individual or Entity.
▪ Operating Countries: Enter the operating country code of the Entity.
6.3 Running the Real-Time Screening Job
To source the data from the Financial Crime Data Model (FCDM) and run the FCDM data preparation
process, disable the MAIN_RT real-time screening job phase and enable the FCDM job phases in the
customer screening-real time.properties and external-entity-
screening.properties run profiles. These files are available in the
<domain_name>/edq/oedq.local.home/runprofiles/ directory in the WinSCP server.
phase.Start\ Real-time\ Screening.enabled = Y
# Control single real-time screening types
phase.Real-time\ Screening.process.Individual\ Real-time\
Screening.san_enabled = Y
phase.Real-time\ Screening.process.Individual\ Real-time\
Screening.pep_enabled = Y
phase.Real-time\ Screening.process.Individual\ Real-time\
Screening.edd_enabled = Y
phase.Real-time\ Screening.process.Entity\ Real-time\ Screening.san_enabled
= Y
phase.Real-time\ Screening.process.Entity\ Real-time\ Screening.pep_enabled
= Y
phase.Real-time\ Screening.process.Entity\ Real-time\ Screening.edd_enabled
= Y

REAL-TIME SCREENING
ADDING A NEW FIELD IN A WEBSERVICE
CUSTOMER SCREENING ADMINISTRATION GUIDE | 82
6.4 Adding a New Field in a Webservice
Currently, you can only search for the ready-to-use web service fields in the Real-time screening user
interface. If you want to add a custom field to an existing web service, for example, full name, you
must enter the field name in the applicable web service node and add the field to the applicable
process. To do this, follow these steps:
1. In the Director landing page, expand the Customer-Screening project in the Project Browser
pane.
Figure 66: Project Browser Pane
2. Expand the Web Services node and double-click the IndividualScreen web service.
Figure 67: Web Services Node

REAL-TIME SCREENING
ADDING A NEW FIELD IN A WEBSERVICE
CUSTOMER SCREENING ADMINISTRATION GUIDE | 83
3. Click the Plus icon in the Web Service Inputs window. A new row appears in the table.
Figure 68: Edit Web Service Window

REAL-TIME SCREENING
ADDING A NEW FIELD IN A WEBSERVICE
CUSTOMER SCREENING ADMINISTRATION GUIDE | 84
4. Enter the name of the column, for example, FullName, and click anywhere inside the table to
enable the Next button.
5. Click Next until you view the Finish button, and click Finish.
6. In the Customer-Screening project, expand the Processes node and double-click the
Individual Real time Screening process.
Figure 69: Processes Node
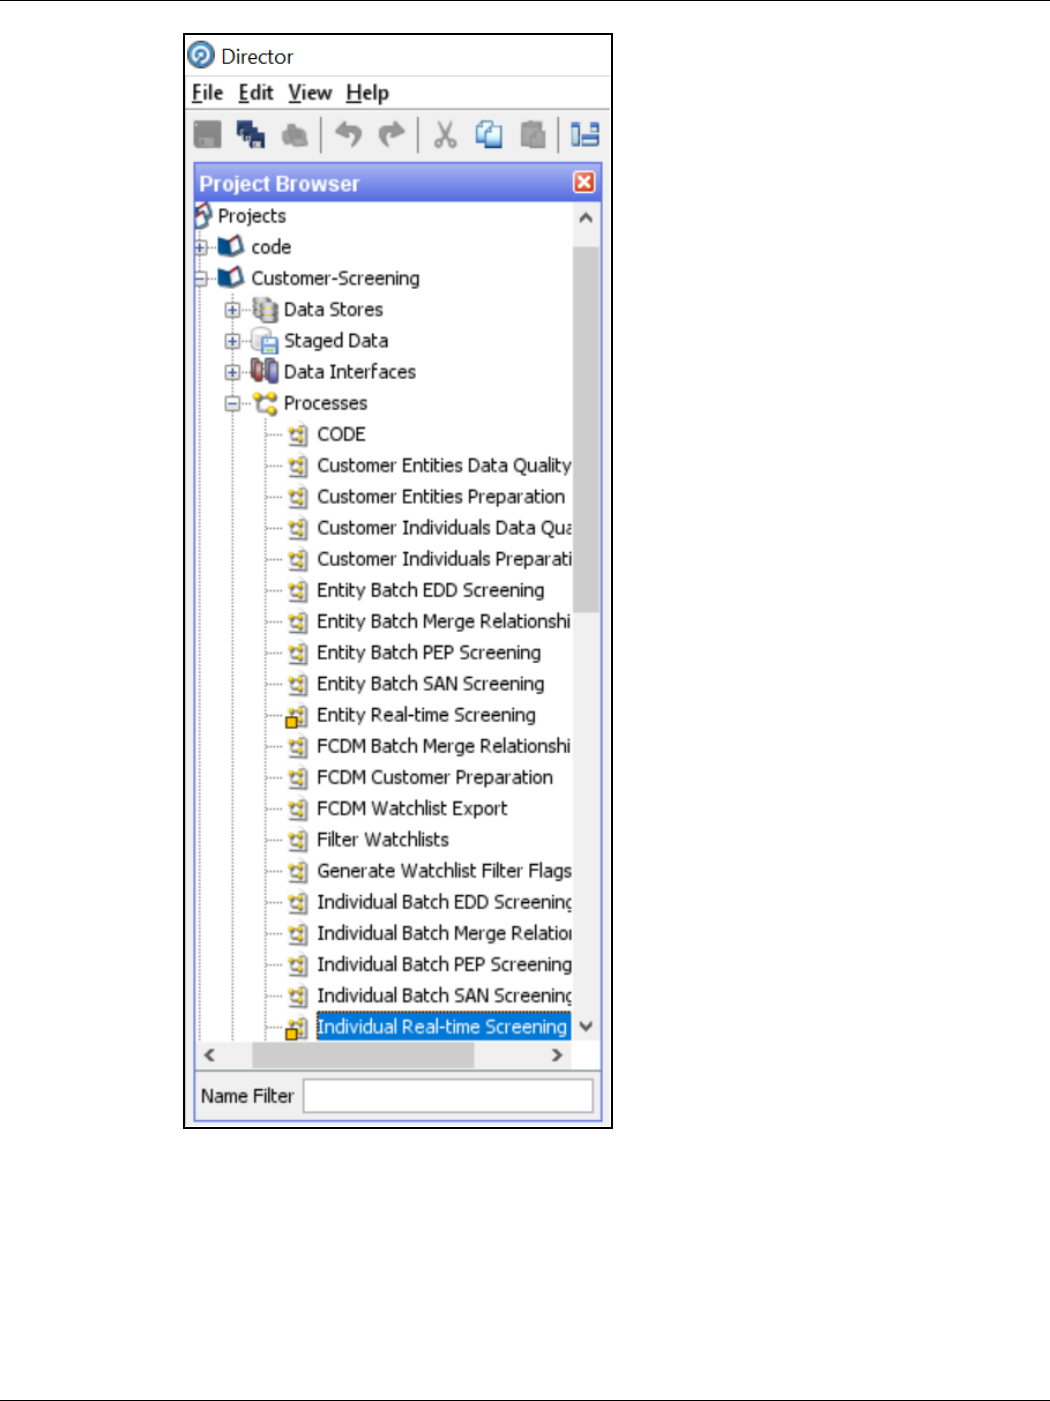
REAL-TIME SCREENING
ADDING A NEW FIELD IN A WEBSERVICE
CUSTOMER SCREENING ADMINISTRATION GUIDE | 85
7. Click the Individual Real-time Data process icon in the Individual Real-time Screening
window.
8. Search for FullName in the Reader Configuration window.

REAL-TIME SCREENING
ADDING A NEW FIELD IN A WEBSERVICE
CUSTOMER SCREENING ADMINISTRATION GUIDE | 86
Figure 70: Reader Configuration window
9. Select FullName and select the Remove icon to move it to Selected Inputs for Process.
10. Click OK.
After you add the new field, you must integrate it with the Real-time screening user interface to
display it in the user interface. To do this, follow these steps:
1. Open the RTScreening.html file from the <Installed Sanctions Path>/js/views
directory. For example, ECM808SAN.war path }/realTimeScreening/js/views.
2. Change the external ID placeholders to FullName.
<oj-label for =”text-input”>External ID</oj-label>
<oj-input-text id=”externalId” value=”{{ExternalId}}”></oj-input-text>
3. Copy the code with the new value.
4. Open the RTScreening.js file from the <Installed Sanctions Path>/js/viewModels
directory. For example, ECM808SAN.war path }/realTimeScreening/js/viewModels.
5. Update the placeholder within ‘’ with the copied code with the same syntax as given in the id
in the html file in the self.Clear function:
Document.getElementById(“FullName”).value = ‘’;
6. Update the placeholder within “” with the copied code with the same syntax as given in the id
in the html file in the self. IndividualScreenObject array:
FullName:””

BATCH SCREENING
CONFIGURING THE EDQ URL
CUSTOMER SCREENING ADMINISTRATION GUIDE | 87
7 Batch Screening
The following diagram describes the data movement from Customer Screening to Enterprise Case
Management (ECM) during the batch screening process.
Figure 71: Batch Screening Workflow
The data movement in the workflow is as follows:
1. Data is moved from the STG_PARTY_MASTER, STG_PARTY_ADDRESS, STG_CASA,
STG_LOAN_CONTRACTS, STG_PARTY_ACCOUNT_ROLE_MAP, STG_PARTY_ROLE_MAP,
STG_TD_CONTRACTS, STG_TRADING_ACCOUNT, and STG_PARTY_OTHER_NAMES tables to the
CUST, CUST_ADDR, ACCT, CUST_NAME and other associated customer tables using the Table-
to-Table (T2T) mode.
2. The watch list data is downloaded from the watch list-management project in EDQ. The
watch list data is matched with the data in the CUST and CUST_ADDR tables in the Customer-
Screening project.
3. The matches are loaded into the CS_MATCHES table and the corresponding watch list data is
loaded into the CS_WATCHLIST table.
4. Data from the CS_MATCHES_HIST table is generated as alerts in the CS_ALERTS and
CS_ALERTS_MATCHES tables.
NOTE
1. The CS_MATCHES_HIST table contains all the matches
made. Each time screening is run, the CS_MATCHES table
is compared to the CS_MATCHES_HIST table and any new
or updated matches are added to the CS_MATCHES_HIST
table. This creates a new alert.
2. Every time you run the Customer-Screening project,
data is cleared from the CS_MATCHES table.
5. Data is correlated and loaded into the KDD_CASES and FCC_EVENTS tables in ECM.
7.1 Configuring the EDQ URL
To configure the EDQ URL for batch screening, follow these steps:
1. Navigate to the FCI_DB_HOME/bin directory.

BATCH SCREENING
STAGING DATABASE CONNECTION DETAILS
CUSTOMER SCREENING ADMINISTRATION GUIDE | 88
2. Execute the command /EDQInsert.sh <INFODOM NAME>. This step is used to register the
EDQ server details. You must replace the INFODOM NAME placeholder with your domain name.
3. Enter the following details in the console where the command is run:
▪ EDQ server IP: An example of the EDQ URL is
http://whf00bte.in.oracle.com:7008/edq. Replace this with your EDQ server’s
URL.
▪ EDQ Server Direct Port number: This is the JMX port number. This value must be 8090.
▪ EDQ Server User Name: An example of the EDQ server user name is weblogic. Replace
this with your EDQ server’s user name.
▪ EDQ Password: An example of the EDQ password is weblogic1. Replace this with your
EDQ server’s password.
Figure 72: Configure the EDQ URL in Batch Screening
4. Configure the EDQ URL in the CONFIG schema. To do this, run the following script and replace
the placeholders in the v_method_name and v_param_1 columns with the EDQ URL, EDQ
user name, and EDQ password respectively:
select t.*,t.rowid from aai_wf_application_api_b t where
t.v_process_id='CSRT' and t.v_app_api_id in
('1521535704140','1521535760435')
7.2 Staging Database Connection Details
To run the customer screening jobs using the Financial Crime Data Model (FCDM) as a source of
customer and external entity data, you must add the connection details of the staging database into
which FCDM will place the data to be screened in EDQ.
To set the connection details for customer and external entity data, follow these steps:
1. Go to the EDQ URL and open the Director menu.
Figure 73: Director Menu in EDQ

BATCH SCREENING
STAGING DATABASE CONNECTION DETAILS
CUSTOMER SCREENING ADMINISTRATION GUIDE | 89
2. In the Director landing page, expand the Customer-Screening project in the Project Browser
pane.
Figure 74: Project Browser Pane
3. Expand the Data Stores node and open FCDM Batch Data. The Edit Data Store window
appears.
Figure 75: Data Stores Node

BATCH SCREENING
STAGING DATABASE CONNECTION DETAILS
CUSTOMER SCREENING ADMINISTRATION GUIDE | 90
4. In the Edit Data Store window, enter the database host, database name, user name, and
password.
Figure 76: Edit Data Store for Staging Database Connection

BATCH SCREENING
ENABLING CUSTOMER AND EXTERNAL ENTITY TABLES
CUSTOMER SCREENING ADMINISTRATION GUIDE | 91
NOTE
1. OEDQ release 12c has a base config folder and a local
config folder. The base config folder is called oedqhome
and the local config folder is called oedqlocalhome. The
names may differ in some cases. For example, dots or
underscores may be inserted in the names, such as
oedq_local_home.
2. It is not necessary to enter the schema name if the user
name mentioned is the schema owner.
3. The parameters can be passed as externalized values in
the runopsjob command.
7.3 Enabling Customer and External Entity Tables
The FCDM Integration section of the customer-screening.properties and
external.entity.properties run profile contains the following parameters. These files are
available in the <domain_name>/edq/oedq.local.home/runprofiles/ directory in the WinSCP
server.
• phase.Batch\ Screening\ FCDM.enabled
• phase.Snapshot\ External\ Entity\ Data.enabled
To enable screening of the customer table, set phase.Batch\ Screening\ FCDM.enabled to Y
and phase.Snapshot\ External\ Entity\ Data.enabled to N.

BATCH SCREENING
DATA PREPARATION IN FCDM
CUSTOMER SCREENING ADMINISTRATION GUIDE | 92
To enable screening of the external entity table, set phase.Batch\ Screening\ FCDM.enabled to
N and phase.Snapshot\ External\ Entity\ Data.enabled to Y.
7.4 Data Preparation in FCDM
Before you prepare data for individuals and entities, there is an FCDM-specific data preparation
process which needs to be performed. This process performs the following transformations:
• Splits records into individuals and entities based on Customer Type Code
• Creates additional rows of data for aliases
• Creates name attributes compatible with CDI
• Derives gender and year of birth for individuals
NOTE
The FCDM Data Preparation job is built on expected population of
data in FCDM. This must be validated for each specific
implementation and the process adapted if required.
7.4.1 Establishing a JDBC Database Connection using WebLogic
To set up a database connection using the WebLogic server, follow these steps:
1. In the WebLogic server, provide the name of the JNDI directory in the JNDI Name field in the
General subtab of the Configurations tab.
Figure 77: JNDI Name

BATCH SCREENING
DATA PREPARATION IN FCDM
CUSTOMER SCREENING ADMINISTRATION GUIDE | 93
2. In the Connection Pool subtab, provide the connection details of the JDBC URL. Enter the
JDBC URL in the URL field and the class name of the JDBC driver in the Driver Class Name
field.
Figure 78: JDBC URL and Driver
3. Go to the EDQ URL and open the Director menu. The Director landing page appears.
Figure 79: Director Menu in EDQ
4. In the Director landing page, expand the Customer-Screening project in the Project Browser
pane.

BATCH SCREENING
DATA PREPARATION IN FCDM
CUSTOMER SCREENING ADMINISTRATION GUIDE | 94
Figure 80: Project Browser Pane
5. In the Project Browser pane, right-click Data Stores under the Customer-Screening project
and then select New Data Store.
Figure 81: New Data Store

BATCH SCREENING
ANALYZING THE DATA QUALITY OF CUSTOMER DATA AND EXTERNAL ENTITY
CUSTOMER SCREENING ADMINISTRATION GUIDE | 95
6. In the New Data Store window, select the type as JDBC Connection and click Next.
Figure 82: Edit Data Store
7. In the Edit Data Store window, enter the JDBC connection details.
8. Click OK.
You have now created a JDBC database connection.
7.5 Analyzing the Data Quality of Customer Data and
External Entity
Customer Screening is integrated with a Data Quality (DQ) check process which checks the quality of
data in FCDM for screening. This process is run independently of the screening process and identifies
potential issues with the customer and external entity data quality that can affect the screening
efficiency. Run the Analyze FCDM Customer Data Quality job to analyze the data quality. This
job checks data for any quality issues that can affect the screening efficiency.
To analyze the customer data, follow these steps:
1. Ensure that data is loaded into FCDM and the Customer-Screening project has the correct
database parameters.
2. Go to the EDQ URL and open the Director menu.
Figure 83: Director Menu in EDQ
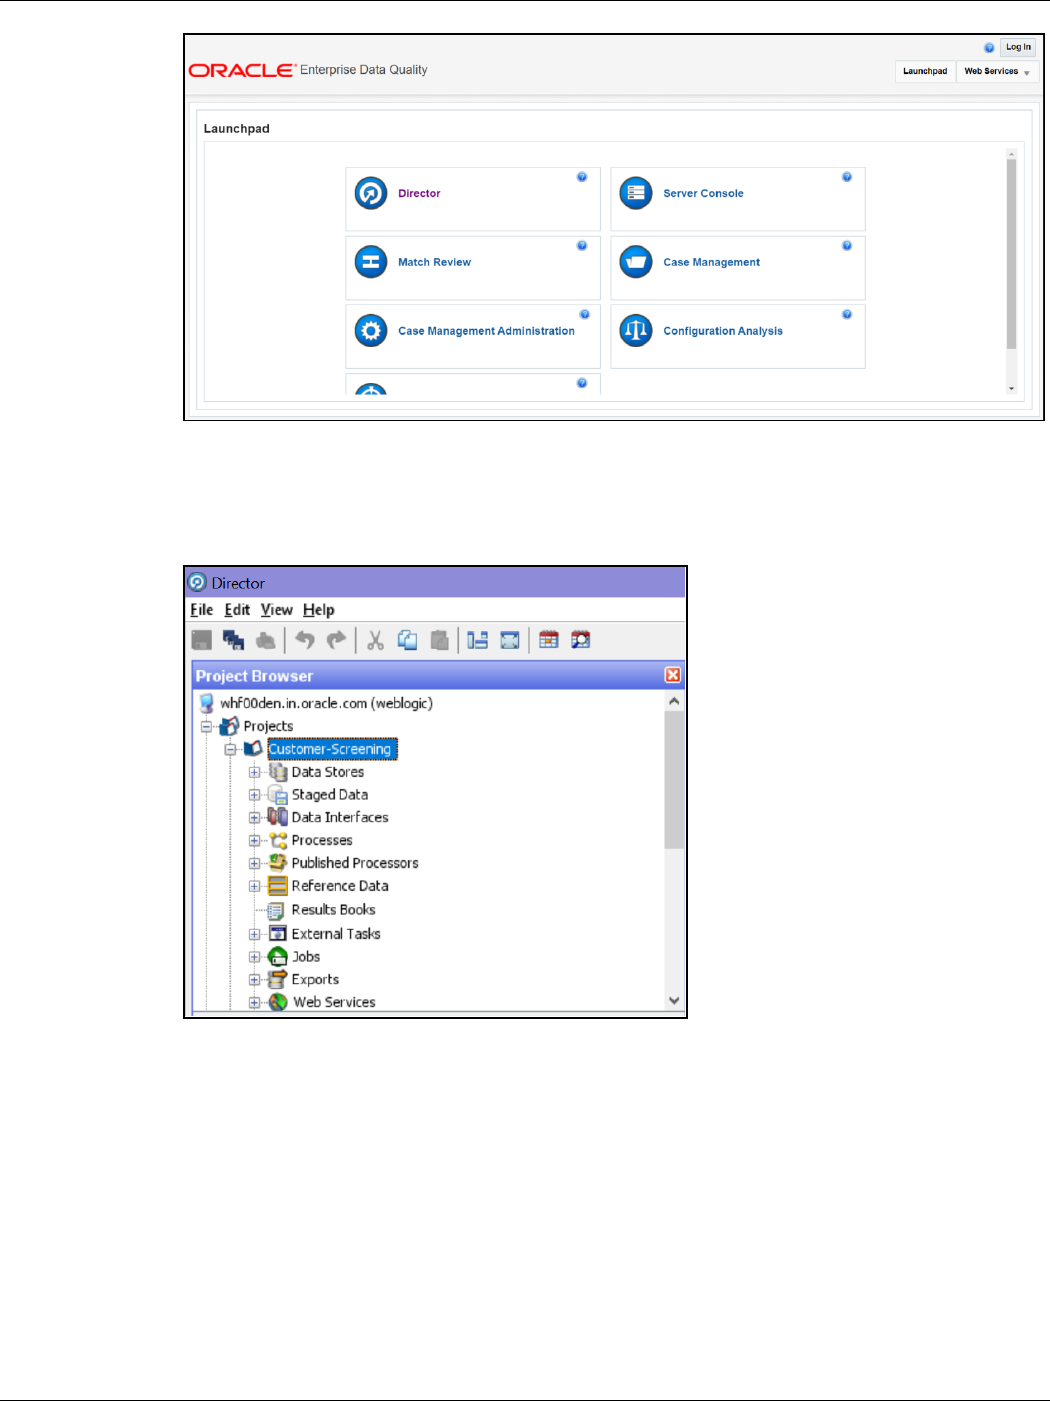
BATCH SCREENING
ANALYZING THE DATA QUALITY OF CUSTOMER DATA AND EXTERNAL ENTITY
CUSTOMER SCREENING ADMINISTRATION GUIDE | 96
3. In the Director landing page, expand the Customer-Screening project in the Project Browser
pane.
Figure 84: Project Browser Pane
4. Expand the Jobs node.
5. Right-click the Analyze FCDM Customer Data Quality job and click Run.
Figure 85: Jobs Node

BATCH SCREENING
ANALYZING THE DATA QUALITY OF CUSTOMER DATA AND EXTERNAL ENTITY
CUSTOMER SCREENING ADMINISTRATION GUIDE | 97
To analyze the external entity data, follow these steps:
1. Ensure that data is loaded into FCDM and the Watch list Management project has the correct
database parameters.
2. Go to the EDQ URL and open the Director menu.
Figure 86: Director Menu in EDQ

BATCH SCREENING
ANALYZING THE DATA QUALITY OF CUSTOMER DATA AND EXTERNAL ENTITY
CUSTOMER SCREENING ADMINISTRATION GUIDE | 98
3. In the Director landing page, expand the Watch list Management project in the Project
Browser pane.
Figure 87: Project Browser Pane
4. Expand the Jobs node.

BATCH SCREENING
ANALYZING THE DATA QUALITY OF CUSTOMER DATA AND EXTERNAL ENTITY
CUSTOMER SCREENING ADMINISTRATION GUIDE | 99
5. Right-click the Analyze FCDM Customer Data Quality job and click Run.
Figure 88: Jobs Node
7.5.1 Data Quality Errors
For each Data Quality (DQ) error, a severity code is assigned, and it corresponds to the likely impact
the issue will have on screening efficiency. The error codes and the associated messages that are
displayed are based on the data analysis are shown in the following table.
Table 5: Severity Codes Assigned to Data Quality Errors
Severity Code
Data Quality Error
1
Severe data error which prevents screening.
2
Invalid data which will limit the effectiveness of screening.
3
Missing data which will limit the effectiveness of screening.

BATCH SCREENING
EXTRACT TRANSFORM LOAD (ETL) DATABASE CONNECTION DETAILS
CUSTOMER SCREENING ADMINISTRATION GUIDE | 100
Severity Code
Data Quality Error
4
Invalid data which does not affect screening. Errors in this
category will not affect the output of the match processor but
can cause issues when manually evaluating any potential
matches that are raised.
The data quality check analyses each row of data. If the analysis of any row results in a severity code
of 1, it is rejected by the screening process. This is because there is a lack of data in the core attributes
used by the screening process, and so screening cannot be performed.
The screening processes load data that cannot be screened into the CUST_Individuals_Invalid
staged data or the CUST_Entities_Invalid staged data tables for the individual and
external entity records, respectively. The error codes associated with each row are also stored in the
database.
7.6 Extract Transform Load (ETL) Database Connection
Details
After screening is run, relationships (matches) and watch list records are exported to the Customer
Screening database, and this data is sent to ECM based on the connections configured in the data
store.
To set the ETL database connection details, follow these steps
1. Go to the EDQ URL and open the Director menu.
Figure 89: Director Menu in EDQ
2. In the Director landing page, expand the Customer-Screening project in the Project Browser
pane.
Figure 90: Project Browser Pane

BATCH SCREENING
EXTRACT TRANSFORM LOAD (ETL) DATABASE CONNECTION DETAILS
CUSTOMER SCREENING ADMINISTRATION GUIDE | 101
3. Expand the Data Stores node and open FCDM Batch Data. The Edit Data Store window
appears.
Figure 91: Data Stores Node
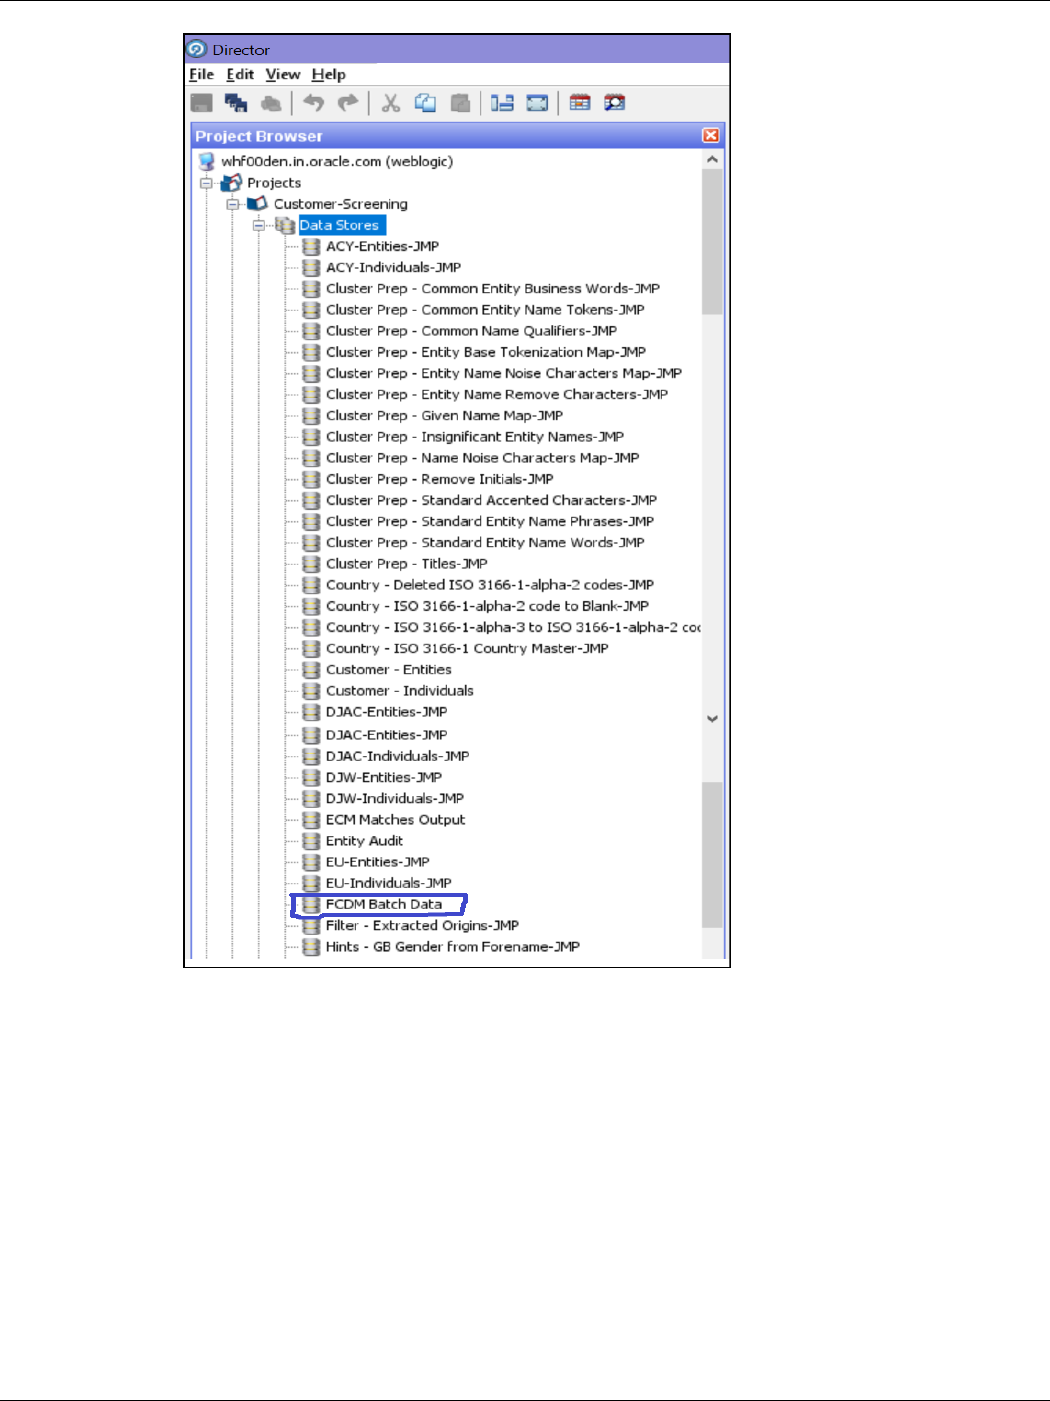
BATCH SCREENING
EXTRACT TRANSFORM LOAD (ETL) DATABASE CONNECTION DETAILS
CUSTOMER SCREENING ADMINISTRATION GUIDE | 102
4. In the Edit Data Store window, enter the database host, database name, user name, and
password.
Figure 92: Edit Data Store for Staging Database Connection

BATCH SCREENING
RUNNING THE BATCH SCREENING JOB
CUSTOMER SCREENING ADMINISTRATION GUIDE | 103
NOTE
1. OEDQ release 12c has a base config folder and a local
config folder. The base config folder is called oedqhome
and the local config folder is called oedqlocalhome. The
names may differ in some cases. For example, dots or
underscores may be inserted in the names, such as
oedq_local_home.
2. It is not necessary to enter the schema name if the user
name mentioned is the schema owner.
3. The parameters can be passed as externalized values in
the runopsjob command.
7.7 Running the Batch Screening Job
To source the data from the Financial Crime Data Model (FCDM) and run the FCDM data preparation
process, disable the MAIN batch screening job phase and enable the FCDM version in the customer
screening.properties and external-entity-screening.properties run profiles:
# Globally turns on/off batch screening types
phase.Batch\ Screening.enabled = N
phase.Batch\ Screening\ FCDM.enabled = Y
To export the data to the Customer Screening database these job phases must also be enabled:
phase.ECM\ Export\ Matches.enabled = Y

BATCH SCREENING
GENERATING ALERTS
CUSTOMER SCREENING ADMINISTRATION GUIDE | 104
phase.ECM\ Export\ Watch list.enabled = Y
7.8 Generating Alerts
This job will move the alerts data displayed in the L1 Investigation for Alert Management from
different origins in the source database to the consolidated database.
The Customer and Watchlist data will be screened in Enterprise Date Quality (EDQ) server. If any
Customer data is matched with Watchlist Data, then the events are created. Based on the Customer,
the alerts are generated.
If any customer data is changed in source data, only that data is moved in the consolidated database.
Based upon the date, you run the batch.
The following workflow explains the data movement from the source database to the consolidated
database.
Figure 93: Generating Alerts Workflow
To run the batch to move data from the source database to the consolidated database, follow these
steps:

BATCH SCREENING
GENERATING ALERTS
CUSTOMER SCREENING ADMINISTRATION GUIDE | 105
1. Log In to the Customer Screening application.
2. Click Common Tasks the list of common tasks displayed. Then click Rule Run Framework,
and then click Run. The Run page is displayed.
Figure 94: Run Page
3. In the Run page, select the Oracle_CS_Zipper_Processing checkbox and click Fire Run
.
Figure 95: Run Page

BATCH SCREENING
GENERATING ALERTS
CUSTOMER SCREENING ADMINISTRATION GUIDE | 106
4. In the Run Definition section, select Request Type from the drop-down list.
5. In the Execution Mode section, select the Batch value as Create to create the batch or select
Create & Execute to create the batch and execute it.
a. If you select Execution Mode as Create & Execute, then select MIS Date.
6. Select the Wait as No if you want to create or create & execute the batch without any delay or
select Yes and enter the duration value in seconds.
7. In the Others section, enter the Parameters and Filters if required.

APPENDIX A: SCREENING NON-LATIN CHARACTER SETS
GENERATING ALERTS
CUSTOMER SCREENING ADMINISTRATION GUIDE | 107
8 Appendix A: Screening Non-Latin Character Sets
The reference data sources supported by Customer Screening are all provided in the Latin character
set, and some in the original scripts. The screening process can also be used with non-Latin data.
Non-Latin data can be screened against the Latin reference data sources which are supported by
performing transliteration of data from the non-Latin character set to the Latin character set.
Non-Latin customer data can be screened against non-Latin reference data without any changes to
the product, although certain fuzzy text matching algorithms may not be as effective when used to
match data with the non-Latin character set. Text is processed on a left-to-right basis.
NOTE
You may have to install additional language packs to display non-
Latin data. For more information, contact My Oracle Support
(MOS).
The following screenshot shows the transliteration of Cyrillic to the Latin character set:
Figure 96: Non-Latin Character Set

APPENDIX A: SCREENING NON-LATIN CHARACTER SETS
ORIGINAL SCRIPT MATCHING
CUSTOMER SCREENING ADMINISTRATION GUIDE | 108
8.1 Original Script Matching
To match the original script data against reference data, follow these steps:
1. Prepare customer and external entity data such that non-Latin names are populated in the
Original Script Name fields.
2. Enable Original Script Name match rules and clusters.
For more information, see the Oracle Financial Services Customer Data Interfaces Guides.
NOTE
You must make changes to the FCDM Customer Preparation
process to support original script matching. For more information,
contact My Oracle Support (MOS).

APPENDIX B: REFERENCE DATA TABLES FOR WATCH LISTS
ORIGINAL SCRIPT MATCHING
CUSTOMER SCREENING ADMINISTRATION GUIDE | 109
9 Appendix B: Reference Data Tables for Watch
Lists
This appendix lists the reference data tables which are available in Customer Screening. These tables
contain data that is used to calculate the risk scores and PEP risk scores. The reference data tables are
stored in the Watch list Management project.
The following table has information on the different reference data tables which contain risk score
values used by each watch list.
Table 6: Reference Data Tables for Watch Lists
Screening Process or
Watch List
Reference Data Table Used
Multiple screening
processes
The following reference data table contains risk score values used by
multiple screening processes:
• Risk - ISO 3166-1 Country to Risk Score (used by the lookup Risk -
ISO 3166-1-alpha-2 code to Risk Score) is used to derive a risk
score from a country code
Country prohibition
screening process
The following reference data tables contain risk score values used in
the country prohibition screening process:
• Country Prohibitions - Entities
• Country Prohibitions - Individuals
Dow Jones watch list (DJW)
The following reference data tables contain risk score values used
when calculating risk scores for the Dow Jones watch list records:
• DJW Occupation Category
• DJW List Provider Risk Scores
• DJW SI Category Description
• DJW SI Category
Dow Jones Anti-Corruption
(DJAC) watch list
The following reference data tables contain risk score values used
when calculating risk scores for the Dow Jones watch list records:
• DJAC Occupation Category
• DJAC List Provider Risk Scores
• DJAC SI Category Description
EU watch list
There are no reference data tables containing risk score values used
only for calculating risk scores for the EU watch list records.
HM Treasury watch list
The HMT Regime reference data table contains risk score values
used when calculating risk scores for the HM Treasury watch list
records.
OFAC watch list
The OFAC SDN Program reference data table contains risk score
values used when calculating risk scores for the OFAC watch list
records.
UN watch list
The UN List Type reference data table contains risk score values
used when calculating risk scores for the UN watch list records.

APPENDIX B: REFERENCE DATA TABLES FOR WATCH LISTS
ORIGINAL SCRIPT MATCHING
CUSTOMER SCREENING ADMINISTRATION GUIDE | 110
Screening Process or
Watch List
Reference Data Table Used
World-Check (WC) watch list
The following reference data tables contain risk score values used
when calculating risk scores for the World-Check watch list records:
• WC Category
• WC Keyword (used by the lookup WC Keyword - Risk Score
Lookup)
Accuity watch list
The following reference data tables contain risk score values used
when calculating risk scores for the Accuity watch list records:
• Accuity Program Sub-Category Risk Scores
• Accuity Source Risk Scores
NA
The Risk – Risk Element Weighting reference data table
contains the weightings used when calculating a record risk score
from the various contributing elements.

APPENDIX C: PRECONFIGURED WATCH LIST INFORMATION
HM TREASURY WATCH LIST
CUSTOMER SCREENING ADMINISTRATION GUIDE | 111
10 Appendix C: Preconfigured Watch List
Information
This appendix contains details of each of the pre-configured watch lists that can be used by Customer
Screening.
10.1 HM Treasury Watch List
The HM Treasury publishes a sanctions list that can be used for screening in Customer Screening. The
sanctions list provides a consolidated list of targets listed by the United Nations, European Union, and
the United Kingdom under legislation relating to current financial sanctions regimes. For more
information, visit the HM Treasury website.
Customer Screening uses the watch list in a semi-colon delimited form. Click the following link to
download the .csv file.
https://ofsistorage.blob.core.windows.net/publishlive/ConList.csv
10.2 OFAC Watch List
The US Treasury’s Office of Foreign Assets Control (OFAC) administers and enforces economic and
trade sanctions based on US foreign policy and national security goals against targeted foreign
countries, terrorists, international narcotics traffickers, and those engaged in activities related to the
proliferation of weapons of mass destruction. For more information, visit the Treasury website.
Customer Screening supports the OFAC Specially Designated Nationals and OFAC Consolidated
Sanctions watch lists.
The OFAC Specially Designated Nationals (SDN) watch list must be downloaded in three parts:
https://www.treasury.gov/ofac/downloads/sdn.csv
https://www.treasury.gov/ofac/downloads/add.csv
https://www.treasury.gov/ofac/downloads/alt.csv
The OFAC Consolidated Sanctions List watch list must be downloaded in three parts:
https://www.treasury.gov/ofac/downloads/consolidated/cons_prim.csv
https://www.treasury.gov/ofac/downloads/consolidated/cons_add.csv
https://www.treasury.gov/ofac/downloads/consolidated/cons_alt.csv

APPENDIX C: PRECONFIGURED WATCH LIST INFORMATION
EU WATCH LIST
CUSTOMER SCREENING ADMINISTRATION GUIDE | 112
10.3 EU Watch List
The European Union applies sanctions or restrictive measures to achieve certain objectives as
mentioned in the Common Foreign and Security Policy (CFSP) and defined in Article 11 of the Treaty
on the European Union. The European Commission offers a consolidated list containing the names
and identification details of all persons, groups, and entities targeted by these financial restrictions.
For more information, visit the European Commission website.
To download the consolidated list, follow these steps:
1. Go to https://webgate.ec.europa.eu/europeaid/fsd/fsf#!/account and create a user name and
password to the site.
2. Navigate to https://webgate.ec.europa.eu/europeaid/fsd/fsf#!/files and open the settings for
the crawler file.
3. Copy the URL for 1.0 XML (Based on XSD). This will be in the format
https://webgate.ec.europa.eu/europeaid/fsd/fsf/public/files/xmlFullSanc
tionsList/content?token=[username]. You must replace the [username] placeholder
with the user name you have created.
4. Enter this URL in your run profile or download task.
10.4 UN Consolidated Watch List
The United Nations (UN) or United Nations Security Council consolidated list is a watch list that
includes all individuals and entities who are subject to sanctions measures imposed by the Security
Council. For more information, visit the UN Security Council website.
Download the consolidated list from
https://www.un.org/sc/suborg/sites/www.un.org.sc.suborg/files/consolidated.xml.
10.5 World-Check Watch List
The World-Check watch list provides a subscription-based service and offers a consolidated list of
Politically Exposed Persons (PEPs) and entities and individuals appearing on the HM Treasury, OFAC,
and other world lists. Three levels of subscription are provided: Standard, Premium, and Premium+.
Some features of the World-Check lists are only available to users with a higher subscription level. For
more information, visit the World-Check website.
To download the World-Check Premium+ feed subscription service, set the following values in the WC
Setup section of the watch list-management.properties run profile:
phase.WC\ -\ Download.enabled = Y
phase.WC\ -\ Download\ native\ aliases.enabled = Y
phase.WC\ -\ Stage\ reference\ lists.enabled = Y
phase.*.process.*.use_accelus_url = Y
To download the Standard or Premium feed subscription services, set the following values in the WC
Setup section of the watch list-management.properties run profile:
phase.WC\ -\ Download.enabled = Y
phase.WC\ -\ Download\ native\ aliases.enabled = N

APPENDIX C: PRECONFIGURED WATCH LIST INFORMATION
DOW JONES WATCH LIST
CUSTOMER SCREENING ADMINISTRATION GUIDE | 113
phase.WC\ -\ Stage\ reference\ lists.enabled = Y
phase.*.process.*.use_accelus_url = Y
When the parameters are set to Y, the watch list data is downloaded from the following URL:
https://app.accelus.com/#accelus/fsp/%7B%22location%22%3A%22%3Flocale%3Den-
US%23fsp%2Fquickid%2F
When the parameters are set to N, the watch list data is downloaded from the following URL:
https://www.world-check.com/frontend/profile/
NOTE
If your instance of Oracle Financial Services Customer
Screening uses the WebLogic application server and you use
the World-Check watch list to screen individuals and entities,
then you must add the -DUseSunHttpHandler=true script
to the Server Start arguments of your EDQ server to download
the World-Check watch list data.
10.6 Dow Jones Watch List
The Dow Jones watch list provides a subscription-based service and offers a consolidated list of PEPs
(Politically Exposed Persons) and entities and individuals appearing on the various sanctions lists. For
more information, visit the Dow Jones website.
You can automate the download of the Dow Jones watch list using the following script files that are
provided with Customer Screening to configure the download process:
download-djw.sh (for use on Unix platforms)
download-djw.bat (for use on Windows platforms)
The script files are used by the automated task to download the data files and copy them to the Oracle
Enterprise Data Quality (OEDQ) landing area. The script files must be modified to provide the
download URL and the proxy server details for your Internet connection as follows:
1. Go to the EDQ URL and open the Director menu.
Figure 97: Director Menu in EDQ

APPENDIX C: PRECONFIGURED WATCH LIST INFORMATION
DOW JONES WATCH LIST
CUSTOMER SCREENING ADMINISTRATION GUIDE | 114
2. In the Director landing page, expand the Watch list Management project in the Project
Browser pane.
Figure 98: Project Browser Pane

APPENDIX C: PRECONFIGURED WATCH LIST INFORMATION
DOW JONES WATCH LIST
CUSTOMER SCREENING ADMINISTRATION GUIDE | 115
3. Expand the External Tasks node for the Watch list Management project and then double-
click on the Download Dow Jones Watch list task.
Figure 99: External Tasks Node
4. Configure the external task to call the batch or shell file by providing the directory and related
command as shown:
Figure 100: Edit Task Window for the Dow Jones Watch List

APPENDIX C: PRECONFIGURED WATCH LIST INFORMATION
DOW JONES ANTI-CORRUPTION WATCH LIST
CUSTOMER SCREENING ADMINISTRATION GUIDE | 116
5. Configure your PATH system variable to include the path to your Java installation.
6. Add the user name and password and the proxy server configuration details for Dow Jones in
the batch or script file.
10.7 Dow Jones Anti-Corruption Watch List
The Dow Jones Anti-Corruption watch list provides a subscription-based service that contains
information to help you assess, investigate, and monitor third-party risk with regards to the anti-
corruption compliance regulation. For more information, visit the Dow Jones website.
You can automate the download of the Dow Jones watch list using the following script files that are
provided with Customer Screening to configure the download process:
download-djac.sh (for use on Unix platforms)
download-djac.bat (for use on Windows platforms)
The script files are used by the automated task to download the data files and copy them to the Oracle
Enterprise Data Quality (OEDQ) landing area. The script files must be modified to provide the
download URL and the proxy server details for your Internet connection as follows:
1. Go to the EDQ URL and open the Director menu.
Figure 101: Director Menu in EDQ

APPENDIX C: PRECONFIGURED WATCH LIST INFORMATION
DOW JONES ANTI-CORRUPTION WATCH LIST
CUSTOMER SCREENING ADMINISTRATION GUIDE | 117
2. In the Director landing page, expand the Watch list Management project in the Project
Browser pane.
Figure 102: Project Browser Pane

APPENDIX C: PRECONFIGURED WATCH LIST INFORMATION
DOW JONES ANTI-CORRUPTION WATCH LIST
CUSTOMER SCREENING ADMINISTRATION GUIDE | 118
3. Expand the External Tasks node for the Watch list Management project and then double-
click on the Download Dow Jones Anti-Corruption List task.
Figure 103: External Tasks Node
4. Configure the external task to call the batch or shell file by providing the directory and related
command as shown:
Figure 104: Edit Task Window for the Dow jones Anti-Corruption Watch List

APPENDIX C: PRECONFIGURED WATCH LIST INFORMATION
ACCUITY WATCH LIST
CUSTOMER SCREENING ADMINISTRATION GUIDE | 119
5. Configure your PATH system variable to include the path to your Java installation.
6. Add the user name and password and the proxy server configuration details for Dow Jones
Anti-Corruption in the batch or script file.
10.8 Accuity Watch List
The Accuity global watch list is a subscription-based service. The Accuity watch list’s proprietary
collection of watch list screening databases is an aggregation of specially designated individuals and
entities compiled from dozens of regulatory and enhanced due diligence lists from around the world.
This watch list provides the ideal framework for your customer screening and interdiction filtering
processes. For more information, visit the Accuity website.
Accuity provides aggregated data in the following watch lists:
• The Regulatory Due Diligence (RDD) watch list, which covers sanctioned entities and individuals.
You can use the Accuity Group File with this list. For more information, see Using the Accuity
Group File.
• The Enhanced Due Diligence (EDD) watch list, which covers entities and individuals who are not
part of the regulatory sanctions lists, but whose activity must be monitored.
• The Politically Exposed Persons (PEPs) Due Diligence Database watch list, which covers PEP
individuals.

APPENDIX C: PRECONFIGURED WATCH LIST INFORMATION
ACCUITY WATCH LIST
CUSTOMER SCREENING ADMINISTRATION GUIDE | 120
10.8.1 Using the Accuity Group File
The Accuity global Watch list is created by aggregating multiple watch lists. As such, any given
individual or entity can be represented in the watch list by multiple entries using the GROUP.XML file.
In the GROUP.XML file, all records which represent the same individual or entity are collected into
groups, and each group is assigned a unique group ID. The group ID has a unique identifier to
differentiate it from the original record identifier in Enterprise Case Management (ECM). Records that
are not included in the group use their original Accuity record ID with a different identifier to indicate
that they are single records.
NOTE
Only entities and individuals on the Regulatory Due Diligence
(RDD) watch lists are included in the group file.
The group file allows you to generate cases on individuals who are grouped together, instead of
generating cases on separate individuals. To use the group file for individuals, follow these steps:
1. Go to the EDQ URL and open the Director menu.
Figure 105: Director Menu in EDQ
2. In the Director landing page, expand the Customer-Screening project in the Project Browser
pane.
Figure 106: Project Browser Pane

APPENDIX C: PRECONFIGURED WATCH LIST INFORMATION
ACCUITY WATCH LIST
CUSTOMER SCREENING ADMINISTRATION GUIDE | 121
3. Expand the Data Stores node and then double-click the ACY node.
Figure 107: Data Stores Node
4. In the Edit Data Store window, deselect the Use groups checkbox.

APPENDIX C: PRECONFIGURED WATCH LIST INFORMATION
ACCUITY WATCH LIST
CUSTOMER SCREENING ADMINISTRATION GUIDE | 122
Figure 108: Edit Data Store Window for the Accuity Watch List
5. Configure your PATH system variable to include the path to your Java installation.
6. Add the user name and password and the proxy server configuration details for Accuity in the
batch or script file.
NOTE
If the Use groups checkbox is selected, you must have downloaded
the GROUP.XML file.
10.8.1.1 New Alerts Resulting from Use of the Group File
When you use the GROUP.XML file, the original record identifier for a record is replaced with the group
ID of the record. Any change to the original record identifier will result in new alerts being generated
for existing and known matches. This can happen in the following scenarios:
• If Individuals or entities are moved into, out of, or between groups, then new alerts are
generated for existing matches.
• If the setting of the Use groups checkbox is changed after alerts or cases are generated.
WARNING
Do not alter the setting of the Use groups checkbox during the
implementation phase of the project.
10.8.2 Configuring the .sh File
You can automate the download of the Accuity watch list using the following script files that are
provided with Customer Screening to configure the download process:

APPENDIX C: PRECONFIGURED WATCH LIST INFORMATION
ACCUITY WATCH LIST
CUSTOMER SCREENING ADMINISTRATION GUIDE | 123
• download-acy-edd.sh
• download-acy-pep.sh
• download-acy-san.sh
The script files are used by the automated task to download the data files and copy them to the Oracle
Enterprise Data Quality (OEDQ) landing area. The script files must be modified to provide the
download URL and the proxy server details for your Internet connection as follows:
1. Go to the EDQ URL and open the Director menu.
Figure 109 Director Menu in EDQ
2. In the Director landing page, expand the Customer-Screening project in the Project Browser
pane.
Figure 110: Project Browser Pane

APPENDIX C: PRECONFIGURED WATCH LIST INFORMATION
ACCUITY WATCH LIST
CUSTOMER SCREENING ADMINISTRATION GUIDE | 124
3. Expand the External Tasks node for the Watch list Management project and then double-
click on the Download Accuity EDD task.
Figure 111: External Tasks Node
4. Replace the EDQ_DOMAIN placeholder with the installed domain path for the EDD,PEP, and
SAN records.
Figure 112: Edit Task Window for the Accuity Watch List
5. Configure your PATH system variable to include the path to your Java installation.
6. Add the user name and password and the proxy server configuration details for Accuity in the
download-acy-edd.sh, download-acy-pep.sh, and download-acy-san.sh script files.

APPENDIX C: PRECONFIGURED WATCH LIST INFORMATION
DELTA WATCH LIST CONFIGURATIONS FOR THE DOW JONES WATCH LIST
CUSTOMER SCREENING ADMINISTRATION GUIDE | 125
NOTE
To ensure that you have the SFTP protocol enabled for
automatic password recognition, you must install sshpass.
10.9 Delta Watch List Configurations for the Dow Jones
Watch List
NOTE
These configurations are performed when you do not want to
download the full watch list, and only want to download the
delta watch list. This helps to reduce the download time and is
not part of the screening process.
Customer Screening recommends that you always use the full watch list during the screening process.
Due to the clustering strategy which is implemented in the screening process, you must not download
the delta watch list. There are certain cases in which you must download the delta watch list files, for
example, if the full watch list files are not yet available for download or if you want to save time.
Customers who download the delta watch list files must first download the full watch list files and then
download the delta watch list files. The delta watch list is then merged into the full watch list before
screening.
The following image shows the information flow for the delta watch list:
Figure 113: Flow for Delta Watch List
When you download the full watch list, data is stored in the FSI_WATCHLIST_INDIVIDUAL and
FSI_WATCHLIST_ENTITIES tables. When you download the delta watch list, data is first stored in the

APPENDIX C: PRECONFIGURED WATCH LIST INFORMATION
DELTA WATCH LIST CONFIGURATIONS FOR THE DOW JONES WATCH LIST
CUSTOMER SCREENING ADMINISTRATION GUIDE | 126
FSI_WATCHLIST_DELTA_INDIVIDUAL and FSI_WATCHLIST_DELTA_ENTITIES tables. Then, based
on the value in the ACTION Flag tag in the delta watch list, it merges with the full watch list.
The ACTION flag key is a non-editable value, and can be one of the following values:
• new: If the value is new, it means that these records are new and are added to the full watch list
when the delta files are merged with the full watch list.
• chg: If the value is chg, it means that these records are modified and are added to the full watch
list when the delta files are merged with the full watch list.
• del: If the value is del, it means that these records are no longer active and are removed from
the full watch list when the delta files are merged with the full watch list.
NOTE
You must always run the full watch list files before you run the
delta watch list files. The full watch list files must be
downloaded if, for example, the download of the delta watch
list files has failed for multiple days. You can also run the full
watch list once every week to ensure that the complete data
has been processed.
10.9.1 Configurations for the Full and Delta Watch Lists
The following configurations must be done for both full and delta watch list updates in the watch
list-management.properties run profile. The run profile is available in the
<domain_name>/edq/oedq.local.home/runprofiles/ directory when you log in to the WinSCP
server.
• Set phase.Initialise\ staged\ data.enabled = N to disable the .jmp file updates.
• Set phase.Initialise\ staged\ data\ DB.enabled = Y to initialize the database.
• Set phase.Initilize\ Prepared\ List\ Data.enabled = N to disable the .jmp file
updates.
• Set phase.Initilize\ Prepared\ List\ Data\ DB.enabled = Y to prepare the
database.
10.9.2 Running the Full Watch list
To run the full watch list, follow these steps:
1. Set the following properties in the watch list-management.properties file:
▪ phase.DJW\ -\ Download.enabled = Y.
▪ phase.DJW\ -\ Download\ Delta.enabled = N.
▪ phase.DJW\ -\ Stage\ reference\ lists.enabled = Y.
▪ phase.*.export.*.ind_table_name = FSI_WATCHLIST_INDIVIDUAL.
▪ phase.*.export.*.entities_table_name = FSI_WATCHLIST_ENTITIES.
2. Set the following properties in the customer-screening.properties file:

APPENDIX C: PRECONFIGURED WATCH LIST INFORMATION
DELTA WATCH LIST CONFIGURATIONS FOR THE DOW JONES WATCH LIST
CUSTOMER SCREENING ADMINISTRATION GUIDE | 127
▪ phase.DJW\ -\ Load\ without\ filtering.enabled = N
▪ phase.DJW\ -\ Load\ without\ filtering\ DB.enabled = Y
▪ phase.DJW\ -\ Load\ with\ filtering\ (Part\ 1).enabled = N
▪ phase.DJW\ -\ Load\ with\ filtering\ (Part\ 1)\ DB.enabled = Y
▪ phase.DJW\ -\ Load\ with\ filtering\ (Part\ 2).enabled = Y
3. Set the following properties in the customer-screening-real-time.properties file:
▪ phase.DJW\ -\ Load\ without\ filtering.enabled = N
▪ phase.DJW\ -\ Load\ without\ filtering\ DB.enabled = Y
▪ phase.DJW\ -\ Load\ with\ filtering\ (Part\ 1).enabled = N
▪ phase.DJW\ -\ Load\ with\ filtering\ (Part\ 1)\ DB.enabled = Y
▪ phase.DJW\ -\ Load\ with\ filtering\ (Part\ 2).enabled = Y
4. Set the following properties in the external-entity-screening.properties file:
▪ phase.DJW\ -\ Load\ without\ filtering.enabled = N
▪ phase.DJW\ -\ Load\ without\ filtering\ DB.enabled = Y
▪ phase.DJW\ -\ Load\ with\ filtering\ (Part\ 1).enabled = N
▪ phase.DJW\ -\ Load\ with\ filtering\ (Part\ 1)\ DB.enabled = Y
▪ phase.DJW\ -\ Load\ with\ filtering\ (Part\ 2).enabled = Y
10.9.3 Running the Delta Watch List
To run the delta watch list, follow these steps:
1. Set the following properties in the watch list-management.properties file:
▪ phase.DJW\ -\ Download.enabled = N.
▪ phase.DJW\ -\ Download\ Delta.enabled = Y.
▪ phase.DJW\ -\ Stage\ reference\ lists.enabled = Y.
2. Set phase.*.export.*.ind_table_name = FSI_WATCHLIST_DELTA_INDIVIDUAL.
3. Set phase.*.export.*.entities_table_name = FSI_WATCHLIST_DELTA_ENTITIES.
10.9.4 Merging the Delta Watch List to the Full Watch List
To merge the delta watch list with the full watch list, set the following properties in the watch list-
management.properties file:
• phase.Delta\ Merge.enabled = Y.
• phase.Linked\ Profiles.enabled = Y.

APPENDIX C: PRECONFIGURED WATCH LIST INFORMATION
DELTA WATCH LIST CONFIGURATIONS FOR THE WORLD-CHECK WATCH LIST
CUSTOMER SCREENING ADMINISTRATION GUIDE | 128
10.10 Delta Watch List Configurations for the World-Check
Watch List
NOTE
These configurations are performed when you do not want to
download the full watch list, and only want to download the
delta watch list. This helps to reduce the download time and is
not part of the screening process.
Customer Screening recommends that you always use the full watch list during the screening process.
Due to the clustering strategy, which is implemented in the screening process, you must not download
the delta watch list. There are certain cases in which you must download the delta watch list files, for
example, if the full watch list files are not yet available for download or if you want to save time.
Customers who download the delta watch list files must first download the full watch list files and then
download the delta watch list files. The delta watch list is then merged into the full watch list before
screening.
The following image shows the information flow for the delta watch list:
Figure 114: Flow for Delta Watch List
When you download the full watch list, data is stored in the FSI_WC_WATCHLIST_INDIVIDUALS and
FSI_WC_WATCHLIST_ENTITIES tables. When you download the delta watch list, data is first stored in
the FSI_WC_WATCHLIST_DELTA_IND and FSI_WC_WATCHLIST_DELTA_ENT tables. Then the data is
merged into the main table. For more information, see Merging the Delta Watch List to the Full Watch
List.

APPENDIX C: PRECONFIGURED WATCH LIST INFORMATION
DELTA WATCH LIST CONFIGURATIONS FOR THE WORLD-CHECK WATCH LIST
CUSTOMER SCREENING ADMINISTRATION GUIDE | 129
NOTE
You must always run the full watch list files before you run the
delta watch list files. The full watch list files must be
downloaded if, for example, the download of the delta watch
list files has failed for multiple days. You can also run the full
watch list once every week to ensure that the complete data
has been processed.
10.10.1 Configurations for the Full and Delta Watch Lists
The following configurations must be done for both full and delta watch list updates in the watch
list-management.properties run profile. The run profile is available in the
<domain_name>/edq/oedq.local.home/runprofiles/ directory when you log in to the WinSCP
server.
• Set phase.Initialise\ staged\ data.enabled = N to disable the .jmp file updates.
• Set phase.Initialise\ staged\ data\ DB.enabled = Y to initialize the database.
• Set phase.Initilize\ Prepared\ List\ Data.enabled = N to disable the .jmp file
updates.
• Set phase.Initilize\ Prepared\ List\ Data\ DB.enabled = Y to prepare the
database.
10.10.2 Running the Full Watch list
To run the full watch list, follow these steps:
1. Set the following properties in the watch list-management.properties file:
▪ phase.WC\ -\ Download.enabled = Y.
▪ phase.WC\ -\ Download\ Delta.enabled = N.
▪ phase.WC\ -\ Stage\ reference\ lists.enabled = Y.
▪ phase.*.export.*.wc_ind_table_name=FSI_WC_WATCHLIST_INDIVIDUAL
▪ phase.*.export.*.wc_entities_table_name=FSI_WC_WATCHLIST_ENTITIES
To run the full watch list without filtering, set the following properties:
▪ phase.WC\ -\ Prepare\ without\ filtering.enabled = N
▪ phase.WC\ -\ Prepare\ without\ filtering\ Full\ DB.enabled = Y
To run the full watch list with filtering, set the following properties:
▪ phase.WC\ -\ Prepare\ with\ filtering\ (Part\ 1).enabled = N
▪ phase.WC\ -\ Prepare\ with\ filtering\ (Part\ 2).enabled = N
▪ phase.WC\ -\ Prepare\ with\ filtering\ Full\ DB.enabled = Y
To run the full watch list without filtering, set the following properties:
▪ phase.WC\ -\ Load\ without\ filtering.enabled = N
▪ phase.WC\ -\ Load\ without\ filtering\ DB.enabled = Y

APPENDIX C: PRECONFIGURED WATCH LIST INFORMATION
DELTA WATCH LIST CONFIGURATIONS FOR THE WORLD-CHECK WATCH LIST
CUSTOMER SCREENING ADMINISTRATION GUIDE | 130
To run the full watch list with filtering, set the following properties:
▪ phase.WC\ -\ Load\ with\ filtering\ (Part\ 1).enabled = N
▪ phase.WC\ -\ Load\ with\ filtering\ (Part\ 1)\ DB.enabled = Y
▪ phase.WC\ -\ Load\ with\ filtering\ (Part\ 2).enabled = Y
2. Set the following properties in the customer-screening-real-time.properties file:
▪ phase.WC\ -\ Load\ without\ filtering.enabled = N
▪ phase. WC \ -\ Load\ without\ filtering\ DB.enabled = Y
▪ phase. WC \ -\ Load\ with\ filtering\ (Part\ 1).enabled = N
▪ phase. WC \ -\ Load\ with\ filtering\ (Part\ 1)\ DB.enabled = Y
▪ phase. WC \ -\ Load\ with\ filtering\ (Part\ 2).enabled = Y
3. Set the following properties in the external-entity-screening.properties file:
▪ phase. WC \ -\ Load\ without\ filtering.enabled = N
▪ phase. WC \ -\ Load\ without\ filtering\ DB.enabled = Y
▪ phase. WC \ -\ Load\ with\ filtering\ (Part\ 1).enabled = N
▪ phase. WC \ -\ Load\ with\ filtering\ (Part\ 1)\ DB.enabled = Y
▪ phase. WC \ -\ Load\ with\ filtering\ (Part\ 2).enabled = Y
10.10.3 Running the Delta Watch List
To run the delta watch list, follow these steps:
1. Set the following properties in the watch list-management.properties file:
▪ phase.WC\ -\ Download.enabled = N.
▪ phase.WC\ -\ Download\ Delta.enabled = Y.
▪ phase.WC\ -\ Stage\ reference\ lists.enabled = Y.
▪ phase.*.export.*.wc_ind_table_name=FSI_WC_WATCHLIST_DELTA_IND
▪ phase.*.export.*.wc_entities_table_name=FSI_WC_WATCHLIST_DELTA_EN
T
2. To run the delta watch list without filtering, set the following properties:
▪ phase.WC\ -\ Prepare\ without\ filtering.enabled = N
▪ set phase.WC\ -\ Prepare\ without\ filtering\ Delta\ DB.enabled =
Y
To run the delta watch list with filtering, set the following properties:
▪ phase.WC\ -\ Prepare\ with\ filtering\ (Part\ 1).enabled = N
▪ phase.WC\ -\ Prepare\ with\ filtering\ (Part\ 2).enabled = N
▪ phase.WC\ -\ Prepare\ with\ filtering\ Delta\ DB.enabled = Y

APPENDIX C: PRECONFIGURED WATCH LIST INFORMATION
DELTA WATCH LIST CONFIGURATIONS FOR THE WORLD-CHECK WATCH LIST
CUSTOMER SCREENING ADMINISTRATION GUIDE | 131
10.10.4 Merging the Delta Watch List to the Full Watch List
To merge the delta watch list with the full watch list, set the following properties in the watch list-
management.properties file:
• phase.WC\Delta\ Merge.enabled = Y.
• phase.WC\Linked\ Profiles.enabled = Y.

APPENDIX D: SPLITTING JOBS USING MULTIPLE EDQ SERVERS
DELTA WATCH LIST CONFIGURATIONS FOR THE WORLD-CHECK WATCH LIST
CUSTOMER SCREENING ADMINISTRATION GUIDE | 132
11 Appendix D: Splitting Jobs Using Multiple EDQ
Servers
You can split jobs across multiple servers to reduce the time taken to process many customers, for
example, one million or more.
NOTE
These steps are applicable only if you plan to use multiple EDQ
servers for customer screening. If you want to use the default
setup, that is, only a single EDQ server, see Scheduling the
Customer Screening Run Job.
Some examples are as follows:
• If one server is used to process the watch lists and another server is used to process the entity
names.
• If one server is used to process data of individuals and another server is used to process data of
entities during different times of day.
NOTE
1. Provide the EDQ user name and password in the
cs_appln_params table .
2. Run the select * from cs_edq_servers query in
your SQL query tool to verify the server details.
To split jobs using multiple servers, follow these steps:
1. Navigate to the FIC_DB_HOME/bin directory.
2. Execute ./EDQServerInsert.sh <INFODOM NAME>. This step is used to register the EDQ
server details. You must replace the INFODOM NAME placeholder with your domain name.
3. Enter the following details in the console where the command is run:
▪ EDQ Server Name
▪ EDQ server IP
▪ EDQ Server Direct Port number (JMX port number). This value must be 8090.
▪ EDQ Server User Name
▪ EDQ Password details
Figure 115: EDQ Details

APPENDIX D: SPLITTING JOBS USING MULTIPLE EDQ SERVERS
DELTA WATCH LIST CONFIGURATIONS FOR THE WORLD-CHECK WATCH LIST
CUSTOMER SCREENING ADMINISTRATION GUIDE | 133
4. Duplicate the CS_Data_Load_Event_Generation batch in the Run page. To do this, copy
the CS_Data_Load_Event_Generation batch and create another batch.
Follow these steps to access the Run page:
1. Login as the administrator. The Financial Services Analytical Applications Customer
Screening home page appears.
Figure 116: Financial Services Analytical Applications Customer Screening Home Page
2. Click the hamburger icon to view the Application Navigation List.
Figure 117: Application Navigation List
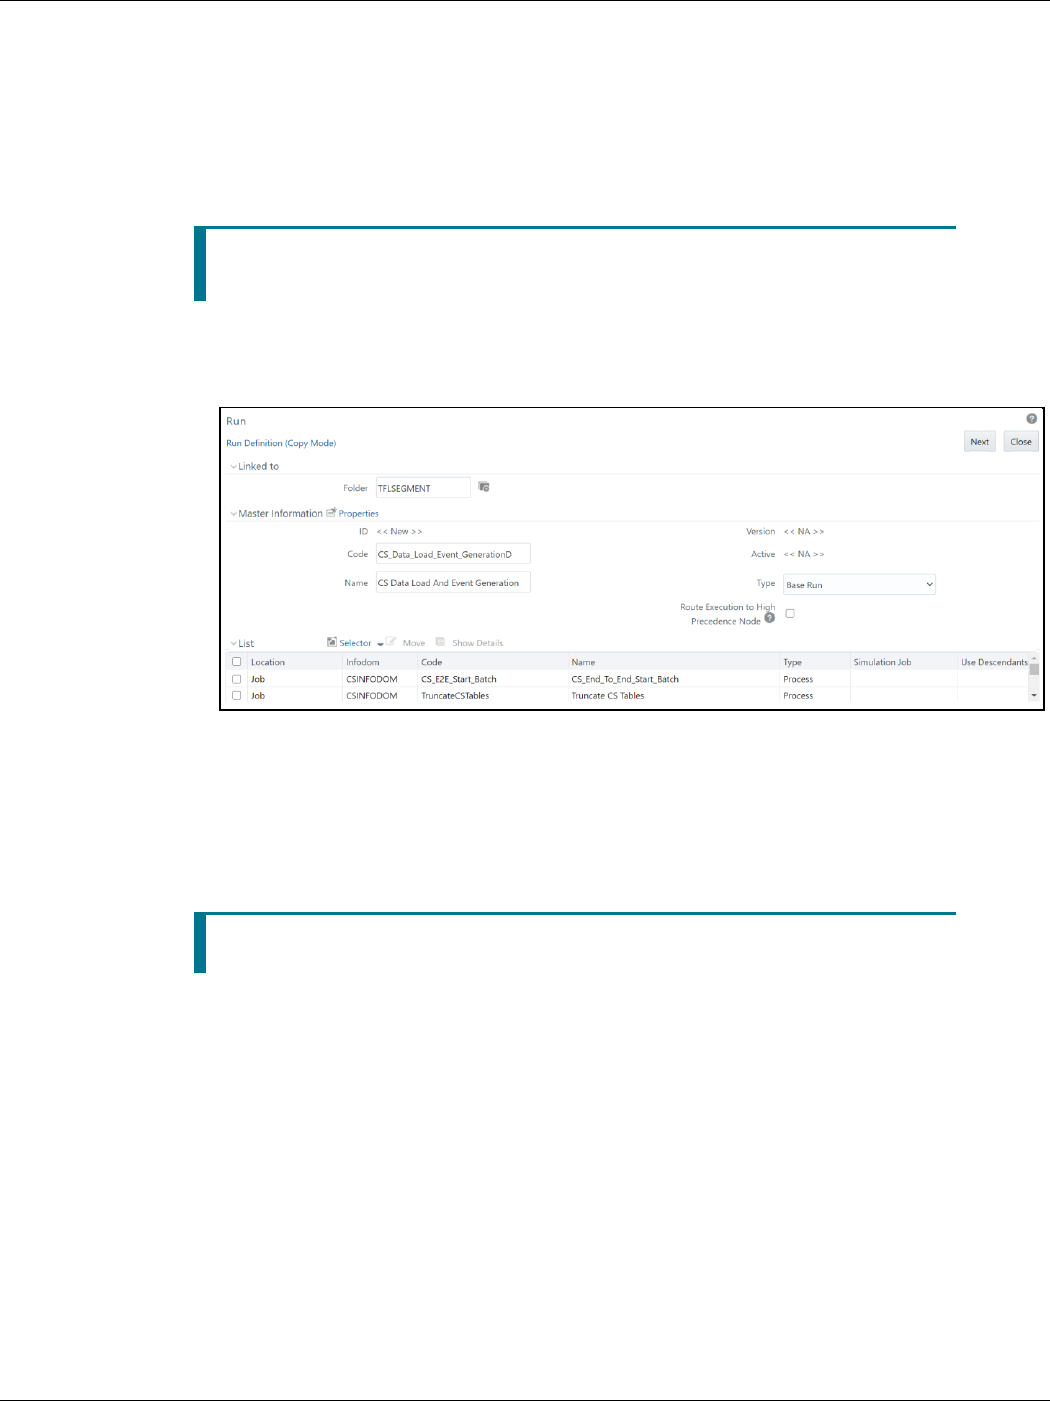
APPENDIX D: SPLITTING JOBS USING MULTIPLE EDQ SERVERS
DELTA WATCH LIST CONFIGURATIONS FOR THE WORLD-CHECK WATCH LIST
CUSTOMER SCREENING ADMINISTRATION GUIDE | 134
3. From the Application Navigation List, select Common Tasks, then select Rule Run
Framework, and then select Run. The Run page appears.
5. In the Run page, follow these steps to create a duplicate batch:
1. Select the CS_Data_Load_Event_Generation run and click Copy. The Run page opens
in copy mode.
NOTE
You must select the segment folder for the Sanctions pack in
the Folder field to proceed.
Figure 118: Run Page in Copy Mode
2. Enter a new run code or alter the existing value in the Code field. For example, code can be
CS_Data_Load_Event_GenerationD.
3. Enter a new run name or alter the existing value in the Code field. For example, name can
be CS Data Load And Event Generation.
NOTE
The run name and run code values can be the same.
4. Click Next to go to the next page and confirm the name.
5. Click Save.
After you click Save, the new run name appears in the Run page.
Figure 119: New Run Name in Run Page
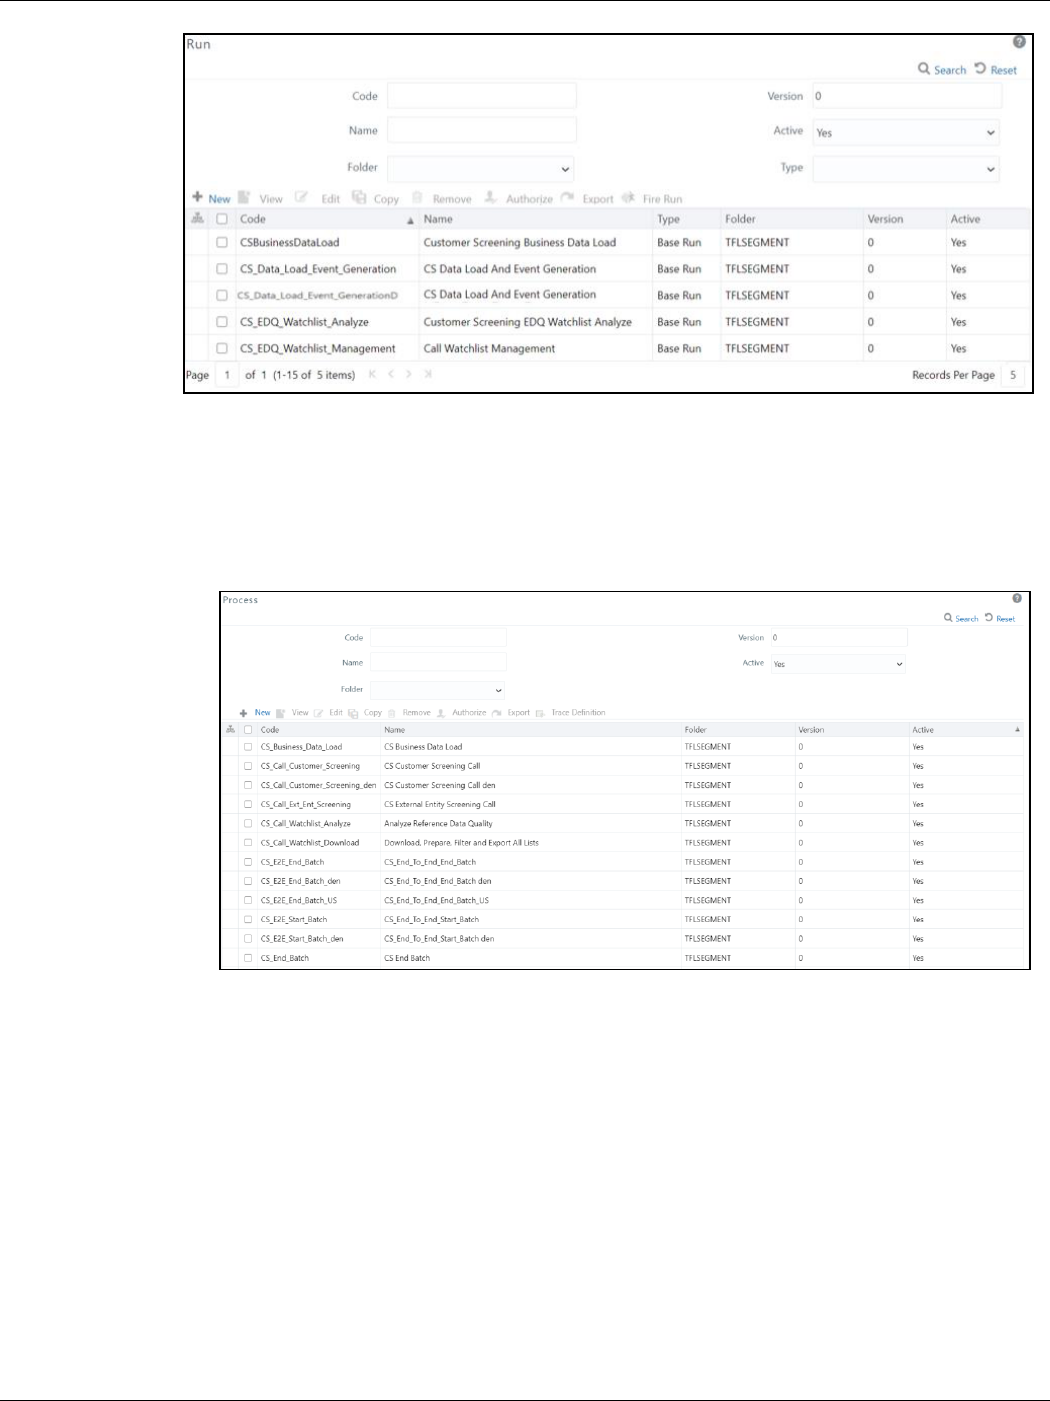
APPENDIX D: SPLITTING JOBS USING MULTIPLE EDQ SERVERS
DELTA WATCH LIST CONFIGURATIONS FOR THE WORLD-CHECK WATCH LIST
CUSTOMER SCREENING ADMINISTRATION GUIDE | 135
6. Duplicate the CS_E2E_Start_Batch, CS_Call_Customer_Screening, and
CS_E2E_End_Batch processes in the Process page.
Figure 120: Process Page
Follow these steps to access the Process page:
1. Login as the administrator. The Financial Services Analytical Applications Customer
Screening home page appears.
Figure 121: Financial Services Analytical Applications Customer Screening Home Page

APPENDIX D: SPLITTING JOBS USING MULTIPLE EDQ SERVERS
DELTA WATCH LIST CONFIGURATIONS FOR THE WORLD-CHECK WATCH LIST
CUSTOMER SCREENING ADMINISTRATION GUIDE | 136
2. Click the hamburger icon to view the Application Navigation List.
Figure 122: Application Navigation List
3. From the Application Navigation List, select Common Tasks, then select Rule Run
Framework, and then select Process. The Process page appears.
7. To duplicate each process, follow these steps:
1. For the CS_E2E_Start_Batch process:
i. In the Process page, select CS_E2E_Start_Batch and click Copy. The Process page
opens in copy mode.
NOTE
You must select the segment folder for the Sanctions pack in
the Folder field to proceed.
ii. Enter a new process code in the Code field and a new process name in the Name field.
You can also alter the existing process code or name. For example,
CS_E2E_Start_Batch_den.
iii. Click Save.
2. For the CS_Call_Customer_Screening process:
i. In the Process page, select CS_Call_Customer_Screening and click Copy. The
Process page opens in copy mode.

APPENDIX D: SPLITTING JOBS USING MULTIPLE EDQ SERVERS
DELTA WATCH LIST CONFIGURATIONS FOR THE WORLD-CHECK WATCH LIST
CUSTOMER SCREENING ADMINISTRATION GUIDE | 137
ii. Enter a new process code in the Code field and a new process name in the Name field.
You can also alter the existing process code or name. For example,
CS_Call_Customer_Screening_den.
iii. Click Save.
3. For the CS_E2E_End_Batch process:
i. In the Process page, select CS_E2E_End_Batch and click Copy. The Process page
opens in copy mode.
ii. Enter a new process code in the Code field and a new process name in the Name field.
You can also alter the existing process code or name. For example,
CS_E2E_End_Batch_den.
iii. Click Save.
After you click Save, the new process names appear in the Process page.
Figure 123: New Process Names in Process Page
8. Update the group name for the CS_E2E_Start_Batch_den and CS_E2E_End_Batch_den
processes. To do this, run the following query:
select * from cs_processing_group
9. Change the parameter for the CS_E2E_Start_Batch_den process. To do this, follow these
steps:
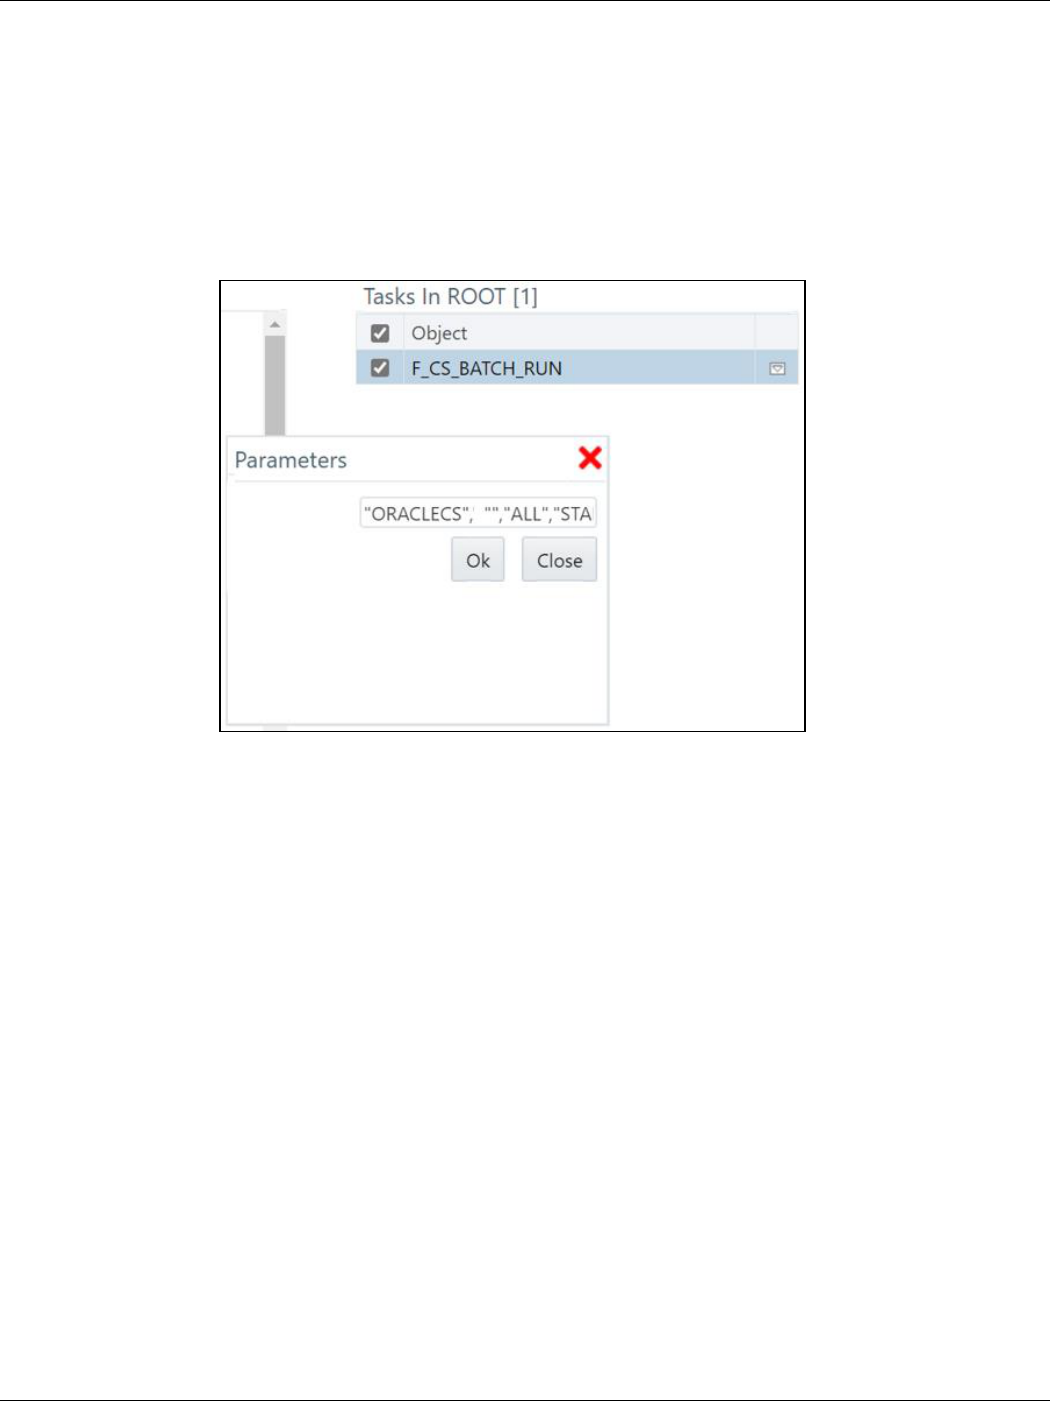
APPENDIX D: SPLITTING JOBS USING MULTIPLE EDQ SERVERS
DELTA WATCH LIST CONFIGURATIONS FOR THE WORLD-CHECK WATCH LIST
CUSTOMER SCREENING ADMINISTRATION GUIDE | 138
1. Select the duplicated process created in the earlier step and click Edit. The Process page
opens in edit mode.
2. Click Component. The Component Selector window appears.
3. Click the drop-down list in line with the F_CS_BATCH_RUN task. The Parameters window
appears.
Figure 124: Parameter for the CS_E2E_Start_Batch Process
Change the ORACLECS parameter to the applicable data origin or processing name.
10. Change the parameter for the CS_E2E_End_Batch_den process. To do this, follow these
steps:
1. Select the duplicated process created in the earlier step and click Edit. The Process page
opens in edit mode.
2. Click Component. The Component Selector window appears.
3. Select the drop-down list in line with the F_CS_BATCH_RUN task. The Parameters window
appears.
Figure 125: Parameter for the CS_E2E_End_Batch Process

APPENDIX D: SPLITTING JOBS USING MULTIPLE EDQ SERVERS
DELTA WATCH LIST CONFIGURATIONS FOR THE WORLD-CHECK WATCH LIST
CUSTOMER SCREENING ADMINISTRATION GUIDE | 139
Change the ORACLECS parameter to the data origin or processing name.
11. To change the parameters for the CS_Call_Customer_Screening_den process, follow
these steps:
1. Select the duplicated process created in the earlier step and click Edit. The Process page
opens in edit mode.
2. Click Component. The Component Selector window appears.
3. Select the drop-down list in line with the CallEDQ task. The Parameters window appears
with the following values:
"runprofileName=customer-screening1.properties","RunLabel=customer-
screening","JobName=MAIN","ProjectName=Customer-
Screening","edqServerName=SERVER_2","condition=and AGE_YR_CT>20 and
BIRTH_DT <= @$~20 June 1972@$~"
Figure 126: Parameters for the CS_Call_Customer_Screening_den Process

APPENDIX D: SPLITTING JOBS USING MULTIPLE EDQ SERVERS
DELTA WATCH LIST CONFIGURATIONS FOR THE WORLD-CHECK WATCH LIST
CUSTOMER SCREENING ADMINISTRATION GUIDE | 140
4. Change the following parameters:
i. Run profile name.
Example: runprofileName=customer-screening1.properties"
ii. EDQ server name. If you do not change the server name, it is replaced with the server
name in the cs_appln_params table.
Example: "edqServerName=SERVER_2"
iii. Condition. By default, a single condition is provided. Use and to give more than one
condition.
Example: "condition=and AGE_YR_CT>20 and BIRTH_DT <= @$~20 June
1972@$~"
NOTE
3. It is not mandatory to provide a condition.
4. Provide the expression @$~ to use alphanumeric
characters for fields such as customer birth date. For
example, "condition=and AGE_YR_CT>20 and
BIRTH_DT <= @$~20 June 1972@$~".
12. Replace the new batches in the Run page. To do this, follow these steps:
1. Select CS_Data_L_Event_Generation_Den and click Edit. The Run page opens in edit
mode.
Click the Selector drop-down list and select Job. The Component Selector window appears.
Figure 127: Parameters for the CS_Call_Customer_Screening_den Process

APPENDIX D: SPLITTING JOBS USING MULTIPLE EDQ SERVERS
ADDING INPUT PARAMETERS FOR THE CALLEDQ TASK
CUSTOMER SCREENING ADMINISTRATION GUIDE | 141
In the List hierarchy window, expand the Transformation Rules node.
Expand the Processes node and then the TFLSEGMENT node.
In the Tasks table, select the original processes, which are CS_End_To_End_Start_Batch, CS Customer
Screening Call, and CS_End_To_End_End_Batch. These processes must be selected one at a time.
Click Move . The selected batches are displayed in the TFLSEGMENT node.
In the List table, select the new processes, which are CS_End_To_End_Start_Batch_den, CS Customer
Screening Call den, and CS_End_To_End_End_Batch_den.
Click Remove . The selected batches are displayed in the Tasks table.
Click OK.
The duplicate jobs are now split across servers using the CS_End_To_End_Start_Batch, CS
Customer Screening Call, and CS_End_To_End_End_Batch batches.
11.1 Adding Input Parameters for the CallEDQ Task
Finally, add the new EDQ server name and applicable condition as input parameters in the Post Load
Changes page as shown in the following steps:
1. Click the hamburger icon to view the Application Navigation List.

APPENDIX D: SPLITTING JOBS USING MULTIPLE EDQ SERVERS
ADDING INPUT PARAMETERS FOR THE CALLEDQ TASK
CUSTOMER SCREENING ADMINISTRATION GUIDE | 142
2. From the Application Navigation List, select Common Tasks, then select Data Management
Framework, then select Data Management Tools, and then select Post Load Changes. The
Post Load Changes page appears.
Figure 128: Post Load Changes Page
3. Search for CallEDQ in the Code field and select it.
4. Click Edit.
5. In the Transformation Process Flow section, select Input Parameters. The Input parameters
appear in the Parameter Definition section.
6. Click Add Row to add a row. You must add two rows, one for the EDQ server name and one for
the condition.
Figure 129: Adding Input Parameters
7. Click Finish.

APPENDIX D: SPLITTING JOBS USING MULTIPLE EDQ SERVERS
FIX FOR PRIMARY KEY CONSTRAINTS
CUSTOMER SCREENING ADMINISTRATION GUIDE | 143
To verify the batch execution logs for the EDQ tasks, see the FIC_HOME/ficdb/bin/CS_EDQ_CALL
log file.
11.2 Fix for Primary Key Constraints
The Multi EDQ Screening process fails when you try to insert in the CS_WATCHLIST table, due to an
interlock problem at the database level when two or more of the EDQ try to perform an action over the
same database. You will experience a unique constraint as multiple systems are trying to update the
same data.
The error caused due to locking of the record is removed by a creating multiple EDQ instances and
then insert data into the temporary table by running CS batch.
For example, consider five EDQ server instances. Error is caused when the five EDQ servers are loaded
into the same CS_WATCHLIST table. To overcome the scenario, five temporary tables
(CS_WATCHLIST1, CS_WATCHLIST2, CS_WATCHLIST3, CS_WATCHLIST4, and CS_WATCHLIST5)
are created. Each EDQ servers are individually loaded into each watchlist table, and then the five tables
are merged into the CS_WATCHLIST table.
The EDQ application is pre-configured with following five watchlist tables:
• CS_WATCHLIST1
• CS_WATCHLIST2
• CS_WATCHLIST3
• CS_WATCHLIST4
• CS_WATCHLIST5
If you have multiple EDQ servers, follow the subsequent steps to load the EDQ server to the watchlist
table:
1. Log into the EDQ Application.
2. Click Customer Screening project from Project Browser. For more information on Importing
the OFS Customer Screening Projects, see Oracle Financial Services Sanctions Pack Installation
and Configuration Guide.
3. Click Export ECM Watchlist in the Export folder under Customer Screening project to open
the Edit Export Definition page.

APPENDIX D: SPLITTING JOBS USING MULTIPLE EDQ SERVERS
FIX FOR PRIMARY KEY CONSTRAINTS
CUSTOMER SCREENING ADMINISTRATION GUIDE | 144
Figure 130: Export Folder
4. Select the ECM_Watchlist data interface from the staged data table and click Next to open
the data store table. ECM_Watchlist is the staged data that you will export.
5. Select the ECM Watchlist Output as data store from the Data Store table and click Next to open
the Table Selection screen. ECM Watchlist Output is the data store which will be used as the
target for the export.
6. In the Table Selection table by default CS_Watchlist table is selected. Instead of
CS_Watchlist, select CS_Watchlist1 and click Next to open Column Mapping table.
Figure 131: Loading EDQ Server to CS_Watchlist1

APPENDIX D: SPLITTING JOBS USING MULTIPLE EDQ SERVERS
FIX FOR PRIMARY KEY CONSTRAINTS
CUSTOMER SCREENING ADMINISTRATION GUIDE | 145
7. Click Next in Column Mapping table and click Finish the process in Export Name screen. The
EDQ server will be loaded to the CS_Watchlist1.
The same procedure steps must be repeated for the remaining EDQ servers if you have multiple EDQ
servers.
Merging the table is a pre-configured procedure. The multiple watchlist table will auto populate to
CS_Watchlist.

APPENDIX E: VIEWING SNAPSHOTS OF TABLES IN EDQ
FIX FOR PRIMARY KEY CONSTRAINTS
CUSTOMER SCREENING ADMINISTRATION GUIDE | 146
12 Appendix E: Viewing Snapshots of Tables in EDQ
To view a snapshot of a selected table and associated columns in the Results Browser pane in
Enterprise Data Quality (EDQ), follow these steps:
1. Go to the EDQ URL and open the Director menu. The Director landing page appears.
Figure 130: Director Menu in EDQ
2. In the Director landing page, expand the Customer-Screening project in the Project Browser
pane.
Figure 131: Project Browser Pane

APPENDIX E: VIEWING SNAPSHOTS OF TABLES IN EDQ
FIX FOR PRIMARY KEY CONSTRAINTS
CUSTOMER SCREENING ADMINISTRATION GUIDE | 147
3. Expand the Staged Data node and double-click FCDM Customer Data.
Figure 132: FCDM Customer Data Node
4. In the Setup Snapshot window, double-click FCDM Batch Data.
Figure 133: Setup Snapshot Window

APPENDIX E: VIEWING SNAPSHOTS OF TABLES IN EDQ
FIX FOR PRIMARY KEY CONSTRAINTS
CUSTOMER SCREENING ADMINISTRATION GUIDE | 148
5. The default view is the SQL query. To change the view to a table view, select Select Table or
View.
Figure 134: Select Table or View
6. Click Next until you see the Finish button.
7. Click Finish to view a snapshot of the selected table in the Results Browser.
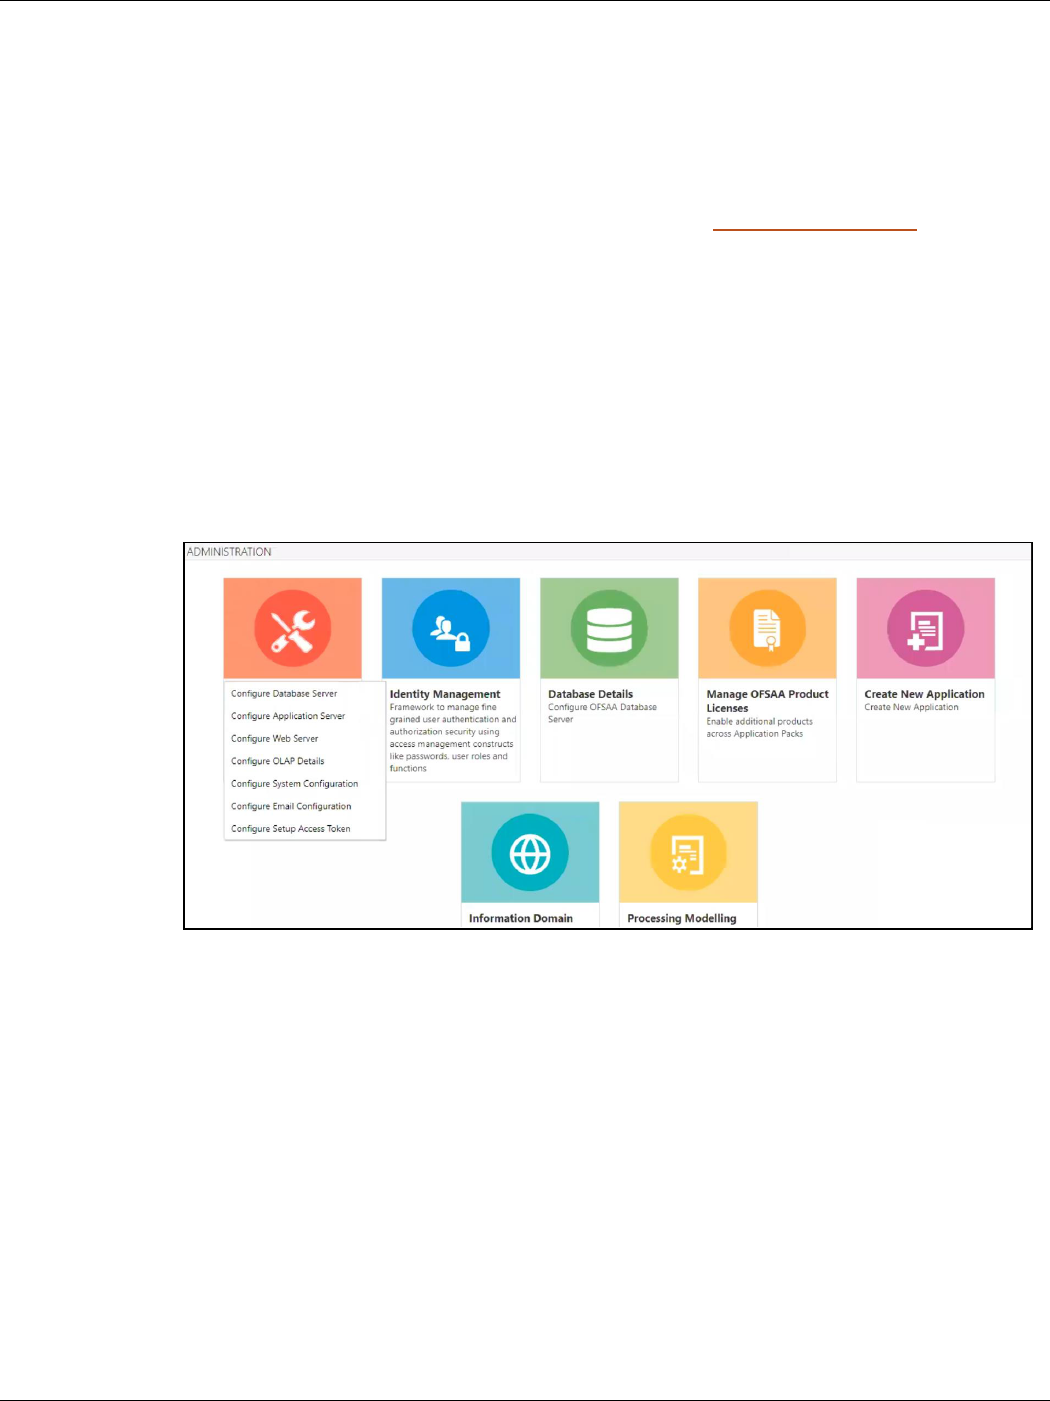
APPENDIX F: CONFIGURATIONS FOR THE BEARER TOKEN
GENERATE USER PASSWORD
CUSTOMER SCREENING ADMINISTRATION GUIDE | 149
13 Appendix F: Configurations for the Bearer Token
The following section takes you through the process of generating a token and using it to get the
individual or entity JSON, depending on the API request. A token is used to authorize the request.
You can begin by generating a password for the user who sends the request. After the password is
generated, generate a token to authorize this request. The default time for token expiration is 3600
seconds (1 hour) and can be changed. To change the validity, see Change Token Validity.
13.1 Generate User Password
To generate a password for the user, follow these steps:
1. Log in as a system administrator.
2. Click System Configuration in the Administration page and select Configure Setup Access
Token. The Configure Setup Access Token window is displayed.
Figure 135: Administration Page
3. In the Configure Setup Access Token section, click Add. A new window is displayed.
Figure 136: Configure Setup Access Token

APPENDIX F: CONFIGURATIONS FOR THE BEARER TOKEN
GENERATE USER PASSWORD
CUSTOMER SCREENING ADMINISTRATION GUIDE | 150
4. Enter the username in the Client Setup Name field and click Generate Token. The token is
displayed in the Setup Access Token Details section.
Figure 137: Generate Token Button
5. Copy and save the text generated in the Setup Access Token Details section.
Figure 138: Setup Access Token Details

APPENDIX F: CONFIGURATIONS FOR THE BEARER TOKEN
CHANGE TOKEN VALIDITY
CUSTOMER SCREENING ADMINISTRATION GUIDE | 151
The STP_ACC_NM field displays the username. The STP_ENC_STR field displays the password.
6. Click Close and log out as the system administrator.
13.2 Change Token Validity
To generate a password for the user, follow these steps:
1. Log in as a system administrator.
2. Click System Configuration in the Administration page and select Configure System
Configuration. The Configuration window is displayed.
Figure 139: Administration Page
3. In the Configuration window, change the token validity time in the API token validity in
seconds field.

APPENDIX F: CONFIGURATIONS FOR THE BEARER TOKEN
GENERATE TOKEN
CUSTOMER SCREENING ADMINISTRATION GUIDE | 152
Figure 140: Configuration window with the API token validity in seconds field shown
4. Click Save.
13.3 Generate Token
After the password is generated, you can generate the token. To generate the token, open your API
client and follow these steps:
NOTE
6. You may use the desktop version of the Postman
client to perform these steps. Postman is an open-
source, collaborative platform for API development.
For more information, see Postman Docs.
7. You can also use any other API client, such as cURL.
For more information, see REST APIs for Oracle
Database.
1. Open the Postman client and click Create a request.
2. Select the request type as GET and enter the request URL in the following format:
http://[servername]:[portnumber]/[context]/v1/token
Figure 141: Request

APPENDIX F: CONFIGURATIONS FOR THE BEARER TOKEN
GENERATE TOKEN
CUSTOMER SCREENING ADMINISTRATION GUIDE | 153
3. Select the Authorization menu and then select the TYPE as Basic Auth.
Figure 142: Authorization
4. Enter the username and password.
The username is the value generated for the STP_ACC_NM attribute and the password is the
value generated for the STP_ENC_STR attribute.
5. Click Send. The token is displayed in the Response field.
Figure 143: Response

APPENDIX F: CONFIGURATIONS FOR THE BEARER TOKEN
SEND REQUESTS
CUSTOMER SCREENING ADMINISTRATION GUIDE | 154
13.4 Send Requests
Requests are sent using the POST request feature. Use the token generated to authorize the request
and pass the JSON in the correct format.
NOTE
8. You may use the desktop version of the Postman
client to perform these steps. Postman is an open-
source, collaborative platform for API development.
For more information, see Postman Docs.
9. You can also use any other API client, such as cURL.
For more information, see REST APIs for Oracle
Database.
1. In the Postman client, select the request type as POST and enter the request URL in the
following format:
http://[servername]:[portnumber]/[context]/restapi/RTScreening/RTScreen
ingRestService/service/IndividualScreen/EntityScreen
Figure 144: Request
2. In the Authorization menu, select the TYPE as Bearer Token.
Figure 145: Authorization
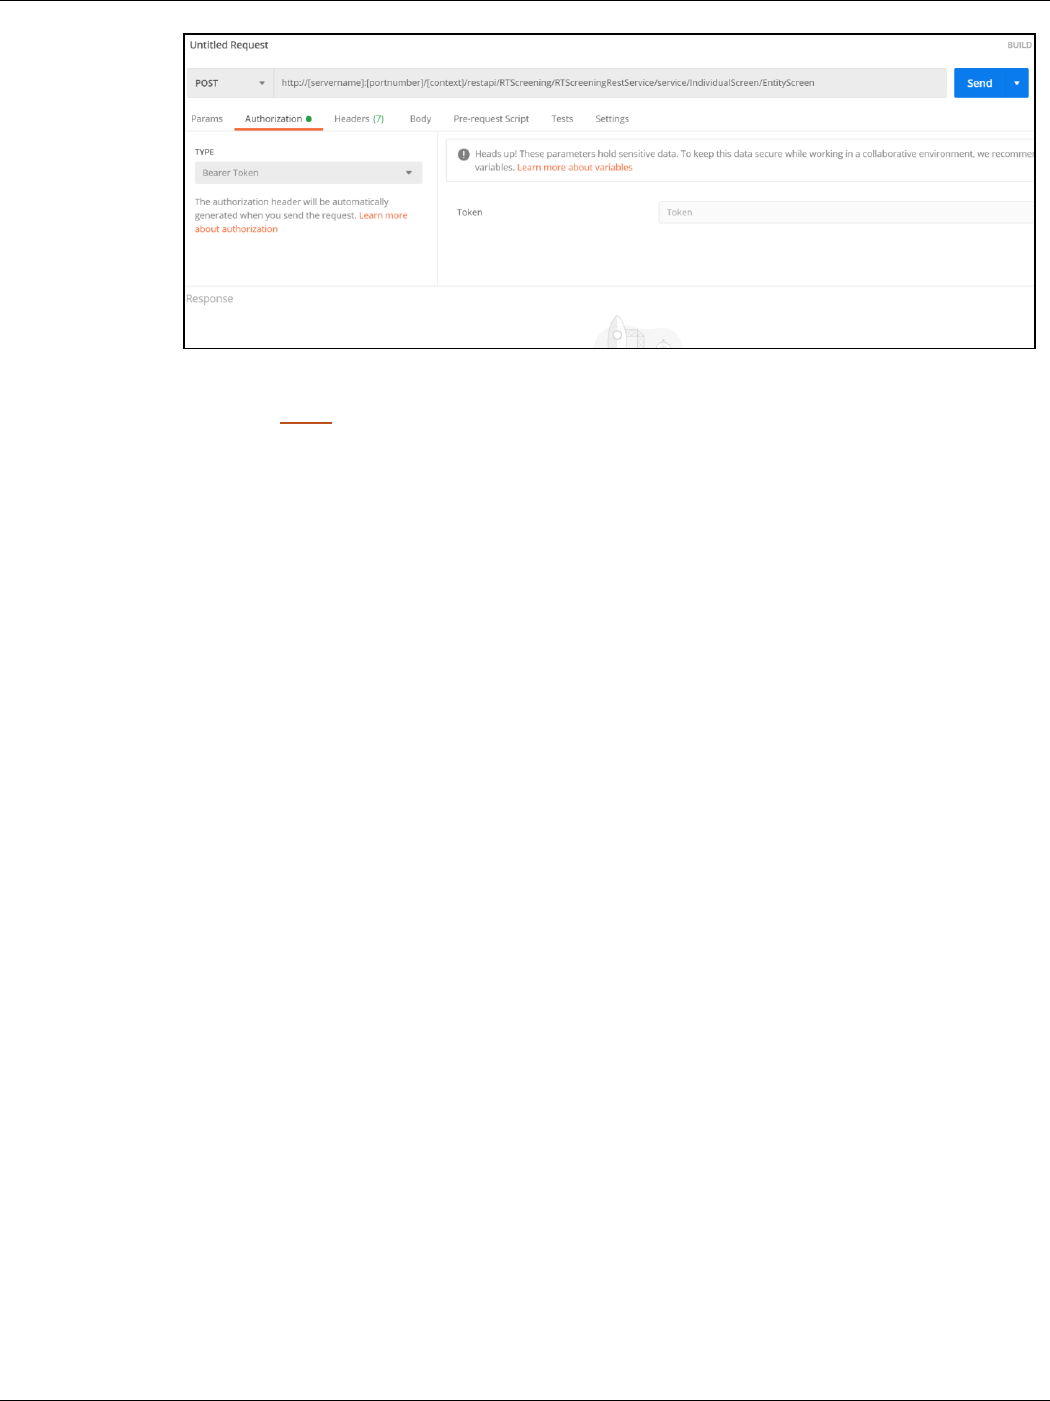
APPENDIX F: CONFIGURATIONS FOR THE BEARER TOKEN
SEND REQUESTS
CUSTOMER SCREENING ADMINISTRATION GUIDE | 155
3. Paste the token generated in the Token field.
4. Click Send. The JSON is displayed in the Response field. A sample JSON is shown:
{
"Jurisdiction": "AMEA",
"BusinessDomain":"d",
"FamilyName": "HAMMAD",
"GivenNames": "Fathi Ahmad"
}

APPENDIX G: ERROR LOGS
EDQ FAILURE
CUSTOMER SCREENING ADMINISTRATION GUIDE | 156
14 Appendix G: Error Logs
The following are the types of failures you may encounter:
• EDQ failure
• Data Model Failure
• Batch Failure
• DM Utility Failure
14.1 EDQ Failure
If there is an EDQ failure, follow these steps.
1. Go to the following path, where the EDQ is installed.
{domain_path}/servers/edq_server1/logs/edq/logs
2. Open the file name (main0.log).
3. Rectify the errors that you find in the logs.
14.2 Data Model Failure
If there is a data model failure, follow these steps.
1. Go to the following path.
{ftpshare_path}/{infodom}/logs.
2. Check for the latest file and rectify the error according or raise an SR to support.
14.3 Batch Failure
If there is batch failure, follow these steps.
1. Go to the following path.
{ftpshare_path}/logs/{BatchDate}/{infodom}/TRANSFORM DATA.
2. Search for the log file with task ID. Rectify the relevant error.
14.4 DM Utility Failure
If there is DM Utility failure, follow these steps.
1. Log in to Atomic Schema and search for the table FCC_DM_AUDIT.
2. This table has all the logs for the current running batch.
3. Rectify the relevant error.
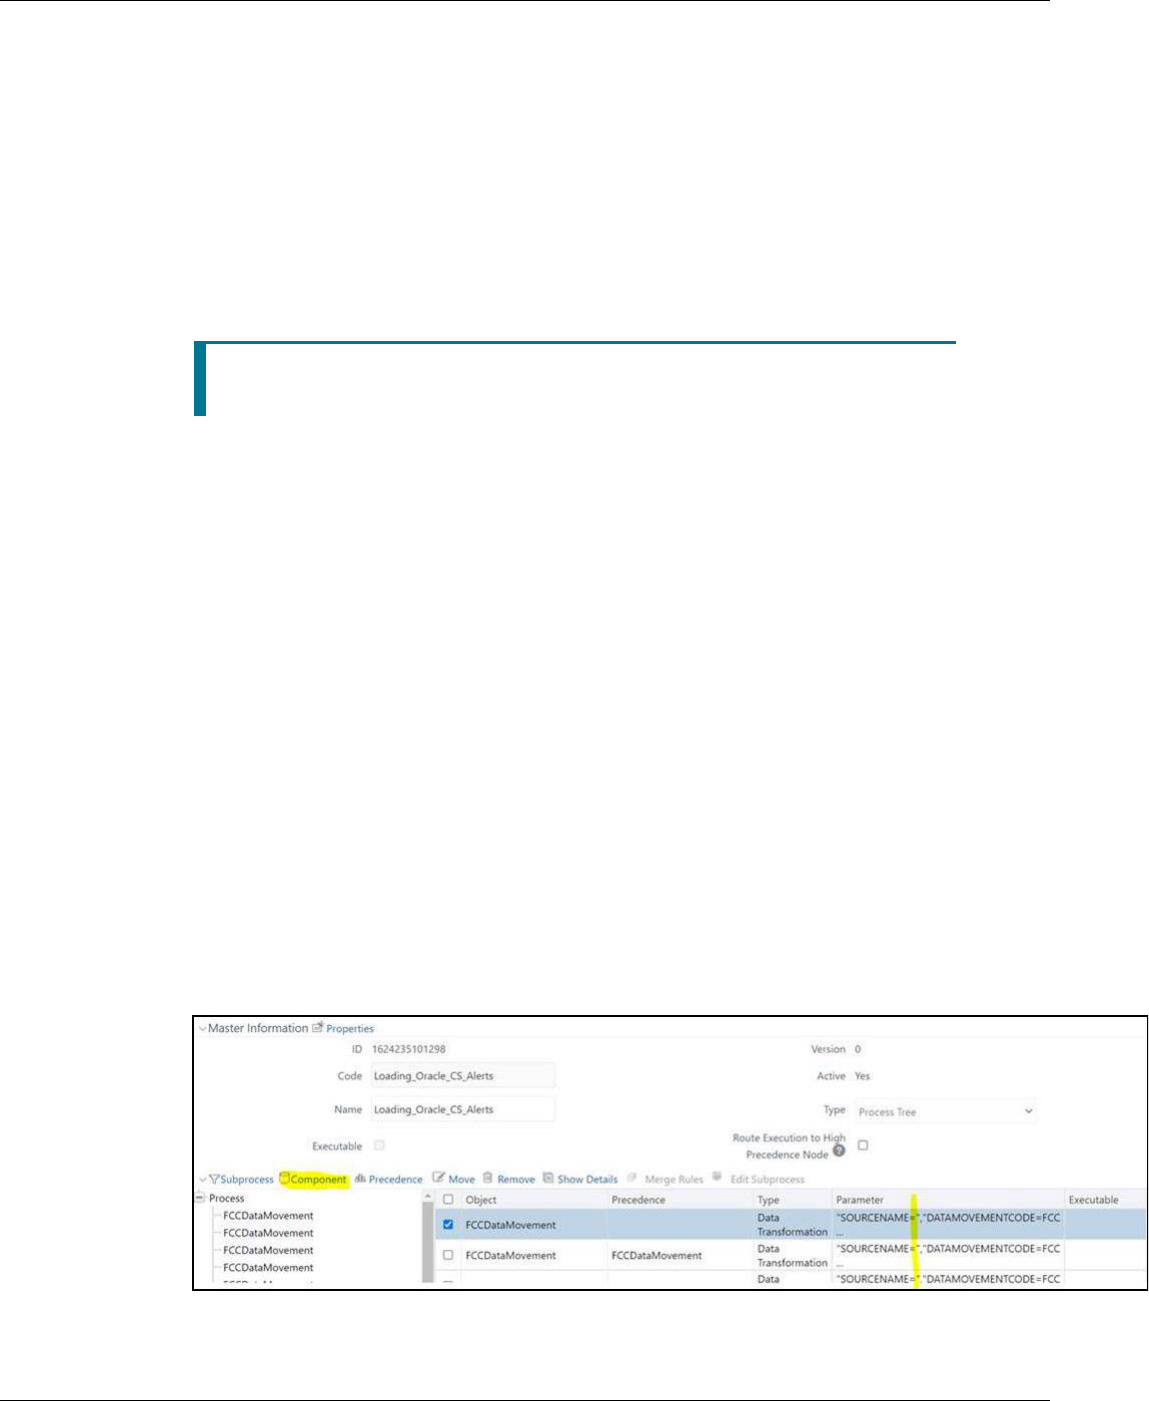
APPENDIX H: OUT OF BOX PROCESS TO MOVE ALERTS FROM CS_ALERTS OF ONE DB INSTANCE TO FCC_ZCS_ALERTS OF ANOTHER DB INSTANCE
DM UTILITY FAILURE
CUSTOMER SCREENING ADMINISTRATION GUIDE | 157
15 Appendix H: Out Of Box process to move Alerts
from CS_ALERTS of one DB instance to
FCC_ZCS_ALERTS of another DB instance
The Oracle_CS_Zipper_Processing run, present under the Run screen of Rule Run Framework,
handles data movement from the CS_ALERTS to FCC_ZCS_ALERTS. It is configured to Out of Box
(OOB) to move this data on the same instance.
The following are the steps to move data from one DB instance to another:
NOTE
The following configurations should be done on the instance
where the Zipper UI is present.
The Oracle_CS_Zipper_Processing run intern calls Loading_Oracle_CS_Alerts process,
which is present under the Process screen of Rule Run Framework. This process is responsible for
moving the CS_ALERTS data from the source system to the destination system.
1. Create a DB link in the Zipper UI database by giving the DB details of source system database
details where CS_ALERTS are present.
2. Login with CS Admin in the Zipper UI instance and navigate to Common Tasks > Rule Run
Framework>Process.
3. Select the check box for Loading_Oracle_CS_Alerts process name and click on Edit.
4. In the process details screen, you will see that in the parameters column, SOURCENAME and
LOADTYPE is value is empty by default as shown in the below screenshot. Make sure to update
these parameters with the following values.
SOURCE NAME: Enter the name of the DB link which is created in Step 1.
LOADTYPE: Enter the value as DBLINK.
Example:"SOURCENAME=SOURCE1_DB_LINK_NAME","DATAMOVEMENTCODE=FCC_ZCS_CUST","
LOADTYPE=DBLINK","DATAMOVEMENTOPERATION=IS".
Figure 146: Master Information
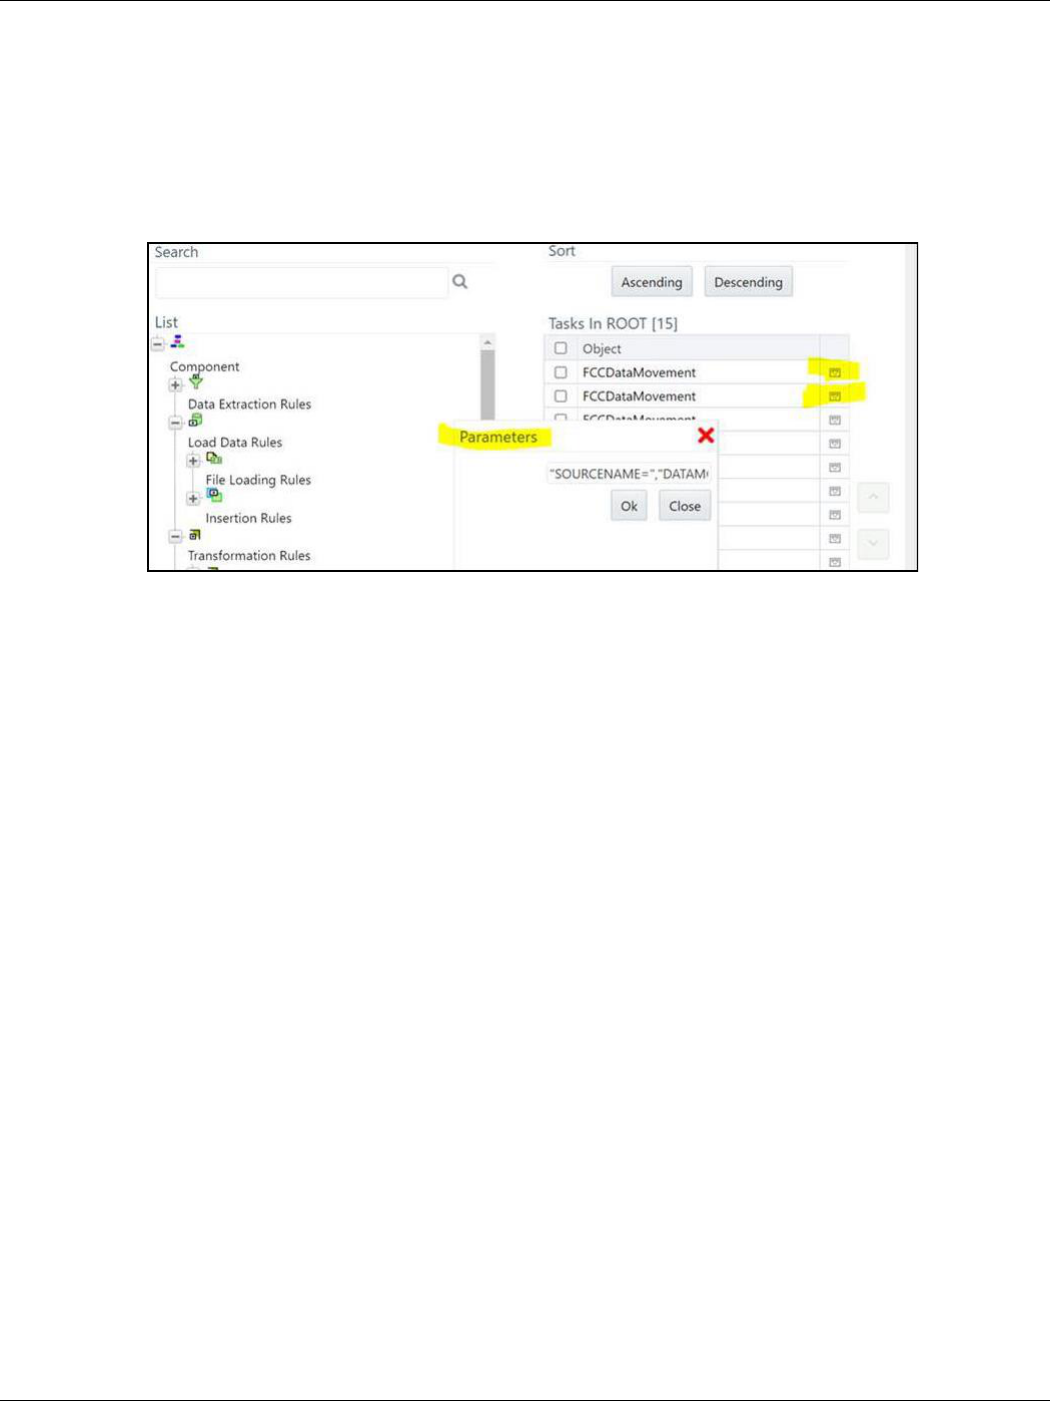
APPENDIX H: OUT OF BOX PROCESS TO MOVE ALERTS FROM CS_ALERTS OF ONE DB INSTANCE TO FCC_ZCS_ALERTS OF ANOTHER DB INSTANCE
DM UTILITY FAILURE
CUSTOMER SCREENING ADMINISTRATION GUIDE | 158
5. Click the Component button to edit the parameters.
6. In the Component Selector popup, on the TASK in the ROOT section on the right side, against
each FCCDataMovement, click on the down arrow button to edit the parameters as shown in
below screenshot.
Figure 147: Component Selector
7. Give the value for SOURCENAME and LOADTYPE as suggested in Step d and click OK to save.
8. Update the above values mentioned in step 7 to all the FCCDataMovement where
SOURCENAME and LOADTYPE are empty.
9. Now, if you create a batch out Oracle_CS_Zipper_Processing run in ZIPPER UI Instance
and execute it, it will pull the CS_ALERTS from the source system and create a zipper alert
Zipper UI instance.
The following are the steps to pull data from multiple source systems in the zipper UI instance:
i. Enter a DB details of source system database where CS_ALERTS are present to create a
DB link in the Zipper UI database for each source system.
ii. Login as a CS Admin in the Zipper UI instance and navigate to Common Tasks>Rule
Run Framework>Process.
iii. Select the check box for Loading_Oracle_CS_Alerts process name and click Copy
to create a copy. Create the copies for all source systems.
iv. Now, select Individual Process and click Edit and follow the above steps from 4 to 7 and
give the respective SOURCENAME value and LOADTYPE as DBLINK.
v. Navigate to Common Tasks>Rule Run Framework>Run.
vi. Select the check box for Oracle_CS_Zipper_Processing run name and click Copy
to create a copy.
vii. In the RUN details, enter a Folder name and give a different name for Code and Name
fields.
viii. Click on the Selector button and then select Job.

APPENDIX H: OUT OF BOX PROCESS TO MOVE ALERTS FROM CS_ALERTS OF ONE DB INSTANCE TO FCC_ZCS_ALERTS OF ANOTHER DB INSTANCE
DM UTILITY FAILURE
CUSTOMER SCREENING ADMINISTRATION GUIDE | 159
ix. From the tasks section on the right side, remove the Loading_Oracle_CS_Alerts,
map the respective process created for a particular source system, and click OK.
x. Verify the Run Details screen to see processes are mapped correctly and proceed to
finish the steps to complete copying of process.
xi. Create a different run for each source system by following the above steps from Step vi
to x.
xii. Now, if you create a batch out individual source system runs created in ZIPPER UI
Instance and execute it, it will pull the CS_ALERTS from the respective source system
and create zipper alert in Zipper UI instance.

APPENDIX I: API TO CREATE THE ALERTS IN THE ZIPPER ALERTS TABLE (FCC_ZCS_ALERTS)
DM UTILITY FAILURE
CUSTOMER SCREENING ADMINISTRATION GUIDE | 160
16 Appendix I: API to create the Alerts in the Zipper
Alerts table (FCC_ZCS_ALERTS)
Multiple CS Instances are used for an ad-hoc Screening of Customer and External Entity from the
Real-time Screening UI. Following are the steps to configure these systems to create zipper alerts in
separate Zipper UI Instances:
1. Navigate to ##FIC_HOME##/ficdb/bin folder of CS instance, used for ad-hoc screening of
Customer and External Entity from Real-time Screening UI.
2. Execute EDQInsert.sh bypassing infodom along with it.
Example: ./EDQInsert.sh TFLTINFO
3. Initially, enter the EDQ server details.
4. If you want to use the Enterprise Case Management Application (ECM) or Customer
Screening Alert Management (CSAM) as an L1 investigation for Real-Time Screening, enter
CSAM.
5. Enter the URL of the Zipper UI instance used for Zipper alerts, and if the Customer Screening
Alert Management (CSAM) application is in the same installation, enter N.
6. Enter the user name and password to access the Zipper UI instance URL.
7. Now, if you perform an ad-hoc screening of Customer and External Entity from Real-time
Screening UI from CS instance, it will create zipper alerts in Zipper UI instance.
8. Follow the above steps 1 to 7 in all the multiple CS instances used for ad-hoc screening of
Customer and External entity from Real-time Screening UI.
NOTE
The source systems are configured with the Rest URL of the
CS Instance used for ad-hoc screening of Customer and
External Entity from the Real-time Screening UI. In this case, it
will still use the same configuration done in the above steps 1
to 7 and creates zipper alerts in the Zipper UI instance.

APPENDIX J: PMF CONFIGURATIONS FOR POOL OF ANALYST
DM UTILITY FAILURE
CUSTOMER SCREENING ADMINISTRATION GUIDE | 161
17 Appendix J: PMF Configurations for Pool of
Analyst
To configure the PMF Pool of Analyst configuration to set the new statuses, follow these steps:
1. Perform the following queries and introduce new status in the following tables.
▪ Select t.*,rowid from AAI_WF_STATUS_B t where t.v_app_package_id in
('OFS_CS_RT');
▪ Select t.*,rowid from AAI_WF_STATUS_TL t where t.v_app_package_id in
('OFS_CS_RT');
▪ Create unique v_status_id in AAI_WF_STATUS_B table and map the same in the
AAI_WF_STATUS_TL table and fill all the other columns data. This data will show in the
PMF screen while mapping new status.
Figure 148: Example 1

APPENDIX J: PMF CONFIGURATIONS FOR POOL OF ANALYST
DM UTILITY FAILURE
CUSTOMER SCREENING ADMINISTRATION GUIDE | 162
2. Perform the following query and introduce new Outcome in both the following tables.
▪ Select t.*, rowid from AAI_WF_OUTCOME_B t;
▪ Select t.*, rowid from AAI_WF_OUTCOME_TL t;
▪ Create unique outcome id in AAI_WF_OUTCOME_B table and map the same in
AAI_WF_OUTCOME_TL table and provide other columns data.
Figure 149: Example 2

APPENDIX J: PMF CONFIGURATIONS FOR POOL OF ANALYST
DM UTILITY FAILURE
CUSTOMER SCREENING ADMINISTRATION GUIDE | 163
3. In the atomic schema, do the configuration for the following tables:
Select t.*,rowid from FCC_ZCS_STATUS_dim t;
Select V_STATUS_CODE, V_STATUS_CODE from fcc_zcs_status_dim;

APPENDIX J: PMF CONFIGURATIONS FOR POOL OF ANALYST
DM UTILITY FAILURE
CUSTOMER SCREENING ADMINISTRATION GUIDE | 164
4. In the following table do the security attribute mapping for the new workflow:
Select t.*, rowid from FCC_ZCS_SECURITY_ATTR_GRP_MAP t;
In the following table, add the two entries:
Select * from cs_appln_params;
For the entry ZCS_ENBL_ANLYST_POOL, the value must be Y and for the entry
POA_CHECK_STS_CODES, add the status code of the newly created status.
5. Create Human task in PMF screen that you want to introduce in-between existing status or you
want to introduce new status or create separate status.
Activity
--------------
Activity Name*
Activity Description
Status* - New Status Name.
Outcomes - Where has to go (Destination Status).
Example: If we have to introduce a new status between Investigation to Pending Review, first add the
new activity as shown in the following Figures (Pending Test Review).
Figure 151: Activity Statuses
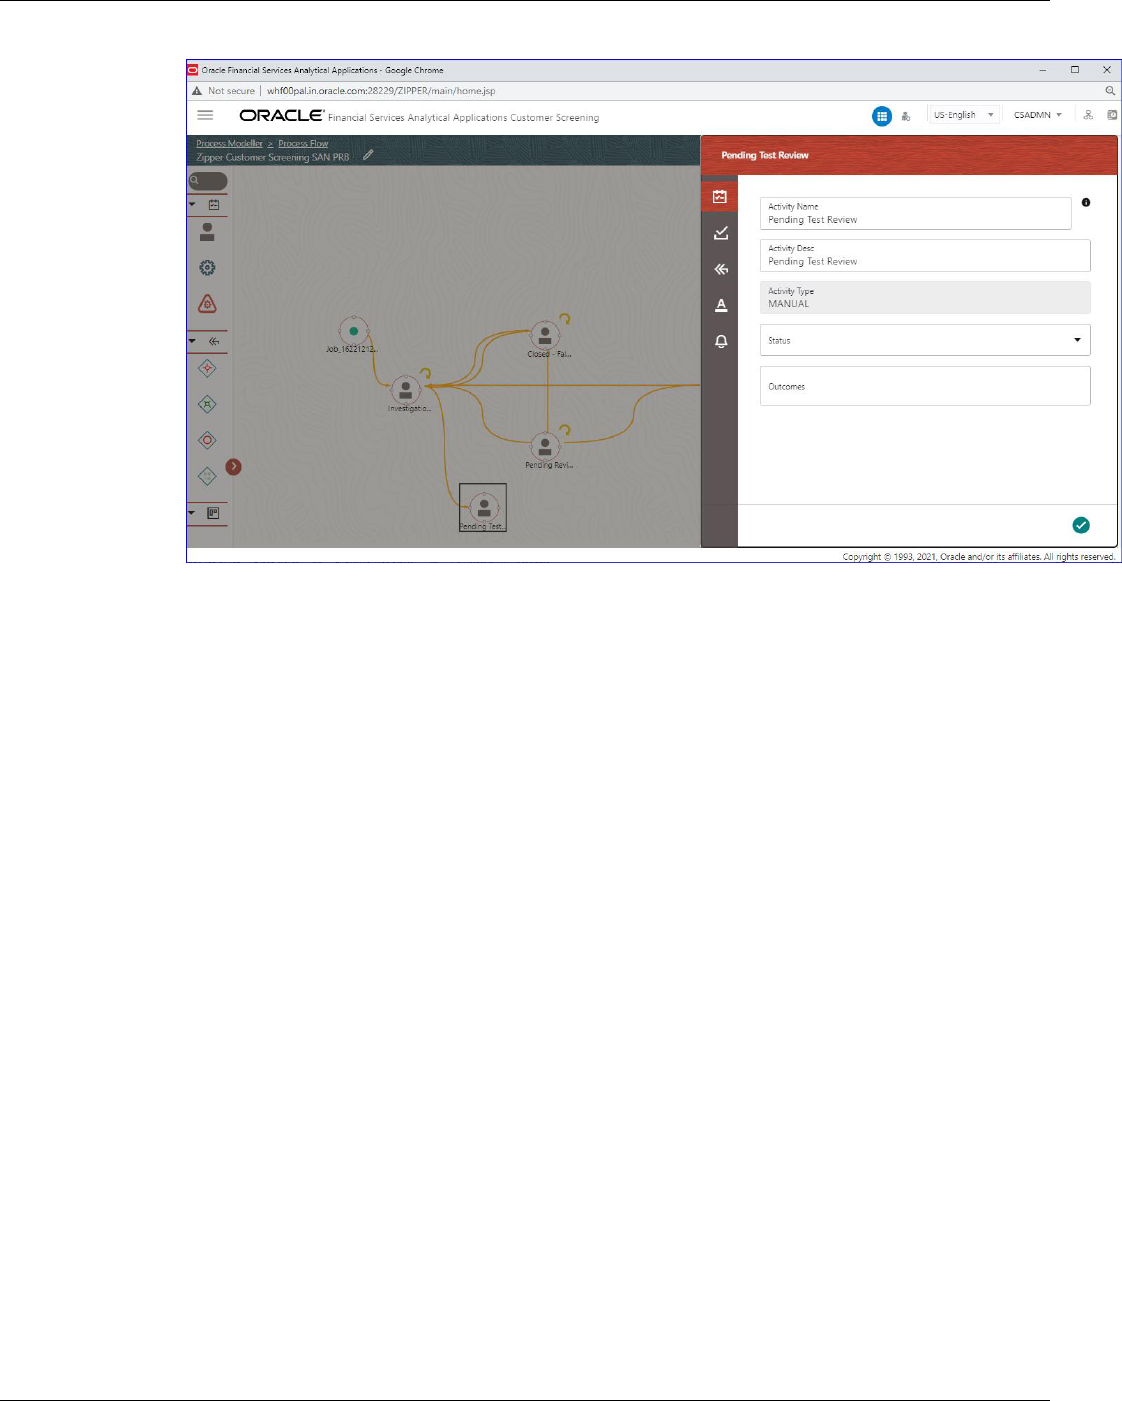
APPENDIX J: PMF CONFIGURATIONS FOR POOL OF ANALYST
DM UTILITY FAILURE
CUSTOMER SCREENING ADMINISTRATION GUIDE | 165
Transitions
------------------
Add ->
Transition Name - Unique Name for the particular Transition.
Connected To – Destination status.
Decision Rule - Map to decision rule for particular status.
Order - 1
Stroke – Default.
Example: First Transition between Investigation to Pending Test Review the next one
between Pending Test Review and Pending Review.
Figure 152: Edit Transaction – Pending Test Review

APPENDIX J: PMF CONFIGURATIONS FOR POOL OF ANALYST
DM UTILITY FAILURE
CUSTOMER SCREENING ADMINISTRATION GUIDE | 166
Figure 153: Edit Transaction – Pending Review
In Transition Decision Rule Map the specified rule for the current status. Or create as per business
requirement.
Example: For the decision rules, add the following 2 decision rules.
Figure 154: Rule Details – Decision Rule 1

APPENDIX J: PMF CONFIGURATIONS FOR POOL OF ANALYST
DM UTILITY FAILURE
CUSTOMER SCREENING ADMINISTRATION GUIDE | 167
Figure 155: Rule Details – Decision Rule 2
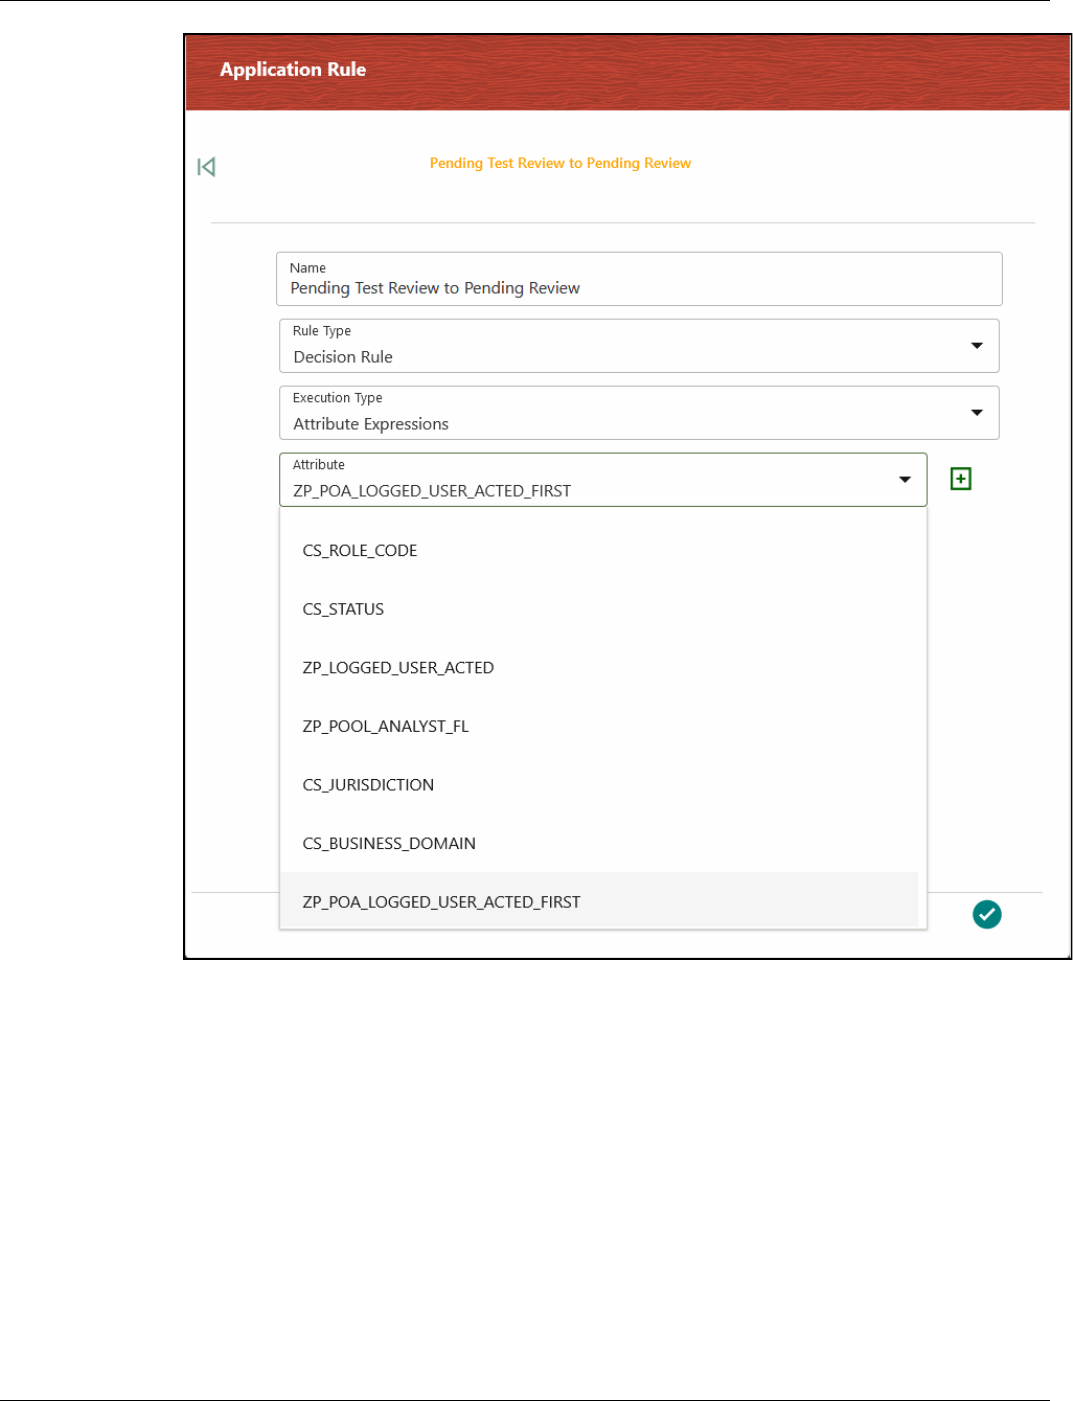
APPENDIX J: PMF CONFIGURATIONS FOR POOL OF ANALYST
DM UTILITY FAILURE
CUSTOMER SCREENING ADMINISTRATION GUIDE | 168
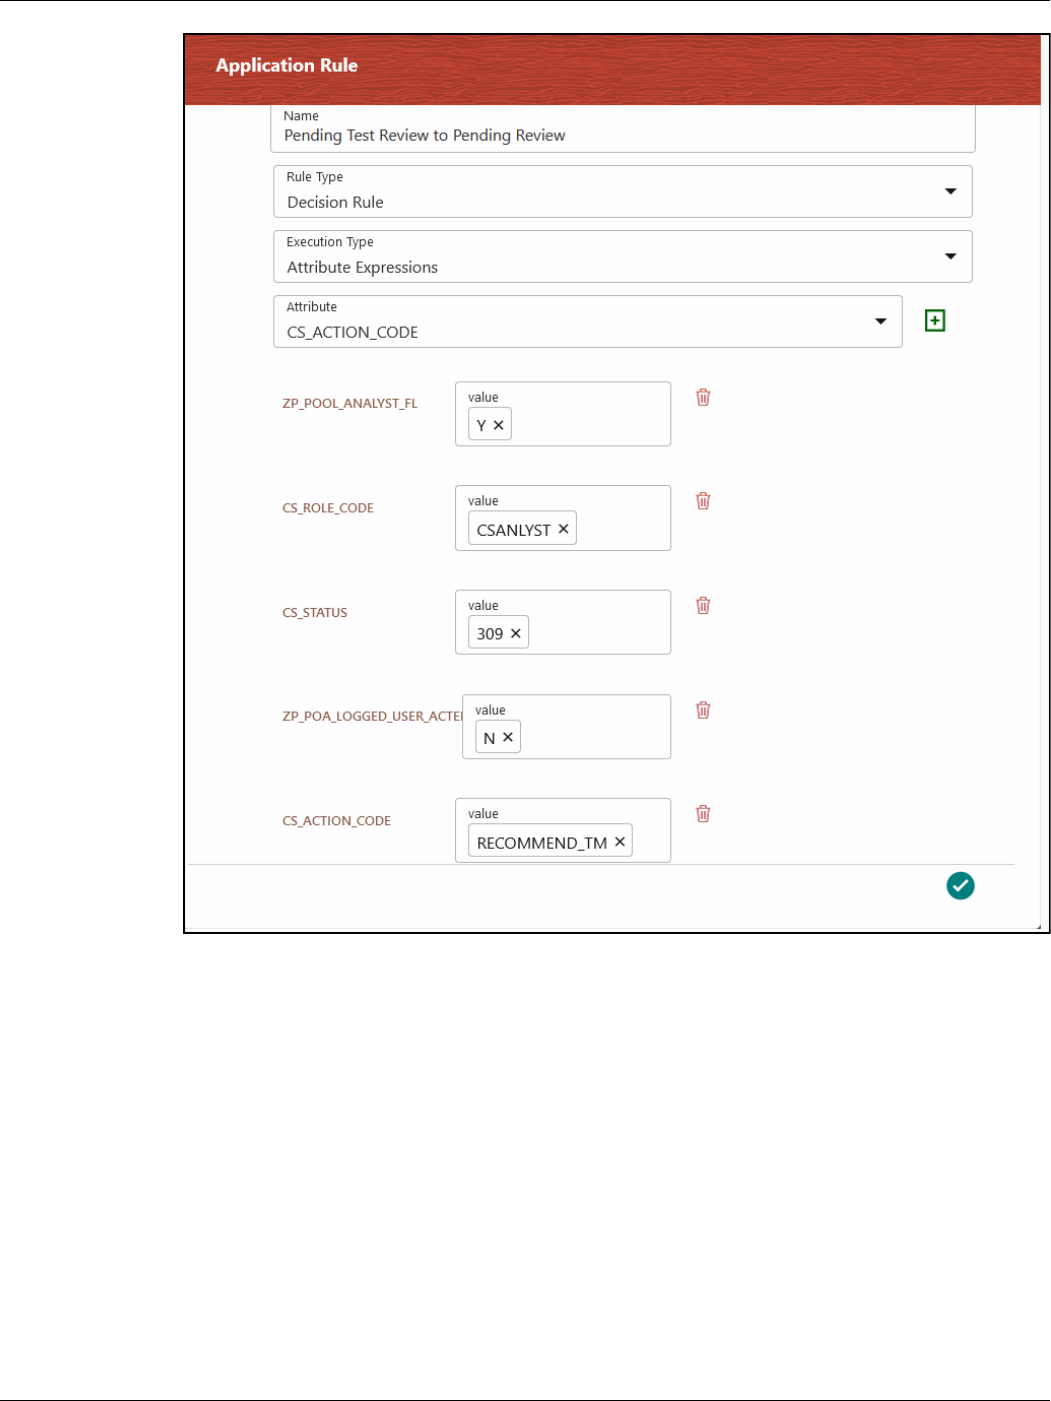
APPENDIX J: PMF CONFIGURATIONS FOR POOL OF ANALYST
LIST OF ATTRIBUTES PASSED TO WORKFLOW
CUSTOMER SCREENING ADMINISTRATION GUIDE | 169
Edit the existing decision rule, by adding the ZP_POOL_ANALYST_FL.
17.1 List of Attributes Passed to Workflow
The following table provides the list of Attributes passed to workflow:
Table 3: Attributes Passed to Workflow

APPENDIX J: PMF CONFIGURATIONS FOR POOL OF ANALYST
LIST OF ATTRIBUTES PASSED TO WORKFLOW
CUSTOMER SCREENING ADMINISTRATION GUIDE | 170
Attributes
Description
CS_ROLE_CODE
Logged in User.
CS_STATUS
Status code.
TF_ALERT TYPE
Alert type of the message (1 or 2).
ZP_POOL_ANALYST_FL
Allowed values are Y/N based on the
CS_appln_params Configuration.
ZP_POA_LOGGED_USER_ACTED_FIRST
If the Logged in User is the user who
performed the first action on the POA
status, then the value of
ZP_POA_LOGGED_USER_ACTED_FIRST
is Y else it’s N.
APPENDIX J: PMF CONFIGURATIONS FOR POOL OF ANALYST
ATTRIBUTE TO CONFIGURE THE AUTO REFRESH IN QUEUE MANAGEMENT
CUSTOMER SCREENING ADMINISTRATION GUIDE | 171
17.2 Attribute to Configure the Auto Refresh in Queue
Management
The following table provides the list of Attribute to configure the Auto Refresh in Queue Management:
Table 4: Q_AUTO_REFRESH_TIME Attribute
Attributes
Description
Q_AUTO_REFRESH_TIME
Provide the time in mille second for the
attribute in CS_APPLN_PARAMS table.
By default it’s 25000 i.e 25 seconds but the
value is editable.

APPENDIX K: INVOKING THE PMF WORKFLOW FROM BACKEND
ATTRIBUTE TO CONFIGURE THE AUTO REFRESH IN QUEUE MANAGEMENT
CUSTOMER SCREENING ADMINISTRATION GUIDE | 172
18 Appendix K: Invoking the PMF Workflow from
backend
This appendix describes invoking the Process Modeller Framework (PMF) workflow from the backend
for the alert.
Table 5 provides the PMF workflow invoking parameters.
Table 5: PMF Workflow Invoking Parameters
Parameter Name
Parameter Description
Object ID
This represents the unique object ID. For Sanctions, the object ID can be
alert ID or Good Guy Whitelist ID.
Object Type
This represents the object type for the object ID. For Sanctions, the
object type will be 301 for alert and 302 for Good Guy Whitelist.
Infodom
This represents the name of the infodom in which Sanctions are
installed.
Segment
This represents the name of the segment. For Sanctions, it will be
TFLSEGMENT.
User ID
This represents the User ID that is triggering the workflow. Pass the
value as SYSTEM.
Locale
This represents the locale. Pass the value as en_US.
Application Params
This represents the list of workflow data fields with their respective
value.
Security Params
This represents the list of workflow security data fields with their
respective value.
To trigger the workflow for Sanctions Alerts, follow the below code snippet:
DECLARE
lv_infodom varchar2(4000);
lv_segment varchar2(4000);
TYPE alert_record_ids IS TABLE OF fsi_rt_alerts.n_grp_msg_id%TYPE;
l_alert_record_ids alert_record_ids;
appParams array_varchar := array_varchar();

APPENDIX K: INVOKING THE PMF WORKFLOW FROM BACKEND
ATTRIBUTE TO CONFIGURE THE AUTO REFRESH IN QUEUE MANAGEMENT
CUSTOMER SCREENING ADMINISTRATION GUIDE | 173
secMap array_varchar := array_varchar();
BEGIN
appParams.extend();
appParams(1) := 'TF_ACTION=MANUAL_CLOSE';
appParams.extend();
appParams(2) := 'Role=SYSTEM';
select t.v_attribute_value1
into lv_infodom
from setup_rt_params t
where t.v_param_name = 'TFLT_INFODOM';
select t.v_attribute_value1
into lv_segment
from setup_rt_params t
where t.v_param_name = 'TFLT_SEGMENT';
select t.n_grp_msg_id bulk collect
into l_alert_record_ids
from fsi_rt_alerts t
where t.n_status_cd in (1,2);
FOR recId IN 1 .. l_alert_record_ids.COUNT loop
startWorkflowForExpireRecord(l_alert_record_ids(recId),
'301',
lv_infodom,
lv_segment,
'SYSTEM',
'en_US',
appParams,
secMap);
end loop;
EXCEPTION
WHEN OTHERS THEN
dbms_output.put_line(SQLCODE || SQLERRM);
ROLLBACK;
END;

APPENDIX L: TIME ZONE CONFIGURATION
ATTRIBUTE TO CONFIGURE THE AUTO REFRESH IN QUEUE MANAGEMENT
CUSTOMER SCREENING ADMINISTRATION GUIDE | 174
19 Appendix L: Time Zone Configuration
This appendix contains information on the expected user input to set up the time zone preference for
any user in the database. You can configure the time zone for each user ID.
If no time zone is specified for a user, the default time zone is the time zone specified in the user’s
browser.ss.
To update the time zone for a user, follow these steps:
1. Run the following script:
select * from AAI_USR_PREFERENCE_DETAIL t where t.v_preference_id =
'TIME_ZONE';
2. Update the time zone name in the following V_PREFERENCE_VALUE column:
Table 6: User IDs for Time Zones
V_USER_ID
V_PREFERENCE_ID
V_PREFERENCE_VALUE
Administrator
TIME_ZONE
Asia/Kolkata
Analyst
TIME_ZONE
Africa/Abidjan
Supervisor
TIME_ZONE
Africa/Accra
Senior Supervisor
TIME_ZONE
etc/UTC
The following table shows the country code and the respective time zone name. The following
country codes listed here are only for reference. For each country code, the respective time
zone name must be used to update the time zone.
Table 5: Country Codes for Time Zones
Country Code
Time Zone Name
CI
Africa/Abidjan
GH
Africa/Accra
ET
Africa/Addis_Ababa
DZ
Africa/Algiers
ER
Africa/Asmara
ML
Africa/Bamako
CF
Africa/Bangui
GM
Africa/Banjul
GW
Africa/Bissau
MW
Africa/Blantyre
CG
Africa/Brazzaville

APPENDIX L: TIME ZONE CONFIGURATION
ATTRIBUTE TO CONFIGURE THE AUTO REFRESH IN QUEUE MANAGEMENT
CUSTOMER SCREENING ADMINISTRATION GUIDE | 175
Country Code
Time Zone Name
BI
Africa/Bujumbura
EG
Africa/Cairo
MA
Africa/Casablanca
ES
Africa/Ceuta
GN
Africa/Conakry
SN
Africa/Dakar
TZ
Africa/Dar_es_Salaam
DJ
Africa/Djibouti
CM
Africa/Douala
EH
Africa/El_Aaiun
SL
Africa/Freetown
BW
Africa/Gaborone
ZW
Africa/Zimbabwe
ZA
Africa/Johannesburg
SS
Africa/Juba
UG
Africa/Kampala
SD
Africa/Khartoum
RW
Africa/Kigali
CD
Africa/Kinshasa
NG
Africa/Lagos
GA
Africa/Libreville
TG
Africa/Lome
AO
Africa/Luanda
CD
Africa/Lubumbashi
ZM
Africa/Lusaka
GQ
Africa/Malabo
MZ
Africa/Maputo
LS
Africa/Maseru
SZ
Africa/Mbabane
SO
Africa/Mogadishu
LR
Africa/Monrovia
KE
Africa/Nairobi
TD
Africa/Ndjamena

APPENDIX L: TIME ZONE CONFIGURATION
ATTRIBUTE TO CONFIGURE THE AUTO REFRESH IN QUEUE MANAGEMENT
CUSTOMER SCREENING ADMINISTRATION GUIDE | 176
Country Code
Time Zone Name
NE
Africa/Niamey
MR
Africa/Nouakchott
BF
Africa/Ouagadougou
BJ
Africa/Porto-Novo
ST
Africa/Sao_Tome
CI
Africa/Timbuktu
LY
Africa/Tripoli
TN
Africa/Tunis
NA
Africa/Windhoek
US
America/Adak
America/Anchorage
America/Boise
America/Chicago
America/Denver
America/Detroit
America/Indianapolis
America/Knox
America/Marengo
America/Petersburg
America/Tell_City
America/Vevay
America/Vincennes
America/Winamac
America/Juneau
America/Louisville
America/Monticello
America/Los_Angeles
America/Menominee
America/Metlakatla
America/New_York
America/Nome
America/Beulah
America/Center

APPENDIX L: TIME ZONE CONFIGURATION
ATTRIBUTE TO CONFIGURE THE AUTO REFRESH IN QUEUE MANAGEMENT
CUSTOMER SCREENING ADMINISTRATION GUIDE | 177
Country Code
Time Zone Name
America/New_Salem
America/Phoenix
America/Sitka
America/Yakutat
America/Honolulu
AI
America/Anguilla
AG
America/Antigua
AR
America/Buenos_Aires
America/Catamarca
America/Cordoba
America/Jujuy
America/La_Rioja
America/Mendoza
America/Rio_Gallegos
America/Salta
America/San_Juan
America/San_Luis
America/Tucuman
America/Ushuaia
AW
America/Aruba
PY
America/Asuncion
CA
America/Atikokan
America/Blanc-Sablon
America/Cambridge_Bay
America/Creston
America/Dawson
America/Dawson_Creek
America/Edmonton
America/Fort_Nelson
America/Glace_Bay
America/Goose_Bay
America/Halifax
America/Inuvik

APPENDIX L: TIME ZONE CONFIGURATION
ATTRIBUTE TO CONFIGURE THE AUTO REFRESH IN QUEUE MANAGEMENT
CUSTOMER SCREENING ADMINISTRATION GUIDE | 178
Country Code
Time Zone Name
America/Iqaluit
America/Moncton
America/Nipigon
America/Pangnirtung
America/Rainy_River
America/Rankin_Inlet
America/Regina
America/Resolute
America/St_Johns
America/Swift_Current
America/Thunder_Bay
America/Toronto
America/Vancouver
America/Whitehorse
America/Winnipeg
America/Yellowknife
BR
America/Araguaina
America/Bahia
America/Belem
America/Boa_Vista
America/Campo_Grande
America/Cuiaba
America/Eirunepe
America/Fortaleza
America/Maceio
America/Manaus
America/Noronha
America/Porto_Velho
America/Recife
America/Rio_Branco
America/Santarem
America/Sao_Paulo
MX
America/Bahia_Banderas

APPENDIX L: TIME ZONE CONFIGURATION
ATTRIBUTE TO CONFIGURE THE AUTO REFRESH IN QUEUE MANAGEMENT
CUSTOMER SCREENING ADMINISTRATION GUIDE | 179
Country Code
Time Zone Name
America/Cancun
America/Chihuahua
America/Hermosillo
America/Matamoros
America/Mazatlan
America/Merida
America/Mexico_City
America/Monterrey
America/Ojinaga
America/Tijuana
BB
America/Barbados
BZ
America/Belize
CO
America/Bogata
VE
America/Caracas
GF
America/Cayenne
KY
America/Cayman
CR
America/Costa_Rica
CW
America/Curacao
GL
America/Danmarkshavn
America/Godthab
America/Scoresbysund
America/Thule
DM
America/Dominica
SV
America/El_Salvador
TC
America/Grand_Turk
GD
America/Grenada
GP
America/Guadeloupe
GT
America/Guatemala
EC
America/Guayaquil
GY
America/Guyana
CU
America/Havana
JM
America/Jamaica
BQ
America/Kralendijk

APPENDIX L: TIME ZONE CONFIGURATION
ATTRIBUTE TO CONFIGURE THE AUTO REFRESH IN QUEUE MANAGEMENT
CUSTOMER SCREENING ADMINISTRATION GUIDE | 180
Country Code
Time Zone Name
BO
America/La_Paz
PE
America/Lima
SX
America/Lower_Princes
NI
America/Managua
MF
America/Marigot
MQ
America/Martinique
PM
America/Miquelon
UY
America/Montevideo
MS
America/Montserrat
BS
America/Nassau
PA
America/Panama
SR
America/Paramaribo
TT
America/Port_of_Spain
HT
America/Port-au-Prince
PR
America/Puerto_Rico
CL
America/Punta_Arenas
America/Santiago
America/Easter
DO
America/Santo_Domingo
BL
America/St_Barthelemy
KN
America/St_Kitts
LC
America/St_ Lucia
VI
America/St_Thomas
VC
America/St_Vincent
HN
America/Tegucigalpa
VG
America/Tortola
AQ
Antarctica/Casey
Antarctica/Davis
Antarctica/DumontDurville
Antarctica/Mawson
Antarctica/McMurdo
Antarctica/Palmer
Antarctica/Rothera
APPENDIX L: TIME ZONE CONFIGURATION
ATTRIBUTE TO CONFIGURE THE AUTO REFRESH IN QUEUE MANAGEMENT
CUSTOMER SCREENING ADMINISTRATION GUIDE | 181
Country Code
Time Zone Name
Antarctica/Syowa
Antarctica/Troll
Antarctica/Vostok
SJ
Arctic/Longyearbyen
YE
Asia/Aden
KZ
Asia/Almaty
Asia/Aqtau
Asia/Aqtobe
Asia/Atyrau
Asia/Oral
Asia/Qyzylorda
JO
Asia/Amman
TM
Asia/Ashgabat
IQ
Asia/Baghdad
BH
Asia/Bahrain
AZ
Asia/Baku
TH
Asia/Bangkok
RU
Asia/Anadyr
Asia/Barnaul
Asia/Chita
Asia/Irkutsk
Asia/Kamchatka
Asia/Khandyga
Asia/Krasnoyarsk
Asia/Magadan
Asia/Novokuznetsk
Asia/Novosibirsk
Asia/Omsk
Asia/Sakhalin
Asia/Srednekolymsk
Asia/Tomsk
Asia/Ust-Nera
Asia/Vladivostok

APPENDIX L: TIME ZONE CONFIGURATION
ATTRIBUTE TO CONFIGURE THE AUTO REFRESH IN QUEUE MANAGEMENT
CUSTOMER SCREENING ADMINISTRATION GUIDE | 182
Country Code
Time Zone Name
Asia/Yakutsk
Asia/Yekaterinburg
Europe/Astrakhan
Europe/Kaliningrad
Europe/Kirov
Europe/Moscow
Europe/Samara
Europe/Saratov
Europe/Ulyanovsk
Europe/Volgograd
LB
Asia/Beirut
KG
Asia/Bishkek
BN
Asia/Brunei
MN
Asia/Choibalsan
Asia/Hovd
Asia/Ulaanbaatar
LK
Asia/Colombo
SY
Asia/Damascus
BD
Asia/Dhaka
TL
Asia/Dili
AE
Asia/Dubai
TJ
Asia/Dushanbe
CY
Asia/Famagusta
PS
Asia/Gaza
VN
Asia/Ho_Chi_Minh
HK
Asia/Hong_Kong
ID
Asia/Jakarta
Asia/Jayapura
Asia/Makassar
Asia/Pontianak
IL
Asia/Jerusalem
AF
Asia/Kabul
PK
Asia/Karachi

APPENDIX L: TIME ZONE CONFIGURATION
ATTRIBUTE TO CONFIGURE THE AUTO REFRESH IN QUEUE MANAGEMENT
CUSTOMER SCREENING ADMINISTRATION GUIDE | 183
Country Code
Time Zone Name
NP
Asia/Kathmandu
IN
Asia/Kolkata
MY
Asia/Kuala_Lumpur
Asia/Kuching
KW
Asia/Kuwait
MO
Asia/Macau
PH
Asia/Manila
OM
Asia/Muscat
KH
Asia/Phnom_Penh
KP
Asia/Pyongyang
QA
Asia/Qatar
MM
Asia/Rangoon
Asia/Yangon
SA
Asia/Riyadh
UZ
Asia/Samarkand
Asia/Tashkent
KR
Asia/Seoul
CN
Asia/Shanghai
Asia/Urumqi
SG
Asia/Singapore
TW
Asia/Taipei
GE
Asia/Tbilisi
IR
Asia/Tehran
BT
Asia/Thimphu
JP
Asia/Tokyo
LA
Asia/Vientiane
AM
Asia/Yerevan
PT
Atlantic/Azores
Atlantic/Madeira
BM
Atlantic/Bermuda
ES
Atlantic/Canary
CV
Atlantic/Cape_Verde
FO
Atlantic/Faroe

APPENDIX L: TIME ZONE CONFIGURATION
ATTRIBUTE TO CONFIGURE THE AUTO REFRESH IN QUEUE MANAGEMENT
CUSTOMER SCREENING ADMINISTRATION GUIDE | 184
Country Code
Time Zone Name
IS
Atlantic/Reykjavik
GS
Atlantic/South_Georgia
SH
Atlantic/St_Helena
FK
Atlantic/Stanley
AU
Australia/Adelaide
Australia/Brisbane
Australia/Broken_Hill
Australia/Canberra
Australia/Currie
Australia/Darwin
Australia/Eucla
Australia/Hobart
Australia/Lindeman
Australia/Lord_Howe
Australia/Melbourne
Australia/Perth
Australia/Sydney
Australia/Yancowinna
NL
Europe/Amsterdam
AD
Europe/Andorra
GR
Europe/Athens
GB
Europe/Belfast
RS
Europe/Belgrade
DE
Europe/Berlin
SK
Europe/Bratislava
BE
Europe/Brussels
RO
Europe/Bucharest
HU
Europe/Budapest
DE
Europe/Busingen
MD
Europe/Chisinau
DK
Europe/Copenhagen
IE
Europe/Dublin
GI
Europe/Gibraltar

APPENDIX L: TIME ZONE CONFIGURATION
ATTRIBUTE TO CONFIGURE THE AUTO REFRESH IN QUEUE MANAGEMENT
CUSTOMER SCREENING ADMINISTRATION GUIDE | 185
Country Code
Time Zone Name
GG
Europe/Guernsey
FI
Europe/Helsinki
IM
Europe/Isle_of_Man
TR
Europe/Istanbul
JE
Europe/Jersey
UA
Europe/Kiev
PT
Europe/Lisbon
SI
Europe/Ljubljana
GB
Europe/London
LU
Europe/Luxembourg
ES
Europe/Madrid
MT
Europe/Malta
AX
Europe/Mariehamn
BY
Europe/Minsk
MC
Europe/Monaco
CY
Europe/Nicosia
NO
Europe/Oslo
FR
Europe/Paris
ME
Europe/Podgorica
CZ
Europe/Prague
LV
Europe/Riga
IT
Europe/Rome
SM
Europe/San_Marino
BA
Europe/Sarajevo
UA
Europe/Simferopol
Europe/Uzhgorod
MK
Europe/Skopje
BG
Europe/Sofia
SE
Europe/Stockholm
EE
Europe/Tallinn
AL
Europe/Tirane
MD
Europe/Tiraspol
LI
Europe/Vaduz

APPENDIX L: TIME ZONE CONFIGURATION
ATTRIBUTE TO CONFIGURE THE AUTO REFRESH IN QUEUE MANAGEMENT
CUSTOMER SCREENING ADMINISTRATION GUIDE | 186
Country Code
Time Zone Name
VA
Europe/Vatican
AT
Europe/Vienna
LT
Europe/Vilnius
PL
Europe/Warsaw
HR
Europe/Zagreb
CH
Europe/Zurich
MG
Indian/Antananarivo
IO
Indian/Chagos
CX
Indian/Christmas
CC
Indian/Cocos
KM
Indian/Comoro
TF
Indian/Kerguelen
SC
Indian/Mahe
MV
Indian/Maldives
MU
Indian/Mauritius
YT
Indian/Mayotte
RE
Indian/Reunion
WS
Pacific/Apia
NZ
Pacific/Auckland
NZ
Pacific/Chatham
PG
Pacific/Bougainville
FM
Pacific/Chuuk
CL
Pacific/Easter
VU
Pacific/Efate
TK
Pacific/Fakaofo
FJ
Pacific/Fiji
TV
Pacific/Funafuti
EC
Pacific/Galapagos
PF
Pacific/Gambier
PF
Pacific/Marquesas
PF
Pacific/Tahiti
SB
Pacific/Guadalcanal
GU
Pacific/Guam

APPENDIX L: TIME ZONE CONFIGURATION
ATTRIBUTE TO CONFIGURE THE AUTO REFRESH IN QUEUE MANAGEMENT
CUSTOMER SCREENING ADMINISTRATION GUIDE | 187
Country Code
Time Zone Name
US
Pacific/Honolulu
KI
Pacific/Enderbury
KI
Pacific/Kiritimati
KI
Pacific/Tarawa
FM
Pacific/Kosrae
MH
Pacific/Majuro
UM
Pacific/Midway
UM
Pacific/Wake
NR
Pacific/Nauru
NU
Pacific/Niue
NF
Pacific/Norfolk
NC
Pacific/Noumea
AS
Pacific/Pago_Pago
PW
Pacific/Palau
PN
Pacific/Pitcairn
FM
Pacific/Pohnpei
PG
Pacific/Port_Moresby
CK
Pacific/Rarotonga
MP
Pacific/Saipan
Pacific/Samoa
TO
Pacific/Tongatapu
WF
Pacific/Wallis

APPENDIX M: MAPPING THE PMF WORKFLOW FOR DIFFERENT JURISDICTION AND DOMAIN
ATTRIBUTE TO CONFIGURE THE AUTO REFRESH IN QUEUE MANAGEMENT
CUSTOMER SCREENING ADMINISTRATION GUIDE | 188
20 Appendix M: Mapping the PMF Workflow for
Different Jurisdiction and domain
The AAI_WF_APP_DEFINITION_MAP table in Config Schema stores the mapping of object type data
to the rocess Modeller Framework (PMF) workflow that is to be used.
The AAI_WF_APP_DEFINITION_MAP table also captures the values for crucial business decisions
such as jurisdiction and business domain.
To map a particular workflow to an object type for a combination of jurisdiction and business domain
follow these steps:
1. Insert V_KBD_1 and V_KBD_2 columns values into the AAI_WF_APP_DEFINITION_MAP
table.
NOTE
V_KBD_1 represents Jurisdiction code and V_KBD_2
represents Business Domain code.
2. Restart the web server after inserting the values into AAI_WF_APP_DEFINITION_MAP table.

APPENDIX N: USER GROUP CUSTOMIZATION
ATTRIBUTE TO CONFIGURE THE AUTO REFRESH IN QUEUE MANAGEMENT
CUSTOMER SCREENING ADMINISTRATION GUIDE | 189
21 Appendix N: User Group Customization
When a new user group for Customer Screening is created from Oracle Financial Services Analytical
Applications (OFSAA) user Interface (UI), you must insert an entry in the CSSMS_GROUP_MAST_PACK
table manually with the product id OFS_CS.

APPENDIX O: FUNCTION CODES FOR USER GROUPS
ATTRIBUTE TO CONFIGURE THE AUTO REFRESH IN QUEUE MANAGEMENT
CUSTOMER SCREENING ADMINISTRATION GUIDE | 190
22 Appendix O: Function Codes for User Groups
All actions or functions in the Customer Screening (CS) application is configured with a function code.
You can define the functionalities for the particular user group by assigning the required functional
code to the user group. If a function code is mapped to the user group, the functionality
corresponding to the functional code is enabled in the UI.
Table 6 provide the list of OOB functional codes assigned for different user groups.
Table 6: Function Codes for User Groups
Function
Codes
Function Description
CSANYST
CSSUPRV
CSSNRSU
PER
CSREAD
ONLY
CSRT
CSQALLALRT
Access to View All Alerts in List
Page through Queue
✓
✓
CSACSALLQ
Access to open any queue in
Queue dashboard
✓
✓
CSQGETNEXT
Access to get the next queue
alerts in details page
✓
✓
CSQGNXTALL
Access to view all alerts from get
next in queue
✓
✓
CSALRTASGN
Access to assign alerts when the
user opens alert
✓
✓
✓
CSALRTATTH
Access to select and save
attachments for an alert in List
Page
✓
✓
✓
CSBLKACNT
This function gives access to Bulk
Update in List Page.
✓
CSADATTH
Access to select and save
attachments for an alert in
Details Page
✓
✓
✓
CSEVNTDEC
Access to take event level action
in alert Details Page
✓
✓
✓
CSEVNTCOM
Access to add or update event
level comments in alert Details
Page
✓
✓
✓
CSSCN
This function gives access to Scan
Button in RealTime Screening
Page
✓
✓
CSSCNINVST
This function gives access to Scan
& Investigate Button in RealTime
Screening Page
✓
✓

APPENDIX O: FUNCTION CODES FOR USER GROUPS
ATTRIBUTE TO CONFIGURE THE AUTO REFRESH IN QUEUE MANAGEMENT
CUSTOMER SCREENING ADMINISTRATION GUIDE | 191
NOTE
If you configure any of the following function codes to a user
group, you must also configure the CSALRTASGN function
code to the user group as a mandatory function code:
• CSADATTH
• CSEVNTDEC
• CSEVNTCOM


SEND US YOUR COMMENTS
CUSTOMER SCREENING ADMINISTRATION GUIDE | 193
Send Us Your Comments
Oracle welcomes your comments and suggestions on the quality and usefulness of this publication.
Your input is an important part of the information used for revision.
• Did you find any errors?
• Is the information clearly presented?
• Do you need more information? If so, where?
• Are the examples correct? Do you need more examples?
• What features did you like most about this manual?
If you find any errors or have any other suggestions for improvement, indicate the title and part
number of the documentation along with the chapter/section/page number (if available) and contact
the My Oracle Support.
Before sending us your comments, you might like to ensure that you have the latest version of the
document wherein any of your concerns have already been addressed. You can access My Oracle
Support site that has all the revised or recently released documen

