
Oracle® Fusion Middleware
User’s Guide for Oracle Content Server
11g Release 1 (11.1.1)
E10797-02
January 2011
Oracle Fusion Middleware User's Guide for Oracle Content Server 11g Release 1 (11.1.1)
E10797-02
Copyright © 1998, 2011, Oracle and/or its affiliates. All rights reserved.
Primary Author: Robert Lies
Contributing Authors: Sandra Christiansen, Bonnie Vaughan
This software and related documentation are provided under a license agreement containing restrictions on
use and disclosure and are protected by intellectual property laws. Except as expressly permitted in your
license agreement or allowed by law, you may not use, copy, reproduce, translate, broadcast, modify,
license, transmit, distribute, exhibit, perform, publish, or display any part, in any form, or by any means.
Reverse engineering, disassembly, or decompilation of this software, unless required by law for
interoperability, is prohibited.
The information contained herein is subject to change without notice and is not warranted to be error-free. If
you find any errors, please report them to us in writing.
If this software or related documentation is delivered to the U.S. Government or anyone licensing it on
behalf of the U.S. Government, the following notice is applicable:
U.S. GOVERNMENT RIGHTS Programs, software, databases, and related documentation and technical data
delivered to U.S. Government customers are "commercial computer software" or "commercial technical
data" pursuant to the applicable Federal Acquisition Regulation and agency-specific supplemental
regulations. As such, the use, duplication, disclosure, modification, and adaptation shall be subject to the
restrictions and license terms set forth in the applicable Government contract, and, to the extent applicable
by the terms of the Government contract, the additional rights set forth in FAR 52.227-19, Commercial
Computer Software License (December 2007). Oracle USA, Inc., 500 Oracle Parkway, Redwood City, CA
94065.
This software is developed for general use in a variety of information management applications. It is not
developed or intended for use in any inherently dangerous applications, including applications which may
create a risk of personal injury. If you use this software in dangerous applications, then you shall be
responsible to take all appropriate fail-safe, backup, redundancy, and other measures to ensure the safe use
of this software. Oracle Corporation and its affiliates disclaim any liability for any damages caused by use of
this software in dangerous applications.
Oracle is a registered trademark of Oracle Corporation and/or its affiliates. Other names may be trademarks
of their respective owners.
This software and documentation may provide access to or information on content, products, and services
from third parties. Oracle Corporation and its affiliates are not responsible for and expressly disclaim all
warranties of any kind with respect to third-party content, products, and services. Oracle Corporation and
its affiliates will not be responsible for any loss, costs, or damages incurred due to your access to or use of
third-party content, products, or services.

iii
Contents
Preface ............................................................................................................................................................... xv
Audience..................................................................................................................................................... xv
Documentation Accessibility................................................................................................................... xv
Related Documents ................................................................................................................................... xvi
Conventions ............................................................................................................................................... xvi
1 Introduction
1.1 About This Guide........................................................................................................................ 1-1
1.2 Product Overview....................................................................................................................... 1-1
1.2.1 Content Server...................................................................................................................... 1-2
1.2.2 Content Repository.............................................................................................................. 1-2
1.2.3 Revision Control .................................................................................................................. 1-2
1.2.4 Metadata................................................................................................................................ 1-3
1.2.5 Security Groups and Accounts .......................................................................................... 1-3
1.2.6 Roles....................................................................................................................................... 1-3
1.2.7 Permissions........................................................................................................................... 1-4
1.2.8 Users ...................................................................................................................................... 1-4
1.2.9 Access Control List (ACL) Security................................................................................... 1-5
1.2.10 Conversion Features............................................................................................................ 1-6
1.2.11 Indexing ................................................................................................................................ 1-6
1.2.12 Finding Content ................................................................................................................... 1-6
1.2.13 Storing and Moving Content with Folders and WebDAV ............................................ 1-6
1.2.14 Grouping Content................................................................................................................ 1-7
1.2.15 Managing Images and Videos ........................................................................................... 1-7
1.2.16 Routing Content Through Workflows.............................................................................. 1-7
2 Getting Started
2.1 Using a Supported Web Browser ............................................................................................. 2-1
2.2 Accessing Oracle Content Server.............................................................................................. 2-1
3 Becoming Familiar with the Interface
3.1 Customizable Interface............................................................................................................... 3-1
3.2 Portal Navigation Bar................................................................................................................. 3-2
3.3 Toolbar.......................................................................................................................................... 3-3
3.4 Home Page................................................................................................................................... 3-3
iv
3.5 Actions Menus............................................................................................................................. 3-4
3.6 Pop-Up Calendar ........................................................................................................................ 3-5
3.6.1 Pop-Up Calendar Screen..................................................................................................... 3-6
3.6.2 Setting Release and Expiration Dates ............................................................................... 3-7
3.6.3 Updating Expiration Dates ................................................................................................ 3-7
3.7 Personalizing the Interface ........................................................................................................ 3-7
3.7.1 About Personalization......................................................................................................... 3-8
3.7.2 Editing Your User Profile ................................................................................................... 3-8
3.7.3 Creating a Custom Search Result Template .................................................................... 3-9
3.7.4 Editing Saved Queries......................................................................................................... 3-9
3.7.5 Saving Personal URLs...................................................................................................... 3-10
3.7.6 User Profile Page............................................................................................................... 3-11
3.7.7 My Oracle Content Server Tray...................................................................................... 3-13
3.7.8 Search Result Templates .................................................................................................. 3-14
3.7.9 Classic View Template..................................................................................................... 3-14
3.7.10 Headline View Template................................................................................................. 3-15
3.7.11 Thumbnail View Template.............................................................................................. 3-16
3.8 Creating and Editing Custom Search Result Templates .................................................... 3-17
4 Finding Content Items
4.1 Options for Finding Content Items .......................................................................................... 4-2
4.2 Searching with Oracle Text Search........................................................................................... 4-2
4.2.1 Specifying a Search on the Expanded Form .................................................................... 4-3
4.2.2 Specifying a Search on the Query Builder Form............................................................. 4-6
4.2.3 Metadata Search Operators for Oracle Text Search........................................................ 4-7
4.2.4 Metadata Wildcards ............................................................................................................ 4-8
4.2.5 Searching for Expired Content........................................................................................... 4-8
4.2.5.1 Searching for Expired Content ................................................................................... 4-8
4.2.5.2 Searching for Content About to Expire ..................................................................... 4-9
4.3 Searching with Database Metadata Search ............................................................................. 4-9
4.3.1 About Metadata Searching................................................................................................. 4-9
4.3.2 Performing a Metadata Search........................................................................................ 4-10
4.3.3 Metadata Search Operators for a Database Metadata Search .................................... 4-10
4.3.4 Metadata Search Case Sensitivity................................................................................... 4-11
4.3.5 Metadata Wildcards ......................................................................................................... 4-11
4.3.6 Searching for Expired Content........................................................................................ 4-12
4.3.6.1 Searching for Expired Content ................................................................................ 4-12
4.3.6.2 Searching for Content About to Expire .................................................................. 4-12
4.4 Searching with Database Full-Text Search........................................................................... 4-13
4.4.1 About Full-Text Searching............................................................................................... 4-13
4.4.2 Full-Text Search Rules...................................................................................................... 4-13
4.4.3 Full-Text Search Case Sensitivity ................................................................................... 4-14
4.4.4 Full-Text Search Wildcards ............................................................................................. 4-14
4.4.5 Oracle Database Full-Text Search Options.................................................................... 4-15
4.4.5.1 Oracle Database Full-Text Search Operators......................................................... 4-15
4.4.5.2 Oracle Database Full-Text Highlighting ................................................................ 4-15
4.4.6 Performing a Full-Text Search ........................................................................................ 4-16
v
4.5 Browsing to Content................................................................................................................ 4-16
4.5.1 Browsing Content to Find a File..................................................................................... 4-16
4.5.2 Browse Content Tray........................................................................................................ 4-17
4.5.2.1 Library Folders........................................................................................................... 4-17
4.5.2.2 Links from Folders .................................................................................................... 4-17
4.6 Using Additional Search Capabilities................................................................................... 4-17
4.6.1 Internet-Style Search Syntax ........................................................................................... 4-17
4.6.2 Complex Queries and Alternate Query Formats ......................................................... 4-18
4.7 Search Pages.............................................................................................................................. 4-19
4.7.1 Quick Search Field............................................................................................................ 4-19
4.7.2 Home Page Search Fields ................................................................................................ 4-20
4.7.3 Search Tray ........................................................................................................................ 4-20
4.7.4 Advanced Search Page..................................................................................................... 4-20
4.7.5 Query Builder Form ......................................................................................................... 4-21
4.8 Working with Search Results ................................................................................................. 4-21
4.8.1 Displaying Search Results ............................................................................................... 4-21
4.8.2 Changing the Search Results View ................................................................................ 4-22
4.9 Searching Referenced Links (optional)................................................................................. 4-22
4.9.1 About Searching Links..................................................................................................... 4-23
4.9.2 Link References on the Content Information Page...................................................... 4-23
4.9.3 Notification of Expiration................................................................................................ 4-24
4.9.4 Performing a Link Search ................................................................................................ 4-25
4.9.5 Checking Content Item Link References....................................................................... 4-25
4.9.5.1 Checking Link References from the Search Results Page.................................... 4-25
4.9.5.2 Checking Link References from the Link Manager’s Search Links page.......... 4-25
4.9.6 Checking the Link Information About Specific Links................................................. 4-26
4.9.6.1 Checking Link Information from the Content Information Page....................... 4-26
4.9.6.2 Checking Link Information from the Search Links Page..................................... 4-26
4.10 Saving Queries.......................................................................................................................... 4-26
4.10.1 About Saved Queries ....................................................................................................... 4-26
4.10.2 Saving a Query.................................................................................................................. 4-27
4.11 Finding Recent Queries........................................................................................................... 4-27
4.11.1 Rerunning a Recent Query .............................................................................................. 4-27
4.11.2 Clearing Recent Queries .................................................................................................. 4-27
4.12 Content Data Tracking and Reporting.................................................................................. 4-28
4.12.1 About Content Tracker .................................................................................................... 4-28
4.12.2 About Content Tracker Reports...................................................................................... 4-28
4.12.2.1 Content Access Reports ............................................................................................ 4-29
4.12.2.2 Content Dashboard Feature..................................................................................... 4-29
4.12.2.3 Drill Down Report Feature....................................................................................... 4-29
5 Working with Files
5.1 Understanding the Lifecycle of a File ...................................................................................... 5-1
5.1.1 Revision Lifecycle ................................................................................................................ 5-1
5.1.2 Revision Status ..................................................................................................................... 5-3
5.1.3 Determining the Revision Status....................................................................................... 5-3
5.2 Viewing Content Information................................................................................................... 5-3
vi
5.3 Working with File Revisions ..................................................................................................... 5-4
5.3.1 Viewing the Revision History............................................................................................ 5-4
5.3.2 Deleting Revisions ............................................................................................................... 5-4
5.4 Content Item Metadata .............................................................................................................. 5-4
5.4.1 Updating Metadata.............................................................................................................. 5-4
5.4.2 Recategorizing Metadata .................................................................................................... 5-5
5.5 Viewing a File.............................................................................................................................. 5-5
5.5.1 About Viewing a File........................................................................................................... 5-5
5.5.2 Viewing a Web-Viewable File............................................................................................ 5-5
5.5.3 Viewing a Native File.......................................................................................................... 5-6
5.6 Discussing Content..................................................................................................................... 5-6
5.6.1 About Discussion Posts and Threads ............................................................................... 5-7
5.6.2 Initiating a Discussion from the Content Information Page.......................................... 5-8
5.6.3 Initiating a Discussion from the Search Results Page .................................................... 5-9
5.6.4 Initiating a Discussion from the Workflow Review Page.............................................. 5-9
5.6.5 Viewing a Threaded Discussion........................................................................................ 5-9
5.6.6 Replying to a Posting ....................................................................................................... 5-10
5.6.7 Printing a Threaded Discussion ..................................................................................... 5-10
5.6.8 Deleting a Threaded Discussion..................................................................................... 5-11
5.6.9 Searching with the Discussion Type Field .................................................................... 5-11
5.6.9.1 Searching for Content That Is a Discussion ........................................................... 5-11
5.6.9.2 Searching for Content That Is Not a Discussion ................................................... 5-11
5.7 Subscribing to New Revisions of a Content Item................................................................ 5-12
5.7.1 About Subscriptions......................................................................................................... 5-12
5.7.2 Subscribing to a Content Item......................................................................................... 5-12
5.7.3 Viewing Your Current Subscriptions ............................................................................ 5-12
5.7.4 Unsubscribing from a Content Item .............................................................................. 5-13
5.7.5 Unsubscribing from a Criteria Group............................................................................ 5-13
6 Checking In Files
6.1 About Manual File Check-In..................................................................................................... 6-1
6.2 Primary and Alternate Files ...................................................................................................... 6-1
6.3 Watermarks and File Check-In ................................................................................................. 6-2
6.3.1 About PDF Watermark ....................................................................................................... 6-2
6.3.2 Watermark Templates......................................................................................................... 6-2
6.3.3 Content Check-In Form ...................................................................................................... 6-3
6.4 Checking In Single Files............................................................................................................. 6-3
6.4.1 Checking In a New File....................................................................................................... 6-3
6.4.2 Checking In a Similar File................................................................................................... 6-5
6.4.3 Checking In a Revised File ................................................................................................. 6-5
6.5 Checking In Multiple Files......................................................................................................... 6-5
6.5.1 About Multiple File Check-In ............................................................................................ 6-6
6.5.2 Upload Applet Requirements............................................................................................ 6-6
6.5.3 Checking In Multiple Files Using Upload ....................................................................... 6-7
6.6 Important Considerations.......................................................................................................... 6-8
6.6.1 Multibyte Characters........................................................................................................... 6-8
6.6.2 Content Profiles.................................................................................................................... 6-8
vii
7 Checking Out Files
7.1 About Manual File Check-Out.................................................................................................. 7-1
7.2 Checking Out Single Files.......................................................................................................... 7-1
7.3 Using Check Out and Open ...................................................................................................... 7-2
7.3.1 About Checking Out and Opening Content.................................................................... 7-2
7.3.2 Opening Content from Oracle Content Server .............................................................. 7-3
7.4 Checking Out Multiple Files ..................................................................................................... 7-4
7.4.1 About Multiple File Check-Out......................................................................................... 7-4
7.4.2 Download Applet Requirements....................................................................................... 7-4
7.4.3 Download Options on Search Results Pages................................................................... 7-5
7.4.4 Downloading Multiple Files .............................................................................................. 7-5
8 Working with Workflows
8.1 About Workflows........................................................................................................................ 8-1
8.1.1 Workflow Types................................................................................................................... 8-1
8.1.2 Workflow Steps.................................................................................................................... 8-1
8.1.3 Postprocess Workflow Options ......................................................................................... 8-2
8.1.4 Workflow Process................................................................................................................ 8-2
8.1.5 Workflow Tasks ................................................................................................................... 8-2
8.2 Participating in a Workflow ...................................................................................................... 8-3
8.2.1 Entering a File to a Workflow............................................................................................ 8-3
8.2.2 Reviewing Revisions in a Workflow................................................................................. 8-4
8.2.3 Working with a Rejected Revision .................................................................................... 8-5
8.3 Viewing Workflow Information ............................................................................................... 8-6
8.3.1 Workflow Information........................................................................................................ 8-6
8.3.2 Viewing a List of Active Workflows................................................................................. 8-6
8.3.3 Viewing a List of Your Workflows.................................................................................... 8-6
8.3.4 Viewing Workflow History and Information About a Workflow Step....................... 8-6
8.3.5 Viewing Content Information............................................................................................ 8-7
9 Storing and Moving Content with Folders/WebDAV
9.1 Introduction ................................................................................................................................. 9-1
9.1.1 About Folders....................................................................................................................... 9-1
9.1.1.1 Content Item Security .................................................................................................. 9-1
9.1.1.2 Folder Metadata Inheritance....................................................................................... 9-2
9.1.1.3 Default Metadata Values ............................................................................................. 9-2
9.1.1.4 Trash Bin ........................................................................................................................ 9-2
9.1.1.5 Metadata Propagation.................................................................................................. 9-3
9.1.1.6 Folder Content Item Revisions ................................................................................... 9-3
9.1.2 About WebDAV................................................................................................................... 9-4
9.1.2.1 What is WebDAV?........................................................................................................ 9-4
9.1.2.2 WebDAV Clients .......................................................................................................... 9-4
9.1.2.3 WebDAV Connection Strings ..................................................................................... 9-4
9.2 Working with Folders ................................................................................................................ 9-5
9.2.1 Naming Folders ................................................................................................................... 9-5
9.2.2 Defining User Configuration Settings .............................................................................. 9-5
viii
9.2.3 Defining User Metadata Defaults for New Content....................................................... 9-6
9.2.4 Defining User Metadata Defaults for Revised Content ................................................. 9-6
9.2.5 Viewing Virtual Folders...................................................................................................... 9-7
9.2.6 Viewing Content Items ....................................................................................................... 9-7
9.2.7 Checking In Content............................................................................................................ 9-7
9.2.8 Adding Virtual Folders....................................................................................................... 9-8
9.2.9 Modifying Virtual Folders.................................................................................................. 9-8
9.2.10 Moving Virtual Folders and Content................................................................................ 9-9
9.2.11 Creating a Shortcut.............................................................................................................. 9-9
9.2.11.1 Creating a Shortcut from an Exploring Page......................................................... 9-10
9.2.11.2 Creating a Shortcut from a Folder Information or Content Information Page 9-10
9.2.12 Deleting Virtual Folders and Their Content................................................................. 9-10
9.2.12.1 About Deleting Folders and Content...................................................................... 9-10
9.2.12.2 Deleting a Folder or Content Item .......................................................................... 9-11
9.2.12.3 Permanently Deleting Folders and Content from Trash ..................................... 9-12
9.2.13 Restoring Folders and Content from Trash .................................................................. 9-12
9.2.14 Propagating Metadata...................................................................................................... 9-13
9.2.15 Searching for Content in Folders.................................................................................... 9-13
9.3 Working with WebDAV ......................................................................................................... 9-13
9.3.1 Setting Up a Web Folder.................................................................................................. 9-13
9.3.2 Working with Virtual Folders......................................................................................... 9-14
9.3.2.1 Folder Name Constraints ......................................................................................... 9-14
9.3.2.2 Viewing Virtual Folders ........................................................................................... 9-14
9.3.2.3 Creating a New Virtual Folder ................................................................................ 9-14
9.3.2.4 Deleting a Virtual Folder.......................................................................................... 9-14
9.3.2.5 Restoring a Virtual Folder........................................................................................ 9-15
9.3.2.6 Setting Default Folder Metadata ............................................................................. 9-15
9.3.3 Working with Content ..................................................................................................... 9-15
9.3.3.1 Checking In Content ................................................................................................. 9-15
9.3.3.1.1 Check-In Through Windows Explorer............................................................ 9-16
9.3.3.1.2 Check-In Through Microsoft Office................................................................. 9-16
9.3.3.2 Checking Out Content .............................................................................................. 9-16
9.3.3.2.1
Check-Out Through Windows Explorer......................................................... 9-17
9.3.3.2.2 Check-Out Through Microsoft Office ............................................................. 9-17
9.3.3.3 Viewing Content........................................................................................................ 9-17
9.3.3.4 Modifying Content.................................................................................................... 9-17
9.3.3.4.1 Modifying a File in a WebDAV Client Format .............................................. 9-17
9.3.3.4.2 Modifying a File in a Non-WebDAV Client Format ..................................... 9-18
9.3.3.5 Deleting Content........................................................................................................ 9-18
9.3.3.5.1 Deleting Through Windows Explorer............................................................. 9-18
9.3.3.5.2 Deleting Through Microsoft Office.................................................................. 9-18
9.3.3.6 Restoring Content...................................................................................................... 9-18
9.3.3.7 Copying Content........................................................................................................ 9-18
9.3.3.7.1 Copying Through Windows Explorer............................................................. 9-18
9.3.3.7.2 Copying Through Microsoft Office ................................................................. 9-19
9.3.3.8 Moving Content......................................................................................................... 9-19
9.3.3.8.1 Moving Through Windows Explorer.............................................................. 9-19
ix
9.3.3.8.2 Moving Through Microsoft Office................................................................... 9-19
9.3.4 Displaying Web Pages ..................................................................................................... 9-19
9.3.4.1 Configuring Windows Explorer.............................................................................. 9-19
9.3.4.2 Displaying a Web Page............................................................................................. 9-20
10 Grouping Content with Folios
10.1 Content Folios........................................................................................................................... 10-1
10.1.1 About Content Folios ....................................................................................................... 10-1
10.1.1.1 What a Folio Is ........................................................................................................... 10-1
10.1.1.2 The Folio Structure.................................................................................................... 10-2
10.1.2 When to Use a Folio.......................................................................................................... 10-3
10.1.2.1 Structured Organization of Content ....................................................................... 10-3
10.1.2.2 Management of Records and Reports .................................................................... 10-3
10.1.2.3 Management of Digital Assets and Production .................................................... 10-4
10.1.2.4 Custom Uses............................................................................................................... 10-5
10.2 Working with Folios ................................................................................................................ 10-5
10.2.1 Creating a Simple Folio.................................................................................................... 10-5
10.2.2 Creating an Advanced Folio ........................................................................................... 10-6
10.2.3 Modifying Folio Structure and Content ........................................................................ 10-7
10.2.3.1 Editing a Simple Folio............................................................................................... 10-7
10.2.3.1.1 Adding Items to a Simple Folio........................................................................ 10-7
10.2.3.1.2 Deleting Items from a Simple Folio ................................................................. 10-8
10.2.3.1.3 Reordering Items in a Simple Folio ................................................................. 10-8
10.2.3.1.4 Updating Simple Folio Element Information................................................. 10-8
10.2.3.2 Editing an Advanced Folio ...................................................................................... 10-9
10.2.3.2.1 Adding and Organizing Nodes and Slots ...................................................... 10-9
10.2.3.2.2 Adding Content Items to an Advanced Folio ................................................ 10-9
10.2.3.2.3 Adding Items from the Source Items Area................................................... 10-10
10.2.3.2.4 Inserting an Existing Item Using a Contextual Menu................................. 10-11
10.2.3.2.5 Inserting an New Item Using a Contextual Menu ...................................... 10-11
10.2.3.2.6 Adding Items from a Search Results Page.................................................... 10-11
10.2.3.2.7 Adding Items from a Digital Asset Basket ................................................... 10-13
10.2.3.2.8 Updating Advanced Folio Element Information......................................... 10-13
10.2.4 Taking Snapshots............................................................................................................ 10-13
10.2.5 Locking and Unlocking Folios...................................................................................... 10-14
10.2.6 Downloading Folio Renditions..................................................................................... 10-14
10.2.7 Finding Existing Folios .................................................................................................. 10-15
10.2.8 Viewing Folios................................................................................................................. 10-15
10.2.9 Viewing Folio Information............................................................................................ 10-15
10.2.10 Subscribing to Folios ...................................................................................................... 10-15
10.2.11 Using Digital Asset Baskets........................................................................................... 10-16
10.2.11.1 Managing Digital Asset Baskets............................................................................ 10-16
10.2.11.2 Working with Digital Asset Baskets ..................................................................... 10-16
10.2.11.2.1 Setting the Active Basket................................................................................. 10-17
10.2.11.2.2 Adding Content to the Active Basket............................................................ 10-17
10.2.11.2.3 Moving and Copying Content Items............................................................. 10-17
10.2.11.2.4 Removing Content Items................................................................................. 10-17
x
10.2.12 Understanding Folio Workflows.................................................................................. 10-18
11 Using Images and Videos
11.1 About Digital Asset Manager................................................................................................. 11-1
11.2 Working with Digital Asset Manager................................................................................... 11-2
11.2.1 About Using Digital Asset Manager.............................................................................. 11-2
11.2.2 Supported Input Formats ................................................................................................ 11-4
11.2.3 Supported Video Output Formats ................................................................................. 11-5
11.2.4 Checking In a Digital Asset............................................................................................. 11-5
11.2.5 Finding Renditions and Information ............................................................................. 11-6
11.2.6 Rendition Information Page............................................................................................ 11-7
11.2.7 Image Data Page ............................................................................................................. 11-10
11.2.8 Rendition Parameters Page ........................................................................................... 11-12
11.2.9 Video Preferences Page.................................................................................................. 11-13
11.2.9.1 No Format Option ................................................................................................... 11-15
11.2.9.2 No Player Option..................................................................................................... 11-16
11.2.10 Working with Renditions .............................................................................................. 11-16
11.2.10.1 Storing Renditions in Your Digital Asset Basket ................................................ 11-17
11.2.10.2 Viewing Items in Your Digital Asset Basket ....................................................... 11-18
11.2.10.3 Removing Items from Your Digital Asset Basket............................................... 11-20
11.2.10.4 Adding and Removing Renditions in a Rendition Set....................................... 11-20
11.2.10.5 Downloading Multiple Items................................................................................. 11-22
11.2.10.6 Creating Renditions................................................................................................. 11-23
11.2.10.7 Updating Renditions............................................................................................... 11-23
11.2.11 Working with Standard Content Items ....................................................................... 11-24
11.2.12 Digital Asset Manager on a Macintosh Client............................................................ 11-25
11.3 FlipFactory Supported Formats........................................................................................... 11-26
11.3.1 Streaming Media Formats ............................................................................................. 11-26
11.3.2 Broadcast Media Formats .............................................................................................. 11-27
11.3.3 Professional Media Formats.......................................................................................... 11-27
11.4 Included Image Rendition Sets............................................................................................ 11-28
11.4.1 BasicRenditions............................................................................................................... 11-28
11.4.2 ThumbnailOnly............................................................................................................... 11-28
11.4.3 MultipleFormats ............................................................................................................. 11-29
11.5 Oracle Outside In Technology Image Formats.................................................................. 11-29
A User Interface
A.1 Getting Started Screens ............................................................................................................. A-1
A.1.1 ExtranetLook Component Logout Option ...................................................................... A-2
A.2 Search Pages................................................................................................................................ A-2
A.2.1 Expired Content Page ........................................................................................................ A-3
A.2.2 Quick Search Field.............................................................................................................. A-4
A.2.3 Content Management Tray ............................................................................................... A-5
A.2.4 Home Page Search Fields .................................................................................................. A-5
A.2.5 Search Tray .......................................................................................................................... A-6
A.2.5.1 Criteria Tab................................................................................................................... A-6
A.2.5.2 Results Tab.................................................................................................................... A-7
xi
A.2.6 Advanced Search Page....................................................................................................... A-8
A.2.6.1 Expanded Form ........................................................................................................... A-9
A.2.6.2 Query Builder Form .................................................................................................. A-10
A.2.7 Results Options ................................................................................................................. A-11
A.2.8 Search Results Page .......................................................................................................... A-12
A.2.9 Custom Description Column for Search Result Templates........................................ A-13
A.2.10 Thumbnail View Advanced Options............................................................................. A-14
A.3 Creating and Editing Custom Search Result Templates .................................................... A-15
A.3.1 Search Result Templates for user Page.......................................................................... A-16
A.3.2 Create/Edit Classic View Search Result Template Page ............................................ A-17
A.3.3 Classic View Basic Information ...................................................................................... A-18
A.3.4 Classic View Customize Description Column.............................................................. A-18
A.3.5 Classic View Advanced Options .................................................................................... A-20
A.3.6 Create/Edit Headline View Search Result Template Page ........................................ A-20
A.3.7 Headline View Basic Information .................................................................................. A-21
A.3.8 Headline View Customize Columns.............................................................................. A-21
A.3.9 Headline View Customize Description Column.......................................................... A-22
A.3.10 Headline View Advanced Options ................................................................................ A-23
A.3.11 Create/Edit Thumbnail View Search Result Template Page..................................... A-24
A.3.12 Thumbnail View Basic Information............................................................................... A-25
A.3.13 Thumbnail View Customize Description Column ...................................................... A-25
A.3.14 Thumbnail View Advanced Options............................................................................. A-26
A.3.15 Saved Queries Page .......................................................................................................... A-27
A.3.16 My Recent Queries............................................................................................................ A-28
A.3.17 My Recently Viewed Content ......................................................................................... A-28
A.3.18 Personal URLs for User Name........................................................................................ A-28
A.4 Access Control Lists (ACL)..................................................................................................... A-29
A.4.1 Access Control List Users, Groups, and Roles ............................................................. A-29
A.4.2 Access Control List Permissions..................................................................................... A-31
A.5 Referenced Links Interface (optional)................................................................................... A-31
A.5.1 Search Links Page .............................................................................................................
A-32
A.5.2 Link Search Results Page................................................................................................. A-33
A.5.3 Item Actions Menu ........................................................................................................... A-34
A.5.4 Link References on Content Information Page............................................................. A-34
A.5.4.1 Hide Link References ................................................................................................ A-34
A.5.4.2 Show Link References............................................................................................... A-35
A.5.5 Link Info Page ................................................................................................................... A-35
A.6 Working with Files .................................................................................................................. A-36
A.6.1 Content Information Page ............................................................................................... A-37
A.6.2 Revision History ............................................................................................................... A-39
A.6.3 Work In Progress Page..................................................................................................... A-40
A.6.4 Info Update Form ............................................................................................................. A-41
A.6.5 Post Comment Form......................................................................................................... A-42
A.6.5.1 Discussion Form Menu............................................................................................. A-42
A.6.6 Discussion Info Page ........................................................................................................ A-43
A.6.7 Content Information Page with Discussion Field........................................................ A-44
A.6.8 Subscriptions Page............................................................................................................ A-45
xii
A.6.9 Subscription Info Page ..................................................................................................... A-46
A.6.10 Subscribe To "Item" Page................................................................................................. A-47
A.6.11 Unsubscribe Page.............................................................................................................. A-48
A.7 Check-In and Check-Out Interface........................................................................................ A-49
A.7.1 Content Check-In Form ................................................................................................... A-50
A.7.2 Dynamic Converter Check-In Fields.............................................................................. A-53
A.7.3 Check-In Confirmation Page........................................................................................... A-54
A.7.4 Upload Files Window ...................................................................................................... A-54
A.7.5 Select File Window ........................................................................................................... A-55
A.7.6 Select Files Window ......................................................................................................... A-56
A.7.7 Change Drive Window .................................................................................................... A-57
A.7.8 Upload Message Screen ................................................................................................... A-57
A.7.9 Checked-Out Content for user Page .............................................................................. A-58
A.7.10 Check-Out Confirmation Page........................................................................................ A-58
A.7.11 Checked-Out Content Page............................................................................................. A-59
A.7.12 Download Files Screen..................................................................................................... A-60
A.7.13 Download Results Summary .......................................................................................... A-61
A.8 Workflow Interface.................................................................................................................. A-62
A.8.1 Workflow Started Notification ....................................................................................... A-62
A.8.2 Workflow Review Notification Message....................................................................... A-63
A.8.3 Workflow Content Items Page........................................................................................ A-63
A.8.4 Reject Content Item Page................................................................................................. A-65
A.8.5 Workflow Content Item Reject Notification ................................................................. A-66
A.8.6 Active Workflows Page ................................................................................................... A-66
A.8.7 Workflow in Queue Page ................................................................................................ A-67
A.8.8 Workflow Info For Item Page ......................................................................................... A-69
A.8.9 Workflow Review Page ................................................................................................... A-70
A.9 Folders Interface....................................................................................................................... A-71
A.9.1 Contribution Folders Link............................................................................................... A-72
A.9.2 Folder Configuration Link............................................................................................... A-72
A.9.3 User Profile Page............................................................................................................... A-72
A.9.4
Folder Configuration Page .............................................................................................. A-72
A.9.5 Default Information Field Configuration Page ............................................................ A-74
A.9.6 Revision Information Field Configuration Page .......................................................... A-75
A.9.7 Exploring Contribution Folders...................................................................................... A-77
A.9.8 Trash Exploring Page ....................................................................................................... A-79
A.9.9 Browsing Window............................................................................................................ A-80
A.9.10 Hierarchical Folder Information Page ........................................................................... A-81
A.9.11 Hierarchy Folder Configuration Page ........................................................................... A-83
A.10 WebDAV Interface................................................................................................................... A-85
A.10.1 Virtual Folders................................................................................................................... A-85
A.10.2 User Interface .................................................................................................................... A-86
A.11 Folio User Interface.................................................................................................................. A-86
A.11.1 My Content Server Tray: My Baskets ............................................................................ A-86
A.11.2 Content Management Tray: New Folio......................................................................... A-87
A.11.3 Pick Folio Type Page ........................................................................................................ A-88
A.11.4 Edit Simple Folio Page ..................................................................................................... A-89
xiii
A.11.5 Edit Folio Page .................................................................................................................. A-90
A.11.5.1 Folio Structure Tray .................................................................................................. A-91
A.11.5.1.1 Folio Structure Contextual Menu..................................................................... A-92
A.11.5.2 Element Info Tray ...................................................................................................... A-93
A.11.5.3 Source Items Tray...................................................................................................... A-95
A.11.5.4 Actions Menu ............................................................................................................. A-96
A.11.5.5 Renderers Menu......................................................................................................... A-96
A.11.6 Set Folio Profile Page........................................................................................................ A-97
A.11.7 Folio Check In Page .......................................................................................................... A-97
A.11.8 Folio Check In Confirmation Page ................................................................................. A-98
A.11.9 View Folio Page ................................................................................................................ A-99
A.11.10 Manage Content Baskets Page........................................................................................ A-99
A.11.11 Content Basket Page....................................................................................................... A-100
A.11.12 Move/Copy Basket Items Page .................................................................................... A-101
A.11.13 Insert Hypertext Page .................................................................................................... A-101
A.11.14 Subscribe to folio_name page ....................................................................................... A-102
A.12 Content Tracker Interface ..................................................................................................... A-102
Glossary
Index
xiv

xv
Preface
This user’s guide provides information for end users of Oracle Content Server, which
serves as the base for the Oracle Universal Content Management system.
Audience
This document is intended for end users of the Oracle Content Server system. It is also
a valuable resource for system administrators who manage a Oracle Content Server
instance.
Documentation Accessibility
Our goal is to make Oracle products, services, and supporting documentation
accessible to all users, including users that are disabled. To that end, our
documentation includes features that make information available to users of assistive
technology. This documentation is available in HTML format, and contains markup to
facilitate access by the disabled community. Accessibility standards will continue to
evolve over time, and Oracle is actively engaged with other market-leading
technology vendors to address technical obstacles so that our documentation can be
accessible to all of our customers. For more information, visit the Oracle Accessibility
Program Web site at http://www.oracle.com/accessibility/.
Accessibility of Code Examples in Documentation
Screen readers may not always correctly read the code examples in this document. The
conventions for writing code require that closing braces should appear on an
otherwise empty line; however, some screen readers may not always read a line of text
that consists solely of a bracket or brace.
Accessibility of Links to External Web Sites in Documentation
This documentation may contain links to Web sites of other companies or
organizations that Oracle does not own or control. Oracle neither evaluates nor makes
any representations regarding the accessibility of these Web sites.
Access to Oracle Support
Oracle customers have access to electronic support through My Oracle Support. For
information, visit http://www.oracle.com/support/contact.html or visit
http://www.oracle.com/accessibility/support.html if you are hearing
impaired.

xvi
Related Documents
For more information, see the specific documents that discuss different aspects of
Oracle Content Server functionality. See your system administrator for details about
the documentation available to you.
Conventions
The following text conventions are used in this document.
Convention Meaning
boldface Boldface type indicates graphical user interface elements associated
with an action, or terms defined in text or the glossary.
italic Italic type indicates book titles, emphasis, or placeholder variables for
which you supply particular values.
monospace Monospace type indicates commands within a paragraph, URLs, code
in examples, text that appears on the screen, or text that you enter.
Forward slashes (/) Forward slashes are used to separate the directory levels in a path to a
UNIX server, directory, or file. Forward slashes are also used to
separate parts of an Internet address. A forward slash is always
included after a UNIX directory name and may or may not be included
after an Internet address.
Backward slashes (\) Backward slashes are used to separate the levels in a path to a
Windows server, directory, or file. A backward slash is always
included after a Windows server, directory, or file path.

1
Introduction 1-1
1Introduction
This guide discusses how to use Oracle Content Server, including how to check
content in and out of the system, how to use workflows, how to search for files, how to
group content, and how to use images and videos.
This chapter provides an overview to the system and the document for end users, in
the following topics:
■ About This Guide
■ Product Overview
1.1 About This Guide
This guide is intended to help those using Oracle Content Server to manage content. It
provides overview and reference information for the pages used when working with
Oracle Content Server through a standard web browser.
1.2 Product Overview
This section describes concepts discussed in this document and provides an overview
of system functionality. It contains the following topics:
■ Content Server
■ Content Repository
■ Revision Control
■ Metadata
■ Security Groups and Accounts
■ Roles
■ Permissions
■ Users
■ Access Control List (ACL) Security
■ Conversion Features
■ Indexing
■ Finding Content
■ Storing and Moving Content with Folders and WebDAV
■ Grouping Content

Product Overview
1-2 Oracle Fusion Middleware User's Guide for Oracle Content Server
■ Managing Images and Videos
■ Routing Content Through Workflows
1.2.1 Content Server
Oracle Content Server is an automated system for sharing, managing, and distributing
business information using a web site as a common access point. Current information
can be accessed quickly and securely from any standard web browser. You can manage
virtually any type of content, including letters, reports, engineering drawings,
spreadsheets, manuals, sales literature, and more, in one powerful content
management system.
1.2.2 Content Repository
When you check in a file, Oracle Content Server stores the original, or native, file in a
central repository for native files. If your system has conversion features installed and
enabled, a web-viewable version of the file (such as PDF) will be created and stored in a
special repository for web-viewable files. (If you are not using conversion, or if a
particular file type cannot be converted, a copy of the native file is placed in the
repository for web-viewable files.)
A file that is checked into the content server is called a content item. Any user with the
correct security permissions can view the web-viewable version of a content item or
get a copy of the original file from the repository of native files. Security permissions
determine who can view, revise, and delete a particular content item. For more
information, see Section 1.2.5, "Security Groups and Accounts."
The various types of files that can be associated with a single content item (the native
file and any web-viewable files) are called renditions. For example, the PDF version of a
content item is a rendition of that content item, as are the HTML and XML versions.
1.2.3 Revision Control
If you want to change a file that is checked into the content server, you need to check
the content item out of the file repository. Only one person can have a content item
checked out at any given time, but others can still view the released version of the file.
When you are finished making changes to the file, you check it back into the content
server, which automatically stores the new file as a new revision of the content item.
Previous revisions remain available for you to view or copy, but the latest revision will
always be displayed by default from content server web pages.
Every content item in the repository for web-viewable files has a persistent URL. This
means that each content item has a unique web address that does not change from one
revision to the next. Therefore, the most current version is always displayed when you
point your browser to the URL of a content item. For more information, see Section 5.3,
"Working with File Revisions."
Note: This user guide describes the standard web pages and
procedures that come with the "out-of-the-box" content server.
However, Oracle Content Server can be highly customized, so your
content server web pages may look quite different from those in this
guide.

Product Overview
Introduction 1-3
1.2.4 Metadata
Metadata is information about a content item, such as the title, author, release date, and
so on. Metadata can be used to find content items in the content server, much as you
would search for books in a library by author or subject. When you check in a content
item, you will need to assign some of the metadata, while some metadata is assigned
by Oracle Content Server automatically. The metadata is stored in a database that
works in conjunction with Oracle Content Server.
Content profiles created by your system administrator can refine the metadata options
available to you during check in and searching, as well as what metadata is displayed
on a content information page. This feature can improve how you work with Oracle
Content Server. Check in and search forms defined by content profiles are accessed
from the Search menu on the Toolbar.
For more information, see Chapter 4, "Finding Content Items."
1.2.5 Security Groups and Accounts
Oracle Content Server’s security features are used to control which users can view,
edit, and delete particular content items. Although security groups can be configured
to allow anonymous (guest) users to check in files, contributors typically must log in to
the content server to check in and check out files. Consumers who have access to
secured files typically must also log in to the content server to view the secured
content.
When you check in a file, you may need to specify a value for the following
security-related metadata fields:
■ Security group: Each content server user is given a particular level of permission
to each security group. When you specify the security group for a content item,
only the users who have permission to that security group can work with that
content item. The security group is a required metadata field for all content items.
■ Account: Accounts are an optional feature that your system administrator can use
to define a more flexible security model. Accounts are similar to security groups,
in that only users who have permission to a particular account can work with
content items that belong to that account.
1.2.6 Roles
A role is a set of permissions (Read, Write, Delete, Admin) for each security group. For
example, as a team member, you may need to view a schedule (Read access), but as the
team leader, you may be responsible for updating the schedule (Read and Write
access).
Roles are assigned to one or more users by the system administrator to provide access
to the security groups. The following roles are predefined on Oracle Oracle Content
Server:
Important: It is important that you understand your organization’s
metadata fields and always assign metadata carefully. Proper
metadata makes content items easier to find, and ensures that only
users who have the proper permissions can access a content item.

Product Overview
1-4 Oracle Fusion Middleware User's Guide for Oracle Content Server
1.2.7 Permissions
Each role allows the following permissions for each security group: Read (R), Write
(W), Delete (D), or Admin (A). The permissions for a security group are the highest
permission defined by any of the roles for that group. For example, if you are assigned
guest and contributor roles, where guest is given Read permission and contributor is
given Write permission to the Public security group, you have Write permission to
content in the Public security group.
Each role allows the following permissions to be assigned for each security group:
1.2.8 Users
Oracle Content Server is designed for two types of users:
■ Consumers: These are people who need to find, view, or print files from the
content server repository. They do not have permission to create, modify, or delete
files.
■ Contributors: These are people who need to create and revise files in the content
server repository. They also have permission to find, view, and print files.
In many Oracle Content Server systems, the majority of users are consumers. To
safeguard the integrity of files in the system, contributors need a user name and
password to check content items in to and out of the content server repository.
Roles Description
contributor The contributor role has Read and Write permission to the Public security
group, which enables users to search for, view, check in, and check out
content.
guest The guest role has Read permission to the Public security group, which
enables users to search for and view content in the Public security group.
sysmanager The sysmanager role has privileges to access the Admin Server on the content
server.
Permissions Description
read Allowed to view files in that security group.
write Allowed to view, check in, check out, and get a copy of documents in that
security group. Non-authors can change the security group setting of a
document if the non-author has admin permission in the new security
group.
delete Allowed to view, check in, check out, get a copy, and delete files in that
security group.
admin Allowed to view, check in, check out, get a copy, and delete files in that
security group. If this user has Workflow rights, they can start or edit a
workflow in that security group.
Users are also allowed to check in documents in that security group with
another user specified as the Author.

Product Overview
Introduction 1-5
Users who have full administrative permission are referred to as system administrators.
Your organization may also assign limited administrative permission to certain users,
such as the ability to set up user log ins and create workflow templates. These users
are referred to as subadministrators.
The Oracle WebLogic Server administrator assigns one or more groups to each user. A
group provides the user access to files within the security groups. Undefined users are
assigned to the guest group, which allows viewing of documents only in the Public
security group by default.
1.2.9 Access Control List (ACL) Security
In addition to the standard Oracle Content Server roles, security groups, and accounts,
Oracle Content Server can be configured to support access control lists (ACL). An
access control list is a list of users, groups, or enterprise roles with permission to access
or interact with a content item.
Depending on how access control list security is configured, three new fields are
available for use when adding, modifying, or searching for content items:
■ User Access List
■ Group Access List
■ Role Access List
To use access control lists with content items, you assign one or more predefined users,
groups, or roles to the item. In addition, you assign the permissions (Read (R), Write
(W), Delete (D), or Admin (A)) to each of the access list entries you specify.
For example, suppose you add a content item and you want guests to have read access
and you want all logged-in users to have read and write access. First, add the guest
role to the content item and click the R (read) permission icon. Then, add the
authenticated user role to the content item and click the W (write) permission icon to
grant both the read and write permissions.
If either role is valid for the user, they have the access specified for the valid role (there
is an implicit OR relationship between access control list entries). If both roles are valid
for the user, they have the greater of the two permission sets. In the example above, if
both roles are valid, the user then has the read and write permissions assigned to the
authenticated user.
Between access control list entries (user, group, and role), there is an implicit OR
relationship. Between access control list entries and other security methods (security
groups and accounts), there is an implicit AND relationship, where the user is granted
access equal to the intersection of the valid permission sets.
Note: As of 11g Release 1 (11.1.1), user logins must be managed with
the Oracle WebLogic Server Administration Console. Although user
logins can be managed in Oracle Content Server for special purposes,
they are not valid for authentication to Oracle Content Server until
they have been created with the Oracle WebLogic Server
Administration Console.

Product Overview
1-6 Oracle Fusion Middleware User's Guide for Oracle Content Server
1.2.10 Conversion Features
The web-viewable formats of a file depend on the original file format of the content
item and the conversion features that are installed. For example, your system could be
set up to convert Microsoft Word documents to the PDF format using the PDF
Converter functionality, and to the HTML format using the Dynamic Converter
functionality.
Your content server system may include one or more conversion features, which
convert native files to web-viewable file formats. Most conversions take place
automatically as soon as you check in a file.
Some file formats cannot be converted, or your system administrator may configure
the system to pass through certain types of documents without conversion. For
example, a compressed ZIP file cannot be converted to a web-viewable format. In
these cases, a copy of the native file is stored in the repository for web-viewable files.
1.2.11 Indexing
Once a file has been converted to a web-viewable format or passed through to the
repository for web-viewable files, the file is automatically "full-text indexed" by an
indexing engine if the system is set up for full-text indexing. The indexing engine
makes a list of all the words in every file in HTML, PDF, TXT, XML, and other
supported formats, and stores the list in a database. When you do a full-text search for
content, Oracle Content Server looks up your search terms in this index. Once the
indexing process is complete, the file is released to the content server.
1.2.12 Finding Content
Oracle Content Server provides many ways for users to find content:
■ Searching for content: You can search for a content item by its metadata, by
full-text, or by a combination of the two. Only the content items you have
permission to view will be displayed in the search results.
■ Browsing content: Browsing content using the Browse Content tray enables you to
drill down to a content item by navigating through a set of hierarchical folders.
When you reach the last folder in a particular branch of the structure, content
items that you have permission to view will be displayed on a search results page.
For more information, see Chapter 4, "Finding Content Items."
1.2.13 Storing and Moving Content with Folders and WebDAV
Folders is an optional component for use with Oracle Content Server that, when
enabled, provides a hierarchical folder interface to content in Oracle Content Server in
the form of virtual folders (also called hierarchical folders). Virtual folders enable you to
create a multi-level folder structure.
WebDAV (Web-Based Distributed Authoring and Versioning) provides a way to
remotely author and manage your content using clients that support the WebDAV
Note: The Access Control List metadata associated with a content
item can include multiple entries and permissions. When searching
for content using Access Control List metadata, use the "Contains" or
the "Substring" option (depending on your search engine) to help
ensure that you find all instances of the specified metadata.

Product Overview
Introduction 1-7
protocol. For example, you can use Microsoft Windows Explorer to check in, check
out, and modify content in the repository rather than using the browser interface.
1.2.14 Grouping Content
Content Server enables you to group content by using folios. A content folio is an XML
file checked into Content Server that uses elements to define a hierarchical structure of
nodes, slots, and specified content items in Oracle Content Server. In practice, a
content folio is a logical grouping, or a framework in which content stored in Oracle
Content Server can be structured. Simple folios are a flat container, while advanced folios
can nest content in a hierarchy within folders.
1.2.15 Managing Images and Videos
You can use Digital Asset Manager functionality to quickly find, group, convert, and
download images and videos of various sizes, formats, and resolutions to meet your
business needs, all while maintaining a consistency of use across your organization.
For example, an organization's logo may need to be available in a variety of sizes for
advertisements, web pages, and presentation, or a company training video may need
to be available in a variety of formats for streaming on an intranet, presenting to an
audience, or copying to tape.
1.2.16 Routing Content Through Workflows
The workflow process routes a file for review and approval before it is released to the
content server repository. Users are notified by e-mail when they have a file to review.
Two types of workflows can be created in Oracle Content Server:
■ In a criteria workflow, files automatically go into a workflow if the values entered
in the metadata fields upon check-in meet certain criteria. Criteria workflows are
useful for individual content items that are approved by the same reviewers on a
regular basis (newsletter articles, for example).
■ In a basic workflow, files are specifically identified in the workflow, along with the
contributors, reviewers, and steps. This type of workflow requires an
administrator to initiate the process, and is best suited for groups of content items
that need to go through a workflow together or individual content items with
unique workflow requirements.
For more information, see Chapter 8, "Working with Workflows."

Product Overview
1-8 Oracle Fusion Middleware User's Guide for Oracle Content Server

2
Getting Started 2-1
2Getting Started
This chapter describes the basics of using Oracle Content Server, in the following
topics:
■ Section 2.1, "Using a Supported Web Browser"
■ Section 2.2, "Accessing Oracle Content Server"
2.1 Using a Supported Web Browser
Consumers and contributors access Oracle Content Server from a standard web
browser. The computer you use to access the content server is a client computer. You
can access Oracle Content Server on a supported client computer from a web browser
listed in Table 2–1.
2.2 Accessing Oracle Content Server
You can access your Oracle Content Server instance by entering a web URL in a web
browser listed in Table 2–1 and logging in. The URL specifies the host name and port
number for Oracle Universal Content Management (Oracle UCM) Managed Server.
The host name is the name of the computer that is running the Oracle UCM Managed
Server. The default port number for Oracle UCM is 16200.
To access Oracle Content Server:
1. Browse to your Oracle Content Server instance with a web URL in this format:
http://host_name:port_number/cs/
For example:
http://myhost.example.com:16200/cs/
Table 2–1 Supported Web Browsers
Browser Versions
Internet Explorer 7, 8
Firefox 3.5+
Safari 4.x
Note: This documentation assumes that you are using the default
Trays layout.

Accessing Oracle Content Server
2-2 Oracle Fusion Middleware User's Guide for Oracle Content Server
2.
On the Oracle Content Server home page, click Login.
3. Enter your user name and password, and click Sign In.
Your Oracle Content Server home page opens. For information about this page,
see Section 3.4, "Home Page."

3
Becoming Familiar with the Interface 3-1
3Becoming Familiar with the Interface
A profound benefit of managing content is the ability to quickly find the information
you need and complete the tasks your job requires. Oracle Content Server provides a
simple interface using standard web applications and common navigational tools to
provide access to the tasks necessary to contribute and find content.
This chapter provides an overview of the standard Oracle Content Server web pages
and describes how to use and customize the navigation features of the interface, in the
following topics:
■ Section 3.1, "Customizable Interface"
■ Section 3.2, "Portal Navigation Bar"
■ Section 3.3, "Toolbar"
■ Section 3.4, "Home Page"
■ Section 3.5, "Actions Menus"
■ Section 3.6, "Pop-Up Calendar"
■ Section 3.7, "Personalizing the Interface"
■ Section 3.8, "Creating and Editing Custom Search Result Templates"
3.1 Customizable Interface
The Oracle Content Server interface can be highly customized, so your content server
web pages might look different than those described throughout this guide. For
example, you may see special colors, icons, and logos, or your system administrator
may choose to add, change, or hide functions on certain pages. For user
documentation specific to your content server system, contact your system
administrator.

Portal Navigation Bar
3-2 Oracle Fusion Middleware User's Guide for Oracle Content Server
3.2 Portal Navigation Bar
The portal navigation bar on the left side of all Oracle Content Server web pages is your
primary navigation tool. You can personalize it with functions you use often, such as
predefined searches and links to your favorite Web sites.
Note: The portal navigation bar is part of the frame-based Trays
layout option, and is the default navigation tool for Oracle Content
Server. If you select Top Menus on the User Profile page, then the
portal navigation functionality is located above the main content area
as a series of menus. For more information, see Section 3.7.6, "User
Profile Page."
Link Description
Home Displays the Home Page.
Library Displays the content server’s Library Folders hierarchy. You
can drill down, or browse through, folders in this hierarchy to
find specific files.
Search Displays the Search Tray. From this page, you can perform
metadata and full-text searches to find specific files.
Microsoft Login If you are logged in to your Microsoft network, click this link
to log in to Oracle Content Server.
This link is present only if your organization is using Microsoft
Network security to log in to Oracle Content Server. Many
browsers, such as Mozilla Firefox, support logging in with this
security, after some configuration.
Your Oracle Content Server instance may be integrated with
your enterprise sign-on system. For more information, ask
your system administrator.
My Oracle Content Server Expands to display links to personal check-in pages and
personal search pages.
Browse Content Expands to display a Browse Content Tray for finding content
and any other special folders configured by the system
administrator.
Search Expands to provide several options for metadata searching and
includes a tab for viewing persistent search results as you work
with them.
For more information, see Section 4.3, "Searching with
Database Metadata Search," and Section 4.8, "Working with
Search Results."
Content Management Expands to display several links for managing content, such as
Content Check-In Form, Checked-Out Content Page (or
Checked-Out Content for user Page), Work In Progress Page,
Active Workflows Page, and Expired Content Page.

Home Page
Becoming Familiar with the Interface 3-3
3.3 Toolbar
The toolbar at the top of all Oracle Content Server web pages contains some of the
same navigation links as the Portal Navigation Bar, and also provides access to the
online help system.
3.4 Home Page
The home page typically includes the tray navigation, the top toolbar, and other page
content and functions as determined by your system administrator. If you set up a
default saved query, the results are displayed on this page (you may have to scroll
down to view them). The home page opens when you first log in. To return to the
home page anytime, click the Oracle Content Server link in the upper left.
Note: If any Content Profiles have been created and enabled for
display on your instance by your system administrator, the Search and
New Check In links are changed to lists, listing the profiles.
Link Description
Oracle Content Server Displays the Home Page.
User profile link Displays the User Profile Page and provides information
needed for Editing Your User Profile. The link is either a user
name or the user’s full name.
Logout Logs out of Oracle Content Server. This option is available only
if the optional ExtranetLook component is installed.
Help Displays the online help system.
Refresh Page Updates the current page.
Search Displays the Advanced Search Page or optionally displays
links to Content Profiles search pages set up by the system
administrator. From the Advanced search or content profile
search page, you can perform metadata and full-text searches
to find specific files.
New Check In Displays the Content Check-In Form, which is used to check
new files into the content server.
Quick Search Enables you to perform searches from any page.

Actions Menus
3-4 Oracle Fusion Middleware User's Guide for Oracle Content Server
3.5 Actions Menus
Actions menus have options that change depending on the context.
There are three types of actions menus:
■ Page actions menus
These menus pull down from below the page heading and list options that apply
to the entire page. A page can have multiple actions menus. For example, on a
search results page the Change View menu lists options for changing the view of
the search results, and the Query Actions menu lists options for searching within
the existing search and saving it.
■ Table Actions menus
These menus are displayed above a table of content items, and the menus list
options that you can apply to multiple items selected in the table. For example, if
the Upload Files Window or Download Files Screen is available, you can select
multiple items from a search result list and use the table Actions menu to
download them.

Pop-Up Calendar
Becoming Familiar with the Interface 3-5
Figure 3–1 Table Actions Menu When Download Applet Is Enabled
■ Item Actions menus
These menus expand from the contextual menu in the Action column next to a
content item and list actions that pertain only to the associated content item. For
example, among the options in the Actions menu for an item in a search result are
links to check out the item and to view the item’s content information.
Figure 3–2 Item Actions Menu from a Search Result
3.6 Pop-Up Calendar
The Pop-up Calendar component is automatically installed with Oracle Content
Server. Click the calendar icon to the right of all editable date metadata fields to open
the Pop-Up Calendar Screen:
■ Release Date (Content Check In page and Search page)
■ Expiration Date (Content Check In page and Search page)
The calendar enables you to quickly select dates and easily move between previous
and future months and years. It also eliminates date formatting and typographical
errors because date fields are automatically populated with the user-selected date.
This section covers the following topics:
■ Section 3.6.1, "Pop-Up Calendar Screen"
■ Section 3.6.2, "Setting Release and Expiration Dates"
■ Section 3.6.3, "Updating Expiration Dates"

Pop-Up Calendar
3-6 Oracle Fusion Middleware User's Guide for Oracle Content Server
3.6.1 Pop-Up Calendar Screen
Click a calendar icon to the right of a date metadata field to open an interactive
calendar screen that displays the current date (month, day, year) by default.
Element Description
Double left-facing arrows Enables you to navigate to previous years without using the
year menu. Each click regresses one year. The calendar adjusts
to display the appropriate days for the selected month in the
earlier year.
Single left-facing arrow Enables you to navigate to previous months without using the
month menu. Each click regresses one month. The calendar
adjusts to display the appropriate days for the earlier month.
Month menu Displays the short month names from January through
December. By default, the list does not include the current
month.
Year menu Displays a 21-year sequential range of years with the current
year displayed by default. You can select from a list of 10 years
earlier and 10 years later than the displayed year by scrolling up
and down. For example, if the year menu shows 2005, the years
1995 through 2004 precede it, and the years 2006 through 2015
follow it.
You can increment or decrement the 20-year range by selecting a
different year. The Pop-up Calendar component automatically
refreshes the year menu. In addition to the selected year, it lists
the ten years prior and the nine years following the selected
year. The date ranges are indefinite for both historical years and
future years.
When you close the pop-up calendar, it automatically defaults
back to the current day, month, and year.
Single right-facing arrow Enables you to navigate to future months without using the
month menu. Each click progresses one month. The calendar
adjusts to display the appropriate days for the future month.
Double right-facing arrows Enables you to navigate to future years without using the year
menu. Each click progresses one year. The calendar adjusts to
display the appropriate days for the selected month in the
future year.
Monthly calendar days Displays the days appropriate for the selected month and year.

Personalizing the Interface
Becoming Familiar with the Interface 3-7
3.6.2 Setting Release and Expiration Dates
You can use the Pop-up Calendar to populate the Release Date and Expiration Date
metadata fields on the Content Check In and Search pages. You can also enter dates
directly.
To select a date using the Pop-up Calendar:
1. Access the Content Check-In Form or a Search page. By default, the Release Date
metadata field shows the current date.
2. Click the calendar icon next to the Release Date or Expiration Date metadata
field. The Pop-Up Calendar Screen opens.
3. Select the month, day, and year. The selected date is entered into the metadata
field.
4. Close the Pop-up Calendar screen.
3.6.3 Updating Expiration Dates
To update the Expiration Date metadata field:
1. Select a content item.
2. Click the calendar icon next to the Expiration Date metadata field. The Pop-Up
Calendar Screen opens.
3. Select the month, day, and year. The selected date is entered into the metadata
field.
4. Close the Pop-up Calendar screen.
3.7 Personalizing the Interface
This section covers the following topics:
■ Section 3.7.1, "About Personalization"
■ Section 3.7.2, "Editing Your User Profile"
■ Section 3.7.3, "Creating a Custom Search Result Template"
■ Section 3.7.4, "Editing Saved Queries"
■ Section 3.7.5, "Saving Personal URLs"
■ Section 3.7.6, "User Profile Page"
■ Section 3.7.7, "My Oracle Content Server Tray"
■ Section 3.7.8, "Search Result Templates"
■ Section 3.7.9, "Classic View Template"
■ Section 3.7.10, "Headline View Template"
■ Section 3.7.11, "Thumbnail View Template"
Note: You can change the user locale to control date format. For
information about changing the locale, see Section 3.7.2, "Editing Your
User Profile."

Personalizing the Interface
3-8 Oracle Fusion Middleware User's Guide for Oracle Content Server
3.7.1 About Personalization
When you log in to Oracle Content Server, the system retrieves information about you
that is stored in your user profile. While much of the information in your user profile
(such as your user name and security permissions) can be changed only by the system
administrator, there are several items you can change yourself:
■ You can change personal information, such as your full name, password, and
e-mail address on the User Profile Page.
■ You can add links to the My Oracle Content Server Tray. Links provides quick
access to things you use most often, such as predefined searches and your favorite
Web sites.
■ You can personalize the way you search for and display content by specifying the
default search form used on the Advanced Search page accessed from the Quick
Search Field, and creating new Search Result Templates for displaying different
types of content in different ways.
3.7.2 Editing Your User Profile
Use the following procedure to edit your user profile information:
1. Click the user_name link at the top of the main menu bar.
The User Profile Page opens.
2. Edit your full name, password, and e-mail address as necessary. Please note the
following considerations:
■ If you are changing your password, you must enter the new password in both
the Password and Confirm Password fields.
If you are using an enterprise authentication system, the Password field might
not be available.
■ Do not change your user type or user locale; these fields should be changed
only by a system administrator.
■ Select the Override check box next to the User Locale field to temporarily
override the locale setting and to save your language choices.
3. Select an option for e-mail notification format, either HTML or text.
4. Enable or disable the upload and download applets.
5. Select a layout, skin, search template, and search form type.
The documentation shows the user interface with the Trays menu selected.
6. Click Update.
Note: The check boxes for the upload and download applets are
displayed only if the system administrator enabled them.

Personalizing the Interface
Becoming Familiar with the Interface 3-9
3.7.3 Creating a Custom Search Result Template
Use the following procedure to create a custom search result template:
1. Navigate to the Search Result Templates for user Page.
– From a search results page, choose Customize from the Actions menu.
– Open the My Oracle Content Server Tray and click My Search Result
Templat es. The Search Result Templates for user Page opens.
2. Click the Add Template icon in the Actions column next to the provided List
template on which you want to base your custom template. The Create Custom
Template page opens.
3. If your custom template is not based on the provided Headline View template,
skip to the next step. If your custom template is based on the Headline View
template, select a metadata field to display as a column from the Available Fields
box, and click the right arrow. The selected metadata field is added to the
Columns field. You must select and move each field separately.
To reorder the column display, use the up and down arrows next to the Columns
field. Click the up arrow to move the selected column to the left in the results
template. Click the down arrow to move the selected column to the right in the
results template.
4. Select a metadata field to display in the Description column from the Available
Fields box, and click Move Here beneath the Description box. The metadata field
is added to the Description box. You must select and move each field separately.
To reorder the column display, use the up and down arrows next to the Main
Information field. Click the up arrow to move the selected item up in the
Description column. Click the down arrow to move the selected column down in
the Description column.
5. Click Save.
3.7.4 Editing Saved Queries
Use the following procedure to edit links to saved queries in your My Saved Queries
tray:
1. Click the My Saved Queries link in the My Oracle Content Server Tray.
The Saved Queries Page opens.
2. To display the results of a query on the home page, select the Default option for
that query, and select the Show Default Query check box.
3. To set the number of content items displayed on the home page for the selected
default query, enter a number in the Results on Portal Page field, and select the
Show Default Query check box.
4. Click Update.
Important: To display the selected fields, you must also display the
Description metadata field as a column.
Note: For information on how to save a query link in your portal
navigation bar, see Section 4.10.2, "Saving a Query."

Personalizing the Interface
3-10 Oracle Fusion Middleware User's Guide for Oracle Content Server
3.7.5 Saving Personal URLs
Use the following procedure to save links to Web sites in your portal navigation bar:
1. Click the My URLs link in the My Oracle Content Server Tray in the portal
navigation bar.
The Personal URLs for User Name page opens.
2. Enter a descriptive name in the Title field. This name appears as the link in your
portal navigation bar.
3. Enter a complete web address in the URL field; for example:
http://www.oracle.com
4. Click Update.

Personalizing the Interface
Becoming Familiar with the Interface 3-11
3.7.6 User Profile Page
Your user profile enables you to change information about yourself and provides
access to other user functions. To access the user profile page, click the user_name
link at the top of the main menu bar
Element Description
User Name field The user currently logged in. This field cannot be modified.
Roles field The roles assigned to your user login. Roles determine what
access you have to content and system functions. This field
cannot be modified.
Full Name field The full name identifies the user in a more easily recognized
way.
E-mail Address field The e-mail address that is used for subscription notifications
and workflow notifications.
User Type field An identifier used by the system administrator to place users
in groups. This field should not be changed.

Personalizing the Interface
3-12 Oracle Fusion Middleware User's Guide for Oracle Content Server
User Locale field Specifies the language and date and time format displayed on
content server pages. If the system administrator has enabled
multiple locale options, you can select the locale that you
prefer.
Select the Override check box next to this field to temporarily
override the locale setting and to save your language choices.
Email Format field html: Formats subscription and workflow notification e-mails
in HTML format.
text: Formats subscription and workflow notification e-mails in
plain-text format.
Layout field Specifies the user interface of Oracle Content Server.
Trays: Trays is the default layout when Oracle Content Server
is installed. Features include expanding trays in the Portal
Navigation Bar, including a Search tray and Results tab. Trays
is a frame-based layout.
Top Menus: Trays are removed from the Portal Navigation Bar
and replaced by menus located above the content area. The Top
Menus layout does not use frames.
Skin field Skins provide predefined color and icon choices for each
layout.
Oracle (Default): Predominantly blue and khaki
Oracle 2: Predominantly blue and gold
Search Template field Specifies the default template used to present search results.
Classic: Each item includes a thumbnail image or content type
icon and multiple lines of metadata.
Headline: Each item is shown on a single line with no
thumbnail and minimal metadata.
Thumbnail: Each item shown with a thumbnail image or
content type icon and minimal metadata arranged in multiple
columns.
Custom Search Template: A variable for a search template that
your administrator may have made. A custom search template
enables you to select a customized search result view, if this
exists in your Oracle Content Server instance, including
Classic, Thumbnail, and Headline formats for displaying
search results.
If the Custom Search Template variable is available in
your instance, you or your administrator can create and save
customized search templates and define what metadata to list
in a search result and how to display it. A custom search
template can be set as a default view, selected from a search
results page, or associated with a particular targeted search
query.
The search result view can be changed dynamically using the
Content Actions menu on a search results page. When selected
on a search results page, the view is saved as the default view
for subsequent search results.
Search Form Type Sets the default search form on the Advanced Search page.
Expanded Form: Displays all search field options on a single
page.
Query Builder Form: Offers available search fields for selection
from lists, and enables fields for direct edit of the query text.
Default Sort Field Sets the default field by which to sort search results.
Element Description

Personalizing the Interface
Becoming Familiar with the Interface 3-13
3.7.7 My Oracle Content Server Tray
The My Oracle Content Server tray places links to various system functions specific to
you in your portal navigation bar. To expand this tray to access the links in this tray,
click My Oracle Content Server on the Portal Navigation Bar.
Default Sort Order Sets the default order in which search results are displayed.
Default Result Count Sets the maximum number of content items listed on a search
results field.
Update button Saves any changes that were made on this page.
Reset button Resets the fields on this page to the previously saved settings.
Element Description
My URLs icon Expands the folder to display links to any URLs you have
saved using the Personal URLs for User Name page. Saved
URLs can include web addresses to internal content or external
sites.
My URLs link Displays the Personal URLs for User Name page, where you
can save links to Web sites in your portal navigation bar.
My Saved Queries icon Expands the folder to display links to any searches you have
saved using the Save Search action on a search results page.
My Saved Queries link Displays the Saved Queries Page, where you can remove
searches from your My Saved Queries folder.
My Recent Queries icon Expands the folder to display links to the most recent queries
you have performed.
My Recent Queries link Displays the My Recent Queries page, where you can view a
list of the most recent search queries you have made and
resubmit a query.
My Recently Viewed
Content icon
Expands the folder to display links to the most recently viewed
content items you have viewed.
Element Description

Personalizing the Interface
3-14 Oracle Fusion Middleware User's Guide for Oracle Content Server
3.7.8 Search Result Templates
Search Result templates determine what content item information is listed on a search
results page and how that information is displayed. You can create custom search
result templates using the Search Result Templates for user Page to identify the
information and specify display options. Custom templates are based on one of three
provided default templates:
■ Section 3.7.9, "Classic View Template"
■ Section 3.7.10, "Headline View Template"
■ Section 3.7.11, "Thumbnail View Template"
3.7.9 Classic View Template
The Classic template lists content items sequentially in single rows, based on the
default sort field and order set on the User Profile Page.
My Recently Viewed
Content link
Displays the My Recently Viewed Content list of the most
recent Content Information Pages you have viewed. To open
the Content Information Page for an item, select the item from
the list.
My Quick Searches Displays a list of the most recent quick searches you have
performed.
My Workflow Assignments Displays a list of all content items currently in a workflow for
which you have responsibility.
My Content Profile Links Displays a list of your defined content profile links.
My Subscriptions Displays a list of all content items to which you are subscribed.
My Checked-Out Content Displays a list of all content currently checked out by you.
My Search Result Templates Displays the Search Result Templates, from which you can
build custom search results views based on the provided
Classic, Headline, and Thumbnail templates.
My Folders Displays a list of folders for you.
My Scheduled Jobs Displays a list of jobs requiring your attention.
Element Description

Personalizing the Interface
Becoming Familiar with the Interface 3-15
3.7.10 Headline View Template
The Headline template by default lists items in a single line, with a minimum of
information to maximize the result list. The list is arranged based on the sort field and
order set on the User Profile Page. The quantity listed per page is based on returned
results and the number specified as the default result count on the User Profile page.
Column Description
Content icon or Thumbnail
image
Displays an icon based on the content type. Optionally, if your
system administrator has set up Oracle Content Server to
create a thumbnail image of the content, then it displays the
thumbnail image.
Description Displays the following information:
Title and Content ID: The title and unique identifier of the
content item, linked to display a web-viewable version of the
content, if it is available. If no web-viewable version is
available, it is linked to the native file.
The title and content ID are displayed in all custom search
result templates based on the Classic View, even if those fields
are not specifically selected from the Classic View Template
section of the Create/Edit Classic View Search Result Template
Page.
Author: The person who checked in the content item.
Revision: Identifies the revision number of the content item.
Release Date: The date the content item was released.
Comments: Comments entered when the item was checked in,
if any.
Content Format: The format of the native file.
Rev. Displays the revision number of the content item.
Actions
Displays the Actions
menu for an item and the Content Info
icon.
Actions icon: Click this icon to open a menu of actions that can
be applied to the selected content item.
Content Info icon: Click this icon to display the Content
Information Page.
Column Description
ID A unique identifier of the content item, linked to a
web-viewable version of the content item, if it is available. If no
web-viewable version is available, it is linked to the native file.
Title Displays the title of the content item without any associated
link.
Date Displays the date the content item was released.

Personalizing the Interface
3-16 Oracle Fusion Middleware User's Guide for Oracle Content Server
3.7.11 Thumbnail View Template
The Thumbnail template by default lists items in a grid from left-to-right and
top-to-bottom and displays an icon based on the content type, or a thumbnail image of
the content if your system administrator has set up Oracle Content Server to create
one. This template is particularly suited for displaying images and other graphic
content. The grid is arranged based on the sort field and order set on the User Profile
Page.
Author Displays the user name of the person who last checked in the
content item.
Actions
Displays the Actions menu for an item and the Content Info
icon.
Actions icon: Click this icon to open a menu of actions that can
be applied to the selected content item.
Content Info icon: Click this icon to display the Content
Information Page of the selected content item.
Item Description
Icons
Displays the Actions
menu for an item and the Content Info
icon.
Actions icon: Click this icon to open a menu of actions that can
be applied to the selected content item.
Content Info icon: Click this icon to display the Content
Information Page of the selected content item.
Thumbnail Icon or Image Displays an icon based on the content type or a thumbnail
image of the content if your system administrator has set up
Oracle Content Server to create one, linked to a web-viewable
version of the content item, if it is available. If no web-viewable
version is available, it is linked to the native file.
Title Displays the title of the content item without any associated
link. To maintain the grid structure, long titles are truncated to
a single line. Rolling the mouse over the title expands the text
to display the full title.
Column Description

Creating and Editing Custom Search Result Templates
Becoming Familiar with the Interface 3-17
3.8 Creating and Editing Custom Search Result Templates
You can personalize how search results are displayed by selecting an option from the
list on the User Profile Page, or from the Search Results Page. There are three templates
available by default, and you have the option to create new views based on the three
provided templates. In this way, you can customize the metadata information you
want to see on a search result. You can even specify different search results templates
to be used for different saved queries.
For more information about custom search result templates, see Section A.3, "Creating
and Editing Custom Search Result Templates."

Creating and Editing Custom Search Result Templates
3-18 Oracle Fusion Middleware User's Guide for Oracle Content Server

4
Finding Content Items 4-1
4Finding Content Items
Oracle Content Server uses a database set up by your system administrator to keep
track of the metadata entered you check in a content item. If your system
administrator has configured the Oracle Text Search option or the database full-text
search capability, then the text of content items is indexed and made available for
searching as well.
Check with your system administrator to see which search solution or database is
being used and to see if full-text indexing is enabled.
This chapter covers the following topics:
■ Section 4.1, "Options for Finding Content Items"
■ Section 4.2, "Searching with Oracle Text Search"
■ Section 4.3, "Searching with Database Metadata Search"
■ Section 4.4, "Searching with Database Full-Text Search"
■ Section 4.5, "Browsing to Content"
■ Section 4.6, "Using Additional Search Capabilities"
■ Section 4.7, "Search Pages"
■ Section 4.8, "Working with Search Results"
■ Section 4.9, "Searching Referenced Links (optional)"
■ Section 4.10, "Saving Queries"
■ Section 4.11, "Finding Recent Queries"
■ Section 4.12, "Content Data Tracking and Reporting"

Options for Finding Content Items
4-2 Oracle Fusion Middleware User's Guide for Oracle Content Server
4.1 Options for Finding Content Items
Your Oracle Content Server can be configured with the either the Oracle Text Search
option or the Database Metadata Search and Database Full-Text Search options for
finding content items:
■ Searching with Oracle Text Search
If you have a license to use Oracle Text Search (in Oracle Database 11g) or Oracle
Secure Enterprise Search 11g, the Oracle Text Search option enables the use of
those technologies as the primary full-text search engine for Oracle Universal
Content Management.
If the system administrator configured Oracle Text Search, this option enables you
to find a content item or items based on information about the file, actual text in
the file, or both. The system administrator can also configure Oracle Secure
Enterprise Search (Oracle SES) as the back-end search engine for Oracle Text
Search.
■ Searching with Database Metadata Search
This option enables you to find a content item or items based on information about
the file. The database metadata search is available if the system administrator did
not configure the Oracle Text Search option.
■ Searching with Database Full-Text Search
This option enables you to find a content item or items based on the actual text in
the file. The database full-text search is available if the system administrator
configured it.
To configure the search engine, set the configuration variable
SearchIndexerEngineName or in the postinstallation configuration page for Oracle
UCM, by selecting the internal/external full text search. The configuration variables
MaxIndexableFileSize (default 10 MB) and MinIndexableFileSize (default 5
BM) control whether a file is full-text indexed, based on size.
You can also search for content by navigating to it through a hierarchical link structure
that your system administrator set up, as described in Section 4.5, "Browsing to
Content."
4.2 Searching with Oracle Text Search
The Oracle Text Search option enables the use of Oracle Text 11g as the primary
full-text search engine for Oracle Universal Content Management (Oracle UCM) 11g.
Oracle Text 11g offers state-of-the-art indexing capabilities.
With Oracle Text Search, noise words cannot be searched because they are ignored
while searching, so the "all of the words" term should not be used. Instead, you should
use essential extracted text.
Oracle Text Search can filter and extract content from different document formats in
different languages. It supports a large number of document formats, including
Microsoft Office file formats, Adobe PDF, HTML, and XML. It can render search
Note: If your system administrator configured the content server to
search database metadata only, then you cannot search for specific
text within content. Additionally, Oracle Content Server can integrate
with other search engines. Check with your system administrator to
see what options are available to you.

Searching with Oracle Text Search
Finding Content Items 4-3
results in various formats, including unformatted text, HTML with term highlighting,
and original document format.
If your system administrator has configured the Oracle Text Search option, you can
select options to filter the results of a search by categories and specify full-text and
metadata searches.
This section covers the following topics:
■ Section 4.2.1, "Specifying a Search on the Expanded Form"
■ Section 4.2.2, "Specifying a Search on the Query Builder Form"
■ Section 4.2.3, "Metadata Search Operators for Oracle Text Search"
■ Section 4.2.4, "Metadata Wildcards"
■ Section 4.2.5, "Searching for Expired Content"
4.2.1 Specifying a Search on the Expanded Form
On the Expanded Form, you can specify a metadata search, a full-text search, or both
to identify a content item or items to search for. Also, you can specify result options.
Figure 4–1 shows part of the Expanded Form for specifying Oracle Text Search queries.
Figure 4–1 Expanded Form for Oracle Text Search
To specify a search on the Expanded Form:
1. On the Oracle Content Server home page, display the Home Page Search Fields
from the Search menu or the Search Tray.
2. In the Metadata Search area of the Expanded Form, you can enter one or more
search criteria for metadata fields:
■ Select the appropriate search operators.
For more information, see Section 4.2.3, "Metadata Search Operators for Oracle
Text Search."

Searching with Oracle Text Search
4-4 Oracle Fusion Middleware User's Guide for Oracle Content Server
■ Use Metadata Wildcards as necessary.
For more information, see Section 4.2.4, "Metadata Wildcards."
■ Oracle Text Search is always case insensitive.
3. In the Full-Text Search area, you can enter text to search for in a content item or
items, to refine your search.
4. In the Results Options area, you can change the Results Options for displaying the
results.
5. To save the search query under My Saved Queries, click Save.
6. To run the search query, click Search.
The content item or items that match your search criteria are displayed on the Search
Results Page.
The Search Results Page displays a menu bar with options that enable users to
selectively view search results. The options represent categories used to filter the
search results. These options can be context sensitive, so if an option returns only one
content item, then it shows only the one result in the menu itself. The default set of
options include Content Type, Security Group, and Account.
Figure 4–2 Search Results with Oracle Text Search Default Menu
An arrow next to the option name indicates that multiple content items were found for
an option. When you move your cursor over the option name, a menu displays the list
of the categories found in the search results for that option and the number of content
items for each of the categories. You can click any category name on the menu to
change the Search Results Page to list only the items that match the category.
Figure 4–3 shows a list of categories under Security Group and the number of items
found in each category.
Note: When using Oracle Text Search with your Oracle Content
Server instance, you cannot enter free-form metadata queries into the
Full-Text Search field on the Expanded Form. Instead, you must use
the advanced options on the Query Builder Form. For more
information, see Section 4.2.2, "Specifying a Search on the Query
Builder Form."

Searching with Oracle Text Search
Finding Content Items 4-5
Figure 4–3 Search Results with Expanded Oracle Text Search Menu
Element Description
Filter by Category Displays the categories used to filter the search results; for
example, Content Type, Security Group, and Account.
The system administrator can use the Oracle Content Server
Configuration Manager to add categories to this list or remove
them. To change the categories used to filter the search results,
see your system administrator.
Content Type (Default) Lists the types and the number of each type of content
items in the search results.
Click a content type name to change the search results list to
show only those items that match the content type.
Security Group (Default) Lists the security groups and number of content items
assigned to each group in the search results. Security groups
include Administration, Public, and Secure.
Click a security group name to change the search results list to
show only those items that match the security group.
Account (Default) Lists the account types and number of items assigned
to each account in the search results.
Click an account type to change the search results list to show
only those content items that match the account.

Searching with Oracle Text Search
4-6 Oracle Fusion Middleware User's Guide for Oracle Content Server
4.2.2 Specifying a Search on the Query Builder Form
On the Query Builder form, you can select search criteria from menus as required. The
Query Builder form enables you to build and save complex queries by selecting
options from a series of lists and to manually edit the query text.
Figure 4–4 shows the Query Builder Form for specifying Oracle Text Search queries.
Figure 4–4 Query Builder Form for Oracle Text Search
To specify a search on the Query Builder Form:
1. On the Oracle Content Server home page, display the Home Page Search Fields
from the Search menu or the Search Tray.
2. On the Search Forms Menu, choose Query Builder Form.
3. To edit the query, click show advanced options, and then choose Modify Query
Te xt .
4. In the Results Options area, you can change the Results Options for displaying the
results.
5. To save the search query under My Saved Queries, click Save.
6. To run the search query, click Search.
Note: When using Oracle Text Search with your Oracle Content
Server instance, you cannot enter free-form metadata queries into the
Full-Text Search field on the Expanded Form. Instead, you must use
the advanced options on the Query Builder Form. For more
information, see Section 4.2.2, "Specifying a Search on the Query
Builder Form."

Searching with Oracle Text Search
Finding Content Items 4-7
4.2.3 Metadata Search Operators for Oracle Text Search
On the Advanced Search Page, use search operators to refine the search criteria for
some metadata fields. These operators are listed as options in lists to the left of each
field.
The following table describes the search terms used and provides examples for use.
Operator Description Example
CONTAINS Finds content items with the
specified whole word or phrase in
the metadata field.
This operator is available only for
Oracle Text Search, or for Oracle
Database and Microsoft SQL Server
database with the optional
DBSearchContainsOpSupport
component enabled. For more
information, see your system
administrator.
If you enter form in the Title field, the
search returns items with the word
form in their title, but does not return
items with the word performance or
reform.
MATCHES Finds items with the exact specified
value in the metadata field.
When you enter address change
form in the Title field, the search
returns items with the exact title of
address change form.
A query that uses the MATCHES
operator on a nonoptimized field
behaves the same as a query that uses
the CONTAINS operator.
For example, if the xDepartment
field is not optimized, then the query
xDepartment MATCHES
’Marketing’ behaves like
xDepartment CONTAINS
’Marketing’, returning documents
that have an xDepartment value of
’Marketing Services’ or
’Product Marketing’.
HAS WORD
PREFIX
Finds all content items with the
specified word at the beginning of
the metadata field. No wildcard
character is placed before or after
the specified value.
If you enter form in the Title field, the
search finds all content items with the
word form at the beginning of their
title but does not find a content item
whose title begins with the word
performance or reform.

Searching with Oracle Text Search
4-8 Oracle Fusion Middleware User's Guide for Oracle Content Server
4.2.4 Metadata Wildcards
A wildcard substitutes for unknown or unpredictable characters in the search term.
You can use wildcards in metadata searches, even when using the Quick Search field.
Use the following wildcards in metadata search fields:
■ An asterisk (*) indicates zero or many alphanumeric characters. For example:
– form* matches form and formula
– *orm matches form and reform
– *form* matches form, formula, reform, and performance
■ A question mark (?) indicates one alphanumeric character. For example:
– form? matches forms and form1, but not form or formal
– ??form matches reform but not perform
4.2.5 Searching for Expired Content
By default, if you have write permission to any security group, you can access the
Expired Content Page and perform a search for expired content. The search results
include only the content for which you have at least read permission.
This section covers the following topics:
■ Section 4.2.5.1, "Searching for Expired Content"
■ Section 4.2.5.2, "Searching for Content About to Expire"
4.2.5.1 Searching for Expired Content
Use the following procedure to search for content that has expired:
1. Log in to the content server.
2. Click Content Manager in the left navigation bar.
3. Click Expired Content on the Content Management page.
The Expired Content Page opens.
4. In the Find Expired Content area, select Before or After from the list.
5. Enter a date in the empty field. You can enter the date or select a relative date from
the list.
6. Click Get Expired.
The Search Results Page displays all content that expired before or after the
specified date.
Note: To search for an asterisk (*) or a question mark (?) without
treating it as wildcard, you must put quotation marks around your
search term; for example: "here*"

Searching with Database Metadata Search
Finding Content Items 4-9
4.2.5.2 Searching for Content About to Expire
Use the following procedure to search for content that expires at a specified time in the
future:
1. Log in to the content server.
2. Click Content Manager in the left navigation bar.
3. Click Expired Content on the Content Management page.
The Expired Content Page opens.
4. In the Expiring Content area, enter a date in the From field, the To field, or both.
You can enter the date or select a relative date from the list.
5. Click Get Expiring.
The Search Results Page displays all content that expires within the specified time
period.
4.3 Searching with Database Metadata Search
This section covers the following topics:
■ Section 4.3.1, "About Metadata Searching"
■ Section 4.3.2, "Performing a Metadata Search"
■ Section 4.3.3, "Metadata Search Operators for a Database Metadata Search"
■ Section 4.3.4, "Metadata Search Case Sensitivity"
■ Section 4.3.5, "Metadata Wildcards"
■ Section 4.3.6, "Searching for Expired Content"
4.3.1 About Metadata Searching
Metadata searching is similar to finding a book in a library by searching for its author,
title, or subject. When you search by metadata, you specify as much information as
you know about a file or a group of files. For example, to find all files written by your
supervisor for your department that were released on or after 1/1/2002, you would
specify the following on the search page:
■ Author: supervisor’s user name
■ Department: department name
■ Release Date From: 1/1/2002
Note: When you search for metadata, case sensitivity varies
depending on how your system administrator has configured Oracle
Content Server. For your specific configuration, see your system
administrator.
When you use full-text searching, a search is case sensitive for
metadata and case insensitive for full text. For Content ID, however,
lowercase letters are converted to uppercase letters, so you cannot
search Content ID with lowercase letters.

Searching with Database Metadata Search
4-10 Oracle Fusion Middleware User's Guide for Oracle Content Server
4.3.2 Performing a Metadata Search
Use the following procedure to search for files using metadata as the search criteria:
1. Display the Home Page Search Fields or the Search Tray.
2. Enter your search criteria in the Expanded Form.
■ Select the appropriate search operators.
For more information, see Section 4.3.3, "Metadata Search Operators for a
Database Metadata Search."
■ Use Metadata Wildcards as necessary.
■ Keep the case sensitivity of metadata searches in mind.
For more information, see Section 4.3.4, "Metadata Search Case Sensitivity."
3. Select the Results Options for displaying the results.
4. Click Search.
The files that match your search criteria are displayed on the Search Results Page.
4.3.3 Metadata Search Operators for a Database Metadata Search
On the Advanced Search Page, use search operators to refine the search criteria for
some metadata fields. These operators are listed as options in lists to the left of each
field.
The following table describes the search terms used and provides examples for use.
Operator Description Example
Substring Finds content items with the
specified string anywhere in the
metadata field. This has the same
effect as placing a wildcard before
and after the search term. This is the
default operator.
This operator is not available for
implementations that use Oracle
Text Search.
When you enter form in the Title
field, the search returns items with
words such as forms, performance,
and reform in their title.
Matches Finds items with the exact specified
value in the metadata field.
When you enter address change
form in the Title field, the search
returns items with the exact title of
address change form.
Starts Finds items with the specified value
at the beginning of the metadata
field. This has the same effect as
placing a wildcard after the search
term when using the Matches
operator.
When you enter form in the Title
field, the search returns all items with
a title that begins with form,
including forms, forming, and so
on.

Searching with Database Metadata Search
Finding Content Items 4-11
4.3.4 Metadata Search Case Sensitivity
Case sensitivity for metadata searches varies depending on how your system
administrator has configured the content server.
■ Microsoft SQL Server: If the content server is using database searching with
Microsoft SQL Server, metadata searches can be case sensitive or insensitive,
depending on how the database is setup.
■ Oracle Database: If the content server is using database searching with Oracle
Database, metadata searches are always case sensitive. This is in contrast to
full-text searches, which are not case sensitive when you use Oracle Database
searching.
■ IBM DB2: If the content server is using database searching with IBM DB2,
metadata searches are case sensitive.
4.3.5 Metadata Wildcards
A wildcard substitutes for unknown or unpredictable characters in the search term.
You can use wildcards in metadata searches, even when using the Quick Search field.
Use the following wildcards in metadata search fields:
■ An asterisk (*) indicates zero or many alphanumeric characters. For example:
– form* matches form and formula
– *orm matches form and reform
– *form* matches form, formula, reform, and performance
Contains Finds items with the specified
whole word or phrase in the
metadata field.
This is available only for Oracle
Text Search, or for Oracle Database
and Microsoft SQL Server database
with the optional
DBSearchContainsOpSupport
component enabled. For more
information, see your administrator.
When you enter form in the Title
field, the search returns items with the
word form in their title but does not
return items with the word
performance or reform.
Ends Finds items with the specified value
at the end of the metadata field.
This has the same effect as placing a
wildcard before the search term
when using the Matches operator.
When you enter form in the Title
field, the search returns all items with
titles that end with form, such as
form, perform, and chloroform.
Not Substring Finds content items that do not have
the specified string anywhere in the
metadata field.
When you enter form in the Title
field, the search returns items without
words such as forms, performance,
and reform in their title.
Not Matches Finds items that do not have the
exact specified value in the
metadata field.
When you enter address change
form in the Title field, the search
returns items without the exact title of
Address Change Form.
Note: For your specific configuration, see your system administrator.
Operator Description Example

Searching with Database Metadata Search
4-12 Oracle Fusion Middleware User's Guide for Oracle Content Server
■ A question mark (?) indicates one alphanumeric character. For example:
– form? matches forms and form1, but not form or formal
– ??form matches reform but not perform
4.3.6 Searching for Expired Content
By default, if you have write permission to any security group, you can access the
Expired Content Page and perform a search for expired content. The search results
include only the content for which you have at least read permission.
This section covers the following topics:
■ Section 4.3.6.1, "Searching for Expired Content"
■ Section 4.3.6.2, "Searching for Content About to Expire"
4.3.6.1 Searching for Expired Content
Use the following procedure to search for content that has expired:
1. Log in to the content server.
2. Click Content Manager in the left navigation bar.
3. Click Expired Content on the Content Management page.
The Expired Content Page opens.
4. In the Find Expired Content area, select Before or After from the list.
5. Enter a date in the empty field. You can enter the date or select a relative date from
the list.
6. Click Get Expired.
The Search Results Page displays all content that expired before or after the
specified date.
4.3.6.2 Searching for Content About to Expire
Use the following procedure to search for content that expires at a specified time in the
future:
1. Log in to the content server.
2. Click Content Manager in the left navigation bar.
3. Click Expired Content on the Content Management page.
The Expired Content Page opens.
4. In the Expiring Content area, enter a date in the From field, the To field, or both.
You can enter the date or select a relative date from the list.
5. Click Get Expiring.
The Search Results Page displays all content that expires within the specified time
period.

Searching with Database Full-Text Search
Finding Content Items 4-13
4.4 Searching with Database Full-Text Search
This section covers the following topics:
■ Section 4.4.1, "About Full-Text Searching"
■ Section 4.4.2, "Full-Text Search Rules"
■ Section 4.4.3, "Full-Text Search Case Sensitivity"
■ Section 4.4.4, "Full-Text Search Wildcards"
■ Section 4.4.5, "Oracle Database Full-Text Search Options"
■ Section 4.4.6, "Performing a Full-Text Search"
4.4.1 About Full-Text Searching
Full-text searching enables you to find a content item based on the text contained in the
file itself. When you check in a content item into the content server, the indexer stores
all of the words in the web-viewable version of the content item (PDF, HTML, text, or
other supported file formats) in an index. When you perform a full-text search, the
search expression is compared with the index, and any content items and discussions
that contain your search text are returned in the search results.
A full-text search expression can include the following elements:
■ Strings: partial words (such as addr)
■ Words: individual whole words (such as addresses)
■ Phrases: multiple-word phrases (such as new addresses)
■ Operators: logic applied to words and phrases (such as news AND addresses)
For more information, see Section 4.4.2, "Full-Text Search Rules."
4.4.2 Full-Text Search Rules
Use the following options to refine your full-text search criteria:
■ You can use wildcards in full-text search queries.
■ You can use search operators in full-text search queries.
For more information, see Section 4.4.5.1, "Oracle Database Full-Text Search
Operators."
■ You can use Internet-Style Search Syntax.
■ When you perform a full-text search, the search finds the word you specify and
words that have the same stem. For example, searching for the word address
finds files with the word address, addressing, addresses, or addressed in
them. To limit the search to the word you specify, place the word in double
quotation marks (for example, "address").
Note: When using Oracle Text Search with your Oracle Content
Server instance, you cannot enter complex search queries into the
Full-Text Search field on the Expanded Form of the Advanced Search
Page. Instead, you must use the advanced options on the Query
Builder Form.

Searching with Database Full-Text Search
4-14 Oracle Fusion Middleware User's Guide for Oracle Content Server
■ You can sort full-text search results by the number of occurrences of the search
terms and the proximity of the search terms when you use an operator such as
<NEAR>. Select the Score option from the Sort By list on the Search Results Page.
4.4.3 Full-Text Search Case Sensitivity
Case sensitivity for full-text searches varies depending on how your system
administrator has configured the content server. By default, full-text searches with
Oracle Database are not case sensitive. Full-text searches with Microsoft SQL Server
vary based on how the database is setup.
If your Oracle Content Server configuration includes an optional search engine, case
sensitivity depends on the search engine. For your specific configuration, see your
system administrator.
4.4.4 Full-Text Search Wildcards
A wildcard substitutes for unknown or unpredictable characters in the search term.
You can use wildcards in metadata searches, even when using the Quick Search field.
With Microsoft SQL Server, use a wildcard only for prefix searches.
Use the following wildcards in metadata search fields:
■ An asterisk indicates zero, one, or more alphanumeric characters. For example:
– form* matches form and formula
– *orm matches form and reform
– *form* matches form, formula, reform, and performance
■ A question mark (?) indicates one alphanumeric character. For example:
– form? matches forms and form1, but not form or formal
– ??form matches reform but not perform
Note: You can sort the results using the Score option only if you are
using the Oracle 11g database search solution and have installed the
Oracle Text Search option.
Tip: Generally, you should use all lowercase search strings to find all
of the files that match your search expression. Use mixed-case search
strings only if you are looking for a specific combination of lowercase
and uppercase.

Searching with Database Full-Text Search
Finding Content Items 4-15
4.4.5 Oracle Database Full-Text Search Options
This section includes these topics:
■ Section 4.4.5.1, "Oracle Database Full-Text Search Operators"
■ Section 4.4.5.2, "Oracle Database Full-Text Highlighting"
4.4.5.1 Oracle Database Full-Text Search Operators
Use the following operators to refine your Oracle Database full-text search expression.
4.4.5.2 Oracle Database Full-Text Highlighting
Search terms can be highlighted in the returned text, provided the content server is
using Oracle Database full-text search and your administrator has enabled the
functionality. Forward (>>) and back (<<) navigation links bracket the highlighted
text. Click the links to go to the next and previous result in the text.
Note: When using Oracle Text Search with your Oracle Content
Server instance, you cannot enter complex search queries into the
Full-Text Search field on the Expanded Form of the Advanced Search
Page. Instead, you must use the advanced options on the Query
Builder Form.
Note: For clarity, the operators are shown in uppercase, but they can
be in lowercase as well.
Operator Description Example
AND Finds content items that contain all
of the specified terms.
address AND name returns
content items that contain both
specified words.
OR Finds content items that contain at
least one of the specified terms.
safety OR security OR
protection returns content items
that contain at least one of the three
words.
NOT Finds content items that contain the
term that precedes the operator (if
any), and ignores content items that
contain the term that follows it.
NOT server returns content items
that do not contain the word
server.
internet NOT server returns
content items that contain the word
internet and do not contain the
word server.
NEAR(term1,
term2)
Finds content items that contain the
specified terms near to each other.
Terms that are closer receive a
higher score.
NEAR(internet,server)
returns content items that contain
the specified words close to one
another.
ISABOUT(phrase) Finds content items that contain the
phrase specified in the parenthesis.
IS ABOUT(changed address)
returns content items that contain
specified phrase.

Browsing to Content
4-16 Oracle Fusion Middleware User's Guide for Oracle Content Server
4.4.6 Performing a Full-Text Search
Use the following procedure to perform a full-text search:
1. Display the Quick Search Field, Home Page Search Fields, Search Tray, or
Advanced Search Page.
2. Enter your search terms in the full-text search field.
■ Take the Full-Text Search Rules into account.
■ Keep the case sensitivity of full-text searches in mind.
For more information, see Section 4.4.3, "Full-Text Search Case Sensitivity."
3. Select the Results Options for displaying the results.
4. Click Search.
The files that match your search criteria are displayed on the Search Results Page or in
the Results Tab in the Search Tray in the Portal Navigation Bar.
4.5 Browsing to Content
This section covers the following topics:
■ Section 4.5.1, "Browsing Content to Find a File"
■ Section 4.5.2, "Browse Content Tray"
4.5.1 Browsing Content to Find a File
Use the following procedure to find information by browsing content:
1. Click Browse Content Tray in the portal navigation bar to expand the tray.
2. Scan the list of folders until you find the one you are looking for.
3. Click the plus sign (+) next to the folder to expand the folder contents and
continue drilling down through the folders until you reach a link to the following:
■ A Search Results Page
■ A different Web site
■ A content server report
Note: When using Oracle Text Search with your Oracle Content
Server instance, you cannot enter complex search queries into the
Full-Text Search field on the Expanded Form of the Advanced Search
Page. Instead, you must use the advanced options on the Query
Builder Form.

Using Additional Search Capabilities
Finding Content Items 4-17
4.5.2 Browse Content Tray
Browsing content in Oracle Content Server is similar to looking for a paper document in
your organization’s file cabinets. In a file cabinet, you find the file drawer, then the
folder, then the document. In Oracle Content Server, you find documents and links to
Web sites in folders in the Browse Content tray.
4.5.2.1 Library Folders
The Browse Content tray is a hierarchical link structure (the Library), where metadata
define the folders in the hierarchy. The Library Folders folder is set up by default.
Your system administrator determines the hierarchy of any folders within the
Library Folders folder. Click the plus sign (+) next to a collapsed folder to expand
the contents of the folder. Click the minus sign (–) next to an expanded folder to
collapse it.
4.5.2.2 Links from Folders
Click a link in the last folder of a hierarchy to display:
■ A list of content items that match the folder’s metadata and that you have
permission to view
■ A Web site
■ A report that provides information about content items, users, metadata fields, or
other content server elements.
4.6 Using Additional Search Capabilities
This section covers the following topics:
■ Section 4.6.1, "Internet-Style Search Syntax"
■ Section 4.6.2, "Complex Queries and Alternate Query Formats"
4.6.1 Internet-Style Search Syntax
Search techniques common to the popular Internet search engines are supported in
Oracle Content Server. For example, new product entered in the Quick Search field
searches for new <AND> product, while new, product searches for new <OR>
product. The following table lists how Oracle Content Server interprets common
characters.
Character Interpreted As
Space ( ) AND
Comma (,) OR

Using Additional Search Capabilities
4-18 Oracle Fusion Middleware User's Guide for Oracle Content Server
The following table lists examples of how Oracle Content Server interprets
Internet-style syntax in a full-text search.
The following table lists examples of how Oracle Content Server interprets
Internet-style syntax when searching title metadata using the substring operator.
4.6.2 Complex Queries and Alternate Query Formats
Oracle Content Server allows for the use of parentheses for complex query
construction and field:value and site:value formats when creating a query. By
using these alternatives, you can more easily search the metadata field you want
across multiple servers, if necessary, and refine your results. For example, to search
only the title metadata for new product without having to go to the Advanced
Search page, enter dDocTitle:"new product" into the Quick Search field. The
search is limited to the field you specified before the colon. You must know the Oracle
Content Server identifier for the metadata field you want to search.
Minus (-) NOT
Phrases enclosed in double-quotes ("any phrase") Exact match of entered phrase
Query Interpreted As
new product
new <AND> product
(new, product) images
(new <OR> product) <AND> images
new product -images
(new <AND> product) <AND> <NOT> images
"new product", "new
images"
"new product" <OR> "new images"
Query Interpreted As
new product
dDocTitle <substring> ‘new’ <AND> dDocTitle
<substring> ‘product’
new, product
dDocTitle <substring> ‘new’ <OR> dDocTitle
<substring> ‘product’
new -product
dDocTitle <substring> ‘new’ <AND> <NOT> ‘product’
"new product"
dDocTitle <substring> ‘new product’
Note: Internet-style search syntax is enabled by default, but it can be
disabled by your system administrator. Check with your system
administrator if you have questions.
Note: When using Oracle Text Search with your Oracle Content
Server instance, you cannot enter complex search queries into the
Full-Text Search field on the Expanded Form of the Advanced Search
Page. Instead, you must use the advanced options on the Query
Builder Form.
Character Interpreted As

Search Pages
Finding Content Items 4-19
The following table lists some examples of complex and alternate query formats.
4.7 Search Pages
You can perform a content item search from the following places in the Oracle Content
Server interface:
■ Section 4.7.1, "Quick Search Field"
■ Section 4.7.2, "Home Page Search Fields"
■ Section 4.7.3, "Search Tray"
■ Section 4.7.4, "Advanced Search Page"
■ Section 4.7.5, "Query Builder Form"
4.7.1 Quick Search Field
With the Quick Search Field, you can perform a search regardless of the page in the
content area. The Quick Search field performs a substring search of the title and
content ID metadata, and the indexed full-text if it is supported on your system.
A substring search is equivalent to including a wildcard at the beginning and end of
the search term. For example, if you enter form in the Quick Search field, the search
returns items with words such as forms, performance, and reform in the title or
content ID metadata, or in the indexed full-text if it is supported on your system.
You or your system administrator can also build custom searches targeted to search
one or more metadata fields you specify, and make them available through the Quick
Search field. You can create targeted searches with either the Query Builder Form or
Expanded Form.
The Quick Search field supports Internet-style search syntax, complex construction,
and alternate query formats. For more information, see Section 4.6, "Using Additional
Search Capabilities."
Query Interpreted As
dDocTitle:New
dDocTitle <contains> `New`
dDocTitle:New product
(dDocTitle <contains> `New`) <AND>
<ftx>`product`</ftx>
dDocTitle:New dDocTitle:product
dDocTitle <contains> `New` <AND>
dDocTitle <contains> `product`
dDocTitle:New,dDocTitle:product
dDocTitle <contains> `New` <AND>
dDocTitle <contains> `product`
dDocTitle:New
dDocType:Presentations
dDocTitle <contains> `New` <AND>
dDocType <contains> `Presentations`
dDocTitle:New,dDocType:"Test Plan"
dDocTitle <contains> `New` <OR> dDocType
<contains> `Test Plan`

Search Pages
4-20 Oracle Fusion Middleware User's Guide for Oracle Content Server
4.7.2 Home Page Search Fields
The the search fields on the content server Home Page enable you to perform a
metadata search, a full-text search, or a combination of both from the home page. Only
the most commonly used search fields are available from the home page.
4.7.3 Search Tray
The Search Tray enables you to perform a metadata, full-text, or combination search
from the content server’s Portal Navigation Bar. Only the most commonly used search
fields are available from the Search tray.
The Criteria Tab on the Search Tray displays a form where you can enter your criteria.
The Results Tab displays the results that are returned.
4.7.4 Advanced Search Page
The Advanced Search Page enables you to perform a metadata search, full-text search,
or a combination of both on all available fields.
To access this page, click the Advanced link in the Search Tray or use the Search menu
on the Toolbar.
The expanded form on the Advanced Search Page displays all search fields available
to you on a single page. You can alternate between the expanded form and the query
builder form using the Search Forms menu at the top of the search page.
Using a Content Profiles link in the My Oracle Content Server Tray to check in or
search for content can help you define and display the most critical metadata fields
necessary for those tasks.
You can specify the default search form to use the Advanced Search page. For more
information, see Section 3.7.6, "User Profile Page."
Note: Your home page may have a different appearance than the
default "out-of-the-box" content server home page, which includes
search fields. If search functionality is not available from your home
page or to search on additional metadata fields, use the Search Tray or
Advanced Search Page.
Note: Queries built using the Expanded form separate the metadata
fields with the <AND> operator. Each search criteria entered into each
field must be met for a result to be returned. For example, if you enter
January into the Title field and presentation into the Type field,
then a search finds content only if it has a presentation type and
has January in the title.
Note: When using Oracle Text Search with your Oracle Content
Server instance, you cannot enter complex search queries into the
Full-Text Search field on the Expanded Form of the Advanced Search
Page. Instead, you must use the advanced options on the Query
Builder Form.

Working with Search Results
Finding Content Items 4-21
4.7.5 Query Builder Form
The Query Builder Form creates and saves complex queries by selecting options from
a series of lists. After a query is built, you can edit the query directly, perform the
search, or save the query for easy access from My Saved Queries.
With the Query Builder form, you can separate the metadata fields with either the
<AND> operator or the <OR> operator. If you use the <AND> operator, then each
search criteria entered into each field must be met to return a result.
If you use the <OR> operator, then only one of each field’s criteria must be met. For
example, if you enter January into the Title field and presentation into the Type
field separated by <OR>, then results include content that has either presentation
as the type or has January in the title.
4.8 Working with Search Results
You can specify how to display the results of your search based on the number of
content items returned per page and the order of the content items. For example, if
you are searching for specific text such as changed address, then you might want
to sort your search results by score. To find the most recent files that match your
criteria, you can sort the results by release date.
Use the Results Options area of the Advanced Search Page to control the display of the
Search Results Page.
This section covers the following topics:
■ Section 4.8.1, "Displaying Search Results"
■ Section 4.8.2, "Changing the Search Results View"
4.8.1 Displaying Search Results
Use the following procedure to specify how to display the search results:
1. Display the Home Page Search Fields or Advanced Search Page.
2. Scroll down to the Results Options.
3. Set Results Per Page to the maximum number of content items to display on each
Search Results Page.
4. Specify the Sort By method and order.
5. Click Search.
6. From the Content Actions menu on a Search Results Page, choose the view option
to specify the search results view.
Note: When using Oracle Text Search with your Oracle Content
Server instance, you cannot enter complex search queries into the
Full-Text Search field on the Expanded Form of the Advanced Search
Page. Instead, you must use the advanced options on the Query
Builder Form.

Searching Referenced Links (optional)
4-22 Oracle Fusion Middleware User's Guide for Oracle Content Server
4.8.2 Changing the Search Results View
Use the following procedure to change the default search results view:
1. Display the User Profile Page.
2. Scroll down to the Search Template option.
3. Click Search Template, and select the search result view.
4. Click Update.
4.9 Searching Referenced Links (optional)
The Link Manager component adds functionality to Oracle Content Server, and is
available to your system administrator as a bundled option. It is not installed by
default. If the administrator install the optional Link Manager component, it evaluates,
filters, and parses the URL links of indexed documents and then extracts the links for
storage in a database table, making them available for searching. After the Link
Manager component populates the table with the extracted URL links, the it references
this table to generate link search results, lists of link references for the Content
Information page, and the resource information for the Link Info page. The Link
Manager component shows these items:
■ Lists of links using specific search criteria
■ Detailed information about a specific link
■ The links to other documents for a specific content item, and any documents that
reference this item
The search results, link references lists, and Link Info pages are useful to determine
what documents are affected by content additions, changes, or revision deletions. For
example, before deleting a content item, you can verify that any URL references
contained in it are insignificant. Another use might be to monitor how content items
are being used.
This section covers the following topics:
Notes:
■ The Clear button clears the search fields, but does not clear the
Results Options settings.
■ For information about changing the defaults for sort field, sort
order, and result count, seeSection 3.7.2, "Editing Your User
Profile."
■ The system administrator can use the Oracle Content Server
Configuration Manager to add or remove sortable fields. To
change the fields available for sorting, see your system
administrator.
Note: Because the Link Manager component extracts the URL links
during the Oracle Content Server indexing cycle, only the URL links
of released documents are extracted. For content items with multiple
revisions, only the most current released revision is available for
searching.

Searching Referenced Links (optional)
Finding Content Items 4-23
■ Section 4.9.1, "About Searching Links"
■ Section 4.9.2, "Link References on the Content Information Page"
■ Section 4.9.3, "Notification of Expiration"
■ Section 4.9.4, "Performing a Link Search"
■ Section 4.9.5, "Checking Content Item Link References"
■ Section 4.9.6, "Checking the Link Information About Specific Links"
4.9.1 About Searching Links
Use the Search Links Page to search for links, using criteria stored in the content server
repository database. This page is useful for finding valid or invalid links, to determine
where a resource is being used, to determine how deleting a content item would affect
other documents linking to it, and so on.
The Link Search Results Page displays items matching your search criteria. Invalid or
broken links are listed in bold font. Each item has an Item Actions Menu and an Info
icon which displays a Link Info Page.
4.9.2 Link References on the Content Information Page
The References toggle switch enables you to see whether the content item references
or is referenced by other content items. The References toggle switch has two options:
■ Show: By default, the links are hidden when the Content Information page opens.
Click Show to display all applicable links. If this content item contains one or
more references to other documents, then these links are listed in the Links
contained in this content item section. If this content item is referenced by other
documents, then these links are listed in the Links to this content item section.
■ Hide: Click Hide to close the Links contained in this content item section and the
Links to this content item section and hides the links.
To access the available link information for content items, click any Content
Information icon, which displays the Content Information Page and the References
toggle switch. Or, you can choose either Content Information or Target Content Info
from the Item Actions Menu, which also displays the Content Information page and
the References toggle switch.
Click the References toggle switch to hide or display link references.
Click Show to open the References sections that list all applicable links associated with
the content item. For information about accessing the Content Information page and
displaying the references, see Section 4.9.5, "Checking Content Item Link References."
Note: You cannot delete a content item revision if it is referenced by
other content items unless the system administrator has set the
AllowForceDelete configuration variable to true. When you delete a
content item revision, the message indicates whether the content item
is referenced by another content item and asks if you are sure you
want to delete it. In this case, deleting a content item that is referenced
by another content item breaks those links and makes them invalid.

Searching Referenced Links (optional)
4-24 Oracle Fusion Middleware User's Guide for Oracle Content Server
Links that are invalid or broken are listed using bold font. Click the Info link in the
Actions column to display the Link Info Page for that particular link.
When the References sections are open, the Hide toggle switch option is available.
Click Hide to close the References sections and hide the lists of links.
4.9.3 Notification of Expiration
With Link Manager installed, the Notification of Expiration page includes additional
information for each content item that is expiring soon. The e-mail notification
specifies if the expiring content item is referenced by another content item:
■ Is Referenced: Yes
■ Is Referenced: No
The e-mail does not provide a list of the content items that reference the soon-to-expire
document. This information is available in the References section on the Content
Information page. For more information, see Section 4.9.5, "Checking Content Item
Link References."
If the Oracle Content Server configuration variable (EnableExpirationNotifier)
has been enabled, an e-mail notification is sent to each author when content expires.
For more information about setting this configuration variable, see
"EnableExpirationNotifier" in the Oracle Fusion Middleware Idoc Script Reference Guide.
Figure 4–5 Notification of Expiration E-mail for Author
To have a separate e-mail notification sent to the system administrator, you can
configure the NotifyExtras variable as follows:
NotifyExtras=sysadmin
Note: When a content item expires, it still exists in the Oracle
Content Server. Expiration only removes the item from the index.
Therefore, all links associated with an expired content item are
functional if they involve a valid document.

Searching Referenced Links (optional)
Finding Content Items 4-25
4.9.4 Performing a Link Search
To search for links in content items:
1. Click the Managed Links Search link in the Content Management tray. The Search
Links Page opens.
2. Enter the applicable values in the field(s). For more detailed descriptions of the
fields, see the Link Search Results Page.
3. Click Search. The Link Manager component generates and displays the search
results, as shown in the Link Search Results Page.
4.9.5 Checking Content Item Link References
Use the Content Information page to display, check, and verify all the link references
associated with a specific content item. You can access the Content Information page
for a content item from either of two pages, as described in these topics:
■ Section 4.9.5.1, "Checking Link References from the Search Results Page"
■ Section 4.9.5.2, "Checking Link References from the Link Manager’s Search Links
page"
4.9.5.1 Checking Link References from the Search Results Page
1. Search for the specific content item using the Oracle Content Server Search page.
2. Select a content item from the Search Results Page, and click the corresponding
Content Info icon in the Actions column.
The Content Information page for the selected content item opens. If this content
item contains links or has links that reference it, the References Show toggle
switch is displayed.
3. Click the References Show toggle switch.
All applicable links are displayed. The Links contained in this content item section
lists all the links included in this content item that reference other documents. The
Links to this content item section lists all the links in other documents that
reference this content item.
4.9.5.2 Checking Link References from the Link Manager’s Search Links page
1. Open the Search Links page and search for links. For details, see Section 4.9.4,
"Performing a Link Search."
2. Select a link from the Search Results section.
3. Click the Content Info icon in the Actions column.
The Content Information page for the selected content item opens. If this content
item contains links or has links that reference it, the References Show toggle
switch is displayed.
4. Click the References Show toggle switch.
All applicable links are displayed. The Links contained in this content item section
lists all the links included in this content item that reference other documents. The
Links to this content item section lists all the links in other documents that reference
this content item.

Saving Queries
4-26 Oracle Fusion Middleware User's Guide for Oracle Content Server
4.9.6 Checking the Link Information About Specific Links
Use the Link Info page to view additional information about a specific link. You can
access the Link Info Page for any link from either of two pages, as described in these
topics:
■ Section 4.9.6.1, "Checking Link Information from the Content Information Page"
■ Section 4.9.6.2, "Checking Link Information from the Search Links Page"
4.9.6.1 Checking Link Information from the Content Information Page
1. Open the Content Information page for a specific content item and display the
applicable links. For details, see Section 4.9.5, "Checking Content Item Link
References."
2. Select a link from a list in the References sections (either Links contained in this
content item or Links to this content item).
3. Click the corresponding Content Info link in the Actions column.
The Link Info page for the selected link opens.
4.9.6.2 Checking Link Information from the Search Links Page
1. Open the Search Links page and search for links. For details, see Section 4.9.4,
"Performing a Link Search."
2. Select a link from the Search Results section.
3. Click the Actions icon in the Actions column. The Item Actions Menu opens.
4. Choose the Link Info menu option.
The Link Info page for the selected link opens.
4.10 Saving Queries
This section covers the following topics:
■ Section 4.10.1, "About Saved Queries"
■ Section 4.10.2, "Saving a Query"
4.10.1 About Saved Queries
To quickly display search results for searches that you perform often, you can save
links to those searches in the My Saved Queries folder in the My Oracle Content
Server Tray in the Portal Navigation Bar.
After you save a query link, you can modify or delete the link from your Saved
Queries Page.
Note: To display the Link Info Page for any link listed in the
References sections (either Links contained in this content item or Links to
this content item), click the corresponding Info link in the Actions
column.

Finding Recent Queries
Finding Content Items 4-27
4.10.2 Saving a Query
Use the following procedure to save a search as a query link in your Portal Navigation
Bar:
1. Specify the search criteria you want to save.
■ On the Search Tray, Home Page Search Fields, or Advanced Search Page, enter
the search criteria in the associated fields.
■ On the Search Results Page, the criteria saved are the criteria that were used to
display the results.
2. Choose Save Search from the Actions menu on the Search Results Page.
A prompt dialog opens.
3. Enter a title for the saved query. This is the link shown in your Portal Navigation
Bar.
4. Click OK.
The new link is shown under the My Saved Queries folder in your Portal
Navigation Bar.
4.11 Finding Recent Queries
Oracle Content Server saves queries that you recently performed in the My Recent
Queries folder in the My Oracle Content Server Tray in the Portal Navigation Bar.
You can rerun or clear queries from the My Recent Queries folder.
4.11.1 Rerunning a Recent Query
Use the following procedure to rerun a recent query from your Portal Navigation Bar.
To rerun a recent query:
1. Open the My Recent Queries folder in the My Oracle Content Server Tray in the
Portal Navigation Bar.
2. Double-click the link for the recent query to rerun.
The output from the query displays on your Search Results Page.
4.11.2 Clearing Recent Queries
Use the following procedure to clear all recent queries from your Portal Navigation
Bar.
To clear recent queries:
1. Open the My Recent Queries folder in the My Oracle Content Server Tray in the
Portal Navigation Bar.
2. Double-click the Clear link.
Oracle Content Server deletes all links except Clear from the My Recent Queries
folder.
Note: For information about modifying and deleting saved queries,
see Section 3.7.4, "Editing Saved Queries."

Content Data Tracking and Reporting
4-28 Oracle Fusion Middleware User's Guide for Oracle Content Server
4.12 Content Data Tracking and Reporting
Content Tracker and Content Tracker Reports are components that are automatically
installed with Oracle Content Server, but are disabled by default. They are separate
modules but, when enabled, they provide information about system usage. This
section covers the following topics:
■ Section 4.12.1, "About Content Tracker"
■ Section 4.12.2, "About Content Tracker Reports"
4.12.1 About Content Tracker
Content Tracker monitors your system and records information about various
activities. Content Tracker collects this information from various sources, then merges
and writes the information to a set of tables in your Oracle Content Server database.
You can customize Content Tracker to change or expand the types of information it
collects. Content Tracker monitors activity based on:
■ Content item accesses:
Content Tracker gathers information about content item usage from Web filter log
files, the Oracle Content Server database, and other external applications such as
portals and Web sites. Content item access data includes dates, times, content IDs,
current metadata, user names, and profile information about users.
■ Oracle Content Server services:
Content Tracker tracks all services that return content and services that handle
search requests. And, with a simple configuration change, Content Tracker can
monitor literally any Oracle Content Server service, even custom services.
4.12.2 About Content Tracker Reports
After Content Tracker extracts data and populates applicable database repository
tables, the information is available for report generation. Content Tracker Reports
enables you to do these tasks:
■ Generate reports:
Content Tracker Reports queries the tables created by Content Tracker and
generates summary reports of various kinds of activities and the usage history of
particular content items. The reports help you analyze specific groups of content
or users based on metadata, file extensions, or user profiles. You can use the
pre-defined reports that are provided, customize them to suit your installation, or
use a compatible third-party reporting package.
■ Optimize content management practices.
You can also use the reported data for content retention management. That is,
depending on the access frequency of particular content items during specific time
intervals, you may decide to archive or delete some items. Similarly, applications
can use the data to provide portlets with the top content for particular types of
users.
This section covers the following topics:
■ Section 4.12.2.1, "Content Access Reports"
■ Section 4.12.2.2, "Content Dashboard Feature"
■ Section 4.12.2.3, "Drill Down Report Feature"

Content Data Tracking and Reporting
Finding Content Items 4-29
4.12.2.1 Content Access Reports
Each report produced using the Content Tracker Report Generator main page has the
same general format and visual layout. Only users that actually request and open
content items are included in the Content Tracker Report Generator's compiled results.
The opened content item can be the web location file (the absolute path to the content
item), an HTML version (by using Dynamic Converter), or the actual native file. Users
that open only the Content Information page are not included in the tracked data.
There is generally a one-day delay from the time that a user accesses a content item
until the Content Tracker Report Generator's access history includes the information.
For more information, see Section A.12, "Content Tracker Interface."
4.12.2.2 Content Dashboard Feature
When a generated query report contains an active link to a specific content item, click
the link to display the corresponding Content Dashboard. The content dashboard in
the following screen capture shows that one version of a particular content item was
accessed three times by one user. In this view, the revision access results are shown
together.
4.12.2.3 Drill Down Report Feature
There are various levels of report results that are generated for each predefined report.
Depending on the search criteria you enter on the Content Tracker Report Generator
main page, the results are filtered accordingly. The top level reports are summary
reports and provide very general information. You can use the links on the top level
reports to drill down to more specific information.

Content Data Tracking and Reporting
4-30 Oracle Fusion Middleware User's Guide for Oracle Content Server

5
Working with Files 5-1
5Working with Files
This chapter describes how to work with files in Oracle Content Server, in the
following topics:
■ Section 5.1, "Understanding the Lifecycle of a File"
■ Section 5.2, "Viewing Content Information"
■ Section 5.3, "Working with File Revisions"
■ Section 5.4, "Content Item Metadata"
■ Section 5.5, "Viewing a File"
■ Section 5.6, "Discussing Content"
■ Section 5.7, "Subscribing to New Revisions of a Content Item"
5.1 Understanding the Lifecycle of a File
This section covers the following topics:
■ Section 5.1.1, "Revision Lifecycle"
■ Section 5.1.2, "Revision Status"
■ Section 5.1.3, "Determining the Revision Status"
5.1.1 Revision Lifecycle
This section describes the process that a file goes through to become a content item
revision in Oracle Content Server. The same process occurs when you check in a new
file and when you check in a revision to an existing content item.
1. The contributor logs in to Oracle Content Server through a web browser and
displays a check-in window. This user is typically be the author of the content
item.
2. The author specifies the file name, enters information about the file (metadata),
and designates security information (security group and account, if enabled).
3. Upon check-in, the native file repository stores a copy of the native file, and the
content information database stores the file’s metadata.
Note: For information on the status of a file at each step in the
process, see Section 5.1.2, "Revision Status."

Understanding the Lifecycle of a File
5-2 Oracle Fusion Middleware User's Guide for Oracle Content Server
4.
If a conversion product is set up for the specified file format, it converts the file to
a web-viewable format (for example, PDF). If the file cannot be converted, it is
"passed through" as is (that is, unconverted).
5. If the file is converted, the web-viewable file repository stores the converted file. If
the file passes through in unconverted form, the web-viewable file repository
stores a copy of the native file.
6. If the file’s metadata meets the criteria for an enabled workflow, it goes through
the workflow process.
7. The file contents or its metadata only are indexed in the web-viewable file
repository when the file meets all of the following criteria:
■ The file converts successfully or passes through
■ The file is approved at all steps of a workflow (if any)
■ The file reaches its release date
8. On the content item’s release date, the file becomes available in the content server.
■ You can find the content item by browsing through the defined hierarchical
link structure (the "Library"), or by searching for metadata or specific text.
■ When users view the content item, they can retrieve the web-viewable file, the
native file, the metadata, or any combination of these.
Figure 5–1 Revision Lifecycle

Viewing Content Information
Working with Files 5-3
5.1.2 Revision Status
A content item revision goes through several statuses within its lifecycle.
5.1.3 Determining the Revision Status
Use the following procedure to determine the status of a content item:
1. Click the Content Management tray in the Portal Navigation Bar.
2. Click Work In Progress.
The Work In Progress Page opens
3. If the content item you are looking for is listed, the status is shown next to the
content ID.
4. If the content item you are looking for is not listed, it could be released (that is,
have the Released status) or it could be in a workflow. Display the Content
Information Page for the content item. The revision status is shown in the Status
field.
5.2 Viewing Content Information
Use the content information page to view metadata and other information about a
specific content item.
Use any of the following procedures to view the Content Information Page for a
content item:
■ From the Search Results Page, click the Info icon to view the Content Information
page for that file.
■ From the Search Results Page, click the Actions icon in the Actions column to open
a contextual menu, and choose Content Information.
■ From the Check-In Confirmation Page, click the Content Info link to view the
Content Information Page for the file you just checked in.
Status Description
Waiting The file has a revision in the system but has not been sent for
conversion.
GenWWW The file is being converted to web-viewable format or is being
indexed, or has failed conversion or indexing.
Done The file is waiting to be released on its specified release date.
Released The revision is available in the content server.
Review The revision is in a workflow and is being reviewed.
Edit The revision is at the initial contribution step of a workflow.
Pending The revision is in a basic workflow and is waiting for approval
of all revisions in the workflow.
Expired The revision is no longer available for viewing in the content
server. (The revision was not deleted, but it can be accessed
only by an administrator.)
Deleted The revision has been deleted and is waiting to be completely
removed from the content server during the next indexing
cycle.

Working with File Revisions
5-4 Oracle Fusion Middleware User's Guide for Oracle Content Server
5.3 Working with File Revisions
Each time you check out a file and check it back in, Oracle Content Server creates a
new revision of that file. The new revision has the same content ID as the previous
revision, but the native file and the metadata can be the same or different. The system
stores the previous versions of a file, so you can review them as necessary.
This section covers the following topics:
■ Section 5.3.1, "Viewing the Revision History"
■ Section 5.3.2, "Deleting Revisions"
5.3.1 Viewing the Revision History
Use the following procedure to view the revision history for a content item:
■ From the Content Information Page for a content item, scroll to the bottom of the
page to view the Revision History.
5.3.2 Deleting Revisions
Use the following procedure to delete a revision from the content server:
1. Display the Content Information Page for the content item.
2. In the Revision History section, click the Delete button for the revision you want
to delete.
You are asked to confirm the deletion.
3. Click OK to delete the revision.
The revision is unavailable in the content server immediately, and is permanently
deleted from the system during the next indexing cycle.
5.4 Content Item Metadata
This section covers the following topics:
■ Section 5.4.1, "Updating Metadata"
■ Section 5.4.2, "Recategorizing Metadata"
5.4.1 Updating Metadata
There are two ways to change the metadata of an existing content item:
■ Change the metadata while checking in a revision to the file. For details, see
Section 6.4.3, "Checking In a Revised File."
■ Update the metadata without creating a new content item revision. For details, see
Section 5.4.1, "Updating Metadata."
Note: You must have delete permission for the content item to delete
a revision.

Viewing a File
Working with Files 5-5
Use the following procedure to update content item metadata:
1. Display the Content Information Page for the revision you want to update.
2. Choose Update from the Content Actions menu.
The Info Update Form opens.
3. Change the metadata fields as necessary.
4. Click Submit Update.
5.4.2 Recategorizing Metadata
When enabled, use the Content Categorizer component to suggest metadata values for
documents being checked into Oracle Content Server, and to recategorize the
metadata of documents that are in Oracle Content Server. The metadata values are
determined according to search rules provided by the system administrator.
To categorize or recategorize documents, Content Categorizer can operate in
Interactive mode. In this mode, Content Categorizer is integrated with the Content
Check In form in Oracle Content Server. Users click the Categorize button on either
form to run Content Categorizer on a single content item. Any value that Content
Categorizer returns is a suggested value, because the contributor can edit or replace
the returned value.
5.5 Viewing a File
This section covers the following topics:
■ Section 5.5.1, "About Viewing a File"
■ Section 5.5.2, "Viewing a Web-Viewable File"
■ Section 5.5.3, "Viewing a Native File"
5.5.1 About Viewing a File
After you find a file, you can view it in several ways, depending on the original file
format, the conversion setup for your system, and the configuration of your web
browser. You may be able to view a web-viewable HTML rendition of the file in the
web browser, with a helper application, with a plug-in, or in its native application.
Depending on your access permissions, you may also be able to open or get a copy of
the native file.
5.5.2 Viewing a Web-Viewable File
To view the web-viewable rendition of a file, you must have the appropriate helper
application or web browser plug-in installed. For example, to view the PDF version of
a file, you must have the Adobe Acrobat plug-in.
Note: You cannot change the content ID or the release date. You can
change the author only if you have Admin permission for the content
item.
Note: The Reset button returns the fields to their original values.

Discussing Content
5-6 Oracle Fusion Middleware User's Guide for Oracle Content Server
You can view a web-viewable file as follows:
■ From a Content Information Page, click the Web Location link.
■ From a Search Results Page, click the Content ID link in the ID column (Headline
view) or Description column (Classic View), or the thumbnail (Classic and
Thumbnail views).
If a web-viewable file does not exist, or you do not have the correct helper application
or plug-in installed, you are prompted to either save the file or open it in its native
application. For details, see Section 5.5.3, "Viewing a Native File."
5.5.3 Viewing a Native File
When you view the native file of a content item, you are prompted to either save a
copy of the file or open it in its native application. If you choose to open the file, you
are actually opening a copy of the native file that is stored in a temporary location on
your hard drive. You are not opening the native file that is stored in the content server
repository.
You can access a native file as follows:
■ From a Content Information Page, click the Native File link.
■ From a Check-Out Confirmation Page, click the Download native file button.
■ From a Workflow Review Notification Message, click the Review workflow item
link to open the Workflow Review page, and then click the Native File link under
Renditions.
5.6 Discussing Content
Oracle Content Server comes with the ThreadedDiscussions component. If enabled, it
allows contributors to create a discussion associated with a content item, where you
can post questions and comments about the content item throughout multiple
revisions. This component must be installed and enabled by your system administer
for this functionality to be available.
This section covers the following topics:
■ Section 5.6.1, "About Discussion Posts and Threads"
■ Section 5.6.2, "Initiating a Discussion from the Content Information Page"
■ Section 5.6.3, "Initiating a Discussion from the Search Results Page"
■ Section 5.6.4, "Initiating a Discussion from the Workflow Review Page"
■ Section 5.6.5, "Viewing a Threaded Discussion"
■ Section 5.6.6, "Replying to a Posting"
■ Section 5.6.7, "Printing a Threaded Discussion"
■ Section 5.6.8, "Deleting a Threaded Discussion"
■ Section 5.6.9, "Searching with the Discussion Type Field"

Discussing Content
Working with Files 5-7
5.6.1 About Discussion Posts and Threads
Threaded discussions enable users to track thoughts, record how and why changes
were made to content, and make notes when content is in a workflow. Because
threaded discussion posts follow content through multiple revisions and refer to the
revision for which the comment was made, threaded discussions help contributors
keep track of enhancement requests or other recommendations for future changes to
the content. Each discussion post conveniently lists the revision number of the content
to which it refers, so you do not have to view the content information of previous
revisions to post to a discussion item.
Unlike other content items in the content server, edits to a discussion do not create
new revisions of the discussion content itself. Instead, the .hscp form that contains the
discussion is modified. When you begin a discussion thread about a content item, an
.hscp form for the discussion is created, given the same ID as the content with _d
appended to the end, associated with the content item, and automatically checked into
Oracle Content Server. The Revision History for discussion content is always Revision
1. The revision number does not increment for discussion content. The number of the
post represents the chronological order in which the comments were posted.
In Figure 5–2, each top-level post represents a thread. Posting number one (#1) and
posting number two (#2) are threads. The reply (#3) to thread number two represents a
post within a thread.
Figure 5–2 Threads and Posts
Figure 5–3 shows posts #1, #2, #3 and #4. The reply to "Change to Introduction (#1),"
"RE: Change to Introduction (#3)" was made after "Change to Conclusion (#2)."

Discussing Content
5-8 Oracle Fusion Middleware User's Guide for Oracle Content Server
Figure 5–3 Posting Order
5.6.2 Initiating a Discussion from the Content Information Page
To initiate a discussion from the content information page of a content item you are
checking in, perform the following steps:
1. From the main menu, choose New Check In. The Content Check-In Form opens.
2. Check in the content item with the associated criteria. On the Check-In
Confirmation Page, click the Content Info link. The Content Information Page
opens.
3. In the Links area, click the Create Discussion link. The Post Comment Form
opens.
4. Enter a subject for the posting in the Subject box.
5. Enter your discussion in the comment text box.
6. Click New Post. The Post Comment Form (Brief Content Info page) displays the
new post.
Note: If you have a content item that has a document name that is
within 1 of the database storage maximum, which is 30 by default,
you cannot create a threaded discussion for it.

Discussing Content
Working with Files 5-9
5.6.3 Initiating a Discussion from the Search Results Page
You must be using a search results view that provides access to the Content Actions
menu, such as the Headline or Thumbnail views. If you are using the thumbnail view,
then you can click the discussion icon to access the discussion.
To initiate or enter a discussion in progress from the Search Results page, perform the
following steps:
1. From the main menu, choose Search. The Advanced Search Page opens.
2. Enter any search metadata fields to narrow your search, and click Search. For
example, selecting Discussion Type=Not applicable prevents your search results
from displaying content items that are discussions. Your search results are
displayed.
3. In the Content Actions menu for the content you want to discuss, click the Create
Discussion link in the popup menu. The Post Comment Form opens.
4. Enter a subject for the posting in the Subject box.
5. Enter your discussion in the comment text box.
6. Click New Post. The Post Comment Form (Brief Content Info page) displays the
new post.
5.6.4 Initiating a Discussion from the Workflow Review Page
Use this procedure to initiate a discussion on a piece of content in your workflow. You
initiate the discussion from the Workflow Review page.
To initiate a discussion about a workflow document:
1. Open your My Oracle Content Server Tray and click the My Workflow
Assignments link. The Workflow in Queue Page opens.
2. In the Actions column, click the Workflow Review icon. The Workflow Review
Page opens.
3. In the Links list, click the Create Discussion link. The Post Comment Form opens.
4. Enter a subject for the posting in the Subject box.
5. Enter your discussion in the comment text box.
6. Click New Post. The Post Comment Form (Brief Content Info page) displays the
new post.
5.6.5 Viewing a Threaded Discussion
Users with read permissions can view the messages within a threaded discussion, but
only those who can edit the content can post messages. You can access an existing
discussion from the following links:
■ The ID of the content item to discuss link on the Content Information Page
■ The Discuss This Item link on the Workflow Review Page or Search Results Page
■ The Web Location link on the Discussion Info Page
■ The Content ID link of a discussion on the Search Results Page
The Discussion link indicates how many discussion posts have been created for the
document. The Discussion Count custom information field generates the number of
items.

Discussing Content
5-10 Oracle Fusion Middleware User's Guide for Oracle Content Server
To view a discussion thread, perform the following steps:
1. Click Search from the navigation bar. The Advanced Search page opens.
2. Search for the content for which you want to view the discussion. In the
Discussion Type field, select N/A. Click Search. The search results are displayed.
3. In the row for the content you want to view, click the Content Info link or icon.
The Content Information Page opens.
4. In the Links area, click the Go to Discussion link to go to the discussion. The Brief
Content Info screen opens.
5.6.6 Replying to a Posting
Use this procedure to reply to a post in a threaded discussion. When you respond to a
post, a new post is created directly underneath the selected post to which you are
replying.
To reply to a post, perform the following steps:
1. Click Search from the navigation bar. The Advanced Search Page opens.
2. Search for the content you want to discuss in a thread. In the Discussion Type
field, select N/A. Click Search.
3. Click the Content Info link or icon. The Content Information Page with Discussion
Field opens.
4. In the Links area, click the Go to Discussion link to go to the discussion. The Brief
Content Info screen opens.
5. In the posting thread you want to participate in, click the Reply To This link.
6. Enter your reply in the comments text box, and click Post Reply. Your posting is
added to the discussion.
5.6.7 Printing a Threaded Discussion
Use this procedure to print a threaded discussion.
1. Click Search from the navigation bar. The Advanced Search Page opens.
2. Search for the discussion thread. In the Discussion Type field, select Single
Content, and click Search. The Search Results Page opens.
3. In the ID column of the Search Results, click the ID of the discussion thread. The
ID should have an underscore d (_d) suffix. The discussion thread opens.
4. Click the Print View option. The discussion opens in a print view in another
browser window.
5. Click the Printer icon.

Discussing Content
Working with Files 5-11
5.6.8 Deleting a Threaded Discussion
Use this procedure to delete a threaded discussion. You must have delete permission
for the content to delete the discussion.
To delete a discussion:
1. In the Search results page, click the Content Item info link for the discussion you
want to delete. The Discussion Info Page opens.
2. Click OK. A message indicates the revision has been successfully deleted from
Oracle Content Server.
5.6.9 Searching with the Discussion Type Field
You can use the Discussion Type metadata field to narrow your search criteria when
searching documents. The Discussion Type search field enables you to refine a search
for content associated with discussions. The discussion type options are:
■ N/A: A search applies to all documents including those without associated
discussions. A search returns content both with and without a discussion, but does
not return any content that is a discussion itself. That is, content IDs with an
underscore "_d" are excluded from the search.
■ Single Content: A search applies to documents that have a discussion focused on
a single content item. A search using this option returns the discussion content
itself (it returns only content that is a discussion). Only content IDs with an
underscore "_d" are included in the search results.
5.6.9.1 Searching for Content That Is a Discussion
Use this procedure to search only for content that is a discussion associated with a
single content item. The content results are the discussions themselves. The discussion
thread content has a content ID with the underscore _d suffix.
To search for content that is a discussion:
1. On the search page, select Single Content in the Discussion Type field.
2. Click Search. The results include only discussion content.
5.6.9.2 Searching for Content That Is Not a Discussion
Use this procedure to search for content that may or may not have a discussion
associated with it. This search does not return any discussion content; that is, any
content with a "_d" suffix in the Content ID.
To search for content that is not a discussion:
1. On the search page, select N/A in the Discussion Type field.
2. Click Search. The results contain content with or without associated discussions,
but do not include content that actually is a discussion.
Note: If you do not select any criteria for Discussion Type, all
content with or without discussions are displayed, including the
discussion content itself.

Subscribing to New Revisions of a Content Item
5-12 Oracle Fusion Middleware User's Guide for Oracle Content Server
5.7 Subscribing to New Revisions of a Content Item
This section covers the following topics:
■ Section 5.7.1, "About Subscriptions"
■ Section 5.7.2, "Subscribing to a Content Item"
■ Section 5.7.3, "Viewing Your Current Subscriptions"
■ Section 5.7.4, "Unsubscribing from a Content Item"
■ Section 5.7.5, "Unsubscribing from a Criteria Group"
5.7.1 About Subscriptions
Subscriptions notify you automatically whenever a content item is revised. There are
two types of subscriptions:
■ File subscription: Users manually subscribe to individual content items.
■ Criteria subscription: The system administrator sets up a subscription based on
one or more metadata fields. When a user subscribes to the Criteria subscription,
they are automatically subscribed to all content items that match a particular value
of those metadata fields.
For example, the system administrator sets up a criteria subscription with Author
values as the criteria. Whenever you view a Content Information Page, you can
choose to subscribe to all content items checked in by the author of the current
content item.
The system administrator can subscribe users to specific content items or to criteria
subscriptions, but users have the ability to cancel these subscriptions.
5.7.2 Subscribing to a Content Item
Use the following procedure to subscribe to a content item:
1. Display the Content Information Page for the content item to subscribe to.
2. Choose Subscribe from the Content Actions menu. If the item is part of a criteria
group, the Subscribe To "Item" Page opens.
3. Click Subscribe under the Subscribe To This Item section.
4. If no e-mail address has been specified in your User Profile Page, you are
prompted to enter an e-mail address for this subscription. Enter an e-mail address,
and click OK.
5.7.3 Viewing Your Current Subscriptions
Use the following procedure to view your current subscriptions:
■ Open the My Oracle Content Server Tray, and click My Subscriptions.
The Subscriptions Page opens, listing all of your current subscriptions.

Subscribing to New Revisions of a Content Item
Working with Files 5-13
5.7.4 Unsubscribing from a Content Item
Use the following procedure to unsubscribe from a file:
1. Open the My Oracle Content Server Tray, and click My Subscriptions.
The Subscriptions Page opens, listing all of your current subscriptions.
2. Choose Unsubscribe from the Actions menu under Subscription Items.
5.7.5 Unsubscribing from a Criteria Group
Use the following procedure to unsubscribe from a file:
1. Open the My Oracle Content Server Tray, and click My Subscriptions.
The Subscriptions Page opens, listing all of your current subscriptions.
2. Choose Unsubscribe from the Actions contextual menu under Subscription
Groups.

Subscribing to New Revisions of a Content Item
5-14 Oracle Fusion Middleware User's Guide for Oracle Content Server

6
Checking In Files 6-1
6Checking In Files
This chapter describes how to check in files to Oracle Content Server, in the following
topics:
■ Section 6.1, "About Manual File Check-In"
■ Section 6.2, "Primary and Alternate Files"
■ Section 6.3, "Watermarks and File Check-In"
■ Section 6.4, "Checking In Single Files"
■ Section 6.5, "Checking In Multiple Files"
■ Section 6.6, "Important Considerations"
6.1 About Manual File Check-In
Manual File Check-in is the process of submitting a file to the content server repository.
You must have the correct permission to check a file into the content server. The
system administrator assigns permissions to users. During the check-in process, you
specify metadata for your file so that the content item can be found by drilling down
or by searching. You can check in files and have metadata automatically applied
through your desktop application by using Desktop Integration Suite. For more
information, see "Setting Metadata To Be Remembered for Form-Based Check-ins" in
Oracle Fusion Middleware User's Guide for Desktop Integration Suite.
6.2 Primary and Alternate Files
When you check in a file, the native file is the primary file. You have the option to also
specify an alternate file, such as the following:
■ A web-viewable version of the native file: This is typically used when the native
file cannot be converted by the content server, or you want to convert the native
file manually.
■ A file in a format that can be converted to a web-viewable file: This is typically
used when the native file cannot be converted by the content server, and you have
an alternate file format that can be converted by the system (such as PostScript).
Important: It is extremely important to know your organization’s
standards before you enter the metadata. The metadata helps users
find the content item and determines where the content server stores
the file.

Watermarks and File Check-In
6-2 Oracle Fusion Middleware User's Guide for Oracle Content Server
■ A file explaining what the native file contains: Typical uses include providing a
text file that describes the contents of a compressed file (such as a ZIP file) and
supplying documentation for an executable file.
For example, if you are checking in a Word document that has several graphics, you
could compress the Word file and all the original graphics into a ZIP file and then
check in that ZIP file as the primary file. As the alternate file, you could specify the
Word document itself (which could be converted to PDF by the Oracle Content
Server), a text file that describes the contents of the ZIP file, or a PDF file that you
created manually.
6.3 Watermarks and File Check-In
This section covers the following topics:
■ Section 6.3.1, "About PDF Watermark"
■ Section 6.3.2, "Watermark Templates"
■ Section 6.3.3, "Content Check-In Form"
6.3.1 About PDF Watermark
PDF Watermark is an optional component that is automatically installed with Oracle
Content Server. If enabled, this component allows watermarks to be applied to PDF
files generated by the PDFConverter component of Oracle Inbound Refinery (Oracle
IBR), or to native PDF content in the weblayout directory.
There are two types of watermarks: Static and Dynamic. A PDF file receives a static
watermark during content check-in as a follow-on step to the Oracle IBR conversion.
Only documents that Oracle IBR converts to PDF can receive a static watermark. After
a document receives a watermark, all viewers of the document see the same
watermark.
Dynamic watermarks are generated as needed when a user requests the document for
viewing or downloading and can contain variable information (for example, the user
name, date, and time of download). System administrators define rules and set up
specific conditions for determining which requested content gets a dynamic
watermark. Different users may see the same content with different watermarks.
6.3.2 Watermark Templates
A special kind of template determines the appearance of a watermark that gets applied
to a PDF document. A watermark template defines the text fields and images used for
the watermark and to which pages each field and image can be applied. The template
may also enforce certain security measures, such as requiring a password for viewing
or printing the watermarked content. The system administrator creates and manages
watermark templates.
Note: The file extension of the alternate file (after the period) cannot
be the same as that of the primary file (for example, both files cannot
end in .doc)

Checking In Single Files
Checking In Files 6-3
6.3.3 Content Check-In Form
When you check in certain document formats to the system, they may be
automatically converted to PDF for viewing on the web. In such cases, you may be
allowed to specify a template used to apply the static watermark.
To request that a document receive a static watermark, enter the content ID of the
template to be used. Your system administrator provides you with a list of templates
that are available and appropriate for your use.
6.4 Checking In Single Files
This section covers the following topics:
■ Section 6.4.1, "Checking In a New File"
■ Section 6.4.2, "Checking In a Similar File"
■ Section 6.4.3, "Checking In a Revised File"
6.4.1 Checking In a New File
Use the following procedure to check in a new file:
1. Click the New Check In link.
2. The Content Check-In Form opens.
3. If applicable, enter a unique name in the Content ID field. Content ID values are
generated automatically by the content server if your system administrator has
enabled this feature. However, you can override an automatically generated
content ID by entering a new value.
4. From the Type list, select the option that best describes the file.
5. Enter a descriptive title in the Title field. The title you enter must be 249 or fewer
characters in length.
6. From the Security Group list, select the security group for the content item. Keep
in mind that this content item is available to users who have permission to the
specified security group.
7. If accounts are enabled for your system, select an option from the Account list, or
enter a new account name. Keep in mind that this content item is available to users
who have permission to the specified account.
8. Specify a primary file in one of two ways:
■ Click Browse next to the Primary File field. Navigate to and select the native
file, then click Open.
■ Enter the complete path name and file name of the native file in the Primary
File field (for example, c:/My Documents/ABC Project/MyFile.doc).
Note: If your content server uses an Oracle database, all content IDs
are converted to uppercase letters automatically.

Checking In Single Files
6-4 Oracle Fusion Middleware User's Guide for Oracle Content Server
9. If the Format field is displayed under the Primary File field, select the conversion
format for the file.
■ If you selected the Use Default option, Oracle Content Server converts the file
format based on its file name extension.
■ If selected any other option, Oracle Content Server ignores the file extension
and uses the selected format to determine how to convert the file.
10. (Optional) Specify an alternate file by browsing or entering the path name and file
name.
■ The alternate file must have a different file extension than the primary file.
■ The alternate file is typically in a web-viewable format or a format that can be
converted to a web-viewable file, such as .pdf, .txt, .doc, and so on.
11. If the Format field is displayed under the Alternate File field and you specified an
alternate file, select a conversion format for the file.
■ If you selected the Use Default option, Oracle Content Server converts the file
format based on its file name extension.
■ If you selected any other option, Oracle Content Server ignores the file
extension and uses the selected format to determine how to convert the file.
12. Accept the default revision in the Revision field. (You should change the revision
only if there is a specific reason to do so.)
13. Enter any notes about the file in the Comments field.
14. Use the default release date, or enter a future release date in the Release Date field.
15. If you want the file to be unavailable in the content server on a particular date,
enter a date in the Expiration Date field.
16. If applicable, fill in any of your organization’s custom metadata fields.
17. After you enter all the appropriate metadata values, click Check In.
Upon successful check-in, the Check-In Confirmation Page opens.
Tip: You can check in a metadata placeholder without specifying a
primary file by entering an invalid path in the Primary File field. For
example, entering the word placeholder into the Primary File
field creates a content item within Oracle Content Server with the
specified metadata, but no indexed primary file. This can be useful for
initiating workflows or making metadata available for searching and
discussion.
Note: If you are checking in a placeholder using Internet Explorer
version 6.0 on the Windows XP operating system with Service Pack 2
installed, the path used in the Primary File field must be valid, but
end with an invalid file. In the following example, c:/ is a valid
drive, but placeholder is not a valid file:
c:/placeholder
If you do not specify a valid drive, an error message is displayed.

Checking In Multiple Files
Checking In Files 6-5
6.4.2 Checking In a Similar File
If you have a new file to check in that has similar metadata to an existing content item,
you can use an existing content item as a model for the new file. The system then
pre-fills metadata fields in the content check-in form with values from the "model"
content item.
Use the following procedure to check in a similar file:
1. From the Check-In Confirmation Page or the Content Information Page of the
existing content item, click Check In Similar.
The Content Check-In Form opens. Most of the metadata fields display the same
values as those assigned to the existing content item.
2. Continue with Step 3 of the procedure for Checking In a New File, changing or
adding metadata values and member permissions as necessary.
6.4.3 Checking In a Revised File
Use the following procedure to check in a revised file:
1. Click the My Content Server tray.
2. Click My Checked-Out Content.
The Checked-Out Content for user Page opens.
3. Click the Actions icon for the appropriate content item to display a contextual
menu, and choose Check In. You can now check in the revised file. For details, see
Section 6.4.1, "Checking In a New File."
Please note the following considerations:
■ The content ID that was assigned to the original file cannot be changed.
■ The name of the original file is displayed for reference; however, the revised file
that you are checking is not required to have the same name.
■ The revision has been incremented by one.
6.5 Checking In Multiple Files
This section covers the following topics:
■ Section 6.5.1, "About Multiple File Check-In"
■ Section 6.5.2, "Upload Applet Requirements"
■ Section 6.5.3, "Checking In Multiple Files Using Upload"
Note: Depending on the type of file you checked in and how your
system is configured, it may take a few minutes for the file to be
converted and indexed before it is available through a search or by
drilling down.

Checking In Multiple Files
6-6 Oracle Fusion Middleware User's Guide for Oracle Content Server
6.5.1 About Multiple File Check-In
You can check in multiple files as a compressed ZIP file that is stored as a single
content item. Checking in multiple files is useful for a variety of situations, including:
■ Publishing software, such as FrameMaker: You can check in an entire book that
contains multiple chapters.
■ Page layout software, such as QuarkXpress: You can check in the Quark file and all
its supporting files (fonts, pictures, and so on).
■ CAD software, such as Solidworks: You can check in an assembly made of several
files.
■ Related files: You can check in a group of related files, such as a set of JPG files for
a Web site.
There are two ways to check in multiple files:
■ Create a compressed ZIP file outside of Oracle Content Server, using a compression
program such as WinZip or PKZIP, then check in this ZIP file as a single file. For
details, refer to Section 6.4.1, "Checking In a New File."
■ Create a compressed ZIP file within Oracle Content Server by selecting the Upload
Multiple Files check box in the Content Check-In Form. Checking in multiple files
using this method is possible if all of the following conditions are true:
– The system administrator has enabled the upload applet on the content server.
– You select the Enable upload applet check box in your User Profile Page.
– You are using a web browser that runs Java.
For details, see Section 6.5.3, "Checking In Multiple Files Using Upload."
6.5.2 Upload Applet Requirements
You can use the upload applet to check in multiple files only if the following
conditions are all true:
■ The system administrator has enabled the upload applet on the content server.
■ You selected the Enable upload applet check box in your User Profile Page.
■ You are using a web browser that runs Java.
The upload applet requires permission to access the local drive. When you access the
Content Check-In Form for the first time after enabling this applet, you may see a Java
security warning:
■ If your system is using the Sun Java plug-in, when you encounter this message
box, click Run. If you do not want to be prompted again with this message box,
select Always trust content from this publisher, then click Run.
■ If your system is using the Microsoft plug-in for Internet Explorer, click Yes to give
full permissions. If you do not want to be prompted again with this message box,
select Always trust software from Oracle, click Yes.

Checking In Multiple Files
Checking In Files 6-7
6.5.3 Checking In Multiple Files Using Upload
Use the following procedure to check in multiple files as a single content item in a
compressed ZIP format using the upload applet:
1. Enable the upload applet in your user profile. For details, refer to Section 3.7.2,
"Editing Your User Profile."
2. Follow the general procedure for Checking In a New File, Checking In a Similar
File, or Checking In a Revised File.
3. Before specifying the primary file or alternate file, select the corresponding
Upload Multiple Files check box.
4. Click the corresponding Browse button.
The Upload Files Window opens.
5. (Optional) Change the default Zip Name value to a more descriptive file name.
Include the .zip extension.
6. Select the files to be checked in.
Use the following procedure to select files one at a time:
a. Click Select File.
The Select File Window opens.
b. Navigate to the file to add, and click Open.
The Files to Upload list displays the file.
c. Repeat the previous two steps as necessary to select individual files.
Use the following procedure to select multiple files at a time:
a. Click Select Multiple.
The Select Files Window opens.
b. To select the drive where the files are located, click Change Drive, select the
drive on the Change Drive Window, and click OK.
c. Navigate to the directory or files to add. The Subdirectories list shows the
contents of the directory where you are currently located. To navigate to the
parent directory, double-click the ".." entry in the Subdirectories list.
d. To select multiple files in the Files list:
– To select noncontiguous files, hold down the Ctrl key, and click each file
name.
– To select contiguous files, hold down the Shift key and click the first and
last file names.
e. To narrow the selection of files, use the File Filter field. For example, the filter
*.doc selects all files with a .doc extension.
Note: You can also check in multiple files by creating a compressed
ZIP file outside of Oracle Content Server using a compression program
such as WinZip or PKZIP, and then checking in the ZIP file as a single
file. For details, see Section 6.4.1, "Checking In a New File."

Important Considerations
6-8 Oracle Fusion Middleware User's Guide for Oracle Content Server
f.
To select all files in all subdirectories of the current directory, select the
Recurse through subdirectories check box.
g. To store path information (from the parent folder) with the files you are
adding, select the Include parent folder in file path check box.
h. Click the button appropriate to your selection: Add Selected or Add with
Filter.
i. The selected files are displayed in the Files to Upload list.
j. Repeat these steps as necessary to add files from other directories or drives.
7. Verify that the correct files are shown in the Files to Upload list, and click OK.
The ZIP file name appears in the Primary File or Alternate File field.
8. Follow the general check-in procedure to complete the check-in. For details, see
Section 6.4.1, "Checking In a New File."
If the chunking function is enabled, the Upload Message Screen displays a
progress bar during upload.
6.6 Important Considerations
This section covers the following topics:
■ Section 6.6.1, "Multibyte Characters"
■ Section 6.6.2, "Content Profiles"
6.6.1 Multibyte Characters
You should not use multibyte characters (for example, Japanese or Korean) in content
IDs and content types, even if Oracle Content Server is to be used in a multibyte
environment. The values of these fields are included in the URLs of content items, and
limitations in current web technology prevent web servers and browsers from
handling URLs with multibyte characters correctly.
To use multibyte characters in content IDs, content types, or both, you must ask your
content server system administrator if the entire content server environment (all
servers and all clients) runs on operating systems that support multibyte languages
(for example, Japanese or Korean versions of Microsoft Windows). Otherwise, errors
may occur, such as links to PDF renditions of content items not working or Dynamic
Converter failing to find content items.
6.6.2 Content Profiles
Content profiles, defined by your system administrator, determine what metadata
fields are displayed and how they are grouped and titled on the associated check in,
search, and information pages, based on rules established by the system administrator.
By default, all content profiles are displayed as links under both the Search and New
Check In lists on the Toolbar.

Important Considerations
Checking In Files 6-9
Figure 6–1 Content Profile Links Under the Search and New Check In Lists on the
Toolbar
If you access a search or check-in page using a content profile link, you may not have
access to all available metadata fields, either for searching or use when checking in a
content item. Also, if you access the Content Information Page of a content item that
meets criteria established by the system administrator, the initial information
displayed may not be the full information available.
Figure 6–2 Content Information Page Streamlined by Content Profiles

Important Considerations
6-10 Oracle Fusion Middleware User's Guide for Oracle Content Server

7
Checking Out Files 7-1
7Checking Out Files
This chapter describes how to check out files from Oracle Content Server, in the
following topics:
■ Section 7.1, "About Manual File Check-Out"
■ Section 7.2, "Checking Out Single Files"
■ Section 7.3, "Using Check Out and Open"
■ Section 7.4, "Checking Out Multiple Files"
7.1 About Manual File Check-Out
Check-out is the process of locking a content item so that no other users can revise it.
You must have write permission to the content item to check out a file or undo a
check-out. Only one user at a time can check out a file; however, multiple users can
continue to view the released file.
There are two approaches to checking out files manually:
■ For content items that could be revised by other users, it is a good idea to check
out the file as soon as you know that you must edit it. This prevents other users
from checking in a new revision with potentially conflicting changes.
■ For content items that are unlikely to be revised by other users, you can make
revisions to a copy of the file, check out the content item, and immediately check it
back in with the edited file.
After you have checked out a content item, you can either check in a revision or undo
the check-out.
You can check out files automatically through your desktop application by using
Desktop Integration Suite. For more information, see "Checking Out Content Files" in
Oracle Fusion Middleware User's Guide for Desktop Integration Suite.
7.2 Checking Out Single Files
Use either of the following procedures to check out a single file:
To check out single files from a Content Information page:
1. Display the Content Information Page of the content item you want to check out.
2. Choose Check Out from the Content Actions menu. The Check-Out Confirmation
Page opens.
3. If applicable, click Native File Link to get a copy of the native file.

Using Check Out and Open
7-2 Oracle Fusion Middleware User's Guide for Oracle Content Server
4.
If a dialog window opens before the Save As window, choose to save the file to
disk.
5. In the Save As dialog box, navigate to the location where you want to save the file,
and click Save.
6. Start the native application (for example, Word or PowerPoint) and locate the file
where you saved it in Step 5.
7. Edit the file in its native application and then save the file.
From a Search Results Page
To check out single files from a Search Results page:
1. Search for content to view a search results list.
2. Choose Headline View or Thumbnail View from the Content Actions menu.
3. Click the Actions icon, and choose Check Out from the contextual menu. The
Check-Out Confirmation Page opens.
4. If applicable, click Native File Link to get a copy of the native file.
5. If a dialog box opens before the Save As window, choose to save the file to disk.
6. On the Save As window, navigate to the location where you want to save the file,
and click Save.
7. Start the native application (for example, Word or PowerPoint), and locate the file
where you saved it in Step 6.
8. Edit the file in its native application, and then save the file.
7.3 Using Check Out and Open
With the Check Out and Open component, you can open content items from Oracle
Content Server directly in a WebDAV-compliant native application. The Check Out
and Open component is enabled by default and adds the Check Out and Open option
to the Item Actions menu on a search results page and to the Content Actions menu
on a Content Information page. Before using Check Out and Open, verify with your
system administrator what WebDAV-compliant applications are in use, and that the
content item you are checking out is associated with a compliant application.
This section covers the following topics:
■ Section 7.3.1, "About Checking Out and Opening Content"
■ Section 7.3.2, "Opening Content from Oracle Content Server"
7.3.1 About Checking Out and Opening Content
When you check out and open a content item, the content item opens in its native
application if the application is WebDAV-compliant (for example, Microsoft Word).
You can edit the content item and check it back into the content server using that
application. Each time you save the content item in the native application, a new
revision of the item is checked into the content server.

Using Check Out and Open
Checking Out Files 7-3
Figure 7–1 Check Out and Open Option on Search Results Page
Figure 7–2 Check Out and Open Option on Content Information Page
7.3.2 Opening Content from Oracle Content Server
Use either of the following procedures to check out a single file.
To open content from a Content Information page:
1. Display the Content Information Page of the content item you want to check out.
2. Choose Check Out and Open from the Content Actions menu. The content item
is checked out from Oracle Content Server transparently and opened in a
WebDAV compliant native application, such as Microsoft Word.
3. Edit the content item, save the changes and close the file. The content is checked in
to Oracle Content Server as a new revision.
Important: Pay close attention to the status of a content item you
attempt to check out using Check Out and Open, both in Oracle
Content Server and in the native application you are using to edit the
file. If you open the file and notice that the title bar designates the file
is Read Only, you are prompted to save the file as a new item on a
local file system.
A file is Read Only if it is in a workflow process. This does not prevent
you from opening the file for viewing or editing as a new item. This is
identical to the behavior of opening a file whose properties are set to
Read Only on a file system. You cannot open a content item if it is
checked out by another user.

Checking Out Multiple Files
7-4 Oracle Fusion Middleware User's Guide for Oracle Content Server
To open content from a Search Results page:
1. Search for content to view a search results list.
2. Choose Headline View or Thumbnail View from the Content Actions menu.
3. Click the Actions icon and choose Check Out and Open from the contextual
menu. The content item is checked out from Oracle Content Server transparently
and opened in a WebDAV compliant native application, such as Microsoft Word.
4. Edit the content item, save the changes and close the file. The content is checked in
to Oracle Content Server transparently as a new revision.
7.4 Checking Out Multiple Files
This section covers the following topics:
■ Section 7.4.1, "About Multiple File Check-Out"
■ Section 7.4.2, "Download Applet Requirements"
■ Section 7.4.3, "Download Options on Search Results Pages"
■ Section 7.4.4, "Downloading Multiple Files"
7.4.1 About Multiple File Check-Out
To get copies of multiple content items, use the download applet. When you
download files, you also have the option to check out the content items and
uncompress any compressed ZIP files.
7.4.2 Download Applet Requirements
You can use the download applet to check out multiple files only if the following
conditions are all true:
The system administrator has enabled the download applet on the content server.
■ You selected the Enable download applet check box in your User Profile Page.
■ You are using a Java-enabled web browser.
The download applet requires permission to access the local drive. When you run a
search for the first time after enabling this applet, you may see a Java security
warning:
■ If your system is using the Sun Java plug-in, when you encounter this message
box, click Run. If you do not want to be prompted again with this message box,
select Always trust content from this publisher, then click Run.
■ If your system is using the Microsoft plug-in for Internet Explorer, click Yes to give
full permissions. If you do not want to be prompted again with this message box,
select Always trust software from Oracle Incorporated, and click Yes.
Note: The Check Out and Open options are available in the Content
Actions menu of a content item’s current revision only.

Checking Out Multiple Files
Checking Out Files 7-5
7.4.3 Download Options on Search Results Pages
When the download applet is enabled, it adds the following features to search results
pages.
7.4.4 Downloading Multiple Files
Use the following procedure to download and check out multiple content items using
the download applet:
1. Locate the files to download by drilling down the hierarchical link structure (the
"Library") or by performing a search. For details, see Chapter 4, "Finding Content
Items."
The Download Files Screen opens.
2. To download all content items on the Search Results page, click Download All.
3. To download selected content items, select the corresponding Select check boxes,
and click Download Selected.
The Download Files Screen opens.
4. Select the type of file to download: Web Viewable or Native.
5. To uncompress ZIP files during the download process, select the Extract zip file
contents check box.
6. If you selected the Native option and you want to check out the content items
upon download, select the Check out file check box.
7. In the Download Location field, enter the path where you want the files to be
copied. You can click Browse and navigate to the directory to select it.
8. If you want a different file name for the downloaded file, change the file name in
the Download Location field. This applies only to the current file. If you click
Download All, all other files retain their default file names.
9. Click a button:
■ Download: to download the current file only.
■ Download All: to download all selected files that have not been skipped (you
are not be prompted for each file that was selected).
■ Skip: to not download the current file and go to the next selected file.
■ Cancel: to cancel the download.
10. If a file with the same file name exists in the target location, you are asked whether
you want to overwrite it. Click a button to indicate whether you want to overwrite
one or more files.
When downloading is complete, the Download Results Summary opens.
11. Click OK.
Element Description
Download This link downloads the selected content items.
Select All check box Selects all items in the search result list.
Select check boxes Selects content items to be downloaded when you click the
Download Selected button.

Checking Out Multiple Files
7-6 Oracle Fusion Middleware User's Guide for Oracle Content Server

8
Working with Workflows 8-1
8Working with Workflows
This chapter discusses using Oracle Content Server to work with workflows, in the
following topics:
■ Section 8.1, "About Workflows"
■ Section 8.2, "Participating in a Workflow"
■ Section 8.3, "Viewing Workflow Information"
8.1 About Workflows
A workflow specifies how to route content for review and approval before it is
released to the system. The workflow notifies users by e-mail when they have a file to
review.
This section covers the following topics:
■ Section 8.1.1, "Workflow Types"
■ Section 8.1.2, "Workflow Steps"
■ Section 8.1.3, "Postprocess Workflow Options"
■ Section 8.1.4, "Workflow Process"
■ Section 8.1.5, "Workflow Tasks"
8.1.1 Workflow Types
From a workflow participant’s point of view, there are two types of workflows:
■ A basic workflow defines the review process for specific content items, and must
be initiated manually.
■ In a criteria workflow, a file enters the workflow automatically upon check-in
when its metadata matches predefined criteria.
8.1.2 Workflow Steps
Each workflow can include multiple review and notification steps, and multiple
reviewers can be assigned to approve or reject the file at each step. For each step in a
workflow, a set of users and a step type must be defined. The users defined for a step
can perform only the tasks allowed for that step type.

About Workflows
8-2 Oracle Fusion Middleware User's Guide for Oracle Content Server
8.1.3 Postprocess Workflow Options
Workflows or individual workflow steps can be set up to allow for items in review to
be released into the system for indexing, searching, and viewing, even though the
workflow to which they belong is not completed. This allows for greater flexibility in
constructing workflows. For example, items in a workflow process can be made to be
available to others not in the workflow, or a workflow can be initiated to update the
content information of an item without advancing the revision of that item.
8.1.4 Workflow Process
The workflow process is as follows:
■ When the minimum number of reviewers for a particular step approves a revision,
the revision goes to the next step in the workflow.
■ If any reviewer rejects a revision, it goes back to the most recent contribution step
for editing.
■ When reviewers approve a revision in the last step in the workflow, the content
item is released to the system.
■ A basic workflow containing multiple content items can be set up so that some
items in the workflow may be released to the system before all of the revisions
have completed the workflow.
8.1.5 Workflow Tasks
These are the most common workflow tasks:
■ Section 8.2.1, "Entering a File to a Workflow"
■ Section 8.2.2, "Reviewing Revisions in a Workflow"
■ Section 8.2.3, "Working with a Rejected Revision"
Step Type Description
Contribution This is the initial step of a basic workflow. The workflow
defines who the contributors are.
Auto-Contribution This is the initial step of a criteria workflow. There are no
predefined users involved in this step.
Review Users can only approve or reject the file. Editing is not allowed.
Review/Edit Revision Users can edit the file if necessary and then approve or reject it,
maintaining an existing revision.
Review/New Revision Users can edit the file if necessary and then approve or reject it,
creating a new revision.
Note: Depending on how your system administrator has set up the
workflow, you may be required to enter your user name and
password before continuing the workflow process on one or more
steps. This re-authentication allows Oracle Content Server to track the
successful completion of a step and provides a digital signature of the
person responsible.

Participating in a Workflow
Working with Workflows 8-3
8.2 Participating in a Workflow
This section covers the following topics:
■ Section 8.2.1, "Entering a File to a Workflow"
■ Section 8.2.2, "Reviewing Revisions in a Workflow"
■ Section 8.2.3, "Working with a Rejected Revision"
8.2.1 Entering a File to a Workflow
When a basic workflow starts, it sends an e-mail message to the contributors, who
must check in the designated files as the first step in the workflow.
Use the following procedure to check in a file to begin a basic workflow:
1. Read the Workflow Started Notification message.
2. Click the Review Workflow Content link.
The Workflow Content Items Page opens.
3. Choose Check Out from the contextual menu in the Actions column.
The Check-Out Confirmation Page opens.
4. Check the content item into the system using one of the following methods:
■ If the check-out confirmation page is still displayed, click Check In.
■ Choose Check In from the contextual menu in the Actions column on the
Workflow Content Items page.
■ Open the Content Management tray, click Active Workflows, click the name
of the workflow, then choose Check In from the contextual menu in the
Actions column on the Workflow Content Items Page.
5. Fill in the content check-in form.
■ If you select the Revision Finished Editing check box, the revision moves
from Edit status to GenWWW status and goes to the next step in the
workflow.
■ If you leave the Revision Finished Editing check box unselected, the file is
checked in but remains in Edit status instead of moving to GenWWW status.
Return to Step 3 to check out the file and check it back in.
6. Click Check In.
Tip: If a document included in a workflow fails to convert in the
check-in process, the content item is set to Edit status automatically.
For this reason, include documents in the workflow that are valid for
conversion.
Note: Depending on how your system administrator has set up the
workflow, you may be required to enter your user name and
password before continuing the workflow process on one or more
steps. This re-authentication allows Oracle Content Server to track the
successful completion of a step and provides a digital signature of the
person responsible.

Participating in a Workflow
8-4 Oracle Fusion Middleware User's Guide for Oracle Content Server
8.2.2 Reviewing Revisions in a Workflow
When the next step in a workflow is a review step, the reviewers receive an e-mail
message.
Use the following procedure to review a file in a workflow:
1. Read the Workflow Review Notification Message.
2. Click the Review Workflow Item link.
The Workflow Review Page opens, indicating the actions that can be performed.
3. Review the file:
■ Review the file in the area to the right of the Workflow Review panel.
■ Click the Web Viewable link to see a version of the content in your browser.
■ Click the Native File link to save a copy of the file in its original format.
■ Click the HTML Rendition link to view the file as HTML in your browser.
4. If you have reviewer/contributor permission and you would like to edit the file,
click the Check out link in the Workflow Review panel to check out the content
item for editing. Otherwise, continue with Step 9.
The Check-Out Confirmation Page opens.
5. Get a copy of the original file and edit it. For details, see Chapter 7, "Checking Out
Files."
6. Check the content item back in to the system using one of the following methods:
■ If the check-out confirmation page is still displayed, click Check In.
■ Choose Check In from the contextual menu in the Actions column on the
Workflow Content Items page.
■ Open the Content Management tray, click Active Workflows, click the name
of the workflow, then choose Check In from the contextual menu in the
Actions column on the Workflow Content Items page.
7. Fill in the Checked-Out Content Page.
■ If you select the Approve Revision box, the revision moves from Edit status to
GenWWW status and goes to the next step in the workflow when the required
number of reviewers approve. Step 8 is not required.
■ If you leave the Approve Revision box unselected, the revision is checked in
but remains in Review status instead of moving to GenWWW status. You
must still approve or reject the revision.
8. Click Check In.
9. To approve or reject the revision, click the appropriate link in the Workflow
Review panel.
■ When the appropriate number of reviewers approve the revision, the content
item goes to the next step in the workflow.
Note: For a reviewer step, you can to approve or reject the content
item. For a reviewer/contributor step, you can to check out, approve, or
reject the content item.

Participating in a Workflow
Working with Workflows 8-5
■ If you reject the revision, the Reject Content Item Page opens so that you can
enter a message explaining the reason for rejecting the content item. When you
reject a content item, it is sent back to the most recent workflow step that
permitted contribution.
8.2.3 Working with a Rejected Revision
When a revision is rejected, the users assigned to the most recent contribution step
receive an e-mail message.
Use the following procedure to edit a file that was rejected:
1. Read the Workflow Content Item Reject Notification message.
2. Click the Review Workflow Content link.
The Workflow Content Items Page opens.
3. Choose Check Out from the contextual menu in the Actions column.
The Check-Out Confirmation Page opens.
4. Get a copy of the original file and edit it. For details see Chapter 7, "Checking Out
Files."
5. Check the content item back into the system using one of the following methods:
■ If the check-out confirmation page is still displayed, click Check In.
■ Choose Check In from the contextual menu in the Actions column on the
Workflow Content Items page.
■ Open the Content Management tray, click Active Workflows, click the name
of the workflow, and then choose Check In from the contextual menu in the
Actions column on the Workflow Content Items page.
6. Fill in the Checked-Out Content Page.
■ If you select the Revision Finished Editing box, the file moves from Review
status to GenWWW status and goes to the next step in the workflow.
■ If you leave the Revision Finished Editing box unselected, the file is checked
in but remains in Review status instead of moving to GenWWW status. You
must still approve the file.
7. Click Check In.
Note: Depending on how your system administrator has set up the
workflow, you may be required to enter your user name and
password before continuing the workflow process on one or more
steps. This re-authentication allows Oracle Content Server to track the
successful completion of a step and provides a digital signature of the
person responsible.

Viewing Workflow Information
8-6 Oracle Fusion Middleware User's Guide for Oracle Content Server
8.3 Viewing Workflow Information
This section covers the following topics:
■ Workflow Information
■ Viewing a List of Active Workflows
■ Viewing a List of Your Workflows
■ Viewing Workflow History and Information About a Workflow Step
■ Viewing Content Information
8.3.1 Workflow Information
There are several ways to view information about a content item in a workflow. With
links between workflow pages you can perform the following tasks:
■ Section 8.3.2, "Viewing a List of Active Workflows"
■ Section 8.3.3, "Viewing a List of Your Workflows"
■ Section 8.3.4, "Viewing Workflow History and Information About a Workflow
Step"
■ Section 8.3.5, "Viewing Content Information"
8.3.2 Viewing a List of Active Workflows
Use the following procedure to view a list of all active workflows in the system:
1. Open the Content Management tray.
2. Click Active Workflows.
The Active Workflows Page opens.
8.3.3 Viewing a List of Your Workflows
Use the following procedure to view a list of workflows that require action from you:
1. Open the My Oracle Content Server Tray.
2. Click My Workflow Assignments.
The Workflow in Queue Page opens.
3. To remove content items from the list, choose Remove from Queue from the
contextual menu in the Actions column. (The content item is not deleted from the
workflow.)
8.3.4 Viewing Workflow History and Information About a Workflow Step
Use the following procedure to view workflow history and information about a
workflow step:
1. Display either the Workflow Content Items Page or the Workflow in Queue Page.
2. Choose Workflow Info from the contextual menu in the Actions column.
The Workflow Info For Item Page opens.

Viewing Workflow Information
Working with Workflows 8-7
8.3.5 Viewing Content Information
Use the following procedure to view content information for a revision in a workflow:
1. Open the My Oracle Content Server Tray.
2. Click My Workflow Assignments.
The Workflow in Queue Page opens.
3. Choose Content Info from the contextual menu in the Actions column.
The Content Information Page opens.

Viewing Workflow Information
8-8 Oracle Fusion Middleware User's Guide for Oracle Content Server

9
Storing and Moving Content with Folders/WebDAV 9-1
9Storing and Moving Content with
Folders/WebDAV
This chapter describes how to store and move content with folders/WebDAV, in the
following topics:
■ Section 9.1, "Introduction"
■ Section 9.2, "Working with Folders"
■ Section 9.3, "Working with WebDAV"
9.1 Introduction
This section covers the following topics:
■ Section 9.1.1, "About Folders"
■ Section 9.1.2, "About WebDAV"
9.1.1 About Folders
Folders is an optional component for use with Oracle Content Server that, when
enabled, provides a hierarchical folder interface to content in Oracle Content Server in
the form of virtual folders (also called hierarchical folders). With virtual folders, you can
create a multilevel folder structure.
Virtual folders provide this main benefit: Users can apply default metadata to content
items by checking them in through a particular folder.
9.1.1.1 Content Item Security
The user logins and security controls in Oracle Content Server also apply to content
that is managed through virtual folders. For example, if you have Read permission for
a content item, you are able to view the file, but you are not able to check in a revision
to the file.

Introduction
9-2 Oracle Fusion Middleware User's Guide for Oracle Content Server
9.1.1.2 Folder Metadata Inheritance
When you create a new folder, the metadata from the parent folder populates the
fields for the new folder. This allows the folder to initially inherit metadata, but enables
you to make changes to the new folder. A folder has the same metadata as a content
item.
Subsequent changes to a parent folder’s metadata do not affect the metadata for
existing subfolders. To apply a parent folder’s metadata to subfolders and content
items, you can use the metadata propagation function. For more information, see
Section 9.1.1.5, "Metadata Propagation."
9.1.1.3 Default Metadata Values
When a file is checked in to the content server through a virtual folder, default
metadata values are entered on the content check-in form automatically. Default
metadata values are evaluated in the following order:
1. Virtual folder default values: When you choose New Folder from the New Item
menu, any content default metadata values defined for that virtual folder are
entered on the content check-in form. These values are defined on the Hierarchy
Folder Configuration Page.
2. User default metadata values: If any content metadata defaults are not defined for
the virtual folder, the user’s default metadata values are applied. These values are
defined by each user for new content items on their Default Information Field
Configuration Page, and for revised content items on their Revision Information
Field Configuration Page.
3. System default metadata values: The system default values are applied to any
fields that are not defined by the virtual folder or the user’s default metadata.
These values are defined by the system administrator.
4. None: A metadata field can be blank if it is not a required field. If a required field
is left blank, an error occurs and the content item is not checked in.
9.1.1.4 Trash Bin
The Trash Bin function is an optional feature that sends deleted items to a Trash folder,
rather than permanently deleting the items. Items in the Trash folder can then be
permanently deleted or restored to their original location in the folder hierarchy.
This enables users to recover files and folders that have been mistakenly deleted.
Please note the following considerations for the Trash Bin feature:
■ The Trash folder works much like a normal folder except that items deleted from
the Trash folder are permanently deleted. For more information, see Section A.9.8,
"Trash Exploring Page."
Important: User default metadata values are only applicable when
creating new content items using WebDAV. They are not applicable
when using the Oracle Content Server web interface.
Important: System default metadata values are only applicable when
creating new content items using WebDAV. They are not applicable
when using the Oracle Content Server web interface.

Introduction
Storing and Moving Content with Folders/WebDAV 9-3
■ Deleting a revision from a content information page bypasses the Trash folder and
permanently deletes the revision.
■ Users can select whether to make use of the Trash folder or permanently delete
items immediately. They can also select whether to see all deleted items in the
Trash folder or just the items they deleted themselves. For more information, see
Section A.9.4, "Folder Configuration Page."
■ Deleting an item from the Exploring page puts the item into the Trash folder.
■ Deleting an item from WebDAV puts it into the Trash folder.
9.1.1.5 Metadata Propagation
The metadata propagation function enables contributors to copy default metadata values
from a folder to its subfolders and content items. Typical uses for this function include:
■ After moving a large number of content items to a new folder structure, you want
to apply the top-level folder’s default metadata to all subfolders and content
items.
■ You revised the default metadata for a folder, and you want to apply it to
subfolders and content items within that folder.
Note the following considerations for metadata propagation:
■ The propagation function applies each folder’s metadata to all "uninhibited"
subfolders and content items within those folders. Each uninhibited subfolder and
content item inherits the metadata of the folder from which propagation was
launched.
■ When you inhibit a folder, it is not affected by metadata propagation from a
higher-level folder. However, you can still launch metadata propagation from an
inhibited folder.
■ The system administrator selects which metadata fields are included in
propagation. (This is a systemwide setting.) By default, no metadata fields are
included until they are specifically selected for metadata propagation.
■ If a folder metadata field does not have a value defined, subfolders and content
items within that folder may not inherit the "blank" value during propagation and
any existing metadata values may stay intact for these items. This depends on how
the system administrator has set up the system.
■ When you launch metadata propagation, only folders and content items for which
you have Write permission to the security group are affected.
9.1.1.6 Folder Content Item Revisions
When documents are edited and checked into the content server, the revised document
must undergo a process that involves being converted, indexed, and released. Before
this process is complete, the system considers the revised document to be the "latest"
version. After the process is complete, the system considers the revised document to
be the "latest released" version.
Depending on how Folders has been set up, users with read access to the content item
see either the latest version or nothing at all if the item is not released. Authors,
however, always see the latest version. By default, the latest version is available to all
users with read access.

Introduction
9-4 Oracle Fusion Middleware User's Guide for Oracle Content Server
9.1.2 About WebDAV
WebDAV (Web-Based Distributed Authoring and Versioning) provides a way to
remotely author and manage your content using clients that support the WebDAV
protocol. For example, you can use Microsoft Windows Explorer to check in, check
out, and modify content in the repository rather than using the browser interface.
9.1.2.1 What is WebDAV?
WebDAV is an extension to the HTTP/1.1 protocol that allows clients to perform
remote web content authoring operations. The WebDAV protocol is specified by RFC
2518.0. For more information, see the WebDAV Resources Web site at
http://www.webdav.org
When a content management system such as Oracle Content Server uses WebDAV,
the WebDAV client serves as an alternate user interface to the native files in the
content repository. The same versioning and security controls apply, whether an
author uses the web browser interface or a WebDAV client.
Desktop Integration Suite (DIS) provides a set of embedded applications that help you
seamlessly integrate your desktop experience with the WebDAV-based Oracle Content
Server repository. DIS provides convenient access to the content server directly from
Microsoft Windows Explorer, Microsoft Office applications (Word, Excel, and
PowerPoint), and supported e-mail clients (Microsoft Outlook and Lotus Notes).
Integrating Oracle Content Server with your desktop applications improves your
ability to work with files on the content server. You can easily manage files on the
server and share files with other users directly from your desktop in addition to
logging in to the content server and using the web browser interface. For more
information about DIS, see Oracle Fusion Middleware User's Guide for Desktop Integration
Suite.
The WebDAV interface in Oracle Content Server uses the hierarchical Folders
interface. For more information, see Section 9.1.1, "About Folders."
9.1.2.2 WebDAV Clients
A WebDAV client is an application that can send requests and receive responses using
the WebDAV protocol.
You can use WebDAV virtual folders in Windows Explorer to manage files that were
created in a non-WebDAV client, but you cannot use the native application to check
content in to and out of the content server repository.
9.1.2.3 WebDAV Connection Strings
With the use of a form-based login, WebDAV connection strings now require the _dav
root before the webroot. For example:
http://host_name:16200/_dav/cs/idcplg/webdav/

Working with Folders
Storing and Moving Content with Folders/WebDAV 9-5
9.2 Working with Folders
This section covers the following topics:
■ Section 9.2.1, "Naming Folders"
■ Section 9.2.2, "Defining User Configuration Settings"
■ Section 9.2.3, "Defining User Metadata Defaults for New Content"
■ Section 9.2.4, "Defining User Metadata Defaults for Revised Content"
■ Section 9.2.5, "Viewing Virtual Folders"
■ Section 9.2.6, "Viewing Content Items"
■ Section 9.2.7, "Checking In Content"
■ Section 9.2.8, "Adding Virtual Folders"
■ Section 9.2.10, "Moving Virtual Folders and Content"
■ Section 9.2.11, "Creating a Shortcut"
■ Section 9.2.12, "Deleting Virtual Folders and Their Content"
■ Section 9.2.13, "Restoring Folders and Content from Trash"
■ Section 9.2.14, "Propagating Metadata"
■ Section 9.2.15, "Searching for Content in Folders"
This guide assumes that your Oracle Content Server instance is using the Trays layout
with the Oracle skin, which is the default for Oracle Content Server 11gR1.
9.2.1 Naming Folders
The Folders component mimics the Windows file system. Therefore, when you create a
folder, you are not allowed to use double quotation marks in the name (for example,
"doublequotedfolder"). Using double quotation marks causes an error. You must use
the standard naming conventions for Windows when creating folders.
9.2.2 Defining User Configuration Settings
Use the following procedure to define your virtual folder configuration settings:
1. Click the My Content Server tray.
2. Click My Folder Configuration.
The Folder Configuration Page opens.
3. Select a Content Style option.
4. If the Hide/Unhide feature is enabled, select or deselect the Show hidden when
browsing check box.
5. If the Trash Bin function is enabled, select or deselect the following check boxes:
■ Remove items immediately when deleted
■ Show only items that user has deleted in trash virtual folder
6. Click Update.

Working with Folders
9-6 Oracle Fusion Middleware User's Guide for Oracle Content Server
9.2.3 Defining User Metadata Defaults for New Content
Use the following procedure to define default metadata values for new content
checked in by a particular user.
These defaults are applied to any new content item checked in through a virtual folder
only if a value is not defined for the folder. For more information, see Section 9.1.1.3,
"Default Metadata Values."
These metadata values are applied only on initial check-in of a content item. These
settings do not affect revisions to existing content. For information about how to set
metadata defaults for revisions, see Section 9.2.4, "Defining User Metadata Defaults for
Revised Content."
To define user metadata defaults for new content:
1. Click the My Content Server tray.
2. Expand the My Folder Configuration link.
3. Click Default Information Field Configuration for user.
The Default Information Field Configuration Page opens.
4. Specify the default values to be applied to new content upon check-in. Use Idoc
Script in any information field.
5. Click Update.
9.2.4 Defining User Metadata Defaults for Revised Content
Use the following procedure to define default metadata values for revised content
checked in by a particular user. These defaults are applied to any content item revision
checked in through a virtual folder only if a value is not defined for the folder. For
more information, see Section 9.1.1.3, "Default Metadata Values."
These metadata values are applied only upon check-in of a revision; these settings do
not affect new content items. For information about how to set metadata defaults for
new content, see Section 9.2.3, "Defining User Metadata Defaults for New Content."
To define user metadata defaults for revised content:
1. Click the My Content Server tray.
2. Expand the My Folder Configuration link.
3. Click Revision Information Field Configuration for User.
The Revision Information Field Configuration Page opens.
4. Specify the default values to be applied to revised content upon check-in. Use Idoc
Script in any information field.
5. Click Update.
Important: Each user should follow this procedure to define their
default metadata before using WebDAV to check in content through a
virtual folder. This ensures that content items do not all have the same
metadata, and that content can be checked in if required values are
not defined for the folder or in the system defaults. Each WebDAV
contributor should repeat this procedure after a required metadata
field is added to the content server or after accounts are enabled.

Working with Folders
Storing and Moving Content with Folders/WebDAV 9-7
9.2.5 Viewing Virtual Folders
Use the following procedure to view a virtual folder from a content server web page:
1. Click the Browse Content tray.
2. Click the Contribution Folders link.
Exploring Contribution Folders opens. Depending on how the system
administrator set up the system, long display lists may be truncated and spread
out over multiple pages. Navigation links are then provided to move between
pages.
3. Click folder links to drill down to the folder you want.
4. To view the Hierarchical Folder Information Page for a folder, click the Folder
Information icon, choose Folder Information from the Action menu, or explore the
folder and click the Info link.
5. If the Web Folder feature is enabled and you are using Internet Explorer 5.0 or
higher, you can view the folder in Windows Explorer by selecting Open Web
Folder from the Content Actions menu.
9.2.6 Viewing Content Items
Use the following procedure to view content items from a virtual folder:
1. View the Exploring page for the virtual folder that contains the content item.
Depending on how the system administrator set up the system, long display lists
may be truncated and spread out over multiple pages. Navigation links are then
provided to move between pages.
For more information, see Section A.9.7, "Exploring Contribution Folders."
2. To view the content information for a content item, click the Information icon, or
choose Content Information from the Actions icon shortcut menu.
3. To view a file, click the file link in the Name column.
■ If you selected the Native option under Content Style on the Folder
Configuration Page, the File Download screen enables you to open or save the
file.
■ If you selected the Web Viewable (Browse only) option under Content Style
on the Folder Configuration Page, the web-viewable file opens.
9.2.7 Checking In Content
Use the following procedure to check in a file through a virtual folder:
1. View the Exploring page for the virtual folder you want to check the content item
into.
For more information, see Section A.9.7, "Exploring Contribution Folders."
2. Display the content check-in form using one of the following methods:
■ Choose New Content from the Actions menu.
■ Click the Actions icon for an existing content item, and then choose Check In
Similar.
■ Click New Check In on the top menu, and then specify a folder in the Folder
field on the check-in form.

Working with Folders
9-8 Oracle Fusion Middleware User's Guide for Oracle Content Server
The content check-in form opens with the folder’s default metadata filled in.
3. Enter the required metadata and any optional metadata for the content item.
4. Enter the path and file name of the Primary File. You cannot check two files with
the same file name into the same folder.
5. In the Inhibit Propagation field, specify whether the content item receives
propagated metadata.
■ Set the value to false to apply propagated metadata to the content item.
■ Set the value to true if the content item’s metadata should remain unchanged
during metadata propagation.
6. Click Check In.
If the number of content items in the folder exceeds the limit set by the system
administrator, you receive an error message and cannot check in the new content item.
9.2.8 Adding Virtual Folders
To add a virtual folder, you must be a contributor.
Use the following procedure to add a virtual folder:
1. Select New Folder from the New Item link on the Exploring Folder page:
2. Specify an owner for the virtual folder.
3. Specify any additional metadata values for the folder.
■ These metadata values are applied to content items upon initial check-in to
this folder.
■ These metadata values override any values inherited from the parent folder.
■ Use Idoc Script in any information field.
4. In the Inhibit Propagation field, specify whether the folder receives metadata
propagated from a higher-level folder.
■ Set the value to false if the folder receives propagated metadata.
■ Set the value to true if the folder’s metadata remains unchanged during
metadata propagation.
5. Click Save.
The Exploring Contribution Folders pages shows the new virtual folder.
If the number of folders exceeds the limit set by the system administrator, you receive
an error message and cannot check in the new folder.
9.2.9 Modifying Virtual Folders
To modify a virtual folder, you must have Write permission to the folder’s security
group. Folders without security metadata can be modified by all users.
Use the following procedure to modify a virtual folder:
1. Open the Hierarchical Folder Information Page.
2. Choose Update from the folder Actions menu.
The Hierarchy Folder Configuration Page opens.
3. Revise one or more metadata values for the folder.

Working with Folders
Storing and Moving Content with Folders/WebDAV 9-9
■ These metadata values are applied to content items upon initial check-in to
this folder; these settings do not affect revisions to existing content in the
folder.
■ These metadata values override any values inherited from the parent folder.
■ Use Idoc Script in any information field.
4. In the Inhibit Propagation field, specify whether the folder receives metadata
propagated from a higher-level folder.
■ Set the value to false if the folder receives propagated metadata.
■ Set the value to true if the folder’s metadata remains unchanged during
metadata propagation.
5. Click Submit Update.
The Exploring Contribution Folders pages shows the modified virtual folder.
If the number of folders exceeds the limit set by the system administrator, you receive
an error message and cannot check in the new folder.
9.2.10 Moving Virtual Folders and Content
Use the following procedure to move virtual folders and content items from one
virtual folder to another:
1. View the Exploring page for the virtual folder that contains the folders, content
items, or both to move.
For more information, see Section A.9.7, "Exploring Contribution Folders."
2. Select the check boxes next to the folders and content items to be moved.
3. Click the item Actions icon, and choose Move.
4. Click the folder to move the selected items to. (You may have to navigate to a
higher-level folder to display its subfolders.) The target folder is the open folder.
5. Click OK.
The selected items are moved to the target folder.
If local folder mapping is setup, if you move a file from one folder to another (either
through the Folders user interface or WebDAV), the copy of that file in the local folder
associated with the source folder is not deleted. For example, if you have a folder
WebSite, files in this folder are automatically copied to its local folder, C:/Website/. If
you now move a file from the folder WebSite to another folder, say, Intranet, with
Z:/Intranet/ as the local folder, then the file copy in C:/Website/ is not deleted.
9.2.11 Creating a Shortcut
Use either of the following procedures to create a shortcut link to a virtual folder or
content item in the folder hierarchy. You can create shortcuts in two ways:
■ Creating a Shortcut from an Exploring Page
■ Creating a Shortcut from a Folder Information or Content Information Page

Working with Folders
9-10 Oracle Fusion Middleware User's Guide for Oracle Content Server
9.2.11.1 Creating a Shortcut from an Exploring Page
Use the following procedure to create a shortcut from an exploring page:
1. View the Exploring page for the virtual folder that contains the folder or content
item for which you want to create a shortcut.
For more information, see Section A.9.7, "Exploring Contribution Folders."
2. Choose the folder or item Actions menu, and then choose Create Shortcut.
The Browsing Window opens.
3. Click the folder where you want to create the shortcut link. (You may have to
navigate to a higher-level folder to display its subfolders.) The target folder is the
open folder.
4. Click OK.
A shortcut link is created in the target folder.
9.2.11.2 Creating a Shortcut from a Folder Information or Content Information Page
Use the following procedure to create a shortcut from a folder information page or
content information page:
1. View the Hierarchical Folder Information Page or Content Information page for
the folder or content item for which you want to create a shortcut.
2. Choose Create Shortcut from the Content Actions menu.
The Browsing Window opens.
3. Click the folder where you want to create the shortcut link. (You may have to
navigate to a higher-level folder to display its subfolders.) The target folder is the
open folder.
4. Click OK.
A shortcut link is created in the target folder.
9.2.12 Deleting Virtual Folders and Their Content
This section covers the following topics:
■ Section 9.2.12.1, "About Deleting Folders and Content"
■ Section 9.2.12.2, "Deleting a Folder or Content Item"
■ Section 9.2.12.3, "Permanently Deleting Folders and Content from Trash"
9.2.12.1 About Deleting Folders and Content
Keep the following in mind when deleting virtual folders and content items:
Caution: When you delete a folder, all subfolders and all revisions of
all content items in the folders are also deleted. When you delete a
content item, all revisions of that content item are deleted. Be
extremely careful when deleting folders and content items so that you
do not accidentally delete content.

Working with Folders
Storing and Moving Content with Folders/WebDAV 9-11
■ When you delete folders and content items from the Folders hierarchy, the action
that occurs depends on whether the Trash Bin function is enabled and whether
you have chosen to use the Trash Bin function in your user profile:
■ To delete a content item, you must have Delete permission to the content item’s
security group. If accounts are enabled, you must have Delete permission to the
account as well.
■ To delete a virtual folder, you must be the owner of the folder or a user with Delete
permission to the folder’s security group. If accounts are enabled, you must have
Delete permission to the account as well.
■ If a folder contains any content items or subfolders that you do not have
permission to delete, you cannot delete the folder.
9.2.12.2 Deleting a Folder or Content Item
To delete a content item, you must have Delete permission for the security group of
that content item. To delete a folder, you must be the Owner of the folder or have
Delete permission for the folder’s security group, and you must have Delete
permission for the security groups of all subfolders and content items within the
folder.
Use the following procedure to delete folders and content items:
1. View the Exploring page for the virtual folder that contains the folder or content
item you want to delete.
For more information, see Section A.9.7, "Exploring Contribution Folders."
2. Select the check box next to each folder and content item to be deleted.
3. For multiple selections, choose Delete from the Actions menu. For an individual
selection, choose Delete from the Actions icon menu.
You are asked to confirm the action.
4. Click OK.
Trash Bin Function
Enabled by System
Administrator
"Remove items immediately when
deleted" Check Box on the Folder
Configuration Page Result of Delete Action
Enabled Cleared Deleting a folder or content item moves it to the Trash
folder. Items can be permanently deleted or restored
from the Trash folder.
Enabled Selected Deleting a folder or content item permanently deletes
it. Items cannot be restored.
Disabled Selected or cleared Deleting a folder or content item permanently deletes
it. Items cannot be restored.
Caution: When you delete a folder, all subfolders and all revisions of
all content items in the folders are also deleted. When you delete a
content item, all revisions of that content item are deleted. Be extremely
careful when deleting folders and content items so that you do not
accidentally delete content.

Working with Folders
9-12 Oracle Fusion Middleware User's Guide for Oracle Content Server
All revisions of selected content items, any selected folders, any subfolders of
selected folders, and all revisions of content items in these folders are deleted.
Whether they can be restored depends on how Folders has been set up.
9.2.12.3 Permanently Deleting Folders and Content from Trash
Use the following procedure to permanently delete items from the Trash folder:
1. View the Exploring page for the Trash folder.
For more information, see Section A.9.7, "Exploring Contribution Folders."
2. Select the check box next to each folder and content item to be permanently
deleted.
3. For multiple selections, choose Delete from the Actions menu. For an individual
selection, choose Delete from the Actions icon menu.
You are asked to confirm the action.
4. Click OK.
All revisions of selected content items, any selected folders, any subfolders of
selected folders, and all revisions of content items in these folders are permanently
deleted from the content server. They cannot be restored.
9.2.13 Restoring Folders and Content from Trash
If you delete a folder or content item from the Trash folder, the folder or item is
permanently deleted from Oracle Content Server. To prevent permanent deletion of
folders and content, you can restore them from the Trash folder to their original parent
folders. Items that remain in the Trash folder are still searchable.
Use the following procedure to restore an item from the Trash folder to its original
parent folder:
1. View the Exploring page for the Trash folder.
For more information, see Section A.9.7, "Exploring Contribution Folders."
2. Click the Actions icon and choose Restore. (You can restore only one item at a
time.)
3. Click OK.
The item is restored to its original parent folder.
Important: If the original parent folder has been deleted and is still
in the Trash folder, the restored item is moved to the original folder. If
the original folder has been permanently deleted, you cannot restore
the item.

Working with WebDAV
Storing and Moving Content with Folders/WebDAV 9-13
9.2.14 Propagating Metadata
Use the following procedure to copy metadata from a folder to its subfolders and
content items.
This procedure replaces metadata values for folders and content items that are not
identified as "inhibited," and there is no "undo." Be extremely careful when propagating
metadata so that you do not accidentally change values you meant to keep.
The system administrator selects which metadata fields are included in propagation.
This is a systemwide setting. Be certain that you know which metadata fields are
enabled for propagation before launching the process.
You can only propagate metadata for a folder if you are the owner or administrator of
that folder. Empty metadata field values may not be propagated, depending on how
the system has been set up.
1. Display the Hierarchical Folder Information Page for the folder from which you
want to propagate metadata.
2. Choose Propagate from the Folder Actions menu.
The metadata values defined for the current folder are copied to any uninhibited
subfolders and content items within those folders. Only content items and folders
for which you have Write permission to the security group are affected.
9.2.15 Searching for Content in Folders
Your Oracle Content Server instance might or might not be configured for subfolders.
If it is not, then you can still search for items in a single folder. Otherwise, you have
the choice to search for content in a folder or the folder and everything below. If there
are many subfolders, you might be limited in how many are actually searched.
If Folders supports searching in a folder and its subfolders, then follow this procedure
to search for content items in Folders:
1. Click Search in the content server.
The Search page opens with a Browse button.
2. Click Browse to find and select the folder, including its subfolders, to search.
3. Specify other parameters on the Search page as needed, then click Search.
9.3 Working with WebDAV
This section covers the following topics:
■ Section 9.3.1, "Setting Up a Web Folder"
■ Section 9.3.2, "Working with Virtual Folders"
■ Section 9.3.3, "Working with Content"
■ Section 9.3.4, "Displaying Web Pages"
9.3.1 Setting Up a Web Folder
For details about specific documentation that provides instructions for setting up a
WebDAV web folder on a client computer, see your system administrator.

Working with WebDAV
9-14 Oracle Fusion Middleware User's Guide for Oracle Content Server
9.3.2 Working with Virtual Folders
This section covers these topics:
■ Section 9.3.2.1, "Folder Name Constraints"
■ Section 9.3.2.2, "Viewing Virtual Folders"
■ Section 9.3.2.3, "Creating a New Virtual Folder"
■ Section 9.3.2.4, "Deleting a Virtual Folder"
■ Section 9.3.2.5, "Restoring a Virtual Folder"
■ Section 9.3.2.6, "Setting Default Folder Metadata"
9.3.2.1 Folder Name Constraints
The following characters cannot be used in the name of a virtual folder:
■ Forward slash (/)
■ Backward slash (\)
■ Number sign (#)
9.3.2.2 Viewing Virtual Folders
Virtual folders can be viewed in Windows Explorer or from the Open or Save As
dialog in a WebDAV client. The virtual folders can be accessed in either of the
following ways:
■ Click the web folder under the My Network Places node
■ Expand the Web Folders node under the My Computer node, and then select the
web folder
9.3.2.3 Creating a New Virtual Folder
You can create a new virtual folder in Windows Explorer or from the Open or Save As
dialog in a WebDAV client. Right-click an existing web folder, choose New, and then
choose Folder.
■ The newly created folder has the same default metadata as its parent folder. For
information about how to modify the default metadata, see Section 9.3.2.6, "Setting
Default Folder Metadata."
■ You cannot create a new folder at the root level.
■ The following characters cannot be used in the folder name:
– Forward slash (/)
– Backward slash (\)
– Number sign (#)
– Quotation mark (")
9.3.2.4 Deleting a Virtual Folder
You can delete a virtual folder from Windows Explorer or from the Open or Save As
screen in a WebDAV client. Browse to the folder you want to delete, right-click, and
choose Delete from the popup menu (or press the Delete key).

Working with WebDAV
Storing and Moving Content with Folders/WebDAV 9-15
For detailed information on security and the Trash Bin function, see Section 9.2.12,
"Deleting Virtual Folders and Their Content."
9.3.2.5 Restoring a Virtual Folder
If the Trash Bin function is enabled, you can restore a virtual folder from Windows
Explorer using one of the following methods:
■ Drag and drop the folder from the Trash folder to another virtual folder.
■ Cut the folder from the Trash folder and paste it into another virtual folder.
9.3.2.6 Setting Default Folder Metadata
Setting default metadata cannot be done from the WebDAV client. Use the web user
interface and the following procedure to define the metadata defaults for a virtual
folder:
1. Open the Hierarchy Folder Configuration Page for the folder.
2. Enter the default metadata for the folder.
3. Click Update.
9.3.3 Working with Content
This section covers the following topics:
■ Section 9.3.3.1, "Checking In Content"
■ Section 9.3.3.2, "Checking Out Content"
■ Section 9.3.3.3, "Viewing Content"
■ Section 9.3.3.4, "Modifying Content"
■ Section 9.3.3.5, "Deleting Content"
■ Section 9.3.3.6, "Restoring Content"
■ Section 9.3.3.7, "Copying Content"
■ Section 9.3.3.8, "Moving Content"
Files that were not created in a supported WebDAV client can be checked in, viewed,
deleted, copied, and moved through WebDAV virtual folders in Windows Explorer,
but they must be checked out through the browser interface.
9.3.3.1 Checking In Content
Placing a file in a virtual folder checks the file into the content server repository. Keep
the following points in mind when checking in files through WebDAV:
■ You cannot check two files with the same file name into the same folder.
■ If an error occurs during check-in, a value might not have been defined for a
required field. Define user default values for required fields on the Default
Information Field Configuration Page.
Caution: When you delete a folder, all subfolders and all revisions of
all content items in the folders are also deleted. Be extremely careful
when deleting folders so that you do not accidentally delete content.

Working with WebDAV
9-16 Oracle Fusion Middleware User's Guide for Oracle Content Server
■ If the Save As screen opens when you attempt to place a file in a virtual folder,
you do not have Write privileges to the security group defined for that folder. You
must select a different virtual folder, or save the file on your hard drive and then
check in the file through a web browser where you can select the appropriate
metadata.
■ The title of the checked-in content item depends on the value of the WebDAV title
allocation configuration parameter as set by the system administrator. The title is
either the file name (with or without the file extension) or the default title
metadata value defined for the folder where the content item resides. Content item
titles are assigned as follows:
– If the WebDAV title inheritance configuration setting is disabled (the default
value), the title is the file name without the file extension (for example,
"monthly_report"). This is the naming convention regardless of whether a
default title metadata value is defined for the folder.
– If the WebDAV title inheritance configuration setting is enabled and no default
title metadata value has been defined for the folder, the title is the file name
with the file extension (for example, "monthly_report.doc").
– If the WebDAV title inheritance configuration setting is enabled and a default
title metadata value is defined for the folder, the title is the defined name (for
example, "Monthly Report").
■ In most WebDAV configurations, an open file is not checked into the content
server repository until it is closed, so you can save the file repeatedly without
affecting the revision number. Your system administrator can change this so that
each save creates a new revision in the content server.
■ If your file has double-byte characters (for example, Chinese, Japanese, or Korean)
in the file name and the content server is running on a Western European
operating system, you may not be able to check in the file through WebDAV due to
a limitation in Microsoft’s WebDAV clients. Eliminate double-byte characters from
the file name or check in the file through the web browser interface of the content
server.
■ Do not use the number sign (#) in your file name. The number sign (#) is an illegal
WebDAV character.
9.3.3.1.1 Check-In Through Windows Explorer Use either of the following methods to
check in a content item through Windows Explorer:
■ Drag and drop a file from your hard drive or another network drive into a virtual
folder.
■ Copy a file from your hard drive or another network drive and paste it into a
virtual folder.
9.3.3.1.2 Check-In Through Microsoft Office Use the following method to check in a
content item through a Microsoft Office application (Word, Excel, PowerPoint, and so
on):
■ Save a file in a virtual folder and then close the file.
9.3.3.2 Checking Out Content
Opening a file from a virtual folder checks out the file from the content server
repository, and locks the file so that other users can only view it. Any of the following
actions check out a content item:

Working with WebDAV
Storing and Moving Content with Folders/WebDAV 9-17
9.3.3.2.1 Check-Out Through Windows Explorer Use the following method to check out a
content item through Windows Explorer:
■ Open a file from a virtual folder.
9.3.3.2.2 Check-Out Through Microsoft Office Use the following method to check out a
content item through a Microsoft Office application (Word, Excel, PowerPoint, and so
on):
■ Open a file from a virtual folder.
The Undo Check Out option cancels the content item check-out. This option is
displayed only if the content item is checked out, and it is only available to the user
who checked out the content item.
9.3.3.3 Viewing Content
You can view a content item without affecting the revision number by opening the
content item and then closing the file without saving it. This results in an "Undo
Checkout" rather than a check-in of a new revision.
9.3.3.4 Modifying Content
Modifying a file in a virtual folder checks in a new revision of the content item. Use
one of the following procedures to modify a content item.
9.3.3.4.1 Modifying a File in a WebDAV Client Format Use the following procedure to
modify a file that is in a WebDAV client supported format (Word, Excel, PowerPoint,
and so on):
1. Open the file from a virtual folder, either through Windows Explorer or from a
WebDAV client.
The file is checked out of the content server repository.
2. Make changes to the file.
3. Save the changes.
4. Close the file.
The file is checked in as a new revision.
In most WebDAV configurations, an open file is not checked into the content server
repository until it is closed, so you can save the file repeatedly without affecting the
revision number. Your system administrator can change this so that each save,
including automatic saves, creates a new revision in the content server.
Caution: If you save any changes to a file opened from a WebDAV
folder, you create a new revision.

Working with WebDAV
9-18 Oracle Fusion Middleware User's Guide for Oracle Content Server
9.3.3.4.2 Modifying a File in a Non-WebDAV Client Format Use the following procedure to
modify a file that is not in a WebDAV client supported format:
1. Copy the file from a virtual folder to a temporary location. Do not change the file
name.
2. Modify the file.
3. Save the changes to the temporary file and close the file.
4. Move or copy the file to its original virtual folder, and replace the existing file.
The file is checked in as a new revision.
9.3.3.5 Deleting Content
Deleting a file from a virtual folder deletes all revisions of the content item. Any of the
following actions deletes a content item. For detailed information on security and the
Trash Bin function, see Section 9.2.12, "Deleting Virtual Folders and Their Content."
9.3.3.5.1 Deleting Through Windows Explorer Use the following method to delete a
content item through Windows Explorer:
■ Delete a file from a virtual folder.
9.3.3.5.2 Deleting Through Microsoft Office Use the following method to delete a content
item through a Microsoft Office application (Word, Excel, PowerPoint, and so on):
■ Delete a file from a virtual folder within the Open or Save As dialog box.
9.3.3.6 Restoring Content
If the Trash Bin function is enabled, you can restore content items from Windows
Explorer using one of the following methods:
■ Drag and drop the file from the Trash folder to another virtual folder.
■ Cut the file from the Trash folder and paste it into another virtual folder.
9.3.3.7 Copying Content
Copying a file from one virtual folder to another checks in the copied file as a new
content item. If the file has the same file name as an existing file in the target folder, a
new revision is checked in. The new content item or new revision is stored with the
file name and metadata of the latest revision of the source. Any of the following
actions copies a content item from one virtual folder to another if you elect to replace
the existing file:
9.3.3.7.1 Copying Through Windows Explorer Use one of the following methods to copy a
content item through Windows Explorer:
■ Right-drag a file from a virtual folder to another, release, and choose Copy Here.
■ Copy a file from a virtual folder and paste it into another virtual folder.

Working with WebDAV
Storing and Moving Content with Folders/WebDAV 9-19
9.3.3.7.2 Copying Through Microsoft Office Use the following method to copy a content
item through a Microsoft Office application (Word, Excel, PowerPoint, and so on):
■ Open a file from a virtual folder, from the File menu, choose Save As, select a
different virtual folder, click OK, and close the file.
9.3.3.8 Moving Content
Any of the following actions moves a content item from one virtual folder to another:
9.3.3.8.1 Moving Through Windows Explorer Use one of the following methods to move a
content item through Windows Explorer:
■ Drag and drop a file from one virtual folder to another.
■ Cut a file from a virtual folder and paste it into another virtual folder.
9.3.3.8.2 Moving Through Microsoft Office Use the following method to move a content
item through a Microsoft Office application (Word, Excel, PowerPoint, and so on):
■ Open a file from a virtual folder, from the File menu, choose Save As, select a
different virtual folder, click OK, and close the file.
Moving a file to a different virtual folder does not change the metadata. To apply the
new parent folder’s metadata, you can use the metadata propagation function. For
more information, see Section 9.1.1.5, "Metadata Propagation."
9.3.4 Displaying Web Pages
You can access the content server virtual folder web pages through Windows Explorer
rather than through a web browser.
9.3.4.1 Configuring Windows Explorer
To be able to display web pages through Windows Explorer, the application must be
set to display the full path in the title bar:
1. In Windows Explorer, from the Tools menu, choose Folder Options.
The Folder Options screen opens.
2. Open the View tab.
3. Under Files and Folders, select the Display the full path in title bar check box.
4. Click OK.
Important: If the Save As dialog opens twice, you do not have Write
privileges to the security group defined for the virtual folder. You
must select a different virtual folder, or save the file on your hard
drive and then check in the file through a web browser where you can
select the appropriate metadata.

Working with WebDAV
9-20 Oracle Fusion Middleware User's Guide for Oracle Content Server
9.3.4.2 Displaying a Web Page
Use the following procedure to display a content server web page from Windows
Explorer:
1. Access the Web Folders folder in Windows Explorer. This folder is usually under
My Computer.
If the Web Folders folder is not displayed, access your contribution folders under
My Network Places. You might have to do this a few times for Web Folders to
appear.
2. In Windows Explorer, double-click the folder on the right for which you want to
display the web page.
3. Click the Address bar at the top of the screen.
4. Press the Enter key.
The exploring page for the folder opens.

10
Grouping Content with Folios 10-1
10Grouping Content with Folios
This chapter discusses grouping content with folios, in the following topics:
■ Section 10.1, "Content Folios"
■ Section 10.2, "Working with Folios"
10.1 Content Folios
Oracle Content Server provides a quick and effective way to assemble, track, and
access logical groupings of multiple content items from within the secure environment
of Oracle Content Server. For example, all items relevant to an upcoming brochure,
such as images, logos, legal disclosures, and ad copy, can be assembled and
downloaded to be sent for print. Or perhaps a new project requires a virtual place to
assemble all relevant content items in a particular hierarchy, whenever they are
checked in, with restricted access to particular areas of the hierarchy. Or a video may
have to be associated and tracked with release waivers and narration text. All this can
be done with content folios.
This section contains the following topics:
■ Section 10.1.1, "About Content Folios"
■ Section 10.1.2, "When to Use a Folio"
10.1.1 About Content Folios
This section describes folios and how to use them:
■ Section 10.1.1.1, "What a Folio Is"
■ Section 10.1.1.2, "The Folio Structure"
10.1.1.1 What a Folio Is
Technically, a content folio is an XML file checked into Oracle Content Server that uses
elements to define a hierarchical structure of nodes, slots, and specified content items
in Oracle Content Server. In practice, a content folio is a logical grouping, or a
framework in which content stored in Oracle Content Server can be structured.
A simple folio is a flat container, while an advanced folio can nest content in a hierarchy
within folders. In an advanced folio, the hierarchy can be established before, during,
or after assembling content items.

Content Folios
10-2 Oracle Fusion Middleware User's Guide for Oracle Content Server
Existing folios can have content added to them, or can be locked so that no changes
can be made. Content items can be added to a simple folio by searching Oracle
Content Server, and to an advanced folio by checking new items into the content
server repository or by searching for content that has previously been checked in, all
through the folio interface. An advanced folio can even contain hyperlinks to outside
resources, such as Web sites or shared network drives.
10.1.1.2 The Folio Structure
Within Oracle Content Server, a folio opens starting at the root, or top level. Each
simple folio contains content items displayed in a table similar to a standard search
results page. You can add content to a simple folio by searching through Oracle
Content Server.
Each advanced folio can contain folders, called nodes, placeholders for content, called
slots, and content items, displayed by default in a hierarchical structure, similar to a
standard file system. Slots in an advanced folio are populated with content items by
either checking in a new item, or searching for an existing item in Oracle Content
Server and inserting it into the slot.
Figure 10–1 Simple Folio Structure

Content Folios
Grouping Content with Folios 10-3
Figure 10–2 Advanced Folio Structure
10.1.2 When to Use a Folio
Use a folio any time you want to create a logical grouping of content, or when you
want to provide a structure for other people to create a logical grouping of content.
Use folios to associate content with a project or vendor, or to group multiple content
items in a hierarchy. The following topics describe when to use folios:
■ Section 10.1.2.1, "Structured Organization of Content"
■ Section 10.1.2.2, "Management of Records and Reports"
■ Section 10.1.2.3, "Management of Digital Assets and Production"
■ Section 10.1.2.4, "Custom Uses"
10.1.2.1 Structured Organization of Content
Use Folios to organize content. For example, a company has a consistent way of giving
sales presentations to prospective clients, with existing content items used in each new
presentation, along with new content specific to the prospective client. Each
presentation includes printed material with current background information on the
company, printed material of recent press coverage, a slide presentation pertinent to
the prospective client, and comments by members of several different departments.
Create a folio template that includes content items of the most recent background and
press coverage automatically, and has empty slots for the new slide presentation and
new comments from each department. When a presentation is developed for a new
client, use the template to create a folio that is routed in workflow. The background
information and press coverage reflects the most recent information automatically,
and the necessary people insert the required slide presentation and comments as it
passes to them in the workflow.
10.1.2.2 Management of Records and Reports
Folios are useful when you want to create and review a group of documents as part of
one or more workflow processes. For example, an agency generates intelligence
reports on various topics. Each report typically has many documents arranged in a

Content Folios
10-4 Oracle Fusion Middleware User's Guide for Oracle Content Server
particular hierarchy, and every report has the same hierarchy. A system administrator
creates a template with nodes in the correct hierarchy. In the appropriate nodes of the
hierarchy, he clones required forms, inserts current versions of standard content items
included in each report, and creates slots where new content items must be inserted,
with labels for the slots indicating what each is for.
When an agent begins a new report, the agent creates a new folio based on the
template created by the system administrator. After the agent collects and enters
certain crucial information, other agents contribute additional information. After
agents contribute all the required parts of the report, meaning that all slots in the folio
are filled, the folio is sent through one or more workflow processes. The processes may
involve further editing and analysis of the data. There may also be processes where
one or more the documents contained in the report must be translated. The translated
documents may be added as part of the report if required, or a link could be inserted
in the folio to the translations, stored separately.
Security is maintained throughout the creation, review, and translation process based
on existing Oracle Content Server permissions, meaning that not all contents of the
folio are visible to all participants of the workflow. For example, certain employees
with Secret clearance cannot see documents or nodes that require Top Secret clearance.
In such cases, the agents with Secret clearance also remain unaware of the existence of
Top Secret items in the folio. Employees who have Top Secret clearance see all Top Secret
and Secret documents in the folio. At any stage in the creation or workflow process, an
authorized agent can easily collect all the items in the folio and download them as a
compressed file. Similarly, an authorized user can compile PDFs or content converted
to PDF (with PDF Converter) as a single PDF file for easy printing.
10.1.2.3 Management of Digital Assets and Production
Often catalogs, technical manuals, and other collateral material require many separate
files that must be managed, reviewed, and sent to a vendor for production. A folio is
an ideal way of organizing such content.
For example, a large retail chain produces advertising biweekly flyers distributed with
newspapers, quarterly catalogs distributed by mail, and an online Web site. The three
products, flyer, catalog, and Web site, share images and text. Each flyer has 8 pages of
products, the catalog has 120 pages, and the Web site lists the entire inventory.
An advertising/marketing manager at the company begins a new flyer by selecting
the Flyer template from the folio template options, and begins a new catalog by
selecting the Catalog template.
The new flyer folio contains a slot for the design file, and 8 nodes representing each
page. Each node contains a sub-node for images and slots for ad copy. Depending on
how the template is set up, the slots could be blank or filled with cloned versions of
the previous flyer copy and images as a starting point.
The new catalog folio contains a slot for the catalog design file, a slot for discussion of
the catalog design, a node for global images, and 7 nodes representing each section of
the catalog. Each section node has a slot for the section design file, a sub-node for
images, and another sub-node for ad copy.
The folios are sent into workflow to others who create content for the empty slots or
modify the existing content. As items are checked into Oracle Content Server, a single
item can be added to each of the folios. When all items are checked in to a folio, the
folio continues on in the workflow to the layout designers, who create the flyer and
catalog designs. When each folio is done, it is locked and future flyers and catalogs can
be started by copying these or beginning fresh using the appropriate template.

Working with Folios
Grouping Content with Folios 10-5
10.1.2.4 Custom Uses
The preceding examples are only a few ways in which you can use folios in Oracle
Oracle Content Server. Additional uses depend on your business needs. If you would
like help implementing Oracle Content Server within your organization, contact
Oracle Consulting Services.
10.2 Working with Folios
Like any other item in Oracle Content Server, folios are created and checked in.
Associated metadata can be searched for and reviewed. Revisions can be tracked by
making snapshots of a folio, and folios can be locked or unlocked to control whether
changes can be made.
This section covers the following topics:
■ Section 10.2.1, "Creating a Simple Folio"
■ Section 10.2.2, "Creating an Advanced Folio"
■ Section 10.2.3, "Modifying Folio Structure and Content"
■ Section 10.2.4, "Taking Snapshots"
■ Section 10.2.5, "Locking and Unlocking Folios"
■ Section 10.2.6, "Downloading Folio Renditions"
■ Section 10.2.7, "Finding Existing Folios"
■ Section 10.2.8, "Viewing Folios"
■ Section 10.2.9, "Viewing Folio Information"
■ Section 10.2.10, "Subscribing to Folios"
■ Section 10.2.11, "Using Digital Asset Baskets"
■ Section 10.2.12, "Understanding Folio Workflows"
10.2.1 Creating a Simple Folio
A simple folio creates a flat folio with no additional hierarchy. A simple folio displays
content in a table, similar to a search results page. You can convert a simple folio to an
advanced folio later if you require additional structure, however you cannot convert
an advanced folio to a simple folio.
Although a simple folio displays content in a manner similar to a standard Oracle
Content Server search results page, there is an important difference. A standard search
results page displays content information from a content item's metadata. The Edit
Simple Folio Page displays element information from the XML file stored in Oracle
Content Server that defines the folio. This element information is unique to the folio,
and can be changed in the folio without affecting the content item's metadata. For
more information, see Section 10.2.3.1.4, "Updating Simple Folio Element Information,"
and Section A.11.5.2, "Element Info Tray."
To create a simple folio after you have logged in to Oracle Content Server:
1. Click the Content Management tray.
2. Click New Folio. The Pick Folio Type Page opens.
3. Accept the default, Simple Folio.
4. Click Load folio. The Edit Simple Folio Page opens.

Working with Folios
10-6 Oracle Fusion Middleware User's Guide for Oracle Content Server
5.
Choose Save folio from the Actions menu. The Set Folio Profile Page opens.
6. Select the profile to be used with the folio, if any, and click Next. The Folio Check
In Page opens.
7. Enter the required information and click Check in. The Folio Check In
Confirmation Page opens.
8. Select how to proceed and click Finish. Options are:
■ Continue editing the folio to add content: The Edit Folio Page opens.
■ View content information for the folio: The Oracle Content Server content
information page for the folio opens.
■ View the folio: The View Folio Page opens.
10.2.2 Creating an Advanced Folio
An advanced folio is a folio that allows for a hierarchical structure. The system
administrator may define the structure in a template. If the folio has no template
associated with it, you can modify the folio structure dynamically as you create and
edit the folio. The structure of a template-based folio may or may not be modifiable,
depending on the template.
To create an advanced folio after you have logged in to Oracle Content Server:
1. Click the Content Management tray.
2. Click New Folio. The Pick Folio Type Page opens.
3. Select Advanced Folio and select a template if needed.
4. Click Load folio. If a content item associated with a selected folio template is set to
be cloned, then the Set Folio Profile Page opens and you are prompted to first
check in the folio and skip to Step 6. If not, The Edit Folio Page opens.
5. Choose Save folio from the Actions menu. The Set Folio Profile Page opens.
6. Select the profile to be used with the folio, if any, and click Next. The Folio Check
In Page opens.
7. Enter the required information and click Check in. The Folio Check In
Confirmation Page opens.
Important: You must save the folio before navigating away from it.
Saving the folio checks the folio into Oracle Content Server. If you do
not save the folio, it and any changes to it are lost.
Important: You must save the page before navigating away from it.
Saving the folio checks the folio into Oracle Content Server. If you do
not save the folio, it and any changes to it are lost.

Working with Folios
Grouping Content with Folios 10-7
8.
Select how to proceed and click Finish. Options are:
■ Continue editing the folio to add structure or content: The Edit Folio Page
opens.
■ View content information for the folio: The Oracle Content Server content
information page for the folio opens.
■ View the folio: The View Folio Page opens.
10.2.3 Modifying Folio Structure and Content
Simple folios have a flat structure displayed as a table. You can change the order of the
content with the Edit Simple Folio Page. You can add or delete content, but you cannot
add hierarchical structure to a simple folio. You can convert a simple folio to an
advanced folio later if you require additional structure, however you cannot convert
an advanced folio to a simple folio.
Advanced folios have a hierarchical structure. If a predefined template was selected
when the folio was created, the folio may or may not be modified, depending on the
properties set when the template was created by the system administrator. If no
template was selected when the folio was created, the folio has a single, root node.
Structure can be defined and modified later. Nodes, slots, and content items can be
added, deleted, modified and moved within an advanced folio's structure, and the
associated properties set using the Edit Folio Page.
This section covers the following topics:
■ Section 10.2.3.1, "Editing a Simple Folio"
■ Section 10.2.3.2, "Editing an Advanced Folio"
10.2.3.1 Editing a Simple Folio
Simple folios have a flat structure. Items can be added, deleted, or reordered within a
simple folio. Unlike advanced folios, items added to a simple folio must already be
checked in to Oracle Content Server.
10.2.3.1.1 Adding Items to a Simple Folio Items can be added to a simple folio using the
Edit Simple Folio Page.
To add content to a simple folio:
1. On the Edit Simple Folio Page, click the Add Row icon in the table heading above
the thumbnail column. A search profile page opens.
2. Select a search profile, if necessary, and click Next. The appropriate Oracle
Content Server search form opens.
3. Enter your search criteria and click Search. A search results page opens.
4. Select the item or items you want to add to the simple folio and click Next. The
selected items are added to the content listed in the simple folio.
5. Choose Save changes from the Actions menu to save the content to the folio.
Important: You must save the page before navigating away from it. If
you do not save the folio, it and any changes to it are lost.

Working with Folios
10-8 Oracle Fusion Middleware User's Guide for Oracle Content Server
10.2.3.1.2 Deleting Items from a Simple Folio Items can be deleted from a simple folio
using the Edit Simple Folio Page.
To delete content from a simple folio:
1. To select the item to be removed from the folio on the Edit Simple Folio Page, click
the row of the item to be deleted. The row is highlighted.
2. Click the Delete Row icon in the table heading above the thumbnail column. The
item or items are removed from the displayed list of items in the folio.
3. Choose Save changes from the Actions menu to save the content to the folio.
10.2.3.1.3 Reordering Items in a Simple Folio Items in a simple folio can be reordered by
dragging and releasing them.
To reorder items in a simple folio:
1. Click and hold on the row you want to move and drag it to the new position, then
release.
2. Choose Save changes from the Actions menu to save the content to the folio.
10.2.3.1.4 Updating Simple Folio Element Information Although a simple folio creates a flat
folio with no additional hierarchy, the content of a simple folio is associated with the
folio using elements in an XML file stored in Oracle Content Server. It is the element
information articulated in the XML file defining the folio that is displayed in the table
of the Edit Simple Folio Page. This element information is unique to the folio and can
be changed in the folio without affecting the content item's metadata, or the
information in any other folio with which a content item may be associated.
To update the element information in a simple folio:
1. On the Edit Simple Folio Page, double-click the information you want to update.
An editable text field opens above the information. By default, only the name and
description can be updated.
2. Modify the information and press the Enter key, or click anywhere outside of the
text field. The changes are applied.
3. Choose Save changes from the page Actions menu. The element information is
updated.
Tip: To select multiple, sequential items, hold the shift key down
and click the first and last items. To select multiple, non-sequential
items, hold the control key down and click each item.
Important: You must save the page before navigating away from it. If
you do not save the folio, it and any changes to it are lost.

Working with Folios
Grouping Content with Folios 10-9
10.2.3.2 Editing an Advanced Folio
An advanced folio is a folio that allows for a hierarchical structure and the insertion of
Hypertexts, which are hyperlinks to Web sites. Like a simple folio, items can be added,
deleted, or reordered within an advanced folio. Unlike simple folios, items can be
nested in folders (nodes), empty slots can be created as placeholders for content items,
and items can be added to an advanced folio by searching Oracle Content Server for
existing content, or by checking in new content through the folio interface.
The structure and content associated with an advanced folio is defined using elements
in an XML file stored in Oracle Content Server. This element information is displayed
in the Element Info Tray area of the Edit Folio Page. Element information is unique to
the folio. You can change the element information in the folio without affecting the
content item's metadata, or the information in any other folio that includes the content
item.
The structure of an advanced folio may be predefined in a template by the system
administrator. The structure of a template-based folio may or may not be modified
later, depending on the template.
10.2.3.2.1 Adding and Organizing Nodes and Slots Nodes and slots can be added to,
moved within, and removed from folios using the Edit Folio Page. Working with the
folio hierarchy and organizing items within it is similar to working with folders and
files in other environments, such as a computer file system. For example, you can
drag-and-drop content items into a folder or slot from the Source Items Tray, and
drag-and-drop nodes, slots, and items within the folio hierarchy area to reorganize
them. Additionally, right-click a node, slot, or item in the folio hierarchy section to
display a contextual menu with options for the selection identical to those in the
contextual menu of the Element Info area.
To add nodes or slots to a folio:
1. Navigate to the Edit Folio Page of the folio to modify.
2. Select the node in which to add a new node or slot. This can be the root node, or a
node within another node.
3. Right-click the selected node or click the contextual menu icon in the Element Info
area to open an element contextual menu.
4. Choose Create Node or Create Slot from the contextual menu. A new node or slot
is displayed.
5. Choose Save changes from the Actions menu to save the changes to the folder
hierarchy.
10.2.3.2.2 Adding Content Items to an Advanced Folio Content items are added to an
advanced folio by using the Source Items tray on the Edit Folio Page, the Element Info
contextual menu, a search results page, or a digital asset basket. For example, content
items are added to a folio by one of the following ways:
■ By using the Source Items area on the Edit Folio Page to search Oracle Content
Server for existing content, and then dragging the items into the folio hierarchy
For more information, see Section 10.2.3.2.3, "Adding Items from the Source Items
Area."
Important: If you do not save changes before navigating away from
the folio, any changes are lost.

Working with Folios
10-10 Oracle Fusion Middleware User's Guide for Oracle Content Server
■ By displaying a digital asset basket in the Source Items area on the Edit Folio Page,
and then dragging the items into the folio hierarchy
For more information, see Section 10.2.3.2.3, "Adding Items from the Source Items
Area."
■ By choosing Insert Item by Search from the Element Info contextual menu to
search for existing Oracle Content Server content and add it to the folio
For more information, see Section 10.2.3.2.4, "Inserting an Existing Item Using a
Contextual Menu."
■ By choosing Insert Item by Checkin from the Element Info contextual menu to check
a new content item into Oracle Content Server and add it to the folio
For more information, see Section 10.2.3.2.5, "Inserting an New Item Using a
Contextual Menu."
■ By using a search results page to add existing content to the Source Items area of a
new or existing advanced folio
For more information, see Section 10.2.3.2.6, "Adding Items from a Search Results
Page."
■ By publishing content gathered in a digital asset basket to a new folio created
during the publishing process
For more information, see Section 10.2.3.2.7, "Adding Items from a Digital Asset
Basket."
10.2.3.2.3 Adding Items from the Source Items Area The Source Items area of an Edit Folio
Page displays content checked into Oracle Content Server. The content may be
collected in a digital asset basket that is displayed in the Source Items area, or collected
using the Source Items area search feature. The source items contextual menu lists each
set of items that can be displayed in the Source Items area.
To add items to a folio from the Source Items area:
1. Navigate to the Edit Folio Page of the folio to which content is being added.
2. Choose the content set containing the items to add from the Source Items area
contextual menu.
3. Select the appropriate item in the Source Items area, and drag it to the node or slot
in the folio to which to add the item.
4. Choose Save changes from the Edit Folio Page Actions menu.
If no items have been collected into a digital asset basket or into the Source Items area,
you can search for items using the Source Items area search function.
To collect items into the Source Items area using the search function
1. Navigate to the Edit Folio Page of the folio to which content is being added.
2. Click Search in the Source Items area. The Search for Items page opens.
3. Select a profile to use for searching, if any, and click Next. A search form opens.
Important: If you do not save changes before navigating away from
the folio, any changes are lost.

Working with Folios
Grouping Content with Folios 10-11
4.
Select the criteria appropriate to the item for which you are searching, and click
Search. The Content Listing page opens.
5. Select the check box next to the item or items in the search results to collect, then
click Next. The items are listed in the Source Items area.
6. Choose Save changes from the Edit Folio Page Actions menu.
10.2.3.2.4 Inserting an Existing Item Using a Contextual Menu Items that have been checked
into Oracle Content Server can be searched for and inserted directly into a folio node
or slot by choosing Insert Item by Search from the Element Info contextual menu.
You can also right-click the appropriate node or slot to access this contextual menu.
To search for and insert a content item directly into a folio node or slot:
1. Navigate to the Edit Folio Page of the folio to which content is being added.
2. Select the node or slot into which the content goes.
3. To open the Element Info contextual menu, either right-click the node or slot, or
click the contextual menu in the Element Info area. The Element Info contextual
menu opens.
4. Choose Insert Item by Search. The Search for Item page opens.
5. Choose the criteria appropriate to the item for which you are searching, and click
Search. The Content Listing page opens.
6. Click Select next to the item to insert. The item is inserted into the folio.
10.2.3.2.5 Inserting an New Item Using a Contextual Menu New items that have not yet been
checked into Oracle Content Server can be inserted directly into a folio node or slot by
using Insert Item by Check In in the Element Info contextual menu. You can also
right-click the appropriate node or slot to access this contextual menu.
To search for and insert a content item directly into a folio node or slot:
1. Navigate to the Edit Folio Page of the folio to which content is being added.
2. Select the node or slot into which the content goes.
3. To open the Element Info contextual menu, either right-click the node or slot, or
click the contextual menu in the Element Info area. The Element Info contextual
menu opens.
4. Choose Insert Item by Check In. The Item Check In page opens.
5. Fill in the appropriate criteria for the item you are checking in, and click Check In.
A check in confirmation page opens.
6. Click Add Item to Folio. The item is inserted into the folio.
7. Choose Save changes from the Edit Folio Page Actions menu.
10.2.3.2.6 Adding Items from a Search Results Page You can add items from a search
results page either directly to a new folio, or to the Source Items area of an existing
folio or new template-based folio. When listed in the Source Items area, content can be
added to the folio by dragging it to the appropriate node or slot. For more information,
see Section 10.2.3.2.3, "Adding Items from the Source Items Area."
Note: Items cannot be selected across multiple pages of search
results.

Working with Folios
10-12 Oracle Fusion Middleware User's Guide for Oracle Content Server
To add items from a Search Results Page to a new folio:
1. From a search results page, select the check box next to the item or items you want
to add to the folio.
2. Choose Add items to folio from the table Actions menu above the check boxes.
The Add Items To Folio page opens.
3. Select New folio and click Next. The Pick Folio Type page opens.
4. Select Simple Folio, or select Advanced Folio and choose an appropriate
template, if any.
■ Selecting Simple Folio inserts the selected content items in the root node of a
flat, single node folio. For more information, see Section A.11.4, "Edit Simple
Folio Page."
■ Selecting Advanced Folio enables the Folio Template list, providing access to
folio templates with structure predefined by a system administrator. For more
information, see Section A.11.5, "Edit Folio Page."
5. Click Load folio. If Simple Folio was selected in Step 4, then the Edit Simple Folio
Page opens with the selected elements listed. If Advanced Folio was selected in
Step 4, then the Edit Folio Page opens with the selected content items inserted into
the root node of the advanced folio.
6. Choose Save changes from the Edit Folio Page Actions menu.
To add items from a Search Results Page to an existing folio:
1. From a search results page, select the check box next to the item or items you want
to add to the folio.
2. Choose Add items to folio from the table Actions menu above the check boxes.
The Add Items To Folio page opens.
3. Select Existing folio, and click Next. The Select Folio Profile page opens.
4. Select the appropriate profile, if any, and click Next. The Search for Existing Folio
page opens.
5. Choose the criteria appropriate to the folio for which you are searching, and click
Search. The Folio Listing page opens.
6. Click Select by the folio to which the content items are to be added. The Edit Folio
Page of the selected folio opens, with the content items listed in the Source Items
area. When listed in the Source Items area, content can be added to the folio by
dragging it to the appropriate node or slot. For more information, see
Section 10.2.3.2.3, "Adding Items from the Source Items Area."
7. Choose Save changes from the Edit Folio Page Actions menu.
Important: If you do not save changes before navigating away from
the folio, any changes are lost.

Working with Folios
Grouping Content with Folios 10-13
10.2.3.2.7 Adding Items from a Digital Asset Basket Digital asset baskets are used to
manage collected items. Items in digital asset baskets are displayed in the Source Items
area of a folio when a digital asset basket is chosen from the Source Items contextual
menu. When displayed in the Source Items area, content in a digital asset basket can
be added to the folio by dragging it to the appropriate node or slot. For more
information, see Section 10.2.3.2.3, "Adding Items from the Source Items Area."
Additionally, items in a digital asset basket can be published to a new folio from the
Digital Asset Basket page.
To publish content in a digital asset basket:
1. Open My Baskets in the My Content Server tray and select the digital asset basket
that contains the items to be published to a new folio. The digital asset basket page
for that basket opens.
2. Choose Publish to folio from the page Actions menu. The Edit Folio Page opens
with the published items inserted at the root level of a new folio.
3. Choose Save folio from the Edit Folio Page Actions menu.
4. Continue with Step 6 of Section 10.2.2, "Creating an Advanced Folio."
10.2.3.2.8 Updating Advanced Folio Element Information The content of an advanced folio
is associated with the folio using elements in an XML file stored in Oracle Content
Server. This element information is displayed in the Element Info Tray area of the Edit
Folio Page. Element information is unique to the folio. You can change the element
information in the folio without affecting the content item's metadata, or the
information in any other folio that includes the content item.
To update the element information in an advanced folio:
1. Select the node, slot, or item you want to update in the Folio Structure Tray of the
Edit Folio Page. The element information is displayed in the Element Info Tray.
2. Modify the information and press the Enter key, or click anywhere outside of the
text field. The changes are applied.
3. Choose Save changes from the page Actions menu. The element information is
updated.
10.2.4 Taking Snapshots
A folio's hierarchy is defined in an XML file checked into Oracle Content Server as a
content item. Like any content item in Oracle Content Server, a folio can have multiple
revisions. Unlike other content items, however, new revisions of a folio are created by
taking a snapshot of the folio using the Edit Folio Page Actions menu, rather than
explicitly checking out the content and checking in a new revision.
When a snapshot is taken, the current hierarchy is saved and duplicated as a new
revision. The new revision can continue to be edited. The previous revision maintains
the folio hierarchy at the point the snapshot was taken. Like any content item in Oracle
Content Server, you can access the revision history of the folio from the folio content
information page.
Important: If you do not save changes before navigating away from
the folio, any changes are lost.

Working with Folios
10-14 Oracle Fusion Middleware User's Guide for Oracle Content Server
To take a snapshot of a folio:
1. Navigate to the Edit Folio Page for the folio.
2. Choose Create snapshot from the Actions menu. The Edit Folio page refreshes.
10.2.5 Locking and Unlocking Folios
Locking a folio takes a snapshot of a folio and locks it, preventing it from being edited.
After a folio is locked, people who have rights to edit the folio are directed to the View
Folio page instead of the Edit Folio Page.
To lock a folio:
1. Navigate to the Edit Folio Page of the folio.
2. Choose Lock folio from the Actions menu. The View Folio page opens.
If required, a locked folio can be unlocked for additional edits. Unlocking a folio
duplicates the locked folios hierarchy as a new revision available for editing.
To unlock a folio:
1. Navigate to the Edit Folio Page of the folio.
2. Choose Create editable revision from the Actions menu. The Edit Folio page
opens.
10.2.6 Downloading Folio Renditions
When content in Oracle Content Server is associated in a folio, renditions of the
associated content can be made. Renditions are defined and made available by your
system administrator, and can be in a variety of forms. For example, a ZIP rendition
could be a single compressed file containing all folio content to which you have access.
Or a PDF rendition could assemble all folio content to which you have access into a
single PDF file suitable for printing. Additional renditions can be defined to meet your
organizations needs.
To download renditions of a folio:
1. Navigate to the Edit Folio Page of the folio.
2. Choose the rendition you require from the Renderers menu. A dialog box asking
for the download location opens.
Tip: You can verify that a new revision has been created by choosing
Content Item Info from the Actions menu on the Edit Folio Page and
reviewing the revision history on the Content Information page.
Important: A PDF rendition is only possible if the content associated
with the folio has a PDF web-viewable file. This requires that either
the associated content item is a PDF file, or that your system
administrator has set up PDF Converter to generate a PDF version.
Important: If the folio is associated with items that do not have a
PDF version and items that do, only the items with PDF versions
become part of the PDF rendition.

Working with Folios
Grouping Content with Folios 10-15
10.2.7 Finding Existing Folios
Because Oracle Content Server manages a folio as a single XML file, you can find folios
by searching Oracle Content Server in the same way you would find any content item.
You can use the search tray, the Advanced Search page, or the Quick Search field to
search for folio titles or other associated metadata. Only folios for which you have
permissions are displayed in the search results. A folio icon is displayed in the Actions
column of the search results field. Click the icon to display the folio. If you can edit the
folio, the Edit Folio Page opens, otherwise, the View Folio Page opens.
On the content info page of a content item that is in a folio, there is a Folio
Membership section (above the Revision table). This has a "show" link which, when
clicked, lists the folios to which the content is a member. There are also action icons
next to the listed folios with the option to View the Folio or see it's content info.
10.2.8 Viewing Folios
Folios can be viewed in the following ways:
■ Using the Edit Folio Page, which displays the folio hierarchy and allows the folio
to be edited, provided you have the rights to do so
■ Using the View Folio Page, which by default shows the folio hierarchy but cannot
be edited. Additional views can be defined by your system administrator, and
may not resemble the default folder hierarchy view.
■ Viewing the native XML file (file extension .xcsr) from a content information page
link.
10.2.9 Viewing Folio Information
Folio information, including revision history, is displayed on the content information
page of the XML file checked into Oracle Content Server. To access folio information,
click the Info icon next to a folio in the Actions column on a search results page, or
choose Content Item info from the Actions menu on the Edit Simple Folio Page, Edit
Folio Page, or View Folio Page.
10.2.10 Subscribing to Folios
You can subscribe to simple and advanced folios like any other item in Oracle Content
Server. Because changes can be made to folios and folio items without causing a new
revision to the folio, however, you can choose the types of changes that cause you to
be notified using the Subscribe to folio_name page.
To subscribe to changes made to a folio or folio items:
1. Choose Subscribe from the Content Actions menu on the content information
page of the folio to which you want to subscribe. The Subscribe to folio_name
page opens.
2. Select the check box next to one or more of the actions for which to be notified:
■ Child update: This notifies on any change to content linked to by this folio
■ Add: This notifies when anything is added to this folio
■ Modify: This notifies when attributes are modified in this folio
■ Delete: This notifies when anything is deleted from this folio

Working with Folios
10-16 Oracle Fusion Middleware User's Guide for Oracle Content Server
3.
Click Subscribe. The standard Oracle Content Server content information page for
the folio opens.
10.2.11 Using Digital Asset Baskets
Digital asset baskets are a useful way to collect items checked into Oracle Content
Server. You add content to a digital asset basket from the search results page. When
collected in a digital asset basket, items can be published to new folios or easily
accessed from within existing folios in the Source Items Tray of the Edit Folio Page.
Multiple baskets can be created using the Manage Content Baskets Page to help
organize content by project, author, date, type, or any other way that you find useful.
Content added to digital asset baskets still resides in the Oracle Content Server
repository. It does not change physical locations. Instead, the metadata for items in a
digital asset basket is updated to reflect the basket or baskets to which a content item
is added. Click a digital asset basket link to execute a search for the metadata reflecting
that digital asset basket, and returns a search result page listing the content items. This
allows content to be collected in multiple baskets.
10.2.11.1 Managing Digital Asset Baskets
Digital asset baskets are created and deleted using the Manage Content Baskets Page.
Multiple baskets can be created, but only one basket can be active at a time. Only the
active basket can have content added to it.
To create a digital asset basket:
1. Click My Baskets in the My Content Server tray. The Manage digital asset baskets
page opens.
2. Click Append basket. A new field is displayed on the page.
3. Enter a name for the basket in the new field.
4. Select Active next to the new basket to make it the active basket if desired,
otherwise leave disabled. Only the active basket can have content added to it.
5. Click Update. The new basket is displayed under My Baskets in the My Content
Server tray.
To delete a digital asset basket:
1. Click My Baskets in the My Content Server tray. The Manage digital asset baskets
page opens.
2. Select Delete next to the basket to delete and click Update. The basket is removed
from the Manage digital asset baskets page and from under My Baskets in the My
Content Server tray.
10.2.11.2 Working with Digital Asset Baskets
Multiple digital asset baskets can be created to help organize collected content. Only
the active basket can have content added to it. Content is added to the active basket
from a search results page. Content can be moved between baskets, copied into
another basket, or reordered within a basket.

Working with Folios
Grouping Content with Folios 10-17
10.2.11.2.1 Setting the Active Basket
You can set the active basket on the Manage Digital Asset Baskets page.
To set the active basket:
1. Click My Baskets in the My Content Server tray. The Manage Digital Asset
Baskets page opens.
2. Select Active next to the basket and click Update. The Basket Icon changes, and
Active is displayed next to the newly active basket under My Baskets in the My
Content Server tray.
10.2.11.2.2 Adding Content to the Active Basket You can add content to the active basket
from a search results page.
To add content to the active basket:
1. From a search results page, select the check box next to the item or items you want
to add to the active basket.
2. Choose Add to active basket from the table Actions menu above the check boxes.
The Home page opens.
3. To verify that the content is added to the active basket, open My Baskets in the
My Content Server tray and click the active basket icon. The active basket page
opens.
10.2.11.2.3 Moving and Copying Content Items If you inadvertently add content to the
wrong basket and want to move it, or to reorganize your content into different baskets,
you can do so. Also, you can copy content in one basket into another basket, so that it
is displayed in both.
To move or copy content items from one basket to another:
1. Open My Baskets in the My Content Server tray and click the basket link of the
basket from which you want to move or copy content.
2. Select the check box next to the item or items you want to move or copy.
3. Choose Move selected items or Copy selected items from the table Actions menu.
The Move Basket Items page or Copy Basket Items page opens.
4. Click the basket to which the items are to be moved or copied. The Home page
opens.
10.2.11.2.4 Removing Content Items Items can be removed from any digital asset basket.
To remove content items from a basket:
1. Open My Baskets in the My Content Server tray and click the basket link of the
basket from which you want to remove content.
2. Select the check box next to the item or items to remove.
3. Choose Remove selected items from the Actions menu. The Home page opens.

Working with Folios
10-18 Oracle Fusion Middleware User's Guide for Oracle Content Server
10.2.12 Understanding Folio Workflows
When working with folios in a workflow, it is important to remember that technically
a folio is an XML file checked into Oracle Content Server that lists associated content
in a meaningful way. When a folio is routed in a workflow, it is the XML file that is
being routed, so it is the structure of the folio that is being reviewed and edited, not
the content items associated with the folio. They are not routed.
Think of the folio as a list of items. When a folio is routed in a workflow, you are being
asked to review the list of items, and possibly to update, add to, or rearrange them. In
the example in Section 10.1.2.1, "Structured Organization of Content," a company used
a template to create a folio to include information for a sales presentation. The new
folio has the latest press releases and company background associated with it
automatically, based on the template, and empty slots for slide presentations from
several departments pertinent to the prospective client.
In this case, when the folio gets routed through a workflow, the appropriate people
are being asked to create slide presentations and insert them into the appropriate slots
on the folio. The slide presentations they work on can go through any number of
separate workflows and be checked in and out of Oracle Content Server any number
of times, but the folio won't move on in the workflow until content is associated with
the specified empty slots. After that is done and the folio moves out of workflow, the
folio is associated with the latest revisions of the content items listed in the folio, until
a snapshot of the folio is taken or the folio is locked.

11
Using Images and Videos 11-1
11Using Images and Videos
This chapter describes how to manage images and videos from within Oracle Content
Server using the Digital Asset Manager functionality. This functionality is installed
and disabled by default. Your system administrator chooses whether to enable this
functionality for your site. The chapter covers the following topics:
■ Section 11.1, "About Digital Asset Manager"
■ Section 11.2, "Working with Digital Asset Manager"
■ Section 11.3, "FlipFactory Supported Formats"
■ Section 11.4, "Included Image Rendition Sets"
11.1 About Digital Asset Manager
Digital Asset Manager enables you to quickly find, group, convert, and download
images and videos of various sizes, formats, and resolutions to meet your business
needs, all while maintaining a consistency of use across your organization. For
example, an organization may have a logo in a variety of sizes for advertisements, web
pages, and presentation, or a training video in a variety of formats for streaming on an
intranet, presenting to an audience, or copying to tape.
Work with your system administrator and other contributors to define the appropriate
size and output. At check in, the digital asset is automatically converted into the
defined formats and sizes, known as renditions. You can then search for the asset
using standard metadata or closed-caption text if it is a video asset. From the
Rendition Information page you can add renditions to a digital asset basket and
download a single compressed file of the renditions you need.
Figure 11–1 Overview

Working with Digital Asset Manager
11-2 Oracle Fusion Middleware User's Guide for Oracle Content Server
Digital Asset Manager adds the following pages to Oracle Content Server:
■ Rendition Information Page
■ Video Preferences Page
■ Digital Asset Basket Page
■ Add a Rendition Page
■ Rendition Parameters Page
■ DAM Search Fields Administration for content-server page
■ Link E-Mail Confirmation
■ Image Data page
■ Add/Edit Attachments page
Digital Asset Manager also adds functionality to the Content Check In, Content
Information, Content Information Update pages, all search result pages, and the My
Content Server tray.
11.2 Working with Digital Asset Manager
This section covers the following topics:
■ Section 11.2.1, "About Using Digital Asset Manager"
■ Section 11.2.2, "Supported Input Formats"
■ Section 11.2.3, "Supported Video Output Formats"
■ Section 11.2.4, "Checking In a Digital Asset"
■ Section 11.2.5, "Finding Renditions and Information"
■ Section 11.2.6, "Rendition Information Page"
■ Section 11.2.7, "Image Data Page"
■ Section 11.2.8, "Rendition Parameters Page"
■ Section 11.2.9, "Video Preferences Page"
■ Section 11.2.10, "Working with Renditions"
■ Section 11.2.11, "Working with Standard Content Items"
■ Section 11.2.12, "Digital Asset Manager on a Macintosh Client"
11.2.1 About Using Digital Asset Manager
Digital Asset Manager enables you to create and find images and videos in specified
formats and sizes. This helps your organization maintain consistent standards for
branding and asset use, while providing the right content to the right people in the
right format.
Digital Asset Manager creates multiple formats of digital assets automatically when
they are checked into Oracle Content Server, and lists the formats under one content
ID. Digital assets, such as a corporate artwork or commercial videos, maintain a
standard size and quality in each format required by your organization. The content
management and workflow features of Oracle Content Server uses only approved
versions because Digital Asset Manager creates them from a single source managed by
Oracle Content Server.

Working with Digital Asset Manager
Using Images and Videos 11-3
If you use digital assets, Digital Asset Manager gives you the confidence that you are
using the approved asset in the format for your needs. For example, an image of the
logo in a format for use on a web-site can be bundled and downloaded with other
formats of the logo for use in office presentations or print collateral, all from a single
digital asset checked into Oracle Content Server. Or, a low-bandwidth version of a
training video can be posted to a streaming server while a high-bandwidth version can
be provided to a vendor for replication to tape or DVD.
Each format created by Digital Asset Manager is called a rendition. Each image
rendition is created based on information regarding size, color, format, and other
criteria defined by your system administrator. Each video rendition is created based
on information regarding display size, bandwidth, and expected use. Renditions are
grouped into rendition sets. When you check in a digital asset, you choose a rendition
set, which then determines what renditions are created for the asset. When finding a
digital asset for use, all renditions of the asset are listed on the asset’s Rendition
Information page, and are available for download.
Figure 11–2 Example Image Rendition Set and Resulting Rendition Listing
Figure 11–3 Example Video Rendition Set and Resulting Rendition Listing

Working with Digital Asset Manager
11-4 Oracle Fusion Middleware User's Guide for Oracle Content Server
11.2.2 Supported Input Formats
Supported input formats are determined by the graphic or video conversion
application being used as set up by your system administrator.
Image Input Formats
Common image input formats include the following:
■ JPG/JPEG (Joint Photographic Expert Group)
■ GIF (Graphics Interchange Format)
■ BMP (Bitmap)
■ PNG (Portable Network Graphics)
■ TIFF (Tag Image File Format)
■ PSD (Adobe Photoshop)
■ AI (Adobe Illustrator)
■ PDF (Portable Document Format)
Image Video Formats
Common video input formats include the following:
■ Flash Media Format
■ MPEG Layer 3 and 4 Elementary Stream Media Format
■ PacketVideo MPEG4 Format
■ QuickTime Media Format
■ QuickTime Streaming Format
■ Windows Media Format
■ AVI Media Format
■ DVD Stream Media Format
■ MPEG1 System Stream Media Format
■ MPEG2 Program Stream Media Format
■ MPEG2 Transport Stream Format
■ MPEG4 Media Format
■ Pinnacle MediaStream Media Format
For a comprehensive listing of supported format, see the conversion application
documentations.
Formats supported by the conversion application must also be associated with the
conversion process within Oracle Content Server by the system administrator using
the Oracle Content Server Configuration Manager. If a supported format is not being
rendered, see your system administrator.

Working with Digital Asset Manager
Using Images and Videos 11-5
11.2.3 Supported Video Output Formats
Output formats are limited to what can be displayed effectively in your browser. Only
output formats supported by Windows Media Player, Real Player, Flash Player, or
Quicktime Player are available for viewing in your web browser. Any assets rendered
in a format not supported by those players is still be managed by Oracle Content
Server, but is available only for download only.
Digital Asset Manager currently supports the following video output formats:
■ MPEG Layers 1, 2, and 4 (.mpg, .mpeg, .mp2, .mp4)
■ Quicktime (.mov)
■ Audio Video Interleave (.avi)
■ Flash Video (.flv)
Other output formats not listed here but supported by your media player may work
when set up properly by your system administrator. For additional format requests,
see your system administrator. For information on formats supported by your media
player, see the player’s help system.
11.2.4 Checking In a Digital Asset
With Digital Asset Manager installed, the Rendition Set list is displayed.
Figure 11–4 Content Check in Form with Rendition Set List
To check in a digital asset, perform these steps:
1. Open the content check-in form.
2. Choose a rendition set from the Rendition Set list.
3. Enter a title and any additional metadata for the asset. The title you enter must be
249 or fewer characters in length.
4. Click Browse to locate the primary file.
5. Click Check In. The Check In Confirmation page opens.

Working with Digital Asset Manager
11-6 Oracle Fusion Middleware User's Guide for Oracle Content Server
Oracle Content Server uses the file extension, such as .psd, .jpg, .mov, or .avi, to
determine if an item is a digital asset. Digital assets checked in to Oracle Content
Server must have the correct file extension appended to the file name. For example, a
Photoshop file named CorporateLogo.psd is correctly identified by Oracle Content
Server as a digital asset, but one named CorporateLogo is not.
Do not select an alternate file when checking in a digital asset. Doing so prevents the
primary file from rendering.
11.2.5 Finding Renditions and Information
Digital Asset Manager builds on the functionality of Oracle Content Server. Searching
for digital assets is identical to searching for other types of content. Digital assets have
an additional icon displayed in the standard search results page. The Rendition
Information icon links to the Rendition Information page of the asset.
Figure 11–5 Search Result Page with Rendition Information Icon
Because you are working with images and videos, you may want to set your default
search result view to Thumbnail View. To do so, choose Thumbnail View from the
Content Actions menu on a search results page.
Figure 11–6 Thumbnail View Search Results Page.

Working with Digital Asset Manager
Using Images and Videos 11-7
11.2.6 Rendition Information Page
When a digital asset is checked into Oracle Content Server, multiple renditions are
created based on the rendition set chosen at the time of check in. Just like with
standard content, information about the original content item is indexed and
displayed on the Content Information page. However, with a digital asset, information
about the created renditions is also displayed on the Rendition Information page, and
on the story board and any closed-captioned text for video assets.
The Rendition Information page is accessed by a link on the Content Information page,
or from a search result page using the Rendition Information icon or the Rendition
information link in the item Actions menu.
The Rendition Information page lists the renditions of an asset and provides a variety
of information about each rendition.
Page Item Description
Content Information Displays the Content Information page for the digital asset, showing
metadata indexed by Oracle Content Server and a listing of any
revision history of the asset. It also provides access to actions that can
be taken on content items.

Working with Digital Asset Manager
11-8 Oracle Fusion Middleware User's Guide for Oracle Content Server
Preview section Shows a web-viewable rendition of the content item with minimal
metadata. For an image asset, click the preview image to display the
primary rendition in a new window. The primary image is specified
by the system administrator, and is typically larger than the preview
image.
Renditions list (video
asset only)
Switches the rendition format in the preview section, based on
available rendition formats.
Content ID The unique identifier used by Oracle Content Server to manage the
digital asset. Specified at check in.
Native File The name of the source file of the digital asset.
File Size The storage size of the source file.
Format Identifies the format of the native file, the mime type.
Video Length (video
asset only)
Specifies how much time it takes to play the full video.
Rendition Set Identifies the metadata option selected when the digital asset was
checked in that determines what renditions are created.
Navigation section
(video asset only)
Provides options for navigating through a digital asset using
keyframes in a storyboard, or closed caption text if it is available.
Storyboard (video
asset only)
Displays a series of keyframes from various intervals in the video.
Click a keyframe to initiate the video at that point in the preview
section. The number of keyframes displayed is configured on the
Video Preferences page.
Click the plus icon above a keyframe to expand the storyboard,
inserting additional keyframes after the one whose icon was clicked.
The storyboard enables you to drill down to view keyframes
representing shorter intervals of time in the video.
Closed Captions
(video asset only)
Displays the closed captioned text of a video if it is available. Click the
icon next to a line of text to initiate the video at that point in the
preview section. If no closed captioned text is available in the video,
this tab is not displayed.
Video Preferences
(video asset only)
Displays the Video Preferences page, on which you can specify the
video format and bandwidth preference for the preview on the
Rendition Information page, and the number of keyframes displayed.
Plus/Minus icon
(video asset only)
Click the plus icon above a keyframe to expand the storyboard,
inserting additional keyframes after the one whose icon was clicked.
Click Refresh in the upper right of page to collapse all opened
keyframes.
Renditions section Lists the renditions stored under the content ID.
Rendition Name Name for each rendition, defined in the rendition set chosen at the
time the digital asset was checked in or updated.
Rendition Name
Info icon
Displays the Rendition Parameters page. The Rendition Parameters
page lists information regarding the parameters of the specific
rendition as logged by the conversion application when the rendition
was created. This information is valuable to you if you need detailed
information about the rendition creation process, or about rendition
parameters otherwise unavailable to you.
Rendition Name
Description icon
(image asset only)
Displays a more detailed description of the rendition. If no icon is
present, then no description exists for the rendition.
Page Item Description

Working with Digital Asset Manager
Using Images and Videos 11-9
Figure 11–7 Rendition Parameters listing with information about the cause of the failure.
Accessing The Rendition Information Page
To access the Rendition Information page of a digital asset from any page in Oracle
Content Server, perform one of these steps:
1. Search for the digital asset for which to view rendition information.
2. Click the Rendition Information icon next to the appropriate digital asset on a
search results page, or choose Rendition Information from the item Action menu.
The Rendition Information page opens.
Format Identifies the rendition’s file format, or way of organizing and storing
the information in the rendition file, as the mime type.
If an image rendition fails, then the format column displays Not
Converted for that rendition. Click the Rendition Name Info Icon of
a failed rendition to display the Rendition Parameters page with
information about the cause of the failure.
Size (video asset
only)
Lists the required storage size of a rendition.
Dimensions (video
asset only)
Lists the height and width, in pixels, of a rendition.
Framerate (video
asset only)
The rate at which each frame of a video is presented, specified in
Frames Per Second.
Renditions menu Download: Bundles the selected renditions into a single compressed
file and copies the file to a local or networked storage space.
Add to Basket: Adds the selected renditions and the native file to the
digital asset basket.
E-mail Links: Opens a prompt that enables the user to enter one or
more e-mail addresses. Then the e-mail is generated and sent from
within the server, after which a confirmation page is shown that
displays the format of the e-mail. The URL links to the selected
rendition or native file are copied into the body of a new message.
Delete: (image asset only) Removes selected renditions from the
rendition set.
Add a New Rendition: (image asset only) Displays the Add a
Rendition page, enabling a user to manually attach a file to the
existing rendition set.
Page Item Description

Working with Digital Asset Manager
11-10 Oracle Fusion Middleware User's Guide for Oracle Content Server
Alternately, you can access the Rendition Information page from the digital asset
basket by performing these steps:
1. Click the My Content Server tray, click My Baskets, and then click Digital Asset
Basket.
2. Click the Rendition Information icon next to the appropriate digital asset in your
digital asset basket. The Rendition Information page opens.
When the Rendition Information page opens, click the tabs at the top of the page to
switch between the Content Information page, the Rendition Information page, and
the Image Data page for the asset.
11.2.7 Image Data Page
The Image Data page displays information about the native image file checked into
Oracle Content Server. However, what that information is and how it is displayed is
contingent on:
■ The specific information the camera or application captures, and
■ Whether the image is generated by a digital camera or an application (such as
Photoshop).
Image Information
The specific information that is displayed is dependent on the type of camera or
application being used to generate the image. Different digital cameras collect
different information, depending on the camera features and capabilities.
Additionally, one camera might have a built-in GPS system and can record GPS
coordinates into the image file. Another camera might not have that capability, and so
wouldn't be able to output that information to the Image Data page. Similarly, an
application such as Photoshop may generate information specific to its feature set
while Paint Shop Pro would generate different information specific to its different
feature set.
Display Formats
How the information is displayed on the Image Data tab is dependent on whether the
native image file is a JPEG from a digital camera or if it is from an application. Digital
cameras store information using the EXIF standard (Exchangeable Image File format),
which is a subset of the XMP standard (Extensible Metadata Platform). Both methods
use the Oracle Outside In filters to generate XML to structure the data.
If the image is a JPEG from a digital camera, Outside In specifies the document type as
JPEG File Interchange, and the EXIF data is displayed on the Image Data tab in a flat
listing. If the image is from an application such as Adobe Photoshop, Outside In
specifies the document type as coming from the application (for example, document
type="Adobe Photoshop"), and the XMP data is displayed on the Image Data tab
with some hierarchical structure.
Figure 11–8 shows the contents of the Image Data tab for a checked in digital photo. In
this case, the information includes the image thumbnail and the photo’s digital
properties.
Note: If the image is a digital photograph that has been manipulated
in Photoshop, the EXIF data gets aggregated and formatted as part of
the XMP data, because EXIF is a subset of XMP.

Working with Digital Asset Manager
Using Images and Videos 11-11
Figure 11–8 Image Data Page of a Digital Photo
Figure 11–9 shows the contents of the Image Data tab for a Photoshop document with
the XMP data displayed in a hierarchy.
Figure 11–9 Image Data Page of a Photoshop Image
Accessing the Image Data Page
To access the Image Data page of a digital asset from any page in Oracle Content
Server, perform one of these steps:
1. Search for the digital asset for which to view rendition information.
2. Navigate to either the Rendition Information page or the Content Information
pages, and click the Image Data tab
3. Click the Image Data tab.

Working with Digital Asset Manager
11-12 Oracle Fusion Middleware User's Guide for Oracle Content Server
Alternately, you can access the Image Data page from the digital asset basket by
performing these steps:
1. Click the My Content Server tray, click My Baskets, and then click Digital Asset
Basket.
2. Click the Rendition Information icon next to the appropriate digital asset in your
digital asset basket. The Rendition Information page opens.
When the Image Data page opens, click the links at the top of the page to switch
between the Content Information page, the Rendition Information page, and the
Image Data page for the asset.
11.2.8 Rendition Parameters Page
To access the Rendition Parameters page, click the Rendition Name Information icon
next to a rendition name on the Rendition Information page.
If an image rendition fails, the format column in the Renditions section of the
Rendition Information page displays Not Converted for that rendition. In the case
of a failed rendition, the Rendition Parameters page displays information about the
cause of the failure.
Figure 11–10 Example of an image Rendition Parameters page.

Working with Digital Asset Manager
Using Images and Videos 11-13
Figure 11–11 Example of a Video Rendition Parameters Page.
Accessing The Rendition Parameters Page
To access the parameters of each specific rendition, perform these steps:
1. Access the Rendition Information page.
2. Click the Rendition Name Info icon. The Rendition Parameters page opens.
11.2.9 Video Preferences Page
To play a video rendition, use the preview section of the Rendition Information Page
or click a web-viewable link on the Content Information, digital asset basket, or search
results pages. Digital Asset Manager determines what format to use as the default for
the preview window based on information you specify on the Video Preferences page.
You can also specify the number of keyframes displayed in the storyboard on the
Rendition Information page, and your preferred bandwidth for the preview.
Other features of the Video Preferences page enable you to specify a video player for
each rendition format and to set a No Player Option and a No Format Option for both
that affect the preview display on the Rendition Information Page. To open and play
renditions in a standalone player, click the rendition name in the rendition section of
the Rendition Information page. The player chosen is then determined by file format
and helper application settings unique to your computer and browser, outside of
Video Manager.

Working with Digital Asset Manager
11-14 Oracle Fusion Middleware User's Guide for Oracle Content Server
Accessing the Video Preferences Page
To access the Video Preferences page, perform these steps:
1. Access the Rendition Information page, or click the My Content Server tray.
2. Click Video Preferences. The Video Preferences page opens.

Working with Digital Asset Manager
Using Images and Videos 11-15
11.2.9.1 No Format Option
Depending on what priority you have assigned to the No Format option in the Video
Format Preference Order section on the Video Preferences Page, the preview area of
the Rendition Information Page may or may not display the video preview player. For
example, the following graphic illustrates that this rendition set does not contain any
preferred video format. That is, all formats available in this set appear below the No
Format option in the Video Format Preference Order which means that they have been
suppressed.
Page Item Description
Video Format
Preference Order
Specifies the preferred media format used in the Rendition
Information page preview section for renditions, and with a
rendition’s web-viewable link in a search result, digital asset basket,
or content information page. Because a rendition set may not have a
rendition in the preferred format, Video Manager plays the rendition
using the first available format found in the order listed here.
The NoPlayer option enables you to suppress one or more of the
media formats here, depending on your preference. The placement of
the NoPlayer option determines what media format is available. For
example, if you move the NoPlayer option immediately following
WindowsMedia, then all other formats are ignored. For more
information, see Section 11.2.9.1, "No Format Option."
Move Up Moves a selected media format up in the preference order.
Move Down Moves a selected media format down in the preference order.
Video Bandwidth
Preference
Specifies the preferred size of streaming and local videos by using the
size information from the rendition listing.
Low: Smaller video best suited when connecting to Video Manager
using a modem to dial in.
High: Larger video best suited when connecting to Video Manager
through a high speed connection, such a corporate network or
broadband internet connection.
Max Keyframe
Segment Length
Specifies the maximum number of keyframes displayed at each
drill-down level in the storyboard section of a Rendition Information
page.
Player Preference By
Format
Enables you to specify a video player for each media format included
in the list. For more information, see Section 11.2.9.2, "No Player
Option."
Update Submits changes made to the Video Preferences page.

Working with Digital Asset Manager
11-16 Oracle Fusion Middleware User's Guide for Oracle Content Server
11.2.9.2 No Player Option
The Player Preference By Format section of the Video Preferences Page enables you to
set a video player for each media format included in the list. For example, if you set
the preference for Quicktime to be No Format, then this option suppresses that format
in the preview area of the Rendition Information Page as illustrated in the following
graphic. Click Access this rendition directly to open a new window and play the
video using the applicable default player.
11.2.10 Working with Renditions
Digital Asset Manager not only creates renditions automatically, it provides a personal
space where you can store renditions you are currently working on, called the digital
asset basket. Your digital asset basket is unique to you, and contains only the
renditions you choose to include.
You can add items to your digital asset basket from a search results page, from the
Rendition Information page, or from the Content Information page. To view the items
in your digital asset basket, click My Baskets and then Digital Asset Basket in the My
Content Server tray.
By design, the digital asset basket can contain renditions from different revisions of the
same digital asset. If you use your basket to quickly find a rendition of an asset, such
as a corporate logo or video, remember that you may not be accessing the most recent
revision of the asset. If a newer revision has been checked into Oracle Content Server,
a notification is displayed next to the revision number in the Description column. Click
the notification to display the Content Information page of the latest revision.
You can do the following tasks with renditions:
■ Section 11.2.10.1, "Storing Renditions in Your Digital Asset Basket"
■ Section 11.2.10.2, "Viewing Items in Your Digital Asset Basket"
Note: The No Format Option placement always overrides the
selected settings for media formats listed in the Player Preference By
Format section.

Working with Digital Asset Manager
Using Images and Videos 11-17
■ Section 11.2.10.3, "Removing Items from Your Digital Asset Basket"
■ Section 11.2.10.4, "Adding and Removing Renditions in a Rendition Set"
■ Section 11.2.10.5, "Downloading Multiple Items"
■ Section 11.2.10.6, "Creating Renditions"
■ Section 11.2.10.7, "Updating Renditions"
11.2.10.1 Storing Renditions in Your Digital Asset Basket
You can store any rendition from any revision of a digital asset in your digital asset
basket, and the web-viewable or native file from any revision of a content item,
provided the revision is released by Oracle Content Server.
From the digital asset basket, you can select renditions from one or multiple assets to
be compressed into a single file and downloaded to a local or networked drive, or
send links to selected renditions in an e-mail. You can also use the digital asset basket
to access the content information and rendition information pages of content items and
digital assets.
You can add items to your digital asset basket from the following pages:
■ Rendition Information page (native file and all renditions)
■ Content Information page (native and web-viewable files only)
■ Search Results page (native and web-viewable files only)
When you add a rendition to the digital asset basket, it may not be listed at the top of
the digital asset basket page. Items in the digital asset basket are listed in descending
order first by content ID and then by revision number. If a rendition of a content item
revision is in the digital asset basket, additional renditions are added to that revision’s
listing. Additionally, if a newer revision of a content item in your digital asset basket
has been checked into Oracle Content Server, a notification is displayed next to the
revision number in the Description column. Click the notification to display the
Content Information page of the latest revision.
To add renditions to your digital asset basket from the Rendition Information page,
perform these steps:
1. Access the rendition information page of an asset. The rendition information page
opens.
2. Select the check box next to a rendition to add the rendition to your digital asset
basket.
3. From the Renditions list, choose Add to Basket. The Digital Asset Basket page
opens with the renditions you selected listed in the Selected Renditions column of
the item.
To add all renditions to your digital asset basket, select all items. You do not have to
select the check box next to any rendition if using this option.
To add the native or web-viewable file to your digital asset basket from the Content
Information page, perform the following steps:
1. Access the Content Information page of an item.
2. From the Content Actions menu, choose one of these:
■ Add Native File to Digital Asset Basket
■ Add Web-Viewable File to Digital Asset Basket

Working with Digital Asset Manager
11-18 Oracle Fusion Middleware User's Guide for Oracle Content Server
The Digital Asset Basket page opens with the selected items listed in the Selected
Renditions column of the item.
You cannot add both the native file and the web-viewable file to the digital asset
basket at the same time using the Content Information page. If the item is a digital
asset and has a Rendition Information page, use it to add multiple items to the digital
asset basket at the same time.
To add the native or web-viewable file to your digital asset basket from a search results
page, perform the following steps:
1. From a search results page, select the check box next to the item or items you want
to add to your digital asset basket.
2. From the Content Actions menu, choose either of these items:
■ Add Native Files to Digital Asset Basket
■ Add Web-Viewable Files to Digital Asset Basket
The Digital Asset Basket page opens with the selected items listed in the Selected
Renditions column of the item.
To add all native or web-viewable items on a search results page to your digital asset
basket, choose All from the Select menu. You do not have to select the check box next
to any item if using this option. Also, web-viewable files of video renditions added to
the digital asset basket are suitable for viewing only from the digital asset basket. They
cannot be downloaded from the digital asset basket. To download a rendition, use the
Rendition Information page.
11.2.10.2 Viewing Items in Your Digital Asset Basket
To access the digital asset basket, click My Basket and then Digital Asset Basket in
the My Content Server tray. From the digital asset basket, you can select renditions
from one or multiple assets to be compressed into a single file and downloaded to a
local or networked drive, or send links to selected renditions in an e-mail. You can also
use the digital asset basket to access the content information and rendition information
pages of content items and digital assets.
To access the Digital Asset Basket page, perform these steps:
1. Click the My Content Server tray.
2. Click My Baskets.
3. Click Digital Asset Basket.
The digital asset basket page opens.

Working with Digital Asset Manager
Using Images and Videos 11-19
Digital Asset Basket Page
Items in the digital asset basket are listed in descending order first by content ID and
then by revision number. If a rendition of a content item revision is in the digital asset
basket, additional renditions are added to that revision’s listing.
Page Item Description
Thumbnail Opens the web-viewable rendition in a separate window. The
web-viewable rendition is specified by your system administrator,
and is typically larger than the thumbnail or preview renditions. And
for video assets the web-viewable rendition is determined by the
choices made on the Video Preferences Page.
Description Title, native file, Content ID, and Revision metadata of the content
item.
If a newer revision of the content item has been checked into Oracle
Content Server, a notification is displayed next to the revision
number. Click the notification to display the Content Information
page of the latest revision.
Selected Renditions Listing of all renditions of a content item saved to the digital asset
basket.
Content Info icon Links to the Content Information page of an item.
Rendition Info icon Links to the Rendition Information Page of an item.
Items menu
■ Download: Bundles the selected items into a single compressed
file and copies the file to a local or networked storage space.
Web-viewable files of video renditions added to the digital asset
basket are suitable for viewing only from the digital asset basket.
They cannot be downloaded from the digital asset basket. To
download a rendition, use the Rendition Information Page.
■ E-mail Links: Opens a prompt that enables the user to enter one
or more e-mail addresses. Then the e-mail is generated and sent
from within the server, after which a confirmation page is shown
that displays the format of the e-mail. The URL links to the
selected items are copied into the body of a new message.
■ Remove: Removes the selected items from the digital asset basket.
■ Empty Basket: Removes all items from the digital asset basket.

Working with Digital Asset Manager
11-20 Oracle Fusion Middleware User's Guide for Oracle Content Server
11.2.10.3 Removing Items from Your Digital Asset Basket
Your digital asset basket is meant to store renditions to which you currently need
access. Because you can store renditions from different revisions of a digital asset in
the digital asset basket, renditions listed in the digital asset basket are not necessarily
the latest revision. It is a good idea to remove the renditions from your digital asset
basket when you are no longer working with them.
You can store a link to the most recent revision of any content item in Oracle Content
Server by searching for the item’s content ID, then choosing Save Search from the
Content Actions menu on the search result page. This saves the search as a link in the
My Saved Queries folder in your My Content Server tray. Click the saved search link
to always access the most recent revision of a content item.
To remove individual renditions from your digital asset basket:
1. Click the My Content Server tray, click My Baskets, and then click Digital Asset
Basket.
The digital asset basket page opens.
2. Select the check box next to the renditions to be removed in the Selected
Renditions column on the digital asset basket page.
3. Choose Remove from the Items menu.
The items are removed from the digital asset basket.
To remove all items from your digital asset basket:
1. Click the My Content Server tray, click My Baskets, and then click Digital Asset
Basket.
The digital asset basket page opens.
2. Choose Empty Basket from the Items menu.
All items in the digital asset basket are removed. You do not have to select the
check box next renditions when removing them all from your basket.
Removing renditions and other items from your digital asset basket does not remove
them from Oracle Content Server. Renditions and other items can be removed from
Oracle Content Server using the Rendition or Content Information pages. Renditions
and other items listed in your digital asset basket are not available if they have been
removed from Oracle Content Server.
11.2.10.4 Adding and Removing Renditions in a Rendition Set
Digital Asset Manager automatically creates multiple renditions of digital assets and
manages them in Oracle Content Server under one content ID. This provides the
content management and workflow benefits of Oracle Content Server while ensuring
that you have access to all the types of renditions you need. One content ID provides
single-point access to all items relevant to the digital asset.
In some situations, you may want to associate an additional rendition or other file to a
digital asset, or remove a rendition that is no longer useful. For example, you may
need a rendition that is a slightly different size than the one created by the rendition
set, or uses a different color palette, so you want to add the new one and remove the
old one. Or, you may have a text file with instructions to a vendor on how they are to
use a logo. Files such as these can be added to a digital asset’s existing set of renditions
using the Add a Rendition page, accessed from the Rendition Information page, and
removed directly from the Rendition Information page.

Working with Digital Asset Manager
Using Images and Videos 11-21
Add a Rendition Page
The Add a Rendition page is accessed from the Renditions menu on the Rendition
Information page of an asset. An added rendition is assumed to be a graphic file, and
metadata fields on the Add a Rendition page allow you to manually add information
pertinent to graphic renditions. Added renditions can be any type of file, however. For
example, if you have a text file with instructions on how to output a PDF file, you can
attach the text file as a rendition of the original asset. You should note, though, that
Oracle Content Server does not manipulate added renditions. It does not modify a
rendition based on information entered into the metadata fields, nor does it convert an
added rendition to a web-viewable format, nor index it for searching.
■ Metadata on the Add a Rendition page is for information only. It does not change
the size of an added graphic file, and it does not get indexed for searching.
■ Any type of file can be added as a rendition. It does not have to be a graphic file.
To view added renditions, you must have the native application or suitable viewer
for the added rendition’s file format.
Page Item Description
Name A descriptive name given to the attached file, listed in the Rendition
Name column on the Rendition Information page.
Description Description of the attached file, listed on the Rendition Information
page when the Rendition Name Description icon is clicked.
File Used to locate the file to be attached.
Width Used to specify the width of the attached file in the Dimensions
column on the Rendition Information page. This assumes the
attachment is a graphic file.
Height Used to specify the height of the attached file in the Dimensions
column on the Rendition Information page. This assumes the
attachment is a graphic file.
Resolution Used to specify the resolution of the attached file in the Resolution
column on the Rendition Information page. This assumes the
attachment is a graphic file.

Working with Digital Asset Manager
11-22 Oracle Fusion Middleware User's Guide for Oracle Content Server
To add a rendition to an existing rendition set:
1. Access the Rendition Information page.
2. Choose Add New Rendition from the Renditions menu. The Add a Rendition
page opens.
3. Enter a name for the rendition in the Name field (required). The name is displayed
in the Rendition Name column of the Rendition Information page.
4. Enter a description for the rendition in the Description field (optional). The
description is displayed when the Rendition Name Description icon in the
Rendition Name column of the Rendition Information Page is clicked.
5. Click Browse to locate the rendition or other file you want to add to the rendition
set (required). It can be any type of file.
6. Fill in the pixel dimensions and resolution information in the Width, Height, and
Resolution fields (optional).
7. Click Add Rendition. The Rendition Information page opens, showing the added
rendition.
Metadata on the Add a Rendition page is for information only. It does not change
the size of an added graphic file, and it does not get indexed for searching.
To delete a rendition from an existing rendition set:
1. Access the Rendition Information page.
2. Select the check box next to the rendition you want to delete. You can select
multiple renditions to delete.
3. Choose Delete from the Renditions menu. The Rendition Information page opens
without the deleted rendition.
Renditions and other items are not available if they have been removed from
Oracle Content Server. When a rendition is deleted from the system, it disappears
from the basket display.
11.2.10.5 Downloading Multiple Items
Renditions and other content items can be compressed into a single file and
downloaded to a local or networked drive. This is useful when you want to send
multiple renditions or native files to others. This can be done from the Digital Asset
Basket page or Rendition Information page.
To download multiple renditions:
1. Access the digital asset basket or Rendition Information page.
2. Select the check box next to the renditions you want to download. The renditions
are listed in the Selected Renditions column of the Digital Asset Basket page, or
the Rendition Name column of the Renditions Information page.
3. Choose Download from the Renditions menu on the Rendition Information page
or from the Items menu on the Digital Asset Basket page.
4. Follow the download instructions as they are displayed on screen.

Working with Digital Asset Manager
Using Images and Videos 11-23
11.2.10.6 Creating Renditions
Renditions are created automatically when a digital asset is checked in. The types of
renditions created are determined by criteria defined in the selected rendition set.
To create renditions:
1. Access the Content Check In form.
2. Choose a rendition set from the Rendition Set list.
3. Enter a title and any additional metadata for the asset. The title you enter must be
249 or fewer characters in length.
4. Click Browse to locate the primary file.
5. Click Check In. The Check In Confirmation page opens.
Notes
■ Oracle Content Server uses the file extension, such as .psd, .jpg, .mov, or .avi, to
determine if an item is a digital asset. You must append the correct extension to
the file name for all digital assets checked in to Oracle Content Server. For
example, a Photoshop file named CorporateLogo.psd is correctly identified by
Oracle Content Server as a digital asset, but one named CorporateLogo is not.
■ Do not select an alternate file when checking in a digital asset. Doing so prevents
the primary file from rendering.
11.2.10.7 Updating Renditions
If an incorrect rendition set was selected when a digital asset was checked in, or if a
new rendition set has been created, you may want to update the renditions created for
a digital asset.
To update to a different rendition set, perform these steps:
1. Choose Update from the Content Actions menu on the Content Information page.
2. Choose a different rendition set from the Rendition Set list.
3. Click Submit Update. The Content Information page opens.
Notes:
■ To download all renditions in your digital asset basket, or on the
Rendition Information page, select all items, and then choose the
Download menu option. You do not have to select the check box
next to any rendition if using this option.
■ Web-viewable files of video renditions added to the digital asset
basket are suitable for viewing only from the digital asset basket.
They cannot be downloaded from the digital asset basket. To
download a rendition, use the Rendition Information page.
■ Renditions and other items can be removed from Oracle Content
Server using the Rendition or Content Information pages.

Working with Digital Asset Manager
11-24 Oracle Fusion Middleware User's Guide for Oracle Content Server
Notes
■ Rendition information cannot be displayed while an asset is being processed by
Oracle Content Server and Digital Asset Manager. If an asset is still being
processed, the status in the revision history on the Content Information page is
listed as GenWWW, and the Rendition Information page displays a message
saying the content item is not released yet.
■ Updating a rendition set replaces the previous renditions with a new set,
effectively removing the previous set from Oracle Content Server.
11.2.11 Working with Standard Content Items
Digital Asset Manager adds functionality to Oracle Content Server that extends to
content items that are not digital assets. You can add native and web-viewable
versions of content items to your digital asset basket, and add or delete attachments to
content items from the Content Information page.
Add/Edit Attachments
In some situations, you may want to associate an additional rendition or other file to a
content item that is not a digital asset, or remove an attachment that is no longer
useful. For example, you may attach a customer’s new logo to a piece of collateral in
which it is used and remove the old one, or you may attach a text file with project
contact information to a project plan. Files such as these can be added to a content item
using the Add/Edit Attachments page, accessed from the Content Actions menu on
the Content Information page. Attached files are not converted to a web-viewable
format, and are not indexed for searching by Oracle Content Server.
Figure 11–12 Adding or Editing an attachment with the Edit Attachments page
Page Item Description
Attachment column Lists the name given to an existing attached file at the time it was
attached.

Working with Digital Asset Manager
Using Images and Videos 11-25
To add an attachment to a content item:
1. Access the Content Information page.
2. Choose Add/Edit Attachments from the Content Actions menu. The Add/Edit
Attachments page opens.
3. Enter a name for the attachment in the Name field (required). The name is
displayed in the Attachments section of the Content Information page.
4. Enter a description for the rendition in the Description field (optional). The
description is displayed in the Attachments section of the Content Information
page.
5. Click Browse to locate the rendition or other file you want to attach to the content
item (required). It can be any type of file.
6. Click Add/Edit Attachments. The Content Information page opens, showing the
attached file in the Attachments section.
Metadata on the Add/Edit Attachments page is for information only. It does not
get indexed for searching.
To delete an attachment from a content item:
1. Access the Content Information page.
2. Choose Add/Edit Attachments from the Content Actions menu. The Add/Edit
Attachments page opens.
3. Select the check box next to the attachment you want to delete. You can select
multiple attachments to delete.
4. Click Edit Attachments. The Content Information page opens without the
attachment.
11.2.12 Digital Asset Manager on a Macintosh Client
Digital Asset Manager renders digital assets when checked in using a Macintosh client
provided the filename of the asset has a valid file extension. However, files created on
Macintosh operating systems before OS X may have information stored in a file
resource fork. Information in a resource fork is not transferred. This may include
custom fonts used by the file.
Depending on your organization’s needs, removing the resource fork generally does
not create a problem. One exception to this is if the asset uses custom fonts and the
rendition set includes a PDF rendition.
Description column Lists the description given to an existing attached file at the time it
was attached.
Name field Used to enter the name of the file to be attached. Displayed in the
Attachments section of the Content Information page.
Description field Used to enter the description of the file to be attached. Displayed in
the Attachments section of the Content Information page.
File field Used to locate the file to be attached.
Add/Edit Attachment
Button
Submits the information to Oracle Content Server.
Page Item Description

FlipFactory Supported Formats
11-26 Oracle Fusion Middleware User's Guide for Oracle Content Server
11.3 FlipFactory Supported Formats
Digital Asset Manager currently supports use of Telestream’s FlipFactory for video
conversion. Visit the Telestream site or consult the FlipFactory help system for
additional documentation on FlipFactory (www.telestream.net).
Formats supported by the video conversion application must also be associated with
Oracle Content Server by the system administrator using the Oracle Content Server
Configuration Manager. If a supported format is not being rendered, see your system
administrator.
FlipFactory supports the following formats:
■ Section 11.3.1, "Streaming Media Formats"
■ Section 11.3.2, "Broadcast Media Formats"
■ Section 11.3.3, "Professional Media Formats"
11.3.1 Streaming Media Formats
Format Description
3GP Media Format .3gp
Flash Media Format .flv
MPEG Layer 3 Elementary Stream Media
Format
MPEG Layer 3 is compliant with the MPEG-3
global standard; it interoperates with MPEG-3
compliant hardware and software from other
companies.
MPEG Layer 4 Elementary Stream Media
Format
MPEG Layer 4 is compliant with the MPEG-4
global standard; it interoperates with MPEG-4
compliant hardware and software from other
companies.
PacketVideo MPEG4 Format PacketVideo MPEG-4 is compliant with the
MPEG-4 global standard; it interoperates with
MPEG-4 compliant hardware and software
from other companies. PacketVideo MPEG-4
is compliant with the following standards:
MPEG-4 (ISO/IEC), H.263 baseline (ITU),
3G-324M (3GPP), RTSP/RTP/RTCP (IETF).
QuickTime Media Format FlipFactory uses the Basic Sorenson codec by
default. If the Sorenson codec is to be used for
professional work, Telestream recommends
that you replace the Basic Sorenson codec
with the Sorenson Professional codec. The
Professional codec can be obtained directly
from Sorenson at www.sorenson.com.
QuickTime Streaming Format FlipFactory uses the Basic Sorenson codec by
default. If the Sorenson codec is to be used for
professional work, Telestream recommends
that you replace the basic codec with the
Sorenson Professional codec. The Professional
codec can be obtained directly from Sorenson
at www.sorenson.com.
VideoClipStream Media Format .asf
WAVE Audio Media Format .wav
Windows Media Format .wmf

FlipFactory Supported Formats
Using Images and Videos 11-27
11.3.2 Broadcast Media Formats
11.3.3 Professional Media Formats
Format Description
Abekas 6000 Format Connection to an Abekas 6000 server is
through its network ports: 10/100 Ethernet,
Gigabit Ethernet, or Fibre Channel. Contact
Accom or Telestream technical support for
details.
Grass Valley Group Profile GXF Media
Format
Connection to Grass Valley Group server’s
real-time system must be made through a
10/100 Ethernet card (XP) or Fibre Channel
(PDR and XP). Contact the Grass Valley
Group or Telestream technical support for
details.
Profile Direct Convert Codec
Profile Direct Convert video codec converts
any MPEG2 video directly into Grass Valley
Profile format. This does not require decoding
to baseband and then re-encoding to the new
format. The media file is deconstructed from
one format and reconstructed into the Profile
format. Generally, this is done many times
faster than real time. The video profile, GOP
structure and bit rate are retained. For
example, If the input file is standard MPEG2
50Mbps, I-frame only, then the resulting
converted file is GVG GXF 50Mpbs I-frame
only.
Leitch Media Format
MXF Media Format .mxf
Omneon Media Format .omf
SeaChange Media Format
Sony MAV70 Media Format
Vortex Media Format
Format Description
AVI Media Format
Avid OMF Media Format
Avid TransferManager DV Media Format
ClipMail MPEG Format
DV Stream Media Format
DVD Stream Media Format
IPV SpectreView Media Format
MPEG1 System Stream Media Format
MPEG2 Program Stream Media Format
MPEG2 Transport Stream Format

Included Image Rendition Sets
11-28 Oracle Fusion Middleware User's Guide for Oracle Content Server
11.4 Included Image Rendition Sets
Digital Asset Manager installs three predefined rendition sets for rendering image
assets. By default, these rendition sets are configured for use with Oracle Outside In
Technology (ImageExport).
If your system administrator has modified the default image rendition sets or set up
Digital Asset Manager to use a different conversion application, then the rendition sets
listed here might not be applicable. For more information regarding the conversion
application used and any custom rendition set, check with your system administrator.
The predefined rendition sets follow:
■ Section 11.4.1, "BasicRenditions"
■ Section 11.4.2, "ThumbnailOnly"
■ Section 11.4.3, "MultipleFormats"
The BasicRenditions rendition set is required for Digital Asset Manager to
function. Your system administrator can add or delete other rendition sets, depending
on your company’s needs.
11.4.1 BasicRenditions
11.4.2 ThumbnailOnly
MPEG4 Media Format
MXF Stream Format
Pinnacle Liquid Media Format
Pinnacle MediaStream Media Format
VOD Transport Stream Media Format
Rendition Name Rendition Description
Web A 72 dpi JPEG no bigger than 800x600 pixels
(primary web-viewable image)
Thumbnail A 72 dpi PNG exactly 80 pixels high
(displayed in the Classic and Thumbnail
search results views)
Preview A 72 dpi GIF exactly 250 pixels wide
(displayed on Rendition Information page)
Rendition Name Rendition Description
Thumbnail A 72 dpi PNG exactly 80 pixels high
Format Description

Oracle Outside In Technology Image Formats
Using Images and Videos 11-29
11.4.3 MultipleFormats
11.5 Oracle Outside In Technology Image Formats
Digital Asset Manager can be configured to work with many different conversion
applications. By default, Digital Asset Manager provides predefined image asset
rendition sets for use with Oracle Outside In Technology. To determine which
conversion application is used by your organization, check with your system
administrator. If it is Oracle Outside In Technology, the following output formats are
available to you.
Formats supported by the graphic conversion application must also be associated with
Oracle Content Server by the system administrator, using the Configuration
Manager. If a supported format is not being rendered, see your system administrator.
For more information about Oracle Outside In Technology, see its Documentation
Library at:
http://download.oracle.com/docs/cd/E14154_01/index.htm
Rendition Name Rendition Description
Web A 72 dpi JPEG no bigger than 800x600 pixels
Thumbnail A 72 dpi PNG exactly 80 pixels high
Preview A 72 dpi GIF exactly 250 pixels wide
Jpeg2000 A 72 dpi JPEG 2000 no bigger than 800x600
wide
Tiff A TIFF
Bitmap A Bitmap
Format Version
Raster Image
CALS Raster (GP4) Type I
CALS Raster (GP4) Type II
Computer Graphics Metafile ANSI
Computer Graphics Metafile CALS
Computer Graphics Metafile NIST
Encapsulated PostScript (EPS) TIFF header only
GEM Image (Bitmap)
Graphics Interchange Format (GIF)
IBM Graphics Data Format (GDF) 1.0
IBM Picture Interchange Format 1.0
JBIG2 Graphic Embeddings in PDF
JFIF (JPEG not in TIFF format)
JPEG
JPEG 2000 JP2

Oracle Outside In Technology Image Formats
11-30 Oracle Fusion Middleware User's Guide for Oracle Content Server
Kodak Flash Pix
Kodak Photo CD 1.0
Lotus PIC
Lotus Snapshot
Macintosh PICT BMP only
Macintosh PICT2 BMP only
MacPaint
Microsoft Windows Bitmap
Microsoft Windows Cursor
Microsoft Windows Icon
OS/2 Bitmap
OS/2 Warp Bitmap
Paint Shop Pro (Win32 only) 5.0, 6.0
PC Paintbrush (PCX)
PC Paintbrush DCX (multi-page PCX)
Portable Bitmap (PBM)
Portable Graymap PGM
Portable Network Graphics (PNG)
Portable Pixmap (PPM)
Progressive JPEG
StarOffice Draw 6.x – 8.0
Sun Raster
TIFF Group 5 & 6
TIFF CCITT Group 3 & 4
TruVision TGA (Targa) 2.0
WBMP wireless graphics format
Word Perfect Graphics 1.0
X-Windows Bitmap x10 compatible
x10 compatible x10 compatible
X-Windows Pixmap x10 compatible
WordPerfect Graphics 1.0 - 10.0
Vector Image
Adobe Illustrator 4.0 - 7.0, 9.0
Adobe Illustrator (XMP only) 11 – 13 (CS 1 – 3))
Adobe InDesign (XMP only) 3.0 – 5.0 (CS 1 - 3)
Adobe InDesign Interchange (XMP only)
Adobe Photoshop (XMP only) 8.0 – 10.0 (CS 1 – 3)
Adobe PDF 1.0 – 1.7 (Acrobat 1 - 9)
Format Version

Oracle Outside In Technology Image Formats
Using Images and Videos 11-31
Adobe Photoshop 4.0
Ami Draw SDW
AutoCAD Drawing 2.5, 2.6
AutoCAD Drawing 9.0 – 14.0
AutoCAD Drawing 2000i - 2007
AutoShade Rendering 2
Corel Draw 2.0 – 9.0
Corel Draw Clipart 5.0, 7.0
Enhanced Metafile (EMF)
Escher graphics
FrameMaker Graphics (FMV) 3.0 – 5.0
Gem File (Vector)
Harvard Graphics Chart DOS 2.0 – 3.0
Harvard Graphics for Windows
HP Graphics Language 2.0
IGES Drawing 5.1 – 5.3
Micrografx Designer through 3.1
Micrografx Designer 6.0
Micrografx Draw through 4.0
Microsoft XPS (Text only)
Novell PerfectWorks Draw 2
OpenOffice Draw 1.1 – 3.0
Visio (Page Preview mode WMF/EMF) 4.0
Visio 5.0 - 2007
Visio XML VSX (File ID only) 2007
Windows Metafile
Format Version

Oracle Outside In Technology Image Formats
11-32 Oracle Fusion Middleware User's Guide for Oracle Content Server

A
User Interface A-1
AUser Interface
This appendix contains information about the user interface for Oracle Content Server,
in descriptions of the following screens:
■ Getting Started Screens
■ Search Pages
■ Creating and Editing Custom Search Result Templates
■ Access Control Lists (ACL)
■ Referenced Links Interface (optional)
■ Working with Files
■ Check-In and Check-Out Interface
■ Workflow Interface
■ Folders Interface
■ WebDAV Interface
■ Folio User Interface
■ Content Tracker Interface
A.1 Getting Started Screens
This section describes the screens used for beginning to use Oracle Content Server.
This section covers the following topic:
■ ExtranetLook Component Logout Option
Note: If you are using Firefox set to open new tabs instead of
windows, help screens launched from an Admin Applet are not
accessible until the applet window that launched the help is closed.
Therefore, it is preferable to set Firefox to open in new windows
instead of tabs.

Search Pages
A-2 Oracle Fusion Middleware User's Guide for Oracle Content Server
A.1.1 ExtranetLook Component Logout Option
The optional ExtranetLook component adds the ability to customize the look and feel
of Oracle Content Server for anonymous users, and adds logout functionality to Oracle
Content Server.
If the optional ExtranetLook component is installed, then a Logout link is added to the
toolbar at the top of a Oracle Content Server instance.
A.2 Search Pages
This section describes the screens used for performing Oracle Content Server searches.
This section covers the following topics:
■ Expired Content Page
■ Quick Search Field
■ Content Management Tray
■ Home Page Search Fields
■ Search Tray
■ Advanced Search Page
■ Query Builder Form
■ Results Options
■ Search Results Page
■ Custom Description Column for Search Result Templates
■ Thumbnail View Advanced Options
Note: If you are using Firefox set to open new tabs instead of
windows, help screens launched from an Admin Applet are not
accessible until the applet window that launched the help is closed.
Therefore, it is preferable to set Firefox to open in new windows
instead of tabs.

Search Pages
User Interface A-3
A.2.1 Expired Content Page
You cannot search for expired content unless you have administrative rights or if your
system administrator has granted you specific rights to view and work with expired
content.
To display the Expired Content page, click the Content Management tray, and click
Expired Content.
Element Description
Expired Content area Displays all expired content in the content server repository
when the Search button is clicked.
Expiring Content area Displays all expiring content in the content server repository
when the Search button is clicked.
Find Expired Content area Used to search the content server repository for content that
has already expired.
Before/After choice list: Limits search results to content that
expired before or after the specified date.
Date field: Specifies the date.
Date choice list: Fills in the Date field with a date relative to
current date and time.
Search button: Displays search results of expired content that
meets the date criteria in the Expired Content area above the
form.
Find Expiring Content area Used to search the content server repository for content that
will expire at a specified time in the future.
From field: Limits search results to content that will expire
after the specified date. If this field is blank, the current date
and time are used by default.
To f ield: Limits search results to content that will expire before
the specified date.
Choice lists: Fills in the Date field with a date relative to the
current date and time.
Search button: Displays search results of expiring content that
meets the date criteria in the Expiring Content area above the
form.

Search Pages
A-4 Oracle Fusion Middleware User's Guide for Oracle Content Server
A.2.2 Quick Search Field
The Quick Search field enables you to perform a search regardless of what page is
displayed in the content area. The Quick Search field searches the title and content ID
metadata, as well as text indexed for full-text search if it is supported on your system.
Note: If you have changed your layout to the Classic layout, you
may need to enable the Quick Search field by selecting the Quick
Search checkbox on your Adding Links to Favorites page.
Item Description
Text entry field Enter search terms in this field for searching the title and
content ID metadata, as well as the full-text index.
Quick Search Action icon Displays the Quick Search Actions menu, which lists the
available searches and links to edit them or to clear the current
selection. Once selected, the search remains persistent until it is
cleared or replaced. The name of the selected search is
displayed to the left of the icon. If the search is cleared, a quick
search reverts to the default behavior of searching content ID,
title, and text indexed for full-text search (if enabled.)
Quick Search List: Displays a list of available searches.
Selecting a search enables it in the Quick Search field.
Clear Selection: Clears the current quick search and returns
the Quick Search field to the default value.
Edit: Displays the available searches, from which you can add
additional or edit existing quick searches.
Quick Search button Displays a search results page that lists the content items that
contain the search terms.
XML Document Type list Provides a list of selectable XML document types. By default,
the searchxml option is selected. If an XML document type is
not selected from the list, the component performs a metadata
search in the stored documents and returns all results. In this
case, there are no limits on the query.
If you select one or more document types and enter a search
term in the text entry field, the component performs a full-text
search in the selected document types.
To support full-text searches, at least one XML document type
must be selected. Any document type included in the list
indicates that it has been full-text indexed.

Search Pages
User Interface A-5
A.2.3 Content Management Tray
The Content Management tray enables contributors to manage content in Oracle
Content Server. To open this tray, click Content Management in the Portal Navigation
Bar.
A.2.4 Home Page Search Fields
The home page search fields enable you to perform a metadata search, full-text search,
or a combination of both from the content server Home Page.
Link Description
Checked Out Content Displays the Checked-Out Content Page, which is used to view
a list of all files currently checked out of the content server.
Work In Progress Displays the Work In Progress Page, which lists files that have
been checked in, but not released.
Active Workflows Displays the Active Workflows Page, which is used to view the
workflows that are currently active.
Expired Content Displays the Expired Content Page, which lists files that have
expired and will be expiring soon.
Registered Publisher
Projects
Displays the Registered Publisher Projects page, which is used
to register Content Publisher projects. (The Content Publisher
product is required for use of this feature.)

Search Pages
A-6 Oracle Fusion Middleware User's Guide for Oracle Content Server
Only the most commonly used search fields are available from the home page.
A.2.5 Search Tray
The Search Tray is used to perform a metadata, full-text, or combination search from
the content server’s Portal Navigation Bar. Clicking the Search tray expands or
collapses the tray.
A.2.5.1 Criteria Tab
The Criteria tab on the Search Tray displays the form in which you enter your search
criteria.
Element Description
Title field A descriptive name for the content item.
Content ID field The unique identifier for the content item.
Release Date fields The date that the item was released to the content server.
From: The search finds items released on or after this date.
To : The search finds items released before (but not on) this
date.
Full-Text Search field Enter full-text search terms.
If your system administrator has configured the content
server to search database metadata only, the Full-Text Search
field will not be displayed.
Sort By list Specifies the field that the search results will be sorted on:
Release Date (default): Sorts by the Release Date metadata
field.
Title: Sorts alphabetically by the Title metadata field.
Order list Specifies the sort order of the search results:
Descending (default): Sorts alphabetical results in Z-A order;
numerical results in 9-0 order; and date results in newest to
oldest order.
Ascending: Sorts alphabetical results in A-Z order; numerical
results in 0-9 order; and date results in oldest to newest order.
Search button Displays a list of the content items that match the search
criteria on a Search Results Page.

Search Pages
User Interface A-7
A.2.5.2 Results Tab
The Results tab in the Search Tray is the area where a listing of search results based on
the criteria entered on the Criteria tab is displayed.
The search results remain on the Results tab until a new search is performed or the
page is refreshed.
Element Description
Advanced Displays the Advanced Search Page.
Search button Submits the search criteria entered to the content server.
Clear button Clears any criteria entered into the search fields.
Title field A descriptive name for the content item.
ID field The unique identifier for the content item.
Text field Enter text search terms.
If your system administrator has configured the content server
to search database metadata only, the Text field will not be
displayed.
Release Date fields The date that the item was released to the content server.
From: The search finds items released on or after this date.
To: The search finds items released before (but not on) this
date.
Element Description
Advanced Displays the Advanced Search Page.
Previous Returns the Results tab in the Search tray back to the previous
results page.
Next Advances the Results tab in the Search tray to the next page of
results.
Arrow buttons Forward: Advances to the next search results page in a series.
Back: Returns to the previous search results page in a series.
Info icon Displays the content information of the corresponding content
item.

Search Pages
A-8 Oracle Fusion Middleware User's Guide for Oracle Content Server
A.2.6 Advanced Search Page
The advanced search page enables you to build a search using either the Expanded
Form to view all criteria options, or the Query Builder Form to select search criteria
from menus as required. The Query Builder Form also allows you to manually edit the
query text.
To access this page, click the Advanced link in the Search Tray or the Search link on
the toolbar.
ID field The unique identifier for the content item.
Text field Enter full-text search terms.
Release Date fields The date the item was released to the content server.
From: The search finds items released on or after this date.
To: The search finds items released before (but not on) this
date.
Note: When using Oracle Text Search with your Content Server
instance, you cannot enter complex search queries into the Full-Text
Search field on the Expanded Form. Instead, you must use the
advanced options on the Query Builder Form.
Element Description

Search Pages
User Interface A-9
A.2.6.1 Expanded Form
The expanded form on the Advanced Search Page displays all search fields available
to you on a single page. For more information about user, group, and role access
control list (ACL) fields, see Section A.4, "Access Control Lists (ACL)."
You can alternate between the expanded form and the Advanced Search Page using
the Actions menu at the top of the search page.
Element Description
Search button Displays a list of the content items that match the search
criteria on a Search Results Page. If no search criteria are
specified, a list of all content items is displayed.
Clear button Clears the search fields, but does not reset the results options
settings.
Save button Saves the search as a saved query link in the Portal Navigation
Bar. You are prompted to enter a title for the link.
Full-Text Search field
(optional)
Enables you to search for words within content items. Also
evaluates IdocScript.
If your system administrator has configured the content server
to search database metadata only, the Full-Text Search field will
not be displayed.
Content ID The unique identifier for the content item.
Title A descriptive name for the content item.
Type The category of the document. You can enter text or select from
the list of predefined values.
Security Group An identifier that specifies access permission to the content
item. You can enter text or select from the list of predefined
values.

Search Pages
A-10 Oracle Fusion Middleware User's Guide for Oracle Content Server
A.2.6.2 Query Builder Form
The Query Builder form enables you to easily build and save complex queries by
selecting options from a series of lists.
Account An identifier that specifies access permission to the content
item. This field is displayed only if accounts are enabled on
your system.
Author The user who checked in the current content item revision.
Release Date The date that the current revision was released to the content
server.
From: The search finds content items released on or after this
date.
To: The search finds content items released before (but not on)
this date.
Expiration Date The date that the content item will no longer be available for
searching or viewing in the content server.
From: The search finds content items that will expire on or
after this date.
To: The search finds content items that will expire before (but
not on) this date.
Comments Additional notes about the content item.
Results Options Enables you to specify how search results are displayed.
Quick Help button Displays the help topic specific to the advanced search page.
Note: The Search Tray and Advanced Search Page enable you to
search on the standard metadata fields. If custom metadata fields have
been created for your content server system, they typically will be
displayed below the standard metadata fields.
Element Description
show/hide advanced options Toggles between displaying and hiding the Modify Query Text
checkbox and Query Text field.
Element Description

Search Pages
User Interface A-11
A.2.7 Results Options
The Results Options area of the Advanced Search Page is used to control the display of
the Search Results page.
Metadata lists Enables you to select metadata fields for searching one field at
a time.
Add/Delete icons Control the display and use of metadata lists.
Add: Displays an additional metadata field below the current
field.
Delete: Hides the selected metadata field and removes any
query text entered into the field.
Operators Provide easy selection of search options. Available search
operators are dependent on the type of search engine being
used.
Modify Query Text Controls whether the Query Text field is available for entering
text directly into the query.
Enabled: Text can be entered directly into the query text field.
Disabled: Query text can be seen as gray text, but cannot be
edited directly.
Query Text field Displays the query text as it is being built, or allows user to
enter text directly into a query, provided the Modify Query
Text checkbox is enabled.
Element Description
Results Per Page field Specifies the maximum number of content items displayed on
each search results page. The default is 25, and the range is
from 0 to 100.
Sort By list Specifies the field that the search results will be sorted on:
Release Date (default): Sorts by the Release Date metadata
field.
Title: Sorts alphabetically by the Title metadata field.
Score: Sorts by the number of occurrences of search terms, or
the proximity of search terms when a proximity operator such
as <NEAR> is used. Applies only to full-text search.
Order list Specifies the sort order of the search results:
Descending (default): Sorts alphabetical results in Z-A order;
numerical results in 9-0 order; and date results in newest to
oldest order.
Ascending: Sorts alphabetical results in A-Z order; numerical
results in 0-9 order; and date results in oldest to newest order.
Element Description

Search Pages
A-12 Oracle Fusion Middleware User's Guide for Oracle Content Server
A.2.8 Search Results Page
The search results page displays a list of content items that match the criteria specified
during a search.
You can control how your search results page looks by choosing a default search
template on your User Profile Page. You can also change the template by selecting a
different view option from the Actions choice list on the search results page.
Search button Displays a list of the content items that match the search
criteria on a Search Results Page. If no search criteria are
specified, a list of all content items is displayed.
Clear button Clears the search fields, but does not reset the results options
settings.
Save button Saves the search as a saved query link in the Portal Navigation
Bar. You are prompted to enter a title for the link.
Element Description
Found x items matching the
query
Shows the number of content items that match the search
criteria.
Arrow buttons Forward: Advances to the next search results page in a series.
Back: Returns to the previous search results page in a series.
Actions menus Search Actions:
Enables you to select an action to perform on the search results
list. Actions include saving the search to the My Content
Server tray and searching within the listed results.
Change View:
Enables you to select a different viewing option for the search
results list:
■ Classic: A thumbnail image and descriptive text is
displayed.
■ Thumbnail: A thumbnail image is displayed.
■ Headline: A single line list of search results with no
thumbnail image is displayed.
■ Custom: Displays custom search results based on a custom
list template created on the Create/Edit Classic View
Search Result Template page.
Element Description

Search Pages
User Interface A-13
A.2.9 Custom Description Column for Search Result Templates
This area determines what content is displayed in the description column of a
Headline View search result template. The Description field must be selected in the
Customize Columns section for display on a search results page for this section to have
any effect. For information about thumbnail view advanced options, see
Section A.2.10, "Thumbnail View Advanced Options."
ID column Displays the content ID of a content item. Clicking the content
ID of a selected item either displays a web-viewable version of
the content, or prompts you to select to save the file to your
local drive or open the document with an associated program.
Title column Displays the title of a content item.
Date column Displays the date that content item was checked in.
Author column Displays the author of the content item.
Actions column Includes the Item Actions Menu icon and Content Info icon,
Item Actions Menu icon: Contains the following options:
■ Content Information, which displays the Content
Information Page for the selected content item
■ Check Out, which checks out the selected content item
and displays the Check-Out Confirmation Page
■ Check In Similar, which displays the Content Check-In
Form with some metadata fields already filled in
■ Send Link by E-mail, which opens a new e-mail message
that contains a URL to the selected content item.
Content Info Icon: Displays the Content Information Page for
the selected content item.
Thumbnail
(Thumbnail and Classic
views)
Displays a small image of the content item or an icon
indicating the content type of the content item. Clicking the
thumbnail of a selected item either displays a web-viewable
version of the content, or prompts you to select if you want to
save the file to your local drive or open the document with an
associated program.
Description column
(Classic view)
Shows the content ID and title of the content item. Clicking the
content ID link displays the web-viewable file.
Rev. link
(Classic view)
Shows the latest released revision of the content item. Clicking
the link displays the Revision History.
Info icon (Classic view) Displays the Content Information Page for the content item.
Element Description

Search Pages
A-14 Oracle Fusion Middleware User's Guide for Oracle Content Server
A.2.10 Thumbnail View Advanced Options
The following table lists the thumbnail view advanced options. For more information
about the description column content, see Section A.2.9, "Custom Description Column
for Search Result Templates."
Item Description
Available Fields box Selecting an item in this box and clicking the right arrow
moves the field to a box on the right. Each available field can
only be included once in either the Main Information box or
Additional Information box, unless the Use Advanced
Description Form checkbox is enabled.
Special: Any special field in the content server. Different
components or configurations may add additional special
fields. The following fields are available by default.
■ Native File
■ Native File Extension
■ Native Format
■ Web Extension
■ Web File Size
■ Vault File Size
Standard: The standard Content Server information fields:
■ Author
■ Content ID
■ Content Type
■ Expiration Date
■ Release Date
■ Security Group
■ File
Custom: Comments and any custom fields created by your
system administrator.
Main Information box Controls the display order of the fields in the Description area
of a search results page by displaying fields listed in the Text1
box first. Additional display options, such as anchor or
formatting tags, can be entered here as either HTML or Idoc
Script.
Use Advanced Description
Form checkbox
Enabling this option displays an advanced version of the fields
in the Main Information box. When enabled, the code for the
display of each available field moved to the Main Information
box is shown and can be edited directly. Additionally, any item
from the Available Fields box can be included in the Main
Information box multiple times.
Item Description
show/hide additional
options
Displays a text field for entering additional Idoc Script options
to control the display of a search results page. Idoc Script
entered into this field is evaluated and included before the
search results page is displayed.
Number of Columns Specifies the number of columns across the result grid.

Creating and Editing Custom Search Result Templates
User Interface A-15
A.3 Creating and Editing Custom Search Result Templates
You can personalize how search results are displayed by selecting an option from the
list on the User Profile Page, or from the Search Results Page. There are three templates
available by default, and you have the option to create new views based on the three
provided templates. In this way, you can customize the metadata information you
want to see on a search result. You can even specify different search results templates
to be used for different saved queries.
This section covers the following topics:
■ Search Result Templates for user Page
■ Create/Edit Classic View Search Result Template Page
■ Classic View Basic Information
■ Classic View Customize Description Column
■ Classic View Advanced Options
■ Create/Edit Headline View Search Result Template Page
■ Headline View Basic Information
■ Headline View Customize Columns
■ Headline View Customize Description Column
■ Headline View Advanced Options
■ Create/Edit Thumbnail View Search Result Template Page
■ Thumbnail View Basic Information
■ Thumbnail View Customize Description Column
■ Saved Queries Page
■ My Recent Queries
■ My Recently Viewed Content
■ Personal URLs for User Name

Creating and Editing Custom Search Result Templates
A-16 Oracle Fusion Middleware User's Guide for Oracle Content Server
A.3.1 Search Result Templates for user Page
This page displays a list of all templates currently available and provides the option to
add, edit, or delete custom templates based on the provided ones. The provided
templates cannot be modified. To access this page, click My Search Result Templates
in the My Content Server Tray.
Column Description
ID The template ID uniquely identifies the template. Custom
template IDs are specified on the Create/Edit Classic View
Search Result Template Page when the template is added. The
provided template IDs are displayed in bold. Custom
templates are indented below the provided template on which
they are based.
Label The template label is listed in the Content Actions menu on a
search results page and in the Search Template list on the User
Profile Page. It should be something that helps you remember
what the template does. The label is specified on the
Create/Edit Classic View Search Result Template Page when
the template is added.
Actions Item Actions Menu icons enable you to add, edit, or delete
custom templates.
Add: Displays the Create/Edit Classic View Search Result
Template Page, enabling you to add a custom template.
Item Actions Menu icon: Clicking this icon displays a menu
with the following actions:
■ Edit: Displays the Create/Edit Classic View Search Result
Template Page for the selected custom template.
■ Delete: Deletes the custom template.

Creating and Editing Custom Search Result Templates
User Interface A-17
A.3.2 Create/Edit Classic View Search Result Template Page
The Create/Edit Classic View Search Result Template page enables you to add
templates based on the Classic View, that specify what content item information is
listed on a search results page and how that information is displayed.
This page is accessed by clicking the Add Item icon in the Actions column of the
Classic View option on the Search Result Templates for user Page.
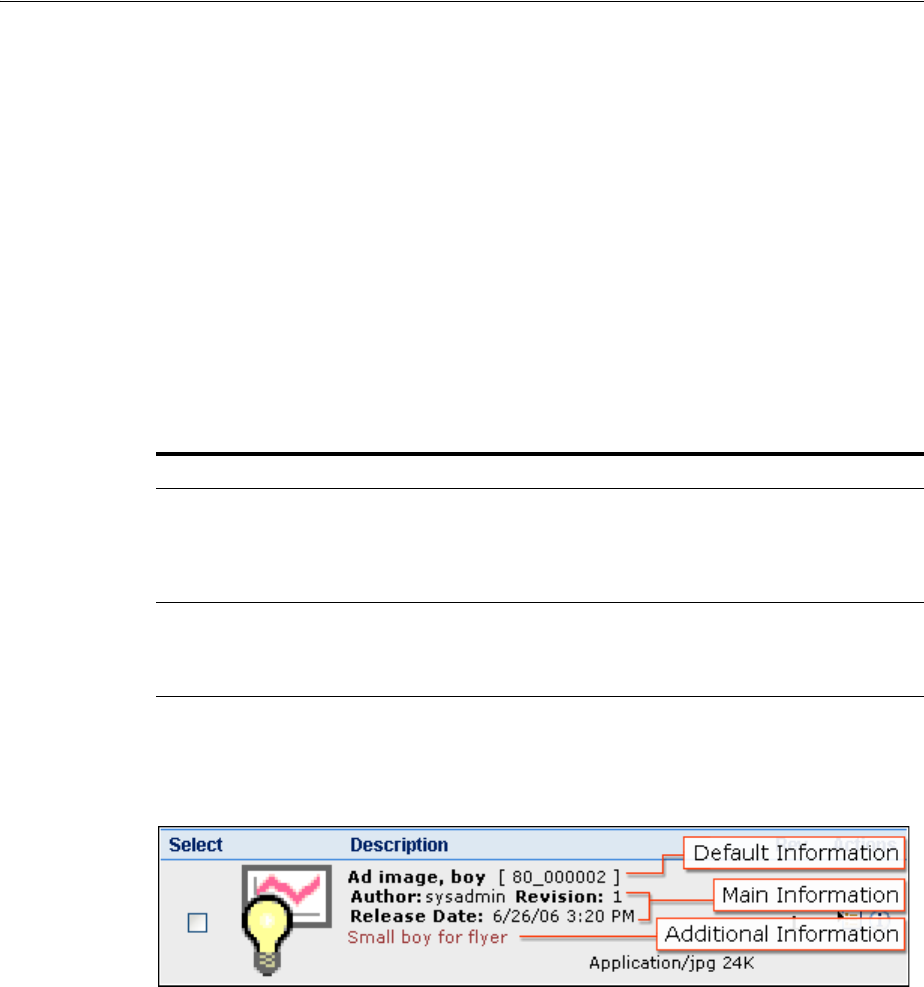
Creating and Editing Custom Search Result Templates
A-18 Oracle Fusion Middleware User's Guide for Oracle Content Server
When creating a template you must specify a unique ID, a descriptive name, what
content information is displayed and how, and the behavior of certain links in the
display. Once you have created a custom template, you may set that template as your
default by setting it on the User Profile Page, or choose it from the Content Actions
menu on a search results page.
There are three main areas of this page:
■ Classic View Basic Information
■ Classic View Customize Description Column
■ Classic View Advanced Options
A.3.3 Classic View Basic Information
The basic information fields of each template define the unique identifier and
descriptive label for the created template.
A.3.4 Classic View Customize Description Column
This area determines what content is displayed in the Description column of a Classic
View search result template.
Item Description
Content List Template ID A unique identifier for the template. It is used by Oracle
Content Server to manage your custom templates.
Alphanumeric characters, underscores and dashes are
recommended. The following characters, as well as spaces, are
not allowed: ; /\ ? : @ & = + \ " # % < > * ~ | [ ] . ,
Content List Template Label A descriptive identifier for the template, displayed on the User
Profile Page and in the Content Actions menu on a search
results page. Alphanumeric characters are recommended.
Spaces can be used.

Creating and Editing Custom Search Result Templates
User Interface A-19
Item Description
Available Fields box Selecting an item in this box and clicking the right arrow
moves the field to a box on the right. Each available field can
be included only once in either the Main Information box or
the Additional Information box, unless you select the Use
Advanced Description Form checkbox.
Special: Any special field in the content server. Different
components or configurations may add additional special
fields. The following fields are available by default:
■ Native File
■ Native File Extension
■ Native Format
■ Web Extension
■ Web File Size
■ Vault File Size
Standard: The standard Oracle Content Server information
fields:
■ Author
■ Content ID
■ Content Type
■ Expiration Date
■ Release Date
■ Security Group
■ Title
Custom: Comments and any custom fields created by your
system administrator.
The title and content ID are displayed in all custom search
result templates based on the Classic View, even if the fields are
not specifically selected from the Available Fields box. If the
Title or Content ID field is selected, it will be duplicated.
Main Information box Controls the display order of the fields in the Description area
of a search results page, by displaying fields listed in the Text1
box first. Additional display options, such as anchor or
formatting tags, can be entered here as either HTML or Idoc
Script.
Additional Information box Controls the display order of the fields in the Description area
of a search results page by displaying fields listed in the Text2
box after those listed in Text1. Additional display options, such
as anchor or formatting tags, can be entered here as either
HTML or Idoc Script.
Use Advanced Description
Form checkbox
Selecting this checkbox displays an advanced version of the
Main Information and Additional Information boxes. When
this option is enabled, the code for the display of each available
field moved to the Main Information or Additional
Information box is shown and can be edited directly.
Additionally, any item from the Available Fields box can be
included in the Main Information and Additional Information
boxes multiple times.

Creating and Editing Custom Search Result Templates
A-20 Oracle Fusion Middleware User's Guide for Oracle Content Server
A.3.5 Classic View Advanced Options
The following are the classic view advanced options and their respective descriptions.
A.3.6 Create/Edit Headline View Search Result Template Page
This page enables you to add templates based on the Headline View, that specify what
content item information is listed on a search results page and how that information is
displayed. The Create/Edit Headline View Search Result Template page is accessed by
clicking the Add Item icon in the Actions column of the Headline View option on the
Search Result Templates for user Page.
When creating a template you must specify a unique ID, a descriptive name, what
content information is displayed and how, and the behavior of any links in the
display. Once you have created a custom template, you may set that template as your
default by setting it on the User Profile Page, or choosing it from the Content Actions
menu on a search results page.
There are four main areas of this page:
■ Headline View Basic Information
■ Headline View Customize Columns
■ Headline View Customize Description Column
■ Headline View Advanced Options
Item Description
The Main Information will
link to checkboxes
Determines what happens when you click on the Content ID if
it is displayed in a custom search results view.
Web-Viewable File: Displays a web-viewable version of the
content item.
Native File: Displays or downloads the native file.
HTML Rendition (Web-Viewable if no rendition): Displays
the web-viewable version of a content item if it is available,
otherwise it attempts to convert the original content item to
HTML for display.
HTML Rendition (Native if no rendition): Displays the
web-viewable version of a content item if it is available,
otherwise it downloads the native file.
None: Removes any link to the content ID. For example, select
this if you do not want the Content ID link active, or if you are
linking the content ID to another item, such as the Content
Information page, using Idoc Script.
show/hide additional
options
Displays a text field for entering additional Idoc Script options
to control the display of a search results page. Idoc Script
entered into this field is evaluated and included before the
search results page is displayed.

Creating and Editing Custom Search Result Templates
User Interface A-21
A.3.7 Headline View Basic Information
The basic information fields of each template define the unique identifier and
descriptive label for the created template.
A.3.8 Headline View Customize Columns
The Customize Columns area is available only for custom templates based on the
provided Headline View template. Use it to determine the columns displayed and their
order on a search result page.
Item Description
Content List Template ID A unique identifier for the template. It is used by Oracle
Content Server to manage your custom templates.
Alphanumeric characters, underscores, and dashes are
recommended. The following characters, as well as spaces, are
not allowed: ; /\ ? : @ & = + \ " # % < > * ~ | [ ] . ,
Content List Template
Description
A descriptive identifier for the template, displayed on the User
Profile Page and in the Content Actions menu on a search
results page. Alphanumeric characters are recommended.
Spaces can be used.
Item Description
Available Fields Selecting an item in this box and clicking the right arrow
moves the field to the Columns box.
Special: Any special field in the content server. Different
components or configurations may add additional special
fields. The following fields are available by default:
■ Native File
■ Native File Extension
■ Native Format
■ Web Extension
Standard: The default Oracle Content Server information
fields:
■ Author
■ Content ID
■ Content Type
■ Expiration Date
■ Date
■ Security Group
■ Title
Custom: Comments, profiles, and any custom fields created by
your system administrator.
Columns Lists the fields you selected to display as separate columns on a
search results list. Selecting a field in this box and clicking the
up or down arrow enables you to adjust the column order.
Selecting a field in this box and clicking the left arrow removes
the field, preventing it from being displayed as a separate
column.

Creating and Editing Custom Search Result Templates
A-22 Oracle Fusion Middleware User's Guide for Oracle Content Server
A.3.9 Headline View Customize Description Column
This area determines what content is displayed in the description column of a
Headline View search result template. The Description field must be selected in the
Customize Columns area to display on a search results page for this section to have
any effect.
Item Description
Available Fields Selecting an item in this box and clicking the right arrow
moves the field to the Columns box. Each available field can be
included only once in either the Main Information section or
the Additional Information section, unless the Use Advanced
Description Form checkbox is selected.
Special: Any special field in the content server. Different
components or configurations may add additional special
fields. The following fields are available by default:
■ Native File
■ Native File Extension
■ Native Format
■ Web Extension
■ Web File Size
■ Vault File Size
Standard: The standard Oracle Content Server information
fields:
■ Author
■ Content ID
■ Content Type
■ Expiration Date
■ Release Date
■ Security Group
■ Title
Custom: Comments and any custom fields created by your
system administrator.
Main Information Controls the display order of the fields in the Description area
of a search results page by displaying fields listed in the Text1
box first. Additional display options, such as anchor or
formatting tags, can be entered here as either HTML or Idoc
Script.

Creating and Editing Custom Search Result Templates
User Interface A-23
A.3.10 Headline View Advanced Options
The following are the headline view advanced options and their respective
descriptions.
Additional Information Controls the display order of the fields in the Description area
of a search results page by displaying fields listed in the Text2
box after those listed in Text1. Additional display options, such
as anchor or formatting tags, can be entered here as either
HTML or Idoc Script.
Use Advanced Description
Form
Enabling this option displays an advanced version of the Main
Information and Additional Information fields. When enabled,
the code for the display of each available field moved to the
Main Information or Additional Information box is shown and
can be edited directly. Additionally, any item from the
Available Fields box can be included in the Main Information
and Additional Information boxes multiple times.
Item Description
The content ID column will
link to
Determines what happens when you click on the Content ID if
it is displayed in a custom search results view.
Web-Viewable File: Displays a web-viewable version of the
content item.
Native File: Displays or downloads the native file.
HTML Rendition (Web-Viewable if no rendition): Displays
the web-viewable version of a content item if it is available,
otherwise it attempts to convert the original content item to
HTML for display.
HTML Rendition (Native if no rendition): Displays the
web-viewable version of a content item if it is available,
otherwise it downloads the native file.
None: Removes any link to the content ID. For example, select
this if you do not want the Content ID link active, or if you are
linking the content ID to another item, such as the Content
Information page, using Idoc Script.
show/hide additional
options
Displays a text field for entering additional Idoc Script options
to control the display of a search results page. Idoc Script
entered into this field is evaluated and included before the
search results page is displayed.
Number of Columns
(Thumbnail-based templates
only)
Specifies the number of columns across the result grid.
Item Description

Creating and Editing Custom Search Result Templates
A-24 Oracle Fusion Middleware User's Guide for Oracle Content Server
A.3.11 Create/Edit Thumbnail View Search Result Template Page
The Create/Edit Thumbnail View Search Result Template page allows you to add
templates based on the Thumbnail View, that specify what content item information is
listed on a search results page and how that information is displayed.
This page is accessed by clicking the Add Item icon in the Actions column of the
Thumbnail View option on the Search Result Templates for user Page.
When creating a template you must specify a unique ID, a descriptive name, what
content information is displayed and how, and the behavior of any links in the
display. Once you have created a custom template, you may set that template as your
default by setting it on the User Profile Page, or choosing it from the Content Actions
menu on a search results page.
There are three main areas of this page:
■ Thumbnail View Basic Information
■ Thumbnail View Customize Description Column
■ Thumbnail View Advanced Options

Creating and Editing Custom Search Result Templates
User Interface A-25
A.3.12 Thumbnail View Basic Information
The basic information fields of each template define the unique identifier and
descriptive label for the created template.
A.3.13 Thumbnail View Customize Description Column
This area determines what content is displayed in the description column of a
Thumbnail View search result template. The Description field must be selected in the
Customize Columns section for display on a search results page for this section to
have any effect.
Item Description
List Template ID A unique identifier for the template. It is used by Oracle
Content Server to manage your custom templates.
Alphanumeric characters, underscores and dashes are
recommended. The following characters, as well as spaces, are
not allowed: ; /\ ? : @ & = + \ " # % < > * ~ | [ ] . ,
List Template Description A descriptive identifier for the template, displayed on the User
Profile Page and in the Content Actions menu on a search
results page. Alphanumeric characters are recommended.
Spaces can be used.

Creating and Editing Custom Search Result Templates
A-26 Oracle Fusion Middleware User's Guide for Oracle Content Server
A.3.14 Thumbnail View Advanced Options
The following table lists the thumbnail view advanced options.
Item Description
Available Fields Selecting an item in this box and clicking the right arrow
moves the field to the Columns box. Each available field can be
included only once in either the Main Information section or
Additional Information section, unless the Use Advanced
Description Form checkbox is selected.
Special: Any special field in the content server. Different
components or configurations may add additional special
fields. The following fields are available by default:
■ Native File
■ Native File Extension
■ Native Format
■ Web Extension
■ Web File Size
■ Vault File Size
Standard: The standard Oracle Content Server information
fields:
■ Author
■ Content ID
■ Content Type
■ Expiration Date
■ Release Date
■ Security Group
■ Title
Custom: Comments and any custom fields created by your
system administrator.
Main Information Controls the display order of the fields in the Description
column of a search results page by displaying fields listed in
the Text1 box first. Additional display options, such as anchor
or formatting tags, can be entered here as either HTML or Idoc
Script.
Use Advanced Description
Form
Enabling this option displays an advanced version of the Main
Information and Additional Information fields. When enabled,
the code for the display of each available field moved to the
Main Information or Additional Information box is shown and
can be edited directly. Additionally, any item from the
Available Fields box can be included in the Main Information
and Additional Information boxes multiple times.
Item Description
show/hide additional
options
Displays a text field for entering additional Idoc Script options
to control the display of a search results page. Idoc Script
entered into this field is evaluated and included before the
search results page is displayed.
Number of Columns Specifies the number of columns across the result grid.

Creating and Editing Custom Search Result Templates
User Interface A-27
A.3.15 Saved Queries Page
The Saved Queries page is used to modify and delete the saved queries that are
displayed in your portal navigation bar.
To access this page, click My Saved Queries in the My Content Server Tray in the
Portal Navigation Bar.
Note: For information about how to save a query link in your portal
navigation bar, see Section 4.10.2, "Saving a Query."
Element Description
Title column Lists the titles of the queries you have saved.
Query column Lists the queries you have saved.
Is Default column Specifies whether a query is the default query, which will be
displayed in a different color in the portal navigation bar if the
Show Default Query checkbox is selected.
Actions column Contains an Item Actions Menu icon you can click to choose
an action to take on the query, such as Set As Default, Edit, or
Delete.
Results on portal page field Indicates the number of content items for the default query that
will be displayed on the portal page (home page) if the Show
Default Query checkbox is selected.
Show Default Query
checkbox
Select this checkbox to display the results of the selected
default query on the portal page (home page). The default
query link will be displayed in a different color in your portal
navigation bar.
Update button Saves any changes that were made on this page.
Reset button Resets the fields on this page to the previously saved settings.

Creating and Editing Custom Search Result Templates
A-28 Oracle Fusion Middleware User's Guide for Oracle Content Server
A.3.16 My Recent Queries
The My Recent Queries link is used to view a list of the most recent search queries
you have made. To access this list, click My Recent Queries in the My Content Server
Tray in the Portal Navigation Bar.
Selecting one of the list items re-executes the query and displays the applicable Search
Results page. Then, when you re-select the My Recent Queries option, the re-executed
query is displayed at the top of the list because it is the most recent.
A.3.17 My Recently Viewed Content
The My Recently Viewed Content link is used to view a list of the most recent Content
Information Pages you have viewed. To access this list, click My Recently Viewed
Content in the My Content Server Tray. Selecting one of the list items opens that
Content Information page.
A.3.18 Personal URLs for User Name
The Personal URLs for user page is used to save links to web sites in your portal
navigation bar. To access this page, click My Urls in the My Content Server Tray in the
Portal Navigation Bar.

Access Control Lists (ACL)
User Interface A-29
A.4 Access Control Lists (ACL)
This functionality must be enabled by your system administrator.
This section covers the following topics:
■ Access Control List Users, Groups, and Roles
■ Access Control List Permissions
A.4.1 Access Control List Users, Groups, and Roles
An access control list is a list of users, groups, or enterprise roles with permission to
access or interact with a content item.
Depending on how access control list security is configured, three new fields are
available for use when adding, modifying, or searching for content items:
■ User Access List
■ Group Access List
■ Role Access List
Element Description
Locator links Active links below the page heading that provide a graphical
representation of where the page is in the navigation hierarchy.
Clicking a link displays the page named by the link.
Title field The link that will appear in your portal navigation bar.
URL field The complete Uniform Resource Locator (URL) of the web site;
for example: http://www.oracle.com
Update button Saves any changes that were made on this page.
Reset button Resets the fields on this page to the previously saved settings.
Note: By default, blank access control lists do not affect access to the
content item. This feature is configurable, however, so that explicit
access is required (blank access control lists prevent access to the
item).

Access Control Lists (ACL)
A-30 Oracle Fusion Middleware User's Guide for Oracle Content Server
Access control list security for users, groups, and roles provide fields similar to the
following:
Element Description
User Access List field Specifies the access control list users who have access to the
item and the permissions assigned to each user.
In the selection box, enter the first two characters of a name to
see a list of names that begin with those characters. Use the "*"
wildcard character to match one or more characters. For
example, to see all names that start with the letter S, enter "S*".
For more information about permissions, see Section A.4.2,
"Access Control List Permissions."
Add User button Adds the selected name to the user access list. New or modified
items are shown in red.
To remove a name from the list, click the red X next to the name.
Group Access List field Specifies the access control list groups who have access to the
item and the permissions assigned to each group.
In the selection box, enter the first two characters of a name to
see a list of names that begin with those characters. Use the "*"
wildcard character to match one or more characters. For
example, to see all names that start with the letter S, enter "S*".
For more information about permissions, see Section A.4.2,
"Access Control List Permissions."
Add Group button Adds the selected name to the group access list.
To remove a name from the list, click the red X next to the name.

Referenced Links Interface (optional)
User Interface A-31
A.4.2 Access Control List Permissions
Each item in the user, group, or role access control lists can have the following
permissions:
To assign a permission, click the associated icon. Permissions are “cumulative.” If you
assign write, you automatically assign read. If you assign admin, you automatically
assign read, write, and delete.
To remove a permission, click the previous icon in the sequence. For example, to
remove the admin permission, click the icon for the delete permission.
A.5 Referenced Links Interface (optional)
This functionality is not available unless the Link Manager component has been added
by your system administrator.
Role Access List field Specifies the access control list roles who have access to the item
and the permissions assigned to each role.
In the selection box, enter the first two characters of a name to
see a list of names that begin with those characters. Use the "*"
wildcard character to match one or more characters. For
example, to see all names that start with the letter S, enter "S*".
For more information about permissions, see Section A.4.2,
"Access Control List Permissions."
Add Role button Adds the selected name to the role access list.
To remove a name from the list, click the red X next to the name.
Permissions Description
Read Allowed to view the content item.
Write Allowed to view, check in, check out, and get a copy of the content item.
Delete Allowed to view, check in, check out, get a copy, and delete the content
item.
Admin Allowed to view, check in, check out, get a copy, and delete the content
item, as well as modify the access control list entries and the permissions
assigned to them.
Note: If you are using Firefox set to open new tabs instead of
windows, help screens launched from an Admin Applet are not
accessible until the applet window that launched the help is closed.
Therefore, it is preferable to set Firefox to open in new windows
instead of tabs.
Element Description

Referenced Links Interface (optional)
A-32 Oracle Fusion Middleware User's Guide for Oracle Content Server
This section describes the following screens:
■ Search Links Page
■ Link Search Results Page
■ Item Actions Menu
■ Link References on Content Information Page
■ Link Info Page
A.5.1 Search Links Page
The Search Links page is used to search for links, using criteria stored in the content
server repository database.
The Search Links page is useful for finding valid or invalid links, to determine where a
resource is being used, or to determine how deleting a content item would affect other
documents linking to it, and so on. If the optional Links Manager component is
installed, you can access the Search Links page by clicking the Managed Links Search
link in the Content Management tray.
Element Description
Content ID field The unique identifier for each content item.
Site field An identifier for a specific web location that is associated with a
link.
Targ e t Co n tent ID field Associated with links where LinkManager was able to
determine the dDocName.
Target Content ID Label
field
The label associated with the target content ID. This field is
applicable only if you are using Site Studio. Please refer to the
Site Studio product documentation for detailed information.
Targ e t No d e field The node used to display search results. This field is applicable
only if you are using Site Studio. Please refer to the Site Studio
product documentation for detailed information.

Referenced Links Interface (optional)
User Interface A-33
A.5.2 Link Search Results Page
This page displays the results of a link search. Links that are invalid or broken in a
Link Search Results Page are listed using bold font.
The Link Manager-specific Item Actions Menu and Content Info icons are available in
the Actions column. Clicking the Content Info icon displays the Content Information
page of the document containing the link.
Target Node Label field The label associated with the target node. This field is applicable
only if you are using Site Studio. Please refer to the Site Studio
product documentation for detailed information.
Link Type field and option
list
Specifies links that are of the type selected from the option list.
Types include service, external, internal, relative, and Site
Studio-specific types of Page, Node, Relative, Absolute, and
Service links.
State field and option list Specifies valid or invalid links.
Create Date From/To fields Link Manager generates and uses create dates to manage the
links and monitor activity performed on the links. Create Date
indicates when the link first entered the system (when it was
extracted and added to the ManagedLinks table). The From and
To fields enable you to specify a date range based on the
creation dates of links.
Update Date From/To fields Link Manager generates and uses update dates to manage the
links and monitor activity performed on the links. Update Date
indicates when the link was last updated. The From and To
fields enable you to specify a date range based on the update
dates of links.
Search button Initiates the search query using the specified field values.
Reset button Clears any populated fields on the page.
Element Description

Referenced Links Interface (optional)
A-34 Oracle Fusion Middleware User's Guide for Oracle Content Server
A.5.3 Item Actions Menu
Clicking the Item Actions Menu icon displays the applicable link management menu.
The menu options include:
■ Content Information: Displays the Content Information page of the document
containing the link. This Content Information page contains a References toggle
switch that displays (Show option) or hides (Hide option) any related links
contained in or links to this content item.
■ Target Content Info: Displays the Content Information page of the document
referenced by the link. Again, this Content Information page contains a References
toggle switch that displays or hides any related links contained in or links to this
content item.
■ Link Info: Displays the Link Info Page for this link.
A.5.4 Link References on Content Information Page
If a content item does not contain any references and no other content items reference
it, then the References toggle switch is not displayed on its Content Information page.
However, if a content item does contain one or more references or has links that
reference it, or both, the References toggle switch is displayed.
You can click Show next to References to see if the content item references or is
referenced by other content items, or both.
A.5.4.1 Hide Link References
This is the default display option for the Content Information page when the content
item has applicable links associated with it.

Referenced Links Interface (optional)
User Interface A-35
The References toggle switch is included on the page but the individual sections are
not displayed. The Show toggle switch option is activated. Clicking Show opens the
References sections that list all applicable links associated with the content item.
A.5.4.2 Show Link References
Clicking the Show toggle switch opens the References sections that list all applicable
links associated with the content item.
The Links contained in this content item section lists all the links contained in this
content item that reference other documents. The Links to this content item section
lists all the links in documents that reference this content item. Links that are invalid
or broken are listed using bold font. Clicking the Info link in the Actions column
displays the Link Info Page for that particular link.
When the References sections are open, the Hide toggle switch option is activated.
Clicking Hide closes the References sections and hides the lists of links.
A.5.5 Link Info Page
The Link Info page provides additional information about a link. The Content ID field
contains an active link to the content item that contains this link.
You can access this page from the Search Links Page or from the Content Information
page.

Working with Files
A-36 Oracle Fusion Middleware User's Guide for Oracle Content Server
A.6 Working with Files
This section describes screens used when you are working with files.
This section covers the following topics:
■ Content Information Page
■ Revision History
■ Work In Progress Page
■ Info Update Form
■ Post Comment Form
■ Discussion Info Page
■ Content Information Page with Discussion Field
■ Subscriptions Page
■ Subscription Info Page
■ Subscribe To "Item" Page
■ Unsubscribe Page
Note: If you are using Firefox set to open new tabs instead of
windows, help screens launched from an Admin Applet are not
accessible until the applet window that launched the help is closed.
Therefore, it is preferable to set Firefox to open in new windows
instead of tabs.

Working with Files
User Interface A-37
A.6.1 Content Information Page
The content information page is used to view metadata and other information about a
specific content item. You can access it from Search Results and the Item Actions
Menu or Content Info icon. For more information about user, group, and role access
control list (ACL) fields, see Section A.4, "Access Control Lists (ACL)."
For example, you can use this page to determine when a file was released or to see the
content item’s revision history.
Note: Content Profiles may affect what content information is
initially displayed on the Content Information page. If content meets a
content profile defined by a system administrator, then only
information meeting the profile criteria is displayed. If you are an
administrator, an additional link for accessing the full content
information is displayed in the page heading.
Element Description
Full link Displays the full content information page.
This link is displayed only if a content item meets criteria
defined by the system administrator in a content profile rule
and if you have administrator privileges. If this link is
displayed, more content information is available than is shown.
Content ID field The unique identifier for the content item.
If your content server uses an Oracle database, all content IDs
are converted to uppercase letters automatically.

Working with Files
A-38 Oracle Fusion Middleware User's Guide for Oracle Content Server
Revision field The revision number of this revision.
Type field The category of the document.
Title field The descriptive name for the content item.
Author link The user who checked in this revision. Clicking the link opens
your e-mail program with a new message addressed to this
user.
Comments field Additional notes about the content item.
Security Group field An identifier that specifies access permission to the content
item.
Account field An identifier that specifies access permission to the content
item. This field is displayed only if accounts are enabled on
your system.
Checked Out By field The user who has the content item checked out.
Status field The revision status indicating where the file is in its lifecycle.
Formats field The file format of the native file.
Web Location link The unique web address for the web-viewable file. Clicking the
link displays the web-viewable file.
Native File link The file name of the native file. Clicking the link enables you to
open or save a copy of the native file.
Discussion Allows for the addition of a post to an associated threaded
discussion of a content item. Associated discussions are stored
as content items in Oracle Content Server, and identified by
appending a _d to the end of the content ID of the item to
which the discussion is associated. For example, an item with
content ID 001 would have an associated discussion with
content ID 001_d.
If you have a content item that has a document name that is
within 1 of the database storage maximum, which is 30 by
default, you cannot create a threaded discussion for it. Ask
your administrator to increase the length of the field.
Create Discussion: Creates a new discussion item in Oracle
Content Server, associated with the content item.
content_id_d (x item): Opens an existing discussion
associated with the content item so that a new post may be
added. The number of posts is listed next to the discussion ID
in parenthesis. For example, 001_d (4 items) means that four
posts have been made in the discussion associated with content
ID 001.
Element Description

Working with Files
User Interface A-39
A.6.2 Revision History
The Revision History section of the Content Information Page is used to view and
delete revisions of a content item.
Actions menus Content Actions
Performs the selected action:
Check Out: Checks out the content item and displays the
Check-Out Confirmation Page. This option is displayed only if
the content item is not checked out.
Undo Check Out: Cancels the content item check-out. This
option is displayed only if the content item is checked out. You
can undo check-out only on content items you checked out, or
you must have Admin permission for the content item.
Update: Displays the Info Update Form, which enables you to
change the content item’s metadata.
Check In Similar: Displays the Content Check-In Form with
the current content item’s metadata already filled in.
Subscribe: Displays the Subscriptions Page, which enables you
to be notified of new revisions to the content item. This button
is displayed if you have not subscribed to the content item.
Unsubscribe: Cancels your subscription to the content item.
This option is displayed if you have subscribed to the content
item and no criteria subscriptions are enabled on your system.
Subscriptions: Displays the Subscriptions Page. This option is
displayed if you have subscribed to the content item and
criteria subscriptions are enabled on your system.
Check Out and Open: Opens the item directly in a
WebDAV-compliant native application from Oracle Content
Server. This option is available only on the current revision,
and only if the optional Check Out and Open component is
installed and configured.
E-Mail: Emails the content item to a recipient.
Send link by e-mail: Opens your e-mail program with a new
message that contains a link to the URL (web address) of the
web-viewable file.
Revision History section Shows the complete revision history of the content item.
Element Description
Revision column Clicking a revision number displays the Content Information
Page for that revision.
Release Date column The date and time the revision was released.
Element Description

Working with Files
A-40 Oracle Fusion Middleware User's Guide for Oracle Content Server
A.6.3 Work In Progress Page
The Work In Progress page displays content items that are in the GenWWW or Done
status. To access this page, click Work In Progress in the Content Management tray.
Expiration Date column The date and time the revision will no longer be available for
searching or viewing in the content server, if any.
Status column The revision status indicating where the file is in its lifecycle.
Actions column Clicking the Delete option removes the revision from the
content server. You must have delete permission for the content
item to delete a revision.
Element Description
Content ID link Clicking the Content ID link displays the web-viewable file.
Title column Displays the title of the content item. Clicking the Content ID link
displays the web-viewable file.
Status column Displays the revision status of the content item.
Revision column Displays the revision number of the content item.
Item Actions Menu icon Displays a contextual menu allowing you to check out the content
item or to display the Content Information Page for the content
item.
Content Info icon Displays the Content Information Page for the content item.
Element Description

Working with Files
User Interface A-41
A.6.4 Info Update Form
The Info Update Form is used to change a content item’s metadata without creating a
new revision. For more information about user, group, and role access control list
(ACL) fields, see Section A.4, "Access Control Lists (ACL)."
To access this page, select Update from the Actions list on the Content Information
Page for a content item.
Element Definition
Content ID field* The unique identifier for the content item. This value cannot be
changed.
If your content server uses an Oracle database, all content IDs
are converted to uppercase letters automatically.
Type field* The category of the file. You must select from a list of
predefined values.
Title field*
A descriptive name identifying the revision.
The title you
enter must be 249 or fewer characters in length.
Author field* The user who created or revised the content item.
Depending on how your system is set up, you might be able to
select from a list of users. This value can be changed only if
you have administrative permission.
Security Group field* An identifier that specifies access permission to the content
item. You can select from the list of predefined values.
Account field An identifier that specifies access permission to the content
item. This field is displayed only if accounts are enabled for
your system.
Revision field The revision number.
Comments field Additional notes about the content item. The maximum length
is 255 characters.

Working with Files
A-42 Oracle Fusion Middleware User's Guide for Oracle Content Server
* Required metadata fields
A.6.5 Post Comment Form
The Post Comment Form can be accessed from numerous popup menus and links if
the ThreadedDiscussions component is enabled by your system administrator. Use this
form to post a comment on a content item, or to post a reply on content that already
has a discussion initiated.
A.6.5.1 Discussion Form Menu
If the ThreadedDiscussions component is enabled by your system administrator, a
new discussion form has the Original Content Info menu link only. After a discussion
has been initiated, the Print View and Discussion Info menu links become available.
The following table describes the menu options.
Release Date field The date that the current revision was released to the content
server. This value cannot be changed.
Expiration Date field The date and time that the revision will no longer be available
for searching or viewing in the content server.
■ Upon expiration, the revision is not deleted, but it can be
accessed only by an administrator.
■ If a value is entered, the date is required; the time is
optional.
Submit Update button Saves the specified metadata.
Reset button Resets all metadata fields to their original values.
Element Definition

Working with Files
User Interface A-43
A.6.6 Discussion Info Page
If the ThreadedDiscussions component is enabled by your system administrator, the
Discussion Info Page is a brief summary page about a discussion.
This page is only for content type that is a discussion, as denoted by the "_d" suffix.
From this page, you can access the Content Information page by clicking the [Full
Info] link.
You can access the Post Comment Form for the discussion thread by clicking the Web
Location link, which accesses the Threaded Discussion (hcsp) form.
Menu Option Description
[Print View] Opens a print view of the discussion that you can elect to print.
A "printed by user" message is printed at the top of the
discussion page for you.
[Discussion Info] Opens the Discussion Info Page for discussion content.
[Original Content Info] Opens the Content Information page for the discussion content.

Working with Files
A-44 Oracle Fusion Middleware User's Guide for Oracle Content Server
A.6.7 Content Information Page with Discussion Field
If the ThreadedDiscussions component is enabled by your system administrator, the
Content Information page contains the additional Discussion field when the
ThreadedDiscussions component is installed and enabled.
The Content Information Page for content that is a discussion itself does not contain
the Discussion link, since it is the discussion.

Working with Files
User Interface A-45
A.6.8 Subscriptions Page
The Subscriptions page is used to view your current subscriptions.
To access this page, click My Subscriptions in the My Content Server tray.
Field Description
Locator Links Active links below the page heading that provide a graphical
representation of where the page is in the navigation hierarchy.
Clicking a link displays the page named by the link.
Subscriptions column Displays the title of the content item. Clicking the title link
displays the web-viewable file.
Subscription Actions Actions icon:
■ Content Information link: Displays the Content
Information Page.
■ Unsubscribe link: Cancels your subscription to the
content item. This link is displayed only if you are already
subscribed.
Info icon: Display the Content Information Page.
Subscriptions Groups
column
Displays the subscription criteria for the content group.
Subscription groups Actions Actions icon:
■ Subscription Info link: Displays the Subscription Info
Page.
■ Unsubscribe link: Cancels your subscription to the
subscription group.
Info icon: Displays the Subscription Info Page.

Working with Files
A-46 Oracle Fusion Middleware User's Guide for Oracle Content Server
A.6.9 Subscription Info Page
The Subscription Info page is used to identify when you were subscribed to a file or
group of files and when you were last notified about a new revision.
To access this page, select Subscription Info from the Content Actions menu on the
Content Information Page.
Field Description
Locator links Active links below the page heading that provide a graphical
representation of where the page is in the navigation hierarchy.
Clicking a link displays the page named by the link.
Name field The name of the subscription.
Description field The description assigned by the system administrator.
Subscribed At field The date and time that you subscribed to the file or your
system administrator subscribed you to the file.
Latest Notification At field The most recent date and time that you were sent an e-mail
notification from this subscription.
Latest Notification Use At
field
The most recent date and time that you accessed a content item
from an e-mail notification from this subscription.
Subscription Criteria field Shows the criteria for the subscription.
Action field Clicking Unsubscribe cancels your subscription.
Content ID column Shows the content IDs of the content items included in the
subscription. Clicking a Content ID link displays the
web-viewable file.
Title column Shows the titles of the content item included in the
subscription.

Working with Files
User Interface A-47
A.6.10 Subscribe To "Item" Page
The Subscribe To "item" page is used to specify whether you want a file subscription or
a criteria subscription.
To access this page, select Subscribe from the Content Actions menu on the Content
Information Page.
Actions column Actions icon:
■ Content Information: Displays the Content Information
Page.
■ Check In: (Seen if content is checked out by a user.)
Displays the Content Check-In Form.
■ Check Out: (Seen if content is not checked out.) Checks
out the item and displays the Check-Out Confirmation
Page.
■ Check In Similar: Displays the Content Check-In Form
with the metadata fields filled in with information similar
to this item.
■ Send link by e-mail: Opens a new e-mail with links to the
content item’s web-viewable and native files, as well as the
Content Information Page.
Info icon: Displays the Content Information Page.
Element Description
Subscribe link Subscribes to the content item and not the group.
Subscriptions column Lists the criteria of the group to which the item belongs.
Field Description

Working with Files
A-48 Oracle Fusion Middleware User's Guide for Oracle Content Server
A.6.11 Unsubscribe Page
The Unsubscribe page is used to cancel the subscription to a content item or group.
To access this page, select Unsubscribe from the Content Actions menu on the
Content Information Page.
Actions column Actions icon:
■ Subscription Info: Displays the Subscription Info Page.
■ Subscribe: Subscribes to the specified criteria group.
Info icon: Displays the Subscription Info Page.
Element Description
Subscriptions column Lists the criteria of the group to which the item belongs.
Actions column Actions icon:
■ Subscription Info: Displays the Subscription Info Page.
■ Unsubscribe: Unsubscribes from the specified criteria
group.
Info icon: Displays the Subscription Info Page.
Element Description

Check-In and Check-Out Interface
User Interface A-49
A.7 Check-In and Check-Out Interface
This section describes the screens used when you check in content to Oracle Content
Server and check out content from it.
This section covers the following topics:
■ Content Check-In Form
■ Dynamic Converter Check-In Fields
■ Check-In Confirmation Page
■ Upload Files Window
■ Select File Window
■ Select Files Window
■ Change Drive Window
■ Upload Message Screen
■ Checked-Out Content for user Page
■ Check-Out Confirmation Page
■ Checked-Out Content Page
■ Download Files Screen
■ Download Results Summary
Note: If you are using Firefox set to open new tabs instead of
windows, help screens launched from an Admin Applet are not
accessible until the applet window that launched the help is closed.
Therefore, it is preferable to set Firefox to open in new windows
instead of tabs.

Check-In and Check-Out Interface
A-50 Oracle Fusion Middleware User's Guide for Oracle Content Server
A.7.1 Content Check-In Form
The content check-in form is used by contributors to check files into Oracle Content
Server. For more information about user, group, and role access control list (ACL)
fields, see Section A.4, "Access Control Lists (ACL)."
To access this page, click New Check In on the top menu.
Tip: Using a Content Profiles link in the My Content Server tray to
check in or search for content can help you define and display the
most critical metadata fields necessary for those tasks. This can help
you use Oracle Content Server more effectively.
Element Definition
Content ID field
1
The unique identifier for the content item.
■ Duplicate names are not allowed.
■ Maximum length is 30 characters.
■ The following are not acceptable: spaces, tabs, linefeeds,
carriage returns, and the symbols ; ^ ? : @ & + " # % < > * ~
|
If a content ID is already filled in or if this field is not
displayed, the system is set up to generate content IDs
automatically.
If your content server uses an Oracle database, all content IDs
are automatically converted to uppercase letters.

Check-In and Check-Out Interface
User Interface A-51
Type field
1
The category of the file. You must select from a list of
predefined values.
Title field
1
A descriptive name identifying the revision. The title you enter
must be 249 or fewer characters in length.
Author field
1
The user who created or revised the content item.
Depending on how your system is set up, you might be able to
select from a list of users. This value can be changed only if
you have administrative permission.
Security Group field
1
The security group is a set of files with the same access
permission.
Account field An identifier that specifies access permission to the content
item. This field is displayed only if accounts are enabled for
your system.
Primary File field
1
The path and file name of the native file being checked in.
■ Maximum length is 80 characters.
■ The maximum file extension length (after the period) is
eight characters.
■ Click the Browse button to navigate to and select the file.
Upload Multiple Files
checkbox
Selected: Clicking the Browse button displays the Upload Files
window, which is used to select the files to be included in the
ZIP file that will be created as the primary file.
Clear: Clicking the Browse button displays the standard file
selection window.
This checkbox appears only if the system administrator has
enabled the upload applet and you have selected the Enable
Upload Applet checkbox in your User Profile Page.
Format field
1
The application format for the file name entered in the Primary
File field.
■ This field appears only if it has been enabled by the system
administrator.
■ If the use default option is selected, Oracle Content Server
converts the file format based on its file name extension.
For example, test.doc is a Word file, test.xls is an Excel file,
and so on.
■ If any other option is selected, Oracle Content Server
ignores the file extension and uses the selected format to
determine how to convert the file.
Alternate File field The path and file name of an alternate, web-viewable file or a
file that can be converted to web-viewable format.
■ The file extension (after the period) cannot be the same as
that of the primary file (for example, both files cannot end
in .doc).
■ Maximum length is 80 characters.
■ The maximum file extension length (after the period) is
eight characters.
■ Click the Browse button to navigate to and select the file.
Element Definition

Check-In and Check-Out Interface
A-52 Oracle Fusion Middleware User's Guide for Oracle Content Server
Upload Multiple Files
checkbox
Selected: Clicking the Browse button displays the Upload Files
window, which is used to select the files to be included in the
ZIP file that will be created as the alternate file.
Clear: Clicking the Browse button displays the standard file
selection window.
This checkbox appears only if the system administrator has
enabled the upload applet and you have selected the Enable
Upload Applet checkbox in your User Profile Page.
Format field The application format for the file name entered in the
Alternate File field.
■ This field appears only if it has been enabled by the system
administrator.
■ If the use default option is selected, Oracle Content Server
converts the file format based on its file name extension.
For example, test.doc is a Word file, test.xls is an Excel file,
and so on.
■ If any other option is selected, Oracle Content Server
ignores the file extension and uses the selected format to
determine how to convert the file.
Revision field The revision increments automatically with each check-in of
the content item, so generally, you should not change this
value.
Comments field Additional notes about the file.
■ Maximum length is 255 characters.
Release Date field The date and time that the revision is available for viewing in
Oracle Content Server.
■ Defaults to the date and time the file is checked in.
■ If another date is entered, the revision remains in Done
status until the specified date. For details, refer to
Section 5.1.2, "Revision Status."
■ The date is required; the time is optional.
Expiration Date field The date and time that the content item will no longer be
available for viewing in the content server.
■ Upon expiration, the revision is not deleted, but it can be
accessed only by an administrator.
■ If a value is entered, the date is required; the time is
optional.
By default, all revisions of the content item will expire when
the current revision expires.
Custom fields Any custom metadata fields for your system will be displayed
on this page.
1
Required metadata fields.
Element Definition

Check-In and Check-Out Interface
User Interface A-53
A.7.2 Dynamic Converter Check-In Fields
When the Dynamic Converter option is enabled, there are additional metadata fields
that are displayed for new and existing content items. For more detailed information
about the Dynamic Converter product, refer to the applicable administration and
template editor guides.
When you check in a new form, the Template Format metadata field is included on the
Content Check-In Form. The available options are:
■ Classic HTML Conversion Template: the template editor from the earlier version
of Dynamic Converter
■ HTML Conversion Template: the current template editor
When you check in an existing template, the Template Type field is included. The
available options are:
■ Classic HTML Conversion Template
■ Classic HTML Conversion Layout
■ Script Template

Check-In and Check-Out Interface
A-54 Oracle Fusion Middleware User's Guide for Oracle Content Server
A.7.3 Check-In Confirmation Page
The check-in confirmation page is displayed after you have checked in a content item
successfully.
A.7.4 Upload Files Window
The Upload Files window is used to create a ZIP file as the primary or alternate file
that will be checked in to the content server.
To access this window, select an Upload Multiple Files checkbox on the Content
Check-In Form, and click the corresponding Browse button.
Element Description
Content ID field The unique content ID that you entered during check-in or that
was generated automatically by the system.
[Content Info] link Displays the Content Information Page for the content item.
Title field The title of the content item that you checked in.
Checked in by field The login you used to check in the file.
Check In Similar button Displays the Content Check-In Form with metadata values
similar to the content item you just checked in already filled in.

Check-In and Check-Out Interface
User Interface A-55
A.7.5 Select File Window
The Select File window is used to select individual files to be included in the uploaded
ZIP file.
To access this window, click Select File in the Upload Files Window.
Element Description
Zip Name field The name of the ZIP file that will be checked in to the content
server repository.
Files to Upload list Lists the files that will be included in the ZIP file.
Select File button Displays the Select File Window, which is used to select
individual files.
Select Multiple button Displays the Select Files Window, which is used to select
multiple files from the same directory.
Delete button Deletes the selected files from the Files to Upload list.
OK button Creates a ZIP file and enters the file name in the Primary File
field or Alternate File field.
Cancel button Closes the Upload Files window without creating a ZIP file.
Element Description
Look in field Select the directory where the file is located.
Contents list Select the file to be included in the ZIP file.
File name field You can filter the files by entering a wildcard expression, such
as doc*.*.
Files of type field You can filter the files in the current directory by selecting a file
type.
Open button Places the selected file in the Files to Upload list in the Upload
Files window.
Cancel button Closes the Select File window without selecting any files.

Check-In and Check-Out Interface
A-56 Oracle Fusion Middleware User's Guide for Oracle Content Server
A.7.6 Select Files Window
The Select Files window is used to select multiple files from the same directory to be
included in the uploaded ZIP file.
To access this window, click Select Multiple in the Upload Files Window.
Element Description
Current Directory field Shows the directory currently selected.
Change Drive button Displays the Change Drive Window.
Subdirectories list Select the subdirectory where the files are located. Double-click
the ".." entry in this list to navigate to the parent directory.
Files list Select specific files to be included in the ZIP file.
■ Holding down the Ctrl key and clicking files selects
noncontiguous files.
■ Holding down the Shift key and clicking two files selects
contiguous files.
File Filter field All files that meet the criteria in this field will be selected when
the Add with Filter button is clicked.
■ You can use the asterisk * (zero or more characters) and
question mark ? (one character) as wildcards.
■ This field has no effect when the Add Selected button is
clicked.
Recurse through
subdirectories checkbox
Selects all files in all subdirectories of the current directory
when the Add with Filter button is clicked.
This checkbox has no effect when the Add Selected button is
clicked.
Include parent folder in file
path checkbox
Store path information from the parent folder with the files you
are adding when the Add with Filter button is clicked.
This checkbox has no effect when the Add Selected button is
clicked.
Add Selected button Places the selected files in the Files to Upload list in the
Upload Files Window.

Check-In and Check-Out Interface
User Interface A-57
A.7.7 Change Drive Window
The Change Drive window is used to change the drive where files to be included in
the uploaded ZIP file are located.
To access this window, click Change Drive in the Select Files Window.
A.7.8 Upload Message Screen
The Upload Message screen shows the upload progress when the Chunking function
is enabled.
If the Chunking function is not enabled on your system, this screen will not appear.
Add with Filter button Places files in the Files to Upload list in the Upload Files
Window, based on the File Filter field, Recurse through
subdirectories checkbox, and Include parent folder in file
path checkbox.
Cancel button Closes the Select Files window without selecting any files.
Element Description
Drive list Select the drive where the files to be selected are located.
OK button Changes the drive displayed in the Current Directory field in
the Select Files Window.
Cancel button Closes the Change Drive window without changing the drive.
Element Description

Check-In and Check-Out Interface
A-58 Oracle Fusion Middleware User's Guide for Oracle Content Server
A.7.9 Checked-Out Content for user Page
The Checked Out Content for User page is used to identify which files are checked out
by the current user.
To access this page, click My Checked-Out Content in the My Content Server tray.
A.7.10 Check-Out Confirmation Page
The Check-Out Confirmation page is displayed after you have checked out a single
content item successfully.
Element Description
Content ID link Clicking the Content ID link displays the web-viewable file.
Title column Displays the title of the content item.
Checked Out By column Displays the user name of the person who has checked out the
content item.
Action icon Displays a contextual menu allowing you to display the
Content Information Page, check in the content item, or undo
the check-out of the content item, depending on your access
rights.
Info icon Displays the Content Information Page for the content item.
Element Description
Title field The title of the content item that you checked out.
Content ID field The content ID of the file that you checked out.
Checked Out By field The login you used to check out the file.

Check-In and Check-Out Interface
User Interface A-59
A.7.11 Checked-Out Content Page
The checked-out content page is used to identify which files are checked out.
To access this page, click Checked Out Content on the Content Management Tray.
Download native file
button
Enables you to open or save a copy of the native file.
Check In button Displays the Checked-Out Content Page.
Element Description
Content ID link Clicking the Content ID link displays the web-viewable file.
Title column Displays the title of the content item.
Checked Out By column Displays the user name of the person who has checked out the
content item.
Actions column, item action
menu icon
Displays a contextual menu allowing you to display the
Content Information Page, check in the content item, or undo
the check-out of the content item, depending on your access
rights.
Actions column, info icon Displays the Content Information Page for the content item.
Element Description

Check-In and Check-Out Interface
A-60 Oracle Fusion Middleware User's Guide for Oracle Content Server
A.7.12 Download Files Screen
The Download Files screen is used to specify download options and the target
directories for files being downloaded from the content server.
To access this screen, click Download on the Search Results Page.
Element Description
Content ID field The content ID of the file.
Title field The descriptive title of the content item.
Web Viewable field The path and file name of the content item’s web-viewable file.
Native field The file name of the content item’s native file. This field is filled
in when the Native option is selected.
Type of file to download
options
Web Viewable: Specifies that the web-viewable file is to be
downloaded.
Native: Specifies that the native file is to be downloaded.
Extract zip file contents
checkbox
Selected: Files in ZIP format will be uncompressed when they
are downloaded.
Clear: Files in ZIP format will be downloaded as is.
Check out file checkbox Selected: Content items will be checked out as well as
downloaded.
Clear: Content items will only be downloaded and will not be
checked out.
This checkbox is available only when the Native option is
selected.
Download Location field The directory and file name where the current file will be
copied. Click the Browse button to navigate to and select the
directory.

Check-In and Check-Out Interface
User Interface A-61
A.7.13 Download Results Summary
The download results summary displays a log of the downloaded files.
This screen is displayed when the download process is complete.
Progress bar Shows the progress of the download as a percentage.
Download button Downloads the current file to the specified directory.
Download All button Downloads all files that have not been skipped to the specified
directory.
This button is not displayed if only one file was selected on the
search results page.
Skip button Excludes the current file from the download.
This button is not displayed if only one file was selected on the
search results page.
Cancel button Closes the Download Files screen.
Element Description

Workflow Interface
A-62 Oracle Fusion Middleware User's Guide for Oracle Content Server
A.8 Workflow Interface
This section describes the screens used when processing workflows.
This section covers the following topics:
■ Workflow Started Notification
■ Workflow Review Notification Message
■ Workflow Content Items Page
■ Reject Content Item Page
■ Workflow Content Item Reject Notification
■ Active Workflows Page
■ Workflow in Queue Page
■ Workflow Info For Item Page
■ Workflow Review Page
A.8.1 Workflow Started Notification
A workflow started notification message is e-mailed to you when you are assigned to
check in a new file for a basic workflow.
This is an automated message that you can use to identify the file that you need to
check in and other workflow information.
Note: If you are using Firefox set to open new tabs instead of
windows, help screens launched from an Admin Applet are not
accessible until the applet window that launched the help is closed.
Therefore, it is preferable to set Firefox to open in new windows
instead of tabs.
Element Description
Workflow Name field Identifies the workflow.
Started By field Opens an e-mail to the person who initiated the workflow.

Workflow Interface
User Interface A-63
A.8.2 Workflow Review Notification Message
A workflow review notification message is e-mailed to you when you are assigned to
review a revision in a workflow.
It is an automated message that you can use to identify some workflow characteristics.
A.8.3 Workflow Content Items Page
The Workflow Content Items page is used to identify which action to perform in the
workflow.
Message field Displays a message from the person who initiated the
workflow.
Review workflow content
link
Opens the Workflow Content Items Page.
Element Description
Workflow Name field Identifies the workflow.
Workflow Step field Identifies the current step in the workflow.
Content Item field Identifies the content item or items in the workflow.
Review workflow item link Opens the Workflow Review Page.
Element Description

Workflow Interface
A-64 Oracle Fusion Middleware User's Guide for Oracle Content Server
To access this page, click the Review Workflow Content link on a Workflow Started
Notification or open the Content Management Tray, click Active Workflows, and then
the workflow name on the Active Workflows Page.
Element Description
Locator links Displays a hierarchical navigation within content server.
Located just below the page title.
Content ID column Click the content ID to display the web-viewable file.
Title column The title of the content.
Status column The status of the revision.
Step Name column The name of the current workflow step.
Actions column, item action
menu icon
Displays the actions (if any) that you can take on the content
item:
Workflow Review: Displays the Workflow Review Page.
Approve: Approves the revision.
Reject: Rejects the revision and displays the Reject Content
Item Page.
Content Info: Displays the Content Information Page for the
revision.
Workflow Info: Displays the Workflow Info For Item Page for
the revision.
Actions column, info icon Displays the Workflow Review Page for the content item.
Note: Content security can affect what is displayed on the Workflow
Content Items page. For example, if 2 content items are included in one
workflow to which you are assigned, but one item belongs to a
security account to which you do not have access, that item is not
displayed on the Workflow Content Items page. It is displayed on the
Workflow in Queue Page, but without providing access to the content
or content information. This ensures that a workflow to which you are
assigned does not get held up because you are unaware of your
responsibility.

Workflow Interface
User Interface A-65
A.8.4 Reject Content Item Page
The Reject Content Item page is used to explain why you are rejecting a workflow
revision.
This page is displayed automatically when you reject a workflow item.
Element Description
Locator links Displays a hierarchical navigation structure within the content
server. Located just below the page heading.
Workflow field The name of the current workflow.
Workflow Step field The name of the current workflow step.
Content ID field The content ID of the content item.
Title field The title of the revision.
Type field The value associated with the Type metadata field.
Author field The login associated with the user who checked in the file.
Security Group field The security group associated with the content item.
Format field The formats corresponding to the file.
Revision field The current revision of the content item.
Message field Enables you to enter an explanation for why you are rejecting
the revision. Include what should be done to ensure that the
revision is approved in the future.
Reject button Sends a Workflow Content Item Reject Notification to the
previous contributor in the workflow.
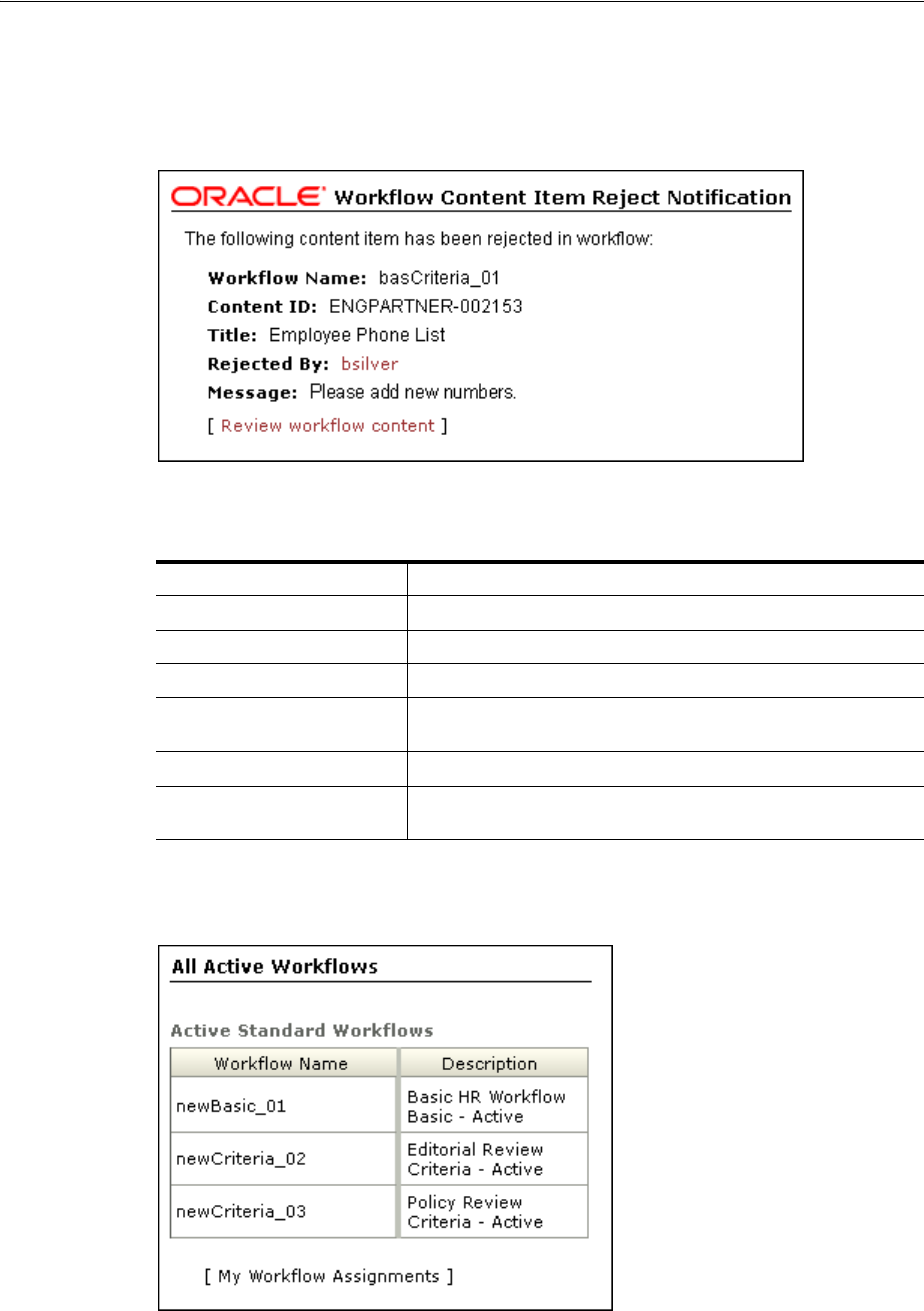
Workflow Interface
A-66 Oracle Fusion Middleware User's Guide for Oracle Content Server
A.8.5 Workflow Content Item Reject Notification
When a revision is rejected and the Reject Content Item Page is filled out, this e-mail
message is automatically sent to users assigned to the previous contribution step in the
workflow.
The workflow content item reject notification message identifies who rejected the
revision and why it was rejected.
A.8.6 Active Workflows Page
The Active Workflows page is used to view a list of all active workflows in the system.
To access this page, click Active Workflows on the Content Management Tray.
Element Description
Workflow Name field The name of the workflow.
Content ID field The content ID of the rejected item.
Title field The title of the rejected item.
Rejected By field The user name of the person rejecting the item. Click to send an
e-mail to the person.
Message field The message sent by the person rejecting the item.
Review workflow content
link
Opens the Workflow Content Items Page.

Workflow Interface
User Interface A-67
A.8.7 Workflow in Queue Page
To access this page, click My Workflow Assignments in the My Content Server tray.
The Workflow in Queue page is used to view a list of all content items that you need
to review.
Element Description
Workflow Name column The names of the active workflows in the corresponding
security group. Clicking a link opens the Workflow Content
Items Page.
Description column A description of the workflow
My Workflow Assignments
link
Displays the Workflow in Queue Page.
Note: Content security can affect what is displayed on the Workflow
Content Items page. For example, if 2 content items are included in one
workflow to which you are assigned, but one item belongs to a
security account to which you do not have access, that item is not
displayed on the Workflow Content Items page. It is displayed on the
Workflow in Queue page, but without providing access to the content
or content information. This ensures that a workflow to which you are
assigned does not get held up because you are unaware of your
responsibility.
Element Description
Locator links Displays a hierarchical navigation structure within the content
server. Located just below the page heading.
Content ID column Displays the content ID and the title of each workflow item.
Clicking the content ID link displays the web-viewable file.
Title column The title of the workflow.
Enter Date column The date and time that the content item entered the current
step.

Workflow Interface
A-68 Oracle Fusion Middleware User's Guide for Oracle Content Server
Actions column, item action
menu icon
Displays the actions (if any) that you can take on the content
item:
Workflow Review: Displays the Workflow Review Page.
Approve: Approves the revision.
Reject: Rejects the revision and displays the Reject Content
Item Page.
Content Info: Displays the Content Information Page for the
revision.
Workflow Info: Displays the Workflow Info For Item Page for
the revision.
Workflow Content Items: Displays the Workflow Content
Items Page for the revision.
Remove from Queue: Removes the content item from the
Workflow in Queue page. (The content item is not deleted from
the workflow.)
Actions column, item action
info icon
Displays the Workflow Review Page.
Note: Content security can affect access to content displayed on the
Workflow in Queue page. For example, if 2 content items are included
in one workflow to which you are assigned, but one item belongs to a
security account to which you do not have access, that item is
displayed on the Workflow in Queue page, but without providing
access to the content or content information. This ensures that a
workflow to which you are assigned does not get held up because you
are unaware of your responsibility.
Element Description

Workflow Interface
User Interface A-69
A.8.8 Workflow Info For Item Page
The Workflow Info For Item page is used to identify where a revision is in the current
workflow and to view the workflow history.
To access this page, select Workflow Info from the contextual menu in the Actions
column on the Workflow Content Items Page or the Workflow in Queue Page, or by
clicking Workflow Info on the Workflow Review Page.
Element Description
Locator links Displays a hierarchical navigation structure within the content
server. Located just below the page heading.
Title field The title of the content item.
Revision field The current revision of the content item.
Type field The value associated with the Type metadata field.
Author field The login associated with the user who checked in the file.
Locator links Displays a hierarchical navigation structure within the content
server. Located just below the page title.
Workflow Name field The name of the current workflow.
Workflow Steps field Lists all of the workflow steps. The current workflow step is in
boldface type. The type of workflow step is shown in
parentheses.
Current Step field The current workflow step.
Approved By field Lists the logins of the users who have approved the revision at
the current workflow step.
Required Approvals field Shows how many approvals are required at the current
workflow step.

Workflow Interface
A-70 Oracle Fusion Middleware User's Guide for Oracle Content Server
A.8.9 Workflow Review Page
The Workflow Review page offers several options for viewing and taking action on
content in a workflow to which you have a responsibility.
To access this page, click Review Workflow Item on the Workflow Review
Notification Message or by selecting Workflow Review from the contextual menus in
the Actions column on the Workflow Content Items Page or the Workflow in Queue
Page.
Remaining Reviewers field Lists the users who have yet to review the revision for the
current step.
Current Step’s Additional
Exit Condition field
Lists additional conditions beyond required approvals that
must be met for the workflow step to be completed.
Workflow Content Action
History field
Lists the actions that have been performed on the revision
during the current workflow process.
Workflow Name column The name of the workflow or sub-workflow.
Step column The name of the workflow step.
Action column The action that was performed on the revision.
Action Date column The date and time that the action was performed.
Users column The users that performed the action.
Element Description
Instructions field Displays instructions on how to proceed with the workflow.
Tasks links Links to specific tasks you can perform in the workflow.
Approve: Approves the revision.
Reject: Rejects the revision and displays the Reject Content
Item Page.
Check Out: Checks out a file and displays the Check-In
Confirmation Page. This link is displayed only if the current
step is a reviewer/contributor step.
Element Description

Folders Interface
User Interface A-71
A.9 Folders Interface
This section describes the Folders interface screens.
This section covers the following topics:
■ Contribution Folders Link
■ Folder Configuration Link
■ User Profile Page
■ Folder Configuration Page
■ Default Information Field Configuration Page
■ Revision Information Field Configuration Page
■ Exploring Contribution Folders
■ Trash Exploring Page
■ Browsing Window
■ Hierarchical Folder Information Page
■ Hierarchy Folder Configuration Page
Renditions Links to specific tasks you can perform in the workflow.
Web Viewable: Opens a version of the item in a format
viewable in your browser, provided your system administrator
has configured the content server to convert the item.
Native File: Opens the item in your browser using the native
application.
Links Links to information relating to the item or workflow.
Content Info: Displays the Content Information Page for the
revision.
Workflow Info: Displays the Workflow Info For Item Page for
the revision.
Get Native File: Prompts for you to open the item in its native
application, or save a copy of the item in its native format.
My Workflow Assignments: Displays the Workflow in Queue
Page.
Note: If you are using Firefox set to open new tabs instead of
windows, help screens launched from an Admin Applet are not
accessible until the applet window that launched the help is closed.
Therefore, it is preferable to set Firefox to open in new windows
instead of tabs.
Element Description

Folders Interface
A-72 Oracle Fusion Middleware User's Guide for Oracle Content Server
A.9.1 Contribution Folders Link
When the Folders component is enabled, a new Contribution Folders link appears in
the Browse Content tray.
Clicking this link displays the top-level Exploring Contribution Folders.
Expanding this link by clicking its plus symbol displays links to the Exploring
Contribution Folders for the top-level folders in the hierarchy.
A.9.2 Folder Configuration Link
When the Folders component is enabled in Content Server, a Folder Configuration for
user link appears in the My Content Server tray. Clicking this link displays the Folder
Configuration Page.
Expanding this link by clicking its plus symbol displays links to the Default
Information Field Configuration Page and Revision Information Field Configuration
Page.
A.9.3 User Profile Page
When the Folders component is enabled in Content Server, a Folder Configuration for
user button appears on the User Profile page. Clicking this button displays the Folder
Configuration Page.
A.9.4 Folder Configuration Page
The Folder Configuration page enables the user to configure their virtual folder
interface. To access this page, do one of the following:
■ Click the Folder Configuration Link in the My Content Server tray.
■ Click the Folder Configuration for user button on the User Profile Page.

Folders Interface
User Interface A-73
Element Description
Content Style options Native: The native file is displayed when the user
clicks a content item in a folder.
Web Viewable (Browse only): The web-viewable file is
displayed when the user clicks a content item in a
folder. The user cannot perform any folder operations
when this option is selected.
Hierarchical Virtual Folder Options Show hidden when browsing: When selected, hidden
folders and content items are displayed and identified
with a dimmed icon; users can still see and work with
hidden items. If not selected, hidden folders and
content items do not appear in the folder hierarchy.
Remove items immediately when deleted: When
selected, items are deleted immediately (not moved to
the Trash folder). If not selected, deleted items are first
moved to the Trash folder.
Show only items that user has deleted in trash virtual
folder: When selected, only items that the current user
has deleted are displayed the Trash folder. If not
selected, all items in the Trash folder are displayed.
Update button Applies any changes to the system.
Reset button Resets the options to the last saved condition.
Default Information Field
Configuration for User button
Displays the Default Information Field Configuration
Page.
Revision Information Field
Configuration for user button
Displays the Revision Information Field Configuration
Page.

Folders Interface
A-74 Oracle Fusion Middleware User's Guide for Oracle Content Server
A.9.5 Default Information Field Configuration Page
The Default Information Field Configuration page defines the default metadata values
to apply to new content (not subsequent revisions) that the user checks in through a
virtual folder. For more information about user, group, and role access control list
(ACL) fields, see Section A.4, "Access Control Lists (ACL)."
To access this page, do one of the following:
■ In the My Content Server tray, expand the Folder Configuration for user link and
click the Default Information Field Configuration for user link.
■ Click the Default Information Field Configuration for user button on the Folder
Configuration Page.
Important: These default settings only apply to content that is pasted
through the WebDAV interface. They do not apply if new content is
added to the folder through the web browser.

Folders Interface
User Interface A-75
A.9.6 Revision Information Field Configuration Page
The Revision Information Field Configuration page defines the default metadata
values to apply to revisions (not new content items) that the user checks in through a
virtual folder. For more information about user, group, and role access control list
(ACL) fields, see Section A.4, "Access Control Lists (ACL)."
To access this page, do one of the following:
■ In the My Content Server tray, expand the Folder Configuration for user link and
click the Revision Information Field Configuration for user link.
■ Click the Revision Information Field Configuration for user button on the Folder
Configuration Page.
Element Description
Information fields Define the metadata values that will be applied to new content (not
subsequent revisions) checked in through a virtual folder if values are
not already defined for the folder.
These metadata values are applied only on initial check-in; these
settings do not affect revisions to existing content.
■ Idoc Script can be used in any of the information fields.
■ The default Idoc Script in the Release Date field
(<$dateCurrent()$>) applies the current release date and time to
content item revisions.
■ Although the Release Date field is required, the content server will
automatically use the current date and time if this field1 is left
blank.
■ You can specify values for the Trash Delete fields, but they will be
overwritten with their current field values at the moment the
content item is actually deleted. It is therefore recommended that
you leave these fields empty.
Update button Applies changes to the user’s profile.
Reset button Resets the fields to the last saved values.
Important: These default settings only apply to revisions that are
pasted through the WebDAV interface. They do not apply if revisions
are added to the folder through the web browser.

Folders Interface
A-76 Oracle Fusion Middleware User's Guide for Oracle Content Server
Element Description
Information fields Define the metadata values that will be applied to
content revisions (not new content items) checked in
through a virtual folder if values are not already
defined for the folder.
■ Idoc Script can be used in any of the information
fields.
■ The default Idoc Script in the Release Date field
(<$dateCurrent()$>) applies the current
release date and time to content item revisions.
■ Although the Release Date field is required, the
content server will automatically use the previous
revision’s release date and time if this field is left
blank.
■ You can specify values for the Trash Delete fields,
but they will be overwritten with their current
field values at the moment the content item is
actually deleted. It is therefore recommended that
you leave these fields empty.
Update button Applies changes to the user’s profile.
Reset button Resets the fields to the last saved values.

Folders Interface
User Interface A-77
A.9.7 Exploring Contribution Folders
The exploring contribution folders pages are used to work with virtual folders within
the hierarchy. To access a folder exploring page, click the folder link under the
Contribution Folders Link, or click the folder link on another folder exploring page.
You can customize the look and feel of your exploring pages from your user profile
page.
Some of the fields in the My View search results are unavailable or not applicable
when browsing through virtual folders. For example, if you enable Vault File Size as a
column in your My View, this field will be populated when performing searches, but
it will be blank on folder exploring pages.
Depending on how the system administrator set up the system, long display lists may
be truncated and spread out over multiple pages. Navigation links are then provided
to move between pages.
Element Description
Folder path Displays the folder hierarchy for the current folder.
Clicking a link displays the exploring page for that folder.

Folders Interface
A-78 Oracle Fusion Middleware User's Guide for Oracle Content Server
Actions list Classic View: Displays the folder contents in the pre-7.0
format.
Thumbnail View: Displays the folder contents as icons.
Headline View: Displays the folder contents in a table.
My View: Displays the folder contents in your
personalized display style.
Customize: Opens a configuration page where you can
modify the personalized My View display.
Select All: Selects all items in the displayed list (that is, all
Select checkboxes are selected at once).
Unselect All: Unselects all items in the displayed list (that
is, all Select checkboxes are cleared at once).
Information: Displays the Hierarchical Folder
Information Page.
New Folder (for contributors only): Displays the
Hierarchy Folder Configuration Page, which is used to
create a new folder. This option is not available for guest
users.
New Content (for contributors only): Displays
the content check-in form, with the current folder’s
default metadata already filled in. This option is not
available for guest users.
Move: Displays the Browsing Window, which is used to
select the target folder for the current folder. This action
appears only when the system administrator has enabled
the Move function.
Actions list Delete: If the Trash Bin function is enabled, this action
moves the folder and its contents to the Trash folder. If the
Trash Bin function is not enabled, this action permanently
deletes the current folder, its subfolders, and all revisions
of all content items in the folders. This action appears
only when the system administrator has enabled the
Delete function.
Open Web Folder: If the Web Folder feature is enabled,
displays the current folder as a WebDAV virtual folder in
Windows Explorer.
Select checkbox Selected: The folder or content item will be moved or
deleted.
Clear: The folder or content item is not affected by the
move or delete operation.
Name column Folder link: Displays the exploring page for the folder.
File link: Displays the web-viewable file or the File
Download dialog, depending on which content style you
selected on the Folder Configuration Page.
Size column Displays the size of the content item.
Date column Displays the release date of the content item.
Author column Displays the author of the content item.
Element Description

Folders Interface
User Interface A-79
A.9.8 Trash Exploring Page
The Trash exploring page is used to work with deleted folders and content items. To
access this page, click the Trash link under the Contribution Folders Link. You can
customize the look and feel of your Trash exploring page from your user profile page.
The system administrator must have enabled the Trash Bin function for the Trash
exploring page to be available.
With only one exception, the descriptions applicable list options for each of the
features on the Trash Exploring page are identical to those for the Exploring
Contribution Folders. The Actions icon for both folders and content items includes a
Restore option. Selecting the Restore option returns the item to its original parent
folder. If the original parent folder has been deleted and is still in the Trash folder, the
item actions menu icon for folders Folder Information: Displays the Hierarchical Folder
Information Page.
Create Shortcut: Displays the Browsing Window, which
is used to select the target folder for a shortcut link to the
current folder.
Move: Displays the Browsing Window, which is used to
select the target folder for the current folder. This action
appears only when the system administrator has enabled
the Move function.
Delete: If the Trash Bin function is enabled, this action
moves the folder and its contents to the Trash folder. If the
Trash Bin function is not enabled, this action permanently
deletes the current folder, its subfolders, and all revisions
of all content items in the folders. This action appears
only when the system administrator has enabled the
Delete function.
item actions menu icon for content
items
Content Information: Displays the content information
page.
Check Out: Checks out content item and displays the
check-out confirmation page.
Check In Similar: Displays the content check-in form,
with a number of metadata field already filled in to match
the current content item’s metadata.
Send link by e-mail: Opens the default mail client and
automatically generates the Web-Viewable link and
Native File link paths in the message area.
Create Shortcut: Displays the Browsing Window, which
is used to select the target folder for a shortcut link to the
content item.
Move: Displays the Browsing Window, which is used to
select the target folder for the content item. This action
appears only when the system administrator has enabled
the Move function.
Delete: If the Trash Bin function is enabled, this action
moves the content item to the Trash folder. If the Trash
Bin function is not enabled, this action permanently
deletes all revisions of the content item. This action
appears only when the system administrator has enabled
the Delete function.
Information icon Displays the Hierarchical Folder Information Page for the
virtual folder or the content information page for the
content item.
Element Description

Folders Interface
A-80 Oracle Fusion Middleware User's Guide for Oracle Content Server
restored item will be moved to the original folder. If the original folder has been
permanently deleted, you will not be able to restore the item.
A.9.9 Browsing Window
The Browsing window is used to select a target folder for moving items, creating
shortcuts, and specifying local folders. To access this window, do one of the following:
■ Select one or more items and click the Move icon on the Exploring Contribution
Folders.
■ Select the Shortcut action on a Hierarchical Folder Information Page or Content
Information page.
■ Click the Browse button on the Local Folders Page (documented in the Folders and
WebDAV Administration Guide).

Folders Interface
User Interface A-81
A.9.10 Hierarchical Folder Information Page
The Hierarchical Folder Information page is used to view information on a virtual
folder. There are two ways to access this page:
■ By selecting Information from the Actions dropdown menu on any of the
Exploring Contribution Folders.
■ By selecting Folder Information from the Actions icon popup menu for a folder
on any of the Exploring Contribution Folders.
The page shows the default metadata for the current virtual folder, and, in the case of
deleted folders, information about the delete action. For more information about user,
group, and role access control list (ACL) fields, see Section A.4, "Access Control Lists
(ACL)."
Element Description
Folder hierarchy Clicking a folder displays any subfolders.
OK button Selects the open folder as the target folder. (Lower-level folders
may be displayed, but only the open folder is active.)
Cancel button Closes the Browsing window without any selection of a folder.
Element Description
Virtual Folder Name field The name of the virtual folder.
Virtual Folder Owner field The user name of the folder’s owner. This user can
change the folder metadata and delete the folder.

Folders Interface
A-82 Oracle Fusion Middleware User's Guide for Oracle Content Server
Folder Information fields Display the metadata values for the folder and content
items that are checked in through this folder.
These metadata values are applied only on initial
content check-in; these settings do not affect revisions to
existing content.
Hidden field Tru e hides the folder. Users will see a dimmed folder
icon if they have permission to the folder’s security
group and they have selected the “Show hidden when
browsing” checkbox on the Folder Configuration Page.
Otherwise, the folder will not be visible in the folder
hierarchy.
False makes the folder visible to all users who have
permission to the folder’s security group.
This field appears only when the system administrator
has enabled the Hide/Unhide feature.
The Hide/Unhide icons are only visible in the Classic
layout. Instead, the Trays and Top menus layouts use
the metadata fields ReadOnly and Hidden on the folder
information page.
Inhibit Propagation field Tru e prevents metadata changes to the folder during
metadata propagation from a higher-level folder.
False includes the folder in metadata propagation from
a higher-level folder.
Read Only field Tru e prevents renaming, moving, or deleting the folder
or content items in that folder. Content can still be
checked in and folder metadata can be updated.
False makes all folder operations available.
This field appears only when the system administrator
has enabled the Read Only feature.
Trash Delete Date field For deleted folders, this field shows when the folder
was deleted.
This field appears only when the system administrator
has enabled the Trash Bin feature.
Trash Delete Location field For deleted folders, this field shows the location of the
folder before it was deleted.
This field appears only when the system administrator
has enabled the Trash Bin feature.
Trash Delete Old Name field For deleted folders, this field shows the name of the
folder before it was deleted.
This field appears only when the system administrator
has enabled the Trash Bin feature.
Trash Deleter field For deleted folders, this field shows the name of the
user who deleted the folder.
This field appears only when the system administrator
has enabled the Trash Bin feature.
Actions list Update: Displays the Hierarchy Folder Configuration
Page.
Create Shortcut: Displays the Browsing Window, which
is used to select the target folder for a shortcut link to
the current folder.
Propagate: Propagates the folder’s default metadata
values to uninhibited subfolders and content items.
Element Description

Folders Interface
User Interface A-83
A.9.11 Hierarchy Folder Configuration Page
The Hierarchy Folder Configuration page is used to define or modify virtual folders.
For more information about user, group, and role access control list (ACL) fields, see
Section A.4, "Access Control Lists (ACL)."
■ To access the Hierarchy Folder Configuration page to add a folder, select New
Folder from the Actions list on any of the Exploring Contribution Folders.
■ To access the Hierarchy Folder Configuration page to edit an existing folder, open
the Hierarchical Folder Information Page and select Update from the Actions list.
Element Description
Virtual Folder Name field The name of the virtual folder.
Owner field The user name of the folder’s owner. This user can
change the folder metadata and delete the folder.
Folder Information fields Define the metadata values for the folder and any
content items that are checked in through this folder.
These metadata values are applied only on initial content
check-in; these settings do not affect revisions to existing
content.

Folders Interface
A-84 Oracle Fusion Middleware User's Guide for Oracle Content Server
Hidden field Tru e hides the folder. Users will see a dimmed folder
icon if they have permission to the folder’s security
group and they have selected the “Show hidden when
browsing” checkbox on the Folder Configuration Page.
False makes the folder visible to all users who have
permission to the folder’s security group.
This field appears only when the system administrator
has enabled the Hide/Unhide feature.
The Hide/Unhide icons are only visible in the Classic
layout. Rather than icons, the Trays and Top Menus
layouts use the metadata fields ReadOnly and Hidden on
the folder information page.
Inhibit Propagation field Tr ue prevents metadata changes to the folder during
metadata propagation from a higher-level folder.
False includes the folder in metadata propagation from a
higher-level folder.
Read Only field Tr ue prevents renaming, moving, or deleting the folder
or content items in that folder. Content can still be
checked in and folder metadata can be updated.
False makes all folder operations available.
This field appears only when the system administrator
has enabled the Read Only feature.
Trash Delete Date field
Trash Delete Location field
Trash Delete Old Name field
Trash Deleter field
You can specify values for these fields, but they will be
overwritten with their current field values at the moment
the virtual folder is actually deleted. It is therefore
recommended that you leave these fields empty.
These fields appear only when the system administrator
has enabled the Trash Bin feature.
Save button Saves the new virtual folder.
This button appears only when a new folder is being
created.
Submit Update button Saves the changes to the virtual folder.
This button appears only when an existing folder is
being modified.
Reset button Resets the fields to the last saved definition of the virtual
folder.
This button appears only when an existing folder is
being modified.
Element Description

WebDAV Interface
User Interface A-85
A.10 WebDAV Interface
This section describes the WebDAV interface screens.
This section covers the following topics:
■ Virtual Folders
■ User Interface
A.10.1 Virtual Folders
The WebDAV interface is based on the hierarchical Folders interface. The interface to a
content server repository is set up as "virtual folders." Each folder contains the content
items that have the same numerical "Folder" value, which is assigned automatically
upon creation of the folder.
You can work with content items and virtual folders in much the same way you
would work with files and folders in a file system. However, typical tasks you perform
on files in a file system may have a different effect when you perform them on files in
a WebDAV virtual folder. For example, opening a file from a WebDAV virtual folder
also checks the content item out of the content server.
The user logins and security controls in Content Server and the Folders component
also apply to content that is managed using WebDAV clients. For example, if you have
Read permission for a content item, you will be able to view the file, but you will not
be able to check in a new revision of the file.
Figure A–1 shows how a typical set of WebDAV virtual folders would look in
Windows Explorer.
Figure A–1 WebDAV Virtual Folders in Windows Explorer
Note: If you are using Firefox set to open new tabs instead of
windows, help screens launched from an Admin Applet are not
accessible until the applet window that launched the help is closed.
Therefore, it is preferable to set Firefox to open in new windows
instead of tabs.

Folio User Interface
A-86 Oracle Fusion Middleware User's Guide for Oracle Content Server
A.10.2 User Interface
Some tasks related to WebDAV can be performed from the following Folders web
pages:
■ Folder Configuration Page
■ Default Information Field Configuration Page
■ Revision Information Field Configuration Page
■ Hierarchy Folder Configuration Page
A.11 Folio User Interface
This section describes the pages and contextual menus added to Oracle Content Server
when folios is enabled.
This section covers the following topics.
■ My Content Server Tray: My Baskets
■ Content Management Tray: New Folio
■ Pick Folio Type Page
■ Edit Simple Folio Page
■ Edit Folio Page
■ Set Folio Profile Page
■ Folio Check In Page
■ Folio Check In Confirmation Page
■ View Folio Page
■ Manage Content Baskets Page
■ Content Basket Page
■ Move/Copy Basket Items Page
■ Insert Hypertext Page
■ Subscribe to folio_name page
A.11.1 My Content Server Tray: My Baskets
Content Baskets are created by you and used as an unstructured place to collect
content you want to access quickly. They are similar to Saved Queries, in that they
display a search results page listing content associated with the basket. They differ
from Saved Queries in that the only defining criteria for the search is whether or not
you have specifically added a content item to a basket.
Content baskets are displayed under the My Baskets folder in the My Content Server
tray, and also in the Source Items tray of the Edit Folio Page. Clicking My Baskets or
Note: If you are using Firefox set to open new tabs instead of
windows, help screens launched from an Admin Applet are not
accessible until the applet window that launched the help is closed.
Therefore, it is preferable to set Firefox to open in new windows
instead of tabs.

Folio User Interface
User Interface A-87
Manage baskets displays the Manage Content Baskets Page, where baskets can be
added, modified, deleted, or made active.
A.11.2 Content Management Tray: New Folio
New folios are created using the New Folio link on the Content Management tray.
Clicking New Folio displays the Manage Content Baskets Page.

Folio User Interface
A-88 Oracle Fusion Middleware User's Guide for Oracle Content Server
A.11.3 Pick Folio Type Page
The Pick Folio Type page is accessed by clicking New Folio in the Content
Management tray. It is used to select the type of folio to create.
Form Element Description
Load Folio Displays the Edit Simple Folio Page or Edit Folio Page for the type
of folio selected.
Simple Folio A simple folio is a folio with no structure established. Items in a
simple folio are displayed as a table on the Edit Simple Folio Page,
and can be reordered in the table, but not nested in a hierarchy
unless the simple folio is converted to an advanced folio. If a simple
folio is converted to an advanced folio, it cannot be converted back
to a simple folio.
Advanced Folio An advanced folio has structure. The structure can be predefined by
the system administrator in a template selected by the user. The
structure of a template-based folio may or may not be modified
later, depending on the template. If no template is selected, then the
folio is created with no structure established. When this option is
selected, a folio is begun with a root level node only, and the
structure can be modified later. An advanced folio cannot be
converted to a simple folio.
Folio Template Lists the templates available on which the new folio is based.
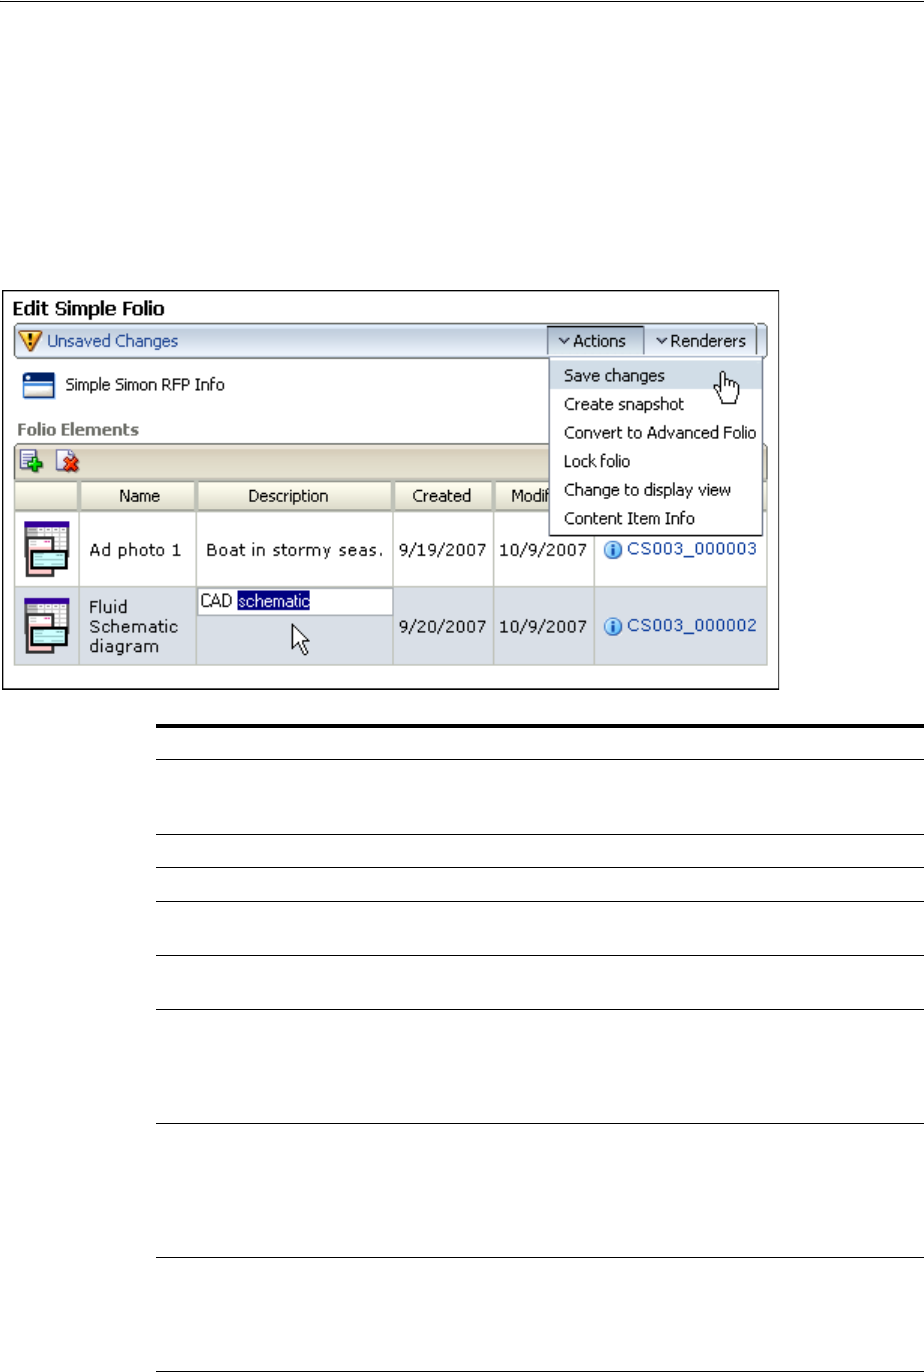
Folio User Interface
User Interface A-89
A.11.4 Edit Simple Folio Page
The Edit Simple Folio page displays the element info of content associated with a
simple folio in a table. Although a simple folio displays content in a manner similar to
a standard Oracle Content Server search results page, there is an important difference.
A standard search results page displays content information from a content item's
metadata. The Edit Simple Folio page displays element information from the XML file
stored in Oracle Content Server that defines the folio. This element information is
unique to the folio, and can be changed in the folio without affecting the content item's
metadata.
Item Description
Changes notification Displays the status of any changes made to the folio. An icon with
an exclamation point indicates unsaved changes. An icon with a
check mark indicates changes were saved.
Actions menu See Section A.11.5.4, "Actions Menu."
Renderers menu See Section A.11.5.5, "Renderers Menu."
Add icon Displays a search from for finding items within Oracle Content
Server to add to the folio.
Delete icon Deletes the selected item from the folio. Items are selected by
clicking the item row.
Thumbnail column Displays a small image of the item if your system administrator has
set up Oracle Content Server to create thumbnails. If thumbnails are
not set up, an icon associated with the item type is displayed.
Clicking the thumbnail displays the Oracle Content Server content
information page.
Name Displays the text entered into the name element of the folio XML
file. When a content item is first added to a simple folio, the name
element is populated with the content item title metadata from
Oracle Content Server. After it is associated with a folio, the name
element information can be edited independently for each folio with
which a content item is associated.
Description Displays the text entered into the description element of the folio
XML file. When a content item is first added to a simple folio, the
description element is blank. After it is associated with a folio, the
description element information can be edited independently for
each folio with which a content item is associated.

Folio User Interface
A-90 Oracle Fusion Middleware User's Guide for Oracle Content Server
A.11.5 Edit Folio Page
Clicking the content ID or the folio icon in the Actions column of a search result
displays the Edit Folio page. From the Edit Folio page, you can add nodes, slots, and
items to the folio, find information regarding the folio and its contents, lock or take a
snapshot of a folio, and view or render the folio. The left side of the Edit Folio page
displays the folio structure. The right side of the Folio is a series of trays, similar to the
left area of Oracle Content Server. Clicking the heading of a tray expands or collapses
the tray. The main areas on the Edit Folio page are:
■ Folio Structure Tray
■ Element Info Tray
■ Source Items Tray
■ Actions Menu
■ Renderers Menu
Created Displays the text entered into the creation date element of the folio
XML file. When a content item is first added to a simple folio, the
creation date element is populated with the creation date from the
content item metadata from Oracle Content Server.
Modified Displays the text entered into the modification date element of the
folio XML file. When a content item is first added to a simple folio,
the modification date element is populated with the current date.
The modification date is updated each time the element information
is updated. For example, if you edit the description text of an item in
the simple folio, the modification date for that item changes. The
modification date does not change if changes are made to the
content item metadata in Oracle Content Server.
Content Item Displays the Content ID of the associated item and the information
icon. Clicking the Content ID displays the web-viewable of a content
item. Clicking the information icon displays the standard Oracle
Content Server content information page for the item.
Item Description

Folio User Interface
User Interface A-91
A.11.5.1 Folio Structure Tray
The left side of the Edit Folio page is the folio structure section. It displays the nodes,
slots, and items that make up the folio hierarchy. Right-clicking within the folio
structure area displays a contextual menu for performing a variety of tasks, such as
adding and deleting nodes and slots, or inserting content items.

Folio User Interface
A-92 Oracle Fusion Middleware User's Guide for Oracle Content Server
A.11.5.1.1 Folio Structure Contextual Menu The following options are available in the
folio structure section contextual menu.
Item Description
Insert Selected Source
Item
Inserts the item in the folio slot with the selected item from the
Source Items Tray. If the slot currently contains a content item, the
item is replaced with the source item.
Insert Item by Search Displays a child window with a search form that searches Oracle
Content Server for a previously checked-in item, and adds it to the
folio in the selected node or slot. If the slot currently contains a
content item, the item is replaced with the found content. Available
in all contexts: Nodes, Slots, and Items.
Insert Item by Checkin Displays a child window with a content check in form that checks a
new content item into Oracle Content Server and adds it to the folio
in the selected node or slot. If the slot currently contains a content
item, the content item is replaced with the checked in content.
Available in all contexts: Nodes, Slots, and Items
Remove Content Item Removes a content item from a slot. Note that this does not delete
the slot, but empties it, leaving the folio structure intact. To delete a
slot, you must select Delete from the contextual menu. Available in
Item context only.
Insert Hypertext Creates a new item in the folio structure that can establish a
hypertext link to the specified URL. Available in all contexts: Nodes,
Slots, and Items
Create Node Creates a new node or sub-node in the folio structure.
Create Slot Creates an empty slot in the folio structure.
Cut Cuts an item, node, or slot from the folio structure for placement
elsewhere in the same folio. Available in all contexts: Nodes, Slots,
and Items
Copy Copies an item, node, or slot from the folio structure for placement
elsewhere in the same folio. Available in all contexts: Nodes, Slots,
and Items

Folio User Interface
User Interface A-93
A.11.5.2 Element Info Tray
The first tray on the right side of the page is the element info tray. The element
information is what is articulated in the XML file checked into Oracle Content Server
that defines the folio. When a node, slot, or item is selected in the folio structure
section of the page, information about what is selected is displayed in the element info
section, where it can be modified. Modified information is written back to the XML file
checked into Oracle Content Server.
Paste Pastes an item, node, or slot that was previously cut or copied from
the folio structure into another area of the same folio. Available in all
contexts: Nodes, Slots, and Items
Delete Deletes an item, node, or slot from the folio structure. Available in
all contexts: Nodes, Slots, and Items
Item Description

Folio User Interface
A-94 Oracle Fusion Middleware User's Guide for Oracle Content Server
The type of information displayed by default on all elements includes name,
description, and attributes. Slots and Content items also display the content ids of the
items, as well as their creation date and last modification date. Hyperlinks display the
URL of the link.
Important: The element information is unique to the folio, and not to
the content item associated with the folio. A single content item can be
associated with several different folios, and the element information
about that item might be different in each folio. It is important to
remember that if you change the element information in one folio, the
information does not change in another folio.
Information Description
Title The title of the item in Oracle Content Server.
Content ID The content ID of the item in Oracle Content Server.
Author The name of the person who last checked the item into Oracle
Content Server.
View Content Info Clicking this link opens the content information page for the item in
a separate window.
Native File Clicking this link downloads the native file from Oracle Content
Server.
Web Viewable
Rendition
Clicking this link opens the web-viewable file for the item in a
separate window.
Name The name given the element, as displayed in the folio hierarchy.
Displayed for all elements.
Description A description of the element to help identify its intended use. For
example, a slot named Field Report could have a description of
Information gathered at the scene by first responders.
Displayed for all elements.
Content id The unique identifier of a content item used by Content Server.
Displayed for items and slots. Slots display this attribute as blank.
Create date The date a content item was created.
Displayed for items and slots.
Last modified The date changes were last made to the content item.
Displayed for items and slots.

Folio User Interface
User Interface A-95
A.11.5.3 Source Items Tray
The Source Items tray provides the ability to collect items checked into Oracle Content
Server for use in the folio. The default enables you to search Oracle Content Server and
display a listing of search results in the tray, from which you can select items to insert
into the folio. This is useful if you have multiple items from a search result that you
want included in your folio.
Additionally, the selection menu in the Source Items tray heading enables you to select
a content basket to display in the tray. This is useful if you have previously collected
items in a content basket and now want to add them to a folio.
Attributes Allowable uses and limitations of an element. Attributes are
identical for slots and items, but differ for nodes.
Default attributes for slots and items:
■ Allow empty: The slot can be empty.
■ Lock content: Items cannot be deleted from the slot.
■ Removable: The slot can be deleted.
■ Allow external: An external link can be specified for the slot.
■ Restrict formats: Specifies what content item formats are
allowed to populate the slot.
■ Allow folio: Specifies whether or not a folio can populate the
slot.
■ Content profile: Specifies the content profile used when adding
an item by search or check in.
Default attributes for nodes:
■ Removable: The node can be deleted.
■ Children moveable: Subnodes can be moved.
■ Allow item creation: An item can be created within the node.
■ Allow node creation: Subnodes can be created within the node.
■ Maximum Items: The total number of items that can be created
within the node.
■ Maximum Nodes: The total number of nodes that can be
created within the node.
■ Content Profile: Specifies the content profile used when adding
an item by search or check in.
link The URL of the hyperlink.
Displayed for hyperlinks only.
Information Description

Folio User Interface
A-96 Oracle Fusion Middleware User's Guide for Oracle Content Server
A.11.5.4 Actions Menu
The Actions menu on the Edit Folio Page enables you to access and control the folio
versions checked into Content Server.
A.11.5.5 Renderers Menu
The Renderers menu on the Edit Folio Page allows you to download folio content
items in a variety of formats.
Item Description
Save Changes Saves the folio and any changes to the folio. When saving a folio for
the first time, the Set Folio Profile Page is displayed to initiate
checking the folio in to Oracle Content Server. When saving
subsequent changes, the graphic under the page title changes from
Unsaved Changes to Changes Saved.
Saving a folio does not update the revision of the folio in Oracle
Content Server. The revision of a folio is not updated until a
snapshot of a folio is made, or until a locked folio is unlocked for
additional editing.
Create snapshot Creates a new revision of the folio in Oracle Content Server. When a
snapshot is created, the folio hierarchy displayed in the Folio
Structure Tray is collapsed, but editing of the folio can continue.
Lock folio Locks a folio at the latest released revision, preventing further
updates unless unlocked. When a folio is locked, the display
changes to the View Folio Page.
Create editable revision Creates a new, unlocked revision of a locked folio. This option is
displayed only on the View Folio Page of a locked folio.
Change to display view Displays the View Folio Page.
Content Item Info Displays the standard Oracle Content Server content information
page for the folio.
Item Description
Download zip
rendition
Downloads a compressed (.zip) file of all folio content for
distribution. For example, a folio of catalog art, text, and instructions
can be compressed and downloaded into a single .zip file to give to
the print vendor.
Download PDF
rendition
Downloads all folio content that has a PDF version available,
consolidated into one printable portable document format (PDF).

Folio User Interface
User Interface A-97
A.11.6 Set Folio Profile Page
The Set Folio Profile page is accessed when you first select Save folio from the Actions
menu of either the Edit Simple Folio Page or Edit Folio Page. It allows you to select a
Oracle Content Server profile for the folio if your system administrator has created
any.
A.11.7 Folio Check In Page
The Folio Check In page is accessed by clicking Next on the Set Folio Profile Page. It
displays a modified Oracle Content Server check in form that allows you to specify
metadata for the folio.
Download XML
rendition
Downloads an XML file articulating the folio hierarchy.
Item Description

Folio User Interface
A-98 Oracle Fusion Middleware User's Guide for Oracle Content Server
A.11.8 Folio Check In Confirmation Page
The Folio Check In Confirmation page is accessed by clicking Check in on the Folio
Check In Page. It confirms the folio has been successfully checked into Oracle Content
Server, and provides you with the following options of how to proceed when clicking
Finish:
Option Description
Continue editing the
folio
Displays the Edit Simple Folio Page or Edit Folio Page of the folio
checked in.
View content
information for the
folio
Displays the standard Oracle Content Server content information
page for the folio.
View the folio Displays the View Folio Page for the folio.

Folio User Interface
User Interface A-99
A.11.9 View Folio Page
By default, the View Folio page is identical to the Edit Folio Page, displaying the folio
as a folder hierarchy with nodes, slots, and items. However, because the folio is stored
in Oracle Content Server as an XML file, your system administrator can create
additional folio views to display folio structure in a way more relevant to your
business, and may set a new default view. When displayed as a view, the folio cannot
be edited.
A.11.10 Manage Content Baskets Page
The Manage Content Baskets page is accessed by clicking My Baskets on the My
Content Server tray, or by clicking Manage Baskets under the My Baskets folder in
the My Content Server tray. The Manage Content Baskets page enables you to
append, rename, or delete a content basket, and to set which is the active basket.

Folio User Interface
A-100 Oracle Fusion Middleware User's Guide for Oracle Content Server
A.11.11 Content Basket Page
The Content Basket page is accessed by clicking a basket under the My Baskets folder
in the My Content Server tray. The Content Basket page is a search results listing
showing all items you have explicitly placed in this content basket.
Item Description
Thumbnail Column Displays an icon of the item type, or a thumbnail of the content item
if your system administrator has set up Content Server to create
them.
Content ID Displays the content ID of the content item.
Title Displays the title of the content item.
Native File Displays the name of the native file of the content item.
Info Clicking the info icon displays the content information page of a
content item.
Table Actions menu The table actions menu lists actions that can be applied to any
selected item or items in the content basket.
■ Move selected items: Displays the Move/Copy Basket Items
Page, allowing you to select a different basket in which to move
the item.
■ Copy selected items: Displays the Move/Copy Basket Items
Page, allowing you to select an additional basket in which to
copy the item.
■ Remove selected items: Removes selected items from the
content basket.
■ Toggle row reorder: Displays up and down arrows that allow
you to move rows within the basket to reorder them. After
reordering the rows, you must select Save basket ordering from
the page actions menu to preserve the new order.

Folio User Interface
User Interface A-101
A.11.12 Move/Copy Basket Items Page
The Move/Copy Basket Items page is accessed by selecting a content item or items in
a content basket from the Content Basket Page, and selecting either Move selected
items or Copy selected items from the table Actions menu. Click the basket on the
page to which you want to move the item or items.
A.11.13 Insert Hypertext Page
The Insert Hypertext page is accessed by selecting Insert Hypertext from the Folio
Structure Contextual Menu on the Edit Folio Page. It allows you to add a label and
hypertext link as a new item in the folio structure.
Page Actions menu The page actions menu lists actions that can be applied to the entire
content basket.
■ Save basket ordering: Saves any changes made to row order
using the Toggle row reorder action from the Table Actions
menu.
■ Empty basket: Removes all items from the content basket.
■ Make active: Makes the displayed basket the active basket.
Content items in Content Server can be added only to the active
basket.
■ Publish to folio: When selected, all items in the content basket
with be added to a new advanced folio with a flat hierarchy.
Item Description
Label A description or other identifier for the item.
HTML Link The URL of the hypertext link. For example,
http://templates.company.com.
Item Description

Content Tracker Interface
A-102 Oracle Fusion Middleware User's Guide for Oracle Content Server
A.11.14 Subscribe to folio_name page
The Subscribe to folio_name page is accessed by selecting Subscribe from the page
Actions menu of a Oracle Content Server content information page for a folio. Select
actions from the list and click Subscribe to be notified when the actions occur.
A.12 Content Tracker Interface
When enabled, the Content Tracker component enables users to generate a
pre-defined access history report of a content item. To generate this report, select the
View Access History Report option from the Content Actions menu on the
document’s Content Information page.
Note: If you are using Firefox set to open new tabs instead of
windows, help screens launched from an Admin Applet are not
accessible until the applet window that launched the help is closed.
Therefore, it is preferable to set Firefox to open in new windows
instead of tabs.

Content Tracker Interface
User Interface A-103
Field Description
Report name field The name of the selected query report.
Dates field The dates entered in the Start Date and End Date fields. If you did not
enter specific dates, the default dates are used for the query.
Results table
columns
Provide the relevant information for the selected report.
Printer-friendly
Ve rsio n link
Opens a new browser window and displays the report without the
navigation trays.

Content Tracker Interface
A-104 Oracle Fusion Middleware User's Guide for Oracle Content Server

Glossary-1
Glossary
access
The level of permission a member has to a content item. See also permission.
access list
A list of members who have permission to a project, folder, or content item.
account
A Oracle security element that enables greater flexibility and granularity in a security
structure than security groups provide. Content can be assigned to a particular
account upon check-in, and users can access the content only if they have the
appropriate permission to that account. See also security group, documents without
accounts, #none, and #all.
account hierarchy
Structure whereby accounts are ordered in levels (for example,
Company/Region/Store). Permission to a particular level in the account hierarchy
also permits access to all of its sub-level accounts.
account prefix
Permission to an account prefix grants access to all accounts with that prefix. For
example, permission to the "ACME" account provides access to all content checked in
with any account that begins with ACME, such as "ACME/Midwest" or
"ACME/Midwest/Store_1."
active report
A list that contains the results of a database query that is dynamically generated each
time the report page is accessed. This type of report always reflects current content
server information. Active reports are accessed through the hierarchical link structure
(the "Library"). See also historical report.
administration applets
See administration application.
administration application
A Java application used for administration such as: User Admin, Workflow Admin,
Web Layout Editor, Repository Manager, Configuration Manager (system
administrator only), or Archiver (system administrator only).
These applications can be run as a Java applet from a Java-enabled browser, or in
standalone mode from the content server computer.

administration rights
Glossary-2
administration rights
Permission to use an administration application. A user must also have admin
permission to at least one security group to be able to use the administration
applications for which they have rights.
administrator
Person in an organization that manages all or part of a content server system. See also
consumer, contributor, subadministrator, and system administrator.
admin permission
The permission level that enables users to perform the following tasks within a
particular security group:
■ Viewing content
■ Checking in content
■ Checking out content
■ Getting a copy of content
■ Deleting content
■ Checking in content with another user specified as the author
■ Using the User Admin, Workflow Admin, Web Layout Editor, and Repository
Manager administration applications (the user must also have administration
rights for the application)
See also read permission, write permission, and delete permission.
admin role
A standard role that gives the user read, write, delete, and admin permission to all
security groups and rights to all administration tools. This role does not allow a user to
access the Admin Server. See also guest role, contributor role, and sysmanager role.
Advanced Search
A function that enables users to search by full-text and all metadata fields, specify
search operators, and specify how search results are to be displayed. See also Quick
Search.
alias
A name that represents one or more users in workflows and subscriptions. For
example, the "Sales" alias could include all users in a sales department.
#all
A special account classification used to assign a user a single permission level for all
accounts.
alternate file
A web-viewable version of the primary file, or a version that can be converted to a
web-viewable format upon check-in. The alternate file must be specified and checked
in at the same time as the primary file. See also primary file.
approve
To accept a revision in a workflow. See also reject.

check out and open
Glossary-3
ascending sort order
Arrangement of data in a low to high sequence; for example, from A to Z or from 0 to
9. See also descending sort order.
associated discussion
A discussion that is related to a particular folder or content item. See also discussion.
authentication
The process by which the content server system validates a user’s logon information.
The user name and password are compared against an authorized list. If the system
detects a match, access is granted to the extent specified in the permissions list for that
user.
Author
A required metadata field that specifies the user who checked in a content item
revision.
authorization type
The way that Oracle groups users, depending on how their user attributes are defined:
local user, global user, or external user. Also referred to as user type.
automatic numbering
Assigning content IDs automatically in sequential order as new content items are
checked in. This is an optional content server feature that can be enabled or disabled in
the System Properties utility or the Admin Server.
autonumber prefix
An optional prefix that is placed before the sequential portion of the content ID when
automatic numbering is enabled.
basic subscription
A subscription to an individual piece of content by content ID. See also criteria
subscription, forced subscription, and open subscription.
basic workflow
A type of workflow where specific content items are entered into a workflow by an
administrator. See also criteria workflow.
caption
See field caption.
check in
To submit a file to the content server file repository.
check out
To lock a content item in the content server file repository so that no other users can
revise it. Other users can still view and get a copy of a checked out content item. See
also undo check-out.
check out and open
A feature that enables users to check out and open content items directly in a
WebDAV-compliant native application from Oracle Content Server. This feature
requires WebDAV to be enabled.

child
Glossary-4
child
A page or folder that is one level lower in a hierarchical structure (such as a page in
the Web Layout Editor or a folder in the Folders component). See also parent.
choice list
See option list.
Classic View
A predefined search result template showing a thumbnail, title, and other content
information for each returned content item on multiple lines of a search result list.
Comments
An optional metadata field that is used for general notes about a content item.
consumer
A content server user who only needs to find, view, or print content. See also
contributor, subadministrator, and administrator.
consumption site
A Web site that content consumers use to view content. Content contributors use a
different Web site (a contribution site) to check in content.
content
A collective term for the content items in the Oracle Content Server repository.
content ID
A standard, required metadata field that provides a unique identifier for each content
item.
content information
See metadata.
content item
A file that has been checked in to the Oracle Content Server repository. A content item
includes a primary file and metadata, and can include an alternate file.
content profile
A set of criteria based on rules established by the system administrator to define which
metadata fields are available on search and check-in forms and how they behave, and
which metadata information is displayed on the content information page.
content repository
The place where content files are stored. Oracle Content Server uses two file
repositories: one for the native files and one for the web-viewable files.
content type
A designation used to group similar content by category (for example, "Invoices").
contribution site
A Web site that content contributors use to check in content. Content consumers access
a different Web site (a consumption site) to view the content.

dependent choice list
Glossary-5
contributor
(1) A content server user who creates, revises, and collaborates on documents. See also
consumer, subadministrator, and administrator.
(2) A user who submits a content item to a basic workflow.
contributor role
A standard role that gives the user read and write permission (RW) to the Public
security group. See also guest role, admin role, and sysmanager role.
conversion
The process of changing an electronic file to a different file format (for example,
changing a Microsoft Word document into PDF or HTML format).
core
The basic functionality of Oracle Content Server.
criteria subscription
A subscription to a group of content items based on metadata criteria. See also basic
subscription, forced subscription, and open subscription.
criteria workflow
A type of workflow where a content item automatically enters the workflow if the
security group and one metadata field match predefined criteria. See also basic
workflow and sub-workflow.
current revision
See latest revision.
custom metadata field
An administrator-defined metadata field.
Deleted status
The revision status that indicates that the revision has been deleted and is waiting to
be completely removed from the content server during the next indexing cycle.
delete permission
The permission level that allows users to perform the following tasks within a
particular security group:
■ viewing content
■ checking in content
■ checking out content
■ getting a copy of content
■ deleting content
See also read permission, write permission, and admin permission.
dependent choice list
An option list in which the options depend on what is selected in a different option
list. For example, if there is an option list for the Continent field and another option list
for the Country field, the available choices in the Country option list depend on which
Continent is selected.

descending sort order
Glossary-6
descending sort order
Arrangement of data in high to low sequence; for example, from Z to A or from 9 to 0.
See also ascending sort order.
discussion
A set of threaded messages that enable project members to comment on projects,
folders, content items, and general topics.
documents without accounts
A special account classification that assigns a permission level for content items that
do not have an account specified. Same as #none.
document type
A designation used to group similar documents by category (for example, "Invoices").
Done status
The revision status that indicates that the revision has been indexed and is waiting to
be released on its specified release date.
download
To copy a file from the content server to your local hard disk.
download applet
An optional Java applet that enables users to download multiple content items at the
same time. The content items can also be checked out during the download process.
See also multiple file check-out.
editor
A user who can approve, reject, and check out a workflow item for editing.
Edit status
The revision status that indicates that the revision is at the initial contribution step of a
workflow.
Expanded Form
The form on the advanced search page that displays all available metadata fields on a
single page. See also Query Builder Form and Advanced Search.
expiration date
The date and time when a revision is no longer available for searching or viewing in
the content server.
Expired status
The revision status that indicates that the revision is no longer available for searching
or viewing in the content server.
external collection
A set of content files that are indexed and stored in a separate search engine collection
rather than in the content server database.
external members
Users or groups who have access to your Oracle Content Server system but are not
employees of your company or members of your organization.

GenWWW status
Glossary-7
external user
An authorization type where user security attributes (password, roles, and accounts)
are stored in an external storage system. External users might use a Microsoft network
login or another type of provider (LDAP) login. See also local user and global user.
field caption
The name of a metadata field as it appears on web pages. For example, "Content ID" is
the field caption, while the internal field name is "dDocName."
file format
The structure of a file. The file format is determined by the application used to create
the file, and can typically be determined by the file extension (such as .pdf or .doc).
folder
A level in the project hierarchy. Folders can contain subfolders, content items, and
general discussions.
Folder Name
A required metadata field that specifies a unique name for a folder.
folder owner
See owner.
Folders component
A Oracle Content Server "Extras" component that is required as a foundation for
Oracle Content Server.
forced subscription
A subscription where users and aliases are assigned to the subscription by an
administrator. If individual users are assigned, each user can unsubscribe if they want.
If an alias is assigned, the users in that alias cannot unsubscribe. See also open
subscription, basic subscription, and criteria subscription.
format
The file type for a primary or alternate file, such as a Word document (.doc), bitmap
image (.bmp), Acrobat file (.pdf), and so on.
full-text indexing
The process of creating a searchable index that includes every word in a file.
full-text search
A search that compares the query expression against every word in a file. See also
metadata search.
full-text search operator
A word or symbol that refines the query expression for a full-text search (for example,
AND, OR, and double quotation marks ").
GenWWW status
The revision status that indicates that the revision is being converted to web-viewable
format or is being indexed, or has failed conversion or indexing.

global user
Glossary-8
global user
An authorization type where user security attributes (password, roles, and accounts)
are stored on master content server, but the user has access to proxied content servers
as well. Global users are considered "lightly managed" users, as this authorization type
limits some user functions to enhance scalability and performance. Note that all
self-registered users are global users by default. See also local user and external user.
group
A group of users that can be referenced by a single name.
guest portal page
The web page that users see after they start Oracle Content Server but before they log
in. See also login portal page.
guest role
A standard role that gives the user read permission (R) to the Public security group. A
login is not required to access content items in the security groups for which the guest
role has permission. This role is assigned to anonymous users by default. See also
contributor role, admin role, and sysmanager role.
Headline View
A predefined search result template showing content information for each returned
content item on a single line of a search result list.
historical report
A list that contains the results of a database query that was performed at a specific
date and time. This type of report provides a "snapshot" of content server information
as it existed at a particular moment. Historical reports are built with the Web Layout
Editor and accessed through the Library. See also active report.
Home page
See guest portal page and login portal page.
Idoc Script
Oracle’s proprietary server-side script language that is used to modify the
functionality and look-and-feel of Oracle Content Server and related products. Idoc
Script tags are in the format <$script$>.
Inbound Refinery
Oracle Content Server software that converts native files to web-viewable files, along
with specific conversion add-on products (such as PDF Converter or XML Converter).
index
The name of the web page at the highest level of the Library hierarchy in the Web
Layout Editor. All other pages are at a lower level than (are children of) the index
page.
Indexer
Software included with Oracle Content Server that full-text indexes files and stores the
indexed words in a database. When you do a full-text search for content, the Oracle
Content Server looks for the search terms in this index. See also search index.

local user
Glossary-9
information field
See metadata field.
instance
A single copy of Oracle Content Server. Multiple content server instances may be
running on the same computer.
internal field name
The name of a metadata field as it appears on web pages. For example, "Content ID" is
a field caption, while the internal name of the field is "dDocName".
internal members
Users and groups who are employees of your company or members of your
organization.
internet-style search syntax
Search techniques common to the most popular internet search engines.
item
A content item, folder, or discussion.
latest notification
The most recent date and time that a user was sent a subscription notification e-mail
for a particular content item.
latest notification use
The most recent date and time that a user accessed a particular content item from a
subscription notification e-mail.
latest revision
The most recent version of a content item.
Library
A hierarchical structure of links that organizes content items based on metadata
criteria. Users can drill down through the levels of the Library to find content items
they are looking for. The Library hierarchy is built using the Web Layout Editor
application, and is accessed by users through the Library link in the portal.
locale
A setting that specifies the language of the content server interface and defines how
the content server handles language-specific issues, such as date formatting and
full-text indexing. See also system locale and user locale.
local page
A type of link in the hierarchical link structure (the "Library") that links to another web
page that contains more local page links, URL links, and query links.
local user
An authorization type where user security attributes (password, roles, and accounts)
are stored on master content server, and the user is included in all local content server
functions. See also global user and external user.

log in
Glossary-10
log in
To gain access, or sign in, to the Oracle system. Logging in requires users to identify
themselves by entering their user name and password, which Oracle Content Server
uses to grant security permissions to content and rights to administrative functions.
login
See user name.
login portal page
The web page that users see after they log in. See also guest portal page.
major revision
The primary revision label (for example, the number portion of the revision sequence
1a, 1b, 2a, 2b). See also minor revision.
member
A user or group who has been given access to a particular project, folder, or content
item.
metadata
Information about a content item, such as title, author, or security group. Metadata is
used to describe, find, and group content items. Also referred to as content information.
metadata field
A field on a web page that is used to define metadata during check-in, or to define
search criteria. Also referred to as content information field.
metadata propagation
A Folders component feature that enables contributors to copy default metadata
values from parent folders to subfolders and content items.
metadata search
A search that compares the query expression against metadata field values. See also
full-text search.
minor revision
The secondary revision label (for example, the letter portion of the revision sequence
1a, 1b, 2a, 2b). See also major revision.
multiple file check-in
An optional feature of Oracle Content Server that enables users to check in multiple
content items as a single compressed zip file. See also upload applet.
multiple file check-out
An optional feature of Oracle Content Server that enables users to check out and
download multiple content items at the same time. See also download applet.
My Checked-Out Content
Name of main menu element which provides links to a list of content that is currently
checked out.

notification
Glossary-11
My Oracle Content Server
Name of main menu element which provides links to multiple user-specific tasks and
options.
My Profile
Link in the toolbar and the My Oracle Content Server tray. See User Profile.
My Saved Queries
Name of main menu element which opens a list of queries that have been saved by the
current user.
My Search Result Templates
Name of main menu element which provides links to the Search Result Templates for
user Page, where you can specify what content item information is listed on a search
results page and how that information is displayed.
My Subscriptions
Name of main menu element which opens a list of content items that the current user
is subscribed to.
My URLs
Name of main menu element which opens a list of URLs that have been saved by the
current user.
My View
Name of search result template you use to specify the displayed metadata and how it
is organized.
My Workflow Assignments
Name of main menu element which opens a list of content items in a workflow that
the current user is assigned to do something with (for example, review).
native application
A software application that was used to create an original file that was checked in to
the content server (for example, Microsoft Word or Adobe Photoshop).
native file
The original file that is checked into the content server file repository. See also primary
file.
native file format
The file format that an original file was created in.
#none
A special account classification that assigns a permission level for content items that
do not have an account specified. Same as documents without accounts.
notification
The act of informing users through e-mail. In Oracle Content Server, e-mail
notification is used in subscriptions and workflows.

open subscription
Glossary-12
open subscription
A type of subscription where users manually subscribe to content items through a
basic or criteria subscription. See also forced subscription, basic subscription, and
criteria subscription.
option list
A list on an Oracle web page from which users can select an item.
original file name
The name of the native file that was checked in as the primary file.
owner
The user who has Admin permission to a folder by default. The owner is typically the
user who created the folder.
page properties
The page title, page description, security group, and links for a specific web page
defined in the Web Layout Editor.
parent
A page or folder that is one level higher in a hierarchical structure (such as a page in
the Web Layout Editor or a folder in the Folders component). See also child.
pass through
The process of storing a native file in the weblayout repository without converting it to
a web-viewable format. Inbound Refinery may pass through a file if it cannot be
converted (for example, because the native application is not supported), if a
pass-through file format is specified during check-in, or if it is not necessary to convert
the file (for example, if the original file is in PDF format).
Pending status
The revision status that indicates that the revision is in a basic workflow and is waiting
for approval of all revisions in the workflow.
permission
The access that a user has to a particular security group or account. See also read
permission, write permission, delete permission, and admin permission.
persistent URL
The URL (web address) that always points to the most recent version of a content item.
When a new revision is checked in, the file name of the previous revision is changed to
reflect the revision number (for example, 002050~1.pdf, 002050~2.pdf, and so on), and
the new revision takes on the content ID as the file name (for example, 002050.pdf).
The directory location of the file remains the same if the security group, Type, and
account are not changed.
personal URL
A link from the portal navigation bar to a URL (web address) that a user accesses
frequently.
plain folders
An optional feature that shows project locations as plain folder icons instead of project
icons in project-specific lists.

query expression
Glossary-13
Portal Design
A Oracle Content Server feature that enables users to personalize their portal
navigation bar.
portal navigation bar
The customizable navigation area on the left side of most Oracle Content Server web
pages. See also portal page.
portal page
See guest portal page and login portal page.
post
A message that is submitted to a discussion.
primary file
The original file that is checked in to the Oracle Content Server repository. See also
native file and alternate file.
privilege
See permission.
project
The top-level unit of organization in Oracle Content Server.
project ID
An optional feature that displays the project ID in the page title on project-specific
pages.
project lead
The user who has Admin permission and serves as the main contact for a project.
Project Name
A required metadata field that specifies a unique name for a project.
propagation
See metadata propagation.
Public
A predefined security group. By default, no login is required to view Public content.
query
See search.
Query Builder Form
A form that allows queries to be built by using lists to select the metadata fields to be
searched.
query expression
A statement that specifies the criteria to be matched during a search. See also search
criteria.

query link
Glossary-14
query link
A link on a Library page that displays a list of content items that meet the specified
search criteria.
query result page
See search results page.
Quick Help
A button on Oracle web pages that provides context-sensitive help.
Quick Search
A function that enables users perform a search from the portal navigation bar. See also
Advanced Search.
read permission
The permission level that allows users to perform the following tasks within a
particular security group:
■ viewing content
■ getting a copy of content
See also write permission, delete permission, and admin permission.
refinery
See Inbound Refinery.
reject
To disapprove a revision in a workflow. See also approve.
release date
The date and time when a revision is available for searching and viewing in the
content server.
Released status
The revision status that indicates that the revision is available in the content server.
rendition
A particular file associated with a content item, such as the primary file, alternate file,
or web-viewable file.
report
A list that contains the results of a content server database query. There are two types
of reports, active report and historical report, which are built with the Web Layout
Editor and accessed through the Library.
repository
See content repository.

rights
Glossary-15
Repository Manager
An administration application that is used to do these tasks:
■ Manage content items (view status, delete revisions, and so on)
■ Create criteria subscriptions and assign users to subscriptions
■ Update and rebuild the search index
required field
A metadata field that must have a value for a content item to be checked in.
reviewer
A user who can approve or reject a workflow revision but cannot check it out for
editing. See also reviewer/contributor.
reviewer/contributor
A user who can approve, reject, and check out a workflow revision for editing. See
also reviewer.
reviewer/contributor step
A type of workflow step where users can approve or reject a revision and check it out
for editing. See also reviewer step.
reviewer step
A type of workflow step where users can approve or reject a revision but cannot check
it out for editing. See also reviewer/contributor step.
Review status
The revision status that indicates that the revision is in a workflow and is being
reviewed.
revision
A new or revised version of a content item. By default, revisions are numbered
sequentially starting with Revision 1, and every time the content item is checked out
and checked in again, the revision number is incremented by one.
revision history
A record of all revisions for a particular content item. The files and metadata can be
accessed for all previous revisions that have not been deleted.
revision status
The status of a revision in the content server. The revision status can be Done status,
Edit status, GenWWW status, Released status, Pending status, Expired status, Deleted
status, or Review status.
rights
The access that a user has to any of the following administration applications:
■ User Admin
■ Repository Manager
■ Workflow Admin
■ Web Layout Editor

role
Glossary-16
See also subadministrator.
role
A set of permissions for each security group. Each user is assigned one or more roles
that define their access to content. There are four predefined roles:
■ guest role
■ contributor role
■ sysmanager role
■ admin role
See also permission and security group.
route
To send a content item to other users for review using a workflow.
R permission
See read permission.
RW permission
See write permission.
RWD permission
See delete permission.
RWDA permission
See admin permission.
saved query
A link from the portal navigation bar to a particular search that a user performs
frequently.
score
A search results sorting option that rates each file with a number to determine how
closely it matches the full-text search criteria. The higher the score, the closer the
match.
search
To retrieve a list of content items that match specified criteria.
search criteria
The metadata values and full-text words or phrases to be matched during a search. See
also query expression.
search engine
Software that performs metadata and full-text searches. See also search index.
search index
A set of files that contain metadata information and the full-text indexes. The search
index is created by the Indexer and is read by the search engine.

step
Glossary-17
search operator
A word or symbol used in a query expression to refine the search criteria (for example,
AND, OR, NOT, Substring, or Matches).
search result templates
A way of determining what content item information is listed on a search results page
and how that information is displayed.
search results
A list of content items that match specified search criteria.
search results page
Standard Oracle Content Server page that displays the results of a query. Also referred
to as query result page.
Secure
A predefined security group. By default, only the system administrator has access to
this security group.
security group
A set of content items to which users are granted permission based on their roles. Each
content item is assigned to a security group during check-in. There are two predefined
security groups: Public and Secure.
security model
The specific configuration of security groups, roles, and accounts that is defined for an
organization.
Select Member applet
A Java applet that is used to add members to projects, folders, and content items.
self-registration
A function that enables users to create their own login credentials (user name and
password).
shortcut
A link to an original content item, general discussion, or folder.
sort order
The order in which content items are displayed on a search results page. By default,
search results can be sorted by release date, title, or score, and each of these options
can be displayed in ascending sort order or descending sort order.
status
See revision status.
step
A sequential stage in a workflow that defines which users can review, approve, and
reject a revision. There are two types of steps: reviewer step and reviewer/contributor
step.

subadministrator
Glossary-18
subadministrator
A user who has rights to at least one administration application. See also consumer,
contributor, administrator, and system administrator.
subscribe
To request notification by e-mail when a new revision of a particular content item is
checked in to the Oracle Content Server repository.
subscriber
A user who is subscribed to a content item.
subscription
A function that notifies subscribed users by e-mail when a particular content item has
been revised. See also criteria subscription, basic subscription, forced subscription, and
open subscription.
sub-workflow
A type of workflow that does not have an initial contribution step. A file can enter a
sub-workflow only through a jump from a criteria workflow.
sysmanager role
A standard role that gives the user read permission (R) to the Public and Secure
security groups, and access to the Admin Server. See also guest role, contributor role,
and admin role.
system administrator
A user who has full administrative permission and administration rights to manage
the Oracle system.
system locale
A setting that specifies the language of the content server interface and defines how
the content server handles language-specific issues on a systemwide basis. See also
user locale.
thumbnail
A miniature representation of a page or image. In Oracle Content Server, thumbnails
are created by the Inbound Refinery and displayed on search result pages.
Thumbnail View
A predefined search result template showing a thumbnail image of each returned
content item in a search result list.
thread
A hierarchical group of posts within a discussion. See also discussion.
title
A descriptive name for a content item.
token
A piece of Idoc Script that defines variable users in a workflow.
topic
The subject of a discussion post.

User Profile
Glossary-19
toolbar
The set of navigation links at the top of most Oracle web pages.
Type
A required metadata field that specifies which document category a content item
belongs to.
undo check-out
To cancel a content item check-out without creating a new revision.
unsubscribe
To cancel a subscription to a content item.
update
To modify the metadata for a revision without checking out the content item or adding
a revision.
upload applet
An optional Java applet that enables users to check in multiple content items as a
single compressed zip file. See also multiple file check-in.
user
A person who has been assigned a user name and password for Oracle Content Server.
User Admin
An administration application that is used to manage content server users and security
access.
user ID
See user name.
user information
Information about a user, such as the user name, full name, and e-mail address.
user information field
A field that is used to define user information on the User Profile page.
user locale
A setting that specifies the language of the content server interface and defines how
the content server handles language-specific issues for an individual user. See also
system locale.
user login
A user name and password used to gain access to Oracle Content Server.
user name
The name of a user, as recognized by Oracle Content Server (for example, mjohnson).
User Profile
Personal information about a user, such as the user name, full name, and e-mail
address. User information can be changed by an administrator through the User
Admin administration application, or by the user on the User Profile page.

user type
Glossary-20
user type
See authorization type.
vault
The Oracle Content Server directory where native files are stored.
WebDAV (Web-Based Distributed Authoring and Versioning)
A protocol that provides a way to remotely author and manage content using clients
that support WebDAV. For example, you can use Microsoft Windows Explorer to check
in, check out, and modify content in the Oracle repository rather than using Oracle’s
web browser interface.
web folder
A WebDAV feature that displays a Oracle Content Server project or folder in the
Explorer view of the browser.
weblayout
The Oracle Content Server directory where web-viewable files are stored.
Web Layout Editor
An administration application that is used to create the Library hierarchy, define
reports, modify search result pages, and update the portal page.
web-viewable file
A file in a format that can be viewed using a web browser, such as PDF or HTML.
workflow
The process that routes a file for review and approval before it is released to the
content server. Users are notified by e-mail when they have a file to review. There are
three types of workflows: basic workflow, criteria workflow, and sub-workflow.
Workflow Admin
An administration application that is used to set up and manage workflows.
work in progress
A revision that is in GenWWW status or Done status.
write permission
The permission level that allows users to perform the following tasks within a
particular security group:
■ Viewing content
■ Checking in content
■ Checking out content
■ Getting a copy of content
See also read permission, delete permission, and admin permission.

Index-1
Index
Symbols
* (asterisk)
database, 4-11, 4-14
Oracle Text Search, 4-8
? (wildcard)
database, 4-12, 4-14
Oracle Text Search, 4-8
A
access control list
description, 1-5
permissions, A-31
access list, Glossary-1
accessibility, xv
accounts, 1-3
action menus
items, 3-5
options changing, 3-4
table, 3-5
Actions icon, pop-up menu, A-34
Actions menu
Edit Folio page, A-96
Search Results page, A-13
Subscription Info page, A-47
Subscriptions page, A-45
Workflow Content Items page, A-64
Workflow in Queue page, A-68
active workflows, 8-6, A-66
Active Workflows, Content Management tray, A-5
Add a Rendition page, 11-21
admin permission, Glossary-2
access control list, A-31
content server, 1-4
advanced folio, 10-7, A-88
adding items, 10-9
creating, 10-6
Advanced Search page
description, 4-20
Expanded Form, A-8
metadata searches, A-10
Query Builder Form, A-8
AI image input format, 11-4
allocation of content title (WebDAV), 9-16
alternate files, 6-1, A-51
AND (search operator), Oracle Database, 4-15
associated discussion, Glossary-3
Attachment, Edit Attachments page column, 11-24
Author field, Glossary-3
auto-contribution step in workflows, 8-2
B
basic workflows, 1-7, 8-1
BMP image input format, 11-4
Browse Content tray, 4-16, 4-17
browsers
See ’web browsers’
browsing to content, 1-6, 4-16
Browsing window, A-80
C
calendar icon, location of, 3-5
case sensitivity, 4-14
IBM DB2 (metadata searches), 4-11
metadata searches, 4-11
Microsoft SQL Server (metadata searches), 4-11
Oracle Database (metadata searches), 4-11
changing the drive, A-57
Check In Similar, 6-5
Check Out and Open, 7-2
Checked Out Content, Content Management
Tray, A-5
checked-out content page, A-58, A-59
check-in confirmation, A-54
checking in content, 9-7, 9-15
Microsoft Office, 9-16
Windows Explorer, 9-16
checking in digital assets, 11-5
checking in files, 1-2, 6-1, 6-6
check-in conformation, A-54
checking in new files, 6-3
checking in revised files, 6-5
checking in similar files, 6-5
content check-in form, A-50
description, 6-1
important considerations, 6-8
multibyte characters, 6-8
multiple files, 6-5
See also ’checking in multiple files’
Index-2
See also ’checking in single files’
single files, 6-3
checking in multiple files
changing the drive, A-57
description, 6-6
methods of --, 6-6
procedure, 6-7
See also ’checking in files’
selecting files, A-55, A-56
upload applet, 6-6
Upload Files window, A-54
upload message, A-57
checking in single files
new files, 6-3
revised files, 6-5
See also ’checking in files’
similar files, 6-5
checking out content
Microsoft Office, 9-16
Windows Explorer, 9-16
checking out files, 1-2, 7-1, 7-4
check-out confirmation, A-58
description, 7-1
multiple files, 7-4
overview of all checked-out content, A-59
overview of user-specific checked-out
content, A-58
See also ’checking out multiple files’
single files, 7-1
checking out multiple files
description, 7-4
download applet, 7-4
download options, A-60
download options, search results pages, 7-5
download results summary, A-61
downloading files, A-60
procedure, 7-5
See also ’checking out files’
check-out confirmation, A-58
Classic layout, 3-12
Classic View search template, 3-12
clients for WebDAV, 9-4
comments, A-52
Comments field, Glossary-4
complex queries, 4-18
configuration
Default Information Field Configuration
page, A-74
Folder Configuration link, A-72
Folder Configuration page, A-72
folders, A-83
metadata defaults for new content, 9-6
metadata defaults for revised content, 9-6
Revision Information Field Configuration
page, A-75
shortcuts, 9-9
user configuration settings, 9-5
virtual folders, 9-8, 9-14
confirmation
check-in, A-54
check-out, A-58
consumers, 1-4
CONTAINS (search operator), Oracle Text
Search, 4-7
content, 1-2
browsing to --, 4-16
checked out by all users, A-59
checked out by current user, A-58
checking in a new file, 6-3
checking in a similar file, 6-5
checking in revised files, 6-5
expired, searching for, 4-8, 4-12
finding, 4-1
folios, 10-1
full-text searches, 4-13
grouping with folios, 1-7, 10-1
in workflows, A-63
metadata searching, 4-2, 4-9
moving, 1-6
reviewing -- in workflows, A-70
revisions, 1-2
searching for --, 4-2
storing, 1-6
subscribing to --, 5-12
subscribing to a content item --, 5-12
unsubscribing from --, A-48
unsubscribing from a content item, 5-13
unsubscribing from a criteria group, 5-13
viewing --, 5-5
Content Actions menu
Content Information page, A-39
Digital Asset Basket page, 11-19
Content Basket
page, A-100
content basket
definition, A-86
content check-in form
description, A-50
rendition set list, 11-5
content check-in page, PDF Watermark fields, 6-3
Content ID field, Search Links page, A-32
Content ID, Rendition Information page listing, 11-8
content IDs
allowed characters, A-50
maximum length, A-50
multibyte characters, 6-8
Content Info icon, 11-19
content information, 1-3
for revision in workflow, 8-7
revision history, 10-15
viewing --, 5-3
Content Information page
Actions menus, A-39
Content Profiles, 6-9
description, A-37
discussion field, A-44
link, 11-7
link references, 4-23
procedures to show link information, 4-25
showing link information, A-34

Index-3
content items
checking in --, 9-7, 9-15
checking out --, 9-16, 9-18
copying --, 9-18
default metadata for new --, 9-6
default metadata for revised --, 9-6
deleting --, 9-10
modifying --, 9-17
moving --, 9-9, 9-19
restoring --, 9-18
restoring deleted --, 9-10, 9-12
revisions, 9-3
security, 9-1
title allocation (WebDAV), 9-16
viewing --, 9-7, 9-17
Content Management tray, A-5
Active Workflows, A-5, A-66
Checked Out Content, A-5, A-59
Expired Content, A-5
New Check In, A-50
New Folio, A-87
Registered Publisher Projects, A-5
Work In Progress, A-5, A-40
Content Profiles, 6-8
Content Information, 6-9
New Check In, 6-8
Search, 6-8
content repository, 1-2
content server
access control list, 1-5
accounts, 1-3
consumers, 1-4
contributors, 1-4
conversion, 1-6
file repositories, 1-2
full-text index, 1-6
metadata, 1-3
overview, 1-2
permissions, 1-4
revision control, 1-2
roles, 1-3
searching for content, 1-6
security groups, 1-3
users, 1-4
workflows, 1-7
content types
definition, Glossary-4
multibyte characters, 6-8
Contribution Folders link, A-72
contribution step in workflows, 8-2
contributor role, 1-4
contributors, 1-4
conventions, xvi
conversion, 1-2, 1-6
Dynamic Converter, 1-6
PDF Converter, 1-6
copying content
Microsoft Office, 9-18
Windows Explorer, 9-18
Create Date From/To fields, Search Links
page, A-33
Create/Edit Headline View Search Result Template
page, A-20
Create/Edit Search Result Template page for Classic
View, A-17
Create/Edit Thumbnail View Search Result Template
page, A-24
creating shortcuts, 9-9
creating virtual folders, 9-8, 9-14
criteria subscriptions, 5-12
canceling --, 5-13
Subscribe to "item" page, A-47
Criteria tab, Search tray, A-6
criteria workflows, 1-7, 8-1
custom search result templates, 3-9, 3-17, A-15
customization of user interface, 3-1, 3-7
D
DAM
See ’Digital Asset Manager’
database full-text search, 4-2, 4-15
database metadata search, 4-2
date metadata fields, selecting dates, 3-7
DB2, case sensitivity in metadata searches, 4-11
default file format on check-in, A-52
Default Information Field Configuration page, A-74
default metadata, 9-2
evaluation order, 9-2
new content, 9-6
revised content, 9-6
defining virtual folders, 9-8
delete permission, Glossary-5
access control list, A-31
content server, 1-4
Deleted (revision status), 5-3
deleting content items, 9-10
Microsoft Office, 9-18
Windows Explorer, 9-18
deleting revisions, 5-4
deleting virtual folders, 9-10, 9-14
Description
Add a Rendition page field, 11-21
Digital Asset column, 11-19
Edit Attachments page
column, 11-25
field, 11-25
Digital Asset Basket page, 11-19
digital asset baskets
managing, 10-16
renditions, 11-16
using, 10-16
Digital Asset Manager
about, 11-1
conversion applications, 11-29
digital asset basket, 11-16
managing images and videos, 11-1
Oracle Outside In Technology, 11-29
overview, 11-1, 11-2
renditions, 11-16

Index-4
working with, 11-2
digital assets
checking in, 11-5
managing, 10-4
dimensions, rendition file, 11-9
discussion
creating from Content Information page, 5-8
creating from Search Results page, 5-9
creating from Workflow Review page, 5-9
viewing, 5-9
Discussion Info page, A-43
discussion thread, printing, 5-10
discussions, Glossary-6
DiscussionType field, 5-11
displaying categories in search results, 4-4
displaying search results, 4-21
displaying web pages, 9-19
Done (revision status), 5-3
double left-facing arrows, Pop-up Calendar
screen, 3-6
double right-facing arrows, Pop-up Calendar
screen, 3-6
download applet
enabling --, 7-4
options on search results pages, 7-5
requirements, 7-4
use, 7-5
download options on search results pages, 7-5
download results summary, A-61
downloading folio renditions, 10-14
downloading multiple files, 7-5, A-60
downloading multiple items, 11-22
Dynamic Converter
check-in metadata fields, A-53
conversion features, 1-6
dynamic watermark description, 6-2
E
Edit (revision status), 5-3
Edit Attachments page, 11-24
Edit Folio page
Element Info tray, A-93
Source Items tray, A-95
Edit Simple Folio page, A-89
editing
saved queries, 3-9
user profile, 3-8
editing content
See ’modifying content items’
editor, Glossary-6
Element Info tray, A-93
element information
modifying on a simple folio, 10-8
modifying on an advanced folio, 10-13
e-mail format, 3-12
Ends (metadata search operator), 4-11
entering files in workflows, 8-3
examples
digital asset management, 10-4
organization, 10-3
records management, 10-3
Expanded Form, 3-12, A-9
Advanced Search page, 4-20
Oracle Text Search, 4-3
expiration date, A-10, A-52
Expiration Date field, updating, 3-7
Expired (revision status), 5-3
Expired Content, Content Management Tray, A-5
expired content, searching for, 4-8, 4-12
exploring pages, A-77
external members, Glossary-6
F
File
Add a Rendition page field, 11-21
Edit Attachments page field, 11-25
file conversion, 1-2
file dimensions, rendition, 11-9
file format, rendition, 11-9, A-52
file repositories, 1-2
file revisions, 1-2, 5-4
checking in --, 6-5
deleting --, 5-4
history, 5-4
file size, rendition, 11-9
File Size, Rendition Information page listing, 11-8
file subscriptions, 5-12, A-47
canceling --, 5-13
starting --, 5-12
files
alternate --, 6-1, A-51
checking in --, 6-1
checking in multiple --, 6-5
checking in new --, 6-3
checking in revised --, 6-5
checking in similar --, 6-5
checking in single --, 6-3
checking out --, 7-1
checking out multiple --, 7-4
checking out single --, 7-1
entering -- in workflows, 8-3
life cycle, 5-1, 5-3
location in workflow, A-69
native --, 1-2
primary --, 6-1, A-51
reviewing -- in workflows, 8-4, A-70
revisions, 1-2
viewing --, 5-5
viewing native --, 5-6
viewing web-viewable --, 5-5
web-viewable --, 1-2
working with rejected revisions, 8-5
finding content
See ’searching for content’
finding content items, 4-1
finding files, 4-1
Firefox, supported versions, 2-1
Folder Configuration link, A-72

Index-5
Folder Configuration page, A-72
Folder Exploring pages, A-77
Folder Name field, Glossary-7
folder owner, Glossary-7
folders, A-85, Glossary-7
configuration, A-83
creating --, 9-8
deleting --, 9-10, 9-14
exploring pages, A-77
information, A-81
metadata inheritance, 9-2
moving --, 9-9
renaming --, 9-14
restoring --, 9-15
restoring deleted --, 9-10, 9-12
See also ’virtual folders’
setting metadata, 9-15
viewing --, 9-7
Folders component, 1-6, Glossary-7
content item revisions, 9-3
content item security, 9-1
overview, 9-1
Trash Bin, 9-2
user configuration settings, 9-5
user interface, A-71
working with --, 9-5
folio
adding items to an advanced folio, 10-9
adding items to simple folio, 10-7
advanced, A-88
creating a simple folio, 10-5
creating an advanced folio, 10-6
definition, 10-1
simple, A-88
uses, 10-2
Folio Check In Confirmation page, A-98
Folio Check In page, A-97
folio example, 10-3, 10-4
folio information, 10-15
folio rendition
definition, 10-14
downloading, 10-14
folio revision
definition, 10-13
forcing, 10-13
folio snapshot
definition, 10-13
taking, 10-13
folio structure
modifying, 10-7
overview, 10-2
folio structure tray, A-91
folio subscriptions, 10-15
folio template, A-88
folio workflows, 10-18
folios
finding, 10-15
subscribing, 10-15
viewing, 10-15
viewing information, 10-15
working with, 10-5
form type, 3-12
format
definition, Glossary-7
of content item, A-52
rendition file, 11-9
Format, Rendition Information page listing, 11-8
full-text index, 1-6
full-text searches, 4-13
advanced search page, 4-20, A-8
database, 4-2
database options, 4-15
highlighting, 4-15
home page search fields, 4-20, A-5
Oracle Text Search, 4-2
procedure, 4-16
quick search field, 4-19, A-4
rules, 4-13
search operators (Oracle Database), 4-15
Search tray, 4-20, A-6
wildcards, 4-14
G
GenWWW (revision status), 5-3
GIF image input format, 11-4
grouping content with folios, 1-7, 10-1
groups, Glossary-8
guest role, 1-4
H
HAS WORD PREFIX (search operator), Oracle Text
Search, 4-7
Headline View search template, 3-12
Height, Add a Rendition page field, 11-21
Hide toggle switch
Content Information page, 4-23
description and example, A-34
Hierarchical Folder Configuration page, A-83
Hierarchical Folder Information page, A-81
hierarchical folder structure, 4-17
home page, 3-3
search fields, 4-20, A-5
toolbar, 3-3
HTML format of e-mail, 3-12
I
icon
Rendition Name Description, 11-8
Rendition Name description, 11-21
Rendition Name Information, 11-8
Image Data page, 11-11
images
data page, 11-11
input formats, 11-4
managing, 1-7, 11-1
rendition set, 11-3
indexing, 1-6
info update form, A-41

Index-6
information
element, 10-8, 10-13
folders, A-81
Information Pages, Discussion, A-43
inheritance of metadata, 9-2
input formats
images, 11-4
videos, 11-4
Insert Hypertext page, A-101
interface
See ’user interface’
internal members, Glossary-9
Internet Explorer
considerations, 2-1
supported versions, 2-1
Internet-style search syntax, 4-17
ISABOUT (search operator), Oracle Database, 4-15
item action menus, 3-5
item action pop-up menu, Link Manager, A-34
Item Actions menu, Link Manager, A-34
items, Glossary-9
J
Java security warning, upload applet, 6-6, 7-4
JPG/JPEG image input format, 11-4
L
layouts, 3-12
Library, 4-17
Library Folders, 4-17
life cycle of file, 5-1, 5-3
Link Info page
overview, A-35
procedures to show link information, 4-26
Link Manager
Actions icon pop-up menu, A-34
overview, 4-22
search options, 4-22, 4-23, A-32
link references, 4-23
link searches
procedure for, 4-25
Search Links page, 4-23, A-32
Link Type field, Search Links page, A-33
link, Content Information page, 11-7
links
Content Management tray, A-5
Contribution Folders, A-72
Folder Configuration, A-72
My Content Server tray, 3-13
toolbar, 3-3
locales, 3-12, Glossary-19
location of file in workflow, A-69
locking a folio, 10-14
Logout, toolbar, 3-3
M
Manage Content Baskets page, A-99
managing images and videos, Digital Asset
Manager, 1-7, 11-1
Matches (metadata search operator), 4-10
MATCHES (search operator), Oracle Text
Search, 4-7
members, Glossary-10
menus
Actions, A-96
Renderers, A-96
metadata, 1-3
default values, 9-2
defaults for new content, 9-6
defaults for revised content, 9-6
evaluation order, 9-2
info update form, A-41
inheritance, 9-2
propagation, 9-3, 9-13
setting folder --, 9-15
updating --, 5-5, A-41
viewing --, 5-3
metadata fields, PDF Watermark, 6-3
metadata search fields, 4-7, 4-10
metadata search operators
CONTAINS, 4-7
Ends, 4-11
HAS WORD PREFIX, 4-7
MATCHES, 4-7
Matches, 4-10
Starts, 4-10
Substring, 4-10
metadata searches, 4-2, 4-9
advanced search page, 4-20, A-8, A-10
case sensitivity, 4-11
home page search fields, 4-20, A-5
procedure, 4-3, 4-10
search operators, 4-7, 4-10
Search tray, 4-20, A-6, A-10
metadata wildcards, 4-8, 4-11
Microsoft Office
checking in content, 9-16
checking out content, 9-16
copying content, 9-18
deleting content, 9-18
moving content, 9-19
modifying content items
non-WebDAV client format, 9-17
WebDAV client format, 9-17
month menu, Pop-up Calendar screen, 3-6
monthly calendar days, Pop-up Calendar screen, 3-6
Move/Copy Basket Items page, A-101
moving content items, 1-6, 9-9
Microsoft Office, 9-19
Windows Explorer, 9-19
moving virtual folders, 9-9
multibyte characters in content IDs and content
types, 6-8
multiple files
See ’checking in multiple files’
See ’checking out multiple files’
My Baskets, 11-16, A-86
My Checked-Out Content, 3-14

Index-7
My Content Server tray, 3-13
My Checked-Out Content, 3-14
My Personal URLs, 3-10
My Profile, 3-8, 3-11
My Recent Queries, 4-27
My Saved Queries, 3-9, 3-13, 4-26, A-27
My Subscriptions, 3-14, A-45
My URLs, 3-13
My Workflow Assignments, 3-14, 8-6, A-67
My Personal URLs, 3-10
My Profile
editing user profile, 3-8
toolbar, 3-3
User Profile page, 3-11
My Recent Queries, 4-27
My Recent Queries list, A-28
My Recently Viewed Content list, A-28
My Saved Queries, 3-9, 3-13, 4-26, A-27
My Subscriptions, 3-14, A-45
My URLs, 3-13
My Workflow Assignments, 3-14, 8-6, A-67
N
Name
Add a Rendition page field, 11-21
Edit Attachments page field, 11-25
Native File, Rendition Information page listing, 11-8
native files
checking in, 1-2
viewing --, 5-6
navigation arrows
double left-facing arrows, 3-6
double right-facing arrows, 3-6
single left-facing arrow, 3-6
single right-facing arrow, 3-6
NEAR (search operator), Oracle Database, 4-15
New Check In, 6-8, A-50
Content Profiles, 6-8
New Check In link
toolbar, 3-3
new content, default metadata for --, 9-6
nodes, definition, 10-2
NOT (search operator), Oracle Database, 4-15
Notification of Expiration
e-mail for author, 4-24
for expiring content items in use, 4-24
notifications
rejection of item in workflow, A-66
review of item in workflow, A-63
start of workflow, A-62
O
Office
See ’Microsoft Office’
optional components, Check Out and Open, 7-2
OR (search operator), Oracle Database, 4-15
Oracle Database
case sensitivity in metadata searches, 4-11
full-text highlighting, 4-15
full-text search options, 4-15
search operators, 4-15
ABOUT, 4-15
AND, 4-15
NEAR, 4-15
NOT, 4-15
OR, 4-15
Oracle Outside In Technology, 11-28
Digital Asset Manager, 11-29
image formats, 11-29
output formats, 11-29
Oracle Text Search
Expanded Form, 4-3
full-text search, 4-2
Query Builder Form, 4-6
search operators
CONTAINS, 4-7
HAS WORD PREFIX, 4-7
MATCHES, 4-7
search results
default menu, 4-4
expanded menu, 4-5
search results menu options, 4-4
searching with, 4-2
output formats
associating with Oracle Content Server, 11-29
Oracle Outside In Technology, 11-29
videos, 11-5
owner, Glossary-12
P
pages
Add a Rendition, 11-21
Content Basket, A-100
Default Information Field Configuration, A-74
Digital Asset Basket
Content Actions menu, 11-19
description, 11-19
Edit Attachments, 11-24
Edit Simple Folio, A-89
Folder Configuration, A-72
Folder Exploring, A-77
Folio Check In, A-97
Folio Check In Confirmation, A-98
Hierarchical Folder Configuration, A-83
Hierarchical Folder Information, A-81
Image Data, 11-10
Insert Hypertext, A-101
Manage Content Baskets, A-99
Move/Copy Basket Items page, A-101
Pick Folio Type, A-88
Rendition Information
Actions Choice List, 11-9
description, 11-7
Rendition Parameters, 11-12, 11-13
Revision Information Field Configuration, A-75
Set Folio Profile, A-97
Subscribe to folio_name, A-102

Index-8
Trash Exploring, A-79
User Profile, A-72
View Folio, A-99
passing through content, 1-6
PDF Converter, 1-6
PDF image input format, 11-4
PDF Watermark overview, 6-2
Pending (revision status), 5-3
permissions
access control list, A-31
admin, Glossary-2
content server, 1-4
delete, Glossary-5
read, Glossary-14
write, Glossary-20
persistent URLs, 1-2, Glossary-12
Personal URLs for user page, A-28
personal URLs, saving, 3-10
personalization, 3-7
e-mail format, 3-12
layouts, 3-12
personal URLs, 3-10
saved queries, 3-9
search template, 3-12
skins, 3-12
user profile, 3-8, 3-11
Pick Folio Type page, A-88
plain folders, Glossary-12
PNG image input format, 11-4
Pop-up Calendar component, 3-5
Pop-up Calendar screen
accessing, 3-5
double left-facing arrows, 3-6
double right-facing arrows, 3-6
month menu, 3-6
monthly calendar days, 3-6
overview, 3-6
single left-facing arrow, 3-6
single right-facing arrow, 3-6
year menu, 3-6
pop-up menu Actions icon, A-34
Portal Navigation
After Login
Content Management, 3-2
My Content Server tray, 3-2
Search, 3-2
Before Login
Home, 3-2
Library, 3-2
Microsoft Login, 3-2
Search, 3-2
portal navigation bar, 3-2
Post Comment Form, A-42
post, replying, 5-10
postprocess workflow options, 8-2
posts, Glossary-13
primary files, 6-1, A-51
printing discussion thread, 5-10
process of workflows, 8-2
project ID, Glossary-13
project lead, Glossary-13
Project Name field, Glossary-13
projects, Glossary-13
propagation of metadata, 9-3, 9-13
protocol used by WebDAV, 9-4
PSD image input format, 11-4
purpose of content server, 1-2
Q
queries
complex, 4-18
saved --, 3-9, A-27
saving --, 4-26, 4-27
Query Builder Form
description, 4-21, A-10
Oracle Text Search, 4-6
setting as default, 3-12
specifying a search, 4-6
quick search field, 4-19, A-4
R
read permission, Glossary-14
access control list, A-31
content server, 1-4
recursive search, 9-13
references (to or by)
hiding on Content Information page, 4-23, A-34
procedure to show on Content Information
page, 4-25
showing on Content Information page, 4-23, 4-24,
A-35
Registered Publisher Projects, Content Management
Tray, A-5
rejecting content items in workflows, A-65
release date, A-10, A-52
Released (revision status), 5-3
renaming virtual folders, 9-14
Renderers menu, A-96
rendition
definition, 10-14
downloading, 10-14
Rendition Information icon, 11-6, 11-19
Rendition Information page
description, 11-7
playing videos, 11-13
Rendition Name Description icon, 11-8, 11-21
Rendition Name Information icon, 11-8
Rendition Name, Rendition Information page
column, 11-8
Rendition Parameters page, 11-12, 11-13
Rendition Set, Rendition Information page
listing, 11-8
renditions, 1-2, Glossary-14
creating from source, 11-23
digital asset basket, 11-16
downloading, 11-22
information icon, 11-6
listing, 11-3

Index-9
set, 11-3
set list, 11-5
Renditions menu, Rendition Information page, 11-9
replying to a posting, 5-10
repository, 1-2
Reset button, Search Links page, A-33
Resolution, Add a Rendition page field, 11-21
restoring deleted content items, 9-10, 9-12, 9-18
restoring deleted virtual folders, 9-10, 9-12, 9-15
results options, A-11
Results tab on Search tray, A-7
Review (revision status), 5-3
review step in workflows, 8-2
review/edit revision step in workflows, 8-2
reviewing content in workflows, A-70
reviewing files in workflows, 8-4
review/new revision step in workflows, 8-2
revised content, default metadata for --, 9-6
revision control, 1-2
revision history, A-39
folio information, 10-15
viewing the --, 5-4
Revision Information Field Configuration
page, A-75
revision life cycle, 5-1, 5-3
revision status, 5-3
Deleted, 5-3
determining the --, 5-3
Done, 5-3
Edit, 5-3
Expired, 5-3
GenWWW, 5-3
Pending, 5-3
Released, 5-3
Review, 5-3
Waiting, 5-3
revisions, 5-4, 10-13
checking in new --, 6-5
deleting --, 5-4
history, 5-4
information about -- in workflow, 8-7
reviewing -- in workflow, 8-4
working with rejected --, 8-5
Role Access List, A-31
roles, 1-3
route, Glossary-16
S
Safari, supported versions, 2-1
Save Queries page, A-27
saved queries, editing, 3-9
saving personal URLs, 3-10
saving queries, 4-26, 4-27
scope of user’s guide, 1-1
screens
Content Information, A-44
Discussion Info, A-43
Search
Content Profiles, 6-8
list displaying content profile links, 6-8
Search button, Search Links page, A-33
search fields
home page, 4-20, A-5
quick search, 4-19, A-4
search form
Expanded, 4-3, 4-20, A-9
Query Builder, 4-6, 4-21, A-10
Search Form Type
Expanded Form, 3-12
Query Builder Form, 3-12
Search Links page
Content ID field, A-32
Create Date From/To fields, A-33
Link Type field, A-33
overview, 4-23, A-32
Reset button, A-33
Search button, A-33
search results example, A-33
Site field, A-32
State field, A-33
Target Content ID field, A-32
Target Content ID Label field, A-32
Target Node field, A-32
Target Node Label field, A-33
Update Date From/To fields, A-33
search operators
full-text searches (Oracle Database), 4-15
metadata searches, 4-7, 4-10
See also ’Oracle Database search operators’
search options in Link Manager, 4-22, 4-23, A-32
search pages, 4-2, 4-9
search result templates, 3-14
Classic View, 3-14, A-17
creating, 3-17, A-15
custom, 3-9
editing, 3-17, A-15
Headline View, 3-15, A-20
Thumbnail View, 3-16, A-24
Search Result Templates for user page, A-16
search results, 4-21
changing view, 4-22
displaying, 4-21
displaying categories, 4-4
example, A-33
Oracle Text Search default menu, 4-4
Oracle Text Search expanded menu, 4-5
Rendition Information icon, 11-6
Thumbnail View, 11-6
search results pages, A-12
actions, A-13
download options (download applet), 7-5
options, A-11
views, 3-12, A-12
with Oracle Text Search, 4-4
search syntax, Internet, 4-17
search template, 3-12
Search tray, 4-20, A-6
Criteria tab, A-6
metadata searches, A-10

Index-10
Results tab, A-7
searching, 4-15
by Discussion Type, 5-11
database full-text search, 4-2
database metadata search, 4-2
expired content, 4-8, 4-12
links, 4-23
Oracle Text Search, 4-2
referenced links, 4-22
searching for content, 1-6
advanced search page, 4-20, A-8
browsing, 4-16
full-text searches, 4-13, 4-16
home page search fields, 4-20, A-5
metadata searches, 4-2, 4-3, 4-9, 4-10
methods of, 4-2
quick search field, 4-19, A-4
search pages, 4-2, 4-9
search results, 4-21
Search tray, 4-20, A-6
searching for links, procedure for, 4-25
searching recursively in Folders, 9-13
security
access control list, 1-5
content items, 9-1
Oracle Content Server, 1-3
security groups, 1-3
Select Member applet, Glossary-17
Selected Renditions, Digital Asset Basket
column, 11-19
selecting dates for date metadata fields, 3-7
selecting files for upload, A-54
selecting individual files, A-55
selecting multiple files, A-56
Set Folio Profile page, A-97
setting up web folders, 9-13
shortcuts, 9-9, Glossary-17
Show toggle switch
Content Information page, 4-23
description and example, 4-24, A-35
simple folio, 10-7, A-88
adding items, 10-7
creating, 10-5
single files
See ’checking in single files’
See ’checking out single files’
single left-facing arrow, 3-6
single right-facing arrow, 3-6
Site field, Search Links page, A-32
size, rendition file, 11-9
skins, 3-12
slots, definition, 10-2
snapshot
definition, 10-13
taking, 10-13
sort order, A-11
Source Items Tray, A-95
Starts (metadata search operator), 4-10
State field, Search Links page, A-33
static watermark description, 6-2
status of revisions, 5-3
Deleted, 5-3
determining the --, 5-3
Done, 5-3
Edit, 5-3
Expired, 5-3
GenWWW, 5-3
Pending, 5-3
Released, 5-3
Review, 5-3
Waiting, 5-3
steps in workflows
auto-contribution, 8-2
contribution, 8-2
information about --, 8-6
review, 8-2
review/edit revision, 8-2
review/new revision, 8-2
storing content, 1-6
structure, 10-2, 10-7
Subscribe to folio_name page, A-102
subscribing to content, 5-12
criteria subscription, A-47
file subscription, A-47
subscribing to folios, 10-15
subscriptions, 5-12
canceling --, A-48
canceling -- to a content item, 5-13
canceling -- to a criteria group, 5-13
criteria --, 5-12
file --, 5-12
info page, A-46
starting -- to a content item, 5-12
viewing current --, 5-12, A-45
viewing latest notifications, A-46
Substring (metadata search operator), 4-10
supported formats, 11-4
sysmanager role, 1-4
T
table action menus, 3-5
Target Content ID field, Search Links page, A-32
Target Content ID Label field, Search Links
page, A-32
Target Node field, Search Links page, A-32
Target Node Label field, Search Links page, A-33
tasks in workflows, 8-2, A-70
templates
folio, A-88
search result, 3-14
Classic View, 3-14
Headline View, 3-15
Thumbnail View, 3-16
text format of e-mail, 3-12
threads, Glossary-18
Thumbnail View search results, 3-12, 11-6
Thumbnail, Digital Asset Basket, 11-19
thumbnails, 3-12, A-12, A-13, Glossary-18
TIFF image input format, 11-4

Index-11
title allocation (WebDAV), 9-16
toolbar, 3-3
home page, 3-3
Logout link, 3-3
New Check In link, 3-3
Quick Search, 3-3
Top Menus layout, 3-12
topic, Glossary-18
Trash Bin, 9-10
feature description, 9-2
restoring items from --, 9-12
Trash Exploring page, A-79
trays
Browse Content, 4-16, 4-17
Content Management, A-5
Element Info, A-93
folio structure, A-91
My Content Server tray, 3-13
Search, 4-20, A-6
Source Items, A-95
Trays layout, 3-12
Type field, Glossary-19
types of workflows, 8-1
U
unlocking a folio, 10-14
unsubscribing
content, A-48
content item, 5-13
criteria group, 5-13
Update Date From/To fields, Search Links
page, A-33
updating metadata, 5-5, A-41
upload applet
enabling --, 6-6
Java security warning, 6-6, 7-4
requirements, 6-6
use, 6-7
Upload Files window, A-54
upload message, A-57
URL links, search options, 4-22, 4-23, A-32
URLs
persistent, 1-2, Glossary-12
personal, 3-10
User Access List, A-30
user configuration settings, 9-5
user interface
Content Management tray, A-5
customization, 3-1, 3-7
home page, 3-3
layouts, 3-12
My Content Server, 3-13
My Personal URLs, 3-10
My Profile, 3-8, 3-11
My Saved Queries, 3-9
personal URLs, 3-10
personalization, 3-7
portal navigation bar, 3-2
saved queries, 3-9
search template, 3-12
skins, 3-12
toolbar, 3-3
user profile, 3-8, 3-11
user interface (Folders), A-71
Browsing window, A-80
Contribution Folders link, A-72
Default Information Field Configuration
page, A-74
Folder Configuration link, A-72
Folder Configuration page, A-72
Folder Exploring pages, A-77
Hierarchical Folder Configuration page, A-83
Hierarchical Folder Information page, A-81
Revision Information Field Configuration
page, A-75
Trash Exploring page, A-79
User Profile page, A-72
user interface (WebDAV)
Folders pages, A-86
virtual folders, A-85
user locales, 3-12, Glossary-19
User Profile
editing, 3-8
E-mail Address field, 3-11
Email Format field, 3-12
Full Name field, 3-11
Layout choice list, 3-12
personalization, 3-8
Roles field, 3-11
Search Templage choice list, 3-12
Skin choice list, 3-12
User Locale field, 3-12
User Name field, 3-11
User Type field, 3-11
User Profile page, 3-11, A-72
user’s guide scope, 1-1
users, 1-4
consumers, 1-4
content checked out by all users, A-59
content checked out by current user, A-58
contributors, 1-4
using Folders, 9-5
using folios, 10-2
using WebDAV, 9-13
V
vault, Glossary-20
Video Preferences page, 11-13
videos
managing, 1-7, 11-1
output formats, 11-5
playing, 11-13
View Folio page, A-99
viewing content information, 5-3
viewing content items, 9-7, 9-17
viewing current subscriptions, 5-12, A-45
viewing discussion, 5-9
viewing files, 5-5

Index-12
native files, 5-6
web-viewable files, 5-5
viewing folio information, 10-15
viewing revision notifications, A-46
viewing the revision history, 5-4
viewing virtual folders, 9-7, 9-14
viewing workflow information, 8-6
virtual folders, A-85
creating --, 9-8, 9-14
deleting --, 9-10, 9-14
moving --, 9-9
renaming --, 9-14
restoring --, 9-15
restoring deleted --, 9-10, 9-12
setting metadata, 9-15
viewing --, 9-7, 9-14
W
Waiting (revision status), 5-3
watermarks
definition of dynamic, 6-2
definition of static, 6-2
web browsers
Firefox, 2-1
Internet Explorer, 2-1
Safari, 2-1
supported, 2-1
web folders
definition, Glossary-20
setting up --, 9-13
web pages, displaying --, 9-19
web URL for Oracle Content Server, 2-1
WebDAV, Glossary-20
clients, 9-4
functions, 9-4
moving content with Folders component, 1-6
overview, 9-4
protocol, 9-4
storing content with Folders component, 1-6
technology, 9-4
title allocation, 9-16
working with --, 9-13
weblayout, Glossary-20
web-viewable files
content repository, 1-2
viewing --, 5-5
Width, Add a Rendition page field, 11-21
wildcards
* (asterisk), 4-11, 4-14
? (question mark), 4-12, 4-14
full-text searches, 4-14
metadata searches, 4-8, 4-11
Windows Explorer
checking in content, 9-16
checking out content, 9-16
configuring -- to display web pages, 9-19
copying content, 9-18
deleting content, 9-18
moving content, 9-19
Work In Progress page, A-40
Work In Progress, Content Management Tray, A-5
workflow content item reject notification, A-66
workflow review notification, A-63
workflow started notification, A-62
workflows, 1-7, 8-1
actions in --, A-63
active workflows, 8-6, A-66
auto-contribution step, 8-2
basic workflows, 1-7, 8-1
content information for revision, 8-7
content item reject notification, A-66
content items, A-63
contribution step, 8-2
criteria workflows, 1-7, 8-1
entering files in --, 8-3
history, 8-6
information about steps, 8-6
location of revisions, A-69
overview, 8-1
participating in --, 8-3
postprocess options, 8-2
process, 8-2
rejection, A-65
review, A-70
review step, 8-2
review/edit revision step, 8-2
reviewing files in --, 8-4
review/new revision step, 8-2
steps, 8-1
tasks, 8-2, A-70
types, 8-1
viewing information, 8-6
workflow review notification, A-63
workflow started notification, A-62
working with rejected revisions, 8-5
workflows in queue, A-67
working with file revisions, 5-4
working with Folders, 9-5
working with rejected revisions, 8-5
working with WebDAV, 9-13
write permission, Glossary-20
access control list, A-31
content server, 1-4
Y
year menu, Pop-up Calendar screen, 3-6
Z
ZIP files, checking in multiple files, 6-6
