
©
All
Rights
Reserved
2014
-
2016
www.upicrm.com
Contact:
info@upicrm.com
User Guide
V2.X - November 2016

©
All
Rights
Reserved
2014
-
2016
www.upicrm.com
Contact:
info@upicrm.com
CONTENTS
INTRODUCTION - WHAT IS UPICRM AND HOW DOES IT WORK? ............................................................................ 4
UPICRM ADMINISTRATOR’S MENU ........................................................................................................................ 5
UPICRM DASHBOARD .................................................................................................................................................... 5
UPICRM Dashboard top section ............................................................................................................................. 5
Lead Overview section ............................................................................................................................................ 6
Lead By… section .................................................................................................................................................... 6
Leads per Country, Product and Source section ..................................................................................................... 7
LEAD MANAGEMENT ....................................................................................................................................................... 8
DATA TYPES & FIELDS ...................................................................................................................................................... 9
Top Section ............................................................................................................................................................. 9
Mapping Form Fields to UPICRM Database ......................................................................................................... 10
Add New Fields and Status Descriptors to UPICRM ............................................................................................. 10
EMAIL NOTIFICATIONS ................................................................................................................................................... 11
Lead Management section ................................................................................................................................... 11
New Lead, Change User, Change Status, and Request Status sections ................................................................ 12
AUTO LEAD MANAGEMENT ............................................................................................................................................ 13
Add new lead routing rule .................................................................................................................................... 13
Lead Routing Table ............................................................................................................................................... 14
LEAD AGGREGATION ...................................................................................................................................................... 14
Send Leads to Remote UpiCRM MASTER.............................................................................................................. 15
UpiMaster Table ................................................................................................................................................... 15
Receive Leads from Remote UpiCRM SLAVE ........................................................................................................ 15
UpiSlave Table ...................................................................................................................................................... 16
WEB SERVICES.............................................................................................................................................................. 16
Outbound Web Service ......................................................................................................................................... 16
Inbound Web Service ............................................................................................................................................ 17
IMPORT & EXPORT ........................................................................................................................................................ 17
Importing data to UPICRM Database................................................................................................................... 17
Exporting leads database content from UPICRM to local Excel file ..................................................................... 18
Importing Plugin Forms database content (when available) to UPICRM Database............................................. 18
USERS CENTER ............................................................................................................................................................. 19
Add User ............................................................................................................................................................... 19

©
All
Rights
Reserved
2014
-
2016
www.upicrm.com
Contact:
info@upicrm.com
Global User Hierarchy .......................................................................................................................................... 20
UPICRM INSTALLATION ........................................................................................................................................ 21
UPICRM INITIAL CONFIGURATION ................................................................................................................................... 21
UPICRM OPERATION ............................................................................................................................................ 23
LEAD MANAGEMENT WITH UPICRM ............................................................................................................................... 23
ANALYSIS, TRACKING AND MARKETING EFFECTIVENESS WITH UPICRM .................................................................................... 24
FAQ ...................................................................................................................................................................... 25
CONTACT AND SUPPORT ...................................................................................................................................... 28

©
All
Rights
Reserved
2014
-
2016
www.upicrm.com
Contact:
info@upicrm.com
INTRODUCTION - WHAT IS UPICRM AND HOW DOES IT WORK?
UpiCRM is the simplest, most elegant and easy to use CRM & Lead management solution, designed for WordPress
users.
UpiCRM is designed to easily integrate with your WordPress website and works in parallel with existing solutions
you are currently using, such as existing contact forms (Contact Form7, Gravity Forms, and any other contact forms
you are currently using in order to collect leads from your website).
UpiCRM method of operation is as follows:
Elegant, Non-Intrusive, and Easy to Set Up:
UpiCRM maps your existing database/forms of leads from your current website, by using an advanced yet
elegantly simple, semi-automatic mechanism, in order to create a new single, central, unified database of
all your leads, while importing all past data from contact forms databases (if existing).
Complete Customer Lifecycle Management:
The UpiCRM unified leads database offers new capabilities for managing the lifecycle of all leads, from
receiving a new lead and routing it to the designated person, through managing the process required per
lead, and up to the closing of the process with each lead.
Teamwork & Collaboration:
UpiCRM provides the means for the most efficient teamwork, by allowing new leads to be assigned to any
designated member of your team serving any function – sales, marketing, executives, and service
providers.
Analytics, Monitoring and Tracking:
UpiCRM offers advanced capabilities of effectiveness monitoring and analysis, by attaching the traffic
source to each and every lead, as well as utilizing the URL tagging mechanism, in order to allow you to
gather, report, and analyze your marketing activities, starting right from the investment in a marketing
channel.
Dashboards and KPI's (Key Performance Indicators):
Gain instant knowledge of your current funnel and status with the UpiCRM dashboard.
No more endless spreadsheets, manual reports or confused and angry managers. Simply provide your
executive team with an easy access to the real-time, easy to understand UpiCRM dashboard.

©
All
Rights
Reserved
2014
-
2016
www.upicrm.com
Contact:
info@upicrm.com
UPICRM ADMINISTRATOR’S MENU
After installation and activation of the UPICRM plugin, the “UpiCRM” menu item will appear in the WordPress
main Dashboard menu. When you click on it the following submenu will appear:
Clicking on any of the submenu items will open the chosen screen as follows:
UPICRM Dashboard
Depending on the logged-in user’s role, UpiCRM presents one of two dashboards:
Admin Dashboard: Presents all leads’ status and analytics data.
User dashboard: Presents the same information, but only for the leads assigned to the logged-in user.
As this window contains a lot of information, each part will be discussed in detail below, from top to bottom.
UPICRM Dashboard top section
This section contains some quick information and frequently used links.

©
All
Rights
Reserved
2014
-
2016
www.upicrm.com
Contact:
info@upicrm.com
Latest New Leads: preview of the few most recently received leads.
Manage Leads: a quick link to the “Lead Management” section
Export to Excel: a quick link to export UpiCRM’s lead data to an Excel file.
Lead Overview section
This section contains a graph representation of the number of leads accumulated in UPiCRM.
Lead By… section
This section contains a representation of leads totals as sorted by 5 parameters. The parameters are 5 useful fields
in the UpiCRM database:
Status
Assigned to
Country
Product
Received From

©
All
Rights
Reserved
2014
-
2016
www.upicrm.com
Contact:
info@upicrm.com
Leads per Country, Product and Source section

©
All
Rights
Reserved
2014
-
2016
www.upicrm.com
Contact:
info@upicrm.com
Lead Management
This screen presents all leads accumulated in UpiCRM in one table:
The table can be filtered by date:
You can select which columns will be displayed out of all of the data fields contained in the UpiCRM database.
Use this screen in order to change a lead’s status, change who the lead is assigned to, add lead management
comments, and delete selected leads.

©
All
Rights
Reserved
2014
-
2016
www.upicrm.com
Contact:
info@upicrm.com
Note: Always remember to click on the "Save" icon - ’ ’ - in order to save your changes
You can also request a status update from the lead’s owner: use this option when a lead had been reassigned to
another person in your team, in order to send an email from the new lead manager to the former one, requesting a
status update for that lead.
Data Types & Fields
As this window contains a lot of information, each part will be discussed in detail below, from top to bottom.
Top Section
Reset or delete:
1. "Reset all": Reset all settings, but keep data safe and intact. It is still highly recommended to back up the
website prior to performing this action.

©
All
Rights
Reserved
2014
-
2016
www.upicrm.com
Contact:
info@upicrm.com
2. "Delete all": PLEASE USE ONLY AFTER SERIOUS CONSIDERATION! This will erase all your records from
your database, but will not reset configuration.
Mapping Form Fields to UPICRM Database
UpiCRM connects to the form plugins installed on your site (currently supported are Contact form 7 + Contact form
DB, Gravity forms, Ninja Forms and Caldera Forms) and collects their entries into its database.
Map the fields in your forms into the fields in UpiCRM in this section.
This allows you to regulate the data from your different website forms into a uniform database.
Add New Fields and Status Descriptors to UPICRM
UpiCRM includes a list of fields by default. You may also add any additional field you would like in this section.
You can also add any additional statuses to the default list of lead statuses.

©
All
Rights
Reserved
2014
-
2016
www.upicrm.com
Contact:
info@upicrm.com
Email Notifications
In this screen you can configure the email notification settings of UpiCRM.
Lead Management section
Send all leads and updates to the following user: Choose to send all new leads by email to any single
UpiCRM user.
Leads are by default assigned to: Assign all new leads to the selected UpiCRM User.
Email format: You can choose to send email notifications as plain text or HTML. As some external systems
(SalesForce, ZohoCRM etc.) will required plain text in order to parse new leads, you may choose to change
the default format to plain text.
Distribute all leads and updates to additional address(es): Send all leads and updates to any external
email address, or to a list of comma separated (",") email addresses.
Change default "from" field for emails sent from UpiCRM: Set the "from" name used on email sent by
UpiCRM.

©
All
Rights
Reserved
2014
-
2016
www.upicrm.com
Contact:
info@upicrm.com
New Lead, Change User, Change Status, and Request Status sections
UpiCRM will consistently inform you and your team about any reception/edition/modification of any lead.
In this screen you can personalize the messages you wish to distribute, by editing the email templates.
You can use various variables from your lead fields.

©
All
Rights
Reserved
2014
-
2016
www.upicrm.com
Contact:
info@upicrm.com
Auto Lead Management
UpiCRM now allows you to automatically manage your leads' distribution and assignment, based on the contents of
the data received. In this screen you can define rules for automatic lead routing.
Add new lead routing rule

©
All
Rights
Reserved
2014
-
2016
www.upicrm.com
Contact:
info@upicrm.com
Rules for example:
If field "Country" equals "India" - assign lead to "John" (Our Indian sales manager)
If field "Subject" contains "support" – send lead to s[email protected] and change lead status to "Support
Request".
Spam killer example: if "message details" field contains "Free, cheap, buy, increase, sell" (multiple values
separated by comma “,”) then change lead status to "Spam".
If field "Future contact allowed" is bigger then 1, then change lead status to "Newsletter".
You can define all sorts of new fields, users, and statuses.
Rules can also write into the content fields of the lead in the database. For example: if "message details" field
contains "shirt” then change lead Product field to "Clothing" .
You can define multiple rules to work together with an “and” logic.
Note: if you select more than one person to “Assign lead to”, every lead will be distributed to each assignee in turn,
one after the other, in a “Round-robin” que. A lead will NOT be distributed to more than one person
simultaneously!
Lead Routing Table
New rules override older rules.
Lead Aggregation
With Multi Server Installation – UpICRM slave / Master setup
UpiCRM can act as an aggregator of leads from multiple / remote web sites. This means that a UpiCRM master can
receive leads from any other UpiCRM "slave”, as long as the connection (pairing) is performed. UpiCRM can work in
complete orchestration, receive / send leads from and to multiple servers at the same time.
In order to get your required API key, please visit http://www.upicrm.com/apikey
More documentation can be found on: http://www.upicrm.com/docs

©
All
Rights
Reserved
2014
-
2016
www.upicrm.com
Contact:
info@upicrm.com
Send Leads to Remote UpiCRM MASTER
UpiMaster Table
Receive Leads from Remote UpiCRM SLAVE

©
All
Rights
Reserved
2014
-
2016
www.upicrm.com
Contact:
info@upicrm.com
UpiSlave Table
Note: on the leads management table, you can re-transmit a lead to the master server if an error occurred:
Web Services
UpiCRM can transmit leads to a remote source using HTTP Post method.
Outbound Web Service
Transmit leads to a remote web service, using POST method.
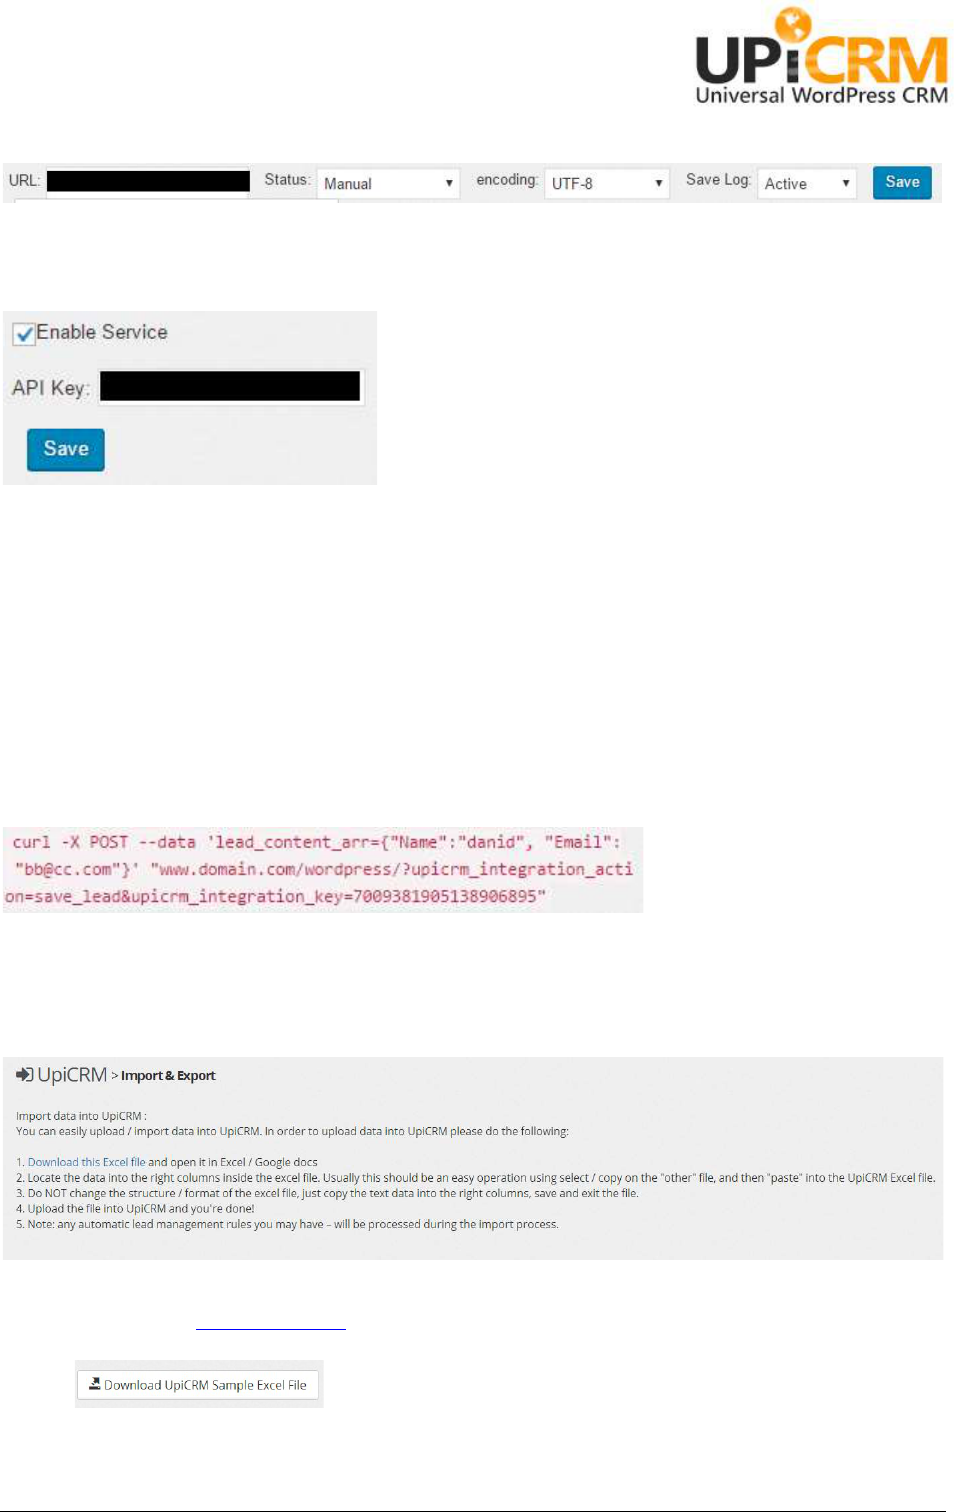
UpiCRM can transmit leads to remote source using HTTP Post method, as shown below:
1. URL: http://www.remoteserver.com/programname.php?username=user&password=pwd
2. Status:
a. Manual: when choosing “Manually transmit lead to a remote web service” form the leads
management table.
b. Always On: all received leads are immediately transmitted to a remote server.
c. On by Auto Lead: allows you to set rule for transmitting leads to a remote service by using the
“Auto lead management” option on the UpiCRM menu.
©
All
Rights
Reserved
2014
-
2016
www.upicrm.com
Contact:
info@upicrm.com
Inbound Web Service
Accept leads from remote sources using POST requests.
UpiCRM inbound web service allows you to receive leads from external sources using simple HTTP POST request.
In order to implement this capability, you should enable the inbound web service and set an API key in the “Web
Services” section in the UpiCRM menu.
The POST request should be sent to your WordPress URL (i.e.: www.yourwebsite.com/) with the following query
string parameters:
1. upicrm_integration_action=save_lead
2. upicrm_integration_key=your_selected_key
The POST data should contain a single value called lead_content_arr, presumed to be a JSON object that contains
the lead information, as shown below:
Import & Export
Importing data to UPICRM Database
In order to import (upload) data to UpiCRM database, please do the following:
1. Download this Excel template file and open it in Excel / Google Sheets. The Excel template file can also be
downloaded by clicking here:
2. Copy your data into the matching columns in the excel template file. Usually this should be an easy
operation using select / copy on you "other" file, and then "paste" into the UpiCRM Excel file.

©
All
Rights
Reserved
2014
-
2016
www.upicrm.com
Contact:
info@upicrm.com
3. Do NOT change the structure / format of the excel file, just copy your text data into the proper columns.
4. Save and exit the file.
5. Upload the file to UpiCRM and you're done.
6. Note: Each automatic lead management rules you may have, will be processed during the import process.
Exporting leads database content from UPICRM to local Excel file
Click here:
The UPICRM database content will be downloaded into an excel file named leads.xlsx
Importing Plugin Forms database content (when available) to UPICRM Database
Note: this will import data from the forms you're currently using, only if they are configured to save entries in a
database. Only database content available at the moment of this action will be imported.
Data entered afterwards will not be imported.
Upload the updated excel
template file

©
All
Rights
Reserved
2014
-
2016
www.upicrm.com
Contact:
info@upicrm.com
Users Center
UpiCRM is designed to work in a multi-user / global organization environment, with up to 5 tiers of users, per your
choice / definition.
For Example, you can define a single "Global Sales Manager", three "Regional Sales Managers", under each of them
- local "Sales Representatives" that are working with "External Distributors".
Per every user you can define:
1. Permission to re-assign leads back to the manager in charge.
2. Enable/Disable sending email status updates to the manager, per each status change.
All users, when connected to the UpiCRM dashboard, will see not only the leads assigned to themselves, but also
the aggregation of leads assigned to the users reporting to them.
Add User
In order add users to UpiCRM:
1. Add a new WordPress "subscriber" user (Important: Do this before Adding UPICRM user/s).
After adding a user to your WordPress site, please assign UPI user rights to the new user, by editing the new user’s
profile, UpiCRM options – Permissions – drop down list:

©
All
Rights
Reserved
2014
-
2016
www.upicrm.com
Contact:
info@upicrm.com
2. Add the new user to UpiCRM:
a. Choose the new user from the drop down list
b. Choose his manager from the drop down ‘Reprts to’ list
c. Add role (free text / label)
d. Choose permission (role): UpiCRMUser/UpiAdmin
e. Choose if a user can re-assign leads back to the manager? yes/no.
f. Choose if the manager will receive notifications on the user status updates? yes/no.
Note: you can always click the "edit" icon and change the user's role/position/permissions.
Global User Hierarchy
This is a graphic representation of the UPICRM User Hierarchy tree

©
All
Rights
Reserved
2014
-
2016
www.upicrm.com
Contact:
info@upicrm.com
UPICRM INSTALLATION
UPICRM complies with WordPress plugin requirements, so just add it as you would with any new WordPress plugin.
After successful addition, activate the UpiCRM plugin.
UPICRM Initial Configuration
Step 1: Set up users and roles
UpiCRM has two built in user roles:
UpiCRM Admin: Can configure all options, can view and edit all leads, can access UpiCRM dashboard, and perform
any additional task UpiCRM allows.
UpiCRM User: Can view & manage leads assigned to him only.
Simply create a WordPress user using the default "Users" menu provided by your WordPress management
interface. Navigate to the lower end of the page, and assign the new user the desired UpiCRM role:
Note: For existing WordPress user(s), simply assign to each a user role.
For more details please refer to ‘Users Center’ information above.
Step 2: Map all of your existing forms and fields into UpiCRM's structured database
UpiCRM needs to import all your data and map all your current forms and fields into its superset of structured
database.
In order to perform this task, perform the actions detailed in ‘Mapping Form Fields to UPICRM Database’ above.
Tip: if you are using an additional field that does not appear on the UpiCRM predefined fields list, you can always
add it to the UpiCRM database using the "Add additional fields and datatypes to UpiCRM" option:
Note: this procedure needs to be performed only once per every form on your website.
Please remember to map the fields of the new form whenever you add a new form to your site in the future!
Step 3: Edit Email notifications
UpiCRM will consistently inform you and your team about any reception/editing/modification of any lead.
Take a couple of minutes in order to personalize the messages you wish to distribute, by editing the Email
templates in the ‘Email Notifications

©
All
Rights
Reserved
2014
-
2016
www.upicrm.com
Contact:
info@upicrm.com
In this screen you can configure the email notification settings of UpiCRM.
Lead Management section
’ screen above.
Tip: use the variables [lead], [url] and [assign-to], and/or [field-any-field-name] in order to embed information into
the email notifications you send. Example: Lead from: [Field-Name], [field-Country].
Basically, you're done.
You can now start managing your leads and prospect customers.
Has it been more than an hour or so since you started the installation process?
If you have come across any issues or difficulties –
please let us know using our online contact form on
http://www.upicrm.com/contact

©
All
Rights
Reserved
2014
-
2016
www.upicrm.com
Contact:
info@upicrm.com
UPICRM OPERATION
Lead Management with UPICRM
Once all the data is collected, organized and available to your team, you can now manage your leads and customers
by working with the UpiCRM leads database:
The operations you can perform on each database record are:
Edit records: simply choose the edit icon on any record, make your changes and then click on the save
icon in order to save your changes.
Delete record: use the delete icon in order to delete a non-relevant record from the database.
Request status update from lead owner: use this option when a lead had been moved to another person
in your team, in order to send a mail from the new lead manager to the former one, requesting a status
update for that lead.
Select what data will be shown to you by default: use the "rows selected" dropdown menu in order to
choose the default set of information you will be presented with upon accessing this screen, and use the
“Default date range:” buttons to filter the date range of the leads shown in the table.
"Assign to" option: use this dropdown menu in order to assign leads to you team members. Every user
assigned with a new lead, will receive an immediate eMail notification with either the default notification
or with the personalized mail you have previously defined during the first-time configuration process.
"Lead Status" option: use this dropdown menu in order to manage the status of a lead as you keep
tracking his status.
"Message details/Remarks": edit this text box in order to add more information to leads and records.
Don't forget to add meaningful information such as date when a note was taken, and be sure to hit the
"save" icon when you have finished.

©
All
Rights
Reserved
2014
-
2016
www.upicrm.com
Contact:
info@upicrm.com
Transmit lead: You can transmit lead to a UpiCRM Master. See "Lead Aggregations" section on order to
learn more.
Note: Always remember to click on the "Save" icon - ’ ’ - in order to save your changes
Analysis, tracking and Marketing effectiveness with UpiCRM
The Challenge: Tracking leads from actual traffic sources – campaigns, referring sites, search engines etc., through
the complete lifecycle of every lead, and creating the full picture of your marketing effectiveness.
UpiCRM supports URL tagging, used for identification of traffic sources to a web site.
Note: Please read more about URL Builder provided by Google. (link)
This means that if you tag all your inbound traffic in compliance with the UTM tagging rules, UpiCRM will attach the
traffic source to each and every lead received.
For example, if you use the link
www.website.com/?page_id=100&utm_source=source&utm_medium=medium&utm_campaign=campaign&utm_t
erm=term&utm_content=content
UpiCRM will show these UTM tags in the Leads Table for leads arriving using this link:
In addition, UpiCRM will also attach the HTTP referrer parameter to every lead, so you'll be able to track the source
per every lead in your database.

©
All
Rights
Reserved
2014
-
2016
www.upicrm.com
Contact:
info@upicrm.com
The bigger picture: With UpiCRM you will be able to analyze the effectiveness of all your marketing activities and
traffic sources, both on a single lead basis, and up to a complete reporting and analytics information.
The way to achieve this is simply by adding the built-in fields - ‘HTTP referrer’, ‘Campaign Source’ (utm_source),
‘Campaign Medium’ (utm_medium), ‘Campaign Term’ (utm_term), ‘Campaign Content’ (utm_content), ‘Campaign
Name’ (utm_campaign) to the default "View leads" table.
Alternatively, simply export all data to excel in order to create your own views and analysis.
FAQ

©
All
Rights
Reserved
2014
-
2016
www.upicrm.com
Contact:
info@upicrm.com
Q: What does UpiCRM do?
A: UpiCRM is a WordPress plugin that enables you to manage your customers throughout the complete lifecycle of
the “leads to customers” process.
Q: CRM solutions are known to be very hard to implement… How easy is UpiCRM, starting with installation, set-up
and work cycle?
A: Based on our experience, UpiCRM is the simplest and easiest to install, configure and manage solution currently
in existence. A typical installation should take no longer than a couple of hours.
Q: With which ‘form plugins’ does UpiCRM work currently?
A: Currently UPICRM supports Contact form 7 + Contact form DB, Gravity forms, Ninja Forms and Caldera forms. If
you are using another solution, please contact us on www.upicrm.com/contact, and we'll be happy to promptly
respond to your needs and those of the community. Caldera forms generates a lot of requests from users…
hopefully we’ll have it soon.
Q: Is UpiCRM free?
A: Yes. Please read the license file located in the installation ZIP file.
Q: How can I track lead source in UpiCRM?
A: UpiCRM provides 3 ways of tracking a lead source: 1) Form name – which form was filled? 2) traffic source –
Referral – from which site/URL did the user arrive from? 2) UTM URL Tagging : add UTM tags to all campaigns and
traffic sources for your site, UpiCRM will parse and attached this information to every new lead.
Q: What about multilingual support? What Languages do you currently provide?
A: UpiCRM supports translation to any language you desire. Currently we support English, and Spanish. Russian
translation is on its way.
Q: Can I use UpiCRM to aggregate leads from more than just one website?
A: Yes, your UpiCRM can act as a slave/master, and can send leads from multiple WordPress sites into a single
location for you to manage all your leads in a single place.
Q: Can I import data from an Excel file into UpiCRM?

©
All
Rights
Reserved
2014
-
2016
www.upicrm.com
Contact:
info@upicrm.com
A: Yes! Go to "Import/Export” screen, download the UpiCRM_Format.xlsx template file, copy & paste the data into
the file, and upload it back to the server. UpiCRM will import all data into its database, and will process the
automatic rules you have defined.

©
All
Rights
Reserved
2014
-
2016
www.upicrm.com
Contact:
info@upicrm.com
CONTACT AND SUPPORT
Supported Platforms: WordPress V3.X, V4.X, RTL. (no LTR support on current version)
Supported Languages:
UpiCRM supports translation to any language you desire. Currently we support English, Spanish & Russian.
If you want to translate UpiCRM to your native language – we’ll be more than happy to work with you, just contact
us!
Spanish Translation of UpiCRM was provide by:
Andrew Kurtis from WebHostingHub.
For all contact request please email info@upicrm.com or fill out a contact form at http://www.upicrm.com/contact
Complete / updated version of this document can be found at
http://www.upicrm.com/docs

©
All
Rights
Reserved
2014
-
2016
www.upicrm.com
Contact:
info@upicrm.com
CHANGE LOG
Version 2.0:
* Improved leads management table, filtering, bulk actions, faster loading.
* Dashboard design – improved UI, design and presentation.
* User hierarchies and roles – up to 5 levels of Upi-Users, from General Managers to a local / external distributors,
all in a single user managing center.
Version 1.9.4.1:
* Integration Center: UpiCRM can act as an aggregator of leads from multiple / remote web sites. This means that a
UpiCRM master can receive leads from any other UpiCRM "slave", as long as the connection (pairing) had been
performed. UpiCRM can work in complete orchestration, receive / send leads from and to multiple servers at the
same time.
* Minor UI / Bug fixes.
* Improved e-mail notification: Use [field-*] (* - UpiCRM field name) in order to include lead details in e-mail
subject (New Lead from John Smith – UK…)
* Send mail bug fix
Version 1.9.6.1:
* Removed CSS objects in order to prevent UI problems.
* Added new feature: Import from Excel file - you can now import new data into UpiCRM!
