
NETWRIX AUDITOR:
GROUP POLICY
ADMINISTRATOR’S GUIDE
Copyright © 2013 Netwrix Corporation. All Rights Reserved.
August 2013
Product Version: 5.0

Netwrix Auditor: Group Policy Administrator’s Guide
Page 2 of 84
Copyright © 2013 Netwrix Corporation. All Rights Reserved
Suggestions or comments about this document? www.Netwrix.com/feedback
Legal Notice
The information in this publication is furnished for information use only, and does not constitute a
commitment from Netwrix Corporation of any features or functions discussed. Netwrix Corporation
assumes no responsibility or liability for the accuracy of the information presented, which is subject
to change without notice.
Netwrix is a registered trademark of Netwrix Corporation. The Netwrix logo and all other Netwrix
product or service names and slogans are registered trademarks or trademarks of Netwrix
Corporation. Active Directory is a trademark of Microsoft Corporation. All other trademarks and
registered trademarks are property of their respective owners.
Disclaimers
This document may contain information regarding the use and installation of non-Netwrix products.
Please note that this information is provided as a courtesy to assist you. While Netwrix tries to
ensure that this information accurately reflects the information provided by the supplier, please refer
to the materials provided with any non-Netwrix product and contact the supplier for confirmation.
Netwrix Corporation assumes no responsibility or liability for incorrect or incomplete information
provided about non-Netwrix products.
© 2013 Netwrix Corporation.
All rights reserved.

Netwrix Auditor: Group Policy Administrator’s Guide
Page 3 of 84
Copyright © 2013 Netwrix Corporation. All Rights Reserved
Suggestions or comments about this document? www.Netwrix.com/feedback
Table of Contents
1. INTRODUCTION ................................................................................ 5
1.1. Overview .............................................................................. 5
1.2. How This Guide is Organized ....................................................... 5
2. PRODUCT OVERVIEW .......................................................................... 6
2.1. Key Features and Benefits .......................................................... 7
2.2. Product Workflow .................................................................... 7
2.3. Product Editions ...................................................................... 8
3. NETWRIX AUDITOR CONSOLE OVERVIEW ....................................................... 9
4. MANAGED OBJECT ........................................................................... 10
4.1. Creating Managed Object .......................................................... 10
4.2. Modifying Managed Object Settings .............................................. 20
5. DATA COLLECTION ........................................................................... 24
5.1. Data Collection Workflow .......................................................... 24
5.2. Change Summary .................................................................... 25
5.2.1. Modifying Change Summary Delivery Schedule ......................... 25
5.2.2. Generating Change Summary on Demand ............................... 26
5.2.3. Viewing Change Summary for Specified Date Range ................... 26
5.3. Sessions ............................................................................... 28
5.3.1. Viewing Change Summary for Sessions ................................... 29
6. REPORTS .................................................................................... 30
6.1. Reports Overview ................................................................... 30
6.2. Configuring Reports ................................................................. 32
6.2.1. Configuring SQL Server Settings ........................................... 32
6.2.2. Uploading Report Templates to the Report Server ..................... 34
6.2.3. Importing Audit Data to SQL Database ................................... 34
6.2.4. Configuring Audit Database Retention Policy ........................... 35
6.2.5. Assigning Permissions to View Reports ................................... 37
6.3. Viewing Reports ..................................................................... 38
6.3.1. Viewing Reports in Netwrix Auditor Console ............................ 38
6.3.2. Viewing Reports in Web Browser .......................................... 40
6.4. Configuring Report Subscriptions ................................................. 43
6.4.1. Creating Subscription ....................................................... 43
6.4.2. Modifying Subscription ..................................................... 47
6.4.3. Forcing on-Demand Report Delivery ...................................... 47

Netwrix Auditor: Group Policy Administrator’s Guide
Page 4 of 84
Copyright © 2013 Netwrix Corporation. All Rights Reserved
Suggestions or comments about this document? www.Netwrix.com/feedback
6.5. Overview Report .................................................................... 49
6.6. Change Management ............................................................... 51
6.6.1. Reviewing Changes to Group Policy ...................................... 51
6.7. State-in-Time Assessment Reports ................................................ 54
6.7.1. Viewing State-in-Time Assessment Reports .............................. 54
6.7.2. Importing Historical Snapshots ............................................ 55
6.8. Reports With Extended Audit Data ............................................... 57
6.8.1. Reports With Originating Workstation .................................... 57
6.8.2. Reports With Data Filtering by Groups ................................... 59
7. CONFIGURING GLOBAL SETTINGS ............................................................ 61
7.1. Configuring Reports Settings ...................................................... 62
7.2. Configuring Email Notifications Settings ........................................ 63
7.3. Configuring Audit Archive Settings ............................................... 64
7.4. Configuring Data Collection Setting .............................................. 65
7.5. Configuring License Settings ...................................................... 67
7.6. Configuring Netwrix Console Audit ............................................... 67
8. ADDITIONAL CONFIGURATION ................................................................ 71
8.1. Configuring Integration with User Session Activity Audit ...................... 71
8.2. Enabling Integration with Third-Party SIEM Solutions ......................... 75
8.3. Excluding/Including Data Types From/in Reports .............................. 76
9. RESTORING GROUP POLICY OBJECTS ........................................................ 77
A APPENDIX: SQL DATABASE RETENTION SCRIPT .............................................. 78
B APPENDIX: REGISTRY KEYS .................................................................. 81
C APPENDIX: RELATED DOCUMENTATION ....................................................... 84

Netwrix Auditor: Group Policy Administrator’s Guide
Page 5 of 84
Copyright © 2013 Netwrix Corporation. All Rights Reserved
Suggestions or comments about this document? www.Netwrix.com/feedback
1. INTRODUCTION
1.1. Overview
This guide contains an overview of the Netwrix Auditor functionality, features intended for
Group Policy auditing and detailed step-by-step instructions on how to configure and use the
product for Group Policy auditing. For instructions on how to install the product and
configure the target Active Directory domain for auditing, refer to Netwrix Auditor
Installation and Configuration Guide.
1.2. How This Guide is Organized
This section explains how this guide is organized and provides a brief overview of each
chapter.
Chapter 1 Introduction: the current chapter. It explains the purpose of this
document and outlines its structure.
Chapter 2 Product Overview provides an overview of the Netwrix Auditor
functionality for Group Policy audit, lists its main features and benefits, and
explains the product workflow. It also contains information on the product
editions and a side-by-side comparison of their features.
Chapter 3 Netwrix Auditor Console Overview provides a description of the Netwrix
Auditor console.
Chapter 4 Managed Object explains how to configure a Managed Object, i.e. an
Active Directory domain that you want to monitor for changes. It also explains how
to modify Managed Object settings.
Chapter 5 Data Collection explains the Netwrix Auditor data collection workflow
and contains detailed information on the Change Summary options and Sessions.
Chapter 6 Reports provides an overview of the Reports feature, explains how to
configure and view reports and contains report examples. It also contains step-by-
step instructions on how to configure subscriptions to Reports.
Chapter 7 Configuring Global Settings explains how to configure or modify the
settings that are applied to all Managed Objects and all target systems audited
with Netwrix Auditor.
Chapter 8 Additional Configuration provides a description of the product additional
configuration options, such as enabling integration with SIEM (Security Information
and Event Management) solutions and excluding data types from data collection
and product reports.
Chapter 9 Restoring Group Policy Objects explains how to revert unwanted
changes to Group Policy Objects.
A Appendix: SQL Database Retention Script contains a SQL script used to configure
the SQL database retention policy.
B Appendix: Registry Keys contains a description of the product registry keys that
can be used for additional configuration.
C Appendix: Related Documentation contains a list of all documentation published
to support Group Policy auditing with Netwrix Auditor.

Netwrix Auditor: Group Policy Administrator’s Guide
Page 6 of 84
Copyright © 2013 Netwrix Corporation. All Rights Reserved
Suggestions or comments about this document? www.Netwrix.com/feedback
2. PRODUCT OVERVIEW
Group Policy auditing is a must-have procedure for all organizations relying on Group Policy
infrastructure. Relatively small changes to security policies, desktop configurations, software
deployment and other settings can severely impact enterprise security, compliance, and
performance. An uncontrolled and unaudited change process imposes major security and
compliance risks for an IT infrastructure run by multiple IT professionals.
Built-in Group Policy management tools do not provide any auditing and change reporting
capabilities, and it is just impossible to track the WHO, WHAT, WHERE and WHEN data for
critical modifications by using these tools. For example, auditing with the native Windows
tools can only indicate that a Group Policy Object changed, but it does not say WHAT setting
has been changed; you can get only cryptic GUIDs for cross-referencing as a source of
information.
Windows 2003 and earlier versions do not provide the before and after values for the Group
Policy Object (GPO) link. Windows 2008 provides this data but it is difficult to use it
efficiently. For detailed comparison of the native auditing tools and Netwrix products refer
to Summary: Limitations of Native Active Directory Auditing Tools.
Powered by the Netwrix AuditAssurance™ technology, Netwrix Auditor makes the Group
Policy change auditing an easy and straightforward process, resulting in a complete and
concise picture of all changes taking place in your monitored environment. AuditAssurance™
is a patent-pending technology that consolidates audit data from multiple independent
sources such as event logs, configuration snapshots, change history records, and others. This
allows detecting WHO changed WHAT, WHERE and WHEN, even if one or several sources of
information do not contain all of the required data, for example because it was deleted,
overwritten, and so on.
Netwrix Auditor collects data on every single change made to the Group Policy configuration,
including newly created and deleted GPOs, GPO link changes, changes made to audit policy,
password policy, software deployment, user desktops, and other settings. The data includes
detailed information for all changes with the previous and current values for all modified
settings.
The product records all Group Policy modifications and archives them to enable historical
reporting. You can build a summary of changes made to Group Policy during any period. For
example, you can analyze any policy violations that took place in the past, see who turned
off invalid logon auditing in your domain security policy, who added new software to deploy
on client computers, who changed desktop firewall and lockdown settings, and so on.
Netwrix offers long-term data archiving that uses a two-tiered system:
Audit Archive, a local file-based storage
SQL Server database
Netwrix offers both agent-based and agentless data collection methods. The use of agents is
recommended for distributed deployments or multi-site networks due to their ability to
compress network traffic.
This guide only covers the configuration and usage of the Netwrix Auditor for Group Policy
audit. For information on how to audit the entire Active Directiry infrastructure, refer to
Netwrix Aditor: Active Direcotry Administrator’s Guide and Netwrix Auditor: Exchange Servers
Administrator’s Guide respectively.

Netwrix Auditor: Group Policy Administrator’s Guide
Page 7 of 84
Copyright © 2013 Netwrix Corporation. All Rights Reserved
Suggestions or comments about this document? www.Netwrix.com/feedback
2.1. Key Features and Benefits
Netwrix Auditor allows tracking and reporting on changes to Group Policy Objects
configuration in the monitored domain. It enables you to do the following:
Monitor day-to-day administrative activities: the product captures detailed
information on all changes made to Group Policy Objects and their settings in the
monitored Active Directory environment, including the information on WHO
changed WHAT, WHEN and WHERE.
Sustain compliance by using in-depth change information. Audit data can be
archived and stored for more than 7 years to be used for reports generation.
Streamline change control: paint the most complete picture of Group Policy
security settings throughout Active Directory by monitoring all settings and
permission changes.
The main Group Policy auditing features are:
Reports with the previous and current values for every object- and setting-level
change. Reports are based on SQL Server Reporting Services (SSRS) with over 40
predefined report templates and support for custom reports.
Report subscriptions allow for scheduled report generation and delivery to the
specified recipients. You can apply different report filters and select report output
format.
State-in-Time reports: reports on the current or historical configuration state of
your Group Policy Objects.
Automatic Backup and Recovery of Group Policy Objects: the product supports
recovery of unwanted Group Policy Objects changes.
Long-term data storage: allows for recreating the full audit trail of changes made
to the monitored Active Directory environment and provides historical reporting
for any specified period of time. Organizations can analyze any policy violations
which occurred in the past, and maintain ongoing compliance with internal and
external regulations.
Integration with SIEM systems: the product can be integrated with multiple SIEM
systems, including RSA enVision®, ArcSight® Logger™, Novell® Sentinel™, NetIQ®
Security Manager™, IBM Tivoli® Security Information and Event Manager™ and
more. The product can also be configured to feed data to Microsoft System Center
Operations Manager, thus providing organizations that use SCOM with fully
automated Active Directory auditing and helping protect these investments.
2.2. Product Workflow
A typical Netwrix Auditor for Group Policy audit data collection and reporting workflow is as
follows:
1. An administrator configures Managed Objects and sets the parameters for automated
data collection and reporting.
2. Netwrix Auditor monitors the target AD domain and collects data on Group Policy
Objects changes. Audit data is written to a local file-based storage, referred to as the
Audit Archive.
3. The product emails Change Summaries that list all changes occurred in the last 24
hours to the specified recipients daily at 3:00 AM by default.
4. If the Reports functionality is enabled and configured, data is imported from the
Audit Archive to a dedicated SQL database. Reports based on the audit data can be

Netwrix Auditor: Group Policy Administrator’s Guide
Page 8 of 84
Copyright © 2013 Netwrix Corporation. All Rights Reserved
Suggestions or comments about this document? www.Netwrix.com/feedback
viewed via the Netwrix Auditor console or in a web browser, or delivered
automatically on a specified scheduled if a subscription is configured.
2.3. Product Editions
Netwrix Auditor is available in two editions: Freeware and Enterprise. The Freeware Edition
can be used by companies or individuals for an unlimited period of time. The Enterprise
Edition can be evaluated free of charge for 20 days.
Note: Licenses for different target systems auditing with Netwrix Auditor (for
example, Active Directory auditing, Group Policy and Exchange Servers auditing)
can be purchased separately.
Table 1: below outlines the difference between the Netwrix Auditor editions for Group Policy
audit:
Table 1: Netwrix Auditor Editions For Group Policy Audit
Feature
Freeware Edition
Enterprise Edition
WHO, WHEN and WHERE fields for every
change
No
Yes
The before and after values for every change
No
Yes
SSRS-based Reports, with filtering, grouping
and sorting, and dozens of predefined report
templates
No
Yes
Custom reports
No
Yes
Create manually, or
order from Netwrix
Predefined reports for SOX, HIPAA, GLBA, and
FISMA compliance
No
Yes
Report Subscriptions
No
Yes
Integration with Microsoft System Center
Operations Manager Pack (SCOM) (via Netwrix
SCOM Management Pack for Group Policy
Change Reporter)
No
Yes
Long-term archiving of audit data
No
Data is only stored 4 days
Yes
Any period of time
Daily Change Summary email reflecting the
changes made during the last day
Yes
Yes
A single installation handles multiple Managed
Objects, each with its own individual settings
No
Yes
Integrated interface for different target
systems audit, which provides centralized
configuration and settings management
No
Yes
Reports can be viewed directly from the
Netwrix Auditor console
No
Yes
Technical Support
Support Forum
Knowledge Base
Full range of options:
Phone, email,
submission of support
tickets, Support Forum,
Knowledge Base
Licensing
Free of charge
Per enabled AD account
or volume license, see
our pricing information
or request a quote

Netwrix Auditor: Group Policy Administrator’s Guide
Page 9 of 84
Copyright © 2013 Netwrix Corporation. All Rights Reserved
Suggestions or comments about this document? www.Netwrix.com/feedback
3. NETWRIX AUDITOR CONSOLE OVERVIEW
The Netwrix Auditor console is an MMC snap-in that allows configuring Managed Objects and
their settings, and the reporting options.
The Netwrix Auditor console enables you to do the following:
Manage the audit settings for all target systems via an integrated interface
Create and configure Managed Objects
Enable and configure SSRS-based Reports
View Reports
Configure long-term archiving
Configure Subscriptions to Reports
Handle numerous Managed Objects with a single installation
Configure your Managed Objects settings in a batch
To start the Netwrix Auditor console, navigate to Start All Programs Netwrix
Netwrix Auditor. The Netwrix Auditor console main page will be displayed:
Figure 1: Netwrix Auditor Console

Netwrix Auditor: Group Policy Administrator’s Guide
Page 10 of 84
Copyright © 2013 Netwrix Corporation. All Rights Reserved
Suggestions or comments about this document? www.Netwrix.com/feedback
4. MANAGED OBJECT
For Group Policy audit, a Managed Object is an Active Directory domain that is monitored for
changes and point-in-time configuration.
This chapter provides detailed step-by-step instructions on how to:
Create and configure a Managed Object
Modify Managed Object settings
4.1. Creating Managed Object
Procedure 1. To create and configure a Managed Object
1. In the Netwrix Auditor console, select the Managed Objects node in the left pane.
The Managed Objects page will be displayed:
Figure 2: Managed Objects Page
2. Click Create New Managed Object in the right pane. Alternatively, right-click the
Managed Objects node and select New Managed Object from the pop-up menu to
start the New Managed Object wizard.
Note: For your convenience, you can group Managed Objects into folders. To
create a folder, right-click the Managed Objects node, select New Folder, and
specify the folder name. Then create a new Managed Object inside this folder. You
cannot move existing Managed Objects into folders once they have been created.
3. On the Select Managed Object Type step, select Domain as the Managed Object type
and click Next.
Note: If you have installed Netwrix Auditor to audit other target systems before,
the list of Managed Object types may contain several options.

Netwrix Auditor: Group Policy Administrator’s Guide
Page 11 of 84
Copyright © 2013 Netwrix Corporation. All Rights Reserved
Suggestions or comments about this document? www.Netwrix.com/feedback
Figure 3: New Managed Object: Select Managed Object Type
4. On the Specify Default Data Processing Account step, click the Specify Account
button.
Note: If you have installed Netwrix Auditor to monitor other target systems before
and specified the default account and email settings on Managed Object
configuration, the Specify Default Data Processing Account and Specify Email
Settings steps of the wizard will be omitted.
5. In the dialog that opens, enter the default Data Processing Account credentials that
will be used by Netwrix Auditor for data collection. The name should be specified in
the following format: domain_name\account_name. For the details on the rights and
permissions required for this account, refer to Chapter 5.Configuring Rights and
Permissions of Netwrix Auditor Installation and Configuration Guide.

Netwrix Auditor: Group Policy Administrator’s Guide
Page 12 of 84
Copyright © 2013 Netwrix Corporation. All Rights Reserved
Suggestions or comments about this document? www.Netwrix.com/feedback
Figure 4: New Managed Object: Specify Default Data Processing Account
Click OK to continue and then Next.
Note: If later you need to modify the default Data Processing Account, you can do
this either for an individual Managed Object (for instructions, refer to Procedure 3
To modify the Data Processing Account) or for all Managed Objects in a batch (for
instructions, refer to Procedure 26 To configure Data Collection settings).
6. On the Specify Email Settings step, specify the email settings that will be used for
the Change Summary and Reports delivery:

Netwrix Auditor: Group Policy Administrator’s Guide
Page 13 of 84
Copyright © 2013 Netwrix Corporation. All Rights Reserved
Suggestions or comments about this document? www.Netwrix.com/feedback
Figure 5: New Managed Object: Specify Email Settings
The following parameters must be specified:
Table 2: Email Settings Parameters
Parameter
Description
SMTP server name
Enter your SMTP server name.
Port
Specify your SMTP server port number.
Sender address
Enter the address that will appear in the “From” field in
reports and Change Summaries.
To check the email address, click Verify. The system will
send a test message to the specified address and will
inform you if any problems are detected.
SMTP Authentication
Select this check box if your mail server requires the SMTP
authentication.
User name
Enter a user name for the SMTP authentication.
Password
Enter a password for the SMTP authentication.
Confirm password
Confirm the password.
Use Secure Sockets Layer
encrypted connection (SSL)
Select this check box if your SMTP server requires SSL to be
enabled.
Use Implicit SSL connection
mode
Select this check box if the implicit SSL mode is used,
which means that an SSL connection is established before
any meaningful data is sent.
Note: If later you need to modify the email settings, in the Netwrix Auditor
console, navigate to Settings Email Notifications. In the right pane, click the
Configure button and edit the required parameters. For instructions, refer to
Procedure 24 To configure the email notifications settings.
7. On the Specify Domain Name step, specify your domain name in the FQDN format:

Netwrix Auditor: Group Policy Administrator’s Guide
Page 14 of 84
Copyright © 2013 Netwrix Corporation. All Rights Reserved
Suggestions or comments about this document? www.Netwrix.com/feedback
Figure 6: New Managed Object: Specify Domain Name
If you want to use a specific account to access data from this domain (other than the
one you have specified as the default Data Processing Account earlier in this
procedure), select the Custom option and enter the credentials. This account must be
granted the same permissions and access rights as the default Data Processing
Account. Click Next to continue.
8. On the Select Target Systems step, make sure Group Policy is selected under Target
Systems:

Netwrix Auditor: Group Policy Administrator’s Guide
Page 15 of 84
Copyright © 2013 Netwrix Corporation. All Rights Reserved
Suggestions or comments about this document? www.Netwrix.com/feedback
Figure 7: New Managed Object: Select Target Systems
9. On the Configure Reports Settings step, select the Enable Reports check box if you
want to use SSRS-based Reports:
Figure 8: New Managed Object: Configure Reports Settings
Note: If you do not enable the Reports feature, audit data will not be written to a
SQL database. You can enable and configure the feature later (for details, refer to
Section 6.2 Configuring Reports).

Netwrix Auditor: Group Policy Administrator’s Guide
Page 16 of 84
Copyright © 2013 Netwrix Corporation. All Rights Reserved
Suggestions or comments about this document? www.Netwrix.com/feedback
Select one of the following options:
Automatically install and configure a new instance of SQL Server Express
Edition to automatically install and configure SQL Server 2008/2012 Express with
Advanced Services. Once you have selected this option and clicked Next, the
Reports Configuration wizard will start. Follow the instructions of the wizard to
install and configure SQL Server 2008/2012 Express.
Use an existing SQL Server instance with SQL Reporting Services to use an
already installed SQL Server instance, or to install and configure it manually
before proceeding with Netwrix Auditor configuration. For detailed instructions on
how to install Microsoft SQL Server 2005/2008 R2/2012 Express with Advanced
Services and configure the Reporting Services, refer to the following Netwrix
Technical Article: Installing Microsoft SQL Server and Configuring the Reporting
Services.
Note: It is recommended to consider the maximum database size in different SQL
Server versions, and make your choice based on the size of the environment you
are going to monitor, the number of users and other factors. Note that the
maximum database size in SQL Server Express editions may be insufficient.
If you have selected the second option, specify the following parameters:
Table 3: Reports Parameters
Parameter
Description
SQL Server
Specify the name of the SQL Server instance name where a
database of collected audit data will be created.
User name
Specify a user name for the SQL Server authentication.
NOTE: This user must belong to the target database owner
(dbo) role. For instructions on how to assign this role to a
user, refer to Chapter 5. Configuring Rights and
Permissions of Netwrix Auditor Installation and
Configuration Guide.
Password
Enter a password for the SQL Server authentication.
Windows Authentication
Select this option if you want to use the Data Processing
Account specified earlier in this procedure to be used to
access the SQL database.
Report Server URL
Specify the Report Server URL
NOTE: It is recommended to click the Verify button to
ensure that the resource is reachable.
Report Manager URL
Specify the Report Manager URL.
NOTE: It is recommended to click the Verify button to
ensure that the resource is reachable.
Note: If you have already created other Managed Objects, and configured the
Reports settings for them, on this step you will only be prompted to enable or
disable the Reports feature. If you want to use custom Reports settings for this
Managed Object (for example, write data to a different SQL database), you can
change the Reports settings later (for instructions, refer to 6.2.1 Configuring SQL
Server Settings).
Click Next to continue and wait until the Netwrix Auditor console has established a
connection with the Report Server.
10. On the State-in-Time Reports step, you can enable or disable the State-in-Time
Reports feature. It allows generating reports on your system configuration state at a
specific moment of time in addition to change reports. If this feature is enabled,

Netwrix Auditor: Group Policy Administrator’s Guide
Page 17 of 84
Copyright © 2013 Netwrix Corporation. All Rights Reserved
Suggestions or comments about this document? www.Netwrix.com/feedback
snapshots of Group Policy Objects configuration will be stored in the database. This
option is unavailable if the Reports feature is disabled. Select/deselect this option
and click Next.
Figure 9: New Managed Object: Snapshot Reporting
11. On the Configure Audit in Target Environment step, select one of the following
options:
Automatically for the selected target systems: for details on the settings that
are configured automatically, click the arrow next to the Group Policy check-
box. Your current audit settings will be checked on each data collection and
adjusted if needed. This method is recommended for evaluation purposes in
test environments. If any conflicts are detected with your current audit
settings, automatic audit configuration will fail.
Manually: for instructions on how to configure audit on you target
environment, refer to Netwrix Auditor Installation and Configuration Guide.

Netwrix Auditor: Group Policy Administrator’s Guide
Page 18 of 84
Copyright © 2013 Netwrix Corporation. All Rights Reserved
Suggestions or comments about this document? www.Netwrix.com/feedback
Figure 10: New Managed Object: Configure Audit in Target Environment
12. On the Select Additional Audit Details step, select the following options:
Originating workstation allows collecting the information on the originating
workstation, that is the name of the workstation where the users were logged on
when they made the change. Netwrix Auditor for Group Policy contains a number
of reports, where the Workstation field under each change in these reports
contains the name/IP address and the MAC address of the computer from which
the change was made. For the details on these reports, refer to Section 6.8
Reports With Extended Audit Data of this guide.
Note: For the product to be able to collect the information on the originating
workstation, you must configure the Audit logon events policy. If automatic audit
configuration is enabled, this setting is adjusted automatically. For instructions on
how to configure it manually, refer to Netwrix Auditor Installation and
Configuration Guide.
Group membership allows collecting the information on the group membership of
the users who make the changes. This information can be used to apply filters to
the collected audit data and get the information on changes performed by
members of specific groups only. For the details on these reports, refer to Section
6.8 Reports With Extended Audit Data of this guide.
Note: If these options are enabled, additional events are written to the Security
event log. This may lead to data overwrites. To prevent data loss it is
recommended to configure the maximum size and retention settings of the
Security event log as described in Netwrix Auditor Installation and Configuration
Guide.
For more details on these options, refer to the following Netwrix Knowledge Base
Article: Additional Audit Details: How it Works.

Netwrix Auditor: Group Policy Administrator’s Guide
Page 19 of 84
Copyright © 2013 Netwrix Corporation. All Rights Reserved
Suggestions or comments about this document? www.Netwrix.com/feedback
Figure 11: New Managed Object: Select Additional Audit Details
13. On the Specify Group Policy Change Summary Recipients step, click the Add button
to specify the Change Summary recipient(s):
Figure 12: New Managed Object: Specify Group Policy Change Summary Recipients
It is recommended to click the Verify button. The system will send a test message to
the specified email address and will inform you if any problems are detected. Click
OK to save the changes and then click Next.

Netwrix Auditor: Group Policy Administrator’s Guide
Page 20 of 84
Copyright © 2013 Netwrix Corporation. All Rights Reserved
Suggestions or comments about this document? www.Netwrix.com/feedback
14. On the last step, review your Managed Object settings and click Finish. A
confirmation message will be displayed.
The newly created Managed Object will appear under the Managed Objects node, and its
details will be displayed in the right pane:
Figure 13: Managed Object Page
4.2. Modifying Managed Object Settings
To modify the settings for an existing Managed Object, perform one of the following
procedures:
To modify general settings: add or remove target systems for the selected
Managed Object.
To modify the Data Processing Account: override the default Data Processing
Account for this Managed Object and specify a different account for data
collection.
To modify the Group Policy audit settings.
Procedure 2. To modify general settings
1. In the Netwrix Auditor console, expand the Managed Objects node and select your
Managed Object. The Managed Object details page will be displayed showing a list of
target systems audited within the scope of this Managed Object.
2. Click the Add/Remove Systems button. The Edit Managed Object wizard will start
with the Add/Remove Systems screen.

Netwrix Auditor: Group Policy Administrator’s Guide
Page 21 of 84
Copyright © 2013 Netwrix Corporation. All Rights Reserved
Suggestions or comments about this document? www.Netwrix.com/feedback
Figure 14: Add/Remove Systems
3. In the Target Systems list, select or clear the required check box to add the system
or remove it respectively. Click Next. Follow the steps of the wizard to configure the
selected target system audit.
Procedure 3. To modify the Data Processing Account
1. In the Netwrix Auditor console, expand the Managed Objects node and select your
Managed Object. Right-click it and select Properties from the pop-up menu.
2. In the dialog that opens, select the Custom option under Data Processing Account
and specify the credentials:
Figure 15: Managed Object Properties
3. Click OK to save the changes. This account will be used for data collection for this
Managed Object.

Netwrix Auditor: Group Policy Administrator’s Guide
Page 22 of 84
Copyright © 2013 Netwrix Corporation. All Rights Reserved
Suggestions or comments about this document? www.Netwrix.com/feedback
Procedure 4. To modify the Group Policy audit settings
1. In the Netwrix Auditor console, navigate to Managed Objects
<Managed_Object_name> and select Group Policy. The Group Policy audit settings
page will be displayed:
Figure 16: Group Policy Audit Settings Page
2. Modify the Group Policy audit settings as follows:
To enable or disable Group Policy audit, select or clear respectively the Enable
Group Policy audit check box.
To add an email address to the Change Summary Recipients list, click the Add
button. Specify the email address and click OK. It is recommended to click the
Verify button to validate this address. The system will send a test message and
will inform you if any problems are detected.
To modify an email address in the Change Summary Recipients list, select it and
click the Edit button. Edit the address and click OK.
To remove an email address from the Change Summary Recipients list, select it
and click the Remove button. The selected address will be deleted.
To adjust your audit settings, click the Configure Audit button.
To generate Change Summary on a particular Managed Object for a specific period
of time, click the Generate Summary button. For details, refer to Procedure 6 To
generate Change Summary on demand.
To use the advanced product options, click the Configure button. The advanced
options allow to: enable integration with third-party SIEM solutions, enable
automatic audit configuration, and detect additional audit details such as

Netwrix Auditor: Group Policy Administrator’s Guide
Page 23 of 84
Copyright © 2013 Netwrix Corporation. All Rights Reserved
Suggestions or comments about this document? www.Netwrix.com/feedback
originating workstation and group membership. To enable advanced options,
select or clear the corresponding check box. For details on integration with third-
party SIEM solutions, refer to Section 8.2 Enabling Integration with Third-Party
SIEM Solutions of the current document.

Netwrix Auditor: Group Policy Administrator’s Guide
Page 24 of 84
Copyright © 2013 Netwrix Corporation. All Rights Reserved
Suggestions or comments about this document? www.Netwrix.com/feedback
5. DATA COLLECTION
5.1. Data Collection Workflow
Netwrix Auditor data collection workflow is as follows:
1. When a new Managed Object is created, Netwrix Auditor starts collecting data from
the monitored domain. The first data collection creates an initial snapshot of your
monitored domain’s current state. Netwrix Auditor uses this information as a
benchmark to collect data on changes made to the managed domain.
2. After the initial analysis has been completed, an email notification is sent to the
specified recipient(s) like in the example below:
Figure 17: Initial Analysis Notification
3. Once a day (at 3:00 AM by default), Netwrix Auditor writes data on the detected
changes to a local storage of audit data, the Audit Archive. If the Reports feature is
enabled and configured, data is then imported from the Audit Archive to a SQL
database. If the State-in-Time Reports feature is enabled, the product will also write
data on the monitored domain’s configuration state.
4. At the same time, the product generates and emails a Change Summary to the
specified recipients (for instructions on how to modify the Change Summary delivery
schedule, refer to Section 5.2.1 Modifying Change Summary Delivery Schedule).If
Report Subscriptions are configured, the product also emails them to the specified
recipients (for instructions on how to configure Subscription, refer to Section 6.4
Configuring Report Subscriptions).
Note: For Netwrix Auditor to be able to collect audit data successfully, you need
to configure your monitored Active Directory domain for audit prior to using the
product. For detailed instructions on how to do this, refer to Chapter 4.
Configuring Target Environment for Audit of Netwrix Auditor Installation and
Configuration Guide.

Netwrix Auditor: Group Policy Administrator’s Guide
Page 25 of 84
Copyright © 2013 Netwrix Corporation. All Rights Reserved
Suggestions or comments about this document? www.Netwrix.com/feedback
5.2. Change Summary
Each day (at 3:00 AM by default), Netwrix Auditor generates a Change Summary that contains
the information on the changes that occurred in the last 24 hours and emails it to the
specified recipients:
Figure 18: Change Summary Example
It provides the following information:
Table 4: Change Summary Fields
Parameter
Description
Change Type
Shows the type of action that was performed on the Group
Policy Object. The values are:
Added
Removed
Modified
When Changed
Shows the exact time when the change occurred.
Who Changed
Shows the name of the account under which the change
was made.
Where Changed
Shows the name of the domain controller from which the
change was made.
Group Policy Object
Shows the Group Policy Object that was changed with the
details on its “before” and “after” values.
5.2.1. Modifying Change Summary Delivery Schedule
The Group Policy Change Summary delivery schedule can only be modified if the Active
Directory audit is enabled for your Managed Object.
Procedure 5. To modify Change Summary delivery schedule
1. In the Netwrix Auditor console, navigate to Managed Objects
<Managed_Object_name> Active Directory:

Netwrix Auditor: Group Policy Administrator’s Guide
Page 26 of 84
Copyright © 2013 Netwrix Corporation. All Rights Reserved
Suggestions or comments about this document? www.Netwrix.com/feedback
Figure 19: Active Directory Audit Page
2. In the right pane, set the time for the Change Summary delivery in the Specify
Change Summary delivery time entry field.
3. If you wish to receive the Change Summary more frequently than once a day, modify
the default value in the Send Change Summary every x hours entry field. The
Change Summary will be delivered at a specified interval starting from the time
indicated above.
Note: The changes will be applied to all target systems audited within the scope
of this Managed Object.
5.2.2. Generating Change Summary on Demand
If you wish to generate an on-demand Change Summary without waiting for a scheduled
delivery, do the following:
Procedure 6. To generate Change Summary on demand
1. In the Netwrix Auditor console, navigate to Managed Objects
<Managed_Object_name> (see Figure 13: Managed Object Page).
2. In the right pane, click the Run button.
3. A Change Summary will be generated and sent to the specified recipient(s).
Note: Depending on the size of the monitored environement and the number of
changes, Change Summary generation may take quite long.
5.2.3. Viewing Change Summary for Specified Date Range
If you want to generate a Change Summary for a specific date range, do the following:

Netwrix Auditor: Group Policy Administrator’s Guide
Page 27 of 84
Copyright © 2013 Netwrix Corporation. All Rights Reserved
Suggestions or comments about this document? www.Netwrix.com/feedback
Procedure 7. To generate Change Summary for a specific date range
1. In the Netwrix Auditor console, navigate to Managed Objects
<Managed_Object_name> Group Policy.
2. In the right pane, click the Generate Summary button next to Change Viewer. The
Change Viewer tool will open:
Figure 20: Change Viewer
3. Make sure Group Policy is selected in the Module drop-down list.
4. Specify the date range by selecting Netwrix Auditor snapshots in the From session
and To session drop-down lists.
5. Click the Generate Summary button. In the Save as dialog, specify the target
location for the Change Summary. Once generated, it will be displayed in your default
web browser:
Figure 21: Change Summary for a Specific Date Range
Note: Change Summary generation time depends on the selected date range and
the size of the monitored environment, and can take quite long. It is
Netwrix Auditor: Group Policy Administrator’s Guide
Page 28 of 84
Copyright © 2013 Netwrix Corporation. All Rights Reserved
Suggestions or comments about this document? www.Netwrix.com/feedback
recommended to use the Reports functionality to review changes made to the
monitored domain.
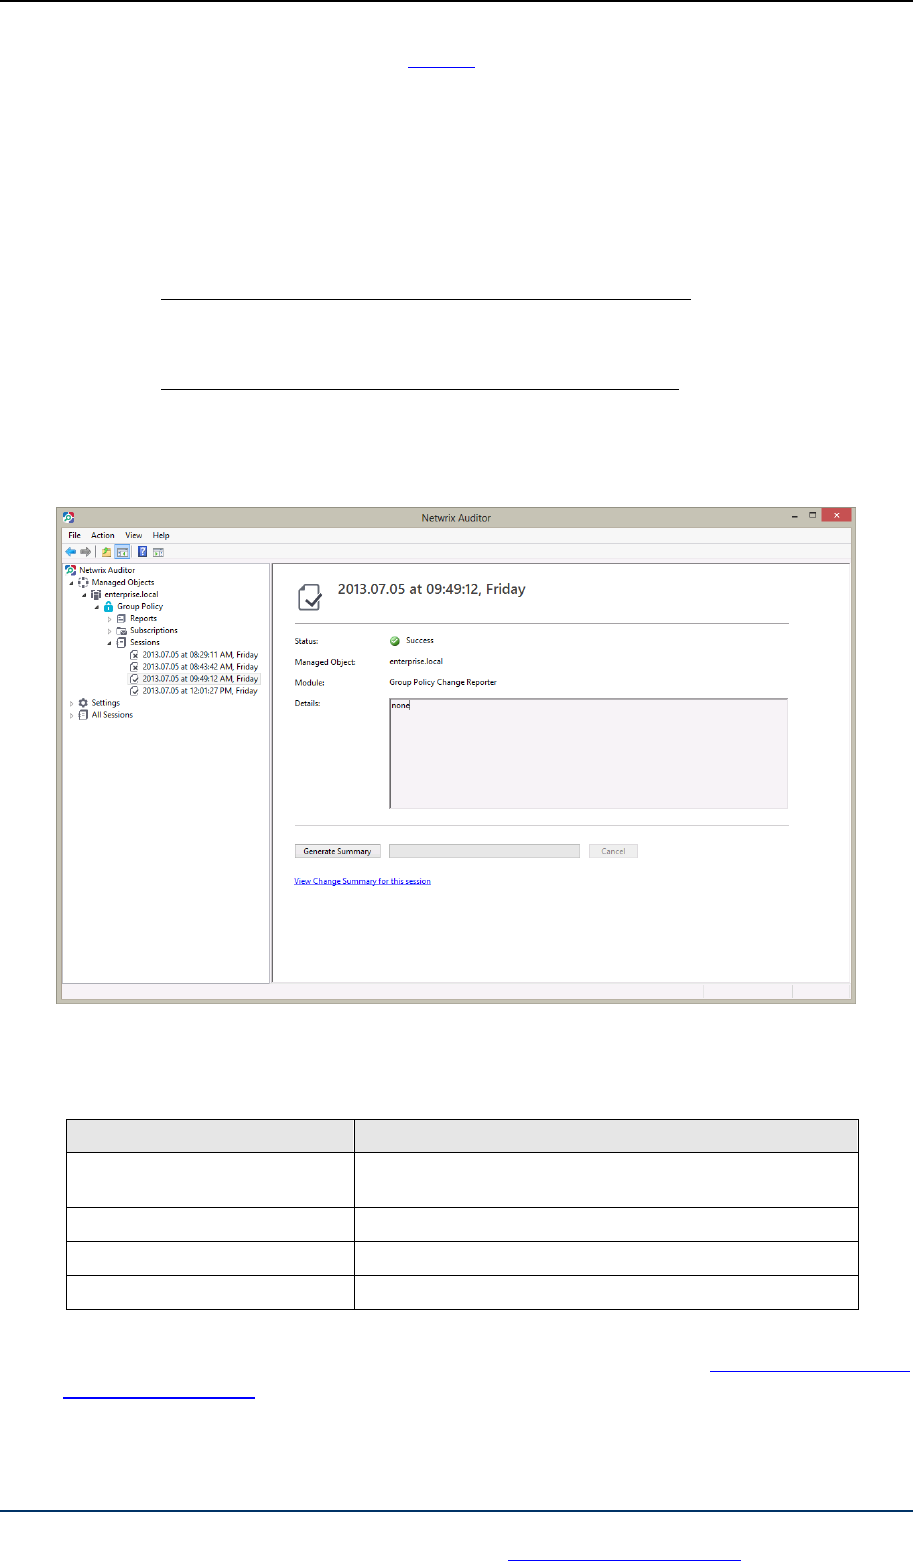
5.3. Sessions
A Session is a scheduled or on-demand data collection that triggers Change Summary
generation and delivery.
You can view Sessions in two ways:
Under a particular Managed Object target system node: in the Netwrix Auditor
console navigate to Managed Objects <Managed_Object_name> Group
Policy Sessions.
In bulk for all Managed Objects and installed modules: in the Netwrix Auditor
console select the All Sessions node in the left pane.
When you select a Session, its details are displayed in the right pane:
Figure 22: The Session Details Page
The following information is provided:
Table 5: Session Details
Parameter
Description
Status
Shows Session status. The possible values are Success and
Error.
Managed Object
Shows the name of the monitored domain.
Module
Shows the target system that this Session is for.
Details
Displays an error text if the Session status is Error.
From this page, you can also view a Change Summary for a particular Session in a web
browser. For detailed instructions on how to do it, refer to Section 5.3.1 Viewing Change
Summary for Sessions.

Netwrix Auditor: Group Policy Administrator’s Guide
Page 29 of 84
Copyright © 2013 Netwrix Corporation. All Rights Reserved
Suggestions or comments about this document? www.Netwrix.com/feedback
You can configure the number of Sessions available for review in the Netwrix Auditor console
by specifying the date range for Sessions to be stored. For detailed instructions on how to do
this, refer to Section 7.3 Configuring Audit Archive Settings.
5.3.1. Viewing Change Summary for Sessions
Procedure 8. To view Change Summary for a Session
1. Select a Session that you want to view a Change Summary for.
2. In the right pane, click the Generate Summary button. If you have already generated
the Change Summary for this session before, click the View Change Summary for this
session link.
3. The Change Summary for this session will be displayed in your default web browser:
Figure 23: Web-based Change Summary

Netwrix Auditor: Group Policy Administrator’s Guide
Page 30 of 84
Copyright © 2013 Netwrix Corporation. All Rights Reserved
Suggestions or comments about this document? www.Netwrix.com/feedback
6. REPORTS
6.1. Reports Overview
Netwrix Auditor allows generating reports on Group Policy changes and configuration
snapshots based on Microsoft SQL Server Reporting Services (SSRS). The product provides a
wide variety of predefined report templates that will help you stay compliant with various
standards and regulations (GLBA, HIPAA, PCI, SOX, and many others). You can use different
output formats for your reports, such as PDF, XLS, and so on.
Note: If your situation requires the use of additional report types, you can order
custom report templates from Netwrix.
In Netwrix Auditor, the following types of Group Policy reports are available:
Overview: This is a chart report that shows an overview of changes to Group Policy
Objects within the selected time frame. Three charts show data grouped by the
monitored domain controller, where the changes were made, date, and the user
who made the changes. This is a drill-through report, which means that by clicking
a chart you will be redirected to a report with the corresponding grouping of data
that provides the next level of detail. For details, refer to Section 6.5 Overview
Report.
Change Review History: This is a report that shows all changes made to Group
Policy. This report is an auxiliary tool that can be used in the basic change
management process. For more details, refer to Section 6.6 Change Management.
GP Change Tracking Reports: Reports that provide data on changes made to Group
Policy. These reports all have a different set of filters allowing you to manage the
collected audit data in the most convenient way. The product provides many pre-
defined report templates, covering the most important areas of Group Policy audit
such as GPO links, security settings, software settings, user configuration, and so
on.
GP State-in-Time Assessment Reports: Reports that provide data on your Group
Policy state at a specific moment of time in addition to change reports. These
reports are only available if the State-in-Time Reports feature is enabled. For
detailed information on State-in-Time Reports, refer to Section 6.7 State-in-Time
Assessment Report of this guide.
Reports with extended audit data: Reports that provided extended audit data on
changes to Group Policy such as originating workstation and group membership.
For detailed information on these reports, refer to Section 6.8 Reports With
Extended Audit Data of this guide.
Reports with Video: Reports that in addition to the data on changes to Group
Policy provide links to the corresponding video files showing how a particular
change was made. For detailed information on the reports with video, refer to
Section 8.1 Configuring Integration with User Session Activity Audit of this guide.
For a full list of available reports, expand the Reports node under Managed Objects
<Managed_Object_name> Group Policy:

Netwrix Auditor: Group Policy Administrator’s Guide
Page 31 of 84
Copyright © 2013 Netwrix Corporation. All Rights Reserved
Suggestions or comments about this document? www.Netwrix.com/feedback
Figure 24: Reports

Netwrix Auditor: Group Policy Administrator’s Guide
Page 32 of 84
Copyright © 2013 Netwrix Corporation. All Rights Reserved
Suggestions or comments about this document? www.Netwrix.com/feedback
6.2. Configuring Reports
To configure SSRS-based Reports, or modify the Reports settings for your Managed Object,
perform the following operations:
Configuring SQL Server Settings
Uploading report templates to the Report Server
Importing audit data from the Audit Archive to an SQL database
Configuring Audit Database Retention Policy
Assigning Permissions to View Reports
6.2.1. Configuring SQL Server Settings
If you have not enabled and configured the Reports feature on Managed Object creation, or if
you want to modify the Reports settings for an existing Managed Object, do the following:
Procedure 9. To configure SQL Server Settings
1. In the Netwrix Auditor console, navigate to Managed Object
<Managed_Object_name> Group Policy Reports. The following page will be
displayed:
Figure 25: Reports Page
2. Select Configure under Configure Reports, or switch to the Report Settings tab. The
Reports Settings page will be displayed:

Netwrix Auditor: Group Policy Administrator’s Guide
Page 33 of 84
Copyright © 2013 Netwrix Corporation. All Rights Reserved
Suggestions or comments about this document? www.Netwrix.com/feedback
Figure 26: Reports Settings
3. Specify or modify the following parameters:
Table 6: Reports Settings
Parameter
Description
Enable Reports
Select this check box to enable the Reports functionality for the
selected Managed Object.
Default
Select this option to use the default SQL Server connection settings.
Custom
Select this option to specify your custom SQL Server connection
settings.
Server
Specify the name of an existing SQL Server instance where a database
of audit data will be created.
Database
Specify the SQL database name.
User name
Enter a user name for the SMTP authentication. This user must belong
to the target database owner role.
Password
Enter a password for the SMTP authentication.
Windows Authentication
Select this check box if you want to use the default Data Processing
Account (specified on Managed Object creation) to access the SQL
database. Clear this box to use the SQL Server authentication.
Report Server URL
Specify the Report Server URL.
NOTE: It is recommended to click the Verify button to ensure that the
resource is reachable.
Report Manager URL
Specify the Report Manager URL.
NOTE: It is recommended to click the Verify button to ensure that the
resource is reachable.
Store audit data in the
This option is disabled in this product version.

Netwrix Auditor: Group Policy Administrator’s Guide
Page 34 of 84
Copyright © 2013 Netwrix Corporation. All Rights Reserved
Suggestions or comments about this document? www.Netwrix.com/feedback
database for x days
Clear all database entries
This option is disabled in this product version.
4. Click Apply to save the changes.
Note: When you configure the Reports settings, a SQL database for audit data is
created. If you skip the Reports configuration on Managed Object creation, the
database will not be created, and audit data will only be written to the local
repository, the Audit Archive. If later you decide to enable the Reports feature for
this Managed Object and want historical audit data to be available for reporting,
you will have to import data from the Audit Archive to the SQL database using the
DB Importer tool. For detailed instructions on how to do this, refer to Section
6.2.3 Importing Audit Data to SQL Database.
6.2.2. Uploading Report Templates to the Report Server
If you have not enabled the Reports feature when creating a Managed Object, and decided to
enable it later, you need to upload the report templates to the Report Server.
Procedure 10. To upload report templates to the Report Server
On the Reports page (see Figure 25: Reports Page), click Upload under Web-based
Reports. The system will upload the report templates to the Report Server and
will display the following confirmation message when the operation is completed:
Figure 27: Uploading Report Templates
6.2.3. Importing Audit Data to SQL Database
If you have not enabled the Reports feature when creating a Managed Object, and decided to
enable it later, you may want to make audit data stored in the Audit Archive available for
Reports. This can be done by importing data from the Audit Archive to a SQL database with
the DB Importer tool. This tool can also be used for data recovery in case the database is
corrupted.
Procedure 11. To import audit data
1. Navigate to Start All Programs Netwrix Exchange Change Reporter
Advanced Tools and select DB Importer. The DB Importer dialog will open:

Netwrix Auditor: Group Policy Administrator’s Guide
Page 35 of 84
Copyright © 2013 Netwrix Corporation. All Rights Reserved
Suggestions or comments about this document? www.Netwrix.com/feedback
Figure 28: Netwrix DB Importer
2. Select your monitored domain in the Domain name menu and the time range for
which you want to import data from the From session and To session drop-down
lists.
3. Click the SQL Database button to select the target database. The following dialog will
be displayed with the default SQL Server and Report Server Settings:
Figure 29: Reports Settings
4. Verify the database settings and click OK.
5. Click the Import button to start importing data from the Audit Archive to the selected
database. A confirmation message will be displayed on successful operation
completion.
6.2.4. Configuring Audit Database Retention Policy
If you want audit data to be deleted automatically from your SQL database after a certain
period of time, you can specify the retention policy for audit data.

Netwrix Auditor: Group Policy Administrator’s Guide
Page 36 of 84
Copyright © 2013 Netwrix Corporation. All Rights Reserved
Suggestions or comments about this document? www.Netwrix.com/feedback
Procedure 12. To configure audit database retention period
1. Navigate to Start All Programs Microsoft SQL Server SQL Server
Management Studio and connect to your SQL Server instance.
2. In the left pane, navigate to your target database, right-click it and select New Query
from the popup menu:
Figure 30: Create New Query
3. Copy the script contained in A Appendix: SQL Database Retention Script of this
document and paste it into the Query tab.
4. In the second line of the query, specify the retention period for your audit data in
days:
SET @Retention_Period_Days = 90
5. Click Execute in the Microsoft SQL Server Management Studio toolbar to execute the
query:

Netwrix Auditor: Group Policy Administrator’s Guide
Page 37 of 84
Copyright © 2013 Netwrix Corporation. All Rights Reserved
Suggestions or comments about this document? www.Netwrix.com/feedback
Figure 31: Execute Query
6.2.5. Assigning Permissions to View Reports
Your situation may require that different users in your organization have access to reports. By
default, reports can only be accessed by domain administrators. To grant other users access
to reports, do the following:
Procedure 13. To assign permissions to view reports
1. On the Reports page (see Figure 25: Reports Page), click Assign under Configure
Reports. The following dialog will be displayed:
Figure 32: Assign Access Permissions
2. Click the Add button and specify the name of the user or group that you want to
assign permissions to. You can click the button to search for users or groups inside
your Active Directory domain. Then click OK. The selected user(s) will now be able to
view reports.

Netwrix Auditor: Group Policy Administrator’s Guide
Page 38 of 84
Copyright © 2013 Netwrix Corporation. All Rights Reserved
Suggestions or comments about this document? www.Netwrix.com/feedback
6.3. Viewing Reports
Netwrix Auditor provides two options for viewing reports on Group Policy changes:
In the Netwrix Auditor console
In a web browser
6.3.1. Viewing Reports in Netwrix Auditor Console
Procedure 14. To view a report in the Netwrix Auditor console
1. In the Netwrix Auditor console, navigate to Managed Objects
<Managed_Object_name> Group Policy Reports.
2. Select a report from one of the folders. A page like the following will be displayed
(report filters may vary depending on the selected report):
Figure 33: All Group Policy Changes Report Page
3. Specify the report filters (a wildcard (%) can be used to replace any number of
characters) and click the View Report button (View Chart for chart reports). The
report will be displayed in the right pane:

Netwrix Auditor: Group Policy Administrator’s Guide
Page 39 of 84
Copyright © 2013 Netwrix Corporation. All Rights Reserved
Suggestions or comments about this document? www.Netwrix.com/feedback
Figure 34: All Group Policy Changes Report
The chart reports provide a visual representation of the changes statistics in the monitored
domain:

Netwrix Auditor: Group Policy Administrator’s Guide
Page 40 of 84
Copyright © 2013 Netwrix Corporation. All Rights Reserved
Suggestions or comments about this document? www.Netwrix.com/feedback
Figure 35: All Group Policy Changes Chart (Chart)
6.3.2. Viewing Reports in Web Browser
To view a report in a web browser, do the following:
Procedure 15. To view a report in a web browser
1. Open a web browser and type the Report Server URL (you can find the URL in the
Netwrix Auditor console by navigating to Settings Reports). Alternatively, in the
Netwrix Auditor console, navigate to the Reports page (see Figure 25: Reports Page)
and click View under Configure Reports. The following page will be displayed:

Netwrix Auditor: Group Policy Administrator’s Guide
Page 41 of 84
Copyright © 2013 Netwrix Corporation. All Rights Reserved
Suggestions or comments about this document? www.Netwrix.com/feedback
Figure 36: SQL Server Reporting Services Page
Note: If you have configured Netwrix Auditor to audit other target systems, and if
the Reports feature is enabled and configured for them, the SQL Server Reporting
Services page will contain reports folders for all of these target systems.
2. Click the Netwrix Group Policy Change Reporter folder and navigate to the report
you want to generate. Click the report name. The report will be displayed showing
the changes that occurred in the last 24 hours. On this page, you can specify filters to
the selected report and click the View Report button (View Chart for chart reports)
to apply them:

Netwrix Auditor: Group Policy Administrator’s Guide
Page 42 of 84
Copyright © 2013 Netwrix Corporation. All Rights Reserved
Suggestions or comments about this document? www.Netwrix.com/feedback
Figure 37: All Group Policy Changes Report (Web Browser)

Netwrix Auditor: Group Policy Administrator’s Guide
Page 43 of 84
Copyright © 2013 Netwrix Corporation. All Rights Reserved
Suggestions or comments about this document? www.Netwrix.com/feedback
6.4. Configuring Report Subscriptions
In Netwrix Group Policy Change Reporter, you can configure a Subscription to schedule
automatic report generation and delivery. You can apply various filters to your reports, and
select their output format. The report will be sent as an email attachment in the selected
format:
Figure 38: Report Delivered by Subscription
This section provides detailed instructions on how to:
Create a Subscription
Modify a Subscription
Force on-demand report delivery
6.4.1. Creating Subscription
To subscribe to a report, do the following:
Procedure 16. To create a Subscription
1. In the Netwrix Auditor console, navigate to Managed Objects
<Managed_Object_name> Group Policy Subscriptions. The following page will
be displayed:

Netwrix Auditor: Group Policy Administrator’s Guide
Page 44 of 84
Copyright © 2013 Netwrix Corporation. All Rights Reserved
Suggestions or comments about this document? www.Netwrix.com/feedback
Figure 39: Subscriptions Page
2. Click the Add button to start the Report Subscription wizard. You can also start the
Report Subscription wizard by selecting a report and clicking the Subscribe button on
the report page.
3. On the Welcome page, click Next. When connection with the Report Server is
established, the following dialog will be displayed:
Figure 40: New Report Subscription: Select Report
4. Specify the following parameters and click Next to proceed:
Table 7: Subscription Settings
Parameter
Description
Subscription name
Specify the subscription name. This name will be displayed in Netwrix
Enterprise Management Console under the Subscriptions node.
Description
Enter the subscription description (optional).

Netwrix Auditor: Group Policy Administrator’s Guide
Page 45 of 84
Copyright © 2013 Netwrix Corporation. All Rights Reserved
Suggestions or comments about this document? www.Netwrix.com/feedback
Report name
Select the report that you want to subscribe to from the drop-down
list.
NOTE: If you start the Report Subscription wizard from a specific
report, this field will be filled in automatically.
Report description
This field is filled in automatically depending on the selected report.
5. On the Specify Report Recipients step, click the Add button and specify the email
address(es) of the report recipients. It is recommended to click the Verify button.
The system will send a test message to the specified address and will inform you if
any problems are detected. Click OK to add the address and then Next to proceed.
Figure 41: New Report Subscription: Specify Report Recipients
6. On the Specify Report Delivery Options and Filters step, select the report delivery
format and select the Do not send empty reports option, if you do not want reports
to be generated when no changes occurred during the reporting period. Specify the
report filters (which differ depending on the selected report) and click Next to
proceed.

Netwrix Auditor: Group Policy Administrator’s Guide
Page 46 of 84
Copyright © 2013 Netwrix Corporation. All Rights Reserved
Suggestions or comments about this document? www.Netwrix.com/feedback
Figure 42: New Report Subscription: Specify Report Delivery Options and Filters
7. On the Subscription Schedule step, specify the report delivery schedule. The
following options are supported:
Daily: reports will be delivered at a specified interval (in days) at 3:00 AM.
Weekly: reports will be delivered on the specified day(s) of the week at 3:00 AM.
Monthly: reports will be delivered in the specified months on the selected date at
3:00 AM.
Note: The time specified is the local time on the computer where Netwrix Auditor
is installed.
Figure 43: New Report Subscription Wizard: Subscription Schedule
8. On the last step, review your Subscription settings and click Finish. The new
Subscription will appear under the Subscriptions node in the left pane.

Netwrix Auditor: Group Policy Administrator’s Guide
Page 47 of 84
Copyright © 2013 Netwrix Corporation. All Rights Reserved
Suggestions or comments about this document? www.Netwrix.com/feedback
6.4.2. Modifying Subscription
If later you need to modify an existing Subscription, perform the following procedure:
Procedure 17. To modify a Subscription
1. In the Netwrix Auditor console, navigate to Managed Objects
<Managed_Object_name> Group Policy Subscriptions and select the
Subscription you want to modify. The Subscription page will be displayed:
Figure 44: Subscription Page
2. Modify the subscription parameters in the General, Recipients and/or Schedule tabs
and click Apply to save the changes.
6.4.3. Forcing on-Demand Report Delivery
You can force an on-demand delivery of any report that you have configured a subscription
for.
Procedure 18. To force on-demand report delivery
1. In the Netwrix Auditor console, expand the Managed Objects
<Managed_Object_name> Group Policy Subscriptions node and select the
Subscription for the report that you want to generate and send now.
2. On the report Subscription page, click Generate Now (see Figure 44: Subscription
Page)

Netwrix Auditor: Group Policy Administrator’s Guide
Page 48 of 84
Copyright © 2013 Netwrix Corporation. All Rights Reserved
Suggestions or comments about this document? www.Netwrix.com/feedback
The report will be generated and sent to the specified recipient(s). The report will contain
data starting from the last scheduled report delivery (or from Subscription creation time, if
no scheduled deliveries have occurred so far) and until the last scheduled data collection
time (3:00 AM by default).

Netwrix Auditor: Group Policy Administrator’s Guide
Page 49 of 84
Copyright © 2013 Netwrix Corporation. All Rights Reserved
Suggestions or comments about this document? www.Netwrix.com/feedback
6.5. Overview Report
Netwrix Auditor provides a visual representation of all changes to Group Policy in the
Overview report.
The Overview report is comprised of three charts showing the changes made to the Group
Policy grouped by Domain Controller, date, and the user who made the changes. Every chart
has a drill-down functionality. When viewing this report you can navigate to the next level of
details by clicking one of the segments in a chart.
Procedure 19. To view Overview Report
1. In the Netwrix Auditor console, expand the Managed Objects
<Managed_Object_name> Group Policy Reports and select the Overview
(Chart) report.
2. Specify filters to the report and click the View Chart button to apply them. The
report will be displayed showing the changes made to Group Policy within the
specified time frame:
Figure 45: Overview Report

Netwrix Auditor: Group Policy Administrator’s Guide
Page 50 of 84
Copyright © 2013 Netwrix Corporation. All Rights Reserved
Suggestions or comments about this document? www.Netwrix.com/feedback
To get more information on the server configuration changes, click on a chart segment to
drill down to the next level of detail. For example, by clicking a segment of the Changes
by User chart you will see the detailed report on the changes made by the corresponding
user.
Figure 46: Overview Report: Changes by User

Netwrix Auditor: Group Policy Administrator’s Guide
Page 51 of 84
Copyright © 2013 Netwrix Corporation. All Rights Reserved
Suggestions or comments about this document? www.Netwrix.com/feedback
6.6. Change Management
The change management process is one of the critical processes for many companies
referring to such areas as requesting, planning, implementing, and evaluating changes to
various systems. Netwrix Auditor allows facilitating the change auditing process for Group
Policy by providing the change monitoring and reporting capabilities. Additionally, you can
review and assign such properties as a review status and reason for each change made to the
monitored components.
All Group Policy changes detected by Netwrix Auditor have the New status by default. If any
of the changes seems to require an additional check regarding its validity, approval, and so
on, you can set the status of the change to In Review and provide the reason for such status.
Once the change has been approved or rolled back, you can set its status to Resolved.
6.6.1. Reviewing Changes to Group Policy
To be able to review changes and assign their statuses you need to open the Change Review
History report in the Netwrix Auditor console or in a web browser.
Procedure 20. To review changes made to Group Policy
1. Open the Change Review History report located under Reports GP Change
Tracking Change Management.
2. Specify the report filters and click the View Report button to apply them. The report
will be displayed showing the changes made to Group Policy within the specified time
frame:

Netwrix Auditor: Group Policy Administrator’s Guide
Page 52 of 84
Copyright © 2013 Netwrix Corporation. All Rights Reserved
Suggestions or comments about this document? www.Netwrix.com/feedback
Figure 47: Change Review History Report
3. Click the Click to update status link, select one of the statuses and provide your
comments if required.
Figure 48: Review Status
4. Click OK to save the changes. The Review Status and Reason fields will be updated
with the information provided on the previous step

Netwrix Auditor: Group Policy Administrator’s Guide
Page 53 of 84
Copyright © 2013 Netwrix Corporation. All Rights Reserved
Suggestions or comments about this document? www.Netwrix.com/feedback
Figure 49: Updated Review Status
Note: If you are updating the status of a change in a web browser, you can specify
as much information in the comments field as required, however, if the text
contains more than 150 characters, you will not be able to change the status for
this change once again. Provide long descriptions only for those changes for which
you do not plan to change the status in the future.

Netwrix Auditor: Group Policy Administrator’s Guide
Page 54 of 84
Copyright © 2013 Netwrix Corporation. All Rights Reserved
Suggestions or comments about this document? www.Netwrix.com/feedback
6.7. State-in-Time Assessment Reports
The State-in-Time Reports feature allows generating reports on your Group Policy
configuration state at a specific moment of time in addition to change reports. In addition to
the Group Policy changes, Netwrix Auditor stores the audited system's snapshots that show
the configuration state of the system on a certain date in the past.
Like all other Netwrix Auditor Reports, State-in-Time Reports can be viewed in the Netwrix
Auditor console or in a web browser. You can also subscribe to State-in-Time Reports in the
same way as to other repot types (for detailed instructions, refer to Section 6.4 Configuring
Report Subscriptions).
This section provides detailed instructions on how to:
View State-in-Time Assessment Reports
Import historical snapshots to the database
6.7.1. Viewing State-in-Time Assessment Reports
Procedure 21. To view State-in-Time Assessment Reports
1. In the Netwrix Auditor console, expand the Managed Objects
<Managed_Object_name> Group Policy Reports GP State-in-Time
Assessment Reports node.
2. Select the report you want to generate and specify the report filters.
3. Click the View Report button and wait for the report to be generated:

Netwrix Auditor: Group Policy Administrator’s Guide
Page 55 of 84
Copyright © 2013 Netwrix Corporation. All Rights Reserved
Suggestions or comments about this document? www.Netwrix.com/feedback
Figure 50: State-in-Time Report: All Group Policy Objects Grouped by Settings
By default, State-in-Time Reports display the current configuration state of your monitored
domain. If you want to generate a report showing the configuration state of the audited
domain on some specific date, select it from the Session filter.
Note: To be able to generate reports on different snapshots, you need to import
them to the database. Otherwise, only the Current Session option is available. For
detailed instructions on how to import snapshots, refer to Section 6.7.2 Importing
Historical Snapshots.
6.7.2. Importing Historical Snapshots
By default, only the most recent snapshot is available for reporting. To be able to generate
reports on historical snapshots, you must import them to the database. To do this, perform
the following procedure:

Netwrix Auditor: Group Policy Administrator’s Guide
Page 56 of 84
Copyright © 2013 Netwrix Corporation. All Rights Reserved
Suggestions or comments about this document? www.Netwrix.com/feedback
Procedure 22. To import historical snapshots to the SQL database
1. In the Netwrix Auditor console, expand the Managed Objects
<Managed_Object_name> Group Policy Reports node and select the State-in-
Time Reports tab. The following page will be displayed:
Figure 51: State-in-Time Reports Settings Page
2. Select a snapshot that you want to generate a report on from the All available
snapshots list and click the button to add it to the Snapshots available for
reporting list.
3. Repeat this step for all snapshots that you want to make available for reporting, and
click the Apply button. Wait until connection with the Report Server is established
and the snapshots are imported.

Netwrix Auditor: Group Policy Administrator’s Guide
Page 57 of 84
Copyright © 2013 Netwrix Corporation. All Rights Reserved
Suggestions or comments about this document? www.Netwrix.com/feedback
6.8. Reports With Extended Audit Data
The latest version of Netwrix Auditor for Group Policy audit provides reports with extended
audit data that show additional details on changes to the monitored environment.
Two types of extended reports are available:
Reports With Originating Workstation
Reports With Data Filtering by Groups
By default, Netwrix Auditor is configured to collect extended audit data. If you want to
disable this functionality, in the Netwrix Auditor console navigate to Managed Objects
<Managed_Object_name> Group Policy, and click Configure under Advanced Options in
the right pane. In the dialog that opens, deselect the Originating workstation and/or the
Group membership options:
Figure 52: Advanced Options
Note: If these options are enabled, additional events are written to the Security
event log, which may lead to data overwrites. To prevent data loss, it is
recommended to configure the maximum size and retention settings of the
Security event log as described in Section 4.2.2. Configuration Security Event Log
Size and Retention Settings of Netwrix Auditor Installation and Configuration
Guide.
6.8.1. Reports With Originating Workstation
Netwirx Auditor for Group Policy audit provides a number of reports that, in addition to the
standard WHO, WHAT, WHERE and WHEN fields, provide the information on the originating
workstation, that is the name of the workstation where the user was logged on when they
made the change.
The following reports are available containing the name of the originating workstation (they
can be found in the All Changes folder under Reports GP Change Tracking):
All Group Policy Changes by Groups With Originating Workstation
All Group Policy Changes With Originating Workstation
Note: For the product to be able to collect the information on the originating
workstation, you must configure the Audit logon events policy. If automatic audit
configuration is enabled, this setting is adjusted automatically. For instructions on

Netwrix Auditor: Group Policy Administrator’s Guide
Page 58 of 84
Copyright © 2013 Netwrix Corporation. All Rights Reserved
Suggestions or comments about this document? www.Netwrix.com/feedback
how to configure it manually, refer to Section 4.2.1. Configuring Domain Controller
Audit Policies of Netwrix Auditor Installation and Configuration Guide.
Note: The Workstation field under each change provides the name/IP address and
the MAC address of the computer from which the change was made:
Figure 53: All Group Policy Changes With Originating Workstation

Netwrix Auditor: Group Policy Administrator’s Guide
Page 59 of 84
Copyright © 2013 Netwrix Corporation. All Rights Reserved
Suggestions or comments about this document? www.Netwrix.com/feedback
6.8.2. Reports With Data Filtering by Groups
Netwrix Auditor can be configured to collect the information on the group membership of the
users who make the changes. This information can be used to apply filters to the collected
audit data and get the information on changes performed by members of specific groups
only. This functionality is available in the report titled All Group Policy Changes by Groups
With Originating Workstation.
By default, this report shows all changes to Group Policy grouped by the groups to which
users who made the changes belong. If you want to get the information on the changes
performed by members of a specific group, select this group (or several groups) in the
corresponding filter, and click View Report:
Figure 54: Filtering By Group
The report will only show the changes made by the members of the specified group(s):

Netwrix Auditor: Group Policy Administrator’s Guide
Page 60 of 84
Copyright © 2013 Netwrix Corporation. All Rights Reserved
Suggestions or comments about this document? www.Netwrix.com/feedback
Figure 55: All Group Policy Changes by Groups With Originating Workstation

Netwrix Auditor: Group Policy Administrator’s Guide
Page 61 of 84
Copyright © 2013 Netwrix Corporation. All Rights Reserved
Suggestions or comments about this document? www.Netwrix.com/feedback
7. CONFIGURING GLOBAL SETTINGS
The Netwrix Auditor console provides a convenient interface for configuring or modifying the
settings that will be applied to all existing Managed Objects and all target systems audited
with the product. This chapter provides detailed instructions on how to configure these
settings.
Note: For instructions on how to configure or modify the settings for an individual
Managed Object, or the target system audited with the product, refer to Section
4.2 Modifying Managed Object Settings.
To access global settings, expand the Settings node in the left pane:
Figure 56: Settings Page
The following global settings can be configured:
Reports settings
Email Notifications settings
Audit Archive settings
Data Collection settings
Licenses settings
Netwrix Console Audit

Netwrix Auditor: Group Policy Administrator’s Guide
Page 62 of 84
Copyright © 2013 Netwrix Corporation. All Rights Reserved
Suggestions or comments about this document? www.Netwrix.com/feedback
7.1. Configuring Reports Settings
The Reports option allows configuring the SQL Server and Report Server settings. To
configure these settings, or modify your existing Reports settings, do the following:
Procedure 23. To configure the Reports settings
1. In the Netwrix Auditor console, expand the Settings node and select the Reports
node. Alternatively, you can click Reports in the Settings page. The following page
will be displayed showing the current Reports settings:
Figure 57: Settings: Reports
2. Click Configure in the right pane. The following dialog will be displayed:
Figure 58: Configure Reports Settings

Netwrix Auditor: Group Policy Administrator’s Guide
Page 63 of 84
Copyright © 2013 Netwrix Corporation. All Rights Reserved
Suggestions or comments about this document? www.Netwrix.com/feedback
3. Modify your current reports settings if necessary and click OK to save the changes. For
a detailed explanation of the reports parameters, refer to Table 3: Reports
Parameters.
7.2. Configuring Email Notifications Settings
The Email Notifications option allows configuring the SMTP settings used to deliver Change
Summaries and Reports. To configure these settings or modify your existing email delivery
settings do the following:
Procedure 24. To configure the email notifications settings
1. In the Netwrix Auditor console, expand the Settings node and select Email
Notifications. Alternatively, you can click Email Notifications in the Settings page.
The following page will be displayed showing the current email settings:
Figure 59: Settings: Email Notifications
2. Click the Modify button in the right pane. The SMTP Settings dialog will be displayed:

Netwrix Auditor: Group Policy Administrator’s Guide
Page 64 of 84
Copyright © 2013 Netwrix Corporation. All Rights Reserved
Suggestions or comments about this document? www.Netwrix.com/feedback
Figure 60: Default SMTP Settings
3. Modify you current email settings if necessary and click OK to save the changes. For a
detailed explanation of the email parameters, refer to Table 2: Email Settings
Parameters.
7.3. Configuring Audit Archive Settings
The Audit Archive option allows configuring the location and the retention period for the
local repository of audit data. To configure these settings, do the following:
Procedure 25. To configure the Audit Archive settings
1. In the Netwrix Auditor console, expand the Settings node and select the Audit
Archive option. Alternatively, you can click Audit Archive in the Settings page. The
following page will be displayed showing the current Audit Archive settings:

Netwrix Auditor: Group Policy Administrator’s Guide
Page 65 of 84
Copyright © 2013 Netwrix Corporation. All Rights Reserved
Suggestions or comments about this document? www.Netwrix.com/feedback
Figure 61: Settings: Audit Archive
2. Modify the following settings if necessary:
Table 8: Audit Archive Settings
Parameter
Description
Write data to the Audit
Archive
Enable this checkbox to be able to store audit data for a longer period.
Write audit data to
Specify the path to the folder where your audit data will be stored.
Click the Browse button to select a location.
Specify the retention period
for audit data (in months)
Specify the number of months for which audit data will be stored. Data
will be deleted automatically when its retention period is over. If the
Write data to the Audit Archive option is disabled, or the retention
period is set to 0, data will be stored for the last 4 sessions.
Specify the retention period
for Sessions (in days)
Specify the number of days for which Sessions (i.e. the information on
daily data collection status) are stored and are available for review in
the Netwrix Auditor console.
NOTE: The Session retention period does not affect the Audit Archive
retention setting.
Note: It is strongly recommended not to disable the Write data to the Audit
Archive option, since if audit data is not written locally, it will not be imported to
the SQL database and will be unavailable for reports.
7.4. Configuring Data Collection Setting
The Data Collection option allows modifying the default Data Processing Account:
Procedure 26. To configure Data Collection settings
1. In the Netwrix Auditor console, expand the Settings node and select the Data
Collection option. Alternatively, you can click Data Collection in the Settings page.
The following page will be displayed showing the current data processing settings:

Netwrix Auditor: Group Policy Administrator’s Guide
Page 66 of 84
Copyright © 2013 Netwrix Corporation. All Rights Reserved
Suggestions or comments about this document? www.Netwrix.com/feedback
Figure 62: Settings: Data Collection
Note: The Data Collection and Change Summary Generation Schedule is not
applicable to Group Polcy audit.
2. To specify a different account for data collection and processing, click the Modify
button next to the Default Data Processing Account option.
3. In the Default Data Processing Account dialog, enter the account name, and
password, and click OK:
Figure 63: Default Data Processing Account
Note: Ensure that the new account has the required rights to collect data from the
monitored computers. For more details, refer to Chapter 5. Configuring Rights and
Permissions of Netwrix Auditor Installation and Configutation Guide.

Netwrix Auditor: Group Policy Administrator’s Guide
Page 67 of 84
Copyright © 2013 Netwrix Corporation. All Rights Reserved
Suggestions or comments about this document? www.Netwrix.com/feedback
7.5. Configuring License Settings
The Licenses option allows viewing your current licenses for the audited systems, updating
them, and adding new licenses. To configure your licenses, perform the following procedure:
Procedure 27. To configure licenses
1. In the Netwrix Auditor console, expand the Settings node and select the Licenses
option. Alternatively, you can click Licenses in the Settings page. The following page
will be displayed showing the list of your current licenses:
Figure 64: Settings: License
2. Perform one of the following operations if necessary:
To add/update your licenses, click the Add/Update button. In the dialog that
opens, specify your company name, your license count and the license codes
(separated by commas or semi-colons).
Note: You can only install multiple licenses at the same time if they have the same
license count. Otherwise, install them separately.
To remove a license, select it from the list and click the Remove button. Then
click Yes in the confirmation dialog.
7.6. Configuring Netwrix Console Audit
The Netwrix Console Audit option allows auditing changes made via the Netwrix Auditor
console. This option is available if you have enabled User Session Activity auditing with
Netwrix Auditor. Netwrix Auditor allows capturing video of any activity on the monitored
computers and embedding metadata (such as the information on which applications and
windows were opened) into video files, which can be used for data search and positioning
inside video recordings. By configuring User Session Activity auditing to monitor the Netwrix
Auditor console you can keep record of any actions performed using the Netwrix Auditor
console and track changes to audit settings, Managed Objects and global settings.

Netwrix Auditor: Group Policy Administrator’s Guide
Page 68 of 84
Copyright © 2013 Netwrix Corporation. All Rights Reserved
Suggestions or comments about this document? www.Netwrix.com/feedback
Procedure 28. To enable Netwrix Console Audit
1. In the Netwrix Auditor console, expand the Settings node and select the Netwrix
Console Audit option. Alternatively, you can click Netwrix Console Audit in the
Settings page. The following page will be displayed:
Figure 65: Settings: Netwrix Console Audit
2. Click Configure to enable Netwrix Console Audit. A Managed Object will be created
automatically with the following default settings:
Table 9: Managed Object Default Settings
Parameter
Status
Enabled module
User Activity Video Reporter
Monitored computers
localhost
Video recording filters by user
All users
Video recording filters by application
Netwrix*
SSRS-based Reports
Not configured
Automatic Activity Summary delivery
Not configured
Video recording quality and duration settings
Default
3. Click OK when the confirmation message is displayed. The newly created Managed
Object will appear under the Managed Objects node, and the status of Netwrix
Console Audit will change to “On”:

Netwrix Auditor: Group Policy Administrator’s Guide
Page 69 of 84
Copyright © 2013 Netwrix Corporation. All Rights Reserved
Suggestions or comments about this document? www.Netwrix.com/feedback
Figure 66: Settings: Enabled Netwrix Console Audit
Once you have enabled the Netwrix Console Audit option, you will receive Activity
Summaries with a list of video recordings and links to video files showing how the changes
were made. By default, Activity Summary is generated and sent every hour starting from 7:00
AM:
Figure 67: Activity Summary

Netwrix Auditor: Group Policy Administrator’s Guide
Page 70 of 84
Copyright © 2013 Netwrix Corporation. All Rights Reserved
Suggestions or comments about this document? www.Netwrix.com/feedback
You can generate a summary of activity records made for your console and Managed Object
configuration changes via the Activity Records page by navigating to Managed Objects
<your Managed_Object_name> User Session Activity Activity Records.
You can modify the Netwrix Console Audit settings (for example, enable SSRS-based Reports,
subscribe to a report, and so on) in the same way as for any other Managed Object.
For details on the User Session Activity auditing, refer to the Netwrix Auditor User Session
Activity Administrator’s Guide.

Netwrix Auditor: Group Policy Administrator’s Guide
Page 71 of 84
Copyright © 2013 Netwrix Corporation. All Rights Reserved
Suggestions or comments about this document? www.Netwrix.com/feedback
8. ADDITIONAL CONFIGURATION
This Chapter provides instructions on how to fine-tune Group Policy audit using the additional
configuration options. It explains how to:
Configuring Integration with User Session Activity
Enable integration with third-party SIEM solutions, including Microsoft System
Center Operations Manager (SCOM)
Exclude or include certain data types from/in reports
8.1. Configuring Integration with User Session Activity
Audit
By integrating Group Policy audit with User Session Activity audit, you can get a report that
shows all changes made to Group Policy with links to the corresponding video files showing
how a particular change was made.
Once the integration has completed, the Changes with Video subfolder containing the All
Changes with video report will be added to the Reports folder under the Group Policy node.
Integration can be enabled if the following conditions are met:
The User Session Activity audit is enabled and configured for the same Managed
Object as Group Policy audit. For details on how to configure the User Session Activity
audit, refer to Netwrix Auditor User Session Activity Administrator’s Guide.
SSRS-based Reports are enabled and configured for both Group Policy and User
Session Activity audit.
Netwrix Auditor is configured to write audit data on Group Policy and User Session
Activity to databases located on the same SQL Server instance. You can check the SQL
Server instance settings for each Managed Object in the <Managed Object name>
Group Policy/ User Session Activity Reports Report Settings page.
At least one data collection for Group Policy must run on your Managed Object. For
details on how to run data collection, refer to Section 5.2.2.Generating Change
Summary on Demand.
Procedure 29. To enable integration with User Sessions Activity Audit
1. In the Netwrix Auditor console tree, navigate to Managed Objects
<Managed_Object_name> User Session Activity.
2. Click the Integrate video records link at the bottom of the User Sessions Activity
main page:

Netwrix Auditor: Group Policy Administrator’s Guide
Page 72 of 84
Copyright © 2013 Netwrix Corporation. All Rights Reserved
Suggestions or comments about this document? www.Netwrix.com/feedback
Figure 68: User Session Activity Page
3. In the Integrate Video Records dialog, select Group Policy Change Reporter from
the list and click the Integrate button:
Figure 69: Integrate Video Records
4. If the operation is completed successfully, the status of the selected module changes
to “Integrated”. If it fails, a message is displayed explaining the reason why
integration has failed.
5. Restart the Netwrix Auditor console for the changes to take effect.

Netwrix Auditor: Group Policy Administrator’s Guide
Page 73 of 84
Copyright © 2013 Netwrix Corporation. All Rights Reserved
Suggestions or comments about this document? www.Netwrix.com/feedback
The report with videos on the changes made to Group Policy is available in the Changes with
Video folder under the Reports node of the relevant Managed Object:
Figure 70: Reports: Changes With Video
This report contains an additional column called “Video” which contains links to the
corresponding video files showing how each change was made:

Netwrix Auditor: Group Policy Administrator’s Guide
Page 74 of 84
Copyright © 2013 Netwrix Corporation. All Rights Reserved
Suggestions or comments about this document? www.Netwrix.com/feedback
Figure 71: Reports: All Changes With Video

Netwrix Auditor: Group Policy Administrator’s Guide
Page 75 of 84
Copyright © 2013 Netwrix Corporation. All Rights Reserved
Suggestions or comments about this document? www.Netwrix.com/feedback
8.2. Enabling Integration with Third-Party SIEM Solutions
If your organization is already using a third-party SIEM solution, Netwrix Auditor can help
protect these investments by integrating with major SIEM systems and letting you manage
audit data in your usual way, but with improved performance and increased reliability of
collected audit data.
Netwrix Auditor can integrate with all major SIEM solutions, including Microsoft SCOM, RSA
enVision®, ArcSight® Logger™, Novell® Sentinel™, NetIQ® Security Manager™, IBM Tivoli®
Security Information and Event Manager™ and many other.
If integration with SIEM products is enabled, a custom Windows event log is created called
Netwrix Change Reporter. This event log will generate events for each detected change (for
detailed information on such events and their IDs, refer to the following Netwrix Technical
Article: Integration with Third Party SIEM Systems). You can configure custom processing
rules, alerts and reports in your SIEM solution to react to these events.
If you are using Microsoft SCOM and want to integrate it with Netwrix Auditor, you need to
install Netwrix Auditor Group Policy SCOM Management Pack, which is a solution that
captures events written by Netwrix Auditor into the dedicated event log, and then feeds it to
Microsoft SCOM that generates corresponding reports and alerts (for a detailed description of
alerts triggered by SCOM alerting rules, you can refer to the following Netwrix Technical
Article: Netwrix Auditor SCOM Alerts Specification).
To enable integration with third party SIEM systems, do the following:
Procedure 30. To enable integration with third-party SIEM solutions
1. In the Netwrix Auditor console, navigate to Managed Objects
<Managed_Object_name> Group Policy.
2. In the right pane, click the Configure button next to Advanced Options. The
following dialog will be displayed:
Figure 72: Advanced Options Dialog
3. Select the Microsoft System Center option to integrate the product with Microsoft
SCOM, or the Third-party SIEM products option to integrate the product with a
different SIEM solution, and click OK to save the changes.

Netwrix Auditor: Group Policy Administrator’s Guide
Page 76 of 84
Copyright © 2013 Netwrix Corporation. All Rights Reserved
Suggestions or comments about this document? www.Netwrix.com/feedback
8.3. Excluding/Including Data Types From/in Reports
You can fine-tune Group Policy audit by specifying various data types that you want to
exclude from the product reports. This can be done by editing .txt configuration files located
in the product installation folder: the Netwrix AD Change Reporter folder. The table below
provides a list of the product configuration files, their description, syntax and examples. One
entry per line is accepted.
Table 10: Configuration Files for Group Policy Audit
File Name
Description
Syntax
Example
omitobjlist_gp.txt
Contains a list of the Group
Policy Object (GPO) names
to be excluded from change
reports.
<object name>
NOTE: A wildcard (*)
can be used to replace
any number of
characters.
To exclude changes to
the Default Domain
Policy GPO, add the
following line:
Default Domain
Policy
omitproplist_gp.txt
Contains a list of the Group
Policy Object settings to be
excluded from change
reports.
<settingname>
NOTE: A wildcard (*)
can be used to replace
any number of
characters.
To exclude data on
changes made to the
Maximum password
length setting, add the
following line:
Maximum password
length
omituserlist_gp
Contains a list of user names
to exclude particular users
from change reports.
<domain\user>
NOTE: A wildcard (*)
can be used to replace
any number of
characters.
To exclude changes
made by the user
“usertest” in the
domain “domaintest”,
add the following line:
domaintest\usertest

Netwrix Auditor: Group Policy Administrator’s Guide
Page 77 of 84
Copyright © 2013 Netwrix Corporation. All Rights Reserved
Suggestions or comments about this document? www.Netwrix.com/feedback
9. RESTORING GROUP POLICY OBJECTS
With Netwrix Auditor, you can restore your Group Policy objects via the backup files saved by
the product. The backups are stored in the folder with snapshots and event log information,
the default path is: %ProgramData%\Netwrix\Management Console\Data\AD
Changes\<domain_name>.
You can use this feature after at least one data collection task has run.
Note: By default, saving of the backup files is disabled. To enable the saving, set
the GPOBackup registry key value to 1. For details, refer to B Appendix: Registry
Keys of this guide.
Procedure 31. To restore Group Policy objects
1. Launch the Group Policy Management Console: navigate to Start Run, type in
gpmc.msc and click OK.
2. In the Group Policy Management Console, expand the Forest: <your_forest_name>
node, right-click Domains and select Manage Backups from the drop-down menu.
3. In the Manage Backups dialog, click Browse and select the folder with Group Policy
backup files. The folders with backup files are usually named by dates, so you can
pick a folder by the required date. You will be presented with a list of Group Policy
objects backed up on the selected date:
Figure 73: Group Policy Management Console
4. Select the required object in the Backed up GPOs grid and click the Restore
bottom button.

Netwrix Auditor: Group Policy Administrator’s Guide
Page 78 of 84
Copyright © 2013 Netwrix Corporation. All Rights Reserved
Suggestions or comments about this document? www.Netwrix.com/feedback
A APPENDIX: SQL DATABASE RETENTION SCRIPT
DECLARE @Retention_Period_Days int
SET @Retention_Period_Days = 90 --Please specify the retention period in days (1 or more).
/****************************************************************************************/
DECLARE @DB sysname
SET @DB = DB_NAME()
exec sp_executesql N'
USE [msdb];
IF EXISTS (SELECT job_id FROM msdb.dbo.sysjobs_view WHERE name = N''Retention Job'')
BEGIN
declare @j_id uniqueidentifier
SELECT @j_id=job_id FROM msdb.dbo.sysjobs_view WHERE name = N''Retention Job''
EXEC msdb.dbo.sp_delete_job @job_id=@j_id, @delete_unused_schedule=1
END;
USE [msdb];
BEGIN TRANSACTION
DECLARE @ReturnCode INT
SELECT @ReturnCode = 0
IF NOT EXISTS (SELECT name FROM msdb.dbo.syscategories WHERE name=N''[Uncategorized
(Local)]'' AND category_class=1)
BEGIN
EXEC @ReturnCode = msdb.dbo.sp_add_category @class=N''JOB'', @type=N''LOCAL'',
@name=N''[Uncategorized (Local)]''
IF (@@ERROR <> 0 OR @ReturnCode <> 0) GOTO QuitWithRollback
END
DECLARE @jobId BINARY(16)
DECLARE @desc nvarchar(100)
SET @desc = N''A scheduled job that deletes all data that is older than ''+CAST(@Retention As
nvarchar(100))+'' day(s).''
EXEC @ReturnCode = msdb.dbo.sp_add_job @job_name=N''Retention Job'',
@enabled=1,
@notify_level_eventlog=0,
@notify_level_email=0,
@notify_level_netsend=0,
@notify_level_page=0,
@delete_level=0,
@description=@desc,
@category_name=N''[Uncategorized (Local)]'',
@owner_login_name=N''sa'', @job_id = @jobId OUTPUT
IF (@@ERROR <> 0 OR @ReturnCode <> 0) GOTO QuitWithRollback
DECLARE @sqlcommand nvarchar(max)
SET @sqlcommand = N''
DECLARE @RetDays int
DECLARE @Date datetime
Set @RetDays = ''+CAST(@Retention As nvarchar(100))+''
Set @Date = DATEADD(d, -1*@RetDays, GETUTCDATE())
IF EXISTS (select * from [dbo].[DBVersion] where ProductId = 0 AND DBVersion = 4)
BEGIN
BEGIN TRAN
IF EXISTS (SELECT * FROM sys.objects WHERE object_id =
OBJECT_ID(N''''[dbo].[GPOPropChanges]'''') AND type in (N''''U''''))
Delete gpc
From
GPOPropChanges gpc
inner join GPOFolderChanges gfc on gpc.GPOFolderId = gfc.GPOFolderChangeId
inner join Changes c on gfc.ChangeId = c.ChangeId
inner join Sessions s on c.ProductId = s.ProductId and c.SessionId =
s.SessionId
Where
s.Date < @Date
If (@@ERROR>0) GOTO QuitWithRollback
IF EXISTS (SELECT * FROM sys.objects WHERE object_id =
OBJECT_ID(N''''[dbo].[GPOFolderChanges]'''') AND type in (N''''U''''))
Delete gfc
From

Netwrix Auditor: Group Policy Administrator’s Guide
Page 79 of 84
Copyright © 2013 Netwrix Corporation. All Rights Reserved
Suggestions or comments about this document? www.Netwrix.com/feedback
GPOFolderChanges gfc
inner join Changes c on gfc.ChangeId = c.ChangeId
inner join Sessions s on c.ProductId = s.ProductId and c.SessionId =
s.SessionId
Where
s.Date < @Date
If (@@ERROR>0) GOTO QuitWithRollback
IF EXISTS (SELECT * FROM sys.objects WHERE object_id =
OBJECT_ID(N''''[dbo].[PropChanges]'''') AND type in (N''''U''''))
Delete pc
From
PropChanges pc
inner join Changes c on pc.ChangeId = c.ChangeId
inner join Sessions s on c.ProductId = s.ProductId and c.SessionId =
s.SessionId
Where
s.Date < @Date
If (@@ERROR>0) GOTO QuitWithRollback
IF EXISTS (SELECT * FROM sys.objects WHERE object_id =
OBJECT_ID(N''''[dbo].[ObjProps]'''') AND type in (N''''U''''))
Delete op
From
ObjProps op
inner join Changes c on op.ChangeId = c.ChangeId
inner join Sessions s on c.ProductId = s.ProductId and c.SessionId =
s.SessionId
Where
s.Date < @Date
If (@@ERROR>0) GOTO QuitWithRollback
IF EXISTS (SELECT * FROM sys.objects WHERE object_id =
OBJECT_ID(N''''[dbo].[Changes]'''') AND type in (N''''U''''))
Delete c
From
Changes c
inner join Sessions s on c.ProductId = s.ProductId and c.SessionId =
s.SessionId
Where
s.Date < @Date
If (@@ERROR>0) GOTO QuitWithRollback
IF EXISTS (SELECT * FROM sys.objects WHERE object_id =
OBJECT_ID(N''''[dbo].[Sessions]'''') AND type in (N''''U''''))
Delete s
From
Sessions s
Where
s.Date < @Date
If (@@ERROR>0) GOTO QuitWithRollback
COMMIT TRANSACTION
GOTO EndSave
QuitWithRollback:
IF (@@TRANCOUNT > 0) ROLLBACK TRANSACTION
EndSave:
END
IF EXISTS (select * from [dbo].[DBVersion] where ProductId = 0 AND DBVersion >= 5)
BEGIN
exec sp_netwrix_DatabaseMaintenance @Date, 0
END
''
EXEC @ReturnCode = msdb.dbo.sp_add_jobstep @job_id=@jobId, @step_name=N''Retention Step'',
@step_id=1,
@cmdexec_success_code=0,
@on_success_action=1,
@on_success_step_id=0,
@on_fail_action=2,
@on_fail_step_id=0,
@retry_attempts=0,
@retry_interval=0,
@os_run_priority=0, @subsystem=N''TSQL'',
@command=@sqlcommand,
@database_name=@DBName,
@flags=0
IF (@@ERROR <> 0 OR @ReturnCode <> 0) GOTO QuitWithRollback
EXEC @ReturnCode = msdb.dbo.sp_update_job @job_id = @jobId, @start_step_id = 1

Netwrix Auditor: Group Policy Administrator’s Guide
Page 80 of 84
Copyright © 2013 Netwrix Corporation. All Rights Reserved
Suggestions or comments about this document? www.Netwrix.com/feedback
DECLARE @scheduleId uniqueidentifier
IF (@@ERROR <> 0 OR @ReturnCode <> 0) GOTO QuitWithRollback
EXEC @ReturnCode = msdb.dbo.sp_add_jobschedule @job_id=@jobId, @name=N''Retention Schedule'',
@enabled=1,
@freq_type=4,
@freq_interval=1,
@freq_subday_type=1,
@freq_subday_interval=0,
@freq_relative_interval=0,
@freq_recurrence_factor=0,
@active_start_date=NULL,
@active_end_date=99991231,
@active_start_time=20000,
@active_end_time=235959
IF (@@ERROR <> 0 OR @ReturnCode <> 0) GOTO QuitWithRollback
EXEC @ReturnCode = msdb.dbo.sp_add_jobserver @job_id = @jobId, @server_name = N''(local)''
IF (@@ERROR <> 0 OR @ReturnCode <> 0) GOTO QuitWithRollback
COMMIT TRANSACTION
GOTO EndSave
QuitWithRollback:
IF (@@TRANCOUNT > 0) ROLLBACK TRANSACTION
EndSave:
',
N'@DBName sysname, @Retention int', @DBName = @DB, @Retention = @Retention_Period_Days

Netwrix Auditor: Group Policy Administrator’s Guide
Page 81 of 84
Copyright © 2013 Netwrix Corporation. All Rights Reserved
Suggestions or comments about this document? www.Netwrix.com/feedback
B APPENDIX: REGISTRY KEYS
The table below contains the description of the basic Group Policy audit registry keys that
you may need to configure while using the product. To configure/modify a registry key,
navigate to Start Run, and type regedit to launch Registry Editor.
Table 11: Netwrix Auditor For Group Policy Audit Registry Keys
Registry Key
Type
Description/Value
Created
during
setup
Preserved
during
upgrade
HKEY_LOCAL_MACHINE\SOFTWARE\(WOW6432Node)\Netwrix\AD Change Reporter
CleanAutoBackupLogs
REG_DWORD
Defines the retention
period for the
security log backups:
0 – backups are never
deleted from DCs
[X] – backups are
deleted after [X]
hours
Yes
Yes
GPOBackup
REG_DWORD
Defines whether to
backup GPOs during
data collection:
0 – no
1- yes
Yes
Yes
GPOBackupDays
REG_DWORD
Defines the backup
frequency:
0 – backup always
X – once in X days
Note: GPOBackup
must be set to 1
Yes
Yes
IgnoreAuditCheckResultError
REG_DWORD
Defines whether
audit check errors
should be displayed
in the Change
Summary footer:
0 – display errors
1 – do not display
errors
Yes
Yes
IgnoreRootDCErrors
REG_DWORD
Defines whether to
display audit check
errors for the root
domain (when data is
collected from a
child domain) in the
Change Summary
footer:
0 – display errors
1 – do not display
errors
Yes
Yes
ShortEmailSubjects
REG_DWORD
Defines whether to
contract the email
subjects (e.g.
Netwrix Group Policy
No
Yes

Netwrix Auditor: Group Policy Administrator’s Guide
Page 82 of 84
Copyright © 2013 Netwrix Corporation. All Rights Reserved
Suggestions or comments about this document? www.Netwrix.com/feedback
Registry Key
Type
Description/Value
Created
during
setup
Preserved
during
upgrade
Change Reporter:
Summary Report –
GPCR Report):
0 - no
1 - yes
ProcessBackupLogs
REG_DWORD
Defines whether to
process security log
backups:
0 – no
1 – yes
Note: Even if this key
is set to 0, the
security log backups
will not be deleted
regardless of the
value of the
CleanAutoBackupLogs
key.
Yes
Yes
ShowReportFooter
REG_DWORD
Defines whether to
display the footer in
the Change Summary
email:
0 – no
1 – yes
Yes
Yes
ShowReportGeneratorServer
REG_DWORD
Defines whether to
display the report
generation server in
the Change Summary
footer:
0 – no
1 – yes
Yes
Yes
ShowSummaryInFooter
REG_DWORD
Defines whether to
display the summary
in the Change
Summary footer:
0 – no
1 – yes
Yes
Yes
ShowSummaryInHeader
REG_DWORD
Defines whether to
display the summary
in the Change
Summary header:
0 – no
1 – yes
Yes
Yes
HKEY_LOCAL_MACHINE\SOFTWARE\(WOW6432Node)\Netwrix\AD Change Reporter\<Managed
Object Name>
CollectLogsMaxThreads
REG_DWORD
Defines the number
of DCs to
simultaneously start
log collection on
No
Yes
HKEY_LOCAL_MACHINE\SOFTWARE\(WOW6432Node)\Netwrix\ AD Change Reporter\<Managed
Object Name>\Database settings
SessionImportDays
REG_DWORD
Defines the
No
Yes

Netwrix Auditor: Group Policy Administrator’s Guide
Page 83 of 84
Copyright © 2013 Netwrix Corporation. All Rights Reserved
Suggestions or comments about this document? www.Netwrix.com/feedback
Registry Key
Type
Description/Value
Created
during
setup
Preserved
during
upgrade
frequency of a full
snapshot upload.
X – once in X days
HKEY_LOCAL_MACHINE\SOFTWARE\(WOW6432Node)\Netwrix\Management Console\Database
settings
overwrite_datasource
REG_DWORD
Defines whether to
overwrite the
database connection
settings (stored in
the reports data
source) if they differ
from the SQL server
settings specified
when configuring the
Managed Object
0 – no
1 – yes
No
No
SqlOperationTimeout
REG_DWORD
Defines the timeout
for executing SQL
queries such as data
selection, insertion
or deletion (in
seconds)
No
Yes
timeout
REG_DWORD
Defines the SQL
database connection
timeout (in seconds)
No
Yes

Netwrix Auditor: Group Policy Administrator’s Guide
Page 84 of 84
Copyright © 2013 Netwrix Corporation. All Rights Reserved
Suggestions or comments about this document? www.Netwrix.com/feedback
C APPENDIX: RELATED DOCUMENTATION
The table below lists all documents available to support Group Policy audit with Netwrix
Auditor 5.0:
Table 12: Product Documentation
Document Name
Overview
Netwrix Auditor: Group Policy
Administrator’s Guide
The current document. Provides a detailed
explanation of the Netwrix Group Policy Change
Reporter features and step-by-step instructions on
how to configure and use the product.
Netwrix Auditor Installation and
Configuration Guide
Provides detailed instructions on how to install
Netwrix Auditor and explains how to configure the
target AD domain for auditing.
Netwrix Auditor: Active Directory
Administrator’s Guide
Provides a detailed explanation of the Netwrix
Auditor features for Active Directory audit and
step-by-step instructions on how to configure and
use the product.
Netwrix Auditor: Exchange Servers
Administrator’s Guide
Provides a detailed explanation of the Netwrix
Auditor features for Exchange Servers audit and
step-by-step instructions on how to configure and
use the product.
Netwrix Auditor Release Notes
Contains a list of the known issues that customers
may experience with Auditor 5.0, and suggests
workarounds for these issues.
Troubleshooting Incorrect Reporting of the
“Who Changed” Parameter
Step-by-step instructions on how to troubleshoot
incorrect reporting of the ‘who changed’
parameter.
Installing Microsoft SQL Server and
Configuring the Reporting Services
This technical article provides instructions on how
to install Microsoft SQL Server 2005/2008 R2/2012
Express and configure the Reporting Services.
How to Subscribe to SSRS Reports
This technical article explains how to configure a
subscription to SSRS reports using the Report
Manager.
Integration with Third Party SIEM Systems
This article explains how to enable integration with
third-party Security Information and Event
Management (SIEM) systems.
