
**Hungerford Technologies LLC
CoreNexa App on Desktops
Hungerford Technologies is proud to announce CoreNexa App for desktop
How to log into the website
• Website: https://pbx.hungerford.tech/
o Make sure to use CHROME as your browser
• Login
o Username: Enter your company email address
o Passcode: Select Forget Your Password
• You will then receive an email to reset your password
• Once you reset your password you will be directed the below screen
• Select Download Now

• The below screen should appear
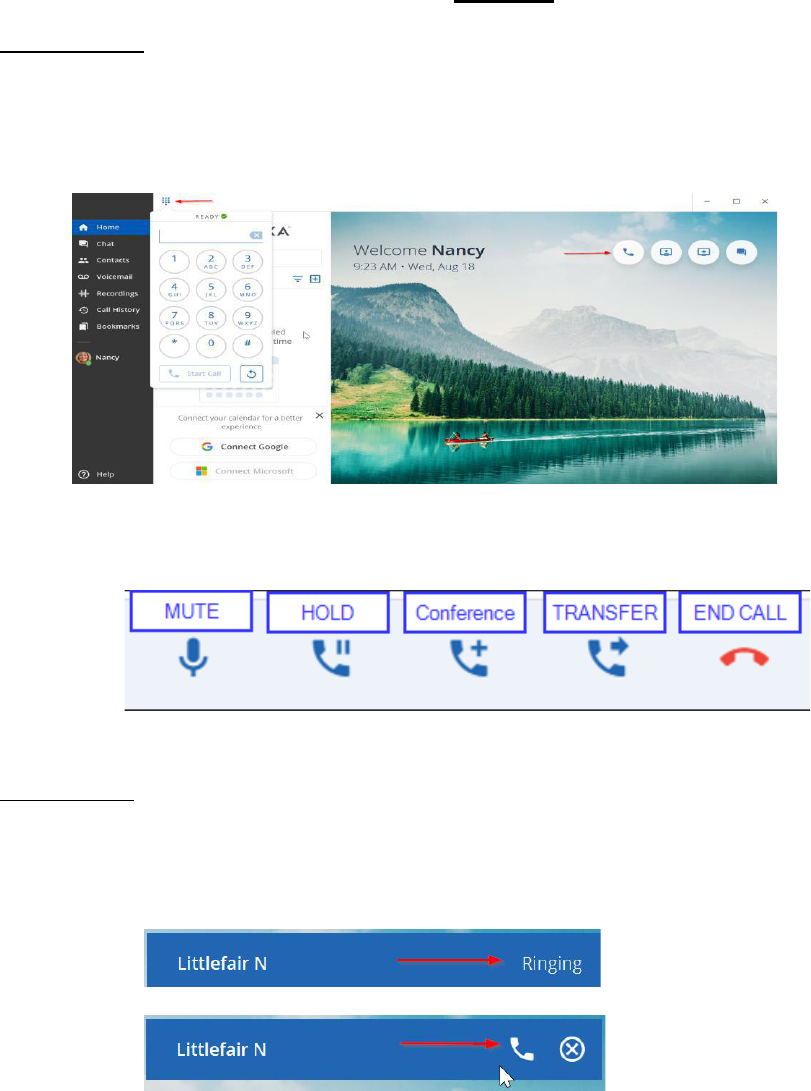
Calling
Outbound Call
• Select the Dial Pad icon or the Handset icon
• Once you select the Dial Pad, the phone key pad will appear
• Enter the phone number or Extension you wish to dial
• Click on the Phone icon from the Dial Pad to initiate the call
• Once active on a call you will see: Mute, Hold, Conference, Transfer, End Call
Incoming Call
• When you receive a call you will see the call information in the upper right corner
o Caller ID will show the internal extension or the incoming caller ID
• Hover over the RINGING and click on the phone to ACCEPT the call
• Once active on a call you will see: Mute, Hold, Conference, Transfer, End Call

Calling Options
• Mute
o Mutes local audio during calls and conferences
o Turn on Mute
▪ While active on a call, click on the Mute icon to enable
▪ To turn off Mute, select the Mute icon (Red)
• Hold
o Places a caller on hold, caller will hear call waiting music
o Place a call on hold
▪ While active on a call, select the Hold icon
▪ Call on Hold will appear next to the caller ID
▪ Press Hold again to resume the call
• Conference
o Abiltiy to add an additional caller to an active call (3-way calling)
o Conference in a user
▪ On a active call the Conference icon
• Original caller will be hold
▪ Enter the phone number or extension
▪ Select Add Call
▪ On the Upper right hand corner select 1+
▪ Click on the Merge icon
o Additional Conference settings
▪ Hang up Current Call and Pick the new one
▪ Swap Calls
• Puts one caller on hold and answer the other call
▪ Hang Up
• Drops the current call

• Transfer Options
o Transfer (Blind Transfer)
▪ Transfer call without warning the called contact
• On a live call, select the Transfer icon
• Select Transfer
• Add Contact or enter Extension
• Press Add Call to complete
o Attended Transfer
▪ Transfer the call and notify the transferred party
• On a live call, select the Transfer icon
• Click on Attendant Transfer
• Add Contact or enter Extension
• When 3
rd
party answers select Complete Transfer
o Select the End call icon to cancel the transfer
o Move To Mobile
▪ Transfer the call to Mobile App (must be logged in)
• Select Transfer
• Click Mobile
• The call will start ringing your mobile app
• Answer the call on your mobile app (you must be signed into the App)
o Move To Desk Phone
▪ Transfer the call to your Desk Phone
• Select Transfer
• Click desk phone
• The call will start ringing your desk phone
• Answer the call on your desk phone
o Transfer call directly to a Mailbox
• On a live call, select the Transfer icon
• Click on Transfer
• Enter the Extension and * (star) - example 100*
• Press Add Call to complete
• End Call
o Hangs up the current call

Tool Bar Functions:
Home
• Home screen with Calling and Meeting
Messages
• CHAT
o Starting a Chat
▪ Select the Messages icon on the left tool bar
▪ Select the down arrow and select Chat
▪ Select Community Chats or Direct Message
▪ Type the name (s) of employee in the To: section
▪ Select the Arrow icon or press Enter on your keyboard
▪ Start typing and then ENTER to send your chat
▪ Direct Message
▪ Select the Plus sign (+) icon for a Direct Message

▪ Search for Contact
▪ Community Chat
▪ Allows you to send a Message to your ALL Users of your hosted phone
environment
o Message Notification
• Message icon will identify the number of unread messages
Contacts
• Community
o Displays Favorites, Online, and Offline.
o This shows presence of UC users
o Does not display presence of desk phone users
Voicemail
• Listen to your Voicemails
o Select the Voicemail Icon
o Select the voicemail message you wish to listen too
o Play, Download or Delete the vm
• Voicemail notifications
o Message icon will identify the number of unread messages

• Accessing Voice Mailbox options
o Dial * + mailbox extension number
o Example: *100
o Enter VM Pin
History
• Select the History Icon to view call History
Help
• Lower left of the screen
• Click on the Visit our Help Page
Voicemail Options:
Mailbox Menu
• Follow the Accessing Voice Mailbox options steps
o Enter 1: New / Old message
o * Asterisk: rewind
o fast forward
o Enter 2: To change folders (do not use)
o Enter 3: Advance Option:
o 5. To leave a message for another user
o Press 1 to enter an extension
o Press 2 to use the directory
o * To return to main menu
o Enter 0: Mailbox Options (Greetings – see steps below Voicemail Greetings)
o 1. Record unavailable message
o 2. Record busy message
o 3. Record name
o 4. Record temporary greeting
o 5. Change password
o Enter *: To Return to main menu
o Enter #: To Exit

• Voicemail Greetings
o Unavailable Message
▪ This is the message users will hear if you do not answer your phone, a message
is directly transferred to your voice mail, or you have not recorded a Busy
Message.
▪ Unavailable Message is also the option you will need to record if you have any
General Mailboxes.
o Busy Message
▪ This is the message that callers will hear if you are on the phone or your DND
(do not disturb) is active. If you do not record a Busy message, caller will hear
your Unavailable message.
o Name Message
▪ You will want to record your Name if you have an Auto Attendant with dial by
name as an option).
o Temporary Greeting
▪ This is the message users will hear if you are out of the office or on vacation.
• After the tone, please record your temporary greeting, then press #
o Press 1 to accept this recording
o This message has now been saved
o Press 2 to listen to your temporary greeting
o Press 3 to re-record your temporary greeting
▪ After you have accepted your recording, you will hear:
• There is a Temporary Greeting that overrides your Standard Greeting
(unavailable message)
▪ The next time you access your voice mail you will need to access Voice Mail
Options (0)
▪ You will hear:
• there is a temporary greeting that overrides your standard greeting
▪ This will loop back to Option 0 (Mailbox Options).
▪ If you choose Option 4 (Temporary Greeting), then you will hear:
• Press 1 to record a Temporary greeting.
• Press 2 to erase your Temporary greeting
▪ If you Erase your temporary greeting it defaults to your Unavailable and Busy
message.
Admin:
Access the Admin Portal
• Click on the Grid icon or Apps (Applications) on the left toolbar
• Select Automation Manager
• A new tab will appear
• Reference our Admin Guide for managing the pbx settings

Other Applications:
Mobile Download
• Click on the Grid icon or Apps (Applications) on the left
• Select Mobile Download
• This will give you direct links for the Apple App Store and Google Play Store
• Download the desired app
• Login into the app
o Use the QR code from 2. Log into Corenexa Mobile
o The app will give you the option
Desktop Download
• Click on the Grid icon or Apps (Applications) on the left
• Select Desktop Download
• A new tab will appear
• Select the correct installer
• Run the installer
• Accept the default options
Other ways to download the desktop App
• https://meet.corenexa.com/
• Select Download in upper right corner
• A new tab will appear
• Select the correct installer
• Run the installer
• Accept the default options
