
One Talk T64LTE 4G
Desk Phone User Guide
verizon.com/support/one-talk/
verizon.com/support/yealink/

User guide
2
Table of contents
Before you begin ................................................................................................................................. 6
Getting started .................................................................................................................................... 6
T64LTE hardware .................................................................................................................................................................... 6
Power LED indicator ................................................................................................................................................................ 7
Screen and icons ..................................................................................................................................................................... 8
Control center and notification center .................................................................................................................................. 8
The Home screen ................................................................................................................................................................ 9
Dss screen ........................................................................................................................................................................ 10
Call Screen........................................................................................................................................................................ 10
Status icons....................................................................................................................................................................... 11
Navigating menus and fields ................................................................................................................................................. 11
Entering information .............................................................................................................................................................. 11
Using the onscreen keyboard............................................................................................................................................ 11
English input method ......................................................................................................................................................... 12
Using the phone keypad and dial pad ............................................................................................................................... 13
eSIM activation and device registration ..................................................................................... 14
SMS ...................................................................................................................................................... 16
Sending messages ................................................................................................................................................................ 16
Receiving messages ............................................................................................................................................................. 17
Viewing the sent box ............................................................................................................................................................. 18
Viewing the draft box ............................................................................................................................................................. 18
Quick reply ............................................................................................................................................................................ 19
LTE or LAN mode switching .......................................................................................................... 19
Switching between LTE and LAN modes .............................................................................................................................. 19
Switching from LTE to LAN ............................................................................................................................................... 19
Switching from LAN to LTE ............................................................................................................................................... 20
Auto-detection ................................................................................................................................................................... 20
Available 4G signal, LTE Account Login Failure ............................................................................................................... 21
No 4G signal ..................................................................................................................................................................... 21
Poor 4G Signal .................................................................................................................................................................. 22
Airplane mode enabled, unavailable 4G signal ................................................................................................................. 22
Available 4G signal under LAN mode ............................................................................................................................... 25
Call features ...................................................................................................................................... 26
Placing calls .......................................................................................................................................................................... 26
Placing a call from the dialer ............................................................................................................................................. 26
Placing multiple calls ......................................................................................................................................................... 26
Redialing a number ........................................................................................................................................................... 27
Placing an International Call.............................................................................................................................................. 27
Placing a call from the call history ..................................................................................................................................... 27
Placing a call from the directory ........................................................................................................................................ 27
Answering calls ..................................................................................................................................................................... 28
Answering a call ................................................................................................................................................................ 28
Answering a call when in a call ......................................................................................................................................... 28
Redirecting Incoming Calls .................................................................................................................................................... 28
Forwarding All Incoming Calls to a Contact ...................................................................................................................... 28
Deactivating Call Forward ................................................................................................................................................. 28
Forwarding an Incoming Call Manually ............................................................................................................................. 29
Switching among the handset, speakerphone and headset modes ...................................................................................... 29
Switching between calls screen and idle screen ................................................................................................................... 29
Switching to the Home Screen during a Call ..................................................................................................................... 29
Switching to the Talking Screen ........................................................................................................................................ 29
Silencing or rejecting incoming calls ...................................................................................................................................... 29
Silencing a call .................................................................................................................................................................. 29
Rejecting a call manually .................................................................................................................................................. 30
Rejecting Anonymous Calls .............................................................................................................................................. 30
Rejecting calls with Do Not Disturb (DND) ........................................................................................................................ 30
Activating DND for All Lines .............................................................................................................................................. 30
Ending calls ........................................................................................................................................................................... 31
Muting/unmuting audio .......................................................................................................................................................... 31
Keep mute ............................................................................................................................................................................. 31
Holding and resuming calls ................................................................................................................................................... 32
Holding a call ..................................................................................................................................................................... 32
Resuming a held call ......................................................................................................................................................... 32
Diverting Calls to a Contact ............................................................................................................................................... 32
Transferring calls ................................................................................................................................................................... 32

User guide
3
Performing a direct (blind) transfer .................................................................................................................................... 32
Performing Semi-Attended/Attended Transfer .................................................................................................................. 33
Conference calls .................................................................................................................................................................... 33
Local conference ............................................................................................................................................................... 34
Setting up a local conference call ...................................................................................................................................... 34
Creating a hybrid conference ............................................................................................................................................ 34
Holding or resuming a conference call .............................................................................................................................. 34
Muting or unmuting a conference call ............................................................................................................................... 34
Ending a conference call ................................................................................................................................................... 34
Call recording ........................................................................................................................................................................ 35
Recording a call ................................................................................................................................................................ 35
Recording a conference .................................................................................................................................................... 35
Setting a Mark When Recording a Call ............................................................................................................................. 35
Stopping a recording ......................................................................................................................................................... 35
Checking storage space .................................................................................................................................................... 36
Advanced call features .................................................................................................................. 36
Call pickup ............................................................................................................................................................................. 36
Picking up a call directly .................................................................................................................................................... 36
Picking up a group call directly .......................................................................................................................................... 36
Call park and call retrieve ...................................................................................................................................................... 36
Parking a call ..................................................................................................................................................................... 36
Retrieving a parked call ..................................................................................................................................................... 37
Voice mail .............................................................................................................................................................................. 37
Setting the voice mail code ............................................................................................................................................... 37
Leaving voice mails ........................................................................................................................................................... 37
Listening to voice mails ..................................................................................................................................................... 37
Directory ............................................................................................................................................ 38
Local directory ....................................................................................................................................................................... 38
Managing the local directory groups ................................................................................................................................. 38
Adding contact groups ...................................................................................................................................................... 38
Editing Contact Groups ..................................................................................................................................................... 38
Deleting contact groups .................................................................................................................................................... 38
Managing the local directory contacts ............................................................................................................................... 38
Adding contacts ................................................................................................................................................................. 38
Viewing contacts ............................................................................................................................................................... 39
Editing contacts ................................................................................................................................................................. 39
Deleting a contact ............................................................................................................................................................. 39
Deleting all contacts .......................................................................................................................................................... 39
Moving a local directory contact to blocklist ...................................................................................................................... 39
Searching for contacts ...................................................................................................................................................... 40
Blocklist ................................................................................................................................................................................. 40
Adding a blocklist contact .................................................................................................................................................. 40
Viewing blocklist contacts ................................................................................................................................................. 40
Editing a blocklist contact .................................................................................................................................................. 40
Deleting blocklist contacts ................................................................................................................................................. 40
Deleting a blocklist contact ................................................................................................................................................ 41
Deleting all blocklist contacts ............................................................................................................................................ 41
Moving a blocklist contact to the local directory ................................................................................................................ 41
Moving Multiple Contacts from Blocklist to Local Directory ............................................................................................... 41
Mobile contacts ..................................................................................................................................................................... 41
Saving a mobile contact to the local directory ................................................................................................................... 42
Searching for mobile contacts ........................................................................................................................................... 42
Updating the mobile contacts ............................................................................................................................................ 42
Remote phone book .............................................................................................................................................................. 42
Searching for remote phone book contacts ....................................................................................................................... 42
Viewing remote phone book contacts ............................................................................................................................... 43
Saving a remote phone book contact to the local directory ............................................................................................... 43
Saving a remote phone book contact to the blocklist ........................................................................................................ 43
Call history ........................................................................................................................................ 43
Call history icons ................................................................................................................................................................... 43
Viewing history records ......................................................................................................................................................... 44
Saving a history record to local directory ............................................................................................................................... 44
Saving a history record to blocklist ........................................................................................................................................ 44
Deleting history records ......................................................................................................................................................... 44
Deleting a call record ........................................................................................................................................................ 44
Deleting all call records ..................................................................................................................................................... 44
System applications ....................................................................................................................... 45
Gallery ................................................................................................................................................................................... 45
Viewing Pictures/Videos .................................................................................................................................................... 45

User guide
4
Editing Pictures ................................................................................................................................................................. 45
Rotating Pictures ............................................................................................................................................................... 45
Adding a Filter for Pictures ................................................................................................................................................ 46
Adding a Frame for Pictures ............................................................................................................................................. 46
Cropping Pictures .............................................................................................................................................................. 46
Coloring Pictures ............................................................................................................................................................... 47
Setting a Picture as Wallpaper .......................................................................................................................................... 47
Printing Pictures ................................................................................................................................................................ 47
Deleting Pictures/Videos ................................................................................................................................................... 47
Sharing Pictures/Videos via Bluetooth .............................................................................................................................. 48
Recorder ............................................................................................................................................................................... 48
Recording audio ................................................................................................................................................................ 49
Playing a recorded call ...................................................................................................................................................... 49
Pause/resuming a playback .............................................................................................................................................. 49
Fast Forwarding/rewinding a playback .............................................................................................................................. 50
Stopping a playback .......................................................................................................................................................... 50
Copying a Recorded Audio to USB Flash Drive ................................................................................................................ 50
Copying All Recorded Audio to USB Flash Drive .............................................................................................................. 50
Renaming the recording .................................................................................................................................................... 51
Deleting a recording .......................................................................................................................................................... 51
Deleting all recordings ....................................................................................................................................................... 51
Checking storage space .................................................................................................................................................... 51
Customizing your phone ................................................................................................................ 52
Changing the Administrator Password .............................................................................................................................. 52
Wallpaper .............................................................................................................................................................................. 52
Changing wallpaper on idle screen ................................................................................................................................... 52
Adding a wallpaper from a USB flash drive ....................................................................................................................... 53
Screen saver ......................................................................................................................................................................... 53
Changing the waiting time for screen saver ...................................................................................................................... 53
Setting the screen saver type ............................................................................................................................................ 53
Changing the Screen backlight and time ............................................................................................................................... 53
Changing the language ......................................................................................................................................................... 54
Changing the input method ................................................................................................................................................... 54
Time & date ........................................................................................................................................................................... 55
Setting the time and date manually ................................................................................................................................... 55
Changing the time and date format ................................................................................................................................... 55
Phone lock and Administrator Password ............................................................................................................................... 56
Accessing the Advanced Settings with Administrator Password ....................................................................................... 56
Setting the phone lock ....................................................................................................................................................... 56
Locking your phone manually ........................................................................................................................................... 56
Unlocking your phone ....................................................................................................................................................... 56
Changing your phone unlock PIN ...................................................................................................................................... 57
Line keys ............................................................................................................................................................................... 57
Assigning functionality to a line key ................................................................................................................................... 57
Changing the locations of the line keys ............................................................................................................................. 57
Deleting a line key ............................................................................................................................................................. 57
Audio settings .................................................................................................................................. 57
Adjusting the volume ............................................................................................................................................................. 58
Setting the ring tone .............................................................................................................................................................. 58
Setting a ring tone for the phone ....................................................................................................................................... 58
Setting a ring tone for an account ..................................................................................................................................... 58
Setting a ring tone for a group ........................................................................................................................................... 58
Setting a ring tone for a contact ........................................................................................................................................ 59
Disabling the key tone ........................................................................................................................................................... 59
Enabling touch tone ............................................................................................................................................................... 59
Configuring notification sound ............................................................................................................................................... 59
Enabling silent mode ............................................................................................................................................................. 60
Bluetooth ........................................................................................................................................... 60
Activating the Bluetooth mode ............................................................................................................................................... 60
Pairing and connecting the Bluetooth headset ...................................................................................................................... 60
Pairing and connecting the Bluetooth-enabled mobile phone ............................................................................................... 61
Pairing and connecting two Bluetooth devices ...................................................................................................................... 61
Syncing the mobile contacts to the phone ............................................................................................................................. 61
Enabling the mobile contacts sync feature ........................................................................................................................ 62
Viewing your mobile contacts ............................................................................................................................................ 62
Handling a mobile phone call on the phone .......................................................................................................................... 62
Configuring the phone audio feature ..................................................................................................................................... 63
Configuring the Media Audio Feature .................................................................................................................................... 63
Changing your phone's Bluetooth name................................................................................................................................ 63

User guide
5
Disabling Bluetooth Device Discovery ................................................................................................................................... 63
Renaming the paired Bluetooth device .................................................................................................................................. 64
Unpairing the Bluetooth device ............................................................................................................................................. 64
Sending files via Bluetooth .................................................................................................................................................... 64
Receiving files via Bluetooth ................................................................................................................................................. 64
Disconnecting the Bluetooth device ...................................................................................................................................... 65
Deactivating the Bluetooth mode........................................................................................................................................... 65
Wireless network ............................................................................................................................. 65
Activating the Wi-Fi mode ..................................................................................................................................................... 65
Connecting to the wireless network ....................................................................................................................................... 65
Connecting to an available wireless network manually ..................................................................................................... 66
Adding a wireless network manually ................................................................................................................................. 66
Viewing the wireless network information .............................................................................................................................. 66
Disconnect from a wireless network ...................................................................................................................................... 67
Deactivating the Wi-Fi mode ................................................................................................................................................. 67
Maintaining your phone ................................................................................................................. 67
Investigating warnings ........................................................................................................................................................... 67
Clearing warning icon ............................................................................................................................................................ 67
Rebooting your phone ........................................................................................................................................................... 68
Resetting to factory settings .................................................................................................................................................. 68
Updating the phone configuration.......................................................................................................................................... 69
Clearing User's personalized configuration settings .............................................................................................................. 69
Notices ............................................................................................................................................... 70
Technical support .................................................................................................................................................................. 70
Important customer information ............................................................................................................................................. 70
WEEE warning ...................................................................................................................................................................... 70
Disclaimer ............................................................................................................................................................................. 70
Important 911 emergency response information ................................................................................................................... 71
Declaration of conformity ........................................................................................................................................... 71
Part 15 FCC Rules ................................................................................................................................................................ 71
Class B digital device or peripheral ....................................................................................................................................... 71
Important safety precautions ................................................................................................................................................. 71
Danger–electric shock and fire .............................................................................................................................................. 72
Learn more ............................................................................................................................................................................ 72

User guide
6
Before you begin
This guide provides information you need to quickly use your new phone.
Make sure you place the phone on a location with strong 4G signal to ascertain the proper activation and functioning of the
device. The phone can only be fully activated over LTE. If the phone does not properly go through the eSIM provisioning the
first time, if you were to set it up to LAN mode, the phone will be unable to register.
Examples and graphics in this guide may not directly reflect what is displayed or is available on your phone screen since
firmware updates occur and may change the user interface of the phone.
Getting started
Before you use your phone, take some time to get familiar with its features and user interface.
The terms "the phone" and "your phone" refer to the LTE Desk phone.
T64LTE hardware
Understanding the phone hardware helps you easily use the phone's features.
No.
Item
Description
1
Volume Key
Adjust the volume of the
handset, the
speakerphone, the earphone, the
ringer, or the media.
2
Redial Key
Opens the call history logs to redial the last number

User guide
7
3
Speaker
Provide audio output
during
hands-free.
4
Keypad
Enable you to
enter
numbers, letters, and special characters.
5
Speakerphone
Toggle the
speakerphone (hands-free)
mode or not. The LED indicator glows
green when the
speakerphone
is activated.
6
Mute Key
Toggle the
microphone
on
or
off. The LED
indicator glows
red when the
mute feature
is activated.
7
Headset
Key
Toggle the
headset on
or
off. The LED
indicator glows green when the
headset
is activated.
8
Touch
Screen
4 inches (480 x 800) capacitive touch screen, tap to
select
items and
navigate
menus.
9
Power LED
Indicator
Indicate
phone statuses: When receiving an
incoming
call, it fast flashes.
When
receiving a voice message,
it slowly flashes.
1
0
USB2.0 port
(5V/0.5 A)
Allow you to
connect
USB devices.
Power LED indicator
The power LED indicator indicates the call and message status.
Led status
Description
Solid red
The phone is initializing.
Fast-flashing red (0.3s)
The phone is ringing.
Slowly-flashing red (1s)
The phone has received a voice mail.
Solid red for 0.5s and off for 3s alternately
The phone in entering the power-saving mode.

User guide
8
Screen and icons
The user screens and icon indicators can help you navigate and understand the important information on the phone's status.
Control center and notification center
Control center or notification center allows you to access some features or view important notifications quickly.
Procedure
1.
Swipe down from the top of the screen.
You can swipe up from the bottom of the screen to hide this screen.
No.
Name
Description
1
Screen
brightness
Drag the slider to adjust the screen brightness.
2
Call Center
•
Airplane Mode: Tap to turn on/off airplane mode.
•
Forward: Tap to enter Call Forward setting screen.
•
Silent: Tap to turn on/off Silent quickly.
•
Wi-Fi
•
Tap to turn on/off Wi-Fi quickly.
•
Long tap to enter the Wi-Fi setting screen.
•
Bluetooth
•
Tap to turn on/off Bluetooth quickly.
•
Long tap to enter the Bluetooth setting screen.
3
Menu Center
•
Tap Settings to access phone settings and features.
•
Tap Message to access the voice mails or the SMS messaging section
•
Tap Recorder to record a call or meeting.
•
Tap Notifications to view detailed notification message.
•
Tap
亩
to delete all notifications.
•
Tap Gallery to view photos and videos.

User guide
9
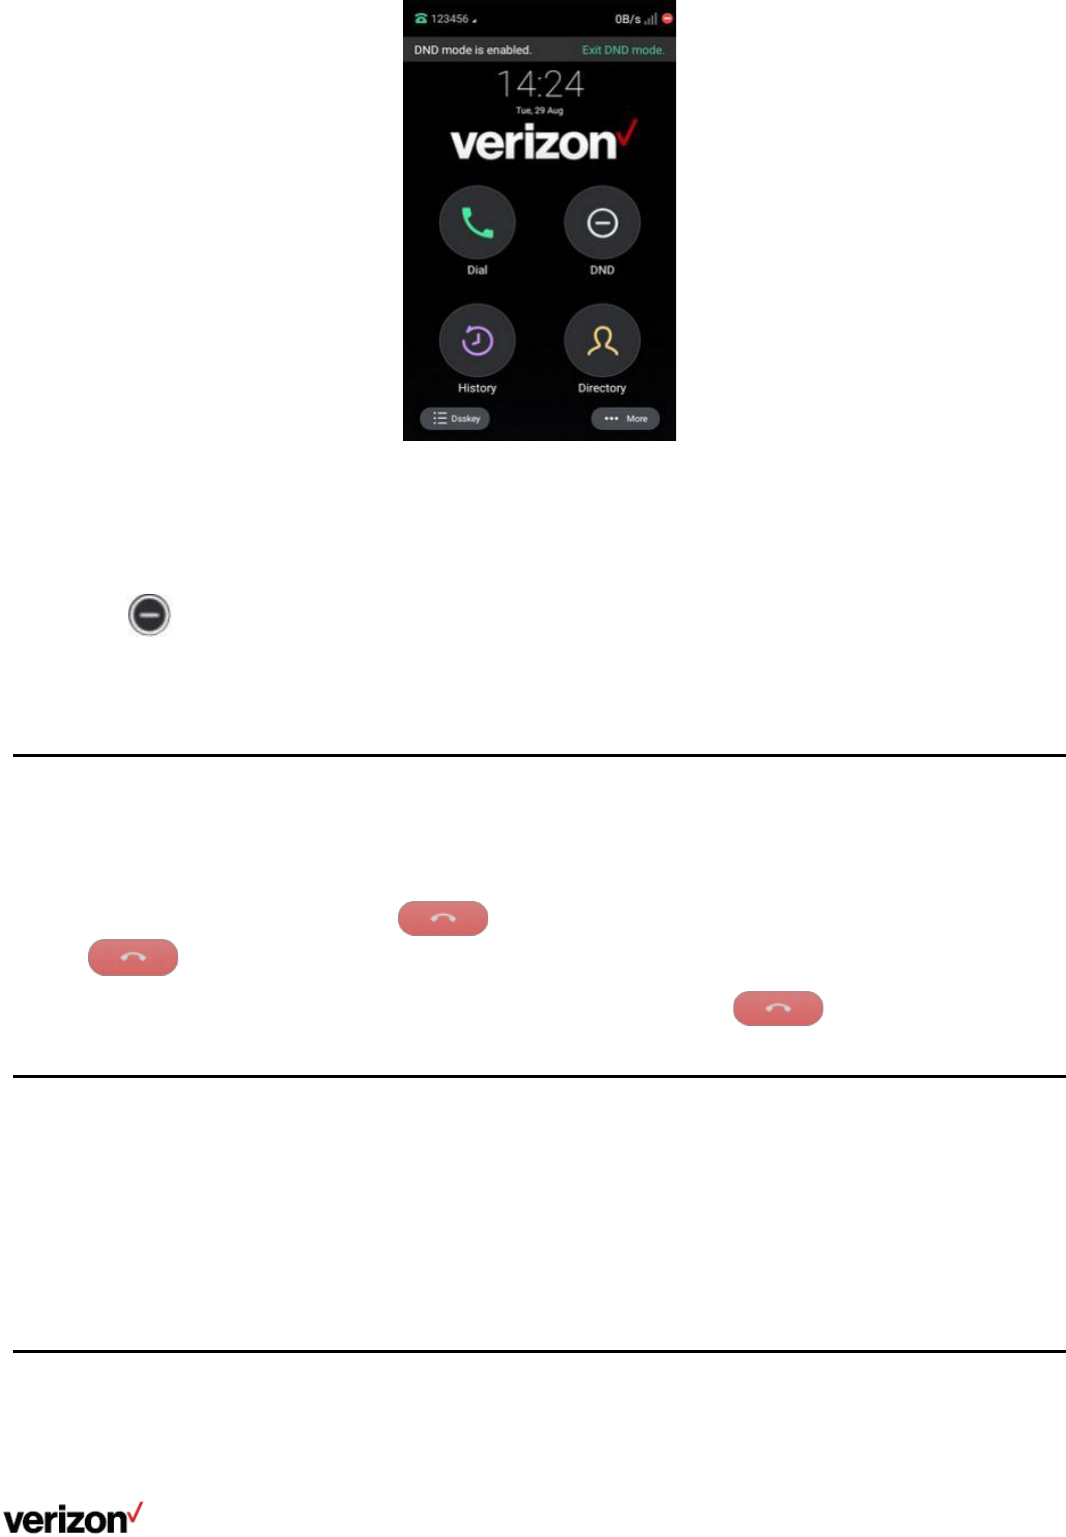
The Home screen
On the home screen, you can view the phone's current state, add line keys, and access the dialing, Directory and
history screens.
No.
Name
Description
1
Status bar
Displays the label of the current account and icons.
2
LTE information
4G LTE Signal strength
3
Telephone
number
Displays the current registered telephone number
If there is no account registered on the phone, No Service appears.
4
Digital Clock
Widget
Displays the phone time and date.
5
Main UI icons
Dial: Tap to enter the dialing screen.
DND: Tap to enter Do not disturb mode.
History: Tap to enter the History screen and view history records.
Directory: Tap to enter the Directory screen and view contacts.
6
Dsskey
Tap to see the line appearances of the phone and access the ‘Features’
section.
7
More
Tap to enter the control center.

User guide
10
Dss screen
The Dsskey screen displays phone’s line keys
No.
Application
Description
1
Tap to add a line key.
2
Line Key List
Shows the line key labels. You can customize the line keys.
3
Page Keys
Tap to turn to the corresponding page.
Call Screen
All of your active and held calls are displayed on the calls screen. When there is an active call and a held call, the calls screen
is shown below:
You can tap the Previous/Next to switch between multiple calls.

User guide
11
Status icons
No.
Icons
Description
1
Mute mode: Mute mode is enabled.
2
4G LTE active: The device is connected to a 4G LTE wireless network.
3
Signal Strength: Cellular network signal strength.
4
Network not available: No wireless network is available.
5
Wi-Fi active: Wi-Fi is active.
6
Wi-Fi available: A Wi-Fi network is available.
Navigating menus and fields
You can use different gestures on the touch screen to perform various operations.
Procedure
1.
To operate your phone using gestures, follow these tips:
Action
Gesture
Tap
Touch an item on the screen with your finger, and then lift your finger.
Long Tap
Touch an item for about 2 seconds without lifting your finger from the screen till an action
occurs.
Swipe
Touch and move. When you want to scroll quickly, swipe your finger across the screen,
either up, down, left or right.
Drag
Touch and hold, then move. To stop scrolling, stop the dragging motion.
Pinch Open
Touch the screen with two or more fingers, and then move the fingers away from each
other (stretch).
Note: It works viewing images: screenshots, Wallpaper.
Pinch Close
Touch the screen with two or more fingers, and then move the fingers towards each other
(pinch).
Entering information
The phone provides onscreen keyboard, phone keypad and dial pad to enter data. Phone keypad and dial pad provide a
standard key layout, which enables you to use existing or familiar key positions.
Using the onscreen keyboard

User guide
12
When you use the onscreen keyboard, the following things you need to know:
If you want to
Action
Position the cursor.
Tap to the position.
Select all characters.
Long tap the entered character(s).
Cut/Copy characters.
1.
Long tap the entered character(s).
2.
Drag / to select the characters you want to cut/copy.
3.
Tap Cut/Copy on the top of the phone screen.
4.
Long tap the desired field.
5.
Tap Paste.
Delete more
characters
at a time.
•
Long tap the entered character(s).
Drag / to select the characters you want to delete.
•
Long tap .
Replace characters.
Drag your finger to highlight the characters you want to replace.
Tap the desired character.
English input method
You can use the English input method to enter information.
No.
Item
Description
1
26 English Letters
•
Tap to enter letters.
•
Long tap a key then slide to choose one of the options to enter an
alternate character.
2
Tap to switch to the uppercase input mode.
3
Tap to switch to the numeric&symbolic input mode.
4
Special Characters
Tap to enter the special character.
5
Long tap to change the input language.
6
Space Key
•
Tap to enter spaces.
Long tap to change the input method.
7
Label automatically to identify
the context-sensitive
•
Next Key: Tap to go to the next field.

User guide
13
features.
•
Done Key: Tap to confirm the settings.
•
Send Key: Tap to dial out the number.
8
Delete Key
•
Tap to delete the entered characters one by one.
•
Long tap to delete two or more characters.
Tap to switch to the numeric & symbolic input mode as shown below:
Tap to switch to the symbolic input mode as shown below:
Using the phone keypad and dial pad
You can use the keypad on your phone or dial pad to enter data. The dial pad only provides digit keys, # key, and * key.
You can tap to switch to the onscreen keyboard.

User guide
14
eSIM activation and device registration
1. When the phone is powered on for the first time, it will automatically go through the 4G LTE network activation process.
2.
After your eSIM card is activated, the 4G signal will be displayed in the upper-right corner of the phone screen.
3.
After the eSIM activation, the phone will trigger the bootup process to download the configuration files when it
connects to the LTE network.

User guide
15
4.
After the configuration file is deployed, the phone will reboot to trigger the E911 location identification and register the
LTE account automatically. Please update your phone’s location, as needed.
5. You can view the phone number by navigating to Status > LTE.

User guide
16
SMS
You can use this feature to send or receive messages.
Sending messages
1.
. Go to Message > Text Message > New Message.
2.
Enter the target number in the To field and the desired text in the input box on the New Message page.
3. Tap Send Message
to send a message.
If the message is successfully sent, the page prompts success and the target person will receive a message.

User guide
17
Receiving messages
1.
When you receive a message, the page is displayed as below:
2. Do one of the following:
Tap View to view the message details.

User guide
18
Tap Exit to return to the idle page if you are busy at that time. You can tap Message > Text Message > Inbox to
view the message when you are available. The green message icon means you have a new, unread message. This will
turn grey after you read the message.
Viewing the sent box
Go to
〇
Message > Text Message > Inbox, and you can view the messages sent from this phone.
Viewing the draft box
Go to Message > Text Message > Inbox, and you can view the unsent but saved messages.

User guide
19
Quick reply
When reading the received message, you can tap Quick replies
to go to the Quick Replies page and select the desired
text to reply.
LTE or LAN mode switching
The LTE Desk phone can only perform the first-time activation via LTE. However, once the phone is active at any point in time
the phone is also capable to operate in LAN mode for those cases where the LTE signal is either too low or non-existent.
You can switch between the LAN mode and the LTE mode anytime you want. If the LTE signal becomes too low the phone
will present a prompt and ask if you want to switch to LAN mode. Every time you switch modes, the phones must reboot to
properly register via LTE or Broadband.
Switching between LTE and LAN modes
The 4G phone is under the LTE mode by default and signed in to an LTE accout. It also allows you to sign in to the SIP
account after switching to LAN mode. In the following section, we will
introduce how to switch between the two modes to use the desired account.
Switching from LTE to LAN

User guide
20
After switching to LAN mode, you can connect to a LAN or Wi-Fi and sign in to a SIP account (up to 16 accounts).
1.
Go to Settings > Basic Settings > Switch Account mode, select LAN mode, and tap the check icon in the
top-right corner.
The phone will reboot to automatically trigger the E911 location identification.
Switching from LAN to LTE
After you switch to LTE mode, you can use one LTE account only.
1.
Go to Settings > Basic Settings > Switch Account mode, select LTE mode, and tap the check icon in the
top-right corner.
The phone will reboot to automatically trigger the E911 location identification.
Auto-detection
The phone will automatically detect available signals under
Page 20
the following situations:
•
Available 4G signal, LTE account login failure
•
No 4G signal

User guide
21
•
Poor 4G signal
•
Airplane mode enabled, unavailable 4G Signal
•
Available 4G signal under LAN mode
Available 4G signal, LTE Account Login Failure
Situation
Dialog
Operation
LTE account login failure
(caused by base station faulty,
no signal in the service area,
the IMS PDN connection failure,
etc.)
No LTE signal detected,
switch the account to
LAN mode in the Basic
Settings menu of the
phone.
Click OK and the dialog
disappears automatically but
the phone will not switch to the
LAN mode automatically.
Note: If you do not click OK, the
dialog will not disappear.
No 4G signal
Under LTE mode, the phone has no 4G signal and the signal bars are greyed out.
Situation
Dialog
Operation
The phone is disconnected
from any wired or wireless
network.
The phone connects to a
wired or wireless network.
No LTE signal detected,
switch the account to
LAN mode in the Basic
Settings menu of the
phone.
Click OK and the dialog disappears
automatically but the phone will not
switch to the LAN mode automatically.
Note:
If you do not click OK, the dialog
will not disappear.

User guide
22
Poor 4G Signal
Situation
Dialog
Operation
The 4G signal
is poor and
not stable
under the LTE
mode
LTE Signal strength is too low for
the device to properly operate.
Move the phone to a better location
or switch to LAN mode in the Basic
Settings menu of the phone.
•
Click OK and the dialog disappears
automatically.
•
If you do not click OK, the dialog will not
disappear.
•
The dialog will pop up again if the phone
detects the signal error after 5 minutes (the
default detecting interval).
•
When the 4G signal is available, the dialog will
disappear automatically.
Note: the criteria for poor signal is RSRP <=-100 dBm&RSRQ <-20 dB&SINR<= 0 dB.
Airplane mode enabled, unavailable 4G signal

User guide
23
When you connect the phone to the LTE network but not the wired network, and you enable the Airplane Mode, the
LTE network, the wired network, and connected Wi-Fi are all disabled.
Situation
Dialog
Operation
Airplane mode enabled
and no available network.
No Ethernet/Broadband
connection detected. Check
Ethernet connection and
Internet Connection.
No service.
Connect to a wired
network so the phone
detects available signal.
To register via LAN/Wi-Fi
mode, the phone needs to
reboot, press OK to continue.
Click OK, then the phone will
reboot to switch to the LAN
mode.
Click Cancel, the dialog
disappears and you are still in
LTE mode with Airplane
mode enabled.
If you ignore the dialog, it will
not disappear.
When you unplug then
plug the network cable so
the device detects
available signal again.
To register via LAN/Wi-Fi
mode, the phone needs to
reboot, press OK to continue
Click OK, then the phone will
reboot to switch to the LAN
mode.
Click Cancel, the dialog
disappears and you are still in
LTE mode with
Airplane mode enabled. If you
ignore the dialog, it will not
disappear.
Connect to Wi-Fi.
To register via LAN/Wi-Fi
mode, the phone needs to
reboot, press OK to continue
Click OK, then the phone will
reboot to switch to the LAN
mode.
Click Cancel, the dialog
disappears and you are still in
LTE mode with Airplane
mode enabled. If you ignore
the dialog, it will not
disappear.
When you connect the phone to both the LTE network and the wired network, and you enable the Airplane Mode, both the
LTE network and the wired network are disabled.

User guide
24
Situation
Dialog
Operation
When the phone detects
available LAN signal
To register via LAN/Wi-Fi
mode, the phone needs to
reboot, press OK to
continue.
Click OK, then the phone will
reboot to switch to the LAN
mode.
Click Cancel, the dialog
disappears and you are still in
LTE mode with Airplane mode
enabled.
If you ignore the dialog, it will not
disappear.
When you unplug then plug
the network cable so the
device detects available
signal again
To register via LAN/Wi-Fi
mode, the phone needs to
reboot, press OK to
continue.
Click OK, then the phone will
reboot to switch to the LAN
mode.
Click Cancel, the dialog
disappears and you are still in
LTE mode with Airplane mode
enabled.
If you ignore the dialog, it will not
disappear.
Connect to Wi-Fi
To register via LAN/Wi-Fi
mode, the phone needs to
reboot, press OK to
continue.
Click OK, then the phone will
reboot to switch to the LAN
mode.
Click Cancel, the dialog
disappears and you are still in
LTE mode with Airplane mode
enabled.
If you ignore the dialog, it will not
disappear.
The Airplane mode is still enabled after the phone reboots.
Situation
Dialog
Operation
When the phone
detects available
LAN signal
To register via LAN/Wi-Fi mode,
the phone needs to reboot, press
OK to continue.
Click OK, then the phone will reboot to
switch to the LAN mode.
Click Cancel, the dialog disappears and
you are still in LTE mode with Airplane
mode enabled.
If you ignore the dialog, it will not
disappear.

User guide
25
Available 4G signal under LAN mode
Prerequisites
1.
Airplane mode is disabled.
2.
The phone is under LAN mode.
3.
Your administrator has enabled the mode detecting feature, which allows the phone to automatically detect the 4G
signal under LAN mode.
Situation
Dialog
Operation
The phone detects that at least
3 bars of 4G signal are available
4G signal detected, do you want to
continue using Ethernet/Wi-Fi or
switch over to LTE?
Click Yes, then the phone will
reboot to switch to the LTE
mode.
Click No, the dialog disappears
and you are still in LAN mode.
If you ignore the dialog, it will not
disappear.
The phone detects that at least
3 bars of 4G signal are available
after rebooting
4G signal detected, do you want to
continue using Ethernet/Wi-Fi or
switch over to LTE?
Click Yes, then the phone will
reboot to switch to the LTE
mode.
Click No, the dialog disappears
and you are still in LAN mode.
If you ignore the dialog, it will not
disappear.

User guide
26
Notes:
1.
The dialog will pop up only when the phone is idle. It will not pop up when you are having a call, upgrading the
phone, or under other situations.
2.
If you ignore the dialog, the dialog will disappear automatically when the phone detects no available 4G signal.
Otherwise, it will not disappear.
3.
The phone will detect the signal at the interval your administrator sets. If the 4G signal is available again, the dialog
will pop up again.
Call features
You can use the phone to place and answer calls, ignore incoming calls, transfer a call to someone else, conduct a
conference call and perform other basic call features.
Placing calls
You can use your phone like a regular phone to place calls in many ways easily.
Placing a call from the dialer
The Dialer enables you to enter a number to place a call, and it displays a list of previously placed calls or contacts in
your directory.
You can also select the desired contact from the search list, the placed call list or Directory.
.
Procedure
1.
Do one of the following:
• Tap Dial .
• Pick up the handset, press the Speakerphone key or the Headset key.
2.
Enter a number.
3.
Select Send .
Placing multiple calls
When you are in a call, you can hold your current call and place a new call.

User guide
27
Procedure
1.
Tap Hold to place the original call on hold.
2.
Select New Call.
2.
Enter the desired number or select a contact.
3.
Select Send .
Redialing a number
The phone keeps a record of all the placed calls. You can recall the contact you recently called.
Procedure
1.
Press the Redial key.
•
The phone screen displays the placed calls list.
2.
Tap the desired record.
Tip: Press the Redial key twice to recall the contact you called.
Placing an International Call
You can place calls to international phone numbers on your phone.
Procedure
1.
Long press digit key 0 on the phone keypad until the plus sign (+) appears.
2.
Enter the phone number with the country code.
3.
Select Send .
Note: An International plan must have been added to the line for International dialing to work properly. If there is no plan
added to the line, the user will hear a network generated error noting the call cannot be completed.
Placing a call from the call history
You can place calls to contacts from the History list, which contains the calls that were recently placed, answered, missed,
or forwarded.
Procedure
1.
Tap History .
• The phone screen displays all call records.
2.
Select the desired call list.
3.
Tap the desired entry.
Placing a call from the directory
You can place a call to a contact directly from your directory.
Procedure
1.
Tap .
2.
Select the desired directory.
3.
If the contact was added to a specified contact group, you can select the desired contact group.
4.
Tap the desired contact.
•
If the
selected
contact has multiple numbers, tap the desired number to dial out.

User guide
28
Answering calls
When you receive a call, you can choose to answer it manually or automatically.
Answering a call
When you receive an incoming call, the phone rings and the screen displays the information of the incoming call. You can
choose to answer the incoming call.
Procedure
1.
Do one of the following: Pick up the handset.
2.
Press the Speakerphone key.
3.
Press the Headset key.
4.
Tap Answer or Line key.
The call is answered in the speakerphone (hands-free) mode by default.
Answering a call when in a call
You can answer a call when there is already an active call on your phone.
When you are in an active call and an incoming call arrives on the phone, a call waiting tone beeps, and the incoming call
information is displayed.
Procedure
1.
Select Answer.
• The active call is placed on hold, and the incoming call becomes active.
Redirecting Incoming Calls
When you are not available to answer calls on your phone, you can forward the calls to another phone.
Forwarding All Incoming Calls to a Contact
You can set up the phone to forward all incoming calls to a contact.
Procedure
1. Go to Dsskey > User Setting > Call Forward.
2. Select the desired forwarding type.
Always Forward: Forwards all incoming calls.
Busy Forward: Forwards incoming calls when you’re in a call.
No Answer Forward: Forwards all unanswered incoming calls.
3. Turn on the desired forwarding type.
4. Do one of the following:
Enter the number you want to forward to in the Forward to field.
。
Select and select the desired contact.
5. If you select No Answer Forward, select the desired ring time to wait before forwarding in the After Ring Time field.
6. Select > .
Deactivating Call Forward
You can deactivate call forward when you no longer want to forward your calls.
Procedure
1. Go to Dsskey > User Setting > Call Forward.

User guide
29
2. Tap the desired forwarding type.
3. Turn off the desired forwarding type.
4. Select > .
Forwarding an Incoming Call Manually
You can manually forward the call to another contact while your phone rings.
Procedure
1. When the phone is ringing, tap .
2. Enter the number you want to forward the incoming call to.
3. Select . The phone prompts a call forward message.
Switching among the handset, speakerphone and headset modes
You can select the desired mode before placing a call or can alternate among Speakerphone, headset, and handset modes
during a call.
When using the speakerphone or the headset, the LED indicator glows green.
Procedure
1.
During the call, pick up the handset, press the Speakerphone key, or press the Headset key.
• For example, if you're using the handset, press the Headset key to switch to the headset, or press the Speakerphone
key to switch to the speakerphone.
Switching between calls screen and idle screen
During the call, you can access other applications to confirm some issues. After the operation, you can return to the call
conveniently.
Switching to the Home Screen during a Call
During the call, you can go back to the idle screen to access other applications.
Procedure
1.
Tap the three-dot icon and select Home Page to return the home screen.
Switching to the Talking Screen
After going back to the idle screen, you can return to the talking screen as long as the call is not ended.
Procedure
1.
Tap Back To Talking on the top of the phone screen.
Silencing or rejecting incoming calls
When you receive an incoming call, you can choose to silence or reject the call instead of answering.
Silencing a call
You can silence a call to stop your phone from ringing. Even if you silence the call, the incoming call notification continues to
be displayed on your phone.
Procedure
1.
Select Silence .

User guide
30
Rejecting a call manually
You can reject a call manually, and the call may be sent to voice mail. The rejected calls are displayed in the Received Calls
list in your History list.
Procedure
1.
Select Ignore.
Rejecting Anonymous Calls
You can reject incoming calls from the callers who have hidden their identities. As a result, your phone will not ring and you
will not be notified of an attempted call.
Before You Begin
Check with your system administrator if the anonymous call rejection on code or off code is required. If required, get
it from your system administrator.
Procedure
1.
Go to Dsskey > User Setting > Anonymous Call Rejection.
2. Select the desired line.
3. Turn on Local Anonymous Rejection (Anonymous Rejection).
Rejecting calls with Do Not Disturb (DND)
You can enable DND to automatically reject all incoming calls when you do not want to be interrupted.
If you want to receive incoming calls from the specific numbers when DND is enabled, you can ask
your system administrator to set DND Authorized Numbers.
Note: Check with your system administrator to find out if the DND feature is available on your phone.
Procedure
1.
Tap the DND softkey set by your administrator.
• The DND icon appears in the status bar. And the phone prompts you that DND is enabled.
Activating DND for All Lines
If there are multiple lines on the phone, you can enable DND for all lines. After activating it, the phone will reject all incoming
calls automatically.
Note: If both DND and busy forward are activated on the phone, calls will be forwarded to the configured destination number.
Procedure
1. Do one of the following to enter the control center:
•
Swipe down from the top of the screen.
•
Tap on the homescreen.
2. The DND icon appears in the status bar. And the phone prompts you that DND is enabled.
User guide
31
Deactivating DND
You can deactivate DND when you are ready to resume receiving calls again.
Procedure
1. Do one of the following:
•
Tap on the homescreen.
•
Tap Exit DND mode on the idle screen.
The DND icon disappears from the status bar.
Ending calls
You can end the current call at any time.
Procedure
1. Do one of the following:
•
If you are using the handset, select or hang up the handset. If you are using the headset, select
.
•
If you are using the speakerphone, press the Speakerphone key or select .
Muting/unmuting audio
When you are in a call, you can mute the audio, so that you can hear the other person, but they cannot hear you.
Procedure
1.
Press the Mute key during a call.
• The mute key LED glows red.
2.
Press the Mute key again to unmute the call.
• The mute key LED goes out.
Keep mute
In a meeting room, if incoming calls are answered automatically on your phone, callers may hear your discussion with your
colleagues. You can keep the phone in mute to prevent this unintended situation.
The mute state of your phone persists across calls. The phone stays in the mute state until you unmute the microphone

User guide
32
manually or until the phone restarts.
Procedure
1.
Press the mute key when the phone is idle.
• The mute key LED glows red, and the mute icon appears on the idle screen.
2.
Press mute key again to deactivate the mute state.
Holding and resuming calls
You can place an active call on hold and resume the call when you are ready. When you place a call on hold, the held party
may hear the music or message on hold.
Holding a call
You can place an active call on hold on your phone.
Procedure
1.
Press the Hold key or select Hold during a call.
Note: When you have multiple calls on the phone and the current call is held, you can select Previous Call/Next Call or swipe
the screen to swap to the active call.
Resuming a held call
You can view and resume a held call on the phone.
Procedure
1.
Press the Hold key or select Resume.
• If multiple calls are placed on hold, select the desired call first.
Note: When you have multiple calls on the phone and the current call is active, you can select Previous Call/Next Call or swipe
the screen to swap to the held call.
Diverting Calls to a Contact
You can divert all incoming calls from a particular contact to another contact. Auto divert has precedence over call forward.
Procedure
1. Tap Directory .
2. Tap after the desired contact
3.
Tap to edit the contact information.
4. Enter a contact’s number you want to divert the call to in the Auto Divert field.
5. Save the change.
Transferring calls
During a call, you can transfer the call to another contact.
You can use one of three ways:
• Blind Transfer: Transfer a call directly to the third party without consulting.
• Semi-Attended Transfer: Transfer a call when receiving ringback.
• Attended Transfer (Consultative Transfer): Transfer a call with prior consulting.
Performing a direct (blind) transfer
You can transfer a call to another contact immediately without consulting with them first. You can enter the number, or select
a contact from directory or history to perform a blind transfer.

User guide
33
Procedure
1.
Press the Transfer key during a call.
2.
Do one of the following:
• Enter the number you want to transfer the call to, and press the Transfer. The phone will prompt a dialog box as the
following shows:
Select Direct to complete the transfer. (The call will automatically dial out in about 5 seconds if you do not select
Transfer.)
Performing Semi-Attended/Attended Transfer
You can transfer calls to other contacts immediately when receiving ringback or after consulting with them first.
Procedure
1. Select Transfer during a call.
2. Do one of the following:
•
Enter the number you want to transfer the call to.
•
Select Transfer > CONSULT to dial out.
•
Select and select the desired contact to dial out.
•
Select and select the desired entry to dial out.
3.
Do one of the following:
•
When you hear the ringback tone, select Transfer to finish the semi-attended transfer.
•
After the contact answers the call, select Transfer to finish the attended transfer (consultative transfer).
Tip: If you are using a handset, the transfer can be completed by hanging up the handset.
Conference calls
The phone supports creating local conference.
During the conference, follow these tips:
•
Use the handset or a headset if you're in an open environment.
•
Mute your microphone when you are not speaking, especially in noisy environments.

User guide
34
•
Avoid tapping or rustling papers near the microphone.
•
Speak in your normal voice without shouting.
Local conference
You can create up to six-way local conference.
Setting up a local conference call
Procedure
1.
Place a call to the first party.
2.
Select Conference to place a new call.
The active call is placed on hold.
3.
Dial the second party’s number.
4.
When the second party answers the call, select Conference to add the second party to the conference.
5.
Repeat the above steps to add more parties to the conference.
Creating a hybrid conference
You can merge the calls on your phone, and connected mobile phone into a hybrid conference. There are many ways to
create a hybrid conference, the following shows an example.
Before you begin
Make sure you have connected a mobile phone to your phone.
Procedure
1.
Place a mobile call over Bluetooth on the mobile phone.
2.
Place a call on the phone.
3.
Tap Conference.
4.
Tap the Hold Call.
The calls are merged into a conference call.
Holding or resuming a conference call
When you place a conference call on hold, other participants cannot hear each other until you resume the held conference
call.
Procedure
1.
Press the Hold key or tap Hold to place the conference on hold.
2.
Press the Hold key again or tap Resume to resume the held conference call.
Muting or unmuting a conference call
When you mute the local microphone during a conference call, other participants can hear each other except you.
Procedure
1.
Press the Mute key to mute the conference.
2.
Press the Mute key again to unmute the conference.
Ending a conference call
When you end the conference call, the other parties drop the call.
However, the system administrator can set up your phone so that the other two parties remain connected when you end the
conference call.
Procedure

User guide
35
1.
Select End Call .
Call recording
You can record up to 12 hours in one file. By default, the recorded files are saved in the internal SD card.
But if there is a USB flash drive connected to the rear USB port of your phone, the recorded files will be saved in the storage
device according to the priority: USB flash drive>internal SD card.
Recording a call
You can record the important parts during an active call.
Important: Before call recording, especially those involving PSTN, it is necessary to know about the rules and restrictions of
call recording in the country where you are.
It is also very important to inform all the call parties that you are recording and ask for their consent before recording the
conversation.
Procedure
1.
During a call, select Record.
• The phone screen displays a recording icon and recording duration.
Recording a conference
You can record conference calls in the same way as other calls. All conference participants are recorded while recording.
The following lists exceptions:
•
If one of the participants holds the conference call, only that participant is recorded. When a conference call is
placed on hold, recording of the conference is paused. You can place or answer other calls, which will be
recorded in the same file. When the conference call is resumed, recording of the conference resumes.
•
If one of the participants mutes the conference call, only that participant is not recorded.
Setting a Mark When Recording a Call
You can set a mark when recording a call to mark the special moment. And there will be a red flag on this moment when
playing the recorded file so that you can drag to the moment quickly.
Procedure
1.
Select .
The
icon
changes to , the number will
increase
if you
set
more marks.
Stopping a recording
You can stop recording a call before the call ends. The recording also stops when the active call ends. The recording will be
saved as a "*.aac" file in the internal SD card or the USB flash drive automatically.
Procedure
1.
Do one of the following:
• Select Stop during a call.
The recording icon and recording duration disappears. The screen prompts a message that the call is
recorded successfully.
• Select End Call .
The recording icon and recording duration disappears, and the phone returns to the idle screen. The screen
prompts a message that the call is recorded successfully.

User guide
36
Checking storage space
You can check the total space or available space of the phone or connected USB flash drive.
Procedure
Go to Settings > More > Storage.
Advanced call features
You can perform some server-dependent tasks on the phone. Contact your system administrator to find out if your phone
supports these advanced call features.
Call pickup
You can use call pickup to answer someone else’s incoming call on your phone. The phone supports the following two call
pickup features:
•
Directed call pickup - allows you to pick up incoming calls to another phone.
•
Group call pickup - allows you to pick up incoming calls to any phone within a predefined group. Check with
your system administrator to find out if this feature is available on your phone.
Picking up a call directly
You can answer a call that rings on another phone.
Before you begin
The target phone receives an incoming call. Your system administrator has enabled the directed call pickup and set the
directed call pickup code.
Procedure
1.
Dial a FAC (feature access code) followed by an extension (for example, *974605) to pick up a call directed to
another user.
Picking up a group call directly
When any phone within a predefined group receives an incoming call, you can pick up that call on your phone. If there are
multiple incoming calls on the group at the same time, you can only pick up the first incoming call.
Before you begin
Your system administrator has enabled the group call pickup and set the group call pickup code.
Procedure
1.
Dial a FAC (feature access code) followed by an extension (for example, *984605) to pick up a call when any
phone in the group receives an incoming call.
Call park and call retrieve
You can park a call, and then retrieve the call either from your phone or another phone. After parked, the call is placed on
hold, you can continue the conversation after retrieving it.
Note: Call park is not available on all servers. Check with your system administrator to find out if it is available on your phone.
Parking a call
Procedure
1.
During a call, select Park.
The phone will dial the call park code which is pre-configured.
2.
Do one of the following:
• If you want to park the call against the local extension, press the # key.
• If you want to park the call against the desired extension, enter the extension (for example, 4606) where you want
to park the call and press the # key.

User guide
37
If the call is parked successfully, you will hear a voice prompt that the call is parked.
Retrieving a parked call
Procedure
1.
Pick up the handset, press the Speakerphone key or tap the line key.
2.
Select Retrieve on the dialing screen.
The phone will dial the park retrieve code which is configured in advance.
5.
Follow the voice prompt to retrieve:
• Press the # key on the phone where the call is parked.
• Enter the desired extension followed by # (for example, 4606#) on any phone.
Voice mail
Voice mail feature allows you to leave voice mails for someone or listen to your voice mail messages on your phone. This
feature is set up on the server side and not all servers support this feature.
Setting the voice mail code
If you want to connect your phone to the message center, you need to set the voice mail code on your phone.
Before you begin
Get the voice mail code from your system administrator.
Procedure
1.
Do one of the following to enter the control center:
2.
Swipe down from the top of the screen.
Tap More.
3.
Tap Message > Set Voice Mail.
4.
Enter the voice mail code (for example, *4) in the desired account field.
5.
Save the change.
Leaving voice mails
You can leave a voice mail to someone who is busy or inconvenient to answer the call.
Procedure
1.
Follow the voice prompts to leave a voice mail.
2.
Hang up to complete the voice mail.
Listening to voice mails
You can listen to your voice mails on the phone, to obtain a voice information sent by a contact.
Before you begin
You need to set the voice mail code in advance.
Procedure
1.
Do one of the following to enter the control center:
•
Swipe down from the top of the screen.
•
Tap More.
2.
Tap Message > View Voice Mail.
•
The phone screen displays the amount of new and old voice mails. You can tap the account to listen to voice
mails.
Tip: When The phone prompts that the phone receives a new voice mail, you can press the Message key or select

User guide
38
Connect to dial out the voice mail access code directly.
Directory
The phone provides several types of phone directories, which can be customized by your system administrator.
Local directory
You can store up to 1000 contacts and 48 groups in your local directory, you can search, add, edit and delete a contact.
Managing the local directory groups
You can manage the Local Directory groups when the phone is idle.
Adding contact groups
To organize your contacts and make them easier to find, you can add additional groups in the Local Directory.
Procedure
1.
Go to Directory > Local Directory > Custom Group.
2.
Enter the desired group name.
3.
Save the change.
Editing Contact Groups
You can change or add the group's information.
Procedure
1.
Go to Directory > Local Directory
2.
Select after the desired group and select Rename.
3.
Edit the group name.
4.
Save the change.
Deleting contact groups
When you delete a contact group, the contacts in the group will not be deleted. You can view the contacts in All Contacts list.
Procedure
1.
Go to Directory > Local Directory
2.
Select after the desired group and select Delete.
The phone prompts you to delete the group or not.
3.
Select OK.
Managing the local directory contacts
You can manage the Local Directory contacts when the phone is idle.
Adding contacts
When you add a contact to your Local Directory, you can choose how much information you want to enter for your contact.
You are required to enter a contact name at least for each new contact.
Procedure
1.
Tap Directory.
2.
If you want to add a contact to the specified contact group, select the contact group first.
3.
Select
+
.
4.
Enter your contact's information.

User guide
39
5.
Select the desired account from the Account field.
6.
Select the desired photo from the Photo field.
7.
Save the change.
Viewing contacts
You can view the local contacts from the Local Directory on your phone.
Procedure
1.
Tap Directory.
2.
If you want to view a contact to the specified contact group, select the contact group first. The contact names are
displayed in alphabetical order.
Editing contacts
You can update your contacts' information.
Procedure
1.
Tap Directory.
2.
If you want to edit a contact from the specified contact group, select the contact group first.
3.
Select the desired contact and tap in the top-right corner.
4.
Edit the contact information.
5.
Save the change.
Deleting a contact
You can delete any contact from the Local Directory.
Procedure
1.
Tap Directory.
2.
If you want to delete a contact from the specified contact group, select the contact group first.
3.
Select the desired contact.
4.
Select Delete.
The phone prompts you to delete the contact or not.
5.
Select OK.
Deleting all contacts
You can delete all contacts from the Local Directory.
Procedure
1.
Tap Directory.
2.
Long tap a contact.
3.
Tap the radio box on the top-right of the screen.
4.
Select > Delete contacts.
The phone prompts you to delete all contacts or not.
5.
Select OK.
Moving a local directory contact to blocklist
You can move a contact in the Local Directory to blocklist. Incoming calls from this contact will be rejected automatically.
Procedure

User guide
40
1.
Tap Directory.
2.
Tap the desired contact.
3.
Select Blocklist.
The phone prompts you to move this contact to the blocklist or not.
4.
Select OK.
Searching for contacts
In the Local Directory, you can enter search criteria to find your desired contact quickly.
Procedure
1.
Tap Directory.
2.
Do one of the following:
•
Tap and enter your search criteria in the search field.
•
Select the desired letter (for example, T) along the right side to jump to contacts whose names start with T or t.
Blocklist
Incoming calls from the Blocklist are rejected automatically. You can store up to 30 contacts in the blocklist to block
unwanted callers.
Adding a blocklist contact
You can add a blocklist contact on the phone to prevent someone from calling you.
Procedure
1.
Go to Directory > Blocklist.
2.
Select
+
.
3.
Enter the blocklist contact’s information.
4.
Save the change.
Viewing blocklist contacts
You can view the blocklist contacts from the Blocklist on your phone.
Procedure
1.
Go to Directory > Blocklist.
Editing a blocklist contact
You can update your blocklist contacts' information.
Procedure
1.
Go to Directory > Blocklist.
2.
Select the desired contact and tap in the top-right corner.
3.
Edit the blocklist contact information.
4.
Save the change.
Deleting blocklist contacts
You can delete one or all blocklist contacts. If a contact is removed from the blocklist, you can answer the call from the

User guide
41
contact normally.
Deleting a blocklist contact
If you want to answer a call from a specific contact, you need to remove it from the Blocklist.
Procedure
1.
Go to Directory > Blocklist.
2.
Select the desired contact.
3.
Select Delete.
The phone prompts you to delete the contact or not.
4.
Select OK
Deleting all blocklist contacts
You can delete all contacts from the Blocklist when you are ready to answer calls from them again.
Procedure
1.
Go to Directory > Blocklist.
2.
Long tap a contact.
3.
Tap the radio box on the top-right of the screen.
4.
Select > Delete contacts.
The phone prompts you to delete all contacts or not.
5.
Select OK.
Moving a blocklist contact to the local directory
You can move a blocklist contact to a Local Directory. Incoming calls from this contact will not be rejected automatically.
Procedure
1.
Go to Directory > Blocklist.
2.
Select the desired contact and tap in the top-right corner.
3.
Select Local Directory from the Group field.
4.
Save the change.
Moving Multiple Contacts from Blocklist to Local Directory
Procedure
1.
Go to Directory > Blocklist.
2.
Long tap a contact.
3.
Select the contacts you want to move.
4.
Select > Move to other group.
5.
Select OK.
Mobile contacts
You can synchronize the contacts on your mobile phone to your IP phone. The mobile phone contacts will be imported to your
IP phones and stored under the Mobile Contacts directory.
You can save mobile contacts to the local directory, but you cannot save a local contact to the Mobile Contacts directory.
Note: If you disconnect the Bluetooth-enabled mobile phone from phone or disable the phone to synchronize phone contacts,

User guide
42
the mobile contacts will not be displayed.
Saving a mobile contact to the local directory
You can save any mobile contact to the Local Directory, to conveniently call this contact after disconnecting the mobile
phone from the phone.
Before you begin
Make sure your Bluetooth-enabled mobile phone has been paired with your IP phones, and mobile contact sync feature
is enabled.
Procedure
1.
Select Directory > Mobile Contacts.
2.
Select after the desired contact.
3.
Select Local Directory from the Group field.
4.
Edit the contact information.
5.
Save the change.
Searching for mobile contacts
In Mobile Contacts, you can enter search criteria to find your desired mobile contact quickly.
Before you begin
Make sure your Bluetooth-enabled mobile phone has been paired with and connected to your IP phones, and mobile contact
sync feature is enabled.
Procedure
1.
Select Directory > Mobile Contacts.
2.
Do one of the following:
Select Search.
Enter your search criteria.
The contacts whose name or phone number matches the search string will be displayed in the result list.
Select the desired letter (for example, T) along the right side to jump to the contacts whose names start with T or t.
Updating the mobile contacts
You can update the Mobile Contact to synchronize the contacts you add, edit, and delete on the mobile phone to your phone.
Before you begin
Make sure your Bluetooth-enabled mobile phone has been paired with and connected to your phones, and mobile contact
sync feature is enabled.
Procedure
1.
Select Directory > Mobile Contacts.
2.
Select .
The phone prompts “Updating, please wait…”.
Note: If you disconnect the mobile phone from the phone when the phone is updating the Mobile Contacts, the phone screen
will prompt “Fail to download mobile contacts!”, and the mobile contacts disappear from the phone directory list.
Remote phone book
If the Remote Phone Book feature has been enabled by your system administrator, you can access your corporate directory
directly from your phone.
Searching for remote phone book contacts

User guide
43
In the Remote Phone Book, you can enter search criteria to find your desired contact quickly.
Procedure
1.
Go to Directory > Local Directory > Remote Phone Book.
2.
Do one of the following:
Select .
Enter your search criteria in the search field.
Select the desired letter (for example, T) along the right side to jump to contacts whose names start with T or t.
Viewing remote phone book contacts
You can view the contact list of the remote phone book on your phone. Procedure
Procedure
1.
Go to Directory > Local Directory > Remote Phone Book.
Saving a remote phone book contact to the local directory
You can save any remote phone book contact to the Local Directory, to conveniently call this contact when you can- not
access the remote phone book.
Procedure
1.
Go to Directory > Local Directory > Remote Phone Book.
2.
Select the desired remote phone book.
3.
Select the desired contact and select .
4.
Select Add.
5.
Select Local Directory from the Group field.
6.
Save the change.
Saving a remote phone book contact to the blocklist
You can save any remote phone book contact to the Blocklist on the phone, to prevent this contact from calling you.
Procedure
1.
Go to Directory > Local Directory > Remote Phone Book.
2.
Select the desired remote phone book.
3.
Select the desired contact.
4.
Select Blocklist.
5.
Save the change.
Call history
The call history list includes Missed Calls, Placed Calls, Received Calls and Forwarded Calls, and each list holds 100 entries.
Call history icons
Each icon in the Call History indicates the corresponding call history status.
Icons
Description
Icons
Description
Received Call
Missed Call

User guide
44
Placed Call
Forwarded Call
Viewing history records
The history record saves the call information such as the caller's name and number, local line and call duration.
Procedure
1.
Tap History.
2.
Select the desired list.
3.
Tap
①
after the desired entry.
Saving a history record to local directory
To identify someone’s call the next time, you can save a history record to the Local Directory.
Procedure
1.
Tap History.
2.
Select the desired list.
3.
Select > Add.
4.
Edit the contact information.
5.
Save the change.
Saving a history record to blocklist
You can prevent someone from calling you again by saving a history record to Blocklist.
Procedure
1.
Tap History.
2.
Select the desired list.
3.
Scroll down to the bottom and select Blocklist.
4.
Edit the contact information.
5.
Save the change.
Deleting history records
You can delete one or all call records from the call history list.
Deleting a call record
You can delete any call record from the call history list.
Procedure
1.
Tap History.
2.
Select the desired list.
3.
Tap
①
after the desired entry.
4.
Scroll down to the bottom and select Delete.
The phone prompts you to delete the record or not.
5.
Select OK.
Deleting all call records

User guide
45
You can delete all call records from the call history list.
Procedure
1.
Tap History.
2.
Long tap an entry.
3.
Tap the radio box on the top-right of the screen.
4.
Select > Delete calls.
The phone prompts you to delete all contacts or not.
5.
Select OK.
System applications
The system applications are pre-installed on your phone and they cannot be uninstalled.
Gallery
You can access the Gallery to do many operations for the listed pictures/videos. You can also take pictures/videos with it.
Viewing Pictures/Videos
You can view the pictures/videos on your phone in different ways.
Procedure
1.
Swipe down from the top of the screen.
2.
Tap to launch the Gallery.
By default, the pictures are displayed as thumbnails in the albums arrangement mode.
3.
(Optional.) Tap Albums.
You can tap Albums/Locations/Times/People/Tags to view the pictures in different arrangement modes.
4.
Swipe left/right to view all albums if required.
5.
Select the desired album.
6.
You can do the following:
Tap the album name on top-left of the phone screen.
Select Filmstrip view or Grid view to view the pictures/videos in different modes. Tap , and then tap Group by.
Select a desired group type in the pop-up dialog box to view the pictures/videos in different arrangement modes.
7.
Tap a desired picture/video to preview the picture.
Note: The menu keys and Android keys will disappear after 5 seconds, you may tap the phone screen to show them again.
You can also select a desired picture and tap > Details to view the detailed information.
Editing Pictures
You can edit pictures in the Gallery.
Rotating Pictures
You can rotate the picture as you want.
Procedure
1.
Swipe down from the top of the screen.
2.
Tap to launch the Gallery.
3.
Tap the desired picture album.

User guide
46
4.
Tap the desired picture.
5.
Tap > Rotate left/Rotate right to rotate the picture left/right
6.
Tap SAVE.
Adding a Filter for Pictures
You can add a filter for the picture to change its display style.
Procedure
1.
Swipe down from the top of the screen.
2.
Tap to launch the Gallery.
3.
Tap the desired picture album.
4.
4ap the desired picture.
5.
Go to > Edit > .
6.
Select the desired filter.
7.
Tap SAVE.
Adding a Frame for Pictures
You can add a frame for the picture to make it displayed more vivid.
Procedure
1.
Swipe down from the top of the screen.
2.
Tap to launch the Gallery.
3.
Tap the desired picture album.
4.
Tap the desired picture.
5.
Go to > Edit >
回
.
6.
Select the desired frame.
7.
Tap SAVE.
Cropping Pictures
You can crop a picture to the desired size.
Procedure
1.
Swipe down from the top of the screen.
2.
Tap to launch the Gallery.
3.
Tap the desired picture album.
4.
Tap the desired picture.
5.
Go to > Edit > .
6.
Do the following:
Tap Crop to resize the picture.
Tap Straighten to straighten the picture.
Tap Rotate to rotate the picture clockwise.

User guide
47
Tap Mirror to flip the picture symmetrically.
Tap Draw to draw the picture.
7.
Tap SAVE.
Coloring Pictures
You can color pictures to make the pictures displayed better.
Procedure
1.
Swipe down from the top of the screen.
2.
Tap to launch the Gallery.
3.
Tap the desired picture.
4.
Go to > Edit > .
5.
Adjust the desired exposure, contrast, saturation and so on.
6.
Tap SAVE.
Setting a Picture as Wallpaper
You can set a desired picture as wallpaper to make your phone more personalized.
Procedure
1.
Swipe down from the top of the screen.
2.
Tap to launch the Gallery.
3.
Tap the desired picture album.
4.
Tap the desired picture.
5.
Go to > Set picture as.
6.
If you want to set the picture as phone wallpaper, tap Wallpaper, and then tap Set wallpaper on the top-right of the
screen.
Printing Pictures
You can print the desired pictures in the Gallery.
Before You Begin
Before printing the picture, make sure your phone has been connected to the network printer. For more information, refer to
the documentation from the printer manufacturer.
Procedure
1.
Swipe down from the top of the screen.
2.
Tap to launch the Gallery.
3.
Tap the desired picture album.
4.
Tap the desired picture.
5.
Go to > Print to print the picture.
Deleting Pictures/Videos
You can delete any useless picture/video from the Gallery.
Procedure
1.
Swipe down from the top of the screen.

User guide
48
2.
Tap to launch the Gallery.
3.
Tap the desired album.
4.
Do one of the following:
Long tap the desired picture/video.
Go to > Select item.
Select the pictures/videos you want to delete.
You can also tap n items selected (n represents the number of pictures you selected) and then tap Select all to
select all pictures.
5.
Press delete the selected pictures/videos.
The phone prompts you whether to delete the pictures/videos.
6.
Tap OK.
Sharing Pictures/Videos via Bluetooth
You can share the pictures/videos in the Gallery via Bluetooth.
Before You Begin
Before sharing pictures/videos via Bluetooth, make sure the Bluetooth device is discoverable.
Procedure
1.
Swipe down from the top of the screen.
2.
Tap to launch the Gallery.
3.
Tap the desired picture album.
4.
Do one of the following:
Long tap one of the pictures/videos.
Go to > Select item.
Select the pictures/videos you want to share.
You can also tap n items selected (n represents the number of pictures/videos you selected) and then tap Select all
to select all pictures/videos.
5.
Tap , and then select Bluetooth.
6.
If the Bluetooth is deactivated, it will prompt you to tap Turn on to activate the Bluetooth mode.
The phone scans and displays the available Bluetooth device automatically.
If there is no Bluetooth device found, go to > Refresh to search for the Bluetooth devices.
7.
Tap the desired Bluetooth device to share the pictures/videos.
The phone screen will prompt “Sending n file to“XXX””(n represents the number of pictures/videos that are being
sent).
8.
Accept the request of transferring files via Bluetooth on the Bluetooth device.
If the pictures/videos are successfully transferred, the notification center will display a notification “Bluetooth
share: Sent files n successful, n unsuccessful.”(n represents the number of files that are sent successfully or
unsuccessfully).
You can tap the notification to view the detail information about the shared files.
Recorder
You can use the Recorder to record audio and manage the recording.
During recording, you can mark specific moments so that you can quickly find and listen to them later. You can record up to
12 hours in one file. The recording is saved in "*.amr" format with the name consisting of a prefix “record@” and date & time

User guide
49
stamp.
Recording audio
By default, the recorded audio is saved in the internal SD card. You can connect a USB flash drive to your phone, the
recorded audio will be saved in the USB flash drive instead of the internal SD card.
Note: For more information on how to attach a USB flash drive, please refer to the Quick Start Guide for your phone.
Procedure
1.
Do one of the following:
Swipe down from the top of the screen and tap Recorder.
Go to More > Recorder.
2.
Tap. to start recording.
If you have inserted a USB flash drive, tap USB to save the recorded audio to USB flash drive.
3.
Do one of the following:
Tap pause to pause the recording.
Tap to set a mark.
The icon changes to , the number will increase if you set more marks. And there is a red flag on this moment
when playing.
4.
Tap to end the recording and save the recording.
The recorded audio will be displayed on the right list automatically.
Playing a recorded call
You can browse and play back the recordings on your phone.
The recorded calls include a date & time stamp and the other party’s number/IP address/name (or the first person’s
number/IP address/name you called), for example, 20160302-1452-Tom was created on March 2, 2016, at 14:52 and you
have a call with Tom.
The recorded audio-only calls are saved in ".aac" format and the recorded video calls are saved in ".mkv" format. You can view
the recorded files by Recorder or File Manager. The following is an example of playing the recorded call using the Recorder.
Tip: You can also play back the recorded calls on the phone or on a computer using an application compatible of playing
“.aac”/".mkv" files.
Procedure
1.
Do one of the following:
Swipe down from the top of the screen and tap Recorder.
Go to More > Recorder.
If you want to play the recorded audio saved in USB flash drive, tap USB.
2.
Tap before the desired recorded call to play the recorded call.
The length of the recording and a progress bar are displayed as the recording plays. You can press the Volume key
to adjust the volume of audio output.
Pause/resuming a playback
When you receive an incoming call while playing a recording, the recording is paused automatically. You can resume the
playback after handling the call. You can also pause the recording manually at any time.
Procedure

User guide
50
1.
Tap to pause playing the recording. The icon appears on the phone screen.
2.
Tap to resume the playback.
Fast Forwarding/rewinding a playback
While a recorded file plays, you can fast forward or rewind the playback at any time.
Procedure
1.
Drag the slider to skip forward the playing or rewind the playing.
If you have set marks for the recorded audio, you can drag the slider to the position with a red flag to listen to the marked
moments.
Stopping a playback
While a recording plays, you can stop playing it at any time.
Procedure
1.
Tap to stop the playing.
Copying a Recorded Audio to USB Flash Drive
You can copy any recorded audio stored in Recorder application to your USB flash drive, as a result, you can view it on PC or
other devices.
Before You Begin
Before copying recorded audio to USB flash drive, you should connect a USB flash drive first.
Procedure
1.
1. Do one of the following:
Swipe down from the top of the screen and tap Recorder.
Go to More > Recorder.
The phone shows all recordings in the Audio Recorder list.
2.
Tap after the desired recorded audio.
3.
Tap Copy to USB.
If the recorded audio is copied successfully, the phone screen will prompt “Copy successfully”.
The prompt “XX Copied” (XX indicates the date when the recorded audio is copied to the USB flash drive) appears
under the corresponding recorded audio.
Copying All Recorded Audio to USB Flash Drive
You can copy all recorded audio to your USB flash drive, as a result, you can view them on PC or other devices.
Before You Begin
Before copying recorded audio to USB flash drive, you should connect a
USB flash
drive first.
Procedure
1.
Do one of the following:
Swipe down from the top of the screen and tap Recorder.
Go to More > Recorder.
The phone shows all recordings in the Audio Recorder list.
2.
Tap Edit.
3.
Check the radio box on the top-left of the screen to select all recordings.

User guide
51
4.
Tap Copy to USB.
The prompt “XX Copied” (XX indicates the date when the recorded audio is copied to the USB flash drive) appears
under the corresponding recorded audio.
Renaming the recording
You can rename the recording for better recognition.
Procedure
1.
Do one of the following:
Swipe down from the top of the screen and tap Recorder.
Go to More > Recorder.
If you want to rename the recorded audio saved in USB flash drive, tap USB.
2.
Tap after the desired recording.
3.
Tap Rename.
4.
Enter the desired file name.
5.
Tap OK.
Deleting a recording
You can delete local recordings or call recordings from Recorder. The local recording is named with a prefix “record@” and
date & time stamp, while the call recordings are named with the date & time stamp.
Procedure
1.
Do one of the following:
Swipe down from the top of the screen and tap Recorder.
Go to More > Recorder.
If you want to delete the recorded audio saved in USB flash drive, tap USB. 2. Tap after the desired recorded
audio.
2.
Tap Delete.
The phone prompts you whether to delete the audio.
3.
Tap OK.
Deleting all recordings
You can delete all the recording when you need additional space.
Procedure
1.
Do one of the following:
Swipe down from the top of the screen and tap Recorder.
Go to More > Recorder.
If you want to delete all recorded audios saved in USB flash drive, tap USB.
2.
Tap .
The phone prompts you whether to delete all the audio files.
3.
Tap OK.
Checking storage space
You can check the total space or available space of the phone or connected USB flash drive.
Procedure

User guide
52
1.
Do one of the following:
Swipe down from the top of the screen and tap Recorder.
Go to More > Recorder.
You can see the storage space.
Customizing your phone
You can make your phone more personalized by customizing various settings.
Changing the Administrator Password
By default, you require an administrator password to access the Advanced/Advanced Settings menu. The default password
is @N3ta!k2@2*.
Note: If you do not change the default password, the phone displays a warning icon in the status bar.
Procedure
1.
Do one of the following to enter the control center:
Swipe down from the top of the screen.
Tap More.
2.
Go to More > Settings > Advanced > Set Password.
3.
Enter your old and new password information.
4.
Select .
Wallpaper
You can change the background picture that is displayed on your phone.
The phone comes with a default background picture, you can change it to another built-in picture. You can also add personal
pictures stored on a USB flash drive, or use a custom picture uploaded by your system administrator as the wallpaper.
Changing wallpaper on idle screen
You can set one of your pictures as the background image on your phone's idle screen.
Procedure

User guide
53
1.
Do one of the following to enter the control center:
Swipe down from the top of the screen.
Tap More.
2.
Go to Settings > Basic Settings > Display > Wallpaper.
3.
Select Gallery or Wallpapers and then select the desired image.
4.
Select Set wallpaper.
Adding a wallpaper from a USB flash drive
You can use a picture that is stored on a USB flash drive as the background image of your phone.
When USB flash drive is connected to your phone, the pictures on the USB flash drive are shown in the album. You can set a
picture as wallpaper using the Gallery or File Manager.
We recommend that you add a picture that meets the size of the custom picture. Either the smaller or larger picture will be
scaled proportionally to fit the screen.
Screen saver
The screen saver starts automatically when your phone has been idle for the preset waiting time. You can stop the screen
saver by pressing any key.
Changing the waiting time for screen saver
You can set the waiting time after no activity before displaying the screen saver.
Procedure
1.
1. Do one of the following to enter the control center:
Swipe down from the top of the screen.
Tap More.
2.
Go to Settings > Basic Settings > Display > Screen Saver.
3.
Select the desired waiting time from the Screen Saver Wait Time field.
4.
Save the change.
Setting the screen saver type
The screen saver can start with different types and you can set it manually.
Your phone supports three screen saver types: Clock, Photo Frame, and Photo Table.
Procedure
1.
Swipe left or right to go to the second idle screen.
1.
Go to Settings > Basic Settings > Display > Screen Saver.
2.
Select the desired screen saver type.
•
If you select Clock, select
to select Style or Night mode.
•
If you select Photo Frame, select to select the desired photo album(s).
•
If you select Photo Table, select to select the desired photo album(s).
3.
Save the change.
Changing the Screen backlight and time
You can change the brightness of the phone screen during phone activity and inactivity.
Active Level: The intensity of the phone screen when the phone is active.

User guide
54
Backlight Time: The delay time to change the brightness of the phone screen when the phone is inactive.
Backlight time includes the following settings:
•
Always On: Backlight is on permanently.
•
15s, 30s, 1min, 2min, 5min, 10min or 30min: Backlight is changed when the phone is inactive after the designated
time.
Procedure
1.
Swipe down from the top of the screen.
2.
Drag the backlight slider.
When dragging the slider, the control center (except the backlight slider) and notification center will be hidden. You can view
the intensity changes of the phone screen in real-time.
If you lift your finger, the control center and notification center will be shown again.
Tip: You can only change the screen intensity during phone activity on the control center. To change the backlight time, go to
Settings > Basic Settings > Display > Backlight.
Changing the language
Your phone supports several languages that you can choose to use on the phone.
Contact your system administrator to find out exactly which languages are supported on your phone.
Procedure
1.
Do one of the following to enter the control center:
Swipe down from the top of the screen.
Tap More.
2.
Go to Settings > Basic Settings > Language & Input > Language.
3.
Select the desired language.
4.
Save the change.
The phone language is changed to the selected one.
Changing the input method
The phone supports two kinds of input methods: English and ⾕歌拼⾳输⼊法. The default input method is English. You can
change the currently used input method.

User guide
55
Procedure
1.
Do one of the following to enter the control center:
Swipe down from the top of the screen.
Tap More.
2.
Go to Settings > Basic Settings > Language & Input > Current Input.
3.
Select the desired input method.
You can also long tap the space key on the onscreen keyboard to change the input method. For English input
method:
Time & date
You can set the time and date manually. The time and date formats are also variable.
Setting the time and date manually
If your phone cannot obtain the time and date automatically, you can set it manually.
Procedure
1.
Do one of the following to enter the control center:
Swipe down from the top of the screen.
Tap More.
2.
Go to Settings > Basic Settings > Time & Date > General.
3.
Edit the date and time.
4.
Save the change.
The time and date set on the phone will be changed accordingly.
Changing the time and date format
You can set the phone to display the time in 12-hour format or 24-hour format. You can also change the date format,
including the options to display the day (D), month (M), and year (Y).
Note: Your system administrator can customize the date format.
Procedure
1.
Do one of the following to enter the control center:
Swipe down from the top of the screen.
Tap More.

User guide
56
2.
Go to Settings > Basic Settings > Time & Date > Time & Date Format.
3.
Select the desired time format or date format.
4.
Save the change.
Phone lock and Administrator Password
Phone lock helps you protect your phone from unauthorized use.
Accessing the Advanced Settings with Administrator Password
To enter the advanced settings on your phone, enter the default password: @N3ta!k2@2*
Setting the phone lock
You can manually lock the phone or wait a specified time to automatically lock the phone. When your phone is locked,
you can:
•
Dial emergency numbers.
•
Reject incoming calls.
•
Answer incoming calls.
•
End the call.
Procedure
1.
Do one of the following to enter the control center:
Swipe down from the top of the screen.
Tap More.
2.
Go to Settings > Basic Settings > Phone Lock.
3.
Enter the desired PIN (default PIN: 123) in the Unlock PIN, New PIN, and Confirm PIN fields.
4.
Save the change.
5.
Select Enabled from the Lock Enable field.
6.
Enter the desired interval (0 - 3600 seconds) in the Auto Lock field.
7.
Save the change.
Note: Enter the password: @N3ta!k2@2*
Locking your phone manually
You can lock the phone manually before the phone is automatically locked.
Before you begin
Make sure that the phone lock is set.
Procedure
1.
Long press # key when the phone is idle.
The lock icon appears on the phone screen.
Unlocking your phone
You can use an unlock PIN to unlock the phone.
If you forget the unlock PIN, you can enter the administrator password to unlock your phone, and then automatically access
the PIN change screen.
Procedure
1.
Tap the screen or tap the locked key, the phone prompts you to enter an unlock PIN.
2.
Enter the desired PIN (default: 123) in the Unlock PIN field.

User guide
57
3.
Select OK.
The lock icon disappears from the phone screen.
Changing your phone unlock PIN
The default unlock PIN is “123”. For security reasons, you should change the default unlock PIN as soon as possible.
Procedure
1.
Do one of the following to enter the control center:
Swipe down from the top of the screen.
Tap More.
2.
Go to Settings > Basic > Change PIN.
3.
Enter your old and new unlock PIN respectively.
The unlock PIN length must be within 15 digits.
4.
Save the change.
Line keys
Line keys allow you to quickly access features such as recall and speed dial. The line key can indicate the monitored status
when the line keys are assigned with particular features, such as BLF.
You can assign predefined functions to line keys. You can also define a label for a line key feature which will appear on the
phone screen.
Assigning functionality to a line key
You can assign functions to a line key, as a result, you can access this function quickly by tapping this line key.
Procedure
1.
Tap Dsskey.
2.
Tap on the top-right of the line key list.
3.
Select the desired key type from the Type field.
4.
Configure the settings for the corresponding key type.
5.
Save the change.
Changing the locations of the line keys
You can change the order in which your line keys display on the phone screen.
Procedure
1.
Tap the desired page key if required.
2.
Drag a line key to the desired location at which another line key locates.
Deleting a line key
You can delete a line key when you no longer need the corresponding function
Procedure
1.
Drag the desired line key to the Delete field.
The phone prompts you to delete the DSS key or not.
2.
Select OK.
Audio settings

User guide
58
You can change the basic audio settings on your phone.
Adjusting the volume
You can adjust the volume of the ringer, media, and audio during a call. \
Procedure
1.
Press the Volume key.
Setting the ring tone
You can set distinctive ring tones for groups or contacts in your Local Directory so that you can identify the caller when your
phone rings.
The ring tones are used according to this priority: Contact ring tone>Group ring tone>Account ring tone >Phone ring tone.
Setting a ring tone for the phone
You can choose a ring tone for all incoming calls.
Procedure
1.
Do one of the following to enter the control center:
Swipe down from the top of the screen.
Tap More.
2.
Go to Settings > Basic Settings > Sound > Ring Tones > Common.
3.
Select the desired ring tone.
4.
Save the change.
Setting a ring tone for an account
You can select a unique ring tone for an individual account.
Procedure
1.
Do one of the following to enter the control center:
Swipe down from the top of the screen.
Tap More.
2.
Go to Settings > Basic > Sound > Ring Tones.
3.
Select the desired account.
4.
Select the desired ring tone.
If Common is selected, this account will use the ring tone selected for the phone.
5.
Save the change.
Setting a ring tone for a group
You can select a unique ring tone for various groups in your Local Directory.
Note: You can only set a ring tone for a group that is added manually.
Procedure
1.
Tap Directory > Local Directory.
2.
Select after the desired group and select Ring.
3.
Select the desired ring tone.
If Auto is selected, this group uses the ring tone according to the default priority.
If a specific ring tone is selected, this group uses the ring tone according to the priority: Contact ring tone>Group
ring tone.

User guide
59
4.
Save the change.
Setting a ring tone for a contact
You can select a unique ring tone for various contacts in your Local Directory. This helps you quickly identify callers
according to the ring tones.
Procedure
1.
Tap Directory > Local Directory.
2.
Select the desired contact group first.
3.
Select the desired contact and tap in the top-right corner.
4.
Select the desired ring tone from the Ring field.
If Auto is selected, the contact uses the ring tone according to the default priority.
5.
Save the change.
Disabling the key tone
If you disable the key tone, the phone will not produce a sound when pressing the keypad keys.
Procedure
1.
Do one of the following to enter the control center:
Swipe down from the top of the screen.
Tap More.
2.
Go to Settings > Basic > Sound > Key Tone.
3.
Turn off Key Tone.
4.
Save the change.
Enabling touch tone
If you enable touch tone, the phone will produce a sound when you tap an option on the phone screen.
Procedure
1.
Do one of the following to enter the control center:
Swipe down from the top of the screen.
Tap More.
2.
Go to Settings > Basic Settings > Sound > Touch Tone.
3.
Turn on Touch Tone.
4.
Save the change.
Configuring notification sound
The phone will produce a notification sound when receiving a notification (for example, incoming email notification).
Procedure
1.
Do one of the following to enter the control center:
Swipe down from the top of the screen.
Tap More.
2.
Go to Settings > Basic Settings > Sound.
3.
Tap the desired notification sound from the Notification Sound field.
4.
Select OK

User guide
60
5.
Save the change.
Enabling silent mode
If you turn on the silent mode, your phone won't produce a ring tone/key tone/touch sound/notification sound from
phone's speaker.
Procedure
1.
1. Do one of the following:
Go to Settings > Basic Settings > Sound, turn on Silent Mode, save the change.
Press the Volume key to adjust the ringer volume to the minimum.
Swipe down from the top of the screen and toggle Silent on.
Note: You may have no permission to turn on the silent mode. Contact your system administrator for more information.
Bluetooth
Bluetooth enables low-bandwidth wireless connections within a range of 20 feet. The best performance is in the 3 to 6 feet
range.
You can activate the Bluetooth mode, and then pair and connect the Bluetooth device with your phone. You can pair up to
countless Bluetooth devices with your phone; however, you can connect up to two different types of Bluetooth devices at a
time. You can also share files with friends via Bluetooth.
You can pair and connect a Bluetooth headset/speakerphone/microphone or a Bluetooth-enabled mobile phone to your
phone. And the Bluetooth operating instructions on different Bluetooth devices are the same.
Activating the Bluetooth mode
You should activate the Bluetooth mode first when you need to connect the Bluetooth device to your phone.
Procedure
1.
Do one of the following:
Swipe down from the top of the screen.
Swipe left or right to go to the second idle screen, go to Settings > Basic Settings > Bluetooth.
2.
Turn on the Bluetooth.
The phone automatically scans the available Bluetooth devices in your area.
The Bluetooth icon appears in the status bar.
Pairing and connecting the Bluetooth headset
You can pair and connect the Bluetooth headset to handle calls on the phone.
Before you begin
Make sure that the Bluetooth headset is discoverable.
Procedure
1.
1. Do one of the following:
Swipe down from the top of the screen and long tap the Bluetooth icon.
Go to More > Settings > Basic Settings > Bluetooth.
2.
Tap to search for the Bluetooth devices.
3.
Tap the desired Bluetooth headset to connect to your phone.
The connection will be completed successfully with a prompt appears under the Bluetooth headset name.
The Bluetooth icon appears in the status bar.

User guide
61
Pairing and connecting the Bluetooth-enabled mobile phone
When you need to use the phone to handle the mobile phone's calls, you can pair and connect the Bluetooth- enabled
mobile phone.
You can only connect one Bluetooth device at a time. After connection, the phone will automatically find an avail- able line key
and assign the line key for Mobile Account. The Mobile Account key’s default label is “Mobile Account”. If there is no available
line key, you may assign it manually.
Before you begin
Make sure that the Bluetooth-enabled mobile phone is discoverable.
Procedure
1.
Do one of the following:
Swipe down from the top of the screen and long tap the Bluetooth icon.
Go to More > Settings > Basic Settings > Bluetooth.
2.
Tap to search for the Bluetooth devices.
3.
Tap the desired Bluetooth-enabled mobile phone.
4.
Tap Pair on both mobile phone and phone.
The phone prompts you to sync phone contacts temporarily.
5.
Tap OK to enable the mobile contacts sync feature and the phone will sync the mobile contacts temporarily, or tap
Cancel to disable mobile contacts sync feature.
The connection will be completed successfully with a prompt appears under the Bluetooth- enabled mobile phone
name.
Note: If you enable mobile contacts sync feature, you also need to authorize the phone to sync the contacts temporarily
on the mobile phone.
Pairing and connecting two Bluetooth devices
You can connect two Bluetooth devices on the phone at a time, for example, a Bluetooth-enable mobile phone and a
Bluetooth headset.
Before you begin
Make sure that the Bluetooth devices are discoverable.
Procedure
1.
Do one of the following:
Swipe down from the top of the screen and long tap the Bluetooth icon.
Go to More > Settings > Basic Settings > Bluetooth.
2.
Tap to search for the Bluetooth devices.
3.
Pair and connect the two Bluetooth devices respectively.
Note: The phone does not support connecting two Bluetooth devices of the same type at the same time. The Bluetooth
channel cannot support two devices at the same time, and Bluetooth- enabled mobile phone has higher priority than the
Bluetooth headset.
Syncing the mobile contacts to the phone
You can sync mobile contacts to your phone. Then you can view a contact without accessing your mobile phone.
Note: Not all mobile phones support syncing the mobile contacts to phone. For more information, contact your system
administrator.

User guide
62
Enabling the mobile contacts sync feature
You can choose to enable the phone to sync the mobile contacts.
Before you begin
Make sure that the Bluetooth-enabled mobile phone is paired and connected to your phone and the phone audio feature is
enabled.
Procedure
1.
Do one of the following:
Swipe down from the top of the screen and long tap the Bluetooth icon.
Go to More > Settings > Basic Settings > Bluetooth.
2.
Tap after the desired Bluetooth-enabled mobile phone name.
3.
Select Mobile Contacts Sync.
Note: You need to authorize the phone to synchronize the contacts temporarily on the mobile phone first, and then the
mobile contacts directory will appear in the phone directory list.
Viewing your mobile contacts
You can view a list of mobile contacts on the phone.
Before you begin
Make sure that the mobile contact sync feature is enabled.
Procedure
1.
Go to Directory > Mobile Contacts.
Handling a mobile phone call on the phone
You can handle a mobile phone call on your phone, the phone acts as a hands-free device for your mobile phone.
The call information appears on both your phone and mobile phone screen. You can control the call’s audio to go through the
mobile phone or phone on your mobile phone. If you choose Bluetooth, the audio will go through the phone; if you choose
Handset earpiece or Speaker, the audio will go through the mobile phone.
Before you begin
Make sure that the Bluetooth-enabled mobile phone is paired and connected to your phone, and the phone audio feature is
enabled.
Procedure
1.
Do the following on the phone:

User guide
63
Place a call. Tap the Mobile Account line key first, and then place a call or multiple calls to the mobile contacts.
Answer a call. An incoming call to your mobile phone is also shown on the phones, you can answer the call on the
phone. The phone will firstly match the contacts in the mobile contacts directory to present the caller identity.
During the call, you can hold/resume, mute/unmute or end the call on the phone.
Configuring the phone audio feature
After syncing the mobile contacts to your phone, the phone acts as a hands-free device for your mobile phone. The call is
made through your mobile phone, but the audio is present and the call control is done by the phone.
If a Bluetooth headset is connected to the phone, you can choose to answer a call using the Bluetooth headset.
Procedure
1.
Do one of the following:
Swipe down from the top of the screen and long tap the Bluetooth icon.
Go to More > Settings > Basic Settings > Bluetooth.
2.
Select after the desired Bluetooth device name.
3.
Turn on Phone audio.
4.
Save the change.
Configuring the Media Audio Feature
If a Bluetooth headset is connected to the phone, you can enable the media audio feature to
stream the audio from IP phone to Bluetooth headset. The Bluetooth headset acts as the player for the SIP phone.
Procedure
1.
Do one of the following:
Swipe down from the top of the screen and long tap the Bluetooth icon.
Go to More > Settings > Basic Settings > Bluetooth.
2.
Select after the connected Bluetooth headset name.
3.
Turn on Media audio.
4.
Save the change.
Changing your phone's Bluetooth name
You can change the Bluetooth name for your phone to identify your phone to other Bluetooth devices. By default, the phone
is identified as "Yealink-T64-LTE" by other Bluetooth devices.
Before you begin
Make sure that the Bluetooth mode is activated.
Procedure
1.
Do one of the following
Swipe down from the top of the screen and long tap the Bluetooth icon.
Go to More > Settings > Basic Settings > Bluetooth.
2.
Select Edit My Device Information.
3.
Enter the desired name in the Device Name field.
4.
Save the change.
Disabling Bluetooth Device Discovery

User guide
64
After the Bluetooth is activated, the phone is automatically placed in Open Discover mode to make it visible to other
Bluetooth devices.
You can choose to disable this feature to not allow your phone to show as an available device on other Bluetooth devices.
Procedure
1.
Do one of the following:
Swipe down from the top of the screen and long tap the Bluetooth icon.
Go to More > Settings > Basic Settings > Bluetooth.
2.
Select Edit My Device Information.
3.
Turn on Open Discover.
4.
Save the change.
Renaming the paired Bluetooth device
You can rename the paired Bluetooth device to make it recognized more easily.
Procedure
1.
Do one of the following:
Swipe down from the top of the screen and long tap the Bluetooth icon.
○
Go to More > Settings > Basic Settings
> Bluetooth.
The phone screen shows the paired and connected Bluetooth device.
2.
Tap after the connected Bluetooth device name.
3.
Enter the desired device name in the Rename field.
4.
Save the change.
The renamed Bluetooth name will be displayed in the PAIRED DEVICES list on your phone. The Bluetooth device name
displayed in the scanning list of other devices will not be changed.
Unpairing the Bluetooth device
After unpairing the Bluetooth device, next time you activate the Bluetooth, the phone will not automatically reconnect to the
device. You need to scan, pair and connect with the device again.
Procedure
1.
Swipe left or right to go to the second idle screen.
2.
Go to Settings > Basic Settings > Bluetooth.
The phone screen shows the paired and connected Bluetooth device.
3.
Tap after the connected Bluetooth device name.
4.
Tap Unpair.
Sending files via Bluetooth
You can use the Gallery or File Manager to share pictures, videos or audio with an available Bluetooth device in your area.
Receiving files via Bluetooth
The available Bluetooth devices in your area can share pictures, audio, videos, documents with your phone. You can use the
corresponding system application to view the files.
Procedure
1.
Share a file with the phone on your Bluetooth device.
The phone will play a notification sound, and the phone prompts you whether to accept the incoming file.

User guide
65
2.
Tap Accept to start receiving the file.
The phone prompts “The file will be received. Check progress in the Notification panel.”. The icon will be displayed
in the status bar.
3.
(Optional.) Swipe down from the top of the screen.
Tap the notification “Bluetooth share: Received files”.
You can use the corresponding system applications to view the file.
Disconnecting the Bluetooth device
When you disconnect a Bluetooth device, it remains paired so that you can reconnect it to your phone.
Procedure
1.
Do one of the following:
Swipe down from the top of the screen and long tap the Bluetooth icon.
Go to More > Settings > Basic Settings > Bluetooth.
2.
Tap the connected Bluetooth device.
3.
Tap OK.
Deactivating the Bluetooth mode
You can deactivate the Bluetooth mode when you no longer use a Bluetooth device.
Procedure
1.
1. Do one of the following:
Swipe down from the top of the screen.
Go to More > Settings > Basic Settings > Bluetooth.
2.
Turn off the Bluetooth.
The Bluetooth icon disappears from the status bar.
Wireless network
The phone can be connected to the wireless network if Wi-Fi is available within the area.
Note: Enabling Bluetooth may degrade your wireless network connection. For improved wireless network performance, you
should disable Bluetooth when it is not in use.
Activating the Wi-Fi mode
You can activate the Wi-Fi mode to connect your phone to an available wireless network.
Procedure
1.
Do one of the following:
Swipe down from the top of the screen.
Go to More > Settings > Basic Settings > Wi-Fi.
2.
Turn on the Wi-Fi.
The phone automatically scans the available wireless networks in your area. The Wi-Fi icon appears in the status
bar.
Connecting to the wireless network
After you have activated the Wi-Fi mode, you can connect the phone to the wireless network.

User guide
66
When the phone is connected to a wireless network, the Wi-Fi icon will display in the status bar.
Connecting to an available wireless network manually
You can use the password provided by your system administrator to connect the phone to a secured wireless net- work.
Before you begin
Make sure that the Wi-Fi mode is activated.
Procedure
1.
Do one of the following:
Swipe down from the top of the screen and long tap the Wi-Fi icon.
Go to More > Settings > Basic Settings > Wi-Fi.
The phone will automatically search for available wireless networks in your area.
2.
(Optional.) To research the available network, select > Scan.
3.
Tap the desired wireless network (SSID) to connect to it.
4.
Enter the desired password in the Password field.
5.
(Optional.) Tap to make the password visible.
6.
Select Show advanced options to configure the HTTP proxy for the Browser.
7.
Select Connect.
Once the connection has completed successfully, the prompt “Connected” appears under the corresponding SSID.
Adding a wireless network manually
If your gateway/router has SSID broadcast disabled, it doesn't appear in the scanning results. Then you must manually add a
wireless network.
Before you begin
Get the available wireless network information from your system administrator. Make sure that the Wi-Fi mode is activated.
Procedure
1.
Do one of the following:
Swipe down from the top of the screen and long tap the Wi-Fi icon.
Go to More > Settings > Basic Settings > Wi-Fi.
2.
Select > Add.
3.
Enter the desired value in the Network SSID field.
4.
Tap the desired value from the Security field.
If you select WEP or WPA/WPA2 PSK, enter the password.
If you select 802.1x EAP, tap the desired value from the EAP method field, and enter additional information.
5.
(Optional.) Tap to make the password visible.
6.
Select Show advanced options to configure the HTTP proxy for the Browser.
7.
Select Save.
Viewing the wireless network information
You can view the detailed wireless network information, such as Profile Name, SSID and Signal Strength.
Procedure
1.
Do one of the following:

User guide
67
Swipe down from the top of the screen and long tap the Wi-Fi icon.
Go to More > Settings > Basic Settings > Wi-Fi.
2.
Select Wi-Fi Status.
3.
(Optional.) Drag up and down to scroll through the list of wireless network information.
Disconnect from a wireless network
You can disconnect the wireless network connection from your phone.
Procedure
1.
Do one of the following:
Swipe down from the top of the screen and long tap the Wi-Fi icon.
Go to More > Settings > Basic Settings > Wi-Fi.
2.
Tap the connected SSID (the top one).
3.
Select Forget.
Tip: You can also disconnect from the wireless network by deactivating the Wi-Fi mode.
Deactivating the Wi-Fi mode
You should deactivate the Wi-Fi mode when you need to connect your phone to the wired network.
Procedure
1.
Do one of the following:
Swipe down from the top of the screen.
Go to More > Settings > Basic Settings > Wi-Fi.
2.
Turn off the Wi-Fi.
The Wi-Fi icon disappears from the status bar.
Maintaining your phone
When your phone is unable to operate properly, you need to investigate or troubleshoot issues along with other tasks your
system administrator may ask you to perform.
Investigating warnings
The warning icon lets you know that your phone has one or more important issues.
Procedure
1.
Do one of the following to enter the control center:
Swipe down from the top of the screen.
Tap More.
2.
Go to Settings > Status > General.
The warning detail is displayed in the Warning field.
Clearing warning icon
You can temporarily remove the warning icon from the status bar. However, the warning message still is displayed on the
Status screen until the issue is fixed.
The warning icon appears in the status bar again after reboot if the issue is not fixed.
Procedure

User guide
68
1.
Do one of the following to enter the control center:
Swipe down from the top of the screen.
Tap More.
2.
Go to Settings > Status > General.
3.
Tap the Warning field.
The phone prompts you to clear the warning icon or not.
4.
Tap OK.
The warning icon is removed from the status bar. And it is also removed from the Warning field.
Tip: You can also swipe left or right to temporarily remove the warning icon via Notification Center.
Rebooting your phone
The improper operation may cause malfunction. If the malfunction occurs, your system administrator may ask you to reboot
your phone.
Procedure
1.
Do one of the following to enter the control center:
Swipe down from the top of the screen.
Tap More.
2.
Go to Settings > Basic Settings > Reboot > Reboot.
The phone prompts you to reboot the phone or not.
3.
Select OK.
Tip: You can also long press the * key on the keypad when the phone is idle to reboot the phone.
Resetting to factory settings
When some issues occur on your phone and you have tried all troubleshooting suggestions but still do not solve the problem,
you can reset your phone to factory configurations.
This operation will delete all your personal configuration settings, and reset all settings to the factory defaults.
Check with your system administrator if the personalized settings are kept before resetting your phone to factory settings.
Procedure
1.
Do one of the following to enter the control center.
Swipe down from the top of the screen.
Tap More.
2.
Go to Settings > Advanced Settings (default password: @N3ta!k2@2*) > Reset Config.
3.
Select RESET TO FACTORY SETTINGS.
The phone prompts you to reset the setting or not.
4.
Select OK.
The phone begins resetting.
Tip: You can also long press the Redial key when the phone is idle.
After reset, the screen prompts “Welcome Initializing…Please wait”. The phone will be reset successfully after startup.
Note: Reset of your phone may take a few minutes. Do not power off until the phone has started up successfully.

User guide
69
Updating the phone configuration
Your system administrator may ask you to update the configuration for your phone to apply any changes to system settings,
which you can do without restarting it.
Procedure
1.
Do one of the following to enter the control center:
Swipe down from the top of the screen.
Tap More.
2.
Go to Settings > Basic Settings > Update Configuration.
3.
Enter the provision information in the corresponding field.
4.
Save the change.
The phone prompts you whether to provision now.
5.
Select OK.
Clearing User's personalized configuration settings
You can clear the personalized configuration settings manually on the phone.
Before you begin
Your system administrator has enabled the phone to keep the user's personalized settings after auto provisioning.
Procedure
1.
Do one of the following to enter the control center:
Swipe down from the top of the screen.
Tap More.
2.
Go to Settings > Basic Settings > Reset Local Config > Reset local settings.
The phone prompts you to reset the local settings or not.
3.
Select OK

User guide
70
Notices
The specifications and information regarding the products in this guide are subject to change without notice. All statements,
information and recommendations in this guide are believed to be accurate and presented without warranty of any kind,
express or implied. Users must take full responsibility for their application of products.
Technical support
For additional support information please visit the One Talk support site (verizonwireless.com/support/one-talk/) for the
latest guides, FAQs, product documents and more.
Important customer information
To avoid electric shock, use caution when connecting cables. For example, do not connect safety extra-low voltage (SELV)
circuits to telephone-network voltage (TNV) circuits. LAN ports contain SELV circuits, and WAN ports contain TNV circuits.
Some LAN and WAN ports both use RJ-45 connectors.
To avoid electric shock, do not operate the product or connect or disconnect cables during electrical storms. To avoid
electric shock, do not use this product in or near water.
To reduce the risk of fire or overheating, keep this product in well-ventilated areas, away from radiators or other heat
sources. Do not block cooling vents.
The plug-socket combination must be accessible at all times because it serves as the main power-disconnecting device.
Use only the manufacturer-provided AC adaptor approved for use with this product. Use of another AC adaptor may cause a
fire or explosion.
This product relies on short-circuit (overcurrent) protection installed in your home or office. Ensure that a fuse or circuit
breaker no larger than 120 VAC, 15 A U.S. is used on the phase conductors (all current carrying conductors).
Unplug this product from the wall outlet and refer servicing to qualified service personnel under the following conditions:
1.
When the power cord or plug is damaged or frayed
2.
If liquid has been spilled into the product
3.
If the product has been exposed to rain or water
4.
If the product does not operate normally when the operating instructions are followed. Adjust only those controls
that are covered by the operating instructions, since improper adjustment of other controls may result in damage
and will often require extensive work by a qualified technician to restore the product to normal condition
WEEE warning
To avoid the potential effects on the environment and human health as a result of the presence of hazardous substances in
electrical and electronic equipment, end users of electrical and electronic equipment should understand the meaning of the
crossed-out wheeled bin symbol. Do not dispose of waste electrical and electronic equipment (WEEE) as unsorted municipal
waste and collect such WEEE separately.
Disclaimer
The specifications and information regarding the products in this guide are subject to change without notice. All statements,
information, and recommendations in this guide are believed to be accurate and presented without warranty of any kind,
express or implied. Users must take full responsibility for their application of products.
Yealink Network Technology CO., LTD., makes no warranty of any kind with regard to this guide, including, but not limited to,
the implied warranties of merchantability and fitness for a particular purpose. Yealink Network Technology CO., LTD., shall
not be liable for errors contained herein nor for incidental or consequential damages in connection with the furnishing,
performance, or use of this guide.

User guide
71
Important 911 emergency response information
If you call 911, emergency service responders will be sent to the registered location you provided when you provisioned this
phone. An incorrect address could result in incorrect routing of 911 calls and dispatch of emergency personnel to the wrong
location, so please contact your administrator if your registered location is not accurate.
Once a 911 call is placed, the device will enter for a period of five minutes Emergency call back mode and on the LCD screen
of the device the message displayed will say “Emergency Call Activated: features restored after 5 minutes”. What this
means is that for a period of five minutes all of the advanced One Talk calling features will not work to allow the 911 operator
to contact the number placing the 911 call during those five minutes. Once the five minutes have passed, the phone will
resume normal operation.
Data and voice functionality (including the ability to make and receive 911 calls) will not be available during a power outage,
broadband connection failure or other service disruption. Neither Verizon Wireless nor any of its affiliates shall be liable for
any service outage and/or inability to access emergency service personnel, nor shall Verizon Wireless or any of its affiliates
be responsible for the acts or omissions of emergency response center personnel.
Declaration of conformity
Hereby, Yealink Network Technology CO., LTD., declares that this phone is in conformity with the essential of the Federal
Communications Commission (FCC). You can find FCC information from the label on the back of the phone.
Part 15 FCC Rules
Any changes or modifications not expressly approved by the party responsible for compliance could void the user’s authority
to operate the equipment.
This device is compliant with Part 15 of the FCC Rules. Operation is subject to the following two conditions:
1.
This device may not cause harmful interference
2.
This device must accept any interference received, including interference that may cause undesired operation.
Class B digital device or peripheral
Note: This equipment has been tested and found to comply with the limits for a Class B digital device, pursuant to Part 15 of
the FCC Rules. These limits are designed to provide reasonable protection against harmful interference in a residential
installation. This equipment generates, uses and can radiate radio frequency energy and, if not installed and used in
accordance with the instructions, may cause harmful interference to radio communications. However, there is no guarantee
that interference will not occur in a particular installation. If this equipment does cause harmful interference to radio or
television reception, which can be determined by turning the equipment off and on, the user is encouraged to try to correct
the interference by one or more of the following measures:
1.
Reorient or relocate the receiving antenna
2.
Increase the separation between the equipment and receiver
3.
Connect the equipment into an outlet on a circuit different from that to which the receiver is connected
4.
Consult the dealer or an experienced radio/TV technician for help
Important safety precautions
Please read the following important safety notices and instructions before installing or using the product.
A DANGER warning refers to situations that could cause bodily injury
A CAUTION warning refers to situations that could result in equipment malfunction or damage
1.
Follow all warnings and instructions marked on the product
2.
Unplug this product from the wall outlet before cleaning. Do not use liquid cleaners or aerosol cleaners. Use an
antistatic cleaning pad for cleaning
3.
Do not use this product near water
4.
Do not place this product on an unstable cart, stand or table. If the product falls, it could be seriously damaged

User guide
72
5.
This product should be operated using the type of power indicated on the marking label. If you are not sure of the
type of power available, consult your dealer or local power company
6.
Do not allow anything to rest on the power cord. Do not locate this product where people will walk on the cord
7.
Never push objects of any kind into this product through cabinet slots as they may touch dangerous voltage points
or short out parts that could result in a fire or electric shock
8.
Never spill liquid of any kind into or onto the product
9.
Do not attempt to service this product yourself, as opening or removing covers may expose you to dangerous
voltage points or other risks
10.
Refer all questions regarding servicing of this product to qualified service personnel
Danger–electric shock and fire
Electric current from power, telephone and communication cables is hazardous and could result in electric shock and/or fire.
Learn more
Terms and Conditions apply. For more information, visit www.onetalk.com
Network details & coverage maps at vzw.com. © 2023 Verizon
