
Continuous Delivery Director 8.5

Continuous Delivery Director 8.5
Table of Contents
Release Notes.....................................................................................................................................12
8.5 New Features, Enhancements, and Updates........................................................................................................ 12
8.4.2 New Features, Enhancements, and Updates..................................................................................................... 13
8.4.1 New Features, Enhancements, and Updates..................................................................................................... 14
8.4 New Features, Enhancements, and Updates........................................................................................................ 15
Acknowledgments and License Agreements..............................................................................................................17
About Continuous Delivery Director................................................................................................18
Features........................................................................................................................................................................... 22
Use Cases....................................................................................................................................................................... 24
Glossary...........................................................................................................................................................................25
Continuous Delivery Solution....................................................................................................................................... 29
Workflow..........................................................................................................................................................................31
User Interface..................................................................................................................................................................32
Getting Started (On-Premise)........................................................................................................... 34
Quick Start Guide for Administrators (On-Premise).................................................................................................. 34
Quick Start Guide for End Users (On-Premise)..........................................................................................................40
User Settings.................................................................................................................................................................. 44
Release Orchestration....................................................................................................................... 46
Release Design............................................................................................................................................................... 46
Design and Create Releases....................................................................................................................................48
Create a Release...............................................................................................................................................50
Automatically-Created Releases........................................................................................................................51
Application Versions, Work Items, and Dependencies......................................................................................52
Tokens................................................................................................................................................................ 61
Create and Duplicate Phases............................................................................................................................67
Tasks.................................................................................................................................................................. 69
Complete the Release....................................................................................................................................... 73
Schedule Releases................................................................................................................................................... 73
Build Promotion......................................................................................................................................................... 76
File Sources.............................................................................................................................................................. 77
Parametrized Releases............................................................................................................................................. 77
Pipelines as Code..................................................................................................................................................... 80
Pipeline as Code Example................................................................................................................................ 85
Example REST Call: Import from File............................................................................................................... 88
Release Management..................................................................................................................................................... 90
Manage Releases..................................................................................................................................................... 90
2

Continuous Delivery Director 8.5
Duplicate Releases............................................................................................................................................ 93
Release Risk Score........................................................................................................................................... 94
Manage Phases........................................................................................................................................................ 97
Create On-Failure Phases............................................................................................................................... 100
Manage Tasks......................................................................................................................................................... 101
Duplicate Tasks................................................................................................................................................ 102
Release Execution........................................................................................................................................................103
Monitor and Troubleshoot Release Execution........................................................................................................106
Activity Panel...........................................................................................................................................................108
Release Notifications...............................................................................................................................................111
Track Planned vs Actual Work............................................................................................................................... 111
Release Risk Score................................................................................................................................................ 114
Rollback Management.............................................................................................................................................117
Release Tracks..............................................................................................................................................................118
Create Release Tracks........................................................................................................................................... 120
Add Releases to a Track........................................................................................................................................ 121
Manage Release Tracks......................................................................................................................................... 121
Calendars.......................................................................................................................................................................123
Release Calendar....................................................................................................................................................123
Maintenance Windows............................................................................................................................................ 124
Create Maintenance Windows.........................................................................................................................124
Environment Planner...............................................................................................................................................125
Freeze Periods........................................................................................................................................................ 125
Create and Edit Freeze Periods......................................................................................................................126
Reports.......................................................................................................................................................................... 127
Test Orchestration............................................................................................................................136
Install Continuous Delivery Director with the Test Module.....................................................................................137
Setting Up the Test Module........................................................................................................................................ 152
Create an Adaptive Testing Task................................................................................................................................153
Monitor Running Tests................................................................................................................................................ 154
Continuous Testing Agents.........................................................................................................................................154
Configure .NET Continuous Testing Agents........................................................................................................... 157
Run a .NET Continuous Testing Agent............................................................................................................161
Configure Java Continuous Testing Agents............................................................................................................162
Monitor Test Suite Executions Through APIs...........................................................................................................164
View Adaptive Testing Results................................................................................................................................... 170
Integration Testing....................................................................................................................................................... 170
Test Advisor.................................................................................................................................................................. 171
Continuous Testing Agents.........................................................................................................................................180
Configure Continuous Testing Agents.................................................................................................................... 182
3

Continuous Delivery Director 8.5
Configure a Java CT Agent.............................................................................................................................183
Configure a .NET CT Agent.............................................................................................................................183
Run a .NET Continuous Testing Agent............................................................................................................186
Test Module Actions.................................................................................................................................................... 187
Import and Export Test Sources................................................................................................................................ 189
Import a Test Source.............................................................................................................................................. 189
Export a Test Source.............................................................................................................................................. 189
Test Source Templates................................................................................................................................................ 190
Create Test Source Templates................................................................................................................................190
Export Test Source Templates Parameters............................................................................................................ 191
Import/Export Test Source Templates.....................................................................................................................191
Export Test Sources.........................................................................................................................................191
Import Test Sources.........................................................................................................................................191
Remove Test Source Templates............................................................................................................................. 191
Security..............................................................................................................................................193
Security Sources.......................................................................................................................................................... 193
Security Summary Report........................................................................................................................................... 194
Security Items Report.................................................................................................................................................. 195
Integrations....................................................................................................................................... 196
Integration Updates......................................................................................................................................................197
Setting up a Local Plugin Server............................................................................................................................... 237
Manage Plug-ins........................................................................................................................................................... 238
Plug-in Proxy........................................................................................................................................................... 244
Set Up a Plug-in Proxy....................................................................................................................................245
Run Plug-in Proxy With Docker Compose...................................................................................................... 250
Run Plug-in Proxy Without Docker Compose................................................................................................. 252
Register an On-Premise Plug-in with Proxy....................................................................................................254
Configure Plug-in Proxy Properties................................................................................................................. 254
Manage Plug-in Proxies...................................................................................................................................255
Containerized Plug-ins............................................................................................................................................ 256
Containerized Plug-in Manager....................................................................................................................... 257
Set Up Containerized Plug-ins........................................................................................................................ 259
Run Containerized Plug-ins using Docker Engine.......................................................................................... 260
Run Containerized Plug-ins using Kubernetes................................................................................................263
Plug-ins..........................................................................................................................................................................265
Apache Tomcat Plug-in........................................................................................................................................... 268
Atlassian Bitbucket Plug-in..................................................................................................................................... 270
Atlassian Jira Plug-in.............................................................................................................................................. 273
Configure a Jira Endpoint................................................................................................................................275
4

Continuous Delivery Director 8.5
Add Jira Issue Comments............................................................................................................................... 276
Create Jira Issue..............................................................................................................................................276
Get Jira Issue...................................................................................................................................................278
Update Jira Issue Status................................................................................................................................. 279
Wait for Approval (Jira)....................................................................................................................................280
Define Output Parameters (Jira)......................................................................................................................281
Import Work Items (Jira).................................................................................................................................. 282
Get Test Assets (Jira)...................................................................................................................................... 283
Automic
®
Continuous Delivery Automation Plug-in................................................................................................284
Configure a CDA Plug-in Endpoint..................................................................................................................287
Start Application Workflow...............................................................................................................................287
Start General Workflow....................................................................................................................................290
AWS CodeDeploy Plug-in....................................................................................................................................... 291
Configure an AWS CodeDeploy Endpoint.......................................................................................................292
Create Deployment (AWS CodeDeploy)......................................................................................................... 294
AWS Elastic Beanstalk Plug-in............................................................................................................................... 294
Azure DevOps Server Plug-in.................................................................................................................................296
Configure an Azure DevOps Server Endpoint................................................................................................ 298
Import Work Items (Azure DevOps Server).................................................................................................... 299
Get Files (Azure DevOps Server)................................................................................................................... 300
Run Build (Azure DevOps Server).................................................................................................................. 301
Create Work Item (Azure DevOps Server)......................................................................................................302
Update Work Item (Azure DevOps Server).....................................................................................................303
Wait for Approval (Azure DevOps Server)...................................................................................................... 303
BlazeMeter
®
Plug-in................................................................................................................................................304
Burp Suite Plug-in................................................................................................................................................... 308
Configure a Burp Suite Endpoint.....................................................................................................................308
Create Scan (Burp Suite)................................................................................................................................ 309
Checkmarx Plug-in.................................................................................................................................................. 310
Configure a Checkmarx Endpoint....................................................................................................................310
Create Scan..................................................................................................................................................... 311
Create Scan using CxFlow.............................................................................................................................. 312
Coverity Plug-in....................................................................................................................................................... 312
Cucumber JVM Plug-in........................................................................................................................................... 314
Set Up the Cucumber JVM Plug-in................................................................................................................. 316
Configure a Cucumber JVM Endpoint.............................................................................................................317
Get Test Assets (Cucumber JVM)...................................................................................................................318
Cucumber for Ruby Plug-in.................................................................................................................................... 319
Docker Plug-in.........................................................................................................................................................321
DX App Experience Analytics Plug-in.................................................................................................................... 325
5

Continuous Delivery Director 8.5
DX App Synthetic Monitor Plug-in.......................................................................................................................... 326
Configure a DX App Synthetic Monitor Plug-in Endpoint................................................................................328
Activate and Deactivate Monitors.................................................................................................................... 329
Activate and Deactivate Monitors by Tags...................................................................................................... 329
Run Rule Check...............................................................................................................................................330
Run Rule Check by Tags................................................................................................................................ 330
Set and Remove Maintenance Time Window................................................................................................. 331
Email Plug-in........................................................................................................................................................... 332
Endevor Software Change Manager Plug-in.......................................................................................................... 333
Flowdock Plug-in..................................................................................................................................................... 338
GitHub Plug-in......................................................................................................................................................... 340
GitLab Plug-in..........................................................................................................................................................343
Gradle Testing Plug-in.............................................................................................................................................347
Helm Plug-in............................................................................................................................................................350
Configure a Helm Plug-in Endpoint.................................................................................................................352
Install Release by Helm Chart.........................................................................................................................354
Upgrade Release by Helm Chart.................................................................................................................... 354
Rollback Release............................................................................................................................................. 355
Uninstall Releases........................................................................................................................................... 355
Jenkins Plug-in........................................................................................................................................................ 356
Configure a Jenkins Endpoint......................................................................................................................... 357
Run Build (Jenkins)..........................................................................................................................................358
JFrog Artifactory Plug-in......................................................................................................................................... 359
Karate Plug-in..........................................................................................................................................................362
Configure a Karate Endpoint........................................................................................................................... 362
Get Test Assets (Karate)................................................................................................................................. 363
Kubernetes Plug-in..................................................................................................................................................364
Configure a Kubernetes Plug-in Endpoint....................................................................................................... 365
Create Deployment.......................................................................................................................................... 367
Delete Deployment...........................................................................................................................................367
Set Image.........................................................................................................................................................368
Import Files from AWS S3 (Kubernetes).........................................................................................................368
Liquibase Plug-in.....................................................................................................................................................368
Configure a Liquibase Endpoint...................................................................................................................... 369
Run Deployment (Liquibase)........................................................................................................................... 370
Manual Deployment Plug-in....................................................................................................................................371
Maven Testing Plug-in.............................................................................................................................................372
Micro Focus ALM Plug-in....................................................................................................................................... 375
Micro Focus LoadRunner Enterprise Plug-in..........................................................................................................380
Configure a LoadRunner Enterprise Endpoint................................................................................................ 381
6

Continuous Delivery Director 8.5
Get Test Assets (LoadRunner Enterprise).......................................................................................................382
Microsoft Teams Plug-in..........................................................................................................................................383
Configure a Microsoft Teams Endpoint........................................................................................................... 385
Post Message (Microsoft Teams).................................................................................................................... 385
Start New Chat (Microsoft Teams).................................................................................................................. 386
Nolio Release Automation Plug-In..........................................................................................................................388
Playwright Plug-in....................................................................................................................................................392
Configure a Playwright Endpoint..................................................................................................................... 393
Get Test Assets (Playwright)........................................................................................................................... 394
Postman Plug-in...................................................................................................................................................... 395
Configure a Postman Endpoint........................................................................................................................395
Get Test Assets (Postman)..............................................................................................................................396
pytest Plug-in...........................................................................................................................................................397
Configure a pytest Endpoint............................................................................................................................ 398
Get Test Assets (pytest).................................................................................................................................. 399
Rally
®
Plug-In..........................................................................................................................................................400
Configure a Rally Endpoint..............................................................................................................................401
Rally Update.....................................................................................................................................................403
Check Test Case Results (Rally).....................................................................................................................404
Import Work Items (Rally)................................................................................................................................404
Get Test Assets (Rally)....................................................................................................................................407
Red Hat Ansible Plug-in......................................................................................................................................... 409
Red Hat Ansible Tower Plug-in...............................................................................................................................412
Define Output Parameters (Ansible Tower).....................................................................................................417
Red Hat OpenShift Plug-in..................................................................................................................................... 419
Configure an OpenShift Endpoint....................................................................................................................420
Create Deployment (OpenShift)...................................................................................................................... 422
Delete Deployment (OpenShift).......................................................................................................................423
Edit BuildConfig (OpenShift)............................................................................................................................423
Set Image (OpenShift)..................................................................................................................................... 424
Start Build (OpenShift).....................................................................................................................................425
REST Plug-In.......................................................................................................................................................... 425
Example: Integrate with a Third Party REST API........................................................................................... 429
Robot Framework Plug-in....................................................................................................................................... 436
Runscope Plug-in.................................................................................................................................................... 439
Salesforce Plug-in................................................................................................................................................... 441
Configure a Salesforce Endpoint.....................................................................................................................441
Run Deployment (Salesforce)..........................................................................................................................442
ServiceNow Plug-in................................................................................................................................................. 443
Slack Plug-in........................................................................................................................................................... 448
7

Continuous Delivery Director 8.5
SoapUI Plug-in........................................................................................................................................................ 450
Set Up the SoapUI Plug-in.............................................................................................................................. 451
Configure a SoapUI Endpoint..........................................................................................................................451
Get Test Assets (SoapUI)................................................................................................................................452
SonarQube Plug-in..................................................................................................................................................453
Configure a SonarQube Endpoint................................................................................................................... 455
Check Project Status (SonarQube)................................................................................................................. 456
Run Code Analysis (SonarQube).................................................................................................................... 457
Sonatype Nexus Lifecycle Plug-in.......................................................................................................................... 458
Configure a Nexus Lifecycle Endpoint............................................................................................................ 459
Evaluate an Application (Nexus Lifecycle)...................................................................................................... 459
Terraform Plug-in.....................................................................................................................................................460
Configure a Terraform Endpoint...................................................................................................................... 461
Create a Run (Terraform)................................................................................................................................ 461
Apply a Run (Terraform).................................................................................................................................. 462
Test Data Manager Plug-in..................................................................................................................................... 463
Configure a TDM Plug-in Endpoint................................................................................................................. 463
Run Data Generation Flow.............................................................................................................................. 464
Publish Job.......................................................................................................................................................465
TestCafe Plug-in...................................................................................................................................................... 467
Twistlock Plug-in......................................................................................................................................................469
Veracode Plug-in..................................................................................................................................................... 471
Develop Custom Plug-ins............................................................................................................................................473
Develop Custom Plug-in HTTP Service................................................................................................................. 475
Create the Plug-in Manifest.................................................................................................................................... 482
Sample Plug-in........................................................................................................................................................ 487
Build Notifications........................................................................................................................................................504
Build Notification Workflow......................................................................................................................................504
Configure Build Notifications...................................................................................................................................506
Run an Existing Release................................................................................................................................. 507
Replace the Application Version......................................................................................................................508
Create a Release from DSL............................................................................................................................ 509
Create a Release from Business Application-Related DSL............................................................................ 510
Run Tests Only................................................................................................................................................ 510
CI Tool Integrations......................................................................................................................................................511
Plug-in for Azure DevOps Server........................................................................................................................... 511
Configure Plug-in for Azure DevOps Server................................................................................................... 512
Integration with Bitbucket Cloud............................................................................................................................. 516
Plug-in for GitLab.................................................................................................................................................... 517
Plug-in for Grafana..................................................................................................................................................518
8

Continuous Delivery Director 8.5
Install Plug-in for Grafana................................................................................................................................521
Configure Plug-in for Grafana..........................................................................................................................522
Plug-in for Jenkins.................................................................................................................................................. 522
Configure Plug-in for Jenkins.......................................................................................................................... 525
Send Build Notifications from a Jenkins Freestyle Project..............................................................................526
Configure Jenkins to Send Git Commit IDs.................................................................................................... 529
Send Build Notifications from Jenkins Pipeline...............................................................................................530
Create Release from File Source in Jenkins Pipeline.....................................................................................532
Documentation Legal Notice.......................................................................................................... 534
Administration.................................................................................................................................. 535
Licensing and Product Usage.................................................................................................................................... 535
View Product Usage - Activity Log......................................................................................................................... 536
View Product Usage - API......................................................................................................................................536
Enable the Portfolio License Agreement................................................................................................................ 536
Enable a Classic Product License..........................................................................................................................538
Manage Users, Groups, and Roles............................................................................................................................ 538
User Permissions.................................................................................................................................................... 542
Integrate with a Directory Server............................................................................................................................544
Enable Single Sign-On............................................................................................................................................547
Configure SAML Authentication.......................................................................................................................551
Enable SAML Groups...................................................................................................................................... 552
Integration Users..................................................................................................................................................... 552
Create An Integration User..............................................................................................................................553
Register Plug-ins.......................................................................................................................................................... 553
Manage Endpoints........................................................................................................................................................554
Create Endpoints.....................................................................................................................................................555
Duplicate Endpoints................................................................................................................................................ 555
Import and Export Endpoints.................................................................................................................................. 556
Projects..........................................................................................................................................................................556
Create and Edit Projects.........................................................................................................................................556
Assign and Manage Project Access.......................................................................................................................557
Applications and Environments................................................................................................................................. 559
Manage Applications............................................................................................................................................... 560
Create Local Applications................................................................................................................................ 560
Import Applications...........................................................................................................................................561
Import and Export Applications with DSL........................................................................................................562
Manage Application Sources........................................................................................................................... 563
Set Source Control Connection.......................................................................................................................564
Set Work Items Connection.............................................................................................................................565
9

Continuous Delivery Director 8.5
Manage Application Versions.......................................................................................................................... 566
Business Applications............................................................................................................................................. 568
Create Business Applications.......................................................................................................................... 568
Import and Export Business Applications........................................................................................................569
Business Application Versions.........................................................................................................................570
Create Release Environments................................................................................................................................ 572
Replace Environments............................................................................................................................................ 572
Production Environment Protection........................................................................................................................ 573
Setting Up Production Environments...............................................................................................................573
Working with Log Files................................................................................................................................................574
Customize Product Settings....................................................................................................................................... 575
Load Metrics and Sizing..............................................................................................................................................581
Configure High Availability......................................................................................................................................... 583
Configure Notifications................................................................................................................................................589
Edit Notifications......................................................................................................................................................590
Notification Management and Parameters............................................................................................................. 591
Configure Secrets.........................................................................................................................................................593
Configure Shared Tokens............................................................................................................................................596
Configure the Home Folder.........................................................................................................................................598
Change Home Folder..............................................................................................................................................599
Activity Log................................................................................................................................................................... 600
Configure Data Export to Grafana............................................................................................................................. 601
Installation.........................................................................................................................................603
System Requirements..................................................................................................................................................603
Installation Best Practices.......................................................................................................................................... 606
Install Continuous Delivery Director..........................................................................................................................609
Secure Communications............................................................................................................................................. 615
Upgrade Continuous Delivery Director......................................................................................................................618
Uninstall Continuous Delivery Director..................................................................................................................... 619
Reference.......................................................................................................................................... 621
REST API Reference.................................................................................................................................................... 621
Example REST Call: Get All Releases...................................................................................................................624
Troubleshooting............................................................................................................................................................629
Troubleshoot LDAP Configuration.......................................................................................................................... 629
Troubleshoot SAML Configuration.......................................................................................................................... 633
Product Tutorial Videos............................................................................................................................................... 646
Product Names and Abbreviations............................................................................................................................ 650
Product Accessibility Features...................................................................................................................................651
Terms of Service and Privacy.....................................................................................................................................653
10

Continuous Delivery Director 8.5
Usage Data (Telemetry)................................................................................................................................................ 654
Documentation Legal Notice.......................................................................................................................................655
11

Continuous Delivery Director 8.5
Release Notes
Continuous Delivery Director augments application deployment capabilities with advanced features to help manage
complex and maturing continuous delivery pipelines.
Continuous Delivery Director works with Automic@ Continuous Delivery Automation and popular SaaS deployment
automation tools. Continuous Delivery Director offers an easily configurable, visual control point to manage, orchestrate,
and optimize continuous delivery pipelines. Continuous Delivery Director includes the following capabilities and benefits:
•
Efficiently design and release multi-app, multi-team, composite applications from agile output through production.
Composite applications help avoid conflicts, drive collaboration, and increase visibility.
•
Track content, such as user stories, across releases to connect delivered content with business goals.
•
Integrate and orchestrate your continuous delivery pipeline tools to leverage preferred tool chains.
•
A flexible, visual interface that helps plan and execute releases, and provides complete control over your release cycle.
•
Define and enforce continuous delivery best practices to improve quality of processes, teams, and applications.
For more information about the value of adding Continuous Delivery Director to your continuous delivery pipeline,
see About Continuous Delivery Director.
8.5 New Features, Enhancements, and Updates
This release includes all features and cumulative maintenance up to 8.5 plus the following new features and
enhancements.
For up-to-date information about our product integrations, see Integration Updates.
Continuous Delivery Director includes all features that are described on this site and summarized in Features.
Enhancements
Modular Release Templates
This feature eases the management of DSL components that repeat in multiple release templates (for example, the phase
or task that are included in many release templates). You can create DSL files that contain a set of objects (for example,
Phase, Task, Tokens) and refer to these files from the release DSL.
Export Phases and Tasks
You can export a single task or phase as a DSL file. This will ease the creation of phase or task DSL template files which
will be referred from a Release DSL, or to import a single phase or task into an existing release.
Security Summary Report - Show by Project
Users can now create a view that lists all the application versions of the current project, selected project or all the projects
which the user is permitted to view the security details report.
Security Report - Search by Reference ID (CVE)
Users can identify if a certain vulnerability is present in the application versions. A new filter by reference ID (CVE) was
added to the "Security Summary" and the "Security Items" reports. Using this filter, users can locate the application
versions which contain the specified vulnerability.
12

Continuous Delivery Director 8.5
8.4.2 New Features, Enhancements, and Updates
This release includes all features and cumulative maintenance up to 8.4.2 plus the following new features and
enhancements.
For up-to-date information about our product integrations, see Integration Updates.
Continuous Delivery Director includes all features that are described on this site and summarized in Features.
New Features
Grafana – Support Multi-Value Variable
Grafana now allows you to define a variable as a multi-value variable. You can select more than one value for the multi-
value variables. For more information, see the Variables section in Plug-in for Grafana.
Approve and Start ASAP a stage in the release track
A new option was added to the action menu of a production stage – “Approve and Start ASAP”. This option is used when
the track owner would like that unapproved stage will start as soon as the predecessor stage is completed.
Selecting this option clears the start time and approves the production stage.
Tags
Added a new field called 'Tags' to CDD entities. You can now add tags to identify a release, task, phase, application,
business application, environment, endpoint, application version, business application version and security source,
in addition to the existing capability to use tags with Tests. Use the same tags across all CDD entities that are associated
with different projects.
Tags are also added to the grid pages as a new column. Click the filter icon in the Tags column to filter your search.
Grafana - Add Query Parameters using Tags
Added a new query parameter field called 'Tags' to group the information. For example, you can now tag several
applications with the same tag name, and by specifying the tag in the query, you can fetch results that are relevant to the
tagged applications.
Endpoints
In the Endpoints home page, the endpoint names are now displayed in an alphabetical order.
You can now filter the endpoints by selecting a plugin name from the list of registered plugins.
Added an option to duplicate endpoints. To duplicate an endpoint, select an endpoint row, click the row actions (three-dot)
menu, then click Duplicate. For more information, refer to Duplicate Endpoints section under Manage Endpoints.
Added two new columns to the Endpoints home page named "Last Modified" and "Last Modified by." You can now view
when an endpoint was created and last modified, and the name of the user who created or modified it.
Switch Project Enhancements - Unauthenticated User
New functionality was added to ease users to access a release that is not associated with their default project - when
clicking on a release URL, after the authentication, CDD will switch the user's project and the release page will open.
13

Continuous Delivery Director 8.5
Changed Manifest Fields
Improved tracking of changes to Tasks, Endpoints, and File Sources: The activity which is generated while editing Tasks,
Endpoints, and File Sources is enhanced to include the old and new values of the input fields.
Build Notification Visibility and Auditing
You can now view the latest build that exists for a specific application version so that you know which build will be
processed next when the first phase starts.
8.4.1 New Features, Enhancements, and Updates
This release includes all features and cumulative maintenance up to 8.4.1 plus the following new features and
enhancements.
For up-to-date information about our product integrations, see Integration Updates.
Continuous Delivery Director includes all features that are described on this site and summarized in Features.
New Features
Mandatory Task
A new option was added to the task editor to set the task as “Mandatory.” A mandatory task must complete with success -
only permitted users can disable, skip and edit the task.
For more information, see Create Tasks.
Manage Test Sources from the Release Page
A new tab was added to the side panel, “Tests.” Users can define new tests source, sync the tests and view the test
source status without leaving the release page.
For more information, see Manage Test Sources from Releases.
Enable / Disable Phase
You can enable or disable the phase for execution. Disabling excludes the phases from the release execution.
For more information, see Manage Phases.
Grafana Metrics - Active Users and Automated Tasks
Two new metrics were added to the Grafana plugin - “Active Users,” which presents the number of users logged into CDD
per day; “Number of Automated/Manual Tasks in Active Releases,” which allows you to track the maturity level of your
releases.
For more information, see Plug-in for Grafana.
A new permission "Can delete design release"
New permission added, allowing users to delete only releases in design status (releases that never ran). With this new
permission, users can delete releases that are in Design mode but cannot delete if the release is in "Running" (also
Running with failure) or "Done" mode.
14

Continuous Delivery Director 8.5
Adaptive Testing Result by Framework Improvements
Search field is added on the "Adaptive Testing Result by Framework" page. You can search for the required test suites
using this field.
UI Enhancements to Application Editor
Added support to associate an application with Business Application from the application page.
For more information, see Create Local Applications and Create Business Applications.
Allow Multi-lines in the Secret Password field
When using "Local" secret, you can store multi-line confidential information such as SSL certificates as Secret Passwords.
For more information, see Configure Secrets.
8.4 New Features, Enhancements, and Updates
This release includes all features and cumulative maintenance up to 8.4 plus the following new features and
enhancements.
For up-to-date information about our product integrations, see Integration Updates.
Continuous Delivery Director includes all features that are described on this site and summarized in Features.
New Features
Secret Management
Secrets are variables that store confidential information such as passwords or API Keys and can be used in the
Endpoints. Using secrets, users can create endpoints without being exposed to the password value. Users can share
passwords across multiple endpoints in the project. The secret value can be defined locally in CDD or, using a plugin, can
get values from the external privilege access management systems.
For more information, see Configure Secrets.
New Release Calendar UI
The Release Calendar is now preset in a modern Gantt chart. Users can select the desired releases to view in the
Release Calendar UI. The performance of the calendar is also improved.
For more information, see Release Calendar.
Grafana Metrics - License Usage
A new metric was added to track the number of active releases in a time range.
For more information, see Plug-in for Grafana.
License Usage Report
A new report with the high watermark of the monthly license usage is made available to the users.
For more information, see Usage Data (Telemetry).
15

Continuous Delivery Director 8.5
Endpoint Usage Report
The new report provides visibility on the usage of the endpoints in the project. In this report, users can also view the
endpoint assignments in the Tasks, Tests Source, Files Source, Work Item Connections, Source Control Connections,
Application Sources, and Secrets.
For more information, see Reports.
Checkmarx Plugin
Checkmarx Plugin is now enhanced with a new Source code scanning task (CxSAST).
For more information, see Plug-in for Checkmarx.
Enhancements
Recurrent Freeze Period
Added support to create repeatable events for the freeze period. You can create daily, weekly, or monthly events or can
use the custom option to define any repeating pattern.
For more information, see Create and Edit Freeze Periods.
Release Track Changes
The new enhancements allow the users to re-order the production stages and apply changes to the production stage date
as long as the stage has not started. The track owner can define that certain production stages require the user's approval
to start. In addition, to simplify the release tracks creation, the duplicate track functionality was added.
For more information, see Manage Phases.
Enhancements to Phase Scheduling
Added support for the custom recurrent option in the phase schedule. Using this option, users can define any repeating
pattern. In addition, users can see the scheduled/planned dates of the phase in the Phase header.
For more information, see Schedule Releases.
Add Pause Option to Phase
The phase owner can pause a phase while running. The phase is paused immediately upon completion of the running
tasks. The user can resume the phase, and the subsequent tasks start running.
For more information, see Manage Phases.
New Swagger OAS3
The new swagger APIs are available now and use the OpenAPI Specification. Users can use these APIs in the
documentation and code generation tools to generate servers and clients in various programming languages, testing
tools, and many other use cases.
Sonatype Nexus Lifecycle (IQ Server) Plugin
New task that invokes nexus policy evaluation is included in the Sonatype Nexus Lifecycle (IQ Server) Plugin.
For more information, see Plug-in for Sonatype Nexus Lifecycle (IQ Server).
16

Continuous Delivery Director 8.5
DX App Synthetic Monitor Plugin
New capabilities are added in the DX App Synthetic Monitor Plugin:
•
Rule check for multiple monitors or by tags
•
Activate/Deactivate multiple monitors or by tags
•
Create/remove immediate maintenance window
For more information, see Plug-in for DX App Synthetic Monitor Plugin.
Cucumber JVM Plugin
Enhanced the plugin to view the execution report even if all the tests are skipped.
For more information, see Plug-in for Cucumber JVM.
Playwright Plugin
Enhanced to view the execution report even if all the tests are skipped.
For more information, see Plug-in for Playwright.
Acknowledgments and License Agreements
Click the following links to access TXT format documents that contain license agreement information for third-party
software that is used in Continuous Delivery Director.
•
Core Product
•
Test Advisor
•
Adaptive Testing Catalog
•
Adaptive Testing Results
17

Continuous Delivery Director 8.5
About Continuous Delivery Director
Continuous Delivery Director is a powerful pipeline planning, release orchestration, test orchestration, and analytics
solution that enables effortless continuous delivery of high-quality, innovative applications from high-performance teams.
To learn more about Continuous Delivery Director, click the tiles below:
Release Design Release Orchestration Release Management Release Execution Reports Test Orchestration https://
techdocs.broadcom.com/us/en/ca-enterprise-software/devops/continuous-delivery-director-integrations/1-0/integrations-
overview.html Release Notifications
Overview
Rapid and reliable deployment of new high-quality release content is essential to drive business agility and reduce
time-to-market. As your processes mature, the speed of your enterprise release cadences and the scale of automated
deployments increase. These changes can result in the following challenges:
•
Increased release complexity, including releases with different requirements and that consist of multiple applications,
teams, and timelines.
•
Increased release velocity makes it more difficult to detect conflicts and bottlenecks.
•
A more agile release process that must support business goals, and application content that is easy to track.
Tools such as Automic
®
Continuous Delivery Automation automate application deployments to help reduce deployment
times and errors. Continuous Delivery Director offers advanced capabilities to help you manage a complex continuous
delivery pipeline.
18

Continuous Delivery Director 8.5
Continuous Delivery Director offers an easily configurable, visual, strategic control point to help plan and direct the
processes and content of multi-team, multi-app releases from development through production. Continuous Delivery
Director helps you transition to the next phase of continuous delivery maturity, and move from automated application
deployment to a fully managed and optimized release pipeline.
Typical continuous delivery pipelines incorporate sophisticated sets of tools that include:
•
Application lifecycle management
•
Change management
•
Continuous integration
•
Artifact storage
•
Intelligent test automation
•
Infrastructure automation
•
Deployment automation
These tools perform key functions to ensure fast, high-quality releases. Release pipeline management provides insight
into, and control of, all continuous delivery functions. Continuous Delivery Director adds more advanced, broader pipeline
orchestration to Automic
®
Continuous Delivery Automation functionality. This enhanced scope helps to manage the end
to end process from development to production. Enhanced release cycle management drives a cross-functional culture of
shared ownership between development, test, release, and operations teams.
Review the content in this section to understand product use cases, concepts, and recommended workflows.
Product Tutorial Videos
These videos are extracted from the following official product training courses:
•
Release Orchestration
•
Test Orchestration
These courses provide extra information, context, and examples to augment the product documentation.
To access this course, see Broadcom Enterprise Software Academy.
Release Orchestration in 60 Seconds
This video provides a 1-minute overview of how release orchestration works in Continuous Delivery Director.
Test Orchestration Overview
This video describes how you can orchestrate tests with your release pipeline. Continuous Delivery Director provides
integration with common testing tools, plus test intelligence and heuristics that automatically select the right tests to run
and return data about release quality based on test results.
System Architecture
You determine the architecture for your CDD instance depending on your specific business needs. The following is a
representation of a typical Continuous Delivery Director system architecture:
19

Continuous Delivery Director 8.5
20

Continuous Delivery Director 8.5
The following is a representation of the Continuous Delivery Director object model architecture:
21

Continuous Delivery Director 8.5
Figure 1: CDD Object Model Architecture
Features
The following section is a summary of Continuous Delivery Director key features:
Plan and Design Releases
Release Design
Continuous Delivery Director provides an interactive interface with the following capabilities:
•
Design flexible, multi-application releases
•
Create releases
•
Add applications to releases
•
Integrate other continuous delivery tools,
•
Divide releases into phases (such as development, QA, and production) and tasks
22

Continuous Delivery Director 8.5
Release Scheduling
You can schedule planned release executions that require no manual start. Release scheduling lets you execute releases
during off hours to minimize the risk of outages during peak usage times. You can schedule releases in the context of
release design, or through an intuitive release calendar interface.
Integrations
Local and Remote Application Model
As a part of frequent, complex releases, you can import application and environment models from CA Continuous
Delivery Automation to orchestrate deployments. You can also create local applications and environments for proof of
concept, testing, and for tracking purposes.
Phase Approval Gates
You can configure an approval gate for all release phases. The approval gate ensures that the completion of the current
phase is approved before the next phase starts. You can set automatic, scheduled, or manual approval gates. Approval
gates provide a logical separation between phases. Approval gates also prevent releases from deploying the next phase,
such as from Dev to QA, without authorized user verification.
User Management
Continuous Delivery Director lets you create users and add users to groups that are associated with specific product
roles. Permissions range from full administration to read only. These permission levels provide stakeholders with insight
into application and environment release cycles, and eliminate unnecessary infrastructure risks.
Integrate and Collaborate
Continuous Delivery Plug-ins
Continuous Delivery Director uses packaged plug- ins to invoke the functionality of many popular continuous delivery
tools. For example, the CA Continuous Delivery Automation plug-in lets you import applications and run CA Continuous
Delivery Automation application deployment plans in the context of larger releases. This capability provides the flexibility
to deploy multiple applications in the context of a single, release-level entity. Other key integration types include testing,
lifecycle management, and change management tools.
Content Source Integrations
Continuous Delivery Director uses packaged plug-ins to integrate with CA Agile Central (formerly CA Rally) and Atlassian
JIRA. These integrations let you automatically import content from these tools into releases to provide clear, focused
visibility into release content. You can also manipulate content items directly from a release.
Collaboration Features
Continuous Delivery Director provides opportunities for collaboration during release design and deployment. You can add
users and stakeholders to a release to provide visibility. You can also add content to a release to link release orchestration
with application change history and other application activities. You can also view the release activities in the Activity
Panel.
23

Continuous Delivery Director 8.5
Release Execution
Execute Releases
Continuous Delivery Director lets you execute multi-application releases with a dynamic interface that provides instant
feedback on progress and results. The user interface takes you through each task and phase of the release. The interface
lets you intervene to fix errors, stop tasks, skip tasks, and move to the next phase. Release execution is automated and
interactive in key ways that provide the appropriate level of oversight for all scenarios.
Monitor Releases
Release Dashboard
The Release Dashboard provides widgets to help you track release trends over time. You can configure the dashboard to
set up role-specific views.
Use Cases
Continuous Delivery Director gives release managers and DevOps professionals comprehensive insight into all tasks
and content across all phases of release cycles in the continuous delivery pipeline. While Automic
®
Continuous Delivery
Automation and other application deployment tools provide robust, application-level deployment automation, Continuous
Delivery Director enables the following functionalities at the pipeline level:
•
Define release content that spans multiple teams and multiple applications
•
Define deployment order and dependencies between applications
•
Configure approvals across applications and phases
•
Use global environments to configure a clear promotion path
•
Respond to release status in real time to ensure success
•
Track release content for visibility into what gets deployed
•
Visualize your entire continuous delivery pipeline to manage multiple releases simultaneously
The following examples show how these functionalities map to high-level continuous delivery use cases:
•
You can effectively manage the complexity of cross-application releases in a content-driven manner that directly
supports underlying agile processes. Tie release content to releases to efficiently map user stories, customer
feedback, and other agile artifacts to the completed release. This level of insight in a single tool lets you anticipate
dependencies, and fully understand how your processes work together.
•
Managing releases from a single tool lets you enforce consistency across the enterprise, and creates a repeatable
release process blueprint.
•
Continuous delivery pipeline optimization becomes simpler when teams have end-to-end transparency. End-to-end
transparency helps avoid conflicts, detect bottlenecks, and fix problems. End-to-end transparency provides visibility
into trends to understand where future problems might occur.
•
You can orchestrate deployments of applications to SaaS, on premises, and hybrid deployment models from a single
tool.
Example Use Case
Consider as an example, a financial company that maintains a complex payment processing system. This system consists
of four discrete applications that always have to run and work together:
•
A front-end user interface application
•
A back-end batch processing application
•
A database for account and transaction storage
•
An application that secures and monitors all transactions
24

Continuous Delivery Director 8.5
These applications include application dependencies, and the teams and stakeholders responsible for each application.
These applications might be modeled as separate applications in the baseline application deployment software. These
applications can also contain the following continuous delivery artifacts:
•
Deployment plans
•
Development, test, and production environments
•
Build processes
•
Regression tests
•
Performance tests
•
Virtual services
•
Change management data
Release owners can model continuous delivery activities for the payment processing application into a single release
pipeline workflow. This capability unlocks the following key benefits and use cases:
•
Organize the release activities into phases for a global environment view
Ensures that all application phases are complete before they move to the next phase.
Example: You model a Development phase that contains all activities to deploy applications into your Development
environment. If the Development environment includes different systems for each application, the phases in
Continuous Delivery Director give you a global environment view.
•
Add all stakeholders to a release
Ensures that everyone responsible for aspects of the release has the necessary level of insight.
Example: If the build fails for the front-end application, the responsible development team and all relevant personnel
are notified. This notification provides insight into current status to allow stakeholders to adjust their plans accordingly.
•
Model a sequential task-based workflow in each phase
Lets you assemble a logical order of events at the release level to allow for application dependencies and other
factors.
Example: If the batch processing application regression tests or deployment fails, the front-end application updates do
not run.
•
Integration with lower-level continuous delivery tools
Lets you effectively orchestrate the process from a single tool. You can configure Continuous Delivery Director to kick
off deployment plans after you confirm the completion of prior tasks.
•
Collaborative features
Provides increased release insight. For example, you can add release content that tracks the work items that are
addressed in a given application update.
•
Management at scale
Consider the payment processing system as one of dozens of composite applications that the financial services
company manages. Each application has multiple applications, releases, and teams. Continuous Delivery
Director makes it possible to maintain an efficient continuous delivery pipeline at scale. Continuous Delivery
Director detects release conflicts and shows scheduled releases and the environments that they deploy in a single
calendar view. The product also provides teams with one location for collaboration.
Glossary
The following list defines key Continuous Delivery Director terms
account owner The person who signs up for a Continuous Delivery Director subscription.
NOTE
Applies to SaaS only.
Activity Panel A panel on the Releases page that shows all release activities, such as execution events, warnings, and
error messages.
API key A unique alphanumeric key to authenticate user access to REST APIs.
25

Continuous Delivery Director 8.5
application An entity that you can add to a release and act on using tasks. Applications represent the deployable
units of software that are part of a release. They are often the same as the applications you create in
Automic Continuous Delivery Automation. However, you can also create local application models for proof
of concept and testing purposes or correspond with SaaS-based applications that you deploy with other
tools, such as AWS CodeDeploy.
For more information, see Manage Applications and Environments.
application model A design element that represents an automated configuration and deployment for a server architecture. The
user permissions, actions, and server types must be associated with the application to design processes.
An application model can contain multiple server types and architectures, multiple components to represent
application tiers, and multiple environments.
application source An endpoint providing access to a source control project repository where your application source code files
are stored.
application version An identifier that is assigned to an application.
approval gate An entry gate that lets release owners specify how release phases begin execution. The following approval
gates are available for release phases:
•
Manual - Requires manual execution.
•
Automatic - No approval gate, the phase starts automatically when the previous phase is complete.
•
Scheduled - Starts at the scheduled time.
application version A number that is provided manually at the beginning of a release to indicate the version of an application.
This number is not an auto-generated number, which is given by a build server or source control. This
number is the version number of the application at the end of the release.
blue/green deployment A technique for deploying applications by shifting traffic between two or more production environments at
runtime. This technique lets you switch quickly and easily between staging and production environments
to reduce downtime. You can also roll back to an alternative production environment if changes to a
production environment cause errors.
build notification A DSL file containing build event information sent from a continuous integration tool, such as Jenkins, to
Continuous Delivery Director. The file can contain coded commands to trigger activities within CDD, such
as create or update releases.
build promotion A capability that enables successful builds to automatically advance across the pipeline in Continuous
Delivery Director. You use this capability to promote successful builds across release phases. Application
build numbers are included in and can be automatically tracked across, the lifecycle of a release.
business application A set of applications that represent a meaningful entity to an enterprise or a user (such as a mobile banking
app).
business
application version
An identifier assigned to a business application.
code churn A heuristic that shows the number of code changes in a time range. A large number of changes indicates
code volatility. Measuring the rate of code change is especially relevant in the week before the end of a
release. At this point, the codebase should be stable.
commit source A source control repository in which commit metadata is stored, such as a GitHub repository.
containerized
plug-in manager
A tool that enables you to work with container management platforms such as Docker and Kubernetes.
continuous testing
agent (a.k.a. ct_agent)
An automated service that checks to see if specified test suites have been updated.
custom role A user-defined role containing project and cross-project permissions that do not match the default roles.
Permissions include the following categories
designer The default Continuous Delivery Director user role. Designers can:
•
Edit releases, phases, and tasks if they are owners
•
View releases if they are members
•
Export releases
DSL A specialized programming language for the Continuous Delivery Director system landscape. The
Domain-specific Language (DSL) functionality lets you create and import/export Continuous Delivery
Director objects such as releases, phases, tasks, applications, environments, and so as JSON code. This
functionality reduces the time spent on modeling release pipelines through the user interface.
26

Continuous Delivery Director 8.5
e-mail template A preformatted document for email notifications sent to users that are automatically triggered by system
events. Templates include parameters that hold data related to the notification purpose, such as release
status updates.
endpoint A connection that a user establishes to remote components, such as Rally
®
. You can establish multiple
endpoints to a single plug-in.
For more information, see Manage Endpoints.
environment A design element that represents a context in which deployed applications run. When using Continuous
Delivery Director with Automic
®
Continuous Delivery Automation, they are typically the same as the
environments you create in Automic
®
Continuous Delivery Automation. Like applications, you can create
local environments for proof of concepts, testing, and use in SaaS-based deployments with other tools,
such as AWS CodeDeploy.
For more information, see Manage Applications and Environments.
external application An application model that exists in a remote component, such as Automic
®
Continuous Delivery
Automation.
file source An endpoint providing access to files that represent releases in JSON format, stored in a source control
repository.
freeze period A time frame in which a deployment (or similar tasks) cannot take place in specified environments.
Indication Panel A user interface container that docks to the Activity Panel. The Indication Panel contains icons that indicate
the following release events:
•
Pending tasks
•
Errors
•
Warnings
The panel is activated when the release starts to run.
integration testing A test method designed to expose defects in the interactions between applications and subcomponents that
are integrated into a business application.
integration user A dedicated user that manages integrations with other products and services. You use an integration user
to prevent loss of access if employees whose user credentials are used to authenticate to integrations
leave the company.
local application An application model that only exists in the context of Continuous Delivery Director and which is not
imported. You can use local applications for proof-of-concept activities.
local environment An environment that only exists in the context of Continuous Delivery Director and which is not imported.
You can use local environments for proof-of-concept activities.
maintenance window A time frame during which releases can run in a specified environment.
on-failure phase A phase that activates predefined tasks when started manually or automatically triggered by errors in a
preceding phase.
outage A period during which the system is unavailable. There are two types of outages:
•
Unplanned: Due to a problem with our services such as network unavailability or software issues.
•
Planned: Due to maintenance activities which require us to stop the service for a short period.
NOTE
Applies to SaaS only.
parameterized release A release DSL file containing a parameters section that includes release entity name-value pairs. You use
parametrization in release DSLs to create release entities as code, reducing the time spent on modeling
releases through the user interface. Each parameter is a variable that holds data related to the release.
penetration testing An activity that looks for attack paths that might be used to gain access to assets.
phase An organized collection of release deployment steps. Phases provide a global environment view for all
application activities. A typical release has development, QA, and production phases. These phases consist
of the steps necessary to deploy applications in each phase.
NOTE
More Information:
27

Continuous Delivery Director 8.5
•
Create Phases section in Design and Create Releases
•
Manage Phases
phase gate A setting that specifies how a phase is triggered to run. You can configure phases with the following phase
gates:
•
Manual (default): Runs a phase when a button is selected.
•
Automatic: Runs a phase when the previous phase is complete. Automatic phases that are the first
phase in a release must be started manually.
pipeline as code A Domain-specific Language (DSL) representation of a release pipeline in JSON code. This functionality
reduces the time spent on modeling release pipelines through the user interface.
plug-in Plug-ins allow you to customize Continuous Delivery Director with the integration of remote components.
Each plug-in integrates with a remote component that lets you instrument continuous delivery operations
in release workflows. Plug-ins provide the integration with each component, and endpoints are the
connections to the servers where the remote components reside. For example, the Automic
®
Continuous
Delivery Automation plug-in lets you configure multiple endpoints to Automic
®
Continuous Delivery
Automation servers.
For more information, see Integrations.
plug-in proxy A gateway between Continuous Delivery Director SaaS and on-premise plug-in services that run behind
a firewall, such as your corporate GitHub or JFrog Artifactory. The proxy can enable authentication of the
user and then let traffic flow through the proxy despite the firewall.
project segregation A separation between different teams in a project to ensure that different stakeholders are restricted to their
designated releases and releases assets (applications, environments, endpoints, and so on).
release A representation of a workflow for the deployment of applications in one or many environments. Releases
are the core of Continuous Delivery Director.
For more information, see Releases.
release as code A configuration that provides access to Domain-specific Language (DSL) representations of releases stored
in a source control repository.
release conflict An automatically-generated alert that appears in the user interface during release design to indicate a
scheduling conflict. The notification does not prevent the scheduled execution. The alert lets you see the
point in the release where the conflict occurs.
release idle time An analysis of periods of inactivity, such as manual hold-ups, in a release process.
release manager A Continuous Delivery Director user role. Release managers can:
•
Add, remove, and edit releases, phases, and tasks
•
Import and export releases
•
Add releases to release tracks
release member A set of user permissions for a release. Release members can only view releases and cannot perform
release tasks or actions. All owners of release components are automatically added to the release
members list.
release score A statistical measure that quantifies the likelihood of release failure based on the average of a set of
heuristics.
release track A group of releases that are bundled together to deliver all the bundled releases into production
simultaneously.
For more information, see Release Tracks.
releases over time The number of releases marked as done within a specified time frame.
relevant task A task mapped to applications that have changed since the last deployment on the phase environment.
sample release A preconfigured release that appears in the releases list after the first login. Users can configure a sample
release for product onboarding and proof-of-concept.
shared token A placeholder that is replaced with a value during release execution. Unlike other Continuous Delivery
Director token types, such as built-in tokens and local tokens, these tokens are available to all Continuous
Delivery Director users who have access to the workspace. You can use shared tokens to automate
updates to parameter values used across your organization by multiple users.
28

Continuous Delivery Director 8.5
SMTP An internet standard for electronic mail (email) transmission. System administrators configure SMTP to
enable e-mail messages to alert users to new activities in Continuous Delivery Director.
source control
connection
An endpoint providing access to a source control tool.
subscription An agreement to purchase an account to use Continuous Delivery Director according to the terms and
conditions on the cddirector.io website.
NOTE
Applies to SaaS only.
task A unit of work that represents activity workflows in a release. You add tasks to phases in a specific order to
piece together your release pipeline workflow. Tasks can be manual, such as a change request approval.
Tasks can also enable the automated execution of remote activities like the run of an Automic
®
Continuous
Delivery Automation deployment plan.
NOTE
More information:
•
Create tasks section in Design and Create Releases
•
Manage Tasks
telemetry A service that monitors a Continuous Delivery Director environment and collects data to provide to
customers and Broadcom. The collected data is used to improve the customer experience and to achieve a
greater return on investment.
tenant ID A unique numeric identifier to authenticate workspace access to REST APIs.
test source An endpoint providing access to test suites stored in an external testing tool.
test source template An endpoint configuration that is predefined by users to help test designers quickly create test sources.
Test source templates are similar to regular test sources except that a test source template can only be
assigned to a single application.
trigger phase A phase with errors that initiates an on-failure phase.
token A reusable placeholder that is used to create generic releases with dynamic task fields such as build
number and issue ID.
work item A record of work in an agile project to be fulfilled. The current state and progress are tracked in an agile
planning tool, such as Rally, and can be integrated with Continuous Delivery Director release pipelines.
work items connection An endpoint providing access to an agile tracking tool.
Continuous Delivery Solution
Continuous Delivery Director (CDD) offers an easily configurable, visual, and strategic control point for planning and
directing the processes and content of multi-team, multi-application releases, from agile development through production.
The Automic
®
Continuous Delivery Automation (CDA) plug-in lets you apply the core Automic
®
deployment modeling and
deployment capabilities. This plug-in lets you start both Application and General workflows directly from the Continuous
Delivery Director interface. You can also import applications and environments from an Automic
®
instance. You can
include Automic
®
applications and their environments in releases, phases, tasks, reports, and widgets.
This topic includes the following:
Continuous Delivery Director and Automic
®
Continuous Delivery Automation
The Automic
®
Continuous Delivery Automation plug-in lets you leverage core deployment capabilities by importing the
application model from the integrated CA CDA instance. This plug-in also lets you start both Application and General
Workflows directly from the Continuous Delivery Director user interface.
29

Continuous Delivery Director 8.5
What is Automic
®
Continuous Delivery Automation?
Automic
®
Continuous Delivery Automation (CDA), part of the CA Automic
®
One Automation Platform, is an end-to-end
solution for planning, coordinating and automating software release processes, including automated deployments of
complex multi-tier applications and configurations across heterogeneous large-scale server environments.
The purpose of CDA is to unify enterprise application and infrastructure automation functionality onto a single platform
- without the need of managing multiple tools. Users first architect and control the execution of application process
workflows and then orchestrate the underlying infrastructure to meet the required service levels.
Benefits of Using Continuous Delivery Tools: CDD + CDA
Using CDA for defining Application Deployments and CDD for orchestrating them provides you with the ability to configure
critical building blocks of a continuous delivery and release automation pipeline. By combining both tools, you can model,
deploy, and visualize the application pipeline. Furthermore, you can automate the entire delivery and release pipeline
between development and production, supporting emerging use cases such as containers, microservices, test data
management, and vulnerability tracking.
The following diagram shows you how both products work together in a continuous delivery pipeline:
CDA Roles
Application Developer
Application developers create the entities and set up the infrastructure that underpins the workflows, from build to test,
deploy, and release phases.
They build templates, modify existing deployments, create action packs, schedule and execute workflows.
Operator
The release operator is responsible for keeping the production environment running.
Operators perform first level error analysis, compare deployments, and monitor related environments and deployment
targets.
Manager
Release managers coordinate the delivery process and routines, monitor the release status and inform stakeholders.
30

Continuous Delivery Director 8.5
Administrator
The release administrator implements, reviews, and executes the infrastructure system to support the development
release pipeline.
Administrators create environments. deployment targets, agents, and other infrastructure components, so that an
application developer can use them for deployments.
Configuring the Integration
To configure the Automic
®
Continuous Delivery Automation plug-in, you register the plug-in in the Continuous Delivery
Director user interface and create endpoints to all necessary Automic
®
Continuous Delivery Automation systems. You can
then use the Start General Workflow or Start Application Workflow tasks to run a CDA deployment plan in the context of
Continuous Delivery Director phases and releases. The Start General Workflow and Start Application Workflow tasks let
you orchestrate core CDA activities at a high level. For example, a Continuous Delivery Director release might include
multiple applications that you can deploy through the CDA deployment workflows. A phase might also contain specific
tasks for other activities automated through CDA.
NOTE
Automic recommends using Continuous Delivery Director for orchestrating Release Plans for single and multi-
tier Application platforms. For fresh installations, the Release Planner perspective is disabled by default. You
can enable this perspective manually in the customer.config file (Automic\Release.Manager\WebUI
\customer.config ). The Release Planner and Release Management features have been deprecated and
will not be available in future versions.
NOTE
•
About Automic
•
About CA CDA
•
Automic
®
CDA Documentation
•
Automic
®
Continuous Delivery Automation Plug-in
Workflow
The Continuous Delivery Director workflow consists of initial installation and administration, followed by iterative release
creation and execution.
The following diagram shows the product workflow and the associated roles:
31

Continuous Delivery Director 8.5
Figure 2: This diagram shows the product workflow and the associated roles
1. Install the product - system administrator
2. Perform initial configuration - administrator
An administrator must configure the integrations, applications, and users before continuous delivery pipeline
management can begin.
3. Design releases and release tracks - authorized user
Authorized users design releases and release tracks that consist of applications, phases, tasks, and content.
Note: Release Tracks are groups of releases that are bundled for simultaneous execution.
4. Schedule release execution - authorized user
5. Execute releases - authorized user
The authorized user uses the intuitive product interface to executes releases and release tracks. The authorized
user monitors the release progress from start to finish and takes corrective measures where needed.
6. Repeat release design as needed, and schedule and execute phases - authorized user
Release pipeline management is an iterative process that repeats on the cadence of your continuous delivery process.
For example, weekly releases require a new release and proper execution of that release.
7. Monitor release activity - authorized user
Interested personnel can view release progress and historical release trends. To view the history, go to the Releases
page or Release Over Time report. To view the application, go to the Application report or Environment report.
For more information about roles and permissions, see Manage Users, Groups, and Roles.
User Interface
Continuous Delivery Director provides an interactive, intuitive user interface that contains the following pages as tabs at
the top of the UI:
The UI provides a brief Tour, or review, of UI functionality for each page. To enable the tour, click the yellow question mark
icon.
32

Continuous Delivery Director 8.5
Releases
The RELEASES page provides tools to create and monitor your continuous delivery releases. The RELEASES page
consists of the following interactive components and information:
•
All releases, phases, and tasks
•
A panel with all release applications, Stakeholders, and Tokens
•
An Activity Panel that shows all release activity
For more information, see Releases.
Tracks
The TRACKS page lets you bundle several releases into a track to deliver the bundled releases into production together.
For more information, see Release Tracks.
Calendar
The CALENDAR page provides a real-time, interactive overview of all planned and running releases. You can use the
release calendar to view, drill down into, and manage release components and scheduling.
For more information, see Release Calendar.
Reports
The REPORTS tab lets you create, save, and access the following reports for your releases:
•
Application
•
Content
•
Release analysis
•
Environments
For more information, see Reports.
Administration
The ADMINISTRATION tab lets you manage the following Continuous Delivery Director components from a drop-down
list:
•
Applications and Environments
•
Endpoints
•
Plug-ins
•
User Management
•
Maintenance Windows
•
Settings (On-premises only)
For more information, see Administration.
33

Continuous Delivery Director 8.5
Getting Started (On-Premise)
All new users of the on-premise version of Continuous Delivery Director should read this section to understand how to set
up and work with the product. This section includes the following information:
Quick Guide for End Users
A brief tutorial on how to access and interact with the product.
Quick Guide for Administrators
A brief tutorial on how to configure the product.
Quick Start Guide for Administrators (On-Premise)
As an administrator, you configure Continuous Delivery Director and manage applications, environments, users, and
integrations. Only administrators and authorized users see the ADMINISTRATION tab which is where you configure and
manage the product.
In this section, we divide the process of getting to know Continuous Delivery Director into three stages:
•
Design
•
Setup
•
Test
Design
During the design stage, you collect your business requirements and plan your release pipeline.
Consider the following:
•
Integrations – Continuous Delivery Director supports a large number of plug-ins and other integrations. Which
integrations will you use?
•
Endpoints – Which will you use? What access do you want to provide?
•
Applications – Mandatory. You cannot execute a release that does not contain at least one application. Which
applications do you want to add to your CI/CD pipeline?
•
Environments – Optional but recommended. Which environment do you want to set up?
•
Manage Users, Groups, and Roles – How will you control access to releases, phases, and tasks?
•
How does your organization manage users - local or LDAP?
•
Do you want to enable SAML?
•
Which content providers does your organization use? For example, Rally
®
, Atlassian Jira, Microsoft Team Foundation
Server, and so on.
34

Continuous Delivery Director 8.5
Set Up Your System
During the setup stage, you perform the following actions to complete product configuration:
•
Set Up Authentication
•
Set Up Notifications
•
Set Up Users and Groups
•
Set Up Applications and Environments
•
Set Up Endpoints
•
Set Up Releases
Set Up Authentication
You can configure LDAP and SAML methods to validate and authorize users to access or use Continuous Delivery
Director.
To Do This Comments
Configure SAML Authentication Select Administration, then SAML
Configuration.
Optional.
For more information, see: Enable Single
Sign-On.
Configure LDAP Select Administration, CDDirector
Settings, then User management system.
Optional.
For more information, see: Integrate with a
Directory Server.
Set Up Notifications
You can enable e-mail messages to alert users to new activity in Continuous Delivery Director.
To Do This Comments
Configure Notifications Select Administration, CDDirector
Settings, then SMTP.
Optional. To configure SMTP settings, you
must be a system administrator.
For more information, see: Configure
Notifications.
35

Continuous Delivery Director 8.5
Set Up Users and Groups
You can create users and add the users to groups that you can assign to specific product roles.
To Do This Comments
1 Create Users Select Administration, User
Management, then Add User.
Optional.For more information,
see Manage Users, Groups, and
Roles.
2 Create Groups Select Administration, User
Management, then Add Group.
Optional.
For more information, see
Manage Users, Groups, and
Roles.
3 Import Users Select Administration, User
Management, then the Import
Users plus sign icon on the
Users toolbar.
Optional.
For more information, see:
Integrate with a Directory
Server.
4 Import Groups Select Administration, User
Management, then the Import
Groups plus sign icon on the
Groups toolbar.
Optional.For more information,
see: Integrate with a Directory
Server.
5 Assign Roles to Users Select Administration, User
Management, then a user and
the pencil icon on the Users
toolbar.
Optional.
By default, new users are
assigned the Designer role.
For more information, see
Manage Users, Groups, and
Roles.
6 Assign Roles to Groups Select Administration, User
Management, then a group and
the pencil icon on the Groups
toolbar.
Optional.
By default, new groups are
assigned the Designer role.
For more information, see
Manage Users, Groups, and
Roles.
Set Up Applications and Environments
You can create applications and environments, and assign users to applications to control access.
36

Continuous Delivery Director 8.5
An application represents a deployable unit of software that is part of a release. An environment is a location where the
application runs.
To Do This Comments
1 Create Applications Select Administration,
Applications, then either Add
application or Add Application
Source.
Mandatory.
For more information, see
Manage Applications and
Environments.
2 Create Environments Select Administration,
Applications and
Environments, then an
application, and Add
environment.
Optional but recommended.
For more information, see
Manage Applications and
Environments.
3 Assign Users or Groups to
Applications
Select Administration,
Applications and
Environments, then an
application, and enter values in
the Authorized Users/Groups
field.
Optional. By default, all users
and groups can access all
applications.
For more information, see
Manage Applications and
Environments.
Set Up Endpoints
You can create endpoints, and assign applications and environments to endpoints. Endpoints represent specific instances
of remote components that are supported by a registered plug-in. For example, you can connect a release to Automic
®
Continuous Delivery Automation, AWS CodeDeploy, BlazeMeter, and so on.
To Do This Comments
1 Create Endpoints Select Administration,
Endpoints, Add Endpoint.
Mandatory. When you enter
an endpoint name, choose a
unique and descriptive name,
because releases can have
multiple endpoints
For more information, see
Manage Endpoints.
2 Assign Applications and
Environments to Endpoints
Select Administration,
Endpoints, Add Endpoint.
Optional but recommended.
Specify at least one application
and one environment to an
endpoint, or you will not be able
to use this endpoint inside any
tasks.
For more information, see
Manage Endpoints.
37

Continuous Delivery Director 8.5
Set Up Releases
Releases are the core of Continuous Delivery Director. Releases consist of phases that simulate global environments and
tasks that instrument continuous delivery operations required during release deployment.
To Do This Comments
1 Create a Release Select Releases, New Release. Mandatory
For more information, see
Design and Create Releases.
2 Assign Applications to the
Release
Select Releases, New Release,
and enter values in the
Applications field.
Mandatory – You cannot create
a release without at least one
assigned application. For more
information, see Design and
Create Releases.
3 Assign Owners and Members to
the Release
Select Releases, New Release,
and enter values in the
Members and Owners fields.
Optional but recommended.
Owners are users who own
and configure releases.
Members are users who can
be assigned release tasks. For
more information, see User
Permissions.
4 Configure Application Version In the release, expand the
APPLICATIONS tree on the left
menu, and select Set Version
next to an application.
Mandatory – Each application
in a release must have a
version number. For more
information, see Design and
Create Releases.
5 Import Application Content In the release, expand the
APPLICATIONS tree on the left
menu, and select the arrow to
the right of the version number
for an application.
Note: This option is only
available after you add a version
number to the application.
Optional – Application content
can consist of metadata or
extra information about specific
deployments in the current
release. This information
enriches your applications and
makes it easier for release
owners and members to
understand what is deployed.
For more information, see
Design and Create Releases.
6 Define Tokens In the release, expand the
APPLICATIONS tree on the left
menu, select %Tokens, then
New Token.
Optional – Tokens are reusable
placeholders. Use tokens to
create generic releases with
dynamic task fields like build
number and issue ID. For more
information, see Design and
Create Releases.
38

Continuous Delivery Director 8.5
7 Create a Phase In the release, select Create a
phase...
Mandatory – Phases are
organized collections of release
deployment steps in the
Continuous Delivery chain. For
more information, see Design
and Create Releases.
8 Configure the Phase In the Create Phase page,
add an environment, phase
execution type, and owners.
Optional – Use phases to
organize the sequential
deployment of a release into
the different environments
such as development, QA,
and production. For more
information, see Design and
Create Releases.
9 Create a Task At the bottom of the phase box,
select Create a task..., or select
the Add task icon in the phase
toobar.
Mandatory – Tasks are
units of work that represent
activities and workflows that
are associated with a release.
Tasks let you map the sequence
of events that are required to
deploy the release in each
phase. Tasks correlate and are
mapped to applications.
For more information, see
Design and Create Releases.
10 Configure the Task In the Create Task page, set
the task type, endpoint, and
parameters. Optionally, add
owners and applications.
Mandatory – Tasks can be
application deployments,
automated testing, build
processes, or any other activity
that occurs in your regular
release pipeline. Tasks can also
be simple activities that preclude
or follow deployments.
For more information, see
Design and Create Releases.
Test
During the Test stage, you run a sample release to ensure that you have configured the product correctly:
To Do This Comments
Run the Release Select the Run phase button in the first
phase of the release. When a release
starts, the status Running and a power
button icon appear at the top of the release.
Continuous Delivery Director provides
detailed release information and metrics
to help you monitor release progress
and troubleshoot problems. For more
information, see Monitor and Troubleshoot
Release Execution.
39

Continuous Delivery Director 8.5
Now you are ready to manage Continuous Delivery Director on a daily basis. If you have any questions, please contact us
at: [email protected].
Quick Start Guide for End Users (On-Premise)
This section provides the information you need to know to quickly get started and become productive with a new account.
What is Continuous Delivery Director?
Continuous Delivery Director is your entry point to all of your continuous delivery pipeline. Rather than managing multiple
login IDs for multiple applications and service, you have one login and one account. Use of Continuous Delivery Director
means fewer passwords to remember, real-time oversight of application content (features and fixes), and easier tracking
of progress against test SLAs, standard release criteria and business priorities.
Prerequisites
Note: If you have questions about the following items, please contact your company Continuous Delivery Director
administrator.
•
You use a browser supported by Continuous Delivery Director. For more information, see System Requirements.
•
The WebSocket protocol is enabled for your client
•
Your Continuous Delivery Director has granted you access to the required applications and environments. These
access rights let you use endpoints to integrate with remote services such as AWS Elastic Beanstalk, JetBrains
TeamCity, Jenkins, and so on.
•
You have received your user credentials
•
You have a URL to log into Continuous Delivery Director.
Syntax: http://{hostname}:{port}/cdd
Example: http://catestENV123:8080/cdd
Sign In
The first time you sign in to Continuous Delivery Director, you see the following page:
40

Continuous Delivery Director 8.5
This is the RELEASES page which opens by default. Here you can see all releases that the administrator has authorized
you to access. You work with releases according to the role assigned to you. By default, all users are assigned the
Designer role.
NOTE
If you are assigned the Designer role, the New Release button shown above is disabled.
For more information about roles and permissions, see User Management and User Permissions.
Customize Your User Settings
Your Continuous Delivery Director user account includes settings that you can modify, such as email address and API key.
You can also view your tenant (workspace ) ID. You can access your account settings in the User Settings dialog.
Follow these steps:
1. In the menu bar, select the initials of your user account, for example
,
then select User Settings, General.
2. View or modify your user account settings:
–
Notifications
Determines whether you receive notifications from Continuous Delivery Director by email.
–
Email
Specifies the email address to which Continuous Delivery Director notifications are sent.
–
API Key
Specifies a unique alphanumeric key to authenticate user access to REST APIs.
Note: The key is masked.
–
Tenant ID
Specifies a unique tenant ID to authenticate user access to REST APIs.
3. Select Save.
Generate an API Key
We strongly recommend that the first time you log in Continuous Delivery Director, you select Re-issue API Key to
generate a new API key.
NOTE
Use the Re-issue API Key command with care. After your API key is reissued, any plug-ins and REST APIs
configured with the previous API key will not work. To enable these plug-ins and REST APIs, you need to specify
your new API key where applicable.
Follow these steps:
1. In the menu bar, select the initials of your user account, then select User Settings.
2. Select Re-issue API Key.
3. Select the copy
icon.
4. Open a text editor, such as NotePad, and paste the API key.
5. Save your API key to a secure location.
41

Continuous Delivery Director 8.5
Change Password
NOTE
Only relevant for local (non-SAML) users.
In the menu bar, select the initials of your user account, for example
,
then select User Settings, Change Password.
Release Overview
NOTE
Release Managers and authorized users can create a release. Other users can update existing releases. For
more information, see User Management.
Releases are the core of Continuous Delivery Director. Releases represent workflows for the deployment of applications
in one or many environments.
In this section, we will guide you through the main release concepts, and show you how to create and customize releases.
•
Applications
Represent deployable units of software that are part of a release.
•
Content
Contains the defects, user stories and features that are part of an application version and that are deployed in a given
release.
•
Phases
Represent one or more environments. Your code is promoted from one phase to another until it gets to the production
phase.
•
Tasks
Represent the individual steps needed to move the code to the next phase in the release cycle. There are different
types of tasks: deployment, testing, communication, and manual.
Tasks have owners who are ultimately responsible for the completion of that individual work item. Owners receive
notifications when they have tasks to complete.
For more information, see Releases.
Create a Release
NOTE
You can only create releases if you are an authorized user.
Follow these steps:
1. In the RELEASES page, select New Release.
2. Enter the release name and version.
Example: Quick Start Release, version 1.0.
3. Select one or more applications.
4. Add team members to this release.
5. When ready, select Create.
The release name appears in the release toolbar. You can now add phases to your release.
For more information, see Design and Create Releases.
42

Continuous Delivery Director 8.5
Create a Phase
Add a phase to your release pipeline.
Follow these steps:
1. In your newly-created release, select Create a Phase.
2. Set the details for the Phase.
NOTE
The Phase represents a series of related steps in the application pipeline and one or more
environments. Your code is promoted from one phase to another until it gets to the production phase.
Enter the Phase name.
3. Set the Phase to Manual.
4. Select the environment the phase will run in.
NOTE
Environments are associated with Applications when applications are imported or created.
Select the sample application environment.
5. When ready, select Create.
You can now add tasks to your phase.
For more information, see Design and Create Releases.
Create a Task
Follow these steps:
1. In your newly-created phase, select Create a Task.
NOTE
Tasks represent the individual steps needed to move the code to the next phase in the release cycle.
2. Enter a name for the Task.
3. Select at least application to associate with the Task.
4. Select a Task Type. Task types are based on the plug-ins that your administrators have configured and made
available. For now, select Manual.
5. Select Create.
Congratulations! You have created a task!
For more information, see Design and Create Releases.
Run a Release
You can run releases that contain both phases and tasks.
NOTE
To run a release, you must be a release owner.
Follow these steps:
1. In the RELEASES page, select a release with all the phases set to AUTOMATIC.
The release opens in a new page.
2. In the first phase of the release, select the Run Phase button
.
43

Continuous Delivery Director 8.5
When you select this button, the tasks will run in sequence automatically. When all of the tasks in the phase are
complete, the green check
will appear next to the phase name.
3. When all phases in the release cycle have run, select Mark as Done.
Congratulations, you have just run a release!
For more information, see Release Execution.
Getting Started Video
User Settings
You can access your account settings in the User Settings dialog.
Follow these steps:
1. In the menu bar, select the initials of your user account
,
then select User Settings.
2. View or modify your user account settings:
Notifications For All Projects
Determine whether you receive notifications from Continuous Delivery Director by email, and what type of notifications
you receive.
Corporate Email
Specify the email address to which Continuous Delivery Director notifications are sent.
API Key for Current Project
Specify a unique alphanumeric key to authenticate user access to REST APIs.
Note: The key is masked.
Tenant ID
Specifies a unique tenant ID to authenticate user access to REST APIs.
3. Select Save.
Generate an API Key
We strongly recommend that the first time you log in Continuous Delivery Director, you select Re-issue API Key to
generate an API key.
WARNING
Use the Re-issue API Key command with care. After your API key is reissued, any plug-ins and REST APIs
configured with the previous API key will not work. To enable these plug-ins and REST APIs, you need to specify
your new API key where applicable.
Follow these steps:
1. In the menu bar, select the initials of your user account, then select User Settings.
2. select Re-issue API Key.
3. select the copy icon
.
4. Open a text editor, such as NotePad, and paste the API key.
5. Save your API key to a secure location.
44

Continuous Delivery Director 8.5
Change Your Password
You can change the password you use to authenticate to Continuous Delivery Director, provided your organization does
not use SSO (Single Sign-On).
Follow these steps:
1. In the menu bar, select the initials of your user account
,
then select User Settings.
2. Select Change Password, and follow the on-screen instructions.
3. Select Change.
45

Continuous Delivery Director 8.5
Release Orchestration
Releases consist of phases that simulate global environments and tasks that instrument continuous delivery operations
required during release deployment.
During the design phase, you create releases and populate the releases with phases and tasks. During the execution
phase, you execute and monitor the release, troubleshoot issues, and complete the release deployment.
NOTE
For more information, see Release Design and Release Execution.
Product Tutorial Video
NOTE
The following video is extracted from the Release Orchestration training course. This course provides extra
information, context, and examples to augment the product documentation.
To access this course, see Broadcom Enterprise Software Academy.
Release Orchestration Overview
This video summarizes the artifacts, components, and processes of release orchestration in Continuous Delivery Director.
More Information:
•
Release Design
•
Release Management
•
Release Execution
•
Release Tracks
•
Calendars
•
Reports
Release Design
Administrators and Release Designers design releases to drive deployments that release software
into environments across applications and teams. The Release Design page helps you create cross-functional releases
that can consist of multiple-applications and versions.
Note: You can only see releases that you are a member of.
You can use the RELEASES page to:
46

Continuous Delivery Director 8.5
•
Create and manage releases and memberships
•
Create and manage phases and tasks
•
Assign applications
•
Add users and stakeholders to a release to provide visibility
•
Add content to a release to link your release orchestration with application change history and other application
activities
•
View your releases, and view releases that you are a member of
•
View release activity in real time
•
Manage stakeholders
•
Manage applications
•
Synchronize Conflicts
•
Manage release Tracks.
–
Remap release track phases
–
Return to a release track in the TRACKS page
–
Remove a release from a release track
Note: To open and close a list of keyboard shortcuts, use the question mark (?) key.
Click the RELEASES tab in the top of the UI to show an overview of all releases. Each release is displayed on a separate
line and shows the following release information:
•
Status
•
Name
•
Owners
Note: To filter the page to show only your releases, click the Show my releases box at the top right.
•
Applications
•
Version
Click a release name to open the release and show and manage the release phases and tasks. In the open release, you
can drill down to see and manage the release Applications, Stakeholders, Tokens, and the release status.
Use the following basic workflow to create releases in Continuous Delivery Director:
1. Create a Release
2. Create Phases within the Release
3. Create Tasks within each Phase
The following diagram shows an example of the structure of a release with phases and tasks:
47

Continuous Delivery Director 8.5
Figure 3: This image shows an example of a typical release structure with Phases and Tasks
Design and Create Releases
Use the following workflow to design and create releases in Continuous Delivery Director
48


Continuous Delivery Director 8.5
TIP
Release design is a flexible process. The following scenario shows a typical release design workflow. After you
create the release, other activities can occur in any sequence. Use the workflow that best fits your release and
working model. Leave comments on this page to suggest or contribute other design workflows.
More Information:
•
Create a Release
•
Replace Application Version
•
Automatically-Created Releases
•
Application Versions, Work Items, and Dependencies
•
Create Phases
•
Tasks
•
Complete the Release
Create a Release
You use the RELEASES page to manually create and manage releases for deployments in Continuous Delivery Director.
You have been granted the Can create release permission.
Releases are repeatable plans that you use to drive deployments to your release environment. Access to releases is
application and project-based. When you create a release, you must ensure that:
•
At least one application or business application is assigned to the release
•
All release owners and members are authorized to access the applications assigned to the release
You can view the applications assigned to releases from the RELEASES page.
1. On the RELEASES page, select the New Release button on the upper right.
The CREATE RELEASE dialog opens.
2. Select and populate the following fields to configure the release:
•
Release Name
Specifies the name of the release.
•
Version
Specifies the release version. Use the version number to correspond to the release number, sprint number, or any
other important differentiator.
NOTE
The version is a required property. Versions are important to differentiate multiple release versions.
•
Description
(Optional). Specifies a description of the release details.
NOTE
This field allows you to format the description text. You can also add links to external systems, resources,
and references that are specific to the release.
•
Application Type
Select either Application or Business Application.
Application
–
Applications
Indicates applications that are linked to the release. Add any application to the release that you plan to deploy or
act on in some other way. You can only view and assign applications that you are authorized to access.
50

Continuous Delivery Director 8.5
IMPORTANT
You cannot create a release without at least one assigned application. For more information, see
Applications and Environments.
–
Business Application
Add a business application to the release that you plan to deploy or act on in some other way. You can only view
and assign business applications that you are authorized to access.
•
Owners
Specifies users who own and can configure the release.
NOTE
The release creator is the default release owner.
•
Members
Specifies users who can be assigned release tasks. Users can only see releases that they are members of.
Owners of release components are automatically added as release members and can view the entire release.
NOTE
You can only add owners and members from the users and groups that exist in Continuous Delivery
Director. For more information, see Manage Users, Groups, and Roles.
For more information about the difference between release owners and members, see User Permissions
and Activities.
•
Planned Dates
(Optional). Specifies the planned dates for the release.
•
Tags
(Optional). Specifies the tags for a release. Select or create one or more tags to label the Release.
NOTE
The release owner can select or create new tags.
To create a new tag, enter a value (numeric or alphanumeric) into the Tags field and then select Create New.
3. Select Save.
The release is created and saved, and you can add phases and tasks to the release.
Create a Release with Continuous Delivery Director
NOTE
The following video is extracted from the Release Orchestration training course. This course
provides extra information, context, and examples to augment the product documentation.
To access this course, see Broadcom Enterprise Software Academy.
This video shows the process for creating a release in Continuous Delivery Director. The release is the core
of Continuous Delivery Director and provides the ability to orchestrate and execute nearly every aspect of
application development and testing through each phase of your release pipeline.
Releases open in a panel in the middle of the page. You can also view the release in the RELEASES tab. The activity
panel on the right of the release shows all release activity. The panel on the left of the release shows and lets you manage
applications, stakeholders, and tokens.
Select Stakeholders in the left column to verify that the release owner and members are correct.
Automatically-Created Releases
You can save manual effort by integrating Continuous Delivery Director with your source control system and CI tools so
that releases are created automatically.
51

Continuous Delivery Director 8.5
Let us assume that the source control system is GitHub and the CI tool is Jenkins.
In a typical DevOps workflow, developers edit, stage, and commit changes to a feature branch. You can define feature
branches for applications or an entire business application and automatically create releases for each application/
business application version.
The process is the following:
•
Automatically trigger a build on Jenkins when source files are changed in a feature branch
•
Build the project at the given feature branch
•
Notify Continuous Delivery Director that a new build has been created
•
Create a new release in Continuous Delivery Director
The integration with Jenkins supports both Freestyle projects and Cloudbees pipeline syntax. There are two ways in which
Jenkins integrates with GitHub:
•
A GitHub webhook on your repository. Github sends an HTTP request to Jenkins every time a code change is pushed.
•
Jenkins polls GitHub at specified intervals to check if any files have changed.
An automatically-created release using the Continuous Delivery Director plug-in for Jenkins can contain the following
information:
•
Application name
•
Application version
•
Release token values
•
Source control connection parameters
•
Test sources
For more information, see Plug-in for Jenkins.
Application Versions, Work Items, and Dependencies
Release owners can define dependencies between applications to use application versions across different releases.
Each application in your release should have a version number. The application version can be an indicator of the
application version build that you deploy with this release. The application version plays the following roles:
•
Helps differentiate deployments of different application versions across releases and creates version persistence
when deploying the same version across releases. For example: If you add the same version of the application to two
releases, the version retains the content from both releases.
•
Lets you add content to an application. An application must have a version number for you to be able to add content to
it.
•
Lets you assign applications and their content to a specific task within a release. An application must have a version
number to be associated with a task.
•
Lets you manage dependencies across applications and releases.
After you define a version, you can assign application dependencies to the version. Dependencies help you to ensure
successful releases by enforcing links between applications. For example, to deploy successfully, version 2.0 of
Application A requires that an API is added to version 3.0 of Application B. In this case, you could define version 3.0 of
Application B as a dependency of version 2.0 of Application A. When you define this dependency, Continuous Delivery
Director detects dependency issues and sends a warning. A warning is also sent if version 3.0 of Application B is planned
for deployment in the same environment as version 2.0 of Application A.
More Information:
52

Continuous Delivery Director 8.5
•
Set Up Application Version Dependencies
•
Manage Dependencies Conflicts
•
Manage Business Application Versions in Releases
•
Replace Application Version
•
Application-related Work Items
•
Real-time Work Item Status
•
Tokens
Set Up Application Version Dependencies
Define a dependency between application versions.
1. In a release, click the Applications tab in the left panel, and select Set Version next to an application.
2. Enter the version number for the application. The CREATE NEW APPLICATION VERSION window opens.
NOTE
To edit or to delete a version of an application, select the version number.
•
(Optional) Under Copy Settings, enter an existing application version number. This action copies the settings
(work item source, dependencies and source control connection) from the specified application version to the new
application version.
3. Select Create.
4. Select the version number, and select Set Dependencies.
5. Select another application version that the current application version depends on, and select Set.
After you set a dependency, the orange dependency icon appears next to the application name in the Applications pane.
This dependency is tracked across releases and causes conflict alerts. Alerts are generated if the dependency is not
deployed. Alerts are also generated if the dependency is part of a planned deployment in the same environment before, or
that overlaps with, the dependent application deployment.
When you select an existing version, all content of that version is loaded to the application. Edits to the content of a
deployed version do not affect history. Edits only show in future deployments.
Updates to application versions and content are reflected in the user interface and are visible to other users in real time.
Manage Dependency Conflicts
After you set version dependencies, you can view and resolve dependency conflicts.
1. In the RELEASES page, select Sync Conflicts in the toolbar.
The orange dependencies conflict icon
( )
is displayed next to the phase name and in the task to indicate conflicts. The icon is only visible if there are conflicts.
2. Select the dependencies conflict icon.
The DEPENDENCIES CONFLICTS box opens and shows the conflicts.
53

Continuous Delivery Director 8.5
3. Edit the deployment order or times to address the conflicts
4. Select Sync Conflicts to ensure that the conflicts are resolved.
Replace Application Version
You can create a release using an existing application version to save setup time and effort.
•
The application version in the build notification is equal to the release version
•
The application is part of the release
You can configure Continuous Delivery Director to create a release using existing application versions without creating
a new application version in advance. When a build notification arrives containing new application version information,
Continuous Delivery Director replaces the existing application version in the release with the new information.
1. In a release, click the hamburger menu, then Edit Release.
2. Under Advanced, select the Replace application version when build notification arrives option.
When a build notification arrives, Continuous Delivery Director creates a new application version (if no version exists) and
replaces, in the release, the application version with the application version from the build notification.
Managing Feature Branches using Continuous Delivery Director
EXAMPLE The Web Banking business application contains the following applications: webServer, webUI,
webDB:
Figure 4: Web Banking Business Application Subcomponents
A developer in the Web Banking group is assigned to work on the F2366 feature. According to their research,
they only need to change the webServer component. Let us assume the application and file sources already
exist in Continuous Delivery Director and that DSL files have been created from the CI tool. In the source
control tool, a DSL repository exists. The developer creates a DSL parameter file:
•
Release version: F2366
•
webServer Application Version: F2366
54

Continuous Delivery Director 8.5
All other application versions are set to master by default. Creating a new DSL parameter file triggers the
creation of a new release in Continuous Delivery Director. In the source control tool, the developer branches
the webServer repository, names the branch F2366 , and commits the code. This action triggers a build to
run in the CI tool and sends a build notification to Continuous Delivery Director for the webServer application
version F2366 {source control branch}. The arrival of the build notification triggers the start of the release
first phase – Deploy and Run Tests. Next, a bug is opened for the F2366 feature branch. The developer
realizes that they also need to apply the changes to the webUI application. In the source control tool, the
developer branches the webUI repository, names the repository F2366 and commits the code. This action
triggers a build to run in the CI tool and sends a build notification to Continuous Delivery Director for the
webUI application version F2366 {source control branch}. When the build notification reaches Continuous
Delivery Director, the following events are automatically triggered:
1. Continuous Delivery Director analyzes the build notification
2. Continuous Delivery Director creates an application version
3. Continuous Delivery Director searches the existing releases for a release that contains the application
webUI and the release version F2366
4. Continuous Delivery Director finds the Web Banking release, version F2366 , which contains the
application webUI with the master application version
5. Continuous Delivery Director replaces the master application version of webUI with F2366
6. Continuous Delivery Director starts the first phase in the release
Manage Business Application Versions in Releases
You are assigned the Can manage business application versions permission.
NOTE
Users without this permission can assign and remove existing business application versions, but cannot create
and rename versions.
You can see which business applications and which business application versions are in use in releases in the
Applications column on the RELEASES page. You can create, rename, and replace business application versions. You
can also search for specific business application versions.
1. In a release, click the Applications tab.
2. Click the business application version name/number.
3. Click one of the following menu options:
•
Rename.
•
Replace.
NOTE
This option lets you replace the existing business application version in your release with
another business application version or create a new business application version.
Manage Test Sources from Releases
You can manage the test sources as per your Application version or Business Application version from the Releases
page.
Managing the test sources from the Releases page include:
•
Adding new test sources as needed
•
Copying the tests from another application/business application version
•
Syncing the test sources
55

Continuous Delivery Director 8.5
NOTE
You can also add the Test Sources from the ADAPTIVE TESTING CATALOG page.
Add Test Sources
1. In a release, select the Tests tab in the left panel.
2. Click the hamburger menu of your desired Application or Business Application.
3. Select the Add Test Source option.
The GET TEST ASSETS page opens. Configure the following input parameters:
4. Enter a name for the test source and select a plug-in and an endpoint.
A list of import and execution parameters appears for the selected plug-in and endpoint.
5. Fill in the plug-in input parameters.
6. Specify one or more tags to label the test sources.
7. Click Get Test Assets.
The test source is listed in the Adaptive Testing Catalog page under the application/application version or business
application/business application version.
Copy Tests From Another Application Version/Business Application Version
You can copy the test sources from another application version/business applicartion versions to the current application
version/business application versions.
1. In a release, select the Tests tab in the left panel.
2. Click the hamburger menu of your desired Application or Business Application.
3. Select the Copy Tests from Another Application Version option.
The COPY TESTS FROM ANOTHER APPLICATION VERSION/BUSINESS APPLICATION VERSION page opens.
4. Select the desired Source Application/Business Application Version to copy from.
5. Click Copy.
The test source is copied from the selected source application/business application version. The new test source appears
in the Adaptive Testing Catalog page under the application/application version or business application/business
application version.
Sync All Tests
You can sync the all the tests under the current application/business application version.
1. In a release, select theTests tab in the left panel.
2. Click the hamburger menu of your desired Application or Business Application.
3. Select the Sync All Tests option.
The SYNC ALL TESTS page opens.
4. Click Sync All Tests.
Sync All Tests action updates the test sources and adds the test suites that have been created since the last sync. If a test
suite is deleted from the catalog but still exists in the test framework, it appears again after the sync. This action may take
a few minutes and is performed in the background.
Application-Related Work Items
After you create a release, each application that you add to the release is accessible from the RELEASES page.
56

Continuous Delivery Director 8.5
You can view existing application-related work items in the left panel under the Work Items tab.
You can view the Applications list to see whether applications have source control and work items connections
configured. You can also use the Applications and Applications Management pages to add work items to applications.
Application work items can consist of metadata or extra information about specific deployments in the current release.
This information enriches your applications and makes it easier for release owners and members to understand what is
deployed.
Examples of application work items include:
•
Notes about deployment changes
•
Defects that were fixed in this deployment
•
User stories that were implemented in this deployment
•
Application lifecycle management tasks
•
New features
•
Information that is used for tracking or other purposes
Import External Work Items into Releases
You can use plug-ins to import external work items to releases from remote components that are integrated with
Continuous Delivery Director.
The following steps are prerequisites to import content from remote components:
•
Register a plug-in for the remote component. For more information, see Manage Plug-ins.
•
Create an endpoint to connect to the remote component. The endpoint configuration depends on the plug-in. For more
information, see Manage Endpoints.
•
Create a release and specify application versions. For more information, see Create a Release in this section.
For example, you can import external work items from Rally for application deployment information from associated
stories, tasks, and defects.
TIP
Take care to only import work items that you need, and keep the number of work item sources low.
1. In a release, select the Work Items tab in the left panel, and select the application version number.
2. Select Add Work Items.
The ADD WORK ITEMS window opens.
3. Enter a name for the work items source.
4. From the drop-down lists, select a plug-in and an endpoint.
If you cannot see an endpoint, make sure that an endpoint is added for that plug-in.
5. Provide information in the required parameter fields.
The fields let you build a query that searches the source for work items that match the criteria. For example, with Rally
as a work items source, you can return all resolved defects in the sprint.
Parameters vary by work item source type.
6. Select Create.
The work items source is saved and a list of the returned items is displayed under the application. These items are now
available to assign to tasks in phases to associate important information with the release. You can then use reports to get
a holistic view of all work items deployed with a release.
57

Continuous Delivery Director 8.5
Import Work Items into a Release
NOTE
The following video is extracted from the Release Orchestration training course. This course
provides extra information, context, and examples to augment the product documentation.
To access this course, see Broadcom Enterprise Software Academy.
This video shows how to import work items into a Continuous Delivery Director release. As long as you have
a working connection to an agile planning system, you can import relevant work items and monitor their status
within the release.
Add Manual Work Items
To help distinguish and track the deployment of the specific applications in a release, manually add work items to
applications.
Manual work items are work items that are not imported from a remote component. The following items are examples of
manual work items:
•
Important notes about the application that you want the release owner to see.
•
Links to external resources that contain important information but cannot yet be imported as external content.
•
Other information that optimizes the application deployment.
1. In a release, select the Work Items tab in the left panel.
2. Select Add Work Items.
The ADD WORK ITEMS window opens.
3. Select the Manual Work Items option, then click Create.
IMPORTANT
You can only use one work item source for each application. If you select Manual Work Items, you cannot
select External Work Items as well.
4. In the Work Items tab, click Add Manual Work Items..
5. Enter, or copy and paste, the content into the Add Content box.
6. Select the checkmark icon.
The manual work item is added to the application.
NOTE
Mouse over the manual work item to edit or delete the content.
Real-time Work Item Status
You can quickly see which work items have entered the CD pipeline.
The list of imported work items that appears in the Work Items panel in releases is compared to the changes that
have arrived in Continuous Delivery Director. By analyzing the commit messages of the change, Continuous Delivery
Director can indicate which work items have entered the CD pipeline. By comparing this information to the statuses in the
application lifecycle management (ALM) tool, you can see anomalies such as a work item that has entered the pipeline,
but which was not planned for this release.
NOTE
This feature currently supports integration between Rally
®
or Atlassian Jira as the ALM service and GitHub as
source control. Additionally, make sure that the Git plug-in is configured in Jenkins. The Git plug-in ensures that
the commit range is included in the change notifications sent from Jenkins to Continuous Delivery Director.
58

Continuous Delivery Director 8.5
You can configure the source control connection to use regular expressions to trace work item IDs referenced in commit
messages.
Video: Tracking Planned vs Actual Work - Part One
This two-part video explains how a four-way integration between Continuous Delivery Director, GitHub, Jenkins, and
Rally
®
can help release managers track planned vs. actual work in releases. Part One contains an overview and
explanation of work item status icons.
Video: Tracking Planned vs Actual Work - Part Two
Part two of this video shows the setup required to enable the integration between Continuous Delivery Director, GitHub,
Jenkins, and Rally
®
.
Update Work Items in a Release
NOTE
The following video is extracted from the Release Orchestration training course. This course provides extra
information, context, and examples to augment the product documentation.
To access this course, see Broadcom Enterprise Software Academy.
This video shows how Continuous Delivery Director can update the status of a work item by detecting the work item ID in
the comments of a code commit.
View Work Item Statuses
You view planned and actual work item statuses to manage risks and dependencies and to escalate and track
impediments.
A work item connection is configured.
As a release manager, you need to understand which work items are being implemented, the risk to release execution
and the probability of delivering the agreed business value on time.
Continuous Delivery Director lets you quickly see which work items have entered the CD pipeline. The list of imported
work items that appears in the Work Items tab is compared to the changes that have arrived in Continuous Delivery
Director. By analyzing the commit messages of the change, Continuous Delivery Director can indicate which work items
have entered the CD pipeline. By comparing this information to the statuses in the Agile tracking tool, you can see
anomalies such as a work item that has entered the pipeline, but which was not planned for this release.
Continuous Delivery Director lets you:
•
See which work items (features, user stories, defects, and so on) are planned to be delivered in the current release
cycle.
•
View the progress of the actual work items.
•
Observe the work items that enter the release, the work item statuses, and the completed work items.
•
Understand which work items have changes that have entered the pipeline and accordingly determine the work
progress.
You can also configure the source control connection to use regular expressions to trace work item IDs referenced in
commit messages.
Continuous Delivery Director uses icons are used to highlight the status of work items in the current release:
59

Continuous Delivery Director 8.5
Table 1: Work Item Status Icons
Icon Description
No icon
No progress
No updates have been detected for this work item. There are no
commits and there is no indication that this work item has been
accepted in the ALM tool. If no progress is indicated for this work
item and the release is about to end, there a risk that this work
item will not be ready in time for the release.
Accepted
This work item has been marked as Accepted in the ALM tool
Work in Progress
Continuous Delivery Director has detected commits on this work
item or on a related work item, such as a task within this user
story. Because a commit has been detected, Continuous Delivery
Director marks this work item as in progress.
Warning
An inconsistency exists because Continuous Delivery Director has
detected a commit for this work item, while the same work item is
marked as Accepted in the ALM tool. Usually, there is no cause
for concern, but the anomaly must be investigated.
Possible causes: the assigned developer has not yet updated the
work item in the ALM tool, or a developer has added some tests.
Question mark
A commit has been detected for a work item that was not planned
for the current release.
1. Open the required release.
2. Click the Work Items tab.
3. Optionally, filter the work item view.
•
All
•
Planned
•
Actual
Import External Work Items into Releases
You can use plug-ins to import external work items to releases from remote components that are integrated with
Continuous Delivery Director.
The following steps are prerequisites to import content from remote components:
•
Register a plug-in for the remote component. For more information, see Manage Plug-ins.
•
Create an endpoint to connect to the remote component. The endpoint configuration depends on the plug-in. For more
information, see Manage Endpoints.
•
Create a release and specify application versions. For more information, see Create a Release in this section.
For example, you can import external work items from Rally for application deployment information from associated
stories, tasks, and defects.
60

Continuous Delivery Director 8.5
TIP
Take care to only import work items that you need, and keep the number of work item sources low.
1. In a release, select the Work Items tab in the left panel, and select the application version number.
2. Select Add Work Items.
The ADD WORK ITEMS window opens.
3. Enter a name for the work items source.
4. From the drop-down lists, select a plug-in and an endpoint.
If you cannot see an endpoint, make sure that an endpoint is added for that plug-in.
5. Provide information in the required parameter fields.
The fields let you build a query that searches the source for work items that match the criteria. For example, with Rally
as a work items source, you can return all resolved defects in the sprint.
Parameters vary by work item source type.
6. Select Create.
The work items source is saved and a list of the returned items is displayed under the application. These items are now
available to assign to tasks in phases to associate important information with the release. You can then use reports to get
a holistic view of all work items deployed with a release.
Import Work Items into a Release
NOTE
The following video is extracted from the Release Orchestration training course. This course
provides extra information, context, and examples to augment the product documentation.
To access this course, see Broadcom Enterprise Software Academy.
This video shows how to import work items into a Continuous Delivery Director release. As long as you have
a working connection to an agile planning system, you can import relevant work items and monitor their status
within the release.
Tokens
Tokens are variables that can be used in a release to parameterize fields. Using tokens makes a release more flexible and
easy to maintain.
You can create a generic release that release managers use as the starting point for new release versions. Tokenizing
values provides increased flexibility for reusing releases.
A token:
•
Manages and updates values that might change from one build to another
•
Can be generated by Continuous Delivery Director or created manually
•
Can be updated when each phase runs or at the release level
Token Types
The following types of tokens are available:
Common Tokens
61

Continuous Delivery Director 8.5
•
Are not imported from a remote component
•
Are added manually by release owners and administrators
Release Tokens
•
Manage the variability of certain key values in a release
•
Tokenize values that might change from one build to another
•
Add tokens at the release level
Production Tokens
•
Protect tokens that are used in production phases
•
Contain expressions that are replaced at runtime with production environment IDs
•
Can be used across multiple releases
Syntax: [Prod]{token name}
Built-in Tokens
•
Are part of every release and are automatically created for each application in the release
•
Cannot be deleted or manually edited
•
To use built-in tokens, type "%" in the field and select the token from the dropdown list
IMPORTANT
When you create or import an application, a built-in token is automatically created specifically for that
application.
The new token appears in the %Tokens tab in a release. This token is called {application
name}.last_successful_change.
Always use this token in tasks rather than manually entering a commit or build ID.
In the %Tokens tab, under BUILT-IN TOKENS, you see the following list of tokens:
App1.last_successful_change App2.last_successful_change App3.last_successful_change
Shared Tokens
•
Can only be configured by authorized users
•
There are two types of shared tokens:
–
Shared release tokens, indicated by an [SR] prefix.
NOTE
To manage these tokens, you require the Can manage shared release tokens permission.
–
Shared environment tokens, indicated by an [SE] prefix.
NOTE
To manage these tokens, you require the Can manage shared environment tokens permission.
NOTE
If no applications have been assigned to the shared release token, any user can use that token. However, if
applications are assigned to a token, you can only add that token to releases that contain at least one of the
assigned applications.
System Tokens
•
hen you create or duplicate a release, a set of system tokens is added to that release
•
Display the state of tasks, phases, and releases in the system
•
Help make the deployment process more agile and flexible
•
To use built-in tokens, type "%" in the field and select the token from the dropdown list
62

Continuous Delivery Director 8.5
NOTE
You cannot add system tokens to task output parameters.
NOTE
Releases that were created prior to Continuous Delivery Director 8.0 do not include the system tokens. To add
system tokens to an earlier release, duplicate that release. The created release will contain system tokens.
NOTE
Releases that were created prior to 30th September 2020 do not include the system tokens. To add system
tokens to an earlier release, duplicate that release. The created release will contain system tokens.
Release and phase-related system tokens (regular system tokens) appear in regular phases and are populated during
phase start.
Continuous Delivery Director includes the following regular system tokens:
•
cdd.release_name
Contains the name and the version of the current release.
NOTE
If the release name or the release version is changed before release execution, this token will contain the
new name and version.
•
cdd.release_url
Contains the full URL of the release. This URL can be copied to a web browser and provides a user with an access link
to the release. Syntax: <host and port>/cdd/releases/<release id>
•
cdd.release_id
Contains the current release ID that is used in REST calls to Continuous Delivery Director.
•
cdd.phase_id
Contains the current phase ID that is used in REST calls to Continuous Delivery Director.
•
cdd.phase_name
Contains the current phase name.
NOTE
If the phase name is changed before phase execution, this token will contain the new name.
•
cdd.phase_url
Contains the full URL of the phase. Syntax: <host and port>/cdd/releases/<release id>?phase=<phase id>
NOTE
For reference only.
•
cdd.phase_environment
Contains the environments of the current phase If the current phase contains more than one environment, this token
will include CSV output with the names of the environments.
•
cdd.phase_executor_email
If the phase executes automatically or is scheduled, the token contains "System". If the user does not have an email
address, the token contains their username instead.
•
cdd.phase_executor_name
Contains the first name and last name of the user that executes the phase. If the phase executes automatically or is
scheduled, the token contains "System". Syntax: <First Name> <Last Name>
On-failure tokens are populated when a task fails and an on-failure phase starts.
You can only use these tokens in an on-failure phase. These tokens only appear in on-failure phases and do not appear in
regular phases.
Continuous Delivery Director includes the following on-failure tokens:
•
cdd.failed_phase_id
63

Continuous Delivery Director 8.5
Contains the ID of the failed phase that triggered the on-failure phase. This ID is the current ID of the failed phase that
is used for REST calls to Continuous Delivery Director.
•
cdd.failed_phase_name
Contains the current name of the failed phase that triggered the on-failure phase. Note: If the failed phase name is
changed before phase execution, this token will contain the new name.
•
cdd.failed_phase_executer_email
Contains the email address of the user that executes the failed phase. If the phase executes automatically or
is scheduled, the token contains "System". If the user does not have an email address, the token contains their
username instead.
•
cdd.failed_phase_executer_name
Contains the first name and last name of the user that executes the failed phase. If the phase executes automatically
or is scheduled, the token contains "System". Syntax: <First Name> <Last Name>
•
cdd.failed_task_id
Contains the current failed task ID that is used in REST calls to Continuous Delivery Director.
•
cdd.failed_task_url
Contains the full URL of the failed task. Syntax: <host and port>/cdd/releases/<release id>?task=<task
id>&phase=<phase id>
NOTE
For reference only.
•
cdd.failed_task_name
Contains the failed task name.
•
cdd.failed_task_status_description
Contains error messages that appear in the failed task.
•
cdd.failed_task_detailed_status_description
Contains detailed error messages that appear in the failed task.
Token Scope
You can set tokens to have one of the following scope settings:
•
Phase
You can use a token with a phase scope in the same phase in other tasks. The scope is defined where the value of a
token, as received from an output parameter field, is valid. This token uses the set value and not the output value from
a different phase.
The Phase scope is the default scope of a new token.
IMPORTANT
If the token is used in a different phase as a task field value, the token is regarded as empty. Phases with
tasks that use the token as a mandatory value, or with the value already set, will not run and display the
following error:
•
Release
You can use a token with a release scope in other phases, and in the same phase. The value of the token that is used
is the same value that the token got from the output field result.
The token displays the value as an output parameter from the task. The value changes each time that the token is
used in an output parameter field.
Manage Tokens
You ensure that phases and release run as intended by managing any associated tokens.
Effective token management activities include:
64

Continuous Delivery Director 8.5
•
Search and filtering tokens
•
Adding new tokens as needed
•
Editing existing tokens
•
Viewing token usage to identify which releases, phases, and tasks contain specified tokens
•
Deleting tokens
Search and Filter Tokens
Complex release pipelines can contain large numbers of tokens of all types. Individual releases may also include many
tokens which are listed in the %Tokens tab. To manage specific tokens, first search for existing tokens by typing a text
search string, then filter the results to display the relevant tokens only.
1. Select the %Tokens tab on the Releases page tools panel on the left.
NOTE
To open the tools panel, select the menu icon (three horizontal bars) on the left of the Releases page
toolbar.
2. In the search field, type a text search string.
3. Choose either or both of the following options:
•
Click the filter icon and select one of the following: Common Tokens, Production Tokens, Built-in Tokens.
•
Select a phase or task, then select the Show by Selection checkbox to display only tokens related to the phase or
task you select in the release. If you do not select any phase or task, the tokens panel lists all of the tokens in the
release.
Add Tokens to Releases
After you add a token, you can use the token in task definitions.
1. Select the %Tokens tab on the Releases page tools panel on the left.
NOTE
To open the tools panel, select the menu icon (three horizontal bars) on the left of the Releases page
toolbar.
2. Select Add Token.
3. Enter the token name and select the checkmark icon.
NOTE
You can add either common or production tokens. Token names cannot contain spaces.
4. Specify the current value for the token and press Enter.
The token is available for use in tasks.
5. (Optional) Select the scope of the token from the following options:
NOTE
The default scope setting is Phase.
Phase
A change in token value that results from an output parameter is reflected only in the same phase.
Release
A change in token value that results from an output parameter is reflected across release for all phases.
65

Continuous Delivery Director 8.5
Create Tokens in Continuous Delivery Director
NOTE
The following video is extracted from the Release Orchestration training course. This course
provides extra information, context, and examples to augment the product documentation.
To access this course, see Broadcom Enterprise Software Academy.
This video shows how to create tokens for use in a Continuous Delivery Director release. Tokens are variables
that can parameterize commonly used fields, making releases easier to maintain.
To select a token in a task field, type the percent character (%) and select the token.
Edit Tokens
1. Select the %Tokens tab on the Releases page tools panel on the left.
NOTE
To open the tools panel, select the menu icon (three horizontal bars) on the left of the Releases page
toolbar.
Tokens associated with phases and the release are listed.
2. In a token row, to display the actions menu select the ellipsis icon (three dots).
3. Select Edit Token.
4. Modify the token name, value, and scope as needed, and save.
The token is updated in every release artifact in which that token appears.
View Token Usage
ou can identify the locations of tokens to determine the consequences of editing or deleting a specific token.
1. Select the %Tokens tab on the Releases page tools panel on the left.
NOTE
To open the tools panel, select the menu icon (three horizontal bars) on the left of the Releases page
toolbar.
Tokens associated with phases and the release are listed.
2. In a token row, to display the actions menu select the ellipsis icon (three dots).
3. Select Show Usage.
Every location of the specified token in phases, tasks, and individual fields is displayed, together with the number of
occurrences.
Delete Tokens
CAUTION
Use this option carefully. Deleting tokens unnecessarily may impact access to system data.
1. Select the %Tokens tab on the Releases page tools panel on the left.
NOTE
To open the tools panel, select the menu icon (three horizontal bars) on the left of the Releases page
toolbar.
Tokens associated with phases and the release are listed.
66

Continuous Delivery Director 8.5
2. In a token row, to display the actions menu select the ellipsis icon (three dots).
3. Select Delete Token.
A Delete Token pop-up displays, listing every occurrence of the selected token in phases, tasks, and field.
4. Click Delete.
The token is deleted from every location listed in the Delete Token pop-up.
Create and Duplicate Phases
Phases are organized collections of release deployment steps in the Continuous Delivery chain.
Phases provide a global environment view for all application activities. Use phases to organize the sequential deployment
of a release into different environments such as development, QA, and production. Each phase contains environments
that are based on the applications and on the endpoints that are defined in the release. You can create up to ten phases
with different workflows in a release. You can execute phases as often as needed.
You can use the Blue/Green Environment Selector to determine which of two or more production environments to
deploy at runtime. This capability lets you switch quickly and easily between staging and production environments to
reduce downtime. You can also roll back to an alternative production environment if changes to a production environment
cause errors.
1. On the Releases page, select a release.
2. Select Create a Phase.
The CREATE PHASE window opens. You can also use the keyboard shortcut Alt+Shift+P to open the CREATE
PHASE window.
NOTE
Use the question mark (?) key to show and hide a list of keyboard shortcuts.
3. Select and populate the following fields:
•
Phase Name
Specify a name for the phase.
•
Environments
Specify the environments that are associated with the release phase for each application. For example, if you are
creating a phase for your development environment, add all application development environments to the phase.
Configure environments on the Applications page.
IMPORTANT
Specify environments that are assigned to the endpoints and applications to be used in the phase
tasks. If you enter one or more production environments, this phase becomes a production phase.
•
Blue/Green Environment Selector
Enter a token to define the production environment to use at runtime.
•
Owners
Specifies the users responsible for the activities occurring in this phase. For example, members of the development
team might own the Development phase. Phase owners can populate the phase with tasks and can schedule and
run the phase. They also receive release activity notifications.
NOTE
You can only add owners from the users and groups that are configured in the Project Access - Users
and Project Access - Groupspages. You can only assign users to phases that are authorized to access
67

Continuous Delivery Director 8.5
the applications and environments that are part of the given phase. When you save a release, you are
prompted if permission conflicts exist. The message contains instructions for resolving the conflicts.
•
Choose how you want the phase to run
Specify one of the following phase gates that determine how the phase starts:
–
Manual
Requires a user to start the phase manually.
–
Automatic
Starts automatically when the preceding phase is complete.
NOTE
Automatic phases that are the first phase of a release must be started manually.
–
Scheduled
Starts automatically at the specified time. Use the calendar feature to set the To and From times for scheduled
phases.
NOTE
For a better phase scheduling overview, you can also specify estimated To and From times for
Manual and Automatic phases.
•
Run Tasks with Updated Applications Only
Set a phase to only run tasks mapped to applications that have changed since the last deployment on the phase
environment. When a change notification arrives from the build system or source control for a mapped application,
the phase automatically starts to run. Tasks are executed according to the following rules:
–
If a task does not contain mapped applications, then that task always runs whenever the phase is initiated.
–
If a task has one mapped application, then that task only runs if there is a change to the specific application.
–
If a task has multiple mapped applications, then that task runs if one or more of the specified applications
changes. if multiple applications are changed, the task runs once for all of the changes.
–
If a task is disabled, that task does not run in any event.
NOTE
A task that is not executed due to an invalid application version is marked as disabled and is treated
as a disabled task in all aspects: missing details, release analysis report, token resolving. At the end
of phase execution, disabled tasks revert to enabled status. You cannot change the enabled/disabled
status during phase execution. Tasks that were disabled before the phase execution remain disabled
when the phase is completed.
•
Sync All Relevant Test Sources Prior To Executing Adaptive Testing Task
Select this option to reconcile differences in test availability since the last test suite import before the phase
runs. This setting lets you ensure that any tests that have been added to the test source are included in your
adaptive testing tasks. Similarly, any tests that have been removed from the test source are excluded from adaptive
testing tasks.
•
Description
(Optional) This field supports links to external systems, resources, and references that are specific to the release.
•
Tags
(Optional). Select or create one or more tags to label the Phase.
NOTE
The phase or release owner can select or create new tags.
To create a new tag, enter a value (numeric or alphanumeric) into the Tags field and then select Create New.
4. Select Create.
The phase is added to the release.
68

Continuous Delivery Director 8.5
5. Optional: (Optional) Set the phase to Request Approval to require phase owner approval to execute the phase.
NOTE
This option is only available for the release owner.
6. Select the phase toolbar Icon in the top right of the phase.
7. Select Request Approval.
NOTE
•
To see who approved a phase, hover over the approval icon in the Approval Phase box.
The only action that you can execute on a phase after approval is Run Phase.
•
To approve the phase and replace the Approval icon with the Run Phase button, select the Approval
icon and select Approve.
•
To disable this feature, a release owner can select Cancel Approval Request in the phase toolbar.
If a phase is stopped before completion, approval is required to restart the phase.
The Approve Phase icon replaces the run icon in the phase and the phase requires approval before execution. Before
the phase starts, the owner of the phase receives an approval notification email.
8. Repeat the previous steps to add the required phases to the release.
Create a Phase in Continuous Delivery Director
Duplicate a Phase
NOTE
The following video is extracted from the Release Orchestration training course. This course
provides extra information, context, and examples to augment the product documentation.
To access this course, see Broadcom Enterprise Software Academy.
This video shows how to create a phase in your Continuous Delivery Director release. A phase organizes the
required tasks to execute when applications are deployed to specific environments, such as Development and
QA. This video shows how to duplicate a phase in a Continuous Delivery Director release. Duplicate phases
to reduce manual effort during release design and creation.
To duplicate a phase, select the phase toolbar icon on the top right of the phase, and from the fly-out menu, select
Duplicate Phase. Rename and edit the duplicate phase.
Depending on your preferred method of release design, you can populate the phases with tasks as you create each
phase. You can also create all phases first, and go back to populate them with tasks.
Tasks
Tasks are units of work that represent activities and workflows that are associated with a release.
Tasks let you map the sequence of events that are required to deploy the release in each phase. Tasks correlate and are
mapped to applications.
To configure and execute tasks in a release, create tasks within a release phase. Tasks can be application deployments,
automated testing, build processes, or any other activity that occurs in your regular release pipeline. Tasks can also be
simple activities that preclude or follow deployments. Examples include closing all stories, approving the build manifest, or
signing off on the deployment.
You can specify build numbers for every application associated with a task, using the Builds for Applications field in a
Create/Edit Tasks window. You can use tokens or free text or both. This capability is especially useful for deployment
tasks. The release-as-code DSL also supports this capability.
69

Continuous Delivery Director 8.5
TIP
As with phases, you can also duplicate tasks to share the task properties and reduce effort. Depending on your
preferred method of release design, you can either:
•
Populate the phases with tasks as you create each phase.
•
Create all phases first, then populate each phase with tasks. If the phases have similar tasks, create the
tasks in the first phase, duplicate the phases, and edit the duplicates.
•
Use tokens in tasks where the values can change, or for multiple tasks that might share the same values.
You can create the following task types:
•
Automatic - Automatic tasks run actions, such as deployments, testing, and other continuous delivery activities,
in remote components in external environments. Automatic tasks are associated with a plug-in. For example, the
Automic
®
Continuous Delivery Automation plug-in provides an automatic task that is named Start Application
Workflow. This task runs an Automic
®
Continuous Delivery Automation application workflow in the context of phases
and tasks.
•
Manual - Manual tasks are simple tasks that do not instrument activities in remote components. For manual tasks, the
task owner or phase owner manually executes the operations that are described in the task. The owner then marks
the task as complete. Use manual tasks to coordinate important release activities that are not otherwise tracked in
a release-level workflow. Manual tasks can also help you track activities that do not have automated task types in
Continuous Delivery Director. An M in the blue field on the right of the task indicates a manual task.
More Information:
•
Create Tasks
•
Highlight Relevant Tasks
•
Duplicate Tasks
Create Tasks
To create a task within a release phase, follow these steps:
1. Select Create a Task at the bottom of the phase box.
You can also select the Add task icon in the phase menu to create new tasks.
2. Select and populate the following fields:
•
Task Name
•
Description
•
Applications
Select one or more applications associated with this task. You can specify a build number for every task.
•
Builds For Applications
Specify a build number for every application. You can use a % prefix for tokens. You can also use free text alone or
together with tokens.
•
Owners
Specify the user who determines when the task is complete and who closes the task during release execution. Task
owners can change task properties and task status. They also receive release activity notifications.
NOTE
You can only add owners from the users and groups that are configured in the Project Access -
Users and Project Access - Groups pages.
•
Tags
(Optional). Select or create one or more tags to label the Task.
70

Continuous Delivery Director 8.5
NOTE
The Task, Phase, or Release owner can select or create new tags.
To create a new tag, enter a value (numeric or alphanumeric) into the Tags field and then select Create New.
3. Select the Task Type down arrow and select the task type from the drop-down list. Select “Manual” to create a manual
task. For automatic tasks, select a task type from the drop-down list of plug-ins and associated tasks. For Automatic
tasks enter the required task-specific information. To use the dynamic parameter feature to see the available related
values, enter an at symbol (@).
NOTE
Each automatic task type requires a configured endpoint from which to execute the remote component
operations.
For more information about specific task requirements, see Integrations.
NOTE
To use tokens as task field values, type the percent symbol (%) and select the token from the list. Use tokens
for any task field that you expect to change, or to be reused in another task.
4. Determine how Continuous Delivery Director handles task failures. Select one of the following options:
•
(Default) Wait for user action or run on failure phase if found
NOTE
Pauses task and either waits for user action or runs an on-failure phase if configured.
•
Automatically Skip Task
NOTE
The task is marked as a failure, but the phase continues to run.
•
Always Wait for User Action
NOTE
The task is automatically paused until user action. This option does not run an on-failure phase even if
configured.
•
Ignore Failure When Skipping Task
NOTE
Allows promoting the build to the next phase, regardless of task failure.
CAUTION
Using this option can compromise build quality.
•
Set as "Mandatory task"
NOTE
The task is mandatory and cannot be skipped or disabled. Only users with "can manage mandatory task"
permission can manage (edit, enable/disable, delete, etc.) mandatory tasks. Additionally, any task/phase/
release owner can run, re-run, duplicate and change the task's state.
CAUTION
The options "Automatically Skip Task" and "Ignore Failure When Skipping Task" are not allowed for this
task.
5. Select Create.
The task is saved and assigned to the release.
71

Continuous Delivery Director 8.5
Create a Task in Continuous Delivery Director
NOTE
The following video is extracted from the Release Orchestration training course. This course
provides extra information, context, and examples to augment the product documentation.
To access this course, see Broadcom Enterprise Software Academy.
This video shows how to create a task in a Continuous Delivery Director release. A task is a unit of work that
represents an action or workflow that is associated with a release phase.
Highlight Relevant Tasks
You can display all the tasks in the release that include the specified application version.
1. Select the Apps & Work Items tab in the left panel, and select the application version number.
2. Select Highlight Relevant Tasks.
NOTE
This action does not control the tasks that are run as part of the release execution.
Duplicate Tasks
You can duplicate tasks to reduce the amount of manual labor during the release creation process.
You can duplicate tasks to share the task properties and reduce effort. Depending on your preferred method of release
design, you can either:
•
Populate the phases with tasks as you create each phase
•
Create all phases first, then populate each phase with tasks
TIP
•
If phases have similar tasks, create the tasks in the first phase, duplicate the phases, and edit the duplicates
•
Use tokens in tasks where the values can change or for multiple tasks that might share the same values
•
Drag and drop tasks between phases
1. In a release phase, select a task.
2. Click the task fly out menu, and select Duplicate Task.
3. Change the task properties as needed, such as the application name, tokens, and so on.
4. When done, click Duplicate.
Duplicate a Task
NOTE
The following video is extracted from the Release Orchestration training course. This course
provides extra information, context, and examples to augment the product documentation.
To access this course, see Broadcom Enterprise Software Academy.
This video shows how to duplicate a task in a Continuous Delivery Director release. Duplicate tasks to reduce
effort during release design and creation.
If needed, drag and drop duplicated tasks to the required position in the phase.
72

Continuous Delivery Director 8.5
Complete the Release
Use the following steps to complete the release design phase.
1. Create all phases and tasks that the release requires.
Use the Duplicate Phase and Duplicate Task functionality at the appropriate level. If phases contain the same tasks
in different environments, duplicate the first phase and modify the subsequent phases and tasks. If tasks are unique
across phases, duplicate tasks where appropriate to reduce effort.
2. Drag-and-drop phases and tasks to order the sequence.
3. Drag tasks together to create a container for parallel task execution.
4. Consult with all release owners to ensure that the release has the required activities.
Owners, designers, and viewers can use the Activity panel for a record of design actions.
5. Schedule the release for execution.
Release Conflicts
During release design, Continuous Delivery Director generates alerts in the UI for scheduling conflicts.
Conflict-related notifications do not prevent the scheduled execution. You can see the following conflicts and the point in
the release where the conflicts occur:
•
Phases that exceed the maintenance window duration or are scheduled to deploy outside a defined window
•
An application dependency that is not deployed in the same environment as the application in any release
•
An application dependency that is not planned to be deployed before or during the current application scheduled phase
Conflicts are displayed in the following locations in the UI:
•
In a phase next to the phase name
•
In the Edit Phase window under Environments
•
In the release calendar, where a red dot in a phase bar indicates a phase conflict
Conflict notifications are removed when the conflicts are resolved.
Schedule Releases
You can schedule release execution at a specific time without the need to start the release manually. Release scheduling
lets you execute releases during off hours to minimize the risk of outages during peak usage times. You can schedule
releases in the context of release design, or through an intuitive release calendar interface.
Schedule in Phases
You can set a specific time for phase execution in the EDIT PHASE window. You can also set a recurrence pattern to run
a phase. When you schedule times within a phase, verify the following items:
•
The time that you set does not conflict with another execution of a different release in the same environment
•
Phase execution times are scheduled sequentially with enough time between phases to allow for failures or
modifications
•
If you set up a recurrence pattern, the scheduled executions should fall between the From and To dates and times
•
If you set a maintenance window for environments that are included in the release, the scheduled times should fall
within that window
73

Continuous Delivery Director 8.5
Instead of scheduling a specific execution time for each phase, you can set manual approval gates between phases. In
this case, schedule the first phase to execute at a specific time. Then, set manual approval gates and provide estimated
execution times for the next phases. The estimated times give you a general idea of the planned schedule.
Follow these steps:
1. Access the Phase configuration menu during phase creation, or from the Edit phase button in the phase toolbar.
2. Select Scheduled as the phase gate.
3. Set the From and To times.
4. (Optional) Select an option from the recurrence drop-down to set the frequency that you want the phase to run:
74

Continuous Delivery Director 8.5
Example: Weekly on Monday
5. Click Save.
The phase execution begins at the scheduled time. Execution does not automatically end at the scheduled end time,
but a scheduled end time provides a trackable estimate.
Schedule from the Release Calendar
You can also schedule and reschedule release phases from the Release Calendar. Use the calendar for a holistic view of
all scheduled releases and to make updates to release schedules. The calendar acts as a real-time release dashboard
75

Continuous Delivery Director 8.5
with each release on a separate line. You can use the calendar to monitor scheduled releases, to identify conflicts, and
to make necessary adjustments.
Follow these steps:
1. Click the CALENDAR tab.
The Calendar displays a list of all releases with visual indicators for when each release is scheduled. Releases without
associated schedules show indicators for the current time.
2. Expand a release on the left tree.
The phases for the release appear, and you can see the scheduled execution time for each phase.
3. Move the bubble for any phase on the calendar to reschedule the phase.
The phase is rescheduled.
Schedule Releases to Run Together
You can use the Continuous Delivery Director Tracks feature to bundle several releases into reusable release tracks. This
functionality lets you deliver all the bundled releases into production together. Release tracks are easy to edit and monitor,
and can be reused and modified for future and periodic releases.
For more information, see Release Tracks.
Instructional Video
The following video shows how to schedule multiple releases and use the calendar and maintenance windows to avoid
conflicts:
Build Promotion
The Build Promotion capability lets you automatically promote successful builds across the pipeline. You can use this
capability to promote successful builds across release phases. Application build numbers are included in, and can be
automatically tracked across, the lifecycle of a release.
The Build Promotion capability lets you automatically promote successful builds across the pipeline in Continuous Delivery
Director. You can use this capability to promote successful builds across release phases. Application build numbers are
included in, and can be automatically tracked across, the lifecycle of a release.
For example, Continuous Delivery Director recognizes the ID in the Build Parameters field of a Jenkins Run Build task
as the build number. To promote a successful build to the next phase, use the built-in last_successful_build token. This
token is used for all applications and across all phases in a release where a build field is required. The token correlates
the correct build number and associated applications.
To receive new build numbers inside the relevant releases, integrate releases with your build system. Use the
last_successful_build token in the Build field of the first phase. If the build system is configured correctly, the new build
number is promoted.
NOTE
For the first phase to run automatically when a new build arrives for the applications in the release, set the
phase gate to Automatic.
NOTE
More Information:
•
Jenkins
76

Continuous Delivery Director 8.5
Build Promotion in Continuous Delivery Director
NOTE
The following video is extracted from the Release Orchestration training course. This course provides extra
information, context, and examples to augment the product documentation.
To access this course, see Broadcom Enterprise Software Academy.
This video shows how a Continuous Delivery Director release can move from one phase to the next automatically,
deploying to the appropriate environment with key values changing based on tokens.
File Sources
You can save a lot of the time and effort involved in manually setting up releases by creating file sources.
File sources are connections to files stored in a source control repository, that represent releases in JSON format. Once
you create a file source, releases are automatically created and run whenever you make changes to one of the JSON
files. You can also use the file source feature to manage JSON files that reference other JSON files.
NOTE
To use this capability, create a top-level folder in the relevant repository with the following name: CDD-
FileSource . Place all release-related JSON files in this folder.
The CDD-FileSource folder does not apply if you use file sources to manage JSON files that reference other
JSON files.
Prerequisites: You have been granted Can create file source permissions.
Follow these steps:
1. From the Administration menu, click File Sources, then New File Source.
2. In CREATE FILE SOURCE, select one of the available options as your source control and configure the parameters.
a. Name: Specify a name for the file source configuration.
b. Source Control: Select the requried source control from the available options. Once you select the source control,
addition input parameters fields appear:
•
Endpoint: Select an endpoint.
•
SCM Type: Select either Git or TFVC, according to the source control management system used in Azure
Devops Server.
•
Project: Specify a Azure Devops Server project name or ID.
•
Repository: Specify the name of the Azure Devops Server repository from which to import the files.
•
Branch: Specify a branch used by the specified project. To allow processing of webhook notifications from all
repository branches, keep this field empty.
c. Release Created On Behalf Of (API Key): Specify the API key of the user on whose behalf future releases will be
created.
NOTE
If you are creating the file source on your behalf, then leave the field empty.
d. Send Error Notifications To: Specify the name of the recipients to receive error notifications. By default, the
logged in user’s email address is selected.
3. Click Create.
Parametrized Releases
Use parametrization in release DSLs to create release entities as code, reducing the time spent on modeling releases
through the user interface. Use the user interface to export or import parameterized releases.
77

Continuous Delivery Director 8.5
You can parametrize the following release entities:
•
ApplicationVersion
•
ReleaseToken (regular, shared, and production)
•
Phase
•
Task
•
ContentSource
Export Parameterized Releases
You can export parametrized release DSL files in the Releases page, using the Export Parameterized Release
Template option.
In the Releases page, an icon indicates that a release is parameterized and can be exported as a template.
When you export a release, the release entities are parameterized, and the "parameters" section is added to the DSL
with the parameters.
The export does not modify the objects - if the objects section includes parameters, the exact parameters are exported
(regardless of their values).
The exported file name syntax is <release name>_<release version>_template.json.
The parameters section includes all parameters without values. For example:
"parameters": [
{
"name": "version",
"value": ""
},
{
"name": "appName",
"value": ""
},
{
"name": "releaseName",
"value": ""
}
],
Limitations
Duplicate releases do not keep the parameters. A duplicated release includes only the values and is not marked as a
template.
When the field contains a list of external entities (such as users, shared tokens, groups, application versions), if the
reference is removed from the list, the list is exported with values and not with parameters. For example, a template
contains:
"parameters": [
{
"name": "userName",
"value": "[email protected]"
}
]
********
78

Continuous Delivery Director 8.5
"objects": [
....
"ownerParties": [
"BuildNotification",
"${userName}"
]
The owners appear in the release as BuildNotification , [email protected] , [email protected] . If a
user removes [email protected] , the export does not include the parameter "userName".
If the name of an external entity is changed (for example, you change a group name/application version/phase),
and this entity is parameterized in the release, the export does not include the parameter, but the only the entity name.
If a field contains a reference to another entity, and due to the release editing the reference is changed, the field is
exported with the value and not as a parameter. For example:
"parameters": [
{
"name": "p1",
"value": "CI"
},
{
"name": "p2",
"value": "UAT"
},
]
****************************************************************************************
"objects": [
{
"kind": "Phase","name": "${p1}",
"previousPhase": null
},
{
"kind": "Phase","name": "${p2}",
"previousPhase": "${p1}"
}
]
This scenario creates two phases - "CI" and then "UAT". If a user edits the release and moves "UAT" to before "CI", the
export DSL is:
{
"kind": "Phase","name": "${p2}",
"previousPhase": null
},
{
"kind": "Phase","name": "${p1}",
"previousPhase": "UAT"
}
79

Continuous Delivery Director 8.5
Import Parameterized Releases
When you import a parameterized release, Continuous Delivery Director stores the parameters defined in the DSL.
The same parameter can be used in multiple entities. In the following example, the parameter "version" appears both
as an application version and as a release version.
A parameter can appear next to free text. In the following example, the parameter releaseName is next to the text
"Mobile-Team" .
A release attribute can contain more than one parameter.
{
"ownerParties": [
],
"applicationVersions": [
"Local|${appName}/${version}"
],
"runOnCreation": false,
"version": "${version}",
"name": "${releaseName}-Mobile-Team",
"kind": "Release"
}
Pipelines as Code
The pipelines as code function enables you to export the release entities to a DSL file - a JSON file representing the
release entities.
You can use pipelines as code to:
•
Automate the release creation simply by committing a DSL file containing set of parameters to the source control
•
Apply benefits such as version control, code review, branching strategies
•
Easily transfer content between user accounts and workspaces
•
Share pipelines as templates
•
Make holistic changes to the pipeline with minimal effort
•
Seamlessly and securely deliver new application features and updates
The DSL File Format
The DSL is a JSON format file. The file may contain two sections - Objects and Parameters.
DSL Objects
The JSON files that represent pipelines contain fully qualified names (FQNs) that specify which object, function, or
variable to which a call refers to.
Examples of FQNs
Object Syntax Sample Text
release [release name]/[release version] Sample Release/1496057472000
phase [release name]/[release version]/[phase
name]
Sample Release/1496057472000/
Acceptance
80

Continuous Delivery Director 8.5
task [release name]/[release version]/[phase
name]/[task name]
Sample Release/1496057472000/
Acceptance/Run acceptance tests
application [source name]|[application name] Local|Sample Application 1
application version [source name]|[application
name]/[application version name]
Local|Sample Application 1/1.0
plug-in [plug-in name]/[plug-in version] BlazeMeter/1.0
NOTE
Some objects (such as application, application version) require the use of the pipe '|' character to separate two
adjacent data fields within a segment. This character also separates the segment ID from the first data field in
each segment.
DSL Parameters
To create a DSL template, you can replace hard coded values with parameters. The parameters are specified in the DSL
file in a separate section, or in a separate parameters file.
For example, you can parameterize the following release entities: Application Version, Token value, Phase Name, Tasks
Name, and so on.
The Parameters section in the DSL will specify the name and values. For example:
"parameters": [
{
"name": "p1",
"value": "CI"
},
{
"name": "p2",
"value": "UAT"
},
]
In the Objects section you can use the parameter in the following format:
"objects": [
{
"kind": "Phase",
"name": "${p1}",
"previousPhase": null
},
{
"kind": "Phase",
"name": "${p2}",
"previousPhase": "${p1}"
}
]
You can use the same parameter in multiple utilities. In the following example, the parameter "version" appears both as an
application version and as a release version.
81
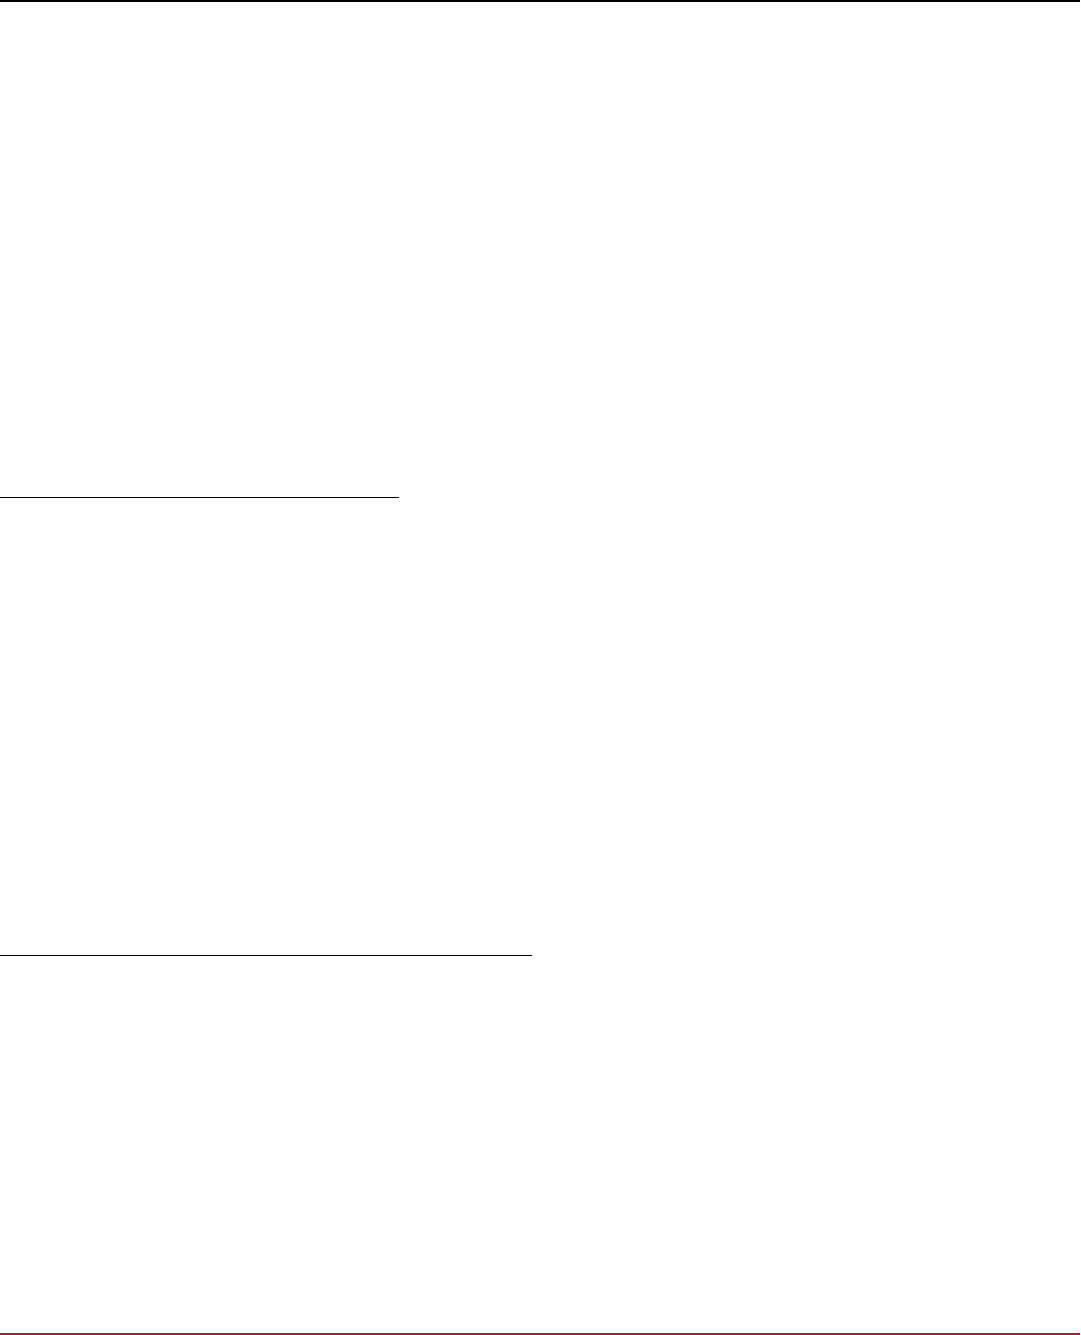
Continuous Delivery Director 8.5
A parameter can appear next to the free text. In the following example, the parameter ‘releaseName’ is next to the text
‘Mobile-Team.’
A release attribute can contain more than one parameter.
{
"ownerParties": [
],
"applicationVersions": [
"Local|${appName}/${version}"
],
"runOnCreation": false,
"version": "${version}",
"name": "${releaseName}-Mobile-Team",
"kind": "Release"
}
Referring Parameters file to an Object File
You can split a parametrized DSL file into two - an object file that contains only the objects and a parameters file. The
objects file will be stored in a Git repository and the parameters file will contain a reference to the objects file. The user will
import the parameters file, and using the reference details CDD will merge the two files and create the release.
To use this capability, create a top-level folder in the relevant repository with the name “CDD-FileSource” and place the
objects file in this folder.
The Reference section in the parameters file contains the following attributes:
•
The objects file name
•
The file source name which will be used to fetch the file from the repository
The following is the format of the Reference section:
"reference": {
"fileName": "My_Release_Template.json",
"fileSource": "My filesource"
}
Add Reference to Phase/Task DSL in a Release DSL File
You can manage release objects such phases or tasks in a separate DSL file, and to include in the release DSL reference
to these objects.
An example of use case is if you have a phase that repeats in many release templates, and you would like to apply
changes to this phase only once and it will apply to all release templates.
First you need to create a DSL file that contains the required object. Make sure that you parameterize all the attributes
that refer to a specific release such as release name, release version, application name and versions, previous phase,
and so on.
Store the file in a git repository and create a file source for this repository.
In the Objects section of the release DSL, enter a reference to this DSL file. The reference will include the file name and
path, the file source for the specific repository and list of parameters and values that are used in the DSL.
Use the following format:
82

Continuous Delivery Director 8.5
{
"kind": "reference",
"fileName": "<path and name of the DSL file>",
"fileSource": "<file source for the specific repository?",
"parameters": [
{
"name": "<Parameter name>",
"value": "<Parameter Value>"
},
{
"name": "<Parameter name>",
"value": "<Parameter Value>"
} ]
}
Specifications:
•
You can use a release parameter as a value for the reference parameter. for example,
{
"name": "APPLICATION1_NAME",
"value": "${applicationName}"
}
In this example, the parameter applicationName is a release DSL parameter.
•
If a certain field may contain more than one value, the object DSL should contain parameters for every value. For
example, owners of a specific phase will have the format:
"ownerParties": [
"${user1}",
"${user2}",
"${user3}"
]
If the calling release is not required to list three owners, in the reference specify only one parameter. The other
parameters will be ignored.
•
An object DSL may contain reference to another Object DSL. For example, a DSL of a phase may include reference to
DSL of a task
•
There is importance to the location of the objects in the DSL file. When object A has a reference to object B (for
example, when a previous phase attribute is defined for a phase object), object A must be defined above to object B. If
you use reference to define object A, the reference object must appear above the definition of object B.
Special Tokens and Attributes
Release DSL Tokens
When you create and edit JSON files that represent pipelines, you can use special tokens as placeholders for values in
FQNs, descriptions, and versions. The tokens must start and end with a '%' percent sign.
The following tokens are available for use in JSON files:
•
CDE.CURRENT_TIME The current time in milliseconds
Example:
83

Continuous Delivery Director 8.5
"kind": "Phase","release": "%CDE.CURRENT_USER_FULL_NAME%'s Sample Release/
%CDE.CURRENT_TIME%",
•
CDE.CURRENT_USERNAME The user name of the logged-in user. This token can be used in owner and member
parties
Example:
"ownerParties": [ "%CDE.CURRENT_USERNAME%"
•
CDE.CURRENT_USER_FULL_NAME The first name and last name of the logged-in user
Example:
"kind": "Phase", "release": "%CDE.CURRENT_USER_FULL_NAME%'s Sample Release/
%CDE.CURRENT_TIME%",
Release Attributes
•
Mark Releases as Done - You can add the markAsDonePhaseName property to the Release paragraph in the DSL to
configure a release to be marked as Done automatically.
To use this property, set the value to the name of the phase that will mark the release as done automatically. This
setting assigns the specified phase in the release as the phase that marks the release as done.
Syntax
"markAsDonePhaseName" : "<phase name>"
Example
"markAsDonePhaseName" : "QA"
•
Run on Creation - Boolean flag, when set to true the first phase will start upon the release creation.
Syntax:
"runOnCreation" : "true"
Export or Import Release
From the Releases page, you can import and export the release DSL.
Export Release with Content
This option will download the release DSL file containing all the release objects and their values.
Export Parameterized Release Template
This option is available only for releases created from a parameterized DSL file. Selecting this option downloads the
release DSL containing the parameters that are used in the objects, and a Parameters section that lists all the parameters
without values.
Export Phase or Task to a DSL Template
You can export a phase or a task from the release, and later use it either as a reference to a DSL template or to import
from the user interface after they are edited.
Exporting a phase provides the following two options:
•
Export Phase with Content: This option creates a DSL file containing the phase object and all the task objects. You
can select to export with or without the on-failure phase (if it exists).
•
Export Parametrized Phase Template: This option creates a DSL that includes the phase object and all the related
tasks. If the phase was created using a parameterized DSL file, the exported DSL will contain the DSL parameters.
You can select to export with or without the on-failure phase (if it exists).
Exporting a task provides the following two options:
84

Continuous Delivery Director 8.5
•
Export Task with Content: Exports the task DSL containing the fields’ value.
•
Export Task as a Parametrized Template: If the task is created from a parameterized DSL file, the exported DSL will
contain the DSL parameters.
Import Release
The import validates the DSL file and errors out any anomalies such as missing entities or duplicate names.
The import creates a new release or even a release component, providing that all the object's FQNs will be specified
correctly.
You can import files either from your local machine or from the source control repository:
•
Import from Source Control Repository:
–
Select the file source which has access to the required repository
–
Provide a relative file path to a JSON file in your source control repository
•
Import from Local Machine
–
Browse the local folders and select the required DSL file.
Import Parameterized Releases
When you import a parameterized release, CDD stores the parameters defined in the DSL.
Creating and Running releases using GitOps
You can create a new release and trigger its run directly from your git repository.
A typical use case is when the dev team would like to release a new application version. The DevOps engineering team
owns the release template and the Dev team needs to supply the parameters value.
The dev team creates the parameters file, commits it to a git repository, and this triggers the release creation and
execution.
To set up the release creation using GitOps, follow the following steps:
1. Create the release DSL objects file that contains the release template and store it in your source control under the
CDD-FileSource folder
2. Create a file source for a specific repository which stores Objects file and copy the webhook URL
3. Create a release DSL parameters file which contains the reference to the object file (the created file source and file
name). Store the file in git repository (can be a separate repository)
4. Create a webhook for push events in the parameters file’s repository using the webhook URL that was generated by
the file source
When a change to the parameters file is committed, a webhook is sent to CDD. CDD then accesses the parameters file
and the objects file, and creates the new release.
Pipeline as Code Video
The following embedded video describes the Pipeline as Code feature in Continuous Delivery Director. This video
provides extra information, context, and examples to augment the product documentation. This video is available in full
size on the Continuous Delivery Director YouTube channel.
Pipeline as Code Example
The following example shows how a sample release is represented in JSON format.
85

Continuous Delivery Director 8.5
User Scenario
A release manager, Julie Wilson, imports a sample release from the code repository:
When Julie clicks the release name, the preconfigured sample release appears, complete with phases and tasks:
The Activity pane shows that the import release action triggers the creation of the child objects and variables of the
sample release.
After the import is complete, Julie can either work with the existing sample release configuration, or make changes as
needed.
Pipeline as Code Sample
The following code sample is the full pipeline definition JSON file for the sample release that Julia imports:
{ "objects": [ { "name": "Sample Application 1", "kind": "Application" }, { "applications": [ "Local|Sample
Application 1" ], "name": "Test", "kind": "Environment" }, { "environments": [ "Test" ], "applications":
[ "Local|Sample Application 1" ], "name": "Blazemeter", "kind": "Endpoint", "type": "BlazeMeter",
"parameters": { "apiKeyId": "0248cb489fd1a1ba731de0f6", "authType": "Advanced", "url": "https:\/\/
86

Continuous Delivery Director 8.5
a.blazemeter.com" }, "plugin": "BlazeMeter\/2.1" }, { "application": "Local|Sample Application 1", "name":
"6.8.0", "kind": "ApplicationVersion" }, { "version": "1.0.1", "ownerParties": [ "[email protected]" ],
"memberParties": [ "[email protected]" ], "applicationVersions": [ "Local|Sample Application 1\/6.8.0" ],
"description": "", "name": "Julie Wilson's Sample Release", "kind": "Release" }, { "environments":
[ "Test" ], "isApprovalRequired": false, "release": "Julie Wilson's Sample Release\/1.0.1", "approvalGate":
"MANUAL", "ownerParties": [ "[email protected]" ], "name": "PhaseTemplate", "kind": "Phase" }, { "phase":
"Julie Wilson's Sample Release\/1.0.1\/PhaseTemplate", "ownerParties": [ "[email protected]" ], "isDisabled":
false, "applicationVersions": [ "Local|Sample Application 1\/6.8.0" ], "name": "TaskTemplate", "kind":
"Task", "type": "Run Test", "parameters": { "workspace": "Default workspace", "test": "Test 2 - Valid URL",
"project": "Default project" }, "endpoint": "Blazemeter", "plugin": "BlazeMeter\/2.1" } ] }
Explanation of the Pipeline as Code Sample
The following section explains how the different elements of the sample release are represented in JSON format.
•
Application
A deployable unit of software that is part of a release.
Example: The sample release contains an application, Sample Application 1:
],
"name":"Sample Application 1",
"kind": "Application"
},
•
Environment
A location where an application runs
Example: The sample release contains a Test environment:
],
"name":"Test",
"kind": "Environment"
},
•
Application Version
A unique version number assigned to a unique state of the application in sequential order.
Example: The application Sample Application 1 is in version 6.8.0:
],
"application":"Local|Sample Application 1",
"name": "6.8.0", "kind": "ApplicationVersion"
},
•
Release
A configuration that consists of phases that simulate global environments and tasks that instrument continuous delivery
operations required during release deployment.
Note: Pipeline as Code automatically assigns logged-in users the role of release owner.
Example: The release, Julie Wilson's Sample Release, is in version, 1.0.1. The release owner is [email protected],
and the release member is [email protected].
{ "version": "1.0.1", "ownerParties": [ "[email protected]" ], "memberParties": [ "[email protected]" ],
"applicationVersions": [ "Local|Sample Application 1\/6.8.0" ], "description": "", "name": "Julie Wilson's
Sample Release", "kind": "Release" },
•
Phase
87

Continuous Delivery Director 8.5
A representation of the different environments that are part of your release.
Example: The sample release contains a PhaseTemplate phase.
], "name": "PhaseTemplate", "kind": "Phase" }, { "phase": "Julie Wilson's Sample Release\/1.0.1\/
PhaseTemplate", "ownerParties": [ "[email protected]" ],
•
Task
A representation of the relevant workflow inside each release phase.
Example: The sample release contains a Blazemeter task, Run Test.
], "name": "TaskTemplate", "kind": "Task", "type": "Run Test", "parameters": { "workspace": "Default
workspace", "test": "Test 2 - Valid URL", "project": "Default project" }, "endpoint": "BlazeMeter",
"plugin": "BlazeMeter\/2.1" }
•
Parameters
A representation of the parameters that determine how Continuous Delivery Director accesses specific release
components. The DSL JSON file can refer to parameters such as ${APPLICATION_NAME}.
You specify the value of parameters in the parameters section.
Syntax:
{ "objects": [ { "kind": "string" } ], "parameters": [ { "name": "string", "value": "string" } ]}
Example 1: The parameters provide access to the specified application.
{ "objects": [ { "application": "${APPLICATION_NAME}", "kind": "ApplicationVersion",
"name": "${APPLICATION_VERSION_NAME}" }, { "applicationVersions": [ "${APPLICATION_NAME}/
${APPLICATION_VERSION_NAME}" ], "description": "", "kind": "Release", "memberParties":
[ "[email protected]" ], "name": "${RELEASE_NAME}", "ownerParties": [ "[email protected]" ], "version":
"${RELEASE_VERSION_NAME}" } ], "parameters": [ { "name": "APPLICATION_NAME", "value": "Sample Application
1" }, { "name": "APPLICATION_VERSION_NAME", "value": "1.1" }, { "name": "RELEASE_NAME", "value": "Julie
Wilson's Sample Release" }, { "name": "RELEASE_VERSION_NAME", "value": "1.0.1" } ]}
Example 2: The parameters provide secure access to the BlazeMeter endpoint capabilities.
], "name": "Blazemeter", "kind": "Endpoint", "type": "BlazeMeter", "parameters": { "apiKeyId":
"0248cb489fd1a1ba731de0f6", "authType": "Advanced", "url": "https:\/\/a.blazemeter.com" }, "plugin":
"BlazeMeter\/2.1" },
Example REST Call: Import from File
/dsl-manifest/attachment
Imports a file and creates a manifest.
Resource URL
Type Description
GET https://<host>:<port>/cdd/administration/0000/v1/dsl-manifest/atta
chment
Method Parameters
Parameter Type Description
file Undefined file
Response Parameters
HTTP Status Code Reason
201 Created
88

Continuous Delivery Director 8.5
401 Unauthorized
403 Forbidden
404 Not Found
Curl
curl -X Get --header "Accept: application/json" "http://<host>:<port>/cdd/design/0000/v1/dsl-manifest/
attachment"
Response Body
[{
"Kind": "Application Version",
"ID": "3505453"
},
{
"Kind": "Release Token",
"ID" :"2345656523"
},
{
"Kind": "Release",
"ID" :"23"
},
{
"Kind": "Phase",
"ID" :"11"
},
{
"Kind": "Phase",
"ID" :"12"
},{
"Kind": "Phase",
"ID" :"13"
},
{
"Kind": "Task",
"ID" :"122"
},{
"Kind": "Task",
"ID" :"123"
},
{
"Kind": "Task",
"ID" :"124"
},
{
"Kind": "Task",
89

Continuous Delivery Director 8.5
"ID" :"125"
}]
Response Code
200
Response Headers
{
"hostname": "server-4-3h6qp",
"date": "Wed, 14 Mar 2018 12:25:00 GMT",
"server": "nginx/1.11.10",
"connection": "keep-alive",
"transfer-encoding": "chunked",
"x-upstream": "10.131.0.178:8080",
"content-type": "application/json;charset=UTF-8"
}
Release Management
This section provides information about how to manage releases, phases, and tasks during release design and execution.
Permissions to execute release activities are role-based. For more information about roles and associated release
activities, see User Permissions and Activities.
More Information:
•
Manage Releases
•
Manage Phases
•
Manage Tasks
Manage Releases
To help manage your Continuous Delivery Director releases during and following release design, use the following
information and actions.
Start Releases
To start a release, click the Run phase button in the first phase of the release. When a release starts, the status Running
and a power button icon appear at the top of the release.
Phases with a SCHEDULED phase as the first phase of the release start automatically at the scheduled time.
Complete Releases
To complete a release, click MARK AS DONE next to the Running status at the top of the release. If phases are running
in the release when you click MARK AS DONE, a message opens to confirm that you want to stop the release.
Note: When you mark a release as Done, the release is permanently in a read-only status and cannot be edited. For more
information, see Release Execution.
90

Continuous Delivery Director 8.5
Edit Releases
To edit a release, open the release and click the pencil icon next to the release name. You can also use the keyboard
shortcut alt+shift+r to edit a release.
Note: Use the question mark (?) key to show and hide a list of keyboard shortcuts.
Edit a release to change the main release properties, such as name, version, and applications.
Important If you remove an application from a release, all endpoints mapped to this application from the release are also
removed.
Delete Releases
Administrators can delete releases from the RELEASES page.
Follow these steps:
1. Click and highlight the release field in the RELEASES page.
2. Click the trash can icon at the top right of the page, and click Delete.
Duplicate Releases
After you execute a release, you cannot execute the release again. To reuse releases, use the Duplicate Release
functionality.
To deploy the next version of a release, duplicate the release, change the version number, and edit the release content.
If you duplicate a release, you are prompted if permission conflicts exist. The message contains instructions for resolving
the conflicts.
Note: When you duplicate a release, new application versions are automatically created for each application mapped to
the source release. The settings (work item source, dependencies and source control connection) are copied from the
original application versions to the corresponding application versions in the new release.
Follow these steps:
1. Click and highlight the release field on the RELEASES page.
2. Click the duplicate icon in the upper right.
3. Edit the target release name and click Save.
The release is duplicated. The duplicate release shows on the RELEASES page as a copy, and the Design page
appears for the release.
Duplicated releases include the following content:
•
Phases
Note: Duplicate phases include scheduled dates and times for scheduled phases.
•
Tasks
•
Stakeholders
•
Tokens and token values
•
Application versions
Application versions are duplicated to retain the connection between the application and the promoted tasks. Duplicated
application versions are named <original version> - Copy. Application content must be added to duplicate releases.
If you duplicate a release that is part of a Release Track, the status of the duplicate release defaults to Manual in the
production phase.
91

Continuous Delivery Director 8.5
Filter Releases
You can filter the releases list on the RELEASES page to display only relevant releases. This capability is especially
useful if you manage a large number of releases. You can filter releases by:
•
Date created
•
Last activity
•
Releases that you own
•
Only releases created from parameterized DSL
•
Status
You can also sort the following columns in ascending or descending order:
•
Release name
•
Date created
•
Last activity
Release Roles
For each release, the release manager assigns the following roles:
Owner
•
Release Owners can be one or more users or user groups.
•
Release Owners must be authorized to access the endpoints, applications, and environments that are part of the given
release. When you save a release, you are prompted if permission conflicts exist. The message contains instructions
for resolving the conflicts.
•
A Designer product role is required to be assigned as a release owner.
Note: Assigning a release owner is not mandatory. The user who creates the release is assigned as the default owner.
Member
•
Release Members can be one or more users or user groups.
•
Assignment to one of the product roles is required for release membership.
•
You can only assign members to releases who are authorized to access the applications that are part of the given
release. When you save a release, you are prompted if permission conflicts exist. The message contains instructions
for resolving the conflicts.
Note: A release is created with no members by default. A release can exist without members.
Release owners and members are listed in the expandable Stakeholders section on the left of an open release. You can
edit members and owners for a release.
Follow these steps:
1. Click the release name in the RELEASES page to open the release.
2. Click the pencil icon next to the release name.
3. Edit the members and owners.
Note: Add users in User Management on the ADMINISTRATION page.
4. Click Save.
For more information about roles, see Manage Users, Groups, and Roles.
Mark a Release as Done
NOTE
The following video is extracted from the Release Orchestration training course. This course provides extra
information, context, and examples to augment the product documentation.
92

Continuous Delivery Director 8.5
To access this course, see Broadcom Enterprise Software Academy.
This video shows how to mark a release as done in Continuous Delivery Director and describes the different statuses you
can assign to the release.
Duplicate Releases
You can save a considerable amount of setup time by duplicating existing releases.
You have been granted the Can create release permission.
A duplicated release inherits the settings, phases, and tasks of the existing release.
1. On the RELEASES page, select the required release row, then click the Copy icon.
The DELETE RELEASE dialog opens.
2. Review and edit as needed the following fields to configure the duplicate release:
•
Release Name
Specifies the name of the release.
•
Version
Specifies the release version. Use the version number to correspond to the release number, sprint number, or any
other important differentiator.
NOTE
The version is a required property. Versions are important to differentiate multiple release versions.
•
Description
(Optional). Specifies a description of the release details.
NOTE
This field allows you to format the description text. You can also add links to external systems, resources,
and references that are specific to the release.
•
Application Type
Select either Application or Business Application.
Application
–
Applications
Indicates applications that are linked to the release. Add any application to the release that you plan to deploy or
act on in some other way. You can only view and assign applications that you are authorized to access.
IMPORTANT
You cannot create a release without at least one assigned application. For more information, see
Applications and Environments.
–
Business Application
Add a business application to the release that you plan to deploy or act on in some other way. You can only view
and assign business applications that you are authorized to access.
NOTE
The business application version is set to the version in the existing release. If the business application
version does not exist, a version is created.
•
Owners
Specifies users who own and can configure the release.
NOTE
The release creator is the default release owner.
•
Members
93

Continuous Delivery Director 8.5
Specifies users who can be assigned release tasks. Users can only see releases that they are members of.
Owners of release components are automatically added as release members and can view the entire release.
NOTE
You can only add owners and members from the users and groups that exist in Continuous Delivery
Director. For more information, see Manage Users, Groups, and Roles.
For more information about the difference between release owners and members, see User Permissions
and Activities.
3. Select Save.
The duplicated release is listed on the RELEASES page.
Release Risk Score
You use the release score to quickly assess release readiness for production deployments. In this way, you can prevent
low-quality code from being delivered and exposed to your customers.
You can determine release health, risks, and quality at a glance, based on metrics collected during the development and
delivery lifecycle.
You view the release score in the RELEASES page. The release score appears as a scale on the right in a release row
and is graded from A (highest) to E (lowest) in increments of 20%:
A: 0-20%
B: 21-40%
C: 41-60%
D:61-80%
E:81-100%
An Continuous Delivery Director release can consist of multiple applications to be delivered to production. The release
score that appears at the release level is based on the metrics for all release applications. The release score is
automatically updated whenever one of the underlying metrics changes.
Release score updates can occur as a result of a change in the source control (such as new commits, or the addition to or
removal from the release of applications and application versions).
You can choose how Continuous Delivery Director calculates a release score:
•
Continuous Delivery Director calculates the average of all the metrics
•
Continuous Delivery Director calculates the release score based on the worst-case metric score
You configure the calculation method by editing the following properties in settings.properties:
settings.properties
=======================================
# algorithm can be worstMetric or averageOfMetrics}
cdd.release.score.algorithm={worstMetric,averageOfMetrics}
=======================================
To view the underlying metrics, click the A-E scale in the release row.
94

Continuous Delivery Director 8.5
Figure 5: Release score in release row
The metrics that are shown are:
Test Coverage - Test coverage of source files that have changed during the release.
Continuous Delivery Director includes a .NET coverage agent that registers code coverage data. The agent maps
modified .NET (C#, Visual Basic, and so on) source code files to test suites and runs the relevant tests only. For each
executed test suite, the agent collects the list of source code files covered.
•
Calculation: Percentage of the number of changed source files that were covered by tests*100 / total number of
changed source files during the release. The higher the score, the better.
•
No data available: Possible causes - None of the application source files were changed during the release; no
continuous testing agent reports for this application.
•
Example: 1 (files with test coverage) / 2 (total number of files that have changed during the release) = 50% (C)
Flaky Tests - Test suites with inconsistent/unstable results during the release.
•
Calculation: Percentage of the number of flaky test suites*100 / total number of test suites that were executed during
the release. The lower the score, the better.
•
No data available: Possible causes - Test module (CDI) is inactive.
•
Example: 4 (number of flaky test suites) / 14 (total number of test suites) = 29% (B)
Code Churn - The number of commits in the last week. A large number of commits indicates code volatility. Measuring
the rate of code change is especially relevant in the week before the end of the release. At this point in time, the codebase
should be stable.
•
Calculation: The number of commits / the number of days. The higher the score, the better.
•
No data available: Possible causes - No commit source (source control connection) is configured.
•
Example: If 3 files changed, 3 are counted; if the same file changes 3 times, 3 are counted.
(A) = 0-5 files have changed in the week before release end
(B) = 6-10 files have changed in the week before release end
(C) = 11-15 files have changed in the week before release end
(D) = 16-20 files have changed in the week before release end
(E) = More than 21 files have changed in the week before release end
You can change the code churn configuration in settings.properties:
cdd.release.score.code_churn.period_in_days=7
cdd.release.score.code_churn.0.risk=5
cdd.release.score.code_churn.1.risk=10
cdd.release.score.code_churn.2.risk=15
cdd.release.score.code_churn.3.risk=20
Incomplete Work Items - The percentage of the planned work items (such as user stories, defects) in the ALM tool (such
as Rally, Jira) for the release applications that are not marked as completed/accepted.
95

Continuous Delivery Director 8.5
•
Calculation: Percentage of the number of incomplete work items*100 / total number of work items for the release. The
lower the score, the better.
•
No data available: Possible causes - No work items have been imported from the ALM tool into Continuous Delivery
Director.
•
Example: 38 (number of incomplete work items) / 50 (total number of work items) = 76% (B)
Figure 6: Metrics for release scores
The release score, in this example, C, is the average of the percentage score of each of the following three metrics: Test
Coverage, Flaky Tests, and Incomplete Work Items:
29 + 50 + 76 = 155
155 / 3 = 51.66% (C)
You can filter to see only the top issues affecting the release applications that require urgent attention:
Figure 7: Top issues affecting release score
You can also view the scores for all release applications:
96
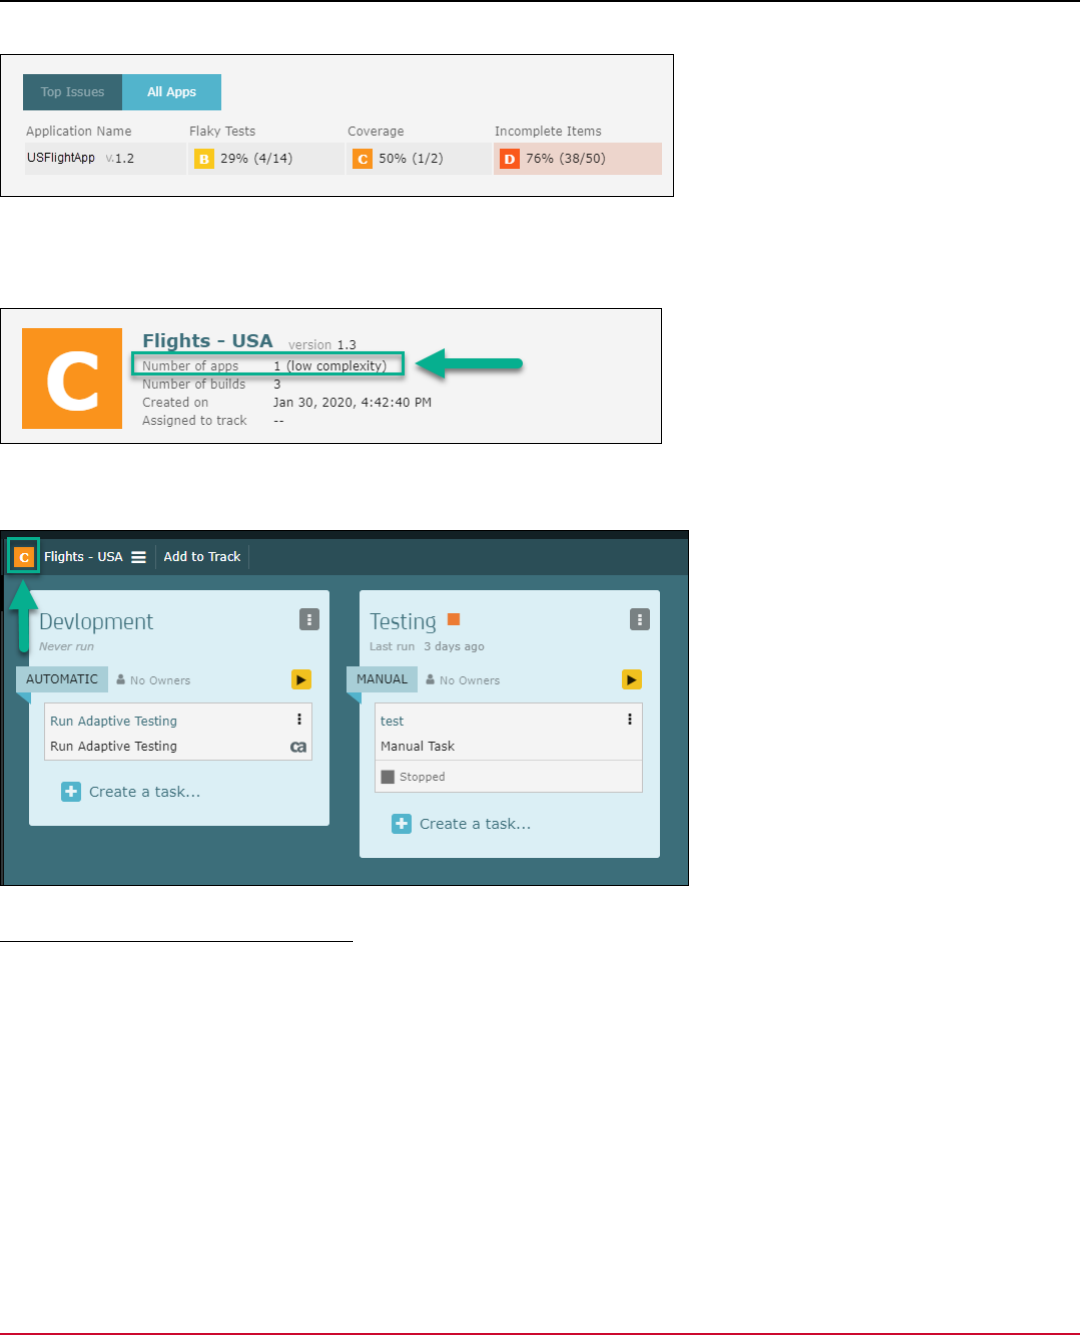
Continuous Delivery Director 8.5
Figure 8: Release scores for all applications
You can also see the release complexity which refers to the number of applications in the release. This metric does not
affect the release score. Additionally, you can see the number of builds and whether this release is assigned to a track.
Figure 9: Release complexity metric
Additionally, you can see the release score when you open a release.
Figure 10: Release score display when release opens
Release Activities and Release Score
NOTE
The following video is extracted from the Release Orchestration training course. This course provides extra
information, context, and examples to augment the product documentation.
To access this course, see Broadcom Enterprise Software Academy.
This video shows how to view release activity in Continuous Delivery Director and see the overall release score. The
release score gives the release a grade based on several indicators that can derive the overall quality of the release.
Manage Phases
Phases represent different environments that are part of your release. Use the following information and operations to
manage release phases during release design and execution.
97

Continuous Delivery Director 8.5
Phase Information
You can view the phase status in the Release page.
Phase statuses include:
•
Never run
•
Running
•
Failed to run
•
Paused
•
Stopped
•
Running with failures
•
Done with failures
•
Done
A timestamp is also shown.
See the following screenshot for the state transistion during the phase execution.
Phase Operations
The following operations are available in the phase actions menu at the top right of the phase box:
•
Add Task
Add a task to the phase.
•
Edit Phase
Change the phase properties that you enter when you create the phase.
Note: You can also click a phase in the Release Calendar to open the Edit Phase window.
98

Continuous Delivery Director 8.5
Important: If you remove an environment from a phase, all endpoints mapped to this environment from the release are
also removed.
•
Enable/Disable Phase
Enable/Disable a phase.
•
Duplicate Phase
Duplicate the phase for use elsewhere in the release.
•
Delete Phase
Delete the phase from the release.
•
Pause Phase
Pause the phase while running. A phase is paused immediately upon completion of the running tasks.
•
Resume Phase
Resume the paused phase, the subsequent tasks start running.
•
Request approval
Sets a phase to require approval before execution.
Phase Gates
When you create a phase, you set the phase gate to specify how the phase is triggered to run. You can configure phases
with the following phase gates:
•
Manual (default)
Runs the phase when you click the phase run button.
•
Automatic
Runs the phase when the previous phase is complete. Automatic phases that are the first phase in a release must be
started manually.
•
Scheduled
Runs the phase automatically at the scheduled time.
Note: The run phase button overrides Scheduled and Automatic phase gates.
You can also edit a phase gate for existing phases.
Follow these steps:
1. Click the edit icon in the phase actions menu.
2. Under CHOOSE HOW YOU WANT THE PHASE TO RUN, select the phase type (Manual, Automatic, or
Scheduled).
Note: For Scheduled phases, also specify the From and To times. For automatic and manual phases, you can specify
the estimated From and To times.
3. Click Save.
Phase Approval
Release owners can specify that a phase requires manual approval before the phase runs. The owner of the phase
receives an approval notification email before this phase is executed.
Phases that are set to Request Approval require approval before every execution. If you duplicate a phase that is set to
Request Approval, the duplicate phase is also set to require approval before each execution.
For more information, see the Create Phases section of Design and Create Releases.
Disable Phase
You can disable a phase, and the disabled phase does not get executed.
You cannot disable a phase that is mapped to a production stage or a milestone in a track.
99

Continuous Delivery Director 8.5
The disabled phases cannot be approved/disapproved.
When the first phase is disabled and a build notification arrives, CDD ignores the phase and does not auto-start the
release.
When importing a DSL with "runOnCreation = true and the first phase is disabled, CDD ignores the phase and does not
auto-start the release
If a scheduled phase is disabled, on the scheduled time, the phase starts and fails with the "fail to start" status. If a
recurrent phase is disabled, the next run does not get calculated as long as the phase is disabled. Once the phase is
enabled, the next run date is calculated.
When an on-failure phase is disabled, failures are managed as if an on-failure phase does not exist.
You cannot disable a phase which requires approval and is approved.
Phases Errors
Running with Errors
If failures are detected during phase execution, a red dot next to the Run button indicates Phase Running With Errors.
The red error indicator also appears in the RELEASES window status column while the release is running.
Done with Errors
If a phase is stopped or skipped while Running With Errors, a green checkmark icon with a red dot displays in the phase
as a reminder of the phase errors.
Failed to Run
If a phase did not initiate, a red triangle
next to the Run button indicates Failed to Run.
Possible causes:
•
A token is missing a value.
•
There are missing details in the CREAT/EDIT PHASE form.
The red triangle error indicator also appears in the RELEASES window status column while the release is running.
Approve Phase Execution
NOTE
The following video is extracted from the Release Orchestration training course. This course provides extra
information, context, and examples to augment the product documentation.
To access this course, see Broadcom Enterprise Software Academy.
This video shows how you can use approval gates to require approval before executing the next phase in a Continuous
Delivery Director release.
Create On-Failure Phases
You can create special phases to run in the event that errors are detected in another phase.
100

Continuous Delivery Director 8.5
•
In a release, decide which phases require on-failure phases
•
Plan the tasks to initiate when the on-failure phase starts to run
On-failure phases initiate only when errors are detected in an associated phase. Additionally, you can start on-failure
phases manually.
NOTE
A phase with errors that initiates an on-failure phase is called a trigger phase.
You can configure tasks to initiate on-failure activities such as sending release error notifications to release owners,
stopping builds, and so on.
1. In a release, from the trigger phase toolbar, select Create On-Failure Phase.
The CREATE ON-FAILURE PHASE dialog opens.
2. Specify a phase name, environments, and the phase to trigger the on-failure phase.
3. Optionally, select Run Tasks with Updated Applications Only. This option lets you run only those tasks that are
mapped to applications that have changed since the last deployment on the phase environment.
4. Click Create.
5. From the trigger phase, select Show On-Failure.
6. Select Create a Task at the bottom of the on-failure phase box. You can also select the Add Task icon in the phase
toolbar to create new tasks.
7. Specify the required properties and select Create.
The task is saved and assigned to the on-failure phase.
Create an On-Failure Phase
On Failure Phase Execution
NOTE
The following videos are extracted from the Release Orchestration training course.
This course provides extra information, context, and examples to augment the product
documentation.
To access this course, see Broadcom Enterprise Software Academy.
This video shows how to create an On Failure Phase in a Continuous Delivery Director release. An On Failure
Phase only runs when a primary phase fails to complete and can be used for operations like rollbacks. This
video shows how an On Failure phase executes when a task fails in a Continuous Delivery Director release.
Manage Tasks
Tasks represent the relevant workflow inside each release phase. Use the following information and operations to manage
release tasks during release design and execution.
View Task Information
You can hover over tasks in the Releases page to view task details.
Task-related information that is shown in the Releases page includes:
101

Continuous Delivery Director 8.5
•
Status
•
Task Type
•
Start and end time
•
Duration
•
Endpoint
•
Plug-in logo
•
Application name
•
Environment
•
Build number
Task Operations
Use the task actions menu to configure tasks. To open a task actions menu, click the task actions menu icon at the top
right of the task.
The task actions menu contains the following operation icons:
•
Edit Task
Opens the edit task dialog.
•
Disable/Enable
Disables and enables a task. When you disable a task, the release execution process skips the task.
•
Duplicate Task
Duplicates the task for uses elsewhere in the phase or in other phases.
•
Delete a task
To delete a task, select the task and click on the trash icon in the actions menu.Note: If the task is the only task in
a container, also delete the container.
Other task management operations include:
•
Order Tasks
To move tasks within and between phases, drag-and-drop the tasks.
•
Operations on multiple tasks
To perform operations on groups of tasks, hold Shift or Ctrl and click the tasks.
•
Run tasks in parallel
To group tasks to run simultaneously, drag-and-drop tasks together. This action groups the tasks in a single parallel
container in the phase. You can drag tasks out of, and can drag more tasks into, parallel containers.
Note: When all the tasks in a parallel container are complete, the task that follows the container runs.
During the design phase, all tasks show a status of Design.
Duplicate Tasks
You can duplicate tasks to reduce the amount of manual labor during the release creation process.
You can duplicate tasks to share the task properties and reduce effort. Depending on your preferred method of release
design, you can either:
•
Populate the phases with tasks as you create each phase
•
Create all phases first, then populate each phase with tasks
102

Continuous Delivery Director 8.5
TIP
•
If phases have similar tasks, create the tasks in the first phase, duplicate the phases, and edit the duplicates
•
Use tokens in tasks where the values can change or for multiple tasks that might share the same values
•
Drag and drop tasks between phases
1. In a release phase, select a task.
2. Click the task fly out menu, and select Duplicate Task.
3. Change the task properties as needed, such as the application name, tokens, and so on.
4. When done, click Duplicate.
Duplicate a Task
NOTE
The following video is extracted from the Release Orchestration training course. This course
provides extra information, context, and examples to augment the product documentation.
To access this course, see Broadcom Enterprise Software Academy.
This video shows how to duplicate a task in a Continuous Delivery Director release. Duplicate tasks to reduce
effort during release design and creation.
If needed, drag and drop duplicated tasks to the required position in the phase.
Release Execution
Continuous Delivery Director lets you execute multi-application releases using a dynamic interface that provides instant
feedback on progress and results. The Continuous Delivery Director interface lets you closely monitor each task and
phase of the release. The interface lets you fix errors, stop tasks, skip tasks, and move to the next phase at any time.
Release execution is automated and interactive in key ways to give you an appropriate level of oversight in all scenarios.
This page provides a general framework to move through the execution of a release. The sequence of events is
different for every release.
NOTE
To run phases and execute releases in the on premise version, a product license key is required (not required
for SaaS). For more information, see Administration.
Run Individual Releases
After you build a release, the release displays the status DESIGN at the top next to the release name. The release phases
run based on the phase gates, the task types, and manual input from users.
For more information about phase gates, see Create a Phase in Release Design.
Release execution starts based on the phase gate of the first phase in the release. You can set one of the following phase
gates:
•
Manual
Runs when the release owner manually starts the first phase of the release.
Note: The phase Run button overrides the scheduled phase gate.
•
Scheduled
Runs at the scheduled time of the first phase of the release.
•
Automatic
Runs at the time that is specified in the first phase of the release.
103

Continuous Delivery Director 8.5
Note: You can also set phases to require manual approval before execution. For more information see the Create
Phases section in Design and Create Releases.
Follow these steps:
1. (On-premise only) Enter the Release license key information if you have not yet applied your product license.
2. Click the run icon in the first phase, or wait for the scheduled execution for the first phase to start. If the phase if is set
to Request Approval, click the Approve Phase icon in the phase.
Note: Release phases and tasks are locked from editing during execution.
The status of the release changes to RUNNING and the status of the first task in the phase changes as follows:
–
Manual tasks change to PENDING.
–
Automatic tasks automatically run and provide feedback as to whether they succeeded or failed.
The statuses of other tasks in the phase change to READY.
3. (Manual task) Open the toolbar in the first task and click the run icon.
Note: The manual task owner or release owner can carry out this step. While multiple people can manage
the tasks assigned to them, this procedure assumes that a single person manages the execution.
The task starts to run and the status changes to RUNNING.
4. Perform one of the following actions for each manual task:
–
View
Opens the task in a separate window.
–
Fail
Fails the task. A task failure does not automatically stop the release. The release owner can continue with ensuing
tasks or can stop the phase to fix the cause of the failure.
Note: If an automatic task fails, an error appears. This error either matches the input you would receive from the
remote component or indicates an error with the task itself. Mouse over the status of a failed task for details.
–
Skip
Stops the task and skips to the next task. To continue with the other tasks, skip the failed task. Also, disable tasks
that you want to automatically skip in the execution workflow. You can skip a failed automatic task but cannot mark
it Done.
–
Done
Completes the task.
When each task is skipped or done, the next task status changes to PENDING for manual tasks or automatically starts
running for automatic tasks.
5. Continue through the task workflow in the first phase. You can stop and adjust the phase at any time. For example:
In the event of a failed task, stop the phase, fix the problem, reconfigure the tasks, and restart the phase. You can
disable or enable tasks that have already passed, skip tasks for any reason, and mark manual tasks as done. As you
move through the task workflow, the phase progress bar at the top of the phase updates. The progress bar is based on
task completion. When all tasks in the phase are complete, the phase moves out of the RUNNING state. Depending
on the gate of the next phase, move through all phases and repeat the previous steps.
–
If the gate is automatic, the next phase starts automatically.
–
Phases with scheduled or manual gates start when the release owner manually starts the phase, or at the
scheduled time.
6. Adjust to task resolutions as appropriate. You can stop releases anytime to make edits and to reconfigure tasks. You
can also rerun the entire release or parts of the release. The process is flexible and accommodates any situation.
Re-run Tasks
If a task fails during a phase execution, you can re-run that task. If necessary, you can make changes before you re-rerun
a task.
You can re-run a task multiple times. When a task re-runs, an email is sent to the task owner (same as when a task runs
for the first time).
104

Continuous Delivery Director 8.5
Task re-runs are displayed in the Release Analysis report. Each task re-run appears on a separate row per execution.
NOTE
If you skip or stop the phase execution, you cannot re-run a task.
Follow these steps:
1. In the task phase, click the failed task name or select Edit Task from the task menu.
The Edit Task dialog opens.
2. Make any required changes, and click the Re-Run Task button.
Any changes you have made are saved and the task runs.
Note: When a task is rerun, the token value used is always the value that is used when the phase is executed for the
first time. Any changes to the token value after phase execution begins are ignored.
Example: Phase execution is initiated at 14:00 when the last_successful_build number is 45. A phase task fails
at 14:30. A new successful build, number 46, completes at 16:00. When the phase task is rerun at 17:15, the
last_successful_build number used is 45, and not 46.
Mark Releases as Done
Releases that are marked as Done become read-only. Only mark releases as done if
the release is complete. To reconfigure and rerun releases, duplicate the release, set new properties and versions, and
execute the new version.
You can either mark releases as Done manually or automatically.
Manually Mark as Done
When all tasks in all phases are complete, select MARK AS DONE next to the release status of RUNNING.
Automatically Mark as Done
As a release owner or administrator, you can configure releases to be marked as Done automatically when the last phase
or a selected phase is completed successfully.
From the release page, select Mark Release as Done when Phase is Completed, and select a phase.
When the selected phase is completed successfully, Continuous Delivery Director waits for a specified interval to run
checks, then automatically marks the release as Done. You can modify that wait interval (default = 30 seconds) by editing
the following value in settings.properties :
settings.properties
========================================================
cdd.release.mark_as_done.phase_end_wait_time=30
========================================================
A release is not automatically marked as Done if:
•
If the selected phase is stopped
•
If there are other phases running when the selected phase is completed
When duplicating an existing release, the mark as Done configuration is copied from the original release (including the
phase that defines when to mark as Done).
If the phase selected to mark the release as Done is deleted, that release returns to manually mark as Done.
You can select a phase that is running.
You can configure a release that is part of a track to be marked as Done automatically when the track is Done. The
selected phase must not be set to run after the Production time frame ends.
105

Continuous Delivery Director 8.5
Release Statuses
You can select a release status and add free text comments after a release is marked as Done.
From the release page, select the required status from the dropdown list. The following statuses are available
•
Success
•
Failure - Deployment Issues
•
Failure - Performance Issues
•
Failure - Environment Issues
•
Failure - Functional Issues
•
Failure - General
•
Not in use
The selected status is displayed inside the release and in the releases list.
You can also add a free text comment.
A release that is marked as Done automatically is assigned the Success status.
If you duplicate a release, the release status is not copied to the new release.
Execute Multiple Releases in Bundles
You can also bundle multiple releases together into Release Tracks to the bundled releases into production together. For
more information, see Release Tracks.
More Information:
•
Monitor and Troubleshoot Release Execution
•
Activity Panel
•
Release Notifications
•
Track Planned vs Actual Work
•
Release Risk Score
•
Rollback Management
Monitor and Troubleshoot Release Execution
Continuous Delivery Director provides detailed release information and metrics to help you monitor release progress and
troubleshoot problems.
The following tools are available to help monitor and plan releases:
Phase Progress Bar
The progress bar at the top of the phase indicates the phase progress. The bar is divided into increments that equal the
number of tasks in the phase. The progress bar moves as each phase is complete.
Dependencies
Application dependency conflicts appear in the context of a phase as an orange icon next to the phase name. When you
define application dependencies, Continuous Delivery Director checks across releases to see whether the dependencies
are met. The orange icon indicates a dependency conflict when both of the following cases are true:
•
The application dependency is not currently deployed in the same environment as the dependent application.
•
The application dependency is not scheduled to deploy to the same environment as the dependent application in any
phase scheduled for before the dependent application phase.
106

Continuous Delivery Director 8.5
When you click the orange icon, the DEPENDENCIES CONFLICTS box opens and shows the conflicts.
Edit the deployment order or times to address the conflicts so that the dependency deploys, or is scheduled to deploy,
before the dependent application.
Click Sync Conflicts to ensure that the conflicts are resolved.
Task Status
During task execution, tasks display the task status at the bottom of each task with the following icons.
Note: You can use the task toolbar to change a task status during execution.
•
Design
Indicates that a task is not running.
Note: Design is the default status for new tasks.
•
Running
Indicates that the task is in progress.
•
Ready
Indicates that the phase is running and that the task is ready to run.
•
Pending
Indicates that the task is ready to run.
Note: This status is only for manual tasks.
•
Stopped
Indicates that the task stopped before or during execution.
•
Failed
Indicates that a task failed.
Notes:
–
When a task fails, the execution stops. Click Skip to start the next task.
–
When a task in a parallel container fails, other tasks in the container continue to run. The tasks run until all tasks in
the container are complete.
•
Skipped
Indicates that the task was manually skipped and that the next task starts.
•
Missing Details
Indicates that required task fields are not complete, which would prevent the task from running successfully. When you
see a Missing Details indication on a task, the Run button is disabled until you add the missing information.
•
Disabled
Indicates that a user disabled the task. You can disable tasks before the phase run begins.
•
Done
Task ends successfully.
Activity Panel
The activity panel displays release activity on the right side of an open release, including:
•
Execution events, such as phase start, task start, and task completion
•
Error messages
•
Warning messages
•
Notes and events that users enter manually
•
When a release is added to, and is removed from, a release track.
For information about how to use the Activity Panel to monitor and troubleshoot releases, see Activity Panel.
107

Continuous Delivery Director 8.5
Indication Panel
The Indication Panel shows in the top right of a release. The panel also shows on the Dashboard tab in the Running
Releases Health Widget. Color panel icons indicate the following release events:
•
Pending tasks
Click the pending task indicator to view a list of pending tasks. Click a task to locate the task.
•
Errors
Click the Error indicator to show error details.
•
Warnings
Click the warning indicator to show error details. To dismiss the warning, click the gavel icon in the warning.
The panel is activated when the release starts to run.
Release Calendar
Continuous Delivery Director includes a configurable, interactive release CALENDAR that provides a high-level, real-time
calendar view of all planned and running releases.
For more information, see Release Calendar.
Release Track Timeline
The following tools let you monitor releases that are bundled into release tracks for execution together:
•
Release track interactive timeline on the Tracks page
•
Release miletones
•
Release notifications
For more information, see the Release Track Timeline section at Release Tracks
Activity Panel
Use the Activity panel to enter and monitor release activities, and to identify and troubleshoot release issues.
The panel is updated in real time with the following release events:
•
Design events
•
Execution events
•
Error messages
•
Warning messages
•
User Activity and text that users enter manually.
The Activity panel opens on the right side of the RELEASES page when you open a release. Release participants also
receive email notifications of activity.
TIP
Click the arrow at the top right of the Activity panel to collapse the panel. When you are not monitoring release
activity, collapse the panel to provide more screen space for activities like release design.
Activity Types
The Activity panel displays release activities to all users in real time. The following activity types are displayed in the
panel:
•
System
Indicates automatic changes in the release. System activities are generated for the following release events:
108

Continuous Delivery Director 8.5
–
Task Ended
–
Task Executed
–
Task Skipped
–
Task Continued
–
Phase started
–
Phase ended
–
Release Done
–
Release added to a track
–
Release removed from a track
–
Release status, including comments
–
Release marked as Done automatically
–
Release waiting because parent track is not Done
•
User
Indicates release activities that users run manually, and release activity text that users enter.
Note: Manually add user activities to make notes, and for notification and collaboration.
•
Error
Indicates that the status of a task is changed to Failed.
•
Warning
Indicates warning messages for the release. Warning messages are generated for the following events:
Execution Events:
•
A scheduled phase does not start at the estimated time
•
A scheduled phase continues to run after the estimated end time
•
A phase gate that the system changes from Automatic to Manual
•
A phase stops
•
A task stops
Other Events:
•
A scheduled phase does start at the estimated time
•
An environment that is assigned to the phase is deleted
•
A user who is the phase owner is deleted
•
A user who is the task owner is deleted
•
A user who is the release owner is deleted
•
An application that is assigned to the release is deleted
•
A release is added to a release track
•
A release is removed from a release track
Filter Activities
You can filter activities in the Activity Panel by activity type or a specific selection.
To filter by activity type, click the filter icon and select from the following activity types:
My Activities
Activities that are entered manually
Error Activities
Errors in the release
Warning Activities
109

Continuous Delivery Director 8.5
Warnings of activities that are potential problems
Info Activities
Changes in the release
Application and Content Version
Changes or edits to application and content versions
To filter the Activity panel to show only a phase or task that you select, click the Filter by Selection box and select a
phase or a task. The panel filters to show only activities for a selected phase or task.
Add Activities
To make notes and enhance collaboration, you can manually add activities to the Panel.
Follow these steps:
1. Click the plus sign at the top of the Activity Panel and click Type your activity text.
2. Enter the activity text in the dialog, and click the Add icon.
Note: Activities that are added manually are indicated in the Activity Panel next to the user initials.
Add Custom Activities with REST API
You can add custom activities to the panel to the panel using a REST API call.
Follow these steps:
1. In Continuous Delivery Director, click the user initials icon, then REST API.
2. Under DESIGN, navigate to activity, then POST /releases/{releaseId}/activities.
3. In releaseId, enter the relevant release number.
4. In activityDto, enter the following:
{
"id": null,
"content": {
"className": "ActivityContentDto",
"contentValues": {
"content": "<ENTER THE ACTIVITY CONTENT HERE>"
},
"contentTemplate": "manualContent"
},
"releaseId": <ENTER THE RELEASE ID HERE>,
"className": "ActivityDto"
}
Release Activities and Release Score
NOTE
The following video is extracted from the Release Orchestration training course. This course provides extra
information, context, and examples to augment the product documentation.
To access this course, see Broadcom Enterprise Software Academy.
This video shows how to view release activity in Continuous Delivery Director and see the overall release score. The
release score gives the release a grade based on several indicators that can derive the overall quality of the release.
110

Continuous Delivery Director 8.5
Release Notifications
Continuous Delivery Director provides your stakeholders with email notifications for release activity and status changes.
Notifications
Email notifications are sent to the owners of releases, release tracks, phases, and tasks for release activities in the
following categories:
Note: For release tracks, the owner of the track and the owners of the releases in the track receive notifications. The
creator of the track is the track owner.
•
Information
Changes in the status of releases, release tracks, phases, and tasks
•
Warning
Problems in releases, phases, and tasks such as missing details or usual behavior
•
Error
Errors that occur in releases, phases, and tasks
Note: Email notifications for errors contain specific error messages and relevant error details.
Notification emails include the following information:
•
Specific release components (Phase, task, or release track)
•
Release name
•
URL that links directly to the relevant release
Disable Notifications
Users receive email notifications by default. To remove your account from release notifications, disable the notification
feature.
Follow these steps:
1. Click the icon with the initials of the logged in user in the top right of the UI.
2. Select User Settings in the drop-down list.
3. Click Preferences in the left panel.
4. Clear the Get email notifications box.
Email notifications for the user are disabled.
Track Planned vs Actual Work
You can track planned vs actual work in releases through a four-way integration between Continuous Delivery Director, a
source version control system, Jenkins, and an ALM (application lifecycle management) tool.
This integration helps you manage and optimize the flow of business value throughout the release cycle.
NOTE
•
ALM tool: Both Rally
®
(formerly CA Agile Central) and Atlassian Jira are supported.
•
Source version control: Both GitHub and Bitbucket are supported.
The Problem
Release managers are required to ensure that the business value delivered at the end of a release matches the objectives
agreed during release planning. However, looking at the status of work items in your ALM tool, for example, Rally, is not
111

Continuous Delivery Director 8.5
enough to track the execution of features and capabilities. Some of the disadvantages of working solely with ALM tools
are:
•
Statuses in the ALM tool might not be up-to-date.
•
Time and effort remaining to deliver planned features is not obvious.
•
Difficulty of assessing the risk to the release.
•
Lack of clarity regarding work-in-progress and understanding which features have entered the release pipeline.
You must be able to compare planned work to the actual work to manage risks and dependencies and to escalate and
track impediments.
The Solution
Continuous Delivery Director provides an integration that is designed to help release managers keep track of the progress
of releases. This integration involves listening to and analyzing the commit messages that are triggered when developers
commit changes to a GitHub repository.
This integration helps you understand which work items are being implemented, the risk to release execution, and the
probability of delivering the agreed business value on time.
Using this integration, you can:
•
See which work items (features, user stories, defects, and so on) are planned to be delivered in the current release
cycle.
•
View the progress of the actual work items.
•
Observe the work items that enter the release, the work item statuses, and the completed work items.
•
Understand which work items have changes that have entered the pipeline and accordingly determine the work
progress.
Workflow
The Planned vs Actual workflow consists of work item creation, developer commits, build execution triggering build
notifications, and work item ID matching.
The following diagram shows the integration workflow:
112

Continuous Delivery Director 8.5
Key:
1. In Rally (CA Agile Central), project members create work items.
2. In Continuous Delivery Director, a user imports work items from Rally (CA Agile Central).
3. In GitHub, developers commit changed files to the master and add the work item IDs to the commit comments.
4. Jenkins runs a build and gets the new commits from GitHub.
5. Jenkins sends a build notification to Continuous Delivery Director with the commits range.
6. Continuous Delivery Director gets the commit messages from GitHub and matches the work item IDs in the commit
messages to the imported work items. The work item statuses are indicated by icons. For more information, see Work
Item Statuses.
Before You Begin
In Jenkins, ensure that the following prerequisites are enabled:
•
The Continuous Delivery Director plug-in for Jenkins, version 2.0.13 and higher, is configured. For more information,
see Plug-in for Jenkins.
•
The Git plug-in is configured. The Git plug-in ensures that the commit range is included in the change notifications sent
from Jenkins to Continuous Delivery Director. For more information, see https://wiki.jenkins.io.
•
A project in Jenkins is configured with the Git action in the Source Code Management section and Send Notifications
to CDDirector in the post-build section.
Set Up Tracking
After Jenkins is configured, you configure Continuous Delivery Director to enable work item matching.
Follow these steps:
1. In Continuous Delivery Director, set up the latest versions of either the GitHub (1.01 or higher) or Bitbucket (2.0 or
higher) plug-ins, and endpoints accordingly. For more information, see GitHub Plug-in or Atlassian Bitbucket Plug-in.
2. Set up either the Rally (CA Agile Central) plug-in, version 2.2 or higher, or the Jira plug-in, version 1.2.3. or higher, and
an endpoint. For more information, see Rally Plug-In or Jira Plug-in.
3. Create a work item source. For more information, see Import Work Items in Rally Plug-in.
4. Create a source control connection.
This action enables the import of commit messages from your source control. For more information, see Set Source
Control Connection in Design and Create Releases.
Work Item Status Icons
Continuous Delivery Director uses icons are used to highlight the status of work items in the current release:
Videos
Video: Tracking Planned vs Actual Work - Part One
This two-part video explains how a four-way integration between Continuous Delivery Director, GitHub, Jenkins, and Rally
can help release managers track planned vs. actual work in releases. Part One contains an overview and explanation of
work item status icons.
Video: Tracking Planned vs Actual Work - Part Two
Part two of this video shows the setup required to enable the integration between Continuous Delivery Director, GitHub,
Jenkins, and Rally.
113

Continuous Delivery Director 8.5
Release Risk Score
You use the release score to quickly assess release readiness for production deployments. In this way, you can prevent
low-quality code from being delivered and exposed to your customers.
You can determine release health, risks, and quality at a glance, based on metrics collected during the development and
delivery lifecycle.
You view the release score in the RELEASES page. The release score appears as a scale on the right in a release row
and is graded from A (highest) to E (lowest) in increments of 20%:
A: 0-20%
B: 21-40%
C: 41-60%
D:61-80%
E:81-100%
An Continuous Delivery Director release can consist of multiple applications to be delivered to production. The release
score that appears at the release level is based on the metrics for all release applications. The release score is
automatically updated whenever one of the underlying metrics changes.
Release score updates can occur as a result of a change in the source control (such as new commits, or the addition to or
removal from the release of applications and application versions).
You can choose how Continuous Delivery Director calculates a release score:
•
Continuous Delivery Director calculates the average of all the metrics
•
Continuous Delivery Director calculates the release score based on the worst-case metric score
You configure the calculation method by editing the following properties in settings.properties:
settings.properties
=======================================
# algorithm can be worstMetric or averageOfMetrics}
cdd.release.score.algorithm={worstMetric,averageOfMetrics}
=======================================
To view the underlying metrics, click the A-E scale in the release row.
Figure 11: Release score in release row
The metrics that are shown are:
Test Coverage - Test coverage of source files that have changed during the release.
Continuous Delivery Director includes a .NET coverage agent that registers code coverage data. The agent maps
modified .NET (C#, Visual Basic, and so on) source code files to test suites and runs the relevant tests only. For each
executed test suite, the agent collects the list of source code files covered.
114

Continuous Delivery Director 8.5
•
Calculation: Percentage of the number of changed source files that were covered by tests*100 / total number of
changed source files during the release. The higher the score, the better.
•
No data available: Possible causes - None of the application source files were changed during the release; no
continuous testing agent reports for this application.
•
Example: 1 (files with test coverage) / 2 (total number of files that have changed during the release) = 50% (C)
Flaky Tests - Test suites with inconsistent/unstable results during the release.
•
Calculation: Percentage of the number of flaky test suites*100 / total number of test suites that were executed during
the release. The lower the score, the better.
•
No data available: Possible causes - Test module (CDI) is inactive.
•
Example: 4 (number of flaky test suites) / 14 (total number of test suites) = 29% (B)
Code Churn - The number of commits in the last week. A large number of commits indicates code volatility. Measuring
the rate of code change is especially relevant in the week before the end of the release. At this point in time, the codebase
should be stable.
•
Calculation: The number of commits / the number of days. The higher the score, the better.
•
No data available: Possible causes - No commit source (source control connection) is configured.
•
Example: If 3 files changed, 3 are counted; if the same file changes 3 times, 3 are counted.
(A) = 0-5 files have changed in the week before release end
(B) = 6-10 files have changed in the week before release end
(C) = 11-15 files have changed in the week before release end
(D) = 16-20 files have changed in the week before release end
(E) = More than 21 files have changed in the week before release end
You can change the code churn configuration in settings.properties:
cdd.release.score.code_churn.period_in_days=7
cdd.release.score.code_churn.0.risk=5
cdd.release.score.code_churn.1.risk=10
cdd.release.score.code_churn.2.risk=15
cdd.release.score.code_churn.3.risk=20
Incomplete Work Items - The percentage of the planned work items (such as user stories, defects) in the ALM tool (such
as Rally, Jira) for the release applications that are not marked as completed/accepted.
•
Calculation: Percentage of the number of incomplete work items*100 / total number of work items for the release. The
lower the score, the better.
•
No data available: Possible causes - No work items have been imported from the ALM tool into Continuous Delivery
Director.
•
Example: 38 (number of incomplete work items) / 50 (total number of work items) = 76% (B)
115

Continuous Delivery Director 8.5
Figure 12: Metrics for release scores
The release score, in this example, C, is the average of the percentage score of each of the following three metrics: Test
Coverage, Flaky Tests, and Incomplete Work Items:
29 + 50 + 76 = 155
155 / 3 = 51.66% (C)
You can filter to see only the top issues affecting the release applications that require urgent attention:
Figure 13: Top issues affecting release score
You can also view the scores for all release applications:
Figure 14: Release scores for all applications
116

Continuous Delivery Director 8.5
You can also see the release complexity which refers to the number of applications in the release. This metric does not
affect the release score. Additionally, you can see the number of builds and whether this release is assigned to a track.
Figure 15: Release complexity metric
Additionally, you can see the release score when you open a release.
Figure 16: Release score display when release opens
Release Activities and Release Score
NOTE
The following video is extracted from the Release Orchestration training course. This course provides extra
information, context, and examples to augment the product documentation.
To access this course, see Broadcom Enterprise Software Academy.
This video shows how to view release activity in Continuous Delivery Director and see the overall release score. The
release score gives the release a grade based on several indicators that can derive the overall quality of the release.
Rollback Management
When an application build fails, you can automatically revert to a previously successful build.
You can use a system token, previous_successful_change, to quickly roll back to the last build that was deployed in
your environment (before the latest deployment). This token is automatically added to each application.
The previous_successful_change token holds the build number that was deployed in the
environment prior to the latest build promotion. The reference to the token appears as <application
name>.previous_successful_change.
You can also use this token in on-failure phases.
The redeployment is run exactly as the failed deployment was run previously with the same parameters.
117

Continuous Delivery Director 8.5
Release Tracks
Overview
The Release Tracks feature enables authorized users to bundle several releases into a track and deliver them to
production together.
Release tracks are created, displayed, and managed in the TRACKS tab in the product UI.
You can view release tracks in a Gantt chart layout. Using Gantt bars, this view shows a list of the releases in your track.
The Gantt chart illustrates the relationship of these tracks to one another, release dependencies, and the schedule.
The Gantt bars show the duration of the production stages across a timeline. You can change the timeline units of time.
You can zoom out to see the bigger view of release tracks by displaying months or weeks, or zoom in to see the exact
start and end dates and times by displaying days or hours. You can also choose a Fit Screen option.
Administrators and authorized users can create tracks.
When a release is part of a track, the following details are displayed in the release:
•
The name of the track that the release belongs to
•
An indication in each phase that is mapped to a milestone including:
–
An indication that the phase is mapped to future milestones.
–
An indication of whether the milestone passed or failed
–
The name and due date of each milestone that is mapped to the phase
Release tracks can contain releases from all projects.
Users with the Can manage track permission can create a track, and delete tracks to which they are assigned as owner.
A track owner can: edit the track (names dates, and so on), and can approve the milestones, production stages and
production phases.
Benefits
Release tracks provide the following benefits and functionalities:
•
Provide the production owner control over multiple release using a central management page.
–
Approve production phase.
–
Remove releases that are not ready for deployment from the track.
•
The Gantt view helps to plan the delivery milestone and stages.
–
Determine the order in which releases are executed.
–
Manage dependencies between releases.
–
Manage Canary Deployments by braking the production timeframe into stages.
•
Govern releases that involve multiple teams across projects to ensure high quality.
•
Track milestones help to monitor the progress and the quality of the releases in the track.
•
Dynamically prioritize the order in which approved releases are sent to production.
Release Track Timeline
Tracks are displayed and executed in an interactive timeline that shows the bundled releases and includes the following
details:
•
Production Time Frame
The time frame in which all the releases that are included in the track are delivered to production. A phase from each
release must be mapped to this time frame. To run, each phase requires the approval of the track owner.
118

Continuous Delivery Director 8.5
As an authorized user, you can approve the phases in the track when all milestones have reached or passed their due
date. You can also approve one or more phases before the production time frame arrives.
Approving a phase in a production stage does not cause that phase to start running unless the following conditions are
met:
•
The stage planned start date has arrived.
•
The stage was approved (in the case stage requires approval).
•
The predecessor stage is completed.
•
The predecessor phase in the stage is completed (if the release is dependent on another release).
You can withdraw approvals, provided the production stage has not started.
•
Production Stage
The production time frame can include one or more stages. A stage is a period within a production time frame in which
a specified production-related activity is scheduled to occur, for example, for each region or data center. Every stage
has a start time and optionally a planned end time. The start time must be within the production time frame.
•
Track milestones
A checkpoint in the track that is mapped to phases in a release. Milestones provide release progress checks and
notifications.
•
Milestone due dates
Milestone due dates must precede the date that the production time frame begins.
You can perform the following actions in the release timeline:
•
Add a release to a track.
NOTE
Releases can join a track as long as the first production stage has not started.
•
Remove releases from a track.
•
Approve production stages and production phases.
•
Add milestones.
•
Remove milestones.
•
Edit the production time range.
•
Schedule all releases to either run simultaneously or in a specified sequence.
•
Approve all phases in a release track simultaneously.
Release Permissions
The following guidelines apply to release track management:
•
Only administrators and authorized users can edit release tracks.
•
The owner of a release can add and remove a release from a track.
•
When releases are added or removed, an email notification is sent to the track owner.
•
A release can only be added to one track.
•
The track owner is the user who can edit and manage the track:
–
Create/change the production timeframe, stages and milestones.
–
Set release dependencies.
–
Approve phases and stages.
•
You cannot mark releases that are part of a track as done while the track is active.
Notifications
Email notifications are sent to release stakeholders for the following release track activities:
119

Continuous Delivery Director 8.5
•
A release is added to a track.
•
A release is removed from a track.
More Information:
•
Create Release Tracks
•
Add Releases to a Track
•
Manage Release Tracks
Create Release Tracks
Release tracks let you group releases for execution as a bundle. Once you create a release track, you can add existing
releases to the track.
Prerequisites: You have been granted the Can manage tracks permission.
NOTE
•
Only a release owner can add a release to a track
•
A release can only be added to one track.
1. Select the Tracks tab.
The TRACKS page opens.
2. Click New Track.
The Create Track window opens.
3. Enter the track name, track owners, and a description of the track.
NOTE
The track Description field allows you to format the description text. You can also add links to external
systems, resources, and references that are specific to the release.
4. Specify the Production Time Frame dates.
Enter stage name.
Optionally:
–
To add milestones to the track, select +Add Milestone and provide the Milestone Name and the Milestone Due
Date.
–
To require milestone approval by the track owner, select the Require Approval option.
–
To require all track milestones to receive approval by the track owner, select the All Milestones Require
Approval option.
NOTE
Phases that are mapped to an milestone that requires approval cannot start running until an authorized
user approves that milestone
–
To add production stages to the track, select +Add Stage and provide the Stage Name. You can specify the
stage planned start date,
–
To require production stage approval by the track owner, select the Require Approval option.
–
To require all track stages to receive approval by the track owner, select the All Stages Require Approval
option.
NOTE
Phases that are mapped to a stage that requires approval cannot start running until an authorized user
approves that stage
120

Continuous Delivery Director 8.5
5. Select Create.
Once you create a release track, the track is displayed in a timeline in the TRACKS page. The track shows the milestones
in the locations of the milestone due dates. You can hover over a milestone icon to display the details.
Create a Release Track
NOTE
The following video is extracted from the Release Orchestration training course. This course
provides extra information, context, and examples to augment the product documentation.
To access this course, see Broadcom Enterprise Software Academy.
This video shows how to create a release track in Continuous Delivery Director. Release tracks let you track
parallel releases that you want to release in the same time window in a single view.
Add Releases to a Track
After a track is created, you can releases to that track.
1. Select Add Release to Track.
The ADD RELEASE TO TRACK dialog opens.
2. Select Release list and select a release from the drop-down list.
3. In the Production Stages panel, select Map To Phase and select a phase from the drop-down list.
You must map at least one stage to a phase.
4. Click Select a phase next to a milestone name and select a phase from the drop-down list.
The milestones are mapped to phases.
5. Click Add.
The release is added to the track.
When you add a release to a track, the phases that are mapped to production stages are changed to Scheduled. The
scheduled date is the stage planned start date or the production date of the track.
If a phase is in a track, you cannot edit the phase, and cannot run the phase from the release.
Manage Release Tracks
You can manage release tracks in the following locations:
•
Inside a track on the TRACKS page
•
Inside a release on the RELEASE page
You can add up to a maximum of 128 releases to a track. To change the maximum number of releases allowed in a track,
in settings.properties, configure the following properties:
cdd.api.pagination.max_page_size = 128
cdd.tracks.maximum_number_of_releases_per_track = 128
Tracks Page
Add a Release to a Track
You can add a release to a track from inside the tracks on the TRACKS page.
121

Continuous Delivery Director 8.5
Manage Tracks
You can perform the following actions inside a release track:
Edit a Track
To edit a track, select the pencil icon next to the track name.
Reorder Releases in a Track
You can schedule releases to run in a specified sequence.
To move a release to a specific place in the sequence, click the Set Dependencies button, and select and drag the
release.
NOTE
•
You can reorder a release after the track is created until the production time frame arrives. Releases can be
reordered regardless of milestone dates or approval status.
Remove Releases from a Track
To remove a release from a track, select the a phase mapped to a stage, click Actions and select Remove Release from
Track.
Following removal of the release from the track:
•
The release no longer appears in the track.
•
All phases in the removed release are reset to Manual.
•
Notification of the removal is sent to the release owner.
•
Removal of the track is reflected in the Activity Panel.
Release Page
Add a Release to a Track
You can add releases to and can remove releases from, release tracks inside a release on the RELEASE page.
Follow these steps:
1. Select a release name.
2. Select the Add to Track option in the release menu.
The Add to Track window opens.
3. Select the track from the drop-down list.
4. Use the drop-down lists to map the Production Stages and Milestones to phases.
5. Select Add.
Manage Tracks
To perform the following actions from inside a release, select Joined Track: <Track Name> in the toolbar and select
the operation from the drop-down list:
•
Remap phases.
•
Go To the track on the TRACKS page.
•
Remove the release from the track.
NOTE
The following videos are extracted from the Release Orchestration training course. This course provides extra
information, context, and examples to augment the product documentation.
122

Continuous Delivery Director 8.5
To access this course, see Broadcom Enterprise Software Academy.
Add a Release To Track
This video shows how to add releases to a release track in Continuous Delivery Director. It also shows how to map those
releases to production phases and milestones of the track.
Manage Release Tracks
This video shows how to manage the releases, production stages, milestones, and dependencies in a Continuous
Delivery Director release track.
Calendars
A set of calendars offer you visibility about scheduled releases, environment availability, and freeze periods.
The Calendars menu provides the following menu options:
•
Release Calendar displays a timeline of scheduled releases
•
Maintenance Windows shows the periods of time when you can run releases in specified environments
•
Environment Planner helps you to prevent resource conflicts when multiple releases require the same environment
•
Freeze Periods let you prevent deployments from taking place during predefined time intervals
Release Calendar
The calendar acts as a real-time release dashboard with configurations saved per user. Use the calendar to plan resource
use across teams and releases. You can see the Releases in separate lines on the left of the calendar.
You access the Release Calendar from the Calendars tab.
As a release owner or member, you can use the visual release calendar to monitor the following information:
•
Real-time release scheduling and progress during execution
•
Phase with failed tasks
•
Start and stop times for scheduled phases
•
Estimated Start and stop times for automatic and manual phases
•
Environment details
•
Maintenance windows
•
Freeze Periods
•
Failures
•
Conflicts
NOTE
The following conflicts are monitored and are displayed as a red indicator on the left of the phase:
•
Phases are scheduled to exceed maintenance windows
•
Phases are scheduled to run during a freeze period
You can use the following release calendar functionalities to help monitor and manage releases:
123

Continuous Delivery Director 8.5
•
Add Releases – Select one or more releases to include in the calendar view..
•
Select the +/- icons to the left of the release name to expand the release and show the phases, freeze periods and
maintenance windows.
•
Select phases for details.
•
Drag and stretch phases in the release to change the schedule duration and execution times. It is recommended to
change the “View by” from “Fit Screen” to a specific time frame.
•
Select View by <Duration> and select a time frame from the drop-down list to filter the view.
•
Select a phase to open the Edit Phase window and edit phase details.
NOTE
The release calendar displays the disabled phase only if there are past executions.
If there are no executions then the disabled phase is not shown.
Maintenance Windows
If you schedule release phases outside their maintenance windows, warning messages appear.
To manage maintenance windows, you require the Can manage maintenance window permission. From the Calendars
tab, click Maintenance Windows.
In the MAINTENANCE WINDOWS page, you can perform the following actions:
•
Duplicate
Use duplication for environments in separate applications that require the same time frame. Duplicate windows are
also useful when you need multiple windows for the same environments.
•
Edit
To edit, click the required window table row.
•
Delete
•
Enable / Disable
Windows are enabled by default when you create them and appear in the MAINTENANCE WINDOWS and
ENVIRONMENT PLANNER pages. If you disable a window, warnings are not shown when you execute a release
outside of the environment maintenance window. Releases that use a specific environment can only be executed when
the maintenance window is in effect. Warning icons next to the phase name, and in the Edit Phase dialog, indicate that
the phase cannot run until the maintenance window begins. The Release Calendar shows a conflict notification for
items that exceed a maintenance window.
Create Maintenance Windows
You can create maintenance windows for specific environments.
124

Continuous Delivery Director 8.5
Prerequisite: You have been granted the Can manage maintenance window permission.
A maintenance window is a period of time during which one or more teams may release into production on specified
environments.
1. From the Calendars tab, click Maintenance Windows.
2. In the MAINTENANCE WINDOWS page, click Create Window.
3. Enter a name and optionally, a description.
4. Under Environments, click Choose Environments and specify your environments.
5. Under Time Frame, click the From and To calendar icons to set a time frame for the window.
6. Click Add.
This maintenance window is set for the selected environments. The maintenance window is added to the MAINTENANCE
WINDOWS and ENVIRONMENT PLANNER pages.
Environment Planner
You can easily monitor environment usage and availability and identify release and resource scheduling conflicts.
In continuous delivery, organizations manage multiple releases across multiple teams and share environments, often
at the same time. Planning and maintaining environments is critical to the smooth running of your release pipeline. The
ENVIRONMENT PLANNER provides an overview of environment availability in relation to scheduled releases and
outages.
Use the ENVIRONMENT PLANNER to:
•
Track environments
•
View the involvement of environments in scheduled releases
•
See the maintenance windows and freeze periods that might impact the timely delivery of deployments
•
Avoid potential bottlenecks
To view the ENVIRONMENT PLANNER, from the Calendars tab, click Environment Planner. To change the view from
monthly to weekly, click in the calendar grid. To change the view from weekly to monthly, click Back.
You can add or remove the environments shown in the Environments field. You can select environments from all
projects, not only from the current project.
To see copyable details, hover over the following entry types :
•
Maintenance windows - associated environments and time frame
•
Freeze periods - associated environments, time frame, and freeze period type (hard or soft)
Freeze Periods
You can prevent deployments from taking place during predefined periods.
A freeze period is a time frame in which a deployment (or similar tasks) cannot take place in specified environments. To
see the existing freeze periods, from the Calendars tab, click one of the following menu options: Freeze Periods,
Release Calendar, or Environment Planner. Freeze periods are effective across all projects.
There are two types of freeze periods:
•
Hard - Prevents the release from running during the specified time frame
•
Soft - Displays warnings but does not prevent the release from running during the specified time frame
You need the Can manage freeze periods permission to:
125

Continuous Delivery Director 8.5
•
Create hard and soft freeze periods and add all the environments of all projects
•
Edit freeze periods
•
Duplicate freeze periods
•
Delete freeze periods
If you do not have this permission, you can only view freeze periods in read-only mode.
You cannot schedule a freeze period if a maintenance window is already scheduled during the same time
frame. Additionally, you cannot schedule a maintenance window if a freeze period is already scheduled during the same
time frame.
You can define specific releases to run even during a hard freeze period to allow emergency fixes.
If you define a freeze period that conflicts with a release, a Phase scheduling conflict with a freeze period notification
is sent to the release and phase owners. If a scheduled / automatic phase fails to run due to a conflict with a freeze
period, a Phase failed to start - freeze period conflict notification is sent to the release and phase owners.
Create and Edit Freeze Periods
You can create periods in which deployments cannot occur.
Prerequisite: You have been granted the Can manage freeze periods permission.
A freeze period is a time frame in which a deployment (or similar tasks) cannot take place in specified environments. You
may want to define a freeze period during a holiday season or during special activities in the data center.
Figure 17: Freeze Periods Page
1. From the Calendars tab, click Freeze Periods.
2. In the FREEZE PERIODS (CROSS-PROJECT) page, click Create Freeze Period.
3. In the NEW FREEZE PERIOD dialog, define the following parameters:
•
Name
Specify a name for the freeze period.
•
Type
Select the required type of freeze period:
–
Soft - Display warnings when conflicts exist without blocking deployments.
–
Hard - Block deployments and to send automatic notifications to release and phase owners.
•
Allowed Releases
126

Continuous Delivery Director 8.5
NOTE
Applies only for Hard Freeze Period.
Specify releases that can run even during hard freeze periods to allow emergency fixes.
•
Environments
Specify the environments to include in the freeze period.
•
Time Frame
Specify the from and to dates for the freeze period.
–
(Optional) Select an option from the recurrence drop-down to set the frequency that you want for the freeze
period.
NOTE
If you set up a recurrence pattern, the scheduled freeze period is set between the From and To dates
for the number of recurrences.
4. Click Create.
The freeze period is added to the FREEZE PERIODS (CROSS-PROJECT) page and appears in the Release Calendar
and Environment Planner.
Reports
Reporting functionalities help you monitor applications and content.
Reports indicate where applications and content are in the pipeline, and when and where they are scheduled for
deployment. You can create, save, and access reports for your releases. Select the REPORTS tab, and select one of the
following reports from the drop-down list:
NOTE
Report Data is saved in the local browser cache. If you change domains, the report data is not reflected in the
new domain.
Application Pipeline Report
The Application Pipeline Report shows you which releases have been deployed to the various environments including
the version number and any release content. This application-focused view allows you to gain insight into the software
delivery process:
127

Continuous Delivery Director 8.5
This report provides an overview of the following application and deployment information:
•
Environment
•
Phase
•
Release
•
Version
•
Status
•
Build Number
NOTE
If you use Jenkins as your continuous integration hub, you can click the build number to directly access build-
related information and log files in Jenkins.
•
Application version that is running
Note: Also shows the last successful application version
•
Application version that failed
Note: Also shows the last successful application version
Use this report to monitor where applications are in the release pipeline.
An application appears in this report only after:
•
The application is assigned to at least one release.
•
Environments are assigned to the application.
•
The application has at least one version.
•
The application has environments that are mapped to a phase.
•
The application has content that is associated with a task.
Note: The associated task must be deployed or scheduled.
After you configure an application, create an application report.
Follow these steps:
1. Select the REPORTS tab and select Applications.
2. Select Add Applications and select an application from the list.
3. Select Add Selected.
Applications that fit the described criteria are added to the report. Phases show as rows with a column for each task.
128

Continuous Delivery Director 8.5
Work Items Report
NOTE
Formerly known as the Content report.
Use the Work Items Report to access information about work items in different views.
•
Track - See a list of all work items in a given release track:
•
Work Items - See information about a specific work item.:
•
Application Versions - See information about an application version:
129

Continuous Delivery Director 8.5
The Work Items Report includes release name, application version, status in Continuous Delivery Director, and status in
the external Agile management tool, such as Rally
®
or Atlassian Jira. This Agile-centric view provides useful visibility for
the business, showing the release value in the context of features and fixes included.
The data for this report includes all releases that have been created in the workspace by any user.
To access the report, do one of the following: Use the Show By filter at the top of the report to select Tracks, Work Items,
or Application Versions.
•
Select Reports, then Work Items.
•
On a release page, select the Applications tab in the left panel, then the application version number. From the
dropdown menu, select Go to Work Items Report.
NOTE
This report shows you the status and details of all the work items shown on the release page in the Work
Items tab.
Release Analysis Report
You can view details of release execution activities for current and past executions.
The Release Analysis Report shows the execution results of phases and tasks in a selected release and illustrates their
relationship to the schedule using Gantt bars. This capability lets release managers quickly assess release execution
progress and identify issues.
The report contains the following release information:
NOTE
You can only select one release for each report.
•
A list of phase and task executions shown in the grid portion on the left side of the Gantt chart view. You can expand
this list to display the following information:
–
Phase name
–
Phase and task execution start and end times
–
Phase and task duration
–
Phase and task execution status
•
A Gantt chart on the right side of the grid portion. This view provides an illustrated version of your release activities
with Gantt bars that show the duration of your phases and tasks across a timeline. For each task, the associated Gantt
130

Continuous Delivery Director 8.5
bar begins at the start date and finishes at the end date. In the chart view, you can click on a task name to view the
following information:
–
Task applications
–
Task owners
–
Task input and output parameters
Error and warning activities appear as colored icons above the phases and tasks shown in the timeline. Mouse over an
activity to show error and warning messages.
You can adjust the time units for the timeline by selecting one of the following options from the View by dropdown
menu:
–
Fit Screen
–
Months
–
Weeks
–
Days
–
Hours
You can zoom out to see a bigger picture of your release by displaying, for example, Months, or you can zoom in to
see the exact start and finish dates for your release tasks by changing the timescale to Days or Hours. This flexibility
is especially useful if tasks are executed within short intervals of each other.
To go to the Release page for the selected release, click Go to Release.
To access this report, select Reports, then Release Analysis from the top menu. Alternately, in a release, open the
hamburger menu and click Go to Release Analysis Report.
Environment Report
The Environment Report shows all deployed, planned, and failed applications on a selected environment:
The report contains the following details:
•
Application and version
•
Build number, if available
131

Continuous Delivery Director 8.5
NOTE
If you use Jenkins as your continuous integration hub, you can click the build number to directly access build-
related information and log files in Jenkins.
•
Deploy Status
Note: Deploy statuses are Deployed, Scheduled, Failed, and Running.
•
Releases that deployed, or that are scheduled to deploy, the application version on this environment
Releases Over Time Report
You can quickly see how many releases have been marked as done within a specified time frame.
To access the report, select Reports, then Release Over Time from the top menu. Use the Select time frame filter at the
top of the report to select a time period such as Last 6 months or a custom date range.
The data for this report includes all releases that have been created in the workspace by any user.
The Release Over Time report provides the following information:
•
Status
Which releases were successful, which releases failed, and which releases are not in use.
•
Duration
The execution time of each release
•
Mark as Done Date
The date on which the release was marked as complete and became read-only.
CDA Deployments Report
The CDA Deployments report shows detailed information about Automic
®
Continuous Delivery Automation deployments
that have run as part of releases in Continuous Delivery Director:
NOTE
This report is available with Automic
®
Continuous Delivery Automation 12.3. This report is not compatible with
earlier versions of Automic
®
Continuous Delivery Automation.
This report contains the following details:
•
Release Name (CDD)
•
Deploy Status (CDD)
Note: Deploy statuses are Deployed, Scheduled, Failed, and Running.
•
Deployment Package (CDA)
Information: An instance (a version, a revision, a tag, …) of a CDA application that defines the content to deploy.
•
Application (CDD and CDA)
Information: A CDA application is the main container of the deployment model and typically consists of multiple
Components.
•
Environment (CDD)
•
Components (CDA)
Information: A component can be any file (also configuration files), objects (for example, database structure),
administrative scripts that are stored under version control or in a source or staging system, and so on.
•
Workflow
Information: CDA workflows are used to carry out physical deployments. A workflow describes all necessary steps for
the deployment of an application.
•
Duration
•
Deployment Name (CDA)
132

Continuous Delivery Director 8.5
Release Quality Report
You can see detailed information about the quality of your release and quickly assess any risks. You can also use this
report to evaluate the effectiveness of your test automation strategy.
Figure 18: Release Quality Report
The data for this report includes all releases that have been created in the workspace by any user.
You can also see test information for any associated work items that are defined in your agile management tool (Jira/
Rally).
You can use the Release Quality Report to:
•
Save time
•
Select test suites wisely and see the breakdown
•
View results per test framework
•
Optimize test coverage and find gaps in the test plan
The Release Quality report provides the following information:
•
General Information
133

Continuous Delivery Director 8.5
–
Number of builds that exist for the specified business application version/application version.
–
Time saved during test suite execution due to implementation of Test Advisor recommendations.
–
Number of flaky test suites detected either with inconsistent execution results or test suites failed on the last
execution.
–
Number of files without test coverage.
–
Number of tests/test suites that have failed
•
Test Distribution
–
Bar graph showing the distribution of test suite execution. To see more information, hover over the bar graph.
–
Number of failed tests out of total tests recommended by the Test Advisor.
–
Number of failed tests out of total tests not recommended by the Test Advisor.
–
Time to first test failure.
–
Adaptive Testing task duration.
–
Change ID of build or commit that triggered the Adaptive Testing task.
NOTE
If you use Jenkins as your continuous integration hub, you can click the build number to directly access
build-related information and log files in Jenkins.
–
Details of phase containing the Adaptive Testing task executed. Hover over the phase name to see the details.
–
Testing framework from where the test suites were imported.
•
Code Churn
Shows in graphical format the code churn in releases and in business application versions/application versions. This
heuristic is updated on every commit.
•
Flaky Test Suites
Lists the flaky test suites detected either with inconsistent execution results, or test suites that failed on the last
execution.
•
Uncovered / Updated Files
Lists the files that were changed during the release but have no associated test suites.
•
Incomplete Work Items
Shows information about the test coverage of work items in a given release (features, user stories, defects, and so
on). This graph shows how well a work item has been tested and whether that work item has passed or failed the
associated tests.
For every release work item, you can see:
–
The commits that have been done for this work item, and the test coverage status.
–
The tests executed for a specific work item and how many of them are flaky.
To access the report, select Reports, then Release Quality from the top menu. Alternately, in a release, open the
hamburger menu and click Go to Release Quality Report.
To create a new report, open the Release Quality report and select releases, business applications, business application
versions, applications, and application versions.
Follow these steps:
1. Open the Release Quality report and in Release, specify a release name.
The Business Application Version/Application Version Report summary is displayed.
2. Under Business Application Version/Application Version Report, select the release name.
The Release Quality by Business Application Version/Application Version report is displayed.
Note: You can change the release and business application/application version as needed.
134

Continuous Delivery Director 8.5
Endpoint Usage Report
You can quickly view the services which use a specific Endpoint.
To access the report, select Reports, then Endpoint Usage from the top menu. Select the desired Plugin, the Endpoint,
and the Plugin Service for the report. The data for this report includes all plugin services that use the selected endpoint.
135

Continuous Delivery Director 8.5
Test Orchestration
An innovative automated testing solution helps testers prioritize, execute, and fine-tune testing activities.
Overview
The test module lets you optimize and accelerate your code and application testing in a unified storage, planning, tracking,
reporting, and execution hub. This testing solution integrates with unit, functional, and performance test suites, as well as
continuous integration and DevOps activities in your deployment pipeline.
QA experts can use the test module to manage a test suite catalog and to tag tests. Release managers can integrate the
test module into releases to significantly improve release quality and speed up innovation velocity.
Key benefits:
•
Select optimal test plan automatically
•
Store and organize test assets in a single repository
•
Reduce release cycles
•
Increase release quality
Use the test module to:
•
Save time by identifying and removing redundant test executions from test cycles
•
Support continuous testing scenarios
•
Test new code changes efficiently, based on risks and priority
•
Perform risk-based testing cycles
•
Improve your change delivery process by automating test scenarios and optimizing test cycle execution
•
Run test cases (changes per phase, application, and version)
•
Set up test environments
•
Use test data during testing cycles
•
Launch virtual services
•
Visualize release health and quality levels, including current status and quality trend
•
View current status of application quality
The test module lets you:
•
Import references to test suites from test providers, such as Gradle, Protractor, and so on.
•
Tag test suites
•
Run the tagged test suites using Adaptive Testing tasks in releases. When an Adaptive Testing task runs, the results
are stored and added to the Adaptive Testing Results list.
Test Frameworks
Plug-ins provide an interface for storing your test provider authentication credentials and project folders as environment
variables on the cloud. This interface allows you to reference your credentials without the need to hardcode this data into
your tests. Because plug-ins manage authentication at the global level, you can have multiple jobs running in parallel that
use the same credentials and project folders.
The test module provides the following test frameworks for test assets:
•
JUnit - A test automation framework for Java
•
Robot Framework - A test automation framework for Git builds
136

Continuous Delivery Director 8.5
Supported Plug-ins
Plug-ins provide an interface for storing your test provider authentication credentials and project folders as environment
variables on the cloud. This interface allows you to reference your credentials without the need to hardcode this data into
your tests. Because plug-ins manage authentication at the global level, you can have multiple jobs running in parallel that
use the same credentials and project folders.
After you enable plug-ins and create associated endpoints, you can add adaptive testing tasks to your releases.
Terms and Concepts
The following terms and concepts, defined here, are used throughout the Adaptive Testing documentation.
•
Adaptive Testing Catalog: A central repository of test sources and test suites.
•
Application Testing Insights: An interface for viewing performance trends in test execution results.
•
Adaptive Testing Results: An interface for viewing the results of test executions.
•
JUnit: A unit testing framework for the Java programming language.
•
test asset: A reusable test case or test script.
•
test framework: A set of guidelines for creating and designing test cases. A conceptual part of automated testing that
helps testers to use resources more efficiently.
•
test source: A configuration to import tests that includes the plugin name and endpoint to use.
•
test suite: A container of test assets.
Test Orchestration Overview
NOTE
The following videos are extracted from the Test Orchestration training course. This course provides extra
information, context, and examples to augment the product documentation.
To access this course, see Broadcom Enterprise Software Academy.
This video describes how you can orchestrate tests with your release pipeline. Continuous Delivery Director provides
integration with common testing tools, plus test intelligence and heuristics that automatically select the right tests to run
and return data about release quality based on test results.
More Information:
•
Setting Up the Test Module
•
Create an Adaptive Testing Task
•
Continuous Testing Agents
•
Monitor Running Tests
•
Monitor Test Suite Executions Through APIs
•
View Adaptive Testing Results
•
Integration Testing
•
Test Advisor
•
Test Module Actions
•
Import and Export Test Sources
•
Test Source Templates
Install Continuous Delivery Director with the Test Module
Help your colleagues achieve continuous testing by installing the Test module together with Continuous Delivery Director.
Continuous Delivery Director has two flexible offerings:
137

Continuous Delivery Director 8.5
•
SaaS – SaaS provides the same enterprise strength as the on-premises version, but it is available through a tiered
licensing approach, including a free starter tier. For more information, see cddirector.io
•
On-premise – On-premise is available for customers who prefer to manage software in-house.
In this section, you will learn how to install the on-premise solution with the Test module functionality.
NOTE
To install Continuous Delivery Director without the Test module, see Install Continuous Delivery Director.
Solution Overview
Continuous Delivery Director orchestrates releases utilizing open-source, commercial, and homegrown (Broadcom)
solutions across the DevOps toolchain, including planning, CI, testing, and deployment tools.
Continuous Delivery Director coordinates the end-to-end release pipeline, triggering actions, and gathering data for
reporting and analytics. These actions and analytics help teams to build a more efficient and productive continuous
delivery pipeline, ultimately delivering more value to customers.
Figure 19: Intelligent Pipeline
To enable Continuous Delivery Director with the Test module, you need to install and configure a number of components.
The following diagram shows a typical system landscape after installation:
138

Continuous Delivery Director 8.5
Figure 20: CDD On-Premise System Architecture with Test Module
Continuous Delivery Director and the Test module components are packaged as self-installed WAR (cdd.war) files that
you add to a configured Apache Tomcat instance. Additionally, you will also install the Test Advisor, an AI-based tool that
helps developers reduce the test cycle time by selecting a subset of test suites to run instead of all test suites.
Continuous Delivery Director packaged plug-ins are also WAR files that you add to the same Apache Tomcat instance
or to a remote Apache Tomcat instance. To auto-register these plug-ins, include the plug-ins with the cdd.war file. After
Continuous Delivery Director starts to run, the plug-ins are auto-registered and appear in the Plug-ins page.
The Test module uses MongoDB as a repository for test-related data. You can install MongoDB either as a standalone
server or as a Docker container server. For more information, see https://www.mongodb.com/
The Test module supports popular test frameworks such as Protractor and Gradle. These test frameworks require Docker
Engine installation to integrate with the Test module.
Therefore, we recommend that you use a Docker platform that runs on the Red Hat Linux OS to integrate with the Test
module.
Before You Install
For installation purposes, enable the following servers/resources:
•
A dedicated server for Continuous Delivery Director
139

Continuous Delivery Director 8.5
NOTE
Red Hat Linux is provisioned.
•
A dedicated server to run the Docker Engine.
NOTE
Red Hat Linux is provisioned.
•
An NFS service for a shared file system is provisioned.
•
JRE 1.8 is installed.
•
Apache Tomcat 8.5.x is installed.
•
A relational database (MS-SQL, MySQL, Oracle, and so on) is installed.
•
The installation user has full permissions for the Apache Tomcat installation folder where you want to install the
product.
•
Docker Engine is installed
•
The remote API is accessible and a port is exposed (the port is stored in the Continuous Delivery Director
configuration)
•
MongoDB version 4.2 Community Edition is installed. Adaptive Testing uses MongoDB as a repository for test-related
data. You can install MongoDB either as a standalone server or as a Docker container server. For more information,
see https://www.mongodb.com/
Configure the Adaptive Testing Environment
After you carry out the prerequisites, you configure the environment, as shown in the following diagram:
Figure 21: Planning your Test module Installation
Follow these steps:
1. Create an Apache Tomcat owner for the CDD server (Server 1). This server contains Adaptive Testing Catalog,
Adaptive Testing Results, and Continuous Delivery Director.
Important! Do not use root for the Apache Tomcat owner.
140

Continuous Delivery Director 8.5
Example:
user name = cdd
uid=1010
group name = cdd
gid=1010
groupadd 1010 -g 1010 cdd
useradd 1010 -u 1010 -g 1010 -G docker cdd
2. Configure a shared file system on the NFS Server:
a. On NFS server:
a. Create a shared folder.
Example: /home/cdd/.cdd
b. Change folder owner to the same uid and gid defined in step 1.
Example: chown -R 1010:1010 /home/cdd/.cdd
c. Grant folder permissions to all.
Example: chmod -R 777 /home/cdd/.cdd
d. Expose the shared folder to enable access from Server 1 and Server 2 with read/write and sync options.
Example: vi etc/exports
NOTE
If the exports configuration file is missing in the /etc folder, create an exports file.
Add the following text: /home/cdd/.cdd *(rw,sync)
After saving the edited exports file, you must update the operating system. To update the operating system,
run the command:
exportfs -a
b. On CDD server (Server 1):
a. Create .cdd folder in the Apache Tomcat owner home folder to be mapped to the NFS shared folder.
Example: /home/cdd/.cdd
b. Create a mount point on Server 1 to be mapped to the NFS shared folder.
a. Check on the server with the NFS shared folder that mount is open by running this command: rpcinfo -u
localhost nfs.
Successful output:
program 100003 version 3 ready and waiting program 100003 version 4 ready and
waiting
Failure output:
rpcinfo: RPC: Program not registered program 100003 is not available
If you receive failure output, run the following commands (these examples are for CentOs):
yum install nfs-utils
systemctl restart nfs-server
Test again with the command:
rpcinfo -u localhost nfs
b. All folders in the NFS folder path must have permissions (). To change permissions for a folder, navigate to
that folder's parent folder and run the command:
chmod 751 cdd”.
c. On the client, CDD server (Server 1), and Docker Engine server (Server 2), the following command detects
whether the mount succeeds:
showmount -e {IP} where {IP} is the IP of the server with the NFS shared folder.
A successful output is the content of the exports file:
141
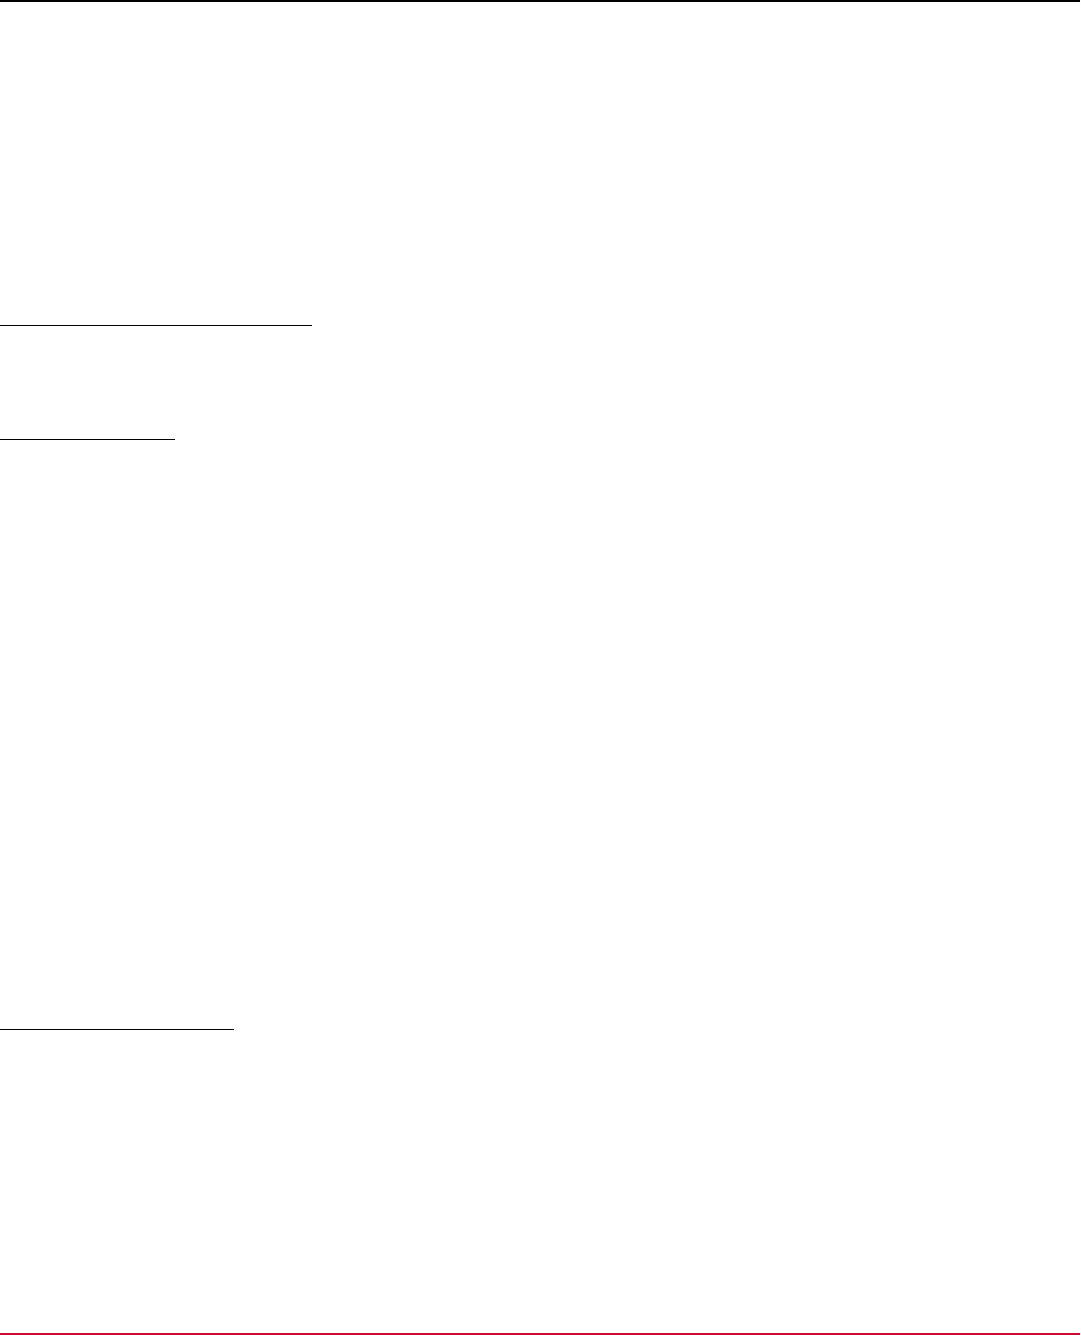
Continuous Delivery Director 8.5
Export list for {IP}:
/home/cdd/.cdd *
Example: mount -t nfs4 <nfs server>:/home/cdd/.cdd /home/cdd/.cdd
c. On Docker Engine server (Server 2):
a. Create .cdd folder owner to be mapped to the NFS shared folder.
Example: /home/cdd/.cdd
b. Change folder owner to the same uid and gid defined in step 1.
Example: chown -R 1010:1010 /home/cdd/.cdd
c. Create a mount point on Server 2 to be mapped to the NFS shared folder.
Example: mount -t nfs4 <nfs server>:/home/cdd/.cdd /home/cdd/.cdd
Create Admin User for MongoDB
After MongoDB is installed, you create an Admin user to connect to the MongoDB instance, to authenticate with, and to
enable remote access to MongoDB. In the following examples, we create a root user.
Standalone Server
Create an admin user from the MongoDB command line:
use admin
db.createUser(
{
user: "<user>",
pwd: "<pwd>",
roles: ["root"]
});
Example:
use admin
db.createUser(
{
user: "cdd",
pwd: "mypassword",
roles: ["root"]
});
Docker Container Server
Create an admin user from the MongoDB command line:
sudo docker exec -it <container-name> mongo admin
db.createUser({ user: '<admin-username>', pwd: '<admin-initial-password>', roles: [ {
role: "root", db: "admin" } ] });
exit
Example:
142

Continuous Delivery Director 8.5
docker exec -it mongo1 mongo admin
> db.createUser({ user: 'cdd', pwd: 'mypassword', roles: [ { role: "root", db:
"admin" } ] });
> db.auth("cdd", "mypassword");
Install the Web Application Files
IMPORTANT
Review the installation instructions for the database setup. For more information, see Install Continuous Delivery
Director
To enable the Test module to work with Continuous Delivery Director, install, on the Apache Tomcat server, the .war files
that are required to run Adaptive Test Catalog, Adaptive Test Results, and the Test Advisor.
The Test module is packaged as self-installed WAR (cds.war , tar.war , and cta.war ) files that you add to a
configured Apache Tomcat instance. cds.war contains the Adaptive Testing Results files, tar.war contains
the Adaptive Testing Catalog files, and cta.war contains the Test Advisor files. Optionally, you can install
the WAR (cds.war , tar.war , and cta.war ) files on the same Apache Tomcat instance that contains the Continuous
Delivery Director cdd.war file and integrate the Test module with Continuous Delivery Director.
After Continuous Delivery Director starts to run, the Test module functionality is enabled and appears under the Tests
menu in the Continuous Delivery Director user interface.
Follow these steps:
1. Download the cds.war , tar.war , cta.war and plug-in .war files from the Support site.
2. Log in to the Apache Tomcat server as the Apache Tomcat owner.
IMPORTANT
Ensure that the user is not logged in to the Apache Tomcat server as root .
3. Stop the Apache Tomcat service.
Depending on your implementation, shut down the Windows service for Apache Tomcat, or navigate to the
<tomcat_home> directory from the command prompt and use the shutdown command.
Example:
[cdd@T11383 apache-tomcat-8.5.24]#./bin/shutdown.sh
4. Copy the cds.war , tar.war , cta.war and plug-ins .war files to the webapps folder of the Apache Tomcat
installation directory.
5. Start the Apache Tomcat service.
Depending on your implementation, start the Windows service for Apache Tomcat in the <tomcat_home> directory or
use the startup command, for example:
[cdd@T11383 apache-tomcat-8.5.24]#./bin/startup.sh
Wait a few minutes for Apache Tomcat to initialize the application and to deploy the web applications.
You must deploy the applications in the order that is specified in this procedure, starting with Adaptive Testing Results
(CDS).
6. Deploy Adaptive Testing Results.
Enter the following URL in a Web browser:
http://<tomcat-host>:<tomcat-port>/cds
NOTE
The default Apache Tomcat port is 8080.
A configuration page opens the first time that you enter this URL.
The following screen capture shows the Adaptive Testing Results Web Installer welcome message:
143

Continuous Delivery Director 8.5
7. Enter the path to Home folder defined in Configure the Adaptive Testing Environment, and select Set.
This folder holds the Adaptive Testing Results configuration and log files. The configuration file holds the database
server connectivity details that you enter in the next step. The following paths are for the default Home folders:
–
Windows: c:\.cdd
–
Linux: /home/cdd/.cdd
After you select Set, the MongoDB connection properties page opens.
The following screen capture shows the Adaptive Testing Results MongoDB connection properties page:
144

Continuous Delivery Director 8.5
8. Enter the necessary information for your MongoDB instance, and select Install.
After the installation has finished, the Apache Tomcat server loads Adaptive Testing Results with a valid connection to
MongoDB.
The next application to be deployed is Adaptive Testing Catalog (TAR).
9. Deploy Adaptive Testing Catalog.
Enter the following URL in a web browser:
http://<tomcat-host>:<tomcat-port>/tar
A configuration page opens the first time that you enter this URL.
The following screen capture shows the Adaptive Testing Catalog Web Installer welcome message:
10. Enter the path to the Home folder created, defined in Configure the Adaptive Testing Environment, and select Set.
145

Continuous Delivery Director 8.5
This folder holds the Adaptive Testing Catalog configuration and log files. The configuration file holds the database
server connectivity details that you enter in the next step. The following paths are for the default Home folders:
–
Windows: c:\.cdd
–
Linux: /home/cdd/.cdd
After you select Set, the MongoDB connection properties page opens.
The following screen capture shows the Adaptive Testing Catalog MongoDB connection properties page:
11. Enter the necessary information for your MongoDB instance, and select Install.
After the installation has finished, the Apache Tomcat server loads Adaptive Testing Catalog with a valid connection to
MongoDB.
12. Deploy Test Advisor
Enter the following URL in a web browser:
http://<tomcat-host>:<tomcat-port>/cta
A configuration page opens the first time that you enter this URL.
The following screen capture shows the Test Advisor welcome message:
146

Continuous Delivery Director 8.5
13. Enter the path to the Home folder created, defined in Configure the Adaptive Testing Environment, and select Set.
This folder holds the Test Advisor configuration and log files. The configuration file holds the database server
connectivity details that you enter in the next step. The following paths are for the default Home folders:
–
Windows: c:\.cdd
–
Linux: /home/cdd/.cdd
After you select Set, the MongoDB connection properties page opens.
The following screen capture shows the Test Advisor MongoDB connection properties page:
147

Continuous Delivery Director 8.5
14. Enter the necessary information for your MongoDB instance, and select Next.
The Apache Tomcat server loads the Test Advisor with a valid connection to MongoDB and the Test Advisor services
connection properties pages opens:
15. Select Install.
The Apache Tomcat server loads the Test Advisor with valid connections to the Adaptive Testing Catalog and Adaptive
Testing Results.
16. Deploy Continuous Delivery Director (CDD).
Enter the following URL in a Web browser:
http://<tomcat-host>:<tomcat-port>/cdd
A configuration page opens the first time that you enter this URL.
The following screen capture shows the Continuous Delivery Director Web Installer welcome message:
17. Accept the default Home folder, or enter the path to Home folder defined in Configure the Adaptive Testing
Environment, and select Set.
148

Continuous Delivery Director 8.5
This folder holds the Continuous Delivery Director configuration and log files. The configuration file holds the
database server connectivity details that you enter in the next step. The following paths are for the default Home
folders:
–
Windows: c:\.cdd
–
Linux: /home/cdd/.cdd
After you select Set, the database connection properties page opens:
Example: MySQL
18. Complete the required fields and select Save. The services connection page opens:
149

Continuous Delivery Director 8.5
19. Select both checkboxes to activate the Test module functionality.
If you install Adaptive Testing Results, Adaptive Testing Catalog, and the Test Advisor on different Apache Tomcat
instances, you can change the server paths.
Select Save.
NOTE
For more information about installation, see:
System Requirements
Installation Best Practices
Install Continuous Delivery Director
Configure Continuous Delivery Director for Testing
1. Connect to the NFS server with the user 1010. If the folder /home/1010/.cdd/artifacts does not yet exist,
create this folder.
On the NFS server, grant full access permissions to all users on the artifacts folder under the .cdd shared folder.
For example:
chmod -R 777 /home/1010/.cdd/artifacts
2. Create a release. For more information, see Design and Create Releases.
3. Create an application. For more information, see Manage Applications and Environments
4. Create an application version for the application you just created. For more information, see Manage Applications and
Environments
5. Set up containerized plug-ins. For more information, see: Set Up Containerized Plug-ins
6. Install the Gradle testing plug-in. For more information, see: Gradle Plug-in
150

Continuous Delivery Director 8.5
7. Install the Robot framework plug-in. For more information, see: Robot Framework Plug-in
8. Install the GitHub plug-in. For more information, see: GitHub Plug-in
9. Create a source control connection. This action enables the import of commit messages from your source control. For
more information, see Set Source Control Connection in Design and Create Releases.
Configure Jenkins for Testing
Follow these steps:
1. Download the cdd-jenkins-<version>.hpi file from the Support site.
2. Configure the Continuous Delivery Director plug-in for Jenkins. For more information, see Plug-in for Jenkins.
3. Open the Jenkins project configuration screen and add a post-build action.
4. Either select the Send notification to CDDirector post-build type and enter:
–
Application name
–
Application version
–
Tenant ID (from User Settings)
–
API key (from User Settings)
Or open the Jenkinsfile and add a post-build action:
sendNotificationToCDD appName: '<appname>',
appVersion: '<appversion>',
gitCommit: "${ env.GIT_COMMIT }",
gitPrevSuccessfulCommit: "${ env.GIT_PREVIOUS_SUCCESSFUL_COMMIT }",
overrideCDDConfig: [
customApiKey: '******************************',
customProxyPassword: '',
customProxyUrl: '',
customProxyUsername: '',
customServerName: 'myserver.net',
customServerPort: 8080,
customTenantId: '***-***-***-***-***',
customUseSSL: false
],
releaseTokens: '{"":""}'
5. Save your configuration.
Set Up the Continuous Testing Agent
The Continuous Testing Agent is a Java agent that is used by SUT (System Under Test) applications to monitor the
interactions between application source files and CDD test suites.
This monitoring is used to determine which test suites to run when an application source file changes.
Follow these steps:
1. Download the ct_agent.jar file from the Support site.
2. In settings.properties, ensure that the following property is set to true:
cdd.ct_agent.enabled=true
3. In SUT setenv.sh in the Tomcat bin folder, ensure that the following lines exist:
export CDD_HOME_FOLDER=/home/cdd/.cdd
export CATALINA_OPTS="$CATALINA_OPTS -javaagent:/home/cdd/.cdd/ct_agent.jar"
151

Continuous Delivery Director 8.5
NOTE
The lines above are for the CentOS operating system.
4. Upload ct_agent.jar to the location you defined above.
5. In CDD_HOME_FOLDER, under the conf folder create a settings.properties file:
cdd.continuous_testing_agent.cdd.application=<application name from CDD>
cdd.continuous_testing_agent.cdd.environment=<env name from CDD>
cdd.continuous_testing_agent.cdd.api_key=<API key from CDD>
cdd.continuous_testing_agent.cdd.url=http://<CDD hostname>:8080/cdd/
cdd.continuous_testing_agent.cdd.tenant_id=00000000-0000-0000-0000-000000000000
cdd.continuous_testing_agent.packages.include=com.ca.cdd
cdd.continuous_testing_agent.packages.exclude=com.ca.cdd.ws,com.ca.cdd.controllers,com.ca.cdd.dao
cdd.continuous_testing_agent.cdd.url_path=/ct_agent
cdd.continuous_testing_agent.cdd.trust_self_signed_certificate=true
cdd.continuous_testing_agent.cdd.disable_host_verification=true
cdd.continuous_testing_agent.log.configuration_file=/home/cdd/.cdd/ct_agent.logback.xml
cdd.continuous_testing_agent.log.maximum_memory_size=800
cdd.continuous_testing_agent.log.level=trace
6. Restart Tomcat.
Setting Up the Test Module
This section describes how to configure the test module for use.
Before you can use the test module, you configure Continuous Delivery Director to enable the test module for use.
Prerequisites
Ensure that the artifacts listed below are available:
•
At least one application is available for testing. For more information, see Manage Applications and Environments
•
At least one environment is available for testing. Test environments should match the phases in your target releases.
For more information, see Manage Applications and Environments
•
At least one testing plug-in is available, such as Gradle, Protractor, Robot Framework, and so on. If you see that there
are no plug-ins, register at least plug-in. For more information, see Register Plug-ins
•
At least one endpoint is available for testing. For more information, see Manage Endpoints
•
At least one release is available for testing. For more information, see Design and Create Releases
You can choose to set up one or more of the following plug-ins:
•
Gradle Testing running JUnit (containerized). For more information, see Gradle Testing Plug-in
•
Robot Framework. For more information, see Robot Framework Plug-in
Follow these steps:
1. Select Tests, then Adaptive Testing Catalog.
2. Specify the Application and the Application Version/ Business Application and the Business Application
Version.
3. Select the New Test Source button on the upper right.
4. The GET TEST ASSETS page opens, configure the following input parameters:
– •
Test Source Name
•
Plug-in
Select Import Test Suites for one of the predefined test plug-ins.
152

Continuous Delivery Director 8.5
Example: Robot Framework
•
Endpoint
Select an endpoint that has been predefined for the selected test plug-in.
•
Input parameters
The input parameters and test configurations vary according to the selected plug-in. However, all plug-ins
contain the Tags input parameter:
•
Tags
A tag is a word or a short phrase associated with a test suite for description and filtering purposes. Tags are
used to filter which test suites are executed when an Adaptive Testing task runs.
You can add multiple tags to test suites:
•
In the Tags field in the Get Test Assets pop-up.
•
In the Imported Tests page. Select one or more rows and select the Tags button.
You can add more tags at any time.
Note: Tags are not case-sensitive.
Example: BZM.Sanity.Test
For more information, see:
•
Gradle Testing Plug-in
•
Robot Framework Plug-in
–
Copy Tests from Another Application Version/Business Application Version
All test suites that match the input parameters are imported, tagged, and ready for use when an Adaptive Testing task is
run.
NOTE
The test configuration is linked to the test source. If you want to run the same test with a different configuration,
you need to create a new test source and to import the tests again. This may cause duplication of test sources.
NOTE
You can manage the test sources as per your Application version or Business Application version from the
Releases page. For more information, refer to Manage Test Sources from Releases.
Import Tests into Continuous Delivery Director
NOTE
The following video is extracted from the Test Orchestration training course. This course provides extra
information, context, and examples to augment the product documentation.
To access this course, see Broadcom Enterprise Software Academy.
This video shows how you can import test suites from your test framework into the Continuous Delivery Director test
modules. You can then associate the tests with the appropriate application and tag them.
Create an Adaptive Testing Task
After tests are imported into Continuous Delivery Director, you can add those tests to an adaptive testing task in a release
phase.
Each time the phase is run, Continuous Delivery Director runs those tests directly from the task on the versions of the
business applications and applications associated with the release.
153

Continuous Delivery Director 8.5
If you have a large number of test suites in your test tool, you may prefer to run only specific tests instead of running all
test suites. You can include and exclude tests using tags.
1. On the Releases page, select a release.
2. In a phase, select Create Task.
3. In Task Type, select Run Adaptive Testing.
4. In Tags, start to type to specify one or more tags.
You can add comma-separated values without spaces that may include:
•
Dynamic Values - type @ (at sign) to get a list of tags defined in the test tool. You can select multiple dynamic
values separated by commas.
•
Tokens - type % (percentage sign) to get a list of available tokens. You can add one or more tokens and can
concatenate tokens as free text.
•
Free text
You can combine free text and tokens. You cannot combine dynamic values with free text or tokens.
Leave empty to execute all the test suites under the application version.
5. Optionally, in Applications, specify application names to add to the task.
You can specify build numbers for each application.
6. Optionally, select Run Business Application Tests.
Select this option to execute all the tests that were imported for the business application in the release.
7. In Build/Commit ID, specify the build number or commit ID of the code to test.
8. Optionally, select Run a subset of test suites selected by the Test Advisor.
9. Click Create.
Monitor Running Tests
You can view a test execution log that is updated in real-time.
A running release that includes one or more adaptive testing tasks.
You can access a test execution log from a release page to see which tests are executed at any given time. The execution
log is updated in real-time so if problems occur in a test run, you can examine the log to determine whether to stop or
continue with the test execution. This feature is especially useful when you run a large set of tests on complex business
applications.
IMPORTANT
This functionality is supported by the CucumberJVM plug-in version 1.4.1-6 and higher and is not backward-
compatible. For more information, see Cucumber JVM Plug-in.
1. In an adaptive testing task in a running release, click the progress bar.
A popup appears with an Execution Log link.
2. Click the Execution Log link.
The execution log opens in a new window.
Continuous Testing Agents
Dedicated programs collect and analyze adaptive testing metrics.
154

Continuous Delivery Director 8.5
Version 2.2
Continuous Testing (CT) agents are automated services that poll test sources to verify if specified test suites have been
updated. The agent is a data-gathering component. This component collects detailed information about applications
under test as test suites are executed. After the tests are run, the agent reports the collected data to Continuous Delivery
Director. An agent:
•
Analyzes the interactions between application source files and test suites.
•
Determines which test suites are executed when an application source file changes.
•
Is referenced by an AUT (application under test) when a new build triggers testing in a release.
•
Connects to Continuous Delivery Director using the WebSocket protocol.
Agents are installed in an environment where a business application/application is being tested. An agent receives a
notification from Continuous Delivery Director every time a test suite is started. The agent identifies the classes that are
examined. Then Continuous Delivery Director notifies the agent that the test suite is complete. At the end of the test
execution, the agent generates a mapped list of all the files that were changed and the test suites that examined the
changed files. This mapping is used by Continuous Delivery Director to instruct the Test Advisor to recommend running
only those tests that are associated with the changed code.
The following illustration shows a simple deployment in which an agent collects application and test metrics and relays this
information to Continuous Delivery Director. You can view these metrics in releases and reports.
155

Continuous Delivery Director 8.5
Figure 22: CT Agent Architecture
There are two types of CT agents:
•
.NET
For testing applications written in C# (C sharp).
•
Java
For testing Java applications.
Download Options
Use one of the following options to download the latest CT agent (ct_agent.jar) version:
156

Continuous Delivery Director 8.5
IMPORTANT
Downloading the ct_agent.jar file is a prerequisite for installing both the .NET and Java CT agents.
Method Info
wget wget -O ct_agent.jar https://
cspdl.broadcom.com/s/
vklrdye94fyyfi7nw99frkf2y7dnt1h8?
LCK=ent.box.com
MD5 edee233c7befd5bf96c6aa32047cd627
Click Download Button
Use one of the following options to download the latest CT agent DLL (ct_agent.dll) file:
IMPORTANT
Downloading the ct_agent.dll file is a prerequisite for installing the .NET CT agent only.
Method Info
wget wget -O ct_agent.jar https://
cspdl.broadcom.com/s/
d6cwhh8hht0n7p1dzm02xslzubacxg9l?
LCK=ent.box.com
MD5 4daf434c3dba818499302548e68a2a8b
Click Download Button
Configure .NET Continuous Testing Agents
Install and configure a .NET CT Agent on the Continuous Delivery Director server so that you can monitor adaptive testing
tasks running on C# (C sharp) applications in a release.
•
Windows Server 2019 or Windows 10
•
Java (JRE) 8 or higher is installed and enabled
•
A CDD_HOME_FOLDER environment variable is configured on the Windows Server
Follow this procedure to prepare a Windows environment with a working CT agent for adaptive testing.
NOTE
The CT agent requires that IIS and specific IIS components be enabled on Windows Server 2019 or Windows
10. The setup cannot proceed if IIS is not detected and specific IIS components are not enabled.
1. Run the CT agent Java application on Windows.
a) Copy ct_agent.jar to the <$CDD_HOME_FOLDER>\lib directory. For more information, see Continuous Testing
Agents.
•
The default home folder of OS user cdd is: \home\cdd
•
The default home folder of the Continuous Delivery Director product is: \home\cdd\.cdd
b) Under C:\<$CDD_HOME_FOLDER>\conf, create a settings.properties file.
C:\cdd\conf\settings.properties
157

Continuous Delivery Director 8.5
c) Configure the settings.properties file as follows:
•
cdd.continuous_testing_agent.id
Specify a unique ID for the agent.
•
cdd.continuous_testing_agent.cdd.application
Specify the application name from Continuous Delivery Director.
•
cdd.continuous_testing_agent.cdd.environment
Specify the Continuous Delivery Director environment in which the CT agent runs.
•
cdd.continuous_testing_agent.cdd.api_key
Specify the Continuous Delivery Director API key of an authorized user, such as an integration user, release
manager, or administrator. You can find the API key in Continuous Delivery Director under My Settings.
•
cdd.continuous_testing_agent.cdd.url
Specify the URL to your Continuous Delivery Director instance.
•
cdd.continuous_testing_agent.cdd.tenant_id
Specify the tenant ID of your Continuous Delivery Director instance. You can find the tenant ID in Continuous
Delivery Director under My Settings.
•
cdd.continuous_testing_agent.packages.include
Specify a comma-separated list of included packages (groups of classes, sub-packages, and interfaces).
•
cdd.continuous_testing_agent.packages.exclude
Specify a comma-separated list of excluded packages.
•
cdd.continuous_testing_agent.cdd.url_path
Specify the file path to the folder that contains the agent files.
•
cdd.continuous_testing_agent.cdd.trust_self_signed_certificate
Define whether to trust the Continuous Delivery Director self-signed certificates: true/false.
•
cdd.continuous_testing_agent.cdd.disable_host_verification
Define whether to disable host verification: true/false.
•
cdd.continuous_testing_agent.log.configuration_file
Specify the path to the agent log configuration file.
•
cdd.continuous_testing_agent.log.maximum_memory_size
Specify the maximum memory size of the agent log. Default is 100KB
•
cdd.continuous_testing_agent.log.level
Specify the granularity of the logging output. Possible entries: trace, debug (default), info, warning, error, fatal.
# Example:
cdd.continuous_testing_agent.id=my_ct_agent
cdd.continuous_testing_agent.cdd.url=http://{cdd-server-name}:8080/cdd
cdd.continuous_testing_agent.cdd.tenant_id=c914e1af-140b-4051-8ba5-0686b661f784
cdd.continuous_testing_agent.cdd.api_key=eyJhbGciOiJIUzUxMiJ9.JHGhgjhgJG
cdd.continuous_testing_agent.cdd.application=OnlineBanking
cdd.continuous_testing_agent.cdd.environment=Dev
cdd.continuous_testing_agent.packages.include=com.ca.cdd
cdd.continuous_testing_agent.packages.exclude=com.ca.cdd.ws,com.ca.cdd.controllers,com.ca.cdd.dao
cdd.continuous_testing_agent.cdd.url_path=/ct_agent
cdd.continuous_testing_agent.cdd.trust_self_signed_certificate=false
cdd.continuous_testing_agent.cdd.disable_host_verification=false
cdd.continuous_testing_agent.log.maximum_memory_size=8192
cdd.continuous_testing_agent.log.configuration_file=/home/cdd/.cdd/conf/ct_agent.logback.xml
cdd.continuous_testing_agent.log.level=trace
cdd.continuous_testing_agent.heartbeat_interval_in_milliseconds=0
cdd.continuous_testing_agent.maximum_idle_timeout_in_millis=60000
158

Continuous Delivery Director 8.5
cdd.continuous_testing_agent.api_key_path=
cdd.continuous_testing_agent.internet_proxy.url=
cdd.continuous_testing_agent.internet_proxy.username=
cdd.continuous_testing_agent.internet_proxy.password=
d) Run ct_agent.jar <java -jar ct_agent.jar>.
e) Verify that you are connected by checking the CT agent logs.
The log files are located at C:\<$CDD_HOME_FOLDER>\logs\ct_agent.log.
2. Install ct_agent dll on your Windows machine and run ct_agent dll with your application under test.
a) Install ct_agent.dll on your Windows machine.
Downloadct_agent.dll and put this file under C:\<CUSTOM_PATH>. For example:
<C:\incoming\ctagent\x64>
b) Configure the application under test.
Ensure that the application under test is running with the following environment variables:
NOTE
The COR_PROFILER is a .NET Framework feature that allows you to specify that the ct_agent.dll is
loaded into each applicable .NET process that loads the Common Language Runtime (CLR).
•
name="COR_PROFILER" value="{f42148d0-acbe-4fbe-be18-b46845e1a26a}"
The COR profiler ID of ct_agent.dll (must appear exactly as shown).
•
name="COR_PROFILER_PATH" value="C:\<CUSTOM_PATH>\ct_agent.dll"
The path to ct_agent.dll 32-bit
•
name="COR_PROFILER_PATH_64" value="C:\<CUSTOM_PATH>\ct_agent.dll"
The path to ct_agent.dll 64-bit
•
name="COMPLUS_ProfAPI_ProfilerCompatibilitySetting" value="EnableV2Profiler"
The profiler compatibility setting (must appear exactly as shown).
•
name="CDD_CT_AGENT_LOG_ENABLED" value="false"
(true/false; Default: false) Determines whether to disable logging completely.
•
name="CDD_CT_AGENT_LOG_CONSOLE_ENABLED" value="true"
(true/false; Default: false) Lets you keep a clean console for the profiled process, and possibly output logs only
to files.
•
name="CDD_CT_AGENT_LOG_LEVEL" value="trace”
(trace, debug, info, warning, error, fatal; Default: debug) Lets you control the granularity of the logging output.
•
name="CDD_HOME_FOLDER" value=“C:\<CDD_HOME_FOLDER>
(Default: read on) Specifies that the logs are written to a /logs sub-directory of this folder. If no folder is
provided, the logs are written to /tmp/cdd_profiler_logs.
•
name="CDD_CT_AGENT_INCLUDED_MODULES" value=“<Application under test name>”
(str1,str2,str3; Default: None) Filters functions (modules) by the containing dll/exe file. Only functions from
modules containing the provided string(s) are treated. Comma-separated strings - with no spaces before/after
the commas.
•
name="CDD_CT_AGENT_EXCLUDED_MODULES" value="module_prefixlong"
(str1,str2,str3; Default: None) Only applicable when some included modules (above) are defined - you can
exclude more specific module names.
•
name="CDD_CT_AGENT_INCLUDED_SOURCE_FILES" value=".cs"
(str1,str2,str3; Default: None) List functions defined in source files which include these strings.
•
name="CDD_CT_AGENT_EXCLUDED_SOURCE_FILES"
value="file_path_prefix3,file_path_prefix4 "
(str1,str2,str3; Default: None) List functions defined in source files which exclude these strings.
•
name="_NT_ALT_SYMBOL_PATH" value="C:\pdbs"
159

Continuous Delivery Director 8.5
The application under test .pdb file debugging output is copied to this path.
If the application under test is running under IIS, add the environment variables above to the
applicationHost.config file.
c) Make sure that the application under test is running as .NET Framework 4.7.
d) Make sure that the following DLLs exist on your server.
The $PATH environment variable specifies a set of directories where executable programs, such as DLLs, are
located. Validate that the Windows environment variable $PATH points to all DLL locations.
NOTE
If you prefer, you can also copy these DLLs to a specific location, and add this location to the $PATH
environment variable.
List of DLLs:
160

Continuous Delivery Director 8.5
•
C:\Windows\System32\advapi32.dll
•
C:\Windows\System32\bcrypt.dll
•
C:\Windows\System32\bcryptprimitives.dll
•
C:\Windows\Microsoft.NET\Framework64\v4.0.30319\clr.dll
•
C:\Windows\Microsoft.NET\Framework64\v4.0.30319\clrjit.dll
•
C:\Windows\System32\combase.dll
•
C:\Windows\System32\gdi32.dll
•
C:\Windows\System32\gdi32full.dll
•
C:\Windows\System32\imm32.dll
•
C:\Windows\System32\kernel.appcore.dll
•
C:\Windows\System32\kernel32.dll
•
C:\Windows\System32\KernelBase.dll
•
C:\Windows\System32\mscoree.dll
•
C:\Windows\Microsoft.NET\Framework64\v4.0.30319\mscoreei.dll
•
C:\Windows\Microsoft.NET\assembly\GAC_64\mscorlib
\v4.0_4.0.0.0__b77a5c561934e089\mscorlib.dll
•
C:\Windows\Microsoft.NET\Framework64\v4.0.30319\mscorrc.dll
•
C:\Windows\System32\msvcp_win.dll
•
C:\Windows\System32\msvcp140d.dll
•
C:\Windows\System32\msvcrt.dll
•
C:\Windows\System32\ntdll.dll
•
C:\Windows\System32\ole32.dll
•
C:\Windows\System32\oleaut32.dll
•
C:\Windows\System32\psapi.dll
•
C:\Windows\System32\rpcrt4.dll
•
C:\Windows\System32\sechost.dll
•
C:\Windows\System32\shlwapi.dll
•
C:\Windows\System32\ucrtbase.dll
•
C:\Windows\System32\ucrtbase_clr0400.dll
•
C:\Windows\System32\ucrtbased.dll
•
C:\Windows\System32\user32.dll
•
C:\Windows\System32\vcruntime140_1d.dll
•
C:\Windows\System32\vcruntime140_clr0400.dll
•
C:\Windows\System32\vcruntime140d.dll
•
C:\Windows\System32\version.dll
•
C:\Windows\System32\win32u.dll
•
C:\Windows\System32\ws2_32.dll
Continue to the instructions for running a .NET CT agent.
Run a .NET Continuous Testing Agent
Perform these steps to ensure that the .NET agent is available for use.
161

Continuous Delivery Director 8.5
•
The .NET agent is installed and configured.
•
The application under test is configured in IIS.
1. In IIS, start the application under test.
2. From the command line, start ct_agent:
java -jar c:\cdd\ct_agent.jar
To run the process in the background use javaw -jar c:\cdd\ct_agent.jar
The agent logs are available under C:\Users\<USER>\.cdd\logs\ct_agent.log or C:\Users\Administrator
\.cdd\logs\ct_agent.log. IIS profiler logs should appear under C:\Windows\System32\inetsrv, and can be
copied later to a custom-defined path such as C:\tmp\cdd_profiler\cdd_profiler_0.log.
When you access the application for the first time, a profiler success message should appear in Windows Event Viewer,
such as:
.NET Runtime version 4.0.30319.0 - The profiler was loaded successfully. Profiler CLSID: '{0gig07oymq-
vffh-2n29-zv6k-004h1v0f71}'. Process ID (decimal): 5624. Message ID: [0x2507].
Configure Java Continuous Testing Agents
Add continuous testing (CT) agents to your release pipelines to monitor and optimize Java application testing.
•
Continuous Delivery Director is installed with the Test module.
For more information, see Install Continuous Delivery Director with the Test Module
•
You have downloaded the ct_agent.jar file. For more information, see Continuous Testing Agent
The Continuous Testing Agent is a Java agent that is used by SUT (System Under Test) applications to monitor the
interactions between application source files and Continuous Delivery Director test suites.This monitoring is used to
determine which test suites to run when an application source file changes.
1. Configure settings.properties for both Continuous Delivery Director and the agent.
a) In the Continuous Delivery Director server, navigate to the home folder, and open settings.properties.
b) In settings.properties, ensure that the following property is set to true: cdd.ct_agent.enabled=true
c) In the Continuous Delivery Director server home folder, under the conf folder create a settings.properties
file.
d) Configure the settings.properties file as follows:
•
cdd.continuous_testing_agent.id
Specify a unique ID for the agent.
•
cdd.continuous_testing_agent.cdd.application
Specify the application name from Continuous Delivery Director.
•
cdd.continuous_testing_agent.cdd.environment
Specify the Continuous Delivery Director environment in which the CT agent runs.
•
cdd.continuous_testing_agent.cdd.api_key
Specify the Continuous Delivery Director API key of an authorized user, such as an integration user, release
manager, or administrator. You can find the API key in Continuous Delivery Director under My Settings.
•
cdd.continuous_testing_agent.cdd.url
Specify the URL to your Continuous Delivery Director instance.
•
cdd.continuous_testing_agent.cdd.tenant_id
Specify the tenant ID of your Continuous Delivery Director instance. You can find the tenant ID in Continuous
Delivery Director under My Settings.
•
cdd.continuous_testing_agent.packages.include
162

Continuous Delivery Director 8.5
Specify a comma-separated list of included packages (groups of classes, sub-packages, and interfaces).
•
cdd.continuous_testing_agent.packages.exclude
Specify a comma-separated list of excluded packages.
•
cdd.continuous_testing_agent.cdd.url_path
Specify the file path to the folder that contains the agent files.
•
cdd.continuous_testing_agent.cdd.trust_self_signed_certificate
Define whether to trust the Continuous Delivery Director self-signed certificates: true/false.
•
cdd.continuous_testing_agent.cdd.disable_host_verification
Define whether to disable host verification: true/false.
•
cdd.continuous_testing_agent.log.configuration_file
Specify the path to the agent log configuration file.
•
cdd.continuous_testing_agent.log.maximum_memory_size
Specify the maximum memory size of the agent log. Default is 100KB
•
cdd.continuous_testing_agent.log.level
Specify the granularity of the logging output. Possible entries: trace, debug (default), info, warning, error, fatal.
# Example:
cdd.continuous_testing_agent.id=my_ct_agent
cdd.continuous_testing_agent.cdd.url=http://{cdd-server-name}:8080/cdd
cdd.continuous_testing_agent.cdd.tenant_id=c914e1af-140b-4051-8ba5-0686b661f784
cdd.continuous_testing_agent.cdd.api_key=eyJhbGciOiJIUzUxMiJ9.JHGhgjhgJG
cdd.continuous_testing_agent.cdd.application=OnlineBanking
cdd.continuous_testing_agent.cdd.environment=Dev
cdd.continuous_testing_agent.packages.include=com.ca.cdd
cdd.continuous_testing_agent.packages.exclude=com.ca.cdd.ws,com.ca.cdd.controllers,com.ca.cdd.dao
cdd.continuous_testing_agent.cdd.url_path=/ct_agent
cdd.continuous_testing_agent.cdd.trust_self_signed_certificate=false
cdd.continuous_testing_agent.cdd.disable_host_verification=false
cdd.continuous_testing_agent.log.maximum_memory_size=8192
cdd.continuous_testing_agent.log.configuration_file=/home/cdd/.cdd/conf/ct_agent.logback.xml
cdd.continuous_testing_agent.log.level=trace
cdd.continuous_testing_agent.heartbeat_interval_in_milliseconds=0
cdd.continuous_testing_agent.maximum_idle_timeout_in_millis=60000
cdd.continuous_testing_agent.api_key_path=
cdd.continuous_testing_agent.internet_proxy.url=
cdd.continuous_testing_agent.internet_proxy.username=
cdd.continuous_testing_agent.internet_proxy.password=
2. Set a path type environment variable to the CT agent home folder: CDD_CT_AGENT_HOME_FOLDER.
After initialization, the agent determines that \conf\settings.properties is located at the specified path.
CDD_CT_AGENT_HOME_FOLDER=C:\Users\bob04\.cdd
3. Stop the Tomcat service.
For example, enter shutdown.sh.
4. In the SUT setenv.sh in the Tomcat bin folder, add the following lines if not found:
export CDD_HOME_FOLDER=/home/cdd/.cdd
export CATALINA_OPTS="$CATALINA_OPTS -javaagent:/home/cdd/.cdd/ct_agent.jar"
NOTE
The lines above are for the CentOS operating system.
163

Continuous Delivery Director 8.5
5. Upload ct_agent.jar to the /home/cdd/.cdd/ location you defined in the preceding step in the setenv.sh file.
6. Restart Tomcat.
Monitor Test Suite Executions Through APIs
View detailed information about test suite execution through REST calls.
You can retrieve test suite execution data for applications under test by phase names and ids using the test-suite-
executions REST API.
Type Description
GET https://<host>:<port>/cdd/cds/0000/v1/
applications/{applicationId}/application-
versions/{applicationVersionId}/test-suite-
executions
Method Parameters
Parameter Type Description
applicationId path[long] applicationId
applicationVersionId path[long] applicationVersionId
test_source query[long] testSourceId
sort_field query[string] sortField
sort_direction query[string] sortDirection
filter query[string] free text filter
endpointId query[long] freeTextFilter
tag query[string] tags
environment query[long] environmentId
release query[long] releaseId
phase Array[long] phaseIds
release_name query[string] releaseName
release_version query[string] releaseVersion
phaseName query[string] phaseName
embed Array[string] embedFields
test_suite_execution_status Array[string] testSuiteExecutionStatuses
page_number integer pageNumber
page_size integer pageSize
Response Parameters
HTTP Status Code Reason
401 Unauthorized
403 Forbidden
404 Not Found
164

Continuous Delivery Director 8.5
Curl
curl -X Get --header "Accept: application/json" "http://<host>:<port>/cdd/cds/0000/v1/applications/
{application-id}/application-versions/{application-version-id}/test-suite-executions"
Response Body
{
"data": [
{
"application": {
"displayName": "string",
"id": 0,
"name": "string"
},
"applicationVersion": {
"displayName": "string",
"id": 0,
"name": "string"
},
"applicationVersionChanges": [
{
"application": {
"displayName": "string",
"id": 0,
"name": "string"
},
"applicationVersion": {
"displayName": "string",
"id": 0,
"name": "string"
},
"buildNumber": "string",
"buildUrl": "string",
"changeId": "string",
"commitId": "string",
"creationDate": 0
}
],
"businessApplication": {
"displayName": "string",
"id": 0,
"name": "string"
},
"businessApplicationVersion": {
"displayName": "string",
"id": 0,
"name": "string"
},
"environments": [
{
"displayName": "string",
"id": 0,
"name": "string"
165

Continuous Delivery Director 8.5
}
],
"executionDuration": 0,
"executionEndDate": 0,
"executionStartDate": 0,
"externalId": "string",
"id": "string",
"isOnlyIntelligentTestSuites": true,
"name": "string",
"numberOfDisabledTestSuites": 0,
"numberOfErrorTestSuites": 0,
"numberOfFailedTestSuites": 0,
"numberOfIntelligentTestSuites": 0,
"numberOfSkippedTestSuites": 0,
"numberOfSuccessfulTestSuites": 0,
"numberOfTestSuites": 0,
"phase": {
"displayName": "string",
"id": 0,
"name": "string"
},
"phaseExecutionId": "string",
"pluginsCounter": [
{
"displayName": "string",
"id": 0,
"name": "string",
"numberOfDisabledTestSuites": 0,
"numberOfErrorTestSuites": 0,
"numberOfFailedTestSuites": 0,
"numberOfSkippedTestSuites": 0,
"numberOfSuccessfulTestSuites": 0
}
],
"release": {
"displayName": "string",
"id": 0,
"name": "string",
"project": {
"displayName": "string",
"id": 0,
"name": "string"
},
"version": "string"
},
"strategyCounters": [
{
"count": 0,
"strategies": [
"string"
]
}
],
166

Continuous Delivery Director 8.5
"tags": [
"string"
],
"task": {
"displayName": "string",
"id": 0,
"name": "string"
},
"testSuiteResults": [
{
"application": {
"displayName": "string",
"id": 0,
"name": "string"
},
"applicationVersion": {
"displayName": "string",
"id": 0,
"name": "string"
},
"applicationVersionChanges": [
{
"application": {
"displayName": "string",
"id": 0,
"name": "string"
},
"applicationVersion": {
"displayName": "string",
"id": 0,
"name": "string"
},
"buildNumber": "string",
"buildUrl": "string",
"changeId": "string",
"commitId": "string",
"creationDate": 0
}
],
"businessApplication": {
"displayName": "string",
"id": 0,
"name": "string"
},
"businessApplicationVersion": {
"displayName": "string",
"id": 0,
"name": "string"
},
"endpoint": {
"displayName": "string",
"id": 0,
"name": "string"
167

Continuous Delivery Director 8.5
},
"environments": [
{
"displayName": "string",
"id": 0,
"name": "string"
}
],
"executionDetailedStatusDescription": "string",
"executionDuration": 0,
"executionEndDate": 0,
"executionStartDate": 0,
"executionStatusDescription": "string",
"externalId": "string",
"id": "string",
"name": "string",
"numberOfFailedTestCases": 0,
"numberOfSuccessfulTestCases": 0,
"phase": {
"displayName": "string",
"id": 0,
"name": "string"
},
"phaseExecutionId": "string",
"phaseExecutionStartDate": 0,
"plugin": {
"displayName": "string",
"id": 0,
"name": "string"
},
"release": {
"displayName": "string",
"id": 0,
"name": "string",
"project": {
"displayName": "string",
"id": 0,
"name": "string"
},
"version": "string"
},
"resultURL": "string",
"strategies": [
"string"
],
"tags": [
"string"
],
"task": {
"displayName": "string",
"id": 0,
"name": "string"
},
168

Continuous Delivery Director 8.5
"testCaseResults": [
{
"buildUrl": "string",
"changeId": "string",
"executionDuration": 0,
"executionEndDate": 0,
"executionStartDate": 0,
"executionStatus": "PASSED",
"externalId": "string",
"id": "string",
"name": "string",
"resultMessage": "string",
"resultURL": "string",
"testSuiteResultId": "string"
}
],
"testSuite": {
"id": "string",
"name": "string"
},
"testSuiteExecutionEndDate": 0,
"testSuiteExecutionOrder": 0,
"testSuiteExecutionStatus": "PASSED",
"testSuitesExecutionId": "string"
}
]
}
],
"maxNumberOfTestSuites": 0,
"pageNumber": 0,
"pageSize": 0,
"totalResultsCount": 0
}
Response Code
200
1. Log in to Continuous Delivery Director.
2. In the menu bar, click the initials of your user account
,
then select REST API.
3. Scroll down to the CDS section, and select test-suite-executions, then GET /applications/
{applicationId}/application-versions/{applicationVersionId}/test-suite-executions.
4. Specify the query parameters and run the API.
You must specify the application id and the application version id.
Related Links
REST API Reference on page 621
REST APIs let external systems configure, execute, and monitor release operations and applications without the need to
access the UI.
169

Continuous Delivery Director 8.5
View Adaptive Testing Results
You can view test results after a phase that includes an Adaptive Testing task runs.
You can access test details per test framework through the Adaptive Testing Results page. You can view the test status
and logs, and identify which tests failed. If you use Jenkins as your continuous integration hub, you can click a build
number to directly access build-related information and log files in Jenkins.
1. From Tests, click Adaptive Testing Results.
2. Configure the following filters:
•
Show By
Select either Application or Business Application.
•
Application/Business Application
Specify an application/business application name.
•
Application/Business Application Version
Specify an application/business application version number.
A list of test results displays.
3. To see results by test framework, such as Gradle Testing, select a table row, then click Results.
To see the release containing the adaptive testing task that has been executed, click the release name.
To see a popover summarizing the test execution results, click a table row on the Adaptive Testing Results page
Integration Testing
When applications (components or microservices) are logically grouped together in a business application, performing
integration tests is very important.
A typical release consists of multiple applications. Each application has its own set of tests that identifies defects of the
specific application. The purpose of integration testing is to expose defects in the interactions between applications and
subcomponents that are integrated into a business application. Successful integration tests ensure that the component
parts of your business application work correctly together as well as separately.
Table 2: Unit Testing vs. Integration Testing
Unit Testing Integration Testing
Tests each unit individually to make sure that application/
subcomponent works properly independent of other units.
Test applications/subcomponents together to make sure they can
be incorporated with each other without any issues.
Can be performed at any time. Is performed after unit testing. In Agile methodology, the order of
unit tests and integration tests is not important.
Can only detect errors within a single unit. Can detect errors resulting from units interacting with one another.
If you work according to the principles of Agile software development, you can perform integration testing continuously.
In continuous integration, you merge source code updates from all developers on a team into a shared codebase. By
continually merging source code and integration testing, you can avoid catastrophic merge conflicts. The Adaptive
Testing Results page and the Release Quality Report help you quickly locate the root cause of errors in integration
testing.
Continuous Delivery Director and Integration Testing
Continuous Delivery Director provides a comprehensive solution for performing integration testing. You can:
170

Continuous Delivery Director 8.5
•
Create test sources for business application versions and import tests. For more information, see Setting Up the Test
Module.
•
Create releases for each business application version and associate the relevant applications with the release. For
more information, see Create a Release.
•
Run integration tests through adaptive testing tasks in release phases. For more information, see Test Module Actions.
•
View integration test outcomes on the Adaptive Testing Results page. For more information, see View Adaptive
Testing Results.
•
Look at the release quality by business application in the Release Quality Report.. For more information, see Reports.
•
Import tests for a business application version. For more information, see Import and Export Test Sources.
•
Duplicate releases with business applications. For more information, see Duplicate Releases.
•
Assess the release risk taking into account business application testing using release scores. For more information,
see Release Risk Score.
•
Export releases with the business application version test sources embedded in the release DSL. For more
information, see Pipelines as Code.
Test Advisor
The test module includes the Test Advisor, an AI-based tool that helps you reduce your test cycle time by only running a
subset of your tests.
Working in Agile, development teams need short development and test cycles to rapidly deliver high-quality software
updates. You can add to your test pipeline an ever-increasing number of test frameworks (functional, APIs, performance,
and so on), test automation, and several CD/CI integration platforms. However, you need to balance the need for short
test cycles with the need to conduct the required tests. You need to fail fast, minimize the time taken to identify the root
causes of failures and fix problems immediately. Failing to deliver on time and at high-quality negatively impacts your
business.
The Test Advisor is an innovative approach to handling test cycles. This tool saves developer time by eliminating the
need to wait for test cycles to finish. A pipeline that contains a lot of test suites will take a long time to run, no matter how
automated that test pipeline is.
The Test Advisor helps you reduce testing time by intelligently selecting a subset of test suites.
Figure 23: Test Advisor-selected test suites
The Test Advisor also ensures that the test suites selected are relevant to the code changes because not all test suites
are relevant to the code changes that are made.
Using the Test Advisor tool, Continuous Delivery Director can shorten the time taken to run test suites, give fail fast
feedback to developers, and reduce the load on test environments. How does Continuous Delivery Director select the test
suites to run? Continuous Delivery Director uses a number of heuristics to determine which test suites to run:
•
Tests associated with code changes
•
Flaky tests
•
New or updated test suites
•
Tests marked as important
171

Continuous Delivery Director 8.5
Figure 24: Test Advisor uses heuristics
Tests Associated with Code Changes
Continuous Delivery Director uses the Test Advisor to run only those tests that are associated with the changed code.
Currently, Continuous Delivery Director uses an agent that is based on Java.
The agent (ct_agent) that is installed on the environment where the business application/application that is being tested
associates the test suites with the files that are changed as a result of the tests. The agent receives a notification from
Continuous Delivery Director every time a test suite is started. The agent identifies the classes that are examined. Then
Continuous Delivery Director notifies the agent that the test suite is complete. At the end of the test execution, the agent
generates a mapped list of all the files that were changed and the test suites that examined the changed files.
172

Continuous Delivery Director 8.5
Figure 25: Changed files mapping
The mapping information is sent to Continuous Delivery Director, and Continuous Delivery Director builds a map where
every analyzed file is associated with the test suites that analyzed that file. When a new build notification arrives.
Continuous Delivery Director finds and analyzes the list of files that were updated in the build. Continuous Delivery
Director then maps those files and generates a list of the test suites that are related to the updated files.
Figure 26: Test Advisor lists changed code files and associated test suites
Flaky Tests
The next heuristic is flaky tests. These are test suites with one or more of the following characteristics:
173

Continuous Delivery Director 8.5
•
Test suites that have failed many times in past executions
•
Test suites that are erratic and change from success to failure in successive test cycles
•
Test suites that have failed in the previous execution
If there is a discernable trend in the test suite results and the last several test runs are all successful then a test is not
identified as a flaky test. This kind of test result shows that an issue existed, but was subsequently fixed.
A test can be flaky because of a problem in the code or because of a problem in the test itself. A test suite that is identified
as flaky is automatically selected for the next test cycle.
New or Updated Test Suites
The next heuristic is new or updated test suites. For example, a developer adds a test suite or updates an existing test
suite with new test cases. Continuous Delivery Director can identify new or updated test suites through the test framework
plug-ins. These plug-ins supply new and updated test suite information to Continuous Delivery Director in different ways
but the result is the same - Continuous Delivery Director can identify changes in the tests in the various test frameworks.
The Test Module synchronizes test suites automatically. New and updated tests become part of the next test cycle and
are also part of the mapping that takes place during the test cycle. The next time the test cycle is run, any of the new and
updated test suites that are associated with changed files will be run as part of the test cycle and also subsequently if
these test suites stay relevant.
The last heuristic is identifying those tests that are marked by a user as important, and therefore as mandatory parts of the
test cycle. Continuous Delivery Director run important test suites in every execution of an adaptive testing task.
When you set up the agent, you can configure the agent to ignore parts of the code such as classes that are not relevant,
for example, because these parts of the code are third-party.
Tests Marked as Important
The last heuristic is identifying those tests that are marked as important, and therefore as mandatory parts of the test
cycle. Continuous Delivery Director runs important test suites in every execution of an adaptive testing task.
To mark a test as important, you select the Must run - Run Test Suite in Every Test Cycle option in the Edit Test Suite
page.
When you set up the agent, you can configure the agent to ignore parts of the code such as classes that are not relevant,
for example, because these parts of the code are third-party.
Test Advisor and Test Cycles
When all of the above heuristics have run, the test selection process is completed. When you set up adaptive testing
tasks in Continuous Delivery Director, you can either choose to run all tests or a Test Advisor-selected subset of tests as
described in this section.
To run the Test Advisor in your test cycles, in a Run Adaptive Testing task, select the Run a subset of test suites
selected by the Test Advisor option.
TIP
We recommend that you run all of the test suites at least for the first time in the test pipeline so that Continuous
Delivery Director can build the mapping before using the Test Advisor option. Once Continuous Delivery Director
has mapped the tests, we suggest that you use the Test Advisor in the earlier phases of a release pipeline to
fail fast and to identify issues to fix. In the later phases of the release pipeline, such as the pre-Production and
Production phases, we suggest that you again run all the tests to identify any outstanding issues.
Using the Test Advisor for test cycles:
174

Continuous Delivery Director 8.5
•
Saves time
•
Helps you select test suites wisely and see the breakdown
•
Lets you view results for each test framework
Test Advisor Summary
After a test cycle, you can see the execution results in a pop-up window, the Test Advisor Summary. You can access the
Test Advisor Summary as follows:
•
In an Adaptive Testing task that has run, hover over the task status:
Figure 27: Invoking the Test Advisor Summary - Adaptive Testing Task
The Task Advisor Summary pops up:
175

Continuous Delivery Director 8.5
Figure 28: Test Advisor Summary in an Adaptive Testing Task
•
In the Release Quality by Business Application/Application Version report, hover over the Test Distribution bar
graph:
176

Continuous Delivery Director 8.5
Figure 29: The Test Advisor Summary in the Release Quality Report
Test Suite Priority
The Test Advisor prioritizes which test suites to run in every test cycle according to the following heuristics:
•
New
The Test Advisor runs new test suites and test suites that have been added since the last test execution.
The Test Advisor automatically synchronizes the test catalog against the test repositories and determines if a new test
suite has been added.
•
Flaky
Flaky test suites:
–
Have failed many times in previous executions
–
Are unstable - results alternate frequently between success and failure
–
Have failed in the previous execution
The Test Advisor parses all saved test execution results to identify flaky tests. A test that fails frequently has a higher
chance of being selected
•
Error
The Test Advisor identifies tests that have not run due to system or environmental errors. These tests are automatically
included in the list of tests to run.
•
Relevant
177

Continuous Delivery Director 8.5
Continuous Delivery Director runs only those test suites that are relevant to the changes in the code that have
triggered the adaptive testing task. When a new build enters the CD pipeline, the Test Advisor identifies the classes
that have changed and selects the test suites that cover it.
•
Changed
Runs test suites that have been updated since the last test execution.
The Test Advisor automatically synchronizes the test catalog against the test repositories and determines if an existing
test suite has been updated.
•
Must Run
You can select mission-critical test suites to be included with the prioritized test suites in every test cycle. In Edit Test
Suite, select Must run - Run Test Suite in Every Test Cycle. Continuous Delivery Director runs these test suites in
every execution of the associated adaptive testing task.
For more information, see Test Module Actions.
Test Advisor Analytics and Release Quality
You can see detailed information about the quality of your release and quickly assess any risks. You can also use this
report to evaluate the effectiveness of your test automation strategy.
Figure 30: Release Quality Report
The data for this report includes all releases that have been created in the workspace by any user.
You can also see test information for any associated work items that are defined in your agile management tool (Jira/
Rally).
You can use the Release Quality Report to:
178

Continuous Delivery Director 8.5
•
Save time
•
Select test suites wisely and see the breakdown
•
View results per test framework
•
Optimize test coverage and find gaps in the test plan
The Release Quality report provides the following information:
•
General Information
–
Number of builds that exist for the specified business application version/application version.
–
Time saved during test suite execution due to implementation of Test Advisor recommendations.
–
Number of flaky test suites detected either with inconsistent execution results or test suites failed on the last
execution.
–
Number of files without test coverage.
–
Number of tests/test suites that have failed
•
Test Distribution
–
Bar graph showing the distribution of test suite execution. To see more information, hover over the bar graph.
–
Number of failed tests out of total tests recommended by the Test Advisor.
–
Number of failed tests out of total tests not recommended by the Test Advisor.
–
Time to first test failure.
–
Adaptive Testing task duration.
–
Change ID of build or commit that triggered the Adaptive Testing task.
NOTE
If you use Jenkins as your continuous integration hub, you can click the build number to directly access
build-related information and log files in Jenkins.
–
Details of phase containing the Adaptive Testing task executed. Hover over the phase name to see the details.
–
Testing framework from where the test suites were imported.
•
Code Churn
Shows in graphical format the code churn in releases and in business application versions/application versions. This
heuristic is updated on every commit.
•
Flaky Test Suites
Lists the flaky test suites detected either with inconsistent execution results, or test suites that failed on the last
execution.
•
Uncovered / Updated Files
Lists the files that were changed during the release but have no associated test suites.
•
Incomplete Work Items
Shows information about the test coverage of work items in a given release (features, user stories, defects, and so
on). This graph shows how well a work item has been tested and whether that work item has passed or failed the
associated tests.
For every release work item, you can see:
–
The commits that have been done for this work item, and the test coverage status.
–
The tests executed for a specific work item and how many of them are flaky.
To access the report, select Reports, then Release Quality from the top menu. Alternately, in a release, open the
hamburger menu and click Go to Release Quality Report.
To create a new report, open the Release Quality report and select releases, business applications, business application
versions, applications, and application versions.
Follow these steps:
1. Open the Release Quality report and in Release, specify a release name.
179

Continuous Delivery Director 8.5
The Business Application Version/Application Version Report summary is displayed.
2. Under Business Application Version/Application Version Report, select the release name.
The Release Quality by Business Application Version/Application Version report is displayed.
Note: You can change the release and business application/application version as needed.
NOTE
The following videos are extracted from the Test Orchestration training course. This course provides extra
information, context, and examples to augment the product documentation.
To access this course, see Broadcom Enterprise Software Academy.
Mark Tests as Must Run
This video shows you how to mark tests as Must Run in Continuous Delivery Director. This setting ensures that these
critical path tests run in every test execution.
Enable Adaptive Testing
This video shows how to enable adaptive testing for a Continuous Delivery Director release. Enable adaptive testing for
Continuous Delivery Director to intelligently run only the appropriate tests based on heuristics.
Test Orchestration Results And Reporting
This video shows how to view test results and key reports with test metrics in Continuous Delivery Director.
Continuous Testing Agents
Dedicated programs collect and analyze adaptive testing metrics.
Version 2.2
Continuous Testing (CT) agents are automated services that poll test sources to verify if specified test suites have been
updated. The agent is a data-gathering component. This component collects detailed information about applications
under test as test suites are executed. After the tests are run, the agent reports the collected data to Continuous Delivery
Director. An agent:
•
Analyzes the interactions between application source files and test suites.
•
Determines which test suites are executed when an application source file changes.
•
Is referenced by an AUT (application under test) when a new build triggers testing in a release.
•
Connects to Continuous Delivery Director using the WebSocket protocol.
Agents are installed in an environment where a business application/application is being tested. An agent receives a
notification from Continuous Delivery Director every time a test suite is started. The agent identifies the classes that are
examined. Then Continuous Delivery Director notifies the agent that the test suite is complete. At the end of the test
execution, the agent generates a mapped list of all the files that were changed and the test suites that examined the
changed files. This mapping is used by Continuous Delivery Director to instruct the Test Advisor to recommend running
only those tests that are associated with the changed code.
The following illustration shows a simple deployment in which an agent collects application and test metrics and relays this
information to Continuous Delivery Director. You can view these metrics in releases and reports.
180

Continuous Delivery Director 8.5
Figure 31: CT Agent Architecture
There are two types of CT agents:
•
.NET
For testing applications written in C# (C sharp).
•
Java
For testing Java applications.
Download Options
Use one of the following options to download the latest CT agent (ct_agent.jar) version:
181

Continuous Delivery Director 8.5
IMPORTANT
Downloading the ct_agent.jar file is a prerequisite for installing both the .NET and Java CT agents.
Method Info
wget wget -O ct_agent.jar https://
cspdl.broadcom.com/s/
vklrdye94fyyfi7nw99frkf2y7dnt1h8?
LCK=ent.box.com
MD5 edee233c7befd5bf96c6aa32047cd627
Click Download Button
Use one of the following options to download the latest CT agent DLL (ct_agent.dll) file:
IMPORTANT
Downloading the ct_agent.dll file is a prerequisite for installing the .NET CT agent only.
Method Info
wget wget -O ct_agent.jar https://
cspdl.broadcom.com/s/
d6cwhh8hht0n7p1dzm02xslzubacxg9l?
LCK=ent.box.com
MD5 4daf434c3dba818499302548e68a2a8b
Click Download Button
Configure Continuous Testing Agents
Add continuous testing (CT) agents to your release pipelines to monitor and optimize application testing.
A machine is provisioned where Continuous Delivery Director is installed and activated.
Continuous Delivery Director provides the following types of CT agents:
•
.NET
For testing applications written in C# (C sharp).
•
Java
For testing Java applications.
The following procedure contains setup instructions for the settings.properties files.
NOTE
These instructions are relevant to both the .NET and the Java CT agent types.
1. In the Continuous Delivery Director server, navigate to the home folder, and open settings.properties.
2. In settings.properties, ensure that the following property is set to true: cdd.ct_agent.enabled=true
3. In the Continuous Delivery Director server home folder, under the conf folder create a settings.properties file:
cdd.continuous_testing_agent.cdd.application=<application name from CDD>
182

Continuous Delivery Director 8.5
cdd.continuous_testing_agent.cdd.environment=<env name from CDD>
cdd.continuous_testing_agent.cdd.api_key=<API key from CDD>
cdd.continuous_testing_agent.cdd.url=http://<CDD hostname>:8080/cdd/
cdd.continuous_testing_agent.cdd.tenant_id=00000000-0000-0000-0000-000000000000
cdd.continuous_testing_agent.packages.include=com.ca.cdd
cdd.continuous_testing_agent.packages.exclude=com.ca.cdd.ws,com.ca.cdd.controllers,com.ca.cdd.dao
cdd.continuous_testing_agent.cdd.url_path=/ct_agent
cdd.continuous_testing_agent.cdd.trust_self_signed_certificate=true
cdd.continuous_testing_agent.cdd.disable_host_verification=true
cdd.continuous_testing_agent.log.configuration_file=/home/cdd/.cdd/ct_agent.logback.xml
cdd.continuous_testing_agent.log.maximum_memory_size=800
cdd.continuous_testing_agent.log.level=trace
4. Set a path type environment variable to the CT agent home folder: CDD_CT_AGENT_HOME_FOLDER.
After initialization, the agent determines that \conf\settings.properties is located at the specified path.
CDD_CT_AGENT_HOME_FOLDER=C:\Users\bob04\.cdd
Continue to the instructions for configuring either a .NET or a Java CT agent.
Configure a Java CT Agent
To monitor adaptive testing tasks running on Java applications in a release, you install and configure a Java CT Agent on
the Continuous Delivery Director server.
•
Continuous Delivery Director is installed with the Test module. For more information, see Install Continuous Delivery
Director with the Test Module
•
You have downloaded the ct_agent.jar file. For more information, see Continuous Testing Agent
The Continuous Testing Agent is a Java agent that is used by SUT (System Under Test) applications to monitor the
interactions between application source files and Continuous Delivery Director test suites.
This monitoring is used to determine which test suites to run when an application source file changes.
1. Stop the Tomcat service.
For example, enter shutdown.sh.
2. In the SUT setenv.sh in the Tomcat bin folder, add the following lines if not found:
export CDD_HOME_FOLDER=/home/cdd/.cdd
export CATALINA_OPTS="$CATALINA_OPTS -javaagent:/home/cdd/.cdd/ct_agent.jar"
NOTE
The lines above are for the CentOS operating system.
3. Upload ct_agent.jar to the /home/cdd/.cdd/ location you defined in the preceding step in the setenv.sh file.
4. Restart Tomcat.
Configure a .NET CT Agent
Install and configure a .NET CT Agent on the Continuous Delivery Director server so that you can monitor adaptive testing
tasks running on C# (C sharp) applications in a release.
183

Continuous Delivery Director 8.5
•
Windows Server 2019 or Windows 10
•
Java (JRE) 8 or higher is installed and enabled
•
A CDD_HOME_FOLDER environment variable is configured on the Windows Server
Follow this procedure to prepare a Windows environment with a working CT agent for adaptive testing. The CT agent
requires that IIS and specific IIS components be enabled on Windows Server 2019 or Windows 10. The setup cannot
proceed if IIS is not detected and specific IIS components are not enabled.
1. Run the CT agent Java application on Windows.
a) Copy ct_agent.jar to the $CDD_HOME_FOLDER\lib directory. <link to the ct agent.jar download page>
•
The default home folder of OS user cdd is: \home\cdd
•
The default home folder of the Continuous Delivery Director product is: \home\cdd\.cdd
b) Under C:\<$CDD_HOME_FOLDER>\conf, create a settings.properties file.
C:\cdd\conf\settings.properties
c) Configure the settings.properties file as shown above.
d) Run ct_agent.jar <java -jar ct_agent.jar>
e) Verify that you are connected by checking the CT agent logs.
The log files are located at C:\<$CDD_HOME_FOLDER>\logs\ct_agent.log.
2. Install ct_agent dll on your Windows and run it with your application under test.
a) Install ct_agent.dll on your Windows machine.
Get ct_agent.dll from <link to the ct agent.dll download page> and put it under C:\<CUSTOM_PATH>. For example:
<C:\incoming\ctagent\x64>
b) Configure the application under test.
Ensure that the application under test is running with the following environment variables:
184

Continuous Delivery Director 8.5
•
name="COR_PROFILER" value="{f42148d0-acbe-4fbe-be18-b46845e1a26a}" - COR profiler ID of
ct_agent.dll ( need to be exact as display)
•
name="COR_PROFILER_PATH" value="C:\<CUSTOM_PATH>\ct_agent.dll" - path to ct_agent.dll 32 bit
•
name="COR_PROFILER_PATH_64" value="C:\<CUSTOM_PATH>\ct_agent.dll" - path to ct_agent.dll
64 bit
•
name="COMPLUS_ProfAPI_ProfilerCompatibilitySetting" value="EnableV2Profiler" -
Profiler compatibility setting, should be exact as displayed.
•
name="CDD_CT_AGENT_LOG_ENABLED" value="false" - (true/false; Default: false) Whether to disable
logging completely.
•
name="CDD_CT_AGENT_LOG_CONSOLE_ENABLED" value="true" - (true/false; Default: false) Lets the user
keep a clean console for the profiled process, and possibly output logs only to files.
•
name="CDD_CT_AGENT_LOG_LEVEL" value="trace” - (trace, debug, info, warning, error, fatal; Default:
debug)
•
name="CDD_HOME_FOLDER" value=“C:\<CDD_HOME_FOLDER> - (Default: read on) The logs will be written
to a /logs sub-directory of this folder. If none is provided, the logs will be written to /tmp/cdd_profiler_logs .
•
name="CDD_CT_AGENT_INCLUDED_MODULES" value=“<Application under test name>” -
(str1,str2,str3; Default: None) Filtering by the containing dll/exe file. Only functions from modules containing the
provided string(s) are treated. Comma separated strings - with no spaces before/after the commas.
•
name="CDD_CT_AGENT_EXCLUDED_MODULES" value="module_prefixlong" - (str1,str2,str3; Default:
None) Only when some includes (above) are defined - you are able to exclude - more specific module names.
•
name="CDD_CT_AGENT_INCLUDED_SOURCE_FILES" value=".cs" - (str1,str2,str3; Default: None)
Functions defined in source files which include those strings.
•
name="CDD_CT_AGENT_EXCLUDED_SOURCE_FILES"
value="file_path_prefix3,file_path_prefix4 " - (str1,str2,str3; Default: None)
•
name="_NT_ALT_SYMBOL_PATH" value="C:\pdbs" - application under test .pdb file should copy to this
path.
For example, if the application under test is running under IIS, add the environment variables above to the
applicationHost.config file.
c) Make sure that the application under test is running as .NET Framework 4.7.
d) Make sure that the following DLLs exist on your server.
The %PATH% environment variable specifies a set of directories where executable programs, such as DLLs, are
located. Validate that the Windows environment variable %PATH% points to all DLL locations.
NOTE
If you prefer, you can also copy these DLLs to a specific location, and add this location to the %PATH%
environment variable.
List of DLLs:
185

Continuous Delivery Director 8.5
•
C:\Windows\System32\advapi32.dll
•
C:\Windows\System32\bcrypt.dll
•
C:\Windows\System32\bcryptprimitives.dll
•
C:\Windows\Microsoft.NET\Framework64\v4.0.30319\clr.dll
•
C:\Windows\Microsoft.NET\Framework64\v4.0.30319\clrjit.dll
•
C:\Windows\System32\combase.dll
•
C:\Windows\System32\gdi32.dll
•
C:\Windows\System32\gdi32full.dll
•
C:\Windows\System32\imm32.dll
•
C:\Windows\System32\kernel.appcore.dll
•
C:\Windows\System32\kernel32.dll
•
C:\Windows\System32\KernelBase.dll
•
C:\Windows\System32\mscoree.dll
•
C:\Windows\Microsoft.NET\Framework64\v4.0.30319\mscoreei.dll
•
C:\Windows\Microsoft.NET\assembly\GAC_64\mscorlib\v4.0_4.0.0.0__b77a5c561934e089\mscorlib.dll
•
C:\Windows\Microsoft.NET\Framework64\v4.0.30319\mscorrc.dll
•
C:\Windows\System32\msvcp_win.dll
•
C:\Windows\System32\msvcp140d.dll
•
C:\Windows\System32\msvcrt.dll
•
C:\Windows\System32\ntdll.dll
•
C:\Windows\System32\ole32.dll
•
C:\Windows\System32\oleaut32.dll
•
C:\Windows\System32\psapi.dll
•
C:\Windows\System32\rpcrt4.dll
•
C:\Windows\System32\sechost.dll
•
C:\Windows\System32\shlwapi.dll
•
C:\Windows\System32\ucrtbase.dll
•
C:\Windows\System32\ucrtbase_clr0400.dll
•
C:\Windows\System32\ucrtbased.dll
•
C:\Windows\System32\user32.dll
•
C:\Windows\System32\vcruntime140_1d.dll
•
C:\Windows\System32\vcruntime140_clr0400.dll
•
C:\Windows\System32\vcruntime140d.dll
•
C:\Windows\System32\version.dll
•
C:\Windows\System32\win32u.dll
•
C:\Windows\System32\ws2_32.dll
Continue to the instructions for running a .NET CT agent.
Run a .NET Continuous Testing Agent
Perform these steps to ensure that the .NET agent is available for use.
The .NET agent is installed and configured.
1. In IIS, start the application under test.
2. From the command line, start ct_agent:
java -jar c:\cdd\ct_agent.jar
186

Continuous Delivery Director 8.5
To run the process in the background use javaw -jar c:\cdd\ct_agent.jar
The agent logs are available under C:\Users\<USER>\.cdd\logs\ct_agent.log or C:\Users\Administrator
\.cdd\logs\ct_agent.log. IIS profiler logs should appear under C:\Windows\System32\inetsrv, and can be
copied later to a custom-defined path such as C:\tmp\cdd_profiler\cdd_profiler_0.log.
When you access the application for the first time, a profiler success message should appear in Windows Event Viewer,
such as:
.NET Runtime version 4.0.30319.0 - The profiler was loaded successfully. Profiler CLSID: '{0gig07oymq-
vffh-2n29-zv6k-004h1v0f71}'. Process ID (decimal): 5624. Message ID: [0x2507].
Test Module Actions
This topic lists the actions available when the test module is configured.
TROUBLE
If the Test Advisor does not work as expected, check that the API key is configured correctly for the current
project.
Action Steps Description
Sync Tests
1. In Adaptive Testing Catalog, select
the Test Sources tab.
2. Select one or more test sources.
3. A floating actions menu appears above
the test sources table.
4. Click the Sync icon.
Syncs all tests added to or removed from
the system since the last import.
Filter Test Suites Filters test suites by tags.
187

Continuous Delivery Director 8.5
Sort Test Suites Select the icon next to the field header, to
sort the list in ascending or descending
order.
To find test suites quickly, you can sort the
Adaptive Testing Catalog list by Import
Date, Endpoint Name, Test Suite Name,
or Test Source Name.
Note: Uppercase letters are always sorted
first.
Edit Test Suites
1. In the Adaptive Testing Catalog,
select the Test Suites tab, and click a
test suite name.
The Edit Test Suite dialog opens.
2. You can add or remove tags. To
ensure that the test suites run in every
execution of the associated adaptive
testing task, select Must run - Run
Test Suite in Every Test Cycle.
Create an Adaptive Testing Task
1. Under Releases, select a release
2. In a phase, select Create Task.
3. In Task Type, select Run Adaptive
Testing.
4. In Tags, start to type to specify one or
more tags. Leave empty to execute all
the test suites under the application
version.
5. In Build/Commit ID, specify the build
number or commit ID of the code to
test.
6. Optionally, select Run a subset of test
suites selected by the Test Advisor.
7. Select Create.
View Application Testing Insights After a Phase that includes an Adaptive
Testing task runs, go to Tests and select
Application Testing Insights.
Application Testing Insights helps you
find the trend or anomaly in tests that have
run.
A bar graph displays the percentage of
successful test suite executions in a given
phase. If you want to see more details,
select on a specific column in the graph.
If you use Jenkins as your continuous
integration hub, you can click a build
number to directly access build-related
information and log files in Jenkins.
NOTE
The following videos are extracted from the Test Orchestration training course. This course provides extra
information, context, and examples to augment the product documentation.
To access this course, see Broadcom Enterprise Software Academy.
Mark Tests as Must Run
This video shows you how to mark tests as Must Run in Continuous Delivery Director. This setting ensures that these
critical path tests run in every test execution.
188

Continuous Delivery Director 8.5
Create Testing Task
This video shows how to create an adaptive testing task in Continuous Delivery Director. This task runs the relevant tests
each time the phase is run.
Run Testing Task
This video shows how to run an adaptive testing task in a Continuous Delivery Director release and how to view test
results after the task completes.
Update Test Tags
This view shows how to update test tags in a Continuous Delivery Director release. You can update tasks between
release runs to change whether or not the test runs.
Import and Export Test Sources
You can export and import the test sources of business application versions or application versions.
Importing and exporting test sources saves manual labor. You can either import test sources from a URL or from your
local machine.
Import a Test Source
1. From Tests, click Adaptive Testing Catalog.
2. Click the Import icon.
The IMPORT TEST SOURCE dialog opens.
3. Do one of the following:
•
a. Select Repository.
b. Specify a file source to retrieve application-related JSON files.
NOTE
To create a file source, in RELEASES, click File Sources, then New File Source.
c. Specify a relative file path to a JSON file in your source control repository.
•
a. Select Local Machine.
b. Browse to the required DSL file.
4. Click Import.
Export a Test Source
1. From Tests, click Adaptive Testing Catalog.
2. Configure the following filters:
•
Show By
Select either Application or Business Application.
•
Application/Business Application
Specify an application/business application name.
•
Application/Business Application Version
Specify an application/business application version number.
3. Click Test Sources.
A list of Test Sources for the specified application/business application version displays.
189

Continuous Delivery Director 8.5
4. Select a test source table row.
5. Click the Export icon.
Continuous Delivery Director generates a DSL file download with the test source JSON.
{
"objects": [
{
"applicationVersion": "Local|AppForNewWebBankingRegulations/VER01",
"name": "cdd-app-integration-testing",
"kind": "TestSource",
"endpoint": "Gradle WebBanking app repo",
"plugin": "proxy_id|Gradle Testing/1.9",
"parameters": {
"jvmParameters": "-Dtest.HOST=E2E-integration-unit-testing-platform.broadcom.net",
"branch": "nightly"
},
"type": "Import Test Suites",
"tags": [
"integrationTests"
]
}
]
}
Test Source Templates
Test Source Templates are predefined configurations that help test designers quickly create test sources for new
application versions.
When the CI tool sends a build notification for a new application version (branch), CDD creates the application version,
and based on the Test Source Templates creates the test sources and imports the tests. This process replaces the
manual step of copying the test source from the previous application version and allows for a fully automated CI/CD
pipeline without human intervention.
More Information:
•
Create Test Source Templates
•
Export Test Source Templates Parameters
•
Import/Export Test Source Templates
•
Remove Test Source Templates
Create Test Source Templates
You have been granted Can manage applications permissions.
1. From the Tests menu, click Test Source Templates.
2. Select the application.
3. Click New Test Source Template.
4. Enter a name for the test source template and select a plug-in and an endpoint.
A list of import and execution parameters appears for the selected plug-in and endpoint.
190

Continuous Delivery Director 8.5
5. Fill in the plug-in input parameters.
6. Specify one or more tags to label the imported test suites.
7. Click Create.
The test source template is listed in the Test Source Templates page under the application.
Export Test Source Templates Parameters
You have been granted Can manage applications permissions.
You can configure the CI tool to include specific parameters in the build notification data that can be used to create new
test sources based on the template. The field is specified in JSON format. To get the JSON format of a specific test source
template, you can export the test source template Parameters.
If you use Jenkins as your CI tool, you can copy and paste test source templates in JSON format into the Test Data field
in the Plug-in for Jenkins.
1. From the Tests menu, click Test Source Templates.
2. Select an application.
3. Select one or more test source template table rows.
A floating actions menu appears above the test source template table.
4. Click the export icon.
The test source template parameters file is downloaded to your machine in JSON format.
Import/Export Test Source Templates
You can export and import Test Source Templates as DSL.
You have been granted Can manage applications permissions.
Export Test Sources
1. From the Tests menu, click Test Source Templates.
2. Select an application.
3. Select one or more test source template table rows.
4. From the top menu click the export icon.
The test source object file is downloaded to your machine in JSON format.
Import Test Sources
1. From the Tests menu, click Test Source Templates.
2. Select an application.
3. From the top menu click the import icon.
A dialog opens that allows you to upload the DSL file either from a local machine or from a source code repository by
selecting a file source.
Remove Test Source Templates
Remove test source templates that you no longer need.
191

Continuous Delivery Director 8.5
You have been granted Can manage applications permissions.
1. From the Tests menu, click Test Source Templates.
2. Select an application.
3. Select one or more test source template table rows.
A floating actions menu appears above the test source template table.
4. Click the garbage can icon and remove.
The test source templates are removed from the test source template table.
192

Continuous Delivery Director 8.5
Security
The Security feature allows you to perform vulnerability assessment scanning and provides the status of the application
from a security perspective.
Using a Security Source, CDD Integrates with 3rd party vulnerability scanning tools and retrieves scanning results. The
Security Summary report presents the severity level using the industry standard scales: Critical, High, Medium, Low, and
None (if the item was not rated by the security scanning application).
The Security Items report lists the vulnerabilities that exist for a specific application version.
CDD integrates with Grafana to present security vulnerabilities metrics. At the Grafana dashboard, you can create a panel
to track the application’s security state at configured intervals. While CDD displays the total number of vulnerabilities,
Grafana’s security panel dynamically displays the number of newly created and resolved vulnerabilities. For more
information, see Plug-in for Grafana.
More Information
•
Security Sources
•
Security Summary Report
•
Security Items Report
Security Sources
The Security Sources page allows you to configure security sources to retrieve scan results from your vulnerability
scanning tools for a specific application version.
Use the ellipsis icon (three dots menu) associated with a security source to:
•
Disable a security scan. If a scan is disabled, no scan will be performed until the security source is enabled.
•
Retrieve the data for the project version scan status.
•
Delete a security source.
Create Security Source
When a user creates a new security source, they define what system CDD is connecting to, connect to an endpoint, and
then configure the security source and define to which project they are connecting to in the selected vulnerability tool.
If the 3rd party uses a different severity level scale, CDD maps to levels that CDD uses. For example, if the reported
levels are Blocker, Critical, Major, Minor, and Info, then CDD will map the security levels as:
•
Blocker = Critical
•
Critical = High
•
Major = Medium
•
Minor = Low
•
Info = None
To create a security source:
1. From the Security dropdown menu, select Security Sources. On the Security Sources page, select the required
Application and Application Version options.
2. In the SECURITY SOURCES screen, select New Security Source. The CREATE SECURITY SOURCE dialog box
opens.
3. Enter a Name and optionally, a description.
4. From the Plug-in dropdown list, select the required vulnerability scanning tool you want to use.
193

Continuous Delivery Director 8.5
5. From the Endpoint dropdown list, select the required endpoint.
NOTE
Registering an endpoint is mandatory while configuring a security source.
6. Fill in the required information in the Input Parameters area.
NOTE
The above entities are inherited from the plugin’s manifest of the selected vulnerability scanning tool that is
selected. These manifests may vary for each selected vulnerability scanning tool.
7. Select or create one or more tags to tag the security source.
8. In the Send Vulnerability Notifications To dropdown list, select the recipients assigned to the project.
NOTE
By default, the logged in user’s email address is selected.
9. In the Severity Level Notifications dropdown list, define the level of Severity included in the vulnerability notification
sent by CDD.
NOTE
Notifications are sent based on the level of severity you select from the dropdown list. If you select ‘Critical’
as an option, then only the critical notifications will be sent. If you select ‘Medium,’ then notifications will be
sent for Medium, High and Critical security levels. If left empty, then no notifications will be sent.
10. For First Occurrence, specify a time you want the vulnerability scan to be performed.
11. Select the Does not repeat option and set a recurrence for the security scan to be performed.
NOTE
If a recurrence is not set, the scan is not performed automatically. You need to perform the scan manually.
Use the Custom option to define a specific time you want the scan to be performed.
12. Select Create. A new security source is created and is shown in the Security Sources page.
Edit Security Source
To edit a security source:
1. In the Security Sources page, click the required Name link.
2. In the Edit Security Source dialog, make the required changes.
3. Click Save.
Import and Export Security Sources
You can export and import the security sources of application or application versions. Importing and exporting security
sources saves manual labor. You can either import security source templates from a URL or from your local machine.
Security Summary Report
The Security Summary Report allows you to view the summary of vulnerability scanning results for a specific Application
Version or group of Application Versions that are associated with a Business Application Version. You can also create
a view that lists all the application versions of the current project, selected project or all the projects which the user is
permitted to view the security details report.
The summary sections displays the sum of security vulnerabilities classified by ‘Critical,’ ‘High,’ ‘Medium,’ ‘Low’ and ‘None’
severity of all the Application Versions.
This line item shows the data for a specific Application Version. Several Application Versions can be associated with a
Business Application Version.
•
When the user selects an Application Version, the report shows the data for the selected Application Version.
•
When the user selects a Business Application Version, the report shows the data of all the Application Versions that
are associated with the selected Business Application Version.
194

Continuous Delivery Director 8.5
To run the Security Summary Report:
1. From the Security dropdown menu, select Security Summary Report.
2. Specify the Application/Business Application/Project and the Application Version/Business Application
Version/Project Version.
Using the filter icons on the columns header, you can filter the results by plugin or category.
The number of rows displayed in the Security Summary Report depends on the number of categories supported by the
selected plugin.
The user can show the report using the selected Reference ID (CVE).
NOTE
The numbers that appear in the Critical, High, Medium, Low and None columns in the report are links. When you
click a link, the Security Items Report is displayed for the selected vulnerability level. For more information, refer
to Security Items Report.
Security Items Report
This report displays the list of vulnerabilities for the selected Application and Application Version.
To generate the Security Items Report, you select the Application and then select Application Version.
After the report is generated, you can filter the number of rows to be displayed using:
•
the Plugin, Category and/or Severity filter for the selected plugin.
•
the Reference ID (CVE) option in the Reference column.
NOTE
In the Security Items Report, the values shown in the Reference column are links.
195

Continuous Delivery Director 8.5
Integrations
Integrate with other continuous delivery tools through configurable plug-ins
You can integrate Continuous Delivery Director with other continuous delivery tools through configurable plug-ins. Plug-ins
give you the flexibility to orchestrate your end-to-end continuous delivery process in a single release workflow.
Integration through plug-ins lets you extend Continuous Delivery Director functionality and can provide the following
capabilities:
•
Import Application Models from Deployment Tools
Plug-ins can import application models from Automic@ Continuous Delivery Automation for use in Continuous Delivery
Director.
•
Instrument Continuous Delivery Tasks
Plug-in tasks let you instrument important actions in your continuous delivery pipeline from remote components in the
context of Continuous Delivery Director releases.
•
Import Release Work Items from Agile Tracking Tools
Plug-ins can integrate with tracking tools to annotate releases with related work items.
You can also develop custom plug-ins for integrations that are not provided in a packaged plug-in.
This section describes how to work with packaged plug-ins and develop custom plug-ins.
Download Options for Integrations
Continuous Delivery Director makes your release pipeline work better by letting you integrate industry-leading software
and platforms with Continuous Delivery Director. You can download integrations in several ways:
•
From the plug-ins page on cddirector.io
•
Clicking the download icon in integration-related documentation topics:
Figure 32: download icon
•
For Linux users, entering wget commands such as
wget -O cdd-endevor-plugin.war https://cspdl.broadcom.com/shared/
static/88usmlbbk142rlvpkdqwkv8wbpkhnsyo.war?LCK=ent.box.com
You can also validate the integrity of your downloads using the MD5 hash checksums shown in integration-related
documentation topics, such as
0187bc8ff38f71247bad696deeb0ca8e
For testing-related integrations, such as the Maven Testing plug-in, you can:
•
Download Docker images from the Customer Support Portal
•
If you do not want to use docker pull, you can download TAR files from the Customer Support Portal
Instructional Video
The following video shows how to use plug-ins to extend the capabilities of Continuous Delivery Director so it can
communicate with other products:
196
Continuous Delivery Director 8.5
Integration Updates
Review the latest information about integrations with Continuous Delivery Director.
Continuous Delivery Director is committed to providing an ever-growing and evolving set of product integrations that
enable you to orchestrate complex release pipelines at high velocity and high quality. Read the latest updates about the
integrations we offer in the following section.
4-October-2022
New Features
Manual Deployment Plug-in
The Manual Deployment plug-in runs automatically and performs the 'set build' based on the task's specified application
version and build number for the phase's environment.
For more information, see Manual Deployment Plug-in.
21-September-2022
Enhanced
Red Hat Ansible Tower Plug-in
Added support for Job Slicing. The plugin now identifies that the job type is workflow and retrieves the same logs as the
'Run Workflow Job' task.
Automic Continuous Delivery Automation (CDA) Plug-in
Users can now use the CDD applications as the CDA components when creating a package. Also, the user can specify an
Application from which the components will be imported and created as applications in CDD.
SonarQube Plug-in
Security source capability was added to the plug-in version 2.0-10. This functionality allows you to retrieve the security
items from Sonarqube to CDD. This allows you to view a security summary report, view a detailed items report, and using
Grafana create a dashboard that shows the items’ resolution progress.
03-August-2022
Enhanced
DX App Synthetic Monitor Plug-in
You can now update the monitor’s attributes. For instance, if due to the new deployment the application URL has
changed, using the new task, users can update the monitor with the new application URL.
197

Continuous Delivery Director 8.5
29-June-2022
New Features
Test Data Manager Plug-in
This plug-in integrates with Test Data Manager and supports the API-driven tasks like running the data generation flows
and publishing the jobs.
For more information, see Test Data Manager Plug-in.
Enhanced
Slack Plug-in
The following update is made for plug-in version 2.0-3:
•
Added a new field to the slack plug-in endpoint - "Messaging Method". This field allows to select two options:
1. Webhook - existing functionality - the user must enter a Webhook that was generated by Slack.
2. Slack App - the user must enter the token with the "chat:write" permission.
The following update is made for plug-in version 2.0-2:
•
Security Enhancements - Updated the 3rd party libraries that are part of the package.
The following update is made for plug-in version 2.0-1:
•
Security Enhancements - Updated the 3rd party libraries that are part of the package.
For more information, see Slack Plug-in.
App Synthetic Monitor Plug-in
The following update is made for plug-in version 1.2-15:
•
Bugfix: Activate Monitor by Tag fails due to a large response.
The following update is made for plug-in version 1.2-14:
•
Security Enhancements - Updated the 3rd party libraries that are part of the package.
For more information, see App Synthetic Monitor plug-in.
Micro Focus LoadRunner Enterprise Plug-in
The following update is made for plug-in version 1.0-3:
•
Filter by Folders: You can now specify a test folder path in the format of folder1/sub-folder/sub-folder-2. Only the tests
from the specified folder and sub folders will be imported.
The following update is made for plug-in version 1.0-2:
•
Security Enhancements - Updated the 3rd party libraries that are part of the package.
For more information, see Micro Focus LoadRunner Enterprise Plug-in.
198

Continuous Delivery Director 8.5
31-May-2022
Enhanced
Red Hat Ansible Tower Plug-in
The following update was made for plug-in version 2.3-11:
•
Bugfix: Field name changed from job_id to jobId.
The following update was made for plug-in version 2.3-10:
•
Bugfix: Ansible Tower Plugin Icon is missing when registered via plugin proxy.
For more information, see Red Hat Ansible Tower Plug-in.
11-May-2022
Enhanced
Postman Plugin
The following update was made for plug-in version 1.0-5:
•
You can now pass the environment variables that are used during test execution. The specified values override the
values defined in the environment json file. For example, when a new SUT is provisioned during the phase run time,
you can pass the SUT address to the test.
The following update was made for plug-in version 1.0-4:
•
Security Enhancements - Updated the 3rd party libraries that are part of the package.
The following update was made for plug-in version 1.0-3:
•
Bugfix: Tooltip for the successful sync/import.
For more information, see Plug-in for Postman.
SonarQube Plug-in
The following updates were made for plug-in version 2.0-8:
•
Java Binaries field is now an optional field. If the field is empty, "." is used by default.
•
Text change in the project key description.
The following update was made for plug-in version 2.0-7:
•
Security Enhancements - Updated the 3rd party libraries that are part of the package.
The following update was made for plug-in version 2.0-6:
•
Bugfix: SonarQube Certificate Issue.
For more information, see SonarQube Plug-in.
199

Continuous Delivery Director 8.5
30-March-2022
Enhanced
Playwright Plug-in
The following update was made for plug-in version 2.0-12:
•
You can define the location of node_modules and yarn cache paths for the Playwright plugin in the containerized
properties.
Example:
cdd.plugins.containerized.playwright.container.volumes.artifacts.volumes=node_modules:/
home/cdd/node_modules,yarn/cache:/home/cdd/.yarn/cache
You can specify your desired local directory paths of the saved dependencies for node_modules and yarn/cache in
the above example.
When running the yarn install command, these volumes reduce the required time for the plugin steps (test suites
import and execution). The plugin does not download dependencies already stored in the mentioned volumes.
For more information, see Plug-in for Playwright.
Red Hat Ansible Plug-in
The following update was made for plug-in version 2.0-5:
•
At the endpoint, the "Private Key" field type has been changed to a password field that accepts Secret or strings. To
use a multi-line private key, store the private key in a "Secret" and use the secret in this field.
•
You can view the execution log during the task run-time. A link to the execution log is added to the task details (while
hovering the task) while the task is running and to the task status when the task is done.
For more information, see Red Hat Ansible Plug-in.
Red Hat Ansible Tower Plug-in
The following update was made for plug-in version 2.3-6:
•
Added a new task Run Workflow Template
•
Build Number (Deprecated) is removed; you can now specify the build number per application in the Builds For
Applications section of the task.
•
Shared File System Location is removed; the base url in the settings properties file is used for the Job Output URLs.
For more information, see Red Hat Ansible Tower Plug-in.
Helm Plug-in
The following updates were made for plug-in version 1.0-8:
•
Added support for Google Cloud Storage buckets as source control.
•
Bugfix: NULL Pointer Exception in Install Release by Helm Chart (Helm) Task.
For more information, see Helm Plug-in.
Containerized Plug-in Manager
The following update was made for version 2.9:
•
Added support to show the execution logs in the run-time even the containerized plug-in is connected using a proxy.
For more information, see Containerized Plug-in Manager.
200

Continuous Delivery Director 8.5
Jenkins Plug-in
The following updates were made for plug-in version 1.3.0-6:
•
Bugfix: Null Pointer Exception in Jenkins plugin of CDD (cdd-jenkins-plugin.war 1.3.0-4).
For more information, see Jenkins Plug-in.
07-March-2022
Enhanced
pytest Plugin
The following update was made for plug-in version 1.0-8:
•
Bugfix: Plugin fails on timeout while copying very large test reports.
For more information, see pytest Plug-in.
DX App Synthetic Monitor Plugin
The following update was made for plug-in version 1.2-13:
•
Bugfix: Wrong time in Set Time Window.
•
Bugfix: Change Monitor State for multi Folders fails.
For more information, see Plug-in for DX App Synthetic Monitor Plugin.
24-February-2022
New Features
Postman Plugin
The Postman plug-in is containerized and supports Adaptive Testing functionality. This plug-in provides you with a
Postman test automation framework for Git and SVN builds that is open-source and application-independent.
For more information, see Plug-in for Postman.
Enhanced
Red Hat Ansible Plug-in
The following update was made for plug-in version 2.0-2:
•
Bugfix: Plug-in terminates the playbook execution after 60 seconds. If the playbook runs for more than 60 seconds,
then the plug-in aborts the execution and fails.
For more information, see Red Hat Ansible Plug-in.
09-February-2022
New Features
Checkmarx Plugin
Checkmarx Plugin is now enhanced with a new Source code scanning task (CxSAST).
201

Continuous Delivery Director 8.5
For more information, see Plug-in for Checkmarx.
Enhancements
Sonatype Nexus Lifecycle (IQ Server) Plugin
New task that invokes nexus policy evaluation is included in the Sonatype Nexus Lifecycle (IQ Server) Plugin.
For more information, see Plug-in for Sonatype Nexus Lifecycle (IQ Server).
DX App Synthetic Monitor Plugin
New capabilities are added in the DX App Synthetic Monitor Plugin:
•
Rule check for multiple monitors or by tags
•
Activate/Deactivate multiple monitors or by tags
•
Create/remove immediate maintenance window
For more information, see Plug-in for DX App Synthetic Monitor Plugin.
Cucumber JVM Plugin
Enhanced the plugin to view the execution report even if all the tests are skipped.
For more information, see Plug-in for Cucumber JVM.
Playwright Plugin
Enhanced to view the execution report even if all the tests are skipped.
For more information, see Plug-in for Playwright.
13-December-2021
Enhanced
Runscope Plug-in
The following update was made for plug-in version 1.1-2:
•
Enhancement:- The plugin now support the use of system variable.
29-November-2021
Enhanced
Cucumber JVM Plug-in
The following update was made for plug-in version 1.4.1-11:
•
Bugfix: Import fails to retrieve all features defined in the Source Control.
For more information, see Cucumber JVM Plug-in.
202

Continuous Delivery Director 8.5
17-November-2021
New
Micro Focus LoadRunner Enterprise Plug-in
You can now automate your application performance testing with LoadRunner Enterprise. This plug-in lets you run
application performance tests in Continuous Delivery Director without using the LoadRunner Enterprise user interface.
You can import and execute LoadRunner Enterprise test suites within release pipelines. The LoadRunner Enterprise plug-
in supports Adaptive Testing functionality.
For more information, see Micro Focus LoadRunner Enterprise Plug-in.
Sonatype Nexus Lifecycle Plug-in
Evaluate the risks of your applications against Nexus Lifecycle (IQ) policies.
Nexus Lifecycle is a solution that lets you identify open source risk in your applications, allowing you to secure your entire
software supply chain. With Nexus Lifecycle, you can create custom security, license, and architectural policies based on
application type or organization and contextually enforce those policies across every stage of the SDLC.
The Nexus Lifecycle plug-in is containerized and supports Adaptive Testing functionality. This plug-in provides you with a
Nexus Lifecycle test automation framework for Git builds.
For more information, see Sonatype Nexus Lifecycle Plug-in.
Enhanced
Docker Plug-in
The following update was made for plug-in version 1.3-3:
•
Added support to define a schema for the "Check Readiness" option.
For more information, see Docker Plug-in.
DX App Synthetic Monitor Plug-in
The following update was made for plug-in version 1.2-8:
•
Bugfix: Importing a Release DSL using the activate/deactivate task fails due to invalid character.
For more information, see DX App Synthetic Monitor Plug-in.
Atlassian Jira Plug-in
The following update was made for plug-in version 2.4-14:
•
You can configure output parameters in the plug-in settings.properties file, store the information retrieved in tokens,
and reuse those details in other release tasks.
•
Support was added for the Bearer Authentication using Jira Personal Access Token.
•
Bugfix: After the authentication changes Jira plugin is not backward compatible.
The following update was made for plug-in version 2.4-13:
•
You can now use personal access tokens to authenticate to Jira in the endpoint configuration.
The following update was made for plug-in version 2.4-12:
•
Security enhancements.
203

Continuous Delivery Director 8.5
The following update was made for plug-in version 2.4-10:
•
The plug-in was modified to support the retrieval of detailed Jira issue data.
For more information, see Atlassian Jira Plug-in.
Plug-in for Azure DevOps Server
You can now download this extension from the Visual Studio Marketplace.
For more information, see Plug-in for Azure DevOps Server.
Plug-in for Grafana
Deployment and task execution metrics have been added. You can use these new metrics to track deployment cadence,
deployment success and failure, and plug-in usage of applications in specific environments.
For more information, see Plug-in for Grafana.
Microsoft Teams Plug-in
The following change was added for plug-in version 1.2-4:
•
Bugfix: Inconsistent name for the task "New Conversation."
For more information, see Microsoft Teams.
Rally Plug-in
The following update was made for plug-in version 2.18-5
•
The Release Quality Report now shows test information per work item as the data appears in Rally, such as the
number of flaky tests. To support this enhancement, the work item IDs of tests are now stored with the tests.
The following update was made for plug-in version 2.18-4
•
Security enhancement.
The following update was made for plug-in version 2.18-3
•
Bugfix: Test case results are not displayed as expected.
For more information, see Rally
®
Plug-in.
Red Hat Ansible Tower Plug-in
The following update was made for plug-in version 2.3-6:
•
Minor modifications were made to the Credentials input parameter in the Run Job Template task.
•
You can now use profiles defined in the plug-in's settings.properties file to add custom output parameters.
For more information, see Red Hat Ansible Tower Plug-in.
SonarQube Plug-in
The following update was made for plug-in version 2.0-2:
•
Default values for the File Suffixes Exclusions input parameter in the Run Code Analysis task have been added.
The following update was made for plug-in version 2.0-1:
•
The Coverage Exclusions input parameter in the Run Code Analysis task has been updated.
204

Continuous Delivery Director 8.5
The following update was made for plug-in version 2.0:
•
A Run Code Analysis task has been added, enabling you to run an analysis of your Java code from your release
pipeline.
The following update was made for plug-in version 1.2:
•
The endpoint now allows you to configure access to a Git project repository.
For more information, see SonarQube Plug-in.
27-October-2021
Enhanced
Cucumber JVM Plug-in
The following update was made for plug-in version 1.4.1-9:
•
Bugfix: Import fails when the feature name contains SPACE characters.
For more information, see Cucumber JVM Plug-in.
29-September-2021
New
Burp Suite Plug-in
A new plug-in lets you scan your web applications for vulnerabilities from your release pipeline. Burp Suite is a popular
and scalable set of tools used for penetration testing of web applications. This plug-in integrates with Burp Suite
Enterprise and lets you create scans.
For more information, see Burp Suite Plug-in.
pytest Plug-in
You can now add the popular pytest software test framework to your release pipeline.
pytest is a robust Python testing tool that is used by development teams and QA teams. The new pytest plug-in is
containerized and supports Adaptive Testing functionality. This plug-in provides you with a pytest test automation
framework for Git and SVN builds that is open-source and application-independent.
For more information, see pytest Plug-in.
Salesforce Plug-in
A new plug-in lets you retrieve, test, and deploy Salesforce apps from your release pipeline. This containerized plug-in lets
you use SFDX (Salesforce Developer Experience) together with Continuous Delivery Director to speed up the standard
development workflow.
For more information, see Salesforce Plug-in.
SOAP UI Plug-in
A new plug-in lets you import and execute API tests in your release pipeline with the most widely-used automated testing
tool for SOAP and REST APIs.
For more information, see SOAP UI Plug-in.
205

Continuous Delivery Director 8.5
Enhanced
AWS CodeDeploy Plug-in
The following updates were made for plug-in version 2.0-2:
•
Bugfix: list-deployment-instances is deprecated and does not support EC2 deployments. Use list-deployment-
targets instead.
For more information, see AWS CodeDeploy Plug-in.
Microsoft Teams Plug-in
The following change was added for plug-in version 1.2-3:
•
A new task, Start New Chat, lets you override the webhook URL defined in the endpoint by overriding the webhook
URL suffix only. This enhancement avoids the need to create a new endpoint when updating the webhook URL. This
task was developed following changes in the webhook URL format introduced by Microsoft in January 2021.
For more information, see Microsoft Teams.
REST Plug-In
The following updates were made for plug-in version 2.6-3:
•
The output parameter of REST tasks has been tokenized and now provides success and fail indicators. The fail value
can be used in on-failure phases.
For more information, see REST Plug-in.
25-August-2021
Enhanced
Atlassian Jira Plug-in
The following update was made for plug-in version 2.4-9:
•
Bugfix: Invalid external work item IDs set on test suites affected work item coverage reporting.
For more information, see Atlassian Jira Plug-in.
11-August-2021
New
Plug-in for Grafana
A new plug-in lets you build stunning data visualizations in Grafana dashboards based on test and release execution
metrics.
For more information, see Plug-in for Grafana.
Build Notifications for Business Application Versions
You can automate release creation per business application version through build notifications.
For more information, see Create a Release from Business Application-Related DSL.
206

Continuous Delivery Director 8.5
Enhanced
Atlassian Jira Plug-in
The following update was made for plug-in version 2.4-8:
•
The work item IDs of tests are now stored with the tests.
For more information, see Atlassian Jira Plug-in.
28-July-2021
New
Enhanced
Atlassian Jira Plug-in
The following updates were made for plug-in version 2.4-7:
•
The Test Execution Key parameter in the Get Test Assets task was moved to the Execution Parameters section.
The following updates were made for plug-in version 2.4-6:
•
Support was added for integration testing.
The following updates were made for plug-in version 2.4-5:
•
The Test Plan Key and Test Execution Key parameters in the Get Test Assets task now support dynamic values
import from Xray.
The following updates were made for plug-in version 2.4-4:
•
A new Trust Any SSL Certificate endpoint parameter lets you allow untrusted and unsigned SSL/TLS certificates.
The following updates were made for plug-in version 2.4-3:
•
A Test Execution Key parameter was added to the Import Tests task.
The following updates were made for plug-in version 2.4-2:
•
Support was added for the Xray Test Management for the Jira application. This enhancement lets you import test
issues as test suites into Continuous Delivery Director.
•
Log rotation was added. A new log is opened daily (regardless of file size) and the system stores up to 10 logs,
providing 10 days log history.
For more information, see Atlassian Jira Plug-in.
Docker Plug-in
The following updates were made for plug-in version 1.3-1:
•
In the Run Container task, only one port is exposed. The expected behavior is that all ports listed in the Ports to
Expose input parameter are exposed.
For more information, see Docker Plug-in.
207

Continuous Delivery Director 8.5
30-June-2021
New
Monitor Running Tests
You can now access a test execution log from a release page to see which tests are executed at any given time. The
execution log is updated in real-time so if problems occur in a test run, you can examine the log to determine whether to
stop or continue with the test execution. This feature is especially useful when you run a large set of tests on complex
business applications. For more information, see Monitor Running Tests
IMPORTANT
This functionality is supported by the CucumberJVM plug-in version 1.4.1-6 and higher and is not backward-
compatible. For more information, see Cucumber JVM Plug-in.
Karate Plug-in
You can now automate your API testing with the Karate open-source framework. This plug-in uses Maven projects to
import and execute Karate test suites within release pipelines. The Karate plug-in is containerized and supports Adaptive
Testing functionality. This plug-in provides you with a Karate test automation framework for Java-based Git and SVN
builds that is open-source and application-independent.
For more information, see Karate Plug-in.
Terraform Plug-in
You can now manage your Terraform runs from your release pipeline. Terraform is an infrastructure-as-code software
tool. Infrastructure as code is the process of managing and provisioning computer data centers through machine-readable
definition files.
In Terraform, a run is a process to make real infrastructure match the desired state (as specified by the contents of the
config version and variables at a specific moment in time). This plug-in integrates with Terraform Cloud and supports the
following API-driven run tasks:
•
Create a Run
•
Apply a Run
For more information, see Terraform Plug-in.
Enhanced
Apache Tomcat Plug-in
The following updates were made for plug-in version 1.5-1:
•
Bugfix: When a plug-in task failed to retrieve a Maven artifact, an unclear NullPointerException error message
displayed on the CDD user interface. This message was replaced with a clearer message that includes the expected
path to the missing Maven artifact.
For more information, see Apache Tomcat Plug-in.
AWS CodeDeploy Plug-in
The following updates were made for plug-in version 2.0-1:
•
Bugfix: A deployment task completed successfully, but an error message, NullPointerException: element
cannot be mapped to a null key, appeared on the release page.
208

Continuous Delivery Director 8.5
For more information, see AWS CodeDeploy Plug-in.
Azure DevOps Server Plug-in
The following updates were made for plug-in version 1.1-3:
•
Support was added for Azure DevOps Server 2020.0.1.
For more information, see Azure DevOps Server Plug-in.
Cucumber JVM Plug-in
The following update was made for plug-in version 1.4.1-6:
•
You can now view a test execution log that is updated in real-time to see which Cucumber tests are executed at any
given time. The execution log is updated in real-time so if problems occur in a test run, you can examine the log to
determine whether to stop or continue with the test execution.
NOTE
This feature is only available for plug-in version 1.4.1-6 and higher and is not backward-compatible.
For more information, see Cucumber JVM Plug-in.
Liquibase Plug-in
The following updates were made for plug-in version 1.0-1:
•
The Database endpoint parameter now supports relative classpaths to the lib folder.
For more information, see Liquibase Plug-in.
Rally Plug-in
The following updates were made for plug-in version 2.18-2
•
You can now import test cases into the Adaptive Testing Catalog.
•
A Milestone Name filter was added to the Import Work Items task.
For more information, see Rally
®
Plug-in.
Red Hat Ansible Tower Plug-in
The following update was made for plug-in version 2.3-5:
•
Bugfixes:
–
The log filename did not include the hostname.
–
The log filename used underscores and not hyphens.
For more information, see Red Hat Ansible Tower Plug-in.
Plug-in for Azure DevOps Server
The following update was made for plug-in version 1.0.2
•
Bugfix - A code vulnerability was detected in the third-party underscore:1.8.3 3rd party JS library.
For more information, see Plug-in for Azure DevOps Server.
Plug-in for Jenkins
The following update was made for plug-in version 3.4
209

Continuous Delivery Director 8.5
•
A new option has been added to Freestyle projects, Use Git Namespace as the Application Source.
If selected, when applications with the same name are imported into Continuous Delivery Director
from different application sources, Continuous Delivery Director can match the build notification
to the correct application. A similar property has been added to the Jenkinsfile Groovy script,
useSourceCodeRepositoryNamespaceAsApplicationSourceName: true/false . When this property is
set to true, the repository namespace is used as the application version (the value of applicationSourceName is
ignored.)
•
Lines are no longer added to the build history with release URLs when Continuous Delivery Director detects the
presence of one or more releases in the build notification. This function became redundant and was removed because
the build details contain links to the release(s).
For more information, see Plug-in for Jenkins.
26-May-2021
New
Liquibase Plug-in
You can now integrate Liquibase with your release pipeline to achieve full-stack continuous integration and continuous
delivery for your databases. This new plug-in lets you align your application and database deployments.
For more information, see Liquibase Plug-in.
Enhanced
BlazeMeter Plug-in
The following update was made for plug-in version 3.7-3:
•
Bugfix: Error messages in Continuous Delivery Director do not include the error code, causing delay in tracing the root
cause of errors.
For more information, see BlazeMeter Plug-in.
Cucumber for Java Plug-in
The following update was made for plug-in version 1.4.1-5:
•
Bugfix: Links to the error and debug logs are not generated when tests complete.
For more information, see Cucumber for Java Plug-in.
DX App Synthetic Monitor (ASM) Plug-in
The following updates were made for plug-in version 1.2-2
•
Bugfix: The plug-in does not handle empty dynamic values as expected
•
Bugfix: Dynamic fields are not working as expected.
For more information, see DX App Synthetic Monitor Plug-in.
GitLab Plug-in
The following updates were made for plug-in version 2.0-1:
210

Continuous Delivery Director 8.5
•
Bugfix: The Namespace Kind parameter in the Import Applications task was changed to mandatory and user was
set as the default.
•
Bugfix: The List Projects by Custom Attributes parameter in the Import Applications task was removed.
•
Bugfix: In the Namespace Kind Group field, the spaces before and after slash characters are ignored, causing sync
errors. To resolve this issue, the help text was updated.
•
Bugfix: In the Application Name parameter in the Import Applications task, the option to add a project path was
removed.
For more information, see GitLab Plug-in.
Red Hat Ansible Tower Plug-in
The following updates were made for plug-in version 2.3-4:
•
Log handling has been enhanced to prevent relevant logging information from being deleted:
–
A new log record is created daily
–
Logs are retained for 14 days
–
The size limit on log files has been removed
•
A Credentials input parameter was added to the Run Job Template task.
For more information, see Red Hat Ansible Tower Plug-in.
12-May-2021
Enhanced
Atlassian Jira Plug-in
The following updates were made for plug-in version 2.4-1:
•
Bugfix: No value was returned if no work items were found matching a commit.
For more information, see Atlassian Jira Plug-in.
BlazeMeter Plug-in
The following update was made for plug-in version 3.7-2:
•
End time and polling time were enhanced.
For more information, see BlazeMeter Plug-in.
Containerized Plug-in Manager
The following update was made for version 2.5:
•
When settings are changed and saved, settings.properties is automatically updated during runtime without the
need to restart the service.
The following update was made for version 2.4:
•
The Tenant ID was updated.
For more information, see Containerized Plug-in Manager.
GitLab Plug-in
The following update was made for plug-in version 2.0:
211

Continuous Delivery Director 8.5
•
You can now filter the applications you import from GitLab instances. To support this capability, the following input
parameters were add to the Add Application Source dialog for GitLab:
–
Namespace Kind
–
Project Name
–
Starred Projects Only
–
Membership
–
Ownership
–
Archived
–
Visibility Level
–
List Projects by Custom Attributes
For more information, see GitLab Plug-in.
Maven Testing Plug-in
The following update was made for plug-in version 1.5-2:
•
The Maven execution log is now created at the beginning of test execution (and not at the end).
The following update was made for plug-in version 1.5-1:
•
Three new import parameters. Settings File Path, Settings Security File Path, and System Properties, were added
to the Get Test Assets task. These additional parameters improve the support for TestNG Selenium testing.
For more information, see Maven Testing Plug-in.
Microsoft Teams Plug-in
The following change was added for plug-in version 1.2-2:
•
A new Group ID parameter in the Post Message task lets you override the group ID defined in the endpoint webhook
URL.
The following change was added for plug-in version 1.2-1:
•
Tooltip updated.
For more information, see Microsoft Teams.
Plug-in for JetBrains TeamCity (Deprecated)
The following update was made for plug-in version 2.3
•
You can now use build notifications to update release token values in Continuous Delivery Director releases. To
support this change, a new parameter, Update Release Token Values, was added to the Send Build Notification
action.
The following update was made for plug-in version 2.2
•
Two new parameters, Use Source Code Repository Name as Application Name and Use Source Code Branch
Name as Application Version, were added to the Send Build Notification action.
The following update was made for plug-in version 2.1
•
Application version build URLs were added to the header of build notifications. This update enables users to access
specific builds in TeamCity from a link in a Continuous Delivery Directorrelease.
Slack Plug-in
The following update was made for plug-in version 2.0:
212

Continuous Delivery Director 8.5
•
Support was added for slack-api-client 1.4.2.
WARNING
This plug-in update is not backward compatible.
For more information, see Slack Plug-in.
31-March-2021
New
Plug-in for Azure DevOps Server
A new integration lets you send Azure build notifications to Continuous Delivery Director and to trigger release creation
and testing automatically.
NOTE
This plug-in supersedes a previous integration with TFS.
For more information, see Plug-in for Azure DevOps Server.
Plug-in for JetBrains TeamCity (Deprecated)
A new integration lets you send TeamCity build notifications to Continuous Delivery Director and to trigger release creation
automatically.
NOTE
This plug-in supersedes a previous integration with TeamCity.
Enhanced
Automic Continuous Delivery Automation (CDA) Plug-in
The following update was made for plug-in version 4.1-4:
•
Bugfix: Internal defect.
The following update was made for plug-in version 4.1-3:
•
Bugfix: An ungrammatical error message was generated when the following scenario occurred. A CDA task to start an
Application workflow ran. However, two mutually exclusive options were both configured: provide a package and create
a package.
The following updates were made for plug-in version 4.1-2:
•
Bugfix: The link in the CDA deployments report under the CDA deployment column was missing. Additionally, the
domain name was missing in the link.
•
Bugfix: Setting dynamic values in a CDA task generated a 500 internal server error, indicating that the HTTP request
could not be fulfilled because an unexpected condition was encountered.
The following updates were made for plug-in version 4.1-1:
•
Bugfix: The set build action was performed on the package name instead of on the build number.
For more information, see Automic
®
Continuous Delivery Automation Plug-in.
AWS CodeDeploy Plug-in
The following updates were made for plug-in version 2.0
213

Continuous Delivery Director 8.5
•
Support was added for Amazon S3 buckets as source control repositories in endpoints.
WARNING
This plug-in update is not backward compatible. To avoid potential issues, unregister the plug-in, overwrite
the war file, and re-register.
•
Default values were added to the Version ID endpoint parameter.
For more information, see AWS CodeDeploy Plug-in.
BlazeMeter Plug-in
The following update was made for plug-in version 3.7-1:
•
Bugfix: When the plug-in was deployed onto multiple hosts, the log files were overwritten because all instances wrote
to the same log file.
For more information, see BlazeMeter Plug-in.
Containerized Plug-in Manager
The following updates were made for version 2.3:
•
Bugfix - Cucumber JVM test suite import failed on SaaS.
•
Bugfix - the containerized plug-in manager does not map volumes in connectivity tests.
The following update was made for version 2.2
•
The Fabric8 software component used by the containerized plug-in manager has been upgraded to version 5.1.1.
For more information, see Containerized Plug-ins.
Cucumber for Java Plug-in
The following update was made for plug-in version 1.4.1-4:
•
You can now specify system properties when importing test suites. To support this change, a System Properties input
parameter was added to the Get Test Assets task.
The following updates were made for plug-in version 1.4.1-3:
•
You can now specify the location of the settings-security.xml file. This improvement is essential in environments
where users do not have control over the home directory (such as a continuous integration farm, where each
project may have its own settings.xml configuration except for settings-security.xml). To support this change, a
Settings Security File Path input parameter was added to the Get Test Assets task.
•
When a Get Test Assets task fails, the error message now contains a URL linking to the import log file. This
enhancement helps users trace the root cause of a task failure. Previously, the error message did not contain full
information for troubleshooting purposes.
For more information, see Cucumber for Java Plug-in.
Kubernetes Plug-in
The following update was made for 2.3.3-3:
•
The Fabric8 software component used by this plug-in has been upgraded to version 5.1.1.
The following update was made for 2.3.3-2:
•
Bugfix: The log bridge from Catalina to cdd-server log files now records fabric8 HTTP traffic only. Previously, idle
Kubernetes/OpenShift plug-in activities were recorded, resulting in very large log files.
The following update was made for 2.3.3-1:
214

Continuous Delivery Director 8.5
•
The Kubernetes plugin now logs complete details of all HTTP requests and responses, including HTTP method, URL,
headers, and body).
For more information, see Kubernetes Plug-in.
Micro Focus ALM Plug-in
The following update was made for plug-in version 2.4-2:
•
Fixed: On the Folder field in the Get Test Assets task, the tooltip incorrectly states that tokens can be used.
For more information, see Micro Focus ALM Plug-in.
Red Hat Ansible Tower Plug-in
The following update was made for plug-in version 2.3-3:
•
You can now connect to an Ansible Tower endpoint through a proxy server. To support this change, a Use Proxy
checkbox was added to the endpoint configuration parameters.
For more information, see Red Hat Ansible Tower Plug-in.
Red Hat OpenShift Plug-in
The following updates were made for 2.2-2
•
The Fabric8 software component used by this plug-in has been upgraded to version 5.1.1.
The following updates were made for 2.2-1
•
Bugfix (DE490722): The log bridge from Catalina to cdd-server log files now records fabric8 HTTP traffic only.
Previously, idle Kubernetes and OS plug-in activities were recorded, resulting in very large log files.
For more information, see Red Hat OpenShift Plug-in.
ServiceNow
®
Plug-in
The following update was made for plug-in version 2.3-2:
•
The success message generated after a Create Change Request task executes now contains a URL linking to the
newly-created change request in ServiceNow.
For more information, see ServiceNow Plug-in.
Slack Plug-in
The following update was made for plug-in version 2.0:
•
Support was added for slack-api-client 1.4.2.
WARNING
This plug-in update is not backward compatible.
For more information, see Slack Plug-in.
215

Continuous Delivery Director 8.5
24-February-2021
Enhanced
GitHub Plug-in
The following update was made for plug-in version 1.0.3-1:
•
You can now authenticate to GitHub with a GitHub API key. To support this change, the Password endpoint parameter
has been renamed Password/API Key.
For more information, see GitHub Plug-in.
GitLab Plug-in
The following updates were made for plug-in version 1.7-2:
•
You can now import environments from GitLab repositories to use as Continuous Delivery Director environments.
For more information, see GitLab Plug-in.
Plug-in for Jenkins
The following updates were made for plug-in version 3.3
•
In the post-build notification action, a new Additional Information section was added. This section contains the
Update Release Token Values, Source Control Connection Parameters, and Test Data sections.
•
In the post-build notification action, the Update Token Values in CDDirector parameter was replaced with the Update
Release Token Values section. This new section lets you add multiple tokens in the form of "name":"value" pairs.
Previously, you could only add one token.
•
A new Enable Notifications for Unstable Builds option was added. In the post-build notification action in Freestyle
projects, you can select this option to prevent the plug-in from sending build notification to Continuous Delivery Director
if the build status is unstable.
For Jenkins Pipeline projects, the boolean sendNotificationOnUnstableBuild parameter was added.
•
In the post-build notification action, a new Source Control Connection Parameters section lets you add multiple
source control connection parameters in the form of "name":"value" pairs.
•
In the post-build notification action in Freestyle projects, a new Specify File Source option lets you create a release
from DSL files in your source control repositories. You specify the file source in the form of a "name":"value"
pair. After a Jenkins build completes, the release DSL is sent to Continuous Delivery Director. A new release is
automatically created according to the release defined in the file.
A new Override File Source Parameters section lets you override the file source parameters that are defined in
Continuous Delivery Director. You specify the required file source parameters in the form of a "name":"value" pair.
NOTE
This capability already existed in Jenkins Pipeline Groovy syntax.
•
In the post-build notification action in Freestyle projects, a new Create from Business Application File Source
option lets you create a release from a business application-related DSL file. You specify the file source using DSL
Parameters in the form of "name":"value" pairs. After a Jenkins build completes, the release DSL is sent to
Continuous Delivery Director. A new release is automatically created according to the business application defined in
the DSL file.
For more information, see Send Build Notifications from a Jenkins Freestyle Project.
216

Continuous Delivery Director 8.5
27-January-2021
Enhanced
Atlassian Bitbucket Plug-in
The following updates were made for plug-in version 2.3-1:
•
Support was added for Bitbucket webhook 7.6. This change allows customers to use BitBucket Data Center 7.6.
For more information, see Atlassian Bitbucket Plug-in.
Containerized Plug-in Manager
The following update was made for version 2.2:
•
Bugfix: The containerized plug-in log files were overwritten in a multi-node active-active high-availability cluster setup.
For more information, see Containerized Plug-ins.
Cucumber for Java Plug-in
The following update was made for plug-in version 1.4.1-2:
•
Bugfix: When test execution failed for a Cluecumber custom report, the link to the associated report was not
generated.
The following update was made for plug-in version 1.4.1-1:
•
Support was added for custom SSL TrustStore files. These files contain only those certificates trusted by the client.
These certificates are CA root certificates, that is, self-signed certificates.
For more information, see Cucumber for Java Plug-in.
Gradle Testing Plug-in
The following updates were made for plug-in version 1.11-1:
•
To improve usability, the following parameters were changed to textarea fields:
–
Source Set
–
JVM Parameters
–
Extra Execution Parameters
For more information, see Gradle Testing Plug-in.
Helm Plug-in
The following updates were made for plug-in version 1.0-1:
•
The locations for stable and incubator charts have changed. The new location for the stable repository is https://
charts.helm.sh/stable and the new location for the incubator repository is https://charts.helm.sh/
incubator. If you use charts in either of these old locations below you MUST update the repositories you used before
November 13, 2020. The new locations are hosted using GitHub pages.
Name Old Location New Location
stable https://kubernetes-
charts.storage.googleapis.com
https://charts.helm.sh/
stable
incubator https://kubernetes-charts-
incubator.storage.googleapis.com
https://charts.helm.sh/
incubator
217

Continuous Delivery Director 8.5
NOTE
Please upgrade the Helm plugin to the latest versions.
•
Bugfix: The sns prefix (for Amazon Simple Notification Service) was missing from the default value for the AWS S3
Service API URL endpoint parameter.
For more information, see Helm Plug-in.
Jenkins Plug-in
The following updates were made for plug-in version 1.3.0-2:
•
Bugfix: Upgrading from plug-in version 1.3.0 to 1.3.0-1 in release DSLs caused Missing details errors in Run
Build tasks.
For more information, see Jenkins Plug-in.
Plug-in for Jenkins
The following update was made for plug-in version 3.2.14
•
Bugfix: A Groovy script missing the overrideCDDConfig section did not use the settings in Jenkins from Manage
Jenkins > Configure System > CDDirector Plugin.
The following update was made for plug-in version 3.2.13
•
You can now use a single global Groovy file (stored in Jenkins global libraries) to support multiple per-project
Continuous Delivery Director API keys.
For more information, see Plug-in for Jenkins.
Red Hat Ansible Tower Plug-in
The following update was made for plug-in version 2.3-2:
•
Bugfix: Connection timeout issues to on-premise hosted plug-ins.
For more information, see Red Hat Ansible Tower Plug-in.
Robot Framework Plug-in
The following update was made for plug-in version 1.7-2:
•
To improve usability, the Extra Execution Parameters field in the Get Test Assets (Test Source) task was changed
to a textarea field.
The following update was made for plug-in version 1.7-1:
•
Fixed: Tests that were skipped and therefore were not associated with reports were reported as failures
For more information, see Robot Framework Plug-in.
218

Continuous Delivery Director 8.5
5-January-2021
New
Playwright Plug-in
A new plug-in lets you import and execute Playwright test suites as part of your release pipeline. This plug-in integrates
with Playwright, a node.js tool to automate end-to-end web testing. The Playwright plug-in is containerized and supports
Adaptive Testing functionality.
For more information, see Playwright Plug-in.
Enhanced
Automic Continuous Delivery Automation (CDA) Plug-in
The following updates were made for plug-in version 4.1:
•
Build numbers are now available as dynamic properties. This change allows you to dynamically update the
last_successful_change property dynamically in CDA with a build number passed from the task in Continuous
Delivery Director.
For more information, see Automic
®
Continuous Delivery Automation Plug-in.
DX App Synthetic Monitor (ASM) Plug-in
The following updates were made for plug-in version 1.2
•
A Run Rule Check task was added to enable users to check that the target machine is up and running and available
for use in the release pipeline.
The following updates were made for plug-in version 1.1
•
To improve usability, the Activate or Deactivate parameter in the Activate and Deactivate task was changed from a
checkbox to a dropdown with Activate and Deactivate options.
For more information, see DX App Synthetic Monitor Plug-in.
GitLab Plug-in
The following updates were made for plug-in version 1.7-1:
•
To avoid errors, the Get Commit Messages task now uses the first commit if previous builds have failed.
For more information, see GitLab Plug-in.
Jenkins Plug-in
The following updates were made for plug-in version 1.3.0-1:
•
You can now control how this plug-in handles an unstable Jenkins build. To support this capability, a new Task
Status for Unstable Build field was added to the Run Build task. This field allows you to define whether the task is
considered as Done or Failed.
For more information, see Jenkins Plug-in.
219

Continuous Delivery Director 8.5
25-November-2020
Enhanced
Azure DevOps Server Plug-in (formerly Microsoft Team Foundation Server plug-in)
The following updates were made for plug-in version 1.1.1:
•
This plug-in was renamed to the Azure DevOps Server plug-in to align with the vendor (Microsoft) name change
decision. Formerly, this plug-in was named the Microsoft Team Foundation Server plug-in.
For more information, see Azure DevOps Server Plug-in.
Maven Testing Plug-in
The following updates were made for plug-in version 1.5:
•
The functionality of the Maven Project parameter in the Get Test Assets (Import Test Suites) task has changed.
Previously, you specified the name of a project from which to import test suites. Now you specify one or more relative
paths to subprojects separated by commas from which to import test suites.
For more information, see Maven Testing Plug-in.
Microsoft Teams Plug-in
The following changes were added for plug-in version 1.2:
•
You can now send messages to different teams and channels using the same webhook which saves you unnecessary
effort. To support this change, a new parameter, Webhook Suffix has been added to the Post Message task. This
parameter overrides the endpoint webhook suffix.
•
You can now specify additional facts in the Post Message task in addition to the facts you specify in the Fact 1-3
Name and Fact Value 1-3 parameters. Previously, you could only define up to three facts. To support this change, a
new Additional Facts parameter was added.
For more information, see Microsoft Teams Plug-in.
Plug-in for Jenkins
The following update was made for plug-in version 3.2.12:
•
You can now create releases by specifying a file source in Groovy pipeline syntax in a Jenkinsfile in your
source control. To support this change, you can now specify the following parameters in Groovy for the
sendNotificationToCDD step:
–
File source name
–
File source parameters
–
DSL file name and path
–
DSL parameters
For more information, see Plug-in for Jenkins.
Red Hat Ansible Core Plug-in
The following update was made for plug-in version 2.0:
•
This plug-in now supports the capability to add multiple applications to tasks, and to assign different build numbers to
each application. To support this capability, the Build field in the Run Playbook task is now optional; previously this
field was mandatory.
220

Continuous Delivery Director 8.5
For more information, see Red Hat Ansible Core Plug-in.
Red Hat Ansible Tower Plug-in
The following update was made for plug-in version 2.3.1:
•
Bugfix: Entering a build number in the Run Job Template task is now optional, because builds are not relevant in user
scenarios such as hardware provisioning and network configuration.
For more information, see Red Hat Ansible Tower Plug-in.
Red Hat OpenShift Plug-in
The following updates were made for plug-in version 2.2
•
Support was added for the following source control systems: GitLab, AWS S3, Web Services.
•
Basic authentication using a username and password was added.
•
A Branch parameter was added to the GitHub endpoint parameters.
•
A Trust Any SSL Certificate option was added to the endpoint parameters.
•
A YAML Settings field was added to the Create Deployment task.
The following updates were made for plug-in version 2.1
•
Multiple bug fixes.
For more information, see Red Hat OpenShift Plug-in.
4-November-2020
New
Automic Continuous Delivery Automation (CDA) Plug-in
We have developed a new CDA plug-in, replacing the previous CDA plug-in, with the following changes:
•
Import Application from CDA to Continuous Delivery Director
The previous plug-in imported a CDA application as a Continuous Delivery Director application. The new plug-in
imports a CDA component as a Continuous Delivery Director application.
NOTE
A Continuous Delivery Director application is equivalent to a CDA component and a Continuous Delivery
Director business application is equivalent to a CDA application.
•
Create Package
In the CD pipeline, each component requires a separate build job, and the package must be created from the artifacts
created by all the build jobs.
The previous plug-in used Jenkins to create the package, meaning that if you wanted to create a CD pipeline, you had
to set up a separate package for each component.
The new plug-in can automatically create packages. If a build of any of the components is ready, the plug-in
automatically creates a package and runs the deployment.
•
Plug-in Downloads
The old plug-in was only available from the Automic Marketplace. Users can now download the new plug-in from the
Continuous Delivery Director home page.
For more information, see Automic
®
Continuous Delivery Automation Plug-in.
221

Continuous Delivery Director 8.5
Enhanced
Containerized Plug-in Manager
The following updates were made for version 2.2:
•
The containerized plug-in manager lets you run Continuous Delivery Director docker-based plugins
on Kubernetes (and not just on Docker engine).
For more information, see Run Containerized Plug-ins using Kubernetes.
•
You can configure settings.properties to support multiple container management platforms.
For more information, see Set Up Multiple Containerized Plug-in Managers.
Cucumber for Java Plug-in
The following updates were made for plug-in version 1.4.1:
•
A new execution parameter, Custom Reports, has been added to the Get Test Assets task, with the following
options, Default, Maven Cucumber Reporting, and Cluecumber. This field lets you store and present custom
cucumber reports based on the project pom.xml settings.
The following updates were made for plug-in version 1.3.2:
•
Support was added for importing Cucumber JVM repositories with multiple projects. To support this enhancement, two
new import parameters have been added to the Get Test Assets task: Settings File Path and Update Snapshots.
The following updates were made for plug-in version 1.3.1:
•
Bugfix: A missing Maven POM file error was invoked when trying to import from a subfolder.
For more information, see Cucumber for Java Plug-in.
GitLab Plug-in
The following updates were made for plug-in version 1.7:
•
You can now import files from GitLab repositories as applications.
The following updates were made for plug-in version 1.6:
•
You can now retrieve linked issues (work items) from GitLab.
For more information, see GitLab Plug-in.
Gradle Testing Plug-in
The following updates were made for plug-in version 1.9:
•
The New or Updated Test Suites heuristic is now supported for SVN test suites. This metric is a weighting factor
when the Test Advisor intelligently selects a subset of test suites to run in subsequent test cycles.
•
Fixed - DE473431. Test suites configured to be skipped were not calculated in the test execution result.
For more information, see Gradle Testing Plug-in.
Maven Testing Plug-in
The following updates were made for plug-in version 1.5:
•
The New or Updated Test Suites heuristic is now supported for SVN test suites. This metric is a weighting factor
when the Test Advisor intelligently selects a subset of test suites to run in subsequent test cycles.
For more information, see Maven Testing Plug-in.
222

Continuous Delivery Director 8.5
Rally Plug-in
The following updates were made for plug-in version 2.18
•
Bugfix: Work items in Rally with Released status are not treated in Continuous Delivery Director as completed work
items. A green checkmark indicating Complete status is not assigned to any associated work items with the Rally
statuses Accepted and Released.
The following updates were made for plug-in version 2.17
•
Bugfix: Multiple duplicate copies of "actual" work items were generated when applications were shared with multiple
releases.
The following updates were made for plug-in version 2.16
•
You can now import and execute manual test suites
The following updates were made for plug-in versions 2.12-2.15
•
Assorted bug fixes
For more information, see Rally Plug-in.
Robot Framework Plug-in
The following updates were made for plug-in version 1.7:
•
The New or Updated Test Suites heuristic is now supported for SVN test suites. This metric is a weighting factor
when the Test Advisor intelligently selects a subset of test suites to run in subsequent test cycles.
For more information, see Robot Framework Plug-in.
30-September-2020
Create Releases and Run Adaptive Tests from Jenkins Build Notifications
You can now use the plug-in for Jenkins to automatically create releases, and trigger adaptive testing in Continuous
Delivery Director, based on build notifications. These options are available for both freestyle and pipeline projects.
For more information, see Plug-in for Jenkins.
Helm Plug-in
Streamline the installation and management of Kubernetes/OpenShift applications and resources with our new Helm plug-
in.
For more information, see Helm Plug-in.
DX App Synthetic Monitor (ASM) Plug-in
Control your site and application performance monitoring from your release pipeline with our new DX App Synthetic
Monitor plug-in.
For more information, see DX App Synthetic Monitor Plug-in.
Enhanced
Kubernetes Plug-in
The following updates were made for 2.3.1:
223
Continuous Delivery Director 8.5
•
You can now select GitLab, AWS S3, and Web Service as source control systems from which to import YAML files.
These new options have been added to the Source Control endpoint parameter.
•
You can now use AWS S3 as a file source, a connection to JSON format representations of releases.
For more information, see Kubernetes Plug-in.
BlazeMeter Plug-in
The following update was made for plug-in version 3.7:
•
A new execution parameter, Enable JMeter Parameters, was added to the Get Test Assets (import tests/test
suites) function in the Adaptive Testing Catalog. This parameter lets you import BlazeMeter tests with the taurus
configuration type with a JMeter executor.
•
The cdd_BlazeMeter_plugin.log file was renamed as cdd-blazemeter-plugin.log.
For more information, see BlazeMeter Plug-in.
GitLab Plug-in
The following updates were made for plug-in version 1.5:
•
You can now synchronize issues (work items) between GitLab and Continuous Delivery Director and assign issues to
release tasks.
For more information, see GitLab Plug-in.
Atlassian Bitbucket Plug-in
The following updates were made for plug-in version 2.2:
•
A new Trust Any SSL Certificate endpoint parameter lets you allow untrusted and unsigned SSL/TLS certificates.
For more information, see Atlassian Bitbucket Plug-in.
Plug-in for Jenkins
The following update was made for plug-in versions 3.2.9 - 3.2.10
•
The order of the input parameters in the Send notification to CDDirector post-build action was changed.
The following updates were made for plug-in version 3.2.8:
•
Two new options have been added to the Send notification to CDDirector post-build action:
–
Create a release and/or execute an existing one
If you select this option, the following parameters display:
•
Update Token Values in CDDirector (pre-existing)
•
Ignore Nonexistent CDD Application (pre-existing)
•
DSL Parameter (new)
–
Only run my tests in CDD
If you select this option, the following parameters display:
•
Test Data (new)
•
Run a subset of test suites selected by the Test Advisor (new)
•
A new field has been added to the Send notification to CDDirector post-build action: Source Control Connection
Parameters.
•
Two new section headings have been added to the Send notification to CDDirector post-build action:
–
Set Application Name
–
Set Application Version Name
224

Continuous Delivery Director 8.5
For more information, see Plug-in for Jenkins.
9-September-2020
Enhanced
Cucumber for Java Plug-in
The following updates were made for plug-in version 1.3:
•
Two new parameters, Settings File Path, and Update Snapshots were added to the Run Adaptive Testing task.
The following updates were made for plug-in version 1.2:
•
A new parameter, Cucumber Tags was added to the Run Adaptive Testing task.
For more information, see Cucumber for Java Plug-in.
Plug-in for Jenkins
The following updates were made for plug-in version 3.2.7:
•
A new option has been added to freestyle projects, Ignore Nonexistent CDD Application? You select this option to
prevent the failure of a Jenkins post-build action in any of the following cases:
–
The specified application does not exist in Continuous Delivery Director
–
The specified application version does not exist in Continuous Delivery Director
–
No release exists that is associated with the specified application version
A similar Boolean parameter, ignoreNonexistentApplication, has been added to Jenkins pipeline projects.
•
You can now click a link in Jenkins to open a release in Continuous Delivery Director that is triggered by a specific
Jenkins Pipeline build. These links appear on the left panel of a Jenkins build in the format CDD {release-name}
Release.
For more information, see Plug-in for Jenkins.
Red Hat Ansible Core Plug-in
The following update was made for plug-in version 2.0:
•
This plug-in now supports the capability to add multiple applications to tasks, and to assign different build numbers to
each application. To support this capability, the Build field in the Run Playbook task is now optional; previously this
field was mandatory.
For more information, see Red Hat Ansible Core Plug-in.
REST Plug-in
The following update was made for plug-in version 2.6:
•
This plug-in now supports URLs that contain top-level domain names that do not appear in a list of valid generic top-
level domains. To support this capability, a new property was added to the settings.properties file of the REST
plug-in.
For more information, see REST Plug-in.
TFS Plug-in
The following update was made for plug-in version 1.1:
225

Continuous Delivery Director 8.5
•
You can now use TFS/VSTS as a file source so that releases are automatically created and run whenever you make
changes to a specified JSON file.
•
A new endpoint parameter has been added, TFS Version. You can choose from the following options:
–
TFS 2018 Update 3
–
TFS 2018 RTW
–
TFS 2018 RTW
For more information, see TFS Plug-in.
15-July-2020
New
Reduced Preconfiguration Effort for Jenkins Build Notifications
You do not need to create an application version as a precondition for accepting build notifications from Jenkins. When
a build notification arrives, Continuous Delivery Director creates the application version (if none exists) and if requested,
replaces the application version in the target release.
For more information, see Plug-in for Jenkins.
Unified Post-Build Notification setting in Jenkins
Instead of specifying the application and version per Jenkins project, you can use one setting for your entire organization.
The Continuous Delivery Director plug-in in Jenkins uses the Git setting to send the right data to Continuous Delivery
Director.
For more information, see Plug-in for Jenkins.
Multiple Plug-in Proxies
The following capabilities have been added to the plug-in proxy feature:
•
You can now assign multiple plug-in proxies to the same plug-in. Previously, you could only assign one plug-in proxy to
a specific plug-in.
•
You can now select a plug-in proxy when registering a plug-in. To support this capability, a Select Proxy parameter
has been added to the Register Plug-in dialog.
•
To support plug-in management, a new Plug-in Proxies page has been added. This page lists proxy details including
connectivity status and lets you update, enable/disable, and delete proxies.
•
When selecting a plug-in (while creating or editing endpoints, tasks, test/work item/commit/file sources), both the plug-
in name and any assigned plug-in proxy name are shown in the format {plug-in name}/{proxy display name}. You can
also see plug-in proxy names in exported DSL (release-as-code).
•
New configurable plug-in proxy parameters have been added to settings.properties.
•
To support the new plug-in proxy capabilities, two new cross-project permissions have been added:
–
Can connect plug-in proxy - only proxies that connect with an API key assigned this permission can connect to
Continuous Delivery Director.
–
Can manage plug-in proxy - lets you update, enable/disable, delete and retrieve plug-in proxies
For more information, see Plug-in Proxies.
Apache Tomcat Plug-in
A new plug-in helps you to deploy WAR files stored in a Maven repository to Tomcat using the Tomcat Web Application
Manager.
226

Continuous Delivery Director 8.5
For more information, see Apache Tomcat Plug-in.
Cucumber for Java Plug-in
A new plug-in lets you easily add Cucumber Java-based features as test suites to your release pipeline. This plug-in
integrates with Cucumber-JVM, a pure Java implementation of Cucumber.
For more information, see Cucumber for Java Plug-in.
Endevor SCM Plug-in
A new plug-in lets you automate deployments of mainframe software through Endevor Software Change Manager
(Endevor SCM) by generating Endevor packages dynamically throughout the lifecycle. The following tasks are available
for the creation and management of packages within your Continuous Delivery Director pipeline.
•
Create Package
•
Cast Package
•
Approve/Deny Package
•
Execute Package
•
Backout Package
•
Ship Package
•
Delete Package
For more information, see Endevor SCM Plug-in.
GitLab Plug-in
A new plug-in lets you use GitLab SCM (Source Control Management) as your source control system to retrieve commit
messages.
The following updates were made for plug-in version 1.4:
•
In the Branch field of the Get Files task, you can now enable the processing of GitLab webhook notifications from all
repository branches.
•
A new Trust Any SSL Certificate endpoint parameter lets you allow untrusted and unsigned SSL/TLS certificates.
For more information, see GitLab Plug-in.
Microsoft Teams Plug-in
A new plug-in lets you integrate Microsoft Team real-time messaging capabilities with your release pipeline.
For more information, see Microsoft Teams Plug-in.
Plug-in for GitLab
A new YAML-based integration lets you send change notifications from a GitLab CI pipeline to Continuous Delivery
Director using GitLab CI variables.
For more information, see Plug-in for GitLab.
Runscope Plug-in
A new plug-in lets you can add an Adapting Testing task to your release pipeline that executes a Runscope API test.
For more information, see Runscope Plug-in.
227

Continuous Delivery Director 8.5
TestCafe Plug-in
A new plug-in lets you execute TestCafe test suites as part of your release pipeline.
This plug-in integrates with TestCafe, a node.js tool to automate end-to-end web testing. The TestCafe plug-in
is containerized and supports Adaptive Testing functionality. You can import tests from TestCafe to run as test suites within
release pipelines.
For more information, see TestCafe Plug-in.
Enhanced
Atlassian Bitbucket Plug-in
The following updates were made for plug-in version 2.1:
•
A new optional endpoint parameter, Project Key, was added.
For more information, see Bitbucket Plug-in.
Atlassian Jira Plug-in
The following updates were made for plug-in version 2.4:
•
You can now retrieve child issues together with parent issues in one API call if an embed parameter is present in the
request. Previously, you could only retrieve parent and child issues in separate API calls. Additionally, the getContent
API call is now asynchronous; previously, this API call was synchronized.
For more information, see Atlassian Jira Plug-in.
Cucumber for Ruby Plug-in
The plug-in formerly called Cucumber is now renamed to Cucumber for Ruby.
For more information, see Cucumber for Ruby Plug-in.
Docker Plug-in
The following updates were made for plug-in version 1.2:
•
A new Remove Image task lets you remove specified images from a container.
For more information, see Docker Plug-in.
GitHub Plug-in
The following updates were made for plug-in version 1.0.3:
•
A new endpoint parameter, Owner, was added.
•
In the Branch field of the Get Files task, you can now enable the processing of GitHub webhook notifications from all
repository branches.
For more information, see GitHub Plug-in.
Plug-in for Jenkins
The following update was made for plug-in version 3.2.4:
•
You can now determine whether your Jenkins project uses a repository name as the application name or an application
name that you provide. You can also determine whether your project uses a Git branch name as the application
228

Continuous Delivery Director 8.5
version or an application version that you provide. This enhancement applies to Pipeline, Freestyle project, and
Multibranch Pipeline projects and is available if you integrate Jenkins with GitHub, GitLab, Bitbucket Server, or
Bitbucket (SaaS). To support this enhancement, new radio buttons and fields were added to the Send notification to
CDDirector post-build action:
–
Use Source Code Repository Name as Application Name
–
Use Application Name
–
Use Source Code Branch Name as Application Version
–
Use Application Version
For more information, see Plug-in for Jenkins.
19-February-2020
New
Cucumber Plug-in
A new plug-in lets you easily trigger Cucumber acceptance tests automatically from your releases.
For more information, see Cucumber Plug-in.
29-January-2020
New
Gradle Testing and Robot Framework Plug-ins
The Gradle Testing and Robot Framework plug-ins are now available in Continuous Delivery Director SaaS.
For more information, see Gradle Testing Plug-in and Robot Framework Plug-in.
Enhanced
Atlassian Bitbucket Plug-in
The following updates were made for plug-in version 2.0:
•
You can now use Bitbucket as your source control system to retrieve commit messages so you can track planned
vs actual work. To support this change, a Bitbucket Get Commit Messages task is now available in the Set Source
Control Connection page.
For more information, see Bitbucket Plug-in.
BlazeMeter Plug-in
The following updates were made for plug-in version 3.1:
•
Support for the Test Advisor was enhanced. This plug-in can now recognize new and updated test suites.
For more information, see BlazeMeter Plug-in.
229

Continuous Delivery Director 8.5
5-December-2019
Enhanced
Rally Plug-in
•
A new field, Success Rate, has been added to the Check Test Case Results task. Users can enter the percentage of
tests that are required to pass for the task to succeed.
•
Support has been added for Multi-Value Dropdown List, a custom field type in Rally.
For more information, see Rally
®
Plug-in.
Micro Focus ALM Plug-in
The following updates were made for plug-in version 2.2:
•
Tests can now run in batch mode. Previously, tests could only run one-by-one.
•
The Test Advisor can now run ALM test suites according to the New and Updated tests heuristic.
For more information, see Micro Focus ALM Plug-in.
2-October-2019
New
Gradle Testing Plug-in
A new plug-in lets you automate JUnit testing on Git and Apache Subversion (SVN) builds. This plug-in
is containerized and supports Adaptive Testing functionality.
For more information, see Gradle Testing Plug-in.
Robot Framework Plug-in
A new plug-in provides you with a test automation framework for Git builds that is open-source and application-
independent. This plug-in is containerized and supports Adaptive Testing functionality.
For more information, see Robot Framework Plug-in.
Plug-in for Jenkins
The following update was made for plug-in version 3.1:
You can now configure the notification sending functionality to work with different local settings per project.
You can override the global connectivity details of Continuous Delivery Director for any project. To support this feature,
an Override CDDirector Configuration checkbox has been added. If you select this option, the list of CDDirector
configuration parameters appears, with the global values as defaults. Any changes to the global Continuous Delivery
Director configuration will not affect this project.
For more information, see Plug-in for Jenkins.
230

Continuous Delivery Director 8.5
20-August-2019
Enhanced
Jenkins Plug-in Support
Jenkins Plug-in Support was added for the tree query parameter, used in Jenkins Enterprise (CloudBees). Additionally,
support was added for the CloudBees Request Filter Plugin. This plug-in is used to enhance the security of REST calls
that include a tree query parameter.
For more information, see Jenkins Plug-in.
Red Hat Ansible Plug-in
You can now configure secure connections to GitHub and Bitbucket.
For more information, see Red Hat Ansible Plug-in.
Red Hat Ansible Tower Plug-in
You can now download and access the standard output of jobs, enabling you to view the deployment details. To support
this change, two new settings are added to the endpoint configuration, Store Job Output and Shared File System
Location.
For more information, see Red Hat Ansible Tower Plug-in.
Plug-in for Jenkins
Support is added for Jenkins Pipeline.
For more information, see Plug-in for Jenkins.
Atlassian JIRA Plug-in
Imported work item IDs are now clickable.
For more information, see Atlassian JIRA Plug-in.
29-May-2019
Enhanced
10-April-2019
New
Email Plug-in
A new Email plug-in lets you send preconfigured auto-generated email messages from your continuous delivery pipeline.
For more information, see Email Plug-in.
Red Hat Ansible Plug-in
A new Ansible plug-in lets you run playbooks within releases. You can use playbooks to manage configurations of and
deployments to remote machines.
231

Continuous Delivery Director 8.5
For more information, see Red Hat Ansible Plug-in.
Containerized Plug-in Manager
Continuous Delivery Director now supports containerized plug-ins that automate the configuration of integration
environments. These plug-ins are based on Integration-as-a-Service (IaaS), which is a cloud service delivery model for
integration. This solution allows release managers to put together quickly integration flows and implement orchestrations,
thereby accelerating development time.
A new containerized plug-in manager tool helps you add containerized plug-ins to your CD pipelines in minutes.
NOTE
Currently, the containerized plug-in manager supports the addition of the Red Hat Ansible core plug-in to
releases.
For more information, see Set Up Containerized Plug-ins.
Enhanced
Rally
®
Plug-in
The following update was made for plug-in version 2.5:
•
Support was added for Java 11
The following update was made for plug-in version 2.4:
•
Two new input parameters have been added to the Add Work Items capability, Additional Filters and Import from
Child Projects.
For more information, see Rally
®
Plug-in.
JFrog Artifactory Plug-in
The following update was made for plug-in version 2.1:
•
Support was added for Java 11
The following update was made for plug-in version 2.0:
•
A new task, Copy Item, has been added. This task lets you copy an artifact or folder from a local Artifactory repository
to another repository.
For more information, see JFrog Artifactory Plug-in.
Kubernetes Plug-in
The following update was made for plug-in version 1.3:
•
A new task, Copy Item, has been added. This task lets you copy an artifact or folder from a local Artifactory repository
to another repository.
•
The method to authenticate to the Kubernetes service account has been changed from Basic (username/password)
to Bearer tokens. This method allows the Kubernetes plugin to interface with systems that allow authentication with an
API token.
•
Support was added for Java 11.
For more information, see Kubernetes Plug-in.
232

Continuous Delivery Director 8.5
Red Hat Ansible Tower Plug-in
The following update was made for plug-in version 1.0.5:
•
Support was added for Java 11
The following update was made for plug-in version 1.0.4:
•
A new Build/Change ID field has been added to the Run Job Template task. You can specify the number of a
successful build or commit to either mark the code change as deployed or to promote the change to the next phase.
For more information, see Red Hat Ansible Tower Plug-in.
Red Hat OpenShift Plug-in
The following updates were made for plug-in version 1.1
•
Support was added for Kubernetes versions 1.9 and higher.
•
Support was added for Java 11
For more information, see Red Hat OpenShift Plug-in.
REST Plug-in
The following updates were made for plug-in version 2.3
•
A new Authentication Method endpoint parameter has been added. In addition to Basic authentication, a
new method, Bearer, is now available. This method allows the REST plugin to interface with systems that allow
authentication with an API token.
•
Support was added for Java 11
For more information, see REST Plug-In.
5-February-2019
New
Docker Plug-in
A new Docker plug-in helps you deploy Docker images to run and to remove containers, and to run commands within
containers. Optionally, for the Run Container task, you can run a readiness probe to notify you when the container is
ready to accept traffic.
For more information, see Docker.
SonarQube Plug-in
A new SonarQube plug-in lets you verify the health of your project against quality gates. SonarQube quality gates contain
a set of Boolean conditions based on metrics such as code coverage on new code, no new blocker issues, and so on.
For more information, see SonarQube Plug-in.
233

Continuous Delivery Director 8.5
12-December-2018
New
Atlassian Bitbucket Plug-in
A new Atlassian Bitbucket plug-in lets you use Bitbucket as your file source, a connection to a JSON format file
representation of a release. You can also use Bitbucket as a file source to manage JSON files that reference other JSON
files.
After the Bitbucket file source is configured, any changes to a JSON file in your repository will automatically create and
run a release.
For more information, see Bitbucket.
Enhanced
GitHub Plug-in
You can now use the GitHub plug-in to use GitHub as a file source, a connection to a JSON format file representation of a
release.
For more information, see GitHub Plug-in.
Nolio Release Automation Plug-in
In the Run Deployment task, a new Manifest field lets you add a deployment manifest previously generated in Release
Automation. This new capability lets you pass parameters, including Continuous Delivery Director tokens, to a running
deployment, using the RA manifest in XML format.
In the Run Deployment task, a new field, Fail This Task When Step Errors Occur In, lets you specify that the task fails
if a step in a selected stage is in failed paused status.
For more information, see Nolio Release Automation Plug-In.
6-November-2018
New
ServiceNow
®
Plug-in
An additional ticket type, Request, is now supported. You can now update a request, add a task to a request item, update
a task for a request, and want for approval for a request ticket. To support this change, the following task types have been
updated:
•
Create Task
•
Update Task
•
Update Ticket
•
Wait for Approval
For more information, see ServiceNow.
234

Continuous Delivery Director 8.5
Rally Plug-in
The Check Test Case Results task now lets you check the results given test sets. To support this change, the User story
and/or Defect IDs field has been renamed to Work Item IDs. This field now lets you enter test set IDs in addition to user
story and defect IDs.
The CA Agile Central plug-in has been enhanced to support the new Work Items list functionality.
For more information, see Rally.
Plug-in for Jenkins
You can now configure the plug-in for Jenkins to automatically send Git Commit IDs to Continuous Delivery Director
whenever a build is created in Jenkins.
For more information, see Plug-in for Jenkins.
6-August-2018
New
Autosync for Plug-Ins
When a plug-in is updated with new or enhanced capabilities, Continuous Delivery Director automatically synchronizes
the plug-in version in your workspace. This features allows you to access any new fields and parameters added since the
previous plug-in version.
Micro Focus ALM Plug-in
A new Micro Focus Application Lifecycle Management (ALM) plug-in enables you to run functional test sets as your
applications progress through the Continuous Delivery Director pipeline. You can track milestones and defects in real-time
and can have visibility into the applications under development.
Note: The ALM plug-in is not autoregistered. You can only run the ALM plug-in on an on-prem Windows server connected
to Continuous Delivery Director with the plug-in proxy.
For more information, see Micro Focus ALM.
Red Hat OpenShift Plug-in
A new Red Hat OpenShift plug-in lets you control your Kubernetes environment from your CI/CD pipeline.
For more information, see Red Hat OpenShift Plug-in.
Red Hat Ansible Tower Plug-in
A new Red Hat Ansible Tower plug-in allows you to execute Ansible jobs from the Continuous Delivery Director pipeline,
according to job templates.
For more information, see Red Hat Ansible Tower Plug-in.
JetBrains TeamCity Plug-in (Deprecated)
A new JetBrains TeamCity plug-In lets you easily add completed builds to your pipeline for deployment, testing, and
production.
The TeamCity integration enables zero-touch continuous delivery, continuous testing, and continuous deployment. This
plug-in fully integrates TeamCity CI and build functionality into the robust Continuous Delivery Director pipeline planning,
235

Continuous Delivery Director 8.5
management, and orchestration functionality. Enable the TeamCity plug-in to connect TeamCity builds directly to the
Continuous Delivery Director pipeline so that a successful build triggers pipeline execution.
Plug-in for Microsoft Team Foundation Server
A new Continuous Delivery Director plug-in for Microsoft Team Foundation Server (TFS) lets you trigger the execution of a
release in Continuous Delivery Director when a TFS build completes.
For more information, see Plug-in for Microsoft Team Foundation Server.
Enhanced
Microsoft Team Foundation Server Plug-in
The new Run Build task lets you run TFS or VSTS project builds in the context of phases and releases.
For more information, see Microsoft Team Foundation Server Plug-in.
Atlassian JIRA Plug-in
Output parameters are added to the Create Jira Issue task. You can store the key, ID, and URL of a created issue as a
token and update the issue in other tasks.
For more information, see Atlassian JIRA Plug-in.
10-September-2017
New
Plug-in Proxy
Continuous Delivery Director has developed a plug-in proxy to allow Continuous Delivery Director SaaS users to execute
plug-in services through on-premise components securely, regardless of corporate firewalls.
To support this change, a Use Proxy checkbox has been added to the Plug-ins page for on-premise plug-ins, such as CA
Continuous Delivery Automation.
For more information, see Proxy Plug-in.
A new JFrog Artifactory plug-in is available.
A new Automic Release Automation plug-in is available for use with the plug-in proxy.
Enhanced
CA REST Plug-in
The CA REST plug-in now supports REST 2.0.
In Continuous Delivery Director SaaS, the upgrade from REST 1.0 to REST 2.0 is done automatically.
For more information, see REST Plug-In.
Atlassian JIRA Plug-in
The Create JIRA Issue task has been updated as follows:
A new checkbox, Show advanced settings has been added. If selected, additional fields display.
236

Continuous Delivery Director 8.5
A new field, Custom fields, has been added.
For more information, see Atlassian JIRA Plug-in.
A new Veracode plug-in is available.
The Twistlock plug-in is enhanced with timeout capabilities.
A new web page is available to access the latest plug-ins.
25-June-2017
The following new plug-ins are available:
•
Flowdock
•
Kubernetes
•
Twistlock
The following plug-ins are enhanced:
•
Atlassian JIRA
•
AWS Code Deploy
•
AWS Elastic Beanstalk
•
ServiceNow
Setting up a Local Plugin Server
System Requirements
Operating System Support
•
Red Hat Enterprise Linux 7.3 and higher
•
CentOS Enterprise OS 7.3 and higher
Hardware Requirements
Size Core CPU RAM (in GB) Disk Space (in GB)
Minimal 2 16 80
Mid-Scale 4 32 80
Large-Scale 8 128 100
Software Requirements
•
Latest Apache Tomcat 8.5.x
•
Latest Oracle JRE and OpenJRE/OpenJDK - Java JRE 8.x (64-bit) and Java JRE 11.0 (64-bit)
•
Latest Docker Engine
Setup Instructions
Enable Firewall ports and Perform OS Updates
•
It is recommended you update the host OS to the latest patches according to your selected operating system.
•
Enable the following ports in the firewall settings:
237

Continuous Delivery Director 8.5
–
80
–
443
–
8080
–
4550
•
Enable “WebSocket protocol (WSS)”.
Create OS user and group on CDD server
CDD’s Plugins will write its logs to the file system. It is recommended to create the same OS user and OS group, as the
embedded user in docker image, in the host.
•
Create OS user: cdd with UID = 1010
•
Create OS Group: cdd with GID = 1010
•
Create the home folder with the below structure:
–
/home/cdd/
–
/home/cdd/.cdd
–
/home/cdd/.cdd/conf and /home/cdd/.cdd/logs
•
Change ownership of all folders to the cdd user.
Install Docker Engine
•
Install the latest docker engine
•
Enable the remote Docker API (port 4550)
•
Update Docker daemon and set to auto restart
Install Tomcat
Install Tomcat and set it to run under the user “cdd” and the group “cdd”.
Install the Plugin Proxy
Follow the instructions of the Plugin-Proxy deployment in the CDD documentation.
Install and Register CDD Plugins
•
Install “war” plugins: Download the plugins war files and store them in the Tomcat WebApps folder.
•
Install Containerized Plug-ins: To use Containerized plugins (for example, Cucumber JVM, Gradle Testing, and so
on), see the Containerized Plug-ins section.
•
Register Plug-ins: To register the plug-ins in CDD, see the Register Plug-ins section.
Manage Plug-ins
Integrate plug-ins with Continuous Delivery Director to enable essential integrations with remote components.
This document describes how to install plug-ins and integrate them with your Continuous Delivery Director installation. For
information about the functionality provided by each plug-in, see the online documentation.
Continuous Delivery Director provides the following plug-ins that are packaged and installable out-of-the-box:
[A] [B] [C] [D] [E] [F] [G] [H] [J] [K] [M] [N] [P] [R] [S] [T] [V]
238

Continuous Delivery Director 8.5
A
•
Atlassian Bitbucket
•
Atlassian JIRA
•
Apache Tomcat
•
Automic
®
Continuous Delivery Automation
•
AWS CodeDeploy
•
AWS Elastic Beanstalk
•
Azure DevOps Server (formerly Microsoft Team Foundation Server)
B
•
BlazeMeter
®
C
•
Cucumber for Java
•
Cucumber for Ruby
D
•
Docker
•
DX App Experience Analytics
•
DX App Synthetic Monitor Plug-in
E
•
Email
•
Endevor SCM
F
•
Flowdock
G
•
GitHub
•
GitLab
•
Gradle Testing
H
•
Helm Plug-in
J
•
Jenkins
•
JFrog Artifactory
K
•
Kubernetes
239

Continuous Delivery Director 8.5
M
•
Maven Testing
•
Micro Focus ALM
•
Microsoft Teams
N
•
Nolio Release Automation
P
•
Playwright
R
•
Rally
®
(formerly CA Agile Central)
•
Red Hat Ansible
•
Red Hat Ansible Tower
•
Red Hat OpenShift
•
REST
•
Robot Framework
•
Runscope
S
•
ServiceNow
•
Slack
•
SonarQube
T
•
TestCafe
•
Twistlock
V
•
Veracode
Plug-in Management Workflow
The following steps represent the high-level plug-in management workflow:
1. Install plug-ins.
2. Register plug-ins.
3. Use endpoints to connect to remote component systems.
4. Import data from remote components, such as content or application model.
5. Use automatic tasks that are provided by the plug-ins to execute operations on the remote components.
6. (Optional) Synchronize plug-ins to apply the latest changes to the plug-in.
7. (Optional) Remove plug-ins.
240

Continuous Delivery Director 8.5
TIP
Steps 2, 3, 4 (application model), 6, and 7 require a product Administrator role. Steps 4 (content) and 5 require a
product Designer role.
Install Plug-ins
TIP
Plug-in installation is not required for SaaS users unless you need to install a custom plug-in that you have
developed. Packaged plug-ins are preinstalled with the SaaS instance.
NOTE
You can run packaged plug-ins on your own on-premise network.
From the support site https://casupport.broadcom.com, download the packaged plug-in, then deploy this plug-in
on a Tomcat 8 web container.
All packaged plug-ins require Tomcat 8.
Install plug-ins on the same server as Continuous Delivery Director or on remote servers. Consider the anticipated load on
the plug-ins before deciding to distribute, such as:
•
The amount, frequency, and potential concurrency of task execution
•
The size, frequency, and potential concurrency of imports (both application models and content)
•
The number of connected endpoints per plug-in
A remote plug-in server for packaged plug-in installation requires Tomcat 8 and Java 1.8 to be running on the remote
server.
In general, Continuous Delivery Director custom plug-ins can be developed using any programming language (Java,
Python, PhP, and so on) and can be hosted by any web container (Tomcat, JBoss, IBM Liberty, and so on). All Continuous
Delivery Director packaged plug-ins require Apache Tomcat 8.
Install a single instance of each required plug-in. One plug-in instance can support multiple endpoint connections.
Follow these steps:
NOTE
These steps might vary for custom plug-ins based on your implementation method. For example, if the plug-in
package is a .war file, you might want to deploy to a different servlet container or on the CDD Server Tomcat
instance.
1. Download the .war files for the packaged plug-ins.
2. Stop the Apache Tomcat service on the plug-in server.
3. Copy the plug-in .war file into the webapps folder of the Tomcat installation directory.
TIP
Plug-ins that you are installing on the same server as the CDD Server component can be installed at the
same time as the CDD Server.
4. Start the Apache Tomcat service.
The plug-ins are installed.
Register Plug-ins
Register remote and custom plug-ins to make their capabilities available from Continuous Delivery Director. Packaged
plug-ins that are installed on the Continuous Delivery Director Server are registered automatically.
241

Continuous Delivery Director 8.5
TIP
As a SaaS user, when you log in for the first time, all existing plug-ins are automatically registered for you. Plug-
in registration is only required for SaaS users when new plug-ins are added to the SaaS instance after your
initial login. Monitor release notes to be notified of new plug-ins, which you register using this procedure.
Packaged plug-ins are installed as .war files in an Apache Tomcat server. The .war file includes a manifest.json file. The
plug-in manifest specifies the plug-in capabilities and the URL for each of the plug-in services. To register a plug-in, you
enter the path to the manifest file in the UI.
While custom plug-in implementation methods can vary, all plug-ins require a manifest.json file. The manifest path might
differ if you implement a custom plug-in differently than the packaged plug-ins, but the concept is the same.
TIP
You can also register plug-ins using the REST API. For more information, see REST API Reference.
Follow these steps:
1. In Continuous Delivery Director, select Administration, and Plug-Ins.
2. Click Register Plug-In.
3. Specify the URL of the plug-in manifest. The plug-in manifest is the location of the JSON file.
On-Premise Examples:
–
Automic@ Continuous Delivery Automation plug-in manifest URL
http://<host>:<port>/cdd-ara-plugin/manifest.json
–
CA REST plug-in manifest URL
http://<host>:<port>/cdd-rest-plugin/manifest.json
These examples can represent locally or remotely installed plug-ins.
NOTE
If you configure the product to use HTTPS communication, you must update existing plug-in registrations
that previously used HTTP. For more information, see Secure Communications.
Example:
•
https://myhost:443/cdd-slack-plugin/manifest.json
4. Click Register.
The plug-in is discovered and registered and shows in the Plug-Ins page.
NOTE
Register Plug-ins
Add Endpoints
To connect an endpoint with an instance of a remote component, add an endpoint for a registered plug-in. Each plug-in
uses a single endpoint type (Endpoint Template) and can connect to multiple endpoint instances of that type. For example,
you can connect a ServiceNow plug-in to multiple ServiceNow servers, if needed.
The information that is required for each endpoint connection varies by the plug-in. For more information, see the
documentation for each plug-in.
Follow these steps:
1. Go to Administration, Endpoints, and click Add Endpoint.
2. Specify the Name, Description, and select the Endpoint Type.
Each plug-in has an endpoint type. When you register a plug-in, its endpoint type becomes available to add in this
dialog.
3. Specify the information that is required for the endpoint type you selected, and click Add.
242

Continuous Delivery Director 8.5
The endpoint is added.
NOTE
Manage Endpoints
Import Plug-in Data
Plug-ins can support the import of the following data from their remote component:
•
Application models
•
Content Items
Import application models during the administration phase before you create releases. You can then add applications and
environments from the remote component to your releases, phases, and tasks.
Import content items during the release design phase to associate specific work items with a release.
NOTE
•
Manage Applications and Environments
•
Design and Create Releases
Use Plug-in Tasks
Tasks let you instrument functionality in the remote component. You add tasks to phases and provide the appropriate
input values to execute the provided functionality in your release. For example, the Check Test Case Results task that is
provided by the Rally plug-in queries the results of a test case in Rally.
You add tasks to releases during the design phase and execute them when you run the release. For more information
about the required inputs for each task, see the detailed documentation for each packaged plug-in.
NOTE
•
Design and Create Releases
•
Plug-ins
Synchronize Plug-ins
When you upgrade to a higher, or downgrade to a lower, plug-in version, synchronize the plug-in. This
synchronization captures the latest plug-in manifest. We also recommend that you synchronize the plug-in when you
update remote components or plug-in versions. For example, to synchronize with the latest Automic@ Continuous
Delivery Automation application model changes, synchronize the Automic@ Continuous Delivery Automation plug-in.
Follow these steps:
1. Select Administration, and Plug-Ins.
2. Mouse over the name of the plug-in, select the information icon, and select Sync Plugin.Continuous Delivery Director
updates the plug-in registration with the new plug-in capabilities based on the new plug-in manifest. For example,
the import application model capability is added, or a task is updated and shows under the plug-in name.
Remove Plug-ins
You can remove a plug-in from your workspace at any time. When you remove a plug-in:
•
All related endpoints are permanently deleted
•
The task configuration in all related tasks is permanently deleted
•
The task type in all related tasks reverts to Manual
243

Continuous Delivery Director 8.5
Follow these steps:
1. From the Administration menu, select Plug-ins.
2. Select the relevant plugin, click the actions icon, then Delete Plug-in.
3. Only for OnPrem and SaaS instances running plug-in proxy—On the plug-in server, remove the deleted plug-in
folder and .war file from the webapps folder of the Tomcat installation directory.
Plug-in Proxy
You configure a plug-in proxy to execute on-premise plug-in services that run behind a firewall. You can assign multiple
plug-in proxies to a single plug-in.
Why Do I Need a Plug-in Proxy?
Let us say that you want to integrate Continuous Delivery Director SaaS with on-premise DevOps components, such as
Automic Continuous Delivery Automation, your corporate GitHub or JFrog Artifactory.
However, these on-premise components reside inside your corporate network. These components are protected by the
corporate firewall from unauthorized internet access. The use of the firewall means that Continuous Delivery Director
SaaS cannot easily connect to these components from outside your corporate network.
Continuous Delivery Director has developed a solution that is based on a plug-in proxy. This solution allows Continuous
Delivery Director SaaS users to execute plug-in services through on-premise components securely, despite the firewall.
How does the Plug-in Proxy Work?
The following diagram shows the plug-in proxy architecture:
Figure 33: Plug-in Proxy
244

Continuous Delivery Director 8.5
Plug-in Proxy Workflow
1. The plug-in proxy is deployed inside the customer (tenant) on-premise network
2. The on-premise installed plug-in proxy initiates a connection request to the remote CDD installation (cddirector.io of a
CDD instance installed in an external firewall system). This connection uses the secured WebSocket protocol (WSS)
through ports 80 or 443.
NOTE
If your organization uses a Web proxy, the plug-in proxy connects to Continuous Delivery Director through
that web proxy.
The plug-in proxy cannot connect to https://cddirector.io if the WebSocket WSS protocol is blocked by on-
premise network elements such as the network router, firewall, and so on). The corporate firewall must be
configured to enable the WebSocket WSS protocol.
WebSocket connections generally work even if a firewall is in place. The connections succeed because
WebSocket connections use ports 80 and 443 which are also used by HTTP connections.
Sometimes WebSocket connections are blocked over port 80. If so, a secure SSL connection using WSS
over port 443 should successfully connect.
3. The plug-in proxy authenticates to the remote Continuous Delivery Director installation using a tenant ID and an API
Key of an user with administrator role.
4. Using the deployed plug-ins proxy, you now can register a plug-in which is installed within the on-premise data center.
You can use this plugin’s capabilities within your releases.
How can I Tell that a Plug-in Proxy is in Use?
Users select plug-ins when creating or editing endpoints, tasks, test/work item/commit/file sources. When selecting a plug-
in, both the plug-in name and any assigned plug-in proxy name are shown in the format {plug-in name}/{proxy
display name}.
For example, a user edits a Rally Update task. In the task type dropdown list, they see Rally/Dev, Rally/QA, and
Rally/Deploy, meaning that different plug-in proxies named Dev, QA, and Deploy, are assigned to the Rally plug-in.
You can also see plug-in proxy names in exported DSL: "plugin": "EMEA|Rally/Dev",
More Information
Set Up a Plug-in Proxy
Run Plug-in Proxy With Docker Compose
Run Plug-in Proxy Without Docker Compose
Register an On-Premise Plug-in with Proxy
Configure Plug-in Proxy Properties
Manage Plug-in Proxies
Set Up a Plug-in Proxy
To enable a plug-in proxy, you need a Docker engine and a Docker image pulled from the support download center.
PREREQUISITES
•
A server with Docker Engine 19.x or higher is allocated inside your on-premise network.
•
Firewall access is enabled from the server to Continuous Delivery Director over the WebSocket protocol.
245

Continuous Delivery Director 8.5
NOTE
The plug-in proxy connects to Continuous Delivery Director through the WebSocket protocol. This step is
needed to enable the plug-in proxy to communicate through WebSocket.
•
The WSS protocol is enabled from the plug-in proxy machine to Continuous Delivery Director SaaS (cddirector.io).
•
Obtain your tenant ID and the API Key of an administrator user for authentication of the plug-in proxy.
CAUTION
If the administrator permissions of the user whose API key is used are removed, the communication fails!
Prepare Your Machine
1. From the Docker Engine server command line, create user cdd with uid 1010 , group cdd with gid 1010, and add
user cdd to the docker group .
useradd -u 1010 cdd
groupadd 1010 -g 1010 cdd
useradd 1010 -u 1010 -g 1010 -G docker cdd
NOTE
The code within the docker container runs with uid=1010 and gid=1010. To enable proper tracing, create
uid=1010 and gid=1010 on the host box.
2. Create the following folder structure:
/home/cdd/.cdd
/home/cdd/.cdd/logs
/home/cdd/.cdd/cdd-plugins-proxy
3. Change the directory to the required base folder.
/home/cdd/.cdd
NEXT STEPS
Install the docker image on your machine by downloading a tar.gz folder from the support download center or a download
link.
Pull the Plug-in Proxy Docker Image from the Support Site
1.
NOTE
The following steps are only required if you have not received a download link and have not downloaded the
plug-in proxy tar.gz folder archive to your machine.
246

Continuous Delivery Director 8.5
In a Web browser, enter the URL https://casupport.broadcom.com/download-center/download-center.html and provide
valid credentials to download Broadcom software.
2. Type Continuous into the search box, and click a Continuous DLVRY DIRCTR tile.
Figure 34: Download Center
247

Continuous Delivery Director 8.5
3. In a table row, select the latest release and click the Docker icon:
Figure 35: Docker icon
248

Continuous Delivery Director 8.5
4. Save the instructions to a file or copy them to a text editor.
Figure 36: Docker command with token
5. Follow the instructions to create a local token, log in to the Broadcom repository and pull the required docker image.
On your docker engine machine:
Create token
token='eyJ2ZXIiOiIyIiwidHlwIjoiSldUIiwiYWxnIjoiUlMOiJqZnJ0QDAxZXA4M3F2MzFjcnowMHg2ZjZ6eWYwNHo2XC91c2Vyc1wvY29saW4ua3VycmFudEBicm9hZGNvbS5jb20iLCJzY3AiOiJtZW1iZXItb2YtZ3JvdXBzOkNERC1HRU4wMDAwMDAwMDAzMzA1IGFwaToqIiwiYXVkIjoiamZydEAwMWVwODNxdjMxY3J4cCI6MTYyMjAyNzMzMCwiaWF0IjoxNjIyMDIwMTMwLCJqdGkiOiIzMDRhNDJmNi05YTIzLTQyOGUtYjRjOC1kMTY1ZmVhMGIwZjYifQ.N9rWnq7B--9ZXp2EY26N04w6OKEHAc1DEZaWNSp01HyZKFcf8O-
G4VQNy3khDybsZIIBXblXnv-OhVdesqHQaJrWMu29H9X1ZOlkKVdzXmCNExKz4iLNbQs1KR5fLu1-
RpkRufUhr4dMFbaXcpvT0ScdH6UUECwYIkTv4yV5KNeHjovdyKwhWvZYl8njyjLfVUbA6O7wXpV37FPfiazJZSu7dScRhfzbuS0OF83lveTGZmAbq4DbdwcomR7rMKkQ92jnTGerU722jU6VfmkIg
Log in to the docker registry:
docker login <docker-registry-name> -u <docker-registry-username> -p <docker-registry-password>
For example:
docker login -u '[email protected]' -p$token cdd.packages.broadcom.com
Pull the plug-in proxy docker image, for example:
docker pull cdd.packages.broadcom.com/plugins-proxy:1234
6. On the target machine, in the command line, for example, PuTTY, paste the generated command lines to access your
registry and to pull the plug-in proxy image.
Add the token, for example:
token='eyJ2ZXIiOiIyIiwidHlwIjoiSldUIiwiYWxnIjoiUlMOiJqZnJ0QDAxZXA4M3F2MzFjcnowMHg2ZjZ6eWYwNHo2XC91c2Vyc1wvY29saW4ua3VycmFudEBicm9hZGNvbS5jb20iLCJzY3AiOiJtZW1iZXItb2YtZ3JvdXBzOkNERC1HRU4wMDAwMDAwMDAzMzA1IGFwaToqIiwiYXVkIjoiamZydEAwMWVwODNxdjMxY3J4cCI6MTYyMjAyNzMzMCwiaWF0IjoxNjIyMDIwMTMwLCJqdGkiOiIzMDRhNDJmNi05YTIzLTQyOGUtYjRjOC1kMTY1ZmVhMGIwZjYifQ.N9rWnq7B--9ZXp2EY26N04w6OKEHAc1DEZaWNSp01HyZKFcf8O-
G4VQNy3khDybsZIIBXblXnv-OhVdesqHQaJrWMu29H9X1ZOlkKVdzXmCNExKz4iLNbQs1KR5fLu1-
RpkRufUhr4dMFbaXcpvT0ScdH6UUECwYIkTv4yV5KNeHjovdyKwhWvZYl8njyjLfVUbA6O7wXpV37FPfiazJZSu7dScRhfzbuS0OF83lveTGZmAbq4DbdwcomR7rMKkQ92jnTGerU722jU6VfmkIg
249

Continuous Delivery Director 8.5
Log in to the docker registry:
docker login <docker-registry-name> -u <docker-registry-username> -p <docker-registry-password>
For example:
docker login -u '[email protected]' -p$token cdd.packages.broadcom.com
Pull the plug-in proxy docker image, for example:
docker pull cdd.packages.broadcom.com/plugins-proxy:1092
NEXT STEPS
Choose one of the following methods for running the plug-in proxy docker image:
•
With Docker Compose – Choose this method if you want to utilize docker compose capabilities. This will allow you
to run several docker images concurrently (for example, run the plug-in proxy and other plug-ins that run as docker
images). For more information, see Run Plug-in Proxy With Docker Compose.
•
Without Docker Compose – Choose this method if you only want to run the plug-in proxy with the docker run
command. For more information, see Run Plug-in Proxy Without Docker Compose.
Run Plug-in Proxy With Docker Compose
PREREQUISITES
You have carried out the setup procedure described in Set Up a Plug-in Proxy.
1. Initialize swarm mode:
docker swarm init
2. Create a Docker secret to hold your Continuous Delivery Director API key:
echo "{Your API KEY}" | docker secret create cdd_plugins_proxy_api_key -
NOTE
Use the API key of a user with an administrator role. To find your API key, in Continuous Delivery Director,
click the user initials icon and click the My Settings option.
An API key is specific to a Continuous Delivery Director project. If you want to use on-premise plug-ins to
connect to cddirector.io using multiple projects, you need to run multiple instances of the plug-in proxy.
3. On your docker engine machine, connect using the cdd user and change the directory to /home/cdd/.cdd.
4. Create a docker-compose.yaml file.
5. Copy the following code block:
version: '3.1'
services:
cdd-plugins-proxy:
image: "cdd.packages.broadcom.com/plugins-proxy:latest"
environment:
CDD_PLUGINS_PROXY_ID: {plugin-proxy-id}
CDD_PLUGINS_PROXY_CDD_API_KEY_PATH: '/run/secrets/cdd_plugins_proxy_api_key'
CDD_PLUGINS_PROXY_CDD_TENANT_ID: {cdd-tenant-id}
CDD_PLUGINS_PROXY_PLUGINS_WHITE_LIST: {plugin-white-list}
CDD_PLUGINS_PROXY_CDD_URL: {cdd-web-address}
volumes:
- /home/cdd/.cdd:/home/cdd/.cdd
250

Continuous Delivery Director 8.5
secrets:
- cdd_plugins_proxy_api_key
deploy:
replicas: 1
restart_policy:
condition: on-failure
secrets:
cdd_plugins_proxy_api_key:
external: true
6. Replace the following values in the YAML indicated by the curly braces '{}':
CAUTION
Do not change the code except for the values within the curly brackets '{}'. Doing so may cause
unpredictable results, including data loss.
Do not change the indentation or use tab characters.
•
{plug-in-proxy-latest-docker-image-tag}
NOTE
If you have obtained the plug-ins proxy image using the wget commant, make sure to update the full
image URL as defined for the image
•
{plugin-proxy-id}
•
{cdd-tenant-id}
•
{plugin-white-list}
•
{cdd-web-address}
Explanation of parameters:
•
CDD_PLUGINS_PROXY_ID
Unique ID of the plug-in proxy
CAUTION
Assign a meaningful name to the plug-in proxy (the CDD_PLUGINS_PROXY_ID property) to facilitate easy
management and traceability. To avoid possible conflicts with other plug-in proxies, make sure that the
proxy ID you enter is unique.
•
CDD_PLUGINS_PROXY_CDD_API_KEY_PATH
Path to the Docker secret file on the Docker Engine server
•
CDD_PLUGINS_PROXY_CDD_TENANT_ID
The Continuous Delivery Director tenant ID. To find your tenant ID, in Continuous Delivery Director, go to the User
Settings menu.
•
CDD_PLUGINS_PROXY_PLUGINS_WHITE_LIST
A list of the on-premise plug-ins server addresses.
•
CDD_PLUGINS_PROXY_CDD_URL
The web address of Continuous Delivery Director SaaS. Value: https://cddirector.io/
version: '3.1'
services:
cdd-plugins-proxy:
image: "cdd.packages.broadcom.com/plugins-proxy:latest"
environment:
CDD_PLUGINS_PROXY_ID: cdd-plugins-proxy-hostname
CDD_PLUGINS_PROXY_CDD_API_KEY_PATH: '/run/secrets/cdd_plugins_proxy_cddirectorio_api_key'
CDD_PLUGINS_PROXY_CDD_TENANT_ID: 96z98z94-b041-4zf5-9ze85-z41c942z211z
CDD_PLUGINS_PROXY_PLUGINS_WHITE_LIST: abcdev003773.mycompany.net
251

Continuous Delivery Director 8.5
CDD_PLUGINS_PROXY_CDD_URL: https://cddirector.io
volumes:
- /home/cdd/.cdd:/home/cdd/.cdd
secrets:
- cdd_plugins_proxy_api_key
deploy:
replicas: 1
restart_policy:
condition: on-failure
secrets:
cdd_plugins_proxy_api_key:
external: true
7. Deploy the new Docker stack:
docker stack deploy --compose-file=docker-compose.yaml cdd-plugins-proxy-stack
8. Check that the Docker stack is ready:
docker stack services cdd-plugins-proxy-stack
The plug-in proxy is enabled and is available for use for on-premise plug-ins.
Handy Docker Compose Commands
You may find the following commands useful when you manage the plug-in proxy Docker image with Docker Compose.
You enter these commands from the Docker engine server command line.
To do this... Enter
Validate Docker stack is available docker stack services cdd-plugins-proxy-
stack
Stop a running Docker stack docker stack rm cdd-plugins-proxy-stack
Create a Docker secret file echo "{Your API KEY}" | docker secret create
cdd_plugins_proxy_api_key -
List existing Docker secret files docker secret ls
Remove a Docker secret file docker secret rm cdd_plugins_proxy_api_key
Run Plug-in Proxy Without Docker Compose
After you have downloaded the Docker image from the support site, you run the image through a command sequence.
Use this method if you want to run specific on-premise plug-ins only.
This method requires a local Apache Tomcat 8.x instance on which you install the required on-premise plug-ins.
ATTENTION
To enable the communication of the plug-in proxy through WebSocket, you must authenticate to Continuous
Delivery Director with the API key of an administrator. You set up a Docker secret to hold your API key.
CAUTION
If the administrator permissions of the user whose API key is used are removed, the communication will fail!
Use the following command to run the Docker image:
docker run -d \
--name plugins-proxy \
--restart=on-failure \
-v /home/cdd/.cdd:/home/cdd/.cdd \
252

Continuous Delivery Director 8.5
-e CDD_PLUGINS_PROXY_ID=<plugins-proxy-id> \
-e CDD_PLUGINS_PROXY_CDD_API_KEY=<cdd-api-key> \
-e CDD_PLUGINS_PROXY_CDD_TENANT_ID=<tenant-id> \
-e CDD_PLUGINS_PROXY_PLUGINS_WHITE_LIST=<plugin-server1,plugin-server2,...> \
-e CDD_PLUGINS_PROXY_CDD_URL=https://cddirector.io \
cdd.packages.ca.com/com/ca/cdd/plugins-proxy:{plug-in-proxy-latest-docker-image-tag}
If your organization uses a web proxy, to run the Docker image, add the following lines:
docker tag cdd.packages.ca.com/com/ca/cdd/plugins-proxy plugins-proxy:latest
docker run -d \
--name plugins-proxy \
--restart=on-failure \
-v /home/cdd/.cdd:/home/cdd/.cdd \
-e CDD_PLUGINS_PROXY_ID=<plugins-proxy-id> \
-e CDD_PLUGINS_PROXY_CDD_API_KEY=<cdd-api-key> \
-e CDD_PLUGINS_PROXY_CDD_TENANT_ID=<tenant-id> \
-e CDD_PLUGINS_PROXY_PLUGINS_WHITE_LIST=<plugin-server1,plugin-server2,...> \
-e CDD_PLUGINS_PROXY_CDD_URL=https://cddirector.io \
-e CDD_PLUGINS_PROXY_INTERNET_PROXY_URL=http://proxy:8080 \
-e CDD_PLUGINS_PROXY_INTERNET_PROXY_USERNAME=username \
-e CDD_PLUGINS_PROXY_INTERNET_PROXY_PASSWORD=password \
cdd.packages.ca.com/com/ca/cdd/plugins-proxy:{plug-in-proxy-latest-docker-image-tag}
Explanation of parameters:
•
CDD_PLUGINS_PROXY_ID
Unique ID of the plug-in proxy
CAUTION
To avoid possible conflicts with other plug-in proxies, make sure that the proxy ID you enter is unique.
•
CDD_PLUGINS_PROXY_CDD_API_KEY
Use the API key of a user with an administrator role. To find your API key, in Continuous Delivery Director, click the
user initials icon and click the My Settings option.
NOTE
An API key is specific to a Continuous Delivery Director project. If you want to use on-premise plug-ins to
connect to cddirector.io using multiple projects, you need to run multiple instances of the plug-in proxy.
•
CDD_PLUGINS_PROXY_CDD_TENANT_ID
Continuous Delivery Director Tenant ID. To find your tenant ID, in Continuous Delivery Director, go to the User Settings
menu.
•
CDD_PLUGINS_PROXY_PLUGINS_WHITE_LIST
Comma-separated list of Continuous Delivery Director plug-in servers.
•
CDD_PLUGINS_PROXY_CDD_URL
Web address of Continuous Delivery Director SaaS. Value: (default) https://cddirector.io
Explanation of parameters for web proxy only:
•
CDD_PLUGINS_PROXY_INTERNET_PROXY_URL
Web address to access organization web proxy.
•
CDD_PLUGINS_PROXY_INTERNET_PROXY_USERNAME
(Optional) Username to authenticate access to the organization web proxy.
•
CDD_PLUGINS_PROXY_INTERNET_PROXY_PASSWORD
(Optional) The password to authenticate access to the organization's web proxy.
253

Continuous Delivery Director 8.5
After the command executes, the plug-in proxy is enabled and is available for use for on-premise plug-ins.
Location of plug-in proxy log files
The plugins_proxy.log files are created in the logs sub-folder of the cdd user local folder:
/home/cdd/.cdd/logs/
plugins_proxy.log
plugins_proxy_out.log
NEXT STEP
Register an On-Premise Plug-in with Proxy
Validate Plug-in Proxy Status
In Continuous Delivery Director, you can check the plug-in proxy status. Click the cross-project cogwheel icon
,
then Plug-in Proxy. You can also review logs for the status.
Register an On-Premise Plug-in with Proxy
After you enable the plug-in proxy, you can register on-premise plug-ins (that run behind a firewall) to use that proxy in
Continuous Delivery Director.
1. Click Administration, then Plug-ins.
2. Click Register Plug-in.
3. Specify the plug-in manifest URL.
https://<whitelist-plugin-server>:<port>/cdd-<plugin-name>-plugin/manifest.json. For
example, https://cdd-plugin-server:8443/cdd-github-plugin/manifest.json.
NOTE
You can use either the hostname or the IP address of the plug-in server.
4. In Select Proxy, choose the required proxy from the dropdown list.
5. Click Register.
The plug-in is discovered and registered and appears in the Plug-Ins page.
Configure Plug-in Proxy Properties
You can edit settings.properties to support multiple plug-in proxies.
Except where indicated, the following content is relevant for both on-premise and SaaS Continuous Delivery Director
instances.
•
To enable plug-in proxies, in settings.properties (/home/cdd/.cdd/conf/settings.properties), ensure
that the following line is set to true :
cdd.pop.enabled = true
NOTE
Only relevant for on-premise.
•
To specify an optional unique ID of the plug-in proxy instance either in setttings.properties or in environment
variables:
•
In settings.properties: cdd.plugins_proxy.id = {proxy ID}
•
In environment variables: CDD_PLUGINS_PROXY_ID
254

Continuous Delivery Director 8.5
NOTE
A proxy ID is limited to 200 characters which can include alphanumeric characters, hyphens, dots, and
underscores.
•
To define heartbeat intervals that indicate normal operation, edit the following line in settings.properties:
cdd.plugins_proxy.cdd.heartbeat_interval_in_millis = {number of milliseconds}
•
To enable/disable message services for plug-in proxies such as Kafka or RabbitMQ, edit the following line in
settings.properties:
cdd.plugins_proxy.message_queue.enabled =
NOTE
Only relevant for on-premise.
cdd.plugins_proxy.id=Dev
cdd.plugins_proxy.cdd.heartbeat_interval_in_millis = 30000
cdd.plugins_proxy.message_queue.enabled = false
Manage Plug-in Proxies
You manage plug-in proxies in the Plug-in Proxies page. This page lists proxy details including connectivity status and
lets you edit, enable/disable, and delete proxies.
PREREQUISITE
To manage plug-in proxies, you need the Can manage plug-in proxy permission.
Edit a Plug-in Proxy
1. Click the cross-project settings icon, then Plug-in Proxy.
2. In the Plug-in Proxies page, either select a name in a table row or click the actions menu on the right of a table row
and choose Edit.
3. Configure and set values for the following parameters:
•
Display Name in UI
Specify the plug-in proxy name to be shown in the user interface. If left empty, the proxy ID is shown.
•
Choose which IP addresses can connect
Determine whether only whitelisted or all IP addresses are allowed to connect to the plug-in proxy.
•
IP Addresses
Specify the IP addresses that can connect to the plug-in proxy. Ex. 192.19.250.253. You can enter IP addresses
manually when the whitelist option is disabled. Any IP addresses through which you have connected will be listed.
If the whitelist option is enabled, only whitelisted IP addresses will be listed.
255

Continuous Delivery Director 8.5
4. Click Save.
Enable/Disable a Plug-in Proxy
1. Click the cross-project settings icon, then Plug-in Proxy.
2. In the Plug-in Proxies page, click the actions menu on the right of a table row and choose Enable/Disable.
Delete a Plug-in Proxy
1. Click the cross-project settings icon, then Plug-in Proxy.
2. In the Plug-in Proxies page, click the actions menu on the right of a table row and choose Delete.
Containerized Plug-ins
Continuous Delivery Director provides some integrations as container images, referred to as containerized plug-ins. These
plug-ins automate the configuration of integrated environments.
Containerized plug-ins are based on Integration-as-a-Service, which is a cloud service delivery model for integration.
These plug-ins deliver an integration solution that can greatly reduce the time involved in setting up third-party clients
and servers as part of your continuous delivery pipeline. This solution allows release managers to quickly put together
integration flows and implement orchestrations, thereby accelerating development time.
Containerized plug-ins are docker images, stored in a registry that is either private or public on a repository, such as
Artifactory. You can also pull the containerized plug-in images from the Broadcom Customer Support Portal.
A single containerized plug-in can be deployed as multiple identical containers on multiple container management
platforms.
Containerized plug-ins are comprised of system libraries, system tools, and other platform settings a third-party service
provider needs to run on container management platforms.
Continuous Delivery Director has developed a tool, the Containerized Plug-in Manager, that enables you to work with
the following container management platforms:
•
Docker Engine. For more information, see Run Containerized Plug-ins using Docker Engine.
•
Kubernetes. For more information, see Run Containerized Plug-ins using Kubernetes.
Continuous Delivery Director provides the following containerized plug-ins:
•
Checkmarx Plug-in
•
Cucumber JVM Plug-in
•
Cucumber for Ruby Plug-in
•
Gradle Testing Plug-in
•
Helm Plug-in
•
Karate Plug-in
•
Maven Testing Plug-in
•
Playwright Plug-in
•
pytest Plug-in
•
Red Hat Ansible Plug-in
•
Robot Framework Plug-in
•
Salesforce Plug-in
•
SoapUI Plug-in
•
TestCafe Plug-in
256

Continuous Delivery Director 8.5
Containerized Plug-in Manager
To use containerized plug-ins in Continuous Delivery Director, install the Containerized Plug-in Manager.
Version 2.9.2
Containerized plug-ins are comprised of system libraries, system tools, and other platform settings a third-party service
provider needs to run on container management platforms.
Continuous Delivery Director has developed a tool, the Containerized Plug-in Manager, that enables you to work with
the following container management platforms:
•
Docker Engine. For more information, see Run Containerized Plug-ins using Docker Engine.
•
Kubernetes. For more information, see Run Containerized Plug-ins using Kubernetes.
Download Options
Use one of the following options to download the latest containerized plug-in manager version:
Method Info
wget wget -O containerized.war https://
cspdl.broadcom.com/shared/static/
emqgzflvrt0oogpinucfhtqjayr78lgk.war?
LCK=ent.box.com
MD5 d49d141dacc2a9fe22b4aa953656258f
Click Download Button
Change History
The following update was made for version 2.9.2:
•
Add Security Source Capabilities to the containerized Plugin.
The following update was made for version 2.9.1:
•
Bugfix - Blackduck fixes.
The following update was made for version 2.9:
•
Added support to show the execution logs in the run-time even the containerized plug-in is connected using a proxy.
The following update was made for version 2.6:
•
Gradle properties were updated.
The following update was made for version 2.5:
•
When settings are changed and saved, settings.properties is automatically updated during runtime without the
need to restart the service.
The following updates were made for version 2.4:
•
The tenant ID was updated.
The following updates were made for version 2.3:
257

Continuous Delivery Director 8.5
•
Bugfix - Cucumber JVM test suite import failed on SaaS.
•
Bugfix - the containerized plug-in manager does not map volumes in connectivity tests.
The following updates were made for version 2.2:
•
The Fabric8 software component used by the containerized plug-in manager has been upgraded to version 5.1.1.
•
The containerized plug-in manager lets you run Continuous Delivery Director docker-based plugins on Kubernetes
(and not just on Docker engine).
•
You can configure settings.properties to support multiple container management platforms.
•
Bugfix: The containerized plug-in log files were overwritten in a multi-node active-active high-availability cluster setup.
Set Up Multiple Containerized Plug-in Managers
You can configure settings.properties to support multiple container management platforms.
You can use multiple container management platforms to run containerized plug-ins (for example, either for multiple
Docker Engines, or for Docker Engine and Kubernetes). To support this scenario, you set up a containerized manager
instance for each container management platform. You can configure settings.properties with multiple
containerized plug-in manager settings.
You must set the CDD_CONTAINERIZED_ID environment variable to specify the unique ID of each containerized manager
instance per container management platform instance. Each containerized manager instance must run using a unique
value of the CDD_CONTAINERIZED_ID environment variable. The value of the CDD_CONTAINERIZED_ID environment
variable is free text.
You can update the settings.properties file and add the concrete value of {cdd-containerized-id} right after
the cdd.plugins.containerized. prefix.
If the {cdd-containerized-id} prefix is not found, the plug-in reverts to the same property name without the {cdd-
containerized-id} prefix.
You have a Docker Engine platform and a Kubernetes platform. You need two containerized manager
instances, one instance with CDD_CONTAINERIZED_ID set to 1, and the other instance with
CDD_CONTAINERIZED_ID set to 2. Your settings.properties file includes the following lines:
cdd.plugins.containerized.1.platform_provider=docker
cdd.plugins.containerized.2.platform_provider=kubernetes
Your settings.properties file includes the following sections:
settings.properties
==================================
cdd.plugins.containerized.{cdd-containerized-id-1}.platform_provider=docker
cdd.plugins.containerized.{cdd-containerized-id-1}.container_engine.home_folder_base_url=http://
cdddev001234.mpc.mycompany.net
cdd.plugins.containerized.{cdd-containerized-id-1}.container_engine.home_folder=/home/cdd/.cdd
cdd.plugins.containerized.{cdd-containerized-id-1}.container_engine.host=http://
cdddev001234.mpc.mycompany.net
cdd.plugins.containerized.{cdd-containerized-id-1}.container_engine.port=4550
cdd.plugins.containerized.{cdd-containerized-id-2}.platform_provider=kubernetes
cdd.plugins.containerized.{cdd-containerized-id-2}.cluster.namespace=
cdd.plugins.containerized.{cdd-containerized-id-2}.cluster.username=
cdd.plugins.containerized.{cdd-containerized-id-2}.cluster.password=
cdd.plugins.containerized.{cdd-containerized-id-2}.cluster.server_url=
cdd.plugins.containerized.{cdd-containerized-id-2}.cluster.persistence_volume_claim_name=
258

Continuous Delivery Director 8.5
cdd.plugins.containerized.{cdd-containerized-id-2}.cluster.access_token=
cdd.plugins.containerized.{cdd-containerized-id-1}[email protected]
cdd.plugins.containerized.{cdd-containerized-id-1}.registry.password=Cdd1234$
cdd.plugins.containerized.{cdd-containerized-id-1}.registry.url=docker-release-candidate-
local.artifactory-xyz.broadcom.net
cdd.plugins.containerized.{cdd-containerized-id-1}.registry.username=bld_cdd_build
cdd.plugins.containerized.{cdd-containerized-id-1}.container.volumes.artifacts=/home/cdd/.cdd/
artifacts
cdd.plugins.containerized.{cdd-containerized-id-2}.cucumberjvm.container.image_name=docker-release-
candidate-local.artifactory-xyz.mycompany.net/com/cdd/trunk/8.0/plugins/cucumberjvm\:15
cdd.plugins.containerized.{cdd-containerized-id-2}.cucumberjvm.container.volumes.artifacts=/home/
cdd/.cdd/artifacts
cdd.plugins.containerized.{cdd-containerized-
id-2}.cucumberjvm.container.volumes.artifacts.volumes=dependencies\:/home/cdd/.m2
cdd.plugins.containerized.{cdd-containerized-id-2}.cucumberjvm.container.volumes.logs=/home/
cdd/.cdd/logs
You also have multiple instances of the same container management platform type, docker. Your
settings.properties file includes the following lines:
cdd.plugins.containerized.1.platform_provider=docker
cdd.plugins.containerized.2.platform_provider=docker
Set Up Containerized Plug-ins
•
You have a working knowledge of Docker.
•
An Apache Tomcat 8.5 server is installed with the containerized-manager plug-in deployed.
•
The Tomcat server is owned and run by an OS user whose UID/GID are 1010/1010 .
The Continuous Delivery Director solution includes a number of plug-ins that are packaged as Docker container images.
These containerized plug-ins support the Adapting Testing functionality.
1. Download and load the plug-in Docker image, using one of the following methods:
•
NOTE
Use this option if you are unable to use docker pull
From the command line, enter the wget command listed in the Download Options section in the plug-in
documentation. For example, Maven Testing Plug-in.
wget -O cdd-maventesting-plugin-v1.5b124.tar.gz https://cspdl.broadcom.com/shared/
static/xu6uvenjk1bfml7jbrw38p9tpq8nu065.gz?LCK=ent.box.com
Enter:
docker load -i <the gz file name>
•
Connect to https://support.broadcom.com/enterprise-software/download-center.
Select either Continuous Delivery Director or Continuous Delivery Director SaaS and click the Docker button.
Follow the on-screen instructions to pull the image to your localhost.
2. Set up a shared mounted filesystem or create the following folder structure:
NOTE
Skip this step if the setup already exists.
259

Continuous Delivery Director 8.5
mkdir /home/cdd/.cdd
mkdir /home/cdd/.cdd/logs
mkdir /home/cdd/.cdd/conf
mkdir /home/cdd/.cdd/artifacts
mkdir /home/cdd/.cdd/certificates
3. Create a settings.properties file under /home/cdd/.cdd/conf/, and add the following lines:
NOTE
Skip this step if the setup already exists.
cdd.plugins.containerized.container.volumes.artifacts=/home/cdd/.cdd/artifacts
cdd.plugins.containerized.container.volumes.logs=/home/cdd/.cdd/logs
cdd.plugins.containerized.container.volumes.certificates=/home/cdd/.cdd/certificates
#Container (Docker) Engine
cdd.plugins.containerized.container_engine.host=localhost
cdd.plugins.containerized.container_engine.port=4550
cdd.plugins.containerized.container_engine.home_folder=/home/cdd/.cdd
cdd.plugins.containerized.home_folder=/home/cdd/.cdd
#Registry
cdd.plugins.containerized.registry.url=
cdd.plugins.containerized.registry.username=
cdd.plugins.containerized.registry.password=
cdd.plugins.containerized.registry.email=
4. In settings.properties, add a line such as the following:
cdd.plugins.containerized.<plug-in name>.container.image_name=<repository>:<tag>
IMPORTANT
Replace plug-in name with the required plug-in name, such as maven . You must update this line every
time you update the relevant plug-in.
5. Restart the containerized-manager service.
cd /opt/apache-tomcat-<tomcat version>/webapps
rm -rf containerized
ls -ltr
6. Register the new plug-in using the following manifest URL: http://<plugin-server>:<port>/
containerized/plugins/cdd-<name of plug-in>-plugin/manifest.json.
Run Containerized Plug-ins using Docker Engine
Learn how to set up containerized plug-ins to work in Continuous Delivery Director using Docker Engine.
260

Continuous Delivery Director 8.5
•
A home folder is set up and includes containerized folders. For more information, see Configure the Home Folder.
•
A Docker Engine machine is provisioned, preferably running Red Hat Linux 7.4.
•
For Continuous Delivery Director SaaS users, a plug-in proxy is defined so that the Docker Engine machine is included
in the approved list. For more information, see Plug-in Proxies.
•
The containerized manager war file and a containerized plug-in tar file (which holds the required docker images) have
been downloaded to the Docker Engine machine.
NOTE
Enhanced Security
Optional. To restrict the access to the Docker remote API port to allow localhost origin only, follow all the steps in
the following Enhanced Security notes.
1. Enable access to Docker containers and images.
a) From the command line, as a root user, create a user with the name cdd and the uid 1010 , and a group with the
name cdd and the gid 1010 on the Docker Engine machine. Add the user cdd to the existing docker group
to allow this user to run Docker images. This step enables the Docker container to read and write the required
settings and logs to a persistent volume on the Docker Engine machine:
groupadd 1010 -g 1010 cdduseradd 1010 -u 1010 -g 1010 -G docker cdd
NOTE
The purpose of the cdd user and cdd group is to limit read-write permissions between the host machine
and the Docker containers to authorized users only.
All cdd services are run on behalf of the cdd OS user. All Continuous Delivery Director artifacts are
stored in the cdd home folder using cdd user access permissions.
b) Set a password for the cdd user:
passwd cdd {provide a password}
2. Enable access to the Docker remote API port for communication between the containerized plug-in and the Docker
Engine:
a) Create the docker.service.d directory:
mkdir /etc/systemd/system/docker.service.d
b) Create the docker-external.conf configuration file:
vi /etc/systemd/system/docker.service.d/docker-external.conf
c) Add the following content to the docker-external.conf file:
[Service] ExecStart=ExecStart=/usr/bin/dockerd -H tcp://0.0.0.0:4550 -H unix:///var/run/docker.sock
NOTE
Enhanced Security
Replace 0.0.0.0 with 127.0.0.1 or with the server name of the Docker Engine machine.
d) Reload and restart the Docker daemon:
systemctl daemon-reload systemctl restart docker
3.
a) Connect as the cdd user:
su - cdd
b) Prepare the docker images:
NOTE
In the following command, replace:
261

Continuous Delivery Director 8.5
{path-to-local-containerized-plug-in-tar-file}
with the download location of the docker images on the Docker Engine machine.
docker load -i {path-to-local-containerized-plug-in-tar-file}
4. Create a settings.properties file with the following content and place this file under the /home/cdd/.cdd/
conf folder:
NOTE
In the following code block, make sure you provide a value for the
cdd.plugins.containerized.container_engine.host parameter.
NOTE
Enhanced Security
When you configured the docker-external.conf file in a previous step, if you replaced 0.0.0.0 with another
value for enhanced security in the following line:
ExecStart=/usr/bin/dockerd -H tcp://0.0.0.0:4550 -H unix:///var/run/docker.sock
Set the cdd.plugins.containerized.container_engine.host parameter to the same value, for
example, 127.0.0.1.
#Provider
cdd.plugins.containerized.platform_provider=docker
#Container Template
cdd.plugins.containerized.container.port=8080
cdd.plugins.containerized.container.user_id=1010
cdd.plugins.containerized.container.group_id=1010
cdd.plugins.containerized.container.volumes.logs=/home/1010/.cdd/logs
#Container Readiness
cdd.plugins.containerized.container_readiness.check_intervals=25
cdd.plugins.containerized.container_readiness.check_interval_duration_ms=1000
#Container (Docker) Engine
cdd.plugins.containerized.container_engine.host=
cdd.plugins.containerized.container_engine.port=4550
cdd.plugins.containerized.container_engine.home_folder=/home/1010/.cdd
#Registry
cdd.plugins.containerized.registry.url=cdd.packages.ca.com
cdd.plugins.containerized.registry.password=
cdd.plugins.containerized.registry.username=
cdd.plugins.containerized.registry.email=
#Container
cdd.plugins.containerized.ansiblecore.container.image_name=isl-dsdc.ca.com:5000/com/ca/cdd/
trunk/7.2/ plugins/ansiblecore:82
cdd.plugins.containerized.ansiblecore.container.port=8080
cdd.plugins.containerized.ansiblecore.container.name_prefix=ac
262

Continuous Delivery Director 8.5
5. Verify that the docker-engine hostname was added. Run the following command:
NOTE
In the following command, replace {hostname} with the Docker Engine machine name or IP address.
more /home/cdd/.cdd/conf/settings.properties | grep {hostname}
6. Optionally, run the containerized manager as a docker container. Alternatively, you can run the containerized manager
as a standard Tomcat war file. If you choose to run the containerized manager as a docker container, from the
command prompt enter the following:
NOTE
Enhanced Security
Run the containerized plug-in using the network of the Docker Engine host (add --network=host to the
following docker run command).
Running the containerized plug-in using the network of the Docker Engine host may create a port conflict
between the docker container and the Docker Engine machine ('Address in use' error message). In this case,
do not use port 8080 as the Tomcat port of the containerized plugin. Instead, in the following command,
replace {port} with an available port on the Docker Engine machine.
docker run --name containerized-plugin --network=host -e CONNECTOR_PORT={port} -e
SECURITY_FLAG=false -e CDD_HOME_FOLDER=/home/cdd/.cdd -v /home/cdd/.cdd:/home/cdd/.cdd -d isl-
dsdc.ca.com:5000/com/ca/cdd/trunk/7.0/plugins/containerized:31
7. Register the containerized plug-in.
For more information, see Manage Plug-ins.
NOTE
In the following command, replace {hostname} with the server or IP address of the machine running the
containerized plug-in and replace {port} with the external Tomcat port of the containerized plug-in.
http://{hostname}:{port}/containerized/plugins/cdd-{name of containerized plugin}-plugin/manifest.json
http://10.121.64.90:8080/containerized/plugins/cdd-ansiblecore-plugin/manifest.json
Run Containerized Plug-ins using Kubernetes
Learn how to set up containerized plug-ins to work in Continuous Delivery Director using Kubernetes.
•
A cdd home folder is set up and includes containerized folders. For more information, see Configure the Home Folder
•
You are familiar with Kubernetes and the concepts of Persistent Volume and Persistent Volume Claim. For more
information, see Kubernetes documentation.
•
For Continuous Delivery Director SaaS users, the plug-in proxy is defined so that the Kubernetes machine is included
in the approved list. For more information, see Plug-in Proxy.
•
The containerized manager war file has been downloaded to the Kubernetes machine.
•
A containerized plug-in tar file which holds the required docker images has been downloaded to the Kubernetes
machine.
1. Create a namespace with the name cdd . From the command prompt:
kubectl create ns cdd
2. Create a persistent volume for the cdd home folder (/home/cdd/.cdd):
kubectl create -f PersistentVolume.yaml
263

Continuous Delivery Director 8.5
3. Add the following content to PersistentVolume.yaml.
apiVersion: v1
kind: PersistentVolume
metadata:
name: cdd
labels:
name: cdd
spec:
capacity:
storage: 2Gi
accessModes:
- ReadWriteMany
storageClassName: hostpath
persistentVolumeReclaimPolicy: Retain
hostPath:
path: /home/cdd/.cdd
type: DirectoryOrCreate
4. Create a persistent volume claim at the cdd namespace:
kubectl create -n cdd -f PersistentVolumeClaim.yaml
5. Add the following content to PersistentVolumeClaim.yaml.
kind: PersistentVolumeClaim
apiVersion: v1
metadata:
name: cdd
namespace: cdd
spec:
selector:
matchLabels:
name: cdd
accessModes:
- ReadWriteMany
storageClassName: hostpath
resources:
requests:
storage: 1Gi
volumeName: cdd
6. Create a settings.properties file with the following content and place this file under the /home/cdd/.cdd/
conf folder:
#Provider
cdd.plugins.containerized.platform_provider=kubernetes
#Cluster
cdd.plugins.containerized.cluster.namespace=
cdd.plugins.containerized.cluster.username=
cdd.plugins.containerized.cluster.password=
cdd.plugins.containerized.cluster.server_url=
cdd.plugins.containerized.cluster.persistence_volume_claim_name=
cdd.plugins.containerized.cluster.access_token=
264

Continuous Delivery Director 8.5
7. Register the containerized plug-in. For more information, see Manage Plug-ins.
NOTE
In the following command, replace {hostname} with the server or IP address of the machine running the
containerized plug-in and replace {port} with the external Tomcat port of the containerized plug-in.
http://{hostname}:{port}/containerized/plugins/cdd-{name of plugin}-plugin/manifest.json
http://10.121.64.90:8080/containerized/plugins/cdd-ansiblecore-plugin/manifest.json
Plug-ins
View information about the available plug-ins.
Plug-ins enable users of third-party solutions to execute Continuous Delivery Director processes and deployments from
within the specific solution.
Plug-in Versioning
Plug-in version numbers are incremented if there is a change to the plug-in input/output parameters or a major
functionality change. For bug fixes or minor changes, the plug-in minor version number is updated. Version and minor
version numbers appear on the Plug-ins page for each plug-in. If there is no minor version in the plug-in manifest, the
minor version does not appear.
If you import a DSL file containing a plug-in reference, the file import fails in the event of a regular plug-in version
mismatch. However, the import does not fail if there is only a minor version mismatch.
On the user interface, the numbering syntax for plug-in versions is <plug-in version>-<minor version>. For example, if
the version is 3.5 and the minor version is 2, the plug-in version is displayed as "3.5-2". If there is no minor version, the
hyphen and the minor version are not displayed.
In a DSL file, the numbering syntax for minor versions is <plug-in version>/<minor version>. For example:
{
"kind": "TestSource",
"plugin": "Robot Framework/1.2/7",
},
Available Plug-ins
Continuous Delivery Director provides the following plug-ins that are packaged and installable out-of-the-box:
[A] [B] [C] [D] [E] [F] [G] [H] [J] [K] [L] [M] [N] [P] [R] [S] [T] [V]
A
•
Atlassian Bitbucket
•
Atlassian JIRA
•
Apache Tomcat
•
Automic
®
Continuous Delivery Automation
•
AWS CodeDeploy
•
AWS Elastic Beanstalk
•
Azure DevOps Server (formerly Microsoft Team Foundation Server)
265

Continuous Delivery Director 8.5
B
•
BlazeMeter
®
•
Burp Suite
C
•
Checkmarx
•
Coverity
•
Cucumber JVM
•
Cucumber for Ruby
D
•
Docker
•
DX App Experience Analytics
•
DX App Synthetic Monitor Plug-in
E
•
Email
•
Endevor SCM
F
•
Flowdock
G
•
GitHub
•
GitLab
•
Gradle Testing
H
•
Helm Plug-in
J
•
Jenkins
•
JFrog Artifactory
K
•
Karate
•
Kubernetes
L
•
Liquibase
266

Continuous Delivery Director 8.5
M
•
Manual Deployment
•
Maven Testing
•
Micro Focus ALM
•
Micro Focus LoadRunner Enterprise
•
Microsoft Teams
N
•
Nolio Release Automation
P
•
Playwright
•
Postman
•
pytest
R
•
Rally
®
(formerly CA Agile Central)
•
Red Hat Ansible
•
Red Hat Ansible Tower
•
Red Hat OpenShift
•
REST
•
Robot Framework
•
Runscope
S
•
Salesforce
•
ServiceNow
•
Slack
•
Soap UI
•
SonarQube
•
Sonatype Nexus Lifecycle
T
•
Terraform
•
TestCafe
•
Test Data Manager
•
Twistlock
V
•
Veracode
Each plug-in has unique characteristics, including:
267

Continuous Delivery Director 8.5
•
Required information for endpoint connections
•
Required security for endpoint connections
•
Task types
•
Import capabilities
•
Task input values
This section provides detailed content for each packaged plug-in to help you use its capabilities in your releases.
Apache Tomcat Plug-in
Use this plug-in to deploy WAR files stored in a Maven repository to Tomcat using the Tomcat Web Application Manager.
Plug-in Version 1.5-2
This plug-in helps you to automatically deploy a built war file to a Tomcat instance. Both Artifactory and Nexus type
repositories are supported.
Supported Versions
This plug-in supports Apache Tomcat 8.x.
Download Options
Use one of the following options to download the latest plug-in version:
Method Info
wget wget -O cdd-tomcat-plugin.war https://
cspdl.broadcom.com/shared/static/
e2shgys90lw0bahngnxcq9fs37h4azr0.war?
LCK=ent.box.com
MD5 4869c5ce1068ceec13a1fd13b844b592
Click Download Button
Change History
The following updates were made for plug-in version 1.5-1:
•
Bugfix: When a plug-in task failed to retrieve a Maven artifact, an unclear NullPointerException error message
displayed on the CDD user interface. This message was replaced with a clearer message that includes the expected
path to the missing Maven artifact.
The following updates were made for plug-in version 1.4:
•
Bugfix: Tomcat plug-in uses the snapshot version of the pom record instead of the snapshot version of the artifact
record.
The following updates were made for plug-in version 1.3:
•
A new output parameter in the Deploy Artifact task, Artifact URL, returns a clickable URL to the deployed artifact.
268

Continuous Delivery Director 8.5
Configuration
Register the plug-in and create endpoints as described in Manage Plug-ins
The URL of the Tomcat manifest for plug-in registration is http://<plugin-server>:<port>/cdd-tomcat-plugin/manifest.json.
Select the Tomcat plug-in in the ADD ENDPOINT dialog to create an endpoint for the Tomcat plug-in. The following
Tomcat information is required wtomhen you create an endpoint:
•
Tomcat URL
Enter the Tomcat URL with the target location for the deployed artifact.
Syntax: http://${tomcat-server}:${port}
NOTE
The URL can be specified as http or https
•
Tomcat Username
Specify a user name to authenticate to Tomcat.
•
Tomcat Password
Specify a password to authenticate to Tomcat.
•
Maven Repository URL
Enter the required Maven repository URL. This is the base URL prefix of the remote artifact repository. For example,
http://artifactory.acme.net/artifactory or https://repository.apache.org.
NOTE
An Artifactory URL must end with: [/artifactory]. A Nexus URL must end with: [/repository].
•
Repository Name
Specify the name of the Maven repository where the project artifacts are stored, for example, maven-repository.
•
Maven Repository Credentials
Specify the authentication method for the Maven repository, either Basic or Bearer.
•
Basic
–
Maven Repository Username
Specify the username to authenticate to the Maven repository.
–
Maven Repository Password
Specify the password to authenticate to the Maven repository.
•
Bearer
–
Maven Repository Access Token
Specify the Maven repository access token
Deploy Artifact
This task helps you to deploy a Maven artifact in WAR format to a Tomcat container.
Configure the following input parameters:
•
Tomcat Context Path
Specify the context path part of the URL under which your application will be published in Tomcat, with or without a
preceding slash [/]. For example: [tomcatPluginApp] or [/tomcatPluginApp].
•
Build Number
Specify the build number to be deployed.
•
Artifact Package Group Name
Specify the package group of the repository.
•
Artifact Package Name
Specify the artifact name.
•
Artifact File Path
269

Continuous Delivery Director 8.5
Specify the path to the folder location where the artifact is stored.
•
Artifact Classifier
Specify the artifact classifier.
•
Request Timeout in Seconds
Specify the request timeout for each operation: download and upload.
Output Parameters
•
Artifact URL
Returns the full URL of the specified artifact, either release or snapshot. You can use this URL in the phase or release.
Atlassian Bitbucket Plug-in
This plug-in lets you use Bitbucket as your source control system to retrieve commit messages so you can track planned
vs actual work.
Plug-in Version 2.3-3
This plug-in also lets you use Bitbucket as your file source, a connection to a JSON format representation of a
release. Additionally, you can also use file sources to manage JSON files that reference other JSON files.
IMPORTANT
Only on-premise Bitbucket instances are supported by this plug-in.
Download Options
Use one of the following options to download the latest plug-in version:
Method Info
wget wget -O cdd-bitbucket-plugin.war https://
cspdl.broadcom.com/shared/static/
tpkp2jjdp4srqhfbwqdgwbjatgzzujvk.war?
LCK=ent.box.com
MD5 943e7a6781d3b365f0eb1aec3930ce8a
Click Download Button
Change History
The following updates were made for plug-in version 2.3-3:
•
Security enhancements.
The following updates were made for plug-in version 2.3-2:
•
Security enhancements.
The following updates were made for plug-in version 2.3-1:
•
Support was added for Bitbucket webhook 7.6. This change allows customers to use BitBucket Data Center 7.6.
The following updates were made for plug-in version 2.3:
•
Assorted bug fixes.
270

Continuous Delivery Director 8.5
The following updates were made for plug-in version 2.2:
•
A new Trust Any SSL Certificate endpoint parameter lets you allow untrusted and unsigned SSL/TLS certificates.
The following updates were made for plug-in version 2.1:
•
A new optional endpoint parameter, Project Key, was added.
The following updates were made for plug-in version 2.0:
•
You can now use Bitbucket as your source control system to retrieve commit messages so you can track planned
vs actual work. To support this change, a Bitbucket Get Commit Messages task is now available in the Set Source
Control Connection page.
The following updates were made for plug-in version 1.1:
•
Support was added for Java 11.
Configuration
Register the plug-in and create endpoints as described in Manage Plug-ins
The URL of the Bitbucket manifest for plug-in registration is http://<plugin-server>:<port>/cdd-bitbucket-plugin/
manifest.json.
Select the Bitbucket plug-in in the ADD ENDPOINT dialog to create an endpoint for the Bitbucket plug-in. The following
Bitbucket information is required when you create an endpoint:
•
Bitbucket API URL
Enter the URL of the remote Bitbucket instance to be used for connection purposes.
Example: https://myBitbucket.mycompany.com:7990
Note: The URL can be specified as http or https
•
Username
Specify a user name to authenticate to Bitbucket.
•
Password
Specify a password to authenticate to Bitbucket.
•
Project Key
Specify the project key of the Bitbucket repository.
•
Trust Any SSL Certificate
Select this option if you want to allow untrusted and unsigned SSL/TLS certificates.
Get Commit Messages
The Bitbucket plug-in lets you retrieve and parse commit messages. Use this capability when you deploy applications in a
release to see the status of related work items.
Optionally, you can configure paths to include and exclude files from the list of changed files that are part of test coverage
metrics. For example, you might not want your tests (written in Java) to be counted as files that are not covered.
Follow these steps:
1. In a release, expand the Apps & Work Items tree on the left menu, and select the version number.
2. Select Set Source Control Connection.
Note: This option is only enabled if a work item source, such as Rally
®
, has been configured.
3. Configure the following parameters, then select Set:
271

Continuous Delivery Director 8.5
–
Source Control - Select Bitbucket and Get Commit Messages.
–
Select Endpoint - Select a Bitbucket endpoint.
–
Project Key - Specify the project key of the Bitbucket repository.
–
Repository - Specify the source control repository to bring the commit messages from. This should be the
repository that corresponds with the project in the build server that you configure to send notifications to this
application version.
Example: https://myBitbucket.mycompany.com/[organization]/[Repository]
–
Regular Expression - (Optional) Specify a regular expression with which to parse the commit comments for work
item IDs.
–
Include Path - (Optional) Specify one or more paths to map the packages and/or classes to include in test
coverage.
Syntax: app/src/java/**
–
Exclude Path - (Optional) Specify one or more paths to map the packages and/or classes to exclude from test
coverage.
Syntax: app/src/tests/**
When the source control connection is configured, the plug-in returns a list of commit IDs with the following information:
•
The commit message
•
The user who made the commit (author)
•
The files that have been changed
•
The time of the commit
NOTE
The list of commit IDs is not visible in the user interface.
Get Files
The Bitbucket plug-in lets you use Bitbucket as a file source so that releases are automatically created and run whenever
you make changes to the JSON file.
NOTE
To use this capability, first create a top-level folder in the relevant repository with the following name: CDD-
FileSource. Place all release-related JSON files in this folder.
NOTE
The CDD-FileSource folder does not apply if you use file sources to manage JSON files that reference other
JSON files.
Follow these steps:
1. From RELEASES, select New File Source.
2. In CREATE FILE SOURCE, configure the following parameters, then select Create:
–
Name - Specify a name for the file source.
–
Select Source Control - Select BITBUCKET and Get Files.
–
Project Key - Specify the project key of the Bitbucket repository.
–
Repository - Specify the name of the Bitbucket repository to bring the files from.
–
Branch - Specify the branch name.
–
Releases Created On Behalf Of (API Key) - Specify the API key of a user on whose behalf future releases will be
created.
Example: The API key of the product owner.
–
Send Error Notifications To - Specify one or more recipients to receive error notifications.
272

Continuous Delivery Director 8.5
3. Save your changes. A COPY WEBHOOK popup is displayed containing an auto-generated webhook. This webhook
supports the connection between Continuous Delivery Directorand Bitbucket. Copy this webhook and paste it into
Bitbucket.
The newly-created file source is added to the FILE SOURCES page.
NOTE
More Information
•
How to Set Up Webhooks in your Source Control
Atlassian Jira Plug-in
This plug-in integrates with the issue tracking and project management capabilities that Jira provides.
Plug-in Version 2.4-15
Download Options
Use one of the following options to download the latest plug-in version:
Method Info
wget wget -O cdd-jira-plugin.war
https://cspdl.broadcom.com/shared/
static/4xillp8ttzg8wg0eubfta0d8c2432xmg.war?
LCK=ent.box.com
MD5 bb03d0e4d58f953d1267daaaa9fbcd82
Click Download Button
Supported Versions
The Jira plug-in has been validated for the following Jira versions:
•
8.13x
NOTE
This plugin is compatible only with the Jira Server due to changes in the Jira Cloud REST Client compatibility.
Capabilities
The Jira plug-in lets you perform the following tasks:
•
Add Jira Issue Comments
•
Create Jira Issue
•
Get Jira Issue
•
Update Jira Issue Status
•
Wait for Approval
•
Import Work Items
•
Get Test Assets
273

Continuous Delivery Director 8.5
Change History
The following update was made for plug-in version 2.4-15:
•
Security enhancements.
The following update was made for plug-in version 2.4-14:
•
You can configure output parameters in the plug-in settings.properties file, store the information retrieved in tokens,
and reuse those details in other release tasks.
•
Support was added for the Bearer Authentication using Jira Personal Access Token.
•
Bugfix: After the authentication changes Jira plugin is not backward compatible.
The following update was made for plug-in version 2.4-13:
•
You can now use personal access tokens to authenticate to Jira in the endpoint configuration.
The following update was made for plug-in version 2.4-12:
•
Security enhancements.
The following update was made for plug-in version 2.4-10:
•
The plug-in was modified to support the retrieval of detailed Jira issue data.
The following update was made for plug-in version 2.4-9:
•
Bugfix: Invalid external work item IDs set on test suites adversely affected work item coverage reporting.
The following update was made for plug-in version 2.4-8:
•
The work item IDs of tests are now stored with the tests.
The following update was made for plug-in version 2.4-7:
•
The Test Execution Key parameter in the Get Test Assets task was moved to the Execution Parameters section.
The following update was made for plug-in version 2.4-6:
•
Support was added for integration testing.
The following update was made for plug-in version 2.4-5:
•
The Test Plan Key and Test Execution Key parameters in the Get Test Assets task now support dynamic values
import from Xray.
The following update was made for plug-in version 2.4-4:
•
A new Trust Any SSL Certificate endpoint parameter lets you allow untrusted and unsigned SSL/TLS certificates.
The following update was made for plug-in version 2.4-3:
•
A Test Execution Key parameter was added to the Import Tests task.
The following updates were made for plug-in version 2.4-2:
•
Support was added for the Xray Test Management for the Jira application. This enhancement lets you import test
issues as test suites into Continuous Delivery Director.
•
Log rotation was added. A new log is opened daily (regardless of file size) and the system stores up to 10 logs,
providing 10 days log history.
The following updates was made for plug-in version 2.4-1:
•
Bugfix: No value was returned if no work items were found matching a commit.
The following updates was made for plug-in version 2.4:
274

Continuous Delivery Director 8.5
•
You can now retrieve child issues together with parent issues in one API call if an embed parameter is present in the
request. Previously, you could only retrieve parent and child issues in separate API calls. Additionally, the getContent
API call is now asynchronous; previously, this API call was synchronized.
The following updates was made for plug-in version 2.3:
•
The following issue was resolved: Import Content Items failed with an IO Exception: Too many open files error. This
error was due to the number of open file descriptors exceeding the maximum number of open files permitted.
The following update was made for plug-in version 1.2.3:
•
Support was added for Java 11.
Configure a Jira Endpoint
Enable communication and synchronization of work items between Jira and Continuous Delivery Director.
You are familiar with Jira.
You have been granted the Can create endpoints permission.
1. Register the plug-in as described in Manage Plug-ins.
The manifest for the Jira plug-in is http://<host>:<port>/cdd-jira-plugin/manifest.json .
2. From the Administration menu, click Endpoints > Add Endpoint.
3. In the ADD ENDPOINT dialog, select the Jira plug-in.
4. Configure the following endpoint parameters:
•
URL
Enter the URL of your Jira instance.
•
Authentication Method
Select an authorization method to use to establish the connection to Jira. Values: Basic, Personal Access Token
–
Basic
•
Username
Enter a user name to authenticate to the Jira instance.
•
Password
Enter the password of the specified user to authenticate to the Jira instance.
NOTE
For Jira SaaS, select the Basic authentication method, enter the username, and enter the API key
generated on the Jira account in the password field.
–
Personal Access Token.
•
Personal Access Token
Specify a personal access token created in Jira.
•
Trust Any SSL Certificate
Select this option if you want to allow untrusted and unsigned SSL/TLS certificates.
•
(Optional) Use Proxy
Select this option to connect to Jira through a proxy server.
NOTE
If selected, the Proxy Host, Proxy Port, Proxy Username, Proxy Password, and Use HTTPS fields
appear.
–
Proxy Host
Specifies the HostName or IP for the proxy server.
–
Proxy Port
275

Continuous Delivery Director 8.5
Specifies the port for the proxy server.
–
Proxy Username
Specifies the user name for the proxy server.
–
Proxy Password
Specifies the password for the proxy server.
–
Use HTTPS
Specifies whether the Jira connection uses an SSL connection.
•
Time Out
Specify the number of seconds to wait before the operation is aborted.
5. Click Test Connection to check the connection to Jira.
6. Click Add.
Add Jira Issue Comments
Add comments to issues to record additional details about these issues and to collaborate with your colleagues.
One or more Jira endpoints are available.
1. In a release, create an automatic task as described in Create Automatic Tasks.
2. Configure the following parameters:
TIP
Values: To define a value, do one of the following actions:
•
To select from a list of possible values, type an at sign "@" in the field
Example: Deploy Tomcat
•
To select from a list of built-in tokens (reusable placeholders that are used to create generic workflows),
type a percent sign "%" in the field
•
Type free text
•
Enter a combination of free text and tokens
Input Parameters
•
Issue Key
Specify the Jira project key that is used for the issue. This is usually the Jira project initials.
•
Comment
Specify a comment to add to the specified Jira issue.
•
Role
Specify the role that can view the comment. Roles belong to project issues. If null, the default value is all roles. If
you select Others, use the Other Role field to define a customized role.
3. Click Create.
Create Jira Issue
Use tasks to automatically create issues in your Jira project from your release pipeline.
276

Continuous Delivery Director 8.5
One or more Jira endpoints are available.
1. In a release, create an automatic task as described in Create Automatic Tasks.
2. Configure the following parameters:
TIP
Values: To define a value, do one of the following actions:
•
To select from a list of possible values, type an at sign "@" in the field.
Example: Deploy Tomcat
•
To select from a list of built-in tokens (reusable placeholders that are used to create generic workflows),
type a percent sign "%" in the field
•
Type free text
•
Enter a combination of free text and tokens
Input Parameters
•
Jira Project Key
Specify the Jira project key that is related to the issue. This is usually the Jira project initials.
•
Issue Type
Select one of the following issue types that is defined in the project to which the issue belongs:
–
Task
–
Sub-task
–
Story
–
Bug
–
Epic
NOTE
If you select Epic, specify the Epic Name.
•
Epic Name
Specify the associated epic name in the Jira agile boards. This input is only valid when you select Epic in the Issue
Type field.
•
Summary
Specify a summary of the issue.
•
Priority
Specify the priority level of the issue.
•
Due Date
Specify the issue due date in the format YYYY-MM-DD. Example: 2022-9-29
•
Show Advanced Settings
Displays the following additional fields:
–
Affects Versions
Specify an array of affected versions separated by a semicolon. Each element is a version. Jira lets you
track different versions for software projects. You can assign issues to version that are configured in project
administration.
–
Fix Versions
Specify an array of versions separated by a semicolon. Each element is a version. Jira lets you track different
versions for software projects. You can assign issues to version that are configured in project administration.
–
Assignee
Specify the name of the issue assignee. This field defaults to the current logon user. Use the user name used to
log in instead of the first name and last name values associated with the user.
–
Reporter
277

Continuous Delivery Director 8.5
Specify the name of the issue reporter. This field defaults to the current logon user. Use the user name used to
log in instead of the first name and last name values associated with the user.
–
Environment
Specify environment details relevant to the issue such as operating system, software platform, or hardware
specifications.
–
Description
Specify the Jira issue description.
–
Labels
Specify an array of issue labels separated by a semicolon. Each element is a label. Labels cannot contain
spaces.
–
Custom Fields
Specify a list of custom field names and values. The following Jira custom field types and JSON syntax are
supported:
•
Text Field (single line). Syntax: {"field_name":"textual_value"}
•
Select List (single choice). Syntax: {"field_name":"choice_1"}
•
Checkboxes. Syntax: {"field_name":["check_1.","check_2"]}
•
Cascade field. A cascading select list with two levels of select lists. What you see in the second select list
depends on what you choose in the first select list. Syntax: {"field_name":["Parent Value", "Child
Value"]}. If you want to enter the parent value only, the syntax is {"field_name":["Parent Value",
""]} (that is, no space between the double quotes).
NOTE
If a standard field and a custom field have identical field names, the merged field displays the custom
field value.
Values: You can update multiple values in the following JSON syntax:
{"field1":"value1","field2":"value2"...}
For example: {"Links":"Reporter","Votes":"Watcher","Updated":"Remaining"} .
For Cascade: {"Task Type":["Tests","Run UI Test"]}
Output Parameters
NOTE
You can store the returned values in tokens (except for built-in tokens) for use in other release items.
•
Issue Key
Returns the key of the created issue. Example: AP-51
•
Issue ID
Returns the ID of the created issue.
•
Self Link
Returns the URL of the created issue.
3. Click Create.
Get Jira Issue
Retrieve detailed information about a Jira issue (ticket).
278

Continuous Delivery Director 8.5
One or more Jira endpoints are available.
You can configure output parameters in the plug-in settings.properties file, store the information retrieved in tokens, and
reuse those details in other release tasks.
1. In a release, create an automatic task as described in Create Automatic Tasks.
2. Configure the following parameters:
TIP
Values: To define a value, do one of the following actions:
•
To select from a list of possible values, type an at sign "@" in the field.
Example: Deploy Tomcat
•
To select from a list of built-in tokens (reusable placeholders that are used to create generic workflows),
type a percent sign "%" in the field
•
Type free text
•
Enter a combination of free text and tokens
Input Parameters
•
Jira Project Key
Specify the Jira project key that is related to the issue. This is usually the Jira project initials.
•
Issue Type
(Optional) Select one of the following issue types that is defined in the project to which the issue belongs:
–
Task
–
Sub-task
–
Story
–
Bug
–
Epic
NOTE
If you select Epic, specify the Epic Name.
•
Issue Key
Specify the key of the Jira issue. Usually, the key has the Jira product initials as a prefix. Example: AP-51
3. Configure the output parameters.
For more information, see Define Output Parameters (Jira).
4. Click Create.
Update Jira Issue Status
Use tasks to automatically change issue statuses in your Jira project from your release pipeline.
One or more Jira endpoints are available.
A transition is a link between two statuses that enables an issue to move from one status to another. For an issue to move
between two statuses, a transition must exist.
1. In a release, create an automatic task as described in Create Automatic Tasks.
2. Configure the following parameters:
TIP
Values: To define a value, do one of the following actions:
•
To select from a list of possible values, type an at sign "@" in the field.
279

Continuous Delivery Director 8.5
Example: Deploy Tomcat
•
To select from a list of built-in tokens (reusable placeholders that are used to create generic workflows),
type a percent sign "%" in the field
•
Type free text
•
Enter a combination of free text and tokens
Input Parameters
•
Issue Key
Specify the issue key that is used for the Jira issue. This is usually the Jira project key plus a numeric key that is
unique. For example: CDD-2021.
•
Transition I would like to perform
Specify a transition according to your issue workflow. Examples:
–
Resolve Issue
–
Reopen
–
Closed
–
Start Progress
–
Stop Progress
–
Start Work
–
Stop Work
–
Define
–
Accept
–
Restart Work
–
Block
–
Complete
–
Verified
–
Assign
–
To Do
–
In Progress
–
Done
–
Others
•
Resolution
Specifies how the issue is resolved if you are resolving the issue. Select from an available resolution, or add
custom codes to the Jira default codes. In some workflows, this field is mandatory. Refer to your Jira workflow
configuration.
•
Comment
Enter a comment for a reopened issue. In some workflows, this field is mandatory. Refer to your Jira workflow
configuration.
3. Click Create.
Wait for Approval (Jira)
Determine that tasks are queued until the completion and approval of a specified issue.
280

Continuous Delivery Director 8.5
One or more Jira endpoints are available.
1. In a release, create an automatic task as described in Create Automatic Tasks.
2. Configure the following parameters:
TIP
Values: To define a value, do one of the following actions:
•
To select from a list of possible values, type an at sign "@" in the field.
Example: Deploy Tomcat
•
To select from a list of built-in tokens (reusable placeholders that are used to create generic workflows),
type a percent sign "%" in the field
•
Type free text
•
Enter a combination of free text and tokens
Input Parameters
•
Jira Issue ID
Specify the ID of a Jira issue to be completed and approved before the next task starts.
•
Required Status
Specify the required status for the selected Jira issue to reach before the next task starts.
•
Poll Interval
Specify the length of time in seconds between system requests for the Jira issue status. Default: 120 seconds
3. Click Create.
Define Output Parameters (Jira)
Configure the output data for Jira tasks by editing the plug-in setting.properties file.
When you create a task in a release, you see a list of output fields provided that the Jira plug-in settings.properties
file is configured accordingly. This list of fields is based on the default output profile defined in settings.properties.
You can add tokens to the fields. After a Jira task executes, the tokens are populated with values based on the JSON path
that is defined in the profile.
1. From the command line, open the settings.properties file.
A typical file path is ../webapps/cdd-jira-plugin/WEB-INF/classes/settings.properties.
2. For each profile, define the following settings:
•
A unique profile name
•
A display name. Syntax: cdd.plugins.jira.profiles.1.display_name
•
An associated task. Each profile must be associated with a specific task by name (the task name that appears in
the plugin manifest). Syntax: cdd.plugins.jira.profiles.<number>.task.<Number>.name
3. Set a specific profile as the default profile. Syntax: cdd.plugins.jira.profiles.default_profile
4. For each output field, define the following settings:
•
A display name. Syntax:
cdd.plugins.jira.profiles.<num>.task.<number> .output.parameters.<number>.display_name
•
A description. Syntax: cdd.plugins.jira.profiles.1.task.1.output.parameters.1.description
NOTE
The description appears in the field help text.
•
An output value. Syntax: cdd.plugins.jira.profiles.1.task.1.output.parameters.1.metadata
281

Continuous Delivery Director 8.5
NOTE
In a Get Jira Issue task, this is a JSON path or property.
If you want to get the value of an attribute directed under Issue, such as
description, you can just provide metadata as the property name. Example:
cdd.plugins.jira.profiles.1.task.1.output.parameters.3.metadata=description.
If you want to get the value of a nested attribute (for example, Issue/Project/Name),
you can specify the property using a dot (.) separator as metadata. Example:
cdd.plugins.jira.profiles.1.task.1.output.parameters.1.metadata=project.name
Sample settings.properties file:
cdd.plugins.jira.profiles.default_profile=Profile 1
cdd.plugins.jira.profiles.1.display_name=Profile 1
cdd.plugins.jira.profiles.2.display_name=Profile 2
cdd.plugins.jira.profiles.1.task.1.name=getJiraIssue
cdd.plugins.jira.profiles.2.task.1.name=getJiraIssue
cdd.plugins.jira.profiles.1.task.1.output.parameters.1.display_name=Project
cdd.plugins.jira.profiles.1.task.1.output.parameters.1.description=
cdd.plugins.jira.profiles.1.task.1.output.parameters.1.metadata=project.name
cdd.plugins.jira.profiles.1.task.1.output.parameters.2.display_name=Comment
cdd.plugins.jira.profiles.1.task.1.output.parameters.2.description=
cdd.plugins.jira.profiles.1.task.1.output.parameters.2.metadata=commentsUri
cdd.plugins.jira.profiles.1.task.1.output.parameters.3.display_name=Description
cdd.plugins.jira.profiles.1.task.1.output.parameters.3.description=
cdd.plugins.jira.profiles.1.task.1.output.parameters.3.metadata=description
cdd.plugins.jira.profiles.2.task.1.output.parameters.1.display_name=Project
cdd.plugins.jira.profiles.2.task.1.output.parameters.1.description=
cdd.plugins.jira.profiles.2.task.1.output.parameters.1.metadata=project.name
cdd.plugins.jira.profiles.2.task.1.output.parameters.2.display_name=Summary
cdd.plugins.jira.profiles.2.task.1.output.parameters.2.description=
cdd.plugins.jira.profiles.2.task.1.output.parameters.2.metadata=summary
Import Work Items (Jira)
Sync work items between Jira and Continuous Delivery Director releases.
You have configured an endpoint between Jira and Continuous Delivery Director as described in Configure a Jira
Endpoint.
The Jira plug-in uses the Jira Query Language (JQL), to import Jira work items into a release. Use this capability when
you create a release to see the related Jira information.
1. In a release, click the Work Items tab on the left menu.
2. Select Add Work Items.
The ADD WORK ITEMS window opens.
282

Continuous Delivery Director 8.5
3. Select External Items.
4. Enter a name for the work items source.
Jira Feed
5. Under Work Items Source, select the Jira plug-in and a configured Jira endpoint.
6. Provide information in the required parameter fields. These fields let you build a query that searches Jira for work
items that match the specified criteria.
•
Query
You can import the following Jira metadata into a release by entering a JQL query into the Query field:
–
Summary - Example:summary = issue ID_123456
–
Type - Example:type = bug and status = resolved
–
External Id - Example:External issue ID ~ YourID_123456
–
Display Type - Example:type = status = open
–
Status - Example:status = open and priority = urgent and assignee = jsmith
7. Click Create.
The content source is saved and a list of the returned work items is displayed under the application in the left menu.
These work items are now available to assign to tasks in phases to associate with the release.
Get Test Assets (Jira)
The Jira plug-in lets you import test issues into the Adaptive Testing Catalog.
You have the Xray Test Management for Jira application integrated with your Jira instance and are familiar with this app.
NOTE
This plug-in has been validated for Xray Test Management for Jira 5.0.1.
You can add Jira as a test source to import test issues as test suites into Continuous Delivery Director. Organizations use
the Xray Test Management for Jira application to facilitate test management using Jira issues. Xray uses special Jira issue
types to support the testing lifecycle. Xray also includes support for Cucumber and other test frameworks.
This plug-in integrates the Test, Test Execution, and Test Plan Jira issue types, as well as TestXY, a custom Jira issue type
for testing. Test assets such as test issues, test plans, and test executions are available according to the Jira project that
you specify.
1. Select Tests, then Adaptive Testing Catalog.
2. Specify the Application and the Application Version. The menu next to the application name and version is
activated.
3. Fill in the following fields:
TIP
Open your Jira instance so that you can check input values.
NOTE
Use the @ symbol in the following fields to select from a dynamic list of entities associated with the selected
project.
•
Test Source Name
Enter a name for the test source.
•
Plug-in
Select Jira and Import Tests (Jira).
•
Endpoint
283

Continuous Delivery Director 8.5
Select a Jira endpoint.
•
Jira Project Key
Specify the key of the Jira project that contains the tests you want to import.
•
Test Issue Type
Select a test issue type from the dropdown menu; either Test or TextXY.
•
Test Plan Key
Specify the test plan key to import the associated tests.
•
Test Execution Key
Specify the test execution key to retrieve the test results.
•
Build Number
Enter the tested build number.
•
Execution Duration in Hours
•
Polling Period in Minutes
•
Tags
Select or create one or more tags to label the imported tests.
NOTE
To import manual test results from Jira, enter the tag Manual.
4. Select Get Test Assets.
Jira is added as a test source. When an adaptive testing task is run, the test results for the specified build appear on the
Adaptive Testing Results page, together with links to the associated reports in Jira.
Automic
®
Continuous Delivery Automation Plug-in
Release automation is a key component of your continuous delivery pipeline. The Automic Continuous Delivery
Automation (CDA) plug-in enables you to apply core CDA deployment modeling (applications, environments, and so
on) and deployment capabilities.
This plug-in lets you start both Application and General workflows in CDA directly from the Continuous Delivery Director
user interface.
NOTE
This plug-in is available for both on-premise installations and SaaS (through a plug-in proxy).
Plug-in Version 4.1-10
Download Options
Use one of the following options to download the latest plug-in version:
Method Info
wget wget -O cdd-cda-plugin.war https://
cspdl.broadcom.com/shared/static/
ypqyd6xzz4adfzbwsms9ob2udycx1kxy.war?
LCK=ent.box.com
MD5 8b086e26e38b29d7ea89d0f5e255c0f2
Click Download Button
284

Continuous Delivery Director 8.5
Change History
The following update was made for plug-in version 4.1-10:
•
Bugfix: Error when running CDA deployment.
The following update was made for plug-in version 4.1-9:
•
Users can now use the CDD applications as the CDA components when creating a package. Also, the user can
specify an Application from which the components will be imported and created as applications in CDD.
The following update was made for plug-in version 4.1-8:
•
Bugfix: Create package fails for the 'Run Application Workflow' task.
The following update was made for plug-in version 4.1-7:
•
Security fixes.
The following update was made for plug-in version 4.1-6:
•
Security enhancements.
The following update was made for plug-in version 4.1-5:
•
Security enhancements.
The following update was made for plug-in version 4.1-4:
•
Bugfix: Internal defect.
The following update was made for plug-in version 4.1-3:
•
Bugfix: An ungrammatical error message was generated when the following scenario occured. A CDA task to start an
Application workflow ran. However two mutually exclusive options were both configured: provide a package and create
a package.
The following updates were made for plug-in version 4.1-2:
•
Bugfix: The link in the CDA deployments report under the CDA deployment column was missing. Additionally, the
domain name was missing in the link.
•
Bugfix: Setting dynamic values in a CDA task generated a 500 internal server error, indicating that the HTTP request
could not be fulfilled because an unexpected condition was encountered.
The following updates were made for plug-in version 4.1-1:
•
Bugfix: The set build action was performed on the package name instead of on the build number.
The following updates were made for plug-in version 4.1:
•
Build numbers are now available as dynamic properties. This change allows you to dynamically update the
last_successful_change property dynamically in CDA with a build number passed from the task in Continuous
Delivery Director.
The following updates were made for plug-in version 4.0:
•
Import Application from CDA to Continuous Delivery Director
The previous plug-in imported a CDA application as a Continuous Delivery Director application. The new plug-in
imports a CDA component as a Continuous Delivery Director application.
NOTE
A Continuous Delivery Director application is equivalent to a CDA component and a Continuous Delivery
Director business application is equivalent to a CDA application.
•
Create Package
285

Continuous Delivery Director 8.5
In the CD pipeline, each component requires a separate build job, and the package must be created from the artifacts
created by all the build jobs.
The previous plug-in used Jenkins to create the package, meaning that if you wanted to create a CD pipeline, you had
to set up a separate package for each component.
The new plug-in can automatically create packages. If a build of any of the components is ready, the plug-in
automatically creates a package and runs the deployment.
•
Build Promotion
The previous plug-in performed the set build action on a package and not on a build. Therefore build promotion did
not take place per component, but per package instead. Furthermore, a workaround to create a package name was
required before build promotion could be used.
The new plug-in resolves this issue and you can simply use the last successful change of any of the other deployments
tools that Continuous Delivery Director supports.
•
Plug-in Downloads
The old plug-in was only available from the Automic Marketplace. Users can now download the new plug-in from the
Continuous Delivery Director home page.
Supported Versions
The CDA plug-in supports CDA 12.0 and above.
To learn more about CDA, see https://docs.automic.com/documentation
Capabilities
This plug-in lets you perform the following activities:
•
Import applications and environments from a CDA instance. You can include all CDA applications and their
environments in releases, phases, tasks, and reports.
•
Start a workflow in CDA from a task in a release.
Import CDA Applications and Environments
You can import applications and environments from your CDA endpoint to be used in the continuous delivery orchestration
pipeline.
NOTE
You must make any changes to the applications or environments directly within your CDA instance.
Continuous Delivery Director converts any imported CDA environments with the same name to a single shared
environment.
TIP
Import applications and environments from CDA before using this CDA plug-in.
For more information about the application and environment model import, see Applications and Environments.
Workflows
In CDA, workflows are used to carry out physical deployments. A workflow describes all necessary steps for the
deployment of your application.
Workflows consist of a set of tasks or actions, which are organized in a combination of sequential and parallel execution
paths, which are combined with conditions, loops, pre-conditions, and post-conditions. Each action can run in parallel or
sequentially for one or multiple deployment targets within an environment.
286

Continuous Delivery Director 8.5
In Continuous Delivery Director, after you configure CDA workflows using the CDA plug-in, you can execute workflows
at any time or schedule workflows to run at a specific time. You can monitor the executions to see how the workflows are
progressing. You can also take action to influence the execution process, such as rolling back to a specific task, when the
execution fails or gets delayed.
The CDA plug-in supports the following types of workflows:
•
Application workflows. For more information, see Start Application Workflow.
•
General workflows. For more information, see Start General Workflow.
ATTENTION
Application workflows are stored in folders with the application (no separate access control), whereas general
workflows are stored in separate folders.
Configure a CDA Plug-in Endpoint
You are familiar with Automic Continuous Delivery Automation (CDA).
You have been granted the Can create endpoints permission.
1. Register the plug-in as described in Manage Plug-ins.
The manifest for the CDA plug-in is http://<host>:<port>/cdd-cda-plugin/manifest.json .
2. From the Administration menu, click Endpoints > Add Endpoint.
3. In the ADD ENDPOINT dialog, select the CDA plug-in.
4. Configure the following endpoint parameters:
•
CDA URL
Specify the URL to the required CDA instance.
•
Username/Password
Specify the credentials of a CDA user (client/name/department and password) with sufficient permissions to
execute a CDA application (the equivalent of a Continuous Delivery Director business application) deployment.
5. Click Test Connection to check the connection to CDA.
6. Click Add.
Start Application Workflow
This task lets you run an Automic Continuous Delivery Automation (CDA) application workflow in the context of
Continuous Delivery Director phases and releases.
One or more CDA endpoints are available.
Applications and environments have been imported from CDA.
Application workflows combine and orchestrate different component workflows for complete end-to-end application
deployment. You can use application workflows for installations, updates, and removal of one or more components that
are involved in deployment for a specific application. To provide a clear structure that is easier to build and to monitor,
application workflows are made up of two kinds of workflows:
•
Application deployment workflow
Defines the overall process of an application deployment by defining the components which are deployed.
An application workflow typically has only one main purpose, for example, installing a program, deploying an update,
or provisioning a new instance.
•
Component workflow
287

Continuous Delivery Director 8.5
Orchestrates the deployment of an individual component (or parts of it) on one or more deployment targets within an
environment. Here you define the steps for the deployment of a single component of an application. You can regard
components as the building blocks for application deployment.
For example, a website may have frontend, backend, and database components. Each component should be
independent of the other components so that only those components that have been updated are deployed.
This task creates a package upon build notification and uses the Continuous Delivery Director applications of the task as
the component names,
1. In a release, create an automatic task as described in Create Automatic Tasks.
2. Configure the following input parameters:
TIP
Values: Applies to the Application, Application Workflow, Package, and Deployment Profile properties.
To define a value, do one of the following actions:
•
To select from a list of possible values, type an at sign "@" in the field
Example: Deploy Tomcat
•
To select from a list of built-in tokens (reusable placeholders that are used to create generic workflows),
type a percent sign "%" in the field
•
Type free text
•
Enter a combination of free text and tokens
•
Application
Specify a CDA application name to execute an application workflow. You can find the application names in the
Applications pane if you imported the CDA deployment model and assigned the relevant applications to the
release.
•
Workflow
Specify the name of the application workflow to be executed.
•
Provide a Package
Specify an existing package to execute an application workflow. A package is an instance (a version, a revision, a
tag, and so on) of an application and defines the content to deploy.
NOTE
If you enter a package name, you cannot select the Create a Package? option.
•
Create a Package?
Select this option if you want to create a package to execute an application workflow. The following fields appear:
NOTE
If you select this option, you cannot specify a package name in Provide a Package.
–
Package Name Prefix
Specify a prefix for the package name. This plug-in appends the current timestamp to this prefix to generate a
unique name.
–
Package Type
Specify the package type, such as Deployment, Generic, and so on.
–
Folder
Specify the folder name. If left empty, the folder name as 'DEFAULT' is used.
–
Package Dynamic Properties
Specify name and values for the Package Dynamic Properties.
–
Artifacts
Specify the artifacts for the package in JSON format. An artifact is a version of a file to be deployed, located in
a specific repository. In a deployment package, an artifact is created for each component. For each component
specify the following:
288

Continuous Delivery Director 8.5
•
Package Name Prefix
Specify a prefix for the package name. This plug-in appends the current timestamp to this prefix to generate a
unique name.
•
Package Type
Specify the package type, such as Deployment, Generic, and so on.
•
Artifacts
Specify the artifacts for the package in JSON format. For each component specify the following:
•
Component Name
Component name to assign to package. Specified components must match applications added to this
task.
•
Artifact Source
Specify artifact source name from which to retrieve the artifact.
•
Artifact Name
Specify artifact name to include in the package.
JSON format:
{
"Artifacts": [
{
"Component Name": "{component name}",
"Artifact Source": "{artifact source}",
"Artifact Name": "{artifact name}"
}
]
}
Example:
{
"Artifacts": [
{
"Component Name": "Joe-Comp1",
"Artifact Source": "ArtifactSource",
"Artifact Name": "PetShop.war"
}
]
}
•
Deployment Profile
Specify a deployment profile to execute an application workflow. A deployment profile links an application to one
specific environment. Typically a profile is an intersection between the application components and the environment
deployment targets. The deployment profile is used during the deployment execution and defines the target
deployment location.
•
Installation Mode
Select one of the following options:
–
SkipExisting to only deploy the application on deployment targets where the package has not yet been
deployed.
–
OverwriteExisting to deploy the package on every deployment target and overwrite existing components.
•
Dynamic Property
(Optional). Specify a dynamic property to use as an input parameter for the workflow execution. Select a dynamic
property and a value to pass on.
•
Value
289

Continuous Delivery Director 8.5
(Optional). If you have specified a dynamic property to be used as an input parameter for the workflow execution,
specify a value to pass on.
•
Additional Dynamic Properties
(Optional). Specify additional dynamic properties and values (in JSON format) to pass on.
•
Compensation Parameters
Define parameters for a compensation workflow to be executed if the CDA status of the main workflow is rejected,
revoked or canceled.
–
Workflow
–
Dynamic Property
–
Value
–
Additional Dynamic Properties
3. Configure the following output parameters:
•
Package Name
Specify the package name that is created in CDA.
•
ExecutionID
Specify the ID of the execution.
•
RunID
Specify the run ID in the Automation Englne.
4. Click Create.
Application Model Import
You can import the application and environment models from the Automic Continuous Delivery Automation (CDA) plugin.
During product configuration, you can import the application and environment models from the Automic Continuous
Delivery Automation (CDA) plugin. Using the CDA Application Models, you can tie the release activities and the content to
the real applications and environments.
For more information about Application Model Import, see Applications and Environments.
Start General Workflow
This task lets you run an Automic Continuous Delivery Automation general workflow in the context of Continuous Delivery
Director phases and releases.
One or more CDA endpoints are available.
Applications and environments have been imported from CDA.
General workflows are available as an option for more generic tasks (as the name implies), such as a single starting
point for larger-scale process automation, maintenance tasks, or for any action that does not require access to the CDA
object model. General workflows are used for generic CDA processes only (such as checking an internal CDA resource).
Typically, any actions outside of deployment are executed here.
General workflows are most often used for the orchestration of multiple application deployments alongside other tasks,
or for user-triggered maintenance tasks. General workflows do not belong to any CDA application (equivalent to a
Continuous Delivery Director business application).
290

Continuous Delivery Director 8.5
This task lets you orchestrate core CDA activities at a high level. For example, a Continuous Delivery Director release
might include multiple applications that you can deploy through the CDA deployment model.
1. In a release, create an automatic task as described in Create Automatic Tasks.
2. Configure the following input parameters:
TIP
Values: Applies to the Application, Application Workflow, Package, and Deployment Profile properties.
To define a value, do one of the following actions:
•
To select from a list of possible values, type an at sign "@" in the field
Example: Deploy Tomcat
•
To select from a list of built-in tokens (reusable placeholders that are used to create generic workflows),
type a percent sign "%" in the field
•
Type free text
•
Enter a combination of free text and tokens
•
Workflow
Specify the name of the general workflow to be executed.
•
Dynamic Property
(Optional). Specify a dynamic property to use as an input parameter for the workflow execution. Select a dynamic
property and a value to pass on.
•
Value
(Optional). If you have specified a dynamic property to be used as an input parameter for the workflow execution,
specify a value to pass on.
To define a value, perform one of the following actions:
–
To select from a list of possible values, type an at sign "@"
–
To select from a list of built-in tokens (reusable placeholders that are used to create generic workflows), type a
percent sign "%"
–
Type free text
–
Enter a combination of free text and tokens
•
Additional Dynamic Properties
(Optional). Specify additional dynamic properties and values (in JSON format) to pass on.
•
Compensation Parameters
Define parameters for a compensation workflow to be executed if the CDA status of the main workflow is rejected,
revoked or canceled.
–
Workflow
–
Dynamic Property
–
Value
–
Additional Dynamic Properties
3. Configure the following output parameters:
•
ExecutionID
Specify the ID of the execution.
•
RunID
Specify the run ID in the Automation Englne.
4. Click Create.
AWS CodeDeploy Plug-in
This plug-in lets you deploy to AWS cloud environments from a GitHub repository.
291

Continuous Delivery Director 8.5
To configure endpoints, see Configure an AWS CodeDeploy Endpoint .
To configure tasks, see Create Deployment (AWS CodeDeploy).
Plug-in Version 2.0-5
Download Options
Use one of the following options to download the latest plug-in version:
Method Info
wget wget -O cdd-awscodedeploy-plugin.war
https://cspdl.broadcom.com/shared/static/
k6o510qt4fhbvhmp9foagrmzu569ogpy.war?
LCK=ent.box.com
MD5 1b83308540bb951c22f7d8ad0b331b2e
Click Download Button
Supported Versions
The AWS CodeDeploy plug-in supports the core AWS CodeDeploy SaaS solution.
For more information, see the AWS CodeDeploy documentation at https://aws.amazon.com/documentation/codedeploy/
Change History
The following updates were made for plug-in version 2.0-5:
•
Security Enhancements - Updated the 3rd party libraries that are part of the package.
The following updates were made for plug-in version 2.0-2:
•
Bugfix: list-deployment-instances is deprecated and does not support EC2 deployments. Use list-deployment-
targets instead.
The following updates were made for plug-in version 2.0-1:
•
Bugfix: A deployment task completed successfully, but an error message, NullPointerException: element
cannot be mapped to a null key, appeared on the release page.
The following updates were made for plug-in version 2.0:
•
Support was added for Amazon S3 buckets as source control repositories in endpoints.
WARNING
This plug-in update is not backward compatible. To avoid potential issues, unregister the plug-in, overwrite
the war file, and re-register.
•
Default values were added to the Version ID endpoint parameter.
The following updates were made for plug-in version 1.2:
•
Support was added for Java 11.
Configure an AWS CodeDeploy Endpoint
Enable communication and synchronization of assets between AWS CodeDeploy and Continuous Delivery Director.
292

Continuous Delivery Director 8.5
You are familiar with AWS Code Deploy.
You have been granted the Can create endpoints permission.
1. Register the plug-in as described in Manage Plug-ins.
The manifest for the AWS Code Deploy plug-in is http://<host>:<port>/cdd-AwsCodeDeploy-plugin/
manifest.json .
2. From the Administration menu, click Endpoints > Add Endpoint.
3. In the ADD ENDPOINT dialog, select the AWS CodeDeploy plug-in.
4. Configure the following endpoint parameters:
•
Name
Specify the name of the endpoint.
•
Region
Specify the AWS region to use, such as us-west-1.
•
Access Key ID
Specify the access key ID that is used to access the AWS CodeDeploy instance.
•
Secret Access Key
Specify the secret access key that is used to access the AWS CodeDeploy instance.
•
Source
Specify the application source type from the following options:
–
GitHub
–
AWS S3
GitHub
–
GitHub Repository Owner
Specify the name of the GitHub repository owner.
–
GitHub Repository
Specify the name of the required GitHub repository, such as RepositoryName.
–
GitHub User Name
(Optional) Specify a GitHub user name.
NOTE
This field is not required when using an API key for authentication (GitHub Cloud only supports API
Key).
–
GitHub Password
(Optional) Specify a password or a personal access token to authenticate to GitHub.
For AWS S3
–
Service API URL
Specify the service endpoint either with or without an https prefix, such as https://s3.us-
west-1.amazonaws.com or s3.us-west-1.amazonaws.com.
–
Region
Specify the region to use for SigV4 signing of requests, such as us-west-1.
–
Bucket Name
Specify the required S3 bucket name.
–
File Name
Specify the required file name.
–
Revision File Type
Specify the revision file type. Possible values: zip, tar, tar.gz, tgz, or leave blank.
293

Continuous Delivery Director 8.5
5. Click Test Connection to check the connection to AWS CodeDeploy.
6. Click Add.
Create Deployment (AWS CodeDeploy)
This task lets you deploy application revisions stored in GitHub repositories or Amazon S3 buckets to AWS CodeDeploy
instances.
One or more AWS CodeDeploy endpoints are available.
1. In a release, create an automatic task as described in Create Automatic Tasks.
2. Configure the following input parameters:
•
Application
Specify the name of the application as the application appears in your AWS account in the endpoint region.
•
Deployment Group
Specifies the name of the deployment group that is a member of the application.
NOTE
If you do not have a deployment group that is configured, first create a deployment group in AWS.
•
Deployment Configuration
(Optional) Specifies the name of a deployment configuration that is associated with the applicable IAM user or
AWS account. Default: The value that is configured in the deployment group.
•
Version ID
Specify the version ID of the S3 object or the SHA1 commit ID of the GitHub commit that represents the bundled
artifacts for the application revision. When left empty, the HEAD is taken.
•
Description
(Optional) Specify a description of the deployment.
3. Click Create.
AWS Elastic Beanstalk Plug-in
The AWS Elastic Beanstalk plug-in lets you deploy web applications from Amazon S3 cloud storage to AWS Elastic
Beanstalk application container environments.
NOTE
You can deploy web applications that are packaged in a web application archive (WAR) file.
Plug-in Version 2.1-2
Download Options
Use one of the following options to download the latest plug-in version:
Method Info
wget wget -O cdd-awselasticbeanstalk-plugin.war
https://cspdl.broadcom.com/shared/static/
gb16spt5474ve3cxj7alm1bq07u9ngin.war?
LCK=ent.box.com
MD5 2888d8455a826e30954abbf3dd6768c3
294

Continuous Delivery Director 8.5
Click Download Button
Supported Versions
The AWS Elastic Beanstalk plug-in supports the core AWS Elastic Beanstalk SaaS solution.
For more information, see the AWS Elastic Beanstalk documentation at https://docs.aws.amazon.com/console/quickstarts
/
What's New
The following updates were made for plug-in version 2.1-2:
•
Security Enhancements - Updated the 3rd party libraries that are part of the package.
The following updates were made for plug-in version 2.1:
•
Support was added for Java 11.
Configuration
Register the plug-in and create endpoints as described in Manage Plug-ins.
Manifest URL
For plug-in registration, use the following AWS Elastic Beanstalk manifest URL:
http://<plugin-server>:<port>/cdd-awselasticbeanstalk-plugin/manifest.json
Endpoint Parameters
The following parameters are required to create an endpoint:
•
Access Key ID
Specifies the AWS Access Key ID that provides permission to access the AWS Elastic Beanstalk instance
Example: AKIAIOSFODNN7EXAMPLE
•
Secret Access Key
Specifies the AWS secret access key that is used to access the AWS Elastic Beanstalk instance
Example: wJalrXUtnFEMI/K7MDENG/bPxRfiCYEXAMPLEKEY
•
AWS Region
Specifies the AWS region
Example: eu-west-1
•
Source
Specifies the source type
Example: S3
•
S3 Bucket
Specifies the name of the Amazon S3 bucket that is used to cache your source archives
To check the connection to AWS Elastic Beanstalk and to Amazon S3, use the endpoint Test Connection option. The
Test Connection option returns the following results:
•
Success
Both connections were successful
•
Failure
One or more connections failed
295

Continuous Delivery Director 8.5
Tasks
The following task types are available in the AWS Elastic Beanstalk Plug-in:
Deploy
The Deploy task contains the following fields:
Input Parameters
•
Application Name
Specifies the logical name of the application as the name appears in your Amazon S3 account
Values: Free text, or a combination of text and tokens
Note: For a list of available values, enter the commercial at sign (@). For a list of available tokens, enter the
percent sign (%)
•
Environment Name
Specifies the name of the AWS Elastic Beanstalk environment to update
Values: Free text, or a combination of text and tokens
Note: For a list of available values, enter the commercial at sign (@). For a list of available tokens, enter the percent
sign (%)
Example: Tomcat 8
•
S3 Key
Specifies the WAR file name or a folder name as these items appear in your Amazon S3 account
•
Values: Free text, or a combination of text and tokens
Note: For a list of available tokens, enter the percent sign (%)
•
Build Number
Specifies the build number that is associated with the selected WAR file
Values: Free text, or a combination of text and tokens
Note: For a list of available tokens, enter the percent sign (%)
•
Description
(Optional) Specifies a description of the deployment
Output Parameters
•
Application URLSpecifies the URL of the deployed application
Values: Free text or a combination of text and tokens
Note: For a list of available tokens, enter the percent sign (%).
Tutorial Videos
Configuration
The following video shows how to configure Continuous Delivery Director integration with AWS Elastic Beanstalk:
Azure DevOps Server Plug-in
This plug-in lets you track work items through the release pipeline.
Plug-in Version 1.1-6
This plug-in synchronizes work items between Azure DevOps Server (formerly Team Foundation Server (TFS) and Visual
Studio Team System (VSTS) and Continuous Delivery Director. This integration allows Azure DevOps Server to be used
as any other content source for a release in Continuous Delivery Director.
296

Continuous Delivery Director 8.5
Content synced includes features, epics, code review requests, tasks, test cases, and bugs. You can also import content
into Continuous Delivery Director from Azure DevOps Server.
Method Info
wget wget -O cdd-tfs-plugin.war https://
cspdl.broadcom.com/shared/static/
nb4twkai3laqb513vueq0it6asteptz3.war?
LCK=ent.box.com
MD5 883f94b02e3c817a398c7bbffa334342
Click Download Button
Supported Versions
The TFS plug-in supports TFS 2017, TFS 2018, Azure DevOps Server 2019 and above, Azure DevOps Services (Cloud).
To learn more about Azure DevOps Server, see https://azure.microsoft.com/en-us/services/devops/server/
Capabilities
The Azure DevOps Server plug-in supports the following capabilities:
•
Release Tasks
–
Run Build
–
Create Work Item
–
Update Work Item
–
Wait for Approval
•
Get Files
•
Import Work Items
Change History
The following updates were made for plug-in version 1.1-6:
•
Security enhancements.
The following updates were made for plug-in version 1.1-5:
•
Security enhancements.
The following updates were made for plug-in version 1.1-4:
•
Security enhancements.
The following updates were made for plug-in version 1.1-3:
•
Support was added for Azure DevOps Server 2020.0.1.
The following updates were made for plug-in version 1.1-2:
•
A Get Commit Messages task was added to the Set Source Control Connection feature. This task lets you use
Azure DevOps Server to retrieve and parse commit messages. Use this capability when you deploy applications in a
release to see the status of related work items and to compare planned and actual work items.
•
You can now retrieve parent work items together with child work items. Use this capability when comparing planned
and actual work items.
297

Continuous Delivery Director 8.5
The following updates were made for plug-in version 1.1:
•
You can now use TFS/VSTS as a file source so that releases are automatically created and run whenever you make
changes to the JSON file.
•
A new endpoint parameter has been added, TFS Version.
The following updates were made for plug-in version 1.0.3:
•
Support was added for Java 11.
Configure an Azure DevOps Server Endpoint
Enable communication and synchronization of assets between Azure DevOps Server and Continuous Delivery Director.
You are familiar with Azure DevOps Server (formerly Team Foundation Server (TFS) and Visual Studio Team System
(VSTS).
You have been granted the Can create endpoints permission.
1. Register the plug-in as described in Manage Plug-ins.
The manifest for the Azure DevOps Server plug-in is http://<host>:<port>/cdd-tfs-plugin/
manifest.json .
2. From the Administration menu, click Endpoints > Add Endpoint.
3. In the ADD ENDPOINT dialog, select the Azure DevOps Server plug-in.
4. Configure the following endpoint parameters:
•
URL
Enter the URL of your Azure DevOps Server machine or Azure DevOps Services instance.
•
Collection
Enter the name of your team project collection (a group of team projects).
•
Authentication Type
Select one of the following methods to authenticate to the TFS service:
–
Personal Access Token
–
NTLM
For Personal Access Token
–
Azure DevOps Server Username
Enter the user name to authenticate to the Azure DevOps Server service.
–
Personal Access Token
Enter your personal access token to authenticate to the TFS service.
For NTLM
–
Azure DevOps Server Username
Enter the user name to authenticate to the Azure DevOps Server service.
–
Azure DevOps Server Password
Enter your password to authenticate to the Azure DevOps Server service.
–
Domain
Enter the Azure DevOps Server domain.
Example: ca.com
•
Version
Select one of the following versions based on your AzureDevOps version and API usage. For information
about Azure DevOps APIs and version mapping, refer to the Microsoft documentation.
298

Continuous Delivery Director 8.5
–
(Default) For API version 4.1 TFS 2018 Update 3
–
For API version 4.0 TFS 2018 RTW
–
For API version 2.3 TFS 2015 Update 4
5. Click Test Connection to check the connection to Playwright.
6. Click Add.
Import Work Items (Azure DevOps Server)
The Azure DevOps Server plug-in lets you sync work items between Azure DevOps Server and Continuous Delivery
Director releases. Use this capability when you create a release to see the related Azure DevOps Server information.
You have configured an endpoint between Azure DevOps Server and Continuous Delivery Director as described in
Configure an Azure DevOps Server Endpoint.
You can also connect applications to Azure DevOps Server to see which work items are being developed and entering
your release pipeline on every notification arrival from your build server. To set up this configuration, follow the instructions
in Set Work Items Connection.
1. In a release, click the Work Items tab on the left menu.
2. Select Add Work Items.
The ADD WORK ITEMS window opens.
3. Select External Items.
4. Enter a name for the work items source.
Azure Feed
5. Under Work Items Source, select the Azure DevOps Server plug-in and a configured Azure DevOps Server
endpoint.
6. In Import Using, select either Filter or WIQL. WIQL lets you write queries in Work Item Query Language to import
content.
7. Provide information in the required parameter fields. These fields let you build a query that searches Azure DevOps
Server for work items that match the specified criteria.
WIQL
•
Query
Specify a WIQL query to import work items. For example:
SELECT [System.ID],[System.WorkItemType],[System.Title],[System.State]
FROM WorkItems
WHERE [System.TeamProject] = 'TFS Demo'
Filter
Use the following fields to filter the work item import results:
TIP
Values: To select from a list of possible values, type an at sign "@" in the field. You cannot combine values
with free text or tokens. Applies to all fields except Work Item Tags.
•
Team Project
Specify the name of the Azure DevOps Server team project that contains the content you want to import. Type an
at sign "@" to select from a list of team projects in the Azure DevOps Server endpoint. Type the at sign "@" in other
fields to select from a dynamic list of entities that are associated with the selected team project.
Values: An alphanumeric string.
299

Continuous Delivery Director 8.5
–
Must not contain any Unicode control characters or surrogate characters
–
Must not contain the following characters: / : \ ~ & % ; @ ' " ? < > | # $ * } { , + = [ ]
–
Must not start with an underscore (_)
–
Must not start or end with a period (.)
•
Area Path
Specify the area path that is defined for the team project.
•
Iteration Path
Specify the iteration path that is defined for the team project.
•
Work Item Type
Specify the type of work item that you want to import.
•
Work Item State
Specify the work item states to import. This field lets you filter what is imported based on the state.
Example: Import only work items that are in the Done state.
•
Work Item Tags
Specify the work item tags stored in Azure DevOps Server. This field lets you filter what work items are imported as
long as the items contain at least one specified tag.
8. Select Create.
The content source is saved and a list of the returned work items is displayed under the application in the left menu.
These work items are now available to assign to tasks in phases to associate with the release.
Get Files (Azure DevOps Server)
Use Azure DevOps Server as a file source so that releases are automatically created and run whenever you make
changes to a JSON file in source control.
•
You have configured an endpoint between Azure DevOps Server and Continuous Delivery Director as described in
Configure an Azure DevOps Server Endpoint.
•
You have created a top-level folder in the relevant repository in Azure DevOps Server with the following name: CDD-
FileSource and placed all release-related JSON files in this folder.
1. Do one of the following:
•
From RELEASES, click File Source, then New File Source.
•
From the Administration menu, click File Sources, then New File Source.
2. In CREATE FILE SOURCE, configure the following parameters:
•
Name
Enter a name for the file source.
•
Select Source Control
Select Azure Devops Server and Get Files.
•
Select Endpoint
•
SCM Type
Select either Git or TFVC, according to the source control management system used in Azure Devops Server.
•
Project
Specify a Azure Devops Server project name or ID.
•
Repository
Specify the name of the Azure Devops Server repository from which to import the files.
•
Branch
300

Continuous Delivery Director 8.5
Specify a branch used by the specified project. To allow processing of webhook notifications from all repository
branches, keep this field empty.
•
Releases Created On Behalf Of (API Key)
Specify the API key of a user on whose behalf future releases will be created. For example, the API key of the
product owner.
•
Send Error Notifications To
Specify one or more recipients to receive error notifications.
3. Click Create.
A COPY WEBHOOK popup is displayed containing an auto-generated webhook.
4. Copy this webhook and paste it into Azure Devops Server.
The newly-created file source is added to the FILE SOURCES page.
NOTE
For more information, seeHow to Set Up Webhooks in your Source Control.
Run Build (Azure DevOps Server)
Run Azure DevOps Server project builds in the context of Continuous Delivery Director phases and releases.
One or more Azure DevOps Server endpoints are available.
1. In a release, create an automatic task as described in Create Automatic Tasks.
2. Configure the following parameters:
TIP
Values: To define a value, do one of the following actions:
•
To select from a list of possible values, type an at sign "@" in the field
Example: Deploy Tomcat
•
To select from a list of built-in tokens (reusable placeholders that are used to create generic workflows),
type a percent sign "%" in the field
•
Type free text
•
Enter a combination of free text and tokens
Input Parameters
•
Project Name
Specify the name of an Azure DevOps Server team project.
•
Build Definition Name
Specify the name of an Azure DevOps Server build definition related to the specified project.
•
Ignore Warnings
Determine whether warnings are suppressed at the build level.
•
Agent Queue
Specify the agent queue used by the specified build definition.
•
Branch
Specify the version control branch used by the project.
•
Parameters
Specify the parameters for an Azure DevOps Server parametrized build to pass to the specified build configuration.
Define the parameters in JSON format. Syntax:
{“param1”:”value”, “param2”:”value” }
301

Continuous Delivery Director 8.5
Output Parameters
•
Build Number
Returns the ID of the build that was run.
•
Build Result
Returns the status of the build that was run.
•
Source Version
Returns a link to the change-set of the build.
3. Click Create.
Create Work Item (Azure DevOps Server)
Create a work item and return the work item ID for future use.
One or more Azure DevOps Server endpoints are available.
1. In a release, create an automatic task as described in Create Automatic Tasks.
2. Configure the following parameters:
TIP
Values: To define a value, do one of the following actions:
•
To select from a list of possible values, type an at sign "@" in the field
Example: Deploy Tomcat
•
To select from a list of built-in tokens (reusable placeholders that are used to create generic workflows),
type a percent sign "%" in the field
•
Type free text
•
Enter a combination of free text and tokens
Input Parameters
•
Team Project
Specify the name of an Azure DevOps Server team project where you want to create the work item.
•
Work Item Type
Specify the type of work item that you want to create.
NOTE
(For Azure DevOps Services) Enter a valid Azure DevOps Services work item type. This field is case-
sensitive.
•
Work Item Title
Specify the name of the work item that you want to create.
•
Work Item Tags
Specify the work item tags to be added to the work item that you want to create. Use simple text and separate
multiple tags with commas. Syntax: tag1, tag2, ...
•
Additional Fields
Specify one or more "field name":"value" pairs. You can update multiple fields using the following format:
{"field1":"value1","field2":"value2"…}. You can use this parameter for both standard and custom fields. For
example, {"System.Description": "Follow the code samples from MSDN"}
Output Parameters
•
Work Item ID
Specifies the ID of the newly-created work item.
302

Continuous Delivery Director 8.5
3. Click Create.
Update Work Item (Azure DevOps Server)
Update an existing work item with customized fields.
One or more Azure DevOps Server endpoints are available.
1. In a release, create an automatic task as described in Create Automatic Tasks.
2. Configure the following parameters:
TIP
Values: To define a value, do one of the following actions:
•
To select from a list of possible values, type an at sign "@" in the field
Example: Deploy Tomcat
•
To select from a list of built-in tokens (reusable placeholders that are used to create generic workflows),
type a percent sign "%" in the field
•
Type free text
•
Enter a combination of free text and tokens
Input Parameters
•
Work Item IDs
Specify one or more IDs of work items to update. Separate multiple IDs with commas.
NOTE
The fields to update must be common to all work items you list here.
•
Fields to Update
Specify one or more "field name":"value" pairs. You can update multiple fields using the following format:
{"field1":"value1","field2":"value2"…}. You can use this parameter for both standard and custom fields. For example:
{"System.Description": "Follow the code samples from MSDN"}
3. Click Create.
Wait for Approval (Azure DevOps Server)
Determine what tasks are queued until the completion and approval of a specified work item.
One or more Azure DevOps Server endpoints are available.
1. In a release, create an automatic task as described in Create Automatic Tasks.
2. Configure the following parameters:
TIP
Values: To define a value, do one of the following actions:
•
To select from a list of possible values, type an at sign "@" in the field
Example: Deploy Tomcat
•
To select from a list of built-in tokens (reusable placeholders that are used to create generic workflows),
type a percent sign "%" in the field
•
Type free text
•
Enter a combination of free text and tokens
Input Parameters
303

Continuous Delivery Director 8.5
•
Work Item ID
Specify the ID of a work item to be completed and approved before the next task starts.Note: (For VSTS) Enter a
valid VSTS work item type. This field is case-sensitive.
NOTE
(For Azure DevOps Services): Enter a valid Azure DevOps Services work item type. This field is case-
sensitive.
•
Required State
Specify the required state for the selected work item to reach before the next task starts.
•
Poll Interval
Specify the length of time in seconds between system requests for the work item state. Default: 120 seconds
3. Click Create.
BlazeMeter
®
Plug-in
The BlazeMeter plug-in lets you run load and performance tests as part of your releases. This plug-in also lets you import
test suites from BlazeMeter to run Adaptive Testing tasks.
Plug-in Version 3.7-7
This plug-in automatically registers the BlazeMeter load testing capabilities with Continuous Delivery Director.
Watch the following video for a summary of how Continuous Delivery Director works with the BlazeMeter plug-in:
Download Options
Use one of the following options to download the latest plug-in version:
Method Info
wget wget -O cdd-blazemeter-plugin.war
https://cspdl.broadcom.com/shared/
static/942ic59jaoq9ytym4xe6yufkbz5dgxbi.war?
LCK=ent.box.com
MD5 e1b7b25e0715eb587a53bd9dcd13ce3f
Click Download Button
Supported Versions
The BlazeMeter plug-in supports the core BlazeMeter SaaS solution.
For more information, see the BlazeMeter documentation at https://guide.blazemeter.com/
Change History
The following update was made for plug-in version 3.7-3:
•
Bugfix: Error messages in Continuous Delivery Director do not include the error code, causing delay in tracing the root
cause of errors.
The following update was made for plug-in version 3.7-2:
•
End time and polling time were enhanced.
304

Continuous Delivery Director 8.5
The following update was made for plug-in version 3.7-1:
•
Bugfix: When the plug-in was deployed onto multiple hosts, the log files were overwritten because all instances wrote
to the same log file.
The following update was made for plug-in version 3.7:
•
A new execution parameter, Enable JMeter Parameters, was added to the Get Test Assets (import tests/test
suites) function in the Adaptive Testing Catalog. This parameter lets you import BlazeMeter tests with the taurus
configuration type with a JMeter executor.
•
Thecdd_BlazeMeter_plugin.log file was renamed as cdd-blazemeter-plugin.log.
The following updates were made for plug-in version 3.6:
•
Four optional filter fields were added to the Get Test Assets (import tests/test suites) function in the Adaptive Testing
Catalog:
–
Test Configuration Type
–
Test Execution Type
–
Test Script Type
–
Test Executor Type
These filters are available for the Test option only and are not applicable to the Multi Test option.
•
Users can now view a BlazeMeter report without logging in to BlazeMeter.
•
A new dynamic endpoint parameter, Use Proxy, was added. This parameter determines whether to use a proxy
server.
•
Support was added for the enhanced API key authentication. To support this enhancement, two new parameters were
added to the Authentication Type field, API Key ID and API Key Secret.
The following updates were made for plug-in version 3.1:
•
Support for the test advisor was enhanced. This plug-in can now recognize new and updated test suites.
The following updates were made for plug-in version 2.3:
•
Support was added for Java 11.
Configuration
Register the plug-in and create endpoints as described in Manage Plug-ins.
Manifest URL
For plug-in registration, use the following BlazeMeter manifest URL:
http://<plugin-server>:<port>/cdd-blazemeter-plugin/manifest.json
Endpoint Parameters
The following parameters are required to create an endpoint:
•
Name
Specify the name of the endpoint.
•
URL
Specify the URL that is used to access the BlazeMeter instance.
Default: https://a.blazemeter.com
•
Authentication Type
Select one of the following methods to authenticate to the BlazeMeter service:
305

Continuous Delivery Director 8.5
NOTE
For more information on API keys, see the BlazeMeter documentation.
–
Legacy
–
Advanced
For Legacy only
–
API Key
Specify the unique identifier for the BlazeMeter user.
Values: A string of alphanumeric characters.
For Advanced only
–
API Key ID
Specify the enhanced BlazeMeter API Key ID.
–
API Key Secret
Specify the enhanced BlazeMeter API Key Secret.
•
Use Proxy
{Optional} Determines whether a proxy server is used
Note: If selected, the Proxy Server URL, Proxy Server Username, and Proxy Server Password fields appear.
–
Proxy Server URL
Specify the web address that is used to access the proxy server
–
Proxy Server Username
{Optional} Specify the username that is used to authenticate to the proxy server
–
Proxy Server Password
{Optional} Specify the password that is used to authenticate to the proxy server
Test Failure Criteria
You can define test failure criteria in BlazeMeter to set your test pass / fail criteria for various metrics, such as response
times, errors, hits/s, test duration, and so on.
If test failure criteria have been defined in BlazeMeter, Continuous Delivery Director will show test pass/fail results of
BlazeMeter tests. If test failure criteria have not been defined in BlazeMeter, Continuous Delivery Director will always
show the tests as passed. In BlazeMeter, the test results appear as not set.
Tasks
The following task types are available in the BlazeMeter plug-in:
TIP
To select from a list of available BlazeMeter Values, enter the commercial At symbol (@) in the task field.
Run Test
The Run Test task requires the following fields:
•
Workspace
Specify the name of the workspace to which the test creator belongs
•
Project
Specify the project where the test is defined
•
Test
Specify the test to run
306

Continuous Delivery Director 8.5
Run Collection
The Run Collection task requires the following fields:
•
Workspace
Specify the name of the workspace to which the test collection belongs
•
Project
Specify the project where the test is defined
•
Collection
Specify the test collection to run
Get Test Assets
This plug-in lets you import test suites into the Adaptive Testing Catalog.
Follow these steps:
1. Select Tests, then Adaptive Testing Catalog.
2. Specify the Application and the Application Version. The menu next to the application name and version is
activated.
3. Select Get Test Assets.
4. Fill in the following fields:
–
Test Source Name
–
Plug-in
Select BlazeMeter and Import Test Suites.
–
Endpoint
Select a BlazeMeter endpoint.
–
Workspace Name
Specify the name of the BlazeMeter workspace where the test suites you want to import are located.
–
Project Name
Specify the name of the BlazeMeter project where the test suites you want to import are located. If left empty, test
suites will be imported from all sub-projects.
–
Type
Select either Test to import a specific test suite or Multi Test to import multiple test suites. If you select Test, the
following filters appear:
•
Test Configuration Type.
Possible Values: "external", "externalFunctionalMobile", "followme", "functionalApi", "functionalGui", "http",
"jmeter", "taurus", "webdriver"
•
Test Execution Type
Possible Values: "blazemeterImage", "taurusCloud"
•
Test Script Type
Possible Values: "jmeter", "selenium", "taurus"
•
Test Executor Type
Possible Values: "gatling", "grinder", "jmeter", "locust", "newman", "pbench", "selenium", "siege", "taurus",
"tsung"
–
Is Public Report
Select this option to enable users to access a link to the test report without logging in to BlazeMeter.
–
Enable JMeter Parameters
Select this option to enable the Jmeter Parameters text box.
NOTE
This option is applicable for BlazeMeter tests with thetaurus configuration type with a JMeter executor.
307

Continuous Delivery Director 8.5
•
Specify a JSON array of "key"/"value" pairs. On execution, the BlazeMeter test source sets the JMeter properties
of all taurus tests with a JMeter executor to this JSON array.
–
Tags
Select one or more tags to execute test suites tagged with your selection. Leave empty to execute all the test suites
under the application version.
Example: Type bl to retrieve all test suites tagged with labels beginning with bl, such as blazemeter.sanity.test
Burp Suite Plug-in
Scan your web applications for vulnerabilities from your release pipeline.
Plug-in Version 1.0-2
Burp Suite is a popular and scalable set of tools used for penetration testing of web applications. This plug-in integrates
with Burp Suite Enterprise and supports the following tasks:
•
Create Scan (Burp Suite)
Supported Versions
This plug-in was validated against Burp Suite Enterprise Edition v-2021.6
Download Options
Use one of the following options to download the latest plug-in version:
Method Info
wget wget -O cdd-burpsuite-plugin.war https://
cspdl.broadcom.com/shared/static/
logqjel3p6nnqvq9oogb118ubs50h3jo.war?
LCK=ent.box.com
MD5 8d2246fa5aa96b67441211bf6b6348ca
Click Download Button
More Information
Configure a Burp Suite Endpoint
Configure a Burp Suite Endpoint
You configure a Burp Suite plug-in endpoint either for the initial setup, or whenever a change to the configuration is
required.
You are familiar with Burp Suite.
You have the Can create endpoints permission.
1. Register the plug-in as described in Manage Plug-ins.
The manifest for the Burp Suite plug-in is http://<host>:<port>/cdd-burpsuite-plugin/manifest.json .
308

Continuous Delivery Director 8.5
2. From the Administration menu, click Endpoints > Add Endpoint.
3. In the ADD ENDPOINT dialog, select the Burp Suite plug-in.
4. Configure the following input parameters:
•
Burp Suite Server URL
Specify the URL to access the Burp Suite web server and log in to Burp Suite Enterprise Edition.
•
API Key
Specify a Burp Suite REST API key to initiate scans from your releases and to fail builds if certain issues are
detected.
5. To check the connection to Burp Suite, click Test Connection.
6. Click Add.
Create Scan (Burp Suite)
Scan your web applications automatically for many common vulnerabilities.
One or more Burp Suite endpoints are available.
You can choose scan configurations provided by Burp Suite Enterprise Edition and any custom configurations that your
organization has add to Burp Suite.
1. In a release, create an automatic task as described in Create Automatic Tasks.
2. Configure the following parameters:
TIP
Values: To define a value, do one of the following actions:
•
To select from a list of possible values, type an at sign "@" in the field
Example: Deploy Tomcat
•
To select from a list of built-in tokens (reusable placeholders that are used to create generic workflows),
type a percent sign "%" in the field
•
Type free text
•
Enter a combination of free text and tokens
Input Parameters
•
Site
Specify the site on which you want to perform the scan.
NOTE
You can only specify a site that is configured in Burp Suite Enterprise.
•
Scan Configuration
Specify one or more comma-separated scan configurations.
NOTE
The scan configurations available in the drop-down list are preconfigured in Burp Suite Enterprise Edition.
•
Severity
(Optional) Specify a severity level for detected issues to fail the scanning task.
NOTE
Issues are classified as High, Medium, Low or Information. These classifications reflect the likely impact
of each issue for your organization.
309

Continuous Delivery Director 8.5
3. Click Create.
Checkmarx Plug-in
Scan your Checkmarx source code for vulnerabilities from your release pipeline.
Plug-in Version 1.0-5
Checkmarx is the leader in application security testing. This plug-in integrates with Checkmarx source code and supports
the following tasks:
•
Create Scan
•
Create Scan using CxFlow
Supported Versions
This plug-in was validated against Checkmarx.
Download Options
Use one of the following options to download the latest plug-in version:
Method Info
wget wget -O cdd-checkmarx-plugin-latest.tar.gz
https://cspdl.broadcom.com/shared/static/
tzj6vaz60oko8whf8a8kbg9axlp1z0z2.gz?
LCK=ent.box.com
MD5 9d459c42eb9da00c89b9d7b51c4f1fc9
Click Download Button
More Information
Configure a Checkmarx Endpoint
Configure a Checkmarx Endpoint
You configure a Checkmarx plug-in endpoint either for the initial setup, or whenever a change to the configuration is
required.
You are familiar with Checkmarx.
You have the Can create endpoints permission.
1. Register the plug-in as described in Manage Plug-ins.
2. From the Administration menu, click Endpoints > Add Endpoint.
3. In the ADD ENDPOINT dialog, select the Checkmarx plug-in.
4. Configure the following input parameters:
•
URL
Specify the CxSAST URL to log in to Checkmarx.
•
Username
310

Continuous Delivery Director 8.5
Specify the CxSAST username.
•
Password
Specify the CxSAST password.
•
Rally URL
Specify the Rally URL.
•
Rally Token
Specify the Rally token.
•
Git Repository URL
Specify the Git repository URL.
•
Git Token
Specify the Git token.
•
Git Namespace
Specify the Git Namespace name.
•
Git Repo Name
Specify the Git Repo name.
•
Git Branch
Specify the Git branch.
•
Git Application Name
Specify the Git app name.
•
Use Proxy
Specify this option to connect to a remote endpoint through a proxy server.
5. To check the connection to Checkmarx, click Test Connection.
6. Click Add.
Create Scan
Scan your web applications automatically for many common vulnerabilities.
One or more Git endpoints are available.
You can scan the projects source code that your organization has add to Checkmarx.
1. In a release, create an automatic task as described in Create Automatic Tasks.
2. Configure the following parameters:
Input Parameters
•
Team Name
Specify the team name.
Use % prefix for tokens. You can also use free text alone or together with tokens.
•
Project Name
Specify the project name.
Use % prefix for tokens. You can also use free text alone or together with tokens.
•
Is Incremental
Specify whether the requested scan is incremental or full scan.
•
Is Public
Specify whether the requested scan is public.
•
Force Scan
Specify whether the requested scan is public.
311

Continuous Delivery Director 8.5
3. Click Create.
Create Scan using CxFlow
Scan your web applications automatically for many common vulnerabilities using CxFlow.
One or more Git endpoints are available.
You can scan the projects source code that your organization has add to Checkmarx. You can also configure the Rally
workspace and project to report the code scan results.
1. In a release, create an automatic task as described in Create Automatic Tasks.
2. Configure the following parameters:
Input Parameters
•
Team Name
Specify the team name.
Use % prefix for tokens. You can also use free text alone or together with tokens.
•
Project Name
Specify the project name.
Use % prefix for tokens. You can also use free text alone or together with tokens.
•
Rally Workspace
Specify the Rally workspace name.
Use @ prefix to load an external list of values or use % prefix for tokens. You can also use free text alone or
together with tokens.
•
Rally Project
Specify the Rally project name.
Use @ prefix to load an external list of values or use % prefix for tokens. You can also use free text alone or
together with tokens.
•
Advanced
Specify the additional options on Task Failure.
–
(Default) Wait for user action or run on failure phase if found.
Pauses task and either waits for user action or runs an on-failure phase if found.
–
Automatically Skip Task.
–
Always Wait for User Action
Automatically pauses tasks until user action. Does not run on-failure phase even if found.
•
Ignore Failure When Skipping Task
Specify this option to allow promoting the build to the next phase, regardless of task failure.
CAUTION
This option can compromise build quality.
3. Click Create.
Coverity Plug-in
This plug-in lets you check the health of your application by importing the security items reported by Coverity.
312

Continuous Delivery Director 8.5
Plug-in Version 1.0-5
Download Options
Use one of the following options to download the latest plug-in version:
Method Info
wget wget -O cdd-coverity-plugin.war https://
cspdl.broadcom.com/shared/static/
vlnk1mykw7eljr9hbtwcuhjra7l4qdog.war?
LCK=ent.box.com
MD5 59b219779e77558ab600610f7aea54d0
Click Download Button
Configure a Coverity Plug-in Endpoint
Before you begin:
•
You are familiar with Coverity.
•
You have been granted the “Can create endpoints " permission.
•
Register the plug-in as described in Manage Plug-ins. The manifest for the Coverity plug-in is http://
<host>:<port>/cdd-coverity-plugin/manifest.json .
To register the Coverity plug-in, do the following:
1. From the Administration menu, click Endpoints | Add Endpoint.
2. In the ADD ENDPOINT dialog, select Coverity plug-in.
3. Configure the following endpoint parameters:
- Coverity URL - specifies the Coverity URL
- Coverity Username - specifies the Coverity username
- Coverity User Password - specifies the password or authentication key for the Coverity user
4. Click Add.
Get Security Issues
This plug-in lets you import security issues and to generate security reports for the specified application version.
1. Select Security, then select Adaptive Security Sources.
2. Select the Application and the Application Version.
The New Test Source button is activated.
3. Click New Security Source.
4. Fill in the following fields:
–
Select the Source Name
–
Plug-in - Select Coverity (Get Issues)
–
Endpoint - Select a Coverity endpoint.
–
Input Parameters:
- Project Name - Specify the project name in Coverity
- View Name - Specify the view name in Coverity
- Issue Type - Choose Coverity security item categories. The values are used to filter issues from Coverity.
Possible values are 'Quality', 'Security', and 'Various'
313

Continuous Delivery Director 8.5
- Split security items by issue occurrences - Determines if multiple security items are created for issues with
multiple occurrences.
–
Tags (optional): you can tags the security source for reporting and filtering purposes
–
Send Vulnerability Notifications To: Specify recipient/s for vulnerability notifications
–
Severity Level Notifications: Determine the level of Severity included in the vulnerability notification sent by
Continuous Delivery Director. If left empty, no notifications are sent.
–
First Occurrence: For recurrent security source, the time displays the first event.
–
Chose the repeat pattern to schedule recurring issues retrieval.
5. Click Create.
Cucumber JVM Plug-in
This plug-in lets you easily add Cucumber Java-based features as test suites to your release pipeline.
Plug-in Version 1.4.1-21
This plug-in integrates with Cucumber-JVM, a pure Java implementation of Cucumber. The Cucumber for Java plug-in
is containerized and supports Adaptive Testing functionality. You can import features from Cucumber-JVM to run as test
suites within release pipelines. This plug-in provides you with a Cucumber test automation framework for Java-based Git
and SVN builds that is open-source and application-independent.
Download Options
Use one of the following options to download the latest plug-in version:
Method Info
wget wget -O cdd-cucumberjvm-plugin.tar.gz
https://cspdl.broadcom.com/shared/static/
nsdugmft4kj9o5j4nknwdzephr5mslod.gz?
LCK=ent.box.com
MD5
9dd72ff855ad353d5efaa19eba5c2a9a
Click Download Button
Download Docker Image from Customer Support Portal Yes
Download TAR file from Customer Support Portal for customers
who cannot use docker pull
Yes
Change History
The following update was made for plug-in version 1.4.1-21:
•
Security Enhancements - Updated the 3rd party libraries that are part of the package.
The following update was made for plug-in version 1.4.1-20:
•
Security Enhancements - Updated the 3rd party libraries that are part of the package.
The following update was made for plug-in version 1.4.1-19:
•
Security Enhancements - Updated the 3rd party libraries that are part of the package.
The following update was made for plug-in version 1.4.1-18:
314

Continuous Delivery Director 8.5
•
Bugfix: Skipping the test execution for feature with plus(+) sign in their name.
The following update was made for plug-in version 1.4.1-17:
•
Security Enhancements - Updated the 3rd party libraries that are part of the package.
The following update was made for plug-in version 1.4.1-16:
•
Added support for multiple glue packages.
The following update was made for plug-in version 1.4.1-15:
•
Added log for the file write operation.
The following update was made for plug-in version 1.4.1-14:
•
Bugfix: Missing Link to Report for skipped test suites.
The following update was made for plug-in version 1.4.1-13:
•
Added support for the log messages.
The following update was made for plug-in version 1.4.1-12:
•
Bugfix: Import fails to retrieve all features.
The following update was made for plug-in version 1.4.1-11:
•
Bugfix: Import fails to retrieve all features defined in the Source Control.
The following update was made for plug-in version 1.4.1-9:
•
Bugfix: Import fails when the feature name contains SPACE characters.
The following update was made for plug-in version 1.4.1-6:
•
You can now view a test execution log that is updated in real-time to see which Cucumber tests are executed at any
given time. The execution log is updated in real-time so if problems occur in a test run, you can examine the log to
determine whether to stop or continue with the test execution.
NOTE
This feature is only available for plug-in version 1.4.1-6 and higher and is not backward-compatible.
The following update was made for plug-in version 1.4.1-5:
•
Bugfix: Links to the error and debug logs are not generated when tests complete.
The following update was made for plug-in version 1.4.1-4:
•
You can now specify system properties when importing test suites. To support this change, a System Properties input
parameter was added to the Get Test Assets task.
The following updates were made for plug-in version 1.4.1-3:
•
You can now specify the location of the settings-security.xml file. This improvement is essential in environments
where users do not have control over the home directory (such as a continuous integration farm, where each
project may have its own settings.xml configuration except for settings-security.xml). To support this change, a
Settings Security File Path input parameter was added to the Get Test Assets task.
•
When a Get Test Assets task fails, the error message now contains a URL linking to the import log file. This
enhancement helps users trace the root cause of a task failure. Previously, the error message did not contain full
information for troubleshooting purposes.
The following update was made for plug-in version 1.4.1-2:
•
Bugfix: When test execution failed for a Cluecumber custom report, the link to the associated report was not
generated.
315

Continuous Delivery Director 8.5
The following update was made for plug-in version 1.4.1-1:
•
Support was added for custom SSL TrustStore files. These files contain only those certificates trusted by the client.
These certificates are CA root certificates, that is, self-signed certificates.
The following update was made for plug-in version 1.4.1:
•
A new execution parameter, Custom Reports, has been added to the Get Test Assets task, with the following
options, Default, Maven Cucumber Reporting, and Cucumber. This field lets you store and present custom
cucumber reports based on the project pom.xml settings.
The following update was made for plug-in version 1.3.2:
•
Support was added for importing Cucumber JVM repositories with multiple projects. To support this enhancement, two
new import parameters have been added to the Get Test Assets task: Settings File Path and Update Snapshots.
The following update was made for plug-in version 1.3.1:
•
Bugfix: A missing Maven POM file error was invoked when trying to import from a subfolder.
The following updates were made for plug-in version 1.3:
•
Two new parameters, Settings File Path, and Update Snapshots were added to the Run Adaptive Testing task.
•
Bugfix: Import test suites failed, because of missing Two new parameters, Settings File Path, and Update Snapshots
were added to the Run Adaptive Testing task.
The following update was made for plug-in version 1.2:
•
A new parameter, Cucumber Tags was added to the Run Adaptive Testing task.
The following update was made for plug-in version 1.1:
•
Support was added for missing values in the 1.x report.
More Information
•
Set Up the Cucumber JVM Plug-in
•
Configure a Cucumber JVM Endpoint
•
Get Test Assets (Cucumber JVM)
Set Up the Cucumber JVM Plug-in
•
You have a working knowledge of Docker.
•
A Linux machine is provisioned with Docker Engine installed and an OS user has been created whose UID/GID are
1010/1010 and a home folder created at /home/cdd/. For more information, see Set Up Containerized Plug-ins.
•
The docker remote API port (4550) is open. For more information, see Set Up Containerized Plug-ins.
•
A Tomcat 8.5 server is installed with the containerized-manager plug-in deployed.
•
The Tomcat server is owned and run by an OS user whose UID/GID are 1010/1010 .
•
You are working with JVM (Java Virtual Machine) 8 or 11.
1. Download and load the Docker image, using one of the following methods:
•
NOTE
Use this option if you are unable to use docker pull
From the command line, enter the wget command listed in the Download Options section in Cucumber for Java
Plug-in. For example:
wget -O cdd-cucumberjvm-plugin-v1.4.1-5b131.tar.gz https://cspdl.broadcom.com/shared/
static/hr9mykdy7wwrg287ns1eumuua6obhikx.gz?LCK=ent.box.com
316

Continuous Delivery Director 8.5
Enter:
docker load -i <the gz file name>
•
Connect to https://support.broadcom.com/enterprise-software/download-center.
Select either Continuous Delivery Director or Continuous Delivery Director SaaS and click the Docker button.
Follow the on-screen instructions to pull the image to your localhost.
2. In the settings.properties file under /home/cdd/.cdd/conf/, add the following lines:
cdd.plugins.containerized.<plugin name>.container.image_name=<repository>:<tag>
cdd.plugins.containerized.cucumberjvm.container.volumes.artifacts.volumes=dependencies:/home/cdd/.m2
IMPORTANT
You must update the following line every time you update this plug-
in:cdd.plugins.containerized.<plugin name>.container.image_name=<repository>:<tag>
cdd.plugins.containerized.cucumberjvm.container.image_name=docker-release-local.artifactory-
lvn.broadcom.net/com/ca/cdd/march2021/plugins/cucumberjvm:115
cdd.plugins.containerized.cucumberjvm.container.volumes.artifacts.volumes=dependencies:/home/cdd/.m2
3. Restart the containerized-manager service.
cd /opt/apache-tomcat-8.5.49/webapps
rm -rf containerized
ls -ltr
4. Register the new plug-in using the following manifest URL: http://<plugin-server>:<port>/
containerized/plugins/cdd-cucumberjvm-plugin/manifest.json.
Configure a Cucumber JVM Endpoint
You configure the Cucumber JVM plug-in endpoint either for the initial setup, or whenever a change to the test build
configuration is required.
You are familiar with Cucumber JVM.
You have the Can create endpoints permission.
1. Register the plug-in as described in Manage Plug-ins.
The manifest for the Cucumber JVM plug-in is http://<host>:<port>/cdd-cucumberjvm-plugin/
manifest.json .
2. From the Administration menu, click Endpoints > Add Endpoint.
3. In the ADD ENDPOINT dialog, select the Cucumber JVM plug-in.
4. Configure the following input parameters:
•
Build Tool
Specify the tool used to manage your project builds.
•
Version Control System
Specifies the version control system where your source project resides.
•
Git/SVN Project URL
Specify the URL to access the Git or SVN project repository.
•
Git/SVN Username
317

Continuous Delivery Director 8.5
Specify the user name to access GitHub or SVN
•
Git/SVN Password
Specify the password to access GitHub or SVN
5. To check the connection to Cucumber JVM and to the source control system, click Test Connection.
6. Click Add.
Get Test Assets (Cucumber JVM)
This plug-in lets you import test suites into the Adaptive Testing Catalog.
1. Select Tests, then Adaptive Testing Catalog.
2. Specify the Application/Business Application and the Application Version/Business Application Version.
The menu next to the application/business application name and version is activated.
3. Select Get Test Assets.
4. Fill in the following fields:
NOTE
Use the @ symbol in the following fields to select from a dynamic list of entities associated with the selected
project.
•
Test Source Name
•
Plug-in
Select Cucumber JVM and Import Tests (Cucumber JVM).
•
Endpoint
Select a Cucumber JVM endpoint.
•
Project Base Directory
Specify the relative path to the project base directory. This is the location of the project pom.xml. Default is blank
which indicates that the current directory is the project root folder.
•
Branch
Specify the branch name.
•
Features Folder
Specify the relative path of the folder where the required features are located. Features are the equivalent of test
suites. The specified folder path must be relative to the project base directory.
•
Glue
Specify the glue for the features.
•
Cucumber Tags
(Optional) Specify a list of cucumber tags.
Example:
(@Demo or @Sanity) and not @Ignore
•
Settings File Path
(Optional) Specify an alternate path to the user settings.xml file.
•
Settings Security File Path
(Optional) Specify an alternate path to the settings-security.xml file.
•
Update Snapshots
(Optional) Select this option to force a check for missing releases and updated snapshots on remote repositories.
•
System Properties
(Optional) Specify a Java system property to include information about the current configuration.
318
Continuous Delivery Director 8.5
Example: To configure all security-related debugging options, enter the string: \"-
Djava.security.debug=all\". To enable detailed error and debug logs, add switches such as -X and -e.
•
JVM Parameters
(Optional) Specify space-separated JVM parameters to customize individual instances.
Example: \"-Dtest.HOST=google.com\" - Overrides the IP address or hostname of URL used by the browser
to execute tests. To enable detailed error and debug logs, add switches such as -X and -e.
•
Tags
Select or create one or more tags to label the imported tests.
The test results for the specified build appear on the Adaptive Testing Results page, together with links to the
associated reports in Cucumber JVM.
Cucumber for Ruby Plug-in
This plug-in lets you easily trigger Cucumber acceptance tests automatically from your releases.
Cucumber is a popular tool that developers use for testing software. Cucumber executes test specifications written in a
human-readable language called Gherkin and produces reports indicating whether the software behaves according to the
specification.
The Cucumber plug-in is containerized and supports Adaptive Testing functionality. This plug-in provides you with a
Cucumber test automation framework for Git builds that is open-source and application-independent.
Plug-in Version 1.4-1:
Download Options
Use one of the following options to download the latest plug-in version:
Method Info
wget wget -O cdd-cdd-cucumberruby-
plugin-latest.tar.gz https://
cspdl.broadcom.com/shared/static/
xu6202fu099lmq0gyy1lwfeqk1jpu2t7.gz?
LCK=ent.box.com
MD5 55fe53594ce957e165b2cad800863d2f
Click Download Button
Download Docker Image from Customer Support Portal Yes
Download TAR file from Customer Support Portal for customers
who cannot use docker pull
Yes
Prerequisites
•
A Linux machine is provisioned with Docker Engine installed and an OS user has been created whose UID/GID are
1010/1010 and a home folder created at /home/cdd/. For more information, see Set Up Containerized Plug-ins.
•
The docker remote API port (4550) is open. For more information, see Set Up Containerized Plug-ins.
•
A Tomcat 8.5 server is installed with the containerized-manager plug-in deployed.
•
The Tomcat server is owned and run by an OS user whose UID/GID are 1010/1010 .
319

Continuous Delivery Director 8.5
What's New
The following updates were made for plug-in version 1.4:
•
The plug-in name was changed to Cucumber for Ruby. This plug-in supersedes the previous Cucumber plug-in.
•
This plug-in now executes all the test suites that are selected by the Test Advisor in batch mode. Additionally, if the
user decides to run all tests, all test suites are run in batch mode, regardless of whether the test suites are selected by
the Test Advisor.
•
Support for Apache Subversion repositories was added.
Set Up the Cucumber Plug-in
1. Connect to support.broadcom.com with your Broadcom support account and continue to https://
support.broadcom.com/enterprise-software/download-center.
2. Select either CONTINUOUS DELIVERY DIRECTOR or CONTINUOUS DELIVERY DRCTR SAAS and click the
Docker button. Follow the on-screen instructions to pull the image to your localhost.
3. Create the following folder structure under the user /home/cdd/ directory:
mkdir /home/cdd/.cdd
mkdir /home/cdd/.cdd/logs
mkdir /home/cdd/.cdd/conf
mkdir /home/cdd/.cdd/artifacts
mkdir /home/cdd/.cdd/certificates
4. Create a settings.properties file under /home/cdd/.cdd/conf/ and add the following lines:
cdd.plugins.containerized.container_engine.home_folder=/home/cdd/.cdd
cdd.plugins.containerized.container_engine.port=4550
cdd.plugins.containerized.container.volumes.artifacts=/home/cdd/.cdd/artifacts
cdd.plugins.containerized.container.volumes.logs=/home/cdd/.cdd/logs
cdd.plugins.containerized.cucumber.container.image_name=cdd.packages.ca.com/com/ca/cdd/v720/7.2/plugins/
cucumberruby:101
5. Restart the containerized-manager service.
6. Register the new plug-in using the following manifest URL: http://<plugin-server>:<port>/
containerized/plugins/cdd-cucumber-plugin/manifest.json.
Configure the Cucumber Plug-in
You configure the Cucumber plug-in either for the initial setup, or whenever a change to the test build configuration is
required.
Endpoint Parameters
The following parameters are required to create an endpoint:
•
Version Control System
Specify the version control system where your source project resides, either Git or Apache Subversion (SVN).
•
Git/SVN Repository URL
Specify the URL to access the Git or SVN project repository
•
Git/SVN Username
Specify the user name to access GitHub/SVN.
320

Continuous Delivery Director 8.5
NOTE
For GitHub, only required if the Git repository is not a public repository.
•
Git/SVN Password
Specify the password to access GitHub/SVN.
NOTE
For GitHub, only required if the Git repository is not a public repository.
To check the connection to Cucumber and to the version control system, select Test Connection. The Test Connection
action returns the following results:
•
Success
The connection was successful
•
Failure
The connection failed
Tasks
The Cucumber plug-in supports the Run Adaptive Testing task type. You can import test suites from the Adaptive Testing
Catalog through the Get Test Assets command.
For more information, see Setting Up the Test Module
Prerequisites:
•
One or more application versions are specified.
•
One or more Cucumber test suites exist for the application versions specified.
Branch
Specify the branch name.
Root Folder
Specify the relative path to the folder where the required features are located. When left empty, tests are imported from
the root folder.
Tags
Select one or more tags to execute test suites tagged with your selection. Leave empty to execute all the test suites under
the application version.
Example: Type ro to retrieve all test suites tagged with labels beginning with ro, such as robot.sanity.test
Build/Commit id
Specify the commit ID (Git) of the code to test.
TIP
To select from a list of available tokens, enter the percent sign (%) in the task field.
Run a subset of test suites selected by the Test Advisor
Choose this option to run only the test suites that the Test Advisor selects. The test advisor selects test suites that are
likely to fail fast.
Docker Plug-in
This plug-in lets you deploy Docker images to run and to remove containers, and to run commands within containers.
Optionally, for the Run Container task, you can run a readiness probe to notify you when the container is ready to accept
traffic.
321

Continuous Delivery Director 8.5
Plug-in Version 1.3-5
Supported Versions
The Docker plug-in supports the core Docker solution.
For more information, see the Docker documentation at https://docs.docker.com/.
Download Options
Use one of the following options to download the latest plug-in version:
Method Info
wget wget -O cdd-docker-plugin.war https://
cspdl.broadcom.com/shared/static/
bmmohlxc3qq6lm4z6q5fs8nf6tjfewz6.war?
LCK=ent.box.com
MD5 443048a09cabf4b18124002d50b6feda
Click Download Button
What's New
The following updates were made for plug-in version 1.3-5:
•
Security Enhancements - Updated the 3rd party libraries that are part of the package.
The following updates were made for plug-in version 1.3-3:
•
Added support to define a schema for the "Check Readiness" option.
The following updates were made for plug-in version 1.3-1:
•
In the Run Container task, only one port is exposed. The expected behavior is that all ports listed in the Ports to
Expose input parameter are exposed.
The following updates were made for plug-in version 1.3:
•
Bugfix: The plug-in should present the build number during deployment immediately on first polling from CDD and not
just when the task completes.
The following updates were made for plug-in version 1.2:
•
A new Remove Image task lets you remove specified images from a container.
The following updates were made for plug-in version 1.1:
•
Support was added for Java 11.
Configuration
Register the plug-in and create endpoints as described in Manage Plug-ins.
Manifest URL
For plug-in registration, use the following Docker manifest URL:
http://<plugin-server>:<port>/cdd-docker-plugin/manifest.json
322

Continuous Delivery Director 8.5
Endpoint Parameters
To create endpoints, provide the following parameters:
•
Docker Engine Host
Specify the Docker Engine hostname
•
Docker Engine Port
Specify the Docker Engine port
•
Registry Host
Specify the path to the Docker registry host
Example: my.registry.address:port/repositoryname
•
Registry User
Specify the username to authenticate to the Docker registry.
•
Registry Password
Specify the password to authenticate to the Docker registry.
To check the connection to Docker and to GitHub, use the endpoint Test Connection option. The Test Connection option
returns the following results:
•
Success
Both connections were successful
•
Failure
One or more connections failed
Tasks
The following task types are available in the Docker plug-in:
Run Container
The Run Container task contains the following fields:
Input Parameters
•
Image Name
Specify the Docker image name.
•
Container Environment Variable
Specify environment variables that are available to processes running inside the container
Example: CDD_DATABASE_NAME=name1,X=2,Y=3
•
Ports to Expose
Specify one or more ports to expose to provide services or to listen on.
Example: 9090:8080,7070:7070
•
Map Volumes
Enter a list of comma-separated key:value pairs.
Values: key = name of the volume on the host machine, and value = the path where the file or directory is mounted
in the container.
Example: myvol7:/root/cdd/home/myvol7/.cdd
•
Container NameSpecify the name of the container to run.
•
Build Number
Specify the build number associated with the Docker image provided.
•
Readiness Relative Path
Specify the relative path to the readiness probe REST call.
Example: GET https://www.cdd.com/cdd/execution/0000/v1/readiness
•
Initial Delay (in Seconds)
Specify the number of seconds after the container starts to run before the readiness probe is initiated.
323

Continuous Delivery Director 8.5
Minimum: 1
•
Probe Frequency
Specify how often (in seconds) to perform the probe.
Default: 10 (seconds)
Minimum: 1
•
Timeout (in Seconds)
Specify the number of seconds to elapse after which the probe times out.
Minimum: 1
•
Maximum Number of Failed Attempts
Specify the maximum number of failed probe attempts allowed before the task is failed.
Minimum: 1
Output Parameters
•
Container ID
Specifies the container ID.
Remove Container
The Remove Container task contains the following fields:
Input Parameters
•
Container ID
Specify the ID of the container to remove.
Run Command in Docker
The Run Command in Docker task contains the following fields:
NOTE
If the run command execution status is 0, the task will be marked as finished, otherwise, the task will be marked
as failed.
Input Parameters
•
Image Name
Specify the Docker image name.
•
Command
Specify a single command or a call for execution file.
Example: ls; /home/{username}/run.sh
•
Arguments
Specify arguments to append to the command.
Example: -a -l ...
Remove Image
The Remove Image task contains the following fields:
Input Parameters
•
Image
Specify the name or the ID of the image to remove.
Example: alpine:latest
324

Continuous Delivery Director 8.5
DX App Experience Analytics Plug-in
This plug-in lets you monitor application usage, user interactions, and performance.
NOTE
Formerly known as CA App Experience Analytics
Plug-in Version 1.1-4
Supported Versions
The DX App Experience Analytics plug-in supports the core DX App Experience Analytics SaaS solution.
For more information, see the DX App Experience Analytics documentation at App Experience Analytics - Getting Started.
Download Options
Use one of the following options to download the latest plug-in version:
Method Info
wget wget -O cdd-axa-plugin.war https://
cspdl.broadcom.com/shared/static/
aa78fm4w8bye780u9xkpxxgpqdizmakw.war?
LCK=ent.box.com
MD5 9f929cf6b0efb992cb8cef1070207062
Click Download Button
Change History
The following updates were made for plug-in version 1.1-4:
•
Security Enhancements - Updated the 3rd party libraries that are part of the package.
The following updates were made for plug-in version 1.1-3:
•
Security Enhancements - Updated the 3rd party libraries that are part of the package.
The following updates were made for plug-in version 1.1-2:
•
Security Enhancements - Updated the 3rd party libraries that are part of the package.
The following updates were made for plug-in version 1.1-1:
•
Security Enhancements - Updated the 3rd party libraries that are part of the package.
The following updates were made for plug-in version 1.1:
•
Support was added for Java 11.
Configuration
Register the plug-in and create endpoints as described in Manage Plug-ins.
325

Continuous Delivery Director 8.5
Manifest URL
For plug-in registration, use the following CA App Experience Analytics manifest URL:
http://<plugin-server>:<port>/cdd-axa-plugin/manifest.json
Endpoint Parameters
The following parameters are required to create an endpoint:
•
URL
Specifies the URL to the DX App Experience Analytics instance
Example: https://axa.ca.com
•
API Key
Specifies the DX App Experience Analytics access token that you obtain as the result of the Authentication API
For more information, see the DX App Experience Analytics REST API documentation.
Example: a3bdf820-1eaf-47f4-acd6-7caca7fe17d2
To check the connection to DX App Experience Analytics, use the endpoint Test Connection option. The Test
Connection option returns the following results:
•
Success
Both connections were successful
•
Failure
One or more connections failed
Tasks
The following task types are available in the DX App Experience Analytics plug-in:
Monitor
Use this task to monitor application performance, usage, and user experience in real time
This task requires the following fields:
TIP
To load a list of external values, enter the commercial at sign @ in the task field. To select from a list of available
tokens, enter the Percent sign (%). You can also use free text alone or together with tokens.
Input Parameters
•
Application
Specifies the name of the application
Value: Application name as registered with DX App Experience Analytics
•
Time Range
Specifies the time range to monitor the application.
Value: Dynamic value. Enter the commercial at sign @ to load the possible dynamic values: last hour, last 12 hours,
last 24 hours, last week
DX App Synthetic Monitor Plug-in
This plug-in lets you control site and application performance monitoring from your release pipeline.
326

Continuous Delivery Director 8.5
Plug-in Version 1.2-17
DX App Synthetic Monitor (formerly CA App Synthetic Monitor) helps you ensure that users can access sites and
applications 24/7, regardless of their location or the device they are using. This tool lets you check site and application
performance and quickly pinpoint problems. Unlike most monitoring tools that depend on actual user transactions, DX App
Synthetic Monitor mimics real user behavior with synthetic transactions. These transactions take place 24 hours a day
through a global network of nearly 100 monitoring stations across six continents.
For more information about DX App Synthetic Monitor, see DX App Synthetic Monitor SaaS documentation.
Download Options
Use one of the following options to download the latest plug-in version:
Method Info
wget wget -O cdd-asm-plugin.war https://
cspdl.broadcom.com/shared/static/
rrl57ag5vizhq7ftprucd69xpnufghud.war?
LCK=ent.box.com
MD5 dc1efadd7e4522557e1d7053cc8e9829
Click Download Button
You can use this plug-in to perform the following tasks:
•
Activate and Deactivate Monitors
•
Activate and Deactivate Monitors by Tags
•
Run Rule Check
•
Run Rule Check by Tags
•
Set and Remove Maintenance Time Window
To connect to a specific instance of DX App Synthetic Monitor, add an endpoint. For more information, see Configure a DX
App Synthetic Monitor Plug-in Endpoint.
Change History
The following updates were made for plug-in version 1.2-17
•
Bugfix: The 'Exceed Max Size' error appears for change monitor state.
The following updates were made for plug-in version 1.2-16
•
Updates to the monitor's attributes. Users can update the monitor with the new application URL.
The following updates were made for plug-in version 1.2-15
•
Bugfix: Activate Monitor by Tag fails due to large response.
The following updates were made for plug-in version 1.2-14
•
Security Enhancements - Updated the 3rd party libraries that are part of the package.
The following updates were made for plug-in version 1.2-13
•
Bugfix: Wrong time in Set Time Window.
•
Bugfix: Change Monitor State for multi Folders fails.
327

Continuous Delivery Director 8.5
The following updates were made for plug-in version 1.2-9
•
Rule check for multiple monitors or by tags.
•
Activate/Deactivate multiple monitors or by tags.
•
Create/remove immediate maintenance window.
The following updates were made for plug-in version 1.2-8
•
Bugfix: Importing a Release DSL using the activate/deactivate task fails due to invalid character.
The following updates were made for plug-in version 1.2-2
•
Bugfix: The plug-in does not handle empty dynamic values as expected
•
Bugfix: Dynamic fields are not working as expected.
The following update was made for plug-in version 1.2-1
•
The default URL In the ASM API URL endpoint parameter was deprecated and was not yet updated with the latest
URL.
The following update was made for plug-in version 1.2
•
A Run Rule Check task was added to enable users to check that the target machine is up and running and available
for use in the release pipeline.
The following update was made for plug-in version 1.1
•
To improve usability, the Activate or Deactivate parameter in the Activate and Deactivate task was changed from a
checkbox to a dropdown with Activate and Deactivate options.
Configure a DX App Synthetic Monitor Plug-in Endpoint
You are familiar with DX App Synthetic Monitor.
You have the Can create endpoints permission.
1. Register the plug-in as described in Manage Plug-ins.
The manifest for the DX App Synthetic Monitor plug-in is http://<host>:<port>/cdd-asm-plugin/
manifest.json .
2. From the Administration menu, click Endpoints > Add Endpoint.
3. In the ADD ENDPOINT dialog, select the DX App Synthetic Monitor plug-in.
4. Configure the following input parameters:
•
ASM API URL
Specify the DX App Synthetic Monitor API URL. Syntax: https://api.asm.saas.broadcom.com
•
Authentication Method
Select a method to authenticate to the DX App Synthetic Monitor API.
Basic
–
Username
Enter the user name to log into DX App Synthetic Monitor.
–
Password
Enter the API password set in the DX App Synthetic Monitor account settings.
NOTE
This is not the password you use to log into DX App Synthetic Monitor.
Bearer
–
Access Token
328

Continuous Delivery Director 8.5
Specify the access token you use to access DX App Synthetic Monitor.
•
Use Proxy
Select this option to connect to a remote endpoint through a proxy server.
–
Proxy Server URL
–
Proxy Server Username
–
Proxy Server Password
5. To check the connection to DX App Synthetic Monitor and to the source control system, click Test Connection.
6. Click Add.
Activate and Deactivate Monitors
This task lets you activate and deactivate monitors from a DX App Synthetic Monitor instance in your release pipeline.
One or more DX App Synthetic Monitor endpoints are available.
DX App Synthetic Monitor offers several types of monitors that you can use to measure page performance. Monitors
also check whether your website is serving or providing content correctly. If performance issues occur, the monitors send
alerts.
You can activate/deactivate more than one monitor in a single task.
You can specify multiple monitors either by selecting dynamic values (@) or by using free text alone or together with
tokens (%) to enter a list of tags separated by commas. While using the dynamic values (@), do not combine with a string
or token (%). The task performs a rule check for the specified monitors every second according to the polling interval time.
The task fails if the defined timeout period for all the monitors does not set the status to 0.
1. In a release, create an automatic task as described in Create Automatic Tasks.
2. Configure the following input parameters:
•
Activate or Deactivate
From the dropdown, select either Activate or Deactivate to activate or deactivate the monitors.
•
Folder Name (Optional)
Specify the name of a folder in which the monitors are located.
•
Monitor Name (Optional)
Specify the name of a monitor to activate/deactivate. If left empty, all the monitors in the selected folder will be
activated/deactivated.
WARNING
If the folder name and monitor name are not specified, all the monitors will be activated or deactivated.
3. Click Create.
Activate and Deactivate Monitors by Tags
This task lets you activate and deactivate monitors from a DX App Synthetic Monitor instance in your release pipeline.
One or more DX App Synthetic Monitor endpoints are available.
You can activate/deactivate more than one monitor using tags. A new task "Activate/Deactivate monitors by Tags" has
been added to support this feature.
You can specify multiple monitors either by selecting dynamic values (@) or by using free text alone or together with
tokens (%) to enter a list of tags separated by commas. While using the dynamic values (@), do not combine with a string
329

Continuous Delivery Director 8.5
or token (%). The task performs a rule check for the specified monitors every second according to the polling interval time.
The task fails if the defined timeout period for all the monitors does not set the status to 0.
1. In a release, create an automatic task as described in Create Automatic Tasks.
2. Configure the following input parameters:
•
Activate or Deactivate
From the dropdown, select either Activate or Deactivate to activate or deactivate the monitors.
•
Folder Name (Optional)
Specify the name of a folder in which the monitors are located.
•
Tags
Specify one or more tag names (separated by comma). The Rule Check will be performed on all the monitors
associated with one of the specified tags. Use % prefix for tokens. You can also use free text alone or together with
tokens.
3. Click Create.
Run Rule Check
Check whether, after a monitor is activated, that the target machine is up and running. This check validates that you can
proceed with a release.
One or more DX App Synthetic Monitor endpoints using basic authentication are available.
NOTE
This task works only with basic authentication; bearer authentication is not available.
This task performs a rule check for the specified monitor every number of seconds per the polling interval time. If the
status is not set to 0 by the defined timeout period, the task fails.
You can perform Rule Check by specifying a tag and not a specific monitor (or list of monitors). You can specify the tag
names and execute the rule check on all the monitors associated with this tag.
Even if you specify a monitor with more than one tag, the Rule Check executes once only.
You can specify more than one tag name using comma-separated. The Rule Check performs on all the monitors
associated with one of the specified tags. Use % prefix for tokens. You can also use free text alone or together with
tokens. There won't be dynamic values for the tags, as ASM does not have an API to get the list of tags.
1. In a release, create an automatic task as described in Create Automatic Tasks.
2. Configure the following input parameters:
•
Monitor Name
Specify the name of a monitor to check (you can enter more than one monitor to check). To select from a list of
available monitors, enter the commercial at symbol (@) in the task field. To use a token, enter a percent '%' sign.
•
Poll Interval
Specify the period of time in seconds after which the status will be checked. Default: 5.
•
Timeout
Specify the timeout in seconds. Default: 180.
3. Click Create.
Run Rule Check by Tags
Check whether, after a monitor is activated, that the target machine is up and running. This check validates that you can
proceed with a release.
One or more DX App Synthetic Monitor endpoints using basic authentication are available.
330

Continuous Delivery Director 8.5
NOTE
This task works only with basic authentication; bearer authentication is not available.
You can perform Rule Check by specifying a tag and not a specific monitor (or list of monitors). You can specify the tag
names and execute the rule check on all the monitors associated with this tag.
Even if you specify a monitor with more than one tag, the Rule Check executes once only.
You can specify more than one tag name using comma-separated. The Rule Check performs on all the monitors
associated with one of the specified tags. Use % prefix for tokens. You can also use free text alone or together with
tokens. There won't be dynamic values for the tags, as ASM does not have an API to get the list of tags.
1. In a release, create an automatic task as described in Create Automatic Tasks.
2. Configure the following input parameters:
•
Tags
Specify one or more tag names (separated by comma). The Rule Check will be performed on all the monitors
associated with one of the specified tags. Use % prefix for tokens. You can also use free text alone or together with
tokens.
•
Poll Interval
Specify the period of time in seconds after which the status will be checked. Default: 5.
•
Timeout
Specify the timeout in seconds. Default: 180.
3. Click Create.
Set and Remove Maintenance Time Window
This task sets a maintenance window in ASM with a single time period prior to deactivating the monitor.
The plugin creates a maintenance window (or uses an existing one) and adds a new time period that starts immediately
for a number of minutes as specified.
The plugin returns the output with the Maintenance Window ID and the Time Window ID. These values are used for the
following task to remove the window.
Task Name: "Set Maintenance Time Window"
You can remove the entire maintenance window or only a single time slot.
1. In a release, create an automatic task as described in Create Automatic Tasks.
2. Select the task "Set maintenance Time Window."
3. Select an option - Use an existing Maintenance Window or Create a new Maintenance Window.
4. Configure the following input parameters:
For the Use an existing Maintenance Window option:
•
Maintenance Window ID
Enter an ID of an existing Maintenance Window to add a new time window.
•
Period (minutes)
Enter the number in minutes to set the maintenance window.
For the Create a new Maintenance Window option:
•
Name
Specify the name that will be used to create the maintenance window.
•
Description
331

Continuous Delivery Director 8.5
Specify the name that will be used to create the maintenance window.
•
Maintenance Window Folder
Specify the folder which the maintenance window folder which will contain the new maintenance window.
–
Affected Folder - Single dynamic value
Specify a folder that contains the monitors that will be affected by this maintenance window.
–
Affected Monitors - Multiple dynamic values
Specify the monitors that will be affected by this maintenance window. Allow selecting multiple depending on the
selected folder. Allow entering CSV of text and tokens (no combination of text and dynamic values)
–
Persistent
Check this box to create a persistent maintenance window.
•
Period (minutes)
Enter the number in minutes. The task creates a time window starting at the current time for the specified number
of minutes.
5. Click Create.
Email Plug-in
Plug-in Version 1.3-2
Download Options
Use one of the following options to download the latest plug-in version:
Method Info
wget wget -O cdd-email-plugin.war https://
cspdl.broadcom.com/shared/static/
tbyeswz79xmacgocgtc0crf3gyfbto6v.war?
LCK=ent.box.com
MD5 43c850fb5fb5f93549171c77f2d4deca
Click Download Button
What's New
The following updates were made for plug-in version 1.3-2:
•
Security enhancements.
The following updates were made for plug-in version 1.3-1:
•
Security enhancements.
The following updates were made for plug-in version 1.3:
•
Connection timeout fixed.
The following updates were made for plug-in version 1.2:
•
Added From Name and Address to the Send Email task.
The following updates were made for plug-in version 1.1:
•
Support was added for Java 11.
332

Continuous Delivery Director 8.5
Configuration
Register the plug-in and create endpoints as described in Manage Plug-ins.
The URL of the Email manifest for plug-in registration is http://<plugin-server>:<port>/cdd-email-plugin/manifest.json.
Select the Endpoint plug-in in the ADD ENDPOINT dialog to create an endpoint for the Email plug-in. The following
information is required when you create an endpoint:
•
Host
Specify the URL of the SMTP server
•
Port
Specify the SMTP server port
•
Use Secure Connection
Select this option to use SSL to connect to the SMTP server
•
From Address
Specify an email address to send all emails from this email account
•
Sender Display Name
Enter free text to be used as the sender name. If the field is empty, only the From Address is displayed
•
Username/Password
Specify access credentials to authenticate to the SMTP server
•
Send Test Email To:
Enter a valid email address to receive the test email when Test Connection is selected
Tasks
The Email plug-in provides the Send Email task.
For more information about creating tasks, see Tasks.
Send Email
The Send Email task lets you send preconfigured auto-generated email messages from a phase. This task requires the
following information:
Input Parameters
•
To/CC/BCC
Enter email addresses that are separated by a comma. Use % prefix for tokens. You can also use free text
alone or together with tokens. For example, you create a token that is named BCC-Email with a value of
•
Subject
Enter the email subject text. Use % prefix for tokens. You can also use free text alone or together with tokens.
•
Body
Enter the email body text. Use % prefix for tokens. You can also use free text alone or together with tokens.
Endevor Software Change Manager Plug-in
This plug-in lets you automate deployments of mainframe software through Endevor Software Change Manager (Endevor
SCM) by generating Endevor packages dynamically throughout the lifecycle. Tasks are available for the creation and
management of packages within your Continuous Delivery Director pipeline.
333

Continuous Delivery Director 8.5
Plug-in Version 1.1-4
A package is a set of actions that may require approval before the actions can be executed. Packages usually contain
Move actions only, because the primary use of a package is to move a group of related elements from stage to stage in
the software lifecycle.
Supported Versions
This plug-in supports Endevor SCM versions 18.0 and higher. You must have web services installed on the Endevor SCM
host.
This plug-in is REST API-based and is distributed as a war file.
Download Options
Use one of the following options to download the latest plug-in version:
Method Info
wget wget -O cdd-endevor-plugin.war https://
cspdl.broadcom.com/shared/static/
fet3cbuhfg4vv9rkqbbny5hoa4m9r9sp.war?
LCK=ent.box.com
MD5 9f4ec97df4d5b5362fcae7d4d1e87655
Click Download Button
What's New
The following updates were made for plug-in version 1.1-4:
•
Security Enhancements - Updated the 3rd party libraries that are part of the package.
The following updates were made for plug-in version 1.1-3:
•
Security Enhancements - Updated the 3rd party libraries that are part of the package.
The following updates were made for plug-in version 1.1-2:
•
Security Enhancements - Updated the 3rd party libraries that are part of the package.
The following updates were made for plug-in version 1.1-1:
•
Security Enhancements - Updated the 3rd party libraries that are part of the package.
The following updates were made for plug-in version 1.1:
•
This plug-in is now REST API-based. Previously, this plug-in was Brightside-based.
Capabilities
The Endevor SCM plug-in provides tasks to perform the following package-related operations:
334

Continuous Delivery Director 8.5
•
Approve or deny a package
•
Create a package
•
Cast a package
•
Execute a package
•
Backout a package
•
Ship a package
•
Delete a package
Configuration
Register the plug-in and create endpoints as described in Manage Plug-ins.
The URL of the Endevor manifest for plug-in registration is http://<plugin-server>:<port>/cdd-endevor-
plugin-manifest.json.
To create an endpoint for the Endevor plug-in, in the ADD ENDPOINT dialog, select the Endevor SCM plug-in The
following Endevor SCM information is required when you create an endpoint:
•
Hostname
Enter the Endevor SCM host name.
•
Port
Enter the port number for the Endevor SCM host.
•
Instance
Enter the Endevor SCM Web Services data source name.
•
Username/Password
Enter valid credentials for the Endevor SCM host.
•
Use HTTPS
Specify whether to use HTTPS or HTTP to connect to the Endevor SCM REST API.
•
Trust any SSL Certificate
Specify whether to allow untrusted and unsigned TLS/SSL certificates. If your Endevor SCM instance uses a valid
certificate, do not change this value to True.
•
URL Resource
Enter the base URL for the Endevor REST API. If needed, specify a context root to override the default of /
EndevorService/rest.
•
Package Naming Convention
Enter a regular expression to validate that the package name meets the naming convention requirements. If you leave
this field empty, any package name is allowed.
Tasks
The Endevor SCM plug-in includes the following tasks:
For more information about creating tasks, see Tasks.
Create Package Based on Selection Criteria
The Create Package Based on Selection Criteria task lets you create a new package in Endevor SCM from the
Continuous Delivery Director pipeline.
Input Parameters
•
Package Name
335

Continuous Delivery Director 8.5
Specify a name for the new package. If a naming convention regex pattern is specified in the endpoint, the name must
follow this pattern, or else the task will fail.
•
Package Description
Specify a package description.
•
Set Options
Specify only the options to apply. Use the SCL syntax as described in Endevor SCM documentation. Do not add
the command 'Set Options' - this is added by the Endevor plugin. For example:\"CCID 'DEMO' COMMENTS
\"Demonstration\" .\
NOTE
The SCL (Software Control Language) is the language used for the non-interactive (batch) execution of
Endevor SCM. SCL is a freeform language, with English-like statements, that allows you to manipulate
elements, environment definitions, and packages within Endevor SCM.
•
System
Specify the Endevor SCM system where your project resides.
•
Subsystem
Specify the Endevor SCM subsystem where your project resides.
•
Environment
Specify the Endevor SCM environment where your project resides.
•
Stage Number
Specify the Endevor SCM stage number where your project resides.
•
CCID
Specify the Generate CCID associated with an element.
NOTE
Change Control Identifiers (CCIDs) provide a means of grouping and manipulating similar kinds of change
activity.
•
Type
Specify the name of the Endevor SCM element type.
•
Urgency Type
Select the urgency type - \"Standard\" or \"Emergency\".
•
Element Action
Select the element action; either Generate or Move.
•
Promotion
Select this option to define the package as a promotion package.
•
Sharable
Select this option to determine that the package can be edited by more than one person when in 'In-edit' status.
•
No Backout
Select this option to deny a backout facility for this package.
•
Error Level
Specify the return code of a failed action. Any returned code with a value greater than the specified code will
fail the task. Possible values: NORMAL(\"0000\"), WARNING(\"0004\"), CAUTION(\"0008\"), ERROR(\"0012\"),
SEVERE(\"0016\"), INTERNAL(\"0020\").
•
Cast the Package
Select this option to freeze the contents of the package in Endevor SCM and to prevent further changes to the
package.
•
Execute the Package
Select this option to execute a package in Endevor SCM with a status of 'Approved' or 'Exec-failed'.
336

Continuous Delivery Director 8.5
Cast Package
The Cast Package task lets you freeze the contents of the package in Endevor SCM and to prevent further changes to
the package.
Input Parameters
•
Package Name
Specify a package name to be cast.
•
Error Level
Specify the return code of a failed action. Any returned code with a value greater than the specified code will
fail the task. Possible values: NORMAL(\"0000\"), WARNING(\"0004\"), CAUTION(\"0008\"), ERROR(\"0012\"),
SEVERE(\"0016\"), INTERNAL(\"0020\").
Approve/Deny Package
The Approve/Deny Package task lets you change the status of a package to Approved or Denied.
Input Parameters
•
Package Name
Specify a package name to be approved/denied.
•
Error Level
Specify the return code of a failed action. Any returned code with a value greater than the specified code will
fail the task. Possible values: NORMAL(\"0000\"), WARNING(\"0004\"), CAUTION(\"0008\"), ERROR(\"0012\"),
SEVERE(\"0016\"), INTERNAL(\"0020\").
•
Approve/Deny
Define whether to approve or deny the package.
Execute Package
The Execute Package task lets you execute packages that have a status of Approved or Execfailed.
Input Parameters
•
Package Name
Specify a package name to be executed.
•
Error Level
Specify the return code of a failed action. Any returned code with a value greater than the specified code will
fail the task. Possible values: NORMAL(\"0000\"), WARNING(\"0004\"), CAUTION(\"0008\"), ERROR(\"0012\"),
SEVERE(\"0016\"), INTERNAL(\"0020\").
Backout Package
The Backout Package task lets you return all the outputs affected by the execution of a package to their prior state:
Input Parameters
•
Package Name
Specify a package name to backout.
•
Error Level
337

Continuous Delivery Director 8.5
Specify the return code of a failed action. Any returned code with a value greater than the specified code will
fail the task. Possible values: NORMAL(\"0000\"), WARNING(\"0004\"), CAUTION(\"0008\"), ERROR(\"0012\"),
SEVERE(\"0016\"), INTERNAL(\"0020\").
•
Statement Number
Specify the SCL statement number for the element action you want to back out.
•
Element Name
Specify the element name for the element action you want to back out.
Ship Package
The Ship Package task lets you send packages to predefined destinations and to confirm the transmission of packages
per destination.
Input Parameters
•
Package Name
Specify a package name to be shipped.
•
Error Level
Specify the return code of a failed action. Any returned code with a value greater than the specified code will
fail the task. Possible values: NORMAL(\"0000\"), WARNING(\"0004\"), CAUTION(\"0008\"), ERROR(\"0012\"),
SEVERE(\"0016\"), INTERNAL(\"0020\").
•
Destination
Specify the name of the remote site to which you want to ship the specified package.
Delete Package
The Delete Package task lets you delete packages of a specified status and age.
Input Parameters
•
Package Name
Specify the package name to delete. You can use a wildcard to delete multiple packages.
•
Status to Delete
Specify the statuses of the Packages that you are deleting. If you do not specify the package status, the DELETE
PACKAGE action deletes Packages of any status type.This option is available only when using a wildcarded
Package name and ignored when the Package name is fully specified. Possible values: "ALLSTATE", "INEDIT",
"INAPPROVAL", "APPROVED", "INEXECUTION", "EXECUTED", "EXECFAILED", "COMMITTED", "DENIED"
•
Older Than (days)
Specify the minimum age of the package you are deleting. A package must be older than the number of days you
specify. This option is available only when using a wildcarded package name and is ignored when the package name
is fully specified.
•
Error Level
Specify the return code of a failed action. Any returned code with a value greater than the specified code will
fail the task. Possible values: NORMAL(\"0000\"), WARNING(\"0004\"), CAUTION(\"0008\"), ERROR(\"0012\"),
SEVERE(\"0016\"), INTERNAL(\"0020\").
Flowdock Plug-in
The Flowdock plug-in lets you automatically post release and application-related messages from Continuous Delivery
Director to a designated flow.
338

Continuous Delivery Director 8.5
Plug-in Version 1.0.2-1
In Flowdock, a flow is a team workspace that contains a chat room and a shared inbox.
Supported Versions
The Flowdock plug-in supports the core Flowdock REST API.
For more information, see the Flowdock REST API documentation at https://www.flowdock.com/api/rest.
Download Options
Use one of the following options to download the latest plug-in version:
Method Info
wget wget -O cdd-flowdock-plugin.war https://
cspdl.broadcom.com/shared/static/
w6j6kxilp4uxexu6ns9kll81xvc8d877.war?
LCK=ent.box.com
MD5 5f3dfa72925670e5c6c36da73fb8fc5b
Click Download Button
Capabilities
The Flowdock plug-in lets you send messages to a designated flow.
What's New
The following updates were made for plug-in version 1.0.2:
•
Support was added for Java 11.
Configuration
Continuous Delivery Director and Flowdock use OAuth 2.0 for authentication. To set up OAuth, you first register a new
app with the Flowdock service. When you register the new app, you provide the application name and an OAuth Redirect
URI.
1. In Continuous Delivery Director, register the plug-in as described in Manage Plug-ins.
2. Go to https://www.flowdock.com/oauth/applications
The New application form opens.
Note: The only mandatory fields are Name and OAuth Redirect URL.
3. In Name, enter the application name to be used to post messages.
Value: An alphanumeric string, up to a maximum of 16 characters.
Example: CDD2FlowApp
4. In OAuth Redirect URI, enter a URL to redirect back to.
Note: For testing purposes, use: urn:ietf:wg:oauth:2.0:oob
5. Click Save.
The landing page for the app you simply created opens.
6. In the Create a new source section, select a flow and generate a source token.
Important: Copy the source token and store it in a safe location. This token is the flow token that you need to create
the endpoint. You cannot generate the source token again.
339

Continuous Delivery Director 8.5
7. Create an endpoint as described in Manage Plug-ins.
Manifest URL
For plug-in registration, use the following Flowdock manifest URL:
http://<plugin-hostname>:<port>/cdd-flowdock-plugin/manifest.json
Endpoint Parameters
The following parameters are required to create an endpoint:
•
URL
Specifies the URL to connect to the Flowdock REST API
Value: https://api.flowdock.com
•
Flow Token
Specifies the source token of the flow where you want the notifications to go.
To check the connection to Flowdock, use the endpoint Test Connection option.
Tasks
The Flowdock plug-in provides the following task:
•
Post Message
Post Message
The task lets you send a free-text message to a flow.
This task requires the following information:
•
Message
Specifies the text to send to the flow inbox. For more information, see: https://www.flowdock.com/api/messages
GitHub Plug-in
This plug-in lets you use GitHub as your source control system to retrieve commit messages.
Plug-in Version 1.0.3-2
This plug-in also enables you to use GitHub as your file source, a connection to a JSON format representation of a
release. Additionally, you can use file sources to manage JSON files that reference other JSON files.
Download Options
Use one of the following options to download the latest plug-in version:
Method Info
wget wget -O cdd-github-plugin.war https://
cspdl.broadcom.com/shared/static/
fpid2ho3k02wlceh6ea7khfayo4sjhio.war?
LCK=ent.box.com
MD5 43af6ebf721fb67f93b3c857ad3aa6c6
340

Continuous Delivery Director 8.5
Click Download Button
What's New
The following update was made for plug-in version 1.0.3-1:
•
You can now authenticate to GitHub with a GitHub API key. To support this change, the Password endpoint parameter
has been renamed Password/API Key.
This change was necessary because Basic authentication using a password to the Github API has been deprecated.
For more information, see https://developer.github.com/changes/2020-02-14-deprecating-password-auth/.
The following updates were made for plug-in version 1.0.3:
•
A new endpoint parameter, Owner, was added.
•
In the Branch field of the Get Files task, you can now enable the processing of GitHub webhook notifications from all
repository branches.
The following updates were made for plug-in version 1.0.2:
•
Support was added for Java 11.
Configuration
Register the plug-in and create endpoints as described in Manage Plug-ins
The URL of the GitHub manifest for plug-in registration is http://<plugin-server>:<port>/cdd-github-plugin/manifest.json.
Select the GitHub plug-in in the ADD ENDPOINT dialog to create an endpoint for the GitHub plug-in. The following
GitHub information is required when you create an endpoint:
•
GitHub API URL
Enter the URL of the remote GitHub instance to be used for connection purposes.
Example: http://api.github.com
Note: The URL can be specified as http or https
•
Username
NOTE
This field is not required when using an API key for authentication (GitHub Cloud supports only API Key.
Specify a user name to authenticate to GitHub.
•
Password/API Key
Specify a password or a GitHub API key to authenticate to GitHub.
NOTE
You can generate API keys in GitHub.
•
Owner
Specify either the organization name for GitHub Enterprise or the owner name for public and private GitHub accounts.
Get Commit Messages
The GitHub plug-in lets you retrieve and parse commit messages. Use this capability when you deploy applications in a
release to see the status of related work items.
Follow these steps:
1. From Administration, click Applications.
2.
–
In the Applications list, select one or more application rows.
–
In the Applications list, click an application name.
341

Continuous Delivery Director 8.5
NOTE
The Application Management page opens.
3. From the Actions menu, click Set Source Control Connection.
Note: This option is only enabled if a work item source, such as Rally
®
, has been configured.
4. Configure the following parameters, then select Set:
–
Source Control - Select GitHub and Get Commit Messages.
–
Owner - Specify either the organization name for GitHub Enterprise or the owner name for public and private
GitHub accounts.
–
Repository - Specify the source control repository to bring the commit messages from. This should be the
repository that corresponds with the project in the build server that you configure to send notifications to this
application version.
Example: https://myGitHub.mycompany.com/[organization]/[Repository]
–
Regular Expression - Specify a regular expression with which to parse the commit comments for work item IDs.
–
Include Path - (Optional) Specify one or more paths to map the packages and/or classes to include in test
coverage.
Syntax: app/src/java/**
–
Exclude Path - (Optional) Specify one or more paths to map the packages and/or classes to exclude from test
coverage.
Syntax: app/src/tests/**
When the source control connection is configured, the plug-in returns a list of commit IDs with the following information:
•
The commit message
•
The user who made the commit (author)
•
The files that have been changed
•
The time of the commit
NOTE
The list of commit IDs is not visible in the user interface.
Get Files
The GitHub plug-in lets you use GitHub as a file source so that releases are automatically created and run whenever you
make changes to the JSON file.
NOTE
To use this capability, first create a top-level folder in the relevant repository with the following name: CDD-
FileSource. Place all release-related JSON files in this folder.
NOTE
The CDD-FileSource folder does not apply if you use file sources to manage JSON files that reference other
JSON files.
Follow these steps:
1. From RELEASES, select New File Source.
2. In CREATE FILE SOURCE, configure the following parameters, then select Create:
342

Continuous Delivery Director 8.5
–
Name - Specify a name for the file source.
–
Select Source Control - Select GitHub and Get Files.
–
Select Endpoint
–
Owner - Specify the owner of the GitHub repository.
–
Repository - Specify the name of the GitHub repository to bring the files from.
–
Branch - Specify the branch name. To allow processing of GitHub webhook notifications from all repository
branches, keep this field empty.
–
Releases Created On Behalf Of (API Key) - Specify the API key of a user on whose behalf future releases will be
created.
Example: The API key of the product owner.
–
Send Error Notifications To - Specify one or more recipients to receive error notifications.
3. Save your changes. A COPY WEBHOOK popup is displayed containing an auto-generated webhook. This webhook
supports the connection between Continuous Delivery Directorand GitHub. Copy this webhook and paste it into
GitHub.
The newly-created file source is added to the FILE SOURCES page.
More Information
•
How to Set Up Webhooks in your Source Control
GitLab Plug-in
This plug-in lets you use GitLab SCM (Source Control Management) as your source control system.
Plug-in Version 2.0-5
This plug-in enables you to:
•
Retrieve commit messages
•
Import GitLab issues, including linked issues
•
Use GitLab SCM as your file source, a connection to a JSON format representation of a release. Additionally, you can
use file sources to manage JSON files that reference other JSON files.
•
Import applications from GitLab repositories using the External Applications button on the Applications page
Download Options
Use one of the following options to download the latest plug-in version:
Method Info
wget wget -O cdd-gitlab-plugin.war https://
cspdl.broadcom.com/shared/static/
j15i2n8dq7x7mku9op8nx9qhcc7y5xpj.war?
LCK=ent.box.com
MD5 51b02802e5c9148b7d115fac0c25f028
Click Download Button
343

Continuous Delivery Director 8.5
Change History
The following updates were made for plug-in version 2.0-5:
•
GitLab plugin now supports expiring OAuth tokens.
The following updates were made for plug-in version 2.0-4
•
Security Enhancements - Updated the 3rd party libraries that are part of the package.
The following updates were made for plug-in version 2.0-3:
•
Security Enhancements - Updated the 3rd party libraries that are part of the package.
The following updates were made for plug-in version 2.0-2:
•
Security Enhancements - Updated the 3rd party libraries that are part of the package.
The following updates were made for plug-in version 2.0-1:
•
Bugfix: The Namespace Kind parameter in the Import Applications task was changed to mandatory and user was
set as the default.
•
Bugfix: The List Projects by Custom Attributes parameter in the Import Applications task was removed.
•
Bugfix: In the Namespace Kind Group field, the spaces before and after slash characters are ignored, causing sync
errors. To resolve this issue, the help text was updated.
•
Bugfix: In the Application Name parameter in the Import Applications task, the option to add a project path was
removed.
The following update was made for plug-in version 2.0:
•
You can now filter the applications you import from GitLab instances. To support this capability, the following input
parameters were add to the Add Application Source dialog for GitLab:
–
Namespace Kind
–
Project Name
–
Starred Projects Only
–
Membership
–
Ownership
–
Archived
–
Visibility Level
–
List Projects by Custom Attributes
The following update was made for plug-in version 1.7-2:
•
You can now import environments from GitLab repositories to use as Continuous Delivery Director environments.
The following update was made for plug-in version 1.7-1:
•
To avoid errors, the Get Commit Messages task now uses the first commit if previous builds have failed.
The following update was made for plug-in version 1.7:
•
You can now import files from GitLab repositories as applications.
The following update was made for plug-in version 1.6:
•
You can now retrieve linked issues (work items) from GitLab.
The following update was made for plug-in version 1.5:
•
You can now synchronize issues (work items) between GitLab and Continuous Delivery Director and assign issues to
release tasks.
The following updates were made for plug-in version 1.4:
344

Continuous Delivery Director 8.5
•
In the Branch field of the Get Files task, you can now enable the processing of GitLab webhook notifications from all
repository branches.
•
A new Trust Any SSL Certificate endpoint parameter lets you allow untrusted and unsigned SSL/TLS certificates.
Configuration
Register the plug-in and create endpoints as described in Manage Plug-ins
The URL of the GitLab SCM manifest for plug-in registration is https://<plugin-server>:<port>/cdd-gitlab-plugin/
manifest.json.
•
GitLab API URL
Enter the URL of the remote GitLab instance to be used for connection purposes.
Syntax: http://api.gitlab.com for public and private GitLab accounts or https://[hostname]/api/v4 for
on-premise GitLab instances.
Note: The URL can be specified as http or https
•
Authentication Method
Select one of the following authentication methods:
–
OAuth2 Token
Specify a OAuth2 token to authenticate to GitLab.
–
Personal Access Token
Specify a Personal Access Token to authenticate to GitLab.
•
Trust Any SSL Certificate
Select this option if you want to allow untrusted and unsigned SSL/TLS certificates.
WARNING
Use at your own risk! Selecting this option can expose your environment to "man in the middle" attacks.
CA Technologies does not accept responsibility for security vulnerabilities that are caused by selecting this
option.
•
GitLab Owner
Specify a GitLab owner name.
Import Work Items
This plug-in lets you sync issues between GitLab and Continuous Delivery Director releases. Use this capability when you
create a release to see the related GitLab information.
Follow these steps:
1. In a release, click the Work Items tab on the left menu.
2. Select Add Work Items.
The ADD WORK ITEMS window opens.
3. Select External Work Items.
4. Enter a name for the work items source.
Example: GitLab Feed
5. Under Work Items Source, select the GitLab plug-in and a configured GitLab endpoint.
6. Provide information in the required parameter fields. These fields let you build a query that searches GitLab for issues
that match the criteria.
–
Repository
Specify a repository from which to import issues. A repository contains the codebase in GitLab that is updated with
version control. A repository is part of a GitLab project.
–
Issue State
Select the required state to return issues; 'Opened', 'Closed', or 'All' to return all issues.
–
Issue Labels
345

Continuous Delivery Director 8.5
Specify a comma-separated list of required issue labels to return. Enter 'None' to return all issues without a label.
Enter 'Any' to return all issues with at least one label.
–
Issue Milestone
Specify a milestone title to return issues. Enter 'None' to return all issues without a milestone. Enter 'Any' to return
all issues that have an assigned milestone.
–
Search Filter
Specify a filter text to search issues against their title and description.
–
Is Confidential?
Select this option to filter issues that are either public or visible only to authorized members of a GitLab project.
–
Is Archived?
Select this option to return issues only from non-archived projects. Clear this option to return issues from both
archived and non-archived projects.
–
Issue Scope
Select the value to return issues for the given scope: 'Created by Me', 'Assigned to Me' or 'All'.
7. Click Create.
The work items source is saved and a list of the returned issues is displayed under the application in the left menu.
These issues are now available to assign to tasks in phases to associate with the release.
Get Commit Messages
The GitLab plug-in lets you retrieve and parse commit messages. Use this capability when you deploy applications in a
release to see the status of related work items.
Follow these steps:
1. In a release, expand the Applications tree on the left menu, and select the version number.
2. Select Set Source Control Connection.
Note: This option is only enabled if a work items source, such as Rally
®
, has been configured.
3. Configure the following parameters, then select Set:
–
Source Control - Select GitLab and Get Commit Messages.
–
Repository - Specify the source control repository to bring the commit messages from. This should be the
repository that corresponds with the project in the build server that you configure to send notifications to this
application version.
Example: https://mygitlab.mycompany.com/[organization]/[Repository]
–
Regular Expression - Specify a regular expression with which to parse the commit comments for work item IDs.
–
Include Path - (Optional) Specify one or more paths to map the packages and/or classes to include in test
coverage.
Syntax: app/src/java/**
–
Exclude Path - (Optional) Specify one or more paths to map the packages and/or classes to exclude from test
coverage.
Syntax: app/src/tests/**
When the source control connection is configured, the plug-in returns a list of commit IDs with the following information:
Note: The list of commit IDs is not visible in the user interface.
•
The commit message
•
The user who made the commit (author)
•
The files that have been changed
•
The time of the commit
346

Continuous Delivery Director 8.5
Get Files
The GitLab plug-in lets you use GitLab as a file source so that releases are automatically created and run whenever you
make changes to the JSON file.
NOTE
To use this capability, first create a top-level folder in the relevant repository with the following name: CDD-
FileSource. Place all release-related JSON files in this folder.
NOTE
The CDD-FileSource folder does not apply if you use file sources to manage JSON files that reference other
JSON files.
Follow these steps:
1. From RELEASES, select New File Source.
2. In CREATE FILE SOURCE, configure the following parameters, then select Create:
–
Name - Specify a name for the file source.
–
Select Source Control - Select GitLab and Get Files.
–
Select Endpoint
–
Repository - Specify the name of the GitLab repository to bring the files from.
–
Branch - Specify the branch name. To allow processing of GitHub webhook notifications from all repository
branches, keep this field empty.
–
Releases Created On Behalf Of (API Key) - Specify the API key of a user on whose behalf future releases will be
created.
Example: The API key of the product owner.
–
Send Error Notifications To - Specify one or more recipients to receive error notifications.
3. Save your changes. A COPY WEBHOOK popup is displayed containing an auto-generated webhook. This webhook
supports the connection between Continuous Delivery Directorand GitLab SCM. Copy this webhook and paste it into
GitLab SCM.
The newly-created file source is added to the FILE SOURCES page.
Import Applications
You can import applications from a GitLab endpoint. If you have not created an endpoint yet, go to Administration >
Endpoints and click Add Endpoint.
To import applications, go to Administration > Applications and click Add External Application..
NOTE
More Information
•
How to Set Up Webhooks in your Source Control
Gradle Testing Plug-in
The Gradle testing plug-in lets you automate JUnit testing on Git and Apache Subversion (SVN) builds. This plug-in is
containerized and supports Adaptive Testing functionality.
This plug-in is available as a Docker image on the customer support portal which has specific requisites and installation
steps.
347

Continuous Delivery Director 8.5
Plug-in Version 1.11-6
Supported Versions
The Gradle testing plug-in supports the following Gradle versions:
•
5.4.1
•
4.1
•
4.4
•
4.0.2
•
3.5
For more information, see the Gradle documentation at https://gradle.org/.
Download Options
Use one of the following options to download the latest plug-in version:
Method Info
wget wget -O cdd-gradletesting-
plugin-latest.tar.gz https://
cspdl.broadcom.com/shared/
static/2yqozu6g9l01yfmowkzir3c8214igmn8.gz?
LCK=ent.box.com
MD5 4f1f8935b09cf3c6d45e14704b8d63cb
Click Download Button
Download Docker Image from Customer Support Portal Yes
Download TAR file from Customer Support Portal for customers
who cannot use docker pull
Yes
Change History
The following updates were made for plug-in version 1.11-6:
•
Security Enhancements - Updated the 3rd party libraries that are part of the package.
The following updates were made for plug-in version 1.11-5:
•
Security Enhancements - Updated the 3rd party libraries that are part of the package.
The following updates were made for plug-in version 1.11-1:
•
Bugfix: Get Tests Assets/Sync Test Source fails on the last plug-in version.
•
To improve usability, the following parameters were changed to textarea fields:
–
Source Set
–
JVM Parameters
–
Extra Execution Parameters
The following updates were made for plug-in version 1.9:
348

Continuous Delivery Director 8.5
•
The New or Updated Test Suites heuristic is now supported for SVN test suites. This metric is a weighting factor
when the Test Advisor intelligently selects a subset of test suites to run in subsequent test cycles.
•
Fixed - DE473431. Test suites configured to be skipped were not calculated in the test execution result.
Manifest URL
For plug-in registration, use the following manifest URL:
http://<plugin-server>:<port>/cdd-gradletesting-plugin/manifest.json
Configuration
You configure the Gradle testing plug-in either for the initial setup, or whenever a change to the test build configuration is
required.
Endpoint Parameters
The following parameters are required to create an endpoint:
•
Gradle Version
Specify the version of Gradle to use in automated testing.
•
Version Control System
Specify the version control system where your source project resides.
•
Git/SVN Project URL
Specify the URL to access the Git or SVN project repository.
•
GitHub/SVN Username
Specify the user name to access GitHub or SVN
•
GitHub/SVN Password
Specify the password to access GitHub or SVN
To check the connection to Gradle and to the version control system, select Test Connection. This action returns the
following results:
•
Success
The connection was successful
•
Failure
The connection failed
Tasks
The Gradle plug-in supports the Run Adaptive Testing task type.
Prerequisites:
•
One or more application versions are specified.
•
One or more Gradle test suites exist for the application versions specified.
•
Tags
Select one or more tags to execute test suites tagged with your selection. Leave empty to execute all the test suites
under the application version.
Example: Type gr to retrieve all test suites tagged with labels beginning with gr, such as gradle.sanity.test
•
Build/Commit id
Specify the commit ID (Git) or build number (SVN) of the code to test.
TIP
To select from a list of available tokens, enter the percent sign (%) in the task field.
349

Continuous Delivery Director 8.5
Get Test Assets
The Gradle plug-in lets you import test suites into the Adaptive Testing Catalog.
Follow these steps:
1. Select Tests, then Adaptive Testing Catalog.
2. Specify the Application and the Application Version.
The menu next to the application name and version is activated.
3. Select Get Test Assets.
4. Fill in the following fields:
–
Test Source Name
–
Plug-in
Select Gradle Testing and Import Test Suites.
–
Endpoint
Select a Gradle Testing endpoint.
–
Branch
For Git, specify the name of the branch where the test suites you want to import are located.
For SVN, specify the path of the branch where the test suites you want to import are located.
–
Gradle Project
Specify the name of the Gradle project where the test suites you want to import are located. If left empty, test suites
will be imported from all sub-projects.
–
Source Set
Specify the name of the source set where the Java source files of the test suites you want to import are located. If
left empty, the Java source files will be imported from all source sets.
–
Extra Execution Parameters
Specify comma-separated name: value pairs to pass to Gradle.
Example: HOST:google.com,PORT:8080
–
JVM Parameters
Specify space-separated JVM parameters to customize individual instances.
Example: -Dtest.HOST=google.com Overrides the IP address or host name of URL used by the browser to
execute tests.
–
Tags
Specify one or more tags to find possible test suite matches.
Example: Type gr to retrieve all test suites tagged with labels beginning with gr, such as gradle.sanity.test
Helm Plug-in
This plug-in helps you streamline the installation and management of Kubernetes/Openshift applications or resources
using Helm Charts.
Plug-in Version 1.0-12
Helm uses a packaging format called charts. A chart is a collection of files that describe a related set of Kubernetes/
Openshift resources. You can use this plug-in to perform the following chart-related tasks:
•
Install Release by Helm Chart
•
Upgrade Release by Helm Chart
•
Roll Back Release
•
Uninstall Releases
The Helm plug-in is containerized.
350

Continuous Delivery Director 8.5
To connect to a specific instance of Helm, add an endpoint. For more information, see Configure a Helm Plug-in Endpoint.
For more information about Helm version 3, see Helm version 3 documentation.
Download Options
Use one of the following options to download the latest plug-in version:
Method Info
wget wget -O cdd-helm-plugin.tar.gz https://
cspdl.broadcom.com/shared/static/
qpf937fd2oqiag7axtymzx1gdo0e7pi0.gz?
LCK=ent.box.com
MD5 e9770e2fb166080a8342bcac52028ede
Click Download Button
Download Docker Image from Customer Support Portal Yes
Download TAR file from Customer Support Portal for customers
who cannot use docker pull
Yes
Supported Versions
This plug-in supports Helm versions 2 and 3.
NOTE
For Helm version 2, the Tiller component is assumed to be installed already on Kubernetes/Openshift server
side. If not, then run the following commands to install the Tiller component on the cluster to support Helm
operations.
kubectl -n kube-system create serviceaccount tiller
kubectl create clusterrolebinding tiller --clusterrole cluster-admin --serviceaccount=kube-
system:tiller
helm init --service-account tiller
For more information about Helm version 2, see Helm version 2 documentation.
Change History
The following updates were made for plug-in version 1.0-12:
•
Security Enhancements - Updated the 3rd party libraries that are part of the package.
The following updates were made for plug-in version 1.0-8:
•
Added support for Google Cloud Storage buckets as source control.
•
Bugfix: NULL Pointer Exception in Install Release by Helm Chart (Helm) Task.
The following updates were made for plug-in version 1.0-5:
•
Added support for downloading Helm chart file from AWS S3.
The following updates were made for plug-in version 1.0-1:
351

Continuous Delivery Director 8.5
•
The locations for stable and incubator charts have changed. The new location for the stable repository is https://
charts.helm.sh/stable and the new location for the incubator repository is https://charts.helm.sh/
incubator. If you use charts in either of these old locations below you MUST update the repositories you used before
November 13, 2020. The new locations are hosted using GitHub pages.
Name Old Location New Location
stable https://kubernetes-
charts.storage.googleapis.com
https://charts.helm.sh/
stable
incubator https://kubernetes-charts-
incubator.storage.googleapis.com
https://charts.helm.sh/
incubator
NOTE
Please upgrade the Helm plugin to the latest versions.
•
Bugfix: The sns prefix (for Amazon Simple Notification Service) was missing from the default value for the AWS S3
Service API URL endpoint parameter.
Configure a Helm Plug-in Endpoint
You are familiar with Helm and Kubernetes/OpenShift.
You have been granted the Can create endpoints permission.
1. Register the plug-in as described in Manage Plug-ins.
The manifest for the Helm plug-in is http://<host>:<port>/containerized/plugins/cdd-helm-plugin/
manifest.json .
2. From the Administration menu, click Endpoints > Add Endpoint.
3. In the ADD ENDPOINT dialog, select the Helm plug-in.
4. Configure the following input parameters:
•
Cluster URL
Specify the Kubernetes/OpenShift cluster URL.
•
Authentication Method
Select a method to authenticate to Helm.
API Token
–
API Token
Specify the cluster API token.
Kubeconfig
–
Kubeconfig File Path
Specify the Kubeconfig file path.
–
Kubeconfig Context
Specify the Kubeconfig context to use.
•
Helm Version
Specify the Helm version.
–
Source Control
Select the required source control system to connect to your Helm chart repository.
GitHub
352

Continuous Delivery Director 8.5
•
GitHub API URL
•
GitHub Owner
•
GitHub Repository
•
GitHub Branch
•
GitHub Username
•
GitHub Password
GitLab
•
GitLab API URL
•
Authentication Method
Select either OAuth2 Token or Personal Access Token.
•
GitLab Owner
•
GitLab Repository
•
GitLab Branch
Bitbucket
•
Bitbucket API URL
•
Account Name/Project Key
Specify the Bitbucket account name or project key.
•
Bitbucket Repository
•
Bitbucket Branch
•
Bitbucket Username
•
Bitbucket Password
Helm Chart Repository
•
Helm Chart Repository API URL
•
Helm Chart Repository Username
•
Helm Chart Repository Password
AWS S3
•
Service API URL
•
Region
•
Access Key
•
Secret Key
•
Bucket Name
Google Cloud Storage
•
Service Account Project ID
•
Service Account Private Key ID
•
Service Account Private Key
•
Service Account Client Email
•
Service Account Client ID
•
Bucket Name
–
Trust Any SSL Certificate
Select this option if you want to allow untrusted and unsigned SSL/TLS certificates.
WARNING
Use at your own risk! Selecting this option can expose your environment to "man in the middle"
attacks. CA Technologies does not accept responsibility for security vulnerabilities that are caused by
selecting this option.
353

Continuous Delivery Director 8.5
5. To check the connection to Helm and to the source control system, click Test Connection.
6. Click Add.
Install Release by Helm Chart
This task installs a Helm chart or chart reference into a release.
One or more Helm endpoints are available.
1. In a release, create an automatic task as described in Create Automatic Tasks.
2. Configure the following input parameters:
•
Helm Chart Directory
Specify the Helm Chart directory or Chart Key if Helm Chart Repository is the source control system in use.
•
Helm Chart Settings
Define a list of keys/value pairs. Enter each key/value pair in a separate line.
•
Commit Updated Settings
Select this option to commit the updated Helm Chart settings into the selected source control system.
•
Helm Release Name
Specify the Helm release name.
•
Cluster Namespace
(Optional) Specify the cluster namespace.
•
Wait
Select this option to wait until all pods, PVCs, services, and a minimum number of pods of a deployment,
StatefulSet, or ReplicaSet are in a ready state before marking the release as successful. The maximum time to wait
is defined in the Timeout Duration field. The deployment ensures that only a certain number of pods are down
during the update. By default, at least 75% of the required number of pods are up (a maximum of 25% of the pods
are unavailable).
•
Timeout Duration
Specify a period in seconds to wait for any individual Kubernetes operation to complete.
3. Click Create.
Upgrade Release by Helm Chart
This task upgrades a release to a new version of a chart.
One or more Helm endpoints are available.
1. In a release, create an automatic task as described in Create Automatic Tasks.
2. Configure the following input parameters:
•
Helm Chart Directory
Specify the Helm Chart directory or Chart Key if Helm Chart Repository is the source control system in use.
•
Helm Chart Settings
Define a list of keys/value pairs. Enter each key/value pair in a separate line.
•
Commit Updated Settings
Select this option to commit the updated Helm Chart settings into the selected source control system.
•
Helm Release Name
Specify the Helm release name.
•
Install
354

Continuous Delivery Director 8.5
(Optional) If a release by this name doesn't already exist, run an install. Default : false.
•
Cluster Namespace
(Optional) Specify the cluster namespace.
•
Wait
Select this option to wait until all pods, PVCs, services, and a minimum number of pods of a deployment,
StatefulSet, or ReplicaSet are in a ready state before marking the release as successful. The maximum time to wait
is defined in the Timeout Duration field. The deployment ensures that only a certain number of pods are down
during the update. By default, at least 75% of the required number of pods are up (a maximum of 25% of the pods
are unavailable).
•
Timeout Duration
Specify a period in seconds to wait for any individual Kubernetes operation to complete.
3. Click Create.
Rollback Release
This task rolls back a release to a previous version.
One or more Helm endpoints are available.
1. In a release, create an automatic task as described in Create Automatic Tasks.
2. Configure the following input parameters:
•
Helm Release Name
Specify the Helm release name.
•
Rollback to Release Version
Specify the release version number to which you want to roll back. Leave empty to roll back to the previous
release.
•
Cluster Namespace
(Optional) Specify the cluster namespace.
•
Wait
Select this option to wait until all pods, PVCs, services, and a minimum number of pods of a deployment,
StatefulSet, or ReplicaSet are in a ready state before marking the release as successful. The maximum time to wait
is defined in the Timeout Duration field. The deployment ensures that only a certain number of pods are down
during the update. By default, at least 75% of the required number of pods are up (a maximum of 25% of the pods
are unavailable).
•
Timeout Duration
Specify a period in seconds to wait for any individual Kubernetes operation to complete.
3. Click Create.
Uninstall Releases
This task takes a Helm release name and uninstalls the release.
One or more Helm endpoints are available
Running this task removes all of the resources associated with the last release of the chart as well as the release history,
freeing up the release for future use.
1. In a release, create an automatic task as described in Create Automatic Tasks.
2. Configure the following input parameters:
•
Helm Release Name
355

Continuous Delivery Director 8.5
Specify the Helm release name.
•
Cluster Namespace
(Optional) Specify the cluster namespace.
•
Timeout Duration
Specify a period in seconds to wait for any individual Kubernetes operation to complete.
3. Click Create.
Jenkins Plug-in
This plug-in lets you execute Jenkins jobs from within a release pipeline.
Plug-in Version 1.3.0-6
The Jenkins plug-in provides an interface in Continuous Delivery Director for running project builds in Jenkins. The
integration allows you to start and stop existing project builds through the Jenkins REST API and get their status (failed,
passed). This helps you to leverage existing jobs defined in Jenkins, including build, deploy, and testing activities.
NOTE
This plug-in uses the Jenkins basic REST API only and does not work with any third-party Jenkins plug-in.
Download Options
Use one of the following options to download the latest plug-in version:
Method Info
wget wget -O cdd-jenkins-plugin.war https://
cspdl.broadcom.com/shared/static/
xzeuo7unlfltv5963w4wsk16ae90dwq7.war?
LCK=ent.box.com
MD5 b3fa329d5eb838c48ccc9b696c271609
Click Download Button
Change History
The following updates were made for plug-in version 1.3.0-6:
•
Bugfix: Null Pointer Exception in Jenkins plugin of CDD (cdd-jenkins-plugin.war 1.3.0-4).
The following updates were made for plug-in version 1.3.0-2:
•
Bugfix: Upgrading from plug-in version 1.3.0 to 1.3.0-1 in release DSLs caused Missing details errors in Run
Build tasks.
•
Bugfix: When a Jenkins task was executed using a JSON file with one or more missing parameters, an unclear and
therefore unhelpful error message was displayed.
•
The Task Status for Unstable Build field in the Run Build task is now optional.
The following updates were made for plug-in version 1.3.0-1:
•
You can now control how this plug-in handles an unstable Jenkins build. To support this capability, a new Task
Status for Unstable Build field was added to the Run Build task. This field allows you to define whether the task is
considered as Done or Failed.
The following updates were made for plug-in version 1.3.0:
356

Continuous Delivery Director 8.5
•
Added support for CloudBees Request Filter Plugin and tree query parameters.
The following updates were made for plug-in version 1.0.3:
•
Support was added for Java 11.
Tasks
The Jenkins plug-in provides the Run Build task.
Tutorial Video
The following video shows how to configure Continuous Delivery Director integration with Jenkins, and how to run Jenkins
jobs within the release pipeline.
Configure a Jenkins Endpoint
You are familiar with Jenkins.
You have been granted the Can create endpoints permission.
1. Register the plug-in as described in Manage Plug-ins.
The manifest for the Jenkins plug-in is http://<host>:<port>/cdd-jenkins-plugin/manifest.json .
2. From the Administration menu, click Endpoints > Add Endpoint.
3. In the ADD ENDPOINT dialog, select the Jenkins plug-in.
4. Configure the following endpoint parameters:
•
Jenkins Server URL
Enter the URL of the remote Jenkins instance to be used for connection purposes. Example:
http://35.201.71.157
NOTE
The URL can be specified as http or https
•
Authentication Method
Select an authorization method to use to establish a connection to Jenkins. You have to enter additional
information, depending on your choice. Values:Basic, Authentication Token
–
Basic authentication is based on using Jenkins authentication credentials (login/password). You use the same
credentials to establish a connection to Jenkins through your web browser. You can:
a. Ask your system administrator to provide you with personal authentication credentials, or
b. Check the global security configuration in Jenkins, or
c. Directly access the Jenkins security configuration page at http://<your-Jenkins-URL>/
configureSecurity/ .
–
Authentication Token is used to create an anonymous connection to a Jenkins instance. This method is based
on a special token that can be created in Jenkins projects by selecting the Trigger builds remotely Jenkins
option.
NOTE
Jenkins lets you create a new token for each project, so that, in most cases, you will have different
string tokens for different projects. When you use the authentication token method, one endpoint is
assigned to each project.
NOTE
You can configure your Jenkins instance to use the Anyone can do anything or Logged-in users
can do anything or Allow anonymous read access authorization methods. A project-based matrix
357

Continuous Delivery Director 8.5
authorization strategy, that is, user and group-based, prevents access with tokens. Remote users can
only connect to Jenkins with basic authorization credentials (user/password).
•
Task Start Delay
(Optional) Enter the amount of time (in seconds) between the scheduled start of a build and the time Jenkins is
triggered to start that build. Values:None - use Jenkins configuration, 0 (seconds) - start immediately
NOTE
Maximum delay allowed is 1800 seconds, that is, half an hour.
•
Task Execution Timeout
Enter the length of time (in seconds) that is allowed to pass after the task starts before the job is marked as failed.
The count starts as soon as the task execution starts, so any delay (low Jenkins machine CPU time/memory, time
lags due to overloaded execution threads) can result in a timeout execution fail message. Values: Minimum: 5
seconds; maximum: 43,200 seconds, that is, 12 hours.
NOTE
The timeout parameter value must be greater than the delay parameter value.
NOTE
If your Jenkins project is configured to build concurrently, then each task launch causes a different build
job to be queued. If your Jenkins execution queue does not have a free execution thread, then any build
task is postponed and can trigger a timeout execution fail.
5. Click Test Connection to check the connection to Jenkins.
6. Click Add.
Run Build (Jenkins)
Run Jenkins project builds in the context of Continuous Delivery Director phases and releases.
One or more Jenkins endpoints are available.
1. In a release, create an automatic task as described in Create Automatic Tasks.
2. Configure the following parameters:
TIP
Values: To define a value, do one of the following actions:
•
To select from a list of possible values, type an at sign "@" in the field
Example: Deploy Tomcat
•
To select from a list of built-in tokens (reusable placeholders that are used to create generic workflows),
type a percent sign "%" in the field
•
Type free text
•
Enter a combination of free text and tokens
Input Parameters
•
Project Name
Specify the name of a Jenkins team project.
•
Build Parameters
(Optional) Specify the parameters for a Jenkins parameterized build. Define the parameters in JSON format. For
example:
{"parameter": [{"name":"id", "value":"123"}, {"name":"verbosity", "value":"high"}]}
•
Task Start Delay (in Seconds)
358

Continuous Delivery Director 8.5
Define the task execution start delay in seconds (none - use Jenkins configuration, 0 seconds - start immediately.
Maximum is 1800 seconds (half an hour)).
•
Task Expiration Timeout (in Seconds)
Define the task build expiration timeout in seconds (from 5 seconds up to 43200 seconds (12 hours)). This value
must be higher than the task start delay value.
•
Task Status for Unstable Build
(Optional) Define whether the task should fail if the Jenkins build status is \"Unstable\" .
NOTE
In Jenkins, a build that is built successfully but is reported unstable by one or more publishers is
considered unstable. For example, if the JUnit publisher is configured and a test fails then the build is
marked unstable.
3. Click Create.
JFrog Artifactory Plug-in
The JFrog Artifactory plug-in lets you sync Docker images between Artifactory and Bintray through the Continuous
Delivery Director user interface.
Plug-in Version 2.2-1
You can also copy items from one Artifactory repository to another repository. This integration enables you to use
Artifactory as a key component of a continuous delivery pipeline for applications in Docker containers.
Supported Versions
The Artifactory plug-in supports Artifactory 4.x and above.
To learn more about Artifactory, see https://www.jfrog.com/
Download Options
Use one of the following options to download the latest plug-in version:
Method Info
wget wget -O cdd-artifactory-plugin.war
https://cspdl.broadcom.com/shared/static/
lhqtp5zo00c2uuqfae01bj6gamp8d4g4.war?
LCK=ent.box.com
MD5 0c604a6271d95d88e73214527f1862b1
Click Download Button
Capabilities
The Artifactory plug-in lets you sync Docker images between Artifactory and Bintray.
What's New
The following updates were made for plug-in version 2.2:
•
Source Repository in the Copy Items task is now optional; previously, this field was mandatory. If you leave this field
empty, you can provide the repository name as part of the Source File Path value.
359

Continuous Delivery Director 8.5
You can now either rename the source filename or keep the existing source filename. In Source File Path, you
provide the file path including the file name.
If Target File Path does not contain a file name (for example: maven-integration-local/com/ca/cdd/
release-candidate/cdd-artifactory-plugin/), the artifact is copied with the same name as in Source File
Path.
To keep the same file name as in Source File Path, provide the target file path only. The file name in the target file
path will be identical to the file name in the source file path.
If you provide a source file path up to the folder level, you can copy the entire content without changing the file names.
Provide the target repository and the target file path up to the folder level, and the file names will match.
Target File Path is optional. If the field is empty, the files in Source File Path are copied to Target File Path.
The following updates were made for plug-in version 2.1:
•
Support was added for Java 11.
The following update was made for 2.0:
•
A new task, Copy Item, has been added. This task lets you copy an artifact or folder from a local Artifactory repository
to another repository.
Configuration
Register the plug-in and create endpoints as described in Manage Plug-ins.
The URL of the Artifactory manifest for plug-in registration is http://<plugin-server>:<port>/cdd-artifactory-plugin/
manifest.json.
Select the Artifactory plug-in in the ADD ENDPOINT dialog to create an endpoint for the Artifactory plug-in. The following
Artifactory information is required when you create an endpoint:
•
Registry
Enter the URL of your Artifactory instance.
•
Username/Password
Enter the access credentials of an Artifactory user.
Tasks
The Artifactory plug-in provides the Copy Item and Distribute Artifact tasks.
For more information about creating tasks, see Tasks.
Copy Item
The Copy Item task lets you copy an artifact or folder from one Artifactory repository to another repository. This task
requires the following information:
Input Parameters
•
Source Repository
(Optional) Specify the local repository from which you want to copy an artifact or a folder.
NOTE
If you leave this field empty, you can provide the repository name as part of the Source File Path value.
Example: docker-release-candidate-local
•
Source File Path
Specify the file path under the local repository of the artifact or folder you want to copy. You can include file names.
Example: com/mycompany/cdd/trunk/7.0/server/CDD.last_successful_change
•
Target Repository
360

Continuous Delivery Director 8.5
Specify the repository to which you want to copy the specified artifact or folder.
Example: docker-release-candidate-local
•
Target File Path
(Optional) Specify the file path under the repository to which you want to copy the specified artifact or folder. You can
add new folders to the file path to create at runtime.
NOTE
To keep the same file name as in Source File Path, provide the target file path only. The file name in the
target file path will be identical to the file name in the source file path.
If you provide a source file path up to the folder level, you can copy the entire content without changing the
file names. Provide the target repository and the target file path up to the folder level, and the file names will
match.
If Target File Path is empty, the files in Source File Path are copied to Target File Path.
Example: com/mycompany/cdd/release-candidate/server/CDD.last_successful_change
•
Dry Run
Select this option to simulate moving your specified artifact or folder to Bintray without actually distributing this item.
Distribute Artifact
The Distribute Artifact task lets you sync Docker images between Artifactory and Bintray, in the context of Continuous
Delivery Director phases and releases. This task requires the following information, which must match the corresponding
Artifactory values:
TIP
Values: Applies to the Source Repository, Tag, and Distribution Repository properties.
To define a value, do one of the following actions:
•
To select from a list of possible values, type an at sign "@" in the field.
Example: Deploy Tomcat
•
To select from a list of built-in tokens (reusable placeholders that are used to create generic workflows), type
a percent sign "%" in the field.
•
Type free text
•
Enter a combination of free text and tokens
Input Parameters
•
Source Repository
Specify the name of the source repository in Artifactory where the Docker image is located
•
Image
Specify the name of the Docker image to upload to Bintray
TIP
Values: To define a value, do one of the following actions:
•
To select from a list of built-in tokens (reusable placeholders that are used to create generic workflows),
type a percent sign "%" in the field
•
Type free text
•
Enter a combination of free text and tokens
•
Tag
Specify the name of the tag that is stored for the Docker image to upload to Bintray
•
Distribution Repository
Specify the name of the distribution repository through which the Docker image should be uploaded to Bintray
361

Continuous Delivery Director 8.5
Karate Plug-in
Automate your API testing with the Karate open-source framework.
Plug-in Version 1.0-8
This plug-in uses Maven projects to import and execute Karate test suites within release pipelines. The Karate plug-
in is containerized and supports Adaptive Testing functionality. This plug-in provides you with a Karate test automation
framework for Java-based Git and SVN builds that is open-source and application-independent.
The plug-in uses Gherkin script calls to HTTP endpoints to assert that the JSON or XML responses are as expected.
ATTENTION
This plug-in supports testing with JUnit 4.
Download Options
Use one of the following options to download the latest plug-in version:
Method Info
wget wget -O cdd-karate-plugin-latest.tar.gz
https://cspdl.broadcom.com/shared/static/
e5o3sjeljv57unfkf2xyfcq1cajw4bgi.gz?
LCK=ent.box.com
MD5 bbb038ba464c2ef817b4bac0eb034020
Click Download Button
Download Docker Image from Customer Support Portal Yes
Download TAR file from Customer Support Portal for customers
who cannot use docker pull
Yes
Change History
The following update was made for plug-in version 1.0-8:
•
Security Enhancements - Updated the 3rd party libraries that are part of the package.
The following update was made for plug-in version 1.0-1:
•
Added a fix for the log4j CVE-2021-44228 security vulnerability.
•
Support was added for missing values in the 1.x report.
More Information
•
Configure a Karate Endpoint
•
Get Test Assets (Karate)
Configure a Karate Endpoint
You configure the Karate plug-in endpoint either for the initial setup, or whenever a change to the test build configuration
is required.
You are familiar with Karate.
362

Continuous Delivery Director 8.5
You have the Can create endpoints permission.
1. Register the plug-in as described in Manage Plug-ins.
The manifest for the Karate plug-in is http://<host>:<port>/cdd-karate-plugin/manifest.json .
2. From the Administration menu, click Endpoints > Add Endpoint.
3. In the ADD ENDPOINT dialog, select the Karate plug-in.
4. Configure the following input parameters:
•
Build Tool
Specify the tool used to manage your project builds.
•
Version Control System
Specifies the version control system where your source project resides.
•
Git/SVN Project URL
Specify the URL to access the Git or SVN project repository.
•
Git/SVN Username
Specify the user name to access GitHub or SVN
•
Git/SVN Password
Specify the password to access GitHub or SVN
5. To check the connection to Karate and to the source control system, click Test Connection.
6. Click Add.
Get Test Assets (Karate)
This plug-in lets you import test suites into the Adaptive Testing Catalog.
1. Select Tests, then Adaptive Testing Catalog.
2. Specify the Application/Business Application and the Application Version/Business Application Version.
The menu next to the application/business application name and version is activated.
3. Select Get Test Assets.
4. Fill in the following fields:
NOTE
Use the @ symbol in the following fields to select from a dynamic list of entities associated with the selected
project.
•
Test Source Name
•
Plug-in
Select Karate and Import Tests (Karate).
•
Endpoint
Select a Karate endpoint.
•
Project Base Directory
Specify the relative path to the project base directory. This is the location of the project pom.xml. Default is blank
which indicates that the current directory is the project root folder.
•
Branch
Specify the branch name.
•
Features Folder
363

Continuous Delivery Director 8.5
Specify the relative path of the folder where the required features are located. Features are the equivalent of test
suites. The specified folder path must be relative to the project base directory.
Example:
src/test/java
•
Tags
(Optional) Specify one or more tags to label the imported tests.
Example:
(@Demo or @Sanity) and not @Ignore
•
Karate Environment
(Optional) Specify the name of the Karate environment to use when running test suites. An environment is a group
of configuration settings (initial variables, locations, notifications, integrations, and so on). The environment is the
value of karate.env within the karate-config.js file.
•
JVM Parameters
(Optional) Specify space-separated JVM parameters to customize individual instances.
Example: \"-Dtest.HOST=google.com\ -Djavax.net.debug=all -Djava.security.debug=all\" -
Overrides the IP address or hostname of URL used by the browser to execute tests. To enable detailed error and
debug logs, add switches such as -X and -e.
The test results for the specified build appear on the Adaptive Testing Results page, together with links to the
associated reports in Karate.
Kubernetes Plug-in
This plug-in lets you deploy containerized applications in a clustered environment and manage related, distributed
components across varied infrastructures.
Plug-in Version 2.3.3-7
You can use this plug-in to perform the following Kubernetes-related tasks:
•
Create Deployment
•
Delete Deployment
•
Set Image
•
Import Files from AWS S3 (Kubernetes)
To connect to a specific instance of Kubernetes, add an endpoint. For more information, see Configure a Kubernetes
Plug-in Endpoint.
For more information about Kubernetes, see Kubernetes documentation.
Download Options
Use one of the following options to download the latest plug-in version:
Method Info
wget wget -O cdd-kubernetes-plugin.war https://
cspdl.broadcom.com/shared/static/
e1t4keczf4v89azpojulyapv4sewo7i5.war?
LCK=ent.box.com
MD5 224b1fdca7ea431eb47d21147e876b74
364

Continuous Delivery Director 8.5
Click Download Button
Supported Versions
The Kubernetes plug-in supports the core Kubernetes solution.
What's New
The following update was made for 2.3.3-7:
•
Security Enhancements - Updated the 3rd party libraries that are part of the package.
The following update was made for 2.3.3-3:
•
The Fabric8 software component used by this plug-in has been upgraded to version 5.1.1.
The following update was made for 2.3.3-2:
•
Bugfix: The log bridge from Catalina to cdd-server log files now records fabric8 HTTP traffic only. Previously, idle k8s/
os plug-in activities were recorded, resulting in very large log files.
The following update was made for 2.3.3-1:
•
The Kubernetes plugin now logs complete details of all HTTP requests and responses, including HTTP method, URL,
headers, and body).
The following update was made for 2.3.2:
•
Bugfix: Invalid build references were removed from the plug-in.
The following updates were made for 2.3.1:
•
You can now select GitLab, AWS S3, and Web Service as source control systems from which to import YAML files.
Previously, you could only select GitHub and Bitbucket. These new options have been added to the Source Control
endpoint parameter.
•
You can now use AWS S3 as a file source, a connection to JSON format representations of releases.
The following updates were made for 2.0:
•
The method to authenticate to the Kubernetes service account has been changed from Basic (username/password) to
Bearer tokens.
•
Support was added for Java 11.
Configure a Kubernetes Plug-in Endpoint
You are familiar with Kubernetes.
You have the Can create endpoints permission.
1. Register the plug-in as described in Manage Plug-ins.
The manifest for the Kubernetes plug-in is http://<host>:<port>/cdd-kubernetes-plugin/manifest.json
.
365

Continuous Delivery Director 8.5
2. From the Administration menu, click Endpoints > Add Endpoint.
3. In the ADD ENDPOINT dialog, select the Kubernetes plug-in.
4. Configure the following input parameters:
•
URL
Specify the URL of the Kubernetes API. Example: https://api.cluster.com/
•
API Token
Specify the Bearer token to authenticate to your Kubernetes service account.
•
Source Control
Select the required source control system to connect to your file repository.
GitHub
–
GitHub API URL
–
GitHub Owner
–
GitHub Repository
–
GitHub Branch
–
GitHub Username
–
GitHub Password
GitLab
–
GitLab API URL
–
Authentication Method
Select either OAuth2 Token or Personal Access Token.
–
GitLab Owner
–
GitLab Repository
–
GitLab Branch
Bitbucket
–
Bitbucket API URL
–
Account Name/Project Key
Specify the Bitbucket account name or project key.
–
Bitbucket Repository
–
Bitbucket Branch
–
Bitbucket Username
–
Bitbucket Password
AWS S3
–
Service API URL
–
Region
–
Access Key
–
Secret Key
–
Bucket Name
Web Service
–
Web Service API URL
–
Web Service Username
–
Web Service Password
•
Trust Any SSL Certificate
Select this option if you want to allow untrusted and unsigned SSL/TLS certificates.
366

Continuous Delivery Director 8.5
WARNING
Use at your own risk! Selecting this option can expose your environment to "man in the middle" attacks.
CA Technologies does not accept responsibility for security vulnerabilities that are caused by selecting
this option.
5. To check the connection to Kubernetes and to the source control system, click Test Connection.
6. Click Add.
Create Deployment
This task lets you deploy your containerized applications on top of a running Kubernetes cluster from your release
pipeline.
One or more Kubernetes endpoints are available.
1. In a release, create an automatic task as described in Create Automatic Tasks.
2. Configure the following input parameters:
•
Namespace
(Optional) Specify the Kubernetes virtual cluster namespace. For more information about namespaces, see
Kubernetes documentation.
•
Branch
Specify the source control branch.
•
Manifest File Path
Specify the file path to a YAML file in the source control repository.
•
YAML Settings
Specify a list of key/value pairs to update in the deployment YAML manifest. Example: To update the image.tag
element of a manifest file, specify: image.tag: saas-dev-1.6.0.7 . Start a new line for each keys/value pairs
you specify.
3. Click Create.
Delete Deployment
This task lets you delete a Kubernetes deployment from your release pipeline.
One or more Kubernetes endpoints are available.
1. In a release, create an automatic task as described in Create Automatic Tasks.
2. Configure the following input parameters:
•
Namespace
(Optional) Specify the Kubernetes virtual cluster namespace. For more information about namespaces, see
Kubernetes documentation.
•
Branch
Specify the source control branch.
•
Manifest File Path
Specify the file path to a YAML file in the source control repository.
367

Continuous Delivery Director 8.5
3. Click Create.
Set Image
This task lets you identify which builds Kubernetes has deployed.
One or more Kubernetes endpoints are available.
TIP
Add the build ID to the docker image as a tag to enable this plug-in to read the tag and return that tag as the
build ID. This action allows tasks and reports to display the build ID.
1. In a release, create an automatic task as described in Create Automatic Tasks.
2. Configure the following input parameters:
•
Namespace
Specify the Kubernetes virtual cluster namespace. For more information about namespaces, see Kubernetes
documentation.
•
Deployment Name
Specify the Kubernetes deployment name.
•
Container Name
Specify an image container name.
•
Image Name
Specify an image name.
3. Click Create.
Import Files from AWS S3 (Kubernetes)
The Kubernetes plug-in lets you use AWS S3 as your file source, a connection to JSON format representations of
releases.
You have been granted Can create file source permissions.
1. Open the CREATE FILE SOURCE dialog as described in File Sources.
2. In Select Source Control, choose Import from AWS S3.
3. Configure the following input parameters:
•
Namespace
Specify the Kubernetes virtual cluster namespace. For more information about namespaces, see Kubernetes
documentation.
•
Releases Created On Behalf Of (API Key)
Specify the API key of the user on whose behalf future releases will be created.
•
Send Error Notifications To
Specify recipient/s for error notifications.
4. Click Create.
Liquibase Plug-in
Integrate Liquibase with your release pipeline to achieve full-stack continuous integration and continuous delivery for your
databases. This plug-in lets you align your application and database deployments.
368

Continuous Delivery Director 8.5
Plug-in Version 1.0-4
Enterprise organizations typically manage large numbers of databases or multi-tenant databases. Database deployments
can involve numerous manual and time-consuming activities carried out by a database administrator (DBA), such as:
•
Creating or modifying stored procedures, triggers, and functions in databases
•
Altering tables in databases
•
Rolling back database deployments
If developers need to wait for any new changes to be made in the database by a DBA, the turnaround time to test new
features can increase significantly. This plug-in helps you to overcome this challenge by using Liquibase for automating
database deployments. Liquibase can help you with database versioning, deployment, and rollback.
Method Info
wget wget -O cdd-liquibase-plugin.tar.gz
https://cspdl.broadcom.com/shared/
static/8qv3k147n6gihizleyp1lhlw2jr4jjjt.gz?
LCK=ent.box.com
MD5 4e86480b538a1310e19989029aae3c39
Click Download Button
Supported Databases
The Liquibase plug-in currently supports Oracle and MongoDB databases.
Capabilities
The Liquibase plug-in supports the following capabilities:
•
Run Deployment
Change History
The following updates were made for plug-in version 1.0-4:
•
The Database endpoint parameter now supports relative classpaths to the lib folder.
The following updates were made for plug-in version 1.0-1:
•
The Database endpoint parameter now supports relative classpaths to the lib folder.
Configure a Liquibase Endpoint
Enable communication and synchronization of databases between Liquibase and Continuous Delivery Director.
•
You are familiar with Liquibase..
•
Your enterprise organization has purchased a Liquibase Pro license.
•
You have access to a Git project repository where your application source code files are stored.
•
You have configured the following lines in the settings.properties (/home/cdd/.cdd/conf/
settings.properties) file:
cdd.plugins.containerized.liquibase.container.volumes.artifacts.volumes=lib:/opt/liquibase/lib
To allows access to a database from within Continuous Delivery Director and to enable the JDBC driver, set the
classpath:
369

Continuous Delivery Director 8.5
cdd.plugins.liquibase.database.mssql.classpath=C:/apps/liquibase-4.3.2/lib/mssql-jdbc-9.2.0.jre8.jar
Example for MongoDB
cdd.plugins.liquibase.database.mongodb.classpath=/opt/liquibase/lib/mongodb/liquibase-mongodb-4.3.1.jar:/
opt/liquibase/lib/mongodb/mongo-java-driver-3.12.8.jar
•
You have been granted the Can create endpoints permission.
1. Register the plug-in as described in Manage Plug-ins.
The manifest for the Liquibase plug-in is http://<host>:<port>/cdd-liquibase-plugin/manifest.json .
2. From the Administration menu, click Endpoints > Add Endpoint.
3. In the ADD ENDPOINT dialog, select the Liquibase plug-in.
4. Configure the following endpoint parameters:
•
Database
Select a database.
NOTE
You have configured databases in settings.properties as described in the prerequisites section.
•
Database JDBC URL
Specify the database JDBC URLs as shown in the following example formats:
MS SQL Server: jdbc:sqlserver://:1433;database=
PostgreSQL: jdbc:postgresql://:5432/?currentSchema=
MySQL: jdbc:mysql://:3306/
MariaDB: jdbc:mariadb://:3306/
DB2: jdbc:db2://:50000/
Snowflake: jdbc##///?db=&schema=
Sybase jdbc:jtds:sybase://:/
SQLite: jdbc:sqlite:/tmp/.db
•
Database Username
Enter the user name to authenticate to the database.
•
Database Password
Enter the password to authenticate to the database.
•
Liquibase Pro License Key
Specify your Liquibase Pro license key.
•
Git Project URL
Specify the URL to access the Git project repository.
•
Git Username
Enter the user name to authenticate to the Git project repository.
•
Git Password
Enter the password to authenticate to the Git project repository.
5. Click Test Connection to check the connection to Playwright.
6. Click Add.
Run Deployment (Liquibase)
Deploy database schemas in the context of Continuous Delivery Director phases and releases.
One or more Liquibase endpoints are available.
Liquibase uses a changelog file to sequentially list all changes made to your database (changesets). Liquibase uses this
changelog record to audit your database and execute any changes that are not yet applied to your database. This plug-in
370

Continuous Delivery Director 8.5
references a changelog XML format file stored and versioned in your Git source control tool to deploy updated database
schemas.
1. In a release, create an automatic task as described in Create Automatic Tasks.
2. Configure the following parameters:
Input Parameters
•
Branch
Specify the Git version control branch used by the project.
•
Specify File or Folder
Define whether to deploy a single XML/SQL changelog file or deploy SQL files that are stored in a specific folder.
Select either File or Folder.
File
–
Change Log XML
Specify a changelog XML/SQL file name to run this plug-in against.
Folder
–
Scripts Change Log Folder
Specify the location of a Git folder that contains the SQL scripts for the Liquibase migration, including the scripts
changelog file.
3. Click Create.
Manual Deployment Plug-in
Stores the build number as deployed for the specific application version and environment.
Plug-in Version 1.1-3
Deployment tasks, upon completion of the deployment, performs the "set build," that is, stores the build number as
deployed for the specific application version and environment.
There are cases in which the deployment is done out of the scope of CDD - either it is a manual deployment or using
other tools. In this case, there is no event in CDD that performs the "set build".
To overcome this, you can use the "Manual Deployment" task. The task runs automatically and performs the "set build"
based on the task's specified application version and build number for the phase's environment.
Download Options
Use one of the following options to download the latest plug-in version:
Method Info
wget wget -O cdd-manualdeployment-plugin.war
https://cspdl.broadcom.com/shared/static/
c0pka9x7x3dm25804xswtto7ubswrmek.war?
LCK=ent.box.com
MD5 98f87c3bd15b51cebb71b8c3c44a0a37
371

Continuous Delivery Director 8.5
Click Download Button
Supported Versions
The Manual Deployment plug-in supports the core Teams SaaS solution.
•
CDD SaaS
•
CDD 8.3 and above
Change History
The following updates were made for plug-in version 1.1-3:
•
Support was added for Java 11.
Maven Testing Plug-in
This plug-in lets you import and execute tests of a Maven-based Java project supporting TestNG and JUnit test framework
in your release pipeline.
The Maven Testing plug-in is containerized and supports Adaptive Testing functionality. This plug-in is available as a
Docker image on the customer support portal which has specific requisites and installation steps.
Plug-in Version 1.5-7
Download Options
Use one of the following options to download the latest plug-in version:
Method Info
wget wget -O cdd-maventesting-
plugin-latest.tar.gz https://
cspdl.broadcom.com/shared/static/
f46kf3rviaj191czs2tmh82dbs373zao.gz?
LCK=ent.box.com
MD5 1c6a59883884ea4430824ab51a8e2028
Click Download Button
Download Docker Image from the Customer Support Portal Yes
Download TAR file from the Customer Support Portal for
customers who cannot use docker pull
Yes
Supported Versions
This plug-in has been tested with the following Maven versions:
372

Continuous Delivery Director 8.5
•
3.6.2
•
3.6.3
What's New
The following update was made for plug-in version 1.5-7:
•
Security Enhancements - Updated the 3rd party libraries that are part of the package.
The following update was made for plug-in version 1.5-2:
•
The Maven execution log is now created at the beginning of test execution (and not at the end).
The following update was made for plug-in version 1.5-1:
•
Three new import parameters. Settings File Path, Settings Security File Path, and System Properties, were added
to the Get Test Assets task. These additional parameters improve the support for TestNG Selenium testing.
The following updates were made for plug-in version 1.5:
•
The functionality of the Maven Project parameter in the Get Test Assets (Import Test Suites) task has changed.
Previously, you specified the name of a project from which to import test suites. Now you specify one or more relative
paths to subprojects separated by commas from which to import test suites.
•
The New or Updated Test Suites heuristic is now supported for SVN test suites. This metric is a weighting factor
when the Test Advisor intelligently selects a subset of test suites to run in subsequent test cycles.
The following updates were made for plug-in version 1.4:
•
A Project Base Directory parameter was added to the Get Test Assets task.
Manifest URL
For plug-in registration, use the following manifest URL:
http://<plugin-server>:<port>/cdd-maventesting-plugin/manifest.json
Configuration
To use this plug-in through the Containerized Manager, add the following lines to the Continuous Delivery Director
settings.properties file:
cdd.plugins.containerized.maventesting.container.image_name=docker-release-candidate-local.artifactory-
lvn.broadcom.net/com/ca/cdd/trunk/8.0/plugins/maventesting:29
cdd.plugins.containerized.maventesting.container.volumes.artifacts.volumes=dependencies:/home/cdd/.m2
cdd.plugins.containerized.maventesting.container.name_prefix=mt
Endpoint Parameters
The following parameters are required to create an endpoint:
•
Version Control System
Specify the version control system where your source project resides.
–
Git/SVN
•
Git/SVN Project URL
Specify the URL to access the Git/SVN project repository
•
Git/SVN Username
373

Continuous Delivery Director 8.5
Specify the Git/SVN user name to authenticate to Git/SVN.
•
Git/SVN Password
Specify the password for the Git/SVN user to authenticate to Git/SVN.
To check the connection to Maven and to the version control system, select Test Connection. The Test Connection
action returns the following results:
•
Success
The connection was successful
•
Failure
The connection failed
Get Test Assets
The Maven plug-in lets you import test suites into the Adaptive Testing Catalog.
Follow these steps:
1. Select Tests, then Adaptive Testing Catalog.
2. Specify the Application and the Application Version.
The menu next to the application name and version is activated.
3. Select Get Test Assets. The Import Test Suites dialog opens.
4. Fill in the following fields:
–
Branch
Specify the branch name.
–
Project Base Directory
Specify the relative path to the project base directory. This is the location of the project pom.xml.
–
Maven Project
Specify one or more relative paths to subprojects separated by commas from which to import test suites. Leave
empty to import from all subprojects.
NOTE
Subprojects (submodules) are regular Maven projects that inherit their configuration and dependencies
from a parent POM.
–
Settings File Path
(Optional) Specify an alternate path for the user settings.xml file.
–
Settings Security File Path
(Optional) Specify an alternate path for the settings-security.xml file.
–
System Properties
(Optional) Specify space-separated parameters to customize individual instances.
Example: \"-Djava.security.debug=all\" . Add switches like -X, -e if you want detailed error and debug
logs.
–
Source Set
(Optional). Specify the name of a source set from which to import test suites. Leave empty to import from all
projects and sub-projects.
NOTE
A source set is a collection of Java source files and additional resource files that are compiled and
assembled together to be executed. The main idea of source sets is to group files with a common
meaning for the project, without the need to separate those files in another project.
–
Additional Execution Parameters
(Optional) Specify comma-separated name: value pairs of parameters to pass on to Maven.
374

Continuous Delivery Director 8.5
Example: HOST:google.com,PORT:8080
–
JVM Parameters
(Optional) Specify space-separated JVM parameters to customize individual instances.
Example: -Dtest.HOST=google.com Overrides the IP address or hostname of URL used by the browser to
execute tests.
–
Tags
Select one or more tags to execute test suites tagged with your selection. Leave empty to execute all the test suites
under the application version.
Example: Type ro to retrieve all test suites tagged with labels beginning with ma, such as maven.sanity.test
Micro Focus ALM Plug-in
The Micro Focus Application Lifecycle Management (ALM) plug-in enables you to import and run functional test sets as
your applications progress through your CI/CD pipeline.
Plug-in Version 2.4-5
NOTE
Micro Focus Application Lifecycle Management was formerly known as HP Application Lifecycle Management
(HP ALM).
This integration allows you to take advantage of all ALM UFT (Unified Functional Test) features while harnessing the
power of Continuous Delivery Director. By running functional test sets in the release pipeline, you get real-time execution
of functional tests. You also get the test results so you can see the context and status of the testing process.
This page explains how to link an ALM account to Continuous Delivery Director and how to configure ALM-related tasks.
Supported Versions
The ALM plug-in supports Application Lifecycle Management 12.xx.
NOTE
For OnPrem users: The ALM plug-in is not autoregistered. You can only run the ALM plug-in on a Windows
server.
For SaaS users: The ALM plug-in is not autoregistered. You can only run the ALM plug-in on an on-prem
Windows server connected to Continuous Delivery Director with the plug-in proxy.
For more information, see the ALM documentation at https://software.microfocus.com/en-us/solutions/software-
development-lifecycle.
Download Options
Use one of the following options to download the latest plug-in version:
Method Info
wget wget -O cdd-alm-plugin.war https://
cspdl.broadcom.com/shared/
static/2dlwb4tdpntljqkywxinuuxanp1m5e82.war?
LCK=ent.box.com
MD5 fc6a751ded43d4276c8f2fad82685e07
375

Continuous Delivery Director 8.5
Click Download Button
Change History
The following update was made for plug-in version 2.4-5:
•
Security Enhancements - Updated the 3rd party libraries that are part of the package.
The following update was made for plug-in version 2.4-2:
•
Fixed: On the Folder field in the Get Test Assets task, the tooltip incorrectly states that tokens can be used.
The following update was made for plug-in version 2.4-1:
•
Fixed: When importing tests fails, the error message refers to "folder" instead of "test-set-folder" and does not include
an instruction to specify the top-level ("Root") folder.
The following update was made for plug-in version 2.4:
•
Fixed: When a user stopped a phase while an ALM Adaptive Testing task was running, the plug-in did not abort the
run.
The following updates were made for plug-in version 2.2:
•
Tests can now run in batch mode. Previously, tests could only run one-by-one.
•
The Test Advisor can now run ALM test suites according to the New and Updated tests heuristic.
The following update was made for plug-in version 2.1:
•
Support was added for Java 11.
Set Up the Plug-in Server
The ALM plug-in uses ALM client tools which can run only on Windows. Therefore, you must install the plug-in on a
Windows server with Tomcat pre-installed. You also install the ALM client tools on the same Windows server and enable
the tools to work with the ALM application.
If Continuous Delivery Director is installed on a Windows server, you can install the ALM plug-in on the same Windows
server.
If Continuous Delivery Director is not installed on a Windows server, install the ALM plug-in on a separate Windows
server.
ALM Plug-in System Landscapes
Example 1: Continuous Delivery Director installed on a Windows Server
376

Continuous Delivery Director 8.5
Figure 37: ALM Plug-in 1
Explanation of Example 1
Three servers are used in this scenario:
•
Server A is a Windows server and contains the Continuous Delivery Director, the ALM plug-in, and the ALM client tools
installation files.
•
Server B contains the ALM installation files.
•
Server C contains the UFT (Unified Functional Testing) installation files.
Example 2: Continuous Delivery Director installed on a Linux Server
377

Continuous Delivery Director 8.5
Figure 38: ALM Plug-in 2
Explanation of Example 2
Four servers are used in this scenario:
•
Server A is a Linux server and contains the Continuous Delivery Director installation files.
•
Server B is a Windows server and contains the ALM plug-in and the ALM client tools installation files.
•
Server B contains the ALM installation files.
•
Server C contains the UFT (HP Unified Functional Test) installation files.
Follow these steps:
1. Provision a Windows server for the ALM plug-in.
Note:
–
If Continuous Delivery Director is installed on a Windows server, you can install the plug-in on the same Windows
server.
–
If Continuous Delivery Director is not installed on a Windows server, install the plug-in on a separate Windows
server.
2. On the Windows server, install Apache Tomcat 8.x.
3. From either the support site https://casupport.broadcom.com or the Continuous Delivery Director Integration Hub,
download the ALM packaged plug-in (*.*war file).
378

Continuous Delivery Director 8.5
4. On the Windows server, copy the ALM plug-in *.*war file.
5. Still in the Windows server, open Microsoft Internet Explorer as an administrator.
Note: Continuous Delivery Director supports Microsoft Internet Explorer versions 11 and higher.
6. Enter the URL: http://<ALM-Server>:<ALM-Port>/qcbin/start_a.jsp?common=true. The ALM
Management web page opens.
7. Follow the instructions in the tools section in the ALM management web page and deploy the following ALM client
tools on this server:
–
HP ALM Connectivity
–
HP ALM Client Registration
–
Shared Deployment for Virtual Environments
8. On the UFT server, verify that the DCOM configuration properties for that computer give you the proper permissions to
launch and configure the UFT COM server.
Configuration
Register the plug-in and create endpoints as described in Manage Plug-ins.
Manifest URL
For plug-in registration, use the following ALM manifest URL:
http://<plugins-server>:<port>/cdd-alm-plugin/manifest.json
Endpoint Parameters
To create endpoints, provide the following parameters:
•
URL
Specify the ALM URL
Syntax: http://<ALM server name>[<:port number>]/
•
Username
Specify the ALM account user name
•
Password
Specify the ALM account password
To check the connection to ALM, use the endpoint Test Connection option. The Test Connection option returns the
following results:
•
Success
The connection was successful
•
FailureThe connection failed
Tasks
The following task types are available in the ALM plug-in:
Run Functional Test Set
The Run Functional Test Set task lets you schedule automated tests that are preconfigured in ALM. Tests in this test set
use server-side execution. This task contains the following fields:
Input Parameters
•
Domain
379

Continuous Delivery Director 8.5
Specify the ALM domain that contains the group of ALM projects where the required test set resides. Type an at sign
@ to get a list of domains for which you are authorized.
•
Project
Specify the ALM project where the required test set resides. Type an at sign @ to get a list of domain projects that you
are authorized to access.
•
Folder
Specify the name of the folder where the required test set resides.
Syntax: Root\Folder1\Folder2
•
Test Set Name
(Optional) Specify the name of the test set to run. If left empty, all test sets in the specified folder run. Type an at
sign @ to get a list of all the test sets of the specified folder.
•
Test Name
(Optional) Specify a single test to run. If left empty, all the tests in the specified test are set to run. Type an at sign @ to
get the list of all the tests of the specified test set.
•
Host Name
Specify the hostname of the UFT server.
•
Timeout
(Optional) Specify the number of seconds allowed to pass before the test execution fails.
When the tests run, you can view the status of the current test by hovering over the status icon of the task. The tasks fail if
one or more tests have failed during the run.
Import Functional Test Sets
The Import Functional Test Sets task lets you import preconfigured automated tests that are stored in ALM. This task
contains the following fields:
Input Parameters
•
Domain
Specify the ALM domain that contains the group of ALM projects where the required test sets reside. Type an at sign
@ to get a list of domains for which you are authorized.
•
Project
Specify the ALM project where the required test sets reside. Type an at sign @ to get a list of domain projects that you
are authorized to access.
•
Folder
Specify the name of the folder where the required test sets reside.
Syntax: Root\Folder1\Folder2
•
Host Name
Specify the host name of the UFT server.
•
Timeout
(Optional) Specify the number of seconds allowed to pass before the import job fails.
Micro Focus LoadRunner Enterprise Plug-in
Automate your application performance testing with LoadRunner Enterprise.
Plug-in Version 1.0-5
This plug-in lets you run application performance tests in Continuous Delivery Director without using the LoadRunner
Enterprise user interface. You can import and execute LoadRunner Enterprise test suites within release pipelines. You can
also specify a test folder path in the folder1/sub-folder/sub-folder-2 format. Only the tests from the specified folder and sub
folders will be imported. The LoadRunner Enterprise plug-in supports Adaptive Testing functionality.
380

Continuous Delivery Director 8.5
Download Options
Use one of the following options to download the latest plug-in version:
Method Info
wget wget -O cdd-loadrunnerenterprise-plugin.war
https://cspdl.broadcom.com/shared/
static/0ihepwqlggiyltxgaqk9cpn80qs11op3.war?
LCK=ent.box.com
MD5 e20d53ac3aa50d76eae866f1818c6998
Click Download Button
Download Docker Image from Customer Support Portal Yes
Download TAR file from Customer Support Portal for customers
who cannot use docker pull
Yes
•
Configure a LoadRunner Enterprise Endpoint
•
Get Test Assets (LoadRunner Enterprise)
Change History
The following update is made for plug-in version 1.0-5
•
Security Enhancements - Updated the 3rd party libraries that are part of the package.
The following update is made for plug-in version 1.0-4
•
Bugfix: Tactical fix applied to avoid test import failure in case of inconsistent date format.
The following update is made for plug-in version 1.0-3
•
Filter by Folders: You can specify a test folder path in the folder1/sub-folder/sub-folder-2 format. Only the tests from the
specified folder and sub folders will be imported.
The following update is made for plug-in version 1.0-2
•
Security Enhancements - Updated the 3rd party libraries that are part of the package.
Configure a LoadRunner Enterprise Endpoint
You configure the LoadRunner Enterprise plug-in endpoint either for the initial setup, or whenever a change to the test
build configuration is required.
You are familiar with LoadRunner Enterprise.
You have the Can create endpoints permission.
1. Register the plug-in as described in Manage Plug-ins.
The manifest for the LoadRunner Enterprise plug-in is http://<host>:<port>/cdd-loadrunnerenterprise-
plugin/manifest.json .
381

Continuous Delivery Director 8.5
2. From the Administration menu, click Endpoints > Add Endpoint.
3. In the ADD ENDPOINT dialog, select the LoadRunner Enterprise plug-in.
4. Configure the following input parameters:
•
URL
Specify the full URL of the system you want to connect to.
•
Tenant ID
(Optional) Specify the tenant ID if the LoadRunner Enterprise server needs to be accessed via a tenant. For
example, fa128c06-5436-413d-9cfa-9f04bb738df3
•
Authentication Method
Select either SSO or Basic Authentication (LDAP).
NOTE
If LoadRunner Enterprise is configured to use SSO, this method is the only way for this plugin to
authenticate to LoadRunner Enterprise. To use this method, generated a token for your user in
LoadRunner Enterprise.
SSO
–
Client ID Key
Specify a client ID to access LoadRunner Enterprise.
NOTE
Each client ID is associated with a LoadRunner Enterprise user. Therefore, when this plug-in uses a
client ID to access LoadRunner Enterprise, the plug-in is limited by the associated user's permissions.
–
Client Secret Key
Specify the client secret key that is associated with the Client ID Key to access LoadRunner Enterprise.
Basic Authentication
–
Username
Specify the user name to access LoadRunner Enterprise.
–
Password
Specify the password to access LoadRunner Enterprise.
5. To check the connection to LoadRunner Enterprise, click Test Connection.
6. Click Add.
Get Test Assets (LoadRunner Enterprise)
This plug-in lets you import performance tests into the Adaptive Testing Catalog.
1. Select Tests, then Adaptive Testing Catalog.
2. Specify the Application/Business Application and the Application Version/Business Application Version.
The menu next to the application/business application name and version is activated.
3. Select Get Test Assets.
4. Fill in the following fields:
NOTE
Use the @ symbol in the following fields to select from a dynamic list of entities associated with the selected
project.
•
Test Source Name
•
Plug-in
382

Continuous Delivery Director 8.5
Select Loadrunner Enterprise and Import Performance Test Suites
•
Endpoint
Select a Loadrunner Enterprise endpoint.
•
Domain
Specify a domain name.
NOTE
In LoadRunner Enterprise, projects are grouped by domain.
•
Project
Specify a project name.
NOTE
In LoadRunner Enterprise, projects contain data relevant to the application management process.
•
Post-Run Action
Select the action that is triggered automatically when the test run ends.
–
Do Not Collate
Frees the machines immediately after the performance test ends. When the run has finished, the run results are
left on the load generators.
–
Collate Results
When the run has finished, the run results are collected from all the load generators.
–
Collate And Analyze
When the run has finished, the run results are collected and analyzed. Data analysis requires some time,
depending on the size of the results file.
•
Time Slot Duration
Specify the test run time in minutes. The minimal time you can enter when creating a new timeslot is 30 minutes.
You can set the time duration in 15-minute increments. For example, 30 minutes, 45 minutes, 1 hr, 1hr 15 minutes.
•
Use Virtual User Day Mode
Select this option to allow the test to consume Virtual User Day (VUD) licenses.
NOTE
VUDs are a method for boosting the number of virtual users available in a performance test or set of
performance tests run over a period of time.
The performance test results for the specified application/application version appear on the Adaptive Testing Results
page, together with links to the associated reports in LoadRunner Enterprise.
Microsoft Teams Plug-in
Use this plug-in to integrate Microsoft Teams real-time messaging with your release pipeline.
The messages that are posted are in the form of Teams message cards.
Plug-in Version 1.2-5
What's New
The following change was added for plug-in version 1.2-4:
•
Bugfix: Inconsistent name for the task "New Conversation."
The following change was added for plug-in version 1.2-3:
•
A new task, Start New Chat, lets you override the webhook URL defined in the endpoint by overriding the webhook
URL suffix only. This enhancement avoids the need to create a new endpoint when updating the webhook URL. This
task was developed following changes in the webhook URL format introduced by Microsoft in January 2021.
383

Continuous Delivery Director 8.5
The following change was added for plug-in version 1.2-2:
•
A new Group ID parameter in the Post Message task lets you override the group ID defined in the endpoint webhook
URL.
The following change was added for plug-in version 1.2-1:
•
Tooltip updated.
The following changes were added for plug-in version 1.2:
•
You can now send messages to different teams and channels using the same webhook which saves you unnecessary
effort. To support this change, a new parameter, Webhook Suffix has been added to the Post Message task. This
parameter overrides the endpoint webhook suffix.
•
Additional Facts
You can now specify additional facts in the Post Message task in addition to the facts you specify in the Fact 1-3
Name and Fact Value 1-3 parameters. Previously, you could only define up to three facts.
The following changes were added for plug-in version 1.1:
•
You can now use a proxy server for the Teams plug-in. To support this functionality, a checkbox, Use Proxy, was
added to the endpoint parameters. If selected, the following fields appear:
–
Proxy Server URL
–
Proxy Server Username
–
Proxy Server Password
Download Options
Use one of the following options to download the latest plug-in version:
Method Info
wget wget -O cdd-msteams-plugin.war https://
cspdl.broadcom.com/shared/static/
yjcpq436eiasaui0c61zvwcskjrdo5wj.war?
LCK=ent.box.com
MD5 3b14ae1299510395850a079334d80811
Click Download Button
Supported Versions
The Teams plug-in supports the core Teams SaaS solution.
For more information, see the Teams documentation at https://teams.microsoft.com/.
Tasks
The following task types are available in the Teams plug-in:
•
Post Message
•
Start New Chat
384

Continuous Delivery Director 8.5
Configure a Microsoft Teams Endpoint
You configure the Microsoft Teams plug-in endpoint either for the initial setup, or whenever a change to the messaging
configuration is required.
You are familiar with Microsoft Teams.
You have the Can create endpoints permission.
1. Register the plug-in as described in Manage Plug-ins.
The manifest for the Microsoft Teams plug-in is http://<host>:<port>/cdd-msteams-plugin/
manifest.json .
2. From the Administration menu, click Endpoints > Add Endpoint.
3. In the ADD ENDPOINT dialog, select the Microsoft Teams plug-in.
4. Configure the following input parameters:
•
Webhook URL
Copy and paste the URL of an incoming Webhook connector as defined in the channel settings.
•
Use Proxy
Select this option to connect to a remote endpoint through a proxy server
NOTE
If selected, the Proxy Server URL, Proxy Server Username, andProxy Server Password fields appear.
•
Proxy Server URL
Specify the proxy URL including protocol, domain name/IP and port. Syntax: <protocol>://<hostname>:<port>. Ex.:
\"http://192.168.0.101:8080\".
•
Proxy Server Username
Specify a user name to authenticate to the proxy server. Leave empty if authentication is not needed (the proxy
server is public).
•
Proxy Server Password
Specify a password to authenticate to the proxy server. Leave empty if authentication is not needed (the proxy
server is public).
5. To check the connection to Microsoft Teams, click Test Connection.
6. Click Add.
Post Message (Microsoft Teams)
Send a message through your Teams incoming webhook by posting a JSON payload to the webhook URL. This payload
is in the form of a Teams message card.
One or more Microsoft Teams endpoints are available.
1. In a release, create an automatic task as described in Create Automatic Tasks.
2. Configure the following parameters:
TIP
Values: To define a value, do one of the following actions:
385

Continuous Delivery Director 8.5
•
To select from a list of possible values, type an at sign "@" in the field. Example: Deploy Tomcat
•
To select from a list of built-in tokens (reusable placeholders that are used to create generic workflows),
type a percent sign "%" in the field
•
Type free text
•
Enter a combination of free text and tokens
Input Parameters
•
Webhook Suffix
Specify a webhook suffix to override the value in the Webhook URL endpoint parameter. This parameter lets you
send messages to different teams and channels using the same webhook which saves you unnecessary effort.
•
Group ID
Specify a group ID to override the webhook group ID defined in the plug-in endpoint. The webhook URL syntax is
https://outlook.office.com/webhook/<group-ID>@<tenant-ID>/IncomingWebhook/<GUID1>/
<GUID2>.
•
Title
Specify a title to be displayed at the very top of the card.
•
Text
Specify text to be displayed in a normal font below the card title. Use text to display content, such as the description
of the entity being referenced, or an abstract of a news article. You can use simple Markdown, such as bold or
italics to emphasize words, and links to external resources.
•
Theme Color
Specify a custom brand color for the card in Hex code, for example, FF0000 for red and 00FF00 for green.
•
Additional Facts
(Optional) Specify facts as name/value pairs in JSON format, in addition to the facts you specify in the Fact 1-3
Name and Fact Value 1-3 parameters. Facts are presented in a two-column layout - Name, and Value. The fact
name is rendered in a slightly more prominent font. Keep fact names short.
•
Fact 1 Name
Specify a fact name. Facts are presented in a two-column layout - Name, and Value. The fact name is rendered in
a slightly more prominent font. Keep fact names short.
•
Fact 1 Value
Specify the fact value. You can use Teams message card Markdown formatting.
•
Fact 2 Name
Specify a fact name. Facts are presented in a two-column layout - Name, and Value. The fact name is rendered in
a slightly more prominent font. Keep fact names short.
•
Fact 2 Value
Specify the fact value. You can use Teams message card Markdown formatting.
•
Fact 3 Name
Specify a fact name. Facts are presented in a two-column layout - Name, and Value. The fact name is rendered in
a slightly more prominent font. Keep fact names short.
•
Fact 3 Value
Specify the fact value. You can use Teams message card Markdown formatting.
3. Click Create.
Start New Chat (Microsoft Teams)
Send a chat message through your Teams incoming webhook by posting a JSON payload to the webhook URL. This
payload is in the form of a Teams message card.
386

Continuous Delivery Director 8.5
One or more Microsoft Teams endpoints are available.
1. In a release, create an automatic task as described in Create Automatic Tasks.
2. Configure the following parameters:
TIP
Values: To define a value, do one of the following actions:
•
To select from a list of possible values, type an at sign "@" in the field. Example: Deploy Tomcat
•
To select from a list of built-in tokens (reusable placeholders that are used to create generic workflows),
type a percent sign "%" in the field
•
Type free text
•
Enter a combination of free text and tokens
Input Parameters
•
Webhook Suffix
Specify a webhook suffix to override the value in the Webhook URL endpoint parameter. This parameter lets you
send messages to different teams and channels using the same endpoint which saves you unnecessary effort.
NOTE
In January 2021, Microsoft changed the format of the webhook URL. The new format consists of the
following component parts:
•
Tenant name (taken from Azure AD)
•
Webhook root: webhook.office.com/webhookb2. Previously, webhook URLs used office.com/webhook.
•
Group identifier: The Azure AD identifier for the Microsoft 365 group.
•
Tenant identifier: The Azure AD identifier for the tenant.
•
Provider name: This is always “IncomingWebhook.”
•
Alternate identifier: Another GUID to make the URL unique because a group or channel can support
multiple webhooks.
•
Group owner: The Azure AD identifier (GUID) for the group owner, that is, the account of the owner
who adds the webhook to the group.
You can change the component parts marked in bold. If the tenant identifier in the URL does not match
the ID defined in the endpoint, the task fails.
•
Title
Specify a title to be displayed at the very top of the card.
•
Text
Specify text to be displayed in a normal font below the card title. Use text to display content, such as the description
of the entity being referenced, or an abstract of a news article. You can use simple Markdown, such as bold or
italics to emphasize words, and links to external resources.
•
Theme Color
Specify a custom brand color for the card in Hex code, for example, FF0000 for red and 00FF00 for green.
•
Additional Facts
(Optional) Specify facts as name/value pairs in JSON format, in addition to the facts you specify in the Fact 1-3
Name and Fact Value 1-3 parameters. Facts are presented in a two-column layout - Name, and Value. The fact
name is rendered in a slightly more prominent font. Keep fact names short.
•
Fact 1 Name
Specify a fact name. Facts are presented in a two-column layout - Name, and Value. The fact name is rendered in
a slightly more prominent font. Keep fact names short.
•
Fact 1 Value
387
Continuous Delivery Director 8.5
Specify the fact value. You can use Teams message card Markdown formatting.
•
Fact 2 Name
Specify a fact name. Facts are presented in a two-column layout - Name, and Value. The fact name is rendered in
a slightly more prominent font. Keep fact names short.
•
Fact 2 Value
Specify the fact value. You can use Teams message card Markdown formatting.
•
Fact 3 Name
Specify a fact name. Facts are presented in a two-column layout - Name, and Value. The fact name is rendered in
a slightly more prominent font. Keep fact names short.
•
Fact 3 Value
Specify the fact value. You can use Teams message card Markdown formatting.
3. Click Create.
Nolio Release Automation Plug-In
This plug-in lets you leverage core Nolio application modeling and deployment capabilities.
Plug-in Version 5.5.9-7
NOTE
Formerly CA Release Automation
The Nolio Release Automation (Nolio) plug-in lets Continuous Delivery Director use Nolio applications and deployment
plans in release deployments.
Note: This plug-in is only available for on-premise installations.
Download Options
Use one of the following options to download the latest plug-in version:
Method Info
wget wget -O cdd-ra-plugin.war https://
cspdl.broadcom.com/shared/static/
ovfua95yb6qsfqx1re02zaocpqvnxdz4.war?
LCK=ent.box.com
MD5 9cfc10d07de9caddccb5d00b64ffdb8b
Click Download Button
Supported Versions
The Nolio plug-in supports Nolio 6.5 and above.
Capabilities
The Nolio plug-in lets you do the following tasks:
388

Continuous Delivery Director 8.5
•
Import a full application model from a Nolio instance. You can include all Nolio applications models and their
environments in releases, phases, tasks, reports, and widgets.
•
Run a deployment plan in Nolio from a task in a release.
•
Run a deployment plan.
What's New
The following updates were made for plug-in version 5.5.9-7:
•
You can now download the deployment execution data at the end of the run, so that you can analyze the success or
failure of the run.
•
The 'Run Process' task now performs the 'Set Build' task as well.
•
Created the artifact package and added to the deployment.
•
Bugfix: When the deployment plan already exists the task fails with an error message.
The following updates were made for plug-in version 5.5.9-6:
•
Security Enhancements - Updated the 3rd party libraries that are part of the package.
The following updates were made for plug-in version 5.5.9-5:
•
Security Enhancements - Updated the 3rd party libraries that are part of the package.
The following updates were made for plug-in version 5.5.9-4:
•
Security Enhancements - Updated the 3rd party libraries that are part of the package.
The following updates were made for plug-in version 5.5.9:
•
Support was added for Java 11.
Configuration
Register the plug-in and create endpoints as described in Manage Plug-ins.
The URL of the Nolio manifest for plug-in registration is http://<plugin-server>:<port>/cdd-ra-plugin/manifest.json.
Select the Release Automation Endpoint Type in the ADD ENDPOINT dialog to create an endpoint for the Nolio plug-in.
The following Nolio information is required when you create an endpoint:
•
URL
Enter a valid access URL for the Nolio instance. The URL can be specified as http or https. The default Nolio
management server port is 8080.
Example: http://<ra-server>:8080
•
Username/Password
Enter the credentials of a Nolio user. The user must be authorized to view applications or create/execute a deployment
on the remote Nolio instance.
Tasks
The Nolio plug-in provides the following tasks:
•
Run Deployment
•
Run Process
Run Deployment Task
Release automation is a key component of your continuous delivery pipeline. The Run Deployment Task lets you
run a Nolio deployment plan in the context of Continuous Delivery Director phases and releases. This task lets you
389

Continuous Delivery Director 8.5
orchestrate core Nolio activities at a high level. For example, a Continuous Delivery Director release might include multiple
applications that you can deploy through the applications Nolio deployment plans.
The Run Deployment task requires the following information, which must match the corresponding Nolio deployment plan
values:
TIP
Tokenize these values to enter them only once per release across phases and insulate yourself from changes
during the release execution process.
•
Application
Specifies the Nolio application name. Find application names in the Applications pane if you imported the Nolio
application model and assigned the relevant applications to the release.
Note: In Nolio, the application name on most Release Operations Center screens are in the top menu bar.
TIP
Type the @ symbol into the Application field to select from a list of applications in the Nolio instance.
After you populate the Application field, you can use the @ symbol in other fields to select from dynamic
parameters based on the application name. For example, the Project field provides a list of all projects
associated with the selected application.
•
Deployment Plan
Specifies the Nolio deployment plan name. Find the deployment plan name in the Deployment Plans by Projects
page in Release Operations Center. Select the relevant project for your application to see all deployment plans in a
table.
•
Build
Specifies the build number associated with the selected deployment plan. Every deployment plan requires a build
number. Find the build number on the Deployment Plans by Project page in the Deployment Plans table.
Note: For a list of available builds depending on application, project, and deployment plan, type the at symbol (@) in
the Build field.
•
Project
Specifies the project name under which you created the deployment plan. Find the project name in the left pane on the
Deployment Plans by Project page in Release Operations Center.
•
Environment
Specifies the Nolio environment on which to perform the deployment. If you imported the application model from Nolio,
you can find the environments associated with that application on the Applications and Environments page on the
ADMINISTRATION tab of the Continuous Delivery Director UI. You can also find the environments associated with the
application on the Environments, Environments and Tags page of the Release Operations Center UI.
•
Deployment
Specifies the name of the deployment created by the Run Deployment task when you have chosen not to use a
manifest.
•
Manifest
Defines the XML with deployment parameters. You can also add values to the manifest using Continuous Delivery
Director tokens. At runtime, Continuous Delivery Director uses the manifest values when creating the release. Note:
Each process has its own unique manifest. To get the manifest:
a. In Nolio, select the relevant deployment tag.
b. From the right-click menu, select Generate Manifest. Your browser downloads the manifest file.
c. Using a text editor, open the manifest and specify the required values.
d. Copy and paste the updated manifest text into the Manifest field for the Run Deployment task.
Format: Free text
Limits: 10240 characters
Example:
390

Continuous Delivery Director 8.5
<?xml version="1.0" encoding="UTF-8"?
>
<DeploymentManifest name="CounterWebApp-DeploymentPlan" project="CounterWebApp-
Project" build="1.0">
<properties></properties>
<Initialization>
<step name="STEP">
<PRE-PROCESS></PRE-PROCESS>
</step>
</Initialization>
<Deployment>
<step name="STEP 2">
<SampleProcess>
<Application_Parameters>
<DELAY_PARAMETER templateProperty="false">60</DELAY_PARAMETER>
</Application_Parameters>
</SampleProcess>
</step>
</Deployment>
<Post-Deployment></Post-Deployment>
</DeploymentManifest>
•
Fail This Task When Step Errors Occur In:
Specify that the Run Deployment task fails if a step in a selected stage is in failed paused status. A task in the failed
paused status indicates a problem with the deployment. To resolve the issue, go to the Nolio user interface, locate the
error, and select Resume Error.
Run Process Task
The Run Process task lets you use the Nolio API to run deployment tasks that are not part of a deployment plan.
This task has the following parameters:
Note: Except for Manifest, the following parameters are provided through the dynamic parameters function.
•
Application
The application in Nolio that contains the process that you want to run
•
Environment
The Nolio environment that contains the process that you want to run
•
Process
The process that you want to run
•
Tag
•
Manifest
Defines the XML with release scope parameters and values for process execution. Note: Each process has its own
unique manifest. To get the manifest:
a. In Release Automation, select the relevant process tag.
b. From the right-click menu, select Generate Manifest. Your browser downloads the manifest file.
c. Using a text editor, open the manifest and specify the required values.
d. Copy and paste the updated manifest text into the Manifest field for the Run Process task.
Format: Free text
Limits: 10240 characters
391

Continuous Delivery Director 8.5
The task shows the process status and progress.
To stop the task and the process execution, select Stop task.
The task succeeds when the process succeeds, and the task fails if the process fails.
Note: If the task fails, select the failed status to show the error details.
A task in the failed paused state indicates a problem with the process. To resolve the issue either:
•
Stop or skip the task.
•
Go to the Nolio UI, locate the error, and select Resume Error.
Application Model Import
During product configuration, you can import the application and environment models from Nolio. Using Nolio application
models lets you tie release activities and content to real applications and environments.
For more information about application model import, see Applications and Environments.
Playwright Plug-in
This plug-in lets you execute Playwright test suites as part of your release pipeline.
Plug-in Version 2.0-21
This plug-in integrates with Playwright, a node.js tool to automate end-to-end web testing. Playwright is an open-source,
JavaScript-based, cross-browser automation library. The goal of Playwright is to provide a single API to developers and
testers to automate their web applications across three major browser engines:
•
Chromium
•
Firefox
•
WebKit
The Playwright plug-in is containerized and supports Adaptive Testing functionality. You can import tests from Playwright
to run as test suites within release pipelines.
Download Options
Use one of the following options to download the latest plug-in version:
Method Info
wget wget -O cdd-playwright-plugin.tar.gz
https://cspdl.broadcom.com/shared/static/
rqvhyb954geniqoa4ixw1jvzkpixo0vf.gz?
LCK=ent.box.com
MD5 51b438f2627574a4ac657f60a881dd78
Click Download Button
Download Docker Image from Customer Support Portal Yes
Download TAR file from Customer Support Portal for customers
who cannot use docker pull
Yes
392

Continuous Delivery Director 8.5
Change History
The following updates were made for plug-in version 2.0-21.
•
Bugfix - Test suites not imported and executed due to wrong array identification.
The following updates were made for plug-in version 2.0-20.
•
Bugfix - Fixed the test suite execution start and end time calculation.
The following updates were made for plug-in version 2.0-19.
•
Bugfix - Playwright plugin (with Playwright runner) fails to execute test suites when the tests project does not have the
default testDir.
The following updates were made for plug-in version 2.0-18.
•
Security Enhancements - Updated the 3rd party libraries that are part of the package.
The following updates were made for plug-in version 2.0-17.
•
Security Enhancements - Updated the 3rd party libraries that are part of the package.
The following updates were made for plug-in version 2.0-12.
•
You can define the location of node_modules and yarn cache paths for the Playwright plugin in the containerized
properties.
Example:
cdd.plugins.containerized.playwright.container.volumes.artifacts.volumes=node_modules:/
home/cdd/node_modules,yarn/cache:/home/cdd/.yarn/cache
You can specify your desired local directory paths of the saved dependencies for node_modules and yarn/cache in
the above example.
When running the yarn install command, these volumes reduce the required time for the plugin steps (test suites
import and execution). The plugin does not download dependencies already stored in the mentioned volumes.
The following updates were made for plug-in version 2.0-10.
•
You can now view a test execution log that is updated in real-time to see which Playwright tests are executed at any
given time. The execution log is updated in real-time so if problems occur in a test run, you can examine the log to
determine whether to stop or continue with the test execution.
NOTE
This feature is only available for plug-in version 2.0-10 and higher and is not backward-compatible.
•
You can define proxy for the Playwright plugin using the new environment variables YARN_HTTP_PROXY and
YARN_HTTPS_PROXY in the containerized properties.
Example: cdd.plugins.containerized.playwright.container.environment=YARN_HTTP_PROXY:
${proxy-url},YARN_HTTPS_PROXY:${proxy-url}
•
Added support for Playwright runner along with Jest runner.
Configure a Playwright Endpoint
You are familiar with Playwright.
You have been granted the Can create endpoints permission.
1. Register the plug-in as described in Manage Plug-ins.
The manifest for the Playwright plug-in is http://<host>:<port>/cdd-playwright-plugin/manifest.json
.
393

Continuous Delivery Director 8.5
2. From the Administration menu, click Endpoints > Add Endpoint.
3. In the ADD ENDPOINT dialog, select the Playwright plug-in.
4. Configure the following endpoint parameters:
•
Version Control System
Specify the version control system where your source project resides. Default: Git.
•
Git Repository URL
Specify the URL to access the Git project repository.
•
Git Username
Specify the user name to access GitHub.
•
Git Password
Specify the password to access GitHub.
5. Click Test Connection to check the connection to Playwright.
6. Click Add.
Get Test Assets (Playwright)
The Playwright plug-in lets you import test suites into the Adaptive Testing Catalog.
1. Select Tests, then Adaptive Testing Catalog.
2. Specify the Application and the Application Version. The menu next to the application name and version is
activated.
3. Select Get Test Assets.
4. Fill in the following fields:
TIP
Open your Playwright instance so that you can check input values.
NOTE
Use the @ symbol in the following fields to select from a dynamic list of entities associated with the selected
project.
•
Test Source Name
•
Plug-in
Select Playwright and Import Test Suites (Playwright).
•
Endpoint
Select a Playwright endpoint.
•
Branch
Specify the branch name in your source control system.
•
Runner Name
Specify the runner name, available options are Jest and Playright.
•
Project Base Directory
Specify the relative path to the folder containing the test suites from which you want to import. When left empty,
tests will be imported from the root folder.
•
Additional Execution Parameters
•
Environment Variables
Specify environment variables to be used during test execution as name:value pairs in JSON format.
•
Tags
Select or create one or more tags to label the imported tests.
394

Continuous Delivery Director 8.5
5. Click Create.
Postman Plug-in
This plug-in provides an interface to perform testing on the Postman collections.
Plug-in Version 1.0-6
Postman offers a comprehensive API testing tool that makes it easy to set up automated tests. The Postman plug-in
is containerized and supports Adaptive Testing functionality. This plug-in provides you with a Postman test automation
framework for Git and SVN builds that is open-source and application-independent.
Supported Versions
This plug-in was validated against Postman Newman.
Download Options
Use one of the following options to download the latest plug-in version:
Method Info
wget wget -O cdd-postman-plugin.tar.gz
https://cspdl.broadcom.com/shared/
static/7b34enx0w4x7q2grfrsrr36knl6eszn2.gz?
LCK=ent.box.com
MD5 77a916fc3a260b2b471f51062b4b2897
Click Download Button
Change History
The following update was made for plug-in version 1.0-5:
•
You can now pass the environment variables that are used during test execution. The specified values override the
values defined in the environment json file. For example, when a new SUT is provisioned during the phase run time,
you can pass the SUT address to the test.
The following update was made for plug-in version 1.0-4:
•
Security Enhancements - Updated the 3rd party libraries that are part of the package.
The following update was made for plug-in version 1.0-3:
•
Bugfix: Tooltip for the successful sync/import.
More Information
•
Configure a Postman Endpoint
•
Get Test Assets (Postman)
Configure a Postman Endpoint
You configure the Postman plug-in endpoint either for the initial setup, or whenever a change to the test build
configuration is required.
395

Continuous Delivery Director 8.5
You are familiar with Postman.
You have the Can create endpoints permission.
1. Register the plug-in as described in Manage Plug-ins.
The manifest for the postman plug-in is http://<host>:<port>/containerized/plugins/cdd-postman-
plugin/manifest.json .
2. From the Administration menu, click Endpoints > Add Endpoint.
3. In the ADD ENDPOINT dialog, select the Postman plug-in.
4. Configure the following input parameters:
•
Version Control System
Specify the version control system that contains your project.
Values: Git and Svn
•
For Git
–
Git Project URL
Specify the URL to access the Git project repository.
–
Git Username
Specify the Git username.
–
Git Access Token
Specify the Git access token. This is required only when the repository you specified is not a public repository.
You can use the toggle button to switch between Secret selection and typing a password/API key.
•
For Svn
–
SVN Project URL
Specify the URL to access the SVN project repository.
Example: https://svnRepository/myRepo
–
SVN Username
Specify the SVN username.
–
SVN User Password
Specify the SVN user password.
You can use the toggle button to switch between Secret selection and typing a password/API key.
5. To check the connection to Postman and to the source control system, click Test Connection.
6. Click Add.
Get Test Assets (Postman)
Import Postman test suites into the Adaptive Testing Catalog.
1. Select Tests, then Adaptive Testing Catalog.
2. Specify the Application and the Application Version.
The menu next to the application name and version is activated.
3. Select Get Test Assets. The Import Test Suites dialog opens.
4. Fill in the following fields:
•
Test Source Name
•
Plug-in
Select Postman and Import Tests (Postman).
•
Import Parameters:
–
Branch
396

Continuous Delivery Director 8.5
Specify the branch name
–
Project Base Directory
Specify the relative path to the project base directory where the collection files are located. Keep empty for the
project root folder (for example src/test/run)
–
Collection Files Filter
Specify a free text filter to identify the collection files. for importing only specific test suites whose names match
the specified free-text filter. For example, the filter "Test" would import only test suites whose name contains the
word "Test". To import all collection files enter ".json".
•
Execution Parameters:
–
Environment Variables File
Specify the environment variables json file name and the relative path (for example src/test/resources/
myTest.postman_environment.json). Environments provide a set of variables that one can use within collections.
–
Global Variables File
Specify the global variables json file name and the relative path (for example src/test/resources/
workspace.postman_globals.json). Global variables are similar to environment variables but have lower
precedence and can be overridden by environment variables having the same name.
–
Environment Variables
Specify the values for environment variables that are used during test execution. The specified values
override the values defined in the environment json file. You can use shared release tokens to use a value
that is dynamically created by the release, or shared environment tokens to use a pre define value per
environment. Define the variables parameters in JSON style, wrapped in {}, and separated by commas. Ex.:
{ "<var name>":"<var value>", "<var name>":"<var value>" }.
–
Iterations
Specify the number of times the collection has to be run.
5. Click Get Test Assets.
Postman is added as a test source. When an adaptive testing task is run, the test results for the specified build appear on
the Adaptive Testing Results page, together with links to the associated reports in Postman.
pytest Plug-in
Add the popular pytest software test framework to your release pipeline.
Plug-in Version 1.0-9
pytest is a robust Python testing tool that is used by development teams and QA teams. The pytest plug-in is
containerized and supports Adaptive Testing functionality. This plug-in provides you with a pytest test automation
framework for Git and SVN builds that is open-source and application-independent.
Download Options
Use one of the following options to download the latest plug-in version:
Method Info
wget wget -O cdd-pytest-plugin.tar.gz
https://cspdl.broadcom.com/shared/
static/0lmm345mx4chz1604z18sxz6d158pr22.gz?
LCK=ent.box.com
MD5 15b0971560215b3460c8c317cd885881
397

Continuous Delivery Director 8.5
Click Download Button
Download Docker Image from Customer Support Portal Yes
Download TAR file from Customer Support Portal for customers
who cannot use docker pull
Yes
Change History
The following update was made for version 1.0-9:
•
Security Enhancements - Updated the 3rd party libraries that are part of the package.
The following update was made for version 1.0-8:
•
Bugfix - Plugin fails on timeout while copying very large test reports.
More Information
•
Configure a pytest Endpoint
•
Get Test Assets (pytest)
Configure a pytest Endpoint
You configure the pytest plug-in endpoint either for the initial setup, or whenever a change to the test build configuration is
required.
You are familiar with pytest.
You have the Can create endpoints permission.
1. Register the plug-in as described in Manage Plug-ins.
The manifest for the pytest plug-in is http://<host>:<port>/cdd-pytest-plugin/manifest.json .
2. From the Administration menu, click Endpoints > Add Endpoint.
3. In the ADD ENDPOINT dialog, select the pytest plug-in.
4. Configure the following input parameters:
•
Version Control System
Specifies the version control system where your source project resides, either Git or SVN.
•
Git/SVN Project URL
Specify the URL to access the Git or SVN project repository.
•
Git/SVN Username
Specify the user name to access GitHub or SVN
•
Git/SVN Password
Specify the password to access GitHub or SVN
398

Continuous Delivery Director 8.5
5. To check the connection to pytest and to the source control system, click Test Connection.
6. Click Add.
Get Test Assets (pytest)
Import pytest test suites into the Adaptive Testing Catalog.
1. Select Tests, then Adaptive Testing Catalog.
2. Specify the Application/Business Application and the Application Version/Business Application Version.
The menu next to the application/business application name and version is activated.
3. Select Get Test Assets.
4. Fill in the following fields:
NOTE
Use the @ symbol in the following fields to select from a dynamic list of entities associated with the selected
project.
•
Test Source Name
•
Plug-in
Select pytest and Import Tests (pytest).
•
Endpoint
Select a pytest endpoint.
•
Branch
Specify the version control system branch name.
•
Tests Folder
Specify the relative path of the folder in which the required tests are located. The specified folder should be relative
to the project base directory.
•
Filter
Run only tests which match the given regular expression. You can provide names of modules, classes, or test
cases.
•
Requirements
Specify this option to run a Python pip install command before the import.
•
Profile
Specify the type of credentials to authenticate to the application under test. Default: Username/Password.
•
Username
Specify the username to authenticate to the application under test.
•
PasswordUsername
Specify the password to authenticate to the application under test.
•
Driver
Specify the browser type (Chrome / IE).
•
Tags
(Optional) Specify one or more tags to label the imported tests.
Example:
(@Demo or @Sanity) and not @Ignore
5. Click Get Test Assets.
Test suite data appears on the Adaptive Testing Catalog page according to the parameter settings. The imported test
suites are available for pytest-related Run Adaptive Testing tasks.
399

Continuous Delivery Director 8.5
Rally
®
Plug-In
This plug-in integrates with project tracking and change management capabilities
NOTE
Formerly CA Agile Central
Plug-in Version 2.18-6
Agile management tools, like Rally, enhance release and application communication and insight across the continuous
delivery pipeline.
Download Options
Use one of the following options to download the latest plug-in version:
Method Info
wget wget -O cdd-rally-plugin.war https://
cspdl.broadcom.com/shared/static/
pdrsurlym97oc1e17hat864t3b4zvkgg.war?
LCK=ent.box.com
MD
2d52e08e0a21d84d11c71e1477a950c3
Click Download Button
Supported Versions
The Rally plug-in supports the core Rally SaaS solution.
The plug-in supports version 2.0 of the Rally API.
Capabilities
The Rally plug-in lets you perform the following tasks:
•
Import work items from a Rally instance into an application version. For more information, see: Import Work Items.
•
Update application content in Rally from a task in a release. For more information, see: Rally Update.
•
View test case results for specific Rally stories and defects. For more information, see: Check Test Case Results.
•
Import manual test cases from Rally to use in Adaptive Testing tasks. For more information, see Get Test Assets.
Change History
The following update was made for plug-in version 2.18-5
•
The Release Quality Report now shows test information per work item as the data appears in Rally, such as the
number of flaky tests. To support this enhancement, the work item IDs of tests are now stored with the tests.
The following update was made for plug-in version 2.18-4
•
Security enhancement.
The following update was made for plug-in version 2.18-3
•
Bugfix: Test cases results are not displayed as expected.
400

Continuous Delivery Director 8.5
The following updates were made for plug-in version 2.18-2
•
You can now import manual test cases into the Adaptive Testing Catalog.
•
A Milestone Name filter was added to the Import Work Items task.
The following updates were made for plug-in version 2.18-1
•
Bugfix: The Rally plug-in rejected work items with a non-standard tag prefix. In Rally, work item IDs consist of a tag
prefix and a numerical value. The tag can be customized by system administrators to reflect a differentiating prefix for
each work item defined in a project, for example, a user story has the ID S198355 instead of US198355.
The following updates were made for plug-in version 2.18
•
Bugfix: Work items in Rally with Released status are not treated in Continuous Delivery Director as completed work
items. A green checkmark indicating Complete status is not assigned to any associated work items with the Rally
statuses Accepted and Released.
The following updates were made for plug-in version 2.17
•
Bugfix: Multiple duplicate copies of "actual" work items were generated when applications were shared with multiple
releases.
The following updates were made for plug-in version 2.16
•
You can now import and execute manual test suites
The following updates were made for plug-in versions 2.12-2.15
•
Assorted bug fixes
The following updates were made for plug-in version 2.11
•
A new field, Success Rate, has been added to the Check Test Case Results task. Users can enter the percentage of
tests that are required to pass for the task to succeed.
•
Support has been added for the Multi-Value Dropdown List, a Rally custom field type.
The following updates were made for plug-in version 2.5:
•
Support was added for Java 11.
The following updates were made for plug-in version 2.4:
•
Two new input parameters have been added, Additional Filters, and Import from Child Projects.
Configure a Rally Endpoint
Enable communication and synchronization of work items between Rally and Continuous Delivery Director.
You are familiar with Rally.
You have been granted the Can create endpoints permission.
1. Register the plug-in as described in Manage Plug-ins.
The manifest for the Rally plug-in is http://<host>:<port>/cdd-rally-plugin/manifest.json .
2. From the Administration menu, click Endpoints > Add Endpoint.
3. In the ADD ENDPOINT dialog, select the Rally
®
plug-in.
4. Configure the following endpoint parameters:
•
URL
Enter the URL of your Rally instance.
•
Workspace Name
401

Continuous Delivery Director 8.5
Enter the name of the workspace that contains the projects and teams for your product.
•
API Key
Enter an API key to access your Rally subscription data without using your username and password.
TIP
To generate an API Key by user in Rally, use the following link when logged in to Rally:
https://<rallyserver>/login/accounts/index.html#/keys
For security purposes, we recommend that you create a user in Rally for Continuous Delivery Director
and generate a key specific to that user.
WARNING
When you create an API key in Rally, ensure that the ALM WSAPI Read-only checkbox is cleared.
Otherwise, Rally tasks may fail with the error Update Task - HTTP/1.1 401 Unauthorized.
For more information, see KB000106976.
•
Use Proxy
(Optional) Select this option to connect to Rally through a proxy server.
NOTE
If selected, the Proxy Host, Proxy Port, Proxy Username, Proxy Password, and Use HTTPS fields
appear.
–
Proxy Host
Specifies the HostName or IP for the proxy server.
–
Proxy Port
402

Continuous Delivery Director 8.5
Specifies the port for the proxy server.
–
Proxy Username
Specifies the user name for the proxy server.
–
Proxy Password
Specifies the password for the proxy server.
•
Time Out
Specify the number of seconds to wait before the operation is aborted.
5. Click Test Connection to check the connection to Rally.
6. Click Add.
Rally Update
Dynamically update the status of a Rally work item from a task.
One or more Rally endpoints are available.
In Rally, schedule states indicate the progress of a work item from new to completion.
1. In a release, create an automatic task as described in Create Automatic Tasks.
2. Configure the following parameters:
TIP
Values: To define a value, do one of the following actions:
•
To select from a list of possible values, type an at sign "@" in the field.
Example: Deploy Tomcat
•
To select from a list of built-in tokens (reusable placeholders that are used to create generic workflows),
type a percent sign "%" in the field
•
Type free text
•
Enter a combination of free text and tokens
Input Parameters
•
Project Name
Specify the name of the Rally project that contains the work item to update. The project name appears in the upper
left corner of the Rally interface.
•
Type
Select one of the following work item types:
–
Defect
–
Task
–
User Story
–
Capability
–
Feature
•
(Work Item) ID
Specify the ID number of the specific work item to update. Example: DE143243.
•
New (Work Item) Status
Specify the new status of the work item. Example: Select Completed to close the work item when the task
completes.
403

Continuous Delivery Director 8.5
3. Click Create.
Check Test Case Results (Rally)
View test case results for specific Rally stories and defects.
One or more Rally endpoints are available.
In Rally, a test case result is a record of the outcome of a test case. Teams often execute a test case multiple times during
the development cycle with the goal of getting the test case to a passing state. This plug-in retrieves the results of all test
cases for the specified user stories and defects.
1. In a release, create an automatic task as described in Create Automatic Tasks.
2. Configure the following parameters:
TIP
Values: To define a value, do one of the following actions:
•
To select from a list of possible values, type an at sign "@" in the field. Example: Deploy Tomcat
•
To select from a list of built-in tokens (reusable placeholders that are used to create generic workflows),
type a percent sign "%" in the field
•
Type free text
•
Enter a combination of free text and tokens
Input Parameters
•
Project Name
Specify the name of the Rally project that contains the test cases to query. The project name appears in the upper
left corner of the Rally interface.
•
Work Item IDs
Specify a list of user stories, test sets, and defect ID numbers for which you want to check test case
results. Separate the ID numbers with commas.
•
Test Case Type
Select the appropriate test case type from the drop-down list.
•
Success Rate
Specify the percentage of successful tests required for this Check Test Case Results task to succeed.
This field is mandatory, and the default value is 100%. Example: If you enter 80 and less than 80% of the tests
pass, the task fails.
3. Click Create.
Import Work Items (Rally)
Sync work items between Rally and Continuous Delivery Director releases.
You have configured an endpoint between Rally and Continuous Delivery Director as described in Configure a Rally
Endpoint.
The Rally plug-in lets you import Rally work items into an application. Use this capability when you deploy applications in a
release to see information about related stories, tasks, and defects.
1. In a release, click the Work Items tab on the left menu.
2. Select Add Work Items.
The ADD WORK ITEMS window opens.
404

Continuous Delivery Director 8.5
3. Select External Items.
4. Enter a name for the work items source.
Rally Feed
5. Under Work Items Source, select the Rally plug-in and a configured Rally endpoint.
6. Provide information in the required parameter fields. These fields let you build a query that searches Rally for work
items that match the specified criteria.
•
Project Name
Specify the name of the Rally project that contains the content you want to import. The project name appears in the
upper left corner of the Rally interface. Use the @ symbol to select from a list of projects in the Rally endpoint. Use
the @ symbol in other fields to select from a dynamic list of entities associated with the selected project.
•
Release Name
Specify the name of the release to import from. For a list of release names, select Portfolio, Release Planning on
the Rally interface.
•
Iteration Name
Specify the iteration name. Populate this field to limit the imported content to a specific iteration. Select Track,
Iteration on the Rally interface to access a list of iteration names. Example: Deploy a release for Iteration 4 and
show only Iteration 4 content.
•
Milestone Name
Specify the iteration name. Populate this field to limit the imported content to a specific iteration. Select Track,
Iteration on the Rally interface to access a list of iteration names. Example: Deploy a release for Iteration 4 and
show only Iteration 4 content.
•
Type
Specify the type of work item you want to import.
•
Item Status
Specify the item status types to import. This field lets you filter what is imported based on status. Example: Import
only work items that are in the Done state.
•
Tags
Specify one or more tags to filter work items. Separate tags with commas.
•
Additional Filters
Specify one or more "field name":"value" pairs in JSON format to filter the imported work items. You can specify
either built-in or custom fields. The values set here override matching field values in the import dialog. Syntax:
–
Date: {"field_name":"yyyy-mm-dd"}
–
Boolean: {"field_name":"true or false"}
List of standard Rally fields that support the Additional Filters parameter, including usage examples.
405

Continuous Delivery Director 8.5
–
Accepted Date: {"Accepted Date":"2020-01-09"}
–
Attachments: {"Attachments":["Bill.jpg"]}
–
Blocked: {"Blocked":"true"}
–
Blocked Reason: {"Blocked Reason":"blocked"}
–
Children: {"Children":["Fix the problem with the test criteria"]}
–
Creation Date: {"Creation Date":"2020-01-09"}
–
Defects: {"Defects":["Defect name"]}
–
Defect Status: {"Defect Status":["Some closed"]}
–
Description: {"Description":"description text"}
–
Display Color: {"Display Color":"#21a2e0"}
–
Expedite: {"Expedite":"true"}
–
Feature: {"Feature":"F94042"}
–
Flow State: {"Flow State":"New"}
–
Formatted ID: {"Formatted ID":"US643202"}
–
In Progress Date: {"In Progress Date":"2020-01-08"}
–
Iteration: {"Iteration":"CDD 7.2-7"}
–
Last Update Date: {"Last Update Date":"2020-01-23"}
–
Milestones: {"Milestones":["milestone1"]}
–
Name: {"Name":"Execute - Java Test Frameworks (Maven)"}
–
Notes: {"Notes":"notes text"}
–
Owner: {"Owner":"[email protected]"}
–
Plan Estimate: {"Plan Estimate":"21"}
–
Ready: {"Ready":"true"}
–
Release: {"Release":"CDD7.2"}
–
Risks {"Risks":["risk1"]}
–
Schedule State: {"Schedule State":"New"}
–
Submitted by: {"Submitted by":"[email protected]"}
–
Tags: {"Tags":["tag1","tag2"]}
–
Task Actual Total: {"Task Actual Total":"32"}
–
Task Estimate Total: {"Task Estimate Total":"32"}
–
Task Remaining Total: {"Task Remaining Total":"32"}
–
Task Status: {"Task Status":["In progress","Completed"]}
–
Tasks: {"Tasks":["Coding"]}
–
Test Case Status: {"Test Case Status":["None"]}
–
Test Cases: {"Test Cases":["Testcase1","Testcase3"]}
–
User: {"field_name":"e-mail address"}
•
Import from Child Projects
Select this option to import work items from projects that are children of the parent project specified in the Project
parameter.
7. Click Create.
The work item source is saved and a list of the returned work items is displayed under the application in the left menu.
These work items are now available to assign to tasks in phases to associate with the release.
406

Continuous Delivery Director 8.5
Get Test Assets (Rally)
The Rally plug-in lets you import manual test cases into the Adaptive Testing Catalog.
In Rally, a test case is created from a work item (user story or defect) to verify that the work is acceptable. Test cases also
capture test results.
1. Select Tests, then Adaptive Testing Catalog.
2. Specify the Application and the Application Version. The menu next to the application name and version is
activated.
3. Select Get Test Assets.
4. Fill in the following fields:
TIP
Open your Rally instance so that you can check input values.
NOTE
Use the @ symbol in the following fields to select from a dynamic list of entities associated with the selected
project.
•
Test Source Name
•
Plug-in
Select Rally and Import Test Cases (Rally).
•
Endpoint
Select a Rally endpoint.
•
Project Name
Specify the name of a Rally project that contains the test cases that you want to import. The project name appears
in the upper left corner of the Rally interface. Use the @ symbol to select from a list of projects in the Rally
endpoint.
•
Release Name
Specify the name of the required release. For a list of release names, on the Rally interface, select Portfolio, then
Release Planning.
•
Iteration Name
Specify the iteration name. Populate this field to limit the imported test sets to a specific iteration. To access a list of
iteration names, on the Rally interface, select Track, then Iteration.
•
Test Case Type
Select a Rally Test Case Type, such as Regression.
•
Tags
Select one or more tags to import manual tests. For example, type tst01 to retrieve all test suites tagged with
labels beginning with tst01, such as tst01.regression.test.
•
Additional Filters
Specify one or more "field name":"value" pairs in JSON format to filter the imported test suites items. You can
specify either built-in or custom fields. The values set here override matching field values in the import dialog.
Syntax:
–
Date: {"field_name":"yyyy-mm-dd"}
–
Boolean: {"field_name":"true or false"}
List of standard Rally fields that support the Additional Filters parameter, including usage examples.
407

Continuous Delivery Director 8.5
–
Accepted Date: {"Accepted Date":"2020-01-09"}
–
Attachments: {"Attachments":["Bill.jpg"]}
–
Blocked: {"Blocked":"true"}
–
Blocked Reason: {"Blocked Reason":"blocked"}
–
Children: {"Children":["Fix the problem with the test criteria"]}
–
Creation Date: {"Creation Date":"2020-01-09"}
–
Defects: {"Defects":["Defect name"]}
–
Defect Status: {"Defect Status":["Some closed"]}
–
Description: {"Description":"description text"}
–
Display Color: {"Display Color":"#21a2e0"}
–
Expedite: {"Expedite":"true"}
–
Feature: {"Feature":"F94042"}
–
Flow State: {"Flow State":"New"}
–
Formatted ID: {"Formatted ID":"US643202"}
–
In Progress Date: {"In Progress Date":"2020-01-08"}
–
Iteration: {"Iteration":"CDD 7.2-7"}
–
Last Update Date: {"Last Update Date":"2020-01-23"}
–
Milestones: {"Milestones":["milestone1"]}
–
Name: {"Name":"Execute - Java Test Frameworks (Maven)"}
–
Notes: {"Notes":"notes text"}
–
Owner: {"Owner":"[email protected]"}
–
Plan Estimate: {"Plan Estimate":"21"}
–
Ready: {"Ready":"true"}
–
Release: {"Release":"CDD7.2"}
–
Risks {"Risks":["risk1"]}
–
Schedule State: {"Schedule State":"New"}
–
Submitted by: {"Submitted by":"[email protected]"}
–
Tags: {"Tags":["tag1","tag2"]}
–
Task Actual Total: {"Task Actual Total":"32"}
–
Task Estimate Total: {"Task Estimate Total":"32"}
–
Task Remaining Total: {"Task Remaining Total":"32"}
–
Task Status: {"Task Status":["In progress","Completed"]}
–
Tasks: {"Tasks":["Coding"]}
–
Test Case Status: {"Test Case Status":["None"]}
–
Test Cases: {"Test Cases":["Testcase1","Testcase3"]}
–
User: {"field_name":"e-mail address"}
•
Import from Child Projects
Select this option to import test sets from projects that are children of the parent project specified in the Project
parameter.
•
Build Number
Enter the tested build number.
•
Execution Duration in Hours
•
Polling Period in Minutes
•
Tags
Select or create one or more tags to label the imported tests.
NOTE
To import manual test results from Rally, enter the tag Manual.
408

Continuous Delivery Director 8.5
The test results for the specified build appear on the Adaptive Testing Results page, together with links to the associated
reports in Rally.
Red Hat Ansible Plug-in
This plug-in connects Continuous Delivery Director to Ansible, allowing you to run playbooks.
Plug-in Version 2.0-5
Ansible is an open-source automation engine that automates IT tasks such as software provisioning, configuration
management, and application deployment.
The main components of Ansible are playbooks, written in YAML format. Playbooks can be used to manage
configurations of and deployments to remote machines. Playbooks are stored in the project base path for each project.
Download Options
Use one of the following options to download the latest plug-in version:
Method Info
wget wget -O cdd-ansiblecore-plugin.tar.gz
https://cspdl.broadcom.com/shared/static/
e37dj5w43bldtr60ykvvzcf02ls5hhdb.gz?
LCK=ent.box.com
MD5 ed03c5d771fc9613cf2f33977e678f13
Click Download Button
Download Docker Image from Customer Support Portal Yes
Download TAR file from Customer Support Portal for customers
who cannot use docker pull
Yes
Supported Versions
The Ansible plug-in supports Ansible 2.7.5 and higher.
For more information, see the Ansible documentation at https://www.ansible.com/
What's New
The following updates were made for plug-in version 2.0-5:
•
At the endpoint, the "Private Key" field type has been changed to a password field that accepts Secret or strings. To
use a multi-line private key, store the private key in a "Secret" and use the secret in this field.
•
You can view the execution log during the task run-time. A link to the execution log is added to the task details (while
hovering the task) while the task is running and to the task status when the task is done.
The following updates were made for plug-in version 2.0-2:
•
Bugfix: Plug-in terminates the playbook execution after 60 seconds. If the playbook runs for more than 60 seconds,
then the plug-in aborts the execution and fails.
The following updates were made for plug-in version 2.0:
409
Continuous Delivery Director 8.5
•
This plug-in now supports the capability to add multiple applications to tasks and to assign different build numbers
to each application. To support this capability, the Build input parameter for the Run Playbook task is now optional;
previously this parameter was mandatory.
The following updates were made for plug-in version 1.3:
•
A new Build parameter was added to the input parameters for the Run Playbook task.
The following updates were made for plug-in version 1.1:
•
Support was added for Java 11.
Capabilities
Runs Ansible playbooks according to specified input parameters.
Prerequisites
•
A Docker Engine machine is provisioned.
•
The containerized-manager plug-in is deployed on a Docker Engine machine.
•
The required Docker images have been pulled and enabled on the Docker Engine machine.
•
The Ansible Core plug-in is registered in your Continuous Delivery Director system.
NOTE
•
Set Up Containerized Plug-ins
Manifest URL
For plug-in registration, use the following Ansible manifest URL:
http://<plugin-hostname>:<port>/containerized/plugins/cdd-ansiblecore-plugin/manifest.json
Endpoint Parameters
The following parameters are required to create an endpoint:
•
Git Project URL
Specify the URL to access the Git project repository where the Ansible playbooks are located.
•
Git Username
Specify the username to authenticate to the Git project repository.
Note: Required only when the Git repository is not a public repository.
•
Git Password
Specify the password to authenticate to the Git project repository.
Note: Required only when the Git repository is not a public repository.
•
Target Machine Authentication Type
Specify the method to authenticate to the target machine.
–
None
–
SSH
•
Username
Specify the username to authenticate to the target machine.
•
Private Key
Specify the SSH private key. To use a private key with multi-line text, from the Administration tab create a Secret
that contains the required text, and use the Secret in this field.
•
Private Key Passphrase
410

Continuous Delivery Director 8.5
Specify the passphrase if the SSH private key is protected.
–
Credentials
•
Username
Specify the username to authenticate to the target machine.
•
Password
Specify the password to authenticate to the target machine.
•
Vault ID
Specify an Ansible vault identifier.
•
Vault Password
Specify the Ansible vault password.
•
Use Become (Privilege Escalation)
Select this option to enable the login/remote user to execute tasks and create resources with the identity and
permissions of another user.
NOTE
To enable the Use Become (Privilege Escalation) option:
1. Ensure that the following lines are configured in the inventory file. This file (by default, Ansible uses a
simple INI format) describes hosts and groups in Ansible and should be located in the Git project repository
where the Ansible playbooks are located.
2. Replace <password> with a suitable Ansible password:
[all:vars]
ansible_become_method=su
ansible_become_pass=<password>
•
Run As User
Run operations as this user. If left empty, root is used.
To check the connection, select Test Connection.
Tasks
The Ansible plug-in provides the following task:
•
Run Ansible Playbook
Run Ansible Playbook
This task requires the following information:
Input Parameters
•
Playbook Branch
Specify the branch with which to work.
•
Playbook Path
Specify the path to the folder inside the remote project that contains the playbook you want to run.
Example:
playbooks/myplaybook.yml
•
Inventory Path
(Optional) Specify the path to the folder inside the remote project that contains the inventory.
Example: inventory/myinventory
•
Tags To Run
411

Continuous Delivery Director 8.5
(Optional) Only run plays and tasks whose tags do not match the specified tags (comma-separated).
•
Build
(Optional) Specify an Ansible build/change number to mark a change as deployed and to promote as a successful
build/change to the next phase. You can use tokens such as last_successful_build.
•
Tags To Skip
(Optional) Only run plays and tasks whose tags do not match the specified tags (comma-separated).
•
Task To Start At
(Optional) Start the playbook at the task matching the specified name.
•
Number Of Parallel Processes (Forks)
(Optional) Specify the number of parallel processes to use (default=5).
•
Hosts Limit
(Optional) Run the playbook only against one or more members of the host group. You can specify single or multiple
hostnames (comma-separated), a group or a negated limit.
Example: all:!host1
•
Extra Variables(Optional) A list of {\"field name\":\"value\"} pairs.
You can provide multiple fields in the following format: {\"field1\":\"value1\",\"field2\":\"value2\"...}.
•
Verbosity(Optional) Determine the level of detail of the debug output Ansible produces as the playbook executes.
Values: Normal, Verbose, More Verbose, Debug, Connection Debug
Red Hat Ansible Tower Plug-in
This plug-in connects Continuous Delivery Director to Red Hat Ansible Tower, allowing you to execute jobs and view the
job output details.
Plug-in Version 2.3-14
This plug-in downloads and stores job outputs in the artifacts folder under the plug-in home directory: ({cdd-home-
folder}/artifacts/{current-date-yyyymmdd}/{tenant-id}/plugins/ansibletower/{executionId}).
You must mount the home directory on a shared file system to enable user access.
When a job is run, the plug-in generates a URL to the job output file. In the Continuous Delivery Director user interface,
users can click a link to view or download the file. Users who do not have permission to access the shared folder will not
be able to download the file.
REMEMBER
To free up disk space, if you download output files, purge the old output files.
Download Options
Use one of the following options to download the latest plug-in version:
Method Info
wget wget -O cdd-ansibletower-plugin.war
https://cspdl.broadcom.com/shared/
static/2r5wsby1sjglzzvd5j5z23kg4r3sc6xe.war?
LCK=ent.box.com
MD5 39382823de7d2633d793bb8e5a9458c4
Click Download Button
412

Continuous Delivery Director 8.5
Supported Versions
The Ansible Tower plug-in supports Red Hat Ansible Tower 3.x.
For more information, see the Ansible Tower documentation at https://www.ansible.com/
Capabilities
Runs Ansible Tower jobs, according to templates and template parameters.
Change History
The following update was made for plug-in version 2.3-14:
•
You can now import old DSL when a new profile is defined.
The following update was made for plug-in version 2.3-13:
•
Security Enhancements - Updated the 3rd party libraries that are part of the package.
The following update was made for plug-in version 2.3-12:
•
Added support for Job Slicing.
The following update was made for plug-in version 2.3-11:
•
Bugfix: Field name changed from job_id to jobId.
The following update was made for plug-in version 2.3-10:
•
Bugfix: Ansible Tower Plugin Icon is missing when registered via plugin proxy.
The following update was made for plug-in version 2.3-9:
•
Added a new task Run Workflow Template
•
Build Number (Deprecated) is removed; you can now specify the build number per application in the Builds For
Applications section of the task.
•
Shared File System Location is removed; the base url in the settings properties file is used for the Job Output URLs.
The following update was made for plug-in version 2.3-6:
•
Minor modifications were made to the Credentials input parameter in the Run Job Template task.
•
You can now use profiles defined in the plug-in's settings.properties file to add custom output parameters. For
more information, see Define Output Parameters (Ansible Tower).
The following update was made for plug-in version 2.3-5:
•
Bugfixes:
–
The log filename did not include the hostname.
–
The log filename used underscores and not hyphens.
The following updates were made for plug-in version 2.3-4:
•
Log handling has been enhanced to prevent relevant logging information from being deleted:
–
A new log record is created daily
–
Logs are retained for 14 days
–
The size limit on log files has been removed
•
A Credentials input parameter was added to the Run Job Template task.
The following update was made for plug-in version 2.3-3:
•
You can now connect to an Ansible Tower endpoint through a proxy server. To support this change, a Use Proxy
checkbox was added to the endpoint configuration parameters.
413

Continuous Delivery Director 8.5
The following update was made for plug-in version 2.3-2:
•
Bugfix: Connection timeout issues to on-premise hosted plug-ins.
The following update was made for plug-in version 2.3-1:
•
Bugfix: Entering a build number in the Run Job Template task is now optional, because builds are not relevant in user
scenarios such as hardware provisioning and network configuration.
The following update was made for plug-in version 2.3:
•
Bugfix: When a Run Job Template task fails, the job ID token value is not saved in Continuous Delivery Director.
The following update was made for plug-in version 2.2:
•
The Build/Change ID field in the Run Job Template task was renamed to Build Number (Deprecated). This field is
deprecated; you can now specify the build number per application in the Builds For Applications section of this task.
The following update was made for plug-in version 2.1:
•
Fixed:Template Name field. Entering a value which included a colon ":" generated an error.
The following update was made for plug-in version 2.0:
•
You can now retrieve Ansible Tower log files.
The following update was made for plug-in version 1.0.5:
•
Support was added for Java 11.
The following update was made for 1.0.4:
•
A new Authentication Method endpoint parameter has been added. In addition to Basic authentication, a new
method, Bearer, is now available. This method allows the Ansible Tower plug-in to interface with systems that allow
authentication with an API token.
The following update was made for 1.0.2:
•
A new Build/Change ID field was added to the Run Job Template task.
Configuration
Follow these steps:
1. Install the Ansible Tower application according to Red Hat Ansible Tower requirements.
NOTE
For more information about how to install and configure Ansible Tower, see the Ansible Tower installation
documentation at https://www.ansible.com/.
2. Register the plug-in and create endpoints as described in Manage Plug-ins.
3. Ensure that the plug-in home folder is mounted to a shared file system.
Manifest URL
For plug-in registration, use the following Ansible Tower manifest URL:
http://<plugin-hostname>:<port>/cdd-ansibletower-plugin/manifest.json
Endpoint Parameters
The following parameters are required to create an endpoint.
•
Ansible Tower Server URL
414

Continuous Delivery Director 8.5
Enter the URL of the remote Ansible Tower instance to be used for connection purposes. For example: https://
example.testansibleserver.com:443/
•
Authentication Method
Select an authorization method to use to establish the connection to Ansible Tower. Values: Basic, Bearer
–
Basic
•
Username/Password
Specify valid credentials to authenticate to Ansible Tower.
–
Bearer is used to interface with systems that allow authentication with API keys.
•
API Token
Specify an Ansible Tower API token.
•
Use Proxy
{Optional} Determines whether a proxy server is used. If selected, the Proxy URL, Proxy Username, and Proxy
Password fields appear:
–
Proxy URL
{Optional} Specifies the web address that is used to access the proxy server
–
Proxy Username
{Optional} Specifies the username that is used to authenticate to the proxy server
–
Proxy Password
{Optional} Specifies the password that is used to authenticate to the proxy server
•
Trust Any SSL Certificate
Select this option if you want to allow untrusted and unsigned SSL/TLS certificates.
CAUTION
Use at your own risk! Selecting this option can expose your environment to "man in the middle" attacks. CA
does not accept responsibility for security vulnerabilities that are caused by the selection of this option.
•
Store Job Output
Select this option to download and store the output file in the plug-in shared home folder: ({cdd-home-folder}/
artifacts/{current-date-yyyymmdd}/{tenant-id}/plugins/ansibletower/{executionId})
CAUTION
Use at your own risk! Selecting this option can expose your environment to "man in the middle" attacks. CA
does not accept responsibility for security vulnerabilities that are caused by the selection of this option.
•
Shared File System Location
This field appears only if the Store Job Output option is selected.
Provide the shared file system path. Continuous Delivery Director will concatenate the file location and will provide
an accessible link. For example, if the base URL is: \\fs01\cdd\, the task displays the URL \\fs01\cdd
\artifacts\20190428\00000000-0000-0000-0000-000000000000\plugins\ansibletower
\45797_825_5cadd64cf3b92918903sc0da\job_5107.txt. If you do not enter a value, the task displays the
local path on the plug-in server machine.
To check the connection to Ansible Tower, use the endpoint Test Connection option.
NOTE
The connectivity test enables a registry scan from the Defender (specified in the Defender Host Name endpoint
parameter).
Tasks
The Ansible Tower plug-in provides the following task:
•
Run Job Template
•
Run Workflow Template
415

Continuous Delivery Director 8.5
Run Job Template
The task lets you run an Ansible Tower job.
This task requires the following information:
Input Parameters
•
Template name
Specify the name of an existing Ansible Tower job template.
•
Template Parameters
Specify the Ansible Tower job parameters in JSON format. Example:
{
"extra_vars": {"message":"A message to be passed", "pauseInSec":1}
}
"message" and "pauseInSec" are both extra variables to be passed to the Ansible Tower job.
•
Credentials
Specify one or more credential names, separated by commas, to use in this job run. Ex. Credentials1, Credentials2,...,.
NOTE
In the job template, the Prompt on Launch option must be selected for Credentials.
•
Build Number (Deprecated)
This field is deprecated; you can now specify the build number per application in the Builds For Applications section
of this task.
Output Parameters
•
Job Id
Specify the Ansible Tower job ID to be returned as a response from the Ansible Tower job. You can create a token
parameter that contains this value. Value: An integer
Run Workflow Template
The task lets you run an Ansible Tower job.
This task requires the following information:
Input Parameters
•
Template name
Specify the name of an existing Ansible Tower workflow template. Ex. "Test workflow Template". You can specify
multiple tags either by selecting dynamic values (@) or you can use free text alone or together with tokens (%) to enter
a list of tags separated by commas. Dynamic values (@) can’t be combined with a string and/or token (%).
Mandatory
•
Template Parameters
Specify parameters for the specified job template. Define parameters in JSON style, wrapped in {}, and separated by
commas. Use % prefix for tokens. You can also use free text alone or together with tokens.
Optional.
Example:
{"extra_vars": { "pauseInSec": 3, "Hello": 3},"job_type": "run"}
•
Credentials
416

Continuous Delivery Director 8.5
Specify one or more credential names, separated by commas, to use in this workflow run. Ex. Credentials1,
Credentials2,...,.
NOTE
In the workflow template, the Prompt on Launch option must be selected for Credentials.
Output Parameters
•
Job Id
Specify the Ansible Tower Job ID to be returned as a response from the Ansible Tower workflow. You can create a
token parameter that contains this value.
Value: An integer
•
Workflow Nodes List URL
Link to the locally stored output of result of /api/v2/workflow_jobs/<job id>/workflow_nodes/
NOTE
How to Integrate Ansible Tower with CA Continuous Delivery Director.pdf
Define Output Parameters (Ansible Tower)
Add custom output parameters for Ansible Tower tasks by editing the settings.properties file.
The custom output fields are defined per specific task and bundled under “profile”. The task designer can select which
profile to use, and based on the profile the output fields will be populated.
NOTE
For the current version, the output fields from all profiles are displayed in the task, but values will be added only
to the fields of the selected profile.
To create custom output fields, from the command line, edit the settings.properties file.
1. For each profile, define the following settings:
•
A unique profile name.
•
A display name.
Syntax: cdd.plugins.ansibletower.profiles.<profile number>.display_name=<profile
display name> .
Example: cdd.plugins.ansibletower.profiles.1.display_name=Profile 1
2. For each profile associate tasks. Each profile must be associated with a specific task by name (the task name that
appears in the plugin manifest).
•
Syntax: cdd.plugins.ansibletower.profiles.<number>.task.<Number>.name=<task name>
Example: cdd.plugins.ansibletower.profiles.1.task.1.name=Run Job Template
3. For each task associate output fields, and define the following settings:
•
A display name.
Syntax:
cdd.plugins.ansibletower.profiles.<num>.task.<number> .output.parameters.<number>.display_name=<field
name>
Example: cdd.plugins.ansibletower.profiles.1.task.1.output.parameters.1.display_name=Inventory Name
•
A description.
Syntax:
cdd.plugins.ansibletower.profiles.<num>.task.<number> .output.parameters.<number>.description=<description
text>
Example: cdd.plugins.ansibletower.profiles.1.task.1.output.parameters.1.description=Returns the inventory name.
417

Continuous Delivery Director 8.5
NOTE
The description appears in the field help text.
•
An output value.
Syntax:
dd.plugins.ansibletower.profiles.<num>.task.<number> .output.parameters.<number>.metadata=<path
to the value>
Example: cdd.plugins.ansibletower.profiles.1.task.1.output.parameters.1.metadata=
$.summary_fields.inventory.name
NOTE
This is a JSON path to the values in the job's output JSON (for run job template - <ansible server>/
api/v2/jobs/<job id>/).
For Example:
cdd.plugins.ansibletower.profiles.1.task.1.output.parameters.1.metadata=
$.summary_fields.inventory.name
This is a JSON path to the values in the job's output JSON (for run workflow template - <ansible
server>/api/v2/workflow_jobs/<job id>/).
4. Set a specific profile as the default profile. Syntax:
cdd.plugins.ansibletower.profiles.default_profile=<profile name>
5. Sync the plugin in order for the changes to take effect.
Sample settings.properties file:
cdd.plugins.max_items_in_dynamic_result=10
cdd.plugins.ansibletower.profiles.default_profile=Profile 1
cdd.plugins.ansibletower.profiles.1.display_name=Profile 1
cdd.plugins.ansibletower.profiles.2.display_name=Profile 2
cdd.plugins.ansibletower.profiles.1.task.1.name=Run Job Template
cdd.plugins.ansibletower.profiles.2.task.1.name=Run Job Template
cdd.plugins.ansibletower.profiles.1.task.1.output.parameters.1.display_name=Inventory Name
cdd.plugins.ansibletower.profiles.1.task.1.output.parameters.1.description=Inventory Name.
cdd.plugins.ansibletower.profiles.1.task.1.output.parameters.1.metadata=
$.summary_fields.inventory.name
cdd.plugins.ansibletower.profiles.1.task.1.output.parameters.2.display_name=Inventory ID
cdd.plugins.ansibletower.profiles.1.task.1.output.parameters.2.description=Inventory ID.
cdd.plugins.ansibletower.profiles.1.task.1.output.parameters.2.metadata=
$.summary_fields.inventory.tid
cdd.plugins.ansibletower.profiles.1.task.1.output.parameters.3.display_name=Inventory Description
cdd.plugins.ansibletower.profiles.1.task.1.output.parameters.3.description=Inventory
Description cdd.plugins.ansibletower.profiles.1.task.1.output.parameters.3.metadata=
$.summary_fields.inventory.description
cdd.plugins.ansibletower.profiles.2.task.1.output.parameters.1.display_name=Created by Username
cdd.plugins.ansibletower.profiles.2.task.1.output.parameters.1.description=Created by Username.
cdd.plugins.ansibletower.profiles.2.task.1.output.parameters.1.metadata=
$.summary_fields.created_by.username
418

Continuous Delivery Director 8.5
cdd.plugins.ansibletower.profiles.2.task.1.output.parameters.2.display_name=Created by Name
cdd.plugins.ansibletower.profiles.2.task.1.output.parameters.2.description=Created by Name.
cdd.plugins.ansibletower.profiles.2.task.1.output.parameters.2.metadata=
$.summary_fields.created_by.first_name
cdd.plugins.ansibletower.profiles.2.task.1.output.parameters.3.display_name=Created by Lastname
cdd.plugins.ansibletower.profiles.2.task.1.output.parameters.3.description=Created by Lastname.
cdd.plugins.ansibletower.profiles.2.task.1.output.parameters.3.metadata=
$.summary_fields.created_by.last_name
To apply the changes, re-install the plugin from the CDD Plugins menu to sync the plugin.
Red Hat OpenShift Plug-in
This plug-in lets you control your Kubernetes environment from your CI/CD pipeline.
Plug-in Version 2.2-6
OpenShift is an open-source container application platform based on the Kubernetes container orchestrator for enterprise
application development and deployment. You can use this integration to containerize and manage your existing
applications and automate routine configuration tasks.
Use this plug-in to link a source control system, such as Bitbucket or GitHub to Continuous Delivery Director. When
connected to Continuous Delivery Director, any updates to containers that are managed by OpenShift are seamlessly
referenced in your CD/CI pipeline. This plug-in allows Continuous Delivery Director to display information about
your OpenShift development activity in the corresponding release.
This section explains how to link a source control system and an OpenShift project to Continuous Delivery Director and
how to configure OpenShift-related tasks.
Download Options
Use one of the following options to download the latest plug-in version:
Method Info
wget wget -O cdd-openshift-plugin.war
https://cspdl.broadcom.com/shared/
static/32iadcx3c7odcoeabu9xl07yu3dsgm91.war?
LCK=ent.box.com
MD5 3008733e7042a66e00dd5e49e8752f47
Click Download Button
Supported Versions
The OpenShift plug-in supports the core OpenShift solution.
For more information, see the OpenShift documentation at https://docs.openshift.com
What's New
The following updates were made for 2.2-6:
•
Security Enhancements - Updated the 3rd party libraries that are part of the package.
419

Continuous Delivery Director 8.5
The following updates were made for 2.2-5:
•
Security Enhancements - Updated the 3rd party libraries that are part of the package.
The following updates were made for 2.2-4:
•
Security Enhancements - Updated the 3rd party libraries that are part of the package.
The following updates were made for 2.2-3:
•
Security Enhancements - Updated the 3rd party libraries that are part of the package.
The following updates were made for 2.2-2
•
The Fabric8 software component used by this plug-in has been upgraded to version 5.1.1.
The following update was made for 2.2-1:
•
Bugfix (DE490722): The log bridge from Catalina to cdd-server log files now records fabric8 HTTP traffic only.
Previously, idle Kubernetes and OpenShift plug-in activities were recorded, resulting in very large log files.
The following updates were made for 2.2:
•
Support was added for the following source control systems: GitLab, AWS S3, Web Services.
•
Basic authentication using a username and password was added.
•
A Branch parameter was added to the GitHub endpoint parameters.
•
A Trust Any SSL Certificate option was added to the endpoint parameters.
•
A YAML Settings field was added to the Create Deployment task.
The following updates were made for 2.1:
•
Multiple bug fixes.
The following updates were made for 2.0:
•
Namespace support changes.
The following updates were made for 1.3:
•
Minor fix for connectivity testing.
The following updates were made for 1.1:
•
Support was added for Kubernetes versions 1.9 and higher.
•
Support was added for Java 11.
Release Tasks
Tasks
The OpenShift plug-in supports the following task types in your Continuous Delivery Director release pipeline:
•
Create Deployment
•
Delete Deployment
•
Edit BuildConfig
•
Set Image
•
Start Build
Configure an OpenShift Endpoint
You are familiar with OpenShift.
420

Continuous Delivery Director 8.5
You have the Can create endpoints permission.
1. Register the plug-in as described in Manage Plug-ins.
The manifest for the OpenShift plug-in is http://<host>:<port>/cdd-openshift-plugin/manifest.json .
2. From the Administration menu, click Endpoints > Add Endpoint.
3. In the ADD ENDPOINT dialog, select the OpenShift plug-in.
4. Configure the following input parameters:
•
URL
Specify the URL of the OpenShift repository. Example: http://ec2-17-04-196-us-
east-6.compute.amazonaws.com/openshift
•
Namespace
Specify the OpenShift project to use.
NOTE
In OpenShift, a project is a Kubernetes namespace with additional annotations.
•
Username
Specify a user name to authenticate to your cluster.
•
Password
Specify a password to authenticate to your cluster.
•
Source Control
Select the required source control system to connect to your file repository.
GitHub
–
GitHub API URL
–
GitHub Owner
–
GitHub Repository
–
GitHub Branch
–
GitHub Username
–
GitHub Password
GitLab
–
GitLab API URL
–
Authentication Method
Select either OAuth2 Token or Personal Access Token.
–
GitLab Owner
–
GitLab Repository
–
GitLab Branch
Bitbucket
–
Bitbucket API URL
–
Account Name/Project Key
Specify the Bitbucket account name or project key.
–
Bitbucket Repository
–
Bitbucket Branch
–
Bitbucket Username
–
Bitbucket Password
AWS S3
421

Continuous Delivery Director 8.5
–
Service API URL
–
Region
–
Access Key
–
Secret Key
–
Bucket Name
Web Service
–
Web Service API URL
–
Web Service Username
–
Web Service Password
•
Trust Any SSL Certificate
Select this option if you want to allow untrusted and unsigned SSL/TLS certificates.
WARNING
Use at your own risk! Selecting this option can expose your environment to "man in the middle" attacks.
CA Technologies does not accept responsibility for security vulnerabilities that are caused by selecting
this option.
5. To check the connection to OpenShift and to the source control system, click Test Connection.
6. Click Add.
Create Deployment (OpenShift)
This task lets you create an OpenShift deployment to run in the context of Continuous Delivery Director phases and
releases.
One or more OpenShift endpoints are available.
This task creates a deployment package upon the arrival of a build notification. Each time a deployment is triggered, a
deployer pod is started and manages the deployment
1. In a release, create an automatic task as described in Create Automatic Tasks.
2. Configure the following input parameters:
TIP
Values: To define a value, do one of the following actions:
•
To select from a list of possible values, type an at sign "@" in the field
Example: Deploy Tomcat
•
To select from a list of built-in tokens (reusable placeholders that are used to create generic workflows),
type a percent sign "%" in the field
•
Type free text
•
Enter a combination of free text and tokens
•
Namespace
(Optional) Specify the OpenShift virtual cluster namespace. For more information about namespaces, see the
OpenShift documentation at https://docs.openshift.com.
Values: If not specified, the plug-in checks that the YAML file indicated in the Manifest File Path field for the
namespace. If no other namespace is found, the plug-in uses the OpenShift default namespace.
•
Branch
(Optional) Specify the source control branch with which you want to work.
•
Manifest File Path
Specify the file path to a YAML file in the source control repository. Example: app/deployment.yaml
•
YAML Settings
422

Continuous Delivery Director 8.5
Specify a list of key/value pairs to update in the deployment YAML manifest. For example: in order to update the
image.tag element of a manifest file, specify image.tag: saas-dev-1.6.0.7 . You can specify multiple key/
value pairs separated by lines.
3. Click Create.
Delete Deployment (OpenShift)
One or more OpenShift endpoints are available.
1. In a release, create an automatic task as described in Create Automatic Tasks.
2. Configure the following input parameters:
TIP
Values: To define a value, do one of the following actions:
•
To select from a list of possible values, type an at sign "@" in the field
Example: Deploy Tomcat
•
To select from a list of built-in tokens (reusable placeholders that are used to create generic workflows),
type a percent sign "%" in the field
•
Type free text
•
Enter a combination of free text and tokens
•
Namespace
(Optional) Specify the OpenShift virtual cluster namespace. For more information about namespaces, see the
OpenShift documentation at https://docs.openshift.com.
Values: If not specified, the plug-in checks that the YAML file indicated in the Manifest File Path field for the
namespace. If no other namespace is found, the plug-in uses the OpenShift default namespace.
•
Branch
(Optional) Specify the source control branch with which you want to work.
•
Manifest File Path
Specify the file path to a YAML file in the source control repository. Example: app/deployment.yaml
3. Click Create.
Edit BuildConfig (OpenShift)
This task lets you modify an existing OpenShift build configuration.
One or more OpenShift endpoints are available.
In OpenShift, a build configuration describes a single build definition and a set of triggers for when a new build should be
created. A build configuration is defined by a BuildConfig, which is a REST object that can be used in a POST to the API
server to create a new instance.
1. In a release, create an automatic task as described in Create Automatic Tasks.
2. Configure the following input parameters:
TIP
Values: To define a value, do one of the following actions:
•
To select from a list of possible values, type an at sign "@" in the field
423

Continuous Delivery Director 8.5
Example: Deploy Tomcat
•
To select from a list of built-in tokens (reusable placeholders that are used to create generic workflows),
type a percent sign "%" in the field
•
Type free text
•
Enter a combination of free text and tokens
•
Namespace
(Optional) Specify the OpenShift virtual cluster namespace. For more information about namespaces, see the
OpenShift documentation at https://docs.openshift.com.
Values: If not specified, the plug-in checks that the YAML file indicated in the Manifest File Path field for the
namespace. If no other namespace is found, the plug-in uses the OpenShift default namespace.
•
BuildConfig Name
Specify a unique ID of an OpenShift build configuration.
•
Dockerfile
(Optional) Specify the container name in the OpenShift deployment. Example: docker.bintray.io/jfrog/ca-
cdd:8.2.0
•
Image Stream Name
Specify the name of an image stream.
•
Image Stream Tag
(Optional) Specify the tag or tags that are associated with the image stream
3. Click Create.
Set Image (OpenShift)
This task lets you update existing container image(s) of resources.
One or more OpenShift endpoints are available.
1. In a release, create an automatic task as described in Create Automatic Tasks.
2. Configure the following input parameters:
TIP
Values: To define a value, do one of the following actions:
•
To select from a list of possible values, type an at sign "@" in the field
Example: Deploy Tomcat
•
To select from a list of built-in tokens (reusable placeholders that are used to create generic workflows),
type a percent sign "%" in the field
•
Type free text
•
Enter a combination of free text and tokens
•
Namespace
(Optional) Specify the OpenShift virtual cluster namespace. For more information about namespaces, see the
OpenShift documentation at https://docs.openshift.com.
Values: If not specified, the plug-in checks that the YAML file indicated in the Manifest File Path field for the
namespace. If no other namespace is found, the plug-in uses the OpenShift default namespace.
•
Deployment Name
Specify the OpenShift deployment name.
•
Container Name
Specify the container name in the OpenShift deployment.
•
Image Name
424

Continuous Delivery Director 8.5
Specify the name of the image to set.
3. Click Create.
Start Build (OpenShift)
Automatically start a new build from an existing build configuration in your current OpenShift project.
One or more OpenShift endpoints are available.
1. In a release, create an automatic task as described in Create Automatic Tasks.
2. Configure the following input parameters:
TIP
Values: To define a value, do one of the following actions:
•
To select from a list of possible values, type an at sign "@" in the field
Example: Deploy Tomcat
•
To select from a list of built-in tokens (reusable placeholders that are used to create generic workflows),
type a percent sign "%" in the field
•
Type free text
•
Enter a combination of free text and tokens
•
Namespace
(Optional) Specify the OpenShift virtual cluster namespace. For more information about namespaces, see the
OpenShift documentation at https://docs.openshift.com.
Values: If not specified, the plug-in checks that the YAML file indicated in the Manifest File Path field for the
namespace. If no other namespace is found, the plug-in uses the OpenShift default namespace.
•
BuildConfig Name
Specify a unique ID of an OpenShift build configuration.
•
Build Number
Specify an OpenShift build number. You can use tokens such as last_successful_build to promote
applications across environments.
3. Click Create.
REST Plug-In
This plug-in provides an interface to perform REST operations in a release.
Plug-in Version 2.6-5
The REST plug-in provides a way to interact with REST-enabled remote components that do not have a packaged plug-in.
Use the REST plug-in to perform HTTP operations on any web-based remote application that has a REST API.
NOTE
We recommend that you test your REST API calls before you set up generic RESTful tasks.
425

Continuous Delivery Director 8.5
Download Options
Use one of the following options to download the latest plug-in version:
Method Info
wget wget -O cdd-rest-plugin.war https://
cspdl.broadcom.com/shared/static/
uedpcbfuccu0iyv13wqkoe0z6n13dph6.war?
LCK=ent.box.com
MD5 c8f43a04215b8920fe425f3446e7742a
Click Download Button
Capabilities
The REST plug-in lets you execute a REST (HTTP) call in a task. This plug-in supports REST 2.0.
Change History
The following updates were made for plug-in version 2.6-5:
•
Security patch as a result of the static code analysis.
The following updates were made for plug-in version 2.6-4:
•
Security patch as a result of open source components audit.
The following updates were made for plug-in version 2.6-3:
•
The output parameter of REST tasks has been tokenized and now provides success and fail indicators. The fail value
can be used in on-failure phases.
The following updates were made for plug-in version 2.6-2:
•
Bugfix: If an error occurred when a REST task was run, unhandled exceptions and property classes were displayed in
the task status.
The following updates were made for plug-in version 2.6:
•
You can now use top-level domain names that do not appear in a list of valid generic top-level domains. To support this
capability, a new property was added to the settings.properties file of the REST plug-in:
cdd.plugins.rest.url_validator.valid_generic_top_level_domain=
By default, this property is empty. You can enter multiple top-level domains separated by commas. For example:
cdd.plugins.rest.url_validator.valid_generic_top_level_domain=broadcom,testca,caqa
You can also add this property to your custom on-premise settings.properties file (/home/cdd/.cdd/conf/
settings.properties)
The following updates were made for plug-in version 2.5:
•
A new Authentication Method endpoint parameter has been added. In addition to Basic authentication, a
new method, Bearer, is now available. This method allows the REST plugin to interface with systems that allow
authentication with an API token.
•
Support was added for Java 11.
426

Continuous Delivery Director 8.5
Configuration
Register the plug-in and create endpoints as described in Manage Plug-ins.
The URL of the REST manifest for plug-in registration is http://<plugin-server>:<port>/cdd-rest-plugin/manifest.json.
The following information is required when you create an endpoint:
•
Base URL
Specify the base URL of the REST API. The base URL is common to all REST task instances that use the endpoint.
Include in the base URL the remote component address and port, and the http schema (http or https).
Example: https://www.googleapis.com/gmail/v1/users
Each REST task specifies a specific URL postfix to append to the base URL of the endpoint.
•
Authentication Method
Select an authorization method to use to establish the connection to the REST API.
Values: Basic, Bearer
–
Basic
•
Username/Password
Specify valid credentials for accessing the REST API that you want to call.
–
Bearer is used to interface with systems that allow authentication with API keys.
–
API TokenSpecify an API token to authenticate to the API.
•
Proxy Server URL
Specify the proxy server URL. This URL must contain the protocol, domain name or IP, and the port (if the port is not
standard).
Example: https://192.168.0.1:8443
•
Proxy Server Username/Proxy Server Password (Optional)
Specify access credentials for the proxy server. If your proxy server does not require any authorization credentials,
leave this field empty.
Tasks
The REST plug-in provides the following task:
•
REST
REST Task
The REST task lets you execute a REST API call within a release. The task has the flexibility to interface with any remote
component that has a REST interface.
The REST task requires the following information:
Input Parameters
•
URL
Specifies the URL postfix for the REST call you make. The URL postfix is appended to the base URL that you enter
when you configure the base endpoint.
Example: /userId/drafts/id
In this case, the complete URL is: https://www.googleapis.com/gmail/v1/users/userId/drafts/id.
Note: The URL task field only requires the postfix value.
Warning: Do not specify tokens in the URL field.
•
Method
Specifies the method of the REST call.
Values: GET, POST, PUT, PATCH, DELETE, HEAD
•
JSON Body(Optional)
Specifies the full JSON body of the request.
427

Continuous Delivery Director 8.5
Limits: 1024 characters
•
Post Script (Optional)
Specifies a JavaScript snippet (with a limit of 1024 characters) that runs after the REST call executes. It should
process its response to determine the task result and status. It can contain the following parameters:
–
REST JSON response code
The "responseCode" JavaScript variable holds the HTTP response status code that the remote REST endpoint
returns.
–
REST JSON response
The "response" JavaScript object holds the JSON response that the remote REST endpoint returns.
–
Task status text
The "status" JavaScript variable defines the expected task status text that is displayed on the UI.
–
Task state
The returned JavaScript Boolean code controls the task state.
Values: true (success), false (failure)
Note: Set the JavaScript snippet source code inline as the value of this task parameter.
Example: A REST call may return a response like the following:
{
"data": [
{
"state": "Failed Verification"
}
]
}
Here is an example post-script to handle this type of response:
if (responseCode == 200){
status=response.data[0].state; // The task status displays the state field of the
first data element of the JSON response.
if (status=="Failed Verification") return false; // If the state equals “Failed
Verification” the task fails.
} else {
status="Operation Failed";
return false;
}
Note: The format of the response object is different for each REST call. In this example, the response.data[0].state
shows a case where the returned response JSON has an array type data field that contains a state field.
You can embed tokens in the JavaScript snippet as input parameters to this post script. In the preceding example,
you can use a token name to hold the Failed Verification string.
Note: You cannot use tokens as output parameters of this post script. You can only use tokens as input parameters,
and you cannot set the token values.
Note: If you do not supply a post script, any REST call is considered successful, even if, for example, its status
code is 401 Unauthorized. This allows you to make the decision on how to handle any type of condition, including
mixed conditions whose state may be unclear.
•
Headers
Specifies a list of HTTP headers of the request. The list contains header name and header value pairs that are
separated by colons.
Example:
accept:*/*
accept-encoding:gzip, deflate
accept-language:en-GB,en;q=0.8,en-US;q=0.6,he;q=0.4
428

Continuous Delivery Director 8.5
authorization:SAPISIDHASH 64219e71abad
content-length:300
content-type:application/x-www-form-urlencoded;charset=UTF-8
cookie:NID=76=zn-Jcx6; SID=DQQ-n-rc; APISID=xHX/AsO0
origin:https://www.google.co.uk
referer:https://www.google.co.uk/
user-agent:Mozilla/5.0 (Windows NT 6.1) Chrome/48.0.2221.27
x-client-data:CKJjKAQ==
•
Status Check
Activates a status check for this task.
Note: The following fields appear only if the Status Check checkbox is selected.
•
Status URL
Specifies the REST call to run for the status check.
•
Status Post Script
Specifies a script to determine the status of the task using the returned JSON.
Example:
if (responseCode == 200) {
status = response.data[0].state; // The task status displays the state field of the
first data element of the JSON response.
if (status == "Failed Verification") {
return false;
} else {
return true;
} // If the state equals “Failed Verification” the task fails.
} else {
status = "Operation Failed";
return false;
}
return true;
•
Polling Interval
Specifies the interval in milliseconds in which the status is checked by the user in milliseconds.
•
Task Timeout
Specifies the timeout for the entire task execution in milliseconds.
Output Parameters
•
Output Parameter
Specifies the output format for the response.
Note: The output parameter returns a value only if the JavaScript snippet in the Post Script field is configured to
support an output value.
Example: To set the value of the output parameter, use the following syntax in the post script:
“output=response.data[0].something;”
The code in the plug-in sets the output value of Output Parameter to be the value that is returned in the JSON path
that is specified in the post script.
Example: Integrate with a Third Party REST API
The following scenario shows how to use the Continuous Delivery Director CA REST plug-in to integrate with third-party
REST APIs. The Jenkins integration tool is used in this example.
429

Continuous Delivery Director 8.5
Prerequisites
To integrate with a third-party REST API, first configure the Continuous Delivery Director REST plug-in.
Methods
•
Create a New Jenkins Build
This API creates a build of Project-Name project with the project parameters.
Type: POST
URL: /job/Project-Name/buildWithParameters?Param1=value1
•
Get the Status of the Last Jenkins Build
This API gets the status of the last build of the Project-Name project.
Type: GET
URL /job/Project-Name/lastBuild/api/json
Configuration
This example invokes Jenkins Build jobs that are based on the Jenkins build status. The Continuous Delivery Director task
is updated to take the next logical action.
Follow these steps:
1. Log in to Jenkins and create a project. Name the project test-project, and provide the following build definition:
Note: This definition accepts the parameter UserName:
2. Log in to Continuous Delivery Director.
3. Go to Administration, Endpoints, and click Add Endpoint.
4. Complete the fields in the ADD ENDPOINT box.
Note: To integrate with Jenkins, the following fields are required for an endpoint.
–
Endpoint Type
Specify a REST Endpoint to use
430

Continuous Delivery Director 8.5
Example: CDE REST Plugin
–
Base URL
Specify the base URL that is used to access Jenkins
Format: http://<Jenkins-Server-IP/Hostname>:<PORT>
Example: http://jenkins-dev:8080
5. Navigate to RELEASES and add an application and a phase, for example, DEV-phase.
NOTE
For more information, see Design and Create Releases
6. Create and configure two REST plug-in tasks in the phase:
7. a. Provide the following details for the Jenkins Call task:
•
Task Name
•
Description
•
OWNERS
•
TASK TYPE
Value: REST
•
ENDPOINT
Name of the endpoint that is created in step 3.
•
URL
Value: /job/Project-Name/Jenkins-Action-To-Perform
Example: /job/test-project/buildWithParameters?UserName=testuser@ca.com
Note: The UserName parameter is configured in the Jenkins test-project. Refer to step 1.
•
Method
Value: POST
431

Continuous Delivery Director 8.5
b. Provide the following details for the Get Last Output task:
•
Task Name
Example: Get Last Output
•
Description
•
Owners
•
TASK TYPE
Value: REST
•
ENDPOINT
432

Continuous Delivery Director 8.5
Name of the endpoint that is created in step 3.
•
URL
Value: job/Project-Name/Jenkins-Action-To-Perform
Example: job/test-project/lastBuild/api/json
•
Method
Value: GET
•
Postscript
Defines the JavaScript script to run to process the JSON response.
Value: see the following example
Example:
if (responseCode == 200){
returnStatus=false;
status=response.fullDisplayName + "Build ";status+=response.result;
if(response.result.toUpperCase()=="SUCCESS")
{
returnStatus=true;
return returnStatus;
}else
{returnStatus=false;
return returnStatus;}
}else{status+=" REST Call Operation Failed"
return false;
}
433

Continuous Delivery Director 8.5
The following screen capture shows the two tasks
434

Continuous Delivery Director 8.5
Note: The status is the keyword that is used by Continuous Delivery Director to show the task status.
8. Save the tasks and run the phase.
The Continuous Delivery Director REST plug-in is integrated with Jenkins.
In the following screen capture, the task status text is highlighted in Red:
435

Continuous Delivery Director 8.5
NOTE
Each API that the JSON object return is different. Modify the preceding JavaScript example to parse the
returned JSON object.
Robot Framework Plug-in
This plug-in provides you with a test automation framework for Git and SVN builds that is open-source and application-
independent. The Robot Framework plug-in is containerized and supports Adaptive Testing functionality.
Plug-in Version 1.7-4
This plug-in is available as a Docker image on the customer support portal which has specific requisites and installation
steps.
436

Continuous Delivery Director 8.5
Download Options
Use one of the following options to download the latest plug-in version:
Method Info
wget wget -O cdd-robot-plugin-latest.tar.gz
https://cspdl.broadcom.com/shared/
static/2lj2dvl0lbhvyf0n3f715hi0cyga5ley.gz?
LCK=ent.box.com
MD5 603202f55bf52aaac5c7f278d6b8fa73
Click Download Button
Download Docker Image from Customer Support Portal Yes
Download TAR file from Customer Support Portal for customers
who cannot use docker pull
Yes
Change History
The following update was made for plug-in version 1.7-2:
•
To improve readability, the Extra Execution Parameters field in the Get Test Assets (Test Source) task was
changed to a textarea field.
The following update was made for plug-in version 1.7-1:
•
Bugfix: Tests that were skipped and therefore were not associated with reports were reported as failures
The following update was made for plug-in version 1.7:
•
The New or Updated Test Suites heuristic is now supported for SVN test suites. This metric is a weighting factor
when the Test Advisor intelligently selects a subset of test suites to run in subsequent test cycles.
Manifest URL
For plug-in registration, use the following manifest URL:
http://<plugin-server>:<port>/containerized/plugins/cdd-robot-plugin/manifest.json
Configuration
You configure the Robot Framework plug-in either for the initial setup, or whenever a change to the test build configuration
is required.
Endpoint Parameters
The following parameters are required to create an endpoint:
•
Version Control System
Specify the version control system where your source project resides.
•
Git/SVN Project URL
Specify the URL to access the Git or SVN project repository.
•
GitHub/SVN Username
437

Continuous Delivery Director 8.5
Specify the user name to access GitHub or SVN. Only required if the Git or SVN repository is not a public repository.
•
GitHub/SVN Password
Specify the password to access GitHub or SVN.
To check the connection to the Robot Framework and to the version control system, select Test Connection. The Test
Connection action returns the following results:
•
Success
The connection was successful
•
Failure
The connection failed
Tasks
The Robot Framework plug-in supports the Run Adaptive Testing task type.
Prerequisites:
•
One or more application versions are specified.
•
One or more Robot Framework test suites exist for the application versions specified.
Tags
Specify one or more tags to find possible test suite matches.
Example: Type ro to retrieve all test suites tagged with labels beginning with ro, such as robot.sanity.test
Build/Commit id
Specify the commit ID (Git) of the code to test.
TIP
To select from a list of available tokens, enter the percent sign (%) in the task field.
Get Test Assets
The Robot Framework plug-in imports test suites into the Adaptive Testing Catalog.
Follow these steps:
1. Select Tests, then Adaptive Testing Catalog.
2. Specify the Application and the Application Version.
The menu next to the application name and version is activated.
3. Select Get Test Assets.
4. Fill in the following fields:
–
Test Source Name
–
Plug-in
Select Robot Framework and Import Test Suites.
–
Endpoint
Select a Robot Framework endpoint.
–
Branch
Specify the name of the Git branch where the test suites you want to import are located.
–
Root Folder
Specify a path to the folder where the test suites you want to import are located. If left empty, test suites will be
imported from the entire repository.
–
Extra Execution Parameters
438

Continuous Delivery Director 8.5
Specify additions to the robot framework execution command. You can write multiple commands to run before the
tests are executed. You can include shared tokens. Separate the commands with a semi-colon ";".
Example: -v SUT_HOST:sut.com
–
Tags
Select one or more tags to execute test suites tagged with your selection. Leave empty to execute all the test suites
under the application version.
Example: Type ro to retrieve all test suites tagged with labels beginning with ro, such as robot.sanity.test
Runscope Plug-in
This plug-in lets you can add an Adapting Testing task to your release pipeline that executes a Runscope API test
Plug-in Version 1.1-3
You add this task after your API has been deployed and is ready for testing. After the Runscope API is triggered, the plug-
in waits for the test run to finish (or time out). If the API test task is successful, your pipeline will continue to the next task
in your pipeline; however, if the task fails (or times out), the build is marked as failed.
Download Options
Use one of the following options to download the latest plug-in version:
Method Info
wget wget -O cdd-runscope-plugin.war https://
cspdl.broadcom.com/shared/static/
t3z9fhq4rroynzqqp8ifjuv9t0fknbz6.war?
LCK=ent.box.com
MD5 0a2ae0be3a1efba07e595e754ef56a62
Click Download Button
What's New
The following update was made for plug-in version 1.1-2:
•
Enhancement: - The plugin now support the use of system variable..
Configuration
Register the plug-in and create endpoints as described in Manage Plug-ins
The URL of the Runscope manifest for plug-in registration is https://<plugin-server>:<port>/cdd-runscope-plugin/
manifest.json.
Select the Runscope plug-in in the ADD ENDPOINT dialog to create an endpoint for the Runscope plug-in. The following
Runscope information is required when you create an endpoint:
•
URL
Specify the URL of the Runscope instance to use for connection purposes.
Syntax: https://[Runscope server]:443/
Note: The URL can be specified either as http or https
•
Access Token
439

Continuous Delivery Director 8.5
Specify an access token to authenticate to Runscope.
Get Test Assets
This plug-in lets you import test suites into the Adaptive Testing Catalog.
Follow these steps:
1. Select Tests, then Adaptive Testing Catalog.
2. Specify the Application and the Application Version. The menu next to the application name and version is
activated.
3. Select Get Test Assets.
4. Fill in the following fields:
–
Test Source Name
–
Plug-in
Select Runscope and Import Test Suites.
–
Endpoint
Select a Runscope endpoint.
–
Bucket Name
Specify the name of the Runscope bucket (project) where the test suites you want to import are located.
–
Environment Name
Specify the name of the Runscope environment to use when running test suites. An environment is a group of
configuration settings (initial variables, locations, notifications, integrations, and so on).
NOTE
There are two types of environments you can define in Runscope: test-specific environments and shared
environments. The former can be applied to a single test; the latter can be applied across multiple tests.
This plug-in supports shared environments only.
–
Tags
Select one or more tags to execute test suites tagged with your selection. Leave empty to execute all the test suites
under the application version.
Example: Type ru to retrieve all test suites tagged with labels beginning with ru, such as runscope.api.test
Tasks
This plug-in supports the Run Adaptive Testing task type.
Prerequisites:
•
One or more application versions are specified.
•
One or more Runscope test suites exist in the Adaptive Testing Catalog for the application versions specified.
Tags
Specify one or more tags to find possible test suite matches.
Example: Type ru to retrieve all test suites tagged with labels beginning with ru, such as runscope.api.test
Build/Commit id
Specify the commit ID (Git) of the code to test.
TIP
To select from a list of available tokens, enter the percent sign (%) in the task field.
440

Continuous Delivery Director 8.5
Salesforce Plug-in
Retrieve, test, and deploy Salesforce apps from your release pipeline.
Plug-in Version 1.0-4
Salesforce Developer Experience (SFDX) uses a migration tool to retrieve and push metadata to an org, also known as a
developer environment. This containerized plug-in lets you use SFDX together with Continuous Delivery Director to speed
up the standard development workflow.
Tasks
The Salesforce plug-in supports the following tasks:
•
Run Deployment
Method Info
wget wget -O cdd-salesforce-plugin-latest.tar.gz
https://cspdl.broadcom.com/shared/static/
onfwnnihyi90hcdvyiu8qwy08kbm70xz.gz?
LCK=ent.box.com
MD5 c5bdb9012e4a50a60c067587587c26e9
Click Download Button
Change History
The following updates were made for plug-in version 1.0-4:
•
Security Enhancements - Updated the 3rd party libraries that are part of the package.
The following updates were made for plug-in version 1.0-3:
•
Security Enhancements - Updated the 3rd party libraries that are part of the package.
The following updates were made for plug-in version 1.0-1:
•
Import test functionality was added.
Configure a Salesforce Endpoint
You configure the Salesforce plug-in endpoint either for the initial setup, or whenever a change to the deployment
configuration is required.
You are familiar with Salesforce.
You have the Can create endpoints permission.
1. Register the plug-in as described in Manage Plug-ins.
The manifest for the Salesforce plug-in is http://<host>:<port>/cdd-salesforce-plugin/manifest.json
.
441

Continuous Delivery Director 8.5
2. From the Administration menu, click Endpoints > Add Endpoint.
3. In the ADD ENDPOINT dialog, select the Salesforce plug-in.
4. Configure the following input parameters:
•
SFDX Authentication URL
Authorize a Salesforce org by specifying an SFDX auth URL stored within a file. The URL must have
the format [force://<clientId>:<clientSecret>:<refreshToken>@<instanceUrl>]. For example: [force://
PlatformCLI::5Aep8QqXGe.9LrsWV[email protected].salesforce.com].
•
Git Project URL
Specify the URL to access the Git project repository.
•
Git Username
Specify the user name to authenticate to the Git project repository.
•
Git/SVN Password
Specify the user name to authenticate to the Git project repository.
5. To check the connection to Salesforce and to the source control system, click Test Connection.
6. Click Add.
Run Deployment (Salesforce)
Run Salesforce deployments in the context of Continuous Delivery Director phases and releases.
One or more Salesforce endpoints are available.
Optionally, you can run tests against the deployment. This plug-in references a package of metadata source files stored
and versioned in your Git source control tool.
1. In a release, create an automatic task as described in Create Automatic Tasks.
2. Configure the following parameters:
Input Parameters
•
Branch
Specify the Git version control branch used by the project.
•
Package
Specify the folder path of the Salesforce package where the metadata source files are stored.
Test Level
(Optional) Specify which tests are run as part of a deployment. The test level is enforced regardless of the types of
components that are present in the deployment package. Choose from:
–
NoTestRun
No tests are run. This test level is the default for development environments.
–
Run Tests
Specify the comma-separated test classes to run tests.
–
RunLocalTests
Run all tests in your org, except those tests that originate from installed managed and unlocked packages. This
test level is the default for production deployments that include Apex classes or triggers.
–
RunAllTestsInOrg
Run all tests in your org, including tests of managed packages.
Log Level
(Optional) Choose a debug log level from the following:
442

Continuous Delivery Director 8.5
–
TRACE
–
DEBUG
–
INFO
–
WARN
–
ERROR
–
FATAL
•
Ignore Warnings
Determine whether warnings are suppressed at the deployment level.
•
Verbose
Determine whether the debug output Salesforce produces during the deployment run is detailed.
3. Click Create.
ServiceNow Plug-in
This plug-in helps you to automate the approval process and to reduce manual steps that delay delivery to production.
Plug-in Version 2.3-4
The ServiceNow plug-in helps you to automate the approval process and to reduce manual steps that delay delivery
to production. The plug-in matches tickets that are defined in ServiceNow with their appropriate release and creates
visualizations. These features help you to see the ticket status, and act accordingly.
This plug-in also optimizes and fully automates the information flows between the different systems. Tickets are therefore
updated based on the progress of the release.
Download Options
Use one of the following options to download the latest plug-in version:
Method Info
wget wget -O cdd-servicenow-plugin.war https://
cspdl.broadcom.com/shared/static/
s083tni6mq07c51jg0rkmnbsdpphs45l.war?
LCK=ent.box.com
MD5 fa08f2da68aa7b82f35be5472e6eb8ac
Click Download Button
Supported Versions
The ServiceNow plug-in supports the core ServiceNow SaaS solution.
For more information, see the ServiceNow documentation at http://wiki.servicenow.com
What's New
The following update was made for plug-in version 2.3-2:
•
The success message generated after a Create Change Request task executes now contains a URL linking to the
newly-created change request in ServiceNow.
The following update was made for plug-in version 2.3-1:
443

Continuous Delivery Director 8.5
•
Bug fix: - Unclear error message when work item import fails.
The following update was made for plug-in version 2.3:
•
Commas in JSON definitions in task input parameter fields generated task failures.
The following update was made for plug-in version 2.2:
•
Support was added for Java 11.
Configuration
Register the plug-in and create endpoints as described in Manage Plug-ins.
Manifest URL
For plug-in registration, use the following ServiceNow manifest URL:
http://<plugin-server>:<port>/cdd-servicenow-plugin/manifest.json
Endpoint Parameters
The following parameters are required to create an endpoint:
•
Server URL
Specifies the URL that is used to access the ServiceNow instance
•
Username
Specifies the user name that is used to authenticate to the ServiceNow instance
•
Password
Specifies the password that is used to authenticate to the ServiceNow instance
•
Use Proxy
{Optional} Determines whether a proxy server is used
Note: If selected, the Proxy URL, Proxy Username, and Proxy Password fields appear
•
Proxy URL
{Optional} Specifies the web address that is used to access the proxy server
•
Proxy Username
{Optional} Specifies the username that is used to authenticate to the proxy server
•
Proxy Password
{Optional} Specifies the password that is used to authenticate to the proxy server
To check the connection to ServiceNow, use the endpoint Test Connection option.
Import Work Items
The ServiceNow plug-in lets you sync work items between ServiceNow and Continuous Delivery Director releases. Use
this capability when you create a release to see the related ServiceNow information.
Follow these steps:
1. In a release, click the Work Items tab on the left menu.
2. Select Add Work Items.
The ADD WORK ITEMS window opens.
3. Enter a name for the work items source.
Example: ServiceNow Feed
4. Under Work Items Source, select the ServiceNow plug-in and a configured ServiceNow endpoint.
444

Continuous Delivery Director 8.5
5. Provide information in the required parameter fields. These fields let you build a query that searches ServiceNow for
work items that match the criteria.
TIP
Values: To select from a list of possible values, type an at sign "@" in the field. You cannot combine values
with free text or tokens.
–
Item
Specifies the type of content to import.
Example: Incident
–
Category
Specifies the category to which the item belongs.
Example: For an Incident, the category is Software.
–
Priority
Specifies how quickly the service desk should handle the item.
–
Assignment Group
Specify an assignment group, from which an individual agent or vendor is selected to complete a work item.
–
Tags
Specifies the work item tags stored in ServiceNow. This field lets you filter what work items are imported provided
that the items contain at least one specified tag.
–
Custom Fields
Specifies a list of custom field names and values.
Values: You can update multiple values in the following JSON format: {"field1":"value1","field2":"value2"...}
6. Select Create.
The work item source is saved and a list of the returned work items is displayed under the application in the left menu.
These work items are now available to assign to tasks in phases to associate with the release.
Tasks
The following task types are available in the ServiceNow plug-in:
Create Change Request
You typically create change requests when you determine that fixing issues or incidents requires a change to the
environment. The Create Change Request task creates a change request and returns the ID of the request for future use.
This task requires the following fields:
Input Parameters
•
Short Description
Provides enough information for a user to complete the change request
•
Change Request Content
Specifies a list of ServiceNow field names and values.
Values: The field name must be Identical to the name in the ServiceNow change request table. You can update
multiple values in the following JSON format: {"field1":"value1","field2":"value2"...}
Examples: {"Name":"myName","Category":"my Category","Type":"myType"}
Output Parameters
•
Change Request ID
Specifies the ID or name of the request that is created
445

Continuous Delivery Director 8.5
Update Ticket
The Update Ticket task updates an existing ticket with a new status or updates a ticket with a customized field. This task
requires the following fields:
Input Parameters
•
Ticket Type
Select one of the following types of ticket:
–
Change Request-
A proposal to add, modify or remove an IT service-related item. If selected, the following fields appear:
•
Change Request ID
Specifies the ID or the name of the change request you want to update.
•
Change Request Content
Specifies a list of ServiceNow field names and values
Values: The field name must be Identical to the name in the ServiceNow change request table. You can update
multiple values in the following JSON format: {"field1":"value1","field2":"value2"...}
Examples: {"Name":"myName","Category":"my Category","Type":"myType"}
–
Request -
A request for an IT support service. If selected, the following fields appear:
•
Request ID
Specifies the ID or the name of the request you want to update
•
Request Content
Specifies a list of ServiceNow field names and values
Values: The field name must be Identical to the name in the ServiceNow change request table. You can update
multiple values in the following JSON format: {"field1":"value1","field2":"value2"...}
Examples: {"Name":"myName","Category":"my Category","Type":"myType"}
Create Task
You create a task to organize and track the work that is required to complete an existing service request. Create Task
creates a task under a service request and returns the task ID for future use. This task requires the following fields:
Input Parameters
•
Ticket Type
Select one of the following types of ticket:
–
Change Request - A proposal to add, modify or remove an IT service-related item. If selected, the following fields
appear:
•
Change Request ID
Specifies the ID or the name of the change request you want to update
•
Change Task Content
Specifies a list of ServiceNow field names and values
Values: The field name must be Identical to the name in the ServiceNow change request table. You can update
multiple values in the following JSON format: {"field1":"value1","field2":"value2"...}
Examples: {"Name":"myName","Category":"my Category","Type":"myType"}
–
Request Item - Add an item to a request. If selected, the following fields appear:
•
Request Item ID
Specifies the ID or the name of the request you want to update
•
Request Item Task Content
Specifies a list of ServiceNow field names and values
Values: The field name must be Identical to the name in the ServiceNow change request table. You can update
multiple values in the following JSON format: {"field1":"value1","field2":"value2"...}
446

Continuous Delivery Director 8.5
Examples: {"Name":"myName","Category":"my Category","Type":"myType"}
Output Parameters
•
Task ID
Specifies the ID or the name of the task that is created
Update Task
Update Task updates a ServiceNow task. This task requires the following fields:
Input Parameters
•
Task Type
Select one of the following types of task:
–
Change Request - A proposal to add, modify or remove an IT service-related item. If selected, the following fields
appear:
•
Change Request ID
Specifies the ID or the name of the change request you want to update
•
Change Task Content
Specifies a list of ServiceNow field names and values
Values: The field name must be Identical to the name in the ServiceNow change request table. You can update
multiple values in the following JSON format: {"field1":"value1","field2":"value2"...}
Examples: {"Name":"myName","Category":"my Category","Type":"myType"}
–
Request Item - Add an item to a request. If selected, the following fields appear:
•
Request Item ID
Specifies the ID or the name of the request you want to update
•
Request Item Task Content
Specifies a list of ServiceNow field names and values
Values: The field name must be Identical to the name in the ServiceNow change request table. You can update
multiple values in the following JSON format: {"field1":"value1","field2":"value2"...}
Examples: {"Name":"myName","Category":"my Category","Type":"myType"}
Wait for Approval
The Wait for Approval task specifies that the next task starts upon the completion and approval of the specified
ServiceNow change request. This task requires the following fields:
Input Parameters
•
Ticket Type
Select one of the following types of ticket:
–
Change Request - A proposal to add, modify or remove an IT service-related item. If selected, the following fields
appear:
•
Change Request ID
Specifies the ID or the name of the change request you want to update
•
Status Field
Specifies the name of the field you want to check the status of
•
Required Status
Specifies the required status of the field you want so that the task can continue
•
Poll Interval
Specifies the interval in seconds in which the status is checked
–
Request - A request for an IT support service. If selected, the following fields appear:
447

Continuous Delivery Director 8.5
•
Request ID
Specifies the ID or the name of the request you want to update
•
Status Field
Specifies the name of the field you want to check the status of
•
Required Status
Specifies the required status of the field you want so that the task can continue
•
Poll Interval
Specifies the interval in seconds in which the status is checked
Slack Plug-in
This plug-in provides your team with powerful, real-time messaging capabilities.
Plug-in Version 2.0-4
Supported Versions
The Slack plug-in supports the core Slack SaaS solution.
For more information, see the Slack documentation at https://slack.com/.
Download Options
Use one of the following options to download the latest plug-in version:
Method Info
wget wget -O cdd-slack-plugin.war https://
cspdl.broadcom.com/shared/static/
e6ogxcerwe973pe029oqifp175m2jhjv.war?
LCK=ent.box.com
MD5 876a4f29d65ede8744ec6828f870e5e2
Click Download Button
Change History
The following update was made for plug-in version 2.0-4:
•
Security Enhancements - Updated the 3rd party libraries that are part of the package.
The following update was made for plug-in version 2.0-3:
•
A new field was added to the slack plug-in endpoint - "Messaging Method". This field allows to select two options:
1. Webhook - existing functionality - the user must enter a Webhook that was generated by Slack.
2. Slack App - the user must enter the token with the "chat:write" permission.
The following update was made for plug-in version 2.0-2:
•
Security Enhancements - Updated the 3rd party libraries that are part of the package.
The following update was made for plug-in version 2.0-1:
•
Security Enhancements - Updated the 3rd party libraries that are part of the package.
448
Continuous Delivery Director 8.5
The following update was made for plug-in version 2.0:
•
Support was added for slack-api-client 1.4.2.
WARNING
This plug-in update is not backward compatible.
The following update was made for plug-in version 1.1:
•
Support was added for Java 11.
Configuration
Register the plug-in and create endpoints as described in Manage Plug-ins.
Manifest URL
For plug-in registration, use the following Slack manifest URL:
http://<plugin-server>:<port>/cdd-slack-plugin/manifest.json
Endpoint Parameters
The following parameters are required to create an endpoint:
•
Messaging Method
Specify the method to post message.
–
Webhook URL
The URL that contains the integration token. To copy this URL, go to your Slack account, search for
incoming webhooks, and create a new incoming webhook configuration. Copy and paste the incoming webhook
URL into the Webhook URL field.
Example: https://hooks.slack.com/services/T4TAH927P/B4T7VLH0A/VuUOyuAs6j8Uks9namGQCHK
IMPORTANT
Before syncing this plug-in to the latest update, copy the webhook URL from the endpoint. After syncing
the plug-in, re-add the webhook URL.
–
Slack App
Specify an OAuth Token of a User or Bot User that has the chat:write scope.
To check the connection to Slack, use the endpoint Test Connection option. The Test Connection option returns the
following results:
•
Success
Both connections were successful
•
Failure
One or more connections failed
Tasks
The following task types are available in the Slack plug-in:
TIP
To select from a list of available tokens, enter the percent sign (%) in the task field.
Post Message
The Post Message task requires the following fields:
Input Parameters
449

Continuous Delivery Director 8.5
•
Channel
Specify a channel or a direct message to publish to. This field is mandatory when using the Slack app. If the endpoint
is configured with Webhook and the field is left empty, the message will be posted to the channel as per the Webhook
setting.
NOTE
Empty channel messages are posted to the channel that is defined in the endpoint.
•
Sender
Specifies the name of the message sender
•
Message
Defines the message text
SoapUI Plug-in
Execute your SoapUI tests in your release pipelines.
Plug-in Version 1.0-2
The SoapUI plug-in provides SoapUI testing directly from within Continuous Delivery Director releases.
This plug-in is containerized and supports Adaptive Testing functionality. You can import test suites from SoapUI to run
within release pipelines. This plug-in provides you with a SoapUI test automation framework for Git builds that is open-
source and application-independent.
Download Options
Use one of the following options to download the latest plug-in version:
Method Info
wget wget -O cdd-soapui-plugin-v1.0-2b12.tar.gz
https://cspdl.broadcom.com/shared/static/
z5hgvaon63ilmr34893ecc82y581vkzt.gz?
LCK=ent.box.com
MD5 e24c57066d0a91ea2406002cd8268e04
Click Download Button
Supported Versions
The SoapUI plug-in has been validated for the following SoapUI versions:
•
SoapUI Open Source 5.6.0
Capabilities
The SoapUI plug-in lets you perform the following tasks:
450

Continuous Delivery Director 8.5
Set Up the SoapUI Plug-in
•
You have a working knowledge of Docker.
•
A Linux machine is provisioned with Docker Engine installed and an OS user has been created whose UID/GID are
1010/1010 and a home folder created at /home/cdd/.cdd. For more information, see Set Up Containerized Plug-
ins.
•
The docker remote API port (4550) is open. For more information, see Set Up Containerized Plug-ins.
•
A Tomcat 8.5 server is installed with the containerized-manager plug-in deployed.
•
The Tomcat server is owned and run by an OS user whose UID/GID are 1010/1010 .
•
You are working with JVM (Java Virtual Machine) 8 or 11.
1. Download and load the Docker image, using one of the following methods:
•
NOTE
Use this option if you are unable to use docker pull
From the command line, enter the wget command listed in the Download Options section in SoapUI Plug-in.
Enter:
docker load -i <the gz file name>
•
Connect to https://support.broadcom.com/enterprise-software/download-center.
Select either Continuous Delivery Director or Continuous Delivery Director SaaS and click the Docker button.
Follow the on-screen instructions to pull the image to your localhost.
2. In the settings.properties file under /home/cdd/.cdd/conf/, add the following lines:
cdd.plugins.containerized.soapui.container.image_name=<repository>:<tag>
IMPORTANT
You must update the above line every time you update this plug-in.
3. Restart the containerized-manager service (on the machine of the containerized manager).
cd /opt/apache-tomcat-8.5.49/webapps
rm -rf containerized
ls -ltr
4. Register the new plug-in using the following manifest URL: http://<containerized-plug-in-manager-
server>:<port>/containerized/plugins/cdd-soapui-plugin/manifest.json.
Configure a SoapUI Endpoint
Enable communication and synchronization of test suites between SoapUI and Continuous Delivery Director.
You are familiar with SoapUI.
You have been granted the Can create endpoints permission.
1. Register the plug-in as described in Manage Plug-ins.
The manifest for the SoapUI plug-in is http://<host>:<port>/containerized/plugins/cdd-soapui-
plugin/manifest.json .
451

Continuous Delivery Director 8.5
2. From the Administration menu, click Endpoints > Add Endpoint.
3. In the ADD ENDPOINT dialog, select the SoapUI plug-in.
4. Configure the following endpoint parameters:
•
Version Control System
Specify the version control system where your source project resides.
•
Git Project URL
Specify the URL to access the Git project repository.
•
Git Username
Specify the user name to authenticate to Git.
NOTE
This value is required only when the repository you enter is not a public repository.
•
Git User Password
Specify the password to authenticate to Git.
NOTE
This value is required only when the repository you enter is not a public repository.
•
Use Proxy
(Optional) Select this option to connect to Jira through a proxy server.
NOTE
If selected, the Proxy Host, Proxy Port, Proxy Username, Proxy Password, and Use HTTPS fields
appear.
–
Proxy Host
Specifies the HostName or IP for the proxy server.
–
Proxy Port
Specifies the port for the proxy server.
–
Proxy Username
Specifies the user name for the proxy server.
–
Proxy Password
Specifies the password for the proxy server.
5. Click Test Connection to check the connection to SoapUI.
6. Click Add.
The endpoint is:
•
Enabled and available for use in adaptive testing.
•
Listed on the Administration > Endpoints page.
Get Test Assets (SoapUI)
This plug-in lets you import test suites into the Adaptive Testing Catalog.
1. Select Tests, then Adaptive Testing Catalog.
2. Specify the Application/Business Application and the Application Version/Business Application Version.
The menu next to the application/business application name and version is activated.
452

Continuous Delivery Director 8.5
3. Select Get Test Assets.
4. Fill in the following fields:
NOTE
Use the @ symbol in the following fields to select from a dynamic list of entities associated with the selected
project.
•
Test Source Name
•
Plug-in
Select SoapUI and Import Tests (SoapUI).
•
Endpoint
Select a SoapUI endpoint.
•
Branch
Specify the version control system branch name.
•
Root Folder
Specify a path to the version control system folder that contains the tests you want to import. When left empty, tests
will be imported from the root folder. Default is blank which indicates that the current directory is the project root
folder.
•
SoapUI Project XML
Specify the path to the project XML file that contains the tests you want to import.
•
Filter
(Optional) Specify a free text filter to import only test suites with names that match the specified regular expression
filter.
For example, \".*Test\" would import only test suites whose name contains the word Test.
•
Hostname
(Optional) Specify the host and port to use in test requests.
•
Domain
(Optional) Specify the domain for simulated requests to use for authorization.
The test results for the specified build appear on the Adaptive Testing Results page, together with links to the
associated reports in SoapUI.
SonarQube Plug-in
This plug-in lets you check the health of your project against quality gates.
Plug-in Version 2.0-11
SonarQube quality gates contain a set of Boolean conditions based on metrics such as code coverage on new code, no
new blocker issues, and so on. This plug-in is containerized and supports Adaptive T esting functionality.
Download Options
Use one of the following options to download the latest plug-in version:
Method Info
wget wget -O cdd-sonarqube-plugin-latest.tar.gz
https://cspdl.broadcom.com/shared/static/
i2reefk66j0h9856z5c2nqp1wq4rxcop.gz?
LCK=ent.box.com
MD5 8f78fee106244b27ed7f893c63870917
453

Continuous Delivery Director 8.5
Click Download Button
Supported Versions
The SonarQube plug-in supports SonarQube 6.7.5 and higher, including Data Center Edition 8.6.
For more information, see the SonarQube documentation at https://docs.sonarqube.org/latest/.
Change History
The following updates were made for plug-in version 2.0-11:
•
The Security Source task name is now changed to 'Get Vulnerabilities.'
The following updates were made for plug-in version 2.0-10:
•
Added security source capability to the plug-in.
The following updates were made for plug-in version 2.0-9:
•
Security Enhancements - Updated the 3rd party libraries that are part of the package.
The following updates were made for plug-in version 2.0-8:
•
Java Binaries field is now an optional field. If the field is empty, "." is used by default.
•
Text change in the project key description.
The following update was made for plug-in version 2.0-7:
•
Security Enhancements - Updated the 3rd party libraries that are part of the package.
The following update was made for plug-in version 2.0-6:
•
Bugfix: Incorrect folder structure in execution log link.
•
Bugfix: SonarQube Certificate Issue.
The following update was made for plug-in version 2.0-5:
•
Security enhancements.
The following update was made for plug-in version 2.0-4:
•
Text change in the task description.
The following update was made for plug-in version 2.0-3:
•
Added a "link to report" in the detailed status.
The following update was made for plug-in version 2.0-2:
•
Default values for the File Suffixes Exclusions input parameter in the Run Code Analysis task have been added.
The following update was made for plug-in version 2.0-1:
•
The Coverage Exclusions input parameter in the Run Code Analysis task has been updated.
The following update was made for plug-in version 2.0:
454

Continuous Delivery Director 8.5
•
A Run Code Analysis task has been added, enabling you to run an analysis of your Java code from your release
pipeline.
The following update was made for plug-in version 1.2:
•
The endpoint now allows you to configure access to a Git project repository.
The following update was made for plug-in version 1.1:
•
Support was added for Java 11.
Tasks
The following task types are available in the SonarQube plug-in:
•
Check Project Status
•
Run Code Analysis
Configure a SonarQube Endpoint
Enable communication and synchronization of test suites between SoapUI and Continuous Delivery Director.
You are familiar with SonarQube.
You have been granted the Can create endpoints permission.
1. Register the plug-in as described in Manage Plug-ins.
The manifest for the SonarQube plug-in is http://<host>:<port>/cdd-sonarqube-plugin/manifest.json .
2. From the Administration menu, click Endpoints > Add Endpoint.
3. In the ADD ENDPOINT dialog, select the SonarQube plug-in.
4. Configure the following endpoint parameters:
•
URL
Enter the URL of your SonarQube server instance.
•
Authentication Method
Select either API Token or Basic Authentication.
API Token
–
API Token
Enter a SonarQube API token ex. d7cb020edd73c455d2c21a7e5111e4f06c141a84. You use SonarQube
tokens to run code analyses or to invoke web services without the need to provide actual user credentials.
Basic Authentication
–
SonarQube Username
Enter the user name to authenticate to the SonarQube instance.
–
SonarQube Password
Enter your password to authenticate to the SonarQube instance.
•
Git Project URL
Specify the URL to access the Git project repository.
NOTE
Not required for the Check Project Status task.
•
Git Username
Specify the user name to authenticate to the Git project repository. This input is required only when the repository
you enter is not a public repository.
455

Continuous Delivery Director 8.5
NOTE
Not required for the Check Project Status task.
•
Git Password
Specify the user password to authenticate to the Git project repository. This input is required only when the
repository you enter is not a public repository.
NOTE
Not required for the Check Project Status task.
•
Use Proxy
(Optional) Select this option to connect to SonarQube through a proxy server.
NOTE
If selected, the Proxy Host, Proxy Port, Proxy Username, Proxy Password, and Use HTTPS fields
appear.
–
Proxy Host
Specify the HostName or IP for the proxy server.
–
Proxy Port
Specify the port for the proxy server.
–
Proxy Username
Specify the user name for the proxy server.
–
Proxy Password
Specify the password for the proxy server.
5. Click Test Connection to check the connection to Jira.
6. Click Add.
Check Project Status (SonarQube)
Verify the releasability status of your project.
Run this task to ensure your SonarQube project meets the required quality policy. If the project passes the associated
quality gate, the task is successful.
You can determine whether a task fails if the quality gate status is a warning. If so, you can then access SonarQube to
identify what went wrong.
1. In a release, create an automatic task as described in Create Automatic Tasks.
2. Configure the following parameters:
TIP
Values: To define a value, do one of the following actions:
•
To select from a list of possible values, type an at sign "@" in the field. Example: Deploy Tomcat
•
To select from a list of built-in tokens (reusable placeholders that are used to create generic workflows),
type a percent sign "%" in the field
•
Type free text
•
Enter a combination of free text and tokens
Input Parameters
•
Project Key
Specify the SonarQube project key.
•
Fail on "Warning"
Select this option to fail this task if the status of the project quality gate is WARN.
456

Continuous Delivery Director 8.5
Output Parameters
•
Quality Gate
Specifies the quality gate identifier.
3. Click Create.
Run Code Analysis (SonarQube)
Run an analysis of your Java code from your release pipeline.
This task performs a static analysis of compiled code for .class files. During code analysis, data is requested from the
SonarQube server and the Java files provided to the analysis are scanned. The resulting data is sent back to the server at
the end in the form of a report, which you can access through a generated link.
The task collects the project analysis data and fails if any one of the following conditions is met:
•
The quality gate status is "Failed"
•
The quality gate status is "Warning" and the Fail Task on Warning option is selected
•
No analysis data is found
IMPORTANT
This task is not compatible with SonarCloud.
1. In a release, create an automatic task as described in Create Automatic Tasks.
2. Configure the following input parameters:
Input Parameters
•
Git Branch
Specify the Git branch.
•
Project Key
Specify the SonarQube project unique key. Use existing project key or add a new key to create a new
project (sonar.projectKey)
•
Project Name
Specify the name of the SonarQube project to be displayed on the Continuous Delivery Director user interface.
•
Project Version
Specify the project SonarQube version.
•
Java Binaries
(Optional) Specify comma-separated paths to directories containing the compiled bytecode files corresponding to
your source files (sonar.java.binaries). If the field is empty, "." is used by default.
•
Sources
Specify comma-separated paths to directories containing main source files. Keep this field empty to use the project
base directory (sonar.sources).
•
Analysis Exclusions
To use exclusions to analyze only the specified subset(s) of files in sonar.sources, specify patterns that are relative
to the project base directory. For example, **/*Bean.java (sonar.exclusions).
•
Project Branch Name
Specify a branch name to create in Sonar Qube during the analysis (sonar.branch.name).
•
Source Encoding
Specify the encoding of the source files. For example, UTF-8, MacRoman, Shift_JIS. (sonar.sourceEncoding).
•
Coverage Exclusions
457

Continuous Delivery Director 8.5
Specify patterns to exclude files from being taken into account for code coverage. For example, org/sonar/*
(sonar.coverage.exclusions).
•
File Suffixes Exclusions
Specify a comma-separated list of file suffix key patterns to exclude from the scan. For example -
sonar.cs.file.suffixes, sonar.html.file.suffixes, sonar.javascript.file.suffixes.
•
Fail Task on Warning
Select this option to fail tasks if the project's quality gate status is \"Warning\"."
Output Parameters
•
Quality Gate
Retrieves the quality gate status of the project.
•
Report URL
Generates a URL to the specific scan of the project.
3. Click Create.
Sonatype Nexus Lifecycle Plug-in
Evaluate the risks of your applications against Nexus Lifecycle (IQ) policies.
Plug-in Version 1.0-8
Nexus Lifecycle is a solution that lets you identify open source risk in your applications, allowing you to secure your entire
software supply chain. With Nexus Lifecycle, you can create custom security, license, and architectural policies based on
application type or organization and contextually enforce those policies across every stage of the SDLC.
The Nexus Lifecycle plug-in is containerized and supports Adaptive Testing functionality. This plug-in provides you with a
Nexus Lifecycle test automation framework for Git builds.
Download Options
Use one of the following options to download the latest plug-in version:
Method Info
wget wget -O cdd-nexusiq-plugin-latest.tar.gz
https://cspdl.broadcom.com/shared/static/
zoj6gzbd7nrc394q4l9qy1t5wwc07rg1.gz?
LCK=ent.box.com
MD5 0874e2d6d9d360c3cadc3ffcc8bc6dc5
Click Download Button
Download Docker Image from Customer Support Portal Yes
Download TAR file from Customer Support Portal for customers
who cannot use docker pull
Yes
Change History
The following update was made for plug-in version 1.0-1:
•
Dynamic value support added for organization and application.
458

Continuous Delivery Director 8.5
More Information
•
Configure a Nexus Lifecycle Endpoint
•
Evaluate an Application (Nexus Lifecycle)
Configure a Nexus Lifecycle Endpoint
Set up an endpoint to enable Nexus Lifecycle (IQ Server) scans from your release pipeline.
You are familiar with Nexus Lifecycle.
You have been granted the Can create endpoints permission.
1. Register the plug-in as described in Manage Plug-ins.
The manifest for the Nexus Lifecycle plug-in is http://<host>:<port>/containerized/plugins/cdd-
nexusiq-plugin/manifest.json .
2. From the Administration menu, click Endpoints > Add Endpoint.
3. In the ADD ENDPOINT dialog, select the Nexus Lifecycle plug-in.
4. Configure the following endpoint parameters:
•
URL
Specify the URL to access the required Nexus IQ Server instance.
•
Username
Specify a user name to authenticate to the specified Nexus IQ Server instance.
•
Password
Specify a password to authenticate to the specified Nexus IQ Server instance.
•
Git Project URL
Specify the URL to access the required Git project repository.
•
Git Username
Specify a user name to access Git. This action is required only when the repository you enter is not a public
repository.
•
Git User Password
Specify the password for the specified user to access Git. This action is required only when the repository you enter
is not a public repository.
5. Click Test Connection to check the connection to Nexus Lifecycle.
6. Click Add.
Evaluate an Application (Nexus Lifecycle)
Generate a Nexus Lifecycle (IQ Server) report that summarizes the health of your application.
One or more IQ Server endpoints are available and are configured with a user assigned to the Policy Administrator or
Owner role for the application.
This task evaluates a specified application against NexusIQ policies.
1. In a release, create an automatic task as described in Create Automatic Tasks.
2. Configure the following input parameters:
•
IQ Organization
Specify a NexusIQ organization.
•
IQ Application
459

Continuous Delivery Director 8.5
Specify a NexusIQ application. Determines the policy elements (policies, labels, and license threat groups) to
associate with this build, and is managed via the NexusIQ Server.
If automatic application creation is enabled in NexusIQ and the specified application does not exist, that application
will be created. The application can be an archive file, a directory containing such archives, or a Docker image.
•
Branch
Specify the branch of your Git repository. Default: master.
•
Scan Targets
Specify a list of Apache Ant-style patterns relative to the workspace root that denote the files/archives to be
scanned, for example, **/target/*.war or **/target/*.ear. If left unspecified, the scan defaults to the patterns **/*.jar,
**/*.war, **/*.ear, **/*.zip, **/*.tar.gz."
•
Module Excludes
Specify a comma-separated list of Apache Ant-style patterns relative to the workspace root that denote the module
information files (**/nexus-iq/module.xml) to be ignored, for example, **/my-module/target/**, **/another-module/
target/**. If left unspecified, all modules will contribute dependency information (if any) to the scan.
•
Advanced Options
Specify advanced properties to the NexusIQ Server. You can supply a number of additional parameters using this
input field. Typically these parameters are determined by Sonatype support. Define parameters in JSON style,
wrapped in curly braces {}, and separated by commas. Ex.: { \"key1\": \"value1\", \"key2\": value2}.
3. Click Create.
Terraform Plug-in
Manage your Terraform runs from your release pipeline.
Plug-in Version 1.0-2
Terraform is an infrastructure-as-code software tool. Infrastructure as code is the process of managing and provisioning
computer data centers through machine-readable definition files.
In Terraform, a run is the process of making real infrastructure match the desired state (as specified by the contents of the
config version and variables at a specific moment in time). This plug-in integrates with Terraform Cloud and supports the
following API-driven run tasks:
•
Create a Run
•
Apply a Run
Download Options
Use one of the following options to download the latest plug-in version:
Method Info
wget wget -O cdd-terraform-plugin.war
https://cspdl.broadcom.com/shared/
static/0eswer3eb33jdhrz2r7cdswis5cll0nm.war?
LCK=ent.box.com
MD5 c8a933ce7059fb80a54c43463aa92486
Click Download Button
460

Continuous Delivery Director 8.5
More Information
Configure a Terraform Endpoint
Configure a Terraform Endpoint
You configure a Terraform plug-in endpoint either for the initial setup, or whenever a change to the configuration is
required.
You are familiar with Terraform.
You have the Can create endpoints permission.
1. Register the plug-in as described in Manage Plug-ins.
The manifest for the Terraform plug-in is http://<host>:<port>/cdd-terraform-plugin/manifest.json .
2. From the Administration menu, click Endpoints > Add Endpoint.
3. In the ADD ENDPOINT dialog, select the Terraform plug-in.
4. Configure the following input parameters:
•
URL
Specify the Terraform URL.
•
Token
Specify a Terraform authentication token.
IMPORTANT
Do not enter an organization-level authentication token. Instead, enter the authentication token of a user
with workspace plan run and apply run permissions.
•
Organization
Specify the name of your organization.
5. To check the connection to Terraform, click Test Connection.
6. Click Add.
Create a Run (Terraform)
Create a run in a specified workspace and return the run ID for future use.
One or more Terraform endpoints are available.
A run performs a plan and an apply, using a configuration version and the workspace current variables.
1. In a release, create an automatic task as described in Create Automatic Tasks.
2. Configure the following parameters:
TIP
Values: To define a value, do one of the following actions:
•
To select from a list of possible values, type an at sign "@" in the field
Example: Deploy Tomcat
•
To select from a list of built-in tokens (reusable placeholders that are used to create generic workflows),
type a percent sign "%" in the field
•
Type free text
•
Enter a combination of free text and tokens
Input Parameters
461

Continuous Delivery Director 8.5
•
Workspace Id
Specify the ID of the workspace where the run will be executed.
NOTE
Terraform Cloud runs occur in the context of a workspace. Runs use the workspace config data, the
state to identify the real infrastructure being managed, and edit that workspace state to match any
infrastructure changes during the run. A workspace belongs to an organization.
•
Configuration Version
Specify the configuration version to use for this run. If you leave this field empty, the run will be created using the
workspace's latest configuration version.
•
Message
(Optional) Specify a message to be associated with this run.
•
Is Destroy
(Optional) Select this option to specify that this plan is a destroy plan, which will destroy all provisioned resources.
•
Refresh Only
(Optional) Select this option to specify that this run will use the refresh-only plan mode, which will refresh the state
without modifying any resources. Mutually exclusive with the Is Destroy option.
Output Parameters
•
Run Id
Specifies the ID of the newly-created run.
3. Click Create.
Apply a Run (Terraform)
Apply a run in a specified workspace.
One or more Terraform endpoints are available.
This task applies a run that is paused waiting for confirmation after a plan. This endpoint queues the request to perform an
apply; the apply might not happen immediately.
1. In a release, create an automatic task as described in Create Automatic Tasks.
2. Configure the following parameters:
TIP
Values: To define a value, do one of the following actions:
•
To select from a list of possible values, type an at sign "@" in the field
Example: Deploy Tomcat
•
To select from a list of built-in tokens (reusable placeholders that are used to create generic workflows),
type a percent sign "%" in the field
•
Type free text
•
Enter a combination of free text and tokens
Input Parameters
•
Workspace Id
Specify the ID of the workspace where the run will be executed.
462

Continuous Delivery Director 8.5
NOTE
Terraform Cloud runs occur in the context of a workspace. Runs use the workspace config data, the
state to identify the real infrastructure being managed, and edit that workspace state to match any
infrastructure changes during the run. A workspace belongs to an organization.
•
Run Id
Specify the ID of the run to apply.
•
Comment
(Optional) Enter a comment to be associated with this run.
3. Click Create.
Test Data Manager Plug-in
Manage your test data using Test Data Manager from your release pipeline.
Plug-in Version 1.0
Test Data Manager is a test data management solution that supports data subsetting and masking as well as
synthetic data generation. Through these methods, it provides a standardised set of data that covers all possible tests,
remains up-to-date, can be provisioned on-demand, and contains no sensitive data.
This plug-in integrates with Test Data Manager and supports the following API-driven run tasks:
•
Run Data Generation Flow
•
Publish Job
Download Options
Use one of the following options to download the latest plug-in version:
Method Info
wget wget -O cdd-tdm-plugin.war https://
cspdl.broadcom.com/shared/static/
ms934mgd4v921jsc06na9o9bnnicwh59.war?
LCK=ent.box.com
MD5 230bf33ca818d6118be8d47348011ca4
Click Download Button
More Information
Configure a TDM Plug-in Endpoint
Configure a TDM Plug-in Endpoint
You are familiar with Test Data Manager (TDM).
You have been granted the Can create endpoints permission.
1. Register the plug-in as described in Manage Plug-ins.
The manifest for the TDM plug-in is http://<host>:<port>/cdd-tdm-plugin/manifest.json .
463

Continuous Delivery Director 8.5
2. From the Administration menu, click Endpoints > Add Endpoint.
3. In the ADD ENDPOINT dialog, select the Test Data Manager plug-in.
4. Configure the following endpoint parameters:
•
Test Data Manager URL
Specify the Test Data Manager API URL.
•
Username
Specify the Test Data Manager username.
•
Password
Specify the Test Data Manager password.
NOTE
Use the toggle button to switch between Secret selection and typing a password/API key.
•
Trust Any SSL Certificate
Allow untrusted and unsigned SSL/TLS certificates.
NOTE
Do not check the check-box, if your TDM instance is using a valid SSL/TDM certificate, keep it un-
checked.
5. Click Test Connection to check the connection to TDM.
6. Click Add.
Run Data Generation Flow
Create a run data generation flow task in a specified project.
One or more TDM endpoints are available.
Using a run data generation flow, you can define the flow for the data generation in a specified project.
1. In a release, create an automatic task as described in Create Automatic Tasks.
2. Configure the following parameters:
TIP
Values: To define a value, do one of the following actions:
•
To select from a list of possible values, type an at sign "@" in the field. Selecting from a list ("@") is
available only for "Project Name", "Project Version", "Generator", "Configuration", "Source Connection
Profile", "Target Connection Profile" and "Schema".
Example: Deploy Tomcat
•
To select from a list of built-in tokens (reusable placeholders that are used to create generic workflows),
type a percent sign "%" in the field
•
Type free text
•
Enter a combination of free text and tokens
Input Parameters
•
Project name
Specify the project name.
•
Project Version
Specify the version for the selected project.
•
Job Title
464

Continuous Delivery Director 8.5
Enter job title as a string.
•
Generator
Specify the Generator name.
•
Variables
(Optional) Specify values for variables that are used for execution.
Define parameters in JSON style, wrapped in {}, and separated by commas.
Example: { "<var name>":"<var value>", "<var name>":"<var value>" }. Use % prefix for tokens. You can also use
free text alone or together with tokens.
•
Configuration
Specify the Configuration name.
•
Email
(Optional) Specify the email address.
Advanced Options
•
On Task Failure
Specify the additional options on Task Failure.
•
(Default) Wait for user action or run on failure phase if found
Pauses task and either waits for user action or runs an on-failure phase if found.
•
Automatically Skip Task
•
Always Wait for User Action
Automatically pauses tasks until user action. Does not run on-failure phase even if found.
•
Ignore Failure When Skipping Task
Specify this option to allow promoting the build to the next phase, regardless of task failure.
•
Set as "Mandatory Task"
Mandatory task is a task that must run and cannot be skipped. Only authorised users can edit a mandatory task
and skip when the task fails.
NOTE
If you do not have the "Can Manage mandatory task" permission, you cannot edit it once you save the
task.
3. Click Create.
Publish Job
This task lets you publish your TDM jobs from your release pipeline.
One or more TDM endpoints are available.
1. In a release, create an automatic task as described in Create Automatic Tasks.
2. Configure the following parameters:
TIP
Values: To define a value, do one of the following actions:
•
To select from a list of possible values, type an at sign "@" in the field
Example: Deploy Tomcat
•
To select from a list of built-in tokens (reusable placeholders that are used to create generic workflows),
type a percent sign "%" in the field
•
Type free text
•
Enter a combination of free text and tokens
Input Parameters
465

Continuous Delivery Director 8.5
•
Project name
Specify the Name of the project for which the Job is submitted.
•
Project Version
Specify the version for the selected project.
•
Job Title
Enter the job title.
•
Generator
Specify the Generator name.
•
Source Connection Profile
Specify the Source Connection Profile.
•
Target Connection Profile
Specify the Target Connection Profile.
•
Schema
Specify the Schema.
•
Repeat Count
Specify the repeat count for the job execution.
•
Tables
Specify the tables' definition in a JSON format.
Example:
{
"tableNo": 11,
"tableName": "AIRLINES",
"status": 1,
"fileId": null
}
•
On Duplicate in Data Target
Possible Values:
•
continue
•
update
•
(Default) exit
•
On Generated Duplicate
Possible Values:
•
remove
•
(Default) exit
•
ignore
•
Email
(Optional) Specify the email address.
•
Advanced Options
–
On Task Failure
Specify the additional options on Task Failure.
•
(Default) Wait for user action or run on failure phase if found
Pauses task and either waits for user action or runs an on-failure phase if found.
•
Automatically Skip Task
•
Always Wait for User Action
Automatically pauses tasks until user action. Does not run on-failure phase even if found.
–
Ignore Failure When Skipping Task
466

Continuous Delivery Director 8.5
Specify this option to allow promoting the build to the next phase, regardless of task failure.
–
Set as "Mandatory Task"
Mandatory task is a task that must run and cannot be skipped. Only authorised users can edit a mandatory task
and skip when the task fails.
NOTE
If you do not have the "Can Manage task" permission, you cannot edit it once you save the task.
3. Click Create.
TestCafe Plug-in
This plug-in lets you execute TestCafe test suites as part of your release pipeline.
Plug-in Version 1.0-1
This plug-in integrates with TestCafe, a node.js tool to automate end-to-end web testing. The TestCafe plug-in is
containerized and supports Adaptive Testing functionality. You can import tests from TestCafe to run as test suites within
release pipelines.
TestCafe allows you to write tests using TypeScript, JavaScript, or CoffeeScript. To create a test, you create a new .js
or .ts file. TestCafe test files are organized into categories called fixtures. A JavaScript, TypeScript file with TestCafe tests
can contain one or more fixtures.
Download Options
Use one of the following options to download the latest plug-in version:
Method Info
wget wget -O cdd-testcafe-plugin-latest.tar.gz
https://cspdl.broadcom.com/shared/static/
syqb2uii84z6lpn63i1ufzdhbqrrgqnc.gz?
LCK=ent.box.com
MD5 ab8c68900b39a7621b736bf4541178fa
Click Download Button
Download Docker Image from Customer Support Portal Yes
Download TAR file from Customer Support Portal for customers
who cannot use docker pull
Yes
Configure the TestCafe Plug-in
You configure the TestCafe plug-in either for the initial setup, or whenever a change to the test build configuration is
required.
Register the new plug-in using the following manifest URL: http://<plugin-server>:<port>/containerized/
plugins/cdd-testcafe-plugin/manifest.json.
Endpoint Parameters
The following parameters are required to create an endpoint:
•
Version Control System
467

Continuous Delivery Director 8.5
Specifies the version control system where your source project resides.
•
Git Repository URL
Specify the URL of the Git project repository.
•
Git Username
Specify the Git user name. This action is only required when the repository you specified is not a public repository.
•
Git Password
Specify the Git password. This action is only required when the repository you specified is not a public repository.
To check the connection to TestCafe and to the version control system, select Test Connection. The Test Connection
action returns the following results:
•
Success
The connection was successful
•
Failure
The connection failed
Tasks
The TestCafe plug-in supports Adaptive Testing functionality. You can import test suites from the Adaptive Testing Catalog
through the Get Test Assets command.
For more information, see Setting Up the Test Module
Prerequisites:
•
One or more application versions are specified.
•
One or more TestCafe test suites exist for the application versions specified.
Fill in the following input parameters to import TestCafe test suites:
Branch
Specify the version control branch name.
Tests Folder
(Optional) Specify the relative path to the folder where the required tests are located. When left empty, tests will be
imported from the root folder.
Browser
(Optional) Specify the web browser name. For example, chromium:headless; firefox:headless.
For the list of browsers supported by TestCafe, see TestCafe documentation: https://devexpress.github.io/testcafe/
documentation.
Additional Execution Parameters
(Optional) Specify additional execution parameters in JSON format where the key is the command line argument. For
example: {\"--speed\": \".05\",\"--page-load-timeout\": \"5\" }.
For more information, see TestCafe documentation: https://devexpress.github.io/testcafe/documentation.
Environment Variables
(Optional) Specify the environment variables to be used during test execution in JSON format. Syntax:
{\"environment1\": \"value1\",\"environment2\": "value2\" }
Start Node Package Manager?
Select this option to start the node package manager for this project before running the TestCafe tests. You can use this
option to set up the application you are going to test.
468

Continuous Delivery Director 8.5
Node Package Manager Initialization Delay
(Optional) Specify the time (in milliseconds) allowed for an application to initialize. For example, 60000.
Twistlock Plug-in
This plug-in lets you run a static registry scan for Common Vulnerabilities and Exposures (CVE) on an application image
that is hosted on a given registry.
Plug-in Version 1.1-1
You can scan your applications as early as the development phase to avoid or resolve potential issues before you commit
your code. You can view the scan results in Continuous Delivery Director or Twistlock.
Download Options
Use one of the following options to download the latest plug-in version:
Method Info
wget wget -O cdd-twistlock-plugin.war https://
cspdl.broadcom.com/shared/static/
c1po4926fbh17umiq4zzbyfu7rapnlmn.war?
LCK=ent.box.com
MD5 dbf2216914f5befe4cf051fae806d376
Click Download Button
Supported Versions
The Twistlock plug-in supports the core Twistlock SaaS solution.
For more information, see the Twistlock documentation at https://twistlock.desk.com/
Capabilities
Runs a static registry scan for vulnerabilities on an application image that is hosted on a given registry.
Example: JFrog Artifactory
What's New
The following update was made for plug-in version 1.1:
•
Support was added for Java 11.
Configuration
Follow these steps:
1. Install the Twistlock components (Console and Defender). You can use two options for installation:
–
onebox - Install both Console and Defender onto your host machine
–
Separate - Install Console and Defender on separate machines
For more information about how to install and configure Twistlock, see the Twistlock installation documentation
at https://twistlock.desk.com/
469

Continuous Delivery Director 8.5
2. Register the plug-in and create endpoints as described in Manage Plug-ins.
Manifest URL
For plug-in registration, use the following Twistlock manifest URL:
http://<plugin-hostname>:<port>/cdd-twistlock-plugin/manifest.json
Endpoint Parameters
The following parameters are required to create an endpoint:
•
Address
Specifies the URL to connect to Console, the Twistlock management interface
Value: http://domain-name:port
Example: http://example.test.com:8081/
•
Twistlock Username
Specifies the user name to authenticate to Twistlock
•
Twistlock Password
Specifies the password that is used to authenticate to Twistlock
•
Registry
Specifies the registry that contains the images you want Twistlock to scan
Example: repo.com:5000
•
Registry Username
Specifies the user name to authenticate to the registry
•
Registry Password
Specifies the password to authenticate to the registry
•
Defender Host Name
(Optional) Specifies the host name of the Defender that performs the registry scan
Note: If this parameter is empty, a registry scan is enabled by default. The scan originates from the Defender that is
installed on the same machine as Console (onebox).
To check the connection to Twistlock, use the endpoint Test Connection option.
Note: The connectivity test enables a registry scan from the Defender (specified in the Defender Host Name endpoint
parameter).
Tasks
The Twistlock plug-in provides the following task:
•
Run Static Scan
Run Static Scan
The task lets you run a static scan.
This task requires the following information:
•
Repository
Specifies the image repository on which to run the scan.
Example: com/example/test/1.2
•
Tag
Specifies the label that is applied to an image in a repository. Tags are how various images in a repository are
distinguished from each other.
Example: latest
•
Severity
470

Continuous Delivery Director 8.5
Specifies the severity level of the CVE that trigger alerts
Example: Medium
•
CVSS
Specifies the the score of the option that is specified in the Severity drop-down list according to the CVSS (Common
Vulnerability Scoring System)
Value: An integer between 0 to 10
Example: You specify a severity level of Medium in the Severity drop-down list, and a score of 4 in the CVSS field.
When a scan is run, threats of a severity level of Medium trigger alerts, as long as the CVSS score is 4 or higher.
Threats of a security level higher than Medium automatically trigger alerts.
•
Task Timeout
Specifies the number of minutes before the static scan stops
Value: An integer
Default: 30
Veracode Plug-in
This plug-in lets you run a dynamic security scan for a deployed web application.
Plug-in Version 1.0.2-1
Download Options
Use one of the following options to download the latest plug-in version:
Method Info
wget wget -O cdd-veracode-plugin.war https://
cspdl.broadcom.com/shared/static/
kpag3br1y1xal7evmk4240r4rckkx48v.war?
LCK=ent.box.com
MD5 c48b21b9c9f2584329f66329aa0544ef
Click Download Button
Supported Versions
The Veracode plug-in supports the following Veracode API versions:
•
summaryreport.do – version 3.0
•
getappbuilds.do – version 4.0
•
getdynamicstatus.do – version 5.0
•
rescandynamicscan.do – version 5.0
•
submitdynamicscan.do – version 5.0
•
getapplist.do – version 5.0
For more information, see the Veracode documentation at https://www.veracode.com/.
Manifest URL
For plug-in registration, use the following Veracode manifest URL:
http://<plugin-server>:<port>/cdd-veracode-plugin/manifest.json
471

Continuous Delivery Director 8.5
What's New
The following update was made for plug-in version 1.0.2:
•
Support was added for Java 11.
Configuration
You configure the Veracode plug-in either for the initial setup, or whenever a change to the dynamic scan configuration is
required. To use the Veracode API, you must first generate API credentials.
Follow these steps:
1. Navigate to the Veracode platform (https://analysiscenter.veracode.com, and create an application profile.
2. In the application profile, click Start a Dynamic Scan.
The Dynamic Scan wizard opens.
3. Complete each step to configure the dynamic scan: Scan Configuration, Login Instructions, Crawl Instructions,
Advanced Options, and Scan Options. On the Scan Options page, click Run Prescan now.
4. Submit your first dynamic scan.
Note: After the scan is finished and results are ready, you can create and run a task to automate this scan in
Continuous Delivery Director. Once the scan completes, the results are available in the Veracode platform. You can
run the Continuous Delivery Director task repeatedly without the need to configure the Veracode platform again.
5. Go to the user account menu, select API Credentials, and click Generate API Credentials. Veracode generates your
ID and secret key.
Important: Copy these strings and keep them secure. You only see these credentials once. If you forget these
credentials, you must regenerate a new ID and secret key.
6. In Continuous Delivery Director, register the plug-in and create endpoints as described in Manage Plug-ins.
Endpoint Parameters
The following parameters are required to create an endpoint:
•
API Credentials ID
Specifies the Veracode API credentials ID that provides permission to access the Veracode API
•
API Credentials Secret Key
Specifies the Veracode API credentials secret key that provides permission to access the Veracode API
To check the connection to Veracode, use the endpoint Test Connection option. The Test Connection option returns the
following results:
•
Success The connection was successful
•
Failure The connection failed
Tasks
The following task types are available in the Veracode plug-in:
TIP
To select from a list of available tokens, enter the percent sign (%) in the task field.
Run Dynamic Scan
The Run Dynamic Scan task requires the following field:
Application Specifies the name of the application added to the Veracode application security platform
472

Continuous Delivery Director 8.5
Develop Custom Plug-ins
Create custom plug-ins to add remote endpoints to your release pipeline that are outside the scope of the plug-ins
included in Continuous Delivery Director.
Plug-in Version 3.1.7
Download Options
Method Info
MD5 b0f474dcdf98611d09de6d9471f43164
The effectiveness of Continuous Delivery Director depends on the ability of the product to interact with the remote
endpoints in your continuous delivery pipeline. If the library of packaged plug-ins does not contain integration with a key
remote endpoint in your continuous delivery pipeline, you have the following options:
•
Use manual entities in Continuous Delivery Director to simulate an integration point. For example, you can manually
add the stories that are affected by an application release as content if a packaged plug-in is not available for your
change management tool. You can also create a manual task for operations in other continuous delivery remote
endpoints that simply remind the user to complete the operation manually in the remote endpoint. This is not an ideal
solution and can cause high margins for error and a higher release management workload.
•
Use the REST task that is provided by the CA REST packaged plug-in to make REST API calls to remote endpoints
not supported with a packaged plug-in. As long as the remote endpoint has a REST API, you can instrument
operations using the REST plug-in without developing a full custom plug-in.
This option works for tasks but does not cover content and application import use cases. Therefore, we do not
recommend this option for production usage.
•
Develop a custom plug-in to integrate with the remote endpoint. This is the recommended option. This section
describes how to develop a custom plug-in.
Continuous Delivery Director includes a full plug-in framework that supports packaged plug-in integrations and custom
plug-in development. The plug-in framework supports the following capabilities:
•
Configure and test connectivity to a remote endpoint
•
Create automated tasks that instrument operations in the remote endpoint
•
Import application and environment models from the remote endpoint
•
Import content from the remote endpoint
The architecture of the plug-in framework is intended to allow for quick and flexible development of integrations with
remote endpoints in your continuous delivery pipeline.
You can use utilities and helpers to retrieve dynamically a list of possible values from a remote endpoint. You can use
dynamic values to enable end users to select values for task and import content item operations.
You can write your custom plug-in code in any programming language and can deliver the custom plug-in code to any
Web service container such as Apache Tomcat or IBM WebSphere.
To develop a custom plug-in, you must adhere to the following requirements:
•
The plug-in must be an HTTP service that can accept a POST request, instrument the requested operation, and can
return a response.
•
The plug-in must include a manifest.json file that details the plug-in capabilities.
After you finish plug-in development, see Manage Plug-ins for information about how to install and register the plug-in.
473

Continuous Delivery Director 8.5
Enable Java Custom Plug-in
Developers working in Java to develop a custom plug-in need to download a DTO .jar file from the CA Support Web site.
This .jar file declares the Java interfaces and input and output arguments required in the sample plugin code to enable the
plug-in to integrate with Continuous Delivery Director.
Follow these steps:
1. Enter the URL https://casupport.broadcom.com/ in a Web browser and log in to CA Support.
2. From the menu, select Download Management:
3. Search for Continuous Delivery Director and select Product Downloads Available:
4. Click the required Continuous Delivery Director release.
5. Look for CUSTOM PLUG-IN DTO in the results list and download.
474

Continuous Delivery Director 8.5
Develop Custom Plug-in HTTP Service
The plug-in code must be an HTTP service that listens to and processes an incoming HTTP POST request from
Continuous Delivery Director. The service executes any type of request at the remote endpoint.
Outside of this requirement, the nature of the plug-in code is flexible in the following areas:
•
Programming language
•
Network API of the remote endpoint (HTTP, TCP, or other network protocol)
•
Packaging
All packaged plug-ins are Java web applications that are packaged as Tomcat 8 WAR files that you deploy locally or
remotely from the core product installation. You can also deploy plug-ins on a private or public cloud over the Internet.
The following diagram shows how the interface between the product, the plug-in, and the remote endpoint work:
475

Continuous Delivery Director 8.5
Figure 39: plugin flow
1. The CDD Server makes an HTTP POST request to the plug-in when the invocation of a plug-in service occurs.
2. The plug-in uses the information in the POST request to format the appropriate call to the remote endpoint.
3. The endpoint may return a response to the plug-in while the operation is still running on the endpoint side
(asynchronous operation).
4. The plug-in sends an HTTP POST response to the CDD server asking CDD to poll in x seconds.
5. The CDD Server makes repeated HTTP POST requests for the service querying the status of the operation on the
endpoint side.
6. The plug-in sends an HTTP POST response with the operation status to the CDD Server.
7. When the status indicates that the operation has completed, CDD stops polling the plug-in.
The plug-in HTTP service must perform the following functions:
Understand input values from the manifest
Input values from the manifest are typically requested to construct the full request to the remote endpoint. The code must
understand the values that are specified by the user when the task or other plug-in service is created. The code must
properly use the values to construct the request to the remote endpoint.
Example: The plug-in code uses each of the potential input values to construct the request URL of the remote endpoint.
476

Continuous Delivery Director 8.5
Use input values to construct a full request to the remote endpoint
The plug-in manifest must contain definitions for each supported plug-in service. Continuous Delivery Director uses these
manifest definitions to collect the required input field values from the user and deliver the values to the plug-in. The plug-in
uses these input field values to construct and execute the full request that is required for each operation.
Example: The plug-in code can contain a base REST API call with variables to hold the user input values.
Provide a POST response to display in the UI
The plug-in code must produce a POST response that is based on the result of the request to display as status
information in the UI. The JSON scheme in the plug-in framework provides the following inputs that you can leverage for
this purpose. A CDD plug-in may support one or more of the following plug-in services:
•
Execute task (request JSON, response JSON - syntax, description, and an example)
•
Import applications
•
Import content items
•
Test connectivity
•
Retrieve dynamic values
externalTaskExecutionStatus
Provides a high-level status for the task. Set this input to one of the following values:
•
RUNNING
•
FAILED
•
FINISHED
executionContent
Provides a field in which to store the service execution content. The task execution context data might include
a collection of key/value pairs of runtime information for this specific task execution. CA Continuous Delivery
Director persistently stores this context as an opaque data object and delivers the object at the next invocation of this API
for this specific task execution.
Type: Map <String,Sting>
Context Key Limit: 230 characters
Context Value Limit: 4000 characters
Notes:
•
If the response does not include the context element, CA Continuous Delivery Director keeps the context as is.
•
If the response includes an empty context element, CA Continuous Delivery Director clears the context for this task
execution.
taskState
Provides a summary of the task status. This status appears on the UI next to the task status icon.
The status is returned at the statusDescription field of the Task REST API response and displayed on the UI.
Type: String
Limits: 255 characters
Example: Task Failed
detailedInfo
Provides a detailed summary of the task status. The status is returned at the detailedStatusDescription field of the Task
REST API response. This detailed status appears when you click on the high-level status in the UI.
477

Continuous Delivery Director 8.5
Type: String
Limits: 10,000 characters
Example: Endpoint value is incorrect. Provide valid endpoint details.
progress
Provides a progress indicator to display.
Type: Float
delayTillNextPoll
Specifies when Continuous Delivery Director initiates the next invocation of this API for this specific task execution (if at
all).
Type: Long
Sample Plug-in Requests
Test Connectivity
URL
${SCHEME}://${HOST}:${PORT}/cdd-twistlock-plugin/api/connectivity-test/connect
Input
{ "endPointProperties": { "address": "http://twistlockonesrv:8081", "twistlockUsername": "admin",
"twistlockPassword": "admin", "registry": "isl-dsdc.ca.com:5000", "registryUsername": "bld_ra_build",
"registryPassword": "Summer12$" } }
Output
{success=true, errorMessage='null'}
Task Execution
URL
${SCHEME}://${HOST}:${PORT}/cdd-twistlock-plugin/api/run-static-scan
Input
{ "endPointProperties": { "address": "http://twistlockonesrv:8081", "twistlockUsername": "admin",
"twistlockPassword": "admin", "registry": "isl-dsdc.ca.com:5000", "registryUsername": "bld_ra_build",
"registryPassword": "Summer12$" }, "taskProperties" : { "repo" : "com/ca/cdd/trunk/6.5/server", "tag" :
"latest", "Severity" : "low", "CVSS" : "0", "TaskTimeout" : "60" } }
Output
{
"externalTaskExecutionStatus": "FINISHED",
"taskState": "Finished",
"detailedInfo": "No vulnerability was found",
"progress": 100.0,
"executionContext": {},
478

Continuous Delivery Director 8.5
"outSystemParameters": {},
"delayTillNextPoll": -1
}
Dynamic Values
URL
${SCHEME}://${HOST}:${PORT}/cdd-veracode-plugin/api/dynamic-values/applications?max_results=10&filter=myApp
Input
{ "endPointProperties": { "apiId": "6a18092e96013b24da2fc52ca2c4782c", "apiSecretKey":
"7f110a26c3e8dfb7e45861f294cd91362c18a598415226c5e2f4b819a049a81ffcd0e841340b85844d4bb3f0631f6bfcdf8b51623384048d4f61981296f2a3b5" } }
Output
{"values":[{"key":"301530","value":"Ahaz First Application"},
{"key":"304580","value":"AppWithConfiguredDS_not_prescanned"},{"key":"312510","value":"CA Modern
Software Factory - Raffle"},{"key":"299867","value":"CA Raffle"},{"key":"299866","value":"CA Raffle
Web Site"},{"key":"300118","value":"CA Release Automation 6.4"},{"key":"306471","value":"http://
cdbu.io"},{"key":"320737","value":"http://CDBU.io" Win site"},{"key":"317208","value":"CDD QA test 1"},
{"key":"317169","value":"CDD QA Yonatan 01"},{"key":"124089","value":"Demo - 3rd Part - Published w/
Mitigation"},{"key":"155589","value":"Demo - 3rd Party - Request"},{"key":"163261","value":"Demo - 3rd
Party - Results NOT Published"},{"key":"176640","value":"Demo - Vendor Paid"},{"key":"294705","value":"Demo
App 17"},{"key":"294707","value":"Demo App 18 - Prescan Complete"},{"key":"186511","value":"Lesley\u0027s
test application v7.0.9"},{"key":"303216","value":"LironApp3"},{"key":"303018","value":"LironsApp2"},
{"key":"303725","value":"LironsApp4"},{"key":"307128","value":"LironsApp6"},{"key":"321198","value":"Medrec
Application DOD 0"},{"key":"321193","value":"Medrec Application DOD 1"},{"key":"322165","value":"Medrec
Application DOD 10"},{"key":"322166","value":"Medrec Application DOD 11"},{"key":"322155","value":"Medrec
Application DOD 12"},{"key":"322167","value":"Medrec Application DOD 13"},{"key":"322168","value":"Medrec
Application DOD 14"},{"key":"322169","value":"Medrec Application DOD 15"},{"key":"322170","value":"Medrec
Application DOD 16"},{"key":"322171","value":"Medrec Application DOD 17"},{"key":"322172","value":"Medrec
Application DOD 18"},{"key":"322173","value":"Medrec Application DOD 19"},{"key":"321194","value":"Medrec
Application DOD 2"},{"key":"322174","value":"Medrec Application DOD 20"},{"key":"322158","value":"Medrec
Application DOD 3"},{"key":"322159","value":"Medrec Application DOD 4"},{"key":"322160","value":"Medrec
Application DOD 5"},{"key":"322161","value":"Medrec Application DOD 6"},{"key":"322162","value":"Medrec
Application DOD 7"},{"key":"322163","value":"Medrec Application DOD 8"},{"key":"322164","value":"Medrec
Application DOD 9"},{"key":"305890","value":"OferApp"},{"key":"302991","value":"ROBOT Application
With Dynamic Scans"},{"key":"302992","value":"ROBOT Application With Dynamic Scans \u0026 Static
Scans"},{"key":"302990","value":"ROBOT Application Without Scans"},{"key":"306607","value":"RobotApp1"},
{"key":"306922","value":"RobotApp2"},{"key":"306924","value":"RobotApp3"},
{"key":"307126","value":"RobotApp4"},{"key":"307127","value":"RobotApp5"},
{"key":"307629","value":"RobotApp6"},{"key":"307040","value":"RobotNotReadyApp1"},
{"key":"305538","value":"RonenTest"},{"key":"299127","value":"test for bug"},
{"key":"304569","value":"testApp1"},{"key":"304572","value":"testApp2"},{"key":"316288","value":"Travel App"},
{"key":"261605","value":"wer"}],"numOfResults":59}
Import Data
URL
${SCHEME}://${HOST}:${PORT}/cdd-jira-plugin/content-source/contents
479

Continuous Delivery Director 8.5
Input
{"endPointProperties":{"password":"123456AB","url":"https://
assafshlomi.atlassian.net","username":"shlas01"},"contentSourceProperties":{"query":"type \u003d bug"}}
Output
{
"contents": [{
"content": "bug for CAW 1",
"type": "DEFECT",
"displayType": "Bug",
"status": "To Do",
"id": "NAC-22",
"externalId": "15903"
}, {
"content": "bug for CAW 1",
"type": "DEFECT",
"displayType": "Bug",
"status": "To Do",
"id": "NAC-21",
"externalId": "15902"
}, {
"content": "bug for CAW 1",
"type": "DEFECT",
"displayType": "Bug",
"status": "To Do",
"id": "NAC-20",
"externalId": "15901"
}
]
}
Import Apps
URL
${SCHEME}://${HOST}:${PORT}/cdd-awselasticbeanstalk-plugin/api/application-source/applications
Input
{
"endPointProperties":
{
"accessKeyID": "AKIAIGEKPUS7UOKGPHGQ",
"secretAccessKey": "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",
"region": "eu-west-1",
"s3Bucket": "liron.elastic.beanstalk"
480

Continuous Delivery Director 8.5
}
}
Output
{
"applications":
[{
"id": "Twistlock_Robot_App",
"name": "Twistlock_Robot_App",
"environments": []
},
{
"id": "EB_PluginRobotApp",
"name": "EB_PluginRobotApp",
"environments": [
{
"id": "e-fzeypxhnt6",
"name": "EB-RobotEnv-2-1500298217"
},
{
"id": "e-fphiirivpz",
"name": "EB-RobotEnv-1-1500298217"
},
{
"id": "e-dn2vegwnnx",
"name": "EB-RobotEnv-2-1500297850"
},
{
"id": "e-cmbx3r8frb",
"name": "EB-RobotEnv-1-1500297850"
}
]
},
{
"id": "EB_PluginRobotApp_3",
"name": "EB_PluginRobotApp_3",
"description": "Please don\u0027t delete it (used in robot tests) !!!",
"environments": []
},
{
"id": "EB_PluginRobotApp_2",
"name": "EB_PluginRobotApp_2",
"description": "Please don\u0027t delete this app!!! \nit is used in robot tests...",
"environments": []
},
{
"id":
"mySampleApp",
"name": "mySampleApp",
"environments": []
481

Continuous Delivery Director 8.5
},
{
"id": "QA01",
"name": "QA01",
"environments": []
},
{
"id": "CDD",
"name": "CDD",
"environments": [
{
"id": "e-zd7chudif3",
"name": "acceptance",
"description": "Clone of load"
},
{
"id": "e-qg3inbp8qq",
"name": "load",
"description": ""
}
]
}
]
}
To view and download sample plug-in code, see Sample Plug-in.
Create the Plug-in Manifest
Every plug-in requires a manifest.json file that describes the plug-in capabilities (plug-in services). The manifest.json file
requires a specific JSON format that includes the following information:
•
Basic plug-in information such as name and version
•
An endpoint template that describes the name and required parameters for connecting to a remote endpoint for that
plug-in
•
Information for each service that the plug-in provides, such as execute task, import content items, import applications,
and so on
Always place the manifest.json file at the top level of your plug-in package.
Sample Manifest File
To download a sample manifest file for a reference point and a template for your custom plug-in manifest, see Sample
Plug-in.
Basic Plug-in Information
The following basic information is required at the top of the manifest file:
name
Specifies the name of the plug-in, which appears on the UI in the Administration, Plug-ins page.
Example: BlazeMeter
vendor
482

Continuous Delivery Director 8.5
Specifies the plug-in vendor, which appears on the UI in the Administration, Plug-ins page.
Example: CA Technologies
uniqueId
Specifies a unique identifier that distinguishes the plug-in from other plug-ins on the system. The unique ID should be a
concatenation of vendor and name
Example: CA Technologies BlazeMeter
description
Specifies a description for the plug-in.
version
Specifies the plug-in version number, which appears on the UI in the Administration, Plug-ins page. As a best practice,
the version should be written in the form [numeric major version].[numeric minor version], for example, "1.2". Every
change in the plug-in implementation and in the manifest should increment the version number, either minor or major.
Incrementing the version number facilitates version control, change management, and tracking.
Endpoint Template Information
The following information is required in the manifest file to enable a connection to remote endpoints of that plug-
in. A plug-in has only one endpoint template (also known as the endpoint type). This information appears under the
endpointTemplate section of the manifest. The endpoint template specification includes all parameters that are
required for connecting to the remote endpoint. For example, URL, user name, password, and so on. The list of
parameters of the endpoint template is specific to each plug-in.
name
Specifies the name of the endpoint template. As a best practice, set this name to the name of the plug-in. The name
appears as an Endpoint Type option when you click Add Endpoint on the Endpoints page in the UI.
uniqueId
Specifies a unique identifier that distinguishes the service information in this section from the other services within your
manifest, such as tasks and content import. Set this value to "ENDPOINT" as a best practice.
description
Specifies a description for the endpoint type.
servicetype
Specifies the type of plug-in service you are describing. Always specify ENDPOINT for this property.
endPointType
Specifies the name of the endpoint type. Always specify ENDPOINT for this property.
url
Specifies a URL that is associated with this endpoint. Always specify ENDPOINT for this property.
parameters
Specifies the parameters that are required to establish a connection to the remote endpoint, such as URL, user
name, password, and so on. These parameters appear on the UI when the Endpoint Type is selected in the ADD
ENDPOINT dialog. The list of parameters holds the data type of each parameter and does not include the concrete
values. The concrete values are specified by the user when they create a specific endpoint instance based on this
endpoint template definition.
For more information, see Service Parameter Information.
483

Continuous Delivery Director 8.5
Service Information
The following information is required in the manifest file to enable the services supplied by the plug-in, such as tasks,
content import, and application import. A plug-in can have as many services as necessary. This information appears under
the services section of the manifest.
name
Specifies the name of the plug-in service. This name appears as an option when you select from the available Task
Type values in the CREATE TASK dialog or when you select from the available Content Source Types on the CREATE
CONTENT SOURCE dialog.
uniqueId
Specifies a unique identifier that distinguishes the service information in this section from the other services within your
manifest. Set this value to the name of this service as a best practice. This value must not change in future versions of
this service.
description
Specifies a description for the service.
servicetype
Specifies the type of plug-in service that is described. Specify one of the following service types:
•
Task: "TASK"
•
Content import: "CONTENT"
•
Application import: "APPLICATION"
•
Test connectivity: "CONNECTIVITY_TEST"
url
Specifies a URL that is used by Continuous Delivery Director when you build the API call to execute this plug-in service
using the provided parameter values. Ensure that the URL is relative to the base URL of the plug-in package in the
manifest file location. For more information, see Manifest Best Practices.
inputParameters
Specifies the input parameters that are required to execute the plug-in service. These parameters appear on the UI when
the Task Type is selected in the CREATE TASK or CREATE CONTENT SOURCE dialog.
For more information, see Service Parameter Information.
outputParameters
Specifies the output parameters that are returned by the execution of the plug-in service. These parameters appear on the
UI when the Task Type is selected in the CREATE TASK or CREATE CONTENT SOURCE dialog. A user can configure a
token in an output parameter, and Continuous Delivery Director will set the token value as the output parameter value that
is returned by the execution of the plug-in service. The token can also be used as the input parameter of another plug-in
service.
For more information, see Service Parameter Information.
Service Parameter Information
Service parameters are input values that are required for the underlying HTTP request to instrument the service. For
endpoint templates, service parameters are typically connection information. For other services, parameters provide
the information that is required to instrument task execution, and so on that is based on the requirement for that plug-in
service. For example, deployment plan information to run a deployment. Parameters appear as fields when you select the
relevant task type, content source type, or endpoint type on the UI.
484

Continuous Delivery Director 8.5
Input Parameters
name
Specifies a name for the parameter. This value must not change in future versions of this service parameter.
displayName
Specifies the parameter name that appears as the field name for inputs in the UI. This value can be modified without any
effect on the plug-in service execution.
uniqueId
Specifies a unique identifier that distinguishes the parameter in this section from the other parameters of this plug-in
service.
description
Includes a description of the field that appears when you hover over the field in the UI.
type
Specifies the type of input value. Enter one of the following values:
string
A string value.
textarea
Displays a text box for an input value up to 1024 characters. Use this type for longer values such as code snippets.
password
An encrypted value. Use this type for passwords.
boolean
A boolean value, true or false . In the UI, the boolean type appears as a checkbox.
isOptional
Specifies whether the value is required or optional.
defaultValue
Specifies the default value that appears in the field before any other value is supplied.
possibleValues
Defines a set of static possible values for the field that are selectable in the UI from a drop-down list for a string
parameter or checkbox for a boolean parameter (true or false ). Each possible value can be associated with a further
list of parameters that appear whenever the option associated with this value is selected in the UI.
Output parameters
Output parameters provide the ability to return plug-in values and use the values in a later task and phases
name
Specifies a name for the parameter. This value must not change in future versions of this service parameter.
displayName
Specifies the parameter name that appears as the field name for inputs in the UI. This value can be modified without any
effect on the plug-in service execution.
uniqueId
485

Continuous Delivery Director 8.5
Specifies a unique identifier that distinguishes the parameter in this section from the other parameters of this plug-in
service.
description
Includes a description of the field that appears when you hover over the field in the UI.
Manifest Best Practices
Consider the following best practices as you build your manifest file:
Portable Manifest
•
Keep the content of the manifest portable and agnostic to the exact location of the plug-in server container.
A portable manifest lets the administrator relocate and deploy the plug-in on any server. Avoid hard coding specific
server addresses and ports inside the plug-in manifest. The plug-in manifest should not be tightly coupled to its server
container.
For example, all URL values in the plug-in manifest should use relative values such as tasks/task1.
Sensitive Information
•
Store all sensitive information, such as passwords, API keys, and so on, as endpoint parameters.
Do not store sensitive information in task or content source parameters. The endpoint is a central location that plug-in
tasks and content sources share. This best practice prevents the repeated entry of sensitive data. This practice also
prevents the replication of sensitive data across release tasks and content sources.
Example: If a password value is updated for a remote component, you only have to update one location (endpoint
details) in Continuous Delivery Director.
This best practice also lets you implement different security levels for the endpoint creator and the task creator. The
endpoint creator can hide the concrete password value from all task creators that use this endpoint.
•
Store the network connectivity details of remote components as endpoint parameters.
Do not store network connectivity information in task or content source parameters. Use this best practice for central
management and maintenance of all remote servers that plug-ins access over the system network.
When you use this best practice, the ENDPOINTS page lists all remote servers that the plug-ins access. You do not
have to inspect all tasks to detect which network elements Continuous Delivery Director accesses.
Example: If an IP address of a remote component changes, you would only need to update one location (endpoint
details) in Continuous Delivery Director.
Packaging
•
Ensure the manifest is part of the plug-in package. We do not recommend that you store the manifest separately from
the rest of the plug-in.
•
Ensure the manifest resides at the root of the plug-in package.
If the base URL of the plug-in package is /cdd-ra-plugin/ , the manifest resides directly under the root of the plug-in
package: /cdd-ra-plugin/manifest.json
Naming and Versioning
•
Do not create multiple plug-ins with the same name and definitely not for the same vendor..
Ensure that each plug-in name and plug-in vendor name is globally unique. Using a distinct plug-in name helps to
distinguish the plug-ins in the UI.
•
Ensure the unique ID of the plug-in is a string that includes the plug-in name and the vendor.
Example: CA Technologies Continuous Delivery Automation
•
After you have published the plug-in to the community, do not change the plug-in name and vendor in subsequent
versions.
•
Update the plug-in version every time you modify and release the plug-in.
486

Continuous Delivery Director 8.5
Sample Plug-in
This page presents full sample plug-in materials as a reference example and starting point for plug-in development.
Sample Plug-in Details
This sample plug-in provides basic artifacts to get you familiar with the required format of the manifest file and provide a
common way of writing the plug-in code. The plug-in is a blank sample without any capabilities but provides key examples
of important concepts in the basic formatting of the manifest and the code.
You can download each of these artifacts from this page and use them as starting points for your own custom plug-in.
Sample Plug-in Manifest
Here is the sample plug-in manifest file:
{
"name": "Sample",
"vendor": "CA Technologies",
"uniqueId": "CA Technologies Sample",
"description": "Sample Plugin for Continuous Delivery Director",
"version": "1.0",
"iconUrl": "CA.svg",
"endpointTemplate": {
"uniqueId": "Endpoint",
"name": "Sample Endpoint",
"description": "A Sample plugin endpoint",
"serviceType": "ENDPOINT",
"endPointType": "Endpoint",
"url": "Endpoint",
"parameters": [
{
"uniqueId": "URL",
"name": "URL",
"displayName": "URL",
"type": "string",
"isOptional": false,
"defaultValue": null,
"description": "URL"
},
{
"uniqueId": "username",
"name": "username",
"displayName": "Username",
"type": "string",
"isOptional": false,
"defaultValue": null,
"description": "Username"
},
{
"uniqueId": "password",
"name": "password",
"displayName": "Password",
"type": "password",
487

Continuous Delivery Director 8.5
"isOptional": false,
"defaultValue": null,
"description": "Password"
},
{
"uniqueId": "useProxy",
"name": "useProxy",
"displayName": "Use Proxy",
"type": "boolean",
"isOptional": true,
"defaultValue": "false",
"description": "Connect through a proxy",
"possibleValues": [
{
"value": "false"
},
{
"value": "true",
"parameters": [
{
"uniqueId": "proxyUrl",
"name": "proxyUrl",
"displayName": "Proxy Url",
"type": "string",
"isOptional": false,
"defaultValue": null,
"description": "Proxy Url"
},
{
"uniqueId": "proxyUsername",
"name": "proxyUsername",
"displayName": "Proxy Username",
"type": "string",
"isOptional": true,
"defaultValue": null,
"description": "Proxy Username"
},
{
"uniqueId": "proxyPassword",
"name": "proxyPassword",
"displayName": "Proxy Password",
"type": "password",
"isOptional": true,
"defaultValue": null,
"description": "Proxy Password"
}
]
}
]
}
]
},
"services": [
488

Continuous Delivery Director 8.5
{
"uniqueId": "Task1",
"name": "Task1",
"description": "Description of the first task",
"serviceType": "TASK",
"url": "tasks/task1",
"inputParameters": [
{
"uniqueId": "parameter1",
"name": "parameter1",
"displayName": "Parameter1",
"type": "string",
"isOptional": false,
"defaultValue": null,
"description": "Description of the first parameter of the first task",
"url": "tasks/task1/parameter1/values"
},
{
"uniqueId": "parameter2",
"name": "parameter2",
"displayName": "Parameter2",
"type": "string",
"isOptional": false,
"defaultValue": "GET",
"description": "Description of the second parameter of the first task",
"possibleValues": [
{
"value": "GET"
},
{
"value": "POST"
},
{
"value": "PUT"
}
]
},
{
"uniqueId": "parameter3",
"name": "parameter3",
"displayName": "Parameter3",
"type": "textarea",
"isOptional": true,
"defaultValue": null,
"description": "Description of the third parameter of the first task",
"url": "tasks/task1/parameter3/values",
"dependencies": [
"parameter1"
]
}
],
"outputParameters": [
{
489

Continuous Delivery Director 8.5
"uniqueId": "output_parameter1",
"name": "output_parameter1",
"displayName": "output_parameter1",
"description": "description of output_parameter1"
}
]
},
{
"uniqueId": "Import Application Model",
"name": "Import Application Model",
"description": "Description of import application model",
"serviceType": "APPLICATION",
"url": "application-sources/application-source",
"inputParameters": null
},
{
"uniqueId": "Import Content Items",
"name": "Import Content Items",
"description": "Description of import content items",
"serviceType": "CONTENT",
"url": "content-sources/content-source/content-items",
"outputParameters": [
{
"uniqueId": "parameter1",
"name": "Parameter1",
"displayName": "Parameter1",
"type": "string",
"isOptional": false,
"defaultValue": null,
"description": "Description of the first parameter of the first import content items"
}
]
},
{
"name": "Connectivity Test",
"description": "Connection Test",
"serviceType": "CONNECTIVITY_TEST",
"url": "connectivity-tests/connectivity-test",
"uniqueId": "Connectivity Test"
}
]
}
Download the sample manifest here to use it as a template for your custom plug-in manifest.
This manifest presents the following manifest information in an abstract, sample format:
490

Continuous Delivery Director 8.5
•
Basic plug-in information that you can change for your custom plug-in
•
A basic endpoint template with three template parameters: user name, password, and URL. All recommended best
practices for endpoint information values are applied.
•
Template information for two tasks, content import, and application import. The template services provide examples of
several of the parameter types described in Create the Plug-in Manifest.
•
The manifest uses relative URLs for all services. For example, tasks/task1 is the URL for the first task. This is simply
an identifier that is passed to the plug-in code, which can then use the supplied input values to execute the task. The
sample plug-in code shows how the code can interpret the relative URLs to make the appropriate HTTP request.
Configure Plug-in Icons
Plug-in icons appear in the PLUG-INS page and on tasks in the RELEASES page. The source images for plug-in icons
are located in the plug-in *.*war file.
Plug-in manifests contain a JSON declaration that points to the source image in the plug-in *.*war file.
Example:
"iconUrl": "CA.svg",
To add or change a plug-in icon, replace the source image in the plug-in *.*war file and update the plug-in manifest.
Note: You cannot specify an absolute URL in the plug-in manifest to indicate the location of the source image. If you do
not add or update a source image, or if the declaration is not correctly formatted, the CA icon "CA.svg " is used instead.
Tomcat-Based Java .WAR Sample
Note: For general specifications, see Develop Custom Plug-in HTTP Service.
Java Specific Specifications
A plug-in task might continue to run after the plug-in returns a response to Continuous Delivery Director. In this case, the
plugin sets externalTaskExecutionStatus to RUNNING.
The plugin might create an execution context. The execution context is a collection of key and value pairs that are
dynamically created by the plug-in and hold a plug-in-specific execution context of the plugin task. The execution context
might hold a runtime key/value that allows the plug-in to check the execution status/progress.
The plugin sets delayTillNextPoll to polling duration (in seconds) to specify when Continuous Delivery Director checks
the status/progress again.
Continuous Delivery Director executes the task again after this polling duration has passed to check the task status/
progress. The polling request includes the execution context so the plug-in is aware that this is not a new request for task
execution.
The ExternalTaskResult Java class represents the JSON response on task execution request.
The ExternalTaskResult JSON is returned from a plugin to Continuous Delivery Director and includes the following fields:
externalTaskExecutionStatus
Provides a high-level status for the task. Set this input to one of the following values:
•
RUNNING
•
FAILED
•
FINISHED
executionContent
491

Continuous Delivery Director 8.5
Provides a field in which to store the service execution content. The task execution context data might include a collection
of key/value pairs of runtime information for this specific task execution. Continuous Delivery Director persistently stores
this context as an opaque data object and delivers the object at the next invocation of this API for this specific task
execution.
Type: Map <String,Sting>
Context Key Limit: 230 characters
Contest Value Limit: 4000 characters
Notes:
•
If the response does not include the context element, Continuous Delivery Director keeps the context as is.
•
If the response includes an empty context element, Continuous Delivery Director clears the context for this task
execution.
taskState
Provides a summary of the task status. This status appears on the UI next to the task status icon.
The status is returned at the statusDescription field of the Task REST API response and displayed on the UI.
Type: String
Limits: 255 characters
Example: Task Failed
detailedInfo
Provides a detailed summary of the task status. The status is returned at the detailedStatusDescription field of the Task
REST API response. This detailed status appears when you click on the high-level status in the UI.
Type: String
Limits: 10,000 characters
Example: Endpoint value is incorrect. Provide valid endpoint details.
progress
Provides a progress indicator to display.
Type: Float
delayTillNextPoll
Specifies when Continuous Delivery Director initiates the next invocation of this API for this specific task execution (if at
all).
Type: Long
Note: To view and download sample plug-in code, see Sample Plug-in.
Example:
A Java task may use the following to indicate that the task is still running, and ask Continuous Delivery Director to check
the status/progress in POLLING_INTERVAL seconds:
taskInputs.getExecutionContext().put(OPERATION_ID, operationId);
return ExternalTaskResult.createResponseForRunning("Operation started", description, 0f, POLLING_INTERVAL,
taskInputs.getExecutionContext());
When you stop a task, Continuous Delivery Director calls the task and sets the action to the following query parameters:
EXECUTE_ACTION
492

Continuous Delivery Director 8.5
The standard action specified on task execution.
STOP_ACTION
The standard action specified when the task is stopped.
Example:
@POST
@Produces(MediaType.APPLICATION_JSON)
public ExternalTaskResult execute(@QueryParam(TaskConstants.ACTION_PARAM) String action, ExternalTaskInputs
taskInputs) {
ExternalTaskResult externalTaskResult;
if (TaskConstants.EXECUTE_ACTION.equalsIgnoreCase(action)) {
externalTaskResult = executeTask(taskInputs);
} else if (TaskConstants.STOP_ACTION.equalsIgnoreCase(action)) {
externalTaskResult = stopTask(taskInputs);
} else {
throw new IllegalArgumentException("Unexpected invalid action '" + action + "' while trying to execute
task.");
}
return externalTaskResult;
}
Sample Plug-in Code
The following plugins-dto-1.11.jar file declares the Java interfaces and input and output arguments required in the sample
plugin code.
Here is sample code for a single task described in the manifest:
The entry point for this SampleTask file is the execute method (line 40):
public ExternalTaskResult execute(@QueryParam(TaskConstants.ACTION_PARAM) String action, ExternalTaskInputs
taskInputs)
This method has two input arguments:
•
action of type String
•
taskInputs of type ExternalTaskInputs
This method has one output:
•
externalTaskResult of type ExternalTaskResult
package com.ca.cdd.plugins.sample;
import com.ca.rp.plugins.dto.model.*;
import org.glassfish.jersey.client.authentication.HttpAuthenticationFeature;
import javax.ws.rs.*;
import javax.ws.rs.client.Client;
import javax.ws.rs.client.ClientBuilder;
import javax.ws.rs.client.Entity;
493

Continuous Delivery Director 8.5
import javax.ws.rs.client.Invocation;
import javax.ws.rs.core.MediaType;
import javax.ws.rs.core.Response;
import java.util.Map;
/**
* Created by admin on 24/02/2016.
* A sample task that can be used as a template for Continous Delivery Edition plugin tasks
*/
@Path("tasks/task1")
public class SampleTask {
private static final String PARAMETER1 = "parameter1";
private static final String PARAMETER2 = "parameter2";
private static final String PARAMETER3 = "parameter3";
private static final String FILTER = "filter";
@POST
@Produces(MediaType.APPLICATION_JSON)
public ExternalTaskResult execute(@QueryParam(TaskConstants.ACTION_PARAM) String action, ExternalTaskInputs
taskInputs) {
ExternalTaskResult externalTaskResult;
if (TaskConstants.EXECUTE_ACTION.equalsIgnoreCase(action)) {
externalTaskResult = executeTask(taskInputs);
} else if (TaskConstants.STOP_ACTION.equalsIgnoreCase(action)) {
externalTaskResult = stopTask(taskInputs);
} else {
throw new IllegalArgumentException("Unexpected invalid action '" + action + "' while trying to execute
task.");
}
return externalTaskResult;
}
494

Continuous Delivery Director 8.5
@POST
@Path("/parameter1/values")
@Consumes(MediaType.APPLICATION_JSON)
@Produces(MediaType.APPLICATION_JSON)
public DynamicValuesOutput getDynamicValuesForParameter1(DynamicValuesInput dynamicValuesInput,
@DefaultValue("") @QueryParam(FILTER) String filter) throws Exception {
DynamicValuesOutput dynamicValuesOutput = null;
dynamicValuesOutput = getDynamicValues(dynamicValuesInput, filter);
return dynamicValuesOutput;
}
private ExternalTaskResult executeTask(ExternalTaskInputs taskInputs) {
ExternalTaskResult externalTaskResult;
try {
Map < String, String > taskProperties = taskInputs.getTaskProperties();
Map < String, String > endpointProperties = taskInputs.getEndPointProperties();
String username;
String password;
String url;
if (endpointProperties != null && !endpointProperties.isEmpty()) {
username = endpointProperties.get("username");
password = endpointProperties.get("password");
url = endpointProperties.get("URL");
} else {
externalTaskResult = ExternalTaskResult.createResponseForFailure("Missing endpoint", "Unexpected invalid
empty endpoint while trying to execute task");
return externalTaskResult;
}
// These are the task inputs
String parameter1 = taskProperties.get(PARAMETER1);
String parameter2 = taskProperties.get(PARAMETER2);
String parameter3 = taskProperties.get(PARAMETER3);
Client httpClient = ClientBuilder.newClient();
if (username != null && !username.isEmpty()) {
HttpAuthenticationFeature feature = HttpAuthenticationFeature.basic(username, password);
httpClient.register(feature);
495

Continuous Delivery Director 8.5
}
// http header support
Invocation.Builder request = httpClient.target(url).request();
try {
addHeaders(request);
} catch (Exception e) {
externalTaskResult = ExternalTaskResult.createResponseForFailure("Failed to execute",
"Could not parse headers " + e.getLocalizedMessage());
return externalTaskResult;
}
Response response;
String method = "GET";
String body = null;
response = request.method(method, Entity.json(body));
if (response != null) {
int responseCode = response.getStatus();
String responseBody = response.readEntity(String.class);
return ExternalTaskResult.createResponseForFinished("Rest operation ended successfully", responseBody);
} else {
return ExternalTaskResult.createResponseForFailure("Failed to execute",
"No response");
}
} catch (Exception e) {
externalTaskResult = ExternalTaskResult.createResponseForFailure("Failed to execute",
e.getLocalizedMessage());
}
return externalTaskResult;
}
private ExternalTaskResult stopTask(ExternalTaskInputs taskInputs) {
ExternalTaskResult externalTaskResult;
externalTaskResult = ExternalTaskResult.createResponseForFailure("Failed to stop task", "Cannot stop");
return externalTaskResult;
}
private void addHeaders(Invocation.Builder request) {
request.header("Content-Type", "application/json");
496

Continuous Delivery Director 8.5
return;
}
private DynamicValuesOutput getDynamicValues(DynamicValuesInput dynamicValuesInput, String filter) throws
Exception {
return null;
}
}
Download the sample code here to use it as a template for your custom plug-in code.
The plug-in code does the following:
•
Calls the relative URL referenced in the manifest file for the URL, in this case, tasks/task1. This ensures the proper
routing of the task execution.
•
Constructs the appropriate API call that plugs in task input values to complete the request.
•
Builds a POST response to send status back to the UI based on that task state and what issue changed to what status.
Here is sample code for an application import:
package com.ca.cdd.plugins.sample;
import com.ca.rp.plugins.dto.model.*;
import java.util.List;
import java.util.Map;
import javax.ws.rs.*;
import javax.ws.rs.core.MediaType;
/**
* Created by admin on 24/02/2016.
* A sample application source that can be used as a template for Continous Delivery Edition plugin
application sources
*/
@Path("application-sources/application-source")
public class SampleApplicationSource {
@POST
@Path("/application-source")
@Consumes(MediaType.APPLICATION_JSON)
@Produces(MediaType.APPLICATION_JSON)
497

Continuous Delivery Director 8.5
public ExternalApplicationsResponse execute(ExternalApplicationSourceInput externalApplicationSourceInput)
throws Exception {
ExternalApplicationsResponse externalApplicationsResponse;
externalApplicationsResponse = getApplicationsAndEnvironments(externalApplicationSourceInput);
return externalApplicationsResponse;
}
private ExternalApplicationsResponse getApplicationsAndEnvironments(ExternalApplicationSourceInput
externalApplicationSourceInput) throws Exception {
ExternalApplicationsResponse externalApplicationsResponse;
List < ExternalApplication > externalApplications;
Map < String, String > endPointProperties = externalApplicationSourceInput.getEndPointProperties();
externalApplications = getListOfExternalApplications(endPointProperties);
for (int i = 0; i < externalApplications.size(); i++) {
ExternalApplication externalApplication;
List < ExternalEnvironment > externalEnvironments;
externalApplication = externalApplications.get(i);
externalEnvironments = getListOfEnvironmentByApplication(externalApplication, endPointProperties);
externalApplication.setEnvironments(externalEnvironments);
}
externalApplicationsResponse = new ExternalApplicationsResponse();
externalApplicationsResponse.setApplications(externalApplications);
return externalApplicationsResponse;
}
private List < ExternalApplication > getListOfExternalApplications(Map < String, String > endPointProperties)
{
List < ExternalApplication > externalApplications = null;
498

Continuous Delivery Director 8.5
return externalApplications;
}
private List < ExternalEnvironment > getListOfEnvironmentByApplication(ExternalApplication
externalApplication, Map < String, String > endPointProperties) {
List < ExternalEnvironment > externalEnvironments = null;
return externalEnvironments;
}
}
Download this sample code here to use it as a template for your custom plug-in application import.
This sample code does the following:
•
Calls the relative URL referenced in the manifest file for the application import URL. This ensures the proper routing of
an application import request.
•
Runs requests to get the applications and environments associated with a specific endpoint.
Here is sample code for a connectivity test:
package com.ca.cdd.plugins.sample;
import com.ca.rp.plugins.dto.model.ConnectivityInput;
import com.ca.rp.plugins.dto.model.ConnectivityResult;
import javax.ws.rs.Consumes;
import javax.ws.rs.POST;
import javax.ws.rs.Path;
import javax.ws.rs.Produces;
import javax.ws.rs.core.MediaType;
import java.util.Map;
/**
* Created by admin
*/
@Path("connectivity-tests/connectivity-test")
public class SampleConnectivityTest {
@POST
@Consumes(MediaType.APPLICATION_JSON)
@Produces(MediaType.APPLICATION_JSON)
public ConnectivityResult connect(ConnectivityInput connectivityInput) {
ConnectivityResult connectivityResult = new ConnectivityResult(true, null);
boolean status = true;
String errorMessage = null;
499

Continuous Delivery Director 8.5
Map < String, String > endpointProperties = connectivityInput.getEndPointProperties();
if ( status == false )
{
connectivityResult.setSuccess(status);
connectivityResult.setErrorMessage(errorMessage);
}
return connectivityResult;
}
}
Download this sample code for a connectivity test here.
This sample code provides a URL that is called to test an endpoint connection.
Sample Tomcat web.xml File
The following web.xml file uses a Jersey servlet container:
For more information, see the jersey.java.net website.
<?xml version="1.0" encoding="UTF-8"?>
<!-- This web.xml file is not required when using Servlet 3.0 container,
see implementation details http://jersey.java.net/nonav/documentation/latest/jax-rs.html -->
<web-app version="2.5" xmlns="http://java.sun.com/xml/ns/javaee" xmlns:xsi="http://www.w3.org/2001/XMLSchema-
instance" xsi:schemaLocation="http://java.sun.com/xml/ns/javaee http://java.sun.com/xml/ns/javaee/web-
app_2_5.xsd">
<servlet>
<servlet-name>CA Technologies Sample Plugin</servlet-name>
<servlet-class>org.glassfish.jersey.servlet.ServletContainer</servlet-class>
<init-param>
<param-name>jersey.config.server.provider.packages</param-name>
<param-value>com.ca.cdd.plugins.sample</param-value>
</init-param>
<load-on-startup>1</load-on-startup>
</servlet>
<servlet-mapping>
<servlet-name>CA Technologies Sample Plugin</servlet-name>
<url-pattern>/servlet/*</url-pattern>
</servlet-mapping>
</web-app>
Download the sample web.xml File here.
Sample Tomcat Logger Configuration
The following file presents a sample logback configuration for a Tomcat-based Java plug-in:
<?xml version="1.0" encoding="UTF-8"?>
<configuration>
<!--<include resource="org/springframework/boot/logging/logback/base.xml"/>-->
<!--<jmxConfigurator/>-->
<property name="LOG_HOME" value="../logs" />
500

Continuous Delivery Director 8.5
<appender name="STDOUT" class="ch.qos.logback.core.ConsoleAppender">
<layout class="ch.qos.logback.classic.PatternLayout">
<Pattern>
%d{yyyy-MM-dd HH:mm:ss} [%thread] %-5level %logger{36} - %msg%n
</Pattern>
</layout>
</appender>
<appender name="FILE-LOG"
class="ch.qos.logback.core.rolling.RollingFileAppender">
<file>${LOG_HOME}/cdd_sample_plugin.log</file>
<encoder class="ch.qos.logback.classic.encoder.PatternLayoutEncoder">
<Pattern>
%d{yyyy-MM-dd HH:mm:ss} [%thread] %-5level %logger{36} - %msg%n
</Pattern>
</encoder>
<rollingPolicy class="ch.qos.logback.core.rolling.TimeBasedRollingPolicy">
<!-- rollover daily -->
<fileNamePattern>${LOG_HOME}/archived/cdd_sample_plugin.%d{yyyy-MM-dd}.%i.log
</fileNamePattern>
<timeBasedFileNamingAndTriggeringPolicy
class="ch.qos.logback.core.rolling.SizeAndTimeBasedFNATP">
<maxFileSize>10MB</maxFileSize>
</timeBasedFileNamingAndTriggeringPolicy>
</rollingPolicy>
</appender>
<!-- Send logs to both console and file audit -->
<logger name="com.ca.cdd.plugins.sample"
additivity="false">
<appender-ref ref="FILE-LOG" />
<appender-ref ref="STDOUT" />
</logger>
<root level="debug">
<appender-ref ref="FILE-LOG" />
</root>
</configuration>
Download this sample file here to use it as a template for your logback configuration.
In this file, you should change values in the following lines to reflect the artifacts for your plugin:
•
Line 17 specifies the log file name to which to log plugin messages.
•
Line 24 specifies archiving behavior.
•
Line 37 specifies the Java package for the plugin.
These three locations should be updated based on the artifacts for your plugin.
Should include logback.jar and other third-party files with a logback implementation.
Sample Tomcat WAR Folder and File Structure
When you develop a sample plug-in using a Tomcat-based Java architecture, your WAR folder structure will look like the
following:
./WEB-INF
./WEB-INF/classes
501

Continuous Delivery Director 8.5
./WEB-INF/classes/com
./WEB-INF/classes/com/ca
./WEB-INF/classes/com/ca/cdd
./WEB-INF/classes/com/ca/cdd/plugins
./WEB-INF/classes/com/ca/cdd/plugins/sample
./WEB-INF/lib
./META-INF
The files included in the plug-in are as follows:
# Plugin manifest
./manifest.json
# WAR manifest
./META-INF/MANIFEST.MF
# Tomcat web.xml
./WEB-INF/web.xml
# WAR class files
./WEB-INF/classes/logback.xml
./WEB-INF/classes/com/ca/cdd/plugins/sample/SampleTask.class
./WEB-INF/classes/com/ca/cdd/plugins/sample/SampleConnectivityTest.class
./WEB-INF/classes/com/ca/cdd/plugins/sample/SampleApplicationSource.class
# WAR jar files
./WEB-INF/lib/plugins-dto-1.11.jar
./WEB-INF/lib/dtos.jar
./WEB-INF/lib/javax.annotation-api-1.2.jar
./WEB-INF/lib/javax.ws.rs-api-2.0.1.jar
./WEB-INF/lib/javax.inject-2.4.0-b31.jar
./WEB-INF/lib/javax.inject-1.jar
./WEB-INF/lib/jersey-media-json-jackson-2.21.jar
./WEB-INF/lib/jersey-client-2.22.1.jar
./WEB-INF/lib/jersey-media-jaxb-2.22.1.jar
./WEB-INF/lib/jersey-entity-filtering-2.21.jar
./WEB-INF/lib/jersey-server-2.22.1.jar
./WEB-INF/lib/jersey-common-2.22.1.jar
./WEB-INF/lib/jersey-apache-connector-2.21.jar
502

Continuous Delivery Director 8.5
./WEB-INF/lib/jersey-container-servlet-core-2.22.1.jar
./WEB-INF/lib/jersey-guava-2.22.1.jar
./WEB-INF/lib/logback-core-1.1.3.jar
./WEB-INF/lib/logback-classic-1.1.3.jar
./WEB-INF/lib/log4j-over-slf4j-1.7.12.jar
./WEB-INF/lib/slf4j-api-1.7.12.jar
./WEB-INF/lib/jcl-over-slf4j-1.7.12.jar
./WEB-INF/lib/commons-logging-1.2.jar
./WEB-INF/lib/httpcore-4.4.3.jar
./WEB-INF/lib/httpasyncclient-4.0.2.jar
./WEB-INF/lib/httpcore-nio-4.3.2.jar
./WEB-INF/lib/httpclient-4.5.1.jar
./WEB-INF/lib/httpmime-4.3.6.jar
./WEB-INF/lib/unirest-java-1.4.5.jar
./WEB-INF/lib/jackson-jaxrs-json-provider-2.5.4.jar
./WEB-INF/lib/jackson-jaxrs-base-2.5.4.jar
./WEB-INF/lib/jackson-databind-2.5.4.jar
./WEB-INF/lib/jackson-annotations-2.5.4.jar
./WEB-INF/lib/jackson-module-jaxb-annotations-2.5.4.jar
./WEB-INF/lib/jackson-core-2.6.2.jar
./WEB-INF/lib/javassist-3.18.1-GA.jar
./WEB-INF/lib/json-simple-1.1.1.jar
./WEB-INF/lib/json-20140107.jar
./WEB-INF/lib/hk2-api-2.4.0-b31.jar
./WEB-INF/lib/hk2-utils-2.4.0-b31.jar
./WEB-INF/lib/hk2-locator-2.4.0-b31.jar
./WEB-INF/lib/commons-codec-1.9.jar
./WEB-INF/lib/hamcrest-core-1.3.jar
./WEB-INF/lib/junit-4.12.jar
./WEB-INF/lib/validation-api-1.1.0.Final.jar
./WEB-INF/lib/osgi-resource-locator-1.0.1.jar
./WEB-INF/lib/aopalliance-repackaged-2.4.0-b31.jar
./WEB-INF/lib/mockito-all-1.10.19.jar
503

Continuous Delivery Director 8.5
Build Notifications
You use build notifications to automate your continuous delivery pipeline. Build notifications unify your continuous
integration and continuous delivery toolchains.
Continuous Delivery Director has developed plug-ins that integrate with various popular CI tools. These plug-ins contain
configurable post-build steps. You set up post-build steps in your CI tool to automatically send build notifications to
Continuous Delivery Director whenever a build event occurs.
You can configure post-build steps in your CI tool to trigger various activities in Continuous Delivery Director.
Build Notification Workflow
The Continuous Delivery Director integrations with CI tools provide a framework for defining which build notifications are
sent, based on code changes in the source control repository. This section describes the major components and process
flow of build notification delivery to the release pipeline. Understanding how all of the pieces work together helps you
decide how to customize the build notification configuration to meet your organizational needs.
The workflow includes the following stages:
504

Continuous Delivery Director 8.5
Figure 40: Build notification workflow
1. A developer makes changes to the code of an application in the source control tool.
505

Continuous Delivery Director 8.5
2. When the developer has finished, they submit the code change (commit) to the source control repository.
3. The CI tool detects the code change (commit) and initiates a build.
4. When the build completes, the post-build step sends a build notification to Continuous Delivery Director.
5. Continuous Delivery Director attempts to match the build notification information with existing data in the Continuous
Delivery Director database: application name, application version, release, and so on.
6. Continuous Delivery Director initiates release activities according to the build notification configuration.
Related Links
Configure Build Notifications on page 506
Configure build notifications in your CI tool to trigger different activities in Continuous Delivery Director.
Integration with Azure DevOps Server on page 511
Use this plug-in to send build notifications from Azure DevOps Server to Continuous Delivery Director.
Integration with Bitbucket Cloud on page 516
You can send change notifications from Bitbucket to Continuous Delivery Director using scripts.
Integration with GitLab on page 517
You can send change notifications from GitLab to Continuous Delivery Director using scripts.
Inegration with Jenkins on page 522
Use this plug-in to send build notifications from Jenkins to Continuous Delivery Director.
Configure Build Notifications
Configure build notifications in your CI tool to trigger different activities in Continuous Delivery Director.
You configure notification-related post-build steps in your CI tool so that outgoing build notifications trigger specific
activities in Continuous Delivery Director releases. You can set up post-build steps for the following activities:
•
Run an existing release
•
Replace the application version
•
Create a release from DSL
•
Create a release from business application-related DSL
•
Run tests only
Build notifications contain information that is essential for the CD pipeline. The most important information that your CI tool
sends to Continuous Delivery Director includes the following parameters:
NOTE
The exact parameter names may vary according to the CI tool integration in use.
•
Application Name
The application name usually corresponds to the repository name of the application. You predefine applications in
Continuous Delivery Director.
•
Application Version
The best practice is to correlate the application version with the source code repository branch name.
•
Build Number
The ID of the specific build process.
Also, you can configure the post-build step to send the following information according to the activity you want to take
place in Continuous Delivery Director:
•
Application Source
506

Continuous Delivery Director 8.5
If Continuous Delivery Director contains more than one imported application with the same name from multiple
sources, you can specify the application source to identify the correct application.
•
Commit Range ID
The commits that are included in the build. Continuous Delivery Director uses this information for the planned vs actual
feature. The plug-in of the build server sends this data to Continuous Delivery Director automatically. No manual setup
is needed.
•
List of Release Tokens and Values
These values are used by the release that Continuous Delivery Director matches. The tokens are predefined in the
release.
•
Source Control Parameters
To support the planned vs actual feature, configure the post-build step to pass the connection parameters of your
source control repository to Continuous Delivery Director. If a source control template is defined for the application in
Continuous Delivery Director, you can pass values to the source control
-
•
Test Data
You can send test information to the Continuous Delivery Director release from your CI tool if Continuous Delivery
Director creates a release, or if you only want to run tests,
•
DSL Parameters
To create a release when a build notification arrives, you can pass the DSL parameters to Continuous Delivery Director
to create a custom release. You can determine if Continuous Delivery Director creates a release from a DSL file that
specifies a business application or business application version. Alternately, you can specify the DSL file source and
filename
Related Links
Run an Existing Release on page 507
Configure post-build steps to trigger Continuous Delivery Director to run existing releases.
Replace the Application Version on page 508
Automatically update the existing application version in a release with preconfigured build notifications.
Create a Release from DSL on page 509
Automatically create a release from the DSL referenced in incoming build notifications.
Create a Release from Business Application-Related DSL on page 510
Automatically create business application-related releases from the DSL referenced in incoming build notifications.
Run Tests Only on page 510
Run tests without creating a release.
Run an Existing Release
Configure post-build steps to trigger Continuous Delivery Director to run existing releases.
•
A release with an application version exists in Continuous Delivery Director.
•
A Continuous Delivery Director plug-in is installed in the CI tool.
Continuous Delivery Director matches the application version that is contained in an incoming build notification against
existing releases. If a matching release is found, Continuous Delivery Director updates the last_successful_change
system token for the specific application version. If there is no application version, Continuous Delivery Director creates an
application version from the build notification.
If a work item source and a commit source are defined, Continuous Delivery Director matches the application version
that is contained in an incoming commit message against existing releases and presents the updated planned vs actual
information.
507

Continuous Delivery Director 8.5
If the run method in the first phase is Automatic, when Continuous Delivery Director matches an existing release against
an incoming build notification, Continuous Delivery Director executes this phase. If the phase is running, the phase
execution starts when the run is completed (if more notifications arrive while the phase is running, only the last build in the
queue executes the phase.
If test sources have been defined for the application version, on the arrival of a build notification, Continuous Delivery
Director syncs test sources to identify new or updated tests.
1. Open the CI tool project configuration page.
2. Add a post-build step.
3. Select the Send Notification to CDDirector post-build step and configure the parameters, including the following
properties:
•
Use Application Version
Select this option to use the application version you specify in Application Version.
•
Update Release Token Values
Send values for multiple tokens to Continuous Delivery Director.
•
Execute an Existing Release
Execute an existing release in Continuous Delivery Director.
4. Save your configuration.
When a build notification arrives, Continuous Delivery Director runs a release according to the information contained in the
incoming build notification.
Figure 41: Identify and execute an existing release
Replace the Application Version
Automatically update the existing application version in a release with preconfigured build notifications.
508

Continuous Delivery Director 8.5
A Continuous Delivery Director plug-in is installed in the CI tool.
To avoid the manual setup of creating an application version in advance, you can create a release using an existing
application version.
1. In Continuous Delivery Director, open a release.
2. Click the hamburger menu, then Edit Release.
3. Under Advanced, select the Replace application version when build notification arrives option.
When a build notification arrives, Continuous Delivery Director creates an application version (if no version exists) and
replaces the application version with the application version from the build notification in the release version.
Create a Release from DSL
Automatically create a release from the DSL referenced in incoming build notifications.
A Continuous Delivery Director plug-in is installed in the CI tool.
You configure the CI tool so that outgoing build notifications trigger release creation in Continuous Delivery Director based
on DSL in source control repositories.
In the Send Notification to CDDirector post-build action, you can specify a DSL file source, a DSL file, and DSL
parameters. When a build notification arrives, Continuous Delivery Director references the file source to import the DSL
file from the source control repository. During the import, Continuous Delivery Director uses the DSL parameters that are
specified in the build notification.
Before creating a release, Continuous Delivery Director checks whether a release for this application version already
exists. If the release does exist, Continuous Delivery Director does not create the release and simply runs the existing
release. For more information, see Run an Existing Release.
1. Open the CI tool project configuration page.
2. Add a post-build step.
3. Select the Send Notification to CDDirector post-build step and configure the parameters, including the following
properties:
•
Create a Release
–
Specify File Source
Select this option to create a release from DSL files in your source control repositories. You specify the file
source in the form of a "name":"value" pair. After a Jenkins build completes, the release DSL is sent to
Continuous Delivery Director. A new release is automatically created according to the release defined in the file.
•
DSL File Name
Specify a relative file path to a DSL file in your source control repository.
•
Override File Source Parameters
Select this option to override the file source parameters that are defined in Continuous Delivery Director. You
specify the required file source parameters in the form of "name":"value" pairs.
•
Add File Source Parameter
•
Parameter Name
Specify the name of the parameter that you want to add.
•
Parameter Value
Specify the value of the parameter that you want to add.
•
DSL Parameters
Specify the file source in the form of "name":"value" pairs.
•
Add DSL Parameter
509

Continuous Delivery Director 8.5
•
Parameter Name
Specify the name of the parameter that you want to add.
•
Parameter Value
Specify the value of the parameter that you want to add.
4. Save your configuration.
When a build notification arrives, Continuous Delivery Director creates a release based on the DSL referenced by the
incoming build notification.
Create a Release from Business Application-Related DSL
Automatically create business application-related releases from the DSL referenced in incoming build notifications.
A Continuous Delivery Director plug-in is installed in the CI tool.
You can configure the CI tool so that outgoing build notifications trigger a new release based on business application-
related DSL templates in your source control repositories.
In the Send Notification to CDDirector post-build action, you can specify a DSL file source, a DSL file, and DSL
parameters that are related to business applications and business application versions. When a build notification arrives,
Continuous Delivery Director references the file source to import the DSL template from the source control repository and
creates a release if possible. During the import, Continuous Delivery Director uses the DSL parameters that are specified
in the build notification.
Prior to creating a release, Continuous Delivery Director checks whether a release for this business application version
already exists. If the release does exist, Continuous Delivery Director does not create the release and simply runs the
existing release. For more information, see Run an Existing Release.
1. Open the CI tool project configuration page.
2. Add a post-build step.
3. Select the Send Notification to CDDirector post-build step and configure the parameters, including the following:
•
Create a Release
–
Create from Business Application File Source
Select this option to create a release from a business application-related DSL file. After a Jenkins build
completes, the release DSL is sent to Continuous Delivery Director. A new release is automatically created
according to the business application defined in the DSL file.
•
DSL Parameters
Specify the file source in the form of "name":"value" pairs.
•
Parameter Name
Specify the name of the parameter that you want to add.
•
Parameter Value
Specify the value of the parameter that you want to add.
4. Save your configuration.
When a build notification arrives, Continuous Delivery Director creates a release based on the DSL referenced by the
incoming build notification.
Run Tests Only
Run tests without creating a release.
510

Continuous Delivery Director 8.5
A Continuous Delivery Director plug-in is installed in the CI tool.
You can configure the CI tool so that outgoing build notifications trigger test execution in Continuous Delivery Director
without creating a release. This capability helps you test builds during the development process using Adaptive Testing.
1. Open the CI tool project configuration page.
2. Add a post-build step.
3. Select the Send Notification to CDDirector post-build step and configure the parameters, including the following:
•
Only run my tests in CDD
Select this option to run tests without triggering a build in Continuous Delivery Director.
–
Run a subset of test suites selected by the Test Advisor
Choose this option to run in Continuous Delivery Director only the test suites that the Test Advisor selects. The
test advisor selects test suites that are the most relevant to recent changes and are likely to fail fast.
4. Save your configuration.
When a build notification arrives, Continuous Delivery Director executes tests on the applications that are referenced in
the incoming build notification.
CI Tool Integrations
Set up an integration with a third-party Continuous Integration (CI) tool that automatically feeds build notifications into
Continuous Delivery Director.
CI is an agile and DevOps best practice that enables developers to contribute and collaborate in a shared codebase at a
rapid pace. Without continuous integration, developer collaboration involves tedious manual processes for coordinating
code changes and merges.
You can use CI tools together with source control management (SCM) tools and Continuous Delivery Director to
facilitate version control, build automation, automated testing, and automated deployments.
SCM tools (such as Git and Subversion) let multiple developers working in the same codebase communicate and
resolve coding conflicts. CI tools use automatic triggers from the version control system to streamline the build
process. Whenever the CI tool successfully creates a build for a specific application version, a notification is sent to
Continuous Delivery Director. This build notification triggers the execution of the related release for that application
version.Continuous Delivery Director supports automated testing by letting you run test suites in release pipelines
to eliminate bugs in the codebase. Finally, Continuous Delivery Director enables engineering teams to automate the
deployment process.
Continuous Delivery Director supports integration with the following CI tools:
•
Azure DevOps Server
•
GitLab
•
Jenkins
Plug-in for Azure DevOps Server
Use this plug-in to send build notifications from Azure DevOps Server to Continuous Delivery Director.
Plug-in Version 1.0.2
Azure DevOps Server notifies Continuous Delivery Director of any new successful build including application and build
information, and Continuous Delivery Director maps the event to the relevant releases.
511

Continuous Delivery Director 8.5
Download Options
Use one of the following options to download the latest plug-in version:
Method Info
Visual Studio
Marketplace
URL
wget
wget -O BroadcomCDD.cdd-build-release-task-1.0.2.vsix https://cspdl.broadcom.com/shared/
static/7ktcrke1hnurbia50b7b2v8q83f16bfo.vsix?LCK=ent.box.com
MD5 ea55548577ba4f42f9f2512e23b1f929
Click Download Button
Change History
The following update was made for plug-in version 1.0.2
•
Bugfix - A code vulnerability was detected in the third-party underscore:1.8.3 3rd party JS library.
The following update was made for plug-in version 1.0
•
This plug-in was made available to customers.
Related Links
Configure Plug-in for Azure DevOps Server on page 512
Use this procedure to install and configure the plug-in for Azure DevOps Server.
Configure Plug-in for Azure DevOps Server
Use this procedure to install and configure the plug-in for Azure DevOps Server.
•
You have a working instance of Azure DevOps Server.
•
In Azure DevOps Server, you must be a Project Collection Administrator and have Edit collection-level information
permissions.
•
You have downloaded the plug-in for Azure DevOps ServerBroadcomCDD.cdd-build-release-
task-1.0.0.vsix file from https://cddirector.io/plugins/ to your local machine.
This plug-in (extension) installs the following components:
•
A service endpoint for connecting to the Continuous Delivery Director server.
•
A send notification task, to send build notification information to Continuous Delivery Director.
NOTE
This extension is compatible with Azure DevOps Server Version Dev17.M153.5.
NOTICE
The following procedure describes settings in third-party software. CA Technologies is not responsible for any
changes the third-party software vendor may make to the user interface described in this procedure.
512

Continuous Delivery Director 8.5
Add the Extension to a Collection
At least one team project collection is defined in Azure DevOps Server.
To use the extension in Azure projects and build pipelines, you first add the extension to the required team project
collection.
1. In Azure DevOps Server, select the required collection, then Collection Settings.
2. Click Extensions, and from the menu bar, click the extension actions menu, choose Manage extensions, then
Browse local extensions.
3. Click Manage extensions, then Upload extension.
4. Browse to the extension vsix file and upload to Azure DevOps Server.
The Send notification to CDDirector extension is listed on the Manage Extensions page.
5. Right-click the Send notification to CDDirector extension row, then click View Extension.
The extension documentation page opens.
6. Click Get it free.
7. Select a team project collection from the dropdown menu, then click Install.
The Send notification to CDDirector is available for use in projects in the selected collection.
Create a Continuous Delivery Director Server Endpoint
At least one project is configured in the required team project collection.
To send build notifications, Azure DevOps Server requires a service connection to a Continuous Delivery Director server.
1. In Azure DevOps Server, select the required project, then Project Settings.
2. Click Service connections, then from the New Service connection dropdown, select CDD server.
3. In the Add CDD server service connection dialog, configure, and set values for the following parameters:
•
Connection name
Specify a user-friendly name for the service endpoint such as CDD SaaS.
•
CDDirector Server URL
Specify the URL to the required Continuous Delivery Director instance, such as http://cdd-server:8080/ or
https://cddirectio.io/.
•
Tenant ID
Specify a Continuous Delivery Director tenant ID.
–
For an on-prem instance of Continuous Delivery Director, the tenant ID is
00000000-0000-0000-0000-000000000000.
–
For Continuous Delivery Director SaaS, you can find the tenant ID in Continuous Delivery Director under User
Settings.
•
CDD API Key
Specify the Continuous Delivery Director API key of an authorized user, such as an integration user, release
manager, or administrator. You can find the API key in Continuous Delivery Director under User Settings.
•
Azure DevOps Token
Specify the personal access token of an Azure DevOps Server user with at least build access permissions.
513

Continuous Delivery Director 8.5
4. To check the connection., click Verify Connection.
5. Select or clear the Allow all pipelines to use this connection option according to your preferences.
6. To create the connection, click OK.
Send Build Notifications to Continuous Delivery Director
A service connection to a Continuous Delivery Director server is configured for the team project collection.
You can update an existing Azure project to send build notifications to Continuous Delivery Director.
Continuous Delivery Director can automatically create and execute a new release every time a new application
(component) version is built by Azure DevOps Server. Continuous Delivery Director can automatically create a release
and run any relevant tests on the arrival of a build notification (with a preconfigured create new release request).
You can use this extension to update and deploy business applications that contain a subgroup of applications
(components). You can also attach DSL files to business applications to use as templates for releases. A build notification
that comes from any of the business application child applications (components) can trigger the creation of a release
based on a template.
You can use this plug-in to update a test source template, which is a test source that defines the tests to execute for a
specific application (component). You can enter the test parameters in Jenkins. On the arrival of a build notification (with a
preconfigured create new test source request),Continuous Delivery Director can automatically create a release and a test
source on the fly without the need for any preconfiguration.
You can also specify source control connection parameters in Azure DevOps Server instead of in Continuous Delivery
Director. This specification supports the Run Relevant Tests and Planned vs Actual features.
1. In Azure DevOps Server, select the required project, then Project Settings.
2. Under Pipelines, click Build.
A list of build pipelines displays.
3. Select a build pipeline, then clickEdit.
A list of jobs displays.
4. Select the required job and click the icon to add a task.
A list of tasks that are available to add to the job displays.
5. In the task list, select Send notification to CDDirector and click Add.
The extension appears under the selected job.
6. In the extension row, click the round icon.
7. In the Send notification to CDDirector dialog, configure, and set values for the following parameters:
•
Display name
Specify a user-friendly name for the task service endpoint such as sendNotificationToCDD.
•
Connection name
Select the Continuous Delivery Director endpoint to use. If needed, click Manage, and add a new CDD server
connection type service endpoint.
•
Application
Select one of the following options:.
–
Use Source Code Repository Name as Application Name
NOTE
Select this option only if the Source Code Management setting in the project is for a single source
code repository.
–
Specify the Application Name
514

Continuous Delivery Director 8.5
If you select this option, an Application Name field appears.
•
Application Version
Select one of the following options:
–
Use Source Code Branch Name as Application Version
NOTE
Select this option only if the Source Code Management setting in the project is for a single source
code repository.
–
Specify the Application Version Name
If you select this option, an Application Version Name field appears.
•
Ignore Nonexistent CDD Application?
Select this option to pass the Azure build even if the specified application does not exist in Continuous Delivery
Director.
•
Update Token Values in CDDirector
Enter one or more "field name":"value" pairs. You can update multiple fields using the following
format: {"field1":"value1","field2":"value2"…} . When a build notification is sent to
Continuous Delivery Director, the specified token is updated with the specified value. For example,
{"packageName":"BillingPackage_85"}.
•
Source Control Connection Parameters
Enter one or more "field name":"value" pairs. Enter the field name exactly as the name appears in Continuous
Delivery Director when creating a source control connection on the Application Management page. You can
update multiple fields using the following format: {"field1":"value1","field2":"value2" ...} . When a
build notification is sent to Continuous Delivery Director, the specified field is updated with the specified value and
is used to create or update a test source. For example, {"Repository":"MyApp"}.
•
Test Data
Enter the name of the test source and then a key:value pair list with the parameters you want to update. For
example: [{"name": "JUnit_Test_Source", "parameters": {"Branch":"myBranch"...}}].
•
Notification execution strategy:
Select one of the following options:
–
Execute an existing release
Execute an existing release in Continuous Delivery Director.
–
Create a release
Create an existing release in Continuous Delivery Director. If you select this option, the following field appears:
•
DSL Source
Select one of the following options:
•
Business Application
If you select this option, the following field appears:
•
DSL Parameter
Specify parameters to use when creating the release based on the business application DSL file. Enter
"field name" and "value" pairs. For example: "ReleaseVersion":"8.0"
•
File Source
If you select this option, the following fields appear:
•
File Source name
Specify the file source name to use to create the release.
•
DSL Filename
Specify the DSL file name to use to create the release.
•
Override Filesource Parameters
Specify the file source parameters that are defined in Continuous Delivery Director to override.
•
DSL Parameter
515

Continuous Delivery Director 8.5
Specify parameters to use when creating the release based on the business application DSL file. Enter
"field name" and "value" pairs. For example: "ReleaseVersion":"8.0"
–
Only run my tests in CDD
Select this option to run tests without triggering a build in Continuous Delivery Director.
•
Run a subset of test suites selected by the Test Advisor
Choose this option to run in Continuous Delivery Director only the test suites that the Test Advisor selects.
The test advisor selects test suites that are most relevant to recent changes and are likely to fail fast.
Related Links
Plug-in for Azure DevOps Server on page 511
Use this plug-in to send build notifications from Azure DevOps Server to Continuous Delivery Director.
Integration with Bitbucket Cloud
You can send change notifications from Bitbucket to Continuous Delivery Director using scripts.
Bitbucket supports a Continuous Integration pipeline (similar to Jenkins Pipeline). You can use the following YAML script
as an example to send change notifications to Continuous Delivery Director:
image: atlassian/default-image:3
pipelines:
default:
- parallel:
- step:
name: 'Send Notification to CDD'
script:
- echo "Send Notification to CDD"
- chmod +x send_notification_to_cdd.sh
- ./send_notification_to_cdd.sh
IMPORTANT
The whitespace indentation inside yaml files is important. Use the correct number of whitespace indentations on
every line. Do not use tab characters inside yaml files.
This YAML script calls the sendNotificationToCDD.sh script. To use this shell script, define the following secured
workspace or repository variables in the Bitbucket setting:
•
CDD_API_KEY - API key of integration user granted with the "Can execute change notification" permission
•
CDD_TENANT_ID - The cdd tenant ID
•
CDD_SERVER_URL - e.g. https://cddirector.io
•
CDD_APPLICATION_SOURCE - Local or the application source
IMPORTANT
The sendNotificationToCDD.sh script must have execution permissions in Bitbucket. You can use git
commands to pull the file, change the mode of this file to executable, commit, and push the change back
to Bitbucket.
sendNotificationToCDD.sh
=====================================
#!/bin/bash
export CDD_APPLICATION_NAME=$BITBUCKET_REPO_SLUG
export CDD_APPLICATION_VERSION_NAME=$BITBUCKET_BRANCH
export CDD_GIT_COMMIT_ID=$BITBUCKET_COMMIT
export CDD_APPLICATION_VERSION_BUILD_NUMBER=$BITBUCKET_BUILD_NUMBER
516

Continuous Delivery Director 8.5
curl -s --header "Content-Type: application/json" --header "Accept: application/json" -d
"{ \"applicationName\": \"$CDD_APPLICATION_NAME\", \"applicationSourceName\": \"$CDD_APPLICATION_SOURCE
\", \"applicationVersionBuildNumber\": \"$CDD_APPLICATION_VERSION_BUILD_NUMBER\", \"applicationVersionName
\": \"$CDD_APPLICATION_VERSION_NAME\", \"commits\": [ { \"commitId\": \"$CDD_GIT_COMMIT_ID\" } ]}"
"$CDD_SERVER_URL/cdd/design/$CDD_TENANT_ID/v1/applications/application-versions/application-version-builds" -
H "Authorization: Bearer $CDD_API_KEY"
=====================================
Plug-in for GitLab
You can send change notifications from GitLab to Continuous Delivery Director using scripts.
GitLab supports a Continuous Integration pipeline (similar to Jenkins Pipeline). You can use the following YAML script to
send change notifications from a GitLab CI Pipeline to Continuous Delivery Director using GitLab CI variables:
gitlab-ci.yml
=====================================
sendNotificationToCDD:
stage: build
script:
- ./sendNotificationToCDD.sh
=====================================
IMPORTANT
The whitespace indentation inside yml files is important. Use the correct number of whitespace indentations on
every line. Do not use tab characters inside yml files.
This YAML script calls the sendNotificationToCDD.sh script. To use this shell script, define three masked variables
in GitLab (in the variables section of the CI / CD option in project settings):
=====================================
CDD_API_KEY
CDD_SERVER_URL
CDD_TENANT_ID
=====================================
IMPORTANT
The sendNotificationToCDD.sh script must have execution permissions in GitLab. You can use git
commands to pull the file, change the mode of this file to executable, commit, and push the change back to
GitLab.
sendNotificationToCDD.sh
=====================================
#!/bin/bash
export CDD_APPLICATION_NAME=$CI_PROJECT_NAME
export CDD_APPLICATION_VERSION_NAME=$CI_BUILD_REF_NAME
export CDD_GIT_COMMIT_ID=$CI_COMMIT_SHA
export CDD_APPLICATION_VERSION_BUILD_NUMBER=$CDD_GIT_COMMIT_ID
517

Continuous Delivery Director 8.5
curl -s --header "Content-Type: application/json" --header "Accept: application/json" -d "{ \"applicationName
\": \"$CDD_APPLICATION_NAME\", \"applicationVersionBuildNumber\": \"$CDD_APPLICATION_VERSION_BUILD_NUMBER
\", \"applicationVersionName\": \"$CDD_APPLICATION_VERSION_NAME\", \"commits\": [ { \"commitId\":
\"$CDD_GIT_COMMIT_ID\" } ]}" "$CDD_SERVER_URL/cdd/design/$CDD_TENANT_ID/v1/applications/application-versions/
application-version-builds" -H "Authorization: Bearer $CDD_API_KEY"
=====================================
Plug-in for Grafana
Monitor your release pipeline with Grafana data visualization and analytics software.
Download Options
Use one of the following options to download the latest plug-in version:
Method Info
wget wget -O cdd-grafana-plugin.zip
https://cspdl.broadcom.com/shared/
static/433v88ebe5q8b32qug5911ggvt7hqily.zip?
LCK=ent.box.com
MD5 364e6852e359acfe9996d719687ab0b6
Click Download Button
Overview
If your organization uses Grafana, you can utilize the Continuous Delivery Director Data Source plug-in to query and
visualize your adaptive testing metrics. You can download the plug-in from the Grafana community, and add that plug-in
as a data source in your company Grafana instance.
The Continuous Delivery Director data source provides the connection between the Continuous Delivery Director
database and the underlying data set. This data source uses Continuous Delivery Director REST APIs to query the
underlying data services. You can extract data as metrics using query types.
In Grafana, you can configure dashboards, panels, and queries to gain insight into your data. You can also configure
time ranges for the data. For example, you can create a dashboard to view the successful and unsuccessful test suites
executions in a specific release pipeline for every hour in the last seven days.
Grafana provides many data visualization options, such as time series, tables, bar charts, and pie charts. Time series
charts are especially useful for displaying trends in a release pipeline. A time-series chart displays the time units as the X-
axis (horizontal axis), and the units of measure as the Y-axis (vertical axis). The individual metrics appear as a series of
data points between the two axes. You can display up to a maximum of 768 data points in a chart. The number of points is
limited to improve performance.
If your query returns more data points than the maximum data points setting, then the data source consolidates those data
points (reduces the number of points returned by aggregating the points together by average or max or another function).
You can display your data according to the following intervals: Minute, Hour, Day, Week, Month, Year. Intervals control
how your data is grouped in the data visualization. For example, if you select the time range Last 1 year, and a Day
interval, you'll get 365 data points with daily measurements. If you select a Month interval, you'll get 12 data points with
monthly measurements.
518

Continuous Delivery Director 8.5
You can also restrict the data displayed in the chart by defining query parameters (filters). You can specify values for the
following query parameters:
•
Project
•
Plug-in Proxy
•
Plug-in
•
Business Application
•
Business Application Version
•
Application Source
•
Application
•
Application Version
•
Environment
•
Release
•
Release Version
•
Phase
•
Task
•
Is Production - (production environment); possible values: True/False
In all query fields, you can either type a name or enter a variable.
The more query parameters you define, the more granular your data will be. For example, let's say you specify the Total
number of failed test suites query type and a Daily interval.
•
If you only specify the project name, you'll get a daily total of the failed test suites for the specified project.
•
If you specify the project and an application, you'll get a daily total of the failed test suites for the specific application in
the specified project.
•
If you specify the project, an application, and an environment, you'll get a daily total of the failed test suites for the
specific application and environment in the specified project.
Variables
You can configure variables that retrieve data from a Continuous Delivery Director datasource. Variables are displayed as
dropdown lists at the top of the dashboard. A variable is a placeholder for a value. You can use variables in metric queries
so when you change the value, the metric queries in your panel will change to reflect the new value.
When you create or edit a variable, associated query types are displayed, allowing you to further refine the query. For
example, if you create a release variable, the following query types display: project, business application, business
application version, application source, application, application version. If you only want to retrieve and visualize release
data for a specific project, you enter a project name in the project query type textbox.
NOTE
For more information about creating or editing variables, see Grafana documentation.
The following variables are available:
519

Continuous Delivery Director 8.5
•
Project
•
Plug-in Proxy
•
Plug-in
•
Business Application
•
Business Application Version
•
Application Source
•
Application
•
Application Version
•
Environment
•
Release
•
Release Version
•
Phase
•
Task
Tests
You can use metrics (query types) to track test suite execution success and failure. Test suites are executed using testing-
related plug-ins that are integrated with Continuous Delivery Director.
Test query types include:
•
Number of executed test suites
•
Number of successful test suites
•
Number of failed test suites
•
Number of error test suites
•
Number of skipped test suites
•
Test suites execution duration - in milliseconds
Deployments
You can use metrics (query types) to track deployment cadence, and deployment success and failure. Deployments are
performed using deployment-related plug-ins that are integrated with Continuous Delivery Director. Deployment tasks
return a deployed build to Continuous Delivery Director. You can configure the deployment-related query types to provide
information on plug-in executions. Deployment frequency looks at how often an organization deploys code to production
or releases that code to end users. You can display the number of deployments that occur in a specified time interval.
Deployment query types include:
•
Number of Successful Deployments
•
Number of Failed Deployments
•
Number of Deployments
Tasks
You can use metrics (query types) to track plug-in usage of applications in specific environments. You can track the task
execution of tasks for specific plug-ins so that you can monitor plug-in adoption and quality of use. You can also display
the number of task executions that occur in specified time intervals.
Task metrics are associated with the following query types:
520

Continuous Delivery Director 8.5
•
Number of successful task executions
•
Number of failed task executions
•
Number of failed skipped task executions
•
Number of stopped task executions
•
Number of skipped task executions
•
Number of task executions
•
Number of Automated/Manual Tasks in Active Releases
•
Number of Security Items
•
Number of Added Security Items
•
Number of Removed Security Items
Releases
You can use metrics (query types) to track the number of active releases in the specified time intervals. The supported
time intervals are Day, Week, Month, Quarter and Year.
Release metrics are associated with the following query types:
•
Number of Concurrent Releases
Users
You can use metrics (query types) to track the number of active users logged into CDD per day.
User metrics are associated with the following query types:
•
Active Users
Related Links
Configure Plug-in for Grafana on page 522
Add this plug-in to your Grafana instance to visualize Continuous Delivery Director data metrics.
Install Plug-in for Grafana
This page explains how to download, install, and sign the Plug-in for Grafana.
1. Download the plug-in from cddirector.io (just like any other Continuous Delivery Director plugin), or from the command
line, enter the wget command shown on the Plug-in for Grafana page.
2. Copy the zip file to /var/lib/grafana/plugins.
3. Unzip the file.
4. Restart the Grafana server.
Sign Plug-in for Grafana
Sign this plug-in to enable Grafana to verify the authenticity of the plug-in. Signing allows you to ensure that this plug-in
has not been tampered with. For more information, see Grafana documentation.
NOTE
You do not have to sign the plug-in, but Broadcom recommends that you sign, for security reasons.
You can sign this plug-in as a private plug-in only for use on your own company Grafana. This plug-in may not
be distributed to the Grafana community, and this plug-in is not published in the Grafana catalog.
521

Continuous Delivery Director 8.5
If you sign the plug-in, perform the following steps for every plug-in update or when adding a new Grafana server.
1. Generate an API key.
a) Create a Grafana Cloud account.
b) Create a Grafana Cloud API key with the PluginPublisher role.
2. From the plug-in folder, /var/lib/grafana/plugins/cdd-grafana-plugin, run the two following commands:
# export GRAFANA_API_KEY= <the API key you created in the previous step>
# npx @grafana/toolkit plugin:sign --rootUrls <CSV of the server URLs>
Configure Plug-in for Grafana
Add this plug-in to your Grafana instance to visualize Continuous Delivery Director data metrics.
•
Continuous Delivery Director 8.2 or higher / Continuous Delivery Director SaaS
•
Grafana 7.3.1 or higher
•
Familiarity with Grafana
This data source plug-in uses Continuous Delivery Director REST APIs to query the underlying data services.
1. Log in to Continuous Delivery Director.
2. On the menu bar, click the initials of your user account, for example, SU.
3. Click My Settings, then General.
4. Copy the API key and tenant ID.
These credentials are used to authenticate user access to Continuous Delivery Director REST APIs.
5. In Grafana, on the Continuous Delivery Director data source settings page, paste the Continuous Delivery Director API
key and tenant ID and save.
You can now configure dashboards and panels in Grafana to display Continuous Delivery Director data metrics.
Plug-in for Jenkins
Use this plug-in to send build notifications from Jenkins to Continuous Delivery Director.
Plug-in Version 3.4.3
Jenkins notifies Continuous Delivery Director of any new successful build including application and build information.
Continuous Delivery Director maps this change notification to the relevant releases and triggers the corresponding release
executions.
Download Options
Use one of the following options to download the latest plug-in version:
Method Info
wget wget -O cdd-jenkins.hpi https://
cspdl.broadcom.com/shared/
static/27tdf2kfs0l01lzsmmthsygu3mb9mupm.hpi?
LCK=ent.box.com
MD5 a3c5afaf94ede5e85d2f786281bb29e7
522

Continuous Delivery Director 8.5
Click Download Button
Prerequisites
You need JRE 1.8 or JRE 11 to install and configure the Jenkins plug-in.
Change History
The following update was made for plug-in version 3.4.3
•
The Jenkins plug-in now supports Jenkins 3.40 and above.
The following update was made for plug-in version 3.4
•
A new option has been added to Freestyle projects, Use Git Namespace as the Application Source.
If selected, when applications with the same name are imported into Continuous Delivery Director
from different application sources, Continuous Delivery Director can match the build notification
to the correct application. A similar property has been added to the Jenkinsfile Groovy script,
useSourceCodeRepositoryNamespaceAsApplicationSourceName: true/false . When this property is
set to true, the repository namespace is used as the application version (the value of applicationSourceName is
ignored.)
•
Lines are no longer added to the build history with release URLs when Continuous Delivery Director detects the
presence of one or more releases in the build notification. This function became redundant and was removed because
the build details contain links to the release(s).
The following updates were made for plug-in version 3.3
•
In the post-build notification action, a new Additional Information section was added. This section contains the
Update Release Token Values, Source Control Connection Parameters, and Test Data sections.
•
In the post-build notification action, the Update Token Values in CDDirector parameter was replaced with the Update
Release Token Values section. This new section lets you add multiple tokens in the form of "name":"value" pairs.
Previously, you could only add one token.
•
A new Enable Notifications for Unstable Builds option was added. In the post-build notification action in Freestyle
projects, you can select this option to prevent the plug-in from sending build notification to Continuous Delivery Director
if the build status is unstable.
For Jenkins Pipeline projects, the boolean sendNotificationOnUnstableBuild parameter was added.
•
In the post-build notification action, a new Source Control Connection Parameters section lets you add multiple
source control connection parameters in the form of "name":"value" pairs.
•
In the post-build notification action in Freestyle projects, a new Specify File Source option lets you create a release
from DSL files in your source control repositories. You specify the file source in the form of a "name":"value"
pair. After a Jenkins build completes, the release DSL is sent to Continuous Delivery Director. A new release is
automatically created according to the release defined in the file.
A new Override File Source Parameters section lets you override the file source parameters that are defined in
Continuous Delivery Director. You specify the required file source parameters in the form of a "name":"value" pair.
NOTE
This capability already existed in Jenkins Pipeline Groovy syntax.
•
In the post-build notification action in Freestyle projects, a new Create from Business Application File Source
option lets you create a release from a business application-related DSL file. You specify the file source using DSL
Parameters in the form of "name":"value" pairs. After a Jenkins build completes, the release DSL is sent to
Continuous Delivery Director. A new release is automatically created according to the business application defined in
the DSL file.
523

Continuous Delivery Director 8.5
The following update was made for plug-in version 3.2.14
•
Bugfix: A Groovy script missing the overrideCDDConfig section did not use the settings in Jenkins from Manage
Jenkins > Configure System > CDDirector Plugin.
The following update was made for plug-in version 3.2.13
•
You can now use a single global Groovy file (stored in Jenkins global libraries) to support multiple per-project
Continuous Delivery Director API keys.
The following update was made for plug-in version 3.2.12
•
You can now create releases by specifying a file source in Groovy pipeline syntax. To support this change, you can
now specify the following parameters in Groovy for the sendNotificationToCDD step:
–
fileSourceName
–
fileSourceParameters
–
dslFilename
–
dslParameters
The following update was made for plug-in versions 3.2.9 - 3.2.10
•
The order of the input parameters in the Send notification to CDDirector post-build action was changed.
The following updates were made for plug-in version 3.2.8:
•
Two new options have been added to the Send notification to CDDirector post-build action:
–
Create a release and/or execute an existing one
If you select this option, the following parameters display:
•
Update Token Values in CDDirector (pre-existing)
•
Ignore Nonexistent CDD Application (pre-existing)
•
DSL Parameter (new)
–
Only run my tests in CDD
If you select this option, the following parameters display:
•
Test Data (new)
•
Run a subset of test suites selected by the Test Advisor (new)
•
A new field has been added to the Send notification to CDDirector post-build action: Source Control Connection
Parameters.
•
Two new section headings have been added to the Send notification to CDDirector post-build action:
–
Set Application Name
–
Set Application Version Name
The following updates were made for plug-in version 3.2.7:
•
A new option has been added to freestyle projects, Ignore Nonexistent CDD Application? You select this option to
prevent the failure of a Jenkins post-build action in any of the following cases:
–
The specified application does not exist in Continuous Delivery Director
–
The specified application version does not exist in Continuous Delivery Director
–
No release exists that is associated with the specified application version
A similar Boolean parameter, ignoreNonexistentApplication, has been added to Jenkins pipeline projects.
•
You can now click a link in Jenkins to open a release in Continuous Delivery Director that is triggered by a specific
Jenkins Pipeline build. These links appear on the left panel of a Jenkins build in the format CDD {release-name}
Release.
The following update was made for plug-in version 3.2.4:
•
You can now determine whether your Jenkins project uses a repository name as the application name or an application
name that you provide. You can also determine whether your project uses a Git branch name as the application
524

Continuous Delivery Director 8.5
version or an application version that you provide. This enhancement applies to Pipeline, Freestyle project, and
Multibranch Pipeline projects and is available if you integrate Jenkins with GitHub, GitLab, Bitbucket Server, or
Bitbucket (SaaS). To support this enhancement, new radio buttons and fields were added to the Send notification to
CDDirector post-build action:
–
Use Source Code Repository Name as Application Name
–
Use Application Name
–
Use Source Code Branch Name as Application Version
–
Use Application Version
The following update was made for plug-in version 3.1:
•
Support was added for Jenkins Pipeline. When a Jenkins Pipeline build ends successfully, a change notification is sent
to Continuous Delivery Director with the configured application version and build information.
•
You can now configure the notification sending functionality to work with different local settings per project.
You can now override the global connectivity details of Continuous Delivery Director for any project. To support
this feature, an Override CDDirector Configuration option has been added. If you select this option, the list of
Continuous Delivery Directorconfiguration parameters appears, with the global values as defaults. Any changes to the
global Continuous Delivery Director configuration will not affect this project.
The following update was made for plug-in version 2.0.13:
•
Support was added for Java 11.
Related Links
Configure Plug-in for Jenkins on page 525
Send Notifications from Jenkins on page 526
You can update an existing Jenkins project or create a new project to send notifications to Continuous Delivery Director.
Configure Jenkins to Send Git Commit IDs on page 529
You can configure the plug-in for Jenkins to automatically send the commit IDs of Jenkins builds to Continuous Delivery
Director.
Send Build Notifications from Jenkins Pipeline on page 530
You can configure the plug-in for Jenkins to send build notifications from Jenkins Pipeline to Continuous Delivery Director.
Configure Plug-in for Jenkins
1. Download the cdd-jenkins-<version>.hpi file from the https://casupport.broadcom.com site.
2. Upload Continuous Delivery Director plug-in for Jenkins to your Jenkins instance.
3. In your Web browser, open http://<jenkins-server>:<port>/jenkins/configure.
4. Configure and set values for the following parameters:
•
CDDirector Server Name
•
CDDirector Server Port
•
Is CDDirector Secured Communication?
•
Tenant ID
525

Continuous Delivery Director 8.5
–
For an on-prem install of Continuous Delivery Director, the tenant ID is
00000000-0000-0000-0000-000000000000
–
For Continuous Delivery Director SaaS, you can find the tenant ID under User Settings.
•
API Key – you can find the API key under User Settings.
•
Internal Proxy URL Specify the web address to access the organization web proxy.
•
Internet Proxy Username
•
Internet Proxy Password
5. Save your configuration.
The Continuous Delivery Director plug-in for Jenkins is configured and ready for use.
Related Links
Plug-in for Jenkins on page 522
Use this plug-in to send build notifications from Jenkins to Continuous Delivery Director.
Send Notifications from Jenkins on page 526
You can update an existing Jenkins project or create a new project to send notifications to Continuous Delivery Director.
Configure Jenkins to Send Git Commit IDs on page 529
You can configure the plug-in for Jenkins to automatically send the commit IDs of Jenkins builds to Continuous Delivery
Director.
Send Build Notifications from Jenkins Pipeline on page 530
You can configure the plug-in for Jenkins to send build notifications from Jenkins Pipeline to Continuous Delivery Director.
Send Build Notifications from a Jenkins Freestyle Project
You can update an existing Jenkins project or create a new project to send notifications to Continuous Delivery Director.
Continuous Delivery Director can automatically create and execute a new release every time a new application
(component) version is built by Jenkins. Continuous Delivery Director can automatically create a release and run any
relevant tests on the arrival of a build notification (with a preconfigured create new release request).
You can use this plug-in to update and deploy business applications that contain a subgroup of applications
(components). You can also attach DSL files to business applications to use as templates for releases. A build notification
that comes from any of the business application child applications (components) can trigger the creation of a release
based on a template.
You can use this plug-in to update a test source template, which is a test source that defines the tests to execute for a
specific application (component). You can enter the test parameters in Jenkins. On the arrival of a build notification (with a
preconfigured create new test source request),Continuous Delivery Director can automatically create a release and a test
source on-the-fly without the need for any preconfiguration.
You can also specify source control connection parameters in Jenkins instead of in Continuous Delivery Director. This
specification supports the Run Relevant Tests and Planned vs Actual features.
1. Open the Jenkins project configuration screen and add a post-build action.
2. Select the Send notification to CDDirector post-build type and configure the following parameters:
•
Override CDDirector Configuration
Select this option to show the following list of Continuous Delivery Director configuration parameters, with the
global values as defaults:
–
CDDirector Server Name
Specify the server name to log into Continuous Delivery Director
–
CDDirector Port Name
526

Continuous Delivery Director 8.5
Specify the server port to log into Continuous Delivery Director.
–
Is CDDirector Secured Communication
Select this option to use secure communication when logging into Continuous Delivery Director (https)
–
Tenant ID
Specify your tenant ID or leave empty if you are not using multi-tenancy.
•
For an on-prem install of Continuous Delivery Director, the tenant ID is
00000000-0000-0000-0000-000000000000
•
For Continuous Delivery Director SaaS, you can find the tenant ID under User Settings.
–
API Key
Specify the Continuous Delivery Director API key, accessible from the User Settings page.
–
Internal Proxy URL
Specify the web address to access the organizational web proxy.
–
Internal Proxy Username
Specify the username to authenticate to the organizational web proxy.
–
Internal Proxy Password
Specify the password to authenticate to the organizational web proxy.
•
Use Source Code Repository Name as Application Name
Select this option only if the Source Code Management setting in the project is for a single Git or Bitbucket server.
•
Use Application Name
Select this option to use the application name that you specify.
–
Application Name
Specify an application name.
–
Ignore Nonexistent CDD Application?
Select to pass the Jenkins build even if the specified application does not exist in Continuous Delivery Director.
•
Use Source Code Branch Name as Application Version
Select this option only if the Source Code Management setting in the project is for a single Git or Bitbucket server.
•
Use Application Version
Select this option to use the application version you specify in Application Version.
–
Application Version
Specify an application version.
–
Set Application Source Name
Select one of the following options:
•
Use Repository Namespace as the Application Source
Select this option to add the repository namespace as the application source if applications with the same
name are imported into Continuous Delivery Director from different application sources.
•
Specify the Application Source
Specify the application source name if applications with the same name are imported into Continuous
Delivery Director from different sources. You can keep this field empty if the application name is unique.
–
Update Release Token Values
To send values for multiple tokens to Continuous Delivery Director, click Add Token. The following fields open:
NOTE
You can use parameters from the Jenkins build server in the list of tokens. In every release that
gets the notification, if a token with the specified name exists, that token is updated with the value
specified for the token.When token values are updated before a change notification triggers a phase,
the updated values are used in that phase.
•
Token Name
Specify the name of the release token that you want to add.
•
Token Value
527

Continuous Delivery Director 8.5
Specify the value of the release token that you want to add.
•
Source Control Connection Parameters
To send values for multiple tokens to Continuous Delivery Director, click Add Source Control Connection
Parameters. The following fields open:
–
Parameter Name
Specify the name of the source control connection parameter that you want to add. The field name is the
corresponding name that appears in Continuous Delivery Director when you create a source control connection
in the Application Management page.
When a build notification is sent to Continuous Delivery Director, the specified field is updated with the specified
value and is used to create or update a test source. For example, {"Repository":"MyApp"} .
–
Parameter Value
Specify the value of the source control connection parameter that you want to add.
•
Test Data
Enter the name of the test source and then a key:value pair list with the parameters you want to update.
Example: [{"name": "JUnit_Test_Source", "parameters":
{"Branch":"myBranch","key2":"value2"...}}] .
•
Execute an existing release
Execute an existing release in Continuous Delivery Director.
•
Create a release
–
Create from business application File Source
Select this option to create a release from a business application-related DSL file. After a Jenkins build
completes, the release DSL is sent to Continuous Delivery Director. A new release is automatically created
according to the business application defined in the DSL file.
•
DSL Parameters
Specify the file source in the form of "name":"value" pairs.
•
Parameter Name
Specify the name of the parameter that you want to add.
•
Parameter Value
Specify the value of the parameter that you want to add.
–
Specify File Source
Select this option to create a release from DSL files in your source control repositories. You specify the file
source in the form of a "name":"value" pair. After a Jenkins build completes, the release DSL is sent to
Continuous Delivery Director. A new release is automatically created according to the release defined in the file.
•
DSL File Name
Specify a relative file path to a DSL file in your source control repository.
•
Override File Source Parameters
Select this option to override the file source parameters that are defined in Continuous Delivery Director. You
specify the required file source parameters in the form of "name":"value" pairs.
•
Add File Source Parameter
•
Parameter Name
Specify the name of the parameter that you want to add.
•
Parameter Value
Specify the value of the parameter that you want to add.
•
DSL Parameters
Specify the file source in the form of "name":"value" pairs.
•
Add DSL Parameter
•
Parameter Name
528

Continuous Delivery Director 8.5
Specify the name of the parameter that you want to add.
•
Parameter Value
Specify the value of the parameter that you want to add.
•
Only run my tests in CDD
Select this option to run tests without triggering a build in Continuous Delivery Director.
–
Run a subset of test suites selected by the Test Advisor
Choose this option to run in Continuous Delivery Director only the test suites that the Test Advisor selects. The
test advisor selects test suites that are most relevant to recent changes and are likely to fail fast.
3. Save your configuration.
When you trigger your Jenkins build, Jenkins shares the last_successful_build parameter with Continuous Delivery
Director. You can use these parameters within tasks.
You have a business application named Web Banking that comprises three applications (components):
WebBank-DBSVC.war, WebBank-GUI.war, and WebBank-BackEnd.war As a developer, you make a change
and create a new feature branch for WebBakGui.war. When the build is run, you want a Continuous Delivery
Director release to be automatically created to perform all of the following actions:
•
Deploy all three applications
•
Use the new version of WebBankGui.war
•
Run the relevant tests
When your build is ready, the release is created with the required settings, without the need to set up a new
release manually.
To include these parameter values within tasks, make sure to select the relevant Application Version content checkbox.
The last_successful_build parameter can be used as a token (you simply add the % (percent) prefix and select the
relevant token).
Related Links
Plug-in for Jenkins on page 522
Use this plug-in to send build notifications from Jenkins to Continuous Delivery Director.
Configure Plug-in for Jenkins on page 525
Configure Jenkins to Send Git Commit IDs on page 529
You can configure the plug-in for Jenkins to automatically send the commit IDs of Jenkins builds to Continuous Delivery
Director.
Send Build Notifications from Jenkins Pipeline on page 530
You can configure the plug-in for Jenkins to send build notifications from Jenkins Pipeline to Continuous Delivery Director.
Configure Jenkins to Send Git Commit IDs
You can configure the plug-in for Jenkins to automatically send the commit IDs of Jenkins builds to Continuous Delivery
Director.
Continuous Delivery Director uses these commit IDs to retrieve the related work items that are associated with this
Jenkins build. Examples of external work item data sources are Rally, Jira, and so on). This capability is based on Source
Code commit IDs.
A Source Code commit ID is an SHA-1 hash that uniquely identifies the source code commit. The source code information
includes the list of changed source files, the commit message, the commit date, the committer name, and email address,
the ID of the previous commit, and so on.
529

Continuous Delivery Director 8.5
To enable this capability, install and configure the Git plug-in available in Jenkins.
1. In Jenkins, go to Manage Jenkins, then Manage Plugins.
2. From the Available tab, install the Git plug-in. This plug-in integrates Jenkins with Git.
3. Go back to the Dashboard and create or select a project.
4. Select Configure.
5. In Source Code Management, select Git.
6. Configure and set values for the following parameters:
•
Repository URL
•
Credentials
•
Branch Specifier
•
(Optional) Repository browser
7. Save your changes.
The Git plug-in is now enabled, and the plug-in for Jenkins can send commit IDs to Continuous Delivery Director.
Related Links
Plug-in for Jenkins on page 522
Use this plug-in to send build notifications from Jenkins to Continuous Delivery Director.
Configure Plug-in for Jenkins on page 525
Send Notifications from Jenkins on page 526
You can update an existing Jenkins project or create a new project to send notifications to Continuous Delivery Director.
Send Build Notifications from Jenkins Pipeline on page 530
You can configure the plug-in for Jenkins to send build notifications from Jenkins Pipeline to Continuous Delivery Director.
Send Build Notifications from Jenkins Pipeline
You can configure the plug-in for Jenkins to send build notifications from Jenkins Pipeline to Continuous Delivery Director.
This plug-in supports three types of project:
•
Freestyle project
•
Pipeline
•
Multibranch Pipeline
The configuration for Pipeline and Multibranch Pipeline involves creating a Jenkinsfile (a Groovy syntax text file). The
Jenkinsfile contains the definition of a Jenkins Pipeline which sends build notifications to Continuous Delivery Director that
can be checked into your source control system.
1. Create a Jenkinsfile.
Customize the following sample for the Jenkinsfile syntax:
pipeline {
agent {
label 'master'
}
environment {
CDD_API_KEY = credentials('CDD_API_KEY')
CDD_APPLICATION_NAME = "${env.GIT_URL}"
CDD_APPLICATION_VERSION_NAME = "${env.GIT_BRANCH}"
CDD_GIT_COMMIT_ID = "${env.GIT_COMMIT}"
530

Continuous Delivery Director 8.5
CDD_PREVIOUS_GIT_COMMIT_ID = "${env.GIT_PREVIOUS_SUCCESSFUL_COMMIT}"
CDD_SERVER_NAME = "ibndev003773.bpc.broadcom.net"
CDD_SERVER_PORT = "8080"
CDD_TENANT_ID = "00000000-0000-0000-0000-000000000000"
CDD_USE_SSL = "false"
GIT_BRANCH = "${env.GIT_BRANCH}"
BRANCH_NAME = "${env.BRANCH_NAME}"
GIT_LOCAL_BRANCH = "${env.GIT_LOCAL_BRANCH}"
}
stages {
stage("Stage Name") {
steps {
echo '**** Build ****'
}
}
}
post {
success {
echo '----------Sending Build Notification to CDD--------------'
echo "Environment variables: GIT_BRANCH: [$GIT_BRANCH], BRANCH_NAME: [$BRANCH_NAME], GIT_LOCAL_BRANCH:
[$GIT_LOCAL_BRANCH]"
sendNotificationToCDD useSourceCodeRepositoryNameAsApplicationName: true,
appName: "${CDD_APPLICATION_NAME}",
useSourceCodeRepositoryBranchNameAsApplicationVersionName: true,
appVersion: "${CDD_APPLICATION_VERSION_NAME}",
gitCommit: "${CDD_GIT_COMMIT_ID}",
gitPrevSuccessfulCommit: "${CDD_PREVIOUS_GIT_COMMIT_ID}" ,
overrideCDDConfig: [
customApiKey: "${CDD_API_KEY}",
customProxyPassword: '',
customProxyUrl: '',
customProxyUsername: '',
customServerName: "${CDD_SERVER_NAME}",
customServerPort: "${CDD_SERVER_PORT}",
customTenantId: "${CDD_TENANT_ID}",
customUseSSL: "${CDD_USE_SSL}"
],
releaseTokens: '{}',
ignoreNonexistentApplication: true
echo '----------CloudBees Jenkins Pipeline completed successfully--------------'
}
}
}
2. In the Jenkinsfile, customize the following lines as required.
Change the label master to specify the label of the Jenkins nodes to run this pipeline:
agent {
label 'master'
}
Update the following lines as needed:
531

Continuous Delivery Director 8.5
CDD_SERVER_NAME = "ibndev003773.bpc.broadcom.net"
CDD_SERVER_PORT = "8080"
CDD_TENANT_ID = "00000000-0000-0000-0000-000000000000"
CDD_USE_SSL = "false"
3. In your Jenkins instance (http://<jenkins-server>:<port>/jenkins/credentials/store/system/
domain/_/), create new credentials of the Secret text type with the credential ID CDD_API_KEY .
Related Links
Plug-in for Jenkins on page 522
Use this plug-in to send build notifications from Jenkins to Continuous Delivery Director.
Configure Plug-in for Jenkins on page 525
Send Notifications from Jenkins on page 526
You can update an existing Jenkins project or create a new project to send notifications to Continuous Delivery Director.
Configure Jenkins to Send Git Commit IDs on page 529
You can configure the plug-in for Jenkins to automatically send the commit IDs of Jenkins builds to Continuous Delivery
Director.
Create Release from File Source in Jenkins Pipeline
You can create releases by specifying a file source in Groovy pipeline syntax.
This plug-in supports three types of project:
•
Freestyle project
•
Pipeline
•
Multibranch Pipeline
The configuration for Pipeline and Multibranch Pipeline involves creating a Jenkinsfile (a Groovy syntax text file). The
Jenkinsfile contains the definition of a Jenkins Pipeline which sends a build notification with a command to create a
release from a file source to Continuous Delivery Director. This Jenkinsfile can be checked into your source control
system, such as GitHub.
Creating a Jenkinsfile and committing that file to source control lets you:
•
Automatically create a Pipeline build process for all branches and pull requests
•
Establish a single source of truth for the Pipeline, which can be viewed and edited by multiple members of your project
For more information about file sources, see File Sources .
1. Create a Jenkinsfile.
In your source control, for example, GitHub, customize the following sample for the Jenkinsfile syntax:
sendNotificationToCDD useSourceCodeRepositoryNameAsApplicationName: true,
appName: '',
useSourceCodeRepositoryBranchNameAsApplicationVersionName: true,
appVersion: '',
commitSource: '',
fileSourceName: 'FS1',
fileSourceParameters: '{"branch":"testBranch"}',
dslFilename: 'CDD-FileSource/relWithAppVerBranch.json',
dslParameters: '{"appName":"cdd-dsl-demo","appVerName":"testBranch","relName":"app scope
release branch", "envName": "test"}',
ignoreNonexistentApplication: true,
onlyIntelligentTestSuites: true,
532

Continuous Delivery Director 8.5
overrideCDDConfig: [
customApiKey:
'eyJhbGciOiJIUzUxMiJ9.eyJ1c2VybmFtZSI6InN1cGVydXNlckBjYS5jb20iLCJ0ZW5hbnRJZCI6IjAwMDAwMDAwLTAwMDAtMDAwMC0wMDAwLTAwMDAwMDAwMDAwMCIsInVzZXJJZCI6MSwianRpIjoiMjI4NjQyN2YtZjZhMS00Njg5LWJmOGEtNDU0OTk0NTdlY2Q0IiwiZXhwIjoxNjEzOTAzMTU4fQ.jHT41IlEDYq1vcpNZSEjIfEaT4hlR8wJOvC1HDsYCrTn5-
WLVogN93LD360UWcKTqt48p5nFKk8yDhdpx1bhQw',
customProxyPassword: '',
customProxyUrl: '',
customProxyUsername: '',
customServerName: 'lvnapi022959.bpc.broadcom.net',
customServerPort: 8080,
customTenantId: '00000000-0000-0000-0000-000000000000',
customUseSSL: false
],
releaseTokens: '',
scope: 'APPLICATION',
testSources: ''
}
}
}
2. In the Jenkinsfile, update the following lines as needed and commit:
fileSourceName: 'FS1',
fileSourceParameters: '{"branch":"testBranch"}',
dslFilename: 'CDD-FileSource/relWithAppVerBranch.json',
dslParameters: '{"appName":"cdd-dsl-demo","appVerName":"testBranch","relName":"app scope
release branch", "envName": "test"}',
533

Continuous Delivery Director 8.5
Documentation Legal Notice
Information about the documentation legal notice.
This Documentation, which includes embedded help systems and electronically distributed materials, (hereinafter referred
to as the “Documentation”) is for your informational purposes only and is subject to change or withdrawal by Broadcom
at any time. This Documentation is proprietary information of Broadcom and may not be copied, transferred, reproduced,
disclosed, modified or duplicated, in whole or in part, without the prior written consent of Broadcom.
If you are a licensed user of the software product(s) addressed in the Documentation, you may print or otherwise make
available a reasonable number of copies of the Documentation for internal use by you and your employees in connection
with that software, provided that all Broadcom copyright notices and legends are affixed to each reproduced copy.
The right to print or otherwise make available copies of the Documentation is limited to the period during which the
applicable license for such software remains in full force and effect. Should the license terminate for any reason, it is your
responsibility to certify in writing to Broadcom that all copies and partial copies of the Documentation have been returned
to Broadcom or destroyed.
TO THE EXTENT PERMITTED BY APPLICABLE LAW, BROADCOM PROVIDES THIS DOCUMENTATION “AS
IS” WITHOUT WARRANTY OF ANY KIND, INCLUDING WITHOUT LIMITATION, ANY IMPLIED WARRANTIES OF
MERCHANTABILITY, FITNESS FOR A PARTICULAR PURPOSE, OR NONINFRINGEMENT. IN NO EVENT WILL
BROADCOM BE LIABLE TO YOU OR ANY THIRD PARTY FOR ANY LOSS OR DAMAGE, DIRECT OR INDIRECT,
FROM THE USE OF THIS DOCUMENTATION, INCLUDING WITHOUT LIMITATION, LOST PROFITS, LOST
INVESTMENT, BUSINESS INTERRUPTION, GOODWILL, OR LOST DATA, EVEN IF BROADCOM IS EXPRESSLY
ADVISED IN ADVANCE OF THE POSSIBILITY OF SUCH LOSS OR DAMAGE.
The use of any software product referenced in the Documentation is governed by the applicable license agreement and
such license agreement is not modified in any way by the terms of this notice.
The manufacturer of this Documentation is Broadcom Inc.
Provided with “Restricted Rights.” Use, duplication or disclosure by the United States Government is subject to the
restrictions set forth in FAR Sections 12.212, 52.227-14, and 52.227-19(c)(1) - (2) and DFARS Section 252.227-7014(b)
(3), as applicable, or their successors.
Copyright
©
2005–2023 Broadcom. All Rights Reserved. The term “Broadcom” refers to Broadcom Inc. and/or its
subsidiaries. All trademarks, trade names, service marks, and logos referenced herein belong to their respective
companies.
534

Continuous Delivery Director 8.5
Administration
As an Administrator or an authorized user, you use the Administration tab to configure the product and manage
applications, environments, users, and integrations. You can establish connections to remote components and import
application models from Automic
®
Continuous Delivery Automation.
Perform the following tasks before you design or deploy releases.
1. Release Licensing (On Premise only)
Apply your product license to enable release execution. You can apply your license after other administration and
release design tasks, if necessary.
2. Manage Users, Groups, and Roles
Set up users, create groups, and manage user roles.
3. Register Plug-ins
Register plug-ins to enable connections to remote components supported by each plug-in. Packaged plug-ins that are
installed on the Continuous Delivery Director server are automatically registered during installation.
4. (Optional) Manage Endpoints
Configure connections to specific instances of remote components that the registered plug-ins support.
5. Manage Applications and Environments
Add applications and environments to Continuous Delivery Director. You can import applications from a configured
endpoint, or you can create applications that are local to Continuous Delivery Director.
6. Manage Maintenance Windows
Add maintenance windows to specific environments to indicate blocks of time where release execution is scheduled.
7. Configure Email Notifications and Product Settings (On-Premise only)
Configure email notifications and other product settings at any time.
The following video provides basic information about how to work with plug-ins, endpoints, and applications:
Licensing and Product Usage
A flexible subscription service makes our best-of-breed continuous delivery orchestration and analytics solution available
to any team.
We provide a Freemium level to try out the SaaS version of our product. The Freemium level supports up to 10 concurrent
release cycles.
NOTE
To use the Freemium level, sign up today at http://cddirector.io
Enable Continuous Delivery Director for Enterprises
The Enterprise level of Continuous Delivery Director (for both SaaS and on-premise) comes with features and services
to fit the largest, most complex and most demanding organizations. You can typically set up and configure Continuous
Delivery Director in under an hour.
There are two licensing models available for Continuous Delivery Director:
•
Enterprise Subscription Portfolio License Agreement (PLA)
•
Classic Product License
535

Continuous Delivery Director 8.5
View Product Usage - Activity Log
You can view product usage from the user interface.
1. From the Cross-Project Settings menu
( ),
select Activity Log.
2. Filter the Category column by License.
View Product Usage - API
You can view PLA usage information by using a REST API call.
1. In the menu bar, select the hamburger icon
,
then REST API.
2. In the ADMINISTRATION section, navigate to product, then GET /product/license.
3. Click Try it out!
{ "data": { "concurrentRunningReleases": "39", "className": "PortfolioLicensingAgreementDto" }}
Output is generated that contains the number of concurrent running releases. This number is the billing metric for
Continuous Delivery Director.
Enable the Portfolio License Agreement
In a Portfolio License Agreement (PLA), the customer is licensed to use the entire Enterprise Software portfolio or a
subset by segment.
A cap is contractually agreed upon to provide customers with price predictability. When configuring with a PLA, you
must identify your instance as a PLA instance during the setup. You must also provide activation information that
includes your company domain and enterprise site ID. You can update this activation information at any time through the
Administration menu.
Because a PLA is a subscription model, this agreement requires you to transmit customer subscription usage and system
configuration information to the Broadcom/CA Technologies data warehouse. This is accomplished through the telemetry
service that is integrated directly into Continuous Delivery Director . Gathering and leveraging usage data, in a secure and
anonymized way, is essential to our ability to deliver relevant products that drive your success.
Continuous Delivery Director usage is measured according to the highest number of concurrent releases that are run in
the course of a day during the monitored period. There is no maximum number of concurrent releases.
Telemetry does not transmit any Personally Identifiable Information (PII). Broadcom/CA Technologies continues to follow
the policy as outlined in our privacy statement.
1. Log in to Continuous Delivery Director as an administrator.
2. Select the Cross-Project Settings menu
( ),
then CDDirector Settings.
3. Select Portfolio License Agreement, and configure the parameters.
•
Send Product Usage Data to Broadcom
Select this option to enable telemetry reporting.
536

Continuous Delivery Director 8.5
NOTE
If you do not enable this option, telemetry data will only be stored on your database server, and will not be
sent to Broadcom/CA Technologies.
•
Enterprise Site ID
Specify your Enterprise Site ID. You can find your company Enterprise Site ID in your Portfolio License Agreement
and the support portal.
NOTE
SaaS customers who have purchased a classic product license must enter the site ID to remove the
usage limitation.
Values: Numbers only, without letters, special characters, or spaces.
Example: 123456789
•
Company Domain
Specify your company domain (the last part of your company's e-mail address).
Example: broadcom.com
•
Department / Charge Identifier
Specify a non-PII (personally identifiable information) identifier for tracking purposes, such as a department or
charge area.
•
Covered by Broadcom Subscription Product License Agreement
Select this option to confirm that your company has signed an Enterprise Subscription Portfolio License Agreement.
•
Use Proxy (Optional)
Relevant for on-premise only. Select this option to enable a proxy server to be used. You can use this option to
enable telemetry reporting if port 443 is not available.
NOTE
To use this option, verify that you have selected the Send Product Usage Data to Broadcom option. If
you select Use Proxy, the Proxy URL, Proxy Username, and Proxy Password fields appear.
•
Proxy URL
Specify the URL to connect to the proxy server.
•
Proxy Username
Specify the user name for the proxy server
•
Proxy Password
Specify the password for the proxy server
4. Save your changes.
The setup is complete. You and your colleagues can start using Continuous Delivery Director according to the Product
License Agreement. Additionally, the following information appears at the bottom of the Portfolio License Agreement page:
•
Instance ID
A unique number that identifies the Continuous Delivery Director tenant.
Example: 2d65a340-79dc-46a0-b206-a39e6b2fa91fLast
•
Collection Date
The last date on which Continuous Delivery Director collected the usage information.
•
Last Collection Status
The status of the last transaction that sent telemetry data to Broadcom/CA Technologies.
537

Continuous Delivery Director 8.5
Enable a Classic Product License
Your organization has a non-PLA product license with Broadcom.
1. As an administrator, log in to Continuous Delivery Director.
2. Select the Cross-Project Settings menu
( ),
then CDDirector Settings.
3. Select Portfolio License Agreement.
4. Specify your Enterprise Site ID.
Values: Numbers only, without letters, special characters, or spaces.
5. Save your changes.
The setup is complete. You and your colleagues can start using the Enterprise level for your organization according to the
classic product license.
Manage Users, Groups, and Roles
As a Continuous Delivery Director administrator, you can create users and add users to groups that you can assign to
specific project roles. Permissions range from the ability to design a release to full product administration. These roles
provide stakeholders at all levels with appropriate insight into release operation and activity and avoid unnecessary risk.
Roles and Functions
Users can require access to Continuous Delivery Director for the following roles and functions:
•
Executive or management personnel who monitor the health of their infrastructure and the effectiveness of their
continuous delivery release pipeline.
•
IT administrators responsible for product configuration and management.
•
Release owners who manage the release content and who are responsible for the successful release deployment.
•
Developers who are responsible for the build process and overall quality of release applications.
•
Scrum masters and other stakeholders who use tracking tools, such as Rally
®
, to track the release status. These tools
are integrated with Continuous Delivery Director.
•
Administrators of continuous delivery tools, such as Automic
®
Continuous Delivery Automation or Service
Virtualization, who require higher-level release status insight.
There are several default roles as well as activity-related permissions which you can assign to users and groups.
Built-in Roles
Continuous Delivery Director includes a set of built-in roles, explained below, which provide access to specific capabilities
and information. As an administrator, you can grant these roles to users and groups.
•
Designer
Designer is the default user project role. The basic set of Designer role permissions is granted to all users and cannot
be removed.
Assign the designer role to stakeholders who need access to specific releases.
Designers can:
–
Edit releases, phases, and tasks if they are owners
–
View releases if they are members
–
Export releases
538

Continuous Delivery Director 8.5
Designers cannot:
–
Add or remove releases
–
Import releases
–
Add releases to release tracks
–
Perform administration tasks
–
See the Administration menu
•
Release Manager
This built-in project role has greater privileges than the default Designer role. Assign this role to users who are
responsible for ensuring that all software assets are controlled and can be released as required.
Release managers can:
–
Add and remove releases
–
Edit releases, phases, and tasks if they are owners
–
View releases if they are members
–
Ensure that only authorized users can view and manage applications in the release pipeline
–
Import and export releases
–
Add releases to release tracks
Release managers cannot:
–
Perform administration tasks
–
See the Administration menu
•
Administrator
Administrators have full access to the release design and execution, and can perform the following functions:
–
Create and remove users
–
Add, edit, and remove releases, phases, and tasks
–
Manage users, applications, environments, plug-ins, endpoints, and licenses
–
Ensure that only authorized users can view and manage applications in the release pipeline
Assign this cross-project role to users who participate in release design and execution but who should not have access
to integrations with your infrastructure.
NOTE
In a SaaS implementation, users who create a tenant are granted the administrator role.
•
System Administrator
NOTE
This role is not available for SaaS users.
System administrators can do everything that administrators can do as well as configure SMTP and database
settings. For on-premise installations, assign this cross-project role to IT administrators who are responsible for the
management of the products that make up your IT infrastructure. The superuser included with the product is assigned
the system administrator role by default.
Custom Roles
If the default roles do not meet the needs of your organization, you can create your own custom project and cross-project
roles. For example, you can add several permissions which are not included in the basic set of Designer permissions.
Permissions include the following categories:
539

Continuous Delivery Director 8.5
•
Endpoints
•
Releases
•
Tracks
•
File sources
•
Shared tokens
•
Administration
Just like built-in roles, you can assign custom roles to users and groups. As well as project permissions, you can also
assign track and email template management cross-project permissions.
Create a Custom Role
To create custom roles in Continuous Delivery Director, add roles in the Role Management page.
NOTE
You must be logged in as a user with an administrator role to create custom roles.
Follow these steps:
1. Go to the Cross-Project Settings menu
( )
and click Role Management.
2. Select Add Custom Role.
3. Specify a display name for the custom role.
TIP
We strongly recommend that you enter an accurate and detailed description of the custom role.
4. Select one or more permissions, then Add.
NOTE
The permissions you select are additional to the default set of Designer permissions.
The new role is added and is available for assignment to users and groups.
Create Users
You can create your own users and groups or you can integrate with a directory server.
To create users and assign roles in Continuous Delivery Director, add users in user management.
Follow these steps:
1. Go to the Cross-Project Settings menu
( ),
then click User Management.
You must be logged in as a user with the System Administrator or Administrator role to see the Administration tab.
The superuser account has the System Administrator role.
2. Select Add User, and specify the user details. Enter an email address that is regularly monitored. An email address
can only be associated with a single user. This email address receives release notifications.
3. Select a Role, then select Add.
Note: The default role is Designer. An Administrator cannot assign the System Administrator role.
The user is added.
4. Manually notify the user of the new account and login instructions.
Note: The user name is the email address that is used to create the account.
540

Continuous Delivery Director 8.5
User Password Management
Once a user is created, the administrator and the user can change the user account password in the UI.
Password Changes by the Administrator
Follow these steps:
1. Go to the Cross-Project Settings menu
( )
in the UI toolbar and click User Management from the drop-down list.
The USER MANAGEMENT screen opens
2. Select and highlight the user to edit, and select the edit (pencil) icon above the list of users.
The EDIT USER box opens
3. Enter the new password in the Password and Confirm Password fields and select Save.
The new password for the user account is saved.
Password Changes by the User
Follow these steps:
1. Select the icon with the initials of the logged-in user in the top of the UI.
2. Select User Settings from the drop-down list.
3. Select Change Password in the left panel.
4. Enter the old and the new passwords, verify the new password, and select Save.
The user password is changed.
When a user changes a password, the user can continue to work under the current login. The new password is required
for the next login.
Edit a User Role
As an administrator, you can edit user roles and all other user values.
Note: You cannot edit your own role.
Follow these steps:
1. From the menu bar, go to the Cross-Project Settings menu
( )
and click User Management.
2. Select the user and select the pencil icon.
3. Select the role and select Save.
The user role is changed. The changes are reflected after the user refreshes or reloads the UI.
Create a Group
To manage multiple users who are assigned to a release, create a group. Groups are user containers to help you
effectively manage users. You can group release stakeholders, product roles, and other organizational roles.
Follow these steps:
1. Select Add Group, and specify the group information.
2. Select a role for the group and select Add.
Note: The default role is Designer.
3. (Optional) Assign users to the group.
541

Continuous Delivery Director 8.5
The group is created.
Add Users to Groups
To organize users who require similar permissions and release access, add users to groups.
WARNING
The group role supersedes the user role. For example, users with the Designer role who are assigned to a
group with the Administrator role inherit Administrator privileges. Users that belong to multiple groups inherit the
highest permission level of the groups.
Follow these steps:
1. Select the user and select the Add Users to Groups icon on the Users menu bar.
2. Select the groups and select Save.
The user is added to the selected groups.
User Release Notifications
Owners of releases, phases, and tasks receive email notifications for certain release activities.
You can disable the notification function.
NOTE
This functionality is pre-configured in the SaaS version of the product and not configurable by users.
Follow these steps:
1. Select the icon with the initials of the logged-in user in the top of the UI.
2. Select User Management from the drop-down list.
3. Select Preferences in the left panel.
4. Clear the Get email notifications box.
Email notifications are disabled.
For more information, see Release Notifications.
User Permissions
Release and release component owners have permissions over the component that they own and the child components.
For example, a release owner has owner permissions for phases and tasks in the release. A phase owner has owner
permissions for tasks in the phase.
Note: For release members who are also phase or task owners, the ownership permissions override the member role
permissions.
Permissions to perform activities in a release are based on the following user roles:
Release Owner
Release owners can perform the following activities:
542

Continuous Delivery Director 8.5
•
Add applications to the release
•
Create application versions
•
Map content
•
Create tokens
•
Create phases and set phase environments and owners.
•
Create tasks and set task owners
•
Set task values
•
Schedule phases
•
Run phases
•
Reorder phases in the release
Phase Owner
Phase owners can perform the following activities:
•
Create tasks in the phase
•
Delete tasks in the phase
•
Change the order of tasks in the phase
•
Edit tasks in the phase to set values, change task types, and change endpoints
•
Copy tasks from other phases
Note: Phase owners can only copy tasks from phases that they own.
•
Run and schedule the phase
Task Owner
Task owners can perform the following activities:
•
Change the status of the task
•
Edit the task to set values, change the task type, and set endpoints
Release Members
Release members can only view the release and cannot perform release tasks or actions. All owners of release
components are automatically added to the release members list.
To grant permissions to view a release, add the users to the release member list.
For a new release:
When you create the release in the Releases tab, select users from the drop-down list in the Members field of the
CREATE RELEASE window.
For an existing release:
1. In the Releases tab, click the release name.
2. Click the edit icon (pencil) next to the release name.
The EDIT RELEASE window opens.
3. In the Members field, add users from the drop-down list and click save.
Note: Users must be configured in the Cross-Project Settings menu
( )
under USER MANAGEMENT.
543

Continuous Delivery Director 8.5
Integrate with a Directory Server
You can integrate Continuous Delivery Director with an LDAP directory server for authentication, user and group
management.
LDAP (Lightweight Directory Access Protocol) is an Internet protocol that web applications can use to look up user and
group information in a directory server. An LDAP directory is a collection of data about users and groups.
Continuous Delivery Director supports integration with Microsoft Active Directory and non-Active Directory LDAP servers.
There are two stages in LDAP integration:
•
Connect to the LDAP directory server
•
Import users and groups from the LDAP directory server into Continuous Delivery Director
For non-Active Directory servers, the product only supports direct LDAP authentication. To bind to the LDAP server, direct
authentication uses the full user DN patterns that you input.
Connect to a Directory Server
Important: You need system administrator permissions to configure the LDAP directory settings.
Follow these steps:
1. From the Cross-Project Settings menu
( ),
click CDDirector Settings from the drop-down list.
2. Select User management system.
3. In the User management system page, select Directory Server.
4. Enter the values for the directory settings, as described below in
5. Select Test Connection to test the configuration settings.
Note: The Test Connection command performs a simple connectivity check. Test Connection does not check
authentication or whether there is a directory server at the specified host.
6. Select Save.
After you configure LDAP, the user management system does not contain any user accounts, except for the superuser
account. As a superuser, you must import users and groups. Users are assigned permissions according to the imported
groups. If no groups are imported, a message indicates that the authenticated user lacks permissions and must contact
the administrator.
Multiple LDAP domains are not supported with this release.
WARNING
All users and groups are deleted when you switch between local directory and LDAP, or between different LDAP
systems.
Directory Server Settings
•
Host The name of your LDAP server
Examples:
dircd01-cddldap dircd01-cddldap.local.domain
•
Port The port your LDAP server listens to.
Values: Default values are 389 or, for SSL only, 636
•
Use secure directory connection Select this checkbox if your LDAP directory requires SSL connections.
Note: To use this setting, you need to configure an SSL certificate.
•
LDAP user name The user name to connect to the LDAP directory server.
544

Continuous Delivery Director 8.5
Values: For Active Directory: The format can be either domain\user or user@domain.
Note: The domain\user format uses the domain NetBIOS name.
Example:
For LDAP: LDAP DN format
cn=Manager,dc=maxcrc,dc=com
•
LDAP password The user password to authenticate to the LDAP directory server.
•
Active Directory/LDAP The type of directory server to which you will connect.
Note: Select LDAP if the directory server is not Active Directory.
•
Domain name The part of the network address that identifies your website.
•
Note: Use FQDN (fully qualified domain name) format and not LDAP DN format.
Example:
maxcrc.com
•
User DN Pattern
Valid for LDAP system only
The distinguished name of the user and the locations that Continuous Delivery Director will search when connecting to
the directory server. You can add multiple locations (OU paths) using semi-colons as separators.
Example:
uid={0},ou=LA,ou=North America,dc=maxcrc,dc=com;uid={0},ou=UK,ou=Europe,dc=maxcrc,dc=com
Note: Maximum of 4000 characters
•
Group search base The location in the LDAP directory from which the LDAP group search begins.
Value: Use DN format
Note: Define this attribute to override the default base search DN which is taken from the domain name.
•
Group Search FilterThe search criteria to use during searches for groups.
Note: Mandatory for LDAP configurations. To see if a different filter is needed, check the group attributes:
Example:
member={0}
Attributes Mapping
•
Unique user ID The attribute to use when Continuous Delivery Director loads the user ID.
Example: uid
•
Email The attribute to use when Continuous Delivery Director loads the user email address.
545

Continuous Delivery Director 8.5
Example: mail
•
First name The attribute to use when Continuous Delivery Director loads the user first name.
Example: givenName
•
Last name The attribute to use when Continuous Delivery Director loads the user last name.
Example: sn
Search Pattern
•
User pattern
The search criteria to use when Continuous Delivery Director imports users from an LDAP directory. You can also add
free text.
Note: Ensure that the filter for user import aligns with the User DN Pattern settings.
Example: To search for users by their first name enter:
givenName=*{0}*
To search only for users that are located in two different organizational units, namely LA and NY, enter:
(&(cn={0}*)(|ou:dn=NY(ou:dn=LA)))
•
Group pattern
The search criteria to use when Continuous Delivery Director imports groups from an LDAP directory. You can also
add free text.
Note: Ensure that the group filter aligns with the Groups search base settings.
Example: You enter:
(&(cn={0}*)(|ou:dn=NY(ou:dn=UK)))
If the Group search base setting is:
ou=North America,dc=maxcrc,dc=com
then the group import filters out ou=UK groups because the group search base only includes North America-based
organizational unit names.
Import Groups
You can import groups from the LDAP directory and can assign user roles.
Important: You need administrator permissions to import groups.
Follow these steps:
1. Select ADMINISTRATION and select User Management from the drop-down list.
2. Select the Import Groups plus sign icon on the Groups toolbar.
The Import Groups dialog box opens.
546

Continuous Delivery Director 8.5
3. Enter a search term and select Search.
Note: Leave the search box empty to retrieve all groups that match the search patterns defined when the connection
to the directory server was configured.
4. From the results list, select one or more groups, assign a role, and select Import.The imported groups appear in the
User Management page.
Import Users
You can import users from the LDAP directory, and can assign user roles.
Important: You need administrator permissions to import users.
Follow these steps:
1. Select ADMINISTRATION and select User Management from the drop-down list.
2. Select the Import Users plus sign icon on the Groups toolbar.
The Import Users dialog box opens.
3. Enter a search term and select Search.
Note: Ensure that your settings for user import align with the User DN Pattern settings in the User management
system page. Leave the search box empty to retrieve all users that match the search patterns defined when the
connection to the directory server was configured.
4. From the results list, select one or more groups, assign a role, and select Import.The imported groups appear in the
User Management page.
Enable Single Sign-On
Single sign-on (SSO) lets users using the corporate network access Continuous Delivery Director without entering their
usernames and passwords.Continuous Delivery Director validates their usernames and passwords against your corporate
user database.
When users log in to Continuous Delivery Director, they can use their organizational SSO account without the need to
enter a separate username and password. Additionally, when users send invitations to their Continuous Delivery Director
workspace to colleagues, SSO is automatically enabled for the recipients.
Only invited users can use their invitation to log in with their Corporate email account credentials. If a user who has logged
in through an invitation is deleted, they must be invited again to be able to log in through SSO.
SSO uses the Security Assertion Markup Language 2.0 (SAML 2.0) protocol, which is implemented with the Spring
Security SAML Extension.
Set the SAML Signature Algorithm
IdPs use SAML signatures to prove that user metadata is authenticated across secure domains. Continuous Delivery
Director sends outbound SAML request assertions to an identity provider for single sign-on using the SHA-256 hashing
algorithm.
For SaaS
Continuous Delivery Director uses SHA-256 as the SAML signature algorithm.
For OnPrem
The following algorithms are supported:
•
SHA-1 (not recommended)
•
SHA-256
•
SHA-512
•
SHA-384
547

Continuous Delivery Director 8.5
To change the SAML signature algorithm, in settings.properties , edit the corresponding line:
settings.properties
================================================
cdd.authentication.identity_managers.saml.enabled = true
cdd.authentication.identity_managers.saml.role = SYSTEM_ADMINISTRATOR
cdd.authentication.identity_managers.saml.domain_verification.enabled = false
cdd.authentication.identity_managers.saml.domain_verification.txt_record_name = _continuous_delivery_director
cdd.authentication.identity_managers.saml.service_provider.id = https://continuous_delivery_director.io
cdd.authentication.identity_managers.saml.service_provider.metadata_uri = /saml/
metadatacdd.authentication.identity_managers.saml.service_provider.metadata.signing_algorithm = SHA-256
cdd.authentication.identity_managers.saml.service_provider.sso_uri = /saml/sso
cdd.authentication.identity_managers.saml.service_provider.port_included = true
================================================
For Continuous Delivery Director SaaS
Change the SHA settings in your SSO solution to SHA-256, for example, AD FS, as needed.
Set the SAML Service Provider
For SaaS
The SAML Service Provider ID is https://continuous_delivery_director.io
For OnPrem
To change the SAML Service Provider ID, in settings.properties , edit the following line:
settings.properties
================================================cdd.authentication.identity_managers.saml.service_provider.id
= https://continuous_delivery_director.io
================================================
List of Terms
Identity Provider (IdP)
A system that creates, maintains, and manages identity information for principals (users, services, or systems) and
provides principal authentication to other service providers (applications) within a federation or distributed network. An IdP
is a trusted third party for use when users and servers are establishing a dialog that must be authenticated. The IdP sends
an attribute assertion containing trusted information about the user to the SP.
SAML 2.0 (Security Assertion Markup Language 2.0)
A version of the SAML standard for exchanging authentication and authorization data between security domains.
SAML Assertion
An assertion is a package of information that supplies one or more statements that are made by a SAML authority. SAML
defines three different kinds of assertion statement that can be created by a SAML authority:
•
Authentication: The specified subject was authenticated by a particular means at a particular time. This kind
of statement is typically generated by a SAML authority that is called an identity provider, which is in charge of
authenticating users and keeping track of other information about them.
•
Attribute: The specified subject is associated with the supplied attributes.
•
Authorization decision: A request to allow the specified subject to access the specified resource has been granted or
denied.
548

Continuous Delivery Director 8.5
An assertion consists of one or more statements. For single sign-on, a typical SAML assertion contains a single
authentication statement and possibly a single attribute statement.
Note: A SAML response can contain multiple assertions.
Service Provider (SP)
An application server that has been integrated with Spring Security SAML Extension. An SP communicates with a
Spring Security SAML Extension IdP to determine if a user has authenticated and obtain information about the user. The
information that is obtained from the identity provider may be used to make authorization decisions.
A user password is never sent to an SP. The Spring Security SAML Extension uses HTTP redirects extensively. A user
interacts with the IdP to perform initial authentication.
Single sign-on (SSO)
A session and user authentication service that lets a user use one set of user credentials to access multiple applications.
Spring Security SAML Extension
An extension that enables both new and existing applications to act as a Service Provider in federations based on Web
Single Sign-On and Single Logout profiles of the SAML 2.0 protocol.
Benefits
•
Reduce administrative costs— With SSO enabled, system administrators have fewer passwords to manage and
receive fewer requests to reset forgotten passwords.
•
Save time—With SSO in place, users do not have to log in to Continuous Delivery Director manually. SSO prevents
user mistakes, reduces frustration, and adds up to increased productivity.
•
Increase security—All password policies that are established for your corporate network are in effect for Continuous
Delivery Director
How SSO Works
The following section describes the SAML 2.0 workflow in Continuous Delivery Director, involving a Web browser, an
identity provider (IdP), and a service provider (SP):
549

Continuous Delivery Director 8.5
Figure 42: SSO Flow
Explanation of Flow
1. Request the target resource at the SP
An HTTP user agent requests a target resource at the service provider:
https://<sp url>
2. Redirect to IdP SSO Service
The service provider generates an appropriate SAMLRequest (and RelayState, if any), then redirects the browser to
the SSO Service.
Note: The RelayState token is an opaque reference to state information maintained at the service provider.
3. Request the SSO Service at the IdP
The user agent issues a GET request to the SSO service at the identity provider:
GET /SAML2/SSO/Redirect?SAMLRequest=request&RelayState=<TargetURL>
4. Respond with an XHTML form
The SSO service at the IdP validates the request and responds with a document containing an XHTML form:
<form method="post" action="https://sp.ca.com/SAML2/SSO/POST" ...> <input
type="hidden" name="SAMLResponse" value="response" /> <input type="hidden"
name="RelayState" value="token" /> ... <input type="submit" value="Submit" /> </
form>
5. Request assertion container service at the SP
The user agent issues a POST request to the Assertion Consumer Service at the service provider:
POST /SAML2/SSO/POST HTTP/1.1 Host: sp.ca.com Content-Type: application/x-www-form-
urlencoded Content-Length: nnn SAMLResponse=response&RelayState=token
6. Redirect to the target resource
550

Continuous Delivery Director 8.5
The assertion consumer service processes the response, creates a security context at the service provider and
redirects the user agent to the target resource.
7. Request the target resource at the SP again
The user agent requests the target resource at the service provider (again):
https://sp.ca.com/myresource
8. Respond with requested resource
The SP processes and validates the response, and reads the nameid included in the SAML Assertion.
Authorization phase—The SP uses the nameid value to look for the user and its associated permissions
in the DB or in the LDAP Active Directory. When the SP matches the nameid with a user record, the user is
authenticated. Because a security context exists, the SP returns the resource to the Web browser. The user can now
access the requested resource.
Configure SAML Authentication
To enable SAML authentication, you first need to establish mutual trust relationships between Continuous Delivery
Director and the identity providers (IdP) for your domains.
You establish mutual trust relationships by exchanging certificates and unique identifiers between the two endpoints.
1. Download the spring_saml_metadata.xml file. In your Web browser, enter the URL https://cddirector.io/cdd/
saml/metadata.
The spring_saml_metadata.xml file contains the following three elements which comprise the required metadata for
configuring your IdP:
•
SAML Entity ID of Continuous Delivery Director
•
Redirect URL from the IdP back to Continuous Delivery Director
•
SAML certificate of Continuous Delivery Director
These three elements should be configured by the customer administrator at the IdP for your domain. This action
allows the IdP to trust Continuous Delivery Director. Now we need to allow Continuous Delivery Director to trust the
IdP.
2. In Continuous Delivery Director, from the Cross-Project Settings menu
( ),
click SAML Settings Management.
3. Click Add SAML Domain.
4. Specify the following information:
•
Identity Provider Domain
The domain name of the identity provider. For example, hedmoral.com
•
Identity Provider Login URL
The URL of the identity provider to authenticate users on login. For example, https://saml-
qa.hedmoral.com/saml2sso
•
Identity Provider Issuer
A URL that uniquely identifies your identity provider.
•
Identity Provider Certificate
The authentication certificate issued by your identity provider. A Base64 encoded ASCII file, with an extension such
as .pem, .crt , .cer , and .key .
551

Continuous Delivery Director 8.5
NOTE
Copy all of the text, including the "-----BEGIN CERTIFICATE----- " and "-----END
CERTIFICATE----- " statements.
•
Import Groups
Select this option to create user groups from the SAML groups of the logged-in user.
a)
NOTE
For Continuous Delivery Director SaaS only:
Click Generate Verification Code and copy.
b) Follow the instructions on the SAML Configuration page to add a new TXT record to your DNS provider web site.
To store the SAML information, the TXT record uses a structured format in its TXT-DATA field. The
name of the new TXT record should be _continuous_delivery_director.<domain name> and its value
should be the generated verification code. Syntax: The TXT record format consists of the string
_continuous_delivery_director.<domain name>=<generated verification code> . For example:
_continuous_delivery_director.hedmoral.com=116ep08771i12mo341429i52o2v76168
c) Once the TXT record is entered in the DNS provider website, click Verify.
You receive an indication that SAML authentication is enabled in Continuous Delivery Director for your
organization.
5. Once the SAML domain is configured, click Add.
Enable SAML Groups
You enable SAML groups to grant group permissions and roles (cross-project or per project).
If the Import Groups option is selected when adding a SAML domain, the SAML groups of the logged-in user are
mapped to Continuous Delivery Director. These SAML groups appear on the USER MANAGEMENT page in the Groups
list.
1. From the Administration menu, click User & Group Management.
2. In the Groups list, select one or more SAML groups.
A SAML group is marked as External in the Source column.
3. Click the Enable SAML Groups icon, then Enable.
NOTE
The Enable SAML Groups icon is only active if all selected groups are SAML groups.
Integration Users
As an administrator, you can use a dedicated user, known as an integration user, to manage integrations with other
products and services.
You can enable endpoints to be authenticated with an integration user API key. You use an integration user to prevent loss
of access if employees whose user credentials are used to authenticate to integrations leave the company.
There are several differences between integration users and other types of user.
Integration users do not:
•
Require email addresses
•
Have user credentials - only API keys
•
Log in to Continuous Delivery Director
As an administrator, you can:
552

Continuous Delivery Director 8.5
•
Create and remove integration users
•
Copy and re-issue the API key of an integration user
•
Edit an integration user
•
Add an integration user to groups, applications, releases, and so on
NOTE
For OnPrem: If Continuous Delivery Director is integrated with an LDAP directory server, you cannot add an
integration user to a group.
Create An Integration User
As an administrator, you create an integration user to handle authentication in integrations.
1. From the Cross-Project Settings menu
( ),
click User Management.
2. In Users, select the plus sign, then Add Integration User.
3. Specify a username and a role, the select Add.
The Copy API Key dialog opens.
4. Select Copy and Close.
This action copies the API key to the clipboard and closes the Copy API Key dialog.
5. Save the API key securely.
The newly-created integration user appears in the list of users in the User Management page.
Register Plug-ins
Plug-ins enable integration with remote components. For example, the Rally
®
plug-in lets you interface with Rally
®
to update work items and view test case results. Plug-ins let you orchestrate key continuous delivery operations from
Continuous Delivery Director releases and tasks.
To enable integration with a remote component, register a plug-in. One plug-in can support multiple instances of the
remote component. To connect a plug-in to remote component instances, add endpoints.
TIP
As a SaaS user, when you log in for the first time, all existing plug-ins are automatically registered for you. Plug-
in registration is only required for SaaS users when new plug-ins are added to the SaaS instance after your
initial login. Monitor the Release Notes to be notified of new plug-ins, which you register using this procedure.
Packaged plug-ins that you install on the CDD Server are automatically registered. The following plug-in scenarios require
manual registration:
•
Plug-ins installed on a remote server
•
Custom plug-ins
To register plug-ins, use the following steps:
1. Select the Cross-Project Settings menu
( )
and click Plug-ins.
553

Continuous Delivery Director 8.5
The Plug-ins page shows a table of the packaged plug-ins that you installed on the Continuous Delivery Director
Server. These plug-ins are registered and require no further action. To manage these registered plug-ins, go to
Manage Endpoints.
2. To register a custom plug-in, or to register a plug-in that is not in the table, click Register Plugin
3. Enter the manifest URL for the plug-in you want to register in the following format:
http://pluginserver:8080/plugin-name/manifest.json
On Premise Examples:
–
Automic
®
Continuous Delivery Automation plug-in manifest URL
http://<host>:<port>/cdd-ara-plugin/manifest.json
–
REST plug-in manifest URL
http://<host>:<port>/cdd-rest-plugin/manifest.json
These examples can represent locally or remotely installed plug-ins.
Note: If you configure the product to use HTTPS communication, you must update existing plug-in registrations that
previously used HTTP. See Secure Communications in the Administration section.
SaaS Example:
–
http://cde-6-4-plugins.cde-6-4-server-production:8080/cdd-slack-plugin/manifest.json
This example uses the server name and port on which all plug-ins are installed on the SaaS instance. Use this server
name and port in the manifest URL when registering all plug-ins on SaaS.
4. Click Register.
The plug-in is registered.
The plugin-name is the name of the plug-in file without the .war extension. The plug-in must be in the webapps
directory of the Tomcat server on its system for the registration to work.
The Plug-Ins table provides name, version, number of tasks, and the following additional information for registered
plug-ins:
–
Application Model
Specifies whether the plug-in lets you import an external application model from the integrated remote component.
For example, the Automic
®
Continuous Delivery Automation plug-in supports application model import.
–
Content
Specifies whether the plug-in lets you import content from the integrated remote component. For example, the Rally
plug-in supports content import.
–
Connectivity Test
Specifies whether you can test the connection to an endpoint during endpoint and task definition.
5. Click the row for each plug-in to view details about the available tasks.
Manage Endpoints
Endpoints represent specific instances of remote components that are supported by a registered plug-in.
Use endpoints to connect and integrate with remote components that contribute to your continuous delivery process.
Each registered plug-in introduces a specific endpoint type (endpoint template). You can create multiple endpoint
instances for a specific endpoint type. After you add endpoints, you can orchestrate supported tasks and import
operations for the plug-in on a specific remote component instance.
NOTE
•
Access to endpoints during release design is application-based. By default, endpoints are accessible to all
users and all applications. However, you can specify which applications and environment can be used for
a given endpoint. Specify at least one application and one environment, or you will not be able to use this
endpoint inside any tasks. For more information, see Applications and Environments.
•
Register a plug-in before you add an endpoint for an instance of a plug-in remote component. If you do not
see the endpoint type that you need, register the plug-in. For more information, see Register Plug-ins.
554

Continuous Delivery Director 8.5
Create Endpoints
To connect to a specific instance of a remote component, add a new endpoint.
You have been granted the Can create endpoint project permission.
The information that you provide varies by endpoint type. For specific information that is required for each endpoint, see
the documentation for each plug-in.
1. Go to Administration, Endpoints, and select Add Endpoint.
2. Specify the Name and Description.
3. Enter one or more environment names in the Environments box.
To see a list of existing environments, click the Environments box.
4. Select or create one or more Tags to label the Endpoint.
5. Select the endpoint type under Select plugin.
Each plug-in has an endpoint type. When you register a plug-in, the endpoint type becomes available to add in this
dialog.
6. Specify the required information for the endpoint type you selected. and select Test Connection.
IMPORTANT
For security reasons, Continuous Delivery Director SaaS can connect only to remote endpoints that expose
standard ports. The standard ports are 80 for HTTP and 443 for HTTPS. Firewall restrictions require
standard ports (80/443) for HTTP/HTTPS endpoint connections.
7. Select Add.
The endpoint is added and is displayed on the ENDPOINTS page. The specified applications and environments are
available for use in tasks that use the endpoint.
NOTE
If endpoint parameters are missing, an icon with an exclamation point is displayed next to the endpoint name.
Select the icon to provide the missing parameters.
•
For endpoints that support the functionality, such as Automic
®
Continuous Delivery Automation, you can import an
application model from the remote component for use in releases. For more information, see Manage Applications and
Environments.
•
Plug-ins typically provide tasks that you can add to releases to initiate the remote component functionality. For
example, the Rally
®
plug-in provides a Check Test Case Results task that uses the created endpoint. This task lets
you view the results of a test case that ran in a previous step. For more information, see Release Design.
Duplicate Endpoints
You can create a new endpoint that is very similar to an existing endpoint.
To duplicate an existing endpoint:
1. Go to Administration and select Endpoints.
2. In the Endpoints grid, hover over an endpoint name. An ellipsis icon (three dots) appears to the right end of the row.
3. Click the ellipsis icon and select the Duplicate option. A Duplicate Endpoint dialog box appears.
4. Make any required changes and then select Duplicate.
The new endpoint is added to the grid and the endpoint name is concatenated with the word "copy."
555

Continuous Delivery Director 8.5
NOTE
The password field is left empty.
Import and Export Endpoints
From the Endpoints page, you can import and export DSL files in JSON format that represent endpoints. You can import
DSL files either from your local machine or from your source control tool, such as GitHub.
For more information about the JSON syntax, see Pipelines as Code.
To Do This
Import DSL files from your code repository In the Endpoints page, click
.
Generate and export DSL files to your code repository In the Endpoints page, select an endpoint, and click
.
If you click
without selecting an endpoint, all endpoints are exported in the
DSL file.
"objects": [{
"kind": "Endpoint",
"description": "endpoint_description",
"name": "endpoint_name",
"plugin": "plugin.name/plugin.version",
"parameters": { "username": "user"
}
}]
}
Projects
You can uses projects to segregate releases and to protect release assets from being modified by other groups in your
organization.
Projects help you ensure the separation of duties in your software delivery life cycle. Specifically, you can use project roles
and teams to ensure that employees cannot modify and execute the releases of other teams.
Every user and group has a project role. Whereas the applications are unique per application, environments and
endpoints are unique per project. To manage project users, groups, applications, and endpoints, you require the Can
manage project access permission. This permission lets you add and remove project team members as required.
Check out this section to learn more about setting up and managing projects.
Create and Edit Projects
Use this procedure to create projects in a tenant. By default, each tenant includes a project named Base.
1. From the Administration menu, click Project Management.
The TENANT SETTINGS: PROJECTS page opens.
556

Continuous Delivery Director 8.5
2. Click New Project.
3. Enter the project name and optionally a description, and click Create.
The newly-created project appears in the TENANT SETTINGS: PROJECTS page.
To edit an existing project, in the TENANT SETTINGS: PROJECTS page, click the name of the required project.
To switch projects, in the menu bar, click the hamburger menu, then Switch Project. Specify the name of the required
project, then click Switch.
Assign and Manage Project Access
Use project roles to associate users and groups with specific projects.
Prerequisites: You have been granted the Can manage project access permission.
Project roles are predefined sets of permissions for a specific project. Cross-project roles are predefined sets of global
permissions for all projects. Cross-project roles are defined in the USER MANAGEMENT page, and only administrators
can grant these roles.
Users and groups can play different roles in different projects. You can assign users and groups to cross-project roles
or to project-specific roles. Continuous Delivery Director includes built-in roles, such as release manager or designer.
You can also create custom roles in the TENANT SETTINGS: ROLE MANAGEMENT page with your preferred sets of
permissions.
Because newly-created and imported users and groups are not associated with any specific project, administrators create
these associations. In the following procedure, let us assume that your organization requires application builds to be
tested by quality assurance personnel. You, therefore, create and assign a project-specific role named QA Expert.
1. From the Administration menu, click Role Management.
The TENANT SETTINGS: ROLE MANAGEMENT page opens, listing the existing tenant roles.
2. Click Add Custom Role.
3. Define the following parameters and save.
•
Role Type
Specify either Per Project Role or Cross-Project Role.
•
Name
Specify a role name and optionally a description.
•
Permissions Per Project
Specify the required set of permissions for the specific project.
NOTE
This parameter only appears if you select Per Project Role as the role type. If you select Cross-Project
Role, the Cross-Project Permissions parameter appears.
Role Type: Per Project Role
Name: QA Expert
Permissions Per Project:
557

Continuous Delivery Director 8.5
•
Can create endpoint
•
Can update endpoint
•
Can delete endpoint
•
Can create release
•
Can delete release
•
Can add release to track
•
Can remove release from track
•
Can create file source
•
Can update file source
•
Can delete file source
•
Can manage shared environment tokens
•
Can manage shared release tokens
•
Can manage application
•
Can manage maintenance windows
•
Can manage project access
•
Can manage freeze periods
•
Can manage production
Cross-Project roles are:
•
Can manage email templates
•
Can manage track
4. From the Administration menu, click User Management.
The TENANT SETTINGS: ROLE MANAGEMENT page opens, listing the existing tenant roles.
5. Click the Add Group icon. In Create Group, add users, and select a cross-project role.
6. From the Administration menu, click Project Access - Users.
a) Click Manage User Access.
b) In the ASSIGN USERS TO PROJECT dialog, add users, select a project role, and click Assign.
Role: QA Expert
The users are assigned to the context project.
7. From the Administration menu, click Project Access - Groups.
a) Click Manage Groups Access.
b) In the ASSIGN GROUPS TO PROJECT dialog, add groups, select a project role, and click Assign.
Groups: Quality Assurance
Role: QA Expert
The groups are assigned to the context project with the defined project role.
To view the users in the context project, from the Administration menu, click Project Access - Users.
To view the groups in the context project, from the Administration menu, click Project Access - Groups.
To remove users and groups from a project, click the
icon. Optionally, select listed users and groups first before you click this icon.
558

Continuous Delivery Director 8.5
Applications and Environments
Applications and environments are per project only. Application and environment names are unique per project.
To view existing applications, navigate to Administration > Applications.
You can create and manage the following types of applications and environments:
Local
Local applications and environments only exist in the context of Continuous Delivery Director. Use local application
models when your application deployment tool does not support importing applications and environments into Continuous
Delivery Director. You can also use local models for proof-of-concept exercises. For example, an integration includes
a task that deploys applications using AWS CodeDeploy, which does not import an application model into Continuous
Delivery Director. In this case, create local applications to track the deployment of integrated applications that occur only
in the task context.
Local environments are a way to provide a representation of deployment locations in the absence of an external
application model.
Environments in Continuous Delivery Director are global and available for use across applications. For example, if a
release contains three applications that you are deploying to the same QA environment, you can assign that environment
to each application rather than creating three separate entities of that environment per application. All environments
must have a unique name, and when you use an existing name for an environment, you are actually reusing the existing
environment, not defining a new one.
An application without an environment assigned does not appear in the APPLICATIONS list in tasks.
External
External applications and environments are application models that exist in remote components, primarily Automic
®
Continuous Delivery Automation. When you import an application model from Automic
®
Continuous Delivery Automation,
the applications and environments are read-only. Use Automic
®
Continuous Delivery Automation applications and
environments to provide a seamless view of the release and the deployed applications.
Application Sources
If you sync an application source and are required to delete an application, you are prompted if the application is in use
in an active release. You cannot delete an application source that contains an application in use in an active release. You
cannot delete the endpoint of an application source that contains an application in use in an active release.
Application Model Plug-ins
If you sync an application model plug-in, such as Automic
®
Continuous Delivery Automation, and are required to delete an
application, you are prompted if the application is in use in an active release. You cannot delete an application model plug-
in, such as Automic
®
Continuous Delivery Automation, that contains an application in use in an active release.
Application Version Dependencies
Release owners can define dependencies between applications to share application versions across different
releases. For more information, see Set Up Application Version Dependencies.
Delete Applications and Environments
You cannot delete an application or an environment that is part of an active release. You can only delete applications
and environments that are associated with releases that are marked as Done. Continuous Delivery Director removes
environments and shared environment tokens from the phases of a release marked as Done when all of the following
conditions are met:
559

Continuous Delivery Director 8.5
•
The environment is removed from an application
•
The release contains this environment and this application
•
The release does not contain any other applications that are associated with this environment
Manage Applications
You have been granted the Can manage applications permission.
You can perform the following application management activities on the Applications page:
•
View a list of all applications in the selected project.
•
Add local applications. For more information, see Create Local Applications.
•
Add external applications. For more information, see Import Applications.
•
Set source control connections. For more information, see Set Source Control Connection.
•
Remove source control connections. For more information, see Remove Source Control Connection.
•
Set work item connections. For more information, see Set Work Items Connection.
•
Remove work item connections. For more information, see Remove Work Items Connection.
•
Set/remove test source templates. For more information, see Create Test Source Templates and Remove Test Source
Templates.
•
Import/export applications as DSL. For more information, see Import and Export Applications with DSL.
Create Local Applications
You create local applications when an external application model is not available.
Prerequisites: You have been granted the Can manage application permission.
You also create local applications when you test product functionality in a proof-of-concept model. Local applications
provide constructs that you can track in the context of Continuous Delivery Director when you cannot use external
applications. For example, you can deploy applications that do not yet have deployment plans in Automic
®
Continuous
Delivery Automation.
1. From the Administration menu, click Applications.
2. Click Add Local Application.
3. Specify the application name.
The application is added to the APPLICATIONS page.
4. Optionally, type an application description.
5. Optionally, in Environments specify one or more environments.
An application without an environment assigned does not appear in the APPLICATIONS list in tasks.
6. Optionally, in Business Applications specify one or more business applications.
7. Optionally, select or create one or more Tags to label the application. To create a new tag, enter a value (numeric or
alphanumeric) into the Tags field and then select Create New.
8. Click Add.
The application is created.
Create Release Applications
NOTE
The following video is extracted from the Release Orchestration training course. This course
provides extra information, context, and examples to augment the product documentation.
560

Continuous Delivery Director 8.5
To access this course, see Broadcom Enterprise Software Academy.
This video shows how to create applications in Continuous Delivery Director for use in a release. Applications
represent individual microservices or business components that are part of your release pipeline.
To edit an existing application, in the APPLICATIONS page, click the name of the required application. You can add and
remove environments or business applications of the applications, and select or create one or more tags to label the
application.
To delete an existing application, refer to Applications and Environments.
Import Applications
You import application models from remote endpoints to represent applications and environments in your release pipeline.
You have been granted the Can manage applications permission.
When you import application models from a remote endpoint such as an Automic
®
Continuous Delivery Automation
endpoint, the application environments are also imported. You cannot manage imported application and environment
models in Continuous Delivery Director. Only applications that are assigned to the login credentials that you specified
when the endpoint is created are imported. When you import applications and environments, any environments across
applications that have the same name are converted to a single, shared environment in Continuous Delivery Director.
NOTE
You can add local environments to application sources. This capability is useful if you add an application source
that does not include environments.
When you configure an application source, you also configure input parameters to filter the applications to be imported
into Continuous Delivery Director. This capability is particularly important if you are setting up an application source in
which a large number of applications are stored.
1. Do one of the following:
•
From the Administration menu, click Applications, then Add External Applications.
•
From the Administration menu, click Application Sources.
2. Click Add Application Source.
3. Enter a name.
4. Select a plug-in and an endpoint from the list.
Currently, the following Continuous Delivery Director plug-ins support this capability:
•
Automic Continuous Delivery Automation
•
AWS Elastic Beanstalk
•
Nolio Release Automation
•
GitLab
If no endpoints are listed, from the Administration menu, select Endpoints to create the required endpoint.
5. Specify the required input parameters.
The input parameters you see in Input Parameters vary according to the selected plug-in.
6. Click Add.
Any applications and environments you import are synchronized with the source and used in your releases and reports. To
view the application source you added, from the Administration menu, click Application Sources.
561

Continuous Delivery Director 8.5
Import and Export Applications with DSL
You can import and export applications as DSL files in JSON format.
Prerequisites: You have been granted the Can manage applications permission.
You can import applications as DSL files either from your local machine or from your source control. Any application
environments that are defined are also imported. You can also export applications as JSON files.
To define a production environment, use the following syntax:
{
"applications": [
"Local|Web-Access-Auth"
],
"isProduction": true,
"name": "WEB-PREP",
"kind": "Environment"
}
To generate and export applications in JSON format, in the APPLICATIONS page, click the Export Applications icon.
1. To import applications as DSL files, from the Applications menu, click Applications.
2. In the APPLICATIONS page, click the Import Applications icon.
3. Do one of the following:
•
a. Select Repository.
b. Specify a file source to retrieve application-related JSON files.
NOTE
To create a file source, in RELEASES, click File Sources, then New File Source.
c. Specify a relative file path to a JSON file in your source control repository.
•
a. Select Local Machine.
b. Browse to the required DSL file.
4. Click Import.
Sample application:
{
"objects":[
{
"description":"appDesc",
"name":"appName",
"kind":"Application"
}
]
}Environment:{
"objects":[
{
"applications":[
"Local|appName"
],
"description":"envDesc",
"name":"envName",
"kind":"Environment"
}
]
562

Continuous Delivery Director 8.5
}
Manage Application Sources
Application sources let you import applications from specified endpoints.
Application sources are the endpoint configurations you use in Continuous Delivery Director to import applications into
your release pipeline. You manage application sources on the Application Sources page.
You create application sources through the Add External Applications feature on the Applications page. You can
specify input parameters as filters so that only relevant applications are imported from the associated plug-in repository or
project into Continuous Delivery Director.
Create Application Sources
You have been granted the Can manage applications permission.
When you import application models from a remote endpoint such as an Automic
®
Continuous Delivery Automation
endpoint, the application environments are also imported. You cannot manage imported application and environment
models in Continuous Delivery Director. Only applications that are assigned to the login credentials that you specified
when the endpoint is created are imported. When you import applications and environments, any environments across
applications that have the same name are converted to a single, shared environment in Continuous Delivery Director.
NOTE
You can add local environments to application sources. This capability is useful if you add an application source
that does not include environments.
When you configure an application source, you also configure input parameters to filter the applications to be imported
into Continuous Delivery Director. This capability is particularly important if you are setting up an application source in
which a large number of applications are stored.
1. Do one of the following:
•
From the Administration menu, click Applications, then Add External Applications.
•
From the Administration menu, click Application Sources.
2. Click Add Application Source.
3. Enter a name.
4. Select a plug-in and an endpoint from the list.
Currently, the following Continuous Delivery Director plug-ins support this capability:
•
Automic Continuous Delivery Automation
•
AWS Elastic Beanstalk
•
Nolio Release Automation
•
GitLab
If no endpoints are listed, from the Administration menu, select Endpoints to create the required endpoint.
5. Specify the required input parameters.
The input parameters you see in Input Parameters vary according to the selected plug-in.
6. Click Add.
Any applications and environments you import are synchronized with the source and used in your releases and reports. To
view the application source you added, from the Administration menu, click Application Sources.
563

Continuous Delivery Director 8.5
Edit Application Sources
1. From Administration, click Application Sources.
2. Click an application source name.
The Edit Application Source opens.
3. Update the required fields, then click Save.
You can edit the following fields:
•
Name
•
Endpoint
•
Input Parameters
Delete/Sync Application Sources
1. From Administration, click Application Sources.
2. Select one or more application source rows.
3. Click the Actions (three dots menu), then Delete/Sync.
Set Source Control Connection
You can configure the connection to your application source control such as GitHub or Bitbucket.
You have defined a work item source for the application, such as Rally
®
.
You can configure commit sources using Set Source Control Connection for specific applications in the Application
Management page. This configuration lets you work with features such as planned vs. actual and adaptive testing.
When the configuration is set, work items referenced in the commit comments appear in release in the Work Items panel
for the specified application version.
1. From Administration, click Applications.
2.
•
In the Applications list, select one or more application rows.
•
In the Applications list, click an application name.
3. From the Actions menu, click Set Source Control Connection.
The SET SOURCE CONTROL CONNECTION window opens.
4. Provide the following information:
•
Source Control
Specify a task type.
•
Endpoint
•
Owner
•
Repository
•
Regular Expression
(Optional) To locate the work item ID specified in the commit comments, enter a regular expression.
•
Include Path - (Optional) Specify one or more paths to map the packages and/or classes to include in test
coverage.
Syntax: app/src/java/**
•
Exclude Path - (Optional) Specify one or more paths to map the packages and/or classes to exclude from test
coverage.
564

Continuous Delivery Director 8.5
Syntax: app/src/tests/**
Set Application Source Control and Work Items Connections
NOTE
The following video is extracted from the Release Orchestration training course. This course
provides extra information, context, and examples to augment the product documentation.
To access this course, see Broadcom Enterprise Software Academy.
This video shows how to connect your Continuous Delivery Director release with two key information sources:
the source control repository where your application code is maintained, and the Agile management tool that
is tracking work items for your release.
Remove Source Control Connection
You can easily remove a configured connection to your application source control.
1. From Administration, click Applications.
2.
•
In the Applications list, select one or more application rows.
•
In the Applications list, click an application name.
3. From the Actions menu, click Remove Source Control Connection.
Set Work Items Connection
You configure connections to your agile lifecycle management tool, such as Rally or Jira.
•
A source control connection for the application, such as GitHub or Bitbucket is configured.
•
At least one agile lifecycle management plug-in and a corresponding endpoint are configured.
When the configuration is set, work items referenced in the commit comments appear in releases in the Work Items panel
for the specified application version.
1. From Administration, click Applications.
2.
•
In the Applications list, select one or more application rows.
•
In the Applications list, click an application name.
3. From the Actions menu, click Set Work Items Connection.
The SET WORK ITEMS CONNECTION window opens.
4. Provide the following information:
•
Plug-In
Select a plug-in from the dropdown list.
•
Endpoint
(Optional)Select an endpoint from the dropdown list.
Set Application Source Control and Work Items Connections
NOTE
The following video is extracted from the Release Orchestration training course. This course
provides extra information, context, and examples to augment the product documentation.
To access this course, see Broadcom Enterprise Software Academy.
565

Continuous Delivery Director 8.5
This video shows how to connect your Continuous Delivery Director release with two key information sources:
the source control repository where your application code is maintained, and the Agile management tool that
is tracking work items for your release.
Remove Work Items Connection
You can easily remove a configured connection to your work items source.
1. From Administration, click Applications.
2.
•
In the Applications list, select one or more application rows.
•
In the Applications list, click an application name.
3. From the Actions menu, click Remove Work Items Connection.
Manage Application Versions
You can perform application version management activities either on the Application Versions page or on a release
page.
You are assigned the Can manage application version permission.
NOTE
Users without this permission can assign and remove existing application versions, but cannot create and
rename versions.
You can see which applications and which application versions are in use in releases in the Applications column on the
RELEASES page. You can also search for specific application versions.
•
On the Application Versions page, you can create and rename application versions.
•
On a release page, you can create, rename, replace, and remove application versions.
Create Release Application Versions
You can easily create new versions of your existing applications for the associated releases.
You are assigned the Can manage application version permission.
NOTE
Users with this permission can create, rename, replace, and remove an application version from inside the
release. Users without this permission can assign and remove an existing application version, but cannot create
and rename.
1. From the Administration menu, click Application Versions.
2. Click Create Application Version.
3. Enter an application version name.
4. (Optional) Under Copy Settings, enter an existing application version number. This action copies the settings
(work item source, dependencies, and source control connection) from the specified application version to the new
application version.
5. Click Create.
The new application version is listed on the Application Versions page when the base application is selected.
566

Continuous Delivery Director 8.5
Create Release Application Versions
NOTE
The following video is extracted from the Release Orchestration training course. This course
provides extra information, context, and examples to augment the product documentation.
The user interface has been updated with minor change since Continuous Delivery Director
8.0 when this video was created.
To access this course, see Broadcom Enterprise Software Academy.
This video shows how to create application versions for each associated release in Continuous Delivery
Director. Application versions in Continuous Delivery Director typically correspond to the branch name in the
application's code repository.
Rename Application Versions
On the Application Versions page
1. From Administration, click Application Versions.
2. On the Application Versions page, specify an application name.
All existing application versions for the specified application are listed.
NOTE
To rename an application version, in the Application Management page, select an application version row,
click the row actions menu, then Rename.
3. Select an application version row, click the row actions (three-dot) menu, then Rename.
4. Enter the replacement application version name.
On a release page
1. In a release, click the Applications tab.
2. Click the application version name/number.
3. Click Rename:
Replace Application Versions
1. In a release, click the Applications tab.
2. Click the application version name/number.
3. Click Replace.
NOTE
This option lets you replace the existing application version in your release with another application version
or create a new application version.
567

Continuous Delivery Director 8.5
Remove Application Versions
1. In a release, click the Applications tab.
2. Click the application version name/number.
3. Click Remove.
Set the Application Versions in the Release
NOTE
The following video is extracted from the Release Orchestration training course. This course
provides extra information, context, and examples to augment the product documentation.
To access this course, see Broadcom Enterprise Software Academy.
This video shows how to set which application versions to use in your Continuous Delivery Director release.
The version typically corresponds to the branch name in your source control system.
Business Applications
You can consolidate your applications under a business application.
Business applications are customer-facing products or sets of services used by business users to perform a business
function. A business application usually contains multiple applications. You can also associate an application with more
than one business application.
To view existing business applications, navigate to Administration > Business Applications.
A business application meets a particular need, such as facilitating day-to-day resource management, addressing
product lifecycle planning requirements, interconnecting different systems to ease integration pain points, and so on. For
example, Continuous Delivery Director is a business application that includes components that integrate advanced testing
capabilities with release pipelines.
Create Business Applications
Use this procedure to create business applications.
You have been granted the Can manage business application permission.
1. From the Administration menu, click Business Applications.
The BUSINESS APPLICATIONS page opens.
2. Click Add Business Application.
3. Enter the business application name and optionally a description.
4. Configure the following input parameters:
•
Applications
Select available applications from the dropdown list to associate with the business application.
•
Tags
(Optional). Select or create one or more tags to label the business application.
To create a new tag, enter a value (numeric or alphanumeric) into the Tags field and then select Create New.
•
Release DSL File Source
Select a file source to retrieve a DSL to use for automating release creation.
NOTE
To view or edit available file sources, go to Administration > File Sources.
•
DSL File Name and Path
568

Continuous Delivery Director 8.5
Specify the release DSL file name and path in your source control system repository.
5. Click Save.
The newly-created business application appears in the BUSINESS APPLICATIONS page.
To edit an existing business application, in the BUSINESS APPLICATIONS page, click the name of the required business
application. You cannot remove the applications associated with the business applications which are associated with an
active releases (Running or Design). In this case, you must perform one of the following actions:
•
Remove the application version from the assigned release
•
Mark the release as done
•
Delete the release
You cannot remove an application from a business application when it is the only application associated with it. You must
add another application to remove the application or delete the business application.
To delete an existing business application, in the BUSINESS APPLICATIONS page, hover over a table row and click the
trash can icon. Deleting a business application does not affect the associated applications and file sources.
Import and Export Business Applications
You can import and export business applications as DSL files in JSON format.
You have been granted the Can manage business applications permission.
You can import business applications as DSL files either from your local machine or from your source control. Any
application environments that are defined are also imported. You can also export applications as JSON files.
To generate and export applications in JSON format, from the Administration menu, select Business Applications, then
click the Export icon.
1. To import applications as DSL files, from the Administration menu, click Business Applications.
2. In the BUSINESS APPLICATIONS page, click the Import icon.
3. Do one of the following:
•
a. Select Repository.
b. Specify a file source to retrieve application-related JSON files.
NOTE
To create a file source, in RELEASES, click File Sources, then New File Source.
c. Specify a relative file path to a JSON file in your source control repository.
•
a. Select Local Machine.
b. Browse to the required DSL file.
4. Click Import.
Sample business application:
{
"objects": [
{
"name": "app1",
"kind": "Application"
},
{
"applications": [
"app1"
],
569

Continuous Delivery Director 8.5
"fileSource": "John GitHuB",
"dslFilename": "CDD-FileSource/basicRel.json",
"name": "John BA1",
"kind": "BusinessApplication"
}
]
}
Business Application Versions
Coordinate application updates within a parent business application through versioning.
Versioning business applications lets you coordinate the efforts of multiple developers working on child applications. This
methodology helps you avoid conflicts when source files are changed and facilitates integration testing.
To view existing versions for a specific business application, navigate to Administration > Business Application
Versions.
You can increment the version identifiers of business applications manually within Continuous Delivery Director by
creating business application versions.
Alternately, you can automate versioning using third-party source control and continuous integration (CI) tools.
In automated versioning, the version identifiers of applications that are associated with a business application are
incremented independently of each other. So, if one application version is incremented, the other application versions
within an associated business application do not change.
For example, the Web Banking business application version 2.4 contains three applications: Web Banking FrontEnd
1.3, Web Banking BackEnd 1.7, and Web Banking Connector 1.1. A developer works on the Web Banking BackEnd
application. When the developer submits their changes, the Web Banking BackEnd application version increments from
1.7 to 1.8, and the Web Banking business application version increments from 2.4 to 2.5. However, the other application
versions are unchanged.
An application can be associated with more than one business application. So, in automated versioning, if an application
version changes, all associated business application versions change.
Business Application Versioning Workflow
The following sequence is a typical business application versioning workflow using Continuous Delivery Director, a source
control tool, and a CI tool:
1. In the source control tool, before making changes, each developer syncs the application file that they want to update.
This action ensures they are starting with the latest changes and revisions.
2. Each developer checks out (or locks) the application file to prevent other team members from making conflicting
changes.
3. After making changes (and verifying those changes), the developer checks in (or commits) the file to their shared
project repository.
4. The change triggers a build in the CI tool.
5. When the build completes, a build notification is sent to Continuous Delivery Director, triggering one of the following
actions:
–
Create a release that is associated with a new business application version and a new application version.
–
Update an existing release with a new business application version and a new application version.
–
Run tests only on a new business application version and a new application version.
Business application versioning helps to prevent conflicting changes in shared files and if needed facilitates a rocllback to
earlier versions.
570

Continuous Delivery Director 8.5
Create a Business Application Version
Increment the versions of business applications to coordinate development across projects and teams.
You are assigned the Can manage business application versions permission.
NOTE
Users without this permission can assign and remove existing business application versions, but cannot create
and rename versions.
1. From Administration, click Business Application Versions.
2. Click Create Business Application Version.
3. Configure the following parameters:
•
Name
Specify a version identifier for the business application specified on the Business Application Versions page.
•
Existing Business Application Version
From the dropdown list select an existing business application version. This action copies the applications,
application versions, and settings from the specified business application version to the new business application
version. To rename a business application version, click the version name and type the new name.
•
DSL File Name and Path
Specify the file source name and path in the source control repository. Example: DSL/autoCreate/
myRelease.json.
•
Application Versions (Components)
From the dropdown list select the applications you want to associate with the business application version.
4. Next to each selected application name, click Set Version, and specify an application version.
You can also remove or replace the application version.
5. Click Create.
The newly-created business application version is listed on the Business Application Versions page for the specified
application. The business application version is associated with the specified application versions. When the business
application version is added to a release, the associated application versions are also added to the release.
Edit a Business Application Version
You are assigned the Can manage business application versions permission.
NOTE
Users without this permission can assign and remove existing business application versions, but cannot create
and rename versions.
1. From Administration, click Business Application Versions.
2. Click a business application version name.
3. Configure the following parameters:
•
Name
Specify a version identifier for the business application specified on the Business Application Versions page.
•
DSL File Name and Path
Specify the file source name and path in the source control repository. Example: DSL/autoCreate/
myRelease.json.
•
Application Versions (Components)
From the dropdown list select the applications you want to associate with the business application version.
571

Continuous Delivery Director 8.5
4. Next to each selected application name, click Set Version, and specify an application version.
You can also remove or replace the application version.
5. Click Save.
The newly-edited business application version is listed on the Business Application Versions page with the updated
settings.
Create Release Environments
You create release environments to represent the environments in which the applications run.
1. From the Administration menu, click Applications.
2. Click an application name.
The APPLICATION MANAGEMENT page opens.
3. Click Add environment.
4. In the Environments box, enter the environment name.
To see a list of existing environments, enter a percent sign "%".
The environment is created.
NOTE
To add more environments to the application, repeat the preceding steps. An application cannot contain more
than one environment with the same name.
Create Release Environments
NOTE
The following video is extracted from the Release Orchestration training course. This course
provides extra information, context, and examples to augment the product documentation.
To access this course, see Broadcom Enterprise Software Academy.
This video shows how to create environments in Continuous Delivery Director for use in a release.
An Environment corresponds to your different release pipeline phases, such as Production, QA, and
Development.
Replace Environments
You can replace an application environment in a release with another existing environment.
1. From the Administration menu, click Applications.
2. Select an application name.
The APPLICATION MANAGEMENT page opens.
3. Mouse over the environment you want to delete and select the "X" that appears.
4. Select Add environment.
5. In the Environments box, enter the environment name.
To see a list of existing environments, enter a percent sign "%".
6. Click Save.
The new environment is added to the application.
572

Continuous Delivery Director 8.5
Production Environment Protection
You can prevent unauthorized users from changing your production phases and environments, and, worse still, deploying
to production.
You can protect production phases and environments from unauthorized editing and execution by defining production
environments and permissions. Only users who are granted dedicated permissions can manage production environments.
When a production environment is added to a phase, only phase owners and release owners with the Can manage
production permission can edit that phase. A release owner without the Can manage production permission cannot edit
or run the production phase.
You can allow users to manage production phase tasks by granting these task owners the Can manage production task
permission.
Production task owners with this permission can manage production phase tasks and perform actions such as delete,
disable, edit, re-run, skip, and for Manual tasks, change the task status.
Production task owners can remove all tokens but cannot add a production token. However, production task owners can
add non-production tokens.
Production task owners do not have any other production permissions such as editing the production environment or
creating a phase with a production environment.
To allow a user to update an endpoint that is associated with a production environment, grant that user both Can update
endpoint and Can manage production permissions.
To allow a user to delete an endpoint that is associated with a production environment, grant that user both Can delete
endpoint and Can manage production permissions.
To allow a user to create and update production environments using DSL files, grant that user the Can manage
production permission.
Watch Video
Setting Up Production Environments
You can define specified environments as production environments.
Only users who have the Can manage production permission can manage a production environment.
1. From the Administration menu, click Environments.
2. Click the required environment row.
3. In the Edit Environment dialog, select the Mark as Production Environment option.
NOTE
Only users with the Can manage production and Can manage applications permissions can change this
option.
4. (Optional). Select or create one or more Tags to label the environment. To create a new tag, enter a value (numeric or
alphanumeric) into the Tags field and then select Create New.
5. Click Save.
Only users with the Can manage production permission can create or edit phases and endpoints containing this
environment. After a production environment is added to a phase, this phase is considered as a production phase and
only users with the required permissions can manage this phase.
573

Continuous Delivery Director 8.5
Working with Log Files
You can access the Continuous Delivery Director log files to help diagnose problems with product installation and product
functions.
Log Files
Product Log Files
To view the product log files, navigate to where you installed the .cdd directory and open the logs folder. You can view the
following log files:
cdd-server.log
Logs all product activity. Check this log file for installation errors or for errors within the product UI.
cdd-access.log
Logs all attempts to access product resources. Check this log file for a record of successful and failed UI login attempts.
Supplemental Log Files
The following supplemental log files are available in the Apache Tomcat file system:
TOMCAT_HOME\logs\ra_plugin_error
Logs error activity for the CA Release Automation plug-in.
TOMCAT_HOME\Tomcat 8.0\logs\localhost_access_log.<date>
Logs Tomcat activity related to Apache Tomcat access.
catalina.<date> Logs all Tomcat-related issues. Check this file for product installation logs before the home directory
and main Continuous Delivery Director logs are available.
Customize Log Levels
You can change the default logging levels of the cdd-server.log and cdd-access.log files as needed. By default, these files
log at the INFO level and roll over when the files reach 10 MB.
Follow these steps:
1. Open the settings.properties located in the product Home directory.
2. Add the following lines to the file:
# server log properties
cdd.log.cdd-server.maxSize=10MB
cdd.log.cdd-server.minIndex=1
cdd.log.cdd-server.maxIndex=10
cdd.log.cdd-server.level=INFO
# access log properties
cdd.log.cdd-access.maxSize=10MB
cdd.log.cdd-access.minIndex=1
cdd.log.cdd-access.maxIndex=10
574

Continuous Delivery Director 8.5
cdd.log.cdd-access.level=INFO
For more information about each specific value, see Customize Product Settings.
3. Change the default values as needed and save the file.
The following values are the possible log level values:
–
TRACE
–
DEBUG
–
INFO
–
WARN
–
ERROR
Note: All values that are displayed below the selected value are included in the log file.
4. Restart the Apache Tomcat service to apply the changes.
Instructional Video
The following video shows how to change log levels:
Customize Product Settings
During installation, Continuous Delivery Director creates a settings.properties file in the specified Continuous Delivery
Director Home folder. The file contains database connectivity information and other important product settings. Update the
file to customize a wide range of product settings.
You can customize database settings from the product UI, and other product settings in the settings.properties file.
Change Database Properties Settings
After the initial database setup during installation, you can change the database password and other database settings
in the UI. This functionality is useful, for example, to meet security password change requirements. You must have the
System Administrator role to change database settings in the UI.
Note: Database changes take effect only after a server restart.
Follow these steps:
1. Click the Cross-Project Settings menu
( ),
CDDirector Settings, then Database.
The Database Connection Properties window opens.
2. Edit the Database Connection Properties and click Save.
The product settings are changed. The database still has the old settings.
3. Stop the server.
4. Make the same changes in the source database.
5. Start the server.
The changes are saved in the product and in the database.
Change Other Product Settings
Update Configuration Parameters
You can update the information included in the settings.properties file by default. You can also add configuration
parameters to the settings.properties file to override other default settings.
575

Continuous Delivery Director 8.5
Follow these steps:
1. Open the settings.properties file in the Home folder that you specified during installation. (The Windows default is: C:
\.cdd).
2. Update the following prepopulated settings as needed:
cdd.database.host=127.0.0.1
cdd.database.name=cdd
cdd.database.password=CEEC2D1E98D8F3C2
cdd.database.port=3306
cdd.database.user=root
cdd.plugins.automatic_discovery.url.host=berar04-u144404
cdd.plugins.automatic_discovery.url.port=8080
cdd.plugins.automatic_discovery.url.scheme=http
cdd.plugins.automatic_discovery.url.wait_time=55
3. To override the default values of settings that are not included in the file, add parameters.
Note: These parameters are described in the following section, Available Product Settings.
4. Save and close the file.
5. Restart the Apache Tomcat service.The changes take effect.
Available Product Settings
The following list includes the properties that you can change or add to the settings.properties file to customize product
settings. Descriptions are provided where the function is not apparent:
Server Log Properties
Change the following logging properties to update log levels, filesize, and index size:
•
cdd.log.cdd-server.maxSize
Defines the cdd-server.log file maximum size. The file rolls over to a new file when the maximum size is reached and
archives the old file.
Default: 10MB
•
cdd.log.cdd-server.minIndex
Defines the minimum number of log files to retain.
Note: Keep this property set to the default value of 1. Default: 1
•
cdd.log.cdd-server.maxIndex
Defines the maximum number of log files to retain. When the number of archived files exceeds this number, the oldest
archived files are deleted. Default: 10
•
cdd.log.cdd-server.level
Defines the cdd-server.log file log level.
Default: INFO
The following levels are available:
–
TRACE
–
DEBUG
–
INFO
–
WARN
–
ERROR
Note: All levels below the selected level are included in the file.
Access Log Properties
•
cdd.log.cdd-access.maxSize
576

Continuous Delivery Director 8.5
Defines the cdd-access.log file maximum size. The file rolls over to a new file when the maximum size is
reached.Default: 10MB
•
cdd.log.cdd-access.minIndex
Defines the minimum number of log files to retain.
Note: Keep this property set to the default value of 1.
Default: 1
•
cdd.log.cdd-access.maxIndex
Defines the maximum number of log files to retain. When the number of archived files exceeds this number, the oldest
archived files are deleted.
Default:10
•
cdd.log.cdd-access.level
Defines the cdd-access.log file log level:
Default: INFO
–
TRACE
–
DEBUG
–
INFO
–
WARN
–
ERROR
–
OFF
Authentication Properties
•
cdd.authentication.header_based
Default: false
Encoder Types:
For a different authentication type, comment out the current setting and uncomment only one type:
•
cdd.authentication.hash.encoder.type
Default:SHA-256
•
cdd.authentication.hash.encoder.type
Default:SHA-1
•
cdd.authentication.hash.encoder.type
Default:SHA-384
•
cdd.authentication.hash.encoder.type
Default: SHA-512
•
cdd.authentication.superuser.mail
Default: [email protected]
•
cdd.authentication.superuser.password
Default: suser
API Properties
Change these properties to customize the output pagination of API calls.
•
cdd.api.pagination.default_page_size
Specifies the size of the default page that the REST API returns. Default: 10
•
cdd.api.pagination.max_page_size
Default: 100Note: Due to database, network load, and latencies, we recommend that you do not increase
cdd.api.pagination.max_page_size beyond 100 records per page
JMX Properties
To customize JMX settings, change these properties. You can disable the JMX interface, or you can use SSL to expose
the interface over a secured channel.
577

Continuous Delivery Director 8.5
•
cdd.jmx.web.console.port
Default: 7777
•
cdd.jmx.web.console.username
Default: cdd
•
cdd.jmx.web.console.password
Default: 249D847E035EB2434AD9271211D7913C
•
cdd.jmx.web.console.ssl.enabled
Default: false
•
cdd.jmx.web.console.ssl.keystore.path
Default: NOT_IMPLEMENTED
•
cdd.jmx.web.console.ssl.keystore.password
Default: NOT_IMPLEMENTED
•
cdd.jmx.web.console.enabled
Default: true
Server URL Properties
•
cdd.url.schema
Default: http
•
cdd.url.port
Default: 8080
•
cdd.url.virtual_ip
Default: localhost
Plug-in Properties
These properties change the information that is used to register packaged plug-ins that the system detects automatically.
•
cdd.plugins.automatic_discovery.enabled
Default: true
•
cdd.plugins.automatic_discovery.url.schema
When the plug-ins use secure communication, set this property to https. Default: http
•
cdd.plugins.automatic_discovery.url.port
When the plug-ins use secure communication, set this property to the Apache Tomcat SSL port (8443 by default).
Default: 8080
•
cdd.plugins.automatic_discovery.url.host
Default: localhost
•
cdd.plugins.automatic_discovery.url.relative_pathChange this property to add or remove a plug-in manifest from
the list of plug-ins that the system registers automatically. You can update the following property to include more plug-
ins that are automatically discovered at startup. Also update this property to automatically remove discovered plug-ins
from the list.
Default: /cdd-ra-plugin/manifest.json,/cdd-rally-plugin/manifest.json,/cdd-rest-plugin/manifest.json
•
cdd.plugins.automatic_discovery.url.wait_time
Default: 55
Content Item Properties
Change these properties to customize the number of content items you can import into a single instance of the product.
Also change these properties to change the timeout window for the connection to content sources.
•
cdd.content_items.import.limit_number_of_content_items
578

Continuous Delivery Director 8.5
Default: 200
Execution Properties
These properties control and customize how the product executes releases. Update these properties only at the request
of an authorized CA team during troubleshooting and support sessions.
•
cdd.execution.external_task_invoker.thread_pool_size
Default: 10
•
cdd.execution.external_task_invoker.minimum_invoke_interval_in_millis
Default: 2000
•
cdd.execution.external_task_invoker.default_invoke_interval_in_millis
Default: 5000
•
cdd.execution.external_task_invoker.invoke_interval_after_failure_in_millis
Default: 10000
•
cdd.execution.external_task_invoker.maximum_number_of_retries_after_stop_failure
Default: 3
•
cdd.execution.external_task_invoker.maximum_number_of_retries_after_execution_failure
Default: 3
•
cdd.execution.external_task_invoker.failure_status
Default: Failed to execute tasks.
•
cdd.execution.controller.number_of_retries_after_concurrent_modification_failure
Default: 2
•
cdd.execution.controller.retry_interval_in_millis
Default: 200
•
cdd.execution.camunda.default_number_of_retries_after_failure
Default: 10
•
cdd.execution.camunda.job_executor_pool_size
Default: 5
•
cdd.execution.camunda.job_executor_queue_size
Default: 10
•
cdd.execution.camunda.job_lock_time_in_millis
Default: 60000
•
cdd.execution.external_task_invoker.task_recovery_delay_in_millis
Default: 30000
Password complexity properties
•
cdd.authentication.password_policy.password_pattern.disabled
Defualt: false
•
cdd.authentication.password_policy.password_pattern.regular_expression
Default: ((?=.*[0-9])(?=.*[a-z])(?=.*[A-Z])(?=.*[$@$!%*#?&{}()~^+=/]).{8,15})
Notifications properties
•
cdd.notification.enabled
Default: true
579

Continuous Delivery Director 8.5
Example File
The following example shows a settings.properties file with all available properties and their default values:
# Database properties
cdd.database.host = localhost
cdd.database.port = 3306
cdd.database.name = cdd
cdd.database.user = root
cdd.database.password = 123456
cdd.database.create = true
# Logging properties
# server log properties
cdd.log.cdd-server.maxSize=10MB
cdd.log.cdd-server.minIndex=1
cdd.log.cdd-server.maxIndex=10
cdd.log.cdd-server.level=INFO
# access log properties
cdd.log.cdd-access.maxSize=10MB
cdd.log.cdd-access.minIndex=1
cdd.log.cdd-access.maxIndex=10
cdd.log.cdd-access.level=INFO
# Authentication properties
cdd.authentication.header_based = false
# Encoder types - uncomment only one:
cdd.authentication.hash.encoder.type = SHA-256
#cdd.authentication.hash.encoder.type = SHA-1
#cdd.authentication.hash.encoder.type = SHA-384
#cdd.authentication.hash.encoder.type = SHA-512
cdd.authentication.superuser.mail = [email protected]
cdd.authentication.superuser.password = suser
# Api properties
cdd.api.pagination.default_page_size = 10
cdd.api.pagination.max_page_size = 100
# JMX properties
cdd.jmx.web.console.port=7777
cdd.jmx.web.console.username=cdd
cdd.jmx.web.console.password=249D847E035EB2434AD9271211D7913C
cdd.jmx.web.console.ssl.enabled=false
cdd.jmx.web.console.ssl.keystore.path=NOT_IMPLEMENTED
cdd.jmx.web.console.ssl.keystore.password=NOT_IMPLEMENTED
cdd.jmx.web.console.enabled=true
# Server URL properties
cdd.url.schema=http
cdd.url.port=8080
cdd.url.virtual_ip=localhost
# Plugins properties
580

Continuous Delivery Director 8.5
cdd.plugins.automatic_discovery.enabled=true
cdd.plugins.automatic_discovery.url.schema=http
cdd.plugins.automatic_discovery.url.port=8080
cdd.plugins.automatic_discovery.url.host=localhost
# Plugin automatic discovery properties - comma separated urls
cdd.plugins.automatic_discovery.url.relative_path=/cdd-ra-plugin/manifest.json,/cdd-rally-plugin/
manifest.json,/cdd-rest-plugin/manifest.json,/cdd-jira-plugin/manifest.json
cdd.plugins.automatic_discovery.url.wait_time=55
# Content items properties
cdd.content_items.import.limit_number_of_content_items=200
# Execution properties
cdd.execution.external_task_invoker.thread_pool_size = 10
cdd.execution.external_task_invoker.minimum_invoke_interval_in_millis = 2000
cdd.execution.external_task_invoker.default_invoke_interval_in_millis = 5000
cdd.execution.external_task_invoker.invoke_interval_after_failure_in_millis = 10000
cdd.execution.external_task_invoker.maximum_number_of_retries_after_stop_failure = 3
cdd.execution.external_task_invoker.maximum_number_of_retries_after_execution_failure = 3
cdd.execution.external_task_invoker.failure_status = Failed to execute tasks.
cdd.execution.controller.number_of_retries_after_concurrent_modification_failure = 2
cdd.execution.controller.retry_interval_in_millis = 200
cdd.execution.camunda.default_number_of_retries_after_failure = 10
cdd.execution.camunda.job_executor_pool_size = 5
cdd.execution.camunda.job_executor_queue_size=10
cdd.execution.camunda.job_lock_time_in_millis = 60000
cdd.execution.external_task_invoker.task_recovery_delay_in_millis = 30000
# Password complexity properties
cdd.authentication.password_policy.password_pattern.disabled=false
cdd.authentication.password_policy.password_pattern.regular_expression=((?=.*[0-9])(?=.*[a-z])(?=.*[A-Z])(?
=.*[$@$!%*#?&{}()~^+=/]).{8,15})
# Notifications properties
cdd.notification.enabled=true
Load Metrics and Sizing
Use the following metrics as Continuous Delivery Director usage and sizing guidelines.
The Optimum numbers represent metrics not to exceed to experience the best product performance. If you require metrics
beyond the Recommended Maximum, contact product support to review your use case.
NOTE
The Load Metrics and Sizing shown on this page are for a single mid-scale instance of the Continuous Delivery
Director server and database. You can run Continuous Delivery Director in an Active-Active setup that supports
horizontal scalability of the Continuous Delivery Director system.
Concurrent Phases
The number of phases that you can run concurrently
581

Continuous Delivery Director 8.5
Optimum: 25
Recommended Maximum: 100
Tasks per Phase
The number of manual or external tasks that can run in a phase
Optimum: 25
Recommended Maximum: 80
Phases per Release
The number of phases in a release Optimum: 25
Recommended Maximum: 80
Concurrent Releases
The number of releases that you can run concurrently
Optimum: 15
Recommended Maximum: 50
Active Users
The number of users that are logged in to the product
Optimum: 5
Recommended Maximum: 20
Endpoints
The number of endpoints that you can create and use in releases
Optimum: 8
Recommended Maximum: 30
Content Sources
The number of content sources for each application version
Optimum: 1
Recommended Maximum: 5
Content Items
The number of content items for each content source
Optimum: 30
Recommended Maximum: 100
Applications per Release
The number of applications for each release
Optimum: 5
Recommended Maximum: 30
Application Versions
The number of versions for each application
Optimum: N/A
Recommended Maximum: 1
582

Continuous Delivery Director 8.5
Applications
The number of local or external applications that you create or import
Optimum: 100
Recommended Maximum: 500
Environments per Application
The number of local or external environments for each application
Optimum: 5
Recommended Maximum: 20
Configure High Availability
For Continuous Delivery Director to be highly available, a Continuous Delivery Director server must always be operational.
Operational continuity in Continuous Delivery Director is achieved by a multi-server architecture, which consists of servers
configured to run either in Active-Standby or Active-Active mode.
This section describes the configuration activities required to enable high availability in both modes.
Continuous Delivery Director High Availability System Architecture
You determine the architecture for your Continuous Delivery Director instance depending on your specific business needs.
The following is a representation of typical Continuous Delivery Director system architecture:
583

Continuous Delivery Director 8.5
Figure 43: CDD HA System Landscape
Configure Active-Standby Availability
In Active-Standby availability mode, operational continuity in Continuous Delivery Director is achieved by a multi-server
architecture, which consists of servers configured for Active and Standby mode respectively. Standby is a backup
operational mode. When the Active server becomes unavailable because of failure or scheduled downtime, the Standby
server assumes the functions of the Active server. This section describes the configuration activities required to enable
Continuous Delivery Director server instances to run in Active-Standby availability mode.
NOTE
When a Continuous Delivery Director instance becomes unavailable, the load balancer should automatically
route the entire traffic to the other Continuous Delivery Director instance. To facilitate in identifying unavailable
Continuous Delivery Director instances you can configure your load balancer to periodically test the availability
of the Active Continuous Delivery Director server instance.
Follow these steps:
1. Allocate a shared file system for the Continuous Delivery Director home folder. The home folder contains the
configuration files (settings.properties in the conf sub-folder) and the log files (logs sub-folder).
584

Continuous Delivery Director 8.5
The use of a shared file system guarantees that all Continuous Delivery Director server instances use the same
configuration files.
By default, the Continuous Delivery Director home folder is in the {OS-user-home-folder}/.cdd folder on each
Continuous Delivery Director server. You can specify any other location for the home folder using the Continuous
Delivery Director Installer UI.
2. Deploy two identical Continuous Delivery Director server instances on different machines (an Active Continuous
Delivery Director server instance and a Standby Continuous Delivery Director server instance). Both Continuous
Delivery Director server instances must connect to the same database server using the same shared configuration
files.
3. Configure a network load balancer (for example, HA Proxy (http://www.haproxy.org/), F5 (https://f5.com/), or any other
load balancer) in front of the two Continuous Delivery Director server instances.
4. Configure the load balancer to redirect all incoming Continuous Delivery Director client traffic to a specific Continuous
Delivery Director server instance (the Active instance).
5. (Optional) Configure the load balancer to test periodically the availability of the Active
Continuous Delivery Director server instance (HTTP 200 OK response for HTTP GET /cdd/
administration/00000000-0000-0000-0000-000000000000/v1/version ).
You have configured an Active Continuous Delivery Director server instance and a Standby Continuous Delivery Director
server instance:
Figure 44: High Availability Active-Standby Operational Mode
When the Active Continuous Delivery Director server instance is not available, the load balancer redirects all incoming
Continuous Delivery Director client traffic to the Standby Continuous Delivery Director server instance:
585

Continuous Delivery Director 8.5
Figure 45: High Availability Active-Standby Failover Mode
When the Active Continuous Delivery Director server instance availability is restored, the load balancer redirects all
incoming Continuous Delivery Director client traffic back to the Active instance:
586

Continuous Delivery Director 8.5
Figure 46: High Availability Active-Standby Failback Mode
Set Up the Load Balancer
A network load balancer or proxy is required to redirect network traffic to the Active server. This functionality is not a
component of Continuous Delivery Director.
Configure the load balancer for 100 - 0 percent traffic balancing. During normal operation, all client traffic is directed to the
Active server only. However, when the balancer detects a failover, the failed Active server does not receive any traffic.
Configure HA Proxy as the Load Balancer
You can use any load balancer to support Continuous Delivery Director high availability.
The following overview describes an Active-Standby server high availability setup based on HA Proxy.For more
information, see http://www.haproxy.org/.
•
The HA Proxy configuration specifies which of the two Continuous Delivery Director servers is the Active and which is
the Standby.
•
Configure the HA Proxy to periodically poll the master server with an HTTP availability request.
Example: An HTTP GET /cdd/administration/00000000-0000-0000-0000-000000000000/v1/version
request.
The Active server responds to the request with an HTTP 200 OK response.
•
When the Active server fails to respond to the availability request, the HA proxy automatically redirects incoming client
traffic to the Standby server. (Automatic failover)
•
The HA Proxy continues to periodically poll the Active server with the availability request.
•
When the Active server recovers and responds to the availability request, incoming traffic is directed back to the Active
server. (Automatic fallback)
587

Continuous Delivery Director 8.5
The following example is of an HA Proxy configuration:
/etc/haproxy/haproxy.cfg defaultsmode httpoption http-server-closetimeout client 20stimeout server 20stimeout
connect 4sfrontend front_end_applicationbind {ha-proxy-server-address}:{ha-proxy-server-port} name
appdefault_backend bk_appbackend backup_applicationserver cdd-server1 {cdd-server1-address}:{cdd-server1-
port} checkserver cdd-server2 {cdd-server2-address}:{cdd-server2-port} check backup
For more information about HA Proxy configuration, see: http://www.haproxy.org/download/1.9/doc/intro.txt/
Configure Active-Active Availability
This section describes the configuration activities required to enable Continuous Delivery Director server instances to run
in Active-Active availability mode.
NOTE
When a Continuous Delivery Director instance becomes unavailable, the load balancer should automatically
route the entire traffic to the other Continuous Delivery Director instance. To facilitate in identifying unavailable
Continuous Delivery Director instances you can configure your load balancer to periodically test the availability
of the Active Continuous Delivery Director server instance.
Follow these steps:
1. Allocate a shared file system for the Continuous Delivery Director home folder. The home folder contains the
configuration files (settings.properties in the conf sub-folder) and the log files (logs sub-folder).
The use of a shared file system guarantees that all Continuous Delivery Director server instances use exactly the
same configuration files.
By default, the Continuous Delivery Director home folder is located in the {OS-user-home-folder}/.cdd folder on
each Continuous Delivery Director server. You can specify any other location for the home folder using the Continuous
Delivery Director Installer UI.
2. Deploy two or more identical Continuous Delivery Director server instances on different machines (all Continuous
Delivery Director server instances will be Active). All Continuous Delivery Director server instances must connect to
the same database server using the same shared configuration files. For more information, see Install Continuous
Delivery Director.
3. (Optional) Configure the system load balancer to periodically test the availability of the Active
Continuous Delivery Director server instances (HTTP 200 OK response for HTTP GET /cdd/
administration/00000000-0000-0000-0000-000000000000/v1/version ).
4. Deploy and run a Kafka server instance (version 2.4.1 or higher) as a WebSocket/plug-in proxy/ct agent message
broker for Continuous Delivery Director. You can use the default Kafka port (port 9092) or any other port.
This step allows Continuous Delivery Director to redirect all UI updates (WebSocket events), plug-in proxy and
ct_agent messages, from all Continuous Delivery Director server instances to the client UI.
Without a Kafka broker, any UI changes in a UI client that is connected to one Continuous Delivery Director server
instance would not be redirected to all other UI clients that are connected to other Continuous Delivery Director server
instances.
(Optional) You can also run Kafka as a Docker container.
5. Configure Continuous Delivery Director to use the Kafka server instance as a WebSocket broker.
Add the following lines to settings.properties :
settings.properties
cdd.message_queue.enabled=true
cdd.message_queue.servers={kafka-server-1-address}:{kafka-server-1-port},{kafka-server-2-address}:{kafka-
server-2-port}....
cdd.websocket.broker.type=kafka
6. Configure the system load balancer to periodically test the availability of the Kafka server instance.
You have configured Active-Active availability mode for the Continuous Delivery Director server instances. You have also
enabled WebSocket communication between the server instances and their assigned UI clients.
588

Continuous Delivery Director 8.5
Example
UI client A is connected to server A and UI client B is connected to server B. A release manager uses UI client B to create
a phase and receives a response that the phase was created successfully.
Without an Active-Active configuration, a colleague who uses client A is not notified that a phase has been created by the
release manager. To see the change, the colleague on UI client A must refresh their web page.
After Active-Active availability is configured, the flow is as follows:
Figure 47: High Availability Active-Active Operational Mode
1. The release manager uses UI client B to create a phase. A Create Phase request is sent to Continuous Delivery
Director through the load balancer.
2. The load balancer directs the Create Phase request to Active Server CDD 2.
3. Active Server CDD 2 sends the Create Phase request to the database, and returns a successful Create Phase
response to UI Client CDD 2 (not shown).
4. Active Server CDD 2 sends a Phase Created WebSocket notification to the Kafka WebSocket message broker.
5. The Kafka WebSocket message broker sends Phase Created WebSocket notifications to Active Server CDD 1 and to
Active Server CDD 2.
6. Active Server CDD 1 sends a Phase Created WebSocket notification through the load balancer to UI client A. Active
Server CDD 2 sends a Phase Created WebSocket notification through the load balancers to UI client B. Any user who
accesses the release will see the created Phase, whether they use UI client A or UI client B.
Configure Notifications
To configure the product for email notifications, configure the product SMTP server connection settings. You must have
the System Administrator role to configure SMTP settings.
589

Continuous Delivery Director 8.5
Follow these steps:
1. In the Cross-Project Settings menu
( ),
click CDDirector Settings.
2. Click SMTP.
3. Complete the configuration fields.
4. (Optional) To send a test notification to a different address, provide an email address in the Send test email to field.
If this field is blank, a test email is sent to the address of the logged-in user.
5. (Optional) To test the SMTP server configuration settings and receive a test notification, click Send test email.
A test email is sent and a message indicates that the test was successful. If the test fails, an error message indicates
the details.
6. Click Save.
The connection to the SMTP server is configured.
LDAP Users
Members of imported LDAP groups receive notifications only after one of the following events trigger registration in the
product database:
•
The user logs in to the system
•
The Administrator imports the user individually
Notification Release URL
Release notifications contain a direct link to the relevant release. The URL default value for the link to the release is the
URL that was used to install the product.
The default URL properties are at settings.properties:
cdd.url.schema=http
cdd.url.port=8080
cdd.url.virtual_ip=localhost
Sometimes the default URL might not work. For example, when the product is installed on the localhost and the
notification is opened on a different computer. In these cases, replace the URL as necessary.
Edit Notifications
You use email templates to customize the email notifications that are triggered in response to system events.
Email templates are written in HTML format and include both static text and parameters. You can edit the static text to
customize the appearance of an email notification. You can also add and remove parameters that appear in a given
template. At runtime, the parameters are filled with data about the system event that triggers an email notification.
You can edit email templates to add more information to the email such as contact details or to send notifications in
different languages.
You can also edit the master template to change the header or footer and to apply branding elements.
1. From the Cross-Project Settings menu
( ),
click Email Templates.
A list of email templates associated with various system events opens.
590

Continuous Delivery Director 8.5
2. To edit an email template, select the event name. To edit the master template, select Edit Master Template.
The email opens in HTML format in the Email Template Editor.
3. Copy the HTML code to a third-party editor, such as NotePad, and edit as needed. You can add and remove
parameters. For more information, see Email Templates and Parameters.
4. Select Send Test Email.
The updated email template draft is sent to:
For On-Premise: The Send Test Email To address specified in the SMTP tab in CDDirector Settings.
For SaaS: The email address of the user account used to log in to Continuous Delivery Director.
5. When you are satisfied with your changes, select Save.
When you select either Send Test Email or Save, the code is sanitized to remove security vulnerabilities.
If you decide after you have saved that you do not want to keep your changes, select Revert to Default Text. This
action overwrites the existing text with the system default text.
For example, the Release has a stopped phase email template contains the following default text in HTML
format:
<table>
<tbody>
<tr style="height: 40px;">
<td style="padding-left: 15px"> <span>Hi $RECIPIENT_FIRST_NAME,</span>
<br/> </td>
</tr>
<tr style="min-height: 155pxs; vertical-align: initial;">
<td style="padding-left: 15px; color: black"> <span>Phase <strong>$PHASE_NAME</strong>
was stopped</span>
<br/>
<span>In release <strong>$RELEASE_NAME (version $RELEASE_VERSION)</strong>
</span>
<br/> <span>By: $INITIATOR_USER_FIRST_NAME $INITIATOR_USER_LAST_NAME<br/>On: $DATE</
span> </td>
</tr>
<tr style="min-height: 40px; vertical-align: initial;">
<td style="padding-left: 15px; color: black"> <a href="$ENTITY_URI"
rel="nofollow">Click here to open Continuous Delivery Director</a> </td>
</tr>
</tbody>
</table>
Notification Management and Parameters
The available email templates and parameters are listed in this topic.
Nofitication Management
The following email templates are currently available for email notifications automatically triggered by system events:
591

Continuous Delivery Director 8.5
•
File source failed
•
Phase ended
•
Phase exceeded timeframe
•
Phase failed
•
Phase failed to start - Missing parameters
•
Phase failed to start - missing tokens
•
Phase failed to start - not approved
•
Phase is pending an action
•
Phase is waiting for approval
•
Phase started
•
Phase stopped
•
Release assigned to a track
•
Release failed to start - missing parameters
•
Release failed to start - missing tokens
•
Release failed to start - phase not approved
•
Release has a stopped phase
•
Release is marked as done with a failed phase
•
Release no longer assigned to a track
•
Release started
•
SaaS user invited
•
SMTP test email sent
•
Task failed
•
Task is in pending status
•
Task marked as done
•
Task skipped
•
Task started
•
Task stopped
•
Track created
Notification Management Parameters
The following parameters are available for use in email templates:
Name Description
DATE Time and date that the system event occurred.
ENTITY_URI URI elements of a file source, release, or release track.
FAILED_FILE_SOURCE_REASON Reason for a failure to create a file source.
FAILED_REASON Reason for a failure-related system event.
FILE_SOURCE_NAME Name of a file source.
IMAGES_BASE_URI URI elements of an image, such as a company logo.
INITIATOR_TYPE Type of agent that started the action that triggered a system event.
Possible types: user, system, scheduler, external, release track.
INITIATOR_USER_FIRST_NAME First name of the user that started the action that triggered a
system event.
INITIATOR_USER_ID User ID of the user that started the action that triggered a system
event.
INITIATOR_USER_LAST_NAME Last name of the user that started the action that triggered a
system event.
592

Continuous Delivery Director 8.5
Name Description
NUMBER_FAILED_TASK_IN_PHASE The number of failed tasks in a phase.
PHASE_EXPECTED_END_TIME The time that the phase was expected to end.
PHASE_NAME Name of a phase.
RECIPIENT_EMAIL Email address of an email recipient.
RECIPIENT_FIRST_NAME First name of an email recipient.
RECIPIENT_LAST_NAME Last name of an email recipient.
RELEASE_NAME Name of a release.
RELEASE_VERSION The version number of a release.
SEVERITY Severity level of a system event.
TASK_NAME Name of a task.
TASK_TYPE The type of task. Possible values: manual, automatic.
TENANT_NAME The tenant from which the notification is sent.
NOTE
This parameter is not included in the default email
templates (apart from the SaaS invite). To include
a tenant name in an email template, add the
$TENANT_NAME parameter either to the subject or to
the email body.
TRACK_NAME Name of a release track.
Using Parameters in Notification Management
When you select an email template, the text area shows the parameters that are currently configured for the template.
Each parameter is a variable that holds data related to the system event and places it in the right location in the email. All
parameters must be preceded by a '$' dollar sign.
You can add or remove parameters from an email template. Use parameters that are applicable to the system event.
For more information, see Guide to Parameter Usage in Email Templates.
Disable Email Notifications
To disable email notifications:
1. From the Cross-Project Settings menu
( ),
click Notification Management.
2. Select a system event row, click the row actions (three-dot) menu.
3. Click the Disable toggle button.
Configure Secrets
Secrets are variables that store confidential information such as passwords or API Keys and can be used in the
Endpoints. Using secrets, you can create endpoints without exposing the password value. You can share passwords
across multiple endpoints in the project. The secret value can be defined locally in CDD or, using a plugin, can get values
from the external privilege access management systems.
593

Continuous Delivery Director 8.5
Manage Secrets
You can manage the secrets in the Secrets Management page in the Project Administration menu. You can view all
the secrets of which you are either an Owner or Member. You can delete secrets if you have the 'Can manage secret'
permission and are the owner of the secret. Secret without members or owners can be managed only by administrator
and system admin.
Create/Edit Secrets
To Create a Secret, go to Secrets Management page in the Project Administration menu, then click "Add Secret" button.
Only the users with "Can manage secrets" permissions, can create secrets. You become the secret owner by-default for
every secret you create.
While creating a Secret, add the following information:
•
Name - Name of the secret, Unique for local secrets
Mandatory
•
Description - Description of the secret
Optional
•
Owners - Users or Groups that are allowed to edit and use this secret in an endpoint password field.
Optional
•
Members - Users or Groups that are allowed to use this secret in an endpoint password field.
Optional
•
Local/Plugin - The secret source to use an external secret.
Mandatory
•
Manifest Fields - For Local: value (password field).
Mandatory
NOTE
When using "Local" secret, you can store multi-line confidential information such as SSL certificates as
Secret Passwords.
594

Continuous Delivery Director 8.5
Use Secrets
You can use a secret in a password field of an endpoint (instead of typing the password).
You can select the secrets from the list of secrets that you are assigned as a "member" or as an "owner". The list contains
the secret names and the source (similar to applications).
595

Continuous Delivery Director 8.5
For example:
•
ansible-pass (Local)
•
git-pass (Local)
•
snow-pass (CyberArk)
After selecting the secret, the secret appears in the password field in a clear text. When the plugin service is executed,
CDD gets the secret value and uses it as the password.
Edit Endpoints with Secret
You can edit endpoints with a secret with "Can update endpoints" permissions. You must also be the secret member or
owner.
If you are not an owner or member of the secret and try to edit an endpoint with a secret, you cannot save the changes.
Configure Shared Tokens
As an authorized user, you can create shared tokens (placeholders) that are replaced with values during release
execution. Unlike other Continuous Delivery Director token types, such as built-in tokens and local tokens, these tokens
are available to all Continuous Delivery Director users who have access to the workspace. You can use shared tokens to
automate updates to parameter values used across your organization by multiple users.
You can also use shared tokens in Continuous Delivery Director workflows. For example, your development team uses
a particular VM for testing purposes across many releases. The development manager decides to replace that VM with
another with a different name, IP address and configuration. An authorized user updates the token values that reference
the old VM. The release owners and members do not need to replace parameter values across multiple releases.
There are two types of shared tokens:
•
Shared release tokens
•
Shared environment tokens
Shared Release Tokens
These tokens are placeholders for values in input and output parameters in tasks. At runtime, shared release tokens in
task output parameters are replaced by values (usually).
Shared release tokens can represent agents, artifacts, and resources, such as server URLs, project IDs, artifact
directories.
Create a Shared Release Token
Shared release tokens are indicated by an [SR] prefix in the user interface. These tokens are release-independent and
reusable across your organization.
NOTE
You can only perform this task if you have been granted the required permissions.
Follow these steps:
1. From the Administration menu, select Shared Tokens.
2. Select Add [SR] Shared Release Token.
3. In the Create [SR] Shared Release Token page, specify the token name and, optionally, applications, to assign to the
token and save your changes.
596

Continuous Delivery Director 8.5
Note: If no applications have been assigned to the shared release token, any user can use that token. However, if
applications are assigned to a token, you can only add that token to releases that contain at least one of the assigned
applications.
The new token appears in the shared release token list. To access this list, from the Shared Tokens page, select [SR]
Shared Release Tokens. To edit a token, select the token name in the shared release tokens list.
You can use the listed shared release tokens in releases and in adaptive testing. For more information about using shared
release tokens in tasks, see Design and Create Releases.
Example
You create a shared release token named Server_IP_Address.
When creating a test source, you use this token in the relevant execution parameter.
When designing a release:
In the left panel, you select New Token and add the [SR]Server_IP_Address token.
You add the Server IP Address token to an output parameter in a server provisioning task that appears above a Run Test
task. This action ensures that the server is provisioned before the tests execute.
When the release is executed, you can quickly see in the test results on which server the tests were run.
Shared Environment Tokens
These tokens are placeholders for values that are assigned to specific environments. Shared environment tokens can
represent environment-related entities and resources, such as deployment on behalf of, environment owner, environment
URIs, environment status. You can use shared environment tokens in input parameters in tasks.
Create a Shared Environment Token
Shared environment tokens are indicated by an [SE] prefix. These tokens are environment-independent and reusable
across your organization. Usage of shared environment tokens ensures that application data is pulled from, and pushed
to, the correct environments.
Follow these steps:
1. From the Administration menu, select Shared Tokens.
2. Select Add [SE] Shared Environment Token.
3. In the Create [SR] Shared Environment Token page, specify the token name, optionally, applications, to assign to
the token.
Note: You can only add shared environment tokens to:
–
Releases that contain at least one application that is assigned to the shared token, or
–
Tasks of a phase that is assigned to at least one of the SE token environments
4. Specify one or more environments.
5. Specify one or more environment values and save your changes.
The new token appears in the shared environment token list. To access this list, from the Shared Tokens page,
select [SE] Shared Environment Tokens.
You can use the listed shared environment tokens in releases and in adaptive testing. For more information about using
shared environment tokens in tasks, see Design and Create Releases.
Example
You create a shared environment token that is named Deployment_Username and you add three
environments, QA, Staging, and Production. To each environment, you add a different user, to QA, user A,
to Staging user B, and to Production user C.
597

Continuous Delivery Director 8.5
Next, when creating a test source, you use this token in the relevant execution parameter.
In addition, the [SE]Deployment_Username token is available for use input parameters in tasks. Users can enter a %
percent sign, and can select the [SE]Deployment_Username token from the drop-down list of available tokens.
Configure the Home Folder
1. Set up the cdd installation user.
The installation user for prerequisite software, such as Apache Tomcat, CDD components, and CDD docker images, is
the OS user cdd .
All CDD components and CDD docker images must run as user cdd of group cdd .
The uid of user cdd (on CDD physical machines, CDD Docker engine and inside the docker image/container) must
be: 1010
The gid of group cdd (on CDD physical machines, CDD Docker engine and inside the docker image/container) must
be: 1010
You can use the following snippet for creating user cdd of group cdd (on your OS CLI or inside a DockerFile image/
container):
export CDD_GROUP_NAME=cdd
export CDD_USERNAME=cdd
export CDD_GROUP_ID=1010
export CDD_USER_ID=1010
export CDD_USER_PASSWORD={password}
export CDD_USER_HOME_FOLDER=/home/cdd
getent group $CDD_GROUP_NAME || groupadd -r -g $CDD_GROUP_ID $CDD_GROUP_NAME
id -u $CDD_USERNAME &>/dev/null || useradd -m -u $CDD_USER_ID -r -g $CDD_GROUP_NAME -G docker -p $(openssl
passwd -1 $CDD_USER_PASSWORD) -d $CDD_USER_HOME_FOLDER $CDD_USERNAME
NOTE
-G docker is only applicable when the CDD component is running on a Docker engine (using OS group
docker )
2. Set up the installation home folder. Create the subfolders listed below:
conf
logs
logs/containerized
artifacts
certificates
lib
As a best practice, all CDD machines should share the exact same CDD home folder as a shared filesystem. You can
choose any location you want for the CDD home folder.
3. Before the installation, set the CDD_HOME_FOLDER environment variable to the location (absolute path) of the CDD
home folder.
export CDD_HOME_FOLDER=/home/cdd/.cdd
598

Continuous Delivery Director 8.5
CDD home folder and all of its subfolders must be owned by user cdd of group cdd (uid 1010 and gid 1010).
The default home folder of OS user cdd is: /home/cdd
The default home folder of CDD product is: /home/cdd/.cdd
4. Ensure that all the log files of all CDD components are stored in a single folder - the logs folder under the CDD home
folder (as specified in the CDD_HOME_FOLDER environment variable). By default: /home/cdd/.cdd/logs
5. (Applies to instances running Docker Engine) Ensure that all Docker Engines that are running CDD docker containers
have user cdd of group cdd (uid 1010 and gid 1010 ):
You can use the following snippet for creating user cdd of group cdd (on your DockerFile image/container):
export CDD_GROUP_NAME=cdd
export CDD_USERNAME=cdd
export CDD_GROUP_ID=1010
export CDD_USER_ID=1010
export CDD_USER_PASSWORD={password}
export CDD_USER_HOME_FOLDER=/home/cdd
getent group $CDD_GROUP_NAME || groupadd -r -g $CDD_GROUP_ID $CDD_GROUP_NAME
id -u $CDD_USERNAME &>/dev/null || useradd -m -u $CDD_USER_ID -r -g $CDD_GROUP_NAME -G docker -p $(openssl
passwd -1 $CDD_USER_PASSWORD) -d $CDD_USER_HOME_FOLDER $CDD_USERNAME
6. Perform Docker volume mapping.
All docker containers of CDD must be executed (docker compose or docker run) while mounting the Docker Engine
CDD home folder (/home/cdd/.cdd/ ) to the internal docker container CDD home folder (/home/cdd/.cdd ). That
is: -v /home/cdd/.cdd:/home/cdd/.cdd
7. Ensure that all the log files of all CDD components are stored in a single distributed shared folder - the logs folder
under CDD home folder - accessible to (non-root) user cdd .
Change Home Folder
As an administrator, you can change the location of the home folder either during installation, or post-installation.
During installation, you can accept the default home folder, or change the home folder. This folder holds the product
configuration and log files. The settings.properties configuration file holds the database server connectivity details
and all other product configuration settings.
The default home folder of Continuous Delivery Director is the .cdd folder under the home folder of the user that is
running Continuous Delivery Director.
You can change the default home folder to any directory on which the Apache Tomcat service/user has read/write
privileges. As a best practice, avoid locating the Continuous Delivery Director home folder under the Apache Tomcat
home folder. This precaution allows you to isolate the Continuous Delivery Director home folder from the Tomcat home
folder whenever you upgrade or reinstall Tomcat.
The following paths are for the default home folders:
•
Windows Syntax:{user-home-folder}\.cdd\
NOTE
The path is the home folder of the user that Apache Tomcat runs with.
Example: C:\WINDOWS\system32\config\systemprofile\.cdd\
•
Linux Syntax: {user-home-folder}/.cdd/
599

Continuous Delivery Director 8.5
Example: /home/cdd/.cdd/
Change Home Folder Location
To change the location of the home folder of existing Continuous Delivery Director server instances, you re-run the
Continuous Delivery Director Installer of the server instances.
NOTE
Optionally, you can run more than one Continuous Delivery Director server instance on different machines.
In that case, you must change the home folder location on each of the Continuous Delivery Director server
instances in use.
Follow these steps:
1. Stop all Continuous Delivery Director server instances that share the home folder.
2. Move the home folder of these Continuous Delivery Director server instances to the desired new location.
3. Delete the entire cdd sub-folder under the Tomcat webapps folder of these Continuous Delivery Director server
instances. Verify that the webapps folder still contains the cdd.war file.
4. Start one of the Continuous Delivery Director server instances to initiate the Continuous Delivery Director Installer.
NOTE
Any other server instances must remain stopped. This procedure must be applied sequentially on each
Continuous Delivery Director server instance.
5. Specify the new home folder location and confirm the database settings.
The Continuous Delivery Director server starts running.
6. If applicable, start the other Continuous Delivery Director server instance to initiate the Continuous Delivery Director
Installer. Specify the new home folder location and confirm the database settings.
The additional Continuous Delivery Director server starts running.
Activity Log
You can quickly check the events that have taken place in your workspace and filter these events using specified criteria.
To access the Activity Log, from the Cross-Project Settings menu
( ),
select Activity Log.
You can view workspace activities that have occurred such as integration errors and audit changes to the workspace
settings. To see a pop-up with the activity details, mouse over the Details column. The activities shown can include the
following:
•
Endpoint configuration changes
•
User management changes
•
File source imports
•
Release changes
•
Release track changes
•
Application changes
•
Plug-in proxy connection status changes
•
PLA updates
To view PLA (Portfolio License Agreement) usage, filter the Category column by License.
600

Continuous Delivery Director 8.5
Configure Data Export to Grafana
You can enable the export of your organizational Continuous Delivery Director usage and execution data to Grafana.
You have installed or enabled the following:
•
Grafana open source edition
•
JSON Datasource plug-in. For more information, see JSON Plug-in for Grafana.
•
MongoDB Community Edition
Grafana is an open-source platform for data visualization, monitoring, and analysis. Predefined JSON data sources
enable Continuous Delivery Director API data to appear in customer Grafana dashboards. Customers can correlate
Continuous Delivery Director data with metrics from other tools. This capability allows Grafana to be the sole source of
truth of all release data in your organization.
Figure 48: Continuous Delivery Director - Grafana System Landscape
A data collector defines the metrics for which data is collected from the Continuous Delivery Director database. A data
collection job is run at preconfigured time intervals. The data is sent through a JSON datasource plug-in endpoint to
Grafana. Customers can view data visualizations of Continuous Delivery Director data through their Grafana dashboard
configured for this purpose.
1. From the home folder, open settings.properties (/home/cdd/.cdd/conf/settings.properties).
2. Configure the following properties:
•
cdd.monitoring_platform.enabled=
601

Continuous Delivery Director 8.5
Enter true to enable monitoring and collection of metrics for all tenants.
•
cdd.monitoring_platform.time_period_in_minutes=
Specify a time period in minutes to:
1. Monitor metrics in Continuous Delivery Director for a given time frame, such as checking how many new users
have logged on in a 24-hour period
2. Define the interval of the job trigger, meaning the next time the job will run to collect data for metrics
CAUTION
Overly frequent data collection can negatively impact Continuous Delivery Director system performance.
The default is once every 24 hours (1440 minutes).
•
cdd.monitoring_platform.time_offset_in_minutes=
Specify the difference in minutes from the baseline time to calculate data.
Let us say the cdd.monitoring_platform.time_period_in_minutes is set to 1440 (24 hours). As the
system default, midnight is considered as the baseline, so the job collects data from 00:00 to 00:00 the next day. If
you set the time offset to 20 minutes, the job collects data from 00:20 to 00:20 the next day.
A more complex calculation for this property:
When the job is triggered, Continuous Delivery Director calculates the number of minutes since midnight. If you
decrease the time offset, CDD divides the period time proportionately. The latest time that is reported is the number
of complete period plus the time offset.
cdd.monitoring_platform.enabled=true
cdd.monitoring_platform.time_period_in_minutes=1440 (default)
cdd.monitoring_platform.time_offset_in_minutes=0
3. Save your changes and restart the Continuous Delivery Director server.
Data export to Grafana is enabled.
602

Continuous Delivery Director 8.5
Installation
Continuous Delivery Director includes the following primary components:
CDDirector Server
Includes the main product components including the UI, reporting, and back-end.
Database Server
Stores product data in a database. The database server can be on the same server as the CDDirector server, or can be
on a different server.
Plug-ins
Establish integration with remote components, such as Rally
®
.
To install Continuous Delivery Director, insert .war files into an Apache Tomcat instance. Before the installation, closely
review the System Requirements.
More Information:
•
Installation Best Practices
•
Install Continuous Delivery Director
•
Secure Communications
•
Upgrade Continuous Delivery Director
•
Uninstall Continuous Delivery Director
System Requirements
Continuous Delivery Director has the following minimum system requirements for on-premise configuration.
Hardware Requirements
TIP
We recommend that you install plug-ins on a different server than the CDD Apache Tomcat server.
NOTE
MongoDB is required for the Test Module component.
Minimal Requirements
Component CPUs Cores prt CPU RAM
(in GB)
Disk Space
(in GB)
CDD Apache Tomcat
Server
2 2 32 80
Plug-in Server 4 2 32 80
DB Server 2 2 4 80
MongoDB Server 2 2 4 80
Shared Filesystem n/a n/a n/a 100
603

Continuous Delivery Director 8.5
Mid-Scale Requirements
Component CPUs Cores prt CPU RAM
(in GB)
Disk Space
(in GB)
CDD Apache Tomcat
Server
8 2 64 80
Plug-in Server 8 2 64 80
DB Server 4 4 32 500
MongoDB Server 8 2 32 500
Shared Filesystem n/a n/a n/a 500
Large-Scale Requirements
Component CPUs Cores prt CPU RAM
(in GB)
Disk Space
(in GB)
CDD Apache Tomcat
Server 1
8 4 128 100
CDD Apache Tomcat
Server 2
8 4 128 100
Plug-in Server 8 4 128 100
DB Server 8 8 64 1000
MongoDB Server 8 4 64 1000
Kafka Server 8 4 64 1000
Shared Filesystem n/a n/a n/a 1000
High Availability
ATTENTION
We recommend that the two CDD Apache Tomcat servers listed in the large-scale requirements table operate in
high-availability Active-Active mode.
NOTE
Apache Kafka
®
is a distributed streaming platform that is used by Continuous Delivery Director for inter-server
communication in an Active-Active High Availability setup. Continuous Delivery Director uses Kafka 2.4.1 for
routing WebSocket, Plug-in Proxy (Point of Presence) and CT Agent messages from one CDD server to another
CDD server.
For Kafka Server, use a high-availability setup for Kafka cluster version 2.4.1 or higher with three or more replica
sets.
For more information, see Configure High Availability Mode
Operating System Support
Continuous Delivery Director is certified to run on the following 64-bit Windows and Linux operating systems:
•
Windows Server Windows 2012 R2+
•
Red Hat Enterprise Linux 7.3 and higher
•
CentOS Enterprise OS 7.3 and higher
Continuous Delivery Director installation on additional 64-bit Linux operating systems that support Apache Tomcat 8.5 with
latest stable build, and JRE 8 or JRE 11, is supported, but is not certified or tested.
604

Continuous Delivery Director 8.5
Software Requirements
Continuous Delivery Director requires the following software to be configured on your system:
•
Apache Tomcat 8.x
•
Oracle JRE and OpenJRE/OpenJDK - Java JRE 8.x (64-bit) and Java JRE 11.0 (64-bit)
Database Support
Continuous Delivery Director supports the following databases:
•
Microsoft SQL Server
Continuous Delivery Director supports Microsoft SQL Server versions 2012-2019.
To prepare a Microsoft SQL Server database for use by Continuous Delivery Director, you create a database and
database user.
–
Create a database for Continuous Delivery Director
–
Specify the database setting READ_COMMITTED_SNAPSHOT = true, with rollback
You can also specify the command:
ALTER DATABASE [MyDB] SET READ_COMMITTED_SNAPSHOT ON WITH ROLLBACK IMMEDIATE;
Example:
ALTER DATABASE CDD_DB SET READ_COMMITTED_SNAPSHOT ON WITH ROLLBACK IMMEDIATE;
–
Specify a database user with the db_owner role
•
MySQL 5.6 and later
WARNING
For a MySQL database, the Continuous Delivery Director server requires a MySQL connector to
communicate with the database. The file must reside in the lib directory of your Tomcat installation.
Download the latest MySQL connector here.
ATTENTION
For a MySQL database, the Continuous Delivery Director server currently supports utf8 as an alias for the
utf8mb3 character set. The utf8mb4 character set is currently not supported in this release.
The following MySQL flags are required for Windows and Linux installation using 5.6 and 5.7 only:
STRICT_TRANS_TABLES
NO_AUTO_CREATE_USER
NO_ENGINE_SUBSTITUTION
Use the following command to set the flags:
Set global sql_mode = ‘STRICT_TRANS_TABLES,NO_AUTO_CREATE_USER,NO_ENGINE_SUBSTITUTION’;
NOTE
MySQL 8.x requires the use of the latest MySQL connector. Download the latest MySQL connector here.
WARNING
Do not change these flags after the product is installed. Changing these flags might cause issues with the
product and with future upgrades.
•
Oracle 19c
WARNING
For Installations with an Oracle database, create the Continuous Delivery Director database user before you
start the installation.
605

Continuous Delivery Director 8.5
For more information and the user schema scripts with the relevant grants, see the Oracle section in
Installation Best Practices.
•
MongoDB 4.2
NOTE
For test module-related operations.
Browser Support
Continuous Delivery Director supports the following web browsers:
•
Google Chrome 67 or higher
•
Mozilla Firefox 60 or higher
•
Microsoft Edge 79 or higher based on Chromium
Network Support
Ensure that your network allows browser-to-server web socket communication.
Communication Ports
Ensure that the following ports are open to facilitate the required product communication:
Note: These ports indicate the defaults for Continuous Delivery Director or underlying components, such as Apache
Tomcat. These ports are configurable in the underlying component.
•
8080/8443
Protocol: HTTP/HTTPS
Purpose: Communication to and from CDD Server and plug-in servers
•
3306
Protocol: JDBC
Purpose: Communication to the database server
•
8080/8443
Protocol: HTTP/HTTPS
Purpose: Communication between Continuous Delivery Automation plug-in and Continuous Delivery Automation
management server
•
443
Protocol: HTTPS
Purpose: Default port for communication from the CA Agile Center plug-in to the CA Agile Central server.
Other ports may need to be open depending on your implementation. For example, if you configure secure communication
to the database. Other plug-ins may also have port requirements. For example, if you use the REST API plug-in to
connect to a remote system,or if you implement custom plug-ins.
Installation Best Practices
To ensure the best possible installation experience, review the following best practices before you install the product.
Installation User
The installation user for prerequisite software, such as Apache Tomcat, should be an administrator or root user.
606

Continuous Delivery Director 8.5
Apache Tomcat
•
Consult the Apache Tomcat documentation for detailed installation instructions.
•
On Windows, we recommend installing Apache Tomcat using the apache-tomcat-<version>.exe file instead of using a
zip file. The exe file installation creates a Windows service for Apache Tomcat. This service makes it easier for you to
start and stop product services.
•
On Windows, we recommend that you increase the initial memory pool size (--JvmMs ) to 256 MB and the maximum
memory pool size (--JvmMx ) to 2048 MB.
•
We recommend that you retain the default port numbers unless they cause conflicts. If you change to non-default
ports, make note of the ports for future use.
•
On Windows, to ensure that the product always starts automatically, change the Apache Tomcat 8.0 Windows Service
Startup Type from Manual to Automatic after installation.
•
Configure Apache Tomcat 8 to run web applications.
Database Server
MySQL
•
Consult the MySQL documentation for detailed installation instructions.
•
The database can exist on the local system or on a remote system. For production environments, we recommend a
remote database system.
•
CDD Server installation errors may occur when a combination of the following two MySQL settings is present:
–
explicit_defaults_for_timestamp = 'ON'
–
sql_mode
= 'ONLY_FULL_GROUP_BY,STRICT_TRANS_TABLES,NO_ZERO_IN_DATE,NO_ZERO_DATE,ERROR_FOR_DIVISION_BY_ZERO,NO_AUTO_CREATE_USER,NO_ENGINE_SUBSTITUTION'
A typical installation of MySQL using default settings does not contain this combination. When you encounter errors
or use a custom database server configuration that could use this combination, check the status of each property on
your MySQL server. The sql_mode property has many options, but you are simply looking for the NO_ZERO_DATE
option. Use the following queries to check the status:
SELECT @@GLOBAL.sql_mode;
SELECT @@explicit_defaults_for_timestamp;
If the combination of settings does exist, update either of the properties in the MySQL initialization file, and restart
the MySQL server. Either set explicit_defaults_for_timestamp to OFF, or remove the NO_ZERO_DATE option from
sql_mode.
TIP
The MySQL initialization file is typically called my.ini or my.cnf and could be located in the C:\ or MySQL
installation directory. On Linux, the file could be at /etc/my.cnf. If the file does not exist, create it. The
initialization file is a standard text file. The following example shows how one of the settings appears:
# Setting variables
sql_mode=NO_ENGINE_SUBSTITUTION,STRICT_TRANS_TABLES
explicit_defaults_for_timestamp=OFF
•
Note the following:
607

Continuous Delivery Director 8.5
ATTENTION
For a MySQL database, the Continuous Delivery Director server currently supports utf8 as an alias for the
utf8mb3 character set. The utf8mb4 character set is currently not supported in this release.
•
CDD Server installation errors may occur when time zones are incorrectly set, particularly the daylight savings time
settings. These errors occur because the DB time zone is not synchronized with the OS time zone. To prevent time
zone-related errors:
–
Linux
Follow these steps:
a. From the command line, run:
mysql_tzinfo_to_sql /usr/share/zoneinfo | mysql -u root mysql -p (provide
password when asked)
This command populates the time zone tables
b. In my.cnf , the MySQL initialization file, add the required parameter (default_time_zone) with the required time
zone.
Example: default_time_zone=US/Eastern
c. Restart your MySQL.
–
Windows
Download and build time zone packages on your machine from the following URL: https://dev.mysql.com/
downloads/timezones.html
For more information, see Avoiding Time Zone Errors when Integrating CA Continuous Delivery Director with MySQL
8.x.
Oracle
•
Consult the Oracle documentation for detailed installation instructions.
•
The Oracle database should exist on a different server than the Apache Tomcat server.
•
If you are using Oracle 19c, execute the following two statements on the Oracle 19 database server:
==========================================
alter system set "_optim_peek_user_binds"=FALSE scope=both sid='*';
alter system set "_optimizer_nlj_hj_adaptive_join"=FALSE scope=both sid='*';
==========================================
TIP
We recommend that you create the user name in uppercase, for example, CDD. If you want to use lowercase for
the user name, then wrap the user name in quotes, for example, "cdd".
CDD Server
•
For proof of concept purposes, you can add the CDD Server to an existing Apache Tomcat instance that runs other
applications. In production environments, use a dedicated Apache Tomcat instance.
•
Install the CDD Server on a different server than Automic
®
Continuous Delivery Automation.
•
Do not run Continuous Delivery Director components in the same Apache Tomcat instance as Automic
®
Continuous
Delivery Automation components.
608
Continuous Delivery Director 8.5
Plug-ins
•
Only install the plug-ins that you plan to use with the product. Otherwise, designers can see plug-ins and tasks that do
not apply to them.
•
You can install plug-ins on the CDD Server or on a dedicated plug-in server. Before you decide to distribute, consider
the expected plug-in activity including:
–
The amount, frequency, and potential concurrency of task execution
–
The size, frequency, and potential concurrency of application models and content imports
–
The number of connected endpoints per plug-in
–
Any requirements that are associated with the layout of your network
•
Decide on your plug-in distribution strategy before installing any product components.
•
If you decide to install plug-ins on the same system as the CDD Server, you can install the plug-
ins simultaneously together with the CDD Server.
•
If you add local plug-ins to an installed CDD Server, add the .war file to the TOMCAT_HOME\webapps folder. The .war
file unpacks automatically and does not require an Apache Tomcat restart.
•
Local plug-in installations register automatically. Manually register remote plug-ins after installation.
•
Use only a single instance of each required plug-in. You can connect to multiple endpoints from a single plug-in.
Install Continuous Delivery Director
Continuous Delivery Director is packaged as a self-installed WAR (cdd.war) file that you add to a configured Apache
Tomcat instance.
Continuous Delivery Director packaged plug-ins are also WAR files that you add to the same Apache Tomcat instance
or to a remote Apache Tomcat instance. To auto-register these plug-ins, include the plug-ins with the cdd.war file. After
Continuous Delivery Director starts to run, the plug-ins are auto-registered and appear in the Plug-ins page.
Before you Install
•
Review the Installation Best Practices
•
Ensure that the CDDirector server and plug-in servers meet all System Requirements.
•
Ensure that JRE 1.8 exists on the system before you install Apache Tomcat.
•
Ensure that the installation user has read access permission to the Apache Tomcat installation folder where you want
to install the product.
For Installations with a Microsoft SQL Server Database
Note: Continuous Delivery Director supports Microsoft SQL Server versions 2012, 2014, and 2016.
To prepare a Microsoft SQL Server database for use by Continuous Delivery Director, you create a database and
database user.
•
Create a database for Continuous Delivery Director
•
Specify the database setting READ_COMMITTED_SNAPSHOT = true, with rollback
You can also specify the command:
ALTER DATABASE [MyDB] SET READ_COMMITTED_SNAPSHOT ON WITH ROLLBACK IMMEDIATE;
Example:
ALTER DATABASE CDD_DB SET READ_COMMITTED_SNAPSHOT ON WITH ROLLBACK IMMEDIATE;
•
Specify a database user with the db_owner role
For Installations with a MySQL Database
•
The MySQL JDBC driver download comes with many files. Copy the following files to the TOMCAT_HOME\lib folder:
609

Continuous Delivery Director 8.5
Windows - mysql-connector-java-5.1.n.bin.jar
Linux - mysql-connector-java-5.1.n.jar
For Installations with an Oracle Database
•
Ensure that the Oracle database exists on a different server than the Apache Tomcat server.
•
Create the Continuous Delivery Director database user before you start the installation.
•
Assign to the database user a sufficient quota of storage space in a pre-defined tablespace
•
Assign to the user the following minimum set of grants:
–
CONNECT
–
CREATE TABLE
–
CREATE SEQUENCE
–
CREATE TRIGGER
–
CREATE PROCEDURE
NOTE
If you are using an Oracle 12c container database (multi-tenant architecture), create the database user as a
LOCAL user in a dedicated pluggable database (PDB) and not as a common user in the root container. For
more information, see the Oracle Database documentation.
The following formulations are examples of SQL statements for creating an Oracle database user and assigning the
minimum set of permissions. For more information, see the Oracle Database documentation.
USER
CREATE USER <USERNAME> IDENTIFIED BY <PASSWORD> DEFAULT TABLESPACE <TABLESPACENAME>
TEMPORARY TABLESPACE <TEMPTABLESPACENAME>;
QUOTA
Defines the quota for the user
ALTER USER <USERNAME> QUOTA UNLIMITED ON <TABLESPACENAME>;
GRANTS
Defines the grants for the user
•
GRANT CONNECT TO <USERNAME>;
•
GRANT CREATE TABLE TO <USERNAME>;
•
GRANT CREATE SEQUENCE TO <USERNAME>;
•
GRANT CREATE TRIGGER TO <USERNAME>;
•
GRANT CREATE PROCEDURE TO <USERNAME>;
Installation
Follow these steps:
1. Download the cdd.war file and plug-in .war files.
2. Stop the Apache Tomcat service on the system where you want to install the product.
Depending on your implementation, shut down the Windows service for Apache Tomcat, or navigate to the
<TOMCAT_HOME> directory from a command prompt and use the shutdown command.
Example:
C:\Program Files\Apache Software Foundation\Tomcat8.0\bin>shutdown
3. Copy the cdd.war file and any plugin.war files that you want to install locally (such as cdd-ra-plugin.war) to the
webapps folder of the Apache Tomcat installation directory.
610

Continuous Delivery Director 8.5
You can also install plug-ins on separate servers. See Step 11.
4. Start the Apache Tomcat service.
Depending on your implementation, start the Windows service for Apache Tomcat in the <tomcat home> directory or
use the startup command, for example:
C:\Program Files\Apache Software Foundation\Tomcat8.0\bin>startup
Wait a few minutes for Apache Tomcat to initialize the application fully.
5. Enter the following URL in a Web browser:
http://<tomcat-host>:<tomcat-port>/cdd
Note: The default Apache Tomcat port is 8080.
A configuration page opens the first time that you enter this URL.
The following screen capture shows the product Web Installer welcome message:
6. Accept the default Home folder, or change the Home folder to contain product information, and click Set.
This folder holds the product configuration and log files. The configuration file holds the database server connectivity
details that you enter in the next step. The following paths are for the default Home folders:
–
Windows: .cdd
Note: The path is the folder of the user that Apache Tomcat runs with.
Example: C:\Users\Administrator\.cdd
–
Linux: root/.cdd
You can change the default to any directory on which the Apache Tomcat service has read/write privileges.
After you click Set, the database information page opens.
The following screen capture shows the product Web Installer database information page:
MySQL
611

Continuous Delivery Director 8.5
Oracle
612
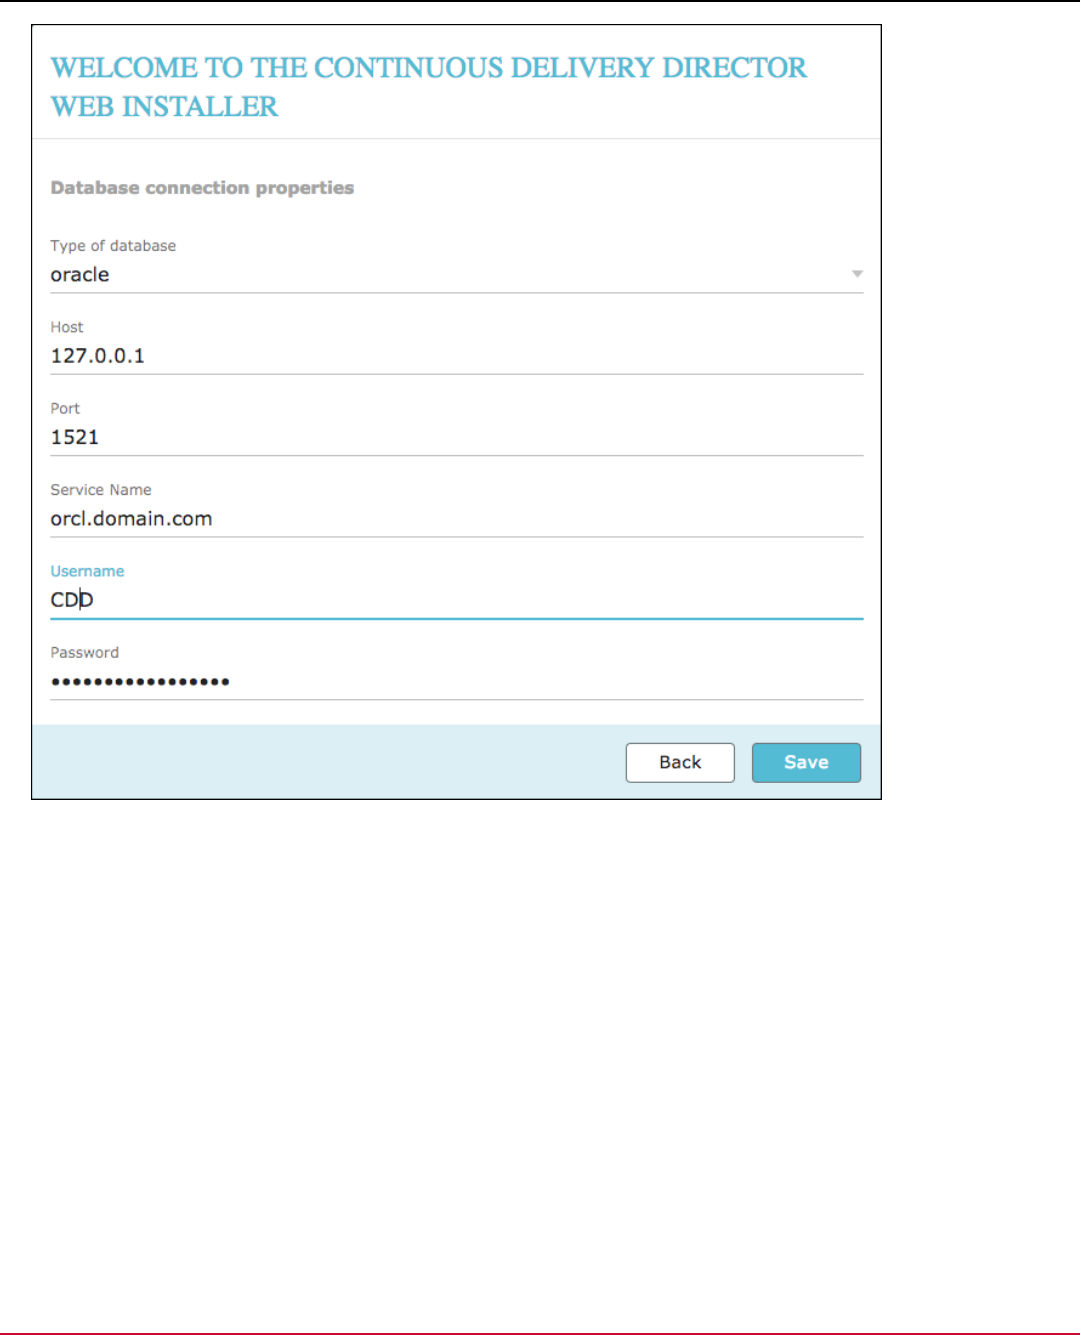
Continuous Delivery Director 8.5
7. Select your database server type, enter the necessary information for your MySQL or Oracle server, and click Save.
Important: For Oracle Installation, the specified user name must be in the same case as was specified when you
created the database user. For more information, see Oracle Database documentation. As a best practice, we
recommend that the user name be in uppercase.
Note: If you are using Oracle 12c container database (multi-tenant architecture), ensure that the service name refers
to the same pluggable database (PDB) in which the local database user was created.
The Apache Tomcat server restarts and loads Continuous Delivery Director with a valid connection to the specific
database.
NOTE
If the automatic restart does not work, manually restart the Apache Tomcat service.
NOTE
If you are unable to access the UI, try the following steps:
613

Continuous Delivery Director 8.5
•
Watch the installer for errors that are related to the existence of the MySQL JDBC driver and the
database connection.
•
Verify that the Apache Tomcat service is running.
•
Verify that MySQL or Oracle and Java are running.
•
Verify that the MySQL driver resides in the lib directory of your Apache Tomcat installation, as described
in System Requirements.
•
Verify that you entered the correct connection details for the MySQL or Oracle server.
•
Access the Apache Tomcat UI (http:/<tomcat-host>:8080), access the Manager app, and attempt to start
the cdd application manually.
•
Check the catalina.<date>.log file in the logs folder of the Apache Tomcat directory for installation errors.
For more information, see Working with Log Files.
•
If the logs indicate a database creation error and you have verified that MySQL connection settings and
driver placement are correct, MySQL property changes could be required. For more information, see
Installation Best Practices.
•
After you fix the problem, restart the Apache Tomcat service to redeploy Continuous Delivery Director and
try again.
•
Check the cdd-server.log for errors in the logs folder under the home folder set during installation, for
example, C:\Users\Administrator\.cdd71\logs
The services connection page opens:
8. Clear all checkboxes and click Save.
NOTE
You clear these checkboxes because the Test Module component files are not installed yet. If you select one
or more of these options at this stage of the installation, you will generate an error.
.
614
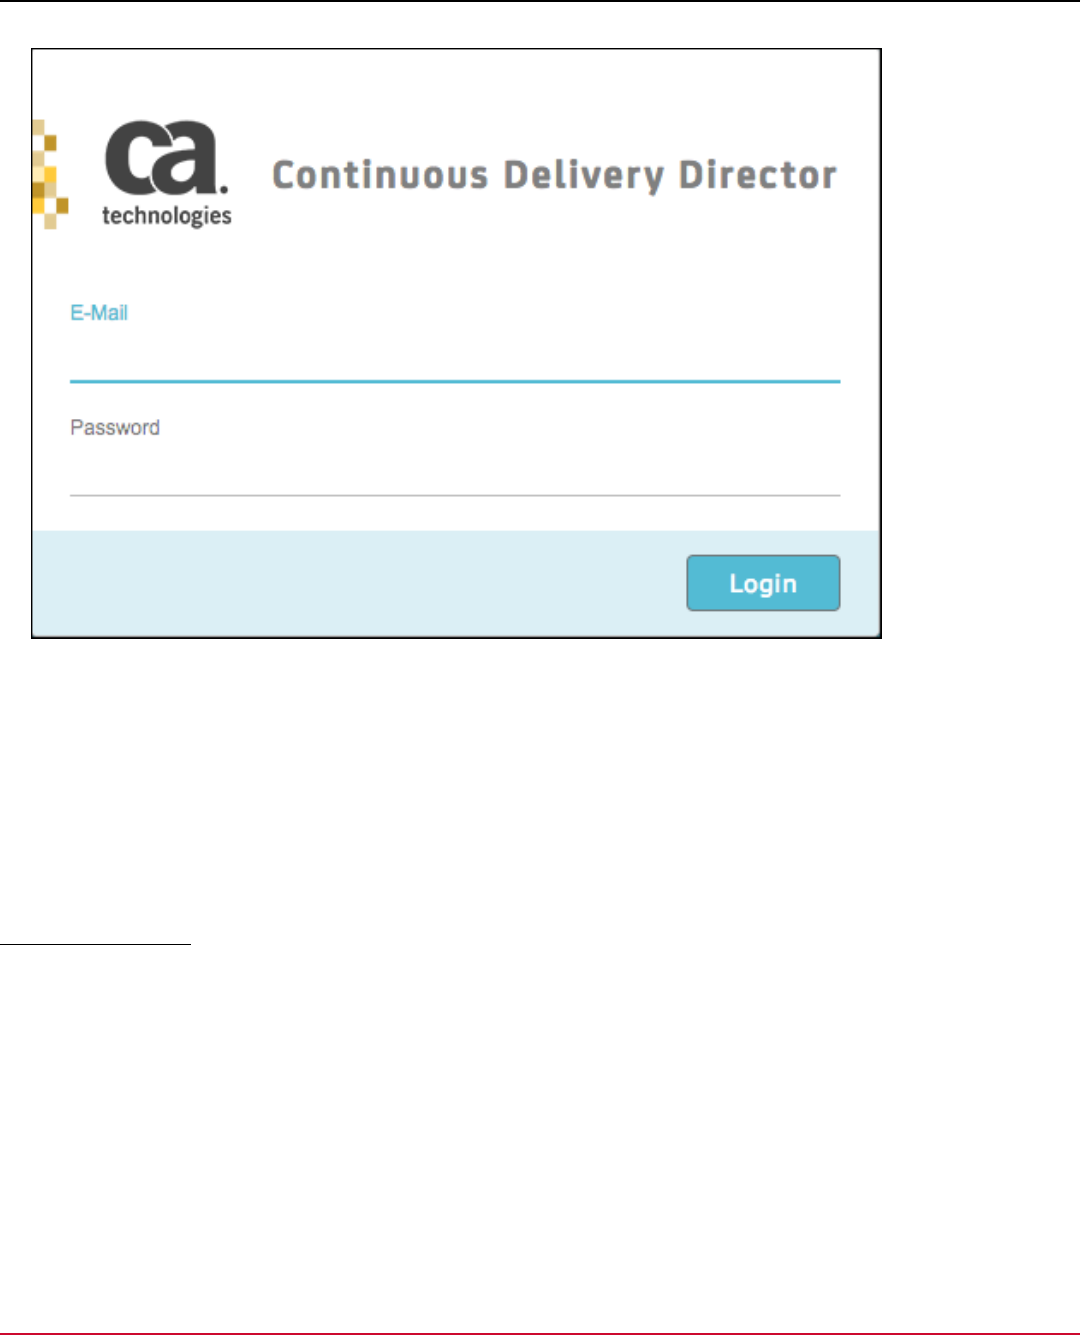
Continuous Delivery Director 8.5
The UI login page opens.
9. Use the following credentials to log in:
Email: [email protected]
Password: suser
The Releases page appears. This page indicates a successful product installation.
10. (Optional) To load your license key, click the question mark icon and select License. Enter your company name, copy
the license key that you received when you downloaded the product into the License dialog fields, and click Register.
You can apply a license later, or can proceed with the pre-loaded Trial license and can execute only one release at a
time.
11. (Optional) Repeat Steps 1 through 4 on a separate server for the plug-in files that you want to install on a remote plug-
in server.
Instructional Videos
Note: The following videos describe how to install the product with a MySQL database. Tutorial videos that cover new
enhancements and features, including installation with an Oracle database, will be available soon.
The following video shows how to install Continuous Delivery Director on a single server:
The following video shows how to perform a distributed installation of Continuous Delivery Director:
Secure Communications
Secure Continuous Delivery Director communications by configuring SSL communication between all components.
615

Continuous Delivery Director 8.5
Verify Prerequisites
Verify the following prerequisites before you secure your installation:
•
Install the same version of Java JDK that is installed with Continuous Delivery Director on a system from which you
generate certificates.
•
Set your PATH environment variable to the JDK installation bin directory on the systems from which you generate the
certificates.
•
To use certificates that are signed by a third party, access is required to a Certificate Authority to sign the certificate.
You can also use self-signed certificates.
•
We recommend that you have experience creating and working with certificates. This experience is useful if you
deviate from the example certificate creation scenario.
Prepare Certificates and Keystores
To secure Continuous Delivery Director, you generate a certificate and a keystore. If you installed plug-ins on a remote
server, the remote server also requires a certificate and keystore.
The following procedures include examples of how to use the keytool to create self-signed certificates and keystores on
the appropriate systems. These examples show one of the possible certificate creation scenarios.
You can use self-signed or certificates signed by a Certificate Authority.
Carefully consider the following items before you proceed:
•
If your certificate and keystore are already prepared, you can skip the steps to create these entities.
•
You can generate certificates and stores on external systems. You do not have to be on the system where
the Continuous Delivery Director components are installed.
•
All certificate, keystore, and alias names in this process are examples that you can change.
•
The first and last name in the keystore should be the host name of the server.
Follow these steps:
1. Open a command prompt on the Continuous Delivery Director Server or on the system from which you generate
certificates.
2. Run the following commands to create the required certificate and keystore for the Continuous Delivery
Director Server:
keytool -genkeypair -keyalg RSA -keysize 2048 -keystore conf/cdd.jks -alias cdd
keytool -exportcert -alias cdd -file cdd.crt -keystore conf/cdd.jks -v
These commands create a custom certificate and keystore for the Continuous Delivery Director Server. These
commands also add the certificate to the custom keystore, and exports the certificate to a file.
3. Copy the cdd.crt and cdd.jks file to the Continuous Delivery Director Server if you generated them on a remote server.
You can put the keystore anywhere on the Continuous Delivery Director Server.
4. (Self-signed certificate only) Import the generated self-signed certificate into the cacerts keystore on the Continuous
Delivery Director Server as follows:
a. Copy the cdd.crt file to JRE_HOME\lib\security.
b. Open a command prompt and navigate to JRE_HOME\lib\security.
c. Run the following command:
keytool -keystore cacerts -importcert -alias cdd -file cdd.cer
5. (Optional) Repeat Steps 1-4 for all remote plug-in servers.
The certificate and keystore are prepared.
616

Continuous Delivery Director 8.5
Configure a Self-signed SSL Certificate for a Remote SMTP Server
This section is relevant if you encounter the following error while trying to set up a connection to a remote SMTP server
that is using a self-signed certificate:
PKIX path building failed: unable to find valid certification path to requested target
Other messages you may encounter:
javax.mail.MessagingException: Could not convert socket to TLS
Caused by: javax.net.ssl.SSLHandshakeException: sun.security.validator.ValidatorException: PKIX path building
failed: sun.security.provider.certpath.SunCertPathBuilderException: unable to find valid certification path
to requested target
Caused by: sun.security.validator.ValidatorException: PKIX path building failed:
sun.security.provider.certpath.SunCertPathBuilderException: unable to find valid certification path to
requested target
Caused by: sun.security.provider.certpath.SunCertPathBuilderException: unable to find valid certification path
to requested target
Follow these steps:
1. Open a command prompt on the CDD server.
2. Check if the certificate of the remote SMTP server is already in the truststore by running the following JAVA keytool
command:
Windows
keytool -list -keystore "%JAVA_HOME%/jre/lib/security/cacerts"
Linux
keytool -list -keystore "$JAVA_HOME/jre/lib/security/cacerts"
3. If your certificate is missing, add the certificate to the truststore with the following command:
keytool -import -noprompt -trustcacerts -alias <AliasName> -file <certificate> -keystore <KeystoreFile> -
storepass <Password>
4. After import, run the keytool -list command again to check if your certificate was added.
Enable SSL Communication
Follow these steps:
1. Open the TOMCAT_HOME\conf\server.xml file on the Continuous Delivery Director Server.
2. Note: Optional but recommended.
Comment out the Connector port 8080 section of the file to prevent HTTP communication as follows:
<!-- <Connector port="8080" protocol="HTTP/1.1"
connectionTimeout="20000"
redirectPort="8443" /> -->
3. Replace the Connector port 8443 section of the file:
<Connector port=”8443”>
<!--
<Connector port="8443" protocol="org.apache.coyote.http11.Http11AprProtocol" maxThreads="150"
SSLEnabled="true" > <UpgradeProtocol className="org.apache.coyote.http2.Http2Protocol" />
<SSLHostConfig> <Certificate certificateKeyFile="conf/localhost-rsa-key.pem" certificateFile="conf/
localhost-rsa-cert.pem" certificateChainFile="conf/localhost-rsa-chain.pem" type="RSA" /> </
SSLHostConfig> </Connector> -->
With:
617

Continuous Delivery Director 8.5
<Connector port="8443" protocol="org.apache.coyote.http11.Http11NioProtocol" SSLEnabled="true"
scheme="https" secure="true" sslEnabledProtocols="TLSv1.2,TLSv1.1,TLSv1" keyAlias="<alias>"
keystoreFile="conf/<keystorefilename>" keystorePass="<password>" compression="on"
compressionMinSize="102400" compressableMimeType="application/x-java-serialized-object"
clientAuth="false" maxThreads="150" maxSwallowSize="-1" connectionTimeout="20000" />
And update the bolded properties with values valid for your organization.
Example:
<Connector port="8443" protocol="org.apache.coyote.http11.Http11NioProtocol" SSLEnabled="true"
scheme="https" secure="true" sslEnabledProtocols="TLSv1.2,TLSv1.1,TLSv1" keyAlias="cacdd"
keystoreFile="conf/conf/cdd.jks" keystorePass="b1l1ab1l1a" compression="on"
compressionMinSize="102400" compressableMimeType="application/x-java-serialized-object"
clientAuth="false" maxThreads="150" maxSwallowSize="-1" connectionTimeout="20000" />
Important! Make sure that the Connector port 8443 section of the file is not commented out.
4. Restart the Apache Tomcat service on the Continuous Delivery Director Server.
5. Repeat Steps 1-4 as necessary on all remote plug-in servers.
6. Access the Plug-ins page in the UI.
7. Update the manifest URL for each plug-in the secured URL, which includes the HTTPS port.
8. (Optional) To install plug-ins, update the protocol for the automatic discovery and registration of new plug-ins.
Security Recommendations
We recommend that you take the following extra steps to ensure the security of your Apache Tomcat instance:
•
Several standards recommend or require usage of TLS v1.2. Configure the server.xml file to require clients to use TLS
version 1.2 using AEAD capable ciphers (Authenticated Encryption with Associated Data).
•
Disable TLS/SSL support for the following cipher suites:
–
Static key cipher suites. These ciphers have been blacklisted from the new HTTP/2 specification.
–
DES and IDEA cipher suites. These suites are no longer recommended for general TLS usage and have been
removed from TLS 1.2.
–
Disable TLS/SSL support for CBC cipher suites. All CBC ciphers are blacklisted in the new HTTP/2 specification.
Configure the server to favor GCM over CBC regardless of the cipher size.
The following recommended cipher configuration provides a higher level of security:
ECDHE-RSA-AES128-GCM-SHA256:ECDHE-ECDSA-AES128-GCM-SHA256:ECDHE-RSA-AES256-GCM-SHA384:ECDHE-ECDSA-AES256-
GCM-SHA384:DHE-RSA-AES128-GCM-SHA256:DHE-DSS-AES128-GCM-SHA256:kEDH+AESGCM:ECDHE-RSA-AES128-SHA256:ECDHE-
ECDSA-AES128-SHA256:ECDHE-RSA-AES128-SHA:ECDHE-ECDSA-AES128-SHA:ECDHE-RSA-AES256-SHA384:ECDHE-ECDSA-AES256-
SHA384:ECDHE-RSA-AES256-SHA:ECDHE-ECDSA-AES256-SHA:DHE-RSA-AES128-SHA256:DHE-RSA-AES128-SHA:DHE-DSS-AES128-
SHA256:DHE-RSA-AES256-SHA256:DHE-DSS-AES256-SHA:DHE-RSA-AES256-SHA:!aNULL:!eNULL:!EXPORT:!DES:!RC4:!3DES:!
MD5:!PSK
•
Secure the Diffie-Hellman group for the TLS server as follows:
–
Use a Diffie-Hellman group with a prime modulus of 2048 bits in length. For more information about configuring the
TLS server to use a stronger Diffie-Hellman group, see the TLS documentation for deploying Diffie-Hellman.
–
Configure the server to use a Diffie-Hellman group with randomly generated parameters. You can use OpenSSL to
generate a new group and directly specify your parameters file as follows:
openssl dhparam -out dhparams.pem 2048
SSLOpenSSLConfCmd DHParameters "{path to dhparams.pem}"
Upgrade Continuous Delivery Director
To deploy the latest features and enhancements, upgrade to the latest version of Continuous Delivery Director. Upgrade is
a seamless process that only requires replacing the product files where they were previously installed.
618

Continuous Delivery Director 8.5
This release supports upgrades from the prior two versions. In many cases, a direct upgrade may also succeed from the
previous versions as well.
Upgrade CDD
The upgrade process does not require end-user intervention.
Continuous Delivery Director introduced application-based access management. To ensure backwards compatibility, the
Continuous Delivery Director upgrade process includes a placeholder application, CDD Upgrade App, and a placeholder
environment, CDD Upgrade Env.
During the upgrade, CDD reads the configuration files to connect to the database and upgrade the required database
settings. CDD also makes all the required updates to the application.
NOTE
Do not delete any configuration files of the previous version (especially do not delete the settings.properties
file that is located under /home/cdd/.cdd/conf folder). CDD uses these settings to connect to the configured
databases.
NOTE
After upgrade, all endpoints, releases, and applications, are accessible for all users and groups. To restrict
access, edit the application and environment assignments in endpoints, releases, and so on.
Follow these steps:
1. Stop the Apache Tomcat service.
2. Take a backup of the CDD database and the Mongo DB (if installed).
3. Delete the CDD folders (cdd, cds, cta, tar) and the CDD plugins folders (example: cdd-jira-plugin) from <TOMCAT-
HOME>/webapps folder.
4. Delete the relevant war files from the same location (example: cdd.war, cds.war, cdd-jira-plugin.war).
5. Copy and paste the latest cdd and plug-in WAR files into the TOMCAT_HOME/webapps folder.
6. Start the Apache Tomcat service.
The upgrade uses the settings.properties details from the previous installation, and you are redirected to the login
page.
7. (Optional) If the plugins are installed on a different server than the CDD application, perform these steps on the plugin
servers.
WARNING
When upgrading from one version to another, always clear your browser cache before starting your new
instance of Continuous Delivery Director for the first time.
Uninstall Continuous Delivery Director
To uninstall Continuous Delivery Director, remove the application from Apache Tomcat and remove the database from
MySQL.
Follow these steps:
1. Stop the Apache Tomcat service on the Continuous Delivery Director server.
Note: Depending on your implementation, shut down the Windows service for Apache Tomcat, or use the shutdown
command.
2. Drop the cdd database schema in the MySQL, MS-SQL, or Oracle database.
3. Delete the existing cdd folder and plug-in folders in the webapps folder of the Apache Tomcat installation directory.
Note: The naming convention for plugin folders is: cdd-<name of plug-in>-plugin
Example: TOMCAT_HOME/webapps/cdd-blazemeter-plugin/
619

Continuous Delivery Director 8.5
4. Delete the cdd.war and plug-in .war files in the webapps folder of the Apache Tomcat installation directory.
Example: TOMCAT_HOME/webapps/cdd-blazemeter-plugin.war
5. Delete the .cdd folder from where you installed it. For Windows users, the default location is C:\.cdd .
Note: The .cdd folder is often created under the user home directory.
Example: /home/cdd/.cdd or /root..cdd
6. Delete the .cdd folder from C:\Windows\System32\config\systemprofile\.cdd .
Note: If you cannot find the .cdd folder at C:\Windows\System32\config\systemprofile\.cdd , look instead
in C:\Windows\SysWOW64\config\systemprofile\.cdd.
7. To delete plug-in folders and .war files, repeat Steps 3 and 4 on remote plug-in servers.
The product is uninstalled.
TIP
To perform a reinstallation, first completely uninstall the product as described, and clear your browser cache
from where you used the UI. Then repeat the instructions in Install Continuous Delivery Director.
620

Continuous Delivery Director 8.5
Reference
This section contains product reference information.
•
REST API Reference
•
Troubleshooting
•
Product Names and Abbreviations
•
Product Accessibility Features
•
Terms of Service and Privacy
REST API Reference
REST APIs let external systems configure, execute, and monitor release operations and applications without the need to
access the UI.
REST APIs provide the GET, PUT, PATCH, DELETE, and POST methods that are required to retrieve data and execute
releases.
Continuous Delivery Director uses Swagger to document the REST APIs. To access the documentation directly
from your Continuous Delivery Director deployment, in the menu bar, click the initials of your user account
,
then select REST API. The REST API documentation is also available at the following URL:
https://<host>:<port>/cdd/apis
The base URL for the available REST API services is:
https://<host>:<port>/cdd/<category>/<tenant ID>/<version>/
•
<host>
Specifies the server where the REST API service is located. The hostname is always the same as the server where
you installed the product.
•
<port>
Specifies the port number where the REST API service is located. This number is always the same as the port number
you use to access the product UI, which is 8080 by default.
•
<category>
Specifies the REST API category type. The category can be one of the following: design, execution, administration, or
reporting.
•
<tenant ID>
Specifies the ID of the tenant (workspace) as shown in User Settings.
•
<version>
The Continuous Delivery Director build version.
Continuous Delivery Director REST calls support the following REST API methods:
•
POST (Create)
Creates a resource. The web service can respond with data or status indicating success or failure.
•
GET (Read)
Performs a query on a resource and retrieves data. The data that is returned from the web service is a representation
of the requested resource.
•
PUT (Update)
621

Continuous Delivery Director 8.5
Updates an existing resource.
•
PATCH (Change)
Changes a piece of an existing resource.
•
DELETE (Delete)
Removes an existing resource.
The Continuous Delivery Director REST APIs are divided into the following category types:
•
design
Retrieves, updates, and deletes release design data. To view an example, see Example REST Call: Get All Releases.
•
execution
Retrieves and changes release execution data.
•
administration
Retrieves, syncs, and deletes administration data.
•
reporting
Retrieves, updates, and deletes report and widget information.
Continuous Delivery Director also lets you use REST calls in tasks to instrument operations in remote components.
NOTE
Names of JSON fields must be quoted using double quotes.
For example, the name of the taskId field must be enclosed in double quotes:
======================================
{
"taskId": 398
}
======================================
For more information, see REST Plug-In.
Authenticate REST APIs
The REST APIs in Continuous Delivery Director support authentication using an API key as a bearer token in an
authorization header (Authorization: Bearer ). This means that the client must supply the API key in the HTTPS
request message. API keys are used in Continuous Delivery Director to track how the APIs are used (for example, to
control access and maintain security). The API key identifies the client responsible for the REST API call.
Where is my API Key?
To find or re-issue your API key, in the menu bar click the initials of your user account
,
then select User Settings. For more information, see User Settings.
Sending Authentication Requests
NOTE
To avoid disclosure of the API key by third parties, only use Bearer authentication over HTTPS (SSL).
The client must send the bearer token in the Authorization header when making requests to REST APIs in the syntax:
Authorization: Bearer <API key>
Example
622

Continuous Delivery Director 8.5
Authorization: Bearer 2a51053a-b240-11e7-abc4-cec278b6b50a
Where 2a51053a-b240-11e7-abc4-cec278b6b50a is the API key
Therefore, the cURL command for getting the product version number is:
curl -X GET --header "Accept: application/json" --header "Authorization: Bearer 2a51053a-b240-11e7-abc4-
cec278b6b50a" https://cddirector.io:443/cdd/administration/4241ac73-ebb8-4d91-9dcd-24d41be1c8e2/v1/version
Where 2a51053a-b240-11e7-abc4-cec278b6b50a is the API key
And 4241ac73-ebb8-4d91-9dcd-24d41be1c8e2 is the tenant ID from User Settings.
Update Manual Tasks
You can use the PATCH method in REST APIs to start or stop manual tasks without the need to access the user interface.
Example
To start a manual task, enter the cURL command:
curl –X PATCH -u admin:123456 --header “Content-Type: application/json” --header “Accept:
application/json” –d “{\”status\”: \”RUNNING\”}” http://{cdd-server-address}:{cdd-server-port}/cdd/
execution/00000000-0000-0000-0000-000000000000/v1/releases-execution/{release-id}/phases-execution/{phase-id}/
tasks-execution/{task-id}
Result: The task starts to run and the status changes to RUNNING.
To stop a manual task, enter the cURL command:
curl –X PATCH -u admin:123456 --header “Content-Type: application/json” --header “Accept:
application/json” –d “{\”status\”: \”DONE\”}” http://{cdd-server-address}:{cdd-server-port}/cdd/
execution/00000000-0000-0000-0000-000000000000/v1/releases-execution/{release-id}/phases-execution/{phase-id}/
tasks-execution/{task-id}
Result: The task completes and the status changes to DONE.
Cross-Project REST API Reports
Using REST APIs with a single API key of a user with administrator permissions, you can generate reports in JSON
format listing the following items cross-project:
•
Users and user groups together with their project and cross-project roles (GET /parties)
•
File Sources (GET /applications/application-versions/file-sources)
•
Applications together with their environments (GET /applications)
To use this capability, toggle the is_project_specific boolean parameter in the following REST APIs:
•
GET /parties
•
GET /applications/application-versions/file-sources
•
GET /applications
Troubleshooting REST APIs
Here are some possible errors to look out for when you run CDD REST API calls.
JSON not Specified as Content-Type in Header
Content-Type headers negotiate the type of information to be sent or received between a client and server. Continuous
Delivery Director REST APIs only accept requests that specify that JSON is the Content-Type in the header.
623
Continuous Delivery Director 8.5
Content-Type: application/json
Accept: application/json
Clear JSession Cookies
When you run a REST API, you may see an error message such as the following:
Cannot determine the source URL of the request as neither origin nor referer headers are present. Hence,
accessing '/cdd/design/00000000-0000-0000-0000-000000000000/v1/releases' is forbidden. You may clear the
JSESSIONID cookie request header or logout from the related CDD session.
Continuous Delivery Director REST APIs do not use cookie-based authentication. To resolve this issue, as indicated,
either clear the JSessionId cookie request header, or log out fromContinuous Delivery Director.
Example REST Call: Get All Releases
/releases
Retrieves all releases.
Resource URL
Type Description
GET https://<host>:<port>/cdd/design/0000/v1/releases
Method Parameters
Parameter Type Description
filter String freeTextFilter
page_size integer pageSize
page_number integer pageNumber
status Array[string] filterByStatus
application Array[long] filterByApplicationIds
embed Array[string] embedFields
current_user Boolean showMyReleases
start_date Long startDate
end_date Long endDate
task_status Array[string] embedTaskStatusFilter
has_content_items Boolean hasContentFilter
Response Parameters
HTTP Status Code Reason
401 Unauthorized
403 Forbidden
404 Not Found
Curl
curl -X Get --header "Accept: application/json" "http://<host>:<port>/cdd/design/0000/v1/releases"
Response Body
624

Continuous Delivery Director 8.5
{
"data": [
{
"applications": [
{
"description": "string",
"id": 0,
"name": "string"
}
],
"creationDate": 0,
"description": "string",
"endDate": 0,
"executionData": {
"allowedStatuses": [
"DESIGN"
],
"id": 0,
"releaseId": 0,
"status": "DESIGN"
},
"id": 0,
"memberParties": [
{
"id": 0,
"role": "VIEWER"
}
],
"name": "string",
"ownerParties": [
{
"id": 0,
"role": "VIEWER"
}
],
"phases": [
{
"approvalGate": "MANUAL",
"conflicts": [
{}
],
"description": "string",
"environments": [
{
"application": {
"description": "string",
"id": 0,
"name": "string"
},
"applicationVersion": {
"application": {
"description": "string",
"id": 0,
625

Continuous Delivery Director 8.5
"name": "string"
},
"contents": [
{
"content": "string",
"id": 0
}
],
"id": 0,
"release": {
"description": "string",
"id": 0,
"name": "string"
},
"version": "string"
},
"applicationVersionPhase": {
"description": "string",
"id": 0,
"name": "string"
},
"description": "string",
"id": 0,
"name": "string"
}
],
"executionData": {
"allowedStatuses": [
"DESIGN"
],
"denyStartReason": "PHASE_CONTAINS_TASK_WITH_MISSING_PARAMS",
"endDate": 0,
"id": 0,
"percentCompleted": 0,
"phaseId": 0,
"startDate": 0,
"status": "DESIGN"
},
"id": 0,
"isDisabled": true,
"maintenanceWindows": [
{
"description": "string",
"endDate": 0,
"environments": [
{
"application": {
"description": "string",
"id": 0,
"name": "string"
},
"applicationVersion": {
"application": {
626

Continuous Delivery Director 8.5
"description": "string",
"id": 0,
"name": "string"
},
"contents": [
{
"content": "string",
"id": 0
}
],
"id": 0,
"release": {
"description": "string",
"id": 0,
"name": "string"
},
"version": "string"
},
"applicationVersionPhase": {
"description": "string",
"id": 0,
"name": "string"
},
"description": "string",
"id": 0,
"name": "string"
}
],
"id": 0,
"isDisabled": true,
"name": "string",
"startDate": 0
}
],
"name": "string",
"nextPhase": {
"id": 0
},
"ownerParties": [
{
"id": 0,
"role": "VIEWER"
}
],
"percentageCompleted": 0,
"plannedEndDate": 0,
"plannedStartDate": 0,
"previousPhase": {
"id": 0
},
"releaseId": 0,
"tasks": [
{
627

Continuous Delivery Director 8.5
"applicationVersions": [
{
"id": 0
}
],
"description": "string",
"executionData": {
"allowedStatuses": [
"DESIGN"
],
"detailedStatusDescription": "string",
"endDate": 0,
"id": 0,
"percentCompleted": 0,
"phaseId": 0,
"startDate": 0,
"status": "DESIGN",
"statusDescription": "string",
"taskId": 0
},
"id": 0,
"isDisabled": true,
"isMissingParameters": true,
"name": "string",
"nextTasks": [
{
"id": 0
}
],
"ownerParties": [
{
"id": 0,
"role": "VIEWER"
}
],
"phaseId": 0,
"pluginService": {
"description": "string",
"endpointId": 0,
"endpointName": "string",
"id": 0,
"isMissingParameters": true,
"name": "string",
"parameters": [
{
"id": 0,
"templateParameterId": 0,
"value": "string"
}
],
"templateId": 0,
"templateName": "string"
},
628

Continuous Delivery Director 8.5
"prevTasks": [
{
"id": 0
}
]
}
]
}
],
"startDate": 0,
"version": "string"
}
],
"pageNumber": 0,
"pageSize": 0,
"totalResultsCount": 0
}
Response Code
200
Response Headers
{
"server": "Apache-Coyote/1.1",
"x-content-type-options": "nosniff",
"x-xss-protection": "1; mode=block",
"cache-control": "no-cache, no-store, max-age=0, must-revalidate",
"pragma": "no-cache",
"expires": "0",
"x-frame-options": "DENY",
"content-type": "application/json",
"transfer-encoding": "chunked",
"date": "Tue, 23 Feb 2016 07:32:11 GMT"
}
Troubleshooting
Troubleshooting information is available on the following topics:
•
Troubleshoot LDAP Configuration
•
Troubleshoot SAML Configuration
Troubleshoot LDAP Configuration
LDAP troubleshooting information is available on the following topics:
NOTE
The information in this page is intended for Continuous Delivery Director system administrators.
629

Continuous Delivery Director 8.5
Test the LDAP Connection
Prior to other troubleshooting activities, we recommend that you test the connection to the LDAP directory server, The
connection test verifies that you can successfully bind (authenticate) to the LDAP system.
Follow these steps:
1. Click the Cross-Project Settings menu
( ),
then CDDirector Settings from the drop-down list.
2. Click User management system.
3. In the User management system page, select Directory Server.
4. Enter values for the following directory settings:
–
Host
–
Port
–
Use a secure directory connection
–
LDAP User Name
–
LDAP Password
5. Click Test Connection to test the configuration settings.
Note: The Test Connection command performs a simple connectivity check. Test Connection does not check
authentication or whether there is a directory server at the specified host.
Test Connection Error Messages
If the connection test fails, a connection error icon will appear:
.
Mouse over this icon to see information about the connection issue.
•
Server is configured with an unknown host
Diagnosis: A host name resolution issue.
•
Server is not accessible
630

Continuous Delivery Director 8.5
Diagnosis: Either network access to the LDAP port is blocked, or the server you use is not listening on the configured
port.
•
Server certificate is not configured correctly
Diagnosis: Two possible causes: a) The Use secure directory connection option is selected but there is no configured
certification for Continuous Delivery Director; b) The LDAP server certificate was imported but Continuous Delivery
Director has not yet been restarted.
•
Server user and password mismatch
Diagnosis: The wrong user name or password has been entered.
Why Can't I Save the User Management System Settings?
Symptom: You see an error message when you try to save your user management system settings.
Diagnosis: The character input limit has been exceeded. You can find additional information in cdd-server.log
Example:
… Caused by: com.mysql.jdbc.MysqlDataTruncation: Data truncation: Data too long for column 'user_dn_pattern'…
Why Can't I Import Users or Groups?
Symptom 1: You see an error message when you import users or groups.
Example:
Solution: Open cdd-server.log and check the syntax in your search patterns
Example:
http-apr-7080-exec-7] DEBUG c.c.r.auth.ad.DirectoryServicesUtils - Using the query: (&(objectClass=person)
(cn=*)))
[http-apr-7080-exec-7] DEBUG c.c.r.auth.ad.DirectoryServicesUtils - Using the search base: dc=mylab,dc=local
[http-apr-7080-exec-7] WARN c.c.r.auth.ad.DirectoryServicesUtils - Failed to finish retrieving user
information
javax.naming.directory.InvalidSearchFilterException: Unbalanced parenthesis
Symptom 2: You retrieve undefined values when you import users or groups:
631

Continuous Delivery Director 8.5
Solution: Make sure that the attribute settings match your LDAP settings.
Example: The last name attribute does not exist in the LDAP directory.
In the LDAP directory, the Last name attribute is appear as sn:
Why does the Bad LDAP Configuration Message Appear on Login?
Symptom: When a user tries to log in in a user management system configured to work with LDAP, they see a 'Bad LDAP
Configuration' message.
Solution: Check one of the following:
•
In the User management system page, is the Group Search filter is empty or not configured correctly?
•
Does the user unique ID exist in the LDAP directory?
632

Continuous Delivery Director 8.5
Troubleshoot SAML Configuration
For Single Sign-On (SSO) to work properly, you must ensure that SAML is properly configured. Many problems with SSO
are likely to be SAML configuration issues.
NOTE
The information in this page is mostly intended for Continuous Delivery Director administrators.
When troubleshooting SAML, you must verify the following items:
•
Continuous Delivery Director is configured to enable users to authenticate through SAML when signing in.
•
LDAP/Active Directory is configured to complete the authorization mechanism for users signing in with SAML.
•
Verify that the SAML identity provider is configured correctly.
Each SAML identity provider has its own configuration requirements. For the following scenarios, Microsoft Active
Directory Federation Services (AD FS) is used as the SAML Identity Provider.
NOTE
The solutions that are provided on this page are intended to help you check the most likely causes of a SAML
configuration issue. System landscapes are diverse and complex. Therefore, it is not possible to cover every
possible SAML issue that may occur.
Troubleshooting information is available on the following topics:
Why must I enter a password to log in after SAML is enabled?
NOTE
Applies to: OnPrem and SaaS
Symptom
You have set the properties in the SAML Configuration page to enable SSO in Continuous Delivery Director . Because
SSO is enabled, users should not be required to enter their user credentials. However, when a user tries to log in, they
see a popup with a password field:
633

Continuous Delivery Director 8.5
Solution
This scenario indicates that Continuous Delivery Director is not configured correctly for SAML. One possible cause is a
keystore-related issue.
Follow these steps:
1. Check the log files for a keystore-related error.
2. Verify that the key that is defined in your Java Keystore (JKS) for Continuous Delivery Director matches the key that is
defined in settings.properties in the following line:
cdd.authentication.key_store.default_key property
Example:
You see the following information in the log file:
Load location of custom settings from 'C:\Users\smijo01\.cdd\settings.source'.
Key for alias 'cdd' was not found within 'C:\Users\smijo01\.cdd\conf\cdd_keystore.jks'
Failed initializing SAML entities
java.lang.IllegalStateException: Key for alias 'cdd' was not found within 'C:\Users
\smijo01\.cdd\conf\cdd_keystore.jks’
Why do I get the following error message: 'This site can't be reached'?
NOTE
Applies to: OnPrem and SaaS
Symptom
You have configured SAML authentication to enable SSO in Continuous Delivery Director. However, when a user tries to
log in, they see the following system message:
634

Continuous Delivery Director 8.5
Solution
This error indicates that the DNS lookup failed because the IP address on the user machine is misconfigured.
The user needs to modify the hosts file on their machine. In Windows, the hosts file is typically located within c:
\windows\system32\drivers\etc\hosts .
Follow these steps:
1. Open the hosts file with a text editor, such as Notepad.
2. Locate the IP address that is associated with your Continuous Delivery Director account and change as needed.
Why do I get the following error message: 'InResponseToField of the Response doesn't correspond to sent
message'
NOTE
Applies to OnPrem only
Symptom
A user cannot log in, even though they enter the correct user credentials. The user needs to try to log in again.
Diagnosis
SAML keeps records in the memory with hash tables per HTTP session. When an HTTP session is regenerated between
Continuous Delivery Director and SAML, Continuous Delivery Director is redirected. SAML Spring Implementation cannot
find the original HTTP request so this error is generated.
HTTP session regeneration can occur when you move from HTTP to HTTPS. This should not happen because once
HTTPS is configured, the assumption is that HTTP is unavailable.
Regeration can also occur if the first login is with a short DNS hostname (such as smijo01-n7) and SAML redirects to a
long DNS hostname (such as smijo01-n7.ca.com). The URL that SAML uses to redirect back comes from CDD SAML
metadata generation which comes from cdd.url.virtual_ip , cdd.url.port , and cdd.url.schema .
The initial server address of Continuous Delivery Director is different to the redirect server address returned from the
domain identity provider.
635

Continuous Delivery Director 8.5
Solution
Browse to the formal server address of Continuous Delivery Director.
Why Can't I Log In to Continuous Delivery Director?
NOTE
Applies to: OnPrem only
Symptom
You have attempted to log in to Continuous Delivery Director but you have received an error message.
Diagnosis
If SSO (Single Sign-On) is enabled in your organization and you have been added as a local user, your local user
credentials will not work. Adding a local user does not automatically add the local user SSO credentials to the IdP (Identity
Provider) used for authentication.
Why Can't I Change My Password?
NOTE
Applies to OnPrem only
Symptom
You have accessed User Settings from the initials of your user account
and have attempted to change your password but you have received an error message.
Diagnosis
SSO (Single Sign-On) is enabled in your organization so you authenticate to Continuous Delivery Director through your
SSO user credentials. You cannot reset your SSO user credentials from Continuous Delivery Director.
Why did I get an error message from my identity provider?
NOTE
Applies to: OnPrem only
Symptom
You have configured SAML authentication to enable SSO in Continuous Delivery Director . However, when a user tries to
log in, they see the following system message:
636

Continuous Delivery Director 8.5
You check the identity provider logs.
Example:
Diagnosis
This scenario indicates that the service provider identity has changed.
Continuous Delivery Director includes an out-of-the-box service provider ID, https://continuous_delivery_director.io. This
service provider ID has been changed.
Example:
In settings.properties , the following line:
cdd.authentication.identity_managers.saml.service_provider.id https://continuous_delivery_director.io
Was changed to.
cdd.authentication.identity_managers.saml.service_provider.id https://this_is_my_cdd_implementation.org
However, the relying trust record has not been updated.
Solution
Perform one of the following actions:
637

Continuous Delivery Director 8.5
•
Either regenerate the Continuous Delivery Director SAML metadata and create a new relying party trust.
•
Or simply alter the existing relying party trust with the new service provider ID:
Where are the endpoints in my identity provider configuration?
NOTE
Applies to: OnPrem only
Symptom
You try to configure your identity provider and a system message appears, indicating that some of your metadata has not
been imported.
Example:
638

Continuous Delivery Director 8.5
You then continue to configure and check to see if your endpoints are set up. The endpoints tab is empty:
Solution
Typically, identity providers, such as AD FS, work only with a secure service provider using HTTPS. Verify that Continuous
Delivery Director is configured correctly for secure configurations.
Also, go to settings.properties and set the following properties:
•
cdd.url.schema
Set to https
•
cdd.url.port
Set to 8443
Why is there no role assigned to me?
NOTE
Applies to: OnPrem and SaaS
639

Continuous Delivery Director 8.5
Symptom
A user logs in to Continuous Delivery Director and sees the following system message:
Solution
You can:
•
Locate the user in the user management console and change their role.
•
For OnPrem only: Configure the directory server that matches the directory SAML is configured with. Then assign
roles to one of the groups the user is a member of.
•
For OnPrem only: Or both.
Why do I see an identity provider configuration error?
NOTE
Applies to: OnPrem and SaaS
Symptom
A user logs in to Continuous Delivery Director and sees the following system message:
640

Continuous Delivery Director 8.5
Case 1: Typo
You check the logs and see the following messages:
SAML authentication process failed.
o.s.s.a.AuthenticationServiceException: Error determining metadata contracts
Caused by: o.o.s.m.p.MetadataProviderException: Metadata for issuer
http://smijo01-w2k12r2-domain.ca.com/AD FS/services/trust wasn't found
Solution
The phrase 'Metadata for Issuer ' in the log means that you must check the identifier provider configuration, identify,
and fix the issue.
Example:
In Continuous Delivery Director, in the SAML Configuration page, there is a typo in the Identifier Provider Issuer field.
641

Continuous Delivery Director 8.5
The 'a ' is missing in the folder name 'adfs ':
Case 2: Wrong Certificate Configured
You check the logs and see the following messages:
SAML authentication process failed.
o.s.s.a.AuthenticationServiceException: Error validating SAML message
Caused by: o.o.c.SAMLException: Response doesn't have any valid assertion which would
pass subject validation
Caused by: o.o.x.v.ValidationException: Signature is not trusted or invalid
642

Continuous Delivery Director 8.5
Solution
The phrase 'Signature is not trusted or invalid ' in the log means that you must check the certificate that is
provided in the spring_saml_metadata.xml file, identify and fix the issue.
To view this metadata file, in your browser, enter the following URL:
https://cddirector.io/cdd/saml/metadata
Example:
In the following example, an encryption certificate has been entered instead of the signing certificate:
Case 3: Java Encryption Error Message
You check the logs and see the following messages:
Error decrypting the encrypted data element
o.a.x.s.e.XMLEncryptionException: Illegal key size
Caused by: java.security.InvalidKeyException: Illegal key size
Diagnosis
If you are performing 192-bit or 256-bit AES encryption in Java, the java.security.InvalidKeyException: Illegal key size
error is generated.
This error occurs because AES is limited to 128-bit key size encryption on a default JDK installation.
Solution
For Java 8 with an update level 150 and lower
To perform 192-bit or 256-bit AES encryption, you must download and install Java Cryptography Extension (JCE)
Unlimited Strength Jurisdiction Policy Files.
Follow these steps:
1. Go to the Oracle website and search for ‘Java Cryptography Extension (JCE) Unlimited Strength Jurisdiction Policy
Files’.
2. Depending upon the Java version that is installed on your machine, download the zip file and extract it on your drive.
3. Copy the extracted files to your <JAVA_HOME>/jre/lib/security folder (replacing existing files if necessary).
4. Restart the server.
643

Continuous Delivery Director 8.5
For Java 8 with an update level 151 and higher
Follow these steps:
1. Navigate to the <JAVA_HOME>/jre/lib/security/java.security file.
2. Uncomment the crypto.policy=unlimited directive line.
3. Restart the server.
Case 4: Error Validating SAML Message
Symptom
User encounters an Error Validating SAML message error after entering their credentials in the Continuous
Delivery Director login page.
Diagnosis
An attribute, for example, NameID , is not being sent by the identity provider, for example, AD FS.
Example
The following error message indicates that AD FS is not sending the NameID attribute:
Error while processing request. Please ask your administrator to check the identity
provider configuration.
Name ID element must be present as part of the Subject in the Response message; please
enable it in the IDP configuration.
Error validating SAML message
This error message indicates that the AD FS is not configured to send the Name ID attribute along with the response.
Solution
For a system-wide or workspace-wide issue: Verify that the IDP, for example, AD FS, is configured to add the Name ID
attribute. In the AD FS Management Console, check if the claim rule is configured correctly:
For a user-specific issue: Check the identities repository, such as Active Directory, to see if the user record is configured
correctly.
Example: You notice that the e-mail address is missing.
Why are user management properties missing?
NOTE
Applies to: OnPrem and SaaS
Symptom
You want to configure a user in the User Management page and you see that some properties are missing.
Example:
You want to assign a role to a user and you notice that the email address is missing:
644

Continuous Delivery Director 8.5
Solution
Check the configuration in the identity provider.
Follow these steps:
1. Verify that the user has an email address that is configured in the directory.
2. If the email address is configured correctly, validate the attribute mapping in the identity provider.
In this case, the expected attribute of the email address has been wrongly configured (with a space).
This means that the Continuous Delivery Director service provider cannot find any value for the expected attribute.
What else can I do to troubleshoot?
NOTE
Applies to: OnPrem
Symptom
None of the solutions on this page helped you and the logs do not reveal anything new.
Solution
Follow these steps:
1. Set the level of the logs to DEBUG. For more information, see Working with Log Files.
2. Add the following packages using the JMX console:
645

Continuous Delivery Director 8.5
•
org.opensaml
•
org.springframework.security.saml
•
com.ca.rp.saml
Product Tutorial Videos
This site includes text and video content of product documentation. The embedded videos are segments of official
product training courses. These courses provide extra information, context, and examples to augment the product
documentation.The order of the following sections represents a logical product learning sequence for this site.
This site includes text and video content of product documentation. The embedded videos are segments of the following
official product training courses:
•
Release Orchestration
•
Test Orchestration
These courses provide extra information, context, and examples to augment the product documentation.
To access these courses, see Broadcom Enterprise Software Academy.
NOTE
The following embedded videos are available in full size on the Continuous Delivery Director YouTube channel.
Release Orchestration
This playlist takes you through the end-to-end release orchestration process in Continuous Delivery Director.
Release Orchestration in 60 Seconds
This video provides a 1-minute overview of how release orchestration works in Continuous Delivery Director.
Release Orchestration Overview
This video summarizes the artifacts, components, and processes of release orchestration in Continuous Delivery Director.
Create Release Applications
This video shows how to create applications in Continuous Delivery Director for use in a release. Applications represent
individual microservices or business components that are part of your release pipeline.
Create Release Environments
This video shows how to create environments in Continuous Delivery Director for use in a release. An Environment
corresponds to your different release pipeline phases, such as Production, QA, and Development.
Create Release Application Versions
This video shows how to create application versions for each associated release in Continuous Delivery Directory.
Application versions in Continuous Delivery Director typically correspond to the branch name in the application's code
repository.
646

Continuous Delivery Director 8.5
Set Application Source Control Work Items Connections
This video shows how to connect your Continuous Delivery Director release with two key information sources: the source
control repository where your application code is maintained, the the tool that is tracking work items for your release.
Create a Release with Continuous Delivery Director
This video shows the process for creating a release in Continuous Delivery Director. The release is the core of Continuous
Delivery Director and provides the ability to orchestrate and execute nearly every aspect of application development and
testing through each phase of your release pipeline.
Set the Application Versions in the Release
This video shows how to set which application versions to use in your Continuous Delivery Director release. The version
typically corresponds to the branch name in your source control system.
Create a Phase in Continuous Delivery Director
This video shows how to create a phase in your Continuous Delivery Director release. A phase organizes the required
tasks to execute when applications are deployed to specific environments, such as Development and QA.
Create a Task in Continuous Delivery Director
This video shows how to create a task in a Continuous Delivery Director release. A task is a unit of work that represents
an action or workflow that is associated with a release phase.
Duplicate a Task
This video shows how to duplicate a task in a Continuous Delivery Director release. Duplicate task to reduce effort during
release design and creation.
Duplicate a Phase
This video shows how to duplicate a phase in a Continuous Delivery Director release. Duplicate phases to reduce manual
effort during release design and creation.
Create an On-Failure Phase
This video shows how to create an On Failure Phase in a Continuous Delivery Director release. An On Failure Phase only
runs when a primary phase fails to complete and can be used for operations like rollbacks.
Create Tokens in Continuous Delivery Director
This video shows how to create tokens for use in a Continuous Delivery Director release. Tokens are variables that can
parameterize commonly used fields, making releases easier to maintain.
Import Work Items into a Release
This video shows how to import work items into a Continuous Delivery Director release. As long as you have a working
connection to an agile planning system, you can import relevant work items and monitor their status within the release.
647

Continuous Delivery Director 8.5
Create Branches and Start Release Pipeline
This video shows how to create branches for your applications in source control to correspond with the versions defined
in your Continuous Delivery Director release. This helps ensure that build notifications can properly start a Continuous
Delivery Director release.
Commit Changes and Run Tasks
This video shows how code commits and a new build in Jenkins can trigger the start of a CI phase in a Continuous
Delivery Director release.
On Failure Phase Execution
This video shows how an On Failure phase executes when a task fails in a Continuous Delivery Director release.
Build Promotion in Continuous Delivery Director
This video shows how a Continuous Delivery Director release can move from one phase to the next automatically,
deploying to the appropriate environment with key values changing based on tokens.
Approve Phase Execution
This video shows how you can use approval gates to require approval before executing the next phase in a Continuous
Delivery Director release.
Update Work Items in a Release
This video shows how Continuous Delivery Director can update the status of a work item by detecting the work item ID in
the comments of a code commit.
Release Activities and Release Score
This video shows how to view release activity in Continuous Delivery Director and see the overall release score. The
release score gives the release a grade based on several indicators that can derive the overall quality of the release.
Mark a Release as Done
This video shows how to mark a release as done in Continuous Delivery Director and describes the different statuses you
can assign to the release.
Create a Release Track
This video shows how to create a release track in Continuous Delivery Director. Release tracks let you track parallel
releases that you want to release in the same time window in a single view.
Add a Release To Track
This video shows how to add releases to a release track in Continuous Delivery Director. It also shows how to map those
releases to production phases and milestones of the track.
648

Continuous Delivery Director 8.5
Manage Release Tracks
This video shows how to manage the releases, production stages, milestones, and dependencies in a Continuous
Delivery Director release track.
Test Orchestration
This playlist shows how you use the Test Module of Continuous Delivery Director to integrate intelligent testing capability
into your release pipeline.
Test Orchestration Overview
This video describes how you can orchestrate tests with your release pipeline. Continuous Delivery Director provides
integration with common testing tools, plus test intelligence and heuristics that automatically select the right tests to run
and return data about release quality based on test results.
Import Tests into Continuous Delivery Director
This video shows how you can import test suites from your test framework into the Continuous Delivery Director test
modules. You can then associate the tests with the appropriate application and tag them.
Mark Tests as Must Run
This video shows you how to mark tests as Must Run in Continuous Delivery Director. This setting ensures that these
critical path tests run in every test execution.
Create Testing Task
This video shows how to create an adaptive testing task in Continuous Delivery Director. This task runs the relevant tests
each time the phase is run.
Run Testing Task
This video shows how to run an adaptive testing task in a Continuous Delivery Director release and how to view test
results after the task completes.
Update Test Tags
This view shows how to update test tags in a Continuous Delivery Director release. You can update tasks between
release runs to change whether or not the test runs.
Enable Adaptive Testing
This video shows how to enable adaptive testing for a Continuous Delivery Director release. Enable adaptive testing for
Continuous Delivery Director to intelligently run only the appropriate tests based on heuristics.
Test Orchestration Results And Reporting
This video shows how to view test results and key reports with test metrics in Continuous Delivery Director.
649

Continuous Delivery Director 8.5
Integrations
Tracking Planned vs Actual Work - Part One
This two-part video explains how a four-way integration between Continuous Delivery Director, GitHub, Jenkins, and
Rally
®
can help release managers track planned vs. actual work in releases. Part One contains an overview and
explanation of work item status icons.
Tracking Planned vs Actual Work - Part Two
Part Two of this video shows the setup required to enable the integration between Continuous Delivery Director, GitHub,
Jenkins, and Rally
®
.
Administration
The following videos complement, and are also embedded in, the section Administration:
Extend Capability Using Plug-ins: CA Continuous Delivery Director
The following video shows how to use plug-ins to extend the capabilities of Continuous Delivery Director so it can
communicate with other products.
For detailed documentation, see:
•
Register Plug-ins
•
Integrations
•
Manage Endpoints
•
Manage Applications and Environments
User Management
The following video shows how to manage users and groups:
For detailed documentation, see Manage Users, Groups, and Roles.
Endpoints
The following video shows how to manage endpoints:
For detailed documentation, see Manage Endpoints.
Log Files
The following section shows how to change log Levels
Product Names and Abbreviations
Products
•
Rally
®
(Formerly CA Agile Central)
•
Automic
®
Continuous Delivery Automation
650

Continuous Delivery Director 8.5
Abbreviations
•
CDD - Continuous Delivery Director
•
CDA - Automic
®
Continuous Delivery Automation
Product Accessibility Features
CA Technologies is committed to ensuring that all customers, regardless of ability, can successfully use our products and
supporting documentation to accomplish vital business tasks. This section outlines the accessibility features of Continuous
Delivery Director.
Product Enhancements
Continuous Delivery Director offers accessibility enhancements in the following areas:
•
Display
•
Keyboard
•
Mouse
NOTE
The following information applies to Windows-based and Macintosh-based applications. Java applications run
on multiple host operating systems, some of which already have assistive technologies available. For assistive
technologies to provide access to programs written in JPL, the programs need a bridge between the native
environments and the Java Accessibility support that is available the Java virtual machine (Java VM). This
bridge spans from the Java VM to the native platform. The bridge is slightly different for each platform. Sun is
developing both the JPL and the Win32 sides of this bridge.
Display
To increase visibility on your computer display, you can adjust the following options:
•
Font style, color, and size of items
Defines font color, size, and other visual combinations.
•
Screen resolution
Defines the pixel count to enlarge objects on the screen.
•
Cursor width and blink rate
Defines the cursor width and blink rate to make the cursor easier to find or minimize blinking.
•
Icon size
Defines the size of the icons. You can make icons larger for visibility, or smaller to increase screen space.
•
High contrast schemes
Defines color combinations. You can select colors that are easier to see.
Keyboard
You can make the following keyboard adjustments:
•
Repeat Rate
Defines how quickly a character repeats when a key is struck.
•
Tones
Defines tones when pressing certain keys.
•
Sticky Keys
Defines the modifier key, such as Shift, Ctrl, Alt, or the Windows Logo key, for shortcut key combinations. Sticky keys
remain active until another key is pressed.
651

Continuous Delivery Director 8.5
Mouse
You can use the following options to make your mouse faster and easier to use:
•
Click Speed
Defines how fast to click the mouse button to make a selection.
•
Click Lock
Sets the mouse to highlight or drag without holding down the mouse button.
•
Reverse Action
Sets the reverse function that the left and right mouse keys control.
•
Blink Rate
Defines the cursor blink speed of a cursor that blinks.
•
Pointer Options
Set the following behaviors:
–
Hide the pointer while typing
–
Show the location of the pointer
–
Set the speed that the pointer moves on the screen
–
Select the pointer size and color for increased visibility
–
Move the pointer to a default location in a dialog box
Keyboard Shortcuts (Windows)
The following list shows the keyboard shortcuts that Continuous Delivery Director supports:
Standard keyboard commands:
•
Ctrl + X
Cut
•
Ctrl + C
Copy
•
Ctrl + K
Find Next
•
Ctrl + F
Find and Replace
•
Ctrl + V
Paste
•
Ctrl + S
Save
•
Ctrl + Shift + S
Save All
•
Ctrl + D
Delete Line
•
Ctrl + Right
Next Word
•
Ctrl + Down
Scroll Line Down
•
End
Line End
652

Continuous Delivery Director 8.5
Product-specific keyboard commands:
Note: Product keyboard shortcuts are specific to UI pages and functions such as releases.
General:
•
Question Mark (?)
Show/Hide help Menu for each page
Calendar Page:
•
Alt + Shift + Plus symbol (+)
Expand All
•
Alt + Shift + Minus symbol (-)
Collapse All
In Releases:
•
Alt + Shift + Up arrow
Expand View space
•
Alt + Shift + Down arrow
Show panels
•
Alt + Shift + P
New Phase
•
Alt + Shift + R
Edit Release
•
Alt + Shift + B
Return to the Releases view
Keyboard Shortcuts for Product Videos
Continuous Delivery Director product documentation includes product tutorial videos that are hosted on YouTube. When
you view these product videos, you can use the following keyboard shortcuts:
•
Tab
Scrolls forward through the functions
•
Tab+Shift
Scrolls backwards
•
Enter
Selects the function that is highlighted in a list
•
Forward Arrow and Back Arrow
Controls the video volume
Terms of Service and Privacy
Digital Transformation For All
To help organizations – no matter their size – become successful digital businesses, Broadcom has designed the Digital
BizOps Starter Edition, which includes a set of capabilities to help organizations get started on their digital transformation
journey, completely free of charge.
The Software You Need. Now Free.
Capabilities available with the Starter Edition are available as a service to help digital product teams get started quickly.
They are enterprise-grade with few functional limits. The Starter Edition is designed to cover most digital product initiatives
653

Continuous Delivery Director 8.5
and support a team size of up to 50 users. There are no time constraints. View the Starter Edition FAQ and Terms and
Conditions for more details.
View Broadcom's Privacy Policy to understand how we process personal data.
Usage Data (Telemetry)
You can configure your product to collect and send telemetry data — product usage and system configuration data — to
Broadcom. Use the information on this page to learn how to send usage data to Broadcom.
If you are licensed to use this product under a Portfolio License Agreement (PLA) subscription, you must configure it to
collect and send product-specific usage data. If you are licensed to use this product under a standard license, you can
consent to have this product collect and send usage data. By default, this product does not collect and send usage data.
For your product, the reporting options are as follows:
•
Report Usage Data Automatically
•
Use the Product Usage Collector
What Usage Data is collected?
The usage data information is securely transmitted to Broadcom. The data includes the number of devices that are being
monitored. No Personally Identifiable Information (PII, as legally defined) covered under GDPR is transmitted. For more
information about how your information is collected and used, read our Privacy Policy. The following table describes some
of the usage data that your product may send to Broadcom.
Name Description
Product This product or product family identifier
Instance ID A product-generated unique ID representing a single installation or environment
Date Collected Use the yyyy-MM-dd format
Product Version The product model and version
Site ID The Enterprise Support Site ID of the customer
Licenses A summary of the installed product licenses
Usage The maximum meter count which was used during a reporting period
Serial Number A value that associates a customer with a specific entitlement (allowed usage and time
period) to a Broadcom product, typically included in a license
Product-specific SKUs
Active Releases Total concurrent active releases
The telemetry service generates a product instance ID. The instance ID uniquely identifies the product instance from
all other product instances and defines the metrics that are collected. Any changes to the username, password, and
the enablement state that is configured in settings.properties are updated to the telemetry service. The instance ID
does not change.
How Licensed Metrics Are Calculated
CDD License is measured by the number of Active Releases.
The release status cycle is "Design" -> "Running"/"Running with Failures" -> "Done". The number of Active Releases is
the count of all releases which are in the status "Running" or "Running With Failures"
654

Continuous Delivery Director 8.5
How To Use the Product Usage Collector
The Product Usage Collector (PUC) is an application for Windows or MacOS that is installed by the customer on a system
that can access the Continuous Delivery Director. The PUC alleviates the need for special firewall rules to access product
licensed metrics, and does not require a dedicated system in your data center.
The PUC requires two different credentials:
•
Broadcom Okta credentials
Your account that has a Subscription Manager role on support.broadcom.com. Use these credentials when you start
PUC, to allow it to retrieve your SiteID, entitlements, and a list of product versions supporting PUC.
•
Product access credentials
The user name and password for each product for which you are reporting usage.
Defining Product-Specific Information
The PUC requires product-specific information to return the relevant data.
As an administrator, you make sure the following requirements are in place:
1. Make sure that telemetry is configured correctly in Continuous Delivery Director.
2. Provide telemetryadmin as username and password during installation of Continuous Delivery Director.
a. On the Telemetry Configuration page, define if the instance is subject to a PLA. When you use the PUC you do
not have to send telemetry data automatically.
b. Provide the mandatory data in the telemetry configuration page during the installation.
3. Use the telemetryadmin User to Access to the metrics endpoint of Continuous Delivery Director REST API.
IMPORTANT
For security reasons, only grant the PUC User (telemetryadmin) the Access to the metrics endpoint of
Continuous Delivery Director REST API (ACCESS_METRICS_ENDPOINT), thus ensuring that the user cannot
access any other data.
PUC REST API Endpoint
The Product Usage Collector (PUC) establishes the connection to the target system through a REST API call. For this
purpose, the Continuous Delivery Director REST API provides the productusage endpoint, which allows you to use
the PUC to pull your usage data on demand.
Request: GET https://{cdd-server}/cdd/administration/{tenantid}/v1/product/license/productusage
Example: https://my-cdd-host.acme.com:8080/cdd/administration/00000000-0000-0000-0000-000000000000/v1/product/
license/productusage
NOTE
For CDD On-Prem, the tenant id is 00000000-0000-0000-0000-000000000000.
Documentation Legal Notice
This online help system (the "System") is for the end user’s informational purposes only and is subject to change or
withdrawal by Broadcom at any time.
This System may not be copied, transferred, reproduced, disclosed, modified or duplicated, in whole or in part, without
the prior written consent of CA. This System is confidential and proprietary information of Broadcom and protected by the
copyright laws of the United States and international treaties.
Notwithstanding the foregoing, licensed users may make one copy of the System as reasonably required for back-up
and disaster recovery purposes, provided that all Broadcom copyright notices and legends are affixed to the reproduced
655

Continuous Delivery Director 8.5
copy. Only authorized employees, consultants, or agents of the user who are bound by the provisions of the license for the
product are permitted to have access to such copy.
The right to make a copy of the System is limited to the period during which the license for the product remains in full force
and effect. Should the license terminate for any reason, it shall be the user’s responsibility to certify in writing to Broadcom
that all copies and partial copies of the System have been destroyed.
EXCEPT AS OTHERWISE STATED IN THE APPLICABLE LICENSE AGREEMENT, TO THE EXTENT PERMITTED
BY APPLICABLE LAW, BROADCOM PROVIDES THIS SYSTEM “AS IS” WITHOUT WARRANTY OF ANY KIND,
INCLUDING WITHOUT LIMITATION, ANY IMPLIED WARRANTIES OF MERCHANTABILITY, FITNESS FOR A
PARTICULAR PURPOSE OR NONINFRINGEMENT. IN NO EVENT WILL BROADCOM BE LIABLE TO THE END USER
OR ANY THIRD PARTY FOR ANY LOSS OR DAMAGE, DIRECT OR INDIRECT, FROM THE USE OF THIS SYSTEM,
INCLUDING WITHOUT LIMITATION, LOST PROFITS, BUSINESS INTERRUPTION, GOODWILL, OR LOST DATA,
EVEN IF CA IS EXPRESSLY ADVISED OF SUCH LOSS OR DAMAGE.
The use of any product referenced in the System is governed by the end user’s applicable license agreement.
The manufacturer of this System is CA, a Broadcom Company.
The System, licensed software, and other documentation are deemed to be commercial computer software as defined
in FAR 12.212 and subject to restricted rights as defined in FAR Section 52.227-19 "Commercial Computer Software -
Restricted Rights" and DFARS 227.7202, Rights in "Commercial Computer Software or Commercial Computer Software
Documentation," as applicable, and any successor regulations, whether delivered by CA as on premises or hosted
services. Any use, modification, reproduction release, performance, display or disclosure of the System, licensed
software, and other documentation by the U.S. Government shall be solely in accordance with the terms of the agreement
between CA and the U.S. Government.
All trademarks, trade names, service marks, and logos referenced herein belong to their respective companies.
Copyright
©
2019 Broadcom. All rights reserved. The term “Broadcom” refers to Broadcom Inc. and/or its subsidiaries.
656

