
Cisco Wireless Phone 840 and 860 Administration Guide for Cisco
Unified Communications Manager
First Published: 2021-01-08
Last Modified: 2024-07-15
Americas Headquarters
Cisco Systems, Inc.
170 West Tasman Drive
San Jose, CA 95134-1706
USA
http://www.cisco.com
Tel: 408 526-4000
800 553-NETS (6387)
Fax: 408 527-0883
THE SPECIFICATIONS AND INFORMATION REGARDING THE PRODUCTS IN THIS MANUAL ARE SUBJECT TO CHANGE WITHOUT NOTICE. ALL STATEMENTS,
INFORMATION, AND RECOMMENDATIONS IN THIS MANUAL ARE BELIEVED TO BE ACCURATE BUT ARE PRESENTED WITHOUT WARRANTY OF ANY KIND,
EXPRESS OR IMPLIED. USERS MUST TAKE FULL RESPONSIBILITY FOR THEIR APPLICATION OF ANY PRODUCTS.
THE SOFTWARE LICENSE AND LIMITED WARRANTY FOR THE ACCOMPANYING PRODUCT ARE SET FORTH IN THE INFORMATION PACKET THAT SHIPPED WITH
THE PRODUCT AND ARE INCORPORATED HEREIN BY THIS REFERENCE. IF YOU ARE UNABLE TO LOCATE THE SOFTWARE LICENSE OR LIMITED WARRANTY,
CONTACT YOUR CISCO REPRESENTATIVE FOR A COPY.
The following information is for FCC compliance of Class A devices: This equipment has been tested and found to comply with the limits for a Class A digital device, pursuant to part 15
of the FCC rules. These limits are designed to provide reasonable protection against harmful interference when the equipment is operated in a commercial environment. This equipment
generates, uses, and can radiate radio-frequency energy and, if not installed and used in accordance with the instruction manual, may cause harmful interference to radio communications.
Operation of this equipment in a residential area is likely to cause harmful interference, in which case users will be required to correct the interference at their own expense.
The following information is for FCC compliance of Class B devices: This equipment has been tested and found to comply with the limits for a Class B digital device, pursuant to part 15 of
the FCC rules. These limits are designed to provide reasonable protection against harmful interference in a residential installation. This equipment generates, uses and can radiate radio
frequency energy and, if not installed and used in accordance with the instructions, may cause harmful interference to radio communications. However, there is no guarantee that interference
will not occur in a particular installation. If the equipment causes interference to radio or television reception, which can be determined by turning the equipment off and on, users are
encouraged to try to correct the interference by using one or more of the following measures:
• Reorient or relocate the receiving antenna.
• Increase the separation between the equipment and receiver.
• Connect the equipment into an outlet on a circuit different from that to which the receiver is connected.
• Consult the dealer or an experienced radio/TV technician for help.
Modifications to this product not authorized by Cisco could void the FCC approval and negate your authority to operate the product.
The Cisco implementation of TCP header compression is an adaptation of a program developed by the University of California, Berkeley (UCB) as part of UCB’s public domain version of
the UNIX operating system. All rights reserved. Copyright
©
1981, Regents of the University of California.
NOTWITHSTANDING ANY OTHER WARRANTY HEREIN, ALL DOCUMENT FILES AND SOFTWARE OF THESE SUPPLIERS ARE PROVIDED "AS IS" WITH ALL FAULTS.
CISCO AND THE ABOVE-NAMED SUPPLIERS DISCLAIM ALL WARRANTIES, EXPRESSED OR IMPLIED, INCLUDING, WITHOUT LIMITATION, THOSE OF
MERCHANTABILITY, FITNESS FOR A PARTICULAR PURPOSE AND NONINFRINGEMENT OR ARISING FROM A COURSE OF DEALING, USAGE, OR TRADE PRACTICE.
IN NO EVENT SHALL CISCO OR ITS SUPPLIERS BE LIABLE FOR ANY INDIRECT, SPECIAL, CONSEQUENTIAL, OR INCIDENTAL DAMAGES, INCLUDING, WITHOUT
LIMITATION, LOST PROFITS OR LOSS OR DAMAGE TO DATA ARISING OUT OF THE USE OR INABILITY TO USE THIS MANUAL, EVEN IF CISCO OR ITS SUPPLIERS
HAVE BEEN ADVISED OF THE POSSIBILITY OF SUCH DAMAGES.
Any Internet Protocol (IP) addresses and phone numbers used in this document are not intended to be actual addresses and phone numbers. Any examples, command display output, network
topology diagrams, and other figures included in the document are shown for illustrative purposes only. Any use of actual IP addresses or phone numbers in illustrative content is unintentional
and coincidental.
All printed copies and duplicate soft copies of this document are considered uncontrolled. See the current online version for the latest version.
Cisco has more than 200 offices worldwide. Addresses and phone numbers are listed on the Cisco website at www.cisco.com/go/offices.
Cisco and the Cisco logo are trademarks or registered trademarks of Cisco and/or its affiliates in the U.S. and other countries. To view a list of Cisco trademarks, go to this URL:
https://www.cisco.com/c/en/us/about/legal/trademarks.html. Third-party trademarks mentioned are the property of their respective owners. The use of the word partner does not imply a
partnership relationship between Cisco and any other company. (1721R)
©
2024 Cisco Systems, Inc. All rights reserved.

CONTENTS
About the phones 1
CHAPTER 1
Cisco Wireless Phone 840 and 860 1
Ingress Protection 4
Phone model numbers 4
New and changed information 5
New and changed information for release 1.10(3) 5
New and changed information for release 1.10(0) 6
New and changed information for release 1.9(0) 6
New and changed information for release 1.8(0) 7
New and changed information for release 1.7(0) 8
New and changed information for release 1.6(0) 8
New and changed information for release 1.5(0) 8
New and changed information for release 1.4(0) 11
New and changed information for release 1.3(0) 12
Supported languages 13
Hardware, buttons, screen, and apps 14
Hardware and buttons 14
Launcher screen 18
Cisco apps 19
Care of your phone 21
Maintenance schedule 21
Maintain your phone 22
Disinfectants 24
UV disinfection 25
Dry your phone 25
Related documentation 26
Cisco Wireless Phone 840 and 860 Administration Guide for Cisco Unified Communications Manager
iii

Cisco Wireless Phone 840 and 860 documentation 26
Cisco Unified Communications Manager documentation 26
Cisco IP phone user support 26
Configuration and deployment workflow 27
Initial setup 29
CHAPTER 2
Network requirements 29
Cisco Wireless Phone 840 and 860 deployment guide 30
Cisco Unified Communications Manager requirements 30
Device enabler QED installer file 31
Phone software file 31
Phone configuration files 31
Load the COP files to Cisco Unified Communications Manager 31
Phone battery installation 33
Install the battery 33
Remove the battery 35
Hot swap the battery for Cisco Wireless Phone 860 and 860S 36
Battery contact damage prevention 37
Phone battery charging 38
Charge the battery with the AC power supply 39
Charge the battery with the USB cable and a USB port on your computer 40
Cisco Unified Communications Manager phone configuration 41
CHAPTER 3
Determine the MAC address of the phone 41
Install manufacturing CA certificates 41
Before you register wireless phones 42
Device pool configuration 43
Create custom SIP profile 43
Phone button template configuration 44
Phone softkey templates 44
Create a new phone security profile 45
Manual phone registration 46
Add an end user (Optional) 46
Add the phone 47
Cisco Wireless Phone 840 and 860 Administration Guide for Cisco Unified Communications Manager
iv
Contents

Add the phone extension 49
Phone feature configuration 50
Set up phone features for all phones 51
Set up phone features for a group of phones 51
Set up phone features for a single phone 52
Product Specific Configuration Layout fields 52
Configure visual voicemail 57
Configure Tomcat trust certificate 58
Configure the voicemail box and Web Application Password 58
Enable Visual Voicemail Access 59
Configure the voicemail server to the Cisco Unity Connection server 59
Phone services 60
Phone line configuration options 61
Problem report tool 61
Configure a customer support upload URL 62
Corporate and personal directories setup 63
Corporate directory setup 63
Personal directory setup 63
Self Care Portal overview 64
Set up user access to the Self Care Portal 64
Call pickup 64
Phone configuration 65
CHAPTER 4
Enterprise Mobility Management application configuration 65
Enroll the phones to the Enterprise Mobility Manager application 65
Cisco Wireless Phone Configuration Management tool 66
Cisco Wireless Phone Configuration Management tool workflow 67
Generate a QR code to initialize phones 68
Enroll phones with Cisco Wireless Phone Configuration Management tool QR code 69
Create encrypted phone configuration file 69
Preinstalled Android apps 71
Upload the phone configuration file to Cisco Unified Communications Manager 73
Update existing configuration file 73
Manual phone configuration 74
Cisco Wireless Phone 840 and 860 Administration Guide for Cisco Unified Communications Manager
v
Contents

Wi-Fi profile configuration 74
Add the phone to a broadcasted Wi-Fi network 74
Add the phone to a nonbroadcast Wi-Fi network 75
Configure a TFTP server 76
Configure a Call server mode 77
Cisco app configuration 79
CHAPTER 5
Cisco app configuration overview 79
Enterprise Mobility Management application interface 79
Program the Enterprise Mobility Management application 80
Cisco Wireless Phone Configuration Management tool for Cisco app configuration 82
Access the Cisco app settings on the phone 82
Emergency app 83
Emergency app configuration 83
Send emergency event notifications 83
Motion sensor 84
Panic Button settings 86
Emergency call settings 88
Emergency tone settings 88
Emergency app and Panic Button training 89
Push to Talk app 89
User settings for Push to Talk 90
Admin settings for Push to Talk 90
Battery Life app 91
User settings for Battery Life 93
Admin settings for Battery Life 93
Buttons app 94
Programmable buttons 94
Buttons settings 95
Set a button to run an application 101
Answer and end calls using the hardware buttons 101
Set a button to answer a call 101
Set a button to end or decline a call 102
Turn ON and OFF flaslight using the hardware buttons 103
Cisco Wireless Phone 840 and 860 Administration Guide for Cisco Unified Communications Manager
vi
Contents

Set a button to control the flashlight 103
Set a button to toggle the flashlight 104
Cisco app package names 105
Barcode app 105
Barcode symbologies 106
General settings for the Barcode app 107
Default settings for the Barcode app 107
ScanFlex 120
ScanFlex settings 121
Actions for advanced data formatting 121
Test scan a barcode 123
Custom Settings app 124
User restrictions in Custom Settings 124
More Custom Settings 129
Call Quality Settings app 138
Wi-Fi information 138
Call Quality Settings 139
Diagnostics app 144
Sound Stage app 144
Admin Settings for Sound Stage 145
Audio profiles 146
Change the audio profile 147
Profile switch rules 147
Web API app 148
Phone state polling 148
Push settings 149
Push request notifications 150
Web application shortcuts 151
Place web application shortcuts on launcher screen 151
Device event notifications 151
Accessories 153
CHAPTER 6
Supported accessories 153
Headsets 154
Cisco Wireless Phone 840 and 860 Administration Guide for Cisco Unified Communications Manager
vii
Contents

Important headset safety information 154
Standard headsets 155
Bluetooth headsets 155
Desktop chargers 155
Set up the desktop chargers 156
Charge your phone and battery with desktop dual charger 157
Charge your spare 860 batteries with desktop battery charger 158
Multichargers 159
Assemble the Cisco Wireless Phone 860 Multicharger Base 160
Charge phones and batteries with multicharger 162
Charger care 163
Scanner handle for the Cisco Wireless Phone 840S 163
Install the Cisco Wireless Phone 840S in the scanner handle 164
Clips 165
Cisco accessory part numbers 165
Maintenance 169
CHAPTER 7
Reboot the phone 169
Factory default settings 169
Reset to factory default through the phone settings 170
Restore to factory default through recovery mode 170
Cisco app software updates 171
Troubleshooting 173
CHAPTER 8
General troubleshooting information 173
Details available on the phone 174
View phone information 174
Access phone status and device information 175
Access the About option for a Cisco app 175
Exit and reenter the Smart Launcher on the phone 176
Capture a screenshot on the phone 176
Problem report log bundles 177
Generate a problem report and log bundle 177
Retrieve problem report log bundles 178
Cisco Wireless Phone 840 and 860 Administration Guide for Cisco Unified Communications Manager
viii
Contents


Cisco Wireless Phone 840 and 860 Administration Guide for Cisco Unified Communications Manager
x
Contents

CHAPTER 1
About the phones
• Cisco Wireless Phone 840 and 860, on page 1
• New and changed information, on page 5
• Supported languages, on page 13
• Hardware, buttons, screen, and apps, on page 14
• Care of your phone, on page 21
• Related documentation, on page 26
• Cisco IP phone user support, on page 26
• Configuration and deployment workflow, on page 27
Cisco Wireless Phone 840 and 860
The Cisco Wireless Phone 840 and 860 are wireless smartphones. These phones provide voice communication
over your organization's wireless network using Cisco Unified Communications Manager and access points
(APs). They work within the Wi-Fi range set by your organization.
Like other devices powered by Android, your phone is app-driven, not menu-driven. You tap icons to open
applications. Your phone may include several different Cisco apps that allow you to:
• Place and receive phone calls.
• Put calls on hold.
• Transfer calls.
• Have conference calls.
• Forward your calls.
• Monitor your phone battery life.
• Customize your phone buttons.
• If configured, provide emergency safety features such as alarms and motion monitoring.
• If configured, send group broadcasts.
Like other network devices, the administrator configures and manages these phones. Based on the needs of
your organization, the administrator may limit certain apps, features, or settings that may be available on
consumer-grade Android devices.
Cisco Wireless Phone 840 and 860 Administration Guide for Cisco Unified Communications Manager
1

Contact your administrator for information about the configured capabilities of your phone within your
organization.
The following figure shows the Cisco Wireless Phone 840 on the left and the Cisco Wireless Phone 840S on
the right. The Cisco Wireless Phone 840S includes a barcode scanner.
Figure 1: Cisco Wireless Phone 840 and Cisco Wireless Phone 840S
The following figure shows the Cisco Wireless Phone 860 on the left and the Cisco Wireless Phone 860S on
the right. The Cisco Wireless Phone 860S includes a barcode scanner.
Cisco Wireless Phone 840 and 860 Administration Guide for Cisco Unified Communications Manager
2
About the phones
Cisco Wireless Phone 840 and 860

Figure 2: Cisco Wireless Phone 860 and Cisco Wireless Phone 860S
The Cisco Wireless Phone 860 and Cisco Wireless Phone 860S, though larger in size than the Cisco Wireless
Phone 840 and Cisco Wireless Phone 840S, are similar in appearance and functionality.
Some physical characteristics of the Cisco Wireless Phone 840 and 860 include:
• 4.0 in. (10.2 cm) touchscreen for the 840 phones
• 5.2 in. (13.2 cm) touchscreen for the 860 phones
• 8 MP rear and 5 MP front camera for the 840 phones
• 13 megapixel (MP) rear and 8 MP front camera for the 860 phones
• Damage resistant Gorilla
™
glass
• Recessed display for screen protection
• Tolerance of antibacterial and alcohol-based wipes
• Latex- and lead-free
• Shockproof and vibration-proof
• USB-C interface
• USB On-the-Go (OTG) 2.0 interface for use with a desktop charger or multicharger
• Cisco Wireless Phone 840 has Ingress Protection 65 (IP65) with resistance to dust and water spray from
a nozzle
• Cisco Wireless Phone 860 has Ingress Protection 68 (IP68) with resistance to dust, drops, and liquids
• Chargeable with a USB, desktop charger, or multicharger
Cisco Wireless Phone 840 and 860 Administration Guide for Cisco Unified Communications Manager
3
About the phones
Cisco Wireless Phone 840 and 860

For more details about the phones, see the product data sheet.
If configured, your phone provides enhanced productivity features that extend your call-handling capabilities,
such as:
• Bluetooth
®
wireless headsets, including some hands-free call features
• Wireless access to your phone number and the corporate directory
• Access to network data, Android apps, and web-based services
• Online customization of the call forward feature from the Self Care portal
To prevent device damage:
• Don't intentionally submerge the phone or battery in water.
• Don't expose the phone to pressurized water or high velocity water, such as when showering, cleaning,
or hand washing.
• Don't bathe or swim with the phone.
• Don't use the phone in a sauna or steam room.
• Don't use the phone in corrosive environments.
• Don't operate or store the phone, batteries, and accessories outside the suggested temperature ranges or
in extremely humid, hot, or cold conditions.
• Don't intentionally drop the phone or subject it to other impacts.
• Don't disassemble the phone; don't remove any screws.
• Don't use harsh cleaning agents, like bleach and other chemicals, to clean the phone exterior.
• Don't use a broken battery.
Minimize the exposure of your phone to soap, detergent, acids or acidic foods, and any liquids; for example,
salt water, soapy water, pool water, perfume, insect repellent, lotions, sun screen, oil, adhesive remover, hair
dye, soft drinks, and solvents. For more information, see Care of your phone, on page 21.
Ingress Protection
The Cisco Wireless Phone 840 and 860 are tested under controlled laboratory conditions.
The Cisco Wireless Phone 840 and 840S have a rating of IP65 in ordinary locations. IP65 indicates that the
phones can withstand dust and are resistant to water spray from a nozzle.
The Cisco Wireless Phone 860 and 860S have a rating of IP68 in ordinary locations. IP68 indicates that the
phones can withstand dust and are resistant to brief submersion in shallow fresh water.
Due to normal wear, the resistance of the phone to dust and water may decrease. Therefore, it’s important to
take care of your phone and not deliberately expose the phone to a hostile environment of dust or water.
Phone model numbers
Each phone has a model number. If you're unsure which model you have, you can locate the model number
on the back of the phone after you remove the battery.
Cisco Wireless Phone 840 and 860 Administration Guide for Cisco Unified Communications Manager
4
About the phones
Ingress Protection

You can also find the model number through Settings > About Phone > Model & hardware.
Note
Table 1: Cisco Wireless Phone 840 and 860 model numbers
Model
number
Phone
CP-840Cisco Wireless Phone 840
CP-840SCisco Wireless Phone
840S
CP-860Cisco Wireless Phone 860
CP-860SCisco Wireless Phone
860S
New and changed information
The following section describes changes to this book to support new releases.
New and changed information for release 1.10(3)
The following table describes changes to this book to support release 1.10(3).
Table 2: New and changed information for release 1.10(3)
New or changed informationFeature
New:
• Answer and end calls using the hardware buttons
Answer and end calls using the hardware buttons
New:
• Set a button to answer a call
Set a button to answer a call
New:
• Set a button to end or decline a call
Set a button to end or decline a call
New:
• Turn ON and OFF flaslight using the hardware
buttons
Turn ON and OFF flashlight using the hardware
buttons
New:
• Set a button to control the flashlight
Set a button to control the flashlight
Cisco Wireless Phone 840 and 860 Administration Guide for Cisco Unified Communications Manager
5
About the phones
New and changed information

New or changed informationFeature
New:
• Set a button to toggle the flashlight
Set a button to toggle the flashlight
New and changed information for release 1.10(0)
The following table describes changes to this book to support release 1.10(0).
Table 3: New and changed information for release 1.10(0)
New or changed informationFeature
Updated:
• Product Specific Configuration Layout fields
Updated Ringtone Per Line Management for Cisco
Unified Communications Manager
Updated:
• General troubleshooting information
Third Party Application Conflicts
Updated:
• Add the phone
CTI Controlled support
New:
• InformaCast Advanced Notification Support
Cisco Unified IP Phone Services Application
Development / XML object support (Informacast)
New:
• CTI-Controlled Support
CTI Controlled support
New and changed information for release 1.9(0)
The following table describes changes to this book to support release 1.9(0).
Table 4: New and changed information for release 1.9(0)
New or changed informationFeature
Updated:
• Phone services
Cisco Unified Survivable Remote Site Telephony
Updated:
• Generate a problem report and log bundle
Add Configuration File Dump to Cisco Apps and Log
Bundles
Cisco Wireless Phone 840 and 860 Administration Guide for Cisco Unified Communications Manager
6
About the phones
New and changed information for release 1.10(0)

New or changed informationFeature
New:
• Call pickup
Call Pickup
Updated:
• Generate a problem report and log bundle
Report a Problem User Choice in Cisco Phone UI
New:
• Diagnostics app
Updated:
• Cisco app package names
Diagnostics Application
Updated:
• Call Quality Settings > Wi-Fi preferences
CAC is Disabled by Default
Updated:
• Product Specific Configuration Layout fields
Announced Caller ID
Updated:
• Product Specific Configuration Layout fields
Mute SIP Registration Notifications
Updated:
• More Custom Settings > Sounds
• More Custom Settings > Wallpaper
Push Custom Ringtone, Notification, Alarm, and
Wallpaper
New and changed information for release 1.8(0)
The following table describes changes to this book to support release 1.8(0).
Table 5: New and changed information for release 1.8(0)
New or changed informationFeature
Updated:
• Phone line configuration options
Recording for Cisco Unified Communications
Manager
Updated:
• Add the phone extension
Recording for Cisco Unified Communications
Manager
Cisco Wireless Phone 840 and 860 Administration Guide for Cisco Unified Communications Manager
7
About the phones
New and changed information for release 1.8(0)

New or changed informationFeature
Updated:
• Product Specific Configuration Layout fields
Ringtone Per Line Management for Cisco Unified
Communications Manager
New and changed information for release 1.7(0)
The following table describes changes to this book to support release 1.7(0).
Table 6: New and changed information for release 1.7(0)
New or changed informationFeature
Updated:
• Phone services
Lightweight Directory Access Protocol (LDAP) for
Webex Calling
Updated:
• Battery Life app
Maximum Battery Charge Cycles Notification
Updated:
• Cisco app package names
Sound Stage app
New:
• Sound Stage app
Sound Stage app
New and changed information for release 1.6(0)
The following table describes changes to this book to support release 1.6(0).
Table 7: New and changed information for release 1.6(0)
New or changed informationFeature
Updated:
• Phone services
Webex Calling support
New:
• Configure a Call server mode
Configure a Call server mode
New and changed information for release 1.5(0)
The following table describes changes to this book to support release 1.5(0).
Cisco Wireless Phone 840 and 860 Administration Guide for Cisco Unified Communications Manager
8
About the phones
New and changed information for release 1.7(0)

Table 8: New and changed information for release 1.5(0)
New or changed informationFeature
New Cisco Wireless Phone
Configuration Management tool to
quickly deploy and configure
multiple Cisco Wireless Phones
without an Enterprise Mobility
Management (EMM) application.
When you use the Cisco Wireless
Phone Configuration Management
tool, the phone has a new smart
launcher screen with single-app or
multi-app display mode.
Cisco Wireless Phone 840 and 860 Administration Guide for Cisco Unified Communications Manager
9
About the phones
New and changed information for release 1.5(0)

New or changed informationFeature
New:
• Cisco Wireless Phone Configuration Management tool , on page
66
• Cisco Wireless Phone Configuration Management tool workflow,
on page 67
• Generate a QR code to initialize phones, on page 68
• Enroll phones with Cisco Wireless Phone Configuration
Management tool QR code, on page 69
• Create encrypted phone configuration file, on page 69
• Preinstalled Android apps, on page 71
• Upload the phone configuration file to Cisco Unified
Communications Manager, on page 73
• Update existing configuration file, on page 73
• Cisco Wireless Phone Configuration Management tool for Cisco
app configuration, on page 82
• Exit and reenter the Smart Launcher on the phone, on page 176
Updated:
• Cisco Wireless Phone 840 and 860, on page 1
• Launcher screen, on page 18
• Cisco apps, on page 19
• Configuration and deployment workflow, on page 27
• Cisco Unified Communications Manager requirements, on page
30
• Load the COP files to Cisco Unified Communications Manager,
on page 31
• Create a new phone security profile, on page 45
• Product Specific Configuration Layout fields, on page 52
• Enroll the phones to the Enterprise Mobility Manager application,
on page 65
• Manual phone configuration, on page 74
• Cisco app configuration overview, on page 79
• User restrictions in Custom Settings, on page 124
• Capture a screenshot on the phone, on page 176
Cisco Wireless Phone 840 and 860 Administration Guide for Cisco Unified Communications Manager
10
About the phones
New and changed information for release 1.5(0)

New or changed informationFeature
Updated:
• Network requirements, on page 29
• More Custom Settings, on page 129
Alternate Network Time Protocol
(NTP) service from local network in
DHCP option 42.
New and changed information for release 1.4(0)
The following table describes changes to this book to support release 1.4(0).
Table 9: New and changed information for release 1.4(0)
New or changed informationFeature
Updated:
Product Specific Configuration Layout fields, on page 52
Cisco app software updates, on page 171
To download firmware, use HTTP on TCP 6970
only, not HTTPS on TCP 6971
Updated:
Phone services, on page 60
Extension mobility cross cluster (EMCC)
New:
Corporate and personal directories setup, on page 63
Corporate directory setup, on page 63
Personal directory setup, on page 63
Self Care Portal overview, on page 64
Set up user access to the Self Care Portal, on page 64
Personal directory is available with contacts
that synchronize through Cisco Unified
Communications Manager
Updated:
Barcode app, on page 105
New:
Test scan a barcode, on page 123
New test scan is available in the Barcode app
New:
Wi-Fi information, on page 138
Information about the Wi-Fi access point
connection displays in the Call Quality Settings
app
Updated:
With this release, you'll notice some minor changes to user
interface elements, such as button colors and icon shapes.
The only icon that looks different is on the Call Quality
Settings app.
Updates to the user interface with new Webex
branding color and style
Cisco Wireless Phone 840 and 860 Administration Guide for Cisco Unified Communications Manager
11
About the phones
New and changed information for release 1.4(0)

New and changed information for release 1.3(0)
The following table describes changes to this book to support release 1.3(0).
Table 10: New and changed information for release 1.3(0)
New or changed informationFeature
Updated:
• Before you register wireless phones, on page 42
• Phone button template configuration, on page 44
• Add the phone extension, on page 49
• Configure a TFTP server, on page 76
• Access phone status and device information, on page 175
• Access the About option for a Cisco app, on page 175
• Generate a problem report and log bundle, on page 177
Multiple lines
Updated:
• Before you register wireless phones, on page 42
• Phone button template configuration, on page 44
Shared lines
Updated:
• Before you register wireless phones, on page 42
• Phone button template configuration, on page 44
Privacy on shared lines
New:
• Phone services, on page 60
Cisco Extension Mobility
New:
• Phone line configuration options, on page 61
Auto answer
New:
• Phone line configuration options, on page 61
Line text label
Updated:
• Network requirements, on page 29
Call Admission Control and Traffic
Specification
Updated:
• Admin settings for Push to Talk , on page 90
PTT broadcast on a locked phone
Cisco Wireless Phone 840 and 860 Administration Guide for Cisco Unified Communications Manager
12
About the phones
New and changed information for release 1.3(0)

New or changed informationFeature
Updated:
• User restrictions in Custom Settings, on page 124
Custom Settings app has Dark
theme and Nearby share quick
settings tiles
Updated:
• More Custom Settings, on page 129
Custom Settings app now includes
display settings
New:
• Phone model numbers, on page 4
• Cisco accessory part numbers, on page 165
Updated:
• Phone battery charging, on page 38
• Charge the battery with the AC power supply, on page 39
• Charge the battery with the USB cable and a USB port on your
computer, on page 40
• Supported accessories, on page 153
• Desktop chargers, on page 155
• Multichargers, on page 159
• Clips, on page 165
More information about model
numbers and accessories
Supported languages
The phones currently support the following languages.
• Danish
• Dutch
• English
• Finnish
• French
• German
• Hungarian
• Italian
• Norwegian
• Portuguese
Cisco Wireless Phone 840 and 860 Administration Guide for Cisco Unified Communications Manager
13
About the phones
Supported languages

• Russian
• Slovenian
• Spanish
• Swedish
Hardware, buttons, screen, and apps
Your phone's hardware, buttons, screens, and apps are similar to that of a consumer-grade smartphone or other
Android device. However, since your phone is a managed device, your organization may configure certain
limitations or allowances on the phone.
Hardware and buttons
Your wireless phone has many hardware features and buttons that you use regularly.
Although the Cisco Wireless Phone 840 and Cisco Wireless Phone 860 are different sizes, the hardware and
buttons perform the same actions. However, the hardware features and buttons are not in the same location
on the phones. Another difference between the phones is that the Cisco Wireless Phone 840 doesn't have a
fingerprint button.
Cisco Wireless Phone 840 hardware and buttons
The following figure shows the Cisco Wireless Phone 840 and 840S with a barcode scanner.
Figure 3: Cisco Wireless Phone 840 and 840S
Cisco Wireless Phone 840 and 860 Administration Guide for Cisco Unified Communications Manager
14
About the phones
Hardware, buttons, screen, and apps

Table 11: Cisco Wireless Phone 840 and 840S hardware and buttons
Hardware or buttons in groupGroup number
On the top left of the phone is the round Power button, which turns the power on and off,
and locks and unlocks the screen.
1
On the top center of the Cisco Wireless Phone 840S is the barcode scanner, and on the
top right is a round red Programmable Emergency alarm button.
• Barcode scanner—If the phone is an 840S, scans a barcode.
• Programmable Emergency button—By default this programmable button is set as
an Emergency button. If configured, the button sends a preprogrammed emergency
panic alert.
2
On the top front of the phone is the receive speaker in the middle, and the front camera
on the right.
• Receive speaker—Receives audio.
• Front camera—Captures images.
3
On the right side of the phone is the Programmable PTT button. By default this
programmable button is set to activate PTT. If enabled, PTT sends broadcast messages
over preprogrammed channels like a walkie-talkie.
4
On the bottom front of the phone is the microphone, which captures your audio to send.5
On the bottom of the phone is the headset jack on the left, the USB charging port in the
middle, and the speaker on the right.
• Headset jack—Supports a headset with a 3.5-mm audio plug.
• USB charging port—Supports a USB cable to charge the phone.
• Speaker—Receives audio you can hear.
6
On the left side of the phone are three programmable buttons. By default, the top and
middle buttons are set as Volume up and Volume down respectively. By default, the
bottom button is not set.
• Programmable Volume up button—By default, this programmable button is set to
turn up the volume.
• Programmable Volume down button—By default, this programmable button is set
to turn down the volume.
• Programmable button—By default, this programmable button is set as the barcode
scanner on the 840S phones.
7
Cisco Wireless Phone 840 and 860 Administration Guide for Cisco Unified Communications Manager
15
About the phones
Hardware and buttons

Hardware or buttons in groupGroup number
On the upper left back of the phone is the rear camera above the flash lens or torch, with
the rear microphone to the right.
• Rear camera—Captures images.
• Flash lens or torch—Emits light for a camera flash, or torch flashlight.
• Rear microphone—Cancels noise.
8
On the lower back of the phone are the charger contacts on the left, the battery latch in
the middle lower edge of the battery, and the battery.
• Charger contacts—Connects with the contacts on a desktop charger or multicharger
to charge the battery.
• Battery latch—Releases and catches the battery in the phone.
• Rechargeable battery—Powers the phone.
9
Cisco Wireless Phone 860 hardware and buttons
The following figure shows the Cisco Wireless Phone 860 and 860S with a barcode scanner.
Figure 4: Cisco Wireless Phone 860 and 860S
Cisco Wireless Phone 840 and 860 Administration Guide for Cisco Unified Communications Manager
16
About the phones
Hardware and buttons

Table 12: Cisco Wireless Phone 860 and 860S hardware and buttons
Hardware or buttons in groupGroup number
On the top of the phone is the headset jack on the left, the bar code scanner for 860S phones
in the middle, and a red Programmable Emergency alarm button on the right.
• Headset jack—Supports a headset with a 3.5-mm audio plug.
• Barcode scanner—If the phone is an 860S, scans a barcode.
• Programmable Emergency button—By default this programmable button is set as
an Emergency button. If configured, the button sends a preprogrammed emergency
panic alert.
1
On the top front left of the phone is the front camera, with the receive speaker to the right.
• Front camera—Captures images.
• Receive speaker—Receives audio.
2
On the right side of the phone is the Programmable Push to Talk (PTT) button on the
top, and the Power button on the bottom.
• Programmable PTT button—By default this programmable button is set to activate
PTT. If enabled, PTT sends broadcast messages over preprogrammed channels like
a walkie-talkie.
• Power button—Turns the power on and off, and locks and unlocks the screen. A
raised edge protects the power button, so it’s not easy to press by accident.
3
On the bottom of the phone is the USB charging port on the left, the microphone in the
middle, and the charger contacts on the right.
• USB charging port—Supports a USB cable to charge the phone.
• Microphone—Captures your audio to send.
• Charger contacts—Connects with the contacts on a desktop charger to charge the
battery.
4
On the left side of the phone are three programmable buttons. By default, the top button
is set as the Scanner for 860S phones. By default, the middle and bottom buttons are set
as Volume up and Volume down respectively.
• Programmable button—By default, this programmable button is set as the barcode
scanner on the 860S phones.
• Programmable Volume up button—By default, this programmable button is set to
turn up the volume.
• Programmable Volume down button—By default, this programmable button is set
to turn down the volume.
5
Cisco Wireless Phone 840 and 860 Administration Guide for Cisco Unified Communications Manager
17
About the phones
Hardware and buttons

Hardware or buttons in groupGroup number
On the top back of the phone is the rear camera on the far left, and the rear microphone
above the flash lens or torch. In the upper middle of the phone is a Programmable
Fingerprint scanner button.
• Rear camera—Captures images.
• Rear microphone—Cancels noise.
• Flash lens or torch—Emits light for a camera flash, or torch flashlight.
• Programmable Fingerprint scanner button—By default, this programmable button
is set to act as a fingerprint scanner to unlock the phone.
6
On the lower back of the phone is the rear speaker on the left, the battery latch in the
middle lower edge of the battery, and the battery.
• Rear speaker—Receives audio you can hear.
• Battery latch—Releases and catches the battery in the phone.
• Rechargeable battery—Powers the phone.
7
This side view of the 860S highlights the barcode scanner on the top of the phone.8
If you use an incorrect cable to connect to the phone USB port, third-party accessories such as keyboards or
a mouse may not work. When buying these products, look for Benson Approved and OTG cables. Any cables
or adapters must be USB certified and built to the USB-C specification.
Note
If available, you can reprogram the Programmable buttons with the Buttons app.
Note
Launcher screen
The launcher screen is the first screen that you see after you turn on or unlock the phone. It differs based on
how the administrator customizes the phones, but contains the following general areas:
• Top of the screen—Contains the status bar, which displays the time and icons that give you information
about the status of your phone and notifications.
• Body of the screen—Contains the apps and widgets that the administrator installs on the phone. The
administrator may use a smart launcher to display a limited number of apps, so what you see can vary
from a:
• Launcher screen with all the factory default apps and widgets such as a phone, web browser, camera,
and collection of Android and custom Cisco apps.
• Smart launcher screen with multiple selected apps.
Cisco Wireless Phone 840 and 860 Administration Guide for Cisco Unified Communications Manager
18
About the phones
Launcher screen

• Smart launcher screen with a single, open app.
• Bottom of the screen—Contains navigation controls.
The smart launchers in this guide show what you may see if the administrator uses the Cisco Wireless Phone
Configuration Management tool to set up your phone. Your phone may not look or act exactly as described
in this guide if set up with another tool, such as an Enterprise Mobility Management (EMM) application.
Note
Figure 5: Sample launcher screens: factory default launcher, smart launcher with multiple apps, and smart launcher with a single open
app
Cisco apps
These Cisco apps may be available on your phone.
Table 13: Cisco apps
DescriptionCisco app
The Cisco Phone app allows you to use full SIP phone call functionality.
The Barcode app allows you to use the barcode scanner on your 800S
phone.
Cisco Wireless Phone 840 and 860 Administration Guide for Cisco Unified Communications Manager
19
About the phones
Cisco apps

DescriptionCisco app
The Battery Life app displays the current condition of the battery and
allows you to adjust the battery alarm volume.
The Buttons app allows you to program the buttons on your device.
The Call Quality Settings app allows the administrator to optimize
audio and video calls from Cisco dialers or other third-party dialers.
The Custom Settings app allows the administrator to provide extra
controls for the phone.
The Emergency app allows you to use personal monitoring alarms and
emergency calling. Deploy this app in lone worker environments or
where you need extra security.
The Logging app allows the administrator to access various debug
options on the phone.
The PTT app allows you to use a radio multicast app on your device.
The System Updater app allows you to see the current and available
firmware versions for the phone. However, the administrator manages
and pushes firmware updates to the phone through the Cisco Unified
Communications Manager.
.
The Web API app allows developers to interface with external services
and provide links to frequently used websites.
Cisco Wireless Phone 840 and 860 Administration Guide for Cisco Unified Communications Manager
20
About the phones
Cisco apps

DescriptionCisco app
The Smart Launcher app allows the administrator to specify which
apps to display on the launcher screen.
The Device Policy Controller app allows the administrator to specify
which apps aren't allowed on the phone.
The Diagnostics app allows the administrator to perform diagnostics
tests quickly and efficiently to verify phone’s hardware components.
Care of your phone
Your phone is rugged and made for use in tough environments. It’s built out of strong and resilient plastics.
All components are durable and reliable.
We’ve extensively tested the phones and warranty them for normal use under rigorous conditions. The Cisco
Wireless Phone 840 has an IP65 rating and the Cisco Wireless Phone 860 has an IP68 rating. However,
accidental, or inadvertent exposure to various substances can cause the phone to perform poorly or fail
completely.
There are many substances that you can’t clean off without damaging the device beyond repair. For instance,
if you drop your phone into glue or paint, even if you carefully clean the phone, it may not function properly.
Also, oil-based substances, such as make-up or lotion, can leave a sticky residue on the phone that attracts
and binds particles. This can jam key components such as the camera, microphone, speaker, or headset jack.
We don’t cover damage from such conditions under warranty. You can prevent or remedy such damage
through careful use and proper care and maintenance.
There are no serviceable parts in the phone, batteries, or chargers. Don't open or disassemble the phone case,
battery, or charger. You void your warranty if you disassemble any of these items.
Warning
Don't roughly handle the battery contacts when you clean the phone, or you may bend them. If you bend the
battery contacts, the phone may not turn on or it may display a battery error.
Caution
Maintenance schedule
It’s important to clean your phone regularly so that it functions properly. To set an effective maintenance
schedule for your phone, consider the following degrees of exposure and types of substances that may be
present in your organization.
Cisco Wireless Phone 840 and 860 Administration Guide for Cisco Unified Communications Manager
21
About the phones
Care of your phone

Table 14: Sample exposure levels
Potential substancesTypical work settingExposure level
• Paper and fiber lint.
• Light soil, dust, and pet hair and dander
• Food residue and spills.
• Human residue from coughs, sneezes, makeup,
lotion, or hair products.
Normal office settings with desks and
chairs and moderately mobile workers.
Light exposure
• All the substances from the light exposure list,
in larger quantities.
• Possibly some substances from the heavy
exposure list.
Interactive work settings with lots of
human contact, such as medical
outpatient facilities, restaurants,
hotels, light manufacturing, schools,
and retail.
Medium
exposure
• All the substances from the light and medium
exposure list.
• Manufacturing materials such as metal lint and
other particulates, various types of fluids, glues
and solutions, and waste products.
• In-patient medical exposures include body
fluids and waste, medical chemicals, drugs,
and various residue from medical processes.
Highly interactive work with much
more human contact and exposure to
different types of substances.
Heavy exposure
Maintain your phone
To avoid substances building up on your phone, follow these steps to maintain your phone. How frequently
you follow these steps depends on your work environment and exposure to various substances.
Cisco Wireless Phone 840 and 860 Administration Guide for Cisco Unified Communications Manager
22
About the phones
Maintain your phone

• Never bend battery contacts.
• Never submerge your phone into any cleaning solution.
• Never allow a cleaning solution to pool on the phone or in an orifice.
• Never spray any solution directly onto the phone.
• Never mix cleaning agents. The combined effects of cleaning agents are unknown. Mixing chemical
agents could seriously degrade the construction of the phone and make it susceptible to damage, even
with normal use.
• Never use furniture polishes, waxes, or plasticizer-based cleaners (ArmorAll
®
, and so on).
• Never use lanolin, aloe, glycerin, or other skin care products.
• Never use hand sanitizers to clean your phone or handle your phone when hands are wet with sanitizer
solution.
• Never apply any solvent such as acetone, mineral spirits, and so on
• Don’t exert undue pressure on the battery contacts on the bottom of the phone and inside the battery
compartment. Don’t rub, scrub, or use bleach.
Warning
Procedure
Step 1 Turn off the phone and remove the clip and battery.
Step 2 Spray canned air into crevices and orifices to blow out any lint or dirt.
Always point canned air at an angle away from your face and eyes.
Always wear safety goggles or glasses.
Never insert any instrument into any orifice including the microphone, earpiece, headphone jack, USB
plug, reset pin hole, or battery contacts.
Warning
Step 3 Clean surface dirt with soap and water with a damp, lint-free cloth.
You may scrub stubborn spots.
Don't scrub or bend battery contacts.
Don't squeeze water or any liquid into orifices, or a sticky plug can form that blocks the opening. The
result may be a significant deterioration in performance.
Warning
Step 4 Wipe off soap film with a different clean damp cloth.
Step 5 Dry with yet another clean dry cloth.
Step 6 Wipe battery contacts with a cotton swab dampened with alcohol to remove any lint.
Step 7 Polish the glass screen, photo lenses, flashlight, fingerprint scanner, and barcode reader (if present) with glass
cleaner towelettes.
Don't exert too much pressure on the glass screen.
Caution
Cisco Wireless Phone 840 and 860 Administration Guide for Cisco Unified Communications Manager
23
About the phones
Maintain your phone

Step 8 Clean the clip and battery separately.
Step 9 When the phone and battery are completely dry, reinstall the battery and replace the clip.
Step 10 Use an approved disinfectant to sanitize the device.
Disinfectants
Products listed here are often used to clean and disinfect in medical environments. They are considered safe
when used according to solution strength and manufacturer instructions. New products are introduced constantly
and generally have similar ingredients. Always follow the manufacturer guidelines for a cleaning or disinfecting
product.
Table 15: Generic liquid products
Solution strengthProduct
Use a 3% solutionHydrogen peroxide
Use a 10% solution (Sodium Hypochlorite 0.55%)
Don't use on metal charging contacts.
Warning
Bleach
Up to 91% solutionIsopropyl alcohol
Here are some brand name products that you can use:
• AZOWIPE
™
• Brulin BruTab 6S
®
Tablets
• Clinell
©
Universal Wipes
• Clorox
©
Dispatch Hospital Cleaner Disinfectant Towels with Bleach
• Clorox
©
Formula 409
®
Glass and Surface Cleaner
• Clorox
©
Healthcare Bleach Germicidal Wipes
• Clorox
©
Healthcare Hydrogen Peroxide Wipes
• Clorox
©
Healthcare Multi-Surface Quat Alcohol WipesDispatch
®
Hospital Cleaner with Bleach
• Diversey
©
D10
®
Concentrate Detergent Sanitizer
• Diversey
©
Dimension 256 Neutral Disinfectant Cleaner
• Diversey
©
Oxivir
®
Tb Wipes
• Diversey
©
Virex II
®
256 One-Step Disinfectant Cleaner
• Medipal
©
Alcohol Wipes
• Metrex
©
CaviCide
®
• Metrex
©
CaviCide1
®
• Metrex
©
CaviWipes
™
Cisco Wireless Phone 840 and 860 Administration Guide for Cisco Unified Communications Manager
24
About the phones
Disinfectants

• Metrex
©
CaviWipes1
®
• Oxivir
©
• PDI
©
Easy Screen
®
Cleaning Wipe
• PDI
©
Sani-Cloth AF3
®
Germicidal Disposable Wipe
• PDI
©
Sani-Cloth
®
Bleach Germicidal Disposable Wipe
• PDI
©
Sani-Cloth
®
HB Sani-Germicidal Disposable Wipe
• PDI
©
Sani-Cloth
®
Plus Germicidal Disposable Cloth
• PDI
©
Super Sani-Cloth
®
Germicidal Wipe
• Progressive
©
Products Wipes Plus
• Sani
©
Professional Disinfecting Multi-Surface Wipes
• Sani-Hands
®
Instant Hand Sanitizing Wipes
• SC Johnson
©
Windex
®
Original Glass Cleaner with Ammonia-D
• Spartan
©
Hepacide
®
Quat II
• Sterets
©
Alcowipe
®
• Steris
©
Coverage Plus Germicidal Surface Wipes
• Veridien
©
Viraguard
• Windex
©
Glass Cleaner
UV disinfection
Ultraviolet (UV) light from the C spectrum has germicidal properties and is used within specially built chambers
to disinfect devices. It is best to use UV-C chambers after you clean a device. In a medical environment,
germicidal UV-C is employed as an extra safeguard against Healthcare-Associated Infections or Hospital
Acquired Infections (HAIs). Although ultraviolet light destroys viruses, bacteria, and spores it can damage
plastics.
Labs conducted extensive testing to determine the durability of Cisco Wireless Phone 840 and 860 when
exposed to UV-C. The phones were tested against a UV-C chamber, the AUVS KR615, designed for disinfecting
mobile devices under hospital disinfection protocols. Commonly known as The UV Box, the KR615 was
developed and is manufactured by Advanced Ultra-Violet Systems and is available through Safety Net.
Due to its superior plastic enclosure and precision manufacturing, the phones exceeded performance expectations
and retained full functionality and integrity throughout the tests. We therefore approve germicidal UV-C for
disinfecting Cisco Wireless Phone 840 and 860 when used according to both Cisco and UV-C device
manufacturer guidelines. For more information about The UV Box, visit Safety Net.
Dry your phone
If your phone is dropped into water or the interior gets wet, you need to take steps to dry your phone.
Cisco Wireless Phone 840 and 860 Administration Guide for Cisco Unified Communications Manager
25
About the phones
UV disinfection

Use of an oven or dryer on the phone to speed up drying can damage the phone and voids the warranty.
Warning
If the phone doesn’t work after these steps, contact your administrator.
Note
Procedure
Step 1 Immediately power off the phone and remove the battery.
Step 2 Shake excess liquid from the phone.
Step 3 Place the phone and battery in an area that is at room temperature and has good airflow.
Step 4 Let the phone and battery dry for 72 hours before you reconnect the battery and power on the phone.
Related documentation
Use the following sections to obtain related information.
Cisco Wireless Phone 840 and 860 documentation
You can locate publications that are specific to your language, phone model, and call control system from the
product support page for the Cisco Wireless Phone.
You can also access the Cisco Wireless Phone 840 and 860 Deployment Guide from the product support page.
Cisco Unified Communications Manager documentation
See the Cisco Unified Communications Manager Documentation Guide and other publications that are specific
to your Cisco Unified Communications Manager release on the product support page.
Cisco IP phone user support
If you are an administrator, you are likely the primary source of information for Cisco IP phone users in your
network or company. It is important to provide current and thorough information to end users.
To successfully use some of the features on the Cisco IP phone (including Services and voice message system
options), users must receive information from you, or from your network team or must be able to contact you
for assistance. Make sure to provide users with the names of people to contact for assistance and with
instructions for contacting those people.
We recommend that you create a web page on your internal support site that provides end users with important
information about their Cisco IP phones.
Consider including the following types of information on this site:
Cisco Wireless Phone 840 and 860 Administration Guide for Cisco Unified Communications Manager
26
About the phones
Related documentation

• User guides for all Cisco IP phone models that you support
• Information on how to access the Cisco Unified Communications Self Care Portal
• List of features supported
• User guide or quick reference for your voicemail system
Configuration and deployment workflow
Cisco Unified Communications Manager (Unified Communications Manager) provides call services through
the Cisco Phone app. There are options to set up and manage these phones:
• We recommend that you use an Enterprise Mobility Management (EMM) application, such as Cisco
Meraki Systems Manager, to manage the devices and Cisco apps.
• If you don't have an EMM application, we recommend that you use the Cisco Wireless Phone
Configuration Management tool to set up phones with release 1.5(0) or later.
• If you don’t use an EMM application or the Cisco Wireless Phone Configuration Management tool, you
can manage the devices and apps individually on each phone. However, we don't recommend this method
for deployments of more than a few phones.
We also recommend using an EMM application or the Cisco Wireless Phone Configuration Management tool
and a Quick Response (QR) code to program the phones to connect to a WPA2 PSK WLAN and, if applicable,
the EMM application. Alternately, you can use a Google Wizard to manually configure the network Service
Set Identifier (SSID) settings.
Procedure
PurposeCommand or Action
See Network requirements, on page 29.Configure the network.
Step 1
Configure Unified Communications Manager
to initialize devices.
Step 2
• You can manually program Unified
Communications Manager for a few
devices.
• You can also use a bulk programming
method to replace several of these steps to
provision many devices at once.
See Cisco Unified Communications Manager
phone configuration, on page 41.
Use a USB, desktop charger, or multicharger
to fully charge the phone.
Fully charge the phones.
Step 3
See Phone battery charging, on page 38,
Desktop chargers, on page 155, or Multichargers,
on page 159.
Cisco Wireless Phone 840 and 860 Administration Guide for Cisco Unified Communications Manager
27
About the phones
Configuration and deployment workflow

PurposeCommand or Action
See Phone configuration, on page 65 and Cisco
app configuration, on page 79.
Choose one of the following:
Step 4
• (Recommended, especially if you need
third-party apps) Configure an EMM
application console and generate a QR
code to program the phones to connect to
a WPA2 PSK WLAN and EMM
application.
• (Recommended, if you don't have an EMM
application) Configure the Cisco Wireless
Phone Configuration Management tool
and generate a QR code to program the
phones to connect to a WPA2 PSK
WLAN.
• (Recommended only for small
deployments) If not using an EMM
application or Cisco Wireless Phone
Configuration Management tool, manually
configure the SSID settings to program the
phones to connect to the wireless network.
See Phone configuration, on page 65 and Cisco
app configuration, on page 79.
Phones contact Unified Communications
Manager and, if used, the EMM application, or
configuration file created in the Cisco Wireless
Phone Configuration Management tool:
Step 5
• Each phone uses DHCP option 150 or 66
to locate its HTTP (Alt TFTP) servers.
Using its Unified Communications
Manager device name (based on its MAC
address) the phone downloads its
configuration file in the Unified
Communications Manager.
• Each phone connects to the WLAN.
• (Optional) Each phone enrolls with the
EMM application. The EMM application
provides the phone apps, certificates, and
configuration for all non-Unified
Communications Manager related
functionality.
See Phone configuration, on page 65 and Cisco
app configuration, on page 79.
The phone is fully functional and downloads
software updates from the server, which is
administered through the Unified
Step 6
Communications Manager. If used, the EMM
application provides app updates.
Cisco Wireless Phone 840 and 860 Administration Guide for Cisco Unified Communications Manager
28
About the phones
Configuration and deployment workflow

CHAPTER 2
Initial setup
• Network requirements, on page 29
• Cisco Unified Communications Manager requirements, on page 30
• Phone battery installation, on page 33
• Battery contact damage prevention, on page 37
• Phone battery charging, on page 38
Network requirements
Network requirements for the Cisco Wireless Phone 840 and 860 include:
• Cisco Unified Communications Manager (Unified Communications Manager):
• Minimum: 11.5(1)
• Recommended: 12.5(1) or later
• Supported Wi-Fi access point.
For supported access point options, see the Cisco Wireless Phone 840 and 860 Deployment Guide.
The phones use DHCP Option 150 or 66 for Unified Communications Manager server configuration. If the
network doesn't provide DHCP Option 150 or 66, or is pointing to the incorrect Unified Communications
Manager server, then you must manually configure the servers in the Cisco Phone app.
Hosts on the network use DHCP to obtain initial configuration information, including IP address, subnet mask,
default gateway, and HTTP server address. DHCP eases the administrative burden of manually configuring
each host with an IP address and other configuration information. DHCP also provides automatic reconfiguration
of network configuration when devices are moved between subnets. The configuration information is provided
by a DHCP server that is located in the network, which responds to DHCP requests from DHCP-capable
clients. Although the server is referred to as an HTTP server in this document, the actual communications
protocol that is used is HTTP or HTTPS.
To simplify deployment of these devices, configure the phones to use DHCP. Use any Request for Comments
(RFC) 2131 compliant DHCP server to provide configuration information to the phones.
Configure the phones to rely on DHCP Option 150 or 66 to identify the source of telephony configuration
information, available from a Unified Communications Manager HTTP server. Option 150 or 66 should
contain a single IP address in a system with one Unified Communications Manager HTTP server or two IP
addresses for deployments where there are two HTTP servers within the same cluster.
Cisco Wireless Phone 840 and 860 Administration Guide for Cisco Unified Communications Manager
29

The phone uses the second address if it fails to contact the primary HTTP server, thus providing redundancy.
To achieve both redundancy and load sharing between the HTTP servers, you can configure Option 150 or
66 to provide the two HTTP server addresses in reverse order for half of the DHCP scopes.
The phone requires using a direct IP address (that is, not relying on a Domain Name System (DNS) service)
for Option 150 or 66 because doing so eliminates dependencies on DNS service availability during the phone
boot and registration process.
From release 1.3(0) and later, you can enable Call Admission Control (CAC) and Traffic Specification (TSPEC)
for call control and voice on the WLAN Controller or Access Point. See the Cisco Wireless Phone 840 and
860 Deployment Guide for more information.
Note
By default, the Cisco Wireless Phones send a Network Time Protocol (NTP) request to a server on the internet
to get the date and time, or to the internal NTP server that you set in the Custom Settings app.
From release 1.5(0) and later, you can define a server in DHCP option 42 to provide an alternate NTP service
in case the NTP server isn't available. If the NTP server isn't available, for example there's no internet, the
phones get their time source from the server that you define in DHCP option 42.
Note
Related Topics
More Custom Settings, on page 129
Cisco Wireless Phone 840 and 860 deployment guide
The Cisco Wireless Phone 840 and 860 Deployment Guide contains useful information about the wireless
phone in the Wi-Fi environment.
Cisco Unified Communications Manager requirements
Cisco Unified Communications Manager (Unified Communications Manager) requirements for the Cisco
Wireless Phone 840 and 860 include:
• Unified Communications Manager 11.5, 12.5, 14.0, or later
• Installation of both of these Cisco Options Package (COP) files on Unified Communications Manager:
• Device enabler QED installer—Enables Cisco Wireless Phone 840 and 860 in Unified
Communications Manager.
• Phone software—Updates software for all Cisco apps.
If you want to use the Cisco Wireless Phone Configuration Management tool to
configure your phones, install release 1.5(0) files or later.
Note
Cisco Wireless Phone 840 and 860 Administration Guide for Cisco Unified Communications Manager
30
Initial setup
Cisco Wireless Phone 840 and 860 deployment guide

Device enabler QED installer file
The Cisco Unified Communications Manager (Unified Communications Manager) device enabler QED
installer Cisco Options Package (COP) file contains configuration files that register the phone and enable
features on the phone. Install the latest device enabler QED installer COP file on the Unified Communications
Manager so that the Cisco Wireless Phone 840 and 860 can register to the Unified Communications Manager
and access the phone features. New features may be turned off by default and they have attributes or settings
that you must configure.
Phone software file
The factory installs a version of the phone software on the phone during manufacturing. But that software
may not be the latest version.
Your Cisco Unified Communications Manager stores the software loads. If the version of software on the
phone isn’t the latest version, the Cisco Unified Communications Manager sends the updated software load
to the phone.
You can't downgrade the phone software to an earlier version. The lowest phone software version that you
can have on the phone is the factory installed version. However, when you upgrade the phone software, that
version becomes the lowest possible software version. Even if you perform a factory reset, the phone software
stays on the latest installed version.
Caution
Phone configuration files
Configuration files for a phone are stored on an HTTP server and define parameters for connecting to Cisco
Unified Communications Manager (Unified Communications Manager). In general, anytime you make a
change in Unified Communications Manager that requires the phone to be reset, a change is automatically
made to the phone configuration file.
Configuration files also contain information about which image load the phone should be running. If this
image load differs from the one currently loaded on a phone, the phone contacts the HTTP server to request
the required load files.
If you configure security-related settings in Cisco Unified Communications Manager Administration, the
phone configuration file contains sensitive information. To ensure the privacy of a configuration file, you
must configure it for encryption. For more information, see the documentation for your particular Unified
Communications Manager release. A phone requests a configuration file whenever it resets and registers with
Unified Communications Manager.
Load the COP files to Cisco Unified Communications Manager
You must install the Cisco Wireless Phone 840 and 860 device enabler QED installer and phone software
Cisco Options Package (COP) files into each Cisco Unified Communications Manager (Unified
Communications Manager) in the cluster.
Cisco Wireless Phone 840 and 860 Administration Guide for Cisco Unified Communications Manager
31
Initial setup
Device enabler QED installer file

These COP files are signed with the sha512 checksum. Cisco Unified Communications Manager versions
before version 14 don't automatically include support for sha512.
Note
For the first installation, install the device enabler QED installer file first and then the software file.
For future software updates, there is not always a corresponding device enabler QED installer update. When
a software update is available, check the latest version of the device enabler QED installer file to see whether
you also must update it.
With each new software release, the Cisco apps are also updated in the Play Store. However, if you manage
the phones through an Enterprise Mobility Management (EMM) application, we recommend that you update
the firmware on the phones to minimize any risk of app incompatibility.
Note
Before you begin
• Download the device enabler QED installer and phone software COP files from the Software Download
site.
If you want to use the Cisco Wireless Phone Configuration Management tool to
configure your phones, install release 1.5(0) files or later.
Note
• If you have Unified Communications Manager version 11.5 or 12.5 and don't already have sha512
checksum support enabled, install ciscocm.enable-sha512sum-2021-signing-key-v1.0.cop.sgn.
Choose an appropriate time to perform this task. As part of this task you must restart each Unified
Communications Manager in the cluster after you install a device enabler QED installer COP file, unless your
version of Unified Communications Manager offers an alternate process that does not require a reboot.
See the Manage Device Firmware section of the Administration Guide for Cisco Unified Communications
Manager for your Unified Communications Manager version, to see if it allows an installation process that
does not require a reboot.
Caution
Procedure
Step 1 In each Unified Communications Manager in the cluster, select Cisco Unified OS Administration > Software
Upgrades > Install/Upgrade.
Step 2 Enter the Software Location data.
Step 3 Click Next.
Step 4 Select the COP (.cop.sha512) file.
If the COP file doesn't appear in the available files list, ensure that you enable sha512 checksum
support.
Note
Cisco Wireless Phone 840 and 860 Administration Guide for Cisco Unified Communications Manager
32
Initial setup
Load the COP files to Cisco Unified Communications Manager

Step 5 Click Next to download the COP file to Unified Communications Manager.
Step 6 Check that the file checksum details are correct.
Step 7 Click Next to install the COP file on Unified Communications Manager.
Step 8 Click Install Another and repeat steps 2–7 to install another COP file.
Step 9 Perform the following actions based on the COP files that you installed.
a) If you installed a device enabler QED installer COP file:
• For 11.5(1)SU4 and earlier:
• Reboot all Unified Communications Manager nodes through Cisco Unified OS Administration >
Settings > Version > Restart.
• For 11.5(1)SU5 and later or 12.5(1) and later:
• Restart the Cisco Tomcat service on all Unified Communications Manager nodes.
• If running the Unified Communications Manager service on the publisher node, restart the
service on the publisher node only. You do not need to restart the Cisco Call Manager Service
on subscriber nodes.
b) If you installed a software COP file, restart the Cisco TFTP service for all nodes running the Cisco TFTP
service.
Phone battery installation
You must read the information in the Product Safety and Security chapter of the User Guide, before you install
or charge the battery, or use the phone.
Before you can use your phone, you must install and charge the battery. The battery may already be installed
in your phone, or you may have to install it yourself.
To maximize the battery storage capacity and lifespan, fully charge the battery before you turn on and set up
the phone.
Install the battery
Don't install the battery in a dusty or wet environment.
The steps to install the battery are the same for both the Cisco Wireless Phone 840 and Cisco Wireless Phone
860. However, the battery contacts are in different locations on these models, as shown in the following
illustration. The illustrations in the steps are of the Cisco Wireless Phone 860.
Cisco Wireless Phone 840 and 860 Administration Guide for Cisco Unified Communications Manager
33
Initial setup
Phone battery installation
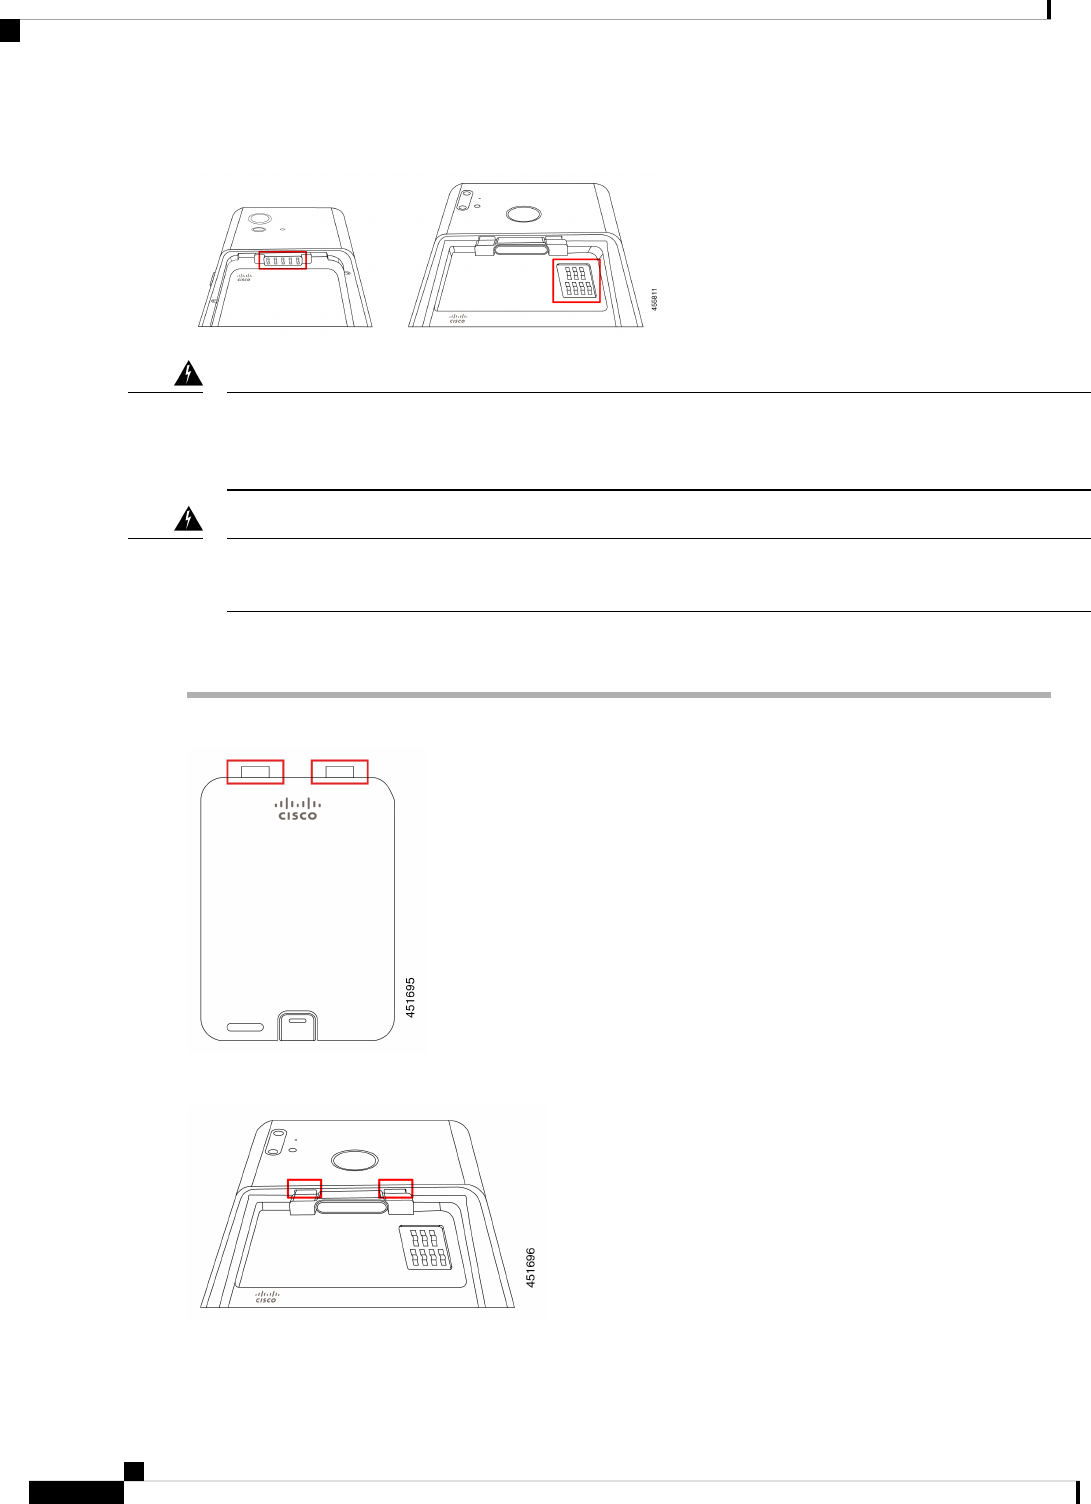
Figure 6: Battery contact location on the Cisco Wireless Phone 840 and Cisco Wireless Phone 860
Take care not to damage the battery contacts within the handset when you remove the battery from the handset.
Take special care not to touch, compress, or come into contact with the battery contacts in any way or damage
may occur.
Warning
Use only the Cisco-branded batteries for this phone. If you attempt to use a third-party battery, you will receive
an error and the battery will not work. We don't support damage from attempting to use third-party batteries.
Warning
Procedure
Step 1 Locate the two battery tabs on the top edge of the battery.
Step 2 Locate the two slots in the wall at the top of the phone battery compartment.
Step 3 Position the battery at an angle approximately 45–60 degrees to the phone battery compartment.
Cisco Wireless Phone 840 and 860 Administration Guide for Cisco Unified Communications Manager
34
Initial setup
Install the battery

Point the battery edge with the two plastic tabs toward the two slots in the battery compartment.
Step 4 Insert the two plastic battery tabs directly into the two battery compartment slots.
Step 5 Use the tab and slot contact point as a pivot to lower the battery into the compartment.
Step 6 Use your finger to press down until you feel and hear the battery clip snap into place.
Related Topics
Phone battery charging, on page 38
Remove the battery
Battery removal follows a reversed but similar procedure to battery insertion.
The steps to remove the battery are the same for both the Cisco Wireless Phone 860 and Cisco Wireless Phone
840. However, the battery contacts are in different locations on these models. The illustrations in the following
steps are of the Cisco Wireless Phone 860.
Cisco Wireless Phone 840 and 860 Administration Guide for Cisco Unified Communications Manager
35
Initial setup
Remove the battery

Procedure
Step 1 To disengage the battery clip, gently use a fingernail to depress the clip towards the top of the phone.
Don’t pull up on or twist the clip. Don't use a tool, such as letter opener or screwdriver, to pry the clip
open. An incorrect prying action with a tool can break the battery clip.
Caution
Step 2 Use your fingernail to lift the battery gently about an eighth of an inch (a few millimeters) out of the battery
compartment.
Step 3 Release the battery clip and grab the battery with your fingers.
Step 4 Use the battery tabs and battery compartment slots as a pivot point to raise the battery edge out the battery
compartment.
Don’t slide the battery across the battery compartment because this action may damage the contacts.
Warning
Step 5 Gently withdraw the battery tabs from the battery compartment slots and lift the battery out of the battery
compartment.
Make sure that no part of the battery drags across the battery contacts in the phone.
Warning
Hot swap the battery for Cisco Wireless Phone 860 and 860S
The Cisco Wireless Phone 860 and 860S have a hot swap feature that allows you to continue to use your
phone while you change a low battery. During a hot swap, the internal phone battery provides minimum power
to allow the phone to remain on.
You can perform a battery hot swap under most normal operations, such as during a voice call or other activity
on an active phone screen. Active use of the phone or anything that increases the power draw during a hot
swap may, in rare situations, cause the phone to power off.
Cisco Wireless Phone 840 and 860 Administration Guide for Cisco Unified Communications Manager
36
Initial setup
Hot swap the battery for Cisco Wireless Phone 860 and 860S

If the new battery that you use during the hot swap doesn't have a proper charge, a low battery alert displays
and the phone shuts down.
If the internal phone battery isn't awake and charged, the battery hot swap may fail. If the phone was in sleep
mode or if you just turned on the phone, the internal battery may not be awake and charged.
Caution
The Cisco Wireless Phone 840 and 840S don't have an internal battery, so they don't support the hot swap
feature.
Note
Before you begin
• Make sure that the new battery that you use during the hot swap has a proper charge.
• If the phone was in sleep mode or if you just turned on the phone, wake and charge the internal battery:
1. Choose one of the following:
• If the phone screen was in sleep mode, unlock the phone and wait for 30 seconds.
• If you just turned on the phone, unlock the phone and wait for 3-5 minutes.
2. Briefly press the Power button to turn off the phone screen and wait for 3-5 seconds.
Procedure
Step 1 Remove the battery.
Step 2 Within 60 seconds, install the new battery.
Related Topics
Install the battery, on page 33
Remove the battery, on page 35
Battery contact damage prevention
If you slide or drag part of the battery over the battery contacts during insertion or removal, it may damage
the battery contacts.
Damaged battery contacts that can't make proper contact with the contacts in the phone, may cause issues
such as:
• The phone won’t power on.
• The phone shuts down randomly.
• The phone displays an Invalid Battery Shutdown message before it shuts down.
Cisco Wireless Phone 840 and 860 Administration Guide for Cisco Unified Communications Manager
37
Initial setup
Battery contact damage prevention

In these failure scenarios, remove the battery from the phone and examine the battery contact fingers and
pads.
The battery contacts are in different locations on the Cisco Wireless Phone 840 and Cisco Wireless Phone
860.
Note
• Check that the contacts aren’t dirty or covered with any substances, or it may prevent a proper electrical
connection.
• Check that the contact fingers on the phone are straight relative to the contact base, with all fingers at
the same height.
In the following image of the Cisco Wireless Phone 860 battery compartment, the finger on the top left
illustrates damage from incorrect battery insertion.
Figure 7: Cisco Wireless Phone 860 battery contact damage
Phone battery charging
Explosion hazard: Don’t charge the phone battery in a potentially explosive atmosphere. Statement 431
Warning
You can charge the battery using any of the following options:
• USB cable—You can charge the phone with an Cisco Unified Communications Manager Attendant
Console power adapter or your computer.
• Desktop chargers—You can charge a phone and spare battery.
• Multicharger—You can charge several phones or batteries at the same time.
The length of time to charge a phone and battery varies depending on the charge method.
• It takes about 3 hours to charge a phone using the USB cable and AC plug.
• It takes about 8 hours to charge a phone using the USB cable and your computer.
• Under normal conditions, a discharged battery charges fully in approximately 3 hours in a desktop or
multicharger.
Cisco Wireless Phone 840 and 860 Administration Guide for Cisco Unified Communications Manager
38
Initial setup
Phone battery charging

• If both a phone and battery are in a desktop charger, the phone takes priority. So it takes longer to charge
the battery.
Charge your phone batteries in an ambient temperature of 50–86°F (10–30°C) for the best results. If you
charge the batteries outside of this temperature range, it results in longer charge times or incomplete charge
cycles.
Store the batteries in dry conditions at approximately 65° F (20° C).
Note
Don’t let the main battery or the internal battery of your Cisco Wireless Phone 860 or 860S fully deplete for
extended periods. If you must store the phone or battery for longer than one month, then we recommend that
you fully charge the battery installed in the phone to 100% every six months. Never store a phone without
the main battery for longer than one month.
Caution
Severely damaged battery contact pins are not repairable and not covered under the Cisco warranty. Minor
deformation may be remediated by carefully bending the battery contact pins back to the correct position
using appropriate tools. Cisco is not responsible for any damage that is caused during this action.
Note
Related Topics
Charge the battery with the AC power supply, on page 39
Charge the battery with the USB cable and a USB port on your computer, on page 40
Desktop chargers, on page 155
Multichargers, on page 159
Charge the battery with the AC power supply
If you don't have a desktop charger or multicharger, you can charge your phone battery using the USB cable
and AC power adapter.
Use only the approved USB cable and power adapter for the Cisco Wireless Phone 840 and 860.
Caution
Procedure
Step 1 Plug the USB cable into the bottom of the phone with the pins aligned.
Step 2 Plug the USB cable into the power adapter.
Step 3 Plug the power adapter into the electrical outlet.
Cisco Wireless Phone 840 and 860 Administration Guide for Cisco Unified Communications Manager
39
Initial setup
Charge the battery with the AC power supply

Charge the battery with the USB cable and a USB port on your computer
If you don't have a desktop charger, multicharger, or USB cable and AC power adapter, you can charge your
phone with a USB cable and computer. However, this method takes more time to charge your phone than the
other methods.
Use only the approved USB cable for the Cisco Wireless Phone 840 and 860.
Caution
Procedure
Step 1 Plug the USB cable into the bottom of the phone with the pins aligned.
Step 2 Plug the USB cable into a USB port on a computer.
Cisco Wireless Phone 840 and 860 Administration Guide for Cisco Unified Communications Manager
40
Initial setup
Charge the battery with the USB cable and a USB port on your computer

CHAPTER 3
Cisco Unified Communications Manager phone
configuration
• Determine the MAC address of the phone, on page 41
• Install manufacturing CA certificates, on page 41
• Before you register wireless phones, on page 42
• Manual phone registration, on page 46
• Phone feature configuration, on page 50
Determine the MAC address of the phone
To add a phone to the Cisco Unified Communications Manager (Unified Communications Manager), you
need the media access control or MAC address of the phone.
The phone's MAC address is also printed on the outside of the phone's box.
Note
Procedure
Perform one of the following actions:
• On the phone, access the Settings app, select System > About Phone > Status, and look in the Wi-Fi
MAC Address field.
• Remove the battery from the phone, and look at the label in the battery compartment of the phone.
Install manufacturing CA certificates
The phones use a new manufacturing certificate authority (CA). Until Cisco Unified Communications Manager
(Unified Communications Manager) includes these new certificates, you must manually add the new root and
intermediate certificates to the certificate chain to trust the new Manufacturing Installed Certificates (MIC).
Cisco Wireless Phone 840 and 860 Administration Guide for Cisco Unified Communications Manager
41

After you add the new certificates to the trust chain, the MICs can be used for trust services such as SIP TLS,
Configuration File Encryption, and LSC Certificate distribution.
Procedure
Step 1 Download the missing root and intermediate certificates from the externally available Cisco PKI website. The
missing certificates to complete the trust chain up to and including the root for the new MICs are:
• Cisco Manufacturing CA III (cmca3) - Intermediate
• Cisco Basic Assurance Root CA 2099 (cbarc2099) - Root for Cisco Manufacturing CA III
Step 2 From your web browser, log in to the Cisco Unified Operating System Administration web page.
Step 3 Under the Security menu, select Certificate Management.
Step 4 Select Upload Certificate/Certificate Chain.
Step 5 Select CallManager-trust for the Certificate Purpose, browse to the certificate, then select Upload.
Repeat this step for all certificates on the Unified Communications Manager Publisher only as the certificate
replicates to all other Unified Communications Manager nodes.
Step 6 Select CAPF-trust for the Certificate Purpose, browse to the certificate, then select Upload.
Repeat this step for all certificates on the Cisco Unified Communications Manager publisher only.
Before you register wireless phones
Before you register wireless phones with your Cisco Unified Communications Manager, you can set up
profiles, groups, and templates. These can simplify the phone setup when you have common information for
all phones or groups of phones.
Auto-registration is not available for the phones.
Note
• Device pool—You can create device pools to provide a common set of configurations for a group of
devices.
• Custom SIP Profile—The phone needs a special SIP Profile, instead of the standard SIP profiles. Do
not use the Standard SIP Profile or Standard SIP Profile for Mobile Device.
• Phone button templates—For release 1.2(0) and earlier, the phone needs a one line phone button template
only.
For release 1.3(0) or later, the phone button template supports a six line phone button template. You can
configure:
• Up to six multiple lines with a modifiable phone template.
• Shared lines.
Cisco Wireless Phone 840 and 860 Administration Guide for Cisco Unified Communications Manager
42
Cisco Unified Communications Manager phone configuration
Before you register wireless phones

• Privacy with the Privacy button option.
• Softkey templates—You can set up the list of features that appear on the phone Overflow or Drawer
menu.
• Common phone profile—You can set up a profile for the wireless phone with the phone button and
softkey templates, and then use the profile for all your wireless phones. For example, we recommend
you change the default common Local Phone Unlock Password from **# to a more secure password.
• Phone security profile—You can create a custom security profile if the default or existing phone security
profiles do not cover your needs.
You can find detailed instructions about these profiles and templates in the System Configuration Guide for
Cisco Unified Communications Manager for your release.
Device pool configuration
Configure device pools for the phones based on your organization's requirements. For example, you may want
to create device pools that are based on phone locations or phone models and that define the following settings.
• Device settings (such as Cisco Unified Communications Manager Group)
• Roaming sensitive settings (such as Date/Time Group, Region, and so on)
• Local route group settings
• Device mobility-related information settings
Create custom SIP profile
Cisco Unified Communications Manager has standard SIP profiles available. However, a custom SIP Profile
for your wireless phones is the preferred profile.
Procedure
Step 1 From the Cisco Unified Communications Manager Administration web page, select Device > Device Settings >
SIP Profile.
Step 2 Click Find.
Step 3 Click the Copy icon beside Standard SIP Profile.
Step 4 Set the name and description. For example:
Custom 840 SIP Profile
Custom 860 SIP Profile
Step 5 Set these parameters.
• Timer Register Delta (seconds)—Set to 30 (default is 5).
• Timer Keep Alive Expires (seconds)—Set to 300 (default is 120).
Cisco Wireless Phone 840 and 860 Administration Guide for Cisco Unified Communications Manager
43
Cisco Unified Communications Manager phone configuration
Device pool configuration

• Timer Subscribe Expires (seconds)—Set to 300 (default is 120).
• Timer Subscribe Delta (seconds)—Set to 15 (default is 5).
Ensure SIP Station KeepAlive Interval at System > > Service Parameters > > Cisco CallManager
remains configured for 120 seconds.
Note
Step 6 Click Save.
Phone button template configuration
Configure a Phone Button Template for the phones. For release, 1.2(0) or earlier, the phones support a one
line phone button template only.
For release 1.3(0) or later, the phones support up to six lines and shared lines. By default, the phone button
template has buttons 1 and 2 set to Line and buttons 3–6 set to None. You can create customer phone templates
to add multiple lines or privacy on shared lines to any of the 6 buttons.
For details, see the System Configuration Guide for Cisco Unified Communications Manager and the Feature
Configuration Guide for Cisco Unified Communications Manager for your Cisco Unified Communications
Manager release, at Configuration Guides.
Phone softkey templates
Phones download softkey configuration files from Cisco Unified Communications Manager (Unified
Communications Manager). At initial release, you can use the Softkey Template to allow or prevent the
appearance of the following features in the Cisco Phone app Overflow menu:
• Call Forward
• Call Park
• iDivert
• Hunt Group Login/Logout
Any other Softkey Template configuration setting is not supported currently.
In the Cisco Unified Communications Manager Softkey Layout Configuration page, there are Softkey options
for 12 different call states. Some call state examples are: On hook, Connected, On Hold, Ring In, Off Hook,
Connected Transfer, and Digits After First.
On a phone, if the Call Forward, Call Park, iDivert, and Hunt Group Login/Logout options are configured as
Selected Softkeys in any of the 12 call states, the phone presents the Overflow menu features only in appropriate
call states. For example, even if configured, the Call Park feature isn’t presented to the user if there are no
active calls. However, if Call Park isn’t in the Selected Softkeys list for any of the Softkey profiles, it isn’t
offered to the user in any call state.
For details, refer to the System Configuration Guide for Cisco Unified Communications Manager for your
Unified Communications Manager release.
Cisco Wireless Phone 840 and 860 Administration Guide for Cisco Unified Communications Manager
44
Cisco Unified Communications Manager phone configuration
Phone button template configuration

Create a new phone security profile
You must have a phone security profile for your phones. You can either:
• Use the default Phone Security Profile in the Cisco Options Package (COP) file:
Cisco 840 Standard SIP Non-Secure Profile
Cisco 860 Standard SIP Non-Secure Profile
• Use an existing Phone Security Profile if it conforms to the following recommended values.
• Create a unique Phone Security Profile for the Cisco Wireless Phone 840 and 860.
The Certificate Authority Proxy Function (CAPF) must be operational to use a Locally Signed Certificate
(LSC) with a security profile. The phones have a Manufacturing Installed Certificate (MIC), which can be
used with a security profile as well.
Note
Each deployment is unique and may require options other than the following recommendations due to site
policy or administrative requirements.
Note
Procedure
Step 1 In the Cisco Unified Communications Manager Administration web page, select System > Security > Phone
Security Profile.
Step 2 Click Add New.
Step 3 Select the phone model:
Cisco 840
Cisco 860
Step 4 Click Next.
Step 5 On the Phone Security Profile Information pane, set these parameters:
• Name—Give the new profile a name, such as Cisco 860 – Encrypted with Digest Authentication.
• Device Security Mode—Select an option:
We do not currently support the Authenticated device security mode.
Note
• Encrypted—For TLS and SRTP.
• Non Secure—To use UDP or TCP.
• Transport Type—Select an option:
We do not recommend the UDP option, due to port connectivity issues. If you choose TCP+UDP,
only TCP is used.
Note
Cisco Wireless Phone 840 and 860 Administration Guide for Cisco Unified Communications Manager
45
Cisco Unified Communications Manager phone configuration
Create a new phone security profile

• TLS—Use with Authenticated or Encrypted Device Security Mode. We recommend TLS for
enhanced security.
• TCP—Use with Nonsecure Device Security Mode for reliable packet delivery.
• Enable Digest Authentication— Select the check box to configure the phone with Digest Authentication.
• TFTP Encrypted Config—Select the check box for enhanced security if you are using the Cisco Wireless
Phone Configuration Management tool to create a configuration file for the phone.
Leave the other fields at their Defaults.
Note
Step 6 (Optional) To help deploy LSC certificates to your devices, complete the Phone Security Profile CAPF
Information pane.
For details, refer to the Security Guide for Cisco Unified Communications Manager for your Cisco Unified
Communications Manager release.
We do not support 512-bit keys.
Note
Step 7 Click Save.
Manual phone registration
When a new phone is added to your network, manual phone registration means that you need to configure
the phone in your call control system. The configuration includes the directory number, information about
the user, and the phone profile.
After you configure the phone in the call control system, you configure the phone to connect to the call control
system.
Add an end user (Optional)
It is optional to add an end user. However, you must add an end user to:
• Provide the user access to the Self Care portal.
• Allow the user to appear in the corporate directory.
• Allow you to configure security profiles that include Digest Authentication.
Procedure
Step 1 From the Cisco Unified Communications Manager Administration web page, select User Management >
End User.
Step 2 Click Add New.
Step 3 In the User Information section, set the following parameters:
• User ID—Enter a user ID that complies with your system and account policies.
Cisco Wireless Phone 840 and 860 Administration Guide for Cisco Unified Communications Manager
46
Cisco Unified Communications Manager phone configuration
Manual phone registration

• Password—Enter a password for this user that complies with your system and account policies. If your
system is LDAP integrated, this field is dimmed and unavailable. In this case, you can create or modify
this password through the Active Directory Server.
• Confirm Password—Repeat the password.
• (Optional) Self Service-User ID—Use the extension number for the device.
• (Optional) Pin—Enter a pin to let the end user use pin enabled features such as user web login.
• Confirm Pin—Repeat the pin.
• Last Name—Enter the User’s last name.
• First Name—Enter the User’s first name.
• Digest Credentials—Enter the Digest Authentication Password that you would like the phone to use to
register.
• Confirm Digest Credentials—Repeat the Digest Authentication Password.
Enter other End User field values as required by your site’s system and account policies.
Note
Step 4 Click Save.
Add the phone
Before the phone can be used, you add it to the Cisco Unified Communications Manager (Unified
Communications Manager) and assign it to a user.
Before you begin
Install the following files on the Unified Communications Manager:
• Latest device enabler QED installer Cisco Options Package (COP) file
• Latest phone software COP file
Get the MAC address of the phone.
Procedure
Step 1 From the Cisco Unified Communications Manager Administration web page, select Device > Phone.
Step 2 Click Add New.
Step 3 Select the phone model:
Cisco 840
Cisco 860
Step 4 Click Next.
Step 5 In the Device Information section, set the following minimal phone information:
Cisco Wireless Phone 840 and 860 Administration Guide for Cisco Unified Communications Manager
47
Cisco Unified Communications Manager phone configuration
Add the phone

These minimal settings allow users to make and receive calls. Enter other fields as required by your
site policies and procedures for new phone additions.
Note
• MAC Address—Enter the MAC address of the phone. You can enter the address with lowercase letters.
This value must match the WLAN MAC address of the physical phone that is registering to this Unified
Communications Manager.
• (Optional) Description—Enter a meaningful description; for example, the user's name and phone model.
• Device Pool—Select the appropriate pool of phones. The device pool defines common settings such as
the Cisco Unified Communications Manager Group, local route group settings, device mobility-related
information settings, and other group settings. It’s helpful to use Device Pools to group devices by location
or model.
• Phone Button Template—Select the appropriate template.
• Softkey Template—Select the appropriate template.
This window lists all the Softkeys in the system although not all phones support all Softkeys. If
you choose a Softkey that is not supported by the phone, the Softkey won’t display on the phone
even if you configured it in this list.
Caution
• Calling Search Space—Select the appropriate space for the phone. The Calling Search Space determines
how, and if, to route a dialed number. Configure the Calling Search Space so that it routes to any numbers
that are part of your dial plan.
• Location—Select the desired location for the phone.
• Owner User ID—Select an option:
• If you want to assign the phone to an End User, select the desired End User.
• If you don't want to associate the phone to an End User, select Anonymous.
• Allow Control of Device from CTI—Select the check box to allow control of device from CTI.
Step 6 In the Protocol Specific Information, set the following minimal information:
• Device Security Profile—Select the desired Phone Security Profile.
• Re-routing Calling Search Space—Select a Calling Search Space with permissions appropriate for
dialing any call forward or transfer destination that you may use.
• SIP Profile—Select Standard SIP Profile.
• Digest User—Select an option:
• If you chose a Device Security Profile that includes Digest Authentication, select the desired end-user
ID.
• If you chose a Device Security Profile that doesn't include Digest Authentication, select None.
• Click Save and OK.
Step 7 In the CAPF section, select CAPFto allow CAPF and allow you to install and upgrade the phone’s certificate.
Cisco Wireless Phone 840 and 860 Administration Guide for Cisco Unified Communications Manager
48
Cisco Unified Communications Manager phone configuration
Add the phone

Step 8 Click Save and OK.
Add the phone extension
For release 1.2(0) or earlier, the phone supports a single line only, which can't be a shared line.
For release 1.3(0) or later, the phone supports up to six lines, including shared lines.
At a minimum, configure the following fields on the Directory Number Configuration window. If required
by your site policies and procedures for new extension provisioning, you may need to configure more fields.
Before you begin
Add the phone.
Procedure
Step 1 From the Cisco Unified Communications Manager Administration Phone Configuration page, click Line [1]
– Add a new DN.
Step 2 In the Directory Number Information section, set the following:
• Directory Number—Enter the Extension number, or Directory Number for the phone.
• Description—Enter a description for this particular Directory Number.
• Alerting Name—Enter a name that displays to callers.
• ASCII Alerting Name—Enter the same name from the Alerting Name field.
Step 3 In the Directory Number Settings section, set the following:
• Voice Mail Profile—If this Directory Number uses voicemail, select a profile that directs callers to the
voicemail pilot number. For example, select the Cisco_Unity_Connection_Profile.
• Calling Search Space—Select a Calling Search Space with partitions that include any numbers you may
dial from this line.
Step 4 In the Call Forward and Call Pickup Settings section, set the Call Forward Settings as desired for your
environment. For example, you can configure Call Forward for all unavailable, no answer, or busy scenarios
to forward calls to the Cisco Unity Connection Voicemail server. Or you may also specify a different, unique
call forward Destination.
If Cisco Unified Communications Manager is using Partitions and Calling Search Spaces, we
recommend that you configure the Call Forward Calling Search Spaces. Failure to configure a Call
Forward Calling Search Space may result in call forward failures.
Caution
Step 5 In the Line 1 on Device section, set the following:
• Display—Enter the name to present to internal called parties.
• ASCII Display—Enter the same name from the Display field.
Cisco Wireless Phone 840 and 860 Administration Guide for Cisco Unified Communications Manager
49
Cisco Unified Communications Manager phone configuration
Add the phone extension

• Line Text Label—Enter the line text label.
• External Phone Number Mask—Enter the external phone number mask.
• Recording Option—Choose one of the following options. Default is Call Recording Disabled.
• Call Recording Disabled
• Automatic Call Recording Enabled
• Selective Call Recording Enabled
• Recording Profile—Select the recording profile from the options after enabling call recording option.
Default is < None >.
• Recording Media Source—Select one of the following options. Default is Gateway Preferred.
• Gateway Preferred
• Phone Preferred
• Monitoring Calling Search Space—Select one of the following options. Default is < None >.
• <None>
• Auto_register
Step 6 In the Multiple Call/Call Waiting Settings on Device section, set the following:
• Maximum Number of Calls—Enter 4. Four calls are the maximum number of calls the phone can place
or receive per registration.
• Busy Trigger—Enter 4. Four calls are the maximum number of calls the phone can place or receive per
registration.
Step 7 Click Save.
Phone feature configuration
You can set up phones to have a variety of features, based on the needs of your users. You can apply features
to all phones, a group of phones, or to individual phones.
When you set up features, the Cisco Unified Communications Manager Administration window displays
information that is applicable to all phones and information that is applicable to the phone model. The
information that is specific to the phone model is in the Product Specific Configuration Layout area of the
window.
For information on the fields applicable to all phone models, see the Cisco Unified Communications Manager
documentation.
When you set a field, the window that you set the field in is important because there is a precedence to the
windows. The precedence order is:
1. Individual phones (highest precedence)
Cisco Wireless Phone 840 and 860 Administration Guide for Cisco Unified Communications Manager
50
Cisco Unified Communications Manager phone configuration
Phone feature configuration

2. Group of phones
3. All phones (lowest precedence)
For example, if you don't want a specific set of users to access the phone Web pages, but the rest of your users
can access the pages, you:
1. Enable access to the phone web pages for all users.
2. Disable access to the phone web pages for each individual user, or set up a user group and disable access
to the phone web pages for the group of users.
3. If a specific user in the user group did need access to the phone web pages, you could enable it for that
particular user.
Set up phone features for all phones
Procedure
Step 1 Sign in to Cisco Unified Communications Manager Administration as an administrator.
Step 2 Select System > Enterprise Phone Configuration.
Step 3 Set the fields you want to change.
Step 4 Check the Override Enterprise Settings check box for any changed fields.
Step 5 Click Save.
Step 6 Click Apply Config.
Step 7 Restart the phones.
This will impact all phones in your organization.
Note
Set up phone features for a group of phones
Procedure
Step 1 Sign in to Cisco Unified Communications Manager Administration as an administrator.
Step 2 Select Device > Device Settings > Common Phone Profile.
Step 3 Locate the profile.
Step 4 Navigate to the Product Specific Configuration Layout pane and set the fields.
Step 5 Check the Override Enterprise Settings check box for any changed fields.
Step 6 Click Save.
Step 7 Click Apply Config.
Step 8 Restart the phones.
Cisco Wireless Phone 840 and 860 Administration Guide for Cisco Unified Communications Manager
51
Cisco Unified Communications Manager phone configuration
Set up phone features for all phones

Set up phone features for a single phone
Procedure
Step 1 Sign in to Cisco Unified Communications Manager Administration as an administrator.
Step 2 Select Device > Phone
Step 3 Locate the phone associated with the user.
Step 4 Navigate to the Product Specific Configuration Layout pane and set the fields.
Step 5 Check the Override Common Settings check box for any changed fields.
Step 6 Click Save.
Step 7 Click Apply Config.
Step 8 Restart the phone.
Product Specific Configuration Layout fields
The following table describes the fields in the Product Specific Configuration Layout pane.
Table 16: Product Specific Configuration Layout fields
DescriptionDefaultField type or choicesField name
Enables or disables access to the phone web pages
through a web browser.
If you enable this field, you may expose
sensitive information about the phone.
Caution
DisabledDisabled
Enabled
Web Access
Specifies the password to access the phone’s Web
interface. Enter a 8-127 character password.
Web Password
Specifies whether the phone reboots immediately after
downloading a software update or if the phone notifies
the user to manually reboot. To apply software updates,
the phone must be rebooted.
DisabledDisabled
Enabled
Reboot immediately after
downloading software
updates
Sets the list of emergency numbers that the users see
when they try to dial without signing in.
Example: 911,411,511
String of up to 16
characters, comma
separated, no spaces
Emergency Numbers
Controls access to Visual Voicemail.DisabledDisabled
Enabled
Visual Voicemail Access
This parameter contains the address of the primary
voicemail server for Visual Voicemail.
String of up to 256
characters
Voicemail Server
(Primary)
Cisco Wireless Phone 840 and 860 Administration Guide for Cisco Unified Communications Manager
52
Cisco Unified Communications Manager phone configuration
Set up phone features for a single phone

DescriptionDefaultField type or choicesField name
This parameter contains the address of the backup
voicemail server for Visual Voicemail.
String of up to 256
characters
Voicemail Server
(Backup)
Identifies the alternate IPv4 server that the phone uses
to obtain firmware loads and upgrades. The load server
uses HTTP on TCP port 6970. It doesn't support TFTP
on UDP port 69.
String of up to 256
characters
Load Server
Indicates whether the phone advertises the G.722 and
Opus codecs to the Cisco Unified Communications
Manager (Unified Communications Manager).
• Use System Default—Defers to the setting
specified in the enterprise parameter Advertise
G.722 Codec.
• Disabled—Does not advertise G.722 or Opus to
the Unified Communications Manager.
• Enabled—Advertises G.722 and Opus to the
Unified Communications Manager.
Codec negotiation involves two steps:
Note
1. The phone must advertise the supported
codec to the Unified Communications
Manager (not all endpoints support the
same set of codecs).
2. When the Unified Communications
Manager gets the list of supported codecs
from all phones that are involved in the
call attempt, it chooses a commonly
supported codec based on various factors,
including the region pair setting.
Use System DefaultUse System Default
Disabled
Enabled
Advertise G.722 and
Opus Codecs
Identifies the location that the phones use to upload
problem reporting tool (PRT) output files.
String of up to 256
characters
Customer support upload
URL
This parameter contains the address of the server for
the optional second registration.
The purpose of the Secondary SIP Server is
to allow registration of a SIP line to a separate
SIP server, such as a Nurse-call system
integration. It is not intended as a failover or
redundancy solution.
Note
Secondary SIP Server
Identifies the far-end port number for the optional
second registration.
Secondary SIP Server
Port
Cisco Wireless Phone 840 and 860 Administration Guide for Cisco Unified Communications Manager
53
Cisco Unified Communications Manager phone configuration
Product Specific Configuration Layout fields

DescriptionDefaultField type or choicesField name
Identifies the transport type for the optional second
registration.
UDPUDP
TCP
TLS
Secondary SIP Transport
Identifies the SIP extension for the optional second
registration.
Secondary SIP Extension
Identifies the SIP username for the optional second
registration.
Secondary SIP Username
Identifies the SIP password for the optional second
registration.
Secondary SIP Password
Identifies the name of the configuration filename
created in the Cisco Wireless Phone Configuration
Management tool and added to Cisco Unified
Communications Manager TFTP nodes. If the file is
encrypted, the format is config.json.enc.
If the file isn't encrypted, the format is config.json.
Don't use unencrypted files on your production server,
use only for troubleshooting.
String of up to 256
characters
Enterprise Mobility
Management (EMM)
Alternative
Configuration
Identifies the key if using an encrypted configuration
file created in the Cisco Wireless Phone Configuration
Management tool. The key.txt file contains the
encryption key.
Blank if the file isn't encrypted.
String of 64 charactersEnterprise Mobility
Management (EMM)
Alternative
Configuration
Encryption Key
Specifies whether to get recording warning tone while
recording the call.
• Disabled— Unmutes the recording warning tone.
• Enabled— Mutes the recording warning tone.
EnabledEnabled
Disabled
Recording Tone
Specifies whether to announce the Caller ID.
• Disabled—Does not announces the Caller ID.
• Enabled—Announces the Caller ID on the phone.
• Headset Only—Announces the Caller ID Only
when using a headset.
DisabledDisabled
Enabled
Headset Only
Announce Caller ID
Specifies whether to receive SIP Registration
Notifications.
DisabledDisabled
Enabled
Mute SIP Registration
Notifications
Cisco Wireless Phone 840 and 860 Administration Guide for Cisco Unified Communications Manager
54
Cisco Unified Communications Manager phone configuration
Product Specific Configuration Layout fields

DescriptionDefaultField type or choicesField name
Specifies the Line 1 Ringtone.
By selecting a "None" type ringtone, the phone
doesn't ring, but displays the incoming calls.
Note
Flutey PhoneLine 1 Ringtone
Specifies the Line 2 Ringtone.
By selecting a "None" type ringtone, the phone
doesn't ring, but displays the incoming calls.
Note
Flutey PhoneLine 2 Ringtone
Specifies the Line 3 Ringtone.
By selecting a "None" type ringtone, the phone
doesn't ring, but displays the incoming calls.
Note
Flutey PhoneLine 3 Ringtone
Specifies the Line 4 Ringtone.
By selecting a "None" type ringtone, the phone
doesn't ring, but displays the incoming calls.
Note
Flutey PhoneLine 4 Ringtone
Specifies the Line 5 Ringtone.
By selecting a "None" type ringtone, the phone
doesn't ring, but displays the incoming calls.
Note
Flutey PhoneLine 5 Ringtone
Specifies the Line 6 Ringtone.
By selecting a "None" type ringtone, the phone
doesn't ring, but displays the incoming calls.
Note
Flutey PhoneLine 6 Ringtone
Cisco Wireless Phone 840 and 860 Administration Guide for Cisco Unified Communications Manager
55
Cisco Unified Communications Manager phone configuration
Product Specific Configuration Layout fields

DescriptionDefaultField type or choicesField name
None
Andromeda
Aquila
Argo Navis
Atria
Beat Plucker
Bell Phone
Big Easy
Canis Major
Carina
Cassiopeia
Centaurus
Chimey Phone
Cygnus
Digital Phone
Ding
Draco
Dream Theme
Eridani
Flutey Phone
Free Flight
Girtab
Growl
Hydra
Insert Coin
Kuma
Lyra
Machina
Mildly Alarming
New Player
Noisey One
Orion
Pegasus
Cisco Wireless Phone 840 and 860 Administration Guide for Cisco Unified Communications Manager
56
Cisco Unified Communications Manager phone configuration
Product Specific Configuration Layout fields

DescriptionDefaultField type or choicesField name
Perseus
Pyxis
Rasalas
Rigel
Scarabaeus
Sceptrum
Solarium
Testudo
Third Eye
Very Alarmed
Vespa
Zeta
Specifies the notification sound files to download.
Multiple files can be specified using the comma
separated format. Once the files have been downloaded,
the notification sound will need to be configured via
the Custom Settings application, Android Settings, or
in other application settings.
Notification Sound
Specifies the alarm sound files to download. Multiple
files can be specified using the comma separated
format. Once the files have been downloaded, the alarm
sound will need to be configured via the Custom
Settings application, Android Settings, or in other
application settings.
Alarm Sound
Specifies the wallpaper files to download. Multiple
files can be specified using the comma separated
format. Once the files have been downloaded, the lock
screen wallpaper and home screen wallpaper will need
to be configured via the Custom Settings application
or Android Settings.
Wallpaper
Related Topics
Cisco app software updates, on page 171
Configure visual voicemail
Configuration and use of visual voicemail is optional. By default, the visual voicemail feature is disabled.
With visual voicemail disabled, users may access, listen to, and delete their voicemail messages through the
Cisco Unity Connection IVR just as they would with any other Cisco handset. However, if you enable visual
voicemail, its UI gives users a much easier to use interface to manage their voicemails than the dial-in IVR.
Cisco Wireless Phone 840 and 860 Administration Guide for Cisco Unified Communications Manager
57
Cisco Unified Communications Manager phone configuration
Configure visual voicemail

Procedure
Step 1 To allow TLS connections from the device to the Cisco Unity Connection server, verify that the server’s
tomcat-trust certificate is in Cisco Unified Communications Manager's tomcat-trust certificate trust list.
Step 2 From the Cisco Unity Administration page, configure the Voicemail box and Web application password for
the user.
Step 3 From the Cisco Unified Communications Manager Administration web page, set the Visual Voicemail Access
field for the device to Enabled.
Step 4 From the Cisco Unified Communications Manager Administration web page, configure the Voicemail Server
(Primary) address to point to the integrated Cisco Unity Connection server.
Configure Tomcat trust certificate
Export the tomcat-trust certificate from the Cisco Unity Connection server and import it as a tomcat-trust
certificate to Cisco Unified Communications Manager.
Procedure
Step 1 Export the certificate from Cisco Unity Connection:
a) On the Cisco Unity Connection server, navigate to Cisco Unified OS Administration.
b) Navigate to Security > Certificate Management.
c) Select the certificate labeled tomcat-trust.
d) Choose to download the .pem file.
Step 2 Import the certificate to each Cisco Unified Communications Manager in the cluster.
a) On the Cisco Unified Communications Manager server, navigate to Cisco Unified OS Administration.
b) Navigate to Security > Certificate Management.
c) Click Upload Certificate/Certificate Chain.
d) From the Certificate Purpose drop-down list, choose tomcat-trust.
e) Enter a Description for the certificate, such as tomcat-trust.
f) Click Browse to search for, and select, the certificate.
g) Click Upload.
Step 3 Restart the Tomcat service for the changes to take effect.
You must restart the Tomcat service for the new certificate to be available to the phone when it validates
the TLS connection to Cisco Unity Connection.
Note
Configure the voicemail box and Web Application Password
Configure a mailbox for the user on the Cisco Unity Connection server as you would for any other user.
However, while users may know their voicemail PIN, it may differ from their Web Application Password;
which is what the Cisco Wireless Phone 840 and 860 visual voicemail feature uses to access their messages.
Set the user’s Web Application Password.
Cisco Wireless Phone 840 and 860 Administration Guide for Cisco Unified Communications Manager
58
Cisco Unified Communications Manager phone configuration
Configure Tomcat trust certificate

Procedure
Step 1 In the Cisco Unity Connection system, navigate to Users > Users, and select the user.
Step 2 Under Choose Pin, use the pulldown to select the Web Application box.
Step 3 Unselect the User must change at Next Sign-In box if currently selected (the Cisco Wireless Phone 840 and
860 does not currently provide a mechanism to change the password through the phone’s UI).
Step 4 Using the top pull-down menu, select Edit > Change Password > .
Step 5 In the Choose Password pulldown, select Web Application.
Step 6 Enter a Password.
Set the Password to something that will conform to your Site’s Authentication rules. This value must match
the value that the user enters in the Enter Unity Web Credentials dialog box that appears when they navigate
to the Voicemail tab in the Cisco Phone app.
Step 7 Select Save.
Step 8 Give the user’s Unity Alias and Web Application Password to the user, so they can enter them in the Unity
Web Credentials dialog box when prompted.
Enable Visual Voicemail Access
For the Voicemail tab to appear on the user’s device, you must enable Visual Voicemail Access on the Phone
Configuration page of the device.
If the Visual Voicemail Access is set to Disabled, the Voicemail tab does not appear on the user’s devices.
Procedure
Step 1 From the Cisco Unified Communications Manager Administration web page, select Device > Phone.
Step 2 Select the device you want to configure.
Step 3 In the Product Specific Configuration Layout portion of the Phone Configuration Page for the device, set
Visual Voicemail Access to Enabled.
Configure the voicemail server to the Cisco Unity Connection server
Provision the voicemail server address in the Cisco Unified Communications Manager, so the phones can
locate the Cisco Unity Connection server.
Procedure
Choose one of the following methods:
• Configure the Voicemail Server (Primary) and Voicemail Server (Backup) IP addresses as part of a
Common Phone Profile Configuration for the devices at an Enterprise level under System > Enterprise
Phone Configuration.
Cisco Wireless Phone 840 and 860 Administration Guide for Cisco Unified Communications Manager
59
Cisco Unified Communications Manager phone configuration
Enable Visual Voicemail Access

• a. Configure the Voicemail Server (Primary) and Voicemail Server (Backup) IP addresses as part of a
Common Phone Profile Configuration for individual devices in Cisco Unified CM Administration
Device > Phone.
b. Select the device you want to configure.
c. From the Product Specific Configuration Layout portion of the Phone Configuration Page of the
device:
• Set the Voicemail Server (Primary) field to the address of your main Cisco Unity Connection
server.
• If available, set the Voicemail Server (Backup) field to the address of your backup Cisco Unity
Connection server.
Phone services
You can provide your users with special phone services. Before a user can access any service, you must
configure the services with Cisco Unified CM Administration.
With release 1.3(0) or later, extension mobility is available for the phones. To configure extension mobility,
see the Extension Mobility chapter in the Feature Configuration Guide for Cisco Unified Communications
Manager for your release.
With release 1.4(0) or later, extension mobility cross cluster (EMCC) is available for the phones. To configure
EMCC, see the Extension Mobility Cross Cluster chapter in the Feature Configuration Guide for Cisco Unified
Communications Manager for your release.
With release 1.6(0) or later, Webex Calling is supported for phones. To configure Webex Calling feature to
your phone, see https://help.webex.com/ld-nzid8xi
Supports the following Webex Standard Call features:
Call Waiting
Call Hold and Resume
Call Transfer
Call Park
Multiline
Shared Call appearance
Support Standard SIP timers on Call duration
Media Codec Support – G.711a, G.711u, G.729a, G.722, OPUS
Message Waiting Indicator signaled by unsolicited SIP notify
Call quality Metrics/Reports on call termination (SIP Bye message)
Cisco Wireless Phone 840 and 860 Administration Guide for Cisco Unified Communications Manager
60
Cisco Unified Communications Manager phone configuration
Phone services

Serviceability support through PRT trigger & Packet Capture ·Call Recording
E-911/RedSky integration – Held support
For release 1.7(0) or later, Lightweight Directory Access Protocol (LDAP) feature is available for the phones
in Webex Calling. It allows you to program NFC card with the audio profiles and use NFC card to copy the
profile(s) to other devices.
With release 1.9(0) or later, Cisco Unified SRST feature is available for the phones. When a WAN link fails,
the phone loses connection with the central CUCM, but the phone immediately registers with a local Cisco
Unified SRST gateway. It detects newly registered wireless phones, queries these phones for their configuration,
and then autoconfigures itself.
Cisco Wireless Phone 840 and 860 support the following Cisco Unified SRST features:
Line labelAuto answer
Multiple linesAttended transfer
RedialCall forward
Secure SRSTCall waiting
Speed dialConference
SRST failover and failbackDo not disturb
Voice hunt groupHold/Resume
Phone line configuration options
For release 1.3(0) or later, you can configure Auto Answer and Line Text Label for the Cisco Wireless Phone
840 and 860.
For more details about these options, see the Feature Configuration Guide for Cisco Unified Communications
Manager for your release.
For release 1.8(0) or later, you can configure Recording Option, Recording Profile, and Recording Media
Source for the Cisco Wireless Phone 840 and 860.
Problem report tool
The Report a Problem feature on the Cisco Phone app creates a problem report log bundle. To troubleshoot
phone problems, you require:
• The log bundles from the Report a Problem feature.
• The date and time of the problem.
• A description of the problem.
If the phone's web browser is enabled, you can download the log bundle from the phone's web browser.
Cisco Wireless Phone 840 and 860 Administration Guide for Cisco Unified Communications Manager
61
Cisco Unified Communications Manager phone configuration
Phone line configuration options

Optionally, you may set up a problem report upload server for the log bundles. To set up a problem report
upload server, you must add a server address to the Customer Support Upload URL field on Cisco Unified
Communications Manager.
Related Topics
Problem report log bundles, on page 177
Configure a customer support upload URL
You must use a server with an upload script to receive PRT files. The PRT uses an HTTP POST mechanism,
with the following parameters included in the upload (utilizing multipart MIME encoding):
• devicename (example: “SEP001122334455”)
• serialno (example: “FCH12345ABC”)
• username (the username configured in Cisco Unified Communications Manager, the device owner)
• prt_file (example: “probrep-20141021-162840.tar.gz”)
A sample script is shown below. This script is provided for reference only. Cisco does not provide support
for the upload script installed on a customer's server.
<?php
// NOTE: you may need to edit your php.ini file to allow larger
// size file uploads to work.
// Modify the setting for upload_max_filesize
// I used: upload_max_filesize = 20M
// Retrieve the name of the uploaded file
$filename = basename($_FILES['prt_file']['name']);
// Get rid of quotes around the device name, serial number and username if they exist
$devicename = $_POST['devicename'];
$devicename = trim($devicename, "'\"");
$serialno = $_POST['serialno'];
$serialno = trim($serialno, "'\"");
$username = $_POST['username'];
$username = trim($username, "'\"");
// where to put the file
$fullfilename = "/var/prtuploads/".$filename;
// If the file upload is unsuccessful, return a 500 error and
// inform the user to try again
if(!move_uploaded_file($_FILES['prt_file']['tmp_name'], $fullfilename)) {
header("HTTP/1.0 500 Internal Server Error");
die("Error: You must select a file to upload.");
}
?>
Procedure
Step 1 Set up a server that can run your PRT upload script.
Cisco Wireless Phone 840 and 860 Administration Guide for Cisco Unified Communications Manager
62
Cisco Unified Communications Manager phone configuration
Configure a customer support upload URL

Step 2 Write a script that can handle the parameters listed above, or edit the provided sample script to suit your needs.
Step 3 Upload your script to your server.
Step 4 In Cisco Unified Communications Manager, go to the Product Specific Configuration Layout area of the
individual device configuration window, Common Phone Profile window, or Enterprise Phone Configuration
window.
Step 5 Check Customer support upload URL and enter your upload server URL.
Example:
http://example.com/prtscript.php
Step 6 Save your changes.
Corporate and personal directories setup
You can make it easy for your users to contact coworkers using a corporate directory.
You can also enable users to create personal directories. Each individual user has a personal directory, which
they can access from any device.
The corporate and personal directories are set up in the Cisco Unified Communications Manager.
Corporate directory setup
The Corporate Directory allows a user to look up phone numbers for coworkers. To support this feature, you
must configure corporate directories.
Cisco Unified Communications Manager uses a Lightweight Directory Access Protocol (LDAP) directory to
store authentication and authorization information about users of Cisco Unified Communications Manager
applications that interface with Cisco Unified Communications Manager. Authentication establishes user
rights to access the system. Authorization identifies the telephony resources that a user is permitted to use,
such as a specific phone extension.
For more information, see the documentation for your particular Cisco Unified Communications Manager
release.
After you complete the LDAP directory configuration, users can use the Corporate Directory service on their
phone to look up users in the corporate directory.
Personal directory setup
The personal directory allows a user to store a set of personal numbers in their Personal Address Book (PAB).
Access the personal directory from the:
• Cisco Unified Communications Self Care Portal on a web browser—Provide users with the URL and
login credentials.
• Contacts tab on the Cisco Phone app—Provide users login credentials.
Cisco Wireless Phone 840 and 860 Administration Guide for Cisco Unified Communications Manager
63
Cisco Unified Communications Manager phone configuration
Corporate and personal directories setup

Self Care Portal overview
From the Cisco Unified Communications Self Care Portal, users can customize and control phone features
and settings.
As the administrator, you control access to the Self Care Portal. You must also provide information to your
users so that they can access the Self Care Portal.
Before a user can access the Cisco Unified Communications Self Care Portal, you must use Cisco Unified
Communications Manager Administration to add the user to a standard Cisco Unified Communications
Manager End User group.
You must provide end users with the following information about the Self Care Portal:
• The URL to access the application. This URL is:
https://<server_name:portnumber>/ucmuser/, where server_name is the host on which
the web server is installed, and portnumber is the port number on that host.
• A user ID and default password to access the application.
• An overview of the tasks that users can accomplish with the portal.
These settings correspond to the values that you entered when you added the user to Cisco Unified
Communications Manager.
For more information, see the documentation for your particular Cisco Unified Communications Manager
release.
Set up user access to the Self Care Portal
Before a user can access the Self Care Portal, you need to authorize the access.
Procedure
Step 1 In Cisco Unified Communications Manager Administration, select User Management > End User.
Step 2 Search for the user.
Step 3 Click the user ID link.
Step 4 Ensure that the user has a password and PIN configured.
Step 5 In the Permission Information section, ensure that the Groups list includes Standard CCM End Users.
Step 6 Select Save.
Call pickup
Cisco Unified Communications Manager Call Pickup allows user to pick up call from other phones when the
phone is busy or in a call queue or shared line group, a call comes into user’s phone. For example, a user can
still pick up the phone from someone’s desk.
• Pickup: A phone that is assigned to a pickup group and can answer a call ringing on another phone in
its own group. To activate, press the Pickup softkey.
Cisco Wireless Phone 840 and 860 Administration Guide for Cisco Unified Communications Manager
64
Cisco Unified Communications Manager phone configuration
Self Care Portal overview

CHAPTER 4
Phone configuration
• Enterprise Mobility Management application configuration, on page 65
• Cisco Wireless Phone Configuration Management tool , on page 66
• Manual phone configuration, on page 74
Enterprise Mobility Management application configuration
We recommend that you configure an Enterprise Mobility Management (EMM) application and generate a
QR code to program the phones to connect to WLAN and EMM application. When each phone enrolls with
the EMM application, it receives the phone apps, certificates, and configuration for all non-Cisco Unified
Communications Manager related functionality.
Enroll the phones to the Enterprise Mobility Manager application
Enroll the phones to the Enterprise Mobility Management (EMM) application through the device owner
method.
See your EMM application documentation for additional information.
Before you begin
Ensure that the battery is fully charged.
Ensure that you allow the following apps:
• Cisco Phone: com.cisco.phone
• System Updater: com.cisco.sysupdater
• UCM Client: com.cisco.ucmclient
• Logging: com.cisco.logging
• Application URLs: com.cisco.appurl
• Port Manager: com.cisco.portmanager
Cisco Wireless Phone 840 and 860 Administration Guide for Cisco Unified Communications Manager
65

You may need to add the Google Keyboard (Gboard) app, based on your EMM application.
There are also several Cisco apps that are on the Google Play Store you may want to add.
Note
Procedure
Step 1 Press and hold the Power button until the phone vibrates and the first screen displays.
Step 2 On the startup screen, quickly tap the display six times.
Step 3 Scan a QR code.
Related Topics
Cisco app package names, on page 105
Cisco Wireless Phone Configuration Management tool
If you don't use an Enterprise Mobility Management (EMM) application to configure your phones, we
recommend that you use the Cisco Wireless Phone Configuration Management tool. The Cisco Wireless
Phone Configuration Management tool Deployment Configuration tab has two apps to allow you to restrict
access to apps and settings.
• The Smart Launcher app allows you to specify which apps to display on the home launcher screen.
You can configure these modes:
• Single-app mode—Specify a single app, such as the Cisco Phone app, to display on the Smart
Launcher. Other apps aren't available to the user.
• Multiple-app mode—Specify multiple apps to display on the Smart Launcher. Other apps aren't
available to the user.
• The Device Policy Controller app allows you to disallow apps on the phone to prevent users from
getting to an app that isn't on their launcher screen through another app. For example, if the user clicks
a link to a website that they receive in a Webex message, the link opens in a browser if the Chrome app
isn't in the disallowed list.
The Cisco Wireless Phone Configuration Management tool also allows you to change or lock down settings
for the various Cisco apps.
Cisco Wireless Phone 840 and 860 Administration Guide for Cisco Unified Communications Manager
66
Phone configuration
Cisco Wireless Phone Configuration Management tool

To use the configuration file that is generated by the utility and loaded into Cisco Unified Communications
Manager (CUCM), the administrator must perform the following:
1. Reset the phone to factory settings.
2. Generate the QR code using the Initial Provisioning tab in the configuration tool.
3. Scan the QR code.
*Failure to scan the QR code to onboard the phone prevents the phone from downloading the configuration
file from CUCM when it has joined the wireless network and registered to CUCM.
Note
In Smart Launcher mode, the phone has only these four Quick Settings: Display brightness, Flashlight, Volume
controls, and Exit Launcher. However, the notification shade also presents the gear icon to open the Android
settings app. We recommend that you disallow the Allow Notification Shade Settings Gear in the Custom
Settings app in Cisco Wireless Phone Configuration Management tool. Otherwise, you can easily open apps
that aren't on the Smart Launcher.
Access the Quick Settings from the notification shade in single-app mode, or in the Overflow menu in
multiple-app mode.
Note
Cisco Wireless Phone Configuration Management tool workflow
You use the Cisco Wireless Phone Configuration Management tool to:
• Generate a QR code to enroll your phones to the call control system.
• Create an encrypted configuration file to allow and restrict certain apps and settings on the phones.
Procedure
PurposeCommand or Action
See Create a new phone security profile, on
page 45.
Enable TFTP encryption in the Phone Security
Profile, so that the configuration data sent to
the phones through TFTP isn't in cleartext
format.
Step 1
Change the password in the Cisco Unified CM
Administration web page under Device >
Device Settings > Common Device Profile.
Update the default Local Phone Unlock
Password of **# so that users can't exit the
Smart Launcher and access more settings or
apps.
Step 2
See Load the COP files to Cisco Unified
Communications Manager, on page 31.
Install the 1.5 software on the phones.
Step 3
See Reset to factory default through the phone
settings, on page 170.
Factory reset the phones.
Step 4
Cisco Wireless Phone 840 and 860 Administration Guide for Cisco Unified Communications Manager
67
Phone configuration
Cisco Wireless Phone Configuration Management tool workflow

PurposeCommand or Action
See Create encrypted phone configuration file,
on page 69.
In the Deployment Configuration tab of the
Cisco Wireless Phone Configuration
Management tool, generate an encrypted phone
configuration file.
Step 5
See Upload the phone configuration file to
Cisco Unified Communications Manager, on
page 73.
Upload the phone configuration file to Cisco
Unified Communications Manager.
Step 6
See Generate a QR code to initialize phones,
on page 68.
In the Initial Provisioning tab of the Cisco
Wireless Phone Configuration Management
tool, generate a QR code.
Step 7
See Enroll phones with Cisco Wireless Phone
Configuration Management tool QR code, on
page 69.
Enroll the phones with the QR code.
Step 8
Restart the phones before you give them to
users.
Step 9
See Update existing configuration file, on page
73.
(Optional) You can update existing phone
configuration files by importing the zip file
into the Cisco Wireless Phone Configuration
Management tool.
Step 10
Generate a QR code to initialize phones
With the Cisco Wireless Phone Configuration Management tool, you generate a Quick Response (QR) code
to connect the phones with the WLAN and Cisco Unified Communications Manager.
You can generate and save as many different QR codes as you need for your organization.
After you generate a QR code, we recommend that you save it as a PDF or other scannable source, so that
you can reuse it.
Note
Before you begin
Get your Wi-Fi credentials, if applicable.
Procedure
Step 1 From any browser, open the Cisco Wireless Phone Configuration Management tool.
Step 2 Click the Initial Provisioning tab.
Step 3 Choose one of these Security options.
• None
• WPA-Personal
Cisco Wireless Phone 840 and 860 Administration Guide for Cisco Unified Communications Manager
68
Phone configuration
Generate a QR code to initialize phones

• WPA-Enterprise
Step 4 Enter the SSID and, if necessary, Password.
Step 5 Click Generate.
Step 6 Keep the QR code open or save it, so you can use it to enroll the phones.
Enroll phones with Cisco Wireless Phone Configuration Management tool QR
code
To enroll the phones with the Cisco Wireless Phone Configuration Management tool QR code, the phone
must be in range of the Wi-Fi network.
Before you begin
• Update the phone software to release 1.5(0) and then factory reset the phone.
• Generate the Cisco Wireless Phone Configuration Management tool QR code.
Procedure
Step 1 On the Hi there startup screen, quickly tap the display six times.
The camera opens.
Step 2 Center the QR code in the camera display.
Step 3 Tap through and accept the Android setup screens.
The phone registers to the Cisco Unified Communications Manager and, if available, downloads the JSON
configuration files, if DHCP points to the Cisco Unified Communications Manager.
Related Topics
Reset to factory default through the phone settings, on page 170
Generate a QR code to initialize phones, on page 68
Create encrypted phone configuration file, on page 69
Create encrypted phone configuration file
With the Cisco Wireless Phone Configuration Management tool, you can generate and save as many different
configuration files that you need for different groups within your organization.
You can use the default settings for all apps, or you can change the app settings. Each setting has a blue info
icon that you can hover over for more information. When you make a change to a setting, a blue dot
appears to the left of the setting's blue info icon.
Cisco Wireless Phone 840 and 860 Administration Guide for Cisco Unified Communications Manager
69
Phone configuration
Enroll phones with Cisco Wireless Phone Configuration Management tool QR code

Before you begin
• Based on your organization's needs, determine which apps and settings you want to allow and disallow
on the phone.
• Ensure that the apps that you want to include on the smart launcher are already installed on the phone.
Procedure
Step 1 From any browser, open the Cisco Wireless Phone Configuration Management tool to the Deployment
Configuration tab.
Step 2 From Choose Application, select Smart Launcher and set these parameters.
• Set Allow-List of Applications: Include the apps that you want to appear on the smart launcher. Use a
comma-separated list of the app package names with no spaces.
By default, in the Cisco Wireless Phone Configuration Management tool, the following apps are set
as allowed:
com.cisco.phone,com.cisco.ptt,com.cisco.emergency,com.cisco.webapi,com.cisco.wx2.android.
Note
• Set Title of Launcher Application: Add a title to display on the smart launcher with multiple apps. The
title doesn't appear if you have a single app on the smart launcher. Use up to 25 characters in the title.
By default, the title is Smart Launcher. For example, add your company name or department.
Step 3 From Choose Application, select Device Policy Controller and set the parameters.
• Disallow These Apps: Include the apps that you don't want to be accessible on the phone. Use a
comma-separated list of the app package names without spaces.
Don't include the Cisco Phone app on this list.
Make sure that none of the applications in the SmartLauncher allowed list are in this disallowed
list, or the apps won't appear on the smart launcher home screen.
Caution
By default, in the Cisco Wireless Phone Configuration Management tool, the following apps are set as disallowed:
com.google.android.youtube,com.google.android.googlequicksearchbox,com.android.soundrecorder,com.google.android.apps.wellbeing,com.google.android.apps.maps,com.google.android.videos,com.google.android.apps.photos,com.android.vending,com.android.chrome.
Note
• Wi-Fi Profile: Add up to five Wi-Fi profiles: WPA2-Personal or WPA2-Enterprise with EAP method
of either:
• PEAP with MSCHAPv2 or GTC
• TTLS with GTC, PAP, MSCHAP or MSCHAPv2
Cisco Wireless Phone Configuration Management tool supports PEM certificates. When you
copy and paste, don't include the certificate header, footer, white space, or new lines.
Note
Step 4 From Choose Application, select, and configure each of the following Cisco apps as required by your
organization.
If you want to accept all the default app settings, you don't need to make any changes. For more details
about these Cisco app settings, see Cisco app configuration, on page 79.
Note
Cisco Wireless Phone 840 and 860 Administration Guide for Cisco Unified Communications Manager
70
Phone configuration
Create encrypted phone configuration file

• Barcode
• Battery Life
• Buttons
• Custom Settings
• PTT
• Emergency
• Call Quality Settings
• Web API
Step 5 Click Export.
Step 6 Check the Encrypt Configuration check box.
Don't use unencrypted files on your production server.
Note
Step 7 Click Export.
The Cisco Wireless Phone Configuration Management tool export creates a zip file that contains three files.
Step 8 Save a copy of the zip file so that you can reuse or update the configuration file as needed.
You can rename the zip file, if needed. But, if you plan on updating the configuration file later, keep
a copy of the intact zip file without the inner files renamed.
Caution
Related Topics
Cisco app package names, on page 105
Preinstalled Android apps, on page 71
Update existing configuration file, on page 73
Product Specific Configuration Layout fields, on page 52
Cisco Wireless Phone Configuration Management tool for Cisco app configuration, on page 82
Preinstalled Android apps
You can set these preinstalled Android apps to be either allowed or disallowed on the phones though the Cisco
Wireless Phone Configuration Management tool Smart Launcher and Device Policy Controller
apps.
The following table lists the preinstalled Android apps that are, by default, set to disallowed in the Device
Policy Controller.
Cisco Wireless Phone 840 and 860 Administration Guide for Cisco Unified Communications Manager
71
Phone configuration
Preinstalled Android apps

Table 17: Default preinstalled Android apps disallowed in the Device Policy Controller
App package nameDefault disallowed Android apps
com.android.chromeChrome
com.google.android.apps.wellbeingDigital Wellbeing
com.google.android.googlequicksearchboxGoogle
com.google.android.videosGoogle TV
com.google.android.apps.mapsMaps
com.google.android.apps.photosPhotos
com.android.vendingPlay Store
com.android.soundrecorderSound Recorder
com.google.android.youtubeYouTube
You can also set these common preinstalled Android apps to the allowed or disallowed lists.
Table 18: More preinstalled apps
App package namePreinstalled app
com.google.android.calculatorCalculator
ccom.google.android.calendarCalendar
com.google.android.GoogleCameraCamera
com.google.android.deskclockClock
com.google.android.contactsContacts
com.google.android.apps.docsDrive
com.google.android.apps.tachyonDuo
com.marc.filesFiles
com.google.android.gmGmail
com.google.android.keepKeep Notes
com.cisco.wx2.androidWebex
com.google.android.apps.youtube.musicYT Music
You can also install other Android apps to the phone, as needed.
Cisco Wireless Phone 840 and 860 Administration Guide for Cisco Unified Communications Manager
72
Phone configuration
Preinstalled Android apps

Uploadthe phoneconfigurationfileto CiscoUnifiedCommunicationsManager
Before you begin
Create the encrypted phone configuration zip file with Cisco Wireless Phone Configuration Management tool.
Procedure
Step 1 Extract the contents of the encrypted phone configuration zip file. The zip file contains three files:
• config.json.enc—Contains the phone configuration to import into Cisco Unified Communications
Manager.
• key.txt—Contains the encryption key to decrypt the config.json.enc file.
• config.json.react.enc—Contains the configuration format for the Cisco Wireless Phone Configuration
Management tool, which is used if you import the file.
Once you extract the zip file, you can rename the config.json.enc before you upload it to Cisco
Unified Communications Manager. We recommend that you do this if you plan on having multiple
configurations for various devices.
Note
Step 2 Sign in to Cisco Unified Communications Manager Administration.
Step 3 Add the name of the config.json.enc file to the Enterprise Mobility Management (EMM) Alternative
Configuration field in the Product Specific Configuration Layout pane.
If you renamed the config.json.enc file, make sure to use the new name.
Note
Step 4 Add the key in the key.txt file to the Enterprise Mobility Management (EMM) Alternative Configuration
Encryption Key field in the Product Specific Configuration Layout pane.
You can also use bulk administration to set the key across the device types.
Note
Step 5 Add the config.json.enc file to all TFTP nodes running TFTP Services, and restart the TFTP services.
Related Topics
Product Specific Configuration Layout fields, on page 52
Update existing configuration file
If you want to update an existing configuration file, you can import the existing configuration zip file in to
the Cisco Wireless Phone Configuration Management tool, make the changes, and export a new configuration
zip file.
Before you begin
If you want to keep a copy of the original configuration file, copy the intact zip file and rename it.
Cisco Wireless Phone 840 and 860 Administration Guide for Cisco Unified Communications Manager
73
Phone configuration
Upload the phone configuration file to Cisco Unified Communications Manager

Don't extract and rename the files within the zip, and then rezip the files.
Caution
Procedure
Step 1 Open the Cisco Wireless Configuration Deployment tool.
Step 2 In the Deployment Configuration tab, click Import.
Step 3 Add the existing configuration zip file and click Import.
Step 4 Update the apps and settings.
Step 5 Click Export to create a new configuration zip file.
Step 6 Follow the steps to upload the new encrypted phone configuration file to Cisco Unified Communications
Manager.
Related Topics
Create encrypted phone configuration file, on page 69
Upload the phone configuration file to Cisco Unified Communications Manager, on page 73
Manual phone configuration
You can manually configure the phones if you don't use an Enterprise Mobility Management (EMM) application
and QR code, or the JSON configuration file and QR code from the Cisco Wireless Phone Configuration
Management tool.
Wi-Fi profile configuration
For an out of box or factory reset phone, you configure the Wi-Fi network through the startup wizard or select
Set up offline. How you configure the phone offline depends on whether the Wi-Fi network is either:
• Broadcasted
• Nonbroadcast or hidden
Add the phone to a broadcasted Wi-Fi network
You add the phone to a broadcasted Wi-Fi network through the startup wizard, or offline through the Settings
app.
Before you begin
Get the following information about the Wi-Fi network from your administrator:
• Network name or Service Set Identifier (SSID)
• Network security mode:
Cisco Wireless Phone 840 and 860 Administration Guide for Cisco Unified Communications Manager
74
Phone configuration
Manual phone configuration

• None
• Pre-shared key (PSK)
• Protected Extensible Authentication Protocol (PEAP)
• Extensible Authentication Protocol (EAP) Transport Layer Security (EAP-TLS)
• EAP Tunneled Transport Layer Security (EAP-TTLS)
• PIN or passkey for the security mode, if you use one
Check with your administrator to see if you need any certificates and arrange to install the certificates on your
phone.
Procedure
Step 1 Swipe up from the bottom of the phone’s display to show the installed applications.
Step 2 Tap the Settings app.
Step 3 Select Network & internet > Wi-Fi.
Step 4 Tap the desired Wi-Fi network name.
If the network doesn't have a security mode, the phone automatically connects to the Wi-Fi network.
If the network security mode is PSK, enter the 8–63 ASCII or 64 Hex Passphrase.
Step 5 For a network with a PEAP, EAP-TLS, or EAP-TTLS security mode, select the EAP method: PEAP, TLS,
or TTLS.
Step 6 For a network with an EAP-TLS security mode, select the desired CA certificate and User certificate.
Step 7 For a network with an EAP-TTLS or PEAP security mode, select the Phase 2 authentication method and
CA certificate option to use, and then enter the Identity and Password.
Step 8 Tap Connect.
Add the phone to a nonbroadcast Wi-Fi network
Follow these steps to add your phone to a Wi-Fi network that is hidden or not broadcast.
Before you begin
Get the following information about the Wi-Fi network from your administrator:
• Network name or Service Set Identifier (SSID)
• Network security mode:
• None
• Wi-Fi Protected Access II (WPA2)-Personal: Pre-shared key (PSK)
• WPA2-Enterprise with EAP method:
Cisco Wireless Phone 840 and 860 Administration Guide for Cisco Unified Communications Manager
75
Phone configuration
Add the phone to a nonbroadcast Wi-Fi network

• Protected Extensible Authentication Protocol (PEAP)
• Extensible Authentication Protocol (EAP) Transport Layer Security (EAP-TLS)
• EAP Tunneled Transport Layer Security (EAP-TTLS)
• PIN or passkey for the security mode, if you use one
Check with your administrator to see if you need any certificates and arrange to install the certificates on your
phone.
Procedure
Step 1 Swipe up from the bottom of the phone’s display to show the installed applications.
Step 2 Tap the Settings app.
Step 3 Select Network & internet > Wi-Fi.
Step 4 Tap Add Network.
Step 5 Enter the desired Wi-Fi Network name.
Step 6 Select the desired Security:
• For an open network, select None.
• For a PSK enabled Wi-Fi network, select WPA2- Personal and enter the 8-63 ASCII or 64 HEX
Password.
• For an EAP enabled Wi-Fi network, select WPA2-Enterprise.
Step 7 For a WPA2-Enterprise network, select the EAP method: PEAP, TLS, or TTLS.
Step 8 For a network with an EAP-TLS security mode, select the desired CA certificate and User certificate.
Step 9 For a network with an EAP-TTLS or PEAP security mode, select the Phase 2 authentication method and
CA certificate option to use, and then enter the Identity and Password.
Step 10 Under Advanced options, set Hidden network to Yes.
You can also set the Proxy and IP settings as required.
Step 11 Tap Save.
Configure a TFTP server
You must configure a TFTP server if your network doesn't provide DHCP option 150 or 66 for the Cisco
Unified Communications Manager that you want to register to.
Configure the DHCP pool with option 150 or 66 if you want to use the automatic configuration method.
Note
Cisco Wireless Phone 840 and 860 Administration Guide for Cisco Unified Communications Manager
76
Phone configuration
Configure a TFTP server

Before you begin
You need the following information:
• Local Phone Unlock Password, if the default password was updated
• IP address of the TFTP server
Procedure
Step 1 Access the Cisco Phone app.
Step 2 Choose one of the following based on your phone's software version:
• For release 1.2(0), tap the Overflow menu.
• For release 1.3(0) or later, tap the Drawer menu.
Step 3 Choose one of the following based on your phone's software version:
• For release 1.2(0), select Settings > Phone information > Security.
• For release 1.3(0) or later, select User settings > Phone information > Security.
Step 4 Enter the Local Phone Unlock Password.
The default password is **#.
Step 5 To enable alternate TFTP servers, swipe the Alternate TFTP slider to the right .
Step 6 Enter the TFTP server addresses and tap OK.
Step 7 Tap the back arrow in the upper left corner twice to save your changes and exit the menu.
Configure a Call server mode
Cisco Wireless Phone 840 and 860 can operate in either UCM or WxC mode. The phone can be configured
both automatically and manually. You can manually select the UCM or WxC in call server mode and for
automatic configuration select Auto detect.
Usually, when you select Auto detect in Call server mode, the phone tries to connect to UCM using the
pre-existing behavior. If the phone gets configuration from a UCM, the phone operates in UCM mode and
WxC mode will be disabled. If the phone cannot get configuration from a UCM, the phone tries to get WxC
configuration. UCM mode will be disabled if WxC configuration is received. If the phone cannot get
configuration for either CUCM or WxC, the phone will retry the auto detection process with a preset backoff
schedule.
Before you begin
You need the following information:
• Local Phone Unlock Password, if the default password was updated
Cisco Wireless Phone 840 and 860 Administration Guide for Cisco Unified Communications Manager
77
Phone configuration
Configure a Call server mode

Procedure
Step 1 Access the Cisco Phone app.
Step 2 For release 1.6(0) or later, tap the Drawer menu.
Step 3 Select User settings > Phone information > Security.
Step 4 Enter the Local Phone Unlock Password.
The default password is **#.
Step 5 Choose one of the following options in the Call server mode.
• Auto detect
• UCM
• WxC
Step 6 Tap the back arrow in the upper left corner twice to save your changes and exit the menu.
Cisco Wireless Phone 840 and 860 Administration Guide for Cisco Unified Communications Manager
78
Phone configuration
Configure a Call server mode

CHAPTER 5
Cisco app configuration
• Cisco app configuration overview, on page 79
• Emergency app, on page 83
• Push to Talk app, on page 89
• Battery Life app, on page 91
• Buttons app, on page 94
• Barcode app, on page 105
• Custom Settings app, on page 124
• Call Quality Settings app, on page 138
• Diagnostics app, on page 144
• Sound Stage app, on page 144
• Web API app, on page 148
Cisco app configuration overview
Configure the Cisco apps and their settings as required by your organization. To configure the Cisco apps,
you can:
• Use an Enterprise Mobility Management (EMM) application (Recommended for multiple phones)
• Use the Cisco Wireless Phone Configuration Management tool (Recommended for multiple phones if
you don't have an EMM application)
• Use the Settings menu for each app directly on the phone (Recommended only for a small number of
phones)
Enterprise Mobility Management application interface
The following Cisco apps are on the Google Play Store. You can configure these apps through an Enterprise
Mobility Management (EMM) application.
• Emergency
• Push to Talk (PTT)
• Battery Life
• Buttons
Cisco Wireless Phone 840 and 860 Administration Guide for Cisco Unified Communications Manager
79

• Barcode
• Custom Settings
• Call Quality Settings
• Web API
The Barcode, Buttons, Call Quality Settings, and Custom Settings apps are OEMConfig apps. To configure
these apps, your EMM must support the OEMConfig enhanced schema. If necessary, consult with your EMM
support for assistance.
Note
Program the Enterprise Mobility Management application
The Cisco Wireless Phone 840 and 860 is designed for environments that deploy mobile devices using an
Enterprise Mobility Management (EMM) application solution such as Cisco Meraki Systems Manager. Your
EMM application allows you to group devices so that you can manage them independently.
For specific directions on how to use Cisco Meraki Systems Manager to group phones, see the technical
documentation.
Before you begin
• Configure your EMM application with your domain certificate.
• Link the phones to an existing or new Android for Work account to manage access to apps in the Google
Play Store, including Cisco apps.
Procedure
Step 1 Sign in to the EMM application.
Step 2 Set up an Android for Work account, which allows you to sequester the phones from external access and
provide only those apps which your organization requires.
Step 3 Create a configuration profile that contains payloads for each configuration area required.
Cisco Wireless Phone 840 and 860 Administration Guide for Cisco Unified Communications Manager
80
Cisco app configuration
Program the Enterprise Mobility Management application

We recommend that you set the following minimal settings.
• Restrictions: Enable use of the camera and allow app installation.
• Android Restrictions:
• System settings: Prevent Android Debug Bridge (ADB) access.
• System settings: Prevent installation of apps from unknown sources.
• Permissions: Auto grant all permissions.
• Android System Apps: Specify the allowed list of Cisco apps that you download to the EMM
application from Google Play Store.
• Android Wallpaper: If needed, lock screen message.
• Wi-Fi Profile: Configure Wi-Fi settings.
Note
Step 4 Add an Android Enterprise Owner Account to identify the administrator who manages the phone profile.
Ensure that the account isn’t a local EMM application account, but an Android Enterprise Owner
Account.
Note
Step 5 Create identifying tags so that you can separate phones into corresponding groups.
Set groups and tags as a payload under the Profiles console. Set the Device Configuration option as
Targets. However, at this point, the device only knows that it’s a certain model with a certain serial
number and MAC address. After enrollment, you can assign device tags with more granularity. You
can group devices by specific owners, keywords, or device types, depending on the desired groupings.
Note
Step 6 Use the full name of the Cisco app (com.cisco.xxxx) to download the desired Cisco apps from the Google
Play Store.
The app and the settings download to the Profile console. Each app is automatically added to the list
and the app settings added as payloads.
Note
Step 7 Configure the Cisco apps with the key-value pairs.
The key-value pairs should have downloaded with the app. Check the key-value pairs to be sure of
accuracy and configure any settings. If any key-value pairs don’t download, manually add them.
Note
Step 8 In the EMM application console, approve the apps for distribution.
Step 9 Configure the Android Kiosk Mode to include the apps that you want.
Kiosk Mode is a launcher for the phone UI. Only approved apps are available to select for the opening
screen.
Note
Related Topics
Cisco app package names, on page 105
Cisco Wireless Phone 840 and 860 Administration Guide for Cisco Unified Communications Manager
81
Cisco app configuration
Program the Enterprise Mobility Management application

Cisco Wireless Phone Configuration Management tool for Cisco app
configuration
If you are not using an Enterprise Mobility Management (EMM) application to configure the Cisco app
settings, you can configure the settings for each of these Cisco apps in the Cisco Wireless Phone Configuration
Management tool.
• Barcode
• Battery Life
• Buttons
• Custom Settings
• PTT
• Emergency
• Call Quality Settings
• Web API
The settings and defaults for these apps in the Cisco Wireless Phone Configuration Management tool are the
same as they are on the phones.
We recommend that you disallow the Allow Notification Shade Settings Gear in the Custom Settings app
in Cisco Wireless Phone Configuration Management tool. Otherwise, users can easily open apps that aren't
on the Smart Launcher.
Note
Related Topics
Create encrypted phone configuration file, on page 69
Access the Cisco app settings on the phone
If you are not using an Enterprise Mobility Management (EMM) application or the Cisco Wireless Phone
Configuration Management tool to configure the Cisco app settings, you can access the settings for each Cisco
app on the phone.
Procedure
Step 1 From the phone, tap the desired Cisco app.
The Buttons, Call Quality Settings, Custom Settings, and Web API apps open directly to their settings
page.
Step 2 For the Barcode, Battery Life, Emergency, and PTT apps, tap the Overflow menu.
Step 3 Tap Settings.
Cisco Wireless Phone 840 and 860 Administration Guide for Cisco Unified Communications Manager
82
Cisco app configuration
Cisco Wireless Phone Configuration Management tool for Cisco app configuration

Emergency app
The Emergency app and Panic Button include features to monitor and alarm for emergency situations. These
features are useful in lone worker environments or where organizations require extra security. How you
program these features depends on what type of situation you anticipate.
• The Emer gencyapp uses an accelerometer to monitor the personal motion of the phone user. If configured,
the app can alarm or send emergency calls to indicate that the user is under some type of physical duress
due to lack of movement, tilt, or shaking of the phone. You can configure each type of motion monitoring
with varying degrees of sensitivity and amount of time to activate the warning.
• The Panic Button produces a loud or silent alarm and, if programmed, instantaneously calls a
preprogrammed emergency number. By default, the red button on the top of the phone is set as the Panic
Button. There is also a soft Panic Button in the Emergency app.
If enabled, users may change the button actions with the Buttons app. If desired,
you can disable a user's ability to change the default Panic Button in the Buttons
app.
Note
The reliability of the Emergency app and Panic Button depends on the functionality and reliability of your
organization's infrastructure. The infrastructure includes the wireless LAN, the LAN, the call server, the
central provisioning server, the server hosting location services, the central security system and its servers,
the correct configuration of the handsets, correct installation and configuration management server, and
thorough training of personnel.
We assume no responsibility and shall not be liable for any of the above dependency factors. In addition,
please be aware that the Panic Button and Emergency app should not be your sole solution to any of your
safety concerns and are not a substitute for safe practices and procedures.
Caution
Emergency app configuration
You can configure the following Emergency app settings.
• Motion sensor
• Panic button
• Emergency call
• Emergency tone
Send emergency event notifications
If your system interfaces with a third-party security application, you can also send an emergency event
notification when the alarm state triggers and cancels.
Cisco Wireless Phone 840 and 860 Administration Guide for Cisco Unified Communications Manager
83
Cisco app configuration
Emergency app

To identify the location of an alerting phone, the Emergency app must use the Web API app to interface
with a method to locate the phone. Typically, they use a type of location services that use the SSID and AP
location to identify the phone’s location.
Note
Both a trigger event and a cancel event for an Emergency or Panic Button alarm send a notification to the
URL.
Procedure
Step 1 From the Web API settings, choose Device event notifications > Add new notification URL.
Step 2 Enter a descriptive notification name and URL of the security application.
Step 3 Check the box beside Emergency events as the type of event you are sending to this URL.
Motion sensor
When an Emergency motion alarm is triggered, the phone displays a warning screen for a configurable number
of seconds. If the user does not cancel the warning, the alarm state occurs and, if configured, the phone places
an emergency call.
The motion detectors function accurately only when the phone is secured to the body. The user is not able to
turn off the Emergency application without turning off the phone. Configure the Snooze option to allow
temporary suspension of Emergency monitoring. Emergency monitoring is also suspended when the phone
is connected to the USB charger.
The three conditions of motion are:
• No movement—the phone remains still for a configurable number of seconds, potentially indicating that
the user is not moving. A certain amount of motion is normal, even when sitting, but no motion at all
can indicate that a person is unable to move due to unconsciousness or being restrained.
• Tilt—the phone is not vertical for a configurable number of seconds, indicating that the user has fallen
or is in some other position than sitting, standing, or walking. The tilt condition may indicate that the
user is leaning over to pick up something.
• Running—the phone detects shaking, which may indicate that the user is moving quickly or suffering
a seizure.
Based on your organization's needs and environmental conditions, you can configure all phones with the same
settings, or you can configure the phones in groups or individually.
The user has no control over these settings, so you must configure the settings to provide the most secure
response without annoying the user with excessive warnings.
Motion sensor settings
Use the following settings to configure the motion sensor.
Cisco Wireless Phone 840 and 860 Administration Guide for Cisco Unified Communications Manager
84
Cisco app configuration
Motion sensor

Table 19: Motion sensor settings
DescriptionDefaultField type or
choices
Field
Enables Emergency motion monitoring.
Enable this setting to allow any of the
motion settings to trigger an alarm.
OffOn
Off
Monitoring
Sets the degree of motionlessness or lack
of any type of movement of the phone to
trigger an alarm.
Level 1 is the least sensitive. An alarm
triggers a warning if the user is moving
some, but below the normal threshold.
Level 7 is the most sensitive. An alarm
triggers if the user is almost completely
still.
DisabledDisabled
Level 1 (lowest)
Level 2
Level 2
Level 2
Level 2
Level 2
Level 7 (highest)
No movement
sensitivity
Sets the length of time in seconds that the
user would have to maintain the configured
degree of stillness (or a more severe
degree).
30Integer 10–300No movement
timeout (seconds)
Sets the nonvertical position of the phone
that is required to trigger an alarm.
Level 1 is the least sensitive. An alarm
triggers if the user is nearly prone.
Level 7 is the most sensitive. An alarm
triggers if the user was leaning somewhat.
DisabledDisabled
Level 1 (lowest)
Level 2
Level 2
Level 2
Level 2
Level 2
Level 7 (highest)
Tilt sensitivity
Sets the length of time in seconds that the
user would have to maintain the configured
degree of tilt (or a more severe degree).
10Integer 10–300Tilt timeout
(seconds)
Cisco Wireless Phone 840 and 860 Administration Guide for Cisco Unified Communications Manager
85
Cisco app configuration
Motion sensor settings

DescriptionDefaultField type or
choices
Field
Sets the amount of shaking of the phone
that is required to trigger an alarm.
Level 1 is the least sensitive. An alarm
triggers if there is quite a bit of jostling.
Level 7 is the most sensitive. An alarm
triggers if the user walks quickly or runs.
DisabledDisabled
Level 1 (lowest)
Level 2
Level 2
Level 2
Level 2
Level 2
Level 7 (highest)
Running sensitivity
Sets the length of time in seconds that the
user would have to maintain the configured
degree of shaking (or a more severe
degree).
10Integer 10–60Running timeout
(seconds)
The Snooze feature allows the user to
temporarily suspend Emergency motion
monitoring. To activate this feature, set the
timeout in seconds 1–300. By default, the
Snooze feature is disabled (set to 0).
0Integer 0–300Snooze timeout
(seconds)
Sets the warning timeout in seconds. This
is the amount of time between the trigger
of the warning and the alarm state. In the
alarm state, an emergency call might be
placed or an alarm is sent to an external
security application.
10Integer 10–60Warning timeout
(seconds)
Related Topics
Access the Cisco app settings on the phone, on page 82
Panic Button settings
When the user activates an enabled Panic Button, an alarm displays on the phone until the user cancels it. By
default, the Panic Button is disabled.
Use the following settings to configure the Panic Button.
Cisco Wireless Phone 840 and 860 Administration Guide for Cisco Unified Communications Manager
86
Cisco app configuration
Panic Button settings

Table 20: Panic Button settings
DescriptionDefaultField type or
choices
Field
Defines the sequence that the user uses to
trigger the Panic Button alarm.
You can also disable the Panic Button
alarm from this setting.
DisabledDisabled
Long press
Two short presses
Two short or one
long press
Panic button
Enables the silent alarm, which disables
the loud local alarm that sounds when a
user triggers the Panic Button. If the user
is under duress, a silent alarm doesn't alert
the assailant.
OnOn
Off
Panic button silent
alarm
Sets the amount of time, in seconds, to time
out the panic alarm.
5Integer 5–30Panic button alarm
timeout
Related Topics
Access the Cisco app settings on the phone, on page 82
Sample Panic Button configuration options
You can set the Panic Button to perform various actions based on the user's needs.
Table 21: Sample Panic Button configuration options
SettingsDescriptionOption
Set the Panic button silent alarm
to Off.
Set the Emergency call to Off.
Allows the user to alert people
nearby with a loud alarm, but does
not place an emergency call.
The loud alarm helps people to
locate the user, or scares away any
potential threats.
Local panic alarm without an
emergency phone call
Set the Panic button silent alarm
to On.
Set the Emergency call to either
On or Off.
If necessary, set the Emergency
dial force speaker to Off.
Allows the user to silently send an
alarm signal for help.
If the user also must place an
emergency call, you can turn off
the speakerphone option to
maintain the silence.
If the Panic Button automatically
pushes an alert to an external
security application, you do not
need to set an emergency call.
Silent duress alarm with or without
an emergency phone call
Cisco Wireless Phone 840 and 860 Administration Guide for Cisco Unified Communications Manager
87
Cisco app configuration
Sample Panic Button configuration options

SettingsDescriptionOption
Set the Panic button silent alarm
to On.
Set the Emergency call to On.
Set the Emergency dial force
speaker to On.
Allows an incapacitated user to
place an emergency call.
An incapacitated user may not be
able to hold the phone to their ear.
To ensure that both parties can hear
the phone call audio, set the alarm
to be silent and turn on the forced
speakerphone option.
Incapacitation panic alarm with an
emergency phone call
Emergency call settings
You can configure the Panic Button to place an emergency call when the user activates the Panic Button. By
default, the emergency call is disabled.
Use the following settings to configure emergency calls.
Table 22: Emergency Call settings
DescriptionDefaultField type or
choices
Field
Enables the phone to call the emergency
number configured in Emergency dial
number, if the user triggers the Panic
Button or an Emergency motion alarm.
OffOn
Off
Emergency call
Enables the speakerphone when the phone
places an emergency call. This setting
allows the user to be in handsfree mode in
case they can't hold the phone to their ear.
OnOn
Off
Emergency dial
force speaker
Defines the number that the phone dials
when the user triggers the Panic Button or
an Emergency motion alarm.
You must configure and enable the other
related settings for the emergency call to
occur.
Follow any dial plan rules when you enter
the emergency dial number.
911Any valid TN
911
Emergency dial
number
Related Topics
Access the Cisco app settings on the phone, on page 82
Emergency tone settings
You can set the emergency warning and alarm tones from the list of available phone ringtones.
Use the following settings to configure the emergency tones.
Cisco Wireless Phone 840 and 860 Administration Guide for Cisco Unified Communications Manager
88
Cisco app configuration
Emergency call settings

Table 23: Emergency tone settings
DescriptionDefaultField type or
choices
Field
Configures the tone to play during a
warning period. This tone plays at a
gradually increasing volume. Tones play
even if the user silences the handset.
There is no warning period for the
Panic Button; it goes straight to
the alarm state.
Note
Default (Pixie Dust)Default notification
sound
None
List of available
warning tones
Warning tone
Configures the tone to play when a Panic
Button press or Emergency alarm triggers.
This tone plays at a high volume. Tones
play even if the user silences the handset.
Default (Cesium)Default alarm sound
None
List of available
alarm tones
Alarm tone
Related Topics
Access the Cisco app settings on the phone, on page 82
Emergency app and Panic Button training
Ensure that you train your users about how to use the Emergency app and Panic Button within your
organization. Use the following list as a guide:
• Monitoring
• Which motion detection sensors are active? What is the degree of sensitivity? What is the timeout?
How long is the warning state?
• What happens when an alarm is triggered? Is there an emergency call? Is there an external security
application, and if so, what does it do?
• Is the Snooze option configured? If so, for how long?
• Panic Button
• How do you activate the Panic Button? With a long press, two short presses, or either?
• If you press the Panic Button, will the phone place an emergency call?
• If you press the Panic Button, will it sound an alarm through the speakerphone?
• If the phone places an emergency call, does the audio come through the speakerphone?
Push to Talk app
The Push to Talk (PTT) app is a radio multicast app, where the phones can operate in a group broadcast mode,
like walkie-talkies.
Cisco Wireless Phone 840 and 860 Administration Guide for Cisco Unified Communications Manager
89
Cisco app configuration
Emergency app and Panic Button training

For the PTT functionality to work on your network, you must enable the multicast feature on your access
points. For detailed information, see the Cisco Wireless Phone 840 and 860 Deployment Guide.
By default, PTT is disabled. As an administrator, you:
• Enable or disable PTT mode.
• Subscribe users to some or all the 25 available channels to receive, and optionally transmit, broadcasts.
Related Topics
Access the Cisco app settings on the phone, on page 82
User settings for Push to Talk
The user controls the following Push to Talk (PTT) settings on the phone.
Table 24: User settings for PTT
DescriptionDefaultField type or
choices
Field
Controls the volume percentage of the PTT
volume.
20Integer 0–100PTT volume
The user sets their default channel. The
default channel is the channel that
broadcasts when the user presses the
programmed PTT button or the Talk
button in the PTT app.
A user can set a channel as their default
channel only if they are subscribed to the
channel and are able to transmit on the
channel.
Channel 1 - ALLChannel 1 - ALL
Channels that have
both Channel can
transmit and
Channel
subscription Admin
settings set to Yes
Default channel
Admin settings for Push to Talk
Use the following Admin settings to configure Push to Talk (PTT).
Table 25: Admin settings for PTT
DescriptionDefaultField type or
choices
Field
PTT must be enabled for it to be activated
on the selected handsets.
OffOn
Off
Enable PTT
From release 1.3(0) onward, you can set
PTT to transmit even if the phone is
locked.
OffOn
Off
Allow PTT
transmission when
phone is locked
Cisco Wireless Phone 840 and 860 Administration Guide for Cisco Unified Communications Manager
90
Cisco app configuration
User settings for Push to Talk

DescriptionDefaultField type or
choices
Field
This is the caller ID that displays on the
broadcast. Usually set at Device or Group
level. If nothing is entered, the default is
Anonymous.
AnonymousTextUsername
Defines the multicast address for broadcast
traffic.
224.0.1.116Domain name or IP
address
Multicast address
Defines the codec.G.726G.711Mu
G.726
Codec
You can set up to 25 PTT channels. By
default, the Channel #1 label defaults to
ALL, and its transmit and subscription
options are set to Yes.
Channel setup
Use the following Channel setup settings to configure the desired PTT channels.
Table 26: Channel setup settings
DescriptionDefaultField type or
choices
Field
Allows you to enter a label for the channel.
You can enter a label with more
than 15 characters, but a long label
truncates when it displays on the
handset.
Note
For Channel # 1:
ALL
For Channel #2-25:
Blank
StringChannel # n label
Enables a user to transmit on the channel.For Channel # 1 -
ALL: Yes
For Channel #2-25:
No
Yes
No
Channel can
transmit
Subscribes a user to the channel so that
they can receive broadcasts.
For Channel # 1 -
ALL: Yes
For Channel #2-25:
No.
Yes
No
Channel
subscription
Battery Life app
By default, battery monitoring is disabled. When you enable battery life monitoring, the Battery Life app
dashboard displays the following:
Cisco Wireless Phone 840 and 860 Administration Guide for Cisco Unified Communications Manager
91
Cisco app configuration
Battery Life app

• Battery serial number
• Battery capacity
• Temperature
• Health
• Charging status
• Voltage
• Battery type
• Charge cycle completed
A low battery warning notification displays on the screen if the percentage of remaining battery life is below
the set Low battery threshold.
As administrator, you can also enable sound and vibration for the low battery alarm.
The Cisco Wireless Phone 860 and Cisco Wireless Phone 860S have an internal secondary battery, which
operates the phone during a hot swap. The Battery Life app dashboard displays the general status of the
internal battery. For more information about the secondary battery, you can tap Open additional metrics
and options.
The The Cisco Wireless Phone 840 and 840S do not have an internal battery.
Note
For 1.7(0) or later, if the number of charge cycles exceed the specified maximum count, you receive a
notification to replace the battery. Make sure to replace the battery immediately after you receive a notification
for better performance.
Cisco Wireless Phone 840 and 860 Administration Guide for Cisco Unified Communications Manager
92
Cisco app configuration
Battery Life app

Related Topics
Access the Cisco app settings on the phone, on page 82
User settings for Battery Life
The user controls the following Battery Life settings.
Table 27: User settings for Battery Life
DescriptionDefaultField type or
choices
Field
Controls the volume percentage of the low
battery alarm.
This is a user-controlled setting.
50Integer 0–100Alarm volume
Admin settings for Battery Life
Use the following Admin settings to configure the Battery Life app.
Table 28: Admin settings for Battery Life
DescriptionDefaultField type or
choices
Field
Controls the volume percentage of the low
battery alarm.
This is a user-controlled setting.
50Integer 0–100Alarm volume
Enables or disables battery monitoring.
When disabled, the low battery alarm does
not sound and the battery life details such
as the serial number, capacity, temperature,
and charging status do not display.
OffOn
Off
Enable battery
monitoring
Causes the phone to vibrate if the battery
alarm is active and battery monitoring is
enabled.
OffOn
Off
Vibrate
Enables sound for the battery alarm, if the
battery alarm is active and battery
monitoring is enabled.
OffOn
Off
Sound
Defines the battery alarm tone.Default (Cesium)Default alarm sound
None
List of available
alarm tones
Alarm tone
Cisco Wireless Phone 840 and 860 Administration Guide for Cisco Unified Communications Manager
93
Cisco app configuration
User settings for Battery Life

DescriptionDefaultField type or
choices
Field
Defines the percentage of remaining
battery life to trigger the alarm.
15%15%
20%
Low battery
threshold
Defines the number of minutes the alarm
is silenced when the user snoozes the
battery life alarm.
2 min1 min
2 min
3 min
4 min
5 min
Snooze time
Buttons app
The Buttons app allows you to program the buttons on their phone. You can disable user control for all buttons
or for specific buttons. For example, you can disable user control of the Programmable Emergency button,
to ensure that users can always access that feature.
Programmable buttons
The following illustrations and table show the programmable buttons on the phone.
The programmable buttons for the Cisco Wireless Phone 840 and Cisco Wireless Phone 860 are not in the
same location. Also, the Cisco Wireless Phone 840 and 840S don't have a Fingerprint button.
Note
Figure 8: Programmable buttons on the Cisco Wireless Phone 840 and 840S
Cisco Wireless Phone 840 and 860 Administration Guide for Cisco Unified Communications Manager
94
Cisco app configuration
Buttons app

Figure 9: Programmable buttons on the Cisco Wireless Phone 860 and 860S
Table 29: Programmable buttons
Programmable buttonCallout
Left button1
Right button2
Top3
Volume up4
Volume down5
Fingerprint—For Cisco Wireless Phone 860 and 860S only.6
Buttons settings
Through the Buttons app settings, you can:
• Enable or disable the user's ability to change some or all programmable buttons.
• Change the default programmable button actions.
Use the following settings to configure the buttons.
Table 30: Buttons settings
DescriptionDefaultField type or
choices
Field
Enables the user to change the Left button.EnabledEnabled
Disabled
Left button user
assigned
Cisco Wireless Phone 840 and 860 Administration Guide for Cisco Unified Communications Manager
95
Cisco app configuration
Buttons settings

DescriptionDefaultField type or
choices
Field
Allows the user to control the button action
if you enable Left button user assigned.
For phones with a
barcode scanner:
Scanner
For phones without
a barcode scanner:
No action
No action
Home key
Back key
Menu key
PTT
Emergency
Volume up
Volume down
Run application
Open URL
Scanner (for 800S
phones only)
Custom 1
Custom 2
Custom 3
Custom 4
Left button
Enables the user to change the Right
button.
EnabledEnabled
Disabled
Right button user
assigned
Cisco Wireless Phone 840 and 860 Administration Guide for Cisco Unified Communications Manager
96
Cisco app configuration
Buttons settings

DescriptionDefaultField type or
choices
Field
Allows the user to control the button action
if you enable Right button user assigned.
PTTNo action
Home key
Back key
Menu key
PTT
Emergency
Volume up
Volume down
Run application
Open URL
Scanner (for 800S
phones only)
Custom 1
Custom 2
Custom 3
Custom 4
Right button
Enables the user to change the Top button.EnabledEnabled
Disabled
Top button user
assigned
Cisco Wireless Phone 840 and 860 Administration Guide for Cisco Unified Communications Manager
97
Cisco app configuration
Buttons settings

DescriptionDefaultField type or
choices
Field
Allows the user to control the button action
if you enable Top button user assigned.
EmergencyNo action
Home key
Back key
Menu key
PTT
Emergency
Volume up
Volume down
Run application
Open URL
Scanner (for 800S
phones only)
Custom 1
Custom 2
Custom 3
Custom 4
Top
For Cisco Wireless Phone 860 and Cisco
Wireless Phone 860S only.
Enables the user to change the Fingerprint
button.
EnabledEnabled
Disabled
Fingerprint button
user assigned
Cisco Wireless Phone 840 and 860 Administration Guide for Cisco Unified Communications Manager
98
Cisco app configuration
Buttons settings

DescriptionDefaultField type or
choices
Field
For Cisco Wireless Phone 860 and Cisco
Wireless Phone 860S only.
Allows the user to control the button action
if you enable Fingerprint button user
assigned.
FingerprintNo action
Home key
Back key
Menu key
PTT
Emergency
Volume up
Volume down
Run application
Open URL
Scanner (for 800S
phones only)
Fingerprint
Custom 1
Custom 2
Custom 3
Custom 4
Fingerprint
Enables the user to change the Volume up
button.
EnabledEnabled
Disabled
Volume up button
user assigned
Cisco Wireless Phone 840 and 860 Administration Guide for Cisco Unified Communications Manager
99
Cisco app configuration
Buttons settings

DescriptionDefaultField type or
choices
Field
Allows the user to control the button action
if you enable Volume up button user
assigned.
Volume upNo action
Home key
Back key
Menu key
PTT
Emergency
Volume up
Volume down
Run application
Open URL
Scanner (for 800S
phones only)
Custom 1
Custom 2
Custom 3
Volume up
Enables the user to change the Volume
down button.
EnabledEnabled
Disabled
Volume down
button user assigned
Allows the user to control the button action
if you enable Volume down button user
assigned.
Volume downNo action
Home key
Back key
Menu key
PTT
Emergency
Volume up
Volume down
Run application
Open URL
Scanner (for 800S
phones only)
Custom 1
Custom 2
Custom 3
Volume down
Cisco Wireless Phone 840 and 860 Administration Guide for Cisco Unified Communications Manager
100
Cisco app configuration
Buttons settings

Related Topics
Cisco app package names, on page 105
Access the Cisco app settings on the phone, on page 82
Set a button to run an application
You can configure a programmable button to open any app that is on the phone.
In the Enterprise Mobility Management (EMM) application, specify both the app package name and the app
activity name in the configuration string:
<package name>/<package name>.<activity name>
When you include the app activity name, it allows you to push that configuration to the phones before you
install the named app on the phones.
If you use only the app package name and the app is not yet on the phone, the Buttons app can't apply that
setting. When you do install the app later, and the user presses the button, the app will not launch.
Note
Procedure
Step 1 In the EMM application, select Run application.
Step 2 Enter the package name of the app and the activity name of the screen within the app.
For example, the package name for the Cisco Phone app is com.cisco.phone. The package name plus the
dialer activity name is com.cisco.phone/com.cisco.phone.activities.Dialer.
Answer and end calls using the hardware buttons
For release 1.10(3) or later, you can answer and disconnect the calls by pressing the hardware buttons instead
of using the on-screen controls. By default, this feature doesn’t come enabled. So, you have to turn it on
manually using the Buttons application.
You cannot use the same button to answer and end the calls.
Note
Set a button to answer a call
To set a button to answer a call:
Procedure
Step 1 Access the Buttons app.
Cisco Wireless Phone 840 and 860 Administration Guide for Cisco Unified Communications Manager
101
Cisco app configuration
Set a button to run an application

Step 2 In the Buttons settings menu, select the button that you want to use to answer a call.
Step 3 Choose Custom in the resulting action menu.
Make sure not to choose Custom1 - 4.
Note
Step 4 In the Enter custom intent popup window that appears enter one of the following strings in the Action down
field (field text is case-sensitive):
• To send the audio to the phone’s earpiece (shown in the screenshot above):
com.cisco.intent.action.ANSWER_CALL_EP
• To use the phone as a speakerphone:
com.cisco.intent.action.ANSWER_CALL_SP
• To send the audio to a wired headset:
com.cisco.intent.action.ANSWER_CALL_HS
If the phone is connected to a Bluetooth headset the audio will automatically route to the headset
regardless of which string is entered above.
Note
Step 5 Leave the remaining fields empty.
Step 6 Tap OK to save your settings.
Your button can now be used to answer the incoming calls.
Set a button to end or decline a call
To set a button to end the current call or decline an incoming call:
Procedure
Step 1 Access the Buttons app.
Step 2 In the Buttons settings menu, select the button that you want to answer a call.
Cisco Wireless Phone 840 and 860 Administration Guide for Cisco Unified Communications Manager
102
Cisco app configuration
Set a button to end or decline a call

Step 3 Choose Custom in the resulting action menu.
Make sure not to choose Custom1 - 4.
Note
Step 4 In the Enter custom intent popup window that appears enter the following string in the Action down field
(field text is case-sensitive):
com.cisco.intent.action.DECLINE_CALL
Step 5 Leave the remaining fields empty.
Step 6 Tap OK to save your settings.
Your button can now be used to end a call or decline an incoming call.
Turn ON and OFF flaslight using the hardware buttons
For release 1.10(3) or later, you can turn ON and OFF the flashlight by pressing the hardware buttons.
Set a button to control the flashlight
To set a button to turn the flashlight on when the button is pressed and held, and turn the flashlight off when
the button is released:
Procedure
Step 1 Access the Buttons app.
Step 2 In the Buttons settings menu, select the button you that you want to control the flashlight.
Step 3 Choose Custom in the resulting action menu.
Make sure not to choose Custom1 - 4.
Note
Step 4 In the Enter custom intent popup window that appears enter the following in the Action down and Action
up fields (field text is case-sensitive):
com.cisco.intent.action.FLASHLIGHT_ONOFF
Cisco Wireless Phone 840 and 860 Administration Guide for Cisco Unified Communications Manager
103
Cisco app configuration
Turn ON and OFF flaslight using the hardware buttons

Step 5 In the Extras for action down field enter the following:
boolean:flashlight=true
Step 6 In the Extras for action up field enter the following:
boolean:flashlight=false
Step 7 Tap OK to save your settings.
Your button will now turn on the flashlight when pressed and held, and turn off the flashlight when released.
Set a button to toggle the flashlight
To set a button to toggle the flashlight on and off:
Procedure
Step 1 Access the Buttons app.
Step 2 In the Buttons settings menu, select the button you that you want to control the flashlight.
Step 3 Choose Custom in the resulting action menu.
Make sure not to choose Custom1 - 4.
Note
Step 4 In the Enter custom intent popup window that appears enter the following in the Action down and Action
up fields (field text is case-sensitive):
com.cisco.intent.action.FLASHLIGHT_ONOFF
Step 5 Leave the remaining fields empty.
Step 6 Tap OK to save your settings.
Pressing your button will now toggle the flashlight on and off.
Cisco Wireless Phone 840 and 860 Administration Guide for Cisco Unified Communications Manager
104
Cisco app configuration
Set a button to toggle the flashlight

Cisco app package names
The following are the package names for the Cisco apps.
Table 31: Cisco app package names
Cisco app package nameCisco app
com.cisco.barcode.serviceBarcode
com.cisco.batterylifeBattery Life
com.cisco.buttonsButtons
com.cisco.callqualityCall Quality Settings
com.cisco.phoneCisco Phone
com.cisco.customsettingsCustom Settings
com.cisco.diagnosticsDiagnostics
com.cisco.emergencyEmergency
com.cisco.loggingLogging
com.cisco.pttPTT
com.cisco.sysupdaterSystem Updater
com.cisco.soundstageSound Stage
com.cisco.webapiWeb API
The Smart Launcher and Device Policy Controller apps are not on the Google store and are available only
through the Cisco Wireless Phone Configuration Management tool.
Note
Barcode app
The Cisco Wireless Phone 840S and Cisco Wireless Phone 860S have a built-in barcode scanner. The Cisco
Wireless Phone 840 and Cisco Wireless Phone 860 don't have a barcode scanner.
By default, the barcode scanner is enabled along with all supported symbologies. As an administrator, you
control the General settings, Default settings, and ScanFlex settings of the Barcode app.
As an administrator, you can:
• Enable and disable barcode scanning.
• Decide which symbologies to deploy.
• Set audible acknowledgments of a scan.
Cisco Wireless Phone 840 and 860 Administration Guide for Cisco Unified Communications Manager
105
Cisco app configuration
Cisco app package names

• Set the intensity of the scan light.
• Set the Enter key to move to the next field to be populated by scanning.
• Enable automatic enter of carriage return.
• Test scan barcodes before you give the phones to users.
Related Topics
Access the Cisco app settings on the phone, on page 82
Test scan a barcode, on page 123
Barcode symbologies
The Cisco Wireless Phone 840S and 860S barcode scanners support the following barcode symbologies.
Table 32: Supported barcode symbologies
Interleaved 2 of 5CodabarAztec
ISBT-128Code 11CCA EAN-128
ISBT-128 ConCode 128CCA EAN-13
Macro PDFCode 32CCA EAN-8
Macro QRCode 39 Full ASCIICCA GS1 DataBar Expanded
Matrix 2 of 5Code 39 TriopticCCA GS1 DataBar Limited
Micro PDFCode 93CCA GS1 DataBar-14
Micro QRDataMatrixCCA UPC-A
MSIEAN-128CCA UPC-E
PDF-417EAN-13CCB EAN-128
QR CodeEAN-13 + 2 SupplementalCCB EAN-13
UPC-AEAN-13 + 5 supplemental EAN-8CCB EAN-8
UPC-A + 2 SupplementalEAN-8CCB GS1 DataBar Expanded
UPC-A + 5 supplementalEAN-8 + 2 SupplementalCCB GS1 DataBar Limited
UPC-E0EAN-8 + 5 supplementalCCB GS1 DataBar-14
UPC-E0 + 2 SupplementalGS1 128CCB UPC-A
UPC-E0 + 5 supplementalGS1 DataBar ExpandedCCB UPC-E
GS1 DataBar LimitedCCC EAN-128
GS1 DataBar-14
Cisco Wireless Phone 840 and 860 Administration Guide for Cisco Unified Communications Manager
106
Cisco app configuration
Barcode symbologies

Han Xin
General settings for the Barcode app
Use the following settings to enable or disable the barcode scanner and configure general scan settings such
as sounds and vibration.
Table 33: General settings for the Barcode app
DescriptionDefaultField type or
choices
Field
Enables the barcode scanner.OnOn
Off
Enable barcode
scanner
Sets the amount of time for the decode
session timeout.
50.5 seconds to 9.9
seconds
Decode session
timeout
Sets the phone to vibrate on scan.OnOn
Off
Vibrate on scan
Sets the phone to produce a sound on scan.OnOn
Off
Sound on scan
Sets the barcode scan tone.Low pitch single
beep
Low pitch single
beep
Low pitch double
beep
High pitch double
beep
Barcode tone
Sets the illumination power of the barcode
scanner.
50–10Illumination power
Default settings for the Barcode app
You can set the following default settings for the Barcode app.
Data manipulation settings
Use the following settings to configure any rules about how to manipulate the scanned data, such as
automatically adding or striping data.
Cisco Wireless Phone 840 and 860 Administration Guide for Cisco Unified Communications Manager
107
Cisco app configuration
General settings for the Barcode app

Table 34: Data manipulation settings
DescriptionDefaultField type or
choices
Field
Prefixes AIM code or symbol id before
data.
The AIM code is an industry standard
3-character identifier that provides
information about the symbology that is
generated by the decoder of a scanner. The
code is prepended to the scanned barcode
and may be employed by keyboard
injection and the data sent through the
intent.
DisableDisable
Enable AIM codes
Enable symbol id
Enable AIM codes
or symbol id
Adds an Enter when inject text to an input
field.
OffOn
Off
Automatic carriage
return
Adds a Tab at the end of an injected
barcode value.
OffOn
Off
Automatic Tab
Removes any trailing or leading
whitespaces from a scanned barcode data.
OffOn
Off
Trim barcode data
Strips this number of characters from the
left (as displayed on screen) of the barcode
data.
Only positive integers allowed.
0IntegerStrip characters
from left
Strips this number of characters from the
right (as displayed on screen) of the
barcode data.
Only positive integers allowed.
0IntegerStrip characters
from right
Prepends a string to the scanned barcode
data.
StringPrepend String
Appends a string to the scanned barcode
data.
StringAppend String
Custom intent settings
Use the following settings to configure any custom intent settings.
Cisco Wireless Phone 840 and 860 Administration Guide for Cisco Unified Communications Manager
108
Cisco app configuration
Default settings for the Barcode app

Table 35: Custom intent settings
DescriptionDefaultField type or
choices
Field
Choose intent delivery method.DisableDisable
Stat activity
Start service
Start foreground
service
Send broadcast
Intent delivery
method
Enter intent action.StringIntent action
Enter intent category.StringIntent category
Symbology settings
Use the following settings to enable or disable individual barcode symbologies and their related settings. By
default all supported symbologies are enabled.
The following table describes the default settings for the Aztec symbology.
Table 36: Aztec
DescriptionDefaultField type or
choices
Field
Enables or disables the symbology.ONOn
Off
Enable Aztec
Sets the decoding.RegularRegular
Inverse
Both
Aztec decoding
The following table describes the default settings for the Codabar symbology.
Table 37: Codabar
DescriptionDefaultField type or
choices
Field
Enables or disables the symbology.ONOn
Off
Enable Codabar
Sets the Codabar length.50–55Codabar length
Strips start and stop characters.OFFOn
Off
Enable Codabar
NOTIS editing
Cisco Wireless Phone 840 and 860 Administration Guide for Cisco Unified Communications Manager
109
Cisco app configuration
Default settings for the Barcode app

The following table describes the default settings for the Code 11 symbology.
Table 38: Code 11
DescriptionDefaultField type or
choices
Field
Enables or disables the symbology.ONOn
Off
Code 11
Enables or disables check digit verification.Disable check digitsDisable check digits
One check digit
Two check digits
Code 11 check digit
verification
Enables or disables transmit.
To transmit, enable verification.
OFFOn
Off
Enable transmit
code 11 Check Digit
The following table describes the default settings for the Code 32 symbology.
Table 39: Code 32
DescriptionDefaultField type or
choices
Field
Enables or disables the symbology.
Enable Code 39 to enable Code 32.
ONOn
Off
Code 32
The following table describes the default settings for the Code 39 symbology.
Table 40: Code 39
DescriptionDefaultField type or
choices
Field
Enables or disables the symbology.
Enable Code 39 to enable Code 32.
ONOn
Off
Enable Code 39
Enables or disables check digit verification.OFFOn
Off
Enable Code 39
check digit
verification
Enables or disables transmit.OFFOn
Off
Enable transmit
Code 39 check digit
Enables or disables full ASCII conversion.OFFOn
Off
Enable Code 39 full
ASCII conversion
The following table describes the default settings for the Code 93 symbology.
Cisco Wireless Phone 840 and 860 Administration Guide for Cisco Unified Communications Manager
110
Cisco app configuration
Default settings for the Barcode app

Table 41: Code 93
DescriptionDefaultField type or
choices
Field
Enables or disables the symbology.ONOn
Off
Enable Code 93
The following table describes the default settings for the Code 128 symbology.
Table 42: Code 128
DescriptionDefaultField type or
choices
Field
Enables or disables the symbology.ONOn
Off
Enable Code 128
The following table describes the default settings for the Data Matrix symbology.
Table 43: Data Matrix
DescriptionDefaultField type or
choices
Field
Enables or disables the symbology.ONOn
Off
Enable Data Matrix
Sets mirror images.NeverNever
Mirror
Both
Data Matrix mirror
images
Sets decoding.RegularRegular
Inverse
Both
Data Matrix
decoding
The following table describes the default settings for the EAN 8 symbology.
Table 44: EAN 8
DescriptionDefaultField type or
choices
Field
Enables or disables the symbology.ONOn
Off
Enable EAN 8
Enables or disables conversion to EAN 13.OFFOn
Off
Enable convert EAN
8 to EAN 13
Cisco Wireless Phone 840 and 860 Administration Guide for Cisco Unified Communications Manager
111
Cisco app configuration
Default settings for the Barcode app

DescriptionDefaultField type or
choices
Field
Enables or disables transmit.OFFOn
Off
Enable transmit
EAN 8 check digit
The following table describes the default settings for the EAN 13 symbology.
Table 45: EAN13
DescriptionDefaultField type or
choices
Field
Enables or disables the symbology.ONOn
Off
Enable EAN 13
The following table describes the default settings for the GS1 DataBar symbology.
Table 46: GS1 DataBar
DescriptionDefaultField type or
choices
Field
Enables or disables the symbology.ONOn
Off
Enable GS1 DataBar
14
ONOn
Off
Enable GS1 DataBar
composite CCA
CCB, and CCC
ONOn
Off
Enable GS1 DataBar
Expanded
ONOn
Off
Enable GS1 DataBar
Limited
The following table describes the default settings for the GS1 128 symbology.
Table 47: GS1 128
DescriptionDefaultField type or
choices
Field
Enables or disables the symbology.ONOn
Off
Enable GS1-128
The following table describes the default settings for the Han Xin symbology.
Cisco Wireless Phone 840 and 860 Administration Guide for Cisco Unified Communications Manager
112
Cisco app configuration
Default settings for the Barcode app

Table 48: Han Xin code
DescriptionDefaultField type or
choices
Field
Enables or disables the symbology.ONOn
Off
Enable Han Xin
code
The following table describes the default settings for the Interleaved 2 of 5 symbology.
Table 49: Interleaved 2 of 5
DescriptionDefaultField type or
choices
Field
Enables or disables the symbology.ONOn
Off
Enable Interleaved
2 of 5
Enables or disables quiet zone.OFFOn
Off
Enable Interleaved
2 of 5 quiet zone
Enables or disables check digit verification.DisableDisable
USS
OPCC
Interleaved 2 of 5
check digit
verification
Enables or disables transmit.OFFOn
Off
Enable transmit
Interleaved 2 of 5
check digit
Governs the usage of the two integer fields
that follow. For Two discrete lengths and
Length within range, it does not matter
which value is in which field.
One discrete lengthOne discrete length
Two discrete lengths
Length within range
Any length
Interleaved 2 of 5
length type
Applicable for all scheme choices except
Any length, which ignores it.
Default value applies only to One discrete
length.
140–55Set Interleaved 2 of
5 length 1 (0 to 55)
Applicable for Two discrete lengths and
Length within range only.
00–55Set Interleaved 2 of
5 length 2 (0 to 55)
The following table describes the default settings for the ISBT 128 symbology.
Cisco Wireless Phone 840 and 860 Administration Guide for Cisco Unified Communications Manager
113
Cisco app configuration
Default settings for the Barcode app

Table 50: ISBT 128
DescriptionDefaultField type or
choices
Field
Enables International Society of Blood
Transfusion (ISBT) 128 symbology.
ONOn
Off
Enable ISBT 128
Disable ISBT Concatenation: The device
does not concatenate pairs of ISBT codes
it encounters.
Enable ISBT Concatenation: There must
be two ISBT codes for the device to decode
and perform concatenation. The device
does not decode single ISBT symbols.
Autodiscriminate ISBT Concatenation: The
device decodes and concatenates pairs of
ISBT codes immediately. If only a single
ISBT symbol is present, the device must
decode the symbol the number of times set
via ISBT Concatenation Redundancy
before transmitting its data to confirm that
there is no additional ISBT symbol.
DisableDisable
Enable
Autodiscriminate
Select an option for
concatenating pairs
of ISTB code types
If you enable ISBT Concatenation, enable
Check ISBT Table to concatenate only
those pairs found in this table.
ONOn
Off
Enable check ISBT
table
With ISBT Concatenation set to
Autodiscriminate, this option sets the
number of times the device must decode
an ISBT symbol before determining that
there is no additional symbol.
102 to 20ISTB concatenation
redundancy
The following table describes the default settings for the Matrix 2 of 5 symbology.
Table 51: Matrix 2 of 5
DescriptionDefaultField type or
choices
Field
Enables or disables the symbology.ONOn
Off
Enable Matrix 2 of
5
OFFOn
Off
Enable Matrix 2 of
5 check digit
Enables or disables transmit.OFFOn
Off
Enable transmit
Matrix 2 of 5 check
digit
Cisco Wireless Phone 840 and 860 Administration Guide for Cisco Unified Communications Manager
114
Cisco app configuration
Default settings for the Barcode app

The following table describes the default settings for the Micro PDF symbology.
Table 52: Micro PDF
DescriptionDefaultField type or
choices
Field
Enables or disables the symbology.ONOn
Off
Enable Micro PDF
The following table describes the default settings for the Micro QR symbology.
Table 53: Micro QR
DescriptionDefaultField type or
choices
Field
Enables or disables the symbology.ONOn
Off
Enable Micro QR
The following table describes the default settings for the MSI Plessey symbology.
Table 54: MSI Plessey
DescriptionDefaultField type or
choices
Field
Enables or disables the symbology.ONOn
Off
MSI Plessey
One digitOne Digit
Two Digits
Number of MSI
check digits
Enables or disables transmit.OFFOn
Off
Enable transmit MSI
check digit
MOD 10/MOD10MOD 10/MOD11
MOD 10/MOD10
MSI check digit
algorithm
The following table describes the default settings for the PDF 417 symbology.
Table 55: PDF 417
DescriptionDefaultField type or
choices
Field
Enables or disables the symbology.ONOn
Off
Enable PDF 417
The following table describes the default settings for the QR symbology.
Cisco Wireless Phone 840 and 860 Administration Guide for Cisco Unified Communications Manager
115
Cisco app configuration
Default settings for the Barcode app

Table 56: QR
DescriptionDefaultField type or
choices
Field
Enables or disables the symbology.ONOn
Off
Enable QR
Sets decoding.RegularRegular
Inverse
Both
QR decoding
The following table describes the default settings for the UPC-A symbology.
Enable EAN/UPC supplementals per option in Administrative settings to enable supplementals for UPC-A
or UPC-E or both.
Note
Table 57: UPC-A
DescriptionDefaultField type or
choices
Field
Enables or disables the symbology.ONOn
Off
Enable UPC-A
Enables or disables transmit.ONOn
Off
Enable transmit
UPC-A check digit
Sets transmit preamble.System characterNo preamble:0
System character
System character
and country code
Transmit UPC-A
preamble
The following table describes the default settings for the UPC-E symbology.
Enable EAN/UPC supplementals per option in Administrative settings to enable supplementals for UPC-A
or UPC-E or both.
Note
Table 58: UPC-E
DescriptionDefaultField type or
choices
Field
Enables or disables the symbology.ONOn
Off
Enable UPC-E
Cisco Wireless Phone 840 and 860 Administration Guide for Cisco Unified Communications Manager
116
Cisco app configuration
Default settings for the Barcode app

DescriptionDefaultField type or
choices
Field
Enables or disables transmit.ONOn
Off
Enable transmit
UPC-E check digit
Sets transmit preamble.System characterNo preamble
System character
System character
and country code
Transmit UPC-E
preamble
Enables or disables conversion.OFFOn
Off
Enable convert
UPCE to UPCA
The following table describes the default settings 1D barcode.
Table 59: 1D Barcode settings
DescriptionDefaultField type or
choices
Field
Sets decoding.Dark on lightDark on light
Light on dark
Either
Inverse 1D
Decoding
The following table describes supplemental symbology settings.
Table 60: Supplemental settings
DescriptionDefaultField type or
choices
Field
Enables or disables supplemental setting.DisableDisable
Enable
Supplemental setting
for UPCA, UPCE
and EAN barcodes
The following table describes more symbology settings.
Table 61: More settings
DescriptionDefaultField type or
choices
Field
Global to both EAN 8 and EAN 13.DisableDisable
Enable
EAN/UPC
supplementals
Sets polarity.Dark on lightDark on light
Either
Light on dark
Polarity (all 1-D
barcodes)
Cisco Wireless Phone 840 and 860 Administration Guide for Cisco Unified Communications Manager
117
Cisco app configuration
Default settings for the Barcode app

Replace control characters settings
As needed, use the following replace control character settings to replace certain ASCII0-31 control character
keys in a barcode string with a space or punctuation.
Table 62: Replace control characters
DescriptionDefaultField type or
choices
Field
Replaces control character [n] with a space
or a punctuation. You can also choose to
use the control character itself.
SPACEUse control
character
SPACE
List of Latin
punctuation or
symbols
Replace n
The following table lists the control characters that you can replace with a space or punctuation.
Table 63: Control characters
Control character decimalControl character
0NULL (NUL)
1Start of Header (SOH)
2Start of Text (STX)
3End of Text (ETX)
4End of Transmission (EOT)
5Enquiry (ENQ)
6Acknowledge (ACK)
7Bell (BEL)
8Backspace (BS)
9Horizontal Tab (HT)
10Line Feed (LF)
11Vertical Tab (VT)
12Form Feed (FF)
13Carriage Return (CR)
14Shift Out (SO)
15Shift In (SI)
Cisco Wireless Phone 840 and 860 Administration Guide for Cisco Unified Communications Manager
118
Cisco app configuration
Default settings for the Barcode app

Control character decimalControl character
16Data Link Escape (DLE)
17Data Control 1 (DC1)
18Data Control 2 (DC2)
19Data Control 3 (DC3)
20Data Control 4 (DC4)
21Negative ACK (NAK)
22Synchronize (SYN)
23End Text Block (ETB)
24Cancel (CAN)
25End Message (EM)
26Substitute (SUB)
27Escape (ESC)
28File Separator (FS)
29Group Separator (GS)
30Record Separator (RS)
31Unit Separator (US)
The following table lists the punction that you can use to replace control characters.
Table 64: Latin punctuation or symbols
DescriptionLatin punctuation or
symbol
Exclamation point!
Quotation mark"
Number sign#
Dollar sign$
Percent sign%
Ampersand&
Apostrophe'
Left parenthesis(
Right parenthesis)
Cisco Wireless Phone 840 and 860 Administration Guide for Cisco Unified Communications Manager
119
Cisco app configuration
Default settings for the Barcode app

DescriptionLatin punctuation or
symbol
Asterisk*
Plus sign+
Comma,
Hyphen-Minus-
Full stop or period.
Forward slash or Solidus/
Colon:
Semicolon;
Less-than sign<
Equal sign=
Greater-than sign>
Question mark?
Commercial at symbol@
Left square bracket[
Black slash or Reverse solidus\
Right square bracket]
Tent, control, or Circumflex accent^
Underline, underscore, or low line_
Grave accent`
Left curly bracket{
Pipe, or Vertical line|
Right curly bracket}
Tilde~
ScanFlex
The Barcode service uses ScanFlex, a feature that allows the Barcode service to support custom data
manipulation for individual applications.
Using the barcode settings and the Enterprise Mobility Management (EMM) application interface, you can
group applications using barcode service into profiles which contain the exact package names that the app
developers provide. Within each profile, you can enable required symbologies and configure custom data
manipulation settings. When the given app is identified in the foreground, the barcode scanner only scans the
symbologies that you program for that identified app.
Cisco Wireless Phone 840 and 860 Administration Guide for Cisco Unified Communications Manager
120
Cisco app configuration
ScanFlex

ScanFlex allows custom intents to provide more specificity. For custom intents to function, the third-party
application must be in the foreground. Some common intent delivery methods are:
• Start activity
• Start service
• Start foreground service
• Send broadcast
Custom intents and keyboard emulation use the manipulated barcode data.
ScanFlex settings
Set the following for each ScanFlex application or activity that you add.
Table 65: ScanFlex settings
DescriptionDefaultField type or
choices
Field
Enter a name for the application or activity.
If more than one name, use a comma to
separate names.
StringApplication or
activity name(s)
Set desired symbology settings for the
application or activity.
Symbology settings
for application(s)
entered above
Select desired symbologies, and set their
data manipulation and custom intent
settings.
Format data
Select desired symbologies, and set custom
actions and parameters.
Advanced data
formatting
Related Topics
Default settings for the Barcode app, on page 107
Actions for advanced data formatting
In the ScanFlex Advanced data formatting settings, you can set the scanner to perform up to ten different
actions on a scanned string. You can set the actions to happen in any order, and you may repeat an action if
needed.
Each action has two parameters that are associated with it: parameter 1 and parameter 2. The parameter fields
may not be necessary for some actions.
The following table describes actions that move the cursor.
Cisco Wireless Phone 840 and 860 Administration Guide for Cisco Unified Communications Manager
121
Cisco app configuration
ScanFlex settings

Table 66: Actions that move the cursor
Directions for parametersCursor action descriptionAction
Enter n in Parameter 1.Move the cursor forward by n
spots.
Move forward
Enter n in Parameter 1.Move the cursor backward by n
spots.
Move back
No parameter required.Move the cursor to the beginning
of the string.
Move to beginning
No parameter required.Move the cursor to the end of the
string.
Move to end
Enter the sub-string in Parameter
1.
Move the cursor to the beginning
of a sub-string.
Move to beginning of sub-string
Enter the sub-string in Parameter
1.
Move the cursor to the end of a
sub-string.
Move to the end of sub-string
The following table describes actions that don't move the cursor.
Table 67: Actions that don't move the cursor
Directions for parametersAction descriptionAction
No parameter required.Remove leading or trailing
whitespaces.
Trim whitespace
No parameter required.Remove all whitespaces.Remove all whitespace
No parameter required.Remove leading zeros on the left
of the string.
Remove all leading zeros
Enter n in Parameter 1.Add n zeros at the beginning.Pad zeros at beginning
Enter the sub-string that you want
to replace in Parameter 1, and enter
the new sub-string in Parameter 2.
Replace the first encountered
sub-string in the scanned string.
Replace first sub-string
Enter the sub-string that you want
to replace in Parameter 1, and enter
the new sub-string in Parameter 2.
Replace all encountered sub-string
in the scanned string.
Replace all sub-strings
Enter the character in Parameter 1.Remove characters encountered in
the string.
Remove characters
Enter the text in Parameter 1.Add textAdd text
Enter integer code of the desired
character in Parameter 1.
Add character as integer code.Add code
Cisco Wireless Phone 840 and 860 Administration Guide for Cisco Unified Communications Manager
122
Cisco app configuration
Actions for advanced data formatting

Directions for parametersAction descriptionAction
No parameter required.Add a Tab from the current position
of cursor.
ScanFlex uses a built-in
pause after Tab; therefore,
you do not need to
manually add a pause.
Note
Add tab
No parameter required.Add an Enter at the current position
of the cursor.
ScanFlex uses a built-in
pause after Enter;
therefore, you do not need
to manually add a pause.
Note
Add enter
Test scan a barcode
Before you use the barcode scanner for the first time, check that the scanner is properly configured to scan
your barcode type.
Before you begin
• Use the small tab to remove the plastic cover on the barcode scanner.
• Use the Buttons app to program a button as the Scanner.
By default, the top-left button of the Cisco Wireless Phone 860S is set to Scanner.
By default, the bottom-left button of the Cisco Wireless Phone 840S is set to
Scanner.
Note
Procedure
Step 1 Access the Barcode app.
Step 2 Tap the Overflow menu.
Step 3 Tap Test scan.
Step 4 From the Barcode screen, tap the barcode scanner button.
Step 5 Point the barcode reader 1–18 inches (2.5–46 centimeters) from the barcode that you want to scan.
Step 6 Press and hold the programmed Scanner button with the light shining across the entire barcode symbol until
the light turns off and you hear a beep.
Cisco Wireless Phone 840 and 860 Administration Guide for Cisco Unified Communications Manager
123
Cisco app configuration
Test scan a barcode

The Barcode type and the Scanned barcode data appear on the Barcode screen. The barcode search
button is enabled.
Step 7 Tap the barcode search button to find data about the scanned barcode.
The search results appear in the default browser on your phone.
Custom Settings app
The Custom Settings app provides phone control settings. It includes:
• User restrictions, where you can grant or restrict access to certain phone settings for the phone user.
• General administrative phone settings, such as time, device, sleep, touch, sound, and wallpaper settings.
Related Topics
Access the Cisco app settings on the phone, on page 82
User restrictions in Custom Settings
By default, all the user restrictions are on, which means that users can control these settings on their phones.
If you don't want users to control certain settings, you can change these settings to Off.
User restrictions for Wi-Fi and airplane mode
The following table describes the user restriction settings that are related to Wi-Fi and airplane mode.
Table 68: User restriction settings for Wi-Fi and airplane mode
DescriptionDefaultField type or
choices
Field
If enabled, and if the Allow quick settings
tiles is enabled, the user can enable or
disable Wi-Fi in the quick settings tiles.
If the Allow quick settings tiles is
disabled, all the quick settings tiles are not
available.
OnOn
Off
Allow Wi-Fi toggle
If enabled, and if the Allow quick settings
tiles is enabled, the user can enable or
disable Airplane mode in the quick
settings tiles.
If the Allow quick settings tiles is
disabled, the Airplane modequick settings
tile is not available.
OnOn
Off
Allow airplane
mode toggle
Cisco Wireless Phone 840 and 860 Administration Guide for Cisco Unified Communications Manager
124
Cisco app configuration
Custom Settings app

User restrictions for quick settings tiles
The following table describes the user restriction settings that are related to the quick settings tiles.
Table 69: User restriction settings for quick settings tiles
DescriptionDefaultField type or
choices
Field
If enabled, all enabled quick setting tiles
are accessible to the end user.
If disabled, all quick setting tiles are
inaccessible to the end user.
OnOn
Off
Allow quick settings
tiles
If enabled, and if the Allow quick settings
tiles is enabled, the user can control this
quick setting tile.
If disabled, the quick setting tile is hidden
and can't be added.
OnOn
Off
Wi-Fi
If enabled, and if the Allow quick settings
tiles is enabled, the user can control this
quick setting tile.
If disabled, the quick setting tile is hidden
and can't be added.
OnOn
Off
Bluetooth
If enabled, and if the Allow quick settings
tiles is enabled, the user can control this
quick setting tile.
If disabled, the quick setting tile is hidden
and can't be added.
OnOn
Off
Do not disturb
If enabled, and if the Allow quick settings
tiles is enabled, the user can control this
quick setting tile.
If disabled, the quick setting tile is hidden
and can't be added.
OnOn
Off
Flashlight
If enabled, and if the Allow quick settings
tiles is enabled, the user can control this
quick setting tile.
If disabled, the quick setting tile is hidden
and can't be added.
OnOn
Off
Rotation lock
If enabled and if the Allow quick settings
tiles is enabled, the user can control this
quick setting tile.
If disabled, the quick setting tile is hidden
and can't be added.
OnOn
Off
Battery saver
Cisco Wireless Phone 840 and 860 Administration Guide for Cisco Unified Communications Manager
125
Cisco app configuration
User restrictions in Custom Settings

DescriptionDefaultField type or
choices
Field
If enabled, and if the Allow quick settings
tiles is enabled, the user can control this
quick setting tile.
If disabled, the quick setting tile is hidden
and can't be added.
OnOn
Off
Mobile data
If enabled, and if the Allow quick settings
tiles is enabled, the user can control this
quick setting tile.
If disabled, the quick setting tile is hidden
and can't be added.
OnOn
Off
Airplane mode
If enabled, and if the Allow quick settings
tiles is enabled, the user can control this
quick setting tile.
If disabled, the quick setting tile is hidden
and can't be added.
OnOn
Off
Cast
If enabled and if the Allow quick settings
tiles is enabled, the user can control this
quick setting tile.
If disabled, the quick setting tile is hidden
and can't be added.
OnOn
Off
High touch
If enabled, and if the Allow quick settings
tiles is enabled, the user can control this
quick setting tile.
If disabled, the quick setting tile is hidden
and can't be added.
OnOn
Off
Hotspot
If enabled, and if the Allow quick settings
tiles is enabled, the user can control this
quick setting tile.
If disabled, the quick setting tile is hidden
and can't be added.
OnOn
Off
Night light
If enabled and if the Allow quick settings
tiles is enabled, the user can control this
quick setting tile.
If disabled, the quick setting tile is hidden
and can't be added.
OnOn
Off
Location
Cisco Wireless Phone 840 and 860 Administration Guide for Cisco Unified Communications Manager
126
Cisco app configuration
User restrictions in Custom Settings

DescriptionDefaultField type or
choices
Field
If enabled and if the Allow quick settings
tiles is enabled, the user can control this
quick setting tile.
If disabled, the quick setting tile is hidden
and can't be added.
OnOn
Off
Invert colors
If enabled, and if the Allow quick settings
tiles is enabled, the user can control this
quick setting tile.
If disabled, the quick setting tile is hidden
and can't be added.
OnOn
Off
Data saver
Available from release 1.3(0) onward, the
Dark theme setting changes the display
from dark text on a light background, to
light text on a dark background.
If enabled and if the Allow quick settings
tiles is enabled, the user can control this
quick setting tile.
If disabled, the quick setting tile is hidden
and can't be added.
OnOn
Off
Dark theme
Available from release 1.3(0) onward,
Nearby share is an Android platform
setting that enables phones to share files,
links, and pictures with other devices
within a certain range.
If enabled and if the Allow quick settings
tiles is enabled, the user can control this
quick setting tile.
If disabled, the quick setting tile is hidden
and can't be added.
OnOn
Off
Nearby share
User restrictions for notification shade settings gear
The following table describes the user restriction setting that is related to the settings gear in the notification
shade.
Cisco Wireless Phone 840 and 860 Administration Guide for Cisco Unified Communications Manager
127
Cisco app configuration
User restrictions in Custom Settings

Table 70: User restriction settings for notification shade settings gear
DescriptionDefaultField type or
choices
Field
If enabled, the user can make Android
settings changes through the gear in the
notification shade.
If disabled, the Android settings gear in
the notification shade is not accessible to
the user.
If you are using a Smart Launcher
to restrict user access to certain
apps and settings, we recommend
that you disallow this setting
through the Cisco Wireless Phone
Configuration Management tool.
Otherwise, users can easily open
apps that aren't on the Smart
Launcher.
Note
OnOn
Off
Allow notification
shade settings gear
User restrictions for time
The following table describes the user restriction settings that are related to time.
Table 71: User restriction settings for time
DescriptionDefaultField type or
choices
Field
If enabled, the user can manually change
the time zone on the phone from Settings >
System > Date & Time.
If disabled, the user cannot manually
change the time zone on the phone.
OnOn
Off
Allow time zone
configuration
If enabled, the user can manually change
the time format on the phone from
Settings > System > Date & Time.
If disabled, the user cannot manually
change the time format on the phone.
OnOn
Off
Allow time format
configuration
Not applicable for Wi-Fi enabled phones.OnOn
Off
Allow automatic
time zone toggle
User restrictions for emergency calls
The following table describes the user restriction setting that is related to emergency calls from the lock screen.
Cisco Wireless Phone 840 and 860 Administration Guide for Cisco Unified Communications Manager
128
Cisco app configuration
User restrictions in Custom Settings

Table 72: User restriction settings for emergency calls
DescriptionDefaultField type or
choices
Field
If enabled, displays the EMERGENCY
button when the phone screen is locked.
Regardless of whether you enable
or disable this setting, a RETURN
to CALL button is present if the
phone is in a call and locked.
Note
OnOn
Off
Allow emergency
call button on
lockscreen
User restrictions for lock screen proximity sensor
The following table describes the user restriction setting that is related to the lock screen proximity sensor.
Table 73: User restriction settings for lock screen proximity sensor
DescriptionDefaultField type or
choices
Field
If enabled, the phone screen automatically
locks when the user covers the proximity
sensor. This prevents accidental input when
a user puts the phone in a pocket.
OnOn
Off
Lock screen
proximity detection
More Custom Settings
Some of the Custom Settings allow you to give users control of certain phone settings from the Android
settings menu. You are also able to enable or disable certain settings, or set a specific value at the Enterprise
Mobility Management (EMM) application or Cisco Wireless Phone Configuration Management tool level.
Consider the following when you configure the Custom Settings:
• If you set a value in the EMM application, users can't change it on the Custom Settings menu, but they
may be able to change it on the Android settings menu. The changed value reflects in the Custom Settings
menu but the EMM application could override the changed value at any time.
• If you set a value in the Cisco Wireless Phone Configuration Management tool, users can't change it on
the Custom Settings menu, or on the Android settings menu.
• If you set a Custom Setting to:
• User controlled, it allows the user to control the setting from the Android settings menu. In this
case, the Android setting menu takes precedence over the Custom Setting.
• Enable, the user could disable it in the Android menu. The changed value reflects in the Custom
Settings menu but the EMM application could override the changed value at any time.
• Disable, the user could enable it in the Android menu. The changed value reflects in the Custom
Settings menu but the EMM application could override the changed value at any time.
Cisco Wireless Phone 840 and 860 Administration Guide for Cisco Unified Communications Manager
129
Cisco app configuration
More Custom Settings

• If you use a secure launcher, users can't access the Android settings menu even if you set a Custom
Setting to User controlled.
Time
Use the following settings to configure custom time settings.
Table 74: Time settings
DescriptionDefaultField type or
choices
Field
The Network Time Protocol (NTP) domain
name or IP address.
Deploy a local time server for phones that
are not connected to the internet and
therefore getting their time from Google
or some other cloud server.
From release 1.5(0), you can also
define a server in DHCP option 42
to provide NTP service in case the
NTP server isn't available.
Note
2.android.pool.ntp.orgStringNTP server address
A drop-down list of all the available time
zones. Unset/deferred does not set a time
zone through this configuration remotely.
The time zone settings are listed
by country/region/city and also
have a number setting under Etc.
(Etc/GMT+/- ##). However, the
number values (for example, –2
or +2) are reversed from usual
GMT time designations. Your
setting for Etc/GMT+2 transposes
into the actual setting of GMT-2).
Therefore, we recommend that
you use the country/region/city
option whenever possible.
Caution
Unset/deferredChoiceTime zone
Unset/deferred does not set a time format
through this configuration remotely.
Unset/deferredUnset/deferred
12 hours
24 hours
Time format
Enables or disables automatic time zone.OnOn
Off
Automatic time zone
Cisco Wireless Phone 840 and 860 Administration Guide for Cisco Unified Communications Manager
130
Cisco app configuration
More Custom Settings

Device info
Use the following settings to configure custom device information settings.
Table 75: Device info settings
DescriptionDefaultField type or
choices
Field
If enabled, provides four text fields for
more information about the user who is
assigned this phone. This information
appears in the phone notifications and on
a locked screen.
OffOn
Off
Display device info
First parameter for device information
notification
StringDevice info 1
Second parameter for device information
notification
StringDevice info 2
Third parameter for device information
notification
StringDevice info 3
Fourth parameter for device information
notification
StringDevice info 4
Device name
Use the following setting to configure a custom name for the device.
Table 76: Edit device name setting
DescriptionDefaultField typeField
Allows you to set the Android device
name. This is useful when you use an
Enterprise Mobility Management (EMM)
application to configure the phones.
StringDevice name
Battery
Use the following settings to configure custom battery settings.
Cisco Wireless Phone 840 and 860 Administration Guide for Cisco Unified Communications Manager
131
Cisco app configuration
More Custom Settings

Table 77: Battery settings
DescriptionDefaultField type or
choices
Field
Android Battery Saver mode curtails
functionality to conserve the battery life.
However, it also reduces functionality by
turning off apps that you might want to
remain operational. Apps that you add to
this list remain operational when the user
turns on the phone's Battery Saver mode.
Apps that you add to this list
increase battery usage by staying
awake. Ensure that users have
extra batteries available.
Caution
Comma-delimited
list of package
names
Battery optimization
allow list
If enabled, allows the user to turn battery
saver mode on or off.
Battery saver mode can have a significant
impact on what apps are available or
functioning.
OnOn
Off
Allow battery saver
User controlled: makes the Battery
percentage Android setting available for
the user to show or hide the battery
percentage in the phone status bar.
Enable and Disable: make the Battery
percentage Android setting unavailable to
users and allow the EMM application to
control the setting.
• Enable displays the battery percentage
on the status bar.
• Disable means that the battery
percentage doesn't display on the
phone.
User controlledUser controlled
Enable
Disable
Battery percentage
Keyboard
Use the following setting to configure the keyboard Google voice typing setting.
Table 78: Keyboard setting
DescriptionDefaultField choicesField
Enables or disables Google voice typing.OnOn
Off
Google
™
voice
typing
Cisco Wireless Phone 840 and 860 Administration Guide for Cisco Unified Communications Manager
132
Cisco app configuration
More Custom Settings

Sleep
Use the following setting to configure the sleep setting.
Table 79: Sleep setting
DescriptionDefaultField choicesField
Sets the amount of time before the screen
times out after inactivity.
User controlled allows users to control
the sleep settings available in the Android
settings menu.
User controlledUser controlled
15 seconds
30 seconds
1 minute
5 minutes
10 minutes
30 minutes
Time to sleep after
inactivity
Display
Allows certain display settings available in the Android settings menu to be controlled by an EMM application
or by the end user.
Use the following settings to configure custom display settings.
Table 80: Display settings
DescriptionDefaultField type or
choices
Field
Sets the display size, which includes all
interface elements such as text and images.
For the Cisco Wireless Phone 840
and 840S, the large display size is
not currently available, so if you
choose this option, the phone uses
the default display size.
Note
User controlledUser controlled
Small
Default
Large
Display size
Sets the font size.User controlledUser controlled
Small
Default
Large
Largest
Font size
Cisco Wireless Phone 840 and 860 Administration Guide for Cisco Unified Communications Manager
133
Cisco app configuration
More Custom Settings

DescriptionDefaultField type or
choices
Field
Sets the system navigation.
For the Cisco Wireless Phone 840
and 840S, 2-button navigation is
not currently available, so if you
choose this option, the phone uses
the 3-button navigation.
Note
User controlledUser controlled
Gesture navigation
2-button navigation
3-button navigation
System navigation
User controlled: makes the Auto-rotate
screen Android setting available for users
to turn automatic screen rotation on or off.
Enable and Disable: make the Auto-rotate
screenAndroid setting unavailable to users
and allow the EMM application to control
the setting.
• Enable turns on automatic screen
rotation.
• Disable means that automatic screen
rotation is not available.
User controlledUser controlled
Enable
Disable
Auto-rotate screen
Touch
Allows certain touch settings available in the Android settings menu to be controlled by an EMM application
or by the end user.
Use the following settings to configure custom touch settings.
Table 81: Touch settings
DescriptionDefaultField type or
choices
Field
Tones available on the phone or custom
tones that are programmed in an EMM
application.
User controlledUser controlled
Enable
Disable
Dialpad tones
Percussive sounds available on the phone
or in an EMM application.
User controlledUser controlled
Enable
Disable
Touch sounds
A vibration when the user taps the phone
touchscreen.
User controlledUser controlled
Enable
Disable
Vibrate on tap
Cisco Wireless Phone 840 and 860 Administration Guide for Cisco Unified Communications Manager
134
Cisco app configuration
More Custom Settings

Sounds
Use the following settings to configure custom sound settings.
Table 82: Sounds settings
DescriptionDefaultField type or
choices
Field
Select the system ringtone sounds that you
want to be available.
AllList of available
ringtones
Ringtones
Must be enabled on the Ringtones list.Default (Flutey
Phone)
Default ringtone
List of available
ringtones
Default ringtone
Select the system notification sounds that
you want to be available.
AllList of available
notification sounds
Notification sounds
Must be enabled on the Notification
sounds list.
Default (Pixie Dust)Default notification
sound
List of available
notification sounds
Default notification
sound
Select the system alarm sounds that you
want to be available.
AllList of available
alarm sounds
Alarm sounds
Must be enabled on the Alarm sounds list.Default (Cesium)Default alarm sound
List of available
alarm sounds
Default alarm sound
Using CUCM, you can download more ringtones, notification sounds, and alarm sounds. The downloaded
ringtones and sounds will appear in their respective list.
Note
Camera
Use the following setting to configure the jump to camera setting.
Table 83: Camera setting
DescriptionDefaultField choicesField
Allows certain camera settings available
in the Android settings menu to be
controlled by an EMM application or by
the end user. Permits the user to set the
Jump to camera Android setting.
User controlled implies the Android
settings value takes precedence.
User controlledUser controlled
Enable
Disable
Jump to camera
Cisco Wireless Phone 840 and 860 Administration Guide for Cisco Unified Communications Manager
135
Cisco app configuration
More Custom Settings

Wallpaper
Use the following settings to configure custom wallpaper settings.
Table 84: Wallpaper settings
DescriptionDefaultField typeField
Enter the complete file path starting with
the exact location of the image file—where
is it stored on the phone.
Example
/sdcard/<name_of_image_file>.
Not configuredStringLock screen
wallpaper
Enter the complete file path.Not configuredStringHome screen
wallpaper
Using CUCM, you can download more wallpapers for Lock screen and Home screen. The downloaded
wallpapers will appear in their respective list.
Note
Admin reboot command
Use the following settings to configure custom admin reboot command settings.
Table 85: Admin reboot command settings
DescriptionDefaultField type or
choices
Field
Sets reboot command ID.StringReboot command ID
Sets when to schedule reboot.TimerTimer
When next
plugged-in
Reboot schedule
type
Timer reboot configuration
Use the following settings to configure custom timer reboot settings.
Cisco Wireless Phone 840 and 860 Administration Guide for Cisco Unified Communications Manager
136
Cisco app configuration
More Custom Settings

Table 86: Timer reboot configuration settings
DescriptionDefaultField type or
choices
Field
Sets time until first automatic reboot
attempt.
Immediately (0
minutes)
Immediately (0
minutes)
1 minute
5 minutes
10 minutes
15 minutes
30 minutes
1 hours
2 hours
3 hours
4 hours
6 hours
8 hours
12 hours
Time until first
automatic reboot
attempt
Sets the number of times to allow a user to
delay the reboot attempt.
NoneNone
1
2
3
4
6
8
12
Unlimited
Number of times to
allow delaying
reboot attempt
Cisco Wireless Phone 840 and 860 Administration Guide for Cisco Unified Communications Manager
137
Cisco app configuration
More Custom Settings

DescriptionDefaultField type or
choices
Field
Sets the time to delay the reboot attempt.1 minute1 minute
5 minutes
10 minutes
15 minutes
30 minutes
1 hours
2 hours
3 hours
4 hours
6 hours
8 hours
12 hours
Time to delay reboot
attempt for
Call Quality Settings app
Call quality settings are automatically set in the phone. However, if your support personnel direct you to adjust
a setting such as the Wi-Fi band or channels, you can do so with the Call Quality Settings app.
By default, all Wi-Fi band options and band channels are enabled. Make sure to enable at least one band and
channel, other wise the phone loses connection and does not function.
Review the bands and channels in use at the intended location before you make any changes. If you select the
wrong band or channels, you can permanently disconnect phones from the network. Contact Cisco TAC if
incorrect band selection disables the phones. Finally, you may need to manually reset factory defaults to the
phones.
Caution
Related Topics
Access the Cisco app settings on the phone, on page 82
Wi-Fi information
The Call Quality Settings app displays information about the Wi-Fi access point connection to the phone.
This Wi-Fi information may help you to troubleshoot call quality issues.
Cisco Wireless Phone 840 and 860 Administration Guide for Cisco Unified Communications Manager
138
Cisco app configuration
Call Quality Settings app

Table 87: Wi-Fi information
DescriptionField
Service Set Identifier (SSID) is the unique name that identifies the
wireless network.
SSID
Access point (AP) name displays the name of the AP.AP name
Basic Service Set Identifier (BSSID) is the MAC of the radio MAC +
SSID.
BSSID
Channel displays the AP radio channel.Channel
Received Signal Strength Indicator (RSSI) is the strength of the signal
connecting the phone and access point.
RSSI
Noise indicates the level of background noise in the environment.Noise
Channel utilization (CU) shows how busy the channel is.CU
Call Quality Settings
You can configure the following Call Quality Settings as required.
Wi-Fi low RSSI threshold
If Cisco TAC instructs you, use the following setting to change the threshold for the Wi-Fi low Received
Signal Strength Indicator (RSSI).
Table 88: Wi-Fi low RSSI threshold
DescriptionDefaultField type or
choices
Field
Voice quality can degrade if the Wi-Fi
signal is too weak. The RSSI changes as
the user moves closer to or away from the
connected AP. The RSSI threshold value
setting is the RSSI level at or below which
the phone seeks a better AP. The phone
uses many attributes of an AP to determine
if it is a good candidate including the
current load on the AP, the available
bandwidth on the AP, and channel.
Sometimes the best AP may have an RSSI
value lower than other candidates.
Consult Cisco TAC before you
change the RSSI threshold value.
Caution
–67Integer –55 to –100Wi-Fi Low RSSI
threshold
Cisco Wireless Phone 840 and 860 Administration Guide for Cisco Unified Communications Manager
139
Cisco app configuration
Call Quality Settings

Channel selection
Use the following settings to select Wi-Fi bands.
Table 89: Wi-Fi band selection options
DescriptionDefaultField type or
choices
Field
When enabled:
• The phone uses any available band or
channel.
• You can’t select a specific band or
channel.
• The phone ignores, but does not
forget, your individual channel
preferences.
When disabled, you can select which band
to enable and select specific channels
within each band.
You can't disable both Wi-Fi bands at the
same time.
EnabledEnabled
Disabled
Auto
If enabled:
• The phone uses any available channel
in the 2.4 GHz band.
• You can enable or disable specific
channels within 2.4 GHz band.
EnabledEnabled
Disabled
2.4 GHz Wi-Fi band
If enabled:
• The phone uses any available channel
in the 5 GHz band.
• You can enable or disable specific
channels within 5 GHz subbands.
Each subband includes a group of
channels.
EnabledEnabled
Disabled
5 GHz Wi-Fi band
Use the following settings to select 2.4 GHz channels.
Table 90: 2.4 GHz channel selection
DescriptionDefaultField type or
choices
Field
Enables channel.OnOn
Off
Channel 1 (2412
MHz)
Cisco Wireless Phone 840 and 860 Administration Guide for Cisco Unified Communications Manager
140
Cisco app configuration
Call Quality Settings

DescriptionDefaultField type or
choices
Field
Enables channel.OnOn
Off
Channel 2 (2417
MHz)
Enables channel.OnOn
Off
Channel 3 (2422
MHz)
Enables channel.OnOn
Off
Channel 4 (2427
MHz)
Enables channel.OnOn
Off
Channel 5 (2432
MHz)
Enables channel.OnOn
Off
Channel 6 (2437
MHz)
Enables channel.OnOn
Off
Channel 7 (2442
MHz)
Enables channel.OnOn
Off
Channel 8 (2447
MHz)
Enables channel.OnOn
Off
Channel 9 (2452
MHz)
Enables channel.OnOn
Off
Channel 10 (2457
MHz)
Enables channel.OnOn
Off
Channel 11 (2462
MHz)
Enables channel.OnOn
Off
Channel 12 (2467
MHz)
Enables channel.OnOn
Off
Channel 13 (2472
MHz)
Enables channel.OnOn
Off
Channel 14 (2484
MHz)
Use the following settings to select 5.0 GHz channels.
Cisco Wireless Phone 840 and 860 Administration Guide for Cisco Unified Communications Manager
141
Cisco app configuration
Call Quality Settings

Table 91: 5.0 GHz channel selection
DescriptionDefaultField type or
choices
Field
Enables channel.OnOn
Off
Channel 36 (5180
MHz)
Enables channel.OnOn
Off
Channel 40 (5200
MHz)
Enables channel.OnOn
Off
Channel 44 (5220
MHz)
Enables channel.OnOn
Off
Channel 48 (5140
MHz)
Enables channel.OnOn
Off
Channel 52 DFS
(5260 MHz)
Enables channel.OnOn
Off
Channel 56 DFS
(5280 MHz)
Enables channel.OnOn
Off
Channel 60 DFS
(5300 MHz)
Enables channel.OnOn
Off
Channel 64 DFS
(5320 MHz)
Enables channel.OnOn
Off
Channel 100 DFS
(5500 MHz)
Enables channel.OnOn
Off
Channel 104 DFS
(5520 MHz)
Enables channel.OnOn
Off
Channel 108 DFS
(5540 MHz)
Enables channel.OnOn
Off
Channel 112 DFS
(5560 MHz)
Enables channel.OnOn
Off
Channel 116 DFS
(5580 MHz)
Enables channel.OnOn
Off
Channel 120 DFS
(5600 MHz)
Cisco Wireless Phone 840 and 860 Administration Guide for Cisco Unified Communications Manager
142
Cisco app configuration
Call Quality Settings

DescriptionDefaultField type or
choices
Field
Enables channel.OnOn
Off
Channel 124 DFS
(5620 MHz)
Enables channel.OnOn
Off
Channel 128 DFS
(5640 MHz)
Enables channel.OnOn
Off
Channel 132 DFS
(5660 MHz)
Enables channel.OnOn
Off
Channel 136 DFS
(5680 MHz)
Enables channel.OnOn
Off
Channel 140 DFS
(5700 MHz)
Enables channel.OnOn
Off
Channel 144 DFS
(5720 MHz)
Enables channel.OnOn
Off
Channel 149 (5745
MHz)
Enables channel.OnOn
Off
Channel 153 (5765
MHz)
Enables channel.OnOn
Off
Channel 157 (5785
MHz)
Enables channel.OnOn
Off
Channel 161 (5805
MHz)
Enables channel.OnOn
Off
Channel 165 (5825
MHz)
Wi-Fi preferences
Use the following settings to select Wi-Fi preferences.
Table 92: Wi-Fi preferences
DescriptionDefaultField type or
choices
Field
Fast Transition (FT)PreferredPreferred
Not preferred
FT
Cisco Wireless Phone 840 and 860 Administration Guide for Cisco Unified Communications Manager
143
Cisco app configuration
Call Quality Settings

DescriptionDefaultField type or
choices
Field
Cisco Centralized Key Management
(CCKM)
PreferredPreferred
Not preferred
CCKM
Call Admission Control (CAC)OFFON
OFF
CAC
Diagnostics app
Diagnostics application allows administrator to perform diagnostics tests quickly and efficiently to verify
phone’s hardware components.
As an administrator, you can:
• Perfom individual tests for the following features:
• Audio
• Battery
• Buttons
• Camera
• Display
• NFC
• Sensor
• Touchscreen
• Vibration
• Wi-Fi
• View Test Results
• Reset Test Results
• Generate QRCode
• View information such as Software Versions, Android Version, Device Serial, Wi-Fi Mac Address,
Device Model, and Battery Serial.
Sound Stage app
The sound stage app prevents the users from accidentally muting the phone and missing critical phone calls
or alerts. This app will override and ignore volume changes made by the user or third-party applications that
Cisco Wireless Phone 840 and 860 Administration Guide for Cisco Unified Communications Manager
144
Cisco app configuration
Diagnostics app

conflict with the admin settings. Volume Profile configurations typically provided by EMM. It also controls
volume on alerts and notifications from third-party applications.
Allows control of volume and can be set it to lower levels during night Shifts from 7PM- 7AM or any customer
set time. Controls volume on Cisco applications such as WebAPI, Battery Life and PTT which have independent
volume setting. Controls volume levels, low or high, based on customer needs when connected to a power
charger. Allows volume control when entering or exiting Quiet zones within the hospital like Neonatal Intensive
Care Unit (NICU). This can be set both manual using the phone UI or automatic by scanning a pre-programmed
NFC card placed at entrance and exits. This feature has the capability to program NFC cards using Android
Beam.
Admin Settings for Sound Stage
Use the following Admin settings to configure the Sound Stage app.
Table 93: Admin settings for Sound Stage
DescriptionDefaultField type or choicesField
Enables Sound Stage app.
If the Enable Sound
Stage is disabled, all the
admin settings tiles are not
available.
OffOn
Off
Enable Sound Stage
If the Enable Sound
Stage tile is enabled, you
can enable or disable
Enable sound profile
switch.
OffOn
Off
Enable sound profile
switch
If the Enable Sound
Stage tile is enabled, you
can enable or disable
Enable normal profile.
OffOn
Off
Enable normal profile
If the Enable Sound
Stage tile is enabled, you
can enable or disable
Enable loud profile.
OffOn
Off
Enable loud profile
If the Enable Sound
Stage tile is enabled, you
can enable or disable
Enable soft profile.
OffOn
Off
Enable soft profile
If the Enable Sound
Stage tile is enabled, you
can enable or disable
Enable silent profile.
OffOn
Off
Enable silent profile
Cisco Wireless Phone 840 and 860 Administration Guide for Cisco Unified Communications Manager
145
Cisco app configuration
Admin Settings for Sound Stage

DescriptionDefaultField type or choicesField
If the Enable Sound
Stage tile is enabled, you
can enable or disable
Enable personal profile.
OffOn
Off
Enable personal profile
If the Enable Sound
Stage tile is enabled, you
can enable or disable
Persist active profile
notification.
OffOn
Off
Persist active profile
notification
If the Enable Sound
Stage tile is enabled, you
can enable or disable
Switch profiles silently.
OffOn
Off
Switch profiles silently
Audio profiles
You can access Audio profiles only if the Enable Sound Stage tile is enabled under Settings > Admin
settings.
Sound stage app has four types of standard audio profiles, they are Normal, Loud, Soft, and Silent. Each
profile contains a default a minimum and a maximum volume level that the phone can be set for that media
type. However, you may use Personal Profile.
You can also customize any of the audio profiles as required, by changing the the volume level for alarm,
media, ringer, in-call, and apps as applicable.
Cisco Wireless Phone 840 and 860 Administration Guide for Cisco Unified Communications Manager
146
Cisco app configuration
Audio profiles

Change the audio profile
You can change the audio profile only if the Enable Sound Stage tile is enabled in Settings > Admin settings.
By default normal profile will be activated.
The audio profile could also be changed by scanning a programmed NFC tag without the phone open.
Note
To change the audio profile:
Procedure
Step 1 Access the Sound Stage app.
Step 2 Tap the Change button for the active audio profile.
Step 3 Choose one of the following audio profiles.
• Normal
• Loud
• Soft
• Silent
• Personal
Profile switch rules
You can set up profile switch rules based on behavior (charging) or time.
Behavior Based: Allows you to set up profile switch rule that automatically switches audio profile to desired
profile when a mobile phone is charging. You can set up behavior based profile switch rule by enabling
Charging tile in Settings > Profile switch rules.
Time Based: Allows you to set up profile switch rule that automatically switches audio profile to desired
profile at a specified time. You can specify four different time based profile switch rules. You can set up the
time based profile switch rule by tapping on any of the four time slots in Settings > Profile switch rules >
TIME BASED and specify the time and desired audio profile.
If you have set up both behavior based and time based profile switch rules, the high priority will be behavior
based.
Note
You can set up the charging based profile switch rules, only if Charging tile is enabled in Settings > Profile
switch rules. You can also set up the time based profile switch rules.
Note
Cisco Wireless Phone 840 and 860 Administration Guide for Cisco Unified Communications Manager
147
Cisco app configuration
Change the audio profile

To change the Switch toprofile:
Procedure
Step 1 Access the Sound Stage app.
Step 2 Tap the Overflow menu.
Step 3 Select Settings > Profile switch rules .
Step 4 Tap Charging.
Step 5 Choose one of the following Switch to options .
• Normal
• Loud
• Soft
• Silent
• Personal
Web API app
Developers use the Web API app to interface with external services and provide links to frequently used
websites. Web API allows you to configure the phones to integrate with an XML application.
The following table describes the Web API settings.
Table 94: Web API settings
DescriptionDefaultField type or
choices
Field
Enables or disables Web API.OffOn
Off
Enable Web API
Enables or disables Web access.OffOn
Off
Enable Web access
Sets the data format. XML is the only
supported format.
XMLXML
JSON
Data format
Related Topics
Access the Cisco app settings on the phone, on page 82
Phone state polling
You can set the following phone state polling parameters.
Cisco Wireless Phone 840 and 860 Administration Guide for Cisco Unified Communications Manager
148
Cisco app configuration
Web API app

Table 95: Polling parameters
DescriptionDefaultField type or
choices
Field
Defines the username that the phone
requires to authenticate polling.
StringUsername
Defines the password that the phone
requires to authenticate polling.
StringPassword
Defines the method for sending the
requested polling data.
If the Respond mode is requester, the
response is automatically sent to the HTTP
server running at the address where the
request was made.
RequesterRequester
URL
Respond mode
When the Respond mode is set as URL,
this field defines the URL of a valid HTTP
server that gets the response.
You must enter the URL. This can be a
different address than the requester.
StringURL
Push settings
When you configure push settings, consider that when a phone receives a push request, it reacts differently
based on the following:
• If a phone is in a call and receives a push with a priority of High, Important, or Normal, the phone accepts
the push but does nothing.
• If a phone receives a push request when it is in Do Not Disturb (DND) with:
• Total Silence—The phone does not make any sound and only displays visual notification. The phone
stays in Total Silence mode after the push request.
• Alarms Only and Priority Only—The phone changes mode to Normal, presents visual notification,
and plays the notification sound. The phone stays in Normal mode after the push request.
Use the following settings to configure push settings.
Table 96: Push settings
DescriptionDefaultField type or
choices
Field
Defines the username for the Web API to
do any kind of push.
StringUsername
Defines the password for the Web API to
do any kind of push.
StringPassword
Cisco Wireless Phone 840 and 860 Administration Guide for Cisco Unified Communications Manager
149
Cisco app configuration
Push settings

DescriptionDefaultField type or
choices
Field
Sets the priority for messages from the app.
Only messages with the selected priority
level display.
• All—Allows all priority push
messages.
• Critical—Allows only critical push
messages.
• High—Allows only high priority push
messages.
• Important—Allows only important
push messages.
• Normal—Allows only normal push
messages.
• None—Discards all push messages.
AllAll
Critical
High
Important
Normal
None
Push alert priority
Defines the URL of the application server.
This root URL is combined with the phone
address and sent to the phone’s browser.
For example, if the application server root
URL is
http://172.24.128.85:8080/sampleapps
and the relative URL is
/examples/sample.html, the URL that is
sent to the web browser on the phone is
http://172.24.128.85:8080/sampleapps/examples/sample.html.
The URL can be either HTTP or HTTPS.
Server root URL
Defines whether a notification ringtone
sound plays when a phone receives a push
message.
The notification sound that plays is set by
the user in the phone Settings > Sound >
Default notification sound.
OffOn
Off
Enable notification
ringtone
Sets the volume for the push ringtone.500–100Web API volume
Push request notifications
Each push request alert that appears in the notification drawer includes a View Alert option and a triangular
exclamation icon. The color of the icon varies according to the priority of the alert:
• Critical: Red
Cisco Wireless Phone 840 and 860 Administration Guide for Cisco Unified Communications Manager
150
Cisco app configuration
Push request notifications

• High: Orange
• Important: Yellow
• Normal: Green
If you receive multiple push requests, the notifications in the notification drawer are grouped by priority. The
groups display in descending order with Critical on top and Normal at the bottom and they indicate the number
of alerts of each priority received.
If you reboot the phone, it does not automatically clear critical alerts. After you reboot a pin protected phone,
if there is an uncleared critical push request, a pop-up dialog with a message Unlock the phone to view
critical alerts appears.
Web application shortcuts
The Web API app allows you to configure the phones to integrate with an XML application. You can configure
up to 12 web application shortcuts. Enter the following fields for each of the desired web application shortcuts.
Table 97: Web application shortcut settings
DescriptionDefaultField type or
choices
Field
Defines a title for the web application
shortcut.
The title displays in the widget box on the
phone after you reboot the phone.
StringShortcut title
Defines the application URL. You can
enter any URL available to the phones.
StringShortcut URL
Place web application shortcuts on launcher screen
For easy access to web application shortcuts, place the shortcuts on the phone launcher screen. Once you place
a shortcut on the launcher screen, you can tap the shortcut to open the web application in a browser.
Procedure
Step 1 Long press the home screen.
Step 2 Tap Widgets.
Step 3 Touch and hold the shortcut.
Step 4 Drag the shortcut to the desired location on a launcher screen.
Device event notifications
You can configure the phones to send notifications of the following phone events to a defined URL.
Cisco Wireless Phone 840 and 860 Administration Guide for Cisco Unified Communications Manager
151
Cisco app configuration
Web application shortcuts

• All events
• Cisco Phone events such as phone state changes, incoming or outgoing calls, or SIP registration.
• Emergency events
To edit an existing event URL, delete it and reenter the information with the new URL name or address.
Note
Use the following settings to configure event notifications.
Table 98: Device event notification settings
DescriptionDefaultField type or
choices
Field
Defines a descriptive label for the event.StringNotification name
Defines the URL for the event.StringNotification URL
By default, there are no notification events.OnOn
Off
None
Sends notifications about all phone events
when enabled.
OffOn
Off
All
Sends notifications about all outgoing
phone events when enabled.
OffOn
Off
Cisco Phone events:
Outgoing
Sends notifications about all incoming
phone events when enabled.
OffOn
Off
Cisco Phone events:
Incoming
Sends notifications about all phone state
change events when enabled.
OffOn
Off
Cisco Phone events:
State Change
Sends notifications about all phone login
and logout events when enabled.
OffOn
Off
Cisco Phone events:
Login/out
Sends notifications about all phone
registration events when enabled.
OffOn
Off
Cisco Phone events:
Registration
Sends notifications about all phone
unregistration events when enabled.
OffOn
Off
Cisco Phone events:
Unregistration
Sends notifications about all Emergency
events when enabled.
OffOn
Off
Emergency events
Cisco Wireless Phone 840 and 860 Administration Guide for Cisco Unified Communications Manager
152
Cisco app configuration
Device event notifications

CHAPTER 6
Accessories
• Supported accessories, on page 153
• Headsets, on page 154
• Desktop chargers, on page 155
• Multichargers, on page 159
• Charger care, on page 163
• Scanner handle for the Cisco Wireless Phone 840S, on page 163
• Clips, on page 165
• Cisco accessory part numbers, on page 165
Supported accessories
You can use several accessories with your phone. For part numbers of the approved accessories, see Cisco
accessory part numbers, on page 165.
Use only the approved chargers and power supplies for your phone.
Caution
• Headsets—Standard headsets that use a 3.5-mm jack or Bluetooth
®
headsets.
The phones don't support Apple headsets. The phones can connect to Bluetooth
headsets and speakers only. They don’t support any other type of Bluetooth
device.
Note
• Desktop chargers—Use the approved power supply.
• Cisco Wireless Phone 840 Desktop Charger
• Cisco Wireless Phone 840 Desktop Dual Charger
• Cisco Wireless Phone 860 Desktop Dual Charger Module
• Cisco Wireless Phone 860 Desktop Battery Charger Module
• Multichargers—Use the approved power supply.
Cisco Wireless Phone 840 and 860 Administration Guide for Cisco Unified Communications Manager
153

• Cisco Wireless Phone 840 Multicharger
• Cisco Wireless Phone 840 Battery Multicharger
• Cisco Wireless Phone 860 Multicharger Base—Holds up to four 860 Desktop Charger Modules (in
any configuration: Dual or Battery).
• USB charger—Use the approved power supply.
• Spare batteries
• Scanner handle—For the Cisco Wireless Phone 840S only.
• Clips
• Cases—For the Cisco Wireless Phone 860 and 860S only.
Headsets
You can use wired and Bluetooth
®
headsets with your phone.
Although we perform some internal testing of third-party wired and Bluetooth wireless headsets for use with
the Cisco Wireless Phone 840 and 860, we don’t certify or support products from headset or handset vendors.
Because of the inherent environmental and hardware inconsistencies in the locations where phones are deployed,
there’s not a single “best” solution that is optimal for all environments. We recommend that customers test
the headsets that work best in their environment before deploying many units in their network.
The Cisco Wireless Phone 840 and 860 hasn’t been tested for wired and Bluetooth headsets in hazardous
locations.
Note
We recommend the use of good quality external devices, like headsets that are screened against unwanted
radio frequency (RF) and audio frequency (AF) signals. Depending on the quality of these devices and their
proximity to other devices such as cell phones and two-way radios, some audio noise may still occur.
The primary reason that a particular headset would be inappropriate for the phone is the potential for an audible
hum. This hum can be heard by either the remote party or by both the remote party and you, the phone user.
Some potential humming or buzzing sounds can be caused by a range of outside sources, for example, electric
lights, electric motors, or large PC monitors. In some instances, the mechanics or electronics of various headsets
can cause remote parties to hear an echo of their own voice when they speak to phone users.
Important headset safety information
High Sound Pressure—Avoid listening to high volume levels for long periods to prevent
possible hearing damage.
When you plug in your headset, lower the volume of the headset speaker before you put the headset on. If
you remember to lower the volume before you take the headset off, the volume will start lower when you
plug in your headset again.
Cisco Wireless Phone 840 and 860 Administration Guide for Cisco Unified Communications Manager
154
Accessories
Headsets

Be aware of your surroundings. When you use your headset, it may block out important external sounds,
particularly in emergencies or in noisy environments. Don’t use the headset while driving. Don’t leave your
headset or headset cables in an area where people or pets can trip over them. Always supervise children who
are near your headset or headset cables.
Standard headsets
You can use a wired headset with your phone. The headset requires a 3.5 mm, 3-band, 4-connector plug.
We recommend the Cisco Headset 520 Series. These headsets offer outstanding audio performance. For more
information about the headset, see Cisco Headset 500 Series.
If you plug a headset into the phone during an active call, the audio path automatically changes to the headset.
Bluetooth headsets
You can use a Bluetooth
®
headset with your phone. When you use a Bluetooth wireless headset, the headset
usually increases battery power consumption on your phone and may result in reducing battery life.
For a Bluetooth wireless headset to work, it does not need to be within direct line-of-sight of the phone, but
some barriers, such as walls or doors, and interference from other electronic devices, can affect the connection.
We recommend the Cisco Headset 560 Series and Cisco Headset 730. These headsets offer outstanding audio
performance. For more information about the headsets, see Cisco Headset 500 Series and Cisco Headset 700
Series.
Desktop chargers
The following desktop chargers are compatible with your phone.
However, the desktop chargers for the Cisco Wireless Phone 840 and Cisco Wireless Phone 860 are not
interchangeable.
Use only the approved chargers and power supplies for your phone.
Caution
Cisco Wireless Phone 840 and 840S
The Cisco Wireless Phone 840 and 840S also have two types of desktop chargers.
Table 99: Desktop chargers
Charger capacityCharger name
One 840 phoneCisco Wireless Phone 840 Desktop Charger
One 840 phone and one 840 batteryCisco Wireless Phone 840 Desktop Dual Charger
Cisco Wireless Phone 840 and 860 Administration Guide for Cisco Unified Communications Manager
155
Accessories
Standard headsets

Figure 10: Cisco Wireless Phone 840 Desktop Charger and Cisco Wireless Phone 840 Desktop Dual Charger
Cisco Wireless Phone 860 and 860S
The Cisco Wireless Phone 860 and 860S have two types of desktop chargers.
Table 100: Desktop chargers
Charger capacityCharger name
One 860 phone and one 860 batteryCisco Wireless Phone 860 Desktop Dual Charger Module
Two 860 batteriesCisco Wireless Phone 860 Desktop Battery Charger Module
Figure 11: Cisco Wireless Phone 860 Desktop Dual Charger Module and Cisco Wireless Phone 860 Desktop Battery Charger Module
Set up the desktop chargers
Follow these steps for all Cisco Wireless Phone 840 and 860 desktop chargers.
The following illustration is of the Cisco Wireless Phone 860 Desktop Dual Charger Module.
Use only the approved chargers and power supplies for your phone.
Caution
Before you begin
Ensure that the power supply has the correct plug for your area.
Procedure
Step 1 Place the module on a flat surface within reach of a power outlet.
Cisco Wireless Phone 840 and 860 Administration Guide for Cisco Unified Communications Manager
156
Accessories
Set up the desktop chargers

Step 2 Plug the power supply into the module.
Step 3 Plug the other end of the power supply into a power outlet.
Charge your phone and battery with desktop dual charger
You can charge your phone and one spare battery with the desktop dual charger.
If both the phone and battery are in the charger, the phone takes priority. So it may take longer to charge the
battery.
There are two LEDs: one for the phone and one for the battery. The LEDs turn on when you properly seat the
phone and battery.
• A solid red LED indicates that the item is charging.
• A solid green LED indicates that the item is fully charged.
• An LED that is off indicates an empty slot or an error condition.
These steps are the same for both the Cisco Wireless Phone 840 Desktop Dual Charger and Cisco Wireless
Phone 860 Desktop Dual Charger Module. The illustration is of the Cisco Wireless Phone 860 Desktop Dual
Charger Module.
Note
Before you begin
Ensure that you properly set up the desktop charger.
Use only the approved chargers and power supplies for your phone.
Caution
Procedure
Step 1 With the battery charging contacts down, insert a spare battery into the dual charger rear slot.
Step 2 Insert your phone face forward into the dual charger front slot.
Cisco Wireless Phone 840 and 860 Administration Guide for Cisco Unified Communications Manager
157
Accessories
Charge your phone and battery with desktop dual charger

Charge your spare 860 batteries with desktop battery charger
You can charge up to two spare 860 batteries at a time in the Cisco Wireless Phone 860 Desktop Battery
Charger Module.
You can't use this charger for 840 batteries.
Caution
There are two LEDs: one for each battery. The LEDs turn on when you properly seat the batteries.
• A solid red LED indicates that the item is charging.
• A solid green LED indicates that the item is fully charged.
• An LED that is off indicates an empty slot or an error condition.
Before you begin
Ensure that you properly set up the Cisco Wireless Phone 860 Desktop Battery Charger Module.
Use only the approved chargers and power supplies for your phone.
Caution
Procedure
With the battery charging contacts facing down, insert a spare battery into each charger slot.
Cisco Wireless Phone 840 and 860 Administration Guide for Cisco Unified Communications Manager
158
Accessories
Charge your spare 860 batteries with desktop battery charger

Multichargers
The following multichargers are compatible with your phone.
However, the multichargers for the Cisco Wireless Phone 840 and Cisco Wireless Phone 860 are not
interchangeable.
Use only the approved chargers and power supplies for your phone.
Caution
Cisco Wireless Phone 840 and 840S
The Cisco Wireless Phone 840 and 840S have two standalone multichargers:
Table 101: Multichargers
Charger
capacity
Charger name
Six 840 phonesCisco Wireless Phone 840 Multicharger
Six 840
batteries
Cisco Wireless Phone 840 Battery Multicharger
Figure 12: Cisco Wireless Phone 840 Multicharger and Cisco Wireless Phone 840 Battery Multicharger
Cisco Wireless Phone 860 and 860S
The Cisco Wireless Phone 860 and 860S multicharger includes a Cisco Wireless Phone 860 Multicharger
Base that holds up to four of the following 860 desktop charger modules in any configuration:
Cisco Wireless Phone 840 and 860 Administration Guide for Cisco Unified Communications Manager
159
Accessories
Multichargers

• Cisco Wireless Phone 860 Desktop Dual Charger Module
• Cisco Wireless Phone 860 Desktop Battery Charger Module
Table 102: Sample multicharger configuration
Charger capacityCisco Wireless Phone 860 Multicharger Base configuration
Four phones and four
batteries
With four Cisco Wireless Phone 860 Desktop Dual Charger Modules
Two phones and six batteriesWith two Cisco Wireless Phone 860 Desktop Dual Charger Modules and two
Cisco Wireless Phone 860 Desktop Battery Charger Modules
Eight batteriesWith four Cisco Wireless Phone 860 Desktop Battery Charger Modules
Figure 13: Cisco Wireless Phone 860 Multicharger Base with 860 Desktop Charger Modules
Assemble the Cisco Wireless Phone 860 Multicharger Base
You can insert up to four desktop charger modules into the multi charger base. You can use any combination
of the Cisco Wireless Phone 860 Desktop Dual Charger Modules and Cisco Wireless Phone 860 Desktop
Battery Charger Modules as desired.
Use only the power supply that comes with the multicharger base.
Caution
Red and green LEDs blink at powerup.
Before you begin
Ensure that the power supply has the correct plug for your area.
Procedure
Step 1 Place the multicharger base on a flat surface within reach of power outlet.
Cisco Wireless Phone 840 and 860 Administration Guide for Cisco Unified Communications Manager
160
Accessories
Assemble the Cisco Wireless Phone 860 Multicharger Base

Step 2 Insert the tabs on the back of the desktop charger module into the slots on the base.
Step 3 Rock the desktop charger module forward and use the front tab to snap it into place.
Step 4 Plug the multicharger base power supply into the base and a power outlet.
Cisco Wireless Phone 840 and 860 Administration Guide for Cisco Unified Communications Manager
161
Accessories
Assemble the Cisco Wireless Phone 860 Multicharger Base

Charge phones and batteries with multicharger
With the 840 multichargers, you can charge up to six phones or batteries at a time. Each slot has an LED.
With the 860 multicharger, you can charge up to eight items at a time. Each desktop module has two LEDs,
one for each slot.
• Solid red LED indicates that the item is charging.
• Solid green LED indicates that the item is fully charged.
• LED that is off indicates an empty slot or an error condition.
Before you begin
For the 840 phones, ensure that you plug in the multicharger.
For the 860 phones, ensure that you properly set up the Cisco Wireless Phone 860 Multicharger Base and
install up to four desktop charger modules.
Use only the approved chargers and power supplies for your phone.
Caution
Procedure
Insert the phones and batteries into the slots.
Related Topics
Assemble the Cisco Wireless Phone 860 Multicharger Base, on page 160
Charge your phone and battery with desktop dual charger, on page 157
Cisco Wireless Phone 840 and 860 Administration Guide for Cisco Unified Communications Manager
162
Accessories
Charge phones and batteries with multicharger

Charger care
Although you don't handle the chargers as much as the phones, they can get dirty, so it's important to periodically
clean them.
The plastic in the charger is different from the plastic in the phone, so it doesn't withstand rigorous disinfection.
Caution
Follow the same steps to clean the charger as you do for the phones, but pay special attention to the following:
• Remove the phone and battery from the charger. Unplug the charger.
• Never immerse the charger in liquid.
• Don't spray any solution directly onto the charger. Dampen a cloth and wipe instead. Do not allow liquid
to pool on or in the plastic.
• Don't use a bleach solution on battery contacts.
• Don't to exert undue pressure on electrical contacts inside the charger compartment. Do not bend the
contacts.
• For light to heavy soil—Wipe the charger surface with a water-dampened cloth or paper towel to remove
most films or residue. If the soiling is too stubborn for plain water, use a mild detergent solution, Lysol
®
,
isopropyl alcohol, or diluted bleach (10 percent or less).
• Wipe battery contacts with a cotton swab dampened with alcohol to remove any lint.
• Never use the following products to clean your charger:
• Don't use furniture polishes, waxes, or plasticizer-based cleaners such as ArmorAll
®
.
• Don't use lanolin, aloe, glycerin, or other skin care products.
• Don't use hand sanitizers to clean chargers or handle the charger when your hands are wet with
sanitizer solution.
• Don't apply any solvent such as acetone, mineral spirits, and so on.
• Allow the charger to air dry. You may wipe the charger with a soft dry cloth to hasten dry time. Be sure
that electrical contacts are completely dry and lint-free. When fully dry, you may plug in the charger and
reinsert the battery and phone.
Scanner handle for the Cisco Wireless Phone 840S
There is a scanner handle available for the Cisco Wireless Phone 840S. Use the scanner handle to easily scan
multiple barcodes.
Cisco Wireless Phone 840 and 860 Administration Guide for Cisco Unified Communications Manager
163
Accessories
Charger care

Figure 14: Cisco Wireless Phone 840S with scanner handle
Install the Cisco Wireless Phone 840S in the scanner handle
Figure 15: Cisco Wireless Phone 840S in the scanner handle
Procedure
Step 1 Insert the bottom end of the Cisco Wireless Phone 840S in the scanner handle.
Step 2 Press down on the top end of the phone to snap it in place on the scanner handle.
Step 3 Scan a barcode with the trigger on the scanner handle to test that it works.
Cisco Wireless Phone 840 and 860 Administration Guide for Cisco Unified Communications Manager
164
Accessories
Install the Cisco Wireless Phone 840S in the scanner handle

Clips
There are clips available for the Cisco Wireless Phone 840 and 860.
The following illustration is of the rotating belt clip holsters for the Cisco Wireless Phone 840 and 840S. The
belt clips for the Cisco Wireless Phone 860 and 860S don't have a holster and aren't interchangeable with the
840 clips.
Figure 16: Cisco Wireless Phone 840 and 840S and clips
Cisco accessory part numbers
The following tables provide the part numbers for the approved Cisco accessories for the Cisco Wireless
Phone 840 and 860. For more information, see the Cisco Wireless Phone Data Sheet.
Use only the approved chargers and power supplies for your phone.
Caution
Table 103: Desktop chargers and power supplies
Power supply model
number
Part numberAccessory
—CP-840-PH-DCHR=Cisco Wireless Phone 840 Desktop Charger
—CP-840-DUAL-DCHR=Cisco Wireless Phone 840 Desktop Dual Charger
SK01T8-0570260SCP-840-DCHR-PS-AU=Cisco Wireless Phone 840 Desktop Charger and Cisco
Wireless Phone 840 Desktop Dual Charger power
supply for Australia
SK01T8-0570260VCP-840-DCHR-PS-EU=Cisco Wireless Phone 840 Desktop Charger and Cisco
Wireless Phone 840 Desktop Dual Charger power
supply for the European Union
Cisco Wireless Phone 840 and 860 Administration Guide for Cisco Unified Communications Manager
165
Accessories
Clips

Power supply model
number
Part numberAccessory
SK01T8-0570260UCP-840-DCHR-PS-NA=Cisco Wireless Phone 840 Desktop Charger and Cisco
Wireless Phone 840 Desktop Dual Charger power
supply for North America
SK01T8-0570260BCP-840-DCHR-PS-UK=Cisco Wireless Phone 840 Desktop Charger and Cisco
Wireless Phone 840 Desktop Dual Charger power
supply for the United Kingdom
—CP-860-DCHR=Cisco Wireless Phone 860 Desktop Dual Charger
Module
—CP-860-BAT-DCHR=Cisco Wireless Phone 860 Desktop Battery Charger
Module
HK-AY-120A200-CPCP-860-DCHR-PSU=Cisco Wireless Phone 860 Desktop Dual Charger
Module and Cisco Wireless Phone 860 Desktop
Battery Charger Module power supply
Table 104: Multichargers and power supplies
Power supply model
number
Part numberAccessory
KT090A1200667B3CP-840-PH-MCHR=Cisco Wireless Phone 840 Multicharger with power
supply
KT090A1200667B3CP-840-BAT-MCHR=Cisco Wireless Phone 840 Battery Multicharger with
power supply
FSP090-ABAN3CP-860-MCHR=Cisco Wireless Phone 860 Multicharger Base with
power supply
Table 105: USB cable and power adapter
Power adapter
model number
Part numberAccessory
IN-CA-310QCP-800-USBCH=Cisco Wireless Phone 840 and 860 USB cable and power adapter
wall plug
Table 106: Spare batteries
Part numberAccessory
CP-840-BAT=Cisco Wireless Phone 840 and 840S spare battery
CP-860-BAT=Cisco Wireless Phone 860 and 860S spare battery
Cisco Wireless Phone 840 and 860 Administration Guide for Cisco Unified Communications Manager
166
Accessories
Cisco accessory part numbers

Table 107: Scanner handle
Part numberAccessory
CP-840S-HANDLE=Cisco Wireless Phone 840S scanner handle
Table 108: Clips
Part numberAccessory
CP-840-CLIP=Cisco Wireless Phone 840 rotating belt clip holster
CP-840S-CLIP=Cisco Wireless Phone 840S rotating belt clip holster
CP-860-CLIP=Cisco Wireless Phone 860 belt clip
CP-860S-CLIP=Cisco Wireless Phone 860S belt clip
Table 109: Cases
Part numberAccessory
CP-860-CASE=Cisco Wireless Phone 860 case
CP-860S-CASE=Cisco Wireless Phone 860S case
Cisco Wireless Phone 840 and 860 Administration Guide for Cisco Unified Communications Manager
167
Accessories
Cisco accessory part numbers

Cisco Wireless Phone 840 and 860 Administration Guide for Cisco Unified Communications Manager
168
Accessories
Cisco accessory part numbers

CHAPTER 7
Maintenance
• Reboot the phone, on page 169
• Factory default settings, on page 169
• Cisco app software updates, on page 171
Reboot the phone
At times, you may need to manually reboot the phone.
Procedure
Step 1 Press and hold the Power button.
Step 2 Tap Restart .
Factory default settings
If necessary, you can restore the factory default settings of the phone.
If you perform a factory reset, the phone software stays on the latest installed version.
Note
We recommend that you enroll your phones through an Enterprise Mobility Management (EMM) application
so that you are the Device Owner and you can factory reset the phones through the EMM application.
However, if you do not enroll the phones in an EMM application, you can restore a phone to the factory
defaults using the following methods:
• If you're able to boot the phone, use the phone Settings method.
• If you're not able to boot the phone, use the recovery mode method.
Cisco Wireless Phone 840 and 860 Administration Guide for Cisco Unified Communications Manager
169

Reset to factory default through the phone settings
If the phone is not enrolled in an Enterprise Mobility Management (EMM) application, you can restore the
factory default settings of the phone through the Settings on the phone.
If the phone has a Google account or other device ownership, then it has factory wipe protection which prevents
the wipe of certain account details. You must have the Google account information to access the phone after
you restore factory defaults.
Caution
Procedure
Step 1 Access the Settings app.
Step 2 Tap System.
Step 3 Select Advanced > Reset options.
Step 4 Tap Erase all data (factory reset).
Step 5 Tap Erase all data.
Step 6 Tap Erase all data.
Restore to factory default through recovery mode
You can restore the factory default settings of the phone through recovery mode. However, it is best to follow
these steps as a last resort and only if:
• The phone is not enrolled in an Enterprise Mobility Management (EMM) application.
• You can't boot the phone to access the Settings.
• The phone user has not signed in to a unique Google account.
If you use recovery mode to reset the factory defaults of a phone that had been signed in to a unique Google
account, you will need the Google account and password. You must work with the phone user, Google account
owner, and Google to reset the phone.
Caution
Procedure
Step 1 Press and hold the Power button.
Step 2 Tap Power off.
Step 3 Press and hold the red Emergency button and press hold the Power button until the phone vibrates, then
release the Power button. Continue to hold the Emergency button.
Step 4 Once the bootloader screen is displayed, release the red Emergency button.
Cisco Wireless Phone 840 and 860 Administration Guide for Cisco Unified Communications Manager
170
Maintenance
Reset to factory default through the phone settings

Step 5 Press the Volume down button until Recovery mode displays.
Step 6 Press the Power button to select Recovery mode.
The phone restarts and returns to a new screen that displays the Android icon.
Step 7 Press and hold the Power button, then quickly press and release the Volume up button to enter the Recovery
Menu screen.
Step 8 When the Recovery Menu displays, release the Power button.
Step 9 Press the Volume down button to highlight Wipe data/factory reset.
Step 10 Press the Power button to select Wipe data/factory reset.
Step 11 Press the Volume down button to highlight Factory data reset.
Step 12 Press the Power button to select Factory data reset.
Step 13 When Reboot system now is highlighted, press the Power button.
Cisco app software updates
To upgrade the Cisco app software, use one of these methods:
• Install the latest signed software COP file to the Cisco Unified Communications Manager.
After you upload the COP file, the phone prompts the user to reboot and apply
the new software, unless you enabled the Rebootimmediately after downloading
software updates option in the Product Specific Configuration Layout pane.
Note
• Copy the extracted firmware ZIP files contents to the HTTP (port 6970) load server defined in the Product
Specific Configuration Layout pane. Then, update the device default or individual phone load within
Cisco Unified Communications Manager, so that the phone upgrades after it is restarted.
Related Topics
Load the COP files to Cisco Unified Communications Manager, on page 31
Product Specific Configuration Layout fields, on page 52
Cisco Wireless Phone 840 and 860 Administration Guide for Cisco Unified Communications Manager
171
Maintenance
Cisco app software updates

Cisco Wireless Phone 840 and 860 Administration Guide for Cisco Unified Communications Manager
172
Maintenance
Cisco app software updates

CHAPTER 8
Troubleshooting
• General troubleshooting information, on page 173
• Details available on the phone, on page 174
• Problem report log bundles, on page 177
General troubleshooting information
General issues
The following table provides general troubleshooting information.
Table 110: General troubleshooting tips
SolutionProblem
Your phone has a proximity sensor at the top right. When this sensor is
blocked, the phone screen is black. The sensor is normally blocked by
the face when the earpiece is used to listen to a caller.
If you’re not in a call and you see the message: Close proximity detected.
The sensor may be covered with a finger or paper or something else that
blocks light. If there’s no apparent blockage, clean the area of the sensor.
You’re not in a call and the phone
goes black and displays the
message: Close proximity
detected.
The headset connector may be dirty. If available, blow canned air into
the connector to clear debris. Always point canned air orientation at
glancing angles away from your face and eyes and always wear safety
goggles or glasses when performing this procedure.
Do not use air compressors on the connectors, since they apply too much
force.
While using a standard headset,
you experience a scratchy or
intermittent signal.
Third party application interference can be eliminated by factory reset
and reregistration of a problematic phone. For more details about the
factory reset, see Restoring Factory Defaults in the Cisco Wireless Phone
840 and 860 Deployment Guide.
Third Party Application Conflicts
Cisco Wireless Phone 840 and 860 Administration Guide for Cisco Unified Communications Manager
173

Visual voicemail issues
The following table provides general troubleshooting information that is related to issues with Visual Voicemail.
Table 111: Visual voicemail troubleshooting tips
SolutionProblem
Validate that the:
• User enters the same Username as the Alias field
(including case) on the User’s Mailbox in the Cisco
Unity Connection voice messaging system.
• User uses the Web Application password, not the
Voicemail pin.
• Password Settings for the User’s Web Application
Password don't have the User Must Change
Password at Next Sign-In check box selected.
Unauthorized message appears in the Enter Unity
Web Credentials dialog box after the user enters
their credentials and selects the Login option.
Validate that the Cisco Unity Connection server’s
tomcat-trust certificate has been imported into the Cisco
Unified Communications Manager’s trust store and the
Tomcat service has been restarted since the import
occurred.
When the user navigates to the Voicemail tab of
the Cisco Phone app, a brief toast notification
appears, which states Voicemail connection
error. Unable to connect along with an error
message Voicemail Authentication failed!
Unable to connect to voicemail. Please
contact your administrator. Also, you know
that visual voicemail is not working on other
devices at the same site.
Visual voicemail is unable to connect to the Cisco Unity
Connection server. Investigate potential connectivity
issues between the user’s phone and the server.
Voicemail connection error. Unable to
connect. toast notification appears on the screen
when the user navigates to the Voicemail tab of
the Cisco Phone app.
Enable visual voicemail from the Phone Configuration
page in Cisco Unified Communications Manager. This
error appears only if visual voicemail was enabled
previously, and then disabled.
This feature has been disabled by your
administrator appears when the user navigates
to the Voicemail tab of the Cisco Phone app.
Details available on the phone
You can see some status and details about the phone in the Cisco apps.
This information helps you troubleshoot problems when you are in the same location as your user.
View phone information
The About phone setting displays information such as the Device name, Model & hardware, Android
version, Wi-Fi MAC address, Bluetooth address, and Build number.
Cisco Wireless Phone 840 and 860 Administration Guide for Cisco Unified Communications Manager
174
Troubleshooting
Details available on the phone

To access the Settings app from any screen, swipe down on the status bar at the top of the screen and tap the
Settings gear icon.
Note
You can also access the Settings app in the launcher screen. Swipe up to open the launcher.
Note
Procedure
Step 1 Access the Settings app.
Step 2 Tap About phone.
Access phone status and device information
The Cisco phone status and Device information menus provide information about the device and the
connections between the phone and the call control system.
Procedure
Step 1 Access the Cisco Phone app.
Step 2 Choose one of the following based on your phone's software version:
• For release 1.2(0), tap the Overflow menu.
• For release 1.3(0) or later, tap the Drawer menu.
Step 3 Tap Cisco phone status.
Step 4 Tap Device information.
Access the About option for a Cisco app
The About menu option provides information about the app itself, including the version number. You might
need to provide this information to the administrator from time to time.
Procedure
Step 1 Tap the desired app.
Step 2 Choose one of the following based on your phone's software version:
Cisco Wireless Phone 840 and 860 Administration Guide for Cisco Unified Communications Manager
175
Troubleshooting
Access phone status and device information

• For release 1.2(0), tap the Overflow menu.
• For release 1.3(0) or later, tap the Drawer menu.
Step 3 Tap About.
Exit and reenter the Smart Launcher on the phone
When troubleshooting issues on a phone with a Cisco Wireless Phone Configuration Management tool Smart
Launcher, you can exit the Smart Launcher to access settings and apps outside of the Smart Launcher.
Before you begin
Get the updated Local Phone Unlock Password. The default password to exit the Smart Launcher is **#.
Make sure to change this password so you can't exit the Smart Launcher and access more settings or apps.
Procedure
Step 1 To exit the launcher, tap the Overflow menu, then tap Exit Launcher, and enter the Local Phone Unlock
Password.
Step 2 To reenter the launcher, swipe up to access more apps, and tap the Smart Launcher app.
Note: You can also restart the phone to automatically open the Smart Launcher.
Capture a screenshot on the phone
When troubleshooting, it may be helpful to have a screenshot of the phone.
An alternate way to capture a screenshot on the phone is to press the Power and Volume down buttons at the
same time.
Note
Procedure
Step 1 Press and hold the Power button.
Step 2 Tap Screenshot.
A notification briefly pops to the foreground and then appears in the notification drawer.
Step 3 Tap the notification to Share, Edit, or Delete the screenshot.
Unless you delete a screenshot, you can also locate it in the Files app, if available.
Note
Cisco Wireless Phone 840 and 860 Administration Guide for Cisco Unified Communications Manager
176
Troubleshooting
Exit and reenter the Smart Launcher on the phone

Problem report log bundles
If a user experiences a problem with their phone, they may generate a problem report on the phone and send
you the log bundle, or you may need to generate a problem report or retrieve the log bundle yourself.
Generate a problem report and log bundle
You generate a problem report and log bundle in the phone.
It may take several minutes to generate the problem report and log bundle. When you tap Report Problem,
a notification pops to the foreground and then appears in the notification drawer. You know that the report is
complete when the phone vibrates twice and the notification disappears.
For release 1.9(0) or later, when you tap Report Problem, a screen appears and allows you to report a specific
issue type before a notification pops up.
For release 1.9(0) or later, the log bundle that is generated also includes a configuration .zip file which contains
the configuration for each application in .txt file format.
Note
Procedure
Step 1 Access the Cisco Phone app.
Step 2 Choose one of the following based on your phone's software version:
• For release 1.2(0), tap the Overflow menu.
• For release 1.3(0) or later, tap the Drawer menu.
Step 3 Choose one of the following based on your phone's software version:
• For release 1.2(0), select Settings > Phone information > Report problem.
• For release 1.3(0), tap Report problem.
• For release 1.9(0), tap Report problem.
Step 4 For release 1.9(0), perform the following actions:
a) Select one of the following issue types:
• Telephony call (dropper, other)
• Audio quality
• Battery
• Other
b) Enter the user comment. (Optional)
Cisco Wireless Phone 840 and 860 Administration Guide for Cisco Unified Communications Manager
177
Troubleshooting
Problem report log bundles

c) Select the date and time of the issue ocurred.
d) Tap Submit.
Retrieve problem report log bundles
Log bundles include the phone's MAC address, a timestamp, and the string LogBundle in the filename.
Before you begin
Get a detailed description and approximate time of the issue from the phone user.
To retrieve log bundles from the phone, you must first enable Web Access through the Cisco Unified
Communications Manager Vendor Specific Option.
To retrieve log bundles from a problem report upload URL server, you must first define the problem report
upload URL in the phone's Cisco Unified Communications Manager Vendor Specific Configuration Layout
fields.
The problem report upload URL server must support file uploads using php.
Note
Procedure
Choose one of these options:
• Download, or ask the user to download the log bundle from the phone web browser Device Logs tab.
The log bundles appear at the bottom of the page.
Note
• Locate the log bundle on the problem report upload URL server.
To locate the file, it may help to search by MAC address or the string LogBundle.
Note
Cisco Wireless Phone 840 and 860 Administration Guide for Cisco Unified Communications Manager
178
Troubleshooting
Retrieve problem report log bundles

APPENDIX A
Appendix
• InformaCast Advanced Notification Support, on page 179
• CTI-Controlled Support, on page 181
InformaCast Advanced Notification Support
Configure and Troubleshoot Informacast
In general, Cisco Wireless Phone 840 or 860 support multicast audio broadcasts, text notifications, and user
feedback to the InformaCast server using the XSI APIs. InformaCast can be configured to use HTTP or Cisco
Unified Communications Manager JTAPI interfaces to the Cisco Unified Communications Manager.
For more information about Configure and Troubleshoot Informacast, see Configure and Troubleshoot
Informacast
Unsupported InformaCast Features
Cisco Wireless Phone 840 or 860 currentlly doesnot support Push to Talk and Quick Page services. Phones
subscribed to these services will have no way to activate the service on the device. Cisco Wireless Phone 840
or 860 also does not support One Button Paging, where the QuickPage service is assigned to a Service URL
button in the device’s Phone Button Template. As the phone does not allow configuration of buttons in the
Cisco Unified Communications Manager.
Partially Supported InformaCast Features
Call Aware
Call Aware is primarily used to detect when a 911 emergency call has been dialed, which then triggers an
InformaCast broadcast. It can also be used to detect calls to numbers other than 911, monitor calls that have
been detected, and record those calls. For example, you could use it to trigger an InformaCast broadcast
whenever someone calls the Front Desk, and a supervisor could elect to monitor those calls for quality assurance
or record them for review later. Cisco Wireless Phone 840 or 860 does not support monitoring and recording
of calls.
Text and Audio Messages using Talk and Listen
InformaCast messages that contain both text and audio can be configured with the option to “Start a phone
call with any phones in a recipient group and allow everyone to speak in real time (Talk and Listen)”. When
Cisco Wireless Phone 840 and 860 Administration Guide for Cisco Unified Communications Manager
179

Cisco Wireless Phone 840 or 860 receives one of these messages, the “talk” and “exit” softkeys are not
displayed, so the Cisco Wireless Phone 840 or 860 can only listen to other phones that are transmitting audio.
Notes on InformaCast Features
Panic Button
Cisco Wireless Phone 840 or 860 have a red button which by default is configured to be the Emergency button
on the device. This function can also be mapped to other device buttons using the Buttons application. Using
the Emergency app, you can configure the phone to trigger an alarm or make an emergency call through the
CiscoPhone app when the user does either a long press, 2 short presses, or 2 short or one long press of the
configured Emergency button. By default, no actions are taken.
InformaCast’s panic button service can be used with or without the configuration of the Emergency app. In
the step where the Cisco IP Phone Service is configured on the Cisco Unified Communications Manager
(Create an InformaCast XML Service (singlewire.com)), the Cisco IP Phone Service created must be named
InformaCast (this is not case-sensitive), otherwise the device will not recognize it as a service configured
for the Panic button feature, and there will be no way for the user to activate it.
If the Emergency App is enabled, it continues to do what it currently does when the panic button is pressed.
If both InformaCast and the Emergency App are being used, the Emergency app should be configured to
trigger the alarm after one long press of the button, because if 2 presses are configured, the InformaCast service
will be triggered twice. The Red circular on-screen panic button press in the Emergency app will not trigger
the InformaCast panic button service.
Other Notes
If the phone is not in an active call, the Cisco Wireless Phone 840 or 860 displays a notification to the user
when it receives a broadcast message from InformaCast.
The user can choose to view or ignore the message and stop the multicast audio stream by touching the
corresponding button on the notification. If a broadcast contains audio only, this behavior differs from the
8821, which has no way of disabling the audio stream. If the phone is in a call, the multicast audio stream
will not be played unless the user elects to play it by clicking on the button in the notification, which will
place the existing call on hold.
If the phone is locked, the broadcast message is automatically displayed, and audio is played (if not in a call)
without any user interaction. The user still has the ability to stop the audio through the stop button on the
displayed message. If the user is in a call while the phone is locked, then ANSWER button in the notification
must be clicked to hear the broadcast.
Phone vibration settings set on the InformaCast Broadcast Parameters page are ignored by Cisco Wireless
Phone 840 or 860.
Cisco Wireless Phone 840 or 860 behaves as shown in the following table when multiple broadcasts are sent
by InformaCast, depending on the configuration of the Enable Message Blending check box on the InformaCast
Broadcast Parameters page:
Blending DisabledBlending EnabledPriority and Arrival Order
Switches from playing broadcast A
to playing broadcast B; once B is
Switches from playing broadcast A
to playing broadcast B; once B is
Lower priority broadcast (A)
followed by higher priority
broadcast (B). over, switches back to playing the
rest of A.
over, switches back to playing the
rest of A.
Cisco Wireless Phone 840 and 860 Administration Guide for Cisco Unified Communications Manager
180
Appendix
Appendix

Blending DisabledBlending EnabledPriority and Arrival Order
Plays broadcast A in full, then
switches to playing the rest of B.
Plays A in full, ignores broadcast
B.
Broadcast (A) followed by
broadcast (B) with the same
priority.
Plays broadcast A in full, then
switches to playing the rest of
broadcast B.
Plays broadcast A in full, then
switches to playing the rest of
broadcast B.
Higher priority broadcast (A)
followed by lower priority
broadcast (B).
CTI-Controlled Support
Need
InformaCast can use either HTTP or Cisco Unified Communications Manager JTAPI.
Using Cisco Unified Communications Manager JTAPI requires Cisco Unified Communications Manager to
say the device supports computer telephony integration (CTI).
The one key feature that is used by InformaCast is XSI object pass thru – see page 276 of the Cisco Unified
Communications Manager JTAPI developers guide:
XSI Object Pass Through Applications can pass XML objects through Cisco Unified Communications
Manager JTAPI and CTI interfaces to the phone. The XML object can contain display updates, softkey
update/enable/disable, and other types of updates on the phone that are available through Cisco IP Phone
Services features. This allows applications to access Cisco IP Phone Service capabilities through Cisco Unified
Communications Manager JTAPI and CTI interfaces without maintaining independent connections to the
phones.
Authentication and Mechanism Sending an HTTP POST request to the phone web server, which requires
the phone IP address, performs an object push. The web server parses the request, authorizes the request
through the HTTP that is returned to the Cisco Unified Communications Manager, runs the request, and returns
an XML response that indicates the success or failure of the request to the application. With XSI, the Cisco
IP Phone Services object gets sent directly to the phone by the Skinny Client Control Protocol (SCCP). The
phone does not authenticate the request, because the Cisco Unified Communications Manager JTAPI client
is trusted and does not require the phone IP address. For more information on actual XML contents, see the
Cisco IP Phone Services Application Development Notes.
Discussion
Cisco Wireless Phone 840 or 860 offers limited CTI support and customers can enable and test functionality
with Third-party Software that exercises the CTI, but their results maybe limited based on what exact
functionality is exercised by the Third-party Software.
SIP Signaling and CTI
The line messaging guide details the kinds of remotecc REFERs we can get from CTI.
The following requests are supported from Cisco Unified Communications Manager to the phone. Details are
in the CMCM 8.0 Line Messaging guide (see table on page 78) and CUCM 12 version of the guide on page
125.
Cisco Wireless Phone 840 and 860 Administration Guide for Cisco Unified Communications Manager
181
Appendix
CTI-Controlled Support

Currently supported in CiscoPhone
app
PurposeRemote cc request
NoTriggers endpoint to send an
INVITE to Cisco Unified CM. An
offhook NOTIFY may precede this
INVITE
initiatecallreq
NoUsed to resume a held dialog.holdretrievereq
YesUsed to send shared line privacy
setting to the endpoint
privacyreq
Yes (although we do not display
the message passed in this by the
CUCM – we use our own logic).
Looks like this was put in when we
did CUCM conferencing and is
used for call pickup Our code is
feature state specific and this could
come with no context.
Used to display a status message
on a phone UI
statuslineupdatereq
Yes – for call pickup. Initially we
also would get this with CUCM
conferencing, but we changed the
implementation method. Our code
is feature state specific and this
could come with no context.
Used to play a tone at the device.playtonereq
Yes, this is how devices learn
whether CFA is active when they
first register.
Used to send call forward all
settings to the endpoint for a
particular line
cfwdallupdate
Yes (new in 1.10 for supporting
XSI over JTAPI)
Cisco Unified CM uses Data
PassThrough Request to pass
subelements to features and CTI
applications
datapassthroughreq
NoThe Cisco Unified CM hold
reversion feature uses this request
to trigger the endpoint to invoke
hold reversion on the specified call
holdreversionreq
No – but will if we implement
silent monitoring
CTI applications use this to request
that a phone begin monitoring a call
on another phone.
monitorcallreq
NoCTI applications use this to request
that a phone simulate the user
pressing the DND softkey. This
toggles the phone DND state from
enabled to disabled or from
disabled to endabled
dndrequest
Cisco Wireless Phone 840 and 860 Administration Guide for Cisco Unified Communications Manager
182
Appendix
Appendix

Currently supported in CiscoPhone
app
PurposeRemote cc request
NoCisco Unified CM uses this request
to convey DND status and DND
option settings when either setting
is modified by using the Cisco
Unified CM web administrative
interface
dndupdate
NoCTI uses this to request the phone
to update the Intercom speeddial
setting.
Linekeyupdate
NoCTI applications use this request to
initiate Intercom talkback for
establishing two-way media.
talkbackreq
No. This is only in the 12.5
document
Requests phone to dial the DTMF
digit
dialdtmfreq
Even if we do not support a particular request, we should still send an appropriate SIP response and a terminating
NOTIFY, if necessary.
Part of supporting CTI is also that the phone informs CUCM of various events via remotecc REFER messages.
See the table on page 120 of the 12.5 version of the document:
Currently supported in
CiscoPhone app
DescriptionFeatureRemotecc request
Yes, for CUCM
conferencing
Create a conferenceconferencesoftkeyeventmsg
Yes – note we use
parkmonitor, not park.
Parkmonitor is not listed
in the document.
Park a callparksoftkeyeventmsg
No. We use the NOTIFY
sent from CUCM. We
don’t support the phone
pressing the softkey to get
it.
List participants in a
conference
conflistsoftkeyeventmsg
NoRemove last participant
added to a conference
rmlastconfsoftkeyeventmsg
YesActivate immediate
diversion feature
idivertsoftkeyeventmsg
Cisco Wireless Phone 840 and 860 Administration Guide for Cisco Unified Communications Manager
183
Appendix
Appendix

Currently supported in
CiscoPhone app
DescriptionFeatureRemotecc request
NoThe CallBack feature
allows you to receive
notification when a busy
extension is available to
receive calls. You can
activate Call Back for a
destination phone that is
within the same Unified
Communications Manager
cluster as your phone or
on a remote Private
Integrated Network
Exchange (PINX) over
QSIG trunks or
QSIG-enabled intercluster
trunks.
callbacksoftkeyeventmsg
NoQuality Reporting ToolQrtSoftkeyeventmsg
YesAllows a call to be locked
such that remote devices
can’t remotely resume a
held call.
SelectSoftkeyeventmsg
YesOpposite of SelectUnselectSoftkeyeventmsg
YesToggle privacy status for
all lines on the phone
PrivacySoftkeyeventmsg
NoThis is how the phone
sends line key presses to
the CUCM for features
that don’t have an
associated standard SIP
primitive in this release.
Document mentions
privacy, but we support
that through softkey press.
Linekeyeventmsg
NoSend XSI XML key
presses to CUCM features
and CTI applications
Datapassthrureq
For more information, see
jtapi - Cisco Developer
Cisco Unified JTAPI Developers Guide for Cisco Unified Communications Manager, Release 14 and SUs
(upload-large-file.s3.us-east-2.amazonaws.com)
Cisco Wireless Phone 840 and 860 Administration Guide for Cisco Unified Communications Manager
184
Appendix
Appendix
