

Teach Yourself e.net solutions
First Edition
SYSPRO (Pty) Ltd.

Published 2007-02-12 19:20:14
This document is a copyright work and is protected by local copyright, civil and criminal
law and international treaty. The information provided is disclosed solely for the purpose
of it being used in the context of the licensed use of Syspro Ltd. computer software
products it relates to. Such copyright works and information may not be published,
disseminated, broadcast, copied or used for any other purpose. This document and all
portions thereof included, but without limitation, copyright, trade secret and other
intellectual property rights subsisting therein and relating thereto, are and shall at all times
remain the sole property of Syspro Ltd.
No part of this book may be copied, photocopied, or reproduced in any form or by any
means without permission in writing from Syspro Ltd.
SYSPRO™ is a trademark of Syspro Ltd.
All other trademarks, service marks, products or services are trademarks or registered
trademarks of their respective holders.
SYSPRO™ is produced under license by Syspro Ltd..
Syspro Ltd. reserves the right to alter the contents of this book without prior notice. While
every effort is made to ensure that the contents of this book are correct, no liability
whatsoever will be accepted for any errors or omissions. This book and all materials
supplied to the student are designed to familiarize the customer, reseller or student with
the subject.
This book is written to SYSPRO Version 6.0 Issue 010. For use with Microsoft™
Windows™.


Contents
Introduction ........................................................................................ 1–1
1.1. Audience ............................................................................... 1–1
1.2. Objectives .............................................................................. 1–2
1.3. Requirements ......................................................................... 1–2
Defining e.net solutions ........................................................................ 2–1
2.1. Business Objects ..................................................................... 2–2
2.2. COM Object ........................................................................... 2–4
2.3. Web Services ......................................................................... 2–6
2.4. XML Schemas ........................................................................ 2–7
2.5. SYSPRO Web Based Applications .............................................. 2–8
2.6. .NET and e.net solutions ........................................................... 2–9
2.6.1. What is .NET? .............................................................. 2–9
2.6.2. SYSPRO ERP integrated with .NET ................................ 2–12
2.7. Service Oriented Architecture (SOA) ......................................... 2–13
2.8. Net Express and other Programming Tool environments ................ 2–14
Getting Started with e.net solutions ....................................................... 3–1
3.1. The Structure of Program .......................................................... 3–1
3.1.1. The Basic Model ........................................................... 3–1
3.1.2. The Abstraction Model ................................................... 3–4
3.2. Your First e.net solutions program ............................................... 3–7
Programming Tools ............................................................................. 4–1
4.1. SYSPRO Software Development Kit (SDK) ................................... 4–1
4.2. e.net Diagnostics Suite ............................................................. 4–1
4.2.1. Install Procedure ........................................................... 4–2
4.2.2. Menus and Buttons ..................................................... 4–11
4.2.3. Status Bar ................................................................. 4–16
4.2.4. Other Menu Items ....................................................... 4–17
4.3. Using the e.net Diagnostics suite's Harness ................................ 4–20

4.3.1. Customizing XmlIn ...................................................... 4–25
4.3.2. Wrapping XmlIn .......................................................... 4–25
The Class Library Reference ................................................................. 5–1
5.1. Utilities Class .......................................................................... 5–4
5.1.1. Utilities.Logon .............................................................. 5–4
5.1.2. Utilities.Logoff .............................................................. 5–6
5.1.3. Utilities.GetLogonProfile ................................................. 5–7
5.1.4. Utilities.Run ................................................................. 5–8
5.2. Query Class ......................................................................... 5–10
5.2.1. Query.Query .............................................................. 5–10
5.2.2. Query.Browse ............................................................ 5–14
5.2.3. Query.Fetch ............................................................... 5–17
5.2.4. Query.NextKey ........................................................... 5–20
5.2.5. Query.PreviousKey ..................................................... 5–23
5.3. Setup Class .......................................................................... 5–26
5.3.1. Setup.Add ................................................................. 5–26
5.3.2. Setup.Update ............................................................. 5–32
5.3.3. Setup.Delete .............................................................. 5–35
5.4. Transaction Class .................................................................. 5–37
5.4.1. Transaction.Post ......................................................... 5–37
5.4.2. Transaction.Build ........................................................ 5–41
More Advanced Options ....................................................................... 6–1
6.1. Transforming XML ................................................................... 6–1
6.1.1. What is XSLT ............................................................... 6–1
6.1.2. The Process of Transforming ........................................... 6–3
6.1.3. Transforming XML to HTML with XSLT .............................. 6–5
6.1.4. The XSLT Language ...................................................... 6–8
6.2. Advanced ASP.NET Notes ...................................................... 6–12
6.2.1. Codebehind ............................................................... 6–12
6.2.2. Codebehind in an Non Visual Studio .NET environment ...... 6–13
6.2.3. Pre-Compilling the Codebehind ...................................... 6–13
6.2.4. Planning .................................................................... 6–14
6.2.5. Coding ...................................................................... 6–16
6.2.6. Testing ..................................................................... 6–16
Processes ........................................................................................... 7–1
7.1. Sales Order Processing ............................................................ 7–1
7.2. Sales Order Processing - Billing ................................................. 7–4
7.3. Sales Order Processing - With Back Orders .................................. 7–4
Licensing ............................................................................................ 8–1
8.1. Introduction to SYSPRO Licensing .............................................. 8–1
vi

8.1.1. Licensing Model ............................................................ 8–1
8.1.2. License to Named users or Specific Operator Codes ............ 8–2
8.1.3. Concurrency Issues ....................................................... 8–5
8.1.4. Installing and Configuring License.xml ............................... 8–7
8.1.5. Evaluation Licensing .................................................... 8–15
8.2. Installing and Apportioning ...................................................... 8–15
Troubleshooting .................................................................................. 9–1
9.1. Error Handling ........................................................................ 9–1
9.2. General Troubleshooting ........................................................... 9–5
Sample Applications .......................................................................... 10–1
10.1. Simple ASP.NET logon ......................................................... 10–1
10.2. Submitting XmlIn and getting XmlOut ....................................... 10–3
10.3. Using the Data in XmlOut ...................................................... 10–7
10.3.1. Simple Xml Data Usage .............................................. 10–7
10.3.2. Using XSL to Transform XML Data ..............................10–15
10.4. Building the Basic Blocks of an Application ...............................10–19
10.4.1. Setting up the environment .........................................10–19
10.4.2. Creating Method Functions .........................................10–20
10.4.3. Calling the Method Functions ......................................10–40
10.5. Sample Business Logic Subroutines ....................................... 10–48
10.5.1. Prerequisite XSL Formating ........................................10–48
10.5.2. Price Query Subroutine .............................................10–49
10.5.3. Sales Order Query Subroutine ....................................10–52
10.5.4. Putting it all together .................................................10–54
Building from Here ............................................................................. 11–1
11.1. e.net solutions Classes and Methods ....................................... 11–1
11.2. Dealing in XML .................................................................... 11–1
11.3. Building Your Application ....................................................... 11–2
Installing the SYSPRO Web Services .....................................................A–1
A.1. Prerequisites ..........................................................................A–1
A.2. Installation .............................................................................A–1
Installing the SYSPRO Web Based Applications ......................................B–1
B.1. Requirements .........................................................................B–1
B.2. The Installation Procedure ........................................................B–1
B.2.1. Installation ...................................................................B–1
B.2.2. Installing e.net Solutions DCOM Remote Client ...................B–3
Teach Yourself e.net solutions
vii

Installing and Apportioning Licenses .....................................................C–1
C.1. Instructions to install License.xml ...............................................C–1
C.2. Importing the License.xml file ....................................................C–1
C.3. Updating an existing SYSPRO company License ...........................C–1
C.4. Adding a new SYSPRO company ...............................................C–2
C.5. Importing and apportioning an e.net License .................................C–2
viii
List of Figures
2.1. e.net solutions Framework Architecture ................................................ 2–2
2.2. The COM Object ............................................................................. 2–5
2.3. .NET Framework ........................................................................... 2–12
3.1. Basic Program Structure ................................................................... 3–3
3.2. Abstracting e.net solutions framework .................................................. 3–6
5.1. The COM Object ............................................................................. 5–1
6.1. The XSLT transformation process. ...................................................... 6–3
7.1. SORRSH UML Sequence ................................................................. 7–2
7.2. SORRSL UML Sequence .................................................................. 7–2
7.3. SORTOI UML Sequence ................................................................... 7–3
7.4. SORQOD UML Sequence ................................................................. 7–3
9.1. e.net solutions Log Text .................................................................... 9–6

x
List of Tables
6.1. XSLT Elements ............................................................................. 6–10
9.1. Language Code Examples ................................................................ 9–3
9.2. Error Handling Message Files ............................................................ 9–4
9.3. e.net solutions Trace File .................................................................. 9–7

xii
List of Examples
5.1. ASP.NET Visual Basic codebehind for Utilities.Logon ............................. 5–5
5.2. ASP 3.0 Code Sample for Utilities.Logon .............................................. 5–5
5.3. ASP.NET C# codebehind for Utilities.Logon .......................................... 5–6
5.4. ASP.NET Visual Basic codebehind for Utilities.Logoff ............................. 5–7
5.5. ASP.NET Visual Basic codebehind for Utilities.GetLogonProfile ................ 5–7
5.6. ASP.NET C# codebehind for Utilities.GetLogonProfile ............................. 5–8
5.7. ASP.NET Visual Basic codebehind for Utilities.Run ................................ 5–9
5.8. ASP.NET Visual Basic codebehind for Query.Query ............................. 5–12
5.9. ASP.NET C# Sample Code for Query.Query ....................................... 5–13
5.10. XmlIn with Query.Browse (COMBRW.XML) .......................................... 5–14
5.11. ASP.NET Visual Basic codebehind for Query.Browse .......................... 5–16
5.12. XmlIn with Query.Fetch (COMFCH.XML) ............................................ 5–18
5.13. ASP.NET Visual Basic codebehind for Query.Fetch ............................ 5–19
5.14. XmlIn with Query.NextKey (COMKEY.XML) ........................................ 5–20
5.15. ASP.NET Visual Basic codebehind for Query.NextKey ........................ 5–22
5.16. XmlIn with Query.PreviousKey (COMKEY.XML) ................................... 5–23
5.17. ASP.NET Visual Basic codebehind for Query.PreviousKey ................... 5–25
5.18. ASP.NET Visual Basic codebehind of Setup.Add ................................ 5–28
5.19. ASP.NET C# codebehind for Setup.Add ........................................... 5–30
5.20. ASP.NET Visual Basic codebehind for Setup.Update .......................... 5–33
5.21. ASP.NET Visual Basic codebehind for Setup.Delete ........................... 5–36
5.22. ASP.NET Visual Basic codebehind for Transaction.Post ...................... 5–38
5.23. ASP.NET C# Sample Code for Transaction.Post ................................ 5–39
5.24. ASP.NET Visual Basic codebehind of Transaction.Build ...................... 5–42
6.1. Simple XML .................................................................................... 6–2
6.2. Transformed Simple XML .................................................................. 6–2
6.3. Chapter.xml .................................................................................... 6–5
6.4. Chapter.xsl ..................................................................................... 6–6
6.5. ASP.NET C# using the XslTransform Class .......................................... 6–7
6.6. XSL Simple Stylsheet File ................................................................. 6–9
6.7. Simple Codebehind Page ................................................................ 6–15
9.1. Error: Unexpected Parameter Sent ...................................................... 9–1
9.2. Message Number ............................................................................ 9–3
10.1. Code Sample for logon.aspx in VB.NET ........................................... 10–1
10.2. ASP.NET code for using COMFND.aspx .......................................... 10–4
10.3. ASP.NET code for ARSQRY.aspx ................................................... 10–7
10.4. SORRSH.aspx ...........................................................................10–11
10.5. SORRSH.xsl ..............................................................................10–15
10.6. Import .NET Namespaces in ASP.NET VB .......................................10–19
10.7. Import .NET Namespaces in ASP.NET C# codebehind .......................10–19
10.8. Query.Query Method in ASP.NET VB codebehind ............................. 10–20
10.9. Query.Query Method in ASP.NET C# codebehind .............................10–21
10.10. Transaction.Build Method in ASP.NET VB codebehind .....................10–22
10.11. Transaction.Build Method in ASP.NET C# codebehind ......................10–23
10.12. Transaction.Post Method in ASP.NET VB codebehind ...................... 10–24
10.13. Transaction.Post Method in ASP.NET C# codebehind ......................10–25

10.14. Setup.Add Method in ASP.NET VB codebehind ...............................10–26
10.15. Setup.Add Method in ASP.NET C# codebehind ...............................10–27
10.16. Setup.Update Method in ASP.NET VB codebehind ..........................10–28
10.17. Setup.Update Method in ASP.NET C# codebehind ..........................10–29
10.18. Setup.Delete Method in ASP.NET VB codebehind ...........................10–30
10.19. Setup.Delete Method in ASP.NET C# codebehind ...........................10–31
10.20. Query.Fetch Method in ASP.NET VB codebehind ............................ 10–32
10.21. Query.Fetch Method in ASP.NET C# codebehind ............................10–33
10.22. Query.Browse Method in ASP.NET VB codebehind ..........................10–34
10.23. Query.Browse Method in ASP.NET C# codebehind ..........................10–35
10.24. Query.NextKey Method in ASP.NET VB codebehind ........................10–36
10.25. Query.NextKey Method in ASP.NET C# codebehind ........................10–37
10.26. Query.PreviousKey Method in ASP.NET VB codebehind ...................10–38
10.27. Query.PreviousKey Method in ASP.NET C# codebehind ...................10–39
10.28. Creating the Transform Function in ASP.NET VB codebehind ............10–41
10.29. Creating the Transform Function in ASP.NET C# codebehind ............10–42
10.30. Calling the Query Method in ASP.NET VB codebehind .....................10–43
10.31. Calling the Query Method in ASP.NET C# codebehind ......................10–44
10.32. Calling the Build Method in ASP.NET VB codebehind .......................10–46
10.33. Calling the Build Method in ASP.NET C# codebehind ....................... 10–47
10.34. Price Query Code in ASP.NET VB codebehind ................................10–49
10.35. Price Query Code in ASP.NET C# codebehind ................................10–50
10.36. ASP.NET .aspx Form Sample ......................................................10–51
10.37. Sales Order Query Code in ASP.NET VB codebehind ......................10–52
10.38. Sales Order Query Code in ASP.NET C# codebehind .......................10–53
10.39. ASP.NET .aspx Form Sample ......................................................10–54
xiv

1
Introduction
This book is written to introduce you to the concepts involved when programming with
SYSPRO e.net solutions. It will help you learn and utilize the power of SYSPRO's e.net
solutions in building your own custom applications and integrating SYSPRO with other
applications. This book cannot tell you everything about SYSPRO e.net solutions, nor can
it provide you with all the tools that you will need to successfully program your own
application with SYSPRO e.net solutions. It can only teach you about what SYSPRO e.net
solutions is and how to apply the functionality of the system to your applications. In a
sense, this book will provide you with the basic tool box and parts that you will be able to
use to assemble a powerful, integrated, SYSPRO e.net solutions enabled application. It
remains up to you to do the assembly, and to learn to use the tools.
There are many reasons for learning the concepts and programming logic of SYSPRO's
e.net solutions. All the various reasons given, however, will typically relate to one of the
following basic reasons:
• The ability to create your own custom application
• The ability to extend the SYSPRO core system to a Web based system
• The ability to add custom content and processes to the SYSPRO system
• The ability to integrate the core SYSPRO system with another system
Whatever your reasons for learning and using the methods and functions of programming
with e.net solutions, this book will help you realize your own potential and the potential of
your company or enterprise as you create new applications, extend specific functionality,
and integrate your SYSPRO system with other applications and services.
1.1. Audience
This book is written for system programmers. We assume that you already know the basic
structures of programming in Visual Basic or C#, and are familiar with ASP.NET. You do
not need to be an expert in these languages to understand the logic and examples presented
in this book, you only need to be familiar enough with them so that you can see the
processes involved (most programmers are able to look at any object oriented
programming language and follow the process, even if the syntax is different). As you will
find out later in this book, e.net solutions based applications can be programmed using any
COM or Web Service enabled language, so you are not limited to the language examples
given in this book. We have used these languages as they have been the most commonly
used to date.

This book also assumes that you know and understand the basics of the SYSPRO system.
What SYSPRO is, an ERP core application that is extended using COM and .NET to
provide SOA capabilities. What a SYSPRO system does, Accounts Receivable, Bill of
Material, etc., and how to connect to a SYSPRO application server (basic networking
knowledge). If you do not have access to a SYSPRO application server then you will not
be able to utilize the information provided in this book.
1.2. Objectives
The main objective of this book is to provide an overview of the classes and methods of
the SYSPRO e.net solutions environment so that the reader is able to create a custom
application or integrate a SYSPRO process within their current system. Each chapter is
written with a specific objective in mind, so that by the end of the book the reader has
been exposed to the concepts of e.net solutions, has been shown specific examples of the
classes and methods of e.net solutions, and has seen a sample application created using
these examples as a foundation.
By the time that you have finished working through this book you will understand the
interaction of the e.net solutions package with the core SYSPRO product. You will also be
able to create, modify, and troubleshoot e.net solutions programs yourself. This book will
provide the foundation knowledge for building an integrated and extended ERP system.
1.3. Requirements
Programming and deploying enterprise level applications through e.net solutions requires
the following:
• Previous programming experience in Visual Basic (VB) or C#, and familiarity with
ASP.NET
• SYSPRO 6.0 server with e.net solutions installed (this book was written using Issue
010) and running on Windows Server 2000/2003
(For ASP.NET applications this book assumes the use of IIS 4.0 or higher as the
installed web server.)
• The .NET 1.1 Framework (This is not needed for VBScript but is recommended for
using this book as we deal with both VBScript, COM, and .NET programming
examples)
• Microsoft Internet Explorer 6.0 or higher
• Microsoft XML 3.0 or higher
• SYSPRO e.net solutions DCOM Remote Client (only required when the Web Server is
located on a host other than the SYSPRO application server, or the application resides
on a machine that is not the SYSPRO application server).
• SYSPRO Web Applications
1–2

It is highly recommended that you request a SYSPRO 6.0 Issue 010 Evaluation Version
from your local SYSPRO VAR and install it on a test server. On this test server also install
the supplied Sample Data and the SYSPRO Web Applications. We will be using the
Sample Data within the code examples of this book. It is also highly recommended that
you install the e.net Diagnostics suite (see Section 4.2, “e.net Diagnostics Suite” [4–1]).
If you do not have .NET programming experience please take time to read
Chapter 2, Defining e.net solutions [2–1] so that you understand the
relationship between e.net solutions, COM, and Microsoft's .NET
Framework. After reading the chapter, do an introductory ASP.NET course,
either online, at a training institution, or from a 'Teach Yourself .NET' type
of book. This book will teach you how to use e.net solutions with the .NET
Framework, and as such the programming knowledge of .NET is assumed to
be known.
Introduction
1–3

1–4

2
Defining e.net solutions
Objectives - The objective of this chapter is to expose you to the concepts behind
SYSPRO e.net solutions. At the end of this chapter you will know about SYSPRO
business objects, the Component Object Model (COM), SYSPRO Web Services, XML
Schemas, SYSPRO Web Based Applications, and the relationship between e.net solutions
and Microsoft's .NET Framework.
Before learning how to program with e.net solutions it is essential to understand what e.net
solutions is. Simply defined, e.net solutions provides a Component Object Model (COM)
interface that allows VB, C++, C#, Java, JBOS, ASP 3.0 and ASP.NET developers to
access SYSPRO functionality via an object model. For this reason, any COM or Web
Services enabled language or application can use the e.net solutions object model (for
simplicity we focus on VBScript, ASP.NET C# and VB examples in this book).
Component-based concepts and principles permeate throughout the entire design of the
SYSPRO system, particularly the e.net solutions functionality that is part of the core
system.
At the high-level, the SYSPRO e.net solutions framework is comprised of four
components:
• Business Objects - proprietary SYSPRO technology, a business object is an executable
piece of code that implements an area of business logic or functionality that is inherent
to the SYSPRO ERP.
• A COM Object - A Component Object Model (COM) object is basically a black box
that can be used by applications to perform one or more tasks. COM objects are
commonly implemented as a dynamic-link library (DLL). Like a conventional DLL,
COM objects expose methods that an application can call to perform any of the
supported tasks.
• Web Services - Preconfigured web based services that extend the full functionality of
the SYSPRO system to an Internet type environment.
• XML Schemas - An XML Schema is an XML file that uses the XML Schema
Definition (XSD), a language, to describe the structure of an XML document.
As shown in Figure 2.1, “e.net solutions Framework Architecture” [2–2], the COM and
business object components are implemented as separate interfaces. The fourth
component, XML Schemas, are used by developers to validate XML instances passed
between the e.net solutions applications and the business objects. We will discuss this a
little later in more detail. Combined, these components provide:

• A component architecture that simplifies integration development around the SYSPRO
environment.
• A standard way of directly accessing the business functionality within SYSPRO without
compromising the business rules or security of the system.
Figure 2.1. e.net solutions Framework Architecture
2.1. Business Objects
Proprietary SYSPRO technology, a business object is an executable piece of code that
implements an area of business logic or functionality that is inherent to the SYSPRO ERP.
A default part of the SYSPRO installation, business objects abstract the business logic or
functionality of multiple SYSPRO programs into a single executable piece of code that
serves as a simplified interface to the core system.
2–2

At time of writing there were 177 business objects as compared to 1200 programs. These
business objects implement approximately 45% of the business logic and functionality
inherent within the 31 SYSPRO modules. The SYSPRO modules are briefly listed below.
We have purposely not listed the business objects associated with each module. The
reason for this is that knowing their names is, at this introductory stage, of little
importance or value. It is sufficient to understand that they exist, and that the business
objects are organized by these modules.
• System Manager
• Accounts Payable
• Accounts Receivable
• Cash Book
• General Ledger
• Assets Register
• Inventory
• Purchase Orders
• Sales Analysis
• Sales Orders
• Bill of Materials
• Quotations
• Requirements Planning
• Lot Traceability
• Report Writer / SYSPRO Reporting Services
• Work in Progress
• Office Automation
• Interface/EDI
• Screen Customization
• Electronic Funds Transfer
• Project & Contracts
• Activity Based Costing
• Landed Cost Tracking
• Counter Sales
• Blanket Sales Orders and Releases
• Return Merchandise System
Defining e.net solutions
2–3

• Product Configurator
• Factory Documentation
• Engineering Change Control
• Inventory Optimization (Forecasting)
• SYSPRO Analytics
SYSPRO will also be releasing these two modules in the near future:
• Contact Management
• Trade promotions
In order to invoke the functionality of a business object with an e.net
solutions based application or one of the e.net solutions web-based
applications shipped with SYSPRO, the business object module must be
licensed. The only exception to this is the e.net solutions Document Flow
Manager (DFM) which by default is able to invoke the functionality of any
business object regardless of licensing constraints.
Business objects are called and passed information using a text-based format called XML.
When a business object accepts this XML it is known as “consuming” it. The business
objects also return information in XML format. The deviation from this is when the
supplied XML contains incorrect information, in which case the business object may
"throw an exception".
To ensure data integrity, each business object is designed to check that the XML instance
passed is in a form and structure that is acceptable for processing. If the XML is
acceptable, processing continues and the result is returned to the e.net solutions application
as a new XML instance, otherwise an exception is raised.
An exception is a program execution error which in context of the e.net solutions
framework is trapped by the COM service provided by the operating system. An exception
typically results in the abrupt termination of a program. To help developers avoid
exceptions an XML Schema is provided for each business object. The XML Schemas
enable developers to validate the XML strings constructed by their e.net solutions
applications.
2.2. COM Object
As we have mentioned before, a Component Object Model (COM) object is basically a
black box that can be used by applications to perform one or more tasks, commonly
implemented as a dynamic-link library (DLL). Like a conventional DLL, COM objects
expose methods that an application can call to perform any of the supported tasks.
2–4

In SYSPRO e.net solutions the COM object is implemented as a Dynamic Linked Library
(DLL) called ENCORE.DLL. In case you're wondering where this name came from, it is a
legacy carry-over from the days when the SYSPRO product was called Encore. As to the
reasons why the filename was not changed when the product was re-branded, they will
soon become apparent.
When SYSPRO e.net solutions is installed on a SYSPRO application server,
ENCORE.DLL is installed to the SYSPRO base folder and registered to expose a number
of interfaces as Public Objects. Each of these objects is essentially a class that categorizes
methods according to the class function.
As shown in Figure 2.2, “The COM Object” [2–5], the COM interface is extremely
simple and compact. The classes and methods provided are also designed to be as abstract
or generic as possible. The implication of this is that the COM Object will rarely, if ever,
need to be modified. For developers, this means that the integrity of the interface on which
their e.net solutions applications are built is more or less guaranteed to remain unchanged,
regardless of the version number of the underlying SYSPRO application.
If you are still wondering why ENCORE.DLL has not been renamed, consider what would
happen to e.net solutions web-based applications if the Encore COM object was renamed
to SYSPRO.DLL. The COM object interface would be broken and e.net solutions would
not be serviceable. This backward compatibility is essential for the smooth transition of
upgrades and updates.
Figure 2.2. The COM Object
Defining e.net solutions
2–5

Each class is a purposeful interface with methods that can be used to perform operations,
as follows:
• Utilities , this class provides methods for authentication, profile retrieval and
running of Net Express programs, including:
• Logon
• Logoff
• GetLoginProfile
• Run
• Query , this class provides methods to query data in a generic way, including:
• Browse
• Fetch
• Query
• NextKey
• PreviousKey
• Setup , this class provides methods that can be used to modify information contained
in the database, the SYSPRO data structures.
• Add
• Update
• Delete
• Transaction , this class provides methods that can be used to build and post
transactions, including:
• Build
• Post
At run-time, e.net solutions creates copies or new instances of these objects. Once this is
done, information can be dynamically passed using an XML string that is defined by the
method called. This information is passed to the business object interface where further
processing takes place.
2.3. Web Services
Web Services extend all the core functions of the SYSPRO system to a Web interface. The
Web Services enable the core SYSPRO ERP system to support direct interactions with
other software applications using XML-based messages. These messages are typically
exchanged via Internet based protocols (such as HTTP , FTP, and SMTP). In other words
the Web Services deliver the core SYSPRO ERP application in an integrated and cohesive
way across a variety of different protocols to almost any client device.
By using the SYSPRO Web Services you enable other web applications and programs to
access and utilize the functionality of your SYSPRO system. This is where SYSPRO
becomes the core functioning system of an SOA (see Section 2.7, “Service Oriented
Architecture (SOA)” [2–13]).The core functionality of the SYSPRO system is made
available through web services.
The SYSPRO Web Services are typically used when the SYSPRO application server is
2–6

hosted on a different network. If an Internet Service Provider (ISP) is hosting the SYSPRO
application server then it is easier to connect to the Web Services than to connect through
DCOM (mainly due to firewall issues). The Web Services are also used when a custom
application has been created that is being used on different operating systems and at
different locations within the enterprise controlled network.
The Web Services are not part of a default SYSPRO install and so will need to be installed
separately (see Appendix A, Installing the SYSPRO Web Services [A–1]).
2.4. XML Schemas
An XML Schema is an XML file that uses the XML Schema Definition (XSD), to describe
the structure of an XML document. All XML documents have to conform to the W3C
Schema specification in order to be considered true XML. These XML documents are said
to be "well-formed". Any document that does not conform to the standard cannot be read
or processed as an XML document and will return an error. The following four
requirements of a well-formed XML document are where most of the XML mistakes
occur:
1. All attribute values must be enclosed in single or double quotation marks
2. All elements must have both begin and end tags (unless they are empty).
3. All empty elements must contain an empty element identifier (/) at the end of the begin
tag.
4. Elements must be nested properly.
While discussing XML it is important to also mention that the W3C has produced XML
specifications for XML versions 1.0, and 1.1 (and is due to release specifications for 2.0 in
the near future). SYSPRO e.net solutions and the associated business objects require the
use of XML 1.0.
Previously we mentioned that business objects can be passed information in the form of
XML strings and that the structure of these XML instances must be acceptable to the
business object in order to continue processing. The XML Schemas shipped with
SYSPRO enable developers to check that the form and structure of XML instances created
by their e.net solutions applications, making sure that they are acceptable to the business
object which is being invoked to perform an operation. In XML terms this is called
"Validation".
The process of validation is performed by an XML Parser. An XML Parser is a processor
that reads an XML document and determines the structure and properties of the data. It
breaks the data up into parts and provides them to other objects or components. When
reading an XML document the parser checks that the document is well-formed and
validates the structure of the document against the XML Schema (XSD).
Defining e.net solutions
2–7

As SYSPRO e.net solutions is designed to operate on the Microsoft Windows operating
system, the Microsoft XML Parser (which has now been renamed Microsoft XML Core
Services) is the processor of choice.
For each business object within SYSPRO there are corresponding XML Schemas (XSD)
that are specifically designed for use with only that business object. Setup and Transaction
class business objects utilize two XML inputs (what we will later call XmlIn and Xml
Parameters). Each of the XML inputs has its own corresponding schema. To validate their
XML instances, developers can pass their XML, which they have constructed for
consumption by a specific business object, to the MSXML Parser together with the XSD
provided for the target business object. The parser will check that the XML is well-formed
and that its structure conforms to the rules defined in the XSD. Assuming that the XML is
acceptable, it can then be passed to the designated business object with the peace of mind
that an exception will not be returned because of incorrect XML structure (there could be
exceptions due to other errors - i.e. the if a Query Key is invalid) and that a new XML
instance will be generated once processing is completed.
When the core SYSPRO ERP is installed, the complete XML Schema Library is copied to
the base\schemas folder.
2.5. SYSPRO Web Based Applications
SYSPRO have developed a set of web based applications that utilize the business objects
through an ASP.NET programmed interface. In this book we will be using some similar
programming structures and XSL formatting ideas as the web based applications. As we
have already mentioned in the requirements section of the previous chapter, we highly
recommend that you obtain the evaluation version of SYSPRO 6.0 Issue 010 (or higher)
and install the SYSPRO Application Server, the SYSPRO Web Applications, and the
Sample Data on a test or development system.
2–8

2.6. .NET and e.net solutions
Although the name 'e.net' implies a close connection between the system and the .NET
Framework, we cannot assume that everyone knows what .NET is and what the
relationship between .NET and the SYSPRO system is. In this section of the introduction
we will briefly discuss what .NET is and what the major components are. In the next
section we will examine the relationship between the SYSPRO system and .NET through
e.net solutions.
2.6.1. What is .NET?
For many people learning e.net solutions, one of the most pressing questions at this
juncture may be "What is .NET?". The simplest answer is: “.NET is a Framework in
which Windows applications may be developed and run”. I agree that this answer does not
tell much, as true a definition as it is. In order to truly understand .NET we must go back
in time and follow the development of Windows and the advent of Windows
programming.
The historical framework and working definitions of .NET used in this section are based
on the information presented in the codeproject
[http://www.codeproject.com/dotnet/dotnet.asp] introductory article on .NET written by
Kashif Manzoor.
2.6.1.1. The Road to .NET
The Windows operating system provides programmers with various functions - called API
(Application Programming Interfaces). Starting from the earliest version of Windows on
the commercial market to the most recent version of WindowsXP, APIs are the basic tools
that let the operating system know what you want it to do. If you want to create a Dialog
Box you need to call a specific API provided by Windows. Creating a button requires
another API call. And so the list goes on. As new and updated GUIs appeared on the
scene, new APIs were introduced in Windows. But using these native APIs became a very
challenging task. Making a simple Window that prints "Hello World" could take more
than hundred lines of code. Compare this to the 5 lines of a "Hello World" program in
DOS. Due to this difficulty, Windows programming was considered something better left
to the experts. Microsoft and other commercial organization's were aware of this trend,
and started marketing Visual Tools that made the programmer's life easier. Using Visual
C++, Visual Basic, Borland's C++ and other such IDEs, it became much simpler to make
Windows programs.
Microsoft also realized that applications needed a solid way to talk to each other. This
realization resulted in the introduction of Object Linking and Embedding (OLE). OLE was
an extremely useful concept, but it had two major flaws : it was notoriously difficult to
program, and it was very limited in its scope - i.e. it only did a few things like drag and
drop, clipboard sharing, OLE client, OLE server, etc. Microsoft addressed (or at least tried
to address) both of these problems. They upgraded OLE to COM. COM was much more
Defining e.net solutions
2–9

capable than OLE, and it introduced other new concepts, like ActiveX controls. These
could directly compete with Java Applets. As for the difficulty of programming
OLE/COM; Microsoft expanded the MFC (Microsoft Foundation Classes) and VBRun to
take care of most of the dirty work. Although making an ActiveX application still was
slightly tricky in Visual C++, developing an ActiveX application in Visual Basic was
extremely easy. For this reason Visual Basic became the foremost ActiveX development
media.
The Internet revolution then posed new problems and challenges. C/C++ (which was the
tool of programming champions) was not suited or ready for Web Development. Microsoft
tried expanding MFC, and included several network oriented classes - like CSocket,
CASyncSocket, and several HTTP based classes. By using these classes a programmer
could very quickly develop a distributed application, but it took considerable effort. These
applications were also always customized and targeted to the specific task. The developers
had to take care of the gory network communication details themselves. By now
object-oriented analysis and development had started becoming ubiquitous. Although
technologies like Remote Procedure Call (RPC) was a great help to the programmers; it
was limited in its scope. For programmers following Object-Oriented development, RPC
was not much help at all as it did not allow the passing of objects as parameters. This
major issue was addressed by the introduction of industry agreed upon standards, like
CORBA, IIOP, RMI, DCOM etc. All these standards used customized protocols to
transmit an object over the network. They also required a tight coupling between the
server and the client - i.e. the client needed to be fully aware of how to talk to the server.
Due to this tight client-server coupling all these protocols needed considerable deployment
efforts in order for distributed applications to function properly. Sun did come up with
another layer on top of RMI - the famous Enterprise Java Beans (EJB). The EJB container
provided lot of services for free - all that a programmer had to do was to extend (inherit)
from an appropriate EJB base class, and there you have it - a fully functional distributed
application. EJB made programmer's lives considerably easier; but it did not eradicate the
client-server coupling issue.
Microsoft realized that upgrading their existing technologies would not work. What was
needed was a complete change in their philosophy. Historically, OLE was upgraded to
COM - and it was welcomed by all. COM was then upgraded to COM+. Microsoft
addressed the distributed programming issue with the introduction of DCOM. Although
COM/COM+/DCOM were all good technologies, they all required a significant learning
curve. Sun on the other hand was making things easier and so a majority of developers
were turning towards Java based technologies for distributed enterprise applications.
Microsoft got their programming gurus together and asked them to reflect back on their
Windows DNA and to come up with a future vision. This group came up with so many
new and great ideas that Microsoft realized that no amount of up upgrading or extending
of their MFC/VBRun/WFC, COM/COM+/DCOM, ASP, APIs etc. would even come
closer to realizing the possibilities of this new vision. So they made a radical but correct
decision - and this was the decision of coming up with something big, something new, and
something that let Microsoft overcome their legacy problems - the .NET Framework.
2–10

2.6.1.2. Major Components of .NET
At the core of The .NET Framework is a component called the Common Language
Runtime (CLR). The CLR can be thought of as a separate operating system that runs
within the context of another operating system (such as Windows XP or Windows 2000).
This idea is not something new. We have seen this with the Java Virtual Machine, as well
as the environments of many interpreted languages such as BASIC and LISP which have
been around for decades. The purpose of a middleware platform like the CLR is simply
that a common OS like Windows is often too close to the hardware of a machine to retain
the flexibility or agility required by software targeted for business on the Internet.
Software running on the CLR (referred to as Managed Code) has the needed flexibility and
is exceptionally agile.
Unlike interpreted languages, managed code runs in the native machine language of the
system on which it is launched. In short, this is how the .NET process works:
1. Developers write their code in a .NET enabled language.
2. The compiler generates binary executable software in a p-code format called Common
Intermediate Language (or CIL for short).
3. When the software is launched, the CLR re-compiles or JIT-compiles (Just In Time) the
CIL into native code such as x86 machine language.
4. Then the code is then executed at full speed.
Another component of the .NET Framework is the massive library of reusable object-types
called the Framework Class Library or FCL. The FCL contains hundreds of classes that
perform tasks ranging from file reads and writes to advanced cryptography and web
services.
The CLR is intrinsically object-oriented; even its CIL (the p-code, which can be viewed as
a virtual assembly language) has instructions to manipulate objects directly. The
Framework Class Library reflects the platform's object-oriented nature. For most
programmers, the FCL is the most extensive and extendable class library that they will
have ever worked with.
Finally, the .NET Framework contains a collection of tools and compilers that help to
make programming productive and enjoyable. Up until now we have not mentioned much
about C# (pronounced See-Sharp) or Visual Basic.NET (we'll be programming in these
languages later). The reason is that the real core of .NET is the CLR. However, over
twenty language compilers are currently being used in the .NET Framework, including the
original five .NET languages from Microsoft: Visual Basic, C#, C++, JavaScript and CIL.
The CLR and the .NET Framework have been designed in such a way that code written in
one language can not only seamlessly be used with another language, but it can also be
naturally extended by code written in another programming language. This means that
Defining e.net solutions
2–11

(depending on the needs of a project’s work-force) developers will be able to write code in
the language in which they are most comfortable.
Figure 2.3. .NET Framework
2.6.2. SYSPRO ERP integrated with .NET
SYSPRO e.net solutions is based on the Windows Distributed Network Architecture
(DNA) model, which in turn is based on the Component Object Model (COM). As we
have seen, COM is basically a black box that can be used by applications to perform one
or more tasks. Like a conventional DLL, COM objects expose methods that an application
can call to perform any of the supported tasks. SYSPRO have taken the business logic of
the SYSPRO ERP system and programmed it into individual executable pieces of code
called business objects. These business objects are available through the COM (or DCOM)
interface and are accessible to .NET programming through the ENCORE.dll of e.net
solutions. This reflects the fact that SYSPRO e.net solutions is a COM object platform that
integrates the .NET Framework within the SYSPRO application. This enhances the core
SYSPRO ERP system with the capabilities of .NET - extending the messaging, security,
2–12

identity and transaction capabilities that are required in order to enable the efficient
management of interactions across a service-orientated architecture (SOA).
SYSPRO e.net solutions is a component architecture that gives authorized individuals the
ability to interact with SYSPRO data over the Web as well as from remote devices,
including PDAs and cell phones. SYSPRO e.net solutions provides a standard way of
directly accessing the business functionality within the SYSPRO system while maintaining
the software's built-in business rules and security. In addition to enabling such functions as
remote purchase order entry and inventory status determination, SYSPRO e.net solutions
also facilitates the integration of other best-of-breed applications with the SYSPRO
software. The .NET integration within SYSPRO's e.net solutions COM architecture opens
the whole application to collaborative networks and Web based interaction.
In order to utilize the .NET Framework capabilities of e.net solutions presented in this
book you will need to already understand programming in .NET (particularly ASP.NET).
You will also need to learn and know the functions of the business objects that are part of
SYSPRO e.net solutions. This book will introduce you to the concepts needed in order to
create programs that interact effectively with the business objects. The Business Object
Library of the Section 4.2, “e.net Diagnostics Suite” [4–1] lists the many business objects
that are currently available. The SYSPRO online Support Zone provides a more extensive
in the e.net solutions Business Objects Reference Library section. The Business Objects
Reference Library also provides greater detail about each business object and is updated
with any new business object or information about a business object. Remember that the
business objects are available through the COM interface as well as through the web-based
applications that are written in ASP.NET. So if you only know Visual Basic Scripting and
only want to program your application through the COM interface then you will not need
to know .NET programming. In this book we will provide you with the foundational
information that will allow you to do both. Many of the sample applications through out
this book will however be presented in ASP.NET.
2.7. Service Oriented Architecture (SOA)
One of the key features of SYSPRO's e.net solutions is the extension of the core SYSPRO
ERP system to the wider network, including the Internet. This capability creates the
functionality required for a Service Oriented Architecture (SOA).
SOA capability is becoming increasingly sought after and utilized in the business software
arena. Using SOA brings increased flexibility and agility to your system, resulting in
greater information exchange, reduced programming expenditure and increased return on
investment. The concept underlying the architecture is based on the principles behind
object oriented programming, but extended to deal with the whole system or architecture.
The central feature of SOA is the creation of re-usable objects of code defined as services.
Each service is dynamically discoverable (i.e. you can perform a search for it, and for the
type of service that it performs), network enabled (usually web based), and part of a larger
group of services that together form components or modules.
In SYSPRO, SOA capability is easily seen through the exposure of the core SYSPRO ERP
Defining e.net solutions
2–13

through e.net solutions web-based and COM based applications. The business objects
exposed through a web-based application and through the web services are the core SOA
services that create the extension of the SYSPRO ERP. The COM/DCOM system is also
part of the extension of the core SYSPRO ERP. Your custom built e.net solutions
application will use the SOA functionality present within SYSPRO, and could become the
core SOA enablement of the enterprise that you are programming for (depending on your
enterprises SOA goals and management strategies).
For more information on SOA and the use of SYSPRO within an SOA please contact your
local SYSPRO VAR office and request a copy of the book: SYSPRO on SOA.
2.8. Net Express and other Programming Tool environments
Many of the programmers at SYSPRO and within their customer base use Net Express as
their Integrated Development Environment (IDE). The SYSPRO Forums at
support.syspro.com [http://www.support.syspro.com] has a specific development forum
for these users.
There are other IDEs that are available for the .NET Framework. Microsoft offers Visual
Studio 2005 as its core .NET IDE, and offers related free products, known as 'Express
Editions' (Visual Web Developer 2005 Express Edition, Visual Basic 2005 Express
Edition, and Visual C# 2005 Express Edition). It is possible to use these tools to develop
your enterprise level applications, or any another IDE that is integrated with the .NET
Framework.
2–14

3
Getting Started with e.net solutions
Objectives - In this chapter we will introduce the basic structure of programming with
e.net solutions. We will demonstrate the capabilities of programs that interact with the
e.net solutions framework by using two different models: the Basic model, and the
Abstraction Model. By the end of this chapter you will have created your first program,
sending and receiving information from the SYSPRO application server through the e.net
solutions framework.
3.1. The Structure of Program
Having seen what SYSPRO e.net solutions is comprised of, and how SYSPRO is
accessible to COM and .NET programming through e.net solutions, we now turn our
attention to the concepts of programming that will access the e.net solutions framework.
Development of e.net solutions based applications requires the programmer or
development team to consider questions of programming organization and structure. As
we consider programming with e.net solutions, there are two development models that we
can use to define our development methods and application structure:
• The Basic Model
• The Abstraction Model
3.1.1. The Basic Model
The Basic Model is centered around the e.net solutions COM interface. As such it requires
that an application will, for each interaction with SYSPRO, call a method, a business
object if required, and pass/receive parameters or data as XML strings. The Basic Model,
while simple, enables rapid development of rich and fully functional applications.
Understanding of the Basic Model provides the foundation for developers that wish to
structure their application using the The Abstraction Model.
As with any application development, developers need to have a clear understanding of
their business's or customer's requirements in order to design an application that will
provide the required functionality. If this objective is clear, the basic structuring and
functionality of an e.net solutions application is easily described using Unified Modeling
Language (UML) Sequence-Diagramming.
The application shown in Figure 3.1, “Basic Program Structure” [3–3] illustrates the use
of the e.net solutions framework and business object components to create an application

that will enable a user to 'Update a Customer Record'. The application is comprised of four
components:
• The e.net solutions web-based application. The application that will enable Customer
Records to be updated.
• ENCORE.DLL. The e.net COM interface.
• ARSSCS. The Accounts Receivable Customer Maintenance business object that
provides the functionality to add, update or delete customer records.
• SYSPRO. A SYSPRO application server with support for SYSPRO e.net solutions.
The application assumes that the user already has knowledge of a valid
Customer ID.
3–2

Figure 3.1. Basic Program Structure
Getting Started with e.net solutions
3–3
We have oversimplified the content of this diagram so that it is easy to see
the process. Other UML sequence diagrams will contain more information
when used later in this book.
Our "Customer Record Update" application first enables users to authenticate themselves.
In so doing a UserID is obtained, this will be used to authenticate the session. Having
obtained a UserID, the application enables the user to input a known Customer ID and
uses the Query.Fetch method to retrieve the record containing the Customer Details.
The Customer ID is passed to SYSPRO in an XML string by way of the XmlIn variable.
It is the value for the Query.Fetch <Key> element of the XML input within the above
example. Don't worry if you don't yet know what a <Key> element is, you will be
introduced to the XML input requirements of the business objects as you continue reading
and applying what you learn from this book.
SYSPRO returns the record details of the specified Customer ID as an output XML string
to the e.net solutions application where the information is displayed on screen and can be
modified by the user. When the user has finished modifying the details, the changes must
be updated on SYSPRO. The e.net solutions application would provide a Save or Update
button that will enable the user to instruct the application to save the changes back to
SYSPRO.
The Setup.Update method is then used to call the ARSSCS business object. The
Setup.Update method requires that two XML strings are passed to it:
XmlParameters (ARSSCS.XML) and XmlIn (ARSSCSDOC.XML). SYSPRO returns
the operation status back to ARSSCS which returns an XML string to the e.net application
(ARSSCSOUT.XML).
The e.net solutions application then enables the user to repeat the operation on another
Customer or to Logoff from the application.
This is a simple e.net solutions application. In this case it has served to illustrate the
principle of the Basic Model that can be used to describe and structure e.net solutions
applications. While it is a fully functional, self-contained application, it can be included as
a functional part of a much larger application.
3.1.2. The Abstraction Model
The Abstraction Model is really a natural extension to The Basic Model described in the
previous section. The Abstraction Model employs the ability of Object Orientated
programming to abstract away lower-level or complex programming functionality to
produce a simpler API.
This model centers around the imagination and ability of developers to develop new class
libraries that abstract the e.net solutions framework. The advantage of doing so is that an
3–4

API can be simplified and tailored to better describe the application. It also enables
extended functionality to be developed in layers within the application.
A simple example of how the e.net solutions framework may be abstracted is shown
Figure 3.2, “Abstracting e.net solutions framework” [3–6]. This abstraction defines a new
class library package called Order that contains the Encore classes and one new class
called Lines. The SalesOrder class abstracts the standard interaction used to interact
with the Sales Order business object (SORTOI) and extends the functionality of Sales
Order functionality within the application.
Getting Started with e.net solutions
3–5
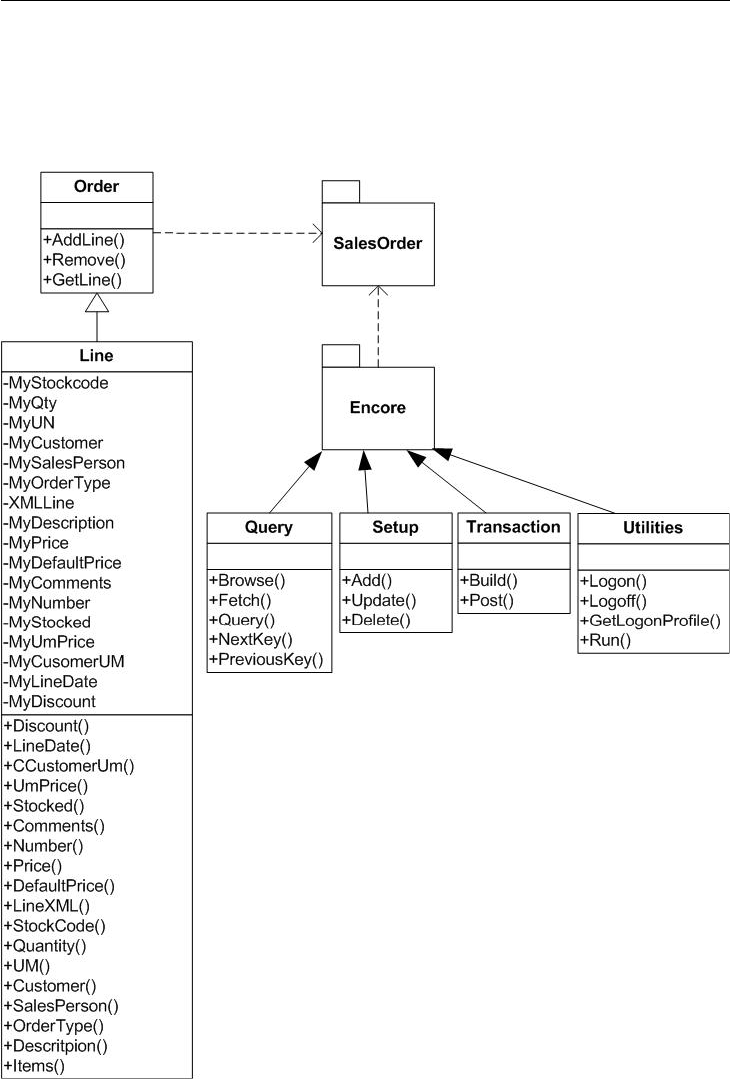
Figure 3.2. Abstracting e.net solutions framework
3–6

3.2. Your First e.net solutions program
It's now time to put the knowledge that you have just gained into use. Using the Basic
Program Structure mentioned earlier in this chapter we will now create our first e.net
program together. We will be creating a simple logon script using Visual Basic Scripting...
1. Open the Programming Editor that you are most comfortable with (or just open the
Windows Notepad)
2. Declare the variables that will be used for the Logon:
• UserID
• Encore
To do this we type in the following code:
Dim UserID, Encore
3. We next set the Encore variable to the Encore.Utilities class
Type in the following code:
Set Encore = createobject("Encore.Utilities")
4. We will now perform the e.net solutions logon function, using the Utillities.Logon
method
Type in the following code:
UserID = Encore.Logon("ADMIN", "password", "0", " ", 5, \
0, 0, " ")
Where you see \ at the end of a line of code and the next line indented,
this means that the text was too long for the page size of this book but
the indented text belongs of the code line above.
(for your logon string change ADMIN to your SYSPRO operator code, change
password to your SYSPRO operator password, the first 0 to your SYSPRO company
Getting Started with e.net solutions
3–7
number [0 is the company number of the evaluation version's The Outdoors
Company], and the following " " to your SYSPRO company password)
5. Now we need to display the logon details that the previous method created in the
SYSPRO system.
Type in the following code:
msgbox UserID, , "This is the User ID created by \
logon"
6. Finally, we need to logoff of the SYSPRO system. To do this we will use the
Utilities.Logoff function.
Type in the following code:
Encore.logoff(UserID)
Set Encore = Nothing
7. Now that you have entered the text, save the file as Logon.vbs. You can now execute
the script and receive the UserID results from the e.net solutions SYSPRO
application server.
Congratulations! You have now successfully created your first e.net solutions program.
This example is created in Visual Basic Scripting, but other examples and sample code
sections will be presented in Visual Basic or C#. We have also provided sample ASP.NET
code later in the book to illustrate the functions in use.
While you might not yet fully understand everything that you did in the previous
procedure, you already know enough to be able to look at more sample code and work out
what function the program is performing. Relax, we will not ask you to do that. Instead we
will discuss some tools that will help you as you explore e.net solutions and create
applications for yourself before we delve more deeply into the e.net solutions Classes and
Methods.
3–8

4
Programming Tools
Objectives - In this chapter we will equip you with specific tools that will enable you to
understand and build e.net solutions applications faster and with greater ease. We will
discuss the Software Development Kit (SDK) and the e.net Diagnostics suite.
You now have a better idea of what e.net solutions programming requires. Before we
examine the various classes and methods available in e.net solutions, we need to introduce
a few tools that will greatly assist your learning of and programming with e.net solutions.
Most of this chapter will be focused on the e.net Diagnostics suite that can be installed as
an add-on to the core SYSPRO 6.0 system, from Issue 010 and onwards.
4.1. SYSPRO Software Development Kit (SDK)
One of the biggest programming resources already produced by SYSPRO for
programmers and developers is the Software Development Kit Documentation. This is
accessible from within the SYSPRO program (click on help, then click on SYSPRO
SDK). This will load the SDK documentation help file, which is full of information and
resources related to programming and development in e.net solutions.
To access the latest version of the SDK from the online SupportZone, use the
"Developers" link from the Key Topics drop down list and select Open/Download: SDK
Documentation
The SDK documentation will be more useful to you once you have finished reading this
book. It is an excellent reference resource and we encourage you to make full use of it as
part of your learning process.
4.2. e.net Diagnostics Suite
With the release of SYSPRO 6.0 Issue 010 comes a great diagnostic and programming
tool, the e.net Diagnostics suite. This is a stand alone addition to the SYSPRO system that
will aid you in using e.net solutions business objects and creating and testing code your
own applications.
In the following sections we will be referring to use of the e.net Diagnostics suite,
particularly in regard to forming XmlIn and XmlOut statements and testing particular
custom Xml statements. It is also a useful tool for familiarizing yourself with the business
objects available for programming with e.net solutions.

If you configure e.net solutions to point to your live data and post anything
(with a Setup or Transaction class business object) the posting will
affect your LIVE data.
The e.net Diagnostics suite can be downloaded from the online SYSPRO
SupportZone for use with issue 010 or other SYSPRO issues.
4.2.1. Install Procedure
This installation procedure assumes that you have already installed e.net solutions with all
the other required software.
1. Insert the SYSPRO Version 6.0 Issue 010 CD into your CD ROM drive. Inserting the
CD initiates the Autorun.exe. If this does not occur, select the Autorun application on
the CD drive.
The SYSPRO 6.0 setup window is displayed.
2. Select Install Product to begin the installation. The Install SYSPRO 6.0 window is
displayed.
4–2

3. Select Core Product. If SYSPRO 6.0 Issue 010 has already been installed without
the e.net Diagnostics suite do not worry about it, your core installation will not be
overwritten during this procedure. The InstallShield Wizard window is displayed.
4. Select Next to continue. The License Agreement window will then be displayed.
Programming Tools
4–3

5. Read the license agreement terms, then select I accept the terms of the license
agreement. The Next button becomes enabled once you accept the terms.
6. Select Next to continue. You will now see the Setup Type window is displayed.
7. We have selected the Network option, but you may select whatever setup type
describes your particular installation requirement. The Parent folder displays the
default path to where the software will be installed. It is suggested that you always
install SYSPRO to this default path.
If you have already performed a client installation the screen will
prompt you to install a new installation or an upgrade. If upgrade is
selected you will not be able to choose Client / Server / Network as it
will already be known. You will also not be able to change the path.
4–4

8. Select Next to continue. The Select Features window is displayed.
9. De-select Core Product and select SYSPRO e.net Diagnostics instead.
10. Select Next to continue The Start Copying Files window is displayed, showing the
program files and directories that will be copied to your computer.
11. Select Next to continue. The SYSPRO 6.0 e.net Diagnostics install file is now being
copied to your machine.
12. Select Finish to complete the installation.
You now need to run the e.net Diagnostics Install program that has been saved onto
your harddrive.
13. Using Windows Explorer, browse to the \tools folder of your SYSPRO 6.0
installation and double click on EnetDiagnosticsSetup.msi,
14. Click 'Next' on the 'Welcome to the SYSPRO e.net Diagnostics Setup Wizard' install
screen.
Programming Tools
4–5

15. Select 'Everyone' if other users will be utilizing the e.net Diagnostics suite or leave
'Just me' selected if you will be the only one using it.
16. Click 'Next' on the 'Confirm Installation' screen.
4–6

17. Click on 'Close' on the 'Installation Complete' screen
4.2.1.1. Installing the Error Message Handler
If you are using Microsoft Visual Studio 2005 (or higher) or Microsoft SQL 2005 (or
higher), the error handling program will already be installed on your machine. If you are
not using the above products, then you will need to install the error message handling
program.
1. Using Windows Explorer, browse to c:\Program Files\SYSPRO\SYSPRO
e.net Diagnostics\ and double click on MessageBox.msi.
2. Click 'Next' on the 'Welcome to the Install Wizard for Microsoft Exception Message
Programming Tools
4–7

Box' install screen.
3. Select the I accept the terms of the license agreement option.
4. Click the Next button to continue with the installation.
5. Enter your Name and Company information, then click the Next button to continue
with the installation.
4–8

6. Click on the Install button to install the Microsoft Exception Message Box program.
7. The install wizard will now install the Microsoft Exception Message Box program.
Programming Tools
4–9

8. Once the install wizard has finished copying the necessary files it will display the
Successful install screen. Click on the Finish button to complete the install.
4–10

4.2.2. Menus and Buttons
The default screen of the e.net Diagnostics suite contains a menu bar, an icon-menu bar,
and a status bar (set at the bottom of the window). In this introduction to the e.net
Diagnostics suite we will briefly go through the icon-menu bar and explain the function of
each button. Then we will mention some of the other pertinent options available from the
top drop-down menu.
4.2.2.1. Global Log On
This tool allows the user to input one operator username and company for all the
debugging activities, rather than entering these details each time a new programming or
XML sequence is loaded or edited. In order to use this feature you will need your Operator
Code and password, as well as the Company Code and Password. If you are using the
sample data supplied with the evaluation distribution of SYSPRO then the Company Code
will be '0' and the password box will remain blank.
4.2.2.2. New Harness
The harness is the main e.net solutions programming diagnostics/debugging tool. The
business objects used in e.net solutions programming are of three different Classes: Query,
Setup, and Transaction. Various business objects within these Classes are available for
each of modules of the core SYSPRO system. Once you have selected which type of Class
Programming Tools
4–11
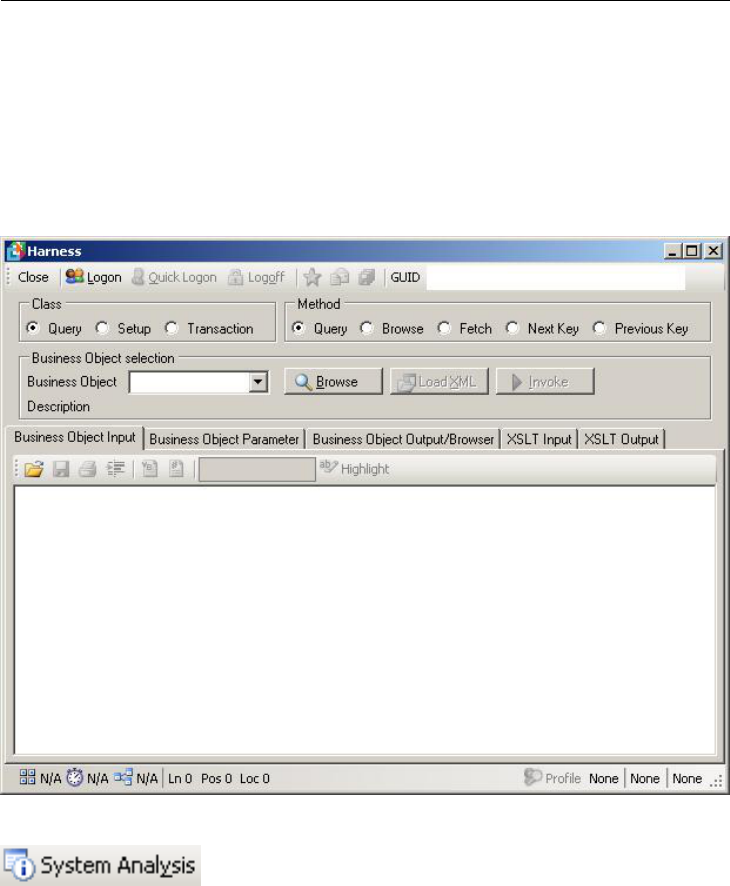
you are dealing with you can click on the business object browse button and load the
business object library which lists each business object available for each SYSPRO
module (System Manager, Accounts Receivable, etc.).
We will go into the usage of the Harness in greater detail in Section 4.3, “Using the e.net
Diagnostics suite's Harness” [4–21].
4.2.2.3. System Analysis
The System Analysis button gives a report of all the basic SYSPRO and database
directories, as well as various registry entries and settings. It is used to check that all the
SYSPRO basics are installed and correctly identified before deeper troubleshooting a
SYSPRO system. It would be useful to familiarize yourself with the basics of the
SYSPRO system from this report before attempting to change anything in the system.
4–12

4.2.2.4. Parser Checker
This tool checks the XML parsing capabilities of your Windows installation. It will
present an HTML report identifying the XML version in use, as well as the XML mode,
the various ProgIDs used by the XML installation, the Microsoft Data Access (MDAC)
version, and the Window's system database drivers.
Programming Tools
4–13

4.2.2.5. Check Dataset Compliance
Some enterprises create custom solutions or utilize legacy systems using the SYSPRO
base system and use dataset definitions to access the SYSPRO data. The XML structure of
the datasets may not be fully recognized by 3rd party applications. This tool may be used
to test a dataset's compliance. It is usually more useful to use XSL functions within
SYSPRO, alleviating the need for datasets.
4.2.2.6. Check Machine Availability
It is often useful to be able to test whether another machine is present on the network that
you are working on. For this reason the 'check machine availability' tool has been included
in the e.net Diagnostic Utility. You will need to enter the network name or IP address of
the computer that you are trying to connect to.
4–14

4.2.2.7. Register e.net Solutions
There are some situations that require the Encore.dll file to be registered or unregistered
within the Windows System Registry. This tool automates the process. If you need to
re-register the Encore.dll simply click on the menu item 'register Encore.dll', and it will be
registered for you.
4.2.2.8. Text Editor
This tool will load your default text editor. If you have not changed the setting within the
'tools - settings' option then this will load 'notepad'. You can change this to WordPad, or an
editor of your choice.
4.2.2.9. Registry Editor
In some programming situations it is useful to be able to quickly edit a property within the
Windows registry. This tools loads the Windows regedit application.
4.2.2.10. Command Prompt
Many programmers have their own command line scripts or are more comfortable using
command line interfaces. This tool opens a command prompt window.
4.2.2.11. DCOM Configure
This tool loads the Windows DCOM configuration utility.
Programming Tools
4–15

4.2.2.12. Windows Explorer
This button will load Windows Explorer in a new window.
4.2.3. Status Bar
The status bar at the bottom of the e.net Diagnostics screen presents the following
information:
4.2.3.1. COM/DCOM or Web Services
This reports the connection to the e.net solutions server. You can change the type of
connection from the settings options on the 'tools' menu.
4.2.3.2. Session ID
The session ID only appears in the status bar if this was a global logon. For normal logons
and quick logons it appears at the top of each individual instance of the harness.
4.2.3.3. Profile
The 'Profile is made up of three parts:
• Operator - This reports the logon name of the user (in this example it is ADMIN).
• Company ID - This reports the company name that is logged into (in this example The
Outdoors Company with Company ID 0).
• Instance - This reports which instance of e.net solutions the operator is logged on to. In
a test / demo environment it is quite common for there to be more than one instance of
e.net solutions installed on a machine. The operator may need to be able to logon to
these different instances of SYSPRO. This can be configured in the registry against the
e.net solutions section. When the operator logs on they can specify which instance they
want, or let it default to instance 0.
4–16

4.2.3.4. Version
This reports the version of e.net Diagnostics that you are running.
Using the status bar you can instantly see your logon details and the status of your
connection with the SYSPRO application server.
4.2.4. Other Menu Items
There are two other menu options under the 'options' menu that are not present in
Icon-Menu bar. You can locate them by clicking on 'Options' icon the main menu bar.
4.2.4.1. Business Object Library
The Business Objects Library will open the list of business objects organized within the
module areas of the SYSPRO ERP system. Within each module folder is a list of all the
business objects that pertain to that module's business logic with a brief description of the
object, a class identification (Query, Transaction, or Setup), and a method identification
(Browse, Query, Fetch, NextKey, PrevKey, Post, Add, Delete, Update, Build). You can
expand the modules to see the functional areas. When you select a functional area it will
show just the business objects associated with it.
4.2.4.2. Settings
The settings options are found under the Options menu. Simply click on Options and then
click on Settings.
The first window contains the System tag, and contains options that control how you
connect to the SYSPRO application server, where the XML Schema files are located, the
default text editor used, and various other system settings:
Programming Tools
4–17

Within the Communication method settings box you are able to choose between
connecting via COM/DCOM or via the SYSPRO Web Services. If you are using the Web
Services then you will need to enter the URL of the SYSPRO Web Services server.
The next option box contains the Schema/XML path settings. These are set to the assumed
default path installed by the SYSPRO installation. If you have installed SYSPRO to a
different directory or have your own XML Schema files that you need to use then change
the path from SYSPRO Samples to Custom Defined.
The e.net Diagnostics Suite uses the Windows Notpad application as your default Text
Editor. In the next option box you are able to change this setting, either to use the
Wordpad application, or to define a Text Editor of your own choice. If you use a text
4–18

editor other than those proved with the Windows operating system then enter the
command path to the executable file for that text editor in the space provided.
At the bottom of the system settings tab are the recent items, favorites, and the auto load
XML and validate business objects options. They are fairly self explanatory. In the
recent items box you are able to set the number of recent options and the number of days
until recent items expire. In the favorites box you are able to select and remove specific
business objects, or clear the whole list. The auto load XML and validate business
objects options are simple check boxes.
The next tab, Logon/Email, contains the harness, email, and auto logon option areas.
Programming Tools
4–19

Within the harness section you are able to enter and save logon details. This is useful if
you are the only user of the e.net Diagnostics on the machine, or if you share logon details
with other members of your development team. Filling in these items sets the default
logon option fields (Operator Code, Operator Password [if auto logon in enabled],
Company Code and Company Password). Within the harness section you are also able to
set the language, instance, debug level, behavior, and history settings.
Within the Email options box you are able to set the default email settings: SMTP server,
default 'TO' and 'FROM' options, and set a default message.
The final section of the Logon/Email tab are the auto logon settings. Setting this option to
Defaults will enable the password options of the harness logon settings.
Once you have entered or changed the settings to suit you needs, click on the Save icon.
The options that you have selected will now be available.
4–20

4.3. Using the e.net Diagnostics suite's Harness
The previous section introduced the functions within the e.net Diagnostics suite. In this
section we will examine the process of selecting a business object, viewing the sample
XmlIn, processing the sample XmlIn and viewing the XmlOut results. We will then deal
with customizing the XmlIn. The e.net Diagnostics suite's Harness will become a useful
testing ground for your custom XmlIn as you develop your own e.net solutions
applications.
Procedure 4.1. The Process of XML In and Out
1.
Selecting a business object
As we saw in the previous section, selecting a business object is very easy. You may
either use the business object library and select the required object from the
alphabetical listing, or select the e.net Class and Method from the tool bar and select
the object from the dropdown menu.
Do not worry if you are not yet familiar with the Class and Method types of e.net
solutions, as we have a whole chapter devoted to discussing them later in the book
(see Chapter 5, The Class Library Reference [5–1]).
Programming Tools
4–21

2.
Getting the Sample XmlIn
Each business object requires an input sting with specific data to process (and those
in the Setup & Transaction Classes require two - XmlIn and XmlParameters). We
pass the relevant information to the business object through the XmlIn string. The
e.net diagnostics application provides an example XmlIn for each of the business
objects (and sample XmlParams when needed). Once you have selected the business
object you can click on the Load XML
and the sample XmlIn for that business object will be displayed in the window area
beneath the Business Object Input tab.
4–22

As you can see from the above screen shot, the XML instance presented is for the
COMBRW business object. The example presents all the XML elements that can be
used to input data to the Object.
As we have mentioned, Setup and Transaction class business objects
require two XML input strings - XmlIn and XmlParameters. These can
be found within the Business Object Input tab and the Business Object
Parameter tab.
3.
Processing the XmlIn
Once you have spent some time familiarizing yourself with the example XML
instance that will be sent to the business object, click on the Invoke button (next to
the Load XML button). This will send the XmlIn string to the business object
selected to be processed.
4.
Viewing the XmlOut
The result will now be displayed in the window beneath the Business Object
Output/Browser tab.
Programming Tools
4–23

It is now possible to view the data contained in each of the XML documents used or
returned by the business object.
If you need to use the output XML in text format (which is difficult to
use from the browser control) you can right-click on the browser control
and select View Source, then copy and paste the text.
As you read through the following chapters, we recommend that you install the e.net
Diagnostics suite on a test server and experiment with loading, reading, and customizing
the XmlIn strings of the various business objects that you will be using.
4–24

4.3.1. Customizing XmlIn
Now that you know how to load the XmlIn example and process it through the e.net
solutions system to get an XmlOut result, you can make changes to the XmlIn string and
observe the different outcomes from processing. You now know enough about the e.net
diagnostic's harness to test your own code. Once you have read and understood the e.net
solutions classes and the various methods available in each class you will be able to
interact with the e.net solutions server to create and test your own XML instances. There
are, however, a few more introductory things that we need to discuss before we get there.
4.3.2. Wrapping XmlIn
When using the e.net Diagnostics Harness tool, it is also possible to 'wrap' the XmlIn
statement for use in VB.NET or C#.NET as a string variable. This will be extremely
useful later on as we create our own applications. We will discuss this in more detail when
dealing with XmlIn statements, but the basic function of these two buttons will save you
some time and effort while programming your application.
To wrap the XmlIn statement for use in VB.NET you simply click on the VB button:
Your selected text editor will now open and display the XmlIn string wrapped for use as a
VB.NET variable named Document. The same is true for wrapping the XmlIn string for
use in C#.NET. Simply click the C# button:
and your selected text editor will now open and display the XmlIn string wrapped for use
as a C#.NET variable named Document.
Programming Tools
4–25

4–26

5
The Class Library Reference
Objectives - The objective of this chapter is to present the underlying framework of the
e.net solutions Classes and Methods. By the end of this chapter you will have the basic
grounding in e.net solutions that you require in order to interact with the SYSPRO
application server.
As we saw in the introductory section, in SYSPRO e.net solutions the COM object is
implemented as a dynamic-link library (DLL) called ENCORE.DLL. When SYSPRO e.net
solutions is installed on a SYSPRO application server, ENCORE.DLL is installed in the
SYSPRO base folder and registered to expose a number of interfaces as Public Objects.
Each of these objects is essentially a class that categorizes methods according to the
functionality of the class (see Figure 5.1, “The COM Object” [5–1]).
We also saw that at run-time, e.net solutions creates new instances of these objects.
Information could then be dynamically passed using an XML string that was defined by
the method called.
Figure 5.1. The COM Object

Remember that each class is an interface with methods that can be used to perform
operations, as follows:
• Query class provides methods to query data in a generic way, including:
• Query.Browse
• Query.Fetch
• Query.Query
• Query.NextKey
• Query.PreviousKey
• Setup class provides methods that can be used to create and modify predominantly
static information contained in the database (the SYSPRO data structures).
• Setup.Add
• Setup.Update
• Setup.Delete
• Transaction class provides methods that can be used to build and post transactions,
including:
• Transaction.Build
• Transaction.Post
• Utilities class provides methods for authentication, profile retrieval and running of
Net Express programs, including:
• Utilities.Logon
• Utilities.Logoff
• Utilities.GetLogonProfile
• Utilities.Run
The following is a list of the variables and their definitions that we will use in this book to
demonstrate and explain the classes and methods of e.net solutions:
Variables
BusinessObject The name of a SYSPRO business object to be run.
CompanyId Used to select a specific company, by its' SYSPRO
Company id number.
CompanyPassword The password corresponding to the passed
CompanyId variable.
LanguageCode Defines the language to be used for error messages
5–2

and for determining the language to be applied in
the Web Applications interface (see Section 9.1,
“Error Handling” [9–1] and Table 9.1, “Language
Code Examples” [9–3] respectively).
LogLevel This is a flag indicating the level of information to
be returned. Valid options are:
• 0: Normal - this is to be used for normal e.net
solutions usage.
• 1: Debug assistance mode - warns if XML strings
contain incorrect parameters - normally these are
ignored.
Operator The name of an account defined in the SYSPRO
application server. Depending on the SYSPRO
system setup options, this may be either a SYSPRO
Operator Code, or a Network User logon. This is
required with corresponding
OperatorPassword variable on creation of a
new session, following which connection
authentication is performed against the returned
UserID.
OperatorPassword The password associated with the account name
passed to the Operator variable. This is required
with corresponding Operator variable on creation
of a new session, following which connection
authentication is performed against the returned
UserID.
Parameter A string parameter. Use spaces if you do not require
a parameter. This string can be up to 1,000 bytes
long. Note that in your SYSPRO program the string
will be null terminated.
SysproInstance The SysproInstance variable is required in
environments running multiple instances of
SYSPRO. If a single instance of SYSPRO is
running, then set this value to "0". To select an
instance, set the SysproInstance to a value between
1 and 9.
UserID The UserID is a returned string obtained at the
start of a new session by means of the Logon
method. During a session the UserID must be
passed to all subsequent e.net solutions method
calls.
XmlIn This is a valid and well formed XML string used to
The Class Library Reference
5–3

pass additional parameters to the business object.
XmlParameters This is a well formed XML string providing
parameters to the Post method.
All the example code in this chapter assumes an operator code called
"ADMIN" with no password and the use of company "1" with no password.
When a method is invoked the return is provided by the business object specified. If the
output of a business object is an XML instance, it will be "Well-Formed" and "Valid". The
tree structure and element values contained in the returned XML will depend on the
Business Logic embodied by the business object and the parameters passed within the
input XML instances. Return information can then be used within the e.net solutions
application. If an exception is raised, the return will contain the errors (see Section 9.1,
“Error Handling” [9–1]).
The application of XML within SYSPRO e.net solutions, combined with the generic
nature of the class library, provides maximum flexibility in developing truly dynamic,
scalable applications that preserve the integrity of data stored within SYSPRO. It also
means that enhancements to existing e.net solutions applications are relatively easy to
develop as the application is independent from the SYSPRO version or the specific
implementation of SYSPRO within an organization.
5.1. Utilities Class
There are four Methods in the SYSPRO Utilities class structure: Logon, Logoff,
GetLogonProfile, and Run. As their names suggest, they are used for logging on and
off of the SYSPRO e.net solutions system, retrieving user settings and running custom
written programs.
5.1.1. Utilities.Logon
Syntax:
Utilities.Logon(Operator, OperatorPassword, CompanyId,
CompanyPassword, LanguageCode, LogLevel, SysproInstance, XmlIn)
The Logon method enables authentication. If authentication is successful a unique
UserID is returned. The UserID is a string that uniquely identifies an e.net solutions
session. The UserID is therefore used to create a new session and authenticate the
connection throughout the session and must be passed to all subsequent e.net solutions
method calls for the duration of a session. To close a session use the Logoff method (see
Section 5.1.2, “Utilities.Logoff” [5–6]).
Business objects available to this method include:
5–4

• COMLGN
Example 5.1. ASP.NET Visual Basic codebehind for Utilities.Logon
'Logon and trap any exceptions
Dim UserID As String
Dim Obj As New Encore.Utilities()
Try
UserID = Obj.Logon ("ADMIN", " ", "1", " ", 5, 0, 0, " ")
Catch exc As Exception
Response.Write("Exception - message:" & exc.Message)
Exit Sub
End Try
Using the above sample code we can see that the script is calling the Encore.dll COM
object's Utilities Class and passing a string variable containing the logon data. The
Utilities.Logon method returns the UserID string, which we then display using the
Response.Write command.
Example 5.2. ASP 3.0 Code Sample for Utilities.Logon
' Logon
Set Obj = Server.CreateObject("Encore.Utilities")
UserID = Obj.Logon ("ADMIN", " ","1", " ", 5, 0, 0, " ")
' Fetch Logon profile Information
LoginProfile = Obj.GetLogonProfile(UserID)
' Logoff and Cancel your current Session
ReturnCode = Obj.Logoff(UserID)
Set Obj = Nothing
The Class Library Reference
5–5
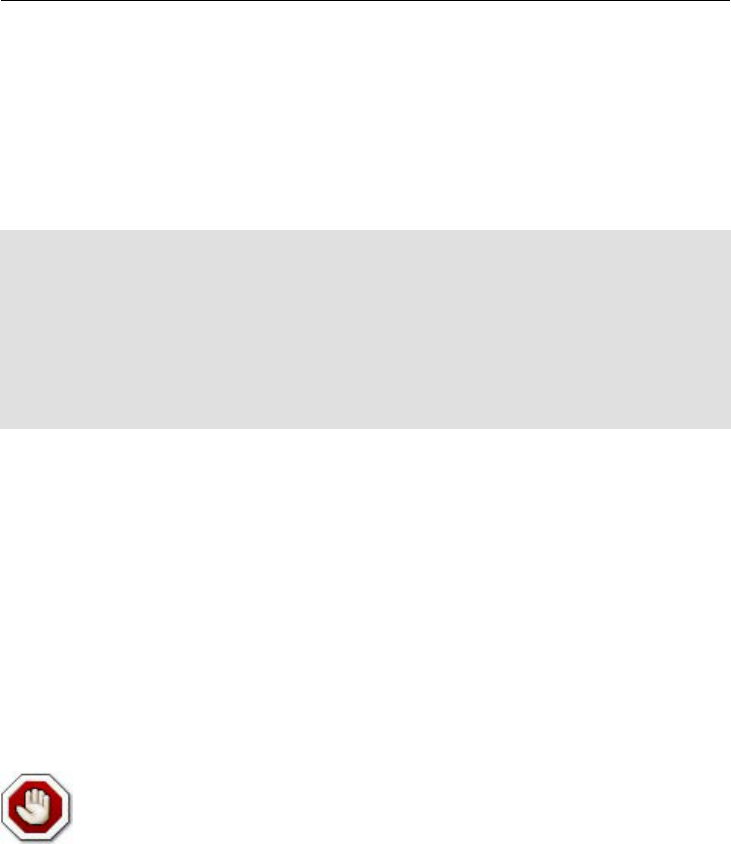
Here is a similar procedure using ASP.NET C#:
Example 5.3. ASP.NET C# codebehind for Utilities.Logon
string UserId;
Encore.Utilities Obj = new Encore.Utilities();
try {
UserId=Obj.Logon("ADMIN", " ", "1", " ", 5, 0, 0, " ");
}
catch (Exception exc) {
Response.Write(("Exception - message:" + exc.Message));
return;
}
If you compare the VB and the C# code you will see that they are almost identical once
you take into account syntax differences. This shows that the Classes and Methods of e.net
solutions are generic enough to be easily accessed by either language, and specific enough
to perform the business functions necessary for an enterprise application.
5.1.2. Utilities.Logoff
Syntax:
Utilities.Logoff(UserID)
The Logoff method closes the e.net solutions session for a given UserID.
Failure to use the Logoff method when exiting e.net solutions leaves the
session associated with the UserID as active within the SYSPRO server.
This may result in exceptions being returned as a result of concurrency issues
related to licensing. To avoid this it is recommended that sessions are always
gracefully terminated using the Logoff method (see Section 8.1.3,
“Concurrency Issues” [8–5]).
Business objects available to this method include:
• COMLGN
5–6

Example 5.4. ASP.NET Visual Basic codebehind for Utilities.Logoff
'Logoff and Cancel your current Session
Dim ReturnCode As Long
ReturnCode = Obj.Logoff(UserID)
Obj = Nothing
5.1.3. Utilities.GetLogonProfile
Syntax:
Utilities.GetLoginProfile(UserID)
The GetLoginProfile method returns an XML string containing additional details
about your current SYSPRO session.
Business objects available to this method include:
• COMLGN
Example 5.5. ASP.NET Visual Basic codebehind for
Utilities.GetLogonProfile
'Fetch Logon profile Information
Dim LoginProfile As String
Try
LoginProfile = Obj.GetLogonProfile(UserID)
Catch exc As Exception
Response.Write("Exception - message:" & exc.Message)
Exit Sub
End Try
'Display as an XML string
Response.Write(LoginProfile)
Response.ContentType = "text/xml"
The Class Library Reference
5–7

Example 5.6. ASP.NET C# codebehind for Utilities.GetLogonProfile
string UserId;
Encore.Utilities Obj = new Encore.Utilities();
try
{
UserId = Obj.Logon("ADMIN", "", "1", "", \
Encore.Language.ENGLISH, 0, 0, " ");
}
catch (Exception exc)
{
Response.Write(("Exception - message:" + exc.Message));
return;
}
string LogonProfile;
try
{
LogonProfile = Obj.GetLogonProfile(UserId);
}
catch (Exception exc)
{
Response.Write(("Exception - message:" + exc.Message));
return;
}
// Display as an XML string
Response.Write(LogonProfile);
Response.ContentType = "text/xml";
long ReturnCode;
ReturnCode = Obj.Logoff(UserId);
Obj = null;
Remember that where ever you see \ at the end of a line of code and the next
line indented, this means that the text was too long for the page size of this
book but the indented text belongs of the code line above.
5.1.4. Utilities.Run
Syntax:
Utilities.Run(UserID, BusinessObject, Parameter)
5–8

The Run method allows a program developed using Micro Focus Net Express and built
to SYSPRO guidelines, to be invoked from the COM interface without the developer
having to be concerned with XML technologies. This method cannot be used to invoke
any proper e.net solutions business object.
business objects available to this method are user defined.
Example 5.7. ASP.NET Visual Basic codebehind for Utilities.Run
' Logon and trap any exceptions
Dim UserID As String
Dim Obj As New Encore.Utilities()
Try
UserID = Obj.Logon ("ADMIN", " ", "1", " ", 5, 0, 0, " ")
Catch exc As Exception
Response.Write("Exception - message:" \
& exc.Message)
Exit Sub
End Try
' Run SDKRUN and read stock code B100
Dim ReturnString As String
Try
ReturnString = Obj.Run(UserID, "SDKRUN", "B100")
Catch exc As Exception
Response.Write("Unable to run SDKRUN - Exception:" \
& exc.Message)
Exit Sub
End Try
Response.Write ("The Stock Description for item B100 is " \
& ReturnString)
' Logoff and Cancel your current Session
Dim ReturnCode As Long
ReturnCode = Obj.Logoff(UserID)
Obj = Nothing
The Class Library Reference
5–9

5.2. Query Class
There are five Methods within the Query class structure: Query, Browse, Fetch,
NextKey, PreviousKey.
Use the e.net Diagnostics suite and open the 'Harness' tool to see the method options
displayed when you select the Query class:
By selecting each different method and clicking on the business object dropdown menu
you can see which business objects are available for that particular method within the
Query class.
5.2.1. Query.Query
Syntax:
Query.Query(UserID, BusinessObject, XmlIn)
The Query method enables generic access to any Query business object in order to return
data in the form of an XML string.
The return data is specified by passing parameters in an XML string via XmlIn. The
structure and parameters allowed in XmlIn is dependent on the business object being
called.
Business objects available to this method can be found in the Business Object Reference
Library list available on the SYSPRO SupportZone e.net solutions menu.
Use the e.net Diagnostics suite's Harness and select Query.Query. Now select the
APSQRY business object:
Click on the Load XML button to view the sample XmlIn.
By using the e.net Diagnostics suite's Harness tool you can view and edit the sample
XmlIn and process it through the e.net solutions application server, receiving the XmlOut
5–10

in the Business Object Output tab of the Harness screen. This is possible with all the
business objects listed for the Query.Query method.
The sample XmlIn, XmlParameters, and XmlOut available in the Business Object
Reference Library list available on the SYSPRO SupportZone e.net solutions menu
contains the most up-to-date information on each business object.
The Class Library Reference
5–11

Example 5.8. ASP.NET Visual Basic codebehind for Query.Query
'Logon and trap any exceptions
Dim UserId As String
Dim Obj As New Encore.Utilities()
Try
UserId = Obj.Logon("ADMIN", "", "1", "", \
Encore.Language.ENGLISH, 0, 0, " ")
Catch exc As Exception
Response.Write("Exception - message:" & exc.Message)
Exit Sub
End Try
Dim Qry As New Encore.Query()
Dim XmlOut As String
'Build an XML string to pass parameters
Dim XmlIn As New System.Text.StringBuilder()
XmlIn.Append("<?xml version='1.0'encoding='Windows-1252'?>")
XmlIn.Append("<Query>")
XmlIn.Append("<Option>")
XmlIn.Append("<IncludeCancelledOrders>Y \
</IncludeCancelledOrders>")
XmlIn.Append("<IncludeCompletedOrders>Y \
</IncludeCompletedOrders>")
XmlIn.Append("</Option>")
XmlIn.Append("</Query>")
Try
XmlOut = Qry.Query(UserId, "SORQSO", XmlIn.ToString())
Catch exc As Exception
Response.Write("Unable to run business object SORQSO \
- Exception:" & exc.Message)
Exit Sub
End Try
Response.Write(XmlOut)
Response.ContentType = "text/xml"
'Logoff and Cancel your current Session
Dim ReturnCode As Long
ReturnCode = Obj.Logoff(UserId)
Qry = Nothing
Obj = Nothing
5–12

Example 5.9. ASP.NET C# Sample Code for Query.Query
// Logon
string UserId;
Encore.Utilities Obj = new Encore.Utilities();
try
{
UserId = Obj.Logon("ADMIN", " ", "1", " ", \
Encore.Language.ENGLISH, 0, 0, " ");
}
catch (Exception exc)
{
Response.Write(("Exception - message:" + exc.Message));
return;
}
Encore.Query Qry = new Encore.Query();
string XmlOut;
System.Text.StringBuilder xmlin = new System.Text. \
StringBuilder();
xmlin.Append("<?xml version='1.0' encoding='Windows-1252'?>");
xmlin.Append("<Query>");
xmlin.Append("<Option>");
xmlin.Append("<IncludeCancelledOrders>Y \
</IncludeCancelledOrders>");
xmlin.Append("<IncludeCompletedOrders>Y \
</IncludeCompletedOrders>");
xmlin.Append("</Option>");
xmlin.Append("</Query>");
try
{
XmlOut = Qry.Query(UserId, "SORQSO", xmlin.ToString());
}
catch (Exception exc)
{
Response.Write("Unable to run business object SORQSO: " \
+ exc.Message);
return;
}
Response.Write(XmlOut);
Response.ContentType = "text/xml";
//Logoff
long ReturnCode;
ReturnCode = Obj.Logoff(UserId);
Qrry = null;
Obj = null;
The Class Library Reference
5–13

5.2.2. Query.Browse
Syntax:
Query.Browse(UserID, XmlIn)
The Browse method enables generic retrieval of rows of one or many columns from a
specific SYSPRO table. The input parameter is an XML string that defines the table, an
initial starting key and various other parameters. The output is returned as an XML string
containing the data residing in the specified rows.
Business objects available to this method include:
• COMBRW
The Browse method automatically calls the COMBRW Business Object.
Example 5.10. XmlIn with Query.Browse (COMBRW.XML)
<?xml version="1.0" encoding="Windows-1252"?>
<Browse>
<BrowseName>ArCustomer</BrowseName>
<StartAtKey/>
<StartCondition>EF</StartCondition>
<ReturnRows>5</ReturnRows>
<BrowseDetails>
<TableName>ArCustomer</TableName>
<Title>Customers</Title>
<Column>
<ColumnName>Customer</ColumnName>
<ColumnDescription>Customer code</ColumnDescription>
<ColumnKey>No</ColumnKey>
</Column>
<Column>
<ColumnName>Branch</ColumnName>
</Column>
<Column>
<ColumnName>Name</ColumnName>
</Column>
</BrowseDetails>
</Browse>
5–14

Validate COMBRW.XML with COMBRW.XSD.
Use the e.net Diagnostics suite Harness and select Query.Browse. Load the COMBRW
business object:
Click on the Load XML button to view the sample XmlIn.
By using the e.net Diagnostics suite's Harness tool you can view and edit the sample
XmlIn and process it through the e.net solutions application server, receiving the XmlOut
in the Business Object Output tab of the Harness screen. Using this tool enables you to
test and troubleshoot your application's XmlIn and quickly see the results and the XML
structures used to convey the required data.
The Class Library Reference
5–15

Example 5.11. ASP.NET Visual Basic codebehind for Query.Browse
' Logon and trap any exceptions
Dim UserId As String
Dim Obj As New Encore.Utilities()
Try
UserId = Obj.Logon("ADMIN", " ", "1", " ", 5, 0, 0, " ")
Catch exc As Exception
Response.Write("Exception - message:" & exc.Message)
Exit Sub
End Try
' Run generic fetch returning a warehouse row
Dim Qry As New Encore.Query()
Dim XmlOut As String
' Build an XML string to pass the table name and key
Dim XmlIn As New System.Text.StringBuilder()
XmlIn.Append("<?xml version='1.0'encoding='Windows-1252'?>")
XmlIn.Append("<Browse>")
XmlIn.Append("<BrowseName>ArCustomer</BrowseName>")
XmlIn.Append("<StartAtKey>0000001</StartAtKey>")
XmlIn.Append("<StartCondition>GE</StartCondition>")
XmlIn.Append("<XslStylesheet>browse.xsl</XslStylesheet>")
XmlIn.Append("</Browse>")
Try
XmlOut = Qry.Browse(UserId, XmlIn.ToString())
Catch exc As Exception
Response.Write("Unable to run generic browse - \
Exception:" & exc.Message)
Exit Sub
End Try
Response.Write(XmlOut)
Response.ContentType = "text/xml"
' Logoff and Cancel your current Session
Dim ReturnCode As Long
ReturnCode = Obj.Logoff(UserId)
Qry = Nothing
Obj = Nothing
5–16

The Generic Browse can use an XML configuration file that describes the
browses available (the browse names), the tables and the columns to be
shown together with a browse title and a default number of rows. This file
allows an administrator to configure the columns to be shown and if required
can configure different views of data for each operator. This configuration
file can be accessed using the Browse Setup program from the e.net solutions
menu item within SYSPRO.
5.2.3. Query.Fetch
Syntax:
Query.Fetch(UserID, XmlIn)
The Fetch method enables generic retrieval of a single row from a SYSPRO table. The
XmlIn is an XML string defining the parameters required. The Fetch method returns the
row data as an XML string.
Business objects available to this method include:
• COMFCH
The Fetch method automatically calls the COMFCH Business Object.
This example uses the customer account number of "0000019", the invoice number of
"100514" and the document type of "I" to form the <Key>. It is also possible to split the
different parts of the <Key> element using the <Key> and <Optional Key> elements (as
demonstrated in the example following this one).
The Class Library Reference
5–17

Example 5.12. XmlIn with Query.Fetch (COMFCH.XML)
<?xml version="1.0" encoding="Windows-1252"?>
<Fetch>
<TableName>ArInvoice</TableName>
<Key>0000019100514I</Key>
<FullKeyProvided>Y</FullKeyProvided>
</Fetch>
Validate COMFCH.XML with COMFCH.XSD.
Use the e.net Diagnostics suite's Harness tool and select Query.Fetch. Load the
COMFCH business object:
Now click on the Load XML button to view the sample XmlIn.
By using the e.net Diagnostics suite's Harness tool you can view and edit the sample
XmlIn and process it through the e.net solutions application server, receiving the XmlOut
in the Business Object Output tab of the Harness screen. By using this tool you can test
and troubleshoot your application's XmlIn and quickly see the results and the XML
structures used to convey the returned data.
5–18

Example 5.13. ASP.NET Visual Basic codebehind for Query.Fetch
' Logon and trap any exceptions
Dim UserId As String
Dim Obj As New Encore.Utilities()
Try
UserId = Obj.Logon("ADMIN", " ", "1", " ", 5, 0, 0, " ")
Catch exc As Exception
Response.Write("Exception - message:" & exc.Message)
Exit Sub
End Try
' Run generic fetch returning a warehouse row
Dim Qry As New Encore.Query()
Dim XmlOut As String
' Build an XML string to pass the table name and key
Dim XmlIn As New System.Text.StringBuilder()
XmlIn.Append("<?xml version='1.0'encoding='Windows-1252'?>")
XmlIn.Append("<Fetch>")
XmlIn.Append("<TableName>ArInvoice</TableName>")
XmlIn.Append("<Key>0000019</Key>")
XmlIn.Append("<OptionalKey1>100514</OptionalKey1>")
XmlIn.Append("<OptionalKey2>I</OptionalKey2>")
XmlIn.Append("</Fetch>")
Try
XmlOut = Qry.Fetch(UserId, XmlIn.ToString())
Catch exc As Exception
Response.Write("Unable to run generic fetch - \
Exception:" & exc.Message)
Exit Sub
End Try
Response.Write(XmlOut)
Response.ContentType = "text/xml"
Response.Write(XmlOut.ToString())
Response.End()
' Logoff and Cancel your current Session
Dim ReturnCode As Long
ReturnCode = Obj.Logoff(UserId)
Qry = Nothing
Obj = Nothing
The Class Library Reference
5–19

5.2.4. Query.NextKey
Syntax:
Query.NextKey(UserID, XmlIn)
The NextKey method provides a generic method with which to retrieve a key that is
alphabetically higher than the current key. In combination with PreviousKey,
NextKey provides a next/previous function within your application. The NextKey
method is passed the current key as an XML string and returns the next alphabetically
higher key as an XML string.
Business objects available to this method include:
• COMKEY
The NextKey method automatically calls the COMKEY Business Object.
Example 5.14. XmlIn with Query.NextKey (COMKEY.XML)
<Keys>
<TableName>ArInvoice</TableName>
<Key>0000019</Key>
<OptionalKey1>100514</OptionalKey1>
<OptionalKey2>I</OptionalKey2>
</Keys>
Validate COMKEY.XML with COMKEY.XSD.
Use the e.net Diagnostics suite's Harness tool and select Query.Next Key. Load the
COMKey business object:
5–20
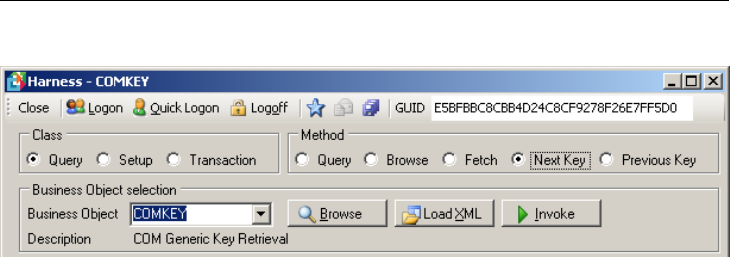
Now click on the Load XML button to view the sample XmlIn.
By using the e.net Diagnostics suite's Harness tool you can view and edit the sample
XmlIn and process it through the e.net solutions application server, receiving the XmlOut
in the Business Object Output tab of the Harness screen.
The Class Library Reference
5–21

Example 5.15. ASP.NET Visual Basic codebehind for Query.NextKey
' Logon and trap any exceptions
Dim UserId As String
Dim Obj As New Encore.Utilities()
Try
UserId = Obj.Logon("ADMIN", " ", "1", " ", 5, 0, 0, " ")
Catch exc As Exception
Response.Write("Exception - message:" & exc.Message)
Exit Sub
End Try
' Run generic fetch returning a warehouse row
Dim Qry As New Encore.Query()
Dim XmlOut As String
' Build an XML string to pass the table name and key
Dim XmlIn As New System.Text.StringBuilder()
XmlIn.Append("<?xml version='1.0'encoding='Windows-1252'?>")
XmlIn.Append("<Keys>")
XmlIn.Append("<TableName>ArInvoice</TableName>")
XmlIn.Append("<Key>0000019</Key>")
XmlIn.Append("<OptionalKey1>100514</OptionalKey1>")
XmlIn.Append("<OptionalKey2>I</OptionalKey2>")
XmlIn.Append("</Keys>")
Try
XmlOut = Qry.NextKey(UserId, XmlIn.ToString())
Catch exc As Exception
Response.Write("Unable to get next key - Exception:" \
& exc.Message)
Exit Sub
End Try
Response.Write("The next key is " & XmlOut)
' Logoff and Cancel your current Session
Dim ReturnCode As Long
ReturnCode = Obj.Logoff(UserId)
Qry = Nothing
Obj = Nothing
5–22

5.2.5. Query.PreviousKey
Syntax:
Query.PreviousKey(UserID, XmlIn)
The PreviousKey method provides a generic method with which to retrieve a key that
is alphabetically lower than the current key. In combination with NextKey,
PreviousKey, provides a next/previous function within your application. The
PreviousKey method is passed the current key as an XML string and returns the next
alphabetically lower key as an XML string.
Business objects available to this method include:
• COMKEY
The NextKey method automatically calls the COMKEY Business Object.
Example 5.16. XmlIn with Query.PreviousKey (COMKEY.XML)
<Keys>
<TableName>ArInvoice</TableName>
<Key>0000019</Key>
<OptionalKey1>100514</OptionalKey1>
<OptionalKey2>I</OptionalKey2>
</Keys>
Validate COMKEY.XML with COMKEY.XSD.
Use the e.net Diagnostics suite's Harness and select Query.Previous Key. Load the
COMKey Business Object:
The Class Library Reference
5–23

Now click on the Load XML button to view the sample XmlIn.
By using the e.net Diagnostics suite's Harness you can view and edit the sample XmlIn
and process it through the e.net solutions application server, receiving the XmlOut in the
Business Object Output tab of the Harness screen.
5–24

Example 5.17. ASP.NET Visual Basic codebehind for
Query.PreviousKey
' Logon and trap any exceptions
Dim UserId As String
Dim Obj As New Encore.Utilities()
Try
UserId = Obj.Logon("ADMIN", " ", "1", " ", 5, 0, 0, " ")
Catch exc As Exception
Response.Write("Exception - message:" & exc.Message)
Exit Sub
End Try
' Run generic fetch returning a warehouse row
Dim Qry As New Encore.Query()
Dim XmlOut As String
' Build an XML string to pass the table name and key
Dim XmlIn As New System.Text.StringBuilder()
XmlIn.Append("<?xml version='1.0'encoding='Windows-1252'?>")
XmlIn.Append("<Keys>")
XmlIn.Append("<TableName>ArInvoice</TableName>")
XmlIn.Append("<Key>0000019</Key>")
XmlIn.Append("<OptionalKey1>100514</OptionalKey1>")
XmlIn.Append("<OptionalKey2>I</OptionalKey2>")
XmlIn.Append("</Keys>")
Try
XmlOut = Qry.PreviousKey(UserId, XmlIn.ToString)
Catch exc As Exception
Response.Write("Unable to get previous key - Exception:" \
& exc.Message)
Exit Sub
End Try
Response.Write("The previous key is " & XmlOut.ToString)
' Response.ContentType = "text/xml"
' Logoff and Cancel your current Session
Dim ReturnCode As Long
ReturnCode = Obj.Logoff(UserId)
Qry = Nothing
Obj = Nothing
The Class Library Reference
5–25

5.3. Setup Class
There are three Methods within the Setup class: Add, Update, and Delete.
Use the e.net Diagnostics suite's Harness tool and see the method options displayed when
you select the Setup class:
By selecting each different method and clicking on the business object drop down menu
you can see which business objects are available for that particular method within the
Setup class.
5.3.1. Setup.Add
Syntax:
Setup.Add(UserID, BusinessObject, XmlParameters, XmlIn)
The Add method enables one or more data items to be added to the SYSPRO data
structures.
The Setup.Add method requires two XML input strings. The first, XmlParameters, is
used to pass parameters to the specified Business Object. The second, XmlIn, contains the
data to be added to SYSPRO. The Business Object will return an XML string indicating
success or failure. The Add method can be used as the basis for an import function.
The structure and parameters allowed in XmlParameters and XmlIn is dependent on
the business object being called.
Business objects available to this method can be found in the Business Object Reference
Library list available on the SYSPRO SupportZone e.net solutions menu.
Use the e.net Diagnostics suite's Harness tool and select Setup.Add. Load the APSSSP
business object:
Now click on the Load XML button to view the sample XmlIn.
5–26

By using the e.net Diagnostics suite's Harness tool you can view and edit the sample
XmlIn and process it through the e.net solutions application server, receiving the XmlOut
in the Business Object Output tab of the Harness screen. Using this tool enables you to
test and troubleshoot your application's XmlIn and quickly see the results and the XML
structures used to convey the returned data. This is possible with all the business objects
listed for the Setup.Add method.
The Class Library Reference
5–27

Example 5.18. ASP.NET Visual Basic codebehind of Setup.Add
'Logon and trap any exceptions
Dim UserId As String
Dim Obj As New Encore.Utilities()
Try
UserId = Obj.Logon("ADMIN", " ", "1", " ", 5, 0, 0, " ")
Catch exc As Exception
Response.Write("Exception - message:" & exc.Message)
Exit Sub
End Try
'Run generic query returning a sales order
Dim Setup As New Encore.Setup()
Dim XmlOut As String
' Build an XML string to pass parameters
Dim XmlParameters As New System.Text.StringBuilder()
XmlParameters.Append("<?xml version='1.0'encoding= \
'Windows-1252'?>")
XmlParameters.Append("<SetupArCustomer>")
XmlParameters.Append("SetupArCustomer>")
XmlParameters.Append("<Parameters>")
XmlParameters.Append("<IgnoreWarnings>N</IgnoreWarnings>")
XmlParameters.Append("<ApplyIfEntireDocumentValid>Y \
</ApplyIfEntireDocumentValid>")
XmlParameters.Append("<ValidateOnly>N</ValidateOnly>")
XmlParameters.Append("</Parameters>")
XmlParameters.Append("</SetupArCustomer>")
' Build an XML string to add a customer
Dim XmlIn As New System.Text.StringBuilder()
XmlIn.Append("<?xml version='1.0'encoding='Windows-1252'?>")
XmlIn.Append("<SetupArCustomer>")
XmlIn.Append("<Item>")
XmlIn.Append("<Key>")
XmlIn.Append("<Customer>0000002</Customer>")
XmlIn.Append("</Key>")
XmlIn.Append("<Name>Bikes and Blades - North</Name>")
XmlIn.Append("<Branch>20</Branch>")
XmlIn.Append("<Salesperson>200</Salesperson>")
XmlIn.Append("</Item>")
XmlIn.Append("</SetupArCustomer>")
Try
XmlOut = Setup.Add(UserId, "ARSSCS", XmlParameters. \
5–28

ToString(), XmlIn.ToString())
Catch exc As Exception
Response.Write("Unable to run business object ARSSCS - \
Exception:" & exc.Message)
Exit Sub
End Try
Response.ContentType = "text/xml"
Response.Write(XmlOut)
Response.End()
'Logoff and Cancel your current Session
Dim ReturnCode As Long
ReturnCode = Obj.Logoff(UserId)
Setup = Nothing
Obj = Nothing
The Class Library Reference
5–29

Example 5.19. ASP.NET C# codebehind for Setup.Add
string UserId;
Encore.Utilities Obj = new Encore.Utilities();
try
{
UserId = Obj.Logon("ADMIN", " ", "1", " ", \
Encore.Language.ENGLISH, 0, 0, " ");
}
catch (Exception exc)
{
Response.Write(("Exception - message:" + exc.Message));
return;
}
Encore.Setup Setup = new Encore.Setup();
string XmlOut;
System.Text.StringBuilder XmlParameters = new System.Text. \
StringBuilder();
XmlParameters.Append("<SetupArCustomer>");
XmlParameters.Append("<Parameters>");
XmlParameters.Append("<IgnoreWarnings>N</IgnoreWarnings> ");
XmlParameters.Append("<ApplyIfEntireDocumentValid>Y \
</ApplyIfEntireDocumentValid>");
XmlParameters.Append("<ValidateOnly>N</ValidateOnly>");
XmlParameters.Append("</Parameters>");
XmlParameters.Append("</SetupArCustomer>");
System.Text.StringBuilder xmlin = new System.Text. \
StringBuilder();
xmlin.Append("<?xml version='1.0' encoding='Windows-1252'?>");
xmlin.Append("<SetupArCustomer>");
xmlin.Append("<Item/>");
xmlin.Append("<Key>");
xmlin.Append("<Customer>0000002</Customer>");
xmlin.Append("</Key>");
xmlin.Append("<Name>Bikes and Blades - North</Name>");
xmlin.Append("<Branch>20</Branch>");
xmlin.Append("<Salesperson>200</Salesperson>");
xmlin.Append("</Item>");
xmlin.Append("</SetupArCustomer>");
try
{
XmlOut = Setup.Add(UserId, "ARSSCS", XmlParameters. \
ToString(), xmlin.ToString());
}
5–30

catch (Exception exc)
{
Response.Write("Unable to run business object ARSSCS - \
Exception:" + exc.Message);
return;
}
Response.ContentType = "text/xml"
Response.Write(XmlOut)
Response.End()
long ReturnCode;
ReturnCode = Obj.Logoff(UserId);
Setup = null;
Obj = null;;
The Class Library Reference
5–31

5.3.2. Setup.Update
Syntax:
Setup.Update(UserID, BusinessObject, XmlParameters, XmlIn)
The Update method enables data contained in the SYSPRO data structures to be
modified.
The Setup.Update method requires two XML input strings. The first,
XmlParameters, is used to pass parameters to the business object. The second, XmlIn,
contains the data that will replace the current data contained in SYSPRO. The business
object will return an XML string indicating success or failure.
The structure and parameters allowed in XmlParameters and XmlIn is dependent on
the business object being called.
Business objects available to this method can be found in the Business Object Reference
Library list available on the SYSPRO SupportZone e.net solutions menu.
Use the e.net Diagnostics suite's Harness tool and select Setup.Update. Load the
APSSSP business object:
Now click on the Load XML button to view the sample XmlIn.
By using the e.net Diagnostics suite's Harness tool you can view and edit the sample
XmlIn and process it through the e.net solutions application server, receiving the XmlOut
in the Business Object Output tab of the Harness screen. Using this tool enables you to
test and troubleshoot your application's XmlIn and quickly see the results and the XML
structures used to convey the returned data. This is possible with all the business objects
listed for the Setup.Update method.
5–32

Example 5.20. ASP.NET Visual Basic codebehind for Setup.Update
' Logon and trap any exceptions
Dim UserId As String
Dim Obj As New Encore.Utilities()
Try
UserId = Obj.Logon("ADMIN", " ", "1", " ", 5, 0, 0, " ")
Catch exc As Exception
Response.Write("Exception - message:" & exc.Message)
Exit Sub
End Try
' Run generic query returning a sales order
Dim Setup As New Encore.Setup()
Dim XmlOut As String
' Build an XML string to pass parameters
Dim XmlParameters As New System.Text.StringBuilder()
XmlParameters.Append("<?xml version='1.0'encoding='Windows- \
1252'?>")
XmlParameters.Append("SetupArCustomer>")
XmlParameters.Append("<Parameters>")
XmlParameters.Append("<IgnoreWarnings>N</IgnoreWarnings>")
XmlParameters.Append("<ApplyIfEntireDocumentValid>Y \
</ApplyIfEntireDocumentValid>")
XmlParameters.Append("<ValidateOnly>N</ValidateOnly>")
XmlParameters.Append("</Parameters>")
XmlParameters.Append("</SetupArCustomer>")
' Build an XML string to add a customer
Dim XmlIn As New System.Text.StringBuilder()
XmlIn.Append("<?xml version='1.0'encoding='Windows-1252'?>")
XmlIn.Append("<SetupArCustomer>")
XmlIn.Append("<Item>")
XmlIn.Append("<Key>")
XmlIn.Append("<Customer>0000002</Customer>")
XmlIn.Append("</Key>")
XmlIn.Append("<Name>Bikes and Blades - Northern</Name>")
XmlIn.Append("</Item>")
XmlIn.Append("</SetupArCustomer>")
Try
XmlOut = Setup.Update(UserId, "ARSSCS", XmlParameters. \
ToString(), XmlIn.ToString())
Catch exc As Exception
The Class Library Reference
5–33

Response.Write("Unable to run business object ARSSCS - \
Exception:" & exc.Message)
Exit Sub
End Try
Response.Write(XmlOut)
Response.ContentType = "text/xml"
' Logoff and Cancel your current Session
Dim ReturnCode As Long
ReturnCode = Obj.Logoff(UserId)
Obj = Nothing
5–34

5.3.3. Setup.Delete
Syntax:
Setup.Delete(UserID, BusinessObject, XmlParameters, XmlIn)
The Delete method enables specified data to be deleted from the SYSPRO data
structures.
The Setup.Delete method requires two XML input strings. The first,
XmlParameters is used to pass parameters to the business object. The second, XmlIn
specifies the data keys to be deleted from SYSPRO. The Business Object will return an
XML string indicating success or failure.
The structure and parameters allowed in XmlParameters and XmlIn is dependent on
the business object being called.
Before Setup.Delete can delete anything, the normal SYSPRO criteria for
deleting the item in the core product must be met. For example, to be able to
delete a stock code there must be no stock on hand in a warehouse, no sales
orders containing this item, no purchase order, etc.
Business objects available to this method can be found in the Business Object Reference
Library list available on the SYSPRO SupportZone e.net solutions menu.
Use the e.net Diagnostics suite's Harness tool and select Setup.Delete. Load the
APSSSP business object:
Now click on the Load XML button to view the sample XmlIn.
By using the e.net Diagnostics suite's Harness tool you can view and edit the sample
XmlIn and process it through the e.net solutions application server, receiving the XmlOut
in the Business Object Output tab of the Harness screen. Using this tool enables you to
test and troubleshoot your application's XmlIn and quickly see the results and the XML
structures used to convey the returned data. This is possible with all the business objects
listed for the Setup.Delete method.
The Class Library Reference
5–35

Example 5.21. ASP.NET Visual Basic codebehind for Setup.Delete
' Logon and trap any exceptions
Dim UserId As String
Dim Obj As New Encore.Utilities()
Try
UserId = Obj.Logon("ADMIN", " ", "1", " ", 5, 0, 0, " ")
Catch exc As Exception
Response.Write("Exception - message:" & exc.Message)
Exit Sub
End Try
Dim Setup As New Encore.Setup()
Dim XmlOut As String
' Build an XML string to pass parameters
Dim XmlParameters As New System.Text.StringBuilder()
XmlParameters.Append("<?xml version='1.0'encoding='Windows- \
1252'?>")
XmlParameters.Append("SetupArCustomer>")
XmlParameters.Append("<Parameters>")
XmlParameters.Append("<IgnoreWarnings>N</IgnoreWarnings>")
XmlParameters.Append("<ApplyIfEntireDocumentValid>Y \
</ApplyIfEntireDocumentValid>")
XmlParameters.Append("<ValidateOnly>N</ValidateOnly>")
XmlParameters.Append("</Parameters>")
XmlParameters.Append("</SetupArCustomer>")
' Build an XML string to add a customer
Dim XmlIn As New System.Text.StringBuilder()
XmlIn.Append("<?xml version='1.0'encoding='Windows-1252'?>")
XmlIn.Append("<SetupArCustomer>")
XmlIn.Append("<Item>")
XmlIn.Append("<Key>")
XmlIn.Append("<Customer>0000002</Customer>")
XmlIn.Append("</Key>")
XmlIn.Append("</Item>")
XmlIn.Append("</SetupArCustomer>")
Try
XmlOut = Setup.Delete(UserId, "ARSSCS", XmlParameters. \
ToString(), XmlIn.ToString())
Catch exc As Exception
Response.Write("Unable to run business object ARSSCS - \
Exception:" & exc.Message)
Exit Sub
5–36

End Try
Response.ContentType = "text/xml"
Response.Write(XmlOut)
Response.End()
' Logoff and Cancel your current Session
Dim ReturnCode As Long
ReturnCode = Obj.Logoff(UserId)
Setup = Nothing
Obj = Nothing
5.4. Transaction Class
The Transaction class has two Methods with it's class structure: Post, and Build.
Use the e.net Diagnostics suite's Harness tool to see the method options displayed when
you select the Transaction class:
By selecting each different method and clicking on the business object drop down menu
you can see which business objects are available for that particular method within the
Setup class.
5.4.1. Transaction.Post
Syntax:
Utilities.Transaction(UserID, BusinessObject, XmlParameters,
XmlIn)
The Post method enables transactions to be posted to SYSPRO.
The return XML string will indicate success or failure. More complex Post methods will
use the Build method to assist with building the XML data.
The Transaction.Post method requires two XML input strings. The first,
XmlParameters is used to pass parameters to the Business Object. The second, XmlIn
contains the data to be posted to SYSPRO. The Business Object will return an XML string
indicating success or failure.
The structure and parameters allowed in XmlParameters and XmlIn is dependent on
the business object being called.
The Class Library Reference
5–37

Business objects available to this method can be found in the Business Object Reference
Library list available on the SYSPRO SupportZone e.net solutions menu.
Use the e.net Diagnostics suite's Harness tool and select Transaction.Post. Load the
APSTIN business object:
Now click on the Load XML button to view the sample XmlIn.
By using the e.net Diagnostics suite's Harness tool you can view and edit the sample
XmlIn and process it through the e.net solutions application server, receiving the XmlOut
in the Business Object Output tab of the Harness screen. Using this tool enables you to
test and troubleshoot your application's XmlIn and quickly see the results and the XML
structures used to convey the returned data. This is possible with all the business objects
listed for the Transaction.Post method.
Example 5.22. ASP.NET Visual Basic codebehind for Transaction.Post
' Sample code to Post a message to the SYSPRO Message Inbox
'Logon and trap any exceptions
Dim UserId As String
Dim Obj As New Encore.Utilities()
Try
UserId = Obj.Logon("ADMIN", " ", "1", " ", 5, 0, 0, " ")
Catch exc As Exception
Response.Write("Exception - message:" & exc.Message)
Exit Sub
End Try
Dim Trn As New Encore.Transaction()
Dim XmlOut As String
' Build an XML string to pass parameters
Dim XmlParameters As New System.Text.StringBuilder()
XmlParameters.Append("<?xml version='1.0'encoding='Windows- \
1252'?>")
5–38

' Build an XML string to add a customer
Dim XmlIn As New System.Text.StringBuilder()
XmlIn.Append("<?xml version='1.0'encoding='Windows-1252'?>")
XmlIn.Append("<Message>")
XmlIn.Append("<Item>")
XmlIn.Append("<Companyid>A</Companyid>")
XmlIn.Append("<Operator>ADMIN</Operator>")
XmlIn.Append("<Date/>")
XmlIn.Append("<Time/>")
XmlIn.Append("<MessageType>ENET</MessageType>")
XmlIn.Append("<Subject>Stock on hand low for item B100 \
</Subject>")
XmlIn.Append("<FromOperator/>")
XmlIn.Append("<FromName/>")
XmlIn.Append("<ProgramToRun>INVPEN</ProgramToRun>")
XmlIn.Append("<ProgramParameters>B100</ProgramParameters>")
XmlIn.Append("<PreventDuplicate/>")
XmlIn.Append("</Item>")
XmlIn.Append("</Message>")
Try
XmlOut = Trn.Post(UserId, "COMTIB", XmlParameters. \
ToString(), XmlIn.ToString())
Catch exc As Exception
Response.Write("Unable to run business object COMTIB - \
Exception:" & exc.Message)
Exit Sub
End Try
Response.ContentType = "text/xml"
Response.Write(XmlOut)
Response.End()
' Logoff and Cancel your current Session
Dim ReturnCode As Long
ReturnCode = Obj.Logoff(UserId)
Obj = Nothing
Example 5.23. ASP.NET C# Sample Code for Transaction.Post
string UserId;
Encore.Utilities Obj = new Encore.Utilities();
try
{
UserId = Obj.Logon("ADMIN", " ", "1", " ", \
Encore.Language.ENGLISH, 0, 0, " ");
The Class Library Reference
5–39

}
catch (Exception exc)
{
Response.Write(("Exception - message:" + exc.Message));
return;
}
Encore.Transaction Trn = new Encore.Transaction();
string XmlOut;
string XmlParameters="<?xml version='1.0' encoding='Windows \
-1252'?>";
System.Text.StringBuilder xmlin = new System.Text. \
StringBuilder();
xmlin.Append("<?xml version='1.0' encoding='Windows-1252'?>");
xmlin.Append("<Message>");
xmlin.Append("<Item>");
xmlin.Append("<Companyid>A</Companyid>");
xmlin.Append("<Operator>ADMIN</Operator>");
xmlin.Append("<Date/>");
xmlin.Append("<Time/>");
xmlin.Append("<MessageType>ENET</MessageType>");
xmlin.Append("<Subject>Stock on hand low for item B100 \
</Subject>");
xmlin.Append("<FromOperator/>");
xmlin.Append("<FromName/>");
xmlin.Append("<ProgramToRun>INVPEN</ProgramToRun>");
xmlin.Append("<ProgramParameters>B100</ProgramParameters>");
xmlin.Append("<PreventDuplicate/>");
xmlin.Append("</Item>");
xmlin.Append("</Message>");
try
{
XmlOut = Trn.Post(UserId, "COMTIB", XmlParameters, \
xmlin.ToString());
}
catch (Exception exc)
{
Response.Write(("Unable to run business object COMTIB \
- Exception:" + exc.Message));
return;
}
Response.ContentType = "text/xml"
Response.Write(XmlOut)
Response.End()
long ReturnCode;
ReturnCode = Obj.Logoff(UserId);
Obj = null;
5–40

5.4.2. Transaction.Build
Syntax:
Transaction.Build(UserID, BusinessObject, XmlIn)
The Build method enables Build business objects to be called, retrieving information
that is used during a Post. The business object returns an XML string, the elements of
which can be added to the input of the Post method.
Business objects available to this method can be found in the Business Object Reference
Library list available on the SYSPRO SupportZone e.net solutions menu.
Use the e.net Diagnostics suite's Harness tool and select Transaction.Build. Load
the INVRMO business object:
Now click on the Load XML button to view the sample XmlIn.
By using the e.net Diagnostics suite's Harness tool you are able to view and edit the
sample XmlIn and process it through the e.net solutions application server, receiving the
XmlOut in the Business Object Output tab of the Harness screen. Using this tool enables
you to test and troubleshoot your application's XmlIn and quickly see the results and the
XML structures used to convey the returned data. This is possible with all the business
objects listed for the Transaction.Build method.
The Class Library Reference
5–41

Example 5.24. ASP.NET Visual Basic codebehind of Transaction.Build
' Logon and trap any exceptions
Dim UserId As String
Dim Obj As New Encore.Utilities()
Try
UserId = Obj.Logon("ADMIN", " ", "1", " ", 5, 0, 0, " ")
Catch exc As Exception
Response.Write("Exception - message:" & exc.Message)
Exit Sub
End Try
' Run generic query returning a sales order
Dim Trn As New Encore.Transaction()
Dim XmlOut As String
' Build an XML string for s/o header build
Dim XmlIn As New System.Text.StringBuilder()
XmlIn.Append("<?xml version='1.0'encoding='Windows-1252'?>")
XmlIn.Append("<Build>")
XmlIn.Append("<Parameters>")
XmlIn.Append("<Customer>0000001</Customer>")
XmlIn.Append("</Parameters>")
XmlIn.Append("</Build>")
Try
XmlOut = Trn.Build(UserId, "SORRSH", XmlIn.ToString())
Catch exc As Exception
Response.Write("Unable to run business object SORRSH - \
Exception:" & exc.Message)
Exit Sub
End Try
Response.ContentType = "text/xml"
Response.Write(XmlOut)
Response.End()
' Logoff and Cancel your current Session
Dim ReturnCode As Long
ReturnCode = Obj.Logoff(UserId)
Obj = Nothing
5–42

6
More Advanced Options
Objectives - In this chapter we deal with two concepts that will advance your use of
ASP.NET with e.net solutions. We will first tackle XSLT, examining the process of
transforming XML output for use in custom applications and by other proprietary
applications. By the end of this section you will be familiar with XSLT and the
transformation of an XmlOut string to an HTML table. In the second section of this
chapter we will deal with the concept of ASP.NET codebehind, separating the
programming logic from the presentation logic.
If you are already familiar with XSLT and ASP.NET codebehind usage then please move
on to the next chapter.
6.1. Transforming XML
XML is useful for transferring data between applications and between objects within an
application. It is, however, not very useful to present an XML file to an accountant or an
auditor or a data capture clerk. The benefit of using XML as a data transfer standard is that
one can also transform that data into other formats that can then be used to display the
information more effectively.
The transformation standards or capabilities for XML were being developed at the same
time that the XML standard was being developed. Using these standards, it is possible to
transform XML into HTML, SQL scripts, emails, and virtually any other document type.
This happens through the use of XSLT (Extensible Style Language Transformation)
definition files and an XSLT processor.
6.1.1. What is XSLT
XSLT (Extensible Style Language Transformation) is a standard that was created to
transform XML files into other formats or other XML Schemas. An XSL processor reads
the XML document and follows the instructions in the XSL stylesheet, then it outputs the
data as an HTML page, a SQL script, an email, an XML file governed by a different
schema, or any other standardized document type.
XSLT transformations are also useful in situations where the XML document's structure
does not match up well with an application that needs access to the data. An XML
document may contain the appropriate data to be imported into a database, for example,
but may not be structured in the format that the application performing the import expects.
The following two examples show how an XML document can be transformed from one

XML format to another:
Example 6.1. Simple XML
<?xml version="1.0"?>
<root>
<row id="1" fname="King" lname="Kong"/>
<row id="2" fname="Mary" lname="Stewart"/>
<row id="3" fname="Gerald" lname="Durrel"/>
<row id="4" fname="Jeffery" lname="Shaw"/>
</root>
Using XSLT, we can transform this document into a different format, one that is better
suited for another application to work with, like this:
Example 6.2. Transformed Simple XML
<?xml version="1.0"?>
<root>
<row>
<id>1</id>
<fname>King</fname>
<lname>Kong</lname>
</row>
<row>
<id>2</id>
<fname>Mary</fname>
<lname>Stewart</lname>
</row>
<row>
<id>3</id>
<fname>Gerald</fname>
<lname>Durrel</lname>
</row>
<row>
<id>4</id>
<fname>Jeffery</fname>
<lname>Shaw</lname>
</row>
</root>
6–2

The data is exactly the same in both XML files. The only difference is how the data has
been arranged. This is a very simple example of the power of XSLT. Once we have
learned more about how to process XML files using an XSLT processor and definition
file, we will be using XSLT transformations to present XmlOut data in HTML format.
6.1.2. The Process of Transforming
The process of transforming an XML document into another format, such as HTML,
requires two types of processing engines. We first need a parser capable of loading the
source XML document into a DOM (Document Object Model) tree structure. The XSLT
document is also loaded into the parser and a tree structure created for it. This tree
structure will normally be optimized to accommodate XSLT processing and is specific to
the processor being used. We then need an XSLT processor to take the XML document
structure and match up the nodes within the document against the various &templates"
found in the XSLT document structure, and then output the result. The final tree structure
(the output) is dynamically created based on information contained within the XSLT
document. Here is a simple diagram of the transformation process:
Figure 6.1. The XSLT transformation process.
More Advanced Options
6–3

6.1.2.1. XSLT as a Template
XSLT is important for transforming the XML output of the SYSPRO business objects for
use in other applications and settings. In order to gain a better understanding of XSLT, it's
important that we define what an XSLT document contains. Although XSLT stands for
Extensible Stylesheet Language Transformations, another name for it could be "Extensible
Template Language Transformations". This is because XSLT relies on templates to
process and create the particular output structure. The W3C provides the following
statement about XSLT in relation to templates:
“A stylesheet contains a set of template rules. A template rule has two parts: a pattern
which is matched against nodes in the source tree and a template which can be instantiated
to form part of the result tree. This allows a stylesheet to be applicable to a wide class of
documents that have similar source tree structures.”
I'm sure that you have used templates in another application (i.e. MS Word) and so will
know that they provide the basic structure that can be reused for specific purposes.
Templates function in much the same way in XSLT, except that they are programmed to
match up with nodes within an XML document. XSLT templates allow us to process and
structure the data contained within the elements and attributes of the source XML
document. They provide a template structure that can be processed when a particular node
in the source XML document is matched.
Remember that the XSLT processor described earlier is provided with two tree structures
to use when transforming. The first is the structure for the source XML document and the
second is the XSLT template document. Once these two structures are loaded, the XSLT
processor attempts to match the element or attribute names found in the source XML
document with templates contained in the XSLT document. The matching process is
performed using XPath expressions that are part of the XSLT document. When a node
from the source XML document matches a template in the XSLT document, the data
contained in that node gets processed though the template.
The use of XSLT definition files as templates offers an effective way to process various
XML document structures. Each element, attribute, text node, or whatever, can be
matched up with the appropriate template via the XPath expressions. If a given node does
not have a matching template, no processing will occur for it, and the next section of the
source XML document will be processed. When a matching node is found, the template
takes care of creating the proper output structure based on information contained within
the node.
The theory of using XSLT to transform XML is very powerful, but let's begin to apply it
to transforming XML to HTML so that we can use the XmlOut data returned from the
SYSPRO e.net solutions business objects in a web-based application.
6–4

6.1.3. Transforming XML to HTML with XSLT
In this section we'll examine a simple XSLT document that transforms XML into HTML
for display in a web browser. The section that follows shows how XSLT can transform
XML into formats other than HTML. This example shows a simple conversion of an XML
document that describes information about a chapter within a book:
Example 6.3. Chapter.xml
<?xml version="1.0" ?>
<chapter>
<name>Sample Applications</name>
<author>
<name>John Smith</name>
<email>[email protected]</email>
<website>http://www.somesite.com/jsmith/</website>
</author>
<examples>
<example>
<reference>7</reference>
<demo>
<url>logon.aspx</url>
<link_text>LogonVB.aspx</link_text>
</demo>
<source>
<url>login.txt</url>
<link_text>LogonVB.aspx</link_text>
</source>
<description>SYSPRO Logon using ASP.NET</description>
</example>
</examples>
</chapter>
More Advanced Options
6–5

The root node of the XML document is <chapter>. The following example shows and
XSLT definition file (Chapter.xsl) that will be used to transform the chapter.xml into
web browser viewable HTML:
Example 6.4. Chapter.xsl
<?xml version="1.0" ?>
<xsl:transform xmlns:xsl="http://www.w3.org/1999/XSL/ \
Transform" version="1.0">
<xsl:output method="xml" />
<xsl:template match="/">
<p>
<xsl:apply-templates select="chapter" />
</p>
</xsl:template>
<xsl:template match="/chapter">
<b><xsl:value-of select="name"/></b>
<br/>
by <xsl:apply-templates select="author" />
<br/><br/>
<xsl:apply-templates select="examples" />
</xsl:template>
<xsl:template match="author">
<i><xsl:value-of select="name"/></i>
</xsl:template>
<xsl:template match="examples">
<table bgcolor="#000033">
<tr bgcolor="#CCCCFF">
<th>Reference</th>
<th>Demo</th>
<th>Source</th>
<th>Description</th>
</tr>
<xsl:apply-templates select="example" />
</table>
</xsl:template>
<xsl:template match="example">
<tr bgcolor="#DDDDDD">
<td><xsl:value-of select="reference"/></td>
<td>
<a>
<xsl:attribute name="href">
<xsl:value-of select="demo/url"/>
</xsl:attribute>
<xsl:value-of select="demo/link_text"/>
</a>
</td>
6–6

<td>
<a>
<xsl:attribute name="href">
<xsl:value-of select="source/url"/>
</xsl:attribute>
<xsl:value-of select="source/link_text"/>
</a>
</td>
<td><xsl:value-of select="description"/></td>
</tr>
</xsl:template>
</xsl:transform>
In order to transform Chapter.xml into an HTML document using Chapter.xsl we
need to load both files into an XSLT processor. We can do this using a simple ASP.NET
program, as demonstrated using the code shown below:
Example 6.5. ASP.NET C# using the XslTransform Class
<%@ Import Namespace="System.Xml" %>
<%@ Import Namespace="System.Xml.Xsl" %>
<%@ Import Namespace="System.Xml.XPath" %>
<script language="C#" runat="server">
public void Page_Load(Object sender, EventArgs E) {
string xmlPath = Server.MapPath("Chapter.xml");
string xslPath = Server.MapPath("Chapter.xsl");
//Instantiate the XPathDocument Class
XPathDocument doc = new XPathDocument(xmlPath);
//Instantiate the XslTransform Class
XslTransform transform = new XslTransform();
transform.Load(xslPath);
//Custom format the indenting of the output document
//by using an XmlTextWriter
XmlTextWriter writer=new XmlTextWriter(Response.Output);
writer.Formatting = Formatting.Indented;
writer.Indentation=4;
transform.Transform(doc, null, writer);
}
</script>
More Advanced Options
6–7

On executing the code in Example 6.5, “ASP.NET C# using the XslTransform Class”
[6–7], the XML document will be transformed into HTML that can be rendered in a web
browser. The result of this transformation is presented below:
Your understanding of the code shown in Example 6.4, “Chapter.xsl” [6–6] and
Example 6.5, “ASP.NET C# using the XslTransform Class” [6–7] may be limited at this
point. Don't let that worry you, though, because a basic understanding of XML coupled
with the XSL descriptions contained in Table 6.1, “XSLT Elements” [6–10] will increase
your understand of each step of the transformation.
6.1.4. The XSLT Language
We have taken you through a simple transformation process and have demonstrated what
an XSLT document looks like. We will now break the different parts used in the .xsl file
into individual pieces and examine them. We will start with the root element, and then
briefly look at the other elements available.
6.1.4.1. The Root Element
If you take another look at Example 6.4, “Chapter.xsl” [6–6], you will notice that the XSL
document follows all the rules specified in the XML specification. We can see that the
case of each opening tag matches the case of the closing tag, that all attributes are quoted,
that all tags are closed, etc. XSLT documents are all well-formed XML documents. The
first line of each XSLT document should therefore contain the XML declaration. Although
this line is optional, it is important that you get into the practice of using it because as new
versions of the XML specification are released it will be important to recognize which
version is being used.
After the line containing the XML declaration, one of two elements specific to the XSLT
language can be used for the document's root node. These elements are:
• <xsl:stylesheet>
• <xsl:transform>
Although it is possible to use either element as the root of an XSLT document, in this book
we will use the xsl:stylesheet element. You can substitute the xsl:transform element
6–8

instead if you are more experienced in XSLT and are more comfortable using it.
Two more items must be included within an XSLT document that follows the guidelines
found in the XSLT specification. These are a local namespace declaration and the
"version" attribute. The following stylesheet file shows the xsl:stylesheet element, the
namespace declaration, and the version attribute:
Example 6.6. XSL Simple Stylsheet File
<?xml version="1.0"?>
<xsl:stylesheet xmlns:xsl="http://www.w3.org/1999/ \
XSL/Transform" version="1.0">
<!-- Your XSLT template goes here -->
</xsl:stylesheet>
The namespace URI (http://www.w3.org/1999/XSL/Transform) is always listed exactly as
shown, and the version attribute should have a value of 1.0 for the document to conform to
the November 1999 XSLT specification (which all XML and XSL used by SYSPRO e.net
solutions does). As future versions of the specification are released, this version number
can be changed, depending on what features the XSLT document uses.
XSLT version 2.0 was in Candidate Recommendation at the time this chapter
was written. All the examples used in this book use XSLT version 1.0.
6.1.4.2. Other XSLT Elements
If you have experience in programming in HTML you will already know how HTML
elements are used to perform specific tasks. For example, you know that the <table>
element is used with the <tr> and <td> elements to construct a table for display in a
browser. You know that the <img> element is used to display an image, and that the <div>
element is used as to define different page locations and divisions. In HTML, each of these
elements have a specific purpose. Each of the elements of XSLT has a specific purpose as
well.
The XSLT version 1.0 specification lists the elements that are used to transform XML
documents. The elements can be used in many different ways. They can be used as to
perform programming logic, performing if/then statements, looping, and writing out data
within a node. They can also be used to determine the output format. An XSLT element is
More Advanced Options
6–9

distinguished from other elements that may be within an XSLT document by its
association with a namespace. Declaring this namespace in the XSLT root element
(xsl:stylesheet or xsl:transform) was shown in Example 6.6, “XSL Simple Stylsheet File”
[6–9].
Table Table 6.1, “XSLT Elements” [6–10] contains a list of the elements defined in version
1.0 of the XSLT specification. Notice that each element contains the xsl: prefix. This list
contains information from Microsoft's XSLT Elements table
[http://msdn2.microsoft.com/en-us/library/ms256058(VS.80).aspx], SAXON's XSLT
Elements table [http://saxon.sourceforge.net/saxon6.5.2/xsl-elements.html], and Dan
Wahlin's XSLT Elements table (from Chapter 7 of his XML for ASP.NET Developers)
[http://www.topxml.com/dotnet/articles/xslt/default.asp].
Table 6.1. XSLT Elements
XSLT Element Description
xsl:apply-imports This is used in conjunction with imported style sheets to override
templates within the source style sheet. Calls to xsl:apply-imports
cause an imported template with lower precedence to be invoked
instead of the source style sheet template with higher precedence.
xsl:apply
-templates
When xsl:apply-templates is used, the XSLT processor finds the
appropriate template to apply, based on the type and context of each
selected node.
xsl:attribute This creates an attribute node that is attached to an element that
appears in the output structure.
xsl:attribute-set This is used when a commonly defined set of attributes will be
applied to different elements in the style sheet. This is similar to
named styles in CSS.
xsl:call-template This is used when processing is directed to a specific template. The
template is identified by name.
xsl:choose This is used along with the xsl:otherwise and xsl:when elements to
provide conditional testing. Similar to using a switch statement in C#
or Select Case statement in VB.NET.
xsl:comment Writes a comment to the output structure.
xsl:copy Copies the current node from the source document to the result tree.
The current node's children are not copied.
xsl:copy-of This is used to copy a result-tree fragment or node-set into the result
tree. This performs a "deep copy," meaning that all descendants of
the current node are copied to the result tree.
xsl:decimal -format Declares a decimal-format that is used when converting numbers into
strings with the format-number() function.
6–10

XSLT Element Description
xsl:element Creates an element with the specified name in the output structure.
xsl:fallback Provides an alternative (or fallback) template when specific
functionality is not supported by the XSLT processor being used for
the transformation. This element provides greater flexibility during
transformations as new XSLT versions come out in the future.
xsl:for-each Iterates over nodes in a selected node-set and applies a template
repeatedly.
xsl:if This is used to wrap a template body that will be used only when the
if statement test returns a true value.
xsl:import Allows an external XSLT style sheet to be imported into the current
style sheet. The XSLT processor will give a lower precedence to
imported templates as compared to templates in the original XSLT
style sheet.
xsl:include Allows for the inclusion of another XSLT style sheet into the current
style sheet. The XSLT processor gives the same precedence to the
included templates as templates in the original XSLT style sheet.
xsl:key Declares a named key and is used in conjunction with the key()
function in XPath expressions.
xsl:message This is used to output a text message and optionally terminate style
sheet execution.
xsl:namespace
-alias
This is used to map a prefix associated with a given namespace to
another prefix. This can be useful when a style sheet generates
another style sheet.
xsl:number Used to format a number before adding it to the result tree or to
provide a sequential number to the current node.
xsl:otherwise This is used with the xsl:choose and xsl:when elements to perform
conditional testing. Similar to using default in a switch statement.
xsl:output Specifies options for use in serializing the result tree.
xsl:param This is used to declare a parameter with a local or global scope.
Local parameters are scoped to the template in which they are
declared.
xsl:preserve -space Preserves whitespace in a document. Works in conjunction with the
xsl:strip-space element.
xsl:processing
-instruction
Writes a processing instruction to the result tree.
xsl:sort This is used with xsl:for-each or xsl:apply-templates to specify sort
criteria for selected node lists.
xsl:strip-space Causes whitespace to be stripped from a document. Works in
conjunction with the xsl:preserve-space element.
More Advanced Options
6–11

XSLT Element Description
xsl:stylesheet This element must be the outermost element in an XSLT document
and must contain a namespace associated with the XSLT
specification and a version attribute.
xsl:template Defines a reusable template for producing output for nodes that
match a particular pattern.
xsl:text Writes out the specified text to the result tree.
xsl:transform This is used in the same manner as the xsl:stylesheet element.
xsl:value-of Writes out the value of the selected node to the result tree.
xsl:variable This is used to declare and assign variable values that can be either
local or global in scope.
xsl:when This is used as a child element of xsl:choose to perform multiple
conditional testing. Similar to using case in a switch or Select
statement.
xsl:with-param This is used in passing a parameter to a template that is called via
xsl:call-template.
By using these XSL attributes you will be able to transform and use the XmlOut data
generated through the business objects used in your application. There is not enough space
in this book to teach you all the in and outs of XSL transformations, so we would
recommend that you use the basics that we have introduced in this chapter and supplement
them with further reading. There are plenty of good articles and tutorials available on the
internet. For example, Chapter 17 of the XML Bible, Second Edition : XSL
Transformations http://www.cafeconleche.org/books/bible2/chapters/ch17.html.
6.2. Advanced ASP.NET Notes
If you are already an expert in programming with ASP.NET please skip this section of the
book.
In this section of the chapter we deal with the use of codebehind. It may be useful for you
to use an integrated development environment (IDE) like Microsoft Visual Studio .NET
(or the free Express version, Visual Web Developer, which you can download from the
Microsoft ASP.NET site [http://msdn.microsoft.com/vstudio/express/vwd/download/]).
These programs present a drag-and-drop style interface to create the web form (.aspx)
page and automatically set up codebehind (.aspx.vb or aspx.cs) controls and event
handlers.
6.2.1. Codebehind
The use of ASP.NET allows a programmer to separate presentation (HTML) code from
the application logic (in our case the C# or VB code) through the use of 'codebehind'. The
6–12

codebehind class file may be compiled so that it can be used as an object. This allows
access to its properties, its methods, and its event handlers. For this to work, the .aspx page
must specify where to inherit the codebehind base class. To do this we will use the
Inherits attribute within the "@Page" directive. The .aspx page inherits from the
codebehind class, and the codebehind class inherits from the Page class.
When creating codebehind files, you should define the file extension using the
abbreviation of the language used. For example, code written in C# should have the
extension ".cs", and code written in VB should have the extension ".vb". Another standard
naming convention is to add the .aspx extension to the presentation filename as in
"mycodebehind.aspx.vb". A codebehind file or compiled codebehind "dll" can be used to
create reusable functions, proprietary application classes and objects, as well as user and
server controls.
Every .aspx page (even one with no programming code in it) gets turned into an instance
of the System.Web.UI.Page class. An .aspx page is parsed by the ASP.NET engine when it
is first requested. Then its JIT (Just-In-Time) compiled version is cached in the temporary
ASP.NET Files folder and used as an object. So, since the .aspx page is always
instantiated as an object, you can modify its parent class and have it inherit from a class of
your choice, provided that your custom made class eventually inherits from
System.Web.UI.Page. You can also have different pages set references to the class files of
other pages, which then makes possible some very interesting sharing of code objects.
The advantage of using codebehind is the ability to wire up intrinsic and custom events,
using ASP.NET server controls, like DataGrids, repeaters, dropdown listboxes and many
others. This creates a much richer, more professional and "Windows like" experience for
the end users. While this could be done with inline code, it isn't very easy, and it certainly
is not fun. You would have to write a lot of custom code to get most of the functionality of
the ASP.NET DataGrid control, but why do that if 90% of the time you can get everything
you need (and more) from the built in ASP.NET control?
6.2.2. Codebehind in an Non Visual Studio .NET environment
Within the Visual Studio .NET "<@page >" attribute of the .aspx file you will find the
entry Inherits="myCodeBehind" Codebehind="WebForm.aspx.vb". This tells Visual
Studio to compile the WebForm.aspx.vb code prior to running the .aspx page. In a non
Visual Studio .NET environment you simply change the "Codebehind=" entry to "Src=".
With this entry, the codebehind file will compile on the fly.
6.2.3. Pre-Compilling the Codebehind
Compiling the codebehind code manually is fairly easy. The command will look
something like this:
vbc /t:library /out:bin\WebForm.dll /r:System.dll /r:System.Web.dll
WebForm.aspx.vb
More Advanced Options
6–13

We are not going to go into all the compiler options in this book, but basically we've taken
WebForm.aspx.vb and compiled it into a DLL named WebForm.dll and placed it in the
application's /bin directory.
If you need further help on compiling codebehind code please read the online ASP.NET
help provided by Microsoft.
In order for .NET to find your classes, make sure your compiled files are stored in the /bin
directory off the root of your application. You need to make sure you've set your directory
up as an IIS application or else ASP.NET will go up the tree until it finds one and end up
at the /bin directory of the root application if it doesn't find one sooner.
Once you have compiled the codebehind and made sure that the DLL file is located within
the \bin directory within the root directory of your ASP.NET application, modify the
page directive on the .aspx presentation page. Change the page directive from
<%@ page inherits="myCodeBehind" Src="WebForm.aspx.vb" %>
to:
<%@ page inherits="myCodeBehind" %>
You no longer need the Src attribute because the compiled codebehind file is located in the
/bin directory. The compiled classes in the /bin directory are automatically available to use
in all the ASP.NET pages in the application.
6.2.4. Planning
When planning to create your own custom class codebehind files, even if they are just
simple ones, you need to identify the controls and namespaces you will be utilizing so that
you can correctly reference them in the Imports section of the file. In order to demonstrate
this process, let's take a look at a sample codebehind file:
6–14

Example 6.7. Simple Codebehind Page
Imports System
Imports System.Web
Imports System.Web.UI
Imports Encore
Namespace SimpleControlSamples
Public Class SimpleVB
Inherits Page
Protected Overrides Sub Render(Output As HtmlTextWriter)
Output.Write("<H>Welcome to Simple Codebehind!</H2>")
End Sub
End Class
End Namespace
We know that when creating a codebehind file we need to specify any namespaces for
other classes that we will be using in the file. In our case we're specifying the System and
System.Web.UI namespaces. We need to specify the System namespace because it
includes the common classes we need to use in almost every operation. If you were using a
Web Server Control in your class, you would need to reference the
System.Web.UI.WebControls. We are also including the SYSPRO e.net solutions
"Encore" namespace so that we can utilize the e.net solutions classes within our code.
When you define your class you need to specify a class it inherits from. The Page class is
associated with all files that have an .aspx extension. These files are compiled at runtime
as Page objects and cached, and should be used when creating a Web Forms page with a
codebehind file. At the same time we are also specifying the custom namespace
(SimpleControlSamples) for the codebehind, which provides a naming scope for our class
and is good way to represent a hierarchy of classes.
More Advanced Options
6–15

6.2.5. Coding
Once the planning stage of your custom application has been completed and you know
what the end result should be, you will be ready to start the process of coding and
debugging. If you are working within a team of developers you should now have a defined
role within the team, and a specific portion of the application to work on.
The e.net Diagnostics suite's Harness tool is incredibly useful for programmers. Sample
XmlIn, XmlParameters (where needed) and XmlOut for each of the business objects are
available through the interface, allowing you to see the options and uses of the business
object that is being called within the code. The e.net Diagnostics suite's Harness tool also
allows you to customize your XmlIn and process the business object in order to test the
outcome.
6.2.6. Testing
No programmer releases code without first testing it. For the purposes of building an e.net
solutions application and testing it we would highly recommend that you use a test or
development server to run your new applications within a controlled environment. There
are few things worse than crashing your enterprises SYSPRO system server because your
code needed more debugging. Once your application is in a stable working state, then start
testing it on the live SYSPRO system during times when the system is not critically
needed (i.e. set up a night time or weekend test time). Always remember to backup!
No matter how much testing you do, there will always be some bugs within an application.
Good documentation of the programming task will aid your testing and debugging
processes.
6–16

7
Processes
Objectives - The objective of this chapter is to show the logical progression possible when
planning an e.net solutions application. By using UML diagrams we will show the steps
that need to be followed for the creation and processing of a sales order.
When developing an e.net solutions application it is useful to first define the processes that
will be necessary to produce the data and business functions that are required. In this
chapter we will briefly present a Sales Order process, with some sample UML diagrams
and some sample ASP.NET Visual Basic code that outlines the basics of the process. We
will then add a few sub processes to the Sales Order process in order to show how
predefining the process can assist in the production of an application.
7.1. Sales Order Processing
The following process demonstrates a simple Sales Order (there are no back orders to
process). Each step along the process can be defined using UML or another process
diagramming system of your choice. As you read through the process and the included
UML diagrams please note that the processes are brief and contain no specific XML
instructions. In order to define a process such as this you will already need to be familiar
with the business objects available on the SYSPRO e.net solutions system.

1. Build information for sales order header. SORRSH (Build Sales Order Header)
Figure 7.1. SORRSH UML Sequence
2. Build information for sales order detail line(s). SORRSL (Build Sales Order Line)
Figure 7.2. SORRSL UML Sequence
3. Create sales order in status “1 - Open order”. SORTOI (Sales Order Import)
7–2

Figure 7.3. SORTOI UML Sequence
4. Retrieve order details to produce own delivery note document. This puts document in to
status "4 - In warehouse". SORQOD
Figure 7.4. SORQOD UML Sequence
5. Change order status from "4 - In warehouse" to "8 - Ready to invoice". SORTOS
6. “Invoice” ie update Accounts Receivable and Inventory. Allocate invoice number,
Processes
7–3

place invoice details in invoice reprint file, order set to status “9 - Complete”. SORTIC
7. Retrieve invoice details and produce own document. SORQID
7.2. Sales Order Processing - Billing
This process defines the steps needed for processing a sales order of type Billing. Like the
previous process, there are no back order lines included.
1. Build information for sales order header. SORRSH
2. Build information for sales order detail line(s). SORRSL
3. Create sales order in status “8 - Ready to invoice”. SORTOI
4. “Invoice” ie update Accounts Receivable and Inventory. Allocate invoice number,
place invoice details in invoice reprint file, set order status to “9 - Complete”. SORTIC
5. Retrieve invoice details and produce own document. SORQID
As you can see, the process is almost identical to the previous one. The first three steps
and the final step are the same. This shows us that certain business objects work together
and provide data and system functions that other business objects need. For further
information about the business objects please visit SYSPRO's Support Zone
(http://support.syspro.com/.
A knowledge of business process logic and programming logic is required when
formulating e.net solutions processes. For this reason it is quite common that a team of
developers work together, some with greater knowledge of business process and others
with greater programming expertise.
Both these process have detailed steps of a Sales Order without back order lines included.
The final process that we will examine in this chapter shows a Sales Order process with
back orders.
7.3. Sales Order Processing - With Back Orders
By now you should be familiar with the Sales Order process and so can concentrate on the
differences that occur when one or many lines go into back order.
1. Build information for sales order header. SORRSH
2. Build information for sales order detail lines. SORRSL
3. Create sales order in status “1 - Open order”. SORTOI
4. Retrieve order details to produce own delivery note document for lines not on back
order. This puts document in to status "4 - In warehouse". SORQOD
5. Change order status from "4 - In warehouse" to "8 - Ready to invoice". SORTOS
7–4

6. “Invoice” ie update Accounts Receivable and Inventory. Allocate invoice number,
place invoice details in invoice reprint file, order set to status “2 - Open backorder”.
SORTIC
7. Retrieve invoice details and produce own document. SORQID
8. Move back order quantity to ship quantity and put order in status "3 - Released
backorder". SORTBO
9. Retrieve order details to produce own delivery note document for lines not on back
order. This puts document in to status "4 - In warehouse". SORQOD
10.Change order status from "4 - In warehouse" to "8 - Ready to invoice". SORTOS
11.“Invoice” ie update Accounts Receivable and Inventory. Allocate invoice number,
place invoice details in invoice reprint file, order set to status “2 - Open backorder” if
there are more detail lines still on back order, or status "9 - Complete" if there are no
more lines. SORTIC
12.Retrieve invoice details and produce own document. SORQID
Having seen the basic Sales Order process outlined in the first sequence of steps presented
in this chapter you can see the simplicity and complexity of creating a process for parts of
an application. Each step requires some action from the application or the SYSPRO ERP
system, and assumes a level of knowledge and understanding about e.net solutions
business objects that is not available in this book. In order to fully utilize e.net solutions
and the knowledge of programming with e.net solutions that is presented in this book you
will need to study the business objects for yourself and create your own processes.
The next chapter will help you understand the licensing model used by SYSPRO in regard
to e.net solutions and the business objects that you will be interacting with through your
applications.
Processes
7–5

7–6

8
Licensing
Objectives - In this chapter we will discuss the various issues regarding SYSPRO 6.0
licensing. We will examine the different components of the licensing model used, and
discuss some of the ramifications of the model. We will then go through the procedures for
installing, updating, importing, and apportioning the licenses.
If you are already aware of the licensing structure that SYSPRO utilizes, please move onto
the next chapter. This information is provided so that programmers will have a better
understanding of e.net solutions.
8.1. Introduction to SYSPRO Licensing
8.1.1. Licensing Model
The SYSPRO license is a yearly per seat usage license. This means that each installation
of the SYSPRO system must be licensed, and that license must be updated on a yearly
basis.
8.1.1.1. SYSPRO licensing
With the core SYSPRO products you license the modules that you have by the maximum
number of users that you need to be able to log in at any one time. If you need to increase
the number of users this has to be done for the all the modules that you have. If you want
to add a new module, this has to be done for the number of users that you already have.
8.1.1.2. e.net solutions licensing
The idea of the e.net solutions licensing is that you "only pay for what you use". This
means that e.net solutions license is highly configurable and requires you to know what
e.net solutions components you will be using. The e.net solutions license needs to be
apportioned within your system. We discuss this in Section 8.1.4, “Installing and
Configuring License.xml” [8–7].
8.1.1.3. Functional areas
The SYSPRO business logic is provided in components. The SYSPRO modules are
broken up in to smaller sections called functional areas, which contain the business
objects. SYSPRO operators are licensed to use only the functional areas that they need, in
the quantity required, in multiples of 10. For example, you could have 10 users of the

Purchase Order Primary Posting functional area and 250 users of the Requisitions
functional area. These licenses are apportioned to specific operator codes, see
Section 8.1.2, “License to Named users or Specific Operator Codes” [8–2].
8.1.1.4. Web-based applications
The web-based applications consist of a standard web front-end to the business objects.
The licensing of the web-based applications is similar to the functional areas except that
they use the web-based functional areas.
8.1.2. License to Named users or Specific Operator Codes
The default licensing method for business objects and the e.net solutions web-based
applications is by "named user". Each functional areas is licensed for the number of named
users that will use them.
A named user is a SYSPRO operator code. Against the functional area you specify which
named users (SYSPRO operator codes) can use that particular functional area. This allows
this named user to have one concurrent logon to e.net solutions. If another user attempts to
logon to e.net solutions using this same operator code while this user is still logged on, the
existing user will either be logged off and the new user logged on, or the new user will be
prevented from logging on, depending on XML parameters passed during the second
logon attempt.
Before attempting to apportion the licenses, the SYSPRO license.xml must have already
been installed.
On the e.net tab within the operator maintenance screen you specify that this operator uses
the "Named user" licensing for e.net solutions business objects.
8–2

To navigate to where the business object functional area licenses are apportioned from the
main menu you need to select Setup, System Setup…, select the Configure e.net
License… button, select the Configure e.net licenses radio button and then select the
Business Objects… button. As this is the area for setting up the business object functional
areas the tab at the top of the screen contains the name “Business Objects” (as opposed to
“Web-based Applications” for the web-based application license apportioning).
The available functional areas are listed down the left-hand side. When you select one, a
list of available SYSPRO operator codes is displayed on the right. Only operators that can
logon to e.net solutions are listed in the right hand window pane. If an operator is set to
"No access to business objects" or has an operator code that begins with underscore
underscore (__), which prevents normal logins, they will not be listed here.
In the following example the Account Receivable Primary Query functional area has been
selected. Against this is the number five in brackets, which is the number of available
licenses for this functional area. This would normally be in multiples of 10 but this was
taken for “The Outdoors Company” test data. The named users ADMIN and PETE have
been allocated licenses as well as the Guest / anonymous user called JOE (you can see that
these are named users as they have a "Type" of operator and a "Concurrent users" of 1).
Licensing
8–3

The bottom right pane shows the selected functional area, the number of licenses, the
number allocated and how many are still free. In this example there were five and five
have been allocated (one to the named user ADMIN, one to the named user PETE and
three to the Guest / anonymous user JOE).
If you attempt to allocated more licenses than you have, an asterisk (*) will appear against
the functional area and a warning message will appear at the top of the screen.
In addition, the bottom right pane will display that the "Free" amount is negative, and you
will not be able to complete the licensing function until the "Free" amount is either zero or
a positive number.
8–4

As well as all the normal defaults and restrictions, such as default company ID, warehouse
and restricted access to inventory costs, etc., there are also e.net solutions specific defaults
and restrictions on the "e.net tab" of the operator maintenance. As a named user operator is
designed for only one user you can use it to specify these defaults and restrictions such as
restricting which customers this operator can access.
When a named user successfully logs on to e.net solutions they are allocated a 33 character
UseId which is placed in the COMSTATE file along with their state information. Each
time that this user uses a business object, a timestamp is updated against this UserID in the
COMSTATE file. When a named user logs off of e.net solutions their UserID and
matching state information is removed from the COMSTATE file.
Only one user can logon to e.net solutions using this operator code at a time. If a second
logon is attempted it is assumed that the previous UserID is no longer in use, and is
removed from the COMSTATE file when this new entry is added (unless the following
XML entry is supplied during the logon process, in which case the second user will be
prevented from logging on.)
Note that this functionality is only available from SYSPRO 6.0 issue 010
<logon>
<FailWhenAlreadyLoggedIn>Y</FailWhenAlreadyLoggedIn>
</logon>
The UserID that has been removed can no longer be used.
8.1.3. Concurrency Issues
The core SYSPRO product is licensed on a concurrency basis. If you have a license for 16
users, only 16 can logon to SYSPRO at any one time. It doesn't matter which operator
code is using which part of SYSPRO, a total of 16 users can logon. If you want to buy an
additional module you have to buy it for 16 users. If you want to upgrade from 16 to 20
users you have to do so for all modules that you have.
As we have seen, the e.net solutions business objects are grouped together in licensable
chunks called functional areas. As we have seen, there are two types of functional areas,
Licensing
8–5

those for the raw business objects and those for using the business objects with the
SYSPRO web-based applications.
For the first type of functional areas (the "business object only" items) the operator can be
either a "Named user" or a "Guest/anonymous user". We've already discussed named users
in Section 8.1.2, “License to Named users or Specific Operator Codes” [8–2].
The idea of the Guest / anonymous users is that you do not need to have one SYSPRO
operator for each person that needs the same access to e.net solutions. For example, if a
SYSPRO company wishes to provide an application to their customers that allows them to
remotely capture sales orders and upload them using web services, they may not want to
provide a license for each one. They may have 300 customers, of which some order
everyday, some only order once a month and some order infrequently. By working out
how frequently their customers order, they can work out the maximum number that could
logon during any 30 minute time period. They can then create an operator to process these
orders and set it to be a Guest / anonymous user. Against this they set the number of
concurrent users during a 30 minute time period.
If a user logs on to e.net solutions using the Guest/anonymous operator code, logs off and
logs back on again within 30 minutes they have used up two licenses. Therefore it is
recommended that this licensing method is only used when it is appropriate, otherwise you
could use more licenses than in a named user environment.
When the licenses are apportioned, an operator that is set as a Named user will consume
only one license. Only one instance of this operator can logon to e.net solutions at a time.
If a second instance of this operator code attempts to logon they will either be prevented
from doing so, or will force the first instance to be logged out (depending on an option
supplied during the logon process).
For the second type of functional areas (the "web-based application business object"
items) the operator can be either a "Named user", a "Guest/anonymous user" (like
"business object only") or part of a "Class". A class is a group of people who perform the
same or similar tasks, and are licensed together in a true concurrency model. A SYSPRO
operator can only be a member of one class but a class can have almost any number of
members. When logging on to e.net solutions web-based applications, operators use their
own SYSPRO operator code. As they are a member of a class it will use the class license,
but they cannot logon using the class code.
When apportioning the access to functional areas for a class, the class consumes the same
number of licenses as the class allows concurrent users. It will consume the same number
of licenses for all functional areas that this class is licensed to use.
Specifying that this class has four concurrent users means that it will consume four of any
web-based functional areas that are apportioned to it. This is different to the core product
concurrency in that it is only consuming the four licenses for the functional areas that are
apportioned to it and not "using up" four users. Many operator codes can have the same
8–6

class against them. For example, if a class allows four concurrent users, there may be ten
people in the sales department of an organization, and at any point in time six are always
on the road. Specifying this class against all ten operator codes means that whichever four
are in the office can logon and use the web-based applications.
When a member of a class attempts to logon to the web-based applications it is detected
that they are a member of a class, and instead of checking the licensing for the operator
code, all the checking s done for the class. A check is made in the state file to see how
many existing members of this class are logged on. If it is less than the number of
concurrent users for this class the operator is given their own UserID (which is added to
the state file) and they are allowed to logon. Whenever this operator accesses a business
object a timestamp is updated against their entry in the state file. When operators that are
members of a class logout their UserID and state information is removed from the state
file.
When a member of the class attempts to logon and the number of members of this class,
already in the state file, is equal to the number of allowed concurrent users, a check is
made to see which member of the class has the greatest period of inactivity. If this period
of inactivity is greater than the timeout value set against this class, then the existing user is
logged out and the new user is logged on. If the period of inactivity was less than the
timeout value the new operator is prevented from logging on and a message to this affect
is passed back to them.
To manage licensing for SYSPRO e.net solutions web-based applications you implement
either "Named User", "Guest/anonymous", or "Class" licensing (or a combination of all
three methods).
The advantages of the e.net solutions licensing are three fold:
a. A greater number of users can have access to the system.
b. Licensing is optimized across the system on a per functional area basis.
c. Both the above result in reduced costs and greater customer value.
The number of licenses may therefore be viewed as a limited resource that must be
appropriately managed. When managed correctly, all users will receive an adequate level
of service from the system.
8.1.4. Installing and Configuring License.xml
8.1.4.1. Importing the License.xml file
The e.net solutions license is always provided in a file called License.xml. This has
been done to simplify the creation and maintenance of the e.net solutions license. There
are many e.net solutions functional areas, and each one could have a different number of
licensed users. By providing an import for this license file it is impossible to make a
Licensing
8–7

mistake during the capture of the license.
The matching SYSPRO core product license is also included in the license.xml file and
must be imported first. This is done via the “Import License” button from the registration
tab where you would normally enter the license details manually. The default location for
importing the license.xml file is the work folder (in a client / server environment this is the
work folder on the server).
The license can then be imported for e.net solutions. This is done via the "configure e.net
license" button against the system setup (Setup, System Setup… from the main menu).
8–8
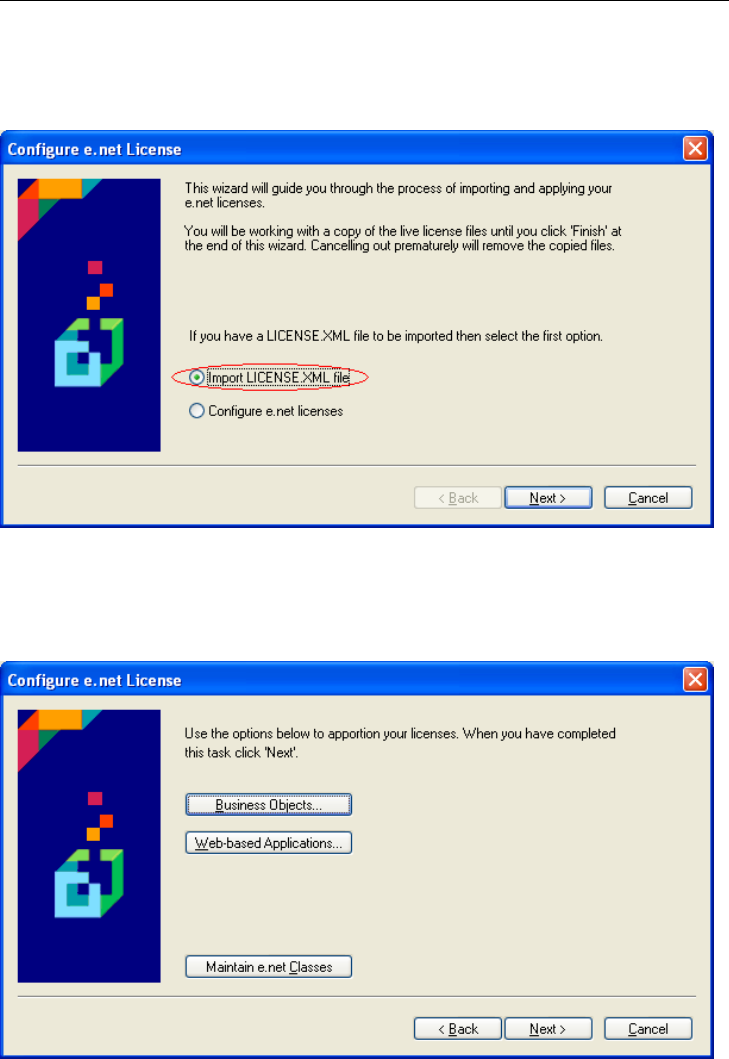
This will display the "Configure e.net License" screen. On this screen make sure that the
"Import LICENSE.XML file" option is selected and select the Next button.
You will be prompted to provide the location of the License.xml file and then to import it.
Once the license file has been imported a screen will be displayed that provides three
options. These are to apportion the functional area licenses for business object licensing, to
apportion the functional area licenses for web-based application licensing and to maintain
the e.net solutions web-based application classes.
Licensing
8–9

8.1.4.2. Maintaining the web-based application classes
The class maintenance facility allows you to add, maintain and delete a class.
The number of concurrent users is the maximum number of members of this class allowed
to use a web-based functional area at any one time.
Note that if you have already apportioned the licenses for a web-based
functional area to this class, and you increase the number of concurrent users
you may not have sufficient licenses for this functional area. If this happens
you will receive the following message:
8–10

8.1.4.3. Maintaining the Business Object functional areas
When you select the "Business Objects…" button from the "Configure e.net licenses"
screen, a screen similar to the one below will be displayed.
The screen has a "Business Objects" tab at the top and consists of three sections. On the
left is the list of the functional areas with a number in brackets against them. This is the
number of licenses that you have for this functional area. On the right is a list of the
available operator codes. This list excludes operator names that begin with two underscore
Licensing
8–11

characters as they cannot logon, and also excludes operators who have the option "No
access to Business Objects" set against them on the e.net tab of the operator maintenance
utility.
Operator codes on this screen that have a number of concurrent users other than 1 are
Guest / anonymous user accounts. As you select or deselect the "Licensed" checkbox
against the operator code it affects the section at the bottom right pane where it shows the
currently selected functional area, the number of available licenses for this area, how many
licenses have been allocated and the remainder (Free). The number of licenses allocated /
de-allocated for each operator code is the same as the number in the "concurrent users"
column.
As you select functional areas on the left pane, the list in the right, and bottom-right panes
change to match. If you select to consume more licenses than you have available an
asterisk will be placed next to the number of available licenses for the affected functional
8–12
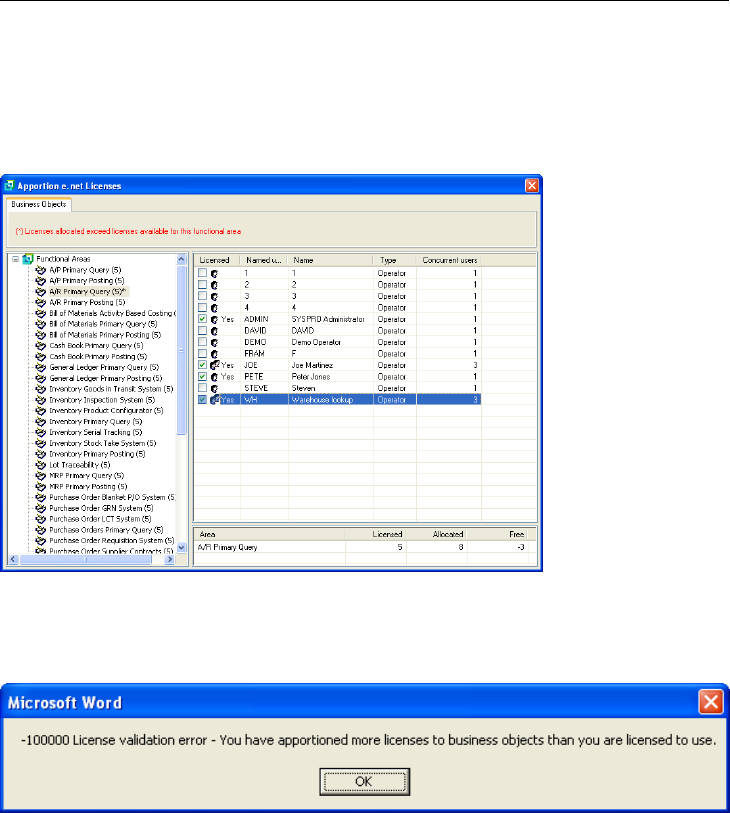
area. When this functional area is displayed, a message will appear directly under the
Business Objects tab stating "Licenses allocated exceed licenses available for this
functional area". The number of Free licenses in the bottom right pane will also go
negative.
If a Guest / anonymous user is already consuming licenses for functional areas and the
number of concurrent users against this operator is increased using the operator
maintenance utility, it is possible that this will cause the number of licenses to exceed
those available. If this occurs, a message similar to that below will be displayed.
8.1.4.4. Maintaining the Business Objects functional areas
When you select the "Web-based Applications…" button from the "Configure e,net
licenses" screen, a screen similar to the one from the "Business Objects…" button will be
displayed.
Licensing
8–13

The list of operators displayed in the right-hand pane excludes those operator names that
begin with two underscore characters as they cannot logon, operators who have the option
"No access to Business Objects" set against them on the e.net tab of the operator
maintenance utility and those that are a member of a class. In addition to the operator
codes, the list of available classes is also displayed. These have a type of "Class" against
them. Entries with a type of "Operator" that have a number of concurrent users other than
1, are Guest / anonymous users. The rest of the utility works in the same way as for
Business Objects.
8.1.4.5. Updating the changes
All of the changes to the business object and web-based application functional areas are
held in a temporary area until they are either posted (when you select the Finish option on
the screen below, or you cancel out, in which case they are discarded.
8–14

The updated changes will be used when the operators next logon to e.net solutions or the
web-based applications.
8.1.5. Evaluation Licensing
Upon request, it is possible to install SYSPRO for purposes of evaluation. Using the
SYSPRO Installation CD it is possible to install SYSPRO with a sample company and
sample data for such purposes. The sample company, called The Outdoors Company may
be used in conjunction with the evaluation license which allows access the sample data.
The license is time limited. If you have obtained an older version of the evaluation license
it may have expired. In this case please contact SYSPRO and request a newer version of
the SYSPRO Installation CDs or a new license file.
The evaluation installation allows the user to install data from a sample company, The
Outdoors Company, and the evaluation license allows access the sample data.
8.2. Installing and Apportioning
For information on installing and apportioning licenses please read Appendix C, Installing
and Apportioning Licenses [C–1].
Licensing
8–15

8–16

9
Troubleshooting
Objectives - In this chapter we deal with some of the problems that could be encountered
while developing a custom application using e.net solutions. We deal with error handling
and some general troubleshooting tips.
Every programmer knows that no matter how hard they try to program correctly, there will
always be something that does not work out as planned. In this chapter we present a few
issues that have caused problems for past e.net solutions programmers so that you can
learn from their experience and be aware of these issues.
9.1. Error Handling
In e.net solutions errors are automatically generated when critical problems are
encountered.
There are three instances where an error can occur:
i. COM: Errors received by COM will result in an exception being raised. This generally
happens when a business object cannot complete its' task, or when it receives an
unexpected parameter. The result is the abnormal termination of the process.
Example 9.1. Error: Unexpected Parameter Sent
The XML Schema (INVQRY.XSD) associated with the Inventory Query object
(INVQRY) accepts specific elements. If one of the elements received is not supported
by the Schema an exception is raised. Therefore, if the spelling of the element
<IncludeBins> is incorrect an exception will be raised.
The Inventory Query object (INVQRY) requires a valid stock code - if
the stock code is not valid then the object cannot continue and an
exception is raised.
ii. Business object: Errors received from the failure of a requested operation are written to
the XML string returned by the business object. The error does not raise an exception to
COM. Consequently processes are not terminated.

iii.Internal to custom application using e.net solutions: When a custom application is
programmed to identify and handle errors internally, the application can raise an
exception internally.
When an exception is raised an exception number and an exception message are generated.
Messages are defined in a set of text files with the extension *.IMP residing in the
\programs\ folder of the SYSPRO 6.0 directory. The message files are organized in a
modular manner matching the logical product areas of SYSPRO and are language specific.
This logic is reflected in the naming convention used for message files, as follows:
[MSG] [logical area][language code].IMP
Where:
[MSG] An abbreviation of the word "Message".
[logical area] Is a logical area of the product.
[language code] A number corresponding to a language selection passed by
Utilities.Logon method at the start of the session (see
Table 9.1, “Language Code Examples” [9–3]).
If a language code is passed but no corresponding message file is found then
the system will revert to using "EN", English. If a language code of zero is
passed to the Utilities.Logon method then the SYSPRO operator's
default language code will be used.
Table 9.1, “Language Code Examples” [9–3] provides examples of language codes
shipped with SYSPRO. Any ISO 693-1 standard language code can be applied by
development.
9–2

Table 9.1. Language Code Examples
Code Language
00 Use operator's default
EN English
FR French
ES Spanish
All message numbers are 6 digits, comprised of:
• a two digit set number
• a four digit sub-message number
Example 9.2. Message Number
The message number 210004 is set 21 (Accounts Receivable), sub-message 0004 returning
the message: Customer '%1' not found.
The message file can contain parameters, such as %1, so that the messages can be more
descriptive. It is important to remember that often a message in e.net solutions is displayed
out of context and therefore the messages should be brief but precise. Conversely, in the
above example, simply saying Customer not found when importing a hundred sales
orders makes it difficult to correct the problem.
Double Hash "##" is a place holder for the two digits used to define a
language. Substitute the "##" to match the required language. See Table 9.1,
“Language Code Examples” [9–3] for a list of available languages and the
LanguageCode options that can be passed by the Utilities.Logon
method.
Troubleshooting
9–3

Table 9.2. Error Handling Message Files
Message file Product area Set numbers
MSGCOM##.IMP Core
10 General Messages
11 Security Messages
12 Disk error messages
13 SQL Messages
34 Report Writer Messages
35 Business to Business Messages
36 Archive Messages
38 Document Flow Manager Messages
40 XML Parsing Error Messages
41 Contact Management Messages
42 Reporting Services Messages
4? Reserved for future Core Messages
MSGFIN##.IMP Financial
20 Accounts Payable Messages
21 Account Receivable Messages
22 Cash Book Messages
23 General Ledger messages
33 Assets Register Messages
5? Reserved for Future Financial Messages
MSGDIS##.IMP Distribution
24 Inventory Control Messages
25 Purchase Order Messages
26 Sales Analysis Messages
27 Sales Order Messages
32 Lot Traceability Messages
39 Landed Cost Tracking
9–4

Message file Product area Set numbers
60 Blanket Sales Orders
61 Serial Tracking
62 Multiple Delivery Notes
63 Trade Promotion Management
64 Load Planning
6? Reserved for Future Distribution
Messages
MSGMAN##.IMP Manufacturing
28 Bill of Material Messages
29 Quotation Messages
30 Work in Progress Messages
31 Requirements Planning Messages
37 Engineering Change Control Messages
70 Projects and Contracts
71 Product Configurator
72 Inventory forecasting
7? Reserved for Future Manufacturing
Messages
9.2. General Troubleshooting
To assist with the process of debugging e.net solutions applications the SYSPRO
application server provides a diagnostic aid that, when set, causes ENCORE.DLL to log
the sequence and frequency of the calls to a text file named enetlog.txt. This file is
generated in the folder \Base\Settings\ of the SYSPRO 6.0 installation.
The log file provides a trace, identifying the business objects invoked, their frequently and
sequence. An example of enetlog.txt is shown in Figure 9.1, “e.net solutions Log
Text” [9–6]. See Table 9.3, “e.net solutions Trace File” [9–7] for a more detailed
description.
Troubleshooting
9–5

Figure 9.1. e.net solutions Log Text
9–6

Table 9.3. e.net solutions Trace File
Column Description
Date The date, in the format YYYY-MM-DD, on which the action
occurred.
Time The time, in the format HH:MM:SS:NN, at which the action
occurred.
Method The e.net solutions method call used to produce the action.
e.net solutions
subsystem
Traces which e.net connection you are using: S = Standard, W =
Web Based.
Process Step The Method step:
• S = Start (SYSPRO is aware that a business object has been
entered)
• B = Before (Before the Business Object processes the data)
• A = After (After the Business Object processes the data)
• E = Exit (SYSPRO ends the Business Object process)
This works in conjunction with the following field.
Processes Running This tracks the number of objects currently open on the machine at
that particular process step. This is primarily used for tracing
memory leaks.
Object The business object invoked by the method call.
Status The message number as defined in Section 9.1, “Error Handling”
[9–1]. A return code of 000000000 means that no error was returned.
Operator The name of the SYSPRO operator authenticated against the UserID.
UserID The UserID used to process the business object.
Troubleshooting
9–7

Procedure 9.1. Configuring e.net solutions Trace Logging
1. Logon to SYSPRO.
2. From the main menu select, Setup → System Setup. The System Setup dialog is
displayed.
3. From the Options group, select Diagnostics → enet01, then click Save.
4. When prompted click OK, then logout of SYSPRO and login again.
5. Open enetlog.txt. Take note of the current contents.
6. Logon to SYSPRO using the Web Application (any e.net solutions utility or
application).
7. Verify that new entries, caused by the e.net solutions logon have been written to the
file.
Entries should include COMLGN and COMQMN.
9–8

10
Sample Applications
Objectives - This chapter presents code samples that demonstrate the use of e.net
solutions to create an application using ASP.NET. We have presented these code sections
to help you integrate what you have learned and incorporate it into one programming
environment.
One of the difficulties facing us when trying to learn a new system or programming
language is being able to comprehend the big picture of what can be done with the limited
knowledge that we have of the system or language while we are learning it. As you have
read through this book you have learned the basics of the e.net solutions system and how
to begin programming with it in VBScript, and ASP.NET C# and VB. In this section we
take you one step further by providing some simple applications of the knowledge that you
have gained.
10.1. Simple ASP.NET logon
The first step of any application is to provide a way to logon to the SYSRPO application
server. The following ASP.NET script does this with four user entry text boxes and a
submit button.
Example 10.1. Code Sample for logon.aspx in VB.NET
<%@ Page Language="VB" %>
<script runat="server">
Sub btnlogon_Click(sender As Object, e As EventArgs)
Dim Util As New Encore.Utilities()
Dim uid As String
uid = Util.logon(tbUser.Text, tbUserPass.Text, tbComp.Text, \
tbCompPass.Text, Encore.Language.ENGLISH, 0, 0, "")
lblUid.Text = uid
Util.Logoff(uid)
End Sub
</script>
<html>
<head>

</head>
<body>
<form runat="server">
<table width="402" border="1">
<tr>
<td width="178">
<div align="right">Operator Name/Code:</div>
</td>
<td width="208">
<asp:TextBox ID="tbUser" runat="server"></asp:TextBox>
</td>
</tr>
<tr>
<td>
<div align="right">Operator Password:</div>
</td>
<td>
<asp:TextBox ID="tbUserPass" runat="server">
</asp:TextBox>
</td>
</tr>
<tr>
<td>
<div align="right">Company ID: </div>
</td>
<td>
<asp:TextBox ID="tbComp" runat="server"></asp:TextBox>
</td>
</tr>
<tr>
<td>
<div align="right">Company Password: </div>
</td>
<td>
<asp:TextBox ID="tbCompPass" runat="server">
</asp:TextBox>
</td>
</tr>
</table>
<p>
<asp:Button id="btnlogon" onclick="btnlogon_Click"
runat="server" Text="logon"></asp:Button>
</p>
<p>
<asp:Label id="lblUid" runat="server" text="">
</asp:Label>
</p>
</form>
</body>
</html>
10–2

Remember that where ever you see \ at the end of a line of code and the next
line indented, this means that the text was too long for the page size of this
book but the indented text belongs of the code line above.
The above code demonstrates a simple table with four text box fields and a button. There
is obviously a lot more that can be done (like validation rules, password type text boxes,
and foreground/background coloring) but it demonstrates the basic variables needed and
button click sequence that submits that data to the logon SYSPRO business object.
Save the Logon.aspx file from the SampleCode download into your IIS localhost
directory (usually c:\Inetpub\wwwroot\ or
c:\Inetpub\wwwroot\Sysproweb if you are using the SYSPRO web-based
applications). Load the .aspx file in your web browser (usually
http://localhost/Logon.aspx) and use your SYSPRO user details to logon and display your
UserID.
Most of the other business objects require the formation of an XmlIn string and the
translating or presentation of the XmlOut string that is returned by the Object. We have
already covered some of the XML and XSL requirements of e.net solutions, and in the
next section we will apply that knowledge using the COMFND business object.
10.2. Submitting XmlIn and getting XmlOut
Having successfully logged on through the code presented in the previous section, we
must now expand our usage of SYSPRO e.net solutions. We will utilize the Query.Query
function by using the business object COMFND to demonstrate the use of XmlIn and
XmlOut.
Remember that the e.net Diagnostics suite contains a tool within the Harness screen that
will wrap the XmlIn string for use in VB or C#. We have used the wrapping tool, but have
renamed the "With" variable from Document to XmlIn.
Sample Applications
10–3

Example 10.2. ASP.NET code for using COMFND.aspx
<%@ Page Language="VB" %>
<script runat="server">
Dim uid As String
Dim Xmlout As String
Dim Util As New Encore.Utilities()
Dim Query As New Encore.Query()
Sub btnlogon_Click(sender As Object, e As EventArgs)
uid = Util.logon(tbUser.Text, tbUserPass.Text, \
tbComp.Text, tbCompPass.Text, Encore.Language. \
ENGLISH, 0, 0, "")
lblUid.Text = uid
Util.Logoff(uid)
End Sub
Sub btnTrial_Click(sender As Object, e As EventArgs)
uid = Util.logon(tbUser.Text, tbUserPass.Text, \
tbComp.Text, tbCompPass.Text, Encore.Language. \
ENGLISH, 0, 0, "")
Dim XmlIn As New System.Text.StringBuilder
With Xmlin
.Append("<?xml version=""1.0"" encoding=""Windows \
-1252""?>")
.Append("<!-- Copyright 1994-2006 SYSPRO Ltd.-->")
.Append("<!--")
.Append("An example XML instance to demonstrate")
.Append("use of the Generic find Business Object")
.Append("-->")
.Append("<Query xmlns:xsd=""http://www.w3.org/ \
2001/XMLSchema-instance"" xsd:noNamespace \
SchemaLocation=""COMFND.XSD"">")
.Append("<TableName>InvWarehouse</TableName>")
.Append("<ReturnRows>1000</ReturnRows>")
.Append("<Columns>")
.Append("<Column>StockCode</Column>")
.Append("<Column>Warehouse</Column>")
.Append("</Columns>")
.Append("<Where>")
.Append("<Expression>")
.Append("<OpenBracket>(</OpenBracket>")
.Append("<Column>Warehouse</Column>")
.Append("<Condition>EQ</Condition>")
.Append("<Value>FG</Value>")
10–4

.Append("<CloseBracket>)</CloseBracket>")
.Append("</Expression>")
.Append("<Expression>")
.Append("<AndOr>Or</AndOr>")
.Append("<OpenBracket>(</OpenBracket>")
.Append("<Column>Warehouse</Column>")
.Append("<Condition>EQ</Condition>")
.Append("<Value>E</Value>")
.Append("<CloseBracket>)</CloseBracket>")
.Append("</Expression>")
.Append("</Where>")
.Append("<OrderBy>")
.Append("<Column>Warehouse</Column>")
.Append("</OrderBy>")
.Append("</Query>")
.Append("")
End With
Xmlout = Query.Query(uid, "COMFND", XmlIn.ToString)
lblOutput.Text = Xmlout
Util.Logoff(uid)
End Sub
</script>
<html>
<head>
</head>
<body>
<form runat="server">
<table width="402" border="1">
<tbody>
<tr>
<td width="178">
<div align="right">Operator Name/Code:
</div>
</td>
<td width="208">
<asp:TextBox id="tbUser" runat="server"> \
</asp:TextBox>
</td>
</tr>
<tr>
<td>
<div align="right">Operator Password:
</div>
</td>
<td>
<asp:TextBox id="tbUserPass" runat="server"> \
</asp:TextBox>
</td>
Sample Applications
10–5

</tr>
<tr>
<td>
<div align="right">Company ID:
</div>
</td>
<td>
<asp:TextBox id="tbComp" runat="server"> \
</asp:TextBox>
</td>
</tr>
<tr>
<td>
<div align="right">Company Password:
</div>
</td>
<td>
<asp:TextBox id="tbCompPass" runat= \
"server"></asp:TextBox>
</td>
</tr>
</tbody>
</table>
<p>
<asp:Button id="btnlogon" onclick="btnlogon_Click" \
runat="server" Text="logon"></asp:Button>
</p>
<p>
<asp:Label id="lblUid" runat="server" text=""> \
</asp:Label>
</p>
<p>
<asp:Button id="btnTrial" onclick="btnTrial_Click" \
runat="server" Text="Trial"></asp:Button>
</p>
<p>
<asp:Label id="lblOutput" runat="server"></asp:Label>
</p>
</form>
</body>
</html>
As you can see from reading through the above code, we took the logon program and
added the COMFND function to it. The results of the query are displayed through the
lblTrial label.
Save the COMFND.aspx file from the SampleCode download into your IIS localhost
10–6

directory (usually c:\Inetpub\wwwroot\ or
c:\Inetpub\wwwroot\Sysproweb if you are using the SYSPRO web-based
applications). Load the .aspx file in your web browser (usually
http://localhost/Logon.aspx) and use your SYSPRO user details to logon and display your
UserID. Then click on the "Trial" button.
10.3. Using the Data in XmlOut
There are different ways of utilizing the data returned in the XmlOut string. In this section
we will show a few of them, ranging from the simple use of asp:Labels to the use of XSL
to format and present the data.
10.3.1. Simple Xml Data Usage
ASP.NET contains the functionality that allows us to assign specific XML nodes to string
variables using LoadXML(). The following example pulls the company name, email, and
address from the XmlOut and assigns the data values to asp:Labels.
Example 10.3. ASP.NET code for ARSQRY.aspx
<%@ Page Language="VB" %>
<%@ import Namespace="System.Data" %>
<%@ import Namespace="System.Xml" %>
<%@ import Namespace="Encore" %>
<script runat="server">
Dim uid As String
Dim Xmlout As String
Dim Util As New Encore.Utilities()
Dim Query As New Encore.Query()
Sub btnLogon_Click(sender As Object, e As EventArgs)
uid = Util.logon(tbUser.Text, tbUserPass.Text, tbComp. \
Text, tbCompPass.Text, Encore.Language.ENGLISH, \
0, 0, "")
lblUid.Text = uid
End Sub
Sub btnTrial_Click(sender As Object, e As EventArgs)
'Define the XmlIn to send to ARSQIP
Dim Xmlin As New StringBuilder()
With Xmlin
.Append("<?xml version=""1.0"" encoding=""UTF-8""?>")
.Append("<Query xmlns:xsd=""http://www.w3.org/2001/ \
XMLSchema-instance"" xsd:noNamespace \
SchemaLocation=""ARSQRY.XSD"">")
.Append("<Key>")
Sample Applications
10–7

.Append("<Customer>000019</Customer>")
.Append("</Key>")
.Append("<Option>")
.Append("<MultiMediaImageType>GIF</MultiMediaImageType>")
.Append("<IncludeFutures>N</IncludeFutures>")
.Append("<IncludeTransactions>Y</IncludeTransactions>")
.Append("<IncludeCheckPayments>Y</IncludeCheckPayments>")
.Append("<IncludePostDated>Y</IncludePostDated>")
.Append("<IncludeZeroBalances>N</IncludeZeroBalances>")
.Append("<IncludeCustomForms>N</IncludeCustomForms>")
.Append("<AsOfPeriod>C</AsOfPeriod>")
.Append("<AgeingOption>S</AgeingOption>")
.Append("<AgeColumn1>30</AgeColumn1>")
.Append("<AgeColumn2>60</AgeColumn2>")
.Append("<AgeColumn3>90</AgeColumn3>")
.Append("<AgeColumn4>120</AgeColumn4>")
.Append("<AgeColumn5>150</AgeColumn5>")
.Append("<AgeColumn6>180</AgeColumn6>")
.Append("<AgeColumn7>210</AgeColumn7>")
.Append("<XslStylesheet/>")
.Append("</Option>")
.Append("</Query>")
End With
'Send the XmlIn and assign the results to Xmlout STRING
Xmlout=Query.Query(lblUid.Text, "ARSQRY", XmlIn.ToString)
lblOutput.Text = Xmlout
'Display only part of the Xmlout String
'Declare a new instance of XmlDocument and load
'Xmlout STRING
Dim xmlDoc As New XmlDocument
xmlDoc.LoadXml(Xmlout)
'Choose the xml nodes to display
Dim xmlNode1 As XmlNode
xmlNode1 = xmlDoc.SelectSingleNode("/ARStatement/Header \
/Name")
Dim xmlNode2 As XmlNode
xmlNode2 = xmlDoc.SelectSingleNode("/ARStatement/Header \
/Email")
Dim xmlNode3 As XmlNode
xmlNode3 = xmlDoc.SelectSingleNode("/ARStatement/Header \
/ShipToAddr1")
'Dispaly the nodes in asp Labels
lblName.Text = xmlNode1.InnerText
lblEmail.Text = xmlNode2.InnerText
lblAddress.Text = xmlNode3.InnerText
End Sub
10–8

Sub btnLogoff_Click(sender As Object, e As EventArgs)
'Log off the SYSPRO server
Util.Logoff(lblUid.Text)
'Empty Visable Variables
lblUid.Text = ""
lblOutput.Text= ""
lblName.Text = ""
lblEmail.Text = ""
lblAddress.Text = ""
tbUser.Text = ""
tbUserPass.Text = ""
tbComp.Text = ""
tbCompPass.Text = ""
tbCusNum.Text = ""
End Sub
</script>
<html>
<head>
</head>
<body>
<form runat="server">
<table width="402" border="1">
<tbody>
<tr>
<td width="178">
<div align="right">Operator Name/Code:
</div>
</td>
<td width="208">
<asp:TextBox id="tbUser" runat="server"></asp:TextBox>
</td>
</tr>
<tr>
<td>
<div align="right">Operator Password:
</div>
</td>
<td>
<asp:TextBox id="tbUserPass" runat="server"></asp:TextBox>
</td>
</tr>
<tr>
<td>
<div align="right">Company ID:
</div>
</td>
<td>
<asp:TextBox id="tbComp" runat="server"></asp:TextBox>
</td>
</tr>
Sample Applications
10–9

<tr>
<td>
<div align="right">Company Password:
</div>
</td>
<td>
<asp:TextBox id="tbCompPass" runat="server"></asp:TextBox>
</td>
</tr>
</tbody>
</table>
<p>
<asp:Button id="btnLogon" onclick="btnLogon_Click" runat= \
"server" Text="Logon"></asp:Button>
</p>
<p>
<asp:Label id="lblUid" runat="server" text=""> </asp:Label>
</p>
<p>
Please Enter the Customer Number:
<asp:TextBox id="tbCusNum" runat= \
"server"></asp:TextBox>
</p>
<p>
(remember - the sample data only has customers 1-19)
</p>
<p>
<asp:Button id="btnTrial" onclick="btnTrial_Click" runat= \
"server" Text="Display Results"></asp:Button>
</p>
<p>
<asp:Label id="lblOutput" runat="server"> </asp:Label>
</p>
<table width="405" border="1">
<tbody>
<tr>
<td width="118">
Customer Name:</td>
<td width="271">
<asp:Label id="lblName" runat="server"></asp:Label></td>
</tr>
<tr>
<td>
Email:
</td>
<td>
<asp:Label id="lblEmail" runat="server"></asp:Label></td>
</tr>
<tr>
<td>
Address:</td>
10–10

<td>
<asp:Label id="lblAddress" runat= \
"server"></asp:Label></td>
</tr>
</tbody>
</table>
<p>
<asp:Button id="btnLogoff" onclick="btnLogoff_Click" \
runat="server" Text="Log Off"></asp:Button>
</p>
</form>
</body>
</html>
Save the ARSQRY.aspx file into the webroot directory of your IIS Inetpub directory
(or whatever IIS directory is configured for localhost) and open the file in your web
browser. Logon to e.net solutions using the logon textboxes and button provided in the
sample code, then enter a customer number and click the Display Results button. You will
now see the chosen XmlOut nodes displayed in the asp:Labels.
The above example used the SYSPRO Query.Query method. We can also use this simple
XML output method for the XmlOut produced by the Transaction.Build method, as
demonstrated within the following code.
Example 10.4. SORRSH.aspx
<%@ Page Language="VB" %>
<%@ import Namespace="System.Data" %>
<%@ import Namespace="System.Xml" %>
<script runat="server">
Dim uid As String
Dim Xmlout As String
Dim Util As New Encore.Utilities()
Dim Transaction As New Encore.Transaction()
Sub btnLogon_Click(sender As Object, e As EventArgs)
uid = Util.logon(tbUser.Text, tbUserPass.Text, tbComp. \
Text, tbCompPass.Text, Encore.Language.ENGLISH, \
0, 0, "")
lblUid.Text = uid
End Sub
Sub btnTrial_Click(sender As Object, e As EventArgs)
Sample Applications
10–11

'Define the XmlIn to send to SORRSH
Dim Xmlin As New StringBuilder()
With Xmlin
.Append("<?xml version=""1.0"" encoding=""Windows-1252 \
""?>")
.Append("<Build xmlns:xsd=""http://www.w3.org/2001/XML \
Schema-instance"" xsd:noNamespace \
SchemaLocation=""SORRSH.XSD"">")
.Append(" <Parameters>")
.Append("<Customer>" & tbCusNum.Text & "</Customer>")
.Append("<AllowCustomerOnHold>N </AllowCustomerOnHold>")
.Append("</Parameters>")
.Append("</Build>")
End With
'Send the XmlIn and assign the results to Xmlout STRING
Xmlout = Transaction.Build(lblUid.Text, "SORRSH", \
XmlIn.ToString)
'Display only part of the Xmlout String
'Declare a new instance of XmlDocument and load the
'Xmlout STRING
Dim xmlDoc As New XmlDocument
xmlDoc.LoadXml(Xmlout)
'Choose the xml nodes to display
Dim xmlNode1 As XmlNode
xmlNode1 = xmlDoc.SelectSingleNode("/SoHeader/OrderDate")
Dim xmlNode2 As XmlNode
xmlNode2 = xmlDoc.SelectSingleNode("/SoHeader/Contact")
Dim xmlNode3 As XmlNode
xmlNode3 = xmlDoc.SelectSingleNode("/SoHeader/Email")
'Dispaly the nodes in asp Labels
lblDate.Text = xmlNode1.InnerText
lblContact.Text = xmlNode2.InnerText
lblEmail.Text = xmlNode3.InnerText
End Sub
Sub btnLogoff_Click(sender As Object, e As EventArgs)
'Log off the SYSPRO server
Util.Logoff(lblUid.Text)
'Empty Visable Variables
lblUid.Text = ""
lblDate.Text = ""
lblContact.Text = ""
lblEmail.Text = ""
tbUser.Text = ""
tbUserPass.Text = ""
tbComp.Text = ""
tbCompPass.Text = ""
10–12

tbCusNum.Text = ""
End Sub
</script>
<html>
<head>
</head>
<body>
<form runat="server">
<table width="402" border="1">
<tbody>
<tr>
<td width="178">
<div align="right">Operator Name/Code:
</div>
</td>
<td width="208">
<asp:TextBox id="tbUser" runat="server"></asp:TextBox>
</td>
</tr>
<tr>
<td>
<div align="right">Operator Password:
</div>
</td>
<td>
<asp:TextBox id="tbUserPass" runat="server"></asp:TextBox>
</td>
</tr>
<tr>
<td>
<div align="right">Company ID:
</div>
</td>
<td>
<asp:TextBox id="tbComp" runat="server"></asp:TextBox>
</td>
</tr>
<tr>
<td>
<div align="right">Company Password:
</div>
</td>
<td>
<asp:TextBox id="tbCompPass" runat="server"></asp:TextBox>
</td>
</tr>
</tbody>
</table>
<p>
<asp:Button id="btnLogon" onclick="btnLogon_Click" runat= \
Sample Applications
10–13

"server" Text="Logon"></asp:Button>
</p>
<p>
<asp:Label id="lblUid" runat="server" text=""> </asp:Label>
</p>
<p>
Please Enter the Customer Number:
<asp:TextBox id="tbCusNum" runat="server"></asp:TextBox>
</p>
<p>
(remember - the sample data only has customers 1-19)
</p>
<p>
<asp:Button id="btnTrial" onclick="btnTrial_Click" runat= \
"server" Text="Display Results"></asp:Button>
</p>
<table width="405" border="1">
<tbody>
<tr>
<td width="118">
Order Date:
</td>
<td width="271">
<asp:Label id="lblDate" runat="server"></asp:Label></td>
</tr>
<tr>
<td>
Contact:
</td>
<td>
<asp:Label id="lblContact" runat="server"></asp:Label></td>
</tr>
<tr>
<td>
E Mail:
</td>
<td>
<asp:Label id="lblEmail" runat="server"></asp:Label></td>
</tr>
</tbody>
</table>
<p>
<asp:Button id="btnLogoff" onclick="btnLogoff_Click" \
runat="server" Text="Log Off"></asp:Button>
</p>
</form>
</body>
</html>
10–14

Save the SORRSH.aspx file from the SampleCode download file into your IIS localhost
directory (usually c:\Inetpub\wwwroot\ or
c:\Inetpub\wwwroot\Sysproweb if you are using the SYSPRO web-based
applications). Load the .aspx file in your web browser (usually
http://localhost/Logon.aspx) and use your SYSPRO user details to logon and display your
UserID. Enter a Customer number, then click on the "Display Results" button to the
results.
10.3.2. Using XSL to Transform XML Data
As we have seen in previous sections of this book, XSL stylesheets are capable of
transforming the data returned in the XmlOut into many different formats. For the
purposes of this book we will use XSL that outputs to HTML.
The XSL file will take the data within the XML nodes and allow us to apply a predefined
HTML template to the data. This will allow us to customize where specific details are
displayed, the order in which certain fields appear, and the text formatting, fonts, colors,
etc, that will make the data more readable and more useful within the application.
The following .xsl file will use the same XmlOut as the previous example, but will
format it very differently once incorporated into the sample application.
Example 10.5. SORRSH.xsl
<xsl:stylesheet version="1.0" xmlns:xsl="http://www\
.w3.org/1999/XSL/Transform" xmlns:SALARE="SALARE" \
xmlns:SALSLS="SALSLS" xmlns:TBLART="TBLART" \
xmlns:SALBRN="SALBRN" xmlns:ARSMST="ARSMST">
<xsl:template match="SoHeader">
<table border="1">
<tr>
<td>Customer: </td>
<td> <xsl:value-of select="Customer"/> </td>
</tr>
<tr>
<td>Currency: </td>
<td> <xsl:value-of select="Currency"/> </td>
</tr>
<tr>
<td>ShippingInstrs: </td>
<td> <xsl:value-of select="ShippingInstrs"/> </td>
</tr>
<tr>
<td>Area: </td>
<td> <xsl:value-of select="Area"/> </td>
Sample Applications
10–15

</tr>
<tr>
<td>SALARE:Description: </td>
<td> <xsl:value-of select="SALARE:Description"/> </td>
</tr>
<tr>
<td>TBLART:Description: </td>
<td> <xsl:value-of select="TBLART:Description"/> </td>
</tr>
<tr>
<td>SALSLS:Name: </td>
<td> <xsl:value-of select="SALSLS:Name"/> </td>
</tr>
<tr>
<td>SALBRN:Description: </td>
<td> <xsl:value-of select="SALBRN:Description"/> </td>
</tr>
<tr>
<td>ARSMST:Name: </td>
<td> <xsl:value-of select="ARSMST:Name"/> </td>
</tr>
<tr>
<td>TaxStatus: </td>
<td> <xsl:value-of select="TaxStatus"/> </td>
</tr>
<tr>
<td>Salesperson: </td>
<td> <xsl:value-of select="Salesperson"/> </td>
</tr>
<tr>
<td>CustomerPoNumber: </td>
<td> <xsl:value-of select="CustomerPoNumber"/> </td>
</tr>
<tr>
<td>OrderDate: </td>
<td> <xsl:value-of select="OrderDate"/> </td>
</tr>
<tr>
<td>SuggestedShipDate: </td>
<td> <xsl:value-of select="SuggestedShipDate"/> </td>
</tr>
<tr>
<td>Branch: </td>
<td> <xsl:value-of select="Branch"/> </td>
</tr>
<tr>
<td>SpecialInstrs: </td>
<td> <xsl:value-of select="SpecialInstrs"/> </td>
</tr>
<tr>
<td>DefaultOrdType: </td>
10–16

<td> <xsl:value-of select="DefaultOrdType"/> </td>
</tr>
<tr>
<td>CompanyTaxNumber: </td>
<td> <xsl:value-of select="CompanyTaxNumber"/> </td>
</tr>
<tr>
<td>SoldToAddr1: </td>
<td> <xsl:value-of select="SoldToAddr1"/> </td>
</tr>
<tr>
<td>SoldToAddr2: </td>
<td> <xsl:value-of select="SoldToAddr2"/> </td>
</tr>
<tr>
<td>SoldToAddr3: </td>
<td> <xsl:value-of select="SoldToAddr3"/> </td>
</tr>
<tr>
<td>SoldToAddr4: </td>
<td> <xsl:value-of select="SoldToAddr4"/> </td>
</tr>
<tr>
<td>SoldToAddr5: </td>
<td> <xsl:value-of select="SoldToAddr5"/> </td>
</tr>
<tr>
<td>SoldPostalCode: </td>
<td> <xsl:value-of select="SoldPostalCode"/> </td>
</tr>
<tr>
<td>Email: </td>
<td> <xsl:value-of select="Email"/> </td>
</tr>
<tr>
<td>Contact: </td>
<td> <xsl:value-of select="Contact"/> </td>
</tr>
<tr>
<td>DateLastSale: </td>
<td> <xsl:value-of select="DateLastSale"/> </td>
</tr>
<tr>
<td>DateLastPay: </td>
<td> <xsl:value-of select="DateLastPay"/> </td>
</tr>
<tr>
<td>Telephone: </td>
<td> <xsl:value-of select="Telephone"/> </td>
</tr>
<tr>
Sample Applications
10–17

<td>AddTelephone: </td>
<td> <xsl:value-of select="AddTelephone"/> </td>
</tr>
<tr>
<td>Fax: </td>
<td> <xsl:value-of select="Fax"/> </td>
</tr>
</table>
</xsl:template>
</xsl:stylesheet>
The sample code for the Sales Order Process in the previous chapter utilizes this XSL to
display the data provided by the business object. Please open and examine
SalesOrderHeader.aspx from the downloaded SampleCode file in order to see how
the XSL is called and used.
There is a command line XSL transformation utility that can be downloaded from the
msdn.microsoft.com website to assist with testing your XSL files. This can be located by
going to microsoft.com [http://msdn.microsoft.com] and entering the two words msxsl and
download in to the search. Within the results will be a page called "Command Line
Transformations Using msxsl.exe" that contains both the option to download the
MSXSL.exe utility as well as detailed instructions on its use.
You can use this utility to view the output of the SORRSH business object after it has been
transformed using the SORRSH.xsl example. In your folder containing MSXSL.exe, save
the results of the SORRSH business object as SORRSHOut.xml. Also place the
SORRSH.xsl transformation file. From the command line use the following command to
process the XML file, using the XSL file, and outputting it as SORRSH.htm.
MSXSL SORRSHOut.xml SORRSH.xsl –o SORRSH.htm
You can now view the file SORRSH.htm in your browser.
10–18
10.4. Building the Basic Blocks of an Application
Now that you have seen some of the underlying requirements for building an application
with e.net solutions, we will start building the foundation of a fully functional e.net
solutions application. We will first look at the namespaces needed to set up the
application's .NET environment, then we will discuss and supply sample functions that
utilize the SYSPRO class methods. We will then look at calling these method functions,
and finally we will present some Business Processes that demonstrate the use of the
method functions and XSL output to the application.
10.4.1. Setting up the environment
Example 10.6. Import .NET Namespaces in ASP.NET VB
<%@ Import Namespace="System" %>
<%@ Import Namespace="System.Data" %>
<%@ Import Namespace="System.Xml" %>
<%@ Import Namespace="System.Xml.Xsl" %>
<%@ Import Namespace="System.IO" %>
<%@ Import Namespace="System.Text" %>
<%@ Import Namespace="Encore" %>
<%@ Page Language="VB" %>
Example 10.7. Import .NET Namespaces in ASP.NET C# codebehind
Imports System
Imports System.Web.UI
Imports System.Web.UI.WebControls
Imports System.Data
Imports System.Xml
Imports System.Xml.Xsl
Imports System.Xml.XPath
Imports System.IO
Imports System.Text
Imports Encore
Sample Applications
10–19

As you can see from the sample code presented above, we have declared Data, Xml, Xsl,
IO, Text, and SYSPRO's Encore for use within this application.
10.4.2. Creating Method Functions
The following code examples demonstrate functions that can be called from the
application to access the various SYSPRO Class Methods. We present an example in
ASP.NET VB codebehind and C# codebehind.
The methods.aspx.vb and methods.aspx.cs contain these code examples as
functions. Save methods.aspx.vb and methods.aspx.cs to your IIS localhost
directory (usually c:\Inetpub\wwwroot\ or
c:\Inetpub\wwwroot\Sysproweb if you are using the SYSPRO web-based
applications). Open both files in your code editor and explore them as you read through
this section.
Lets start with the Query method from the Query class:
Example 10.8. Query.Query Method in ASP.NET VB codebehind
'********************************************************
'-- SysproQuery does the actual call to the specified
' Query business object.
'********************************************************
'Parameters:
'Uid:- GUID returned by Logon
'BusObject:- business object used to do query
'XmlIn:- The xml to be used in query
'********************************************************
'Returns:- The XML returned by the business object.
'********************************************************
Function SysproQuery(ByVal Uid As String, ByVal BusObject \
As String, ByVal XmlIn As String) As String
Dim xmlOut As String
Dim EncoreQuery As New Encore.Query()
xmlOut = EncoreQuery.Query(Uid, BusObject, XmlIn)
EncoreQuery = Nothing
Return xmlOut
End Function
10–20

Example 10.9. Query.Query Method in ASP.NET C# codebehind
//*******************************************************
//- SysproQuery does the actual call to the specified
// Query business object.
//*******************************************************
//Parameters:
//Uid:- GUID returned by Logon
//BusObject:- business object used to do query
//XmlIn:- The xml to be used in query
//*******************************************************
//Returns:- The XML returned by the business object.
//*******************************************************
string SysproQuery(string Uid, string BusObject, \
string XmlIn) {
string xmlOut;
Encore.Query EncoreQuery = new Encore.Query();
xmlOut = EncoreQuery.Query(Uid, BusObject, XmlIn);
EncoreQuery = null;
return xmlOut;
}
As you can see, the functions are fairly simple. At this stage of programming we are not
worried about building Xml strings or creating or using a UserID. Other parts of the
application will create and maintain these variables. The next sample code presents the
function using the Transaction.Build method.
Sample Applications
10–21

Example 10.10. Transaction.Build Method in ASP.NET VB
codebehind
'********************************************************
'-- SysproBuild does the actual call to the specified
' Build business object.
'********************************************************
'Parameters:
'Uid:- GUID returned by Logon
'BusObject:- business object used to do build
'XmlIn:- The xml to be used in build
'********************************************************
'Returns:- The XML returned by the business object.
'********************************************************
Function SysproBuild(ByVal Uid As String, ByVal BusObject \
As String, ByVal XmlIn As String) As String
Dim xmlOut As String
Dim EncoreBuild As New Encore.Transaction()
xmlOut = EncoreBuild.Build(Uid, BusObject, XmlIn)
EncoreBuild = Nothing
Return xmlOut
End Function
10–22

Example 10.11. Transaction.Build Method in ASP.NET C# codebehind
//*******************************************************
//- SysproBuild does the actual call to the specified
// Build business object
//*******************************************************
//Parameters:
//Uid:- GUID returned by Logon
//BusObject:- business object used to do build
//XmlIn:- The xml to be used in build
//*******************************************************
//Returns:- The XML returned by the business object.
//*******************************************************
string SysproBuild(string Uid, string BusObject, \
string XmlIn) {
string xmlOut;
Encore.Transaction EncoreBuild = new \
Encore.Transaction();
xmlOut = EncoreBuild.Build(Uid, BusObject, XmlIn);
EncoreBuild = null;
return xmlOut;
}
You will have noticed by now that the functions are very similar to each other. Each
requires the input of the UserID, the name of the business object, and the XML input that
the business object needs in order to create the required output XML.
Let's continue by looking at a function for Transaction.Post:
Sample Applications
10–23

Example 10.12. Transaction.Post Method in ASP.NET VB codebehind
'********************************************************
'-- SysproPost does the actual call to the specified
' Post business object
'********************************************************
'Parameters:
'Uid:- GUID returned by Logon
'BusObject:- business object used to do post
'XmlParam:- The parameter xml to be used in post
'XmlIn:- The input xml to be used in post
'********************************************************
'Returns:- The XML returned by the business object.
'********************************************************
Function SysproPost(ByVal Uid As String, ByVal BusObject \
As String, ByVal XmlParam As String, ByVal XmlIn As \
String) As String
Dim xmlOut As String
Dim EncorePost As New Encore.Transaction()
xmlOut = EncorePost.Post(Uid, BusObject, XmlParam, XmlIn)
EncorePost = Nothing
Return xmlOut
End Function
10–24

Example 10.13. Transaction.Post Method in ASP.NET C# codebehind
//*******************************************************
//- SysproPost does the actual call to the specified
// Post business object
//*******************************************************
//Parameters:
//Uid:- GUID returned by Logon
//BusObject:- business object used to do post
//XmlParam:- The parameter xml to be used in post
//XmlIn:- The input xml to be used in post
//*******************************************************
//Returns:- The XML returned by the business object.
//*******************************************************
string SysproPost(string Uid, string BusObject, string \
XmlParam, string XmlIn) {
string xmlOut;
Encore.Transaction EncorePost = new Encore.Transaction();
xmlOut=EncorePost.Post(Uid, BusObject, XmlParam, XmlIn);
EncorePost = null;
return xmlOut;
}
The Transaction.Post method also uses the Xml Parameter (XmlParam), but in many cases
it is left empty. The following Setup and Transaction functions will also include the
XmlParam variable so that it can be used within the application.
We will now look at sample function code for the Setup Class methods - Add, Update, and
Delete.
Sample Applications
10–25

Example 10.14. Setup.Add Method in ASP.NET VB codebehind
'********************************************************
'-- SysproAdd does the actual call to the specified
' Add business object.
'********************************************************
'Parameters:
'Uid:- GUID returned by Logon
'BusObject:- business object used to do update
'XmlParam:- The parameter xml to be used in update
'XmlIn:- The input xml to be used in update
'********************************************************
'Returns:- The XML returned by the business object.
'********************************************************
Function SysproAdd(ByVal Uid As String, ByVal BusObject \
As String, ByVal XmlParam As String, ByVal XmlIn As \
String) As String
Dim xmlOut As String
Dim EncoreAdd As New Encore.Setup()
xmlOut = EncoreAdd.Add(Uid, BusObject, XmlParam, XmlIn)
EncoreAdd = Nothing
Return xmlOut
End Function
10–26

Example 10.15. Setup.Add Method in ASP.NET C# codebehind
//*******************************************************
//- SysproAdd does the actual call to the specified
// Add business object.
//*******************************************************
//Parameters:
//Uid:- GUID returned by Logon
//BusObject:- business object used to do update
//XmlParam:- The parameter xml to be used in update
//XmlIn:- The input xml to be used in update
//*******************************************************
//Returns:- The XML returned by the business object.
//*******************************************************
string SysproAdd(string Uid, string BusObject, string \
XmlParam, string XmlIn) {
string xmlOut;
Encore.Setup EncoreAdd = new Encore.Setup();
xmlOut = EncoreAdd.Add(Uid, BusObject, XmlParam, XmlIn);
EncoreAdd = null;
return xmlOut;
}
Sample Applications
10–27

Example 10.16. Setup.Update Method in ASP.NET VB codebehind
'********************************************************
'-- SysproUpdate does the actual call to the specified
' Delete business object.
'********************************************************
'Parameters:
'Uid:- GUID returned by Logon
'BusObject:- business object used to do update
'XmlParam:- The parameter xml to be used in update
'XmlIn:- The input xml to be used in update
'********************************************************
'Returns:- The XML returned by the business object.
'********************************************************
Function SysproUpdate(ByVal Uid As String, ByVal BusObject \
As String, ByVal XmlParam As String, ByVal XmlIn As \
String) As String
Dim xmlOut As String
Dim EncoreUpdate As New Encore.Setup()
xmlOut=EncoreUpdate.Update(Uid, BusObject, XmlParam, XmlIn)
EncoreUpdate = Nothing
Return xmlOut
End Function
10–28

Example 10.17. Setup.Update Method in ASP.NET C# codebehind
//*******************************************************
//- SysproUpdate does the actual call to the specified
// Delete business object.
//*******************************************************
//Parameters:
//Uid:- GUID returned by Logon
//BusObject:- business object used to do update
//XmlParam:- The parameter xml to be used in update
//mlIn:- The input xml to be used in update
//*******************************************************
//Returns:- The XML returned by the business object.
//*******************************************************
string SysproUpdate(string Uid, string BusObject, string \
XmlParam, string XmlIn) {
string xmlOut;
Encore.Setup EncoreUpdate = new Encore.Setup();
xmlOut=EncoreUpdate.Update(Uid, BusObject, XmlParam, XmlIn);
EncoreUpdate = null;
return xmlOut;
}
Sample Applications
10–29

Example 10.18. Setup.Delete Method in ASP.NET VB codebehind
'********************************************************
'-- SysproDelete does the actual call to the specified
' Delete business object.
'********************************************************
'Parameters:
'Uid:- GUID returned by Logon
'BusObject:- business object used to do delete
'XmlParam:- The parameter xml to be used in delete
'XmlIn:- The input xml to be used in delete
'********************************************************
'Returns:- The XML returned by the business object.
'********************************************************
Function SysproDelete(ByVal Uid As String, ByVal BusObject \
As String, ByVal XmlParam As String, ByVal XmlIn As \
String) As String
Dim xmlOut As String
Dim EncoreDelete As Encore.Setup()
xmlOut = EncoreDelete.Delete(Uid, BusObject, XmlParam, XmlIn)
EncoreDelete = Nothing
Return xmlOut
End Function
10–30

Example 10.19. Setup.Delete Method in ASP.NET C# codebehind
//*******************************************************
//- SysproDelete does the actual call to the specified
// Delete business object.
//*******************************************************
//Parameters:
//Uid:- GUID returned by Logon
//BusObject:- business object used to do delete
//XmlParam:- The parameter xml to be used in delete
//XmlIn:- The input xml to be used in delete
//******************************************************
//Returns:- The XML returned by the business object.
//*******************************************************
string SysproDelete(string Uid, string BusObject, string \
XmlParam, string XmlIn)
{
string xmlOut;
Encore.Setup EncoreDelete = new Encore.Setup();
xmlOut=EncoreDelete.Delete(Uid, BusObject, XmlParam, XmlIn);
EncoreDelete = null;
return xmlOut;
}
Sample Applications
10–31

All the functions presented here from the Setup class allow the user to submit the
additional XML Parameters to the business object should they need to. These functions
still follow the simple structure of the earlier ones, taking in the UserID, business object,
XmlIn and XmlParameter strings and submitting them to the SYSPRO application server
through e.net solutions.
The next portion of sample programming presents the more sample functions from the
Query class. We have already seen a function for Query.Query, now lets examine Fetch,
Browse, NextKey and PreviousKey. These functions do not require the business object
name to be supplied as the business object is predetermined for Fetch, Browse, NextKey
and PrevKey.
Example 10.20. Query.Fetch Method in ASP.NET VB codebehind
'********************************************************
'-- SysproFetch does the actual call to the specified
' Fetch Query.
'********************************************************
'Parameters:
'[Uid:- GUID returned by Logon
'XmlIn:- The input xml to be used in fetch
'********************************************************
'Returns:- The XML returned by the business object.
'********************************************************
Function SysproFetch(ByVal Uid As String, ByVal XmlIn \
As String) As String
Dim xmlOut As String
Dim EncoreFetch As New Encore.Query()
xmlOut = EncoreFetch.Fetch(Uid, XmlIn)
EncoreFetch = Nothing
Return xmlOut
End Function
10–32

Example 10.21. Query.Fetch Method in ASP.NET C# codebehind
//*******************************************************
//- SysproFetch does the actual call to the specified
// Fetch Query.
//*******************************************************
//Parameters:
//[Uid:- GUID returned by Logon
//XmlIn:- The input xml to be used in fetch
//*******************************************************
//Returns:- The XML returned by the business object.
//*******************************************************
string SysproFetch(string Uid, string XmlIn) {
string xmlOut;
Encore.Query EncoreFetch = new Encore.Query();
xmlOut = EncoreFetch.Fetch(Uid, XmlIn);
EncoreFetch = null;
return xmlOut;
}
Sample Applications
10–33

Example 10.22. Query.Browse Method in ASP.NET VB codebehind
'********************************************************
'- SysproBrowse does a browse on a given table.
'********************************************************
'Parameters:
'Uid:- GUID returned by Logon
'XmlIn:- The input xml to be used in the browse
'********************************************************
'Returns:- The XML returned by the business object.
'********************************************************
Function SysproBrowse(ByVal Uid As String, ByVal XmlIn \
As String) As String
Dim xmlOut As String
Dim EncoreBrowse As New Encore.Query()
xmlOut = EncoreBrowse.Browse(Uid, XmlIn)
EncoreBrowse = Nothing
Return xmlOut
End Function
10–34

Example 10.23. Query.Browse Method in ASP.NET C# codebehind
//*******************************************************
//- SysproBrowse does a browse on a given table.
//*******************************************************
//Parameters:
//Uid:- GUID returned by Logon
//XmlIn:- The input xml to be used in the browse
//*******************************************************
//Returns:- The XML returned by the business object.
//*******************************************************
string SysproBrowse(string Uid, string XmlIn) {
string xmlOut;
Encore.Query EncoreBrowse = new Encore.Query();
xmlOut = EncoreBrowse.Browse(Uid, XmlIn);
EncoreBrowse = null;
return xmlOut;
}
Sample Applications
10–35

Example 10.24. Query.NextKey Method in ASP.NET VB codebehind
********************************************************
'-- SysproNext does the actual call to the
' next Query.
'********************************************************
'Parameters:
'Uid:- GUID returned by Logon
'XmlIn:- The input xml to be used in query
'********************************************************
'Returns:- The XML returned by the Business Object.
'********************************************************
Function SysproNext(ByVal Uid As String, ByVal XmlIn As \
String) As String
Dim xmlOut As String
Dim EncoreNext As New Encore.Query()
xmlOut = EncoreNext.NextKey(Uid, XmlIn)
Return xmlOut
End Function
10–36

Example 10.25. Query.NextKey Method in ASP.NET C# codebehind
//*******************************************************
//- SysproNext does the actual call to the
// next Query.
//*******************************************************
//Parameters:
//Uid:- GUID returned by Logon
//XmlIn:- The input xml to be used in query
//*******************************************************
//Returns:- The XML returned by the Business Object.
//*******************************************************
string SysproNext(string Uid, string XmlIn) {
string xmlOut;
Encore.Query EncoreNext = new Encore.Query();
xmlOut=EncoreNext.NextKey(Uid, XmlIn);
return xmlOut;
}
Sample Applications
10–37

Example 10.26. Query.PreviousKey Method in ASP.NET VB
codebehind
'********************************************************
'-- SysproPrevious does the actual call to the
' previous Query.
'********************************************************
'Parameters:
'Uid:- GUID returned by Logon
'XmlIn:- The input xml to be used in query
'********************************************************
'Returns:- The XML returned by the Business Object.
'********************************************************
Function SysproPrevious(ByVal Uid As String, ByVal XmlIn \
As String) As String
Dim xmlOut As String
Dim EncorePrev As New Encore.Query()
xmlOut = EncorePrev.PreviousKey(Uid, XmlIn)
Return xmlOut
End Function
10–38

Example 10.27. Query.PreviousKey Method in ASP.NET C#
codebehind
//*******************************************************
//- SysproPrevious does the actual call to the
// previous Query.
//*******************************************************
//Parameters:
//Uid:- GUID returned by Logon
//XmlIn:- The input xml to be used in query
//*******************************************************
//Returns:- The XML returned by the Business Object.
//*******************************************************
string SysproPrevious(string Uid, string XmlIn) {
string xmlOut;
Encore.Query EncorePrev = new Encore.Query();
xmlOut=EncorePrev.PreviousKey(Uid, XmlIn);
return xmlOut;
}
All the method functions that we have shown so far have dealt with the basic submission
of the UserID and the XML input to the business object. These functions can now be
called from within other functions and subroutines that will define the XML input and the
business object to use.
Sample Applications
10–39

10.4.3. Calling the Method Functions
Now that we have defined the basic functions for the processing data through the various
methods of the four SYSPRO e.net solutions classes, we will present some functions that
call the method functions. The calling functions will follow the following steps:
• Identify the session Logon Details
• Identify the XmlIn string
• Identify the business object
• Send details to the processing method function
• The processing function calls the business object
• The processing function transforms the XmlOut
• The calling function receives the returned and formated data
Before we show sample code that calls the Class Method functions, we need to define a
function that will handle the transformation of XML. This is a preliminary function that
will be required by other functions that need to transform an XML string through the use
of an XSL file.
10–40

Example 10.28. Creating the Transform Function in ASP.NET VB
codebehind
'********************************************************
'-- Transform does a server-side transform of an xml
' string and returns HTML --
'********************************************************
'Parameters:
'xmlin:- The xml to be transformed - can have a xsl
' directive
'xslin:- The xsl used to transform the incomming xml
' preferably as a server path ie. "c:\....mac.xsl"
'********************************************************
'Returns:- Whatever the transform does with the xml,
' used mostly to generate HTML.
'********************************************************
Function Transform(ByVal xmlin As String, ByVal xslin \
As String) As String
Dim xmlout As String
Dim Navigator As XPath.XPathNavigator
Dim Reader As XmlReader
Dim Xmldoc As New XmlDocument()
Dim Trans As New XslTransform()
Dim Builder As New StringBuilder()
Try
Xmldoc.LoadXml(xmlin)
Trans.Load(xslin)
Navigator = Xmldoc.CreateNavigator()
Reader = Trans.Transform(Navigator, Nothing)
While Reader.Read = True
Builder.Append(Reader.ReadInnerXml)
End While
Return Builder.ToString
Catch Exc As Exception
Return "<table width=""100%""><tr><td style=""color: \
red;font-size:large;font-family:verdana"">" & Exc. \
Message & "</span></td></tr><tr><td><hr/></td> \
</tr><tr><td style=""font-family:verdana;font-size: \
medium""><a href=""#"" onClick=""var frame = \
parent.document.getElementById('winframe'); \
frame.rows = '*,2px';"" style=""color:#006699; \
font-weight:bold""></a></td></tr></table>"
End Try
End Function
Sample Applications
10–41

Example 10.29. Creating the Transform Function in ASP.NET C#
codebehind
//*******************************************************
//- Transform does a server-side transform of an xml
// string and returns HTML --
//*******************************************************
//Parameters:
//xmlin:- The xml to be transformed - can have a xsl
// directive
//xslin:-The xsl used to transform the incomming xml
// preferably as a server path ie. "c:\....mac.xsl"
//******************************************************
//Returns:- Whatever the transform does with the xml,
// used mostly to generate HTML.
//*******************************************************
string Transform(string xmlin, string xslin)
{
string xmlout;
System.Xml.XPath.XPathNavigator Navigator;
XmlReader Reader;
XmlDocument Xmldoc = new XmlDocument();
XslTransform Trans = new XslTransform();
StringBuilder Builder = new StringBuilder();
try {
Xmldoc.LoadXml(xmlin);
Trans.Load(xslin);
Navigator = Xmldoc.CreateNavigator();
Reader = Trans.Transform(Navigator, null);
while (Reader.Read()) {
Builder.Append(Reader.ReadInnerXml());
}
return Builder.ToString();
} catch (Exception Exc) {
return "<table width=\"100%\"><tr><td style=\"color:red; \
font-size:large;font-family:verdana\">" + Exc.Message + \
"</span></td></tr><tr><td><hr/></td></tr><tr><td \
style=\"font-family:verdana;font-size:medium\"><a href \
=\"#\" onClick=\"var frame = parent.document. \
getElementById('winframe');frame.rows = '*,2px';\" \
style=\"color:#006699;font-weight:bold\"></a></td> \
</tr></table>";
}
}
10–42

As you can see from the sample code presented above, the functions that call a method
function and require XML transformation will also have to provide the XSL string for the
actual transformation. These are typically .xsl file stored in a directory on the server that
can be loaded by a function and submitted as a string variable. You will need to create
your own stylesheet files for the business objects that you will be using.
The following code sample shows how an application would call the Query.Query method
already described in the previous section.
Example 10.30. Calling the Query Method in ASP.NET VB codebehind
'********************************************************
'-- Query does a query using the special xml string
' provided as input and returns xml/html
'********************************************************
'Parameters:
'Uid:- GUID returned by Logon
'BusObject:- business object used to
' do query
'XmlIn:- The xml to be used in query - can have a
' xsl directive
'XmlTransform:- Parameter will specify if
' server/client side transform is required
'XslIn:- The XLS used to transform the
' incomming xml preferably as a server
' path ie. "c:\......mac.xsl"
'ContentType:- ByRef parameter
' representing the content type to be returned by IIS
'********************************************************
'Returns:_ Whatever the transform does with
' the xml, used mostly to generate HTML.
'********************************************************
Function Query(ByVal Uid As String, ByVal BusObject \
As String, ByVal XmlIn As String, ByVal XmlTransform \
As String, ByVal XslIn As String, ByRef ContentType \
As String, Optional ByVal returnLink As Boolean = \
True, Optional ByVal BubleExc As Boolean = False) As String
Try
'Case statement to toggle between server/client
'side transform
Select Case XmlTransform
Case "C" 'Prefers a client side transform
Return SysproQuery(Uid, BusObject, XmlIn)
Case "S" 'Prefers a server side transform (Default)
ContentType = "text/html"
Return Transform(SysproQuery(Uid, BusObject, XmlIn), XslIn)
End Select
Sample Applications
10–43

Catch Exc As Exception
If BubleExc = False Then
If returnLink = True Then
Return "<table width=""100%""><tr><td style=""color:red; \
font-size:large;font-family:verdana"">" & Exc.Message & " \
</span></td></tr><tr><td><hr/></td></tr><tr><td style= \
""font-family:verdana;font-size:medium""><a href=""#"" \
onClick=""var frame = parent.document.getElementById \
('winframe');frame.rows = '*,2px';"" style=""color:#006699; \
font-weight:bold""></a></td></tr></table>"
Else
Return "<table width=""100%""><tr><td style=""color:red; \
font-size:large;font-family:verdana"">" & Exc.Message & " \
</span></td></tr></table>"
End If
Else
Throw Exc
End If
End Try
End Function
Example 10.31. Calling the Query Method in ASP.NET C# codebehind
//*******************************************************
//-- Query does a query using the special xml string
// provided as input and returns xml/html
//********************************************************
//Parameters:
//id:- GUID returned by Logon
//BusObject:- business object used to
// do query
//XmlIn:- The xml to be used in query - can have a
// xsl directive
//XmlTransform:- Parameter will specify if
//' server/client side transform is required
//'XlIn:- The XLS used to transform the
//' incomming xml preferably as a server
//' path ie. "c:\......mac.xsl"
//ContentType:- ByRef parameter
// representing the content type to be returned by IIS
//*******************************************************
//Returns:_ Whatever the transform does with
// the xml, used mostly to generate HTML.
//*******************************************************
string Query(string Uid, string BusObject, string XmlIn, \
10–44

string XmlTransform, string XslIn, ref string ContentType) {
try {
if (XmlTransform == "C") {
return SysproQuery(Uid, BusObject, XmlIn);
} else if (XmlTransform == "S") {
ContentType = "text/html";
return Transform(SysproQuery(Uid, BusObject, XmlIn), \
XslIn);
} else {
return SysproQuery(Uid, BusObject, XmlIn);
}
}
catch (Exception Exc) {
return ("<table width=\"100%\"><tr><td style=\"color:" +
"red;font-size:large;font-family:verdana\">" +
Exc.Message + "</span></td></tr><tr><td><hr/>" +
"</td></tr><tr><td style=\"font-family:verdana;" +
"font-size:medium\"><a href=" +
"\"#\" onClick=\"var frame = parent.document." +
"getElementById(\'winframe\');frame.rows = \'" +
"*,2px\';\" style=\"color:#006699;font-weight:bold\">" +
"</a></td></tr></table>");
}
}
Please note that there are no 'optional' variables in C#, and so the above C# sample code
differs from the VB code in it's variable declarations.
Look through the above functions and take note of flow of data within the "try" statement.
We can specify whether a server side or client side transformation of the XmlOut string
will take place, the default setting not using the transformation function option.
The following code sample demonstrates the use of the Transaction.Build calling function.
Sample Applications
10–45

Example 10.32. Calling the Build Method in ASP.NET VB codebehind
'********************************************************
'-- Build does a build using the special xml string
' provided as input and returns xml/html
'********************************************************
'Parameters:
'Uid:- GUID returned by Logon
'BusObject:- business object used to
' do query
'XmlIn:- The xml to be used in query - can have a
' xsl directive
'XmlTransform:- Parameter will specify if
' server/client side transform is required
'XslIn:- The XLS used to transform the
' incomming xml preferably as a server
' path ie. "c:\......mac.xsl"
'ContentType:- ByRef parameter
' representing the content type to be returned by IIS
'********************************************************
'Returns:_ Whatever the transform does with
' the xml, used mostly to generate HTML.
'********************************************************
Function Build(ByVal Uid As String, ByVal BusObject \
As String, ByVal XmlIn As String, ByVal XmlTransform \
As String, ByVal XslIn As String, ByRef ContentType As \
String) As String
Try
'Case statement to toggle between server/client
'side transform
Select Case XmlTransform
Case "C" 'Prefers a client side transform
ContentType = "text/xml"
Return SysproBuild(Uid, BusObject, XmlIn)
Case "S" 'Prefers a server side transform (Default)
ContentType = "text/html"
Return Transform(SysproBuild(Uid, BusObject, XmlIn), XslIn)
End Select
Catch Exc As Exception
Return "<table width=""100%""><tr><td style=""color:red; \
font-size:large;font-family:verdana"">" & Exc.Message & " \
</span></td></tr><tr><td><hr/></td></tr><tr><td style= \
""font-family:verdana;font-size:medium""><a href=""#"" \
onClick=""var frame = parent.document.getElementById \
('winframe');frame.rows = '*,2px';"" style=""color:#006699; \
font-weight:bold""></a></td></tr></table>"
End Try
End Function
10–46

Example 10.33. Calling the Build Method in ASP.NET C# codebehind
//*******************************************************
//- Build does a build using the special xml string
// provided as input and returns xml/html
//*******************************************************
//Parameters:
//Uid:- GUID returned by Logon
//BusObject:- business object used to
// do query
//XmlIn:- The xml to be used in query - can have a
// xsl directive
//'XlTransform:- Parameter will specify if
// server/client side transform is required
//XslIn:- The XLS used to transform the
// incomming xml preferably as a server
// path ie. "c:\......mac.xsl"
//ContentType:- ByRef parameter
// representing the content type to be returned by IIS
//*******************************************************
//Returns:_ Whatever the transform does with
// the xml, used mostly to generate HTML.
//*******************************************************
string Build(string Uid, string BusObject, string XmlIn, \
string XmlTransform, string XslIn, ref string ContentType) {
try {
if (XmlTransform == "C") {
ContentType = "text/xml";
return SysproBuild(Uid, BusObject, XmlIn);
} else if (XmlTransform == "S") {
ContentType = "text/html";
return Transform(SysproBuild(Uid, BusObject, XmlIn), \
XslIn);
}
else {
return SysproQuery(Uid, BusObject, XmlIn);
}
} catch (Exception Exc) {
return "<table width=\"100%\"><tr><td style=\"color:red; \
font-size:large;font-family:verdana\">" + Exc.Message + \
"</span></td></tr><tr><td><hr/></td></tr><tr><td \
style=\"font-family:verdana;font-size:medium\"> \
<a href=\"#\" onClick=\"var frame = parent.document. \
Sample Applications
10–47

getElementById('winframe');frame.rows = '*,2px';\" \
style=\"color:#006699;font-weight:bold\"></a></td> \
</tr></table>";
}
}
As you can see from the sample code, the basic flow of data is the same as the previous
examples.
None of the method or calling functions that we have presented so far have defined the
XmlIn/XmlParmater strings or identified specific business objects. The next section will
provide sample code that uses the method and calling functions, and will provide this
information to the functions.
10.5. Sample Business Logic Subroutines
The foundation of the business application has now been laid by the functions
demonstrated so far. We now turn to building subroutines that actually utilize the business
logic for specific business processes.
As already indicated, we will use the functions that we have already presented in the
previous section for these subroutines. If you are building your own .aspx file please
make sure that all those functions are correctly assembled within the code script section of
your file (or the codebehind file if you are using one). The SampleCode download file
contains the methods.aspx.vb and methods.aspx.cs codebehind files which
contain the previous functions as well as the following subroutines. If you are copying
code samples from this book please remember to mend broken line [lines ending in " \"]
(these were broken to fit onto the printed page, but are whole in the downloadable code).
10.5.1. Prerequisite XSL Formating
The XSL style sheet (format.xsl) performs the basic transformations with the other
stylesheets of the application. Please open the SampleCode download file and save the
files in the \xsl subdirectory to an \xslsubdirectory on your IIS web server root
directory. This contains three XSL files used to transform the XmlOut strings in the
following examples.
10–48

10.5.2. Price Query Subroutine
This section of sample code deals with creating a Price Query option. The ASP.NET .aspx
form file containing the asp:Button to be clicked is presented after the subroutine
(presented in VB and C#).
Example 10.34. Price Query Code in ASP.NET VB codebehind
'********************************************************
'Price Query Subroutine
'********************************************************
Public Sub btnPriceQuery_Click(ByVal sender As Object, \
ByVal e As EventArgs)
pnlPriceQuery.Visible = True
Dim xmlin As StringBuilder = New StringBuilder
xmlin.Append("<?xml version=""1.0"" encoding=""Windows- \
1252""?>")
xmlin.Append("<Build xmlns:xsd=""http://www.w3.org/2001/ \
XMLSchema-instance"" xsd:noNamespace \
SchemaLocation=""SORRSL.XSD"">")
xmlin.Append("<Parameters>")
xmlin.Append("<stockcode>" + txtstockcode.Text + \
"</stockcode>")
xmlin.Append("<customer>" + txtcustomer.Text + \
"</customer>")
xmlin.Append("<orderquantity>" + txtquantity.Text + \
"</orderquantity>")
xmlin.Append("<warehouse>" + selwarehouse.Text + \
"</warehouse>")
xmlin.Append("</Parameters></Build>")
Dim content As String = "text/html"
Response.Write(Build(lblUid.Text, "SORRSL", \
xmlin.ToString, "S", Server.MapPath("xsl/priceQuery.xsl") \
, content))
Response.ContentType = content
End Sub
Sample Applications
10–49

Example 10.35. Price Query Code in ASP.NET C# codebehind
//*******************************************************
//Price Query Subroutine
//*******************************************************
public void btnPriceQuery_Click(object sender, EventArgs e)
{
pnlPriceQuery.Visible = true;
StringBuilder xmlin = new StringBuilder();
xmlin.Append("<?xml version=\"1.0\" encoding=\"Windows \
-1252\"?>");
xmlin.Append("<Build xmlns:xsd=\"http://www.w3.org/2001/ \
XMLSchema-instance\" xsd:noNamespace \
SchemaLocation=\"SORRSL.XSD\">");
xmlin.Append("<Parameters>");
xmlin.Append("<stockcode>" + txtstockcode.Text + \
"</stockcode>");
xmlin.Append("<customer>" + txtcustomer.Text + \
"</customer>");
xmlin.Append("<orderquantity>" + txtquantity.Text + \
"</orderquantity>");
xmlin.Append("<warehouse>" + selwarehouse.Text + \
"</warehouse>");
xmlin.Append("</Parameters></Build>");
string content = "text/html";
Response.Write(Build(lblUid.Text, "SORRSL", xmlin. \
ToString(), "S", Server.MapPath("xsl/priceQuery.xsl"), \
ref content));
Response.ContentType = content;
}
As you can see from the code sample, we have created four textbox data entry points and
have built our XmlIn string using the input from those textboxes. We use the
Response.Write command to display the data returned from the Build function
described earlier.
10–50

Example 10.36. ASP.NET .aspx Form Sample
<form runat="server">
asp:Panel id="pnlPriceQuery" runat="server"
Visible="false">
<table width="402" border="1">
<tr>
<td width="178">
<div align="right">Stock Code:</div>
</td>
<td width="208">
<asp:TextBox ID="txtstockcode" runat="server"
Text="A100">
</asp:TextBox></td>
</tr>
<tr>
<td>
<div align="right">Customer:</div>
</td>
<td>
<asp:TextBox ID="txtcustomer" runat="server"
Text="000010">
</asp:TextBox></td>
</tr>
<tr>
<td>
<div align="right">Order Quantity:</div>
</td>
<td>
<asp:TextBox ID="txtquantity" runat="server">
</asp:TextBox></td>
</tr>
<tr>
<td>
<div align="right">Warehouse:</div>
</td>
<td>
<asp:TextBox ID="selwarehouse" runat="server"
Text="FG">
</asp:TextBox></td>
</tr>
</table>
<p>
<asp:Button id="btnPriceQuery"
onclick="btnPriceQuery_Click"
runat="server" Text="Submit Price Query"></asp:Button>
</p>
Sample Applications
10–51

</asp:Panel>
</form>
The SampleCode download contains the PriceQuery.cs.aspx and
PriceQuery.vb.aspx files. These contain the ASP.NET presentation code used by
the above functions, and Sales Order Query functions that follow. As we have done
before, save the PriceQuery.cs.aspx and PriceQuery.vb.aspx files to the root
directory of your IIS server (usually C:\Inetpub\wwwroot\ or
C:\Inetpub\wwwroot\Sysproweb if you are using the SYSPRO web-based
applications). Load the files into your web browser and logon, then perform a Price Query
and a Sales Order Query. If everything is set up properly you will see the data from the
Outdoors Company supplied by the SYSPRO 6.0 Issue 010 Evaluation version.
Now take a look at the code of the following Sales Order subroutine.
10.5.3. Sales Order Query Subroutine
The following sample code presents a Sales Order Query. Like the previous sample code,
the .aspx file sample follows after the VB and C# subroutines.
Example 10.37. Sales Order Query Code in ASP.NET VB codebehind
'********************************************************
'Sales Order Query Subroutine
'********************************************************
Public Sub btnSalesOrderQuery_Click(sender As Object, e \
As EventArgs)
pnlSalesQuery.Visible = True
Dim xmlin As New StringBuilder()
With xmlin
xmlin.Append("<?xml version=""1.0"" encoding= \
""Windows-1252""?><query>")
xmlin.Append("<key><salesorder>" & txtorder.Text & \
"</salesorder>")
xmlin.Append("<invoice></invoice></key>")
xmlin.Append("<option><xslstylesheet>soquery.xsl \
</xslstylesheet>")
xmlin.Append("<includeserials>N</includeserials>")
xmlin.Append("<includelots>Y</includelots>")
xmlin.Append("<includebins>Y</includebins>")
xmlin.Append("<includecompletedlines>Y \
10–52

</includecompletedlines></option></query>")
End With
Dim content As String = "text/html"
Response.Write(Query(lblUid.Text, "SORQRY", xmlin.ToString, \
"S", Server.MapPath("xsl/salesOrderQuery.xsl"), content))
Response.ContentType = content
End Sub
Example 10.38. Sales Order Query Code in ASP.NET C# codebehind
//*******************************************************
//Sales Order Query Subroutine
//*******************************************************
public void btnSalesOrderQuery_Click(object sender, \
EventArgs e)
{
pnlSalesQuery.Visible = true;
StringBuilder xmlin = new StringBuilder();
xmlin.Append("<?xml version=\"1.0\" encoding=\"Windows- \
1252\"?><query>");
xmlin.Append("<key><salesorder>" + txtorder.Text + \
"</salesorder>");
xmlin.Append("<invoice></invoice></key>");
xmlin.Append("<option><xslstylesheet>soquery.xsl \
</xslstylesheet>");
xmlin.Append("<includeserials>N</includeserials>");
xmlin.Append("<includelots>Y</includelots>");
xmlin.Append("<includebins>Y</includebins>");
xmlin.Append("<includecompletedlines>Y \
</includecompletedlines></option></query>");
string content = "text/html";
Response.Write(Query(lblUid.Text, "SORQRY", xmlin. \
ToString(), "S", Server.MapPath("xsl/salesOrderQuery.xsl" \
),ref content));
Response.ContentType = content;
}
Sample Applications
10–53

Example 10.39. ASP.NET .aspx Form Sample
<form runat="server">
<asp:Panel ID="pnlSalesOrderQuery" runat="server"
Visible="false">
<table width="402" border="1">
<tr>
<td width="178">
<div align="right">Sales Order:</div>
</td>
<td width="208">
<asp:TextBox ID="txtorder" runat="server" Text="000812">
</asp:TextBox></td>
</tr>
</table>
<p>
<asp:Button id="btnSalesOrderQuery" onclick= \
"btnSalesOrderQuery_Click" runat="server" Text= \
"Submit Sales Order Query"></asp:Button>
</p>
</asp:Panel>
</form>
You will see that the code is fairly similar between the Price Query and the Sales Order
Query. The function builds the required XML input and send it to the calling function
along with the name of the business object to use.
Now take some time to examine the PriceQuery.cs.aspx and
PriceQuery.vb.aspx files along with the methods.aspx.cs and
methods.aspx.vb files that contain the corresponding codebehind code.
10.5.4. Putting it all together
The methods.aspx.cs and methods.aspx.vb files contain the functions that
could form the core of an e.net solutions ASP.NET application. You just need to create the
subroutines that create the specific business object XmlIn and XmlParameters and
stylesheet information, like those contained in the Price Query and Sales Order Query
samples presented above. Study them all again and trace the flow of data from the XmlIn
string, through the calling functions to the method functions and back.
Now that you have seen and examined the code samples provided in this book, you can
10–54

use them (and the knowledge of e.net solutions programming that you have gained from
reading this book) to build your own programs and applications using SYSPRO e.net
solutions. For further examples of e.net solutions programming please examine the code
that is installed with the SYSPRO Web Applications within your
C:\Inetpub\wwwroot\Sysproweb directory. Examine the
\Sysproweb\main\routines.vb file to see the core of the SYSPRO web-based
applications logic, then look in the \Sysproweb\content subdirectories and examine
the code and XSL files that are located there.
The SYSPRO web-based applications use the .NET Class Sysprodll.Syspro,
which is the SYSPRO Web Applications wrapping of Encore.dll. As you will
see, the business object usage is exactly the same regardless of whether one
is programming for the COM object's Ecore.dll or the Web Application's
Sysprodll.Syspro Class. There are some differences. For instance, the Logon
string is different, and the Query NextKey and PreviousKey methods are
combined in one method.
Sample Applications
10–55

10–56

11
Building from Here
Objectives - In this final chapter we will briefly summarize what we have presented in the
book and challenge you to build your e.net solutions programming skills.
11.1. e.net solutions Classes and Methods
The outline plan of e.net solutions is simple and easy to understand. There are four main
class object: Utilities, Query, Setup, and Transaction. Within each of these classes there
are methods that control the interaction of the business objects with the SYSPRO
application server. The Utilities class utilizes the Logon, Logoff,
GetLogonProfile, and Run methods. The Query class utilizes the Query, Browse,
Fetch, Next Key, and Previous Key methods The Setup classes utilizes the Add,
Update, and Delete methods. The Transaction class utilizes the Post, and
Build methods.
When operating together through the SYSPRO COM/DCOM or Web Services interface,
these classes and methods expose the core of the SYSPRO ERP system to your
programming ability. You can create your own custom interface, your own custom
applications, and your own custom web enabled systems.
11.2. Dealing in XML
One of the key elements in programming with e.net solutions is understanding and
transforming XML data. As most of the business objects use an XmlIn string to provide
data to the SYSPRO system, and receive an XmlOut string from the SYSPRO system, it is
vital to build your XML skills to the point where using XML statements and documents is
almost second nature to you.
If, after studying and reading through this book, you are still unsure about the XML Input,
Output, and Parameter strings used in e.net solutions programming then you will need to
speak with someone in your organization (or at your local SYSPRO VAR office) who is
more advanced in the use of XML and learn from their experience. There are also many
online tutorials and articles that deal with XML, XSL Stylesheets, and transforming of
XML to various other types of formats. It is also a good idea to utilize the SYSPRO
SupportZone forums.

11.3. Building Your Application
You now have the tools and the knowledge about e.net solutions that will enable you to
program your own applications. You have the sample code and the various other examples
demonstrated in this book to use as a base. You now need to create your own code in order
to build on this knowledge and increase your personal experience of using e.net solutions.
The one area that you still need information and experience involves the function of all the
business objects. If you followed our advice and went through the Business Object Library
using the e.net Diagnostic Utility's interface or viewed the Business Object Reference
Library at the SYSPRO SupportZone, then you will have the basic information required. It
is up to you to build, test, and produce your own application using the needs and
requirements of your organization's enterprise as your guideline.
SYSPRO produces new business objects on a continuing basis. For an
up-to-date listing of all the business objects please visit the online Support
Zone site.
11–2
A
Installing the SYSPRO Web Services
The SYSPRO Web Services can be setup on the SYSPRO application server or on a
separate web server. In this appendix we take you through the installation of the Web
Services on the SYSPRO application server. If you set the services up on a separate web
server you will need to configure DCOM to connect the web server to the SYSPRO
application server.
A.1. Prerequisites
The SYSPRO Web services require the following to be installed on a Windows Server
2000/2003 computer:
• IIS 4.0 or higher needs to be installed on the machine that will act as a web server
• The Microsoft .NET 1.1 Framework is required on the web server
• SYSPRO e.net solutions must be configured on the web server
• All previous versions of the SYSPRO 6.0 Web services have to be un-installed
IIS is the only prerequisite for the installation to succeed.
A.2. Installation
Procedure A.1. Installing Web Services
1. Insert the SYSPRO CD-ROM into the designated computer. The auto-run installation
menu is displayed.
2. From the auto-run installation menu select, Install Product.

3. Select, Web Services.
The SYSPRO Web Services installshield is invoked.
4. Select Next to continue.
5. At the Select Installation Address dialog, input the Virtual directory id where the
SYSPRO Web Services will be located (default SysproWebServices) and the Port
A–2

number on which the application can be accessed (default: 80). Select Disk Cost if
you want to establish the amount of disk space that is required for this installation.
Select Next to accept the default virtual directory and port.
6. The Confirm Installation window is displayed.
Click Next to install SYSPRO Web Services. The SYSPRO Web Services files will
then be copied to your machine.
7. Finally select Close.
SYSPRO 6.0 Web Services have been installed.
Installing the SYSPRO Web Services
A–3

A–4

B
Installing the SYSPRO Web Based Applications
B.1. Requirements
In order to have a fully functioning installation of the SYSPRO Web Based Applications
you will need:
• Microsoft Internet Information Server (IIS) 4.0 or higher
• Internet Explorer 6.0 or higher
• Microsoft .Net Framework Version 1.1.
• SYSPRO e.net DCOM Remote Client (only required when the Web Server is located on
a host other than the SYSPRO Server).
Microsoft .Net Framework must be installed only after Microsoft Internet
Information Server (IIS) has been installed.
B.2. The Installation Procedure
In this section of the appendix we explain how to install the SYSPRO e.net Web
Applications.
B.2.1. Installation
The following procedure installs the SYSPRO e.net Web Applications.
Before performing the following procedure, please ensure that all the Web
Application Dependencies are satisfied as described in Section B.1,
“Requirements” [B–1]).
Procedure B.1. Installing Web Applications
1. Insert the SYSPRO CD-ROM into the designated computer. The auto-run installation
menu is displayed.

2. From the auto-run installation menu select, Install Product.
3. Select, Web Based Applications.
The SYSPRO Web Applications install shield is invoked.
4. Select Next to continue.
5. At the Select Installation Address dialog, input the Virtual directory id where the
B–2

SYSPRO Web Apps will be located (default Sysproweb) and the Port number on
which the application can be accessed (default: 80). Select Disk Cost if you want to
establish the amount of disk space that is required for this installation. Select Next to
accept the default virtual directory and port.
6. The Confirm Installation window is displayed.
Click Next to install SYSPRO Web Services. The SYSPRO Web Services files will
then be copied to your machine.
7. Finally select Close.
SYSPRO 6.0 Web Services has been installed, and can be accessed from Internet
Explorer.
8. If the Web Application is installed on a host other that the SYSPRO Server,
installation of the SYSPRO e.net DCOM Remote Client is required. Proceed to the
Section B.2.2, “Installing e.net Solutions DCOM Remote Client” [B–3].
Once you have installed the Web Application please make sure that your IIS is configured
to use .Net 1.1. If you have installed the Web Applications on a Windows 2003 Server or
on a Windows 2000 server you can check this by opening the IIS manager, navigate to the
Sysproweb virtual folder in the default website listing, right click on the directory and
select Properties, then change the options for the Sysproweb folder under the ASP.NET
tab to .Net 1.1.
B.2.2. Installing e.net Solutions DCOM Remote Client
When the Web Server running the SYSPRO e.net Web Applications is a host other than
the SYSPRO Server, the SYSPRO e.net solutions DCOM Remote Client must be
installed on the Web Server host. The SYSPRO e.net DCOM Remote Client enables the
SYSPRO e.net Web Applications to communicate with the SYSPRO Server via DCOM.
Do not install SYSPRO e.net solutions DCOM Remote Client on a
SYSPRO Server that has the SYSPRO e.net Framework installed. This is
not required and will override Registry entries that instructs COM of the
installation path and other information pertaining to ENCORE.DLL.
1. Insert the SYSPRO CD-ROM into the designated computer. The auto-run installation
menu is displayed.
2. From the installation menu select, Install Product → SYSPRO 6.0 → Core Product.
3. From the Setup Type dialog, select the Client option, then click Next. The
Component Selection dialog is displayed.
Installing the SYSPRO Web Based Applications
B–3

4. Check the e.net solutions DCOM remote client option. Uncheck all other options,
then click Next. The Remote Server id dialog is displayed.
5. Input the TCP/IP Address or NetBIOS name of the SYSPRO Server into the Server
field.
B–4

6. Complete the remaining installation steps, accepting all defaults.
Installing the SYSPRO Web Based Applications
B–5

B–6

C
Installing and Apportioning Licenses
C.1. Instructions to install License.xml
These instructions should be used to install and apply the License.xml file. The
instructions cover the following topics:
• Changing an existing company – either for a new expiry year or for new modules
• Adding a new company
• Adding and apportioning e.net licenses
C.2. Importing the License.xml file
The License.xml file should be saved into the SYSPRO Application server’s work folder.
Typically use the 'Save as…' function to save this file.
Once the License.xml file has been saved to the work folder you are ready to import it.
C.3. Updating an existing SYSPRO company License
To change a SYSPRO company license perform the following steps:
1. Load SYSPRO and enter your administrator User name and Password.
2. At the Company prompt select the Browse (or press F9)
3. Select a company to be maintained and click 'Change'
4. Select the Registration Tab
5. Click on the 'Import License…''button
6. Choose to import the newly saved License.xml file and click 'Next'
7. Select the company (the current one will be selected by default) and click 'Next'
8. Click 'Finish' to complete the License Import Wizard
9. Back on the Company maintenance 'Registration Tab', click 'Save' to save the
company license
10. Repeat from step 3 for each company

Note that if the new license is for a different number of concurrent users, ODBC seats,
U/SQL seats, Dialog seats or CAL seats then you should use the System Setup to change
the system settings.
C.4. Adding a new SYSPRO company
To add a new SYSPRO company perform the following steps:
1. Load SYSPRO and enter your administrator User name and Password.
2. At the Company prompt select the Browse (or press F9)
3. Click 'Add' and select an unused company id (A-Z, 0-9)
4. Configure your company options
5. Ensure that the correct Company data format is defined on the Database and Data
Paths Tab (select either C-ISAM or SQL Server)
6. Select the Registration Tab
7. Click on the 'Import License…' button
8. Choose to import the newly saved License.xml file and click 'Next'
9. Select one of the company names from the list and click 'Next'
10. Click 'Finish' to complete the License Import Wizard
11. Back on the Company maintenance 'Registration Tab', click 'Save' to save the
company license
Note that if the License.xml file is for a different number of concurrent users, ODBC seats,
U/SQL seats, Dialog seats or CAL seats then you should use the System Setup to change
the system settings before adding a new company.
C.5. Importing and apportioning an e.net License
To import and apply the e.net license perform the following steps:
1. Load SYSPRO and logon to the system using your administrator User name
2. Select the System Setup from the main menu
3. Click on the 'Configure e.net Licenses…' button
4. Select the Import XML file radio button and click 'Next' (this saves your current e.net
license settings)
5. Choose to import the newly saved License.xml file and click 'Next'
6. Click 'Finish' to complete the License Import Wizard
C–2

7. To apportion the newly imported licenses select the Business Objects… and/or Web
based Applications… push buttons.
8. When you have completed apportioning the licenses return to the Configure e.net
License and click 'Next'. This will verify that all apportioned licenses are valid.
9. Click 'Finish' to complete the e.net license import and apportionment. This will make
all the e.net license information live.
Installing and Apportioning Licenses
C–3

C–4
