
1
My UNC Chart Patient Guide
Welcome to My UNC Chart ............................................................................................................................. 3
Sign up for a My UNC Chart account ............................................................................................................... 3
Log in to My UNC Chart ................................................................................................................................... 4
What if I forget my username or password? ................................................................................................... 4
Two-Factor Authentication for My UNC Chart ................................................................................................ 5
Health ............................................................................................................................................................. 6
View your test results ..................................................................................................................................... 6
Manage your medications .............................................................................................................................. 8
View a summary of your health information ................................................................................................ 10
Respond to questionnaires from your clinic ................................................................................................. 10
Track your daily health readings online ........................................................................................................ 11
Messaging ..................................................................................................................................................... 13
View messages from your clinic .................................................................................................................... 13
Ask your care team for medical advice ......................................................................................................... 14
Request a referral to see another provider ................................................................................................... 16
Upload an Image ........................................................................................................................................... 17
Visits ............................................................................................................................................................. 22
View your past or upcoming appointments .................................................................................................. 22
Schedule or request an appointment ........................................................................................................... 23
Cancel an appointment ................................................................................................................................. 27
eCheck-In ...................................................................................................................................................... 27
Receive medical care online with an E-Visit .................................................................................................. 28
Have a video visit with your provider ............................................................................................................ 28
Family Access ................................................................................................................................................ 33
Access a family member's record .................................................................................................................. 33
Invite someone else to access your record ................................................................................................... 34
View and print your child's immunization record ......................................................................................... 36
View your child's growth charts .................................................................................................................... 36
Medical Record Access and Sharing .............................................................................................................. 37
View or download your medical record ........................................................................................................ 37
View, download, or send visit records .......................................................................................................... 38
Download medical records you've requested ............................................................................................... 38

2
Share your medical information with someone else ..................................................................................... 39
See your medical information from other healthcare organizations ............................................................ 39
Billing and Insurance ..................................................................................................................................... 41
View your outstanding balance ..................................................................................................................... 41
Make a payment for an outstanding account balance .................................................................................. 41
Sign up for paperless billing .......................................................................................................................... 41
Get a price estimate for medical care ........................................................................................................... 41
Request assistance with your medical bills ................................................................................................... 42
Review and update your insurance information ........................................................................................... 42
Preferences and Administrative Features ..................................................................................................... 43
Personalize My UNC Chart ............................................................................................................................ 43
Update your personal information ............................................................................................................... 43
Customize your notification preferences ...................................................................................................... 43
Change your My UNC Chart password or update your security question and answer .................................. 43
Protect your account with two-step verification .......................................................................................... 44
Mobile Apps ................................................................................................................................................. 45
Download the My UNC Chart app ................................................................................................................. 45
Connect your My UNC Chart account to Apple Health or Google Fit ............................................................ 46

3
Welcome to My UNC Chart
My UNC Chart provides you with online access to your medical record. It can help you participate in your
healthcare and communicate with your care team.
From My UNC Chart, you can:
Review summaries of your previous appointments, including issues addressed during each visit, your
vital signs, and tests or referrals that were ordered.
View your medications, including dosage information and instructions, and request a refill.
View new lab results, as well as trends over time. For example, view results for your past cholesterol
tests on a graph to see if you're close to meeting your target number.
Access your family members' medical records. For example, you can view your child's growth charts,
immunization history, and upcoming appointments.
This guide provides an overview of many of My UNC Chart's features and how to use them.
Sign up for a My UNC Chart account
To sign up for My UNC Chart, you must be at least 13 years old. There are several different ways to sign up for
My UNC Chart:
Your provider’s office staff can sign you up while you're at the front desk or in the exam room.
You may receive a My UNC Chart activation code on your After Visit Summary after your appointment.
If you are 18 years or older, you may receive a text or email with an activation code when you schedule
an appointment, come in for an appointment, or check out from your appointment.
If you are 18 years or older, you may be able to sign up online to create a My UNC Chart account
without an activation code through Experian. This is a third-party service that matches your personal
information against your medical record.
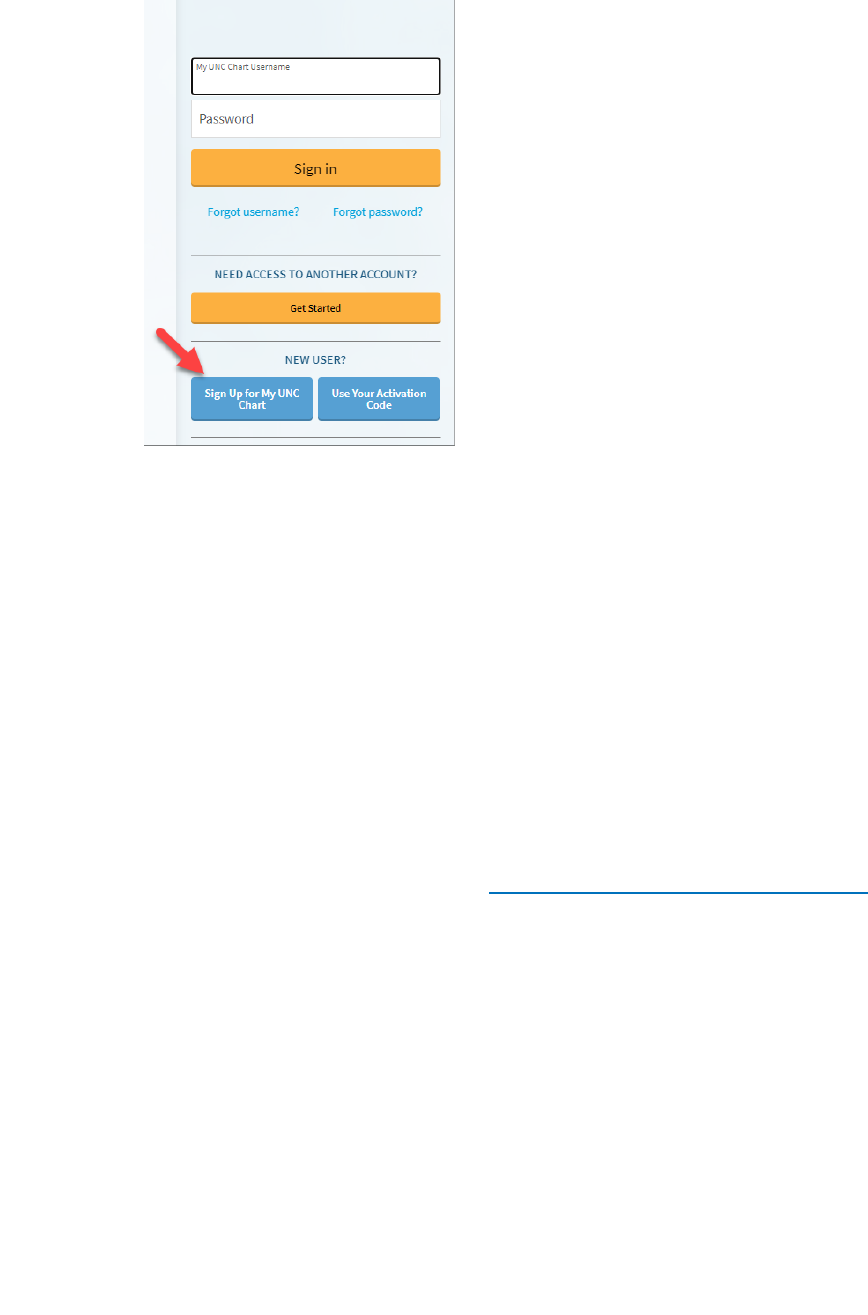
Use your activation code to sign up
1. From the My UNC Chart login page, click Use Your Activation Code in the New User? section.
2. Enter your activation code, date of birth, and home zip code. Click Next.
3. You then will be prompted to enter a Two-Factor Authentication code for extra security
4. On the next page, choose the following:
My UNC Chart username. This should be something that others wouldn't be likely to guess but
easy for you to remember. It cannot be changed at any time.
Password. This should be a unique combination of numbers and letters, using both uppercase and
lowercase letters. Choose a password that you don't use for other websites.
5. On the next page, choose whether you want to receive a notification message in your personal email
or via text message when there is new information available in your My UNC Chart account. You can
update your notification preferences at any time.
4
If you don't have an activation code and are 18 or older
1. Click on Sign up for My UNC Chart.
2. You will be asked a series of questions from Experian to verify your identity.
3. On the next page, choose the following:
My UNC Chart username. This should be something that others wouldn't be likely to guess but
easy for you to remember. It cannot be changed at any time.
Password. This should be a unique combination of numbers and letters, using both uppercase and
lowercase letters. Choose a password that you don't use for other websites.
4. On the next page, choose whether you want to receive a notification message in your personal email
or via text message when there is new information available in your My UNC Chart account. You can
update your notification preferences at any time.
Log in to My UNC Chart
1. In your web browser, enter or click https://myuncchart.org/My UNC Chart to access the login page.
2. Enter your My UNC Chart username and password, and click Sign In.
What if I forget my username or password?
Click the Forgot Username? or Forgot Password? link below the login fields for assistance. You will be
prompted to provide your first and last name, as well as your date of birth and zip code to verify your identity
so you can recover your username or password. If we have your e-mail address on file, then your My UNC
Chart Username will be sent to that e-mail account.
If you do not remember the information required to recover your Username, or if we do not have your valid e-
mail address on file, you will need to contact the UNC Health Outpatient Access Center at (888) 996-2767 to
regain access to your My UNC Chart account.

5
Two-Factor Authentication for My UNC Chart
Two-factor authentication is an extra layer of security for your My UNC Chart account. With this feature
enabled, when you sign in to your account with your username and password, you will be asked for an
additional code that will be sent to your cell phone or email.
How Does It Work?
To use two-factor-authentication, follow these steps:
1. Sign in to your account with your username and password.
2. Choose if you want to have the one-time code sent to your email or cell phone.
3. Enter the code and click "verify."
How to Disable Two-Factor Authentication
If you do not want to use this feature, you can disable it from your account. You will need to verify your
account through two-factor authentication one more time to complete the disable process.
1. Select "Security Settings" in the My UNC Chart menu.
2. Select "Turn off two-step verification."
3. Enter your password and click "continue."
4. Choose if you want to have the one-time code sent to your email or cell phone.
5. Enter the code and click "verify."
You will not be asked to enter an additional code again when signing in to your account. You can always turn
this feature back on, if you change your mind.

6
Health
View your test results
With My UNC Chart, you can view test results as soon as they become available rather than waiting for a
phone call or letter from your provider.
You may see your test results before your provider has had a chance to review them as
Epic@UNC releases test results immediately.
To view test results:
1. Click Test Results located on the home toolbar.
2. Select a test to view more information about it, such as:
• The standard range for the result
• Any additional comments your provider entered about the result

7
If you're looking for a specific result, enter key words in the search field on the Test
Results page.
You will see results for all organizations where you have received care by default. If you
wish to filter to only show results from UNC Health, click the drop-down menu and select
UNC Health Care.
Receive an email when new results are available
1. Go to Menu > Communication Preferences.
2. Expand the Health section and select a notification option next to Test Result.
3. If needed, you can update your email address and mobile phone number at the bottom of the page.

8
Manage your medications
View your current medications
View all of your current medications in one place. You can see details for each medication, including the
prescribed dosage, instructions, and the provider who prescribed the medication.
To view your current medications:
1. Click Medications located on the home toolbar.
2. To view additional information about a medication such as precautions to consider when taking the
medication and potential side effects, click the Learn more link.
3. Click Remove to delete a medication you are no longer taking.
4. To add a medication to your current list of medications, click + Report a medication at the bottom of
the page.
Your chart will be updated after your healthcare provider reviews the change with you at
your next visit.

9
Request a medication refill
1. From the medication list, click Request Refills.
2. Select the check box next to the medication you need refilled. Click Next.
3. Enter any comments under the medication.
4. Select a delivery method and pharmacy.
5. Click Next.
6. Review the details of your refill request and click Submit.

10
View a summary of your health information
To view a summary of your medical record, go to Menu > Health Summary.
This summary includes:
Current health issues
Medications
Allergies
Immunizations
Preventive care
Respond to questionnaires from your clinic
Your provider or clinic may make questionnaires available through My UNC Chart that you can complete
online instead of filling out a form when you arrive at the clinic.
You may be able to respond to questionnaires in three different places:
Access questionnaires from Menu > Questionnaires

11
If your provider wants you to complete a questionnaire for an upcoming appointment, go to Visits >
Appointments and Visits. Locate the upcoming appointment and click Details.
If your provider sends you a My UNC Chart message with an attached questionnaire, open it by clicking
the questionnaire link within the message.
If you need to close a questionnaire before you finish it, click Finish Later to save your progress.
Track your daily health readings online
Your provider may request you record information such as your daily glucose or blood pressure readings in My
UNC Chart. When you enter the information in the Track My Health feature, your provider automatically
receives the readings and can monitor your progress between visits.
Record a new reading in Track My Health
NOTE: this option will only be available if a provider has sent a flowsheet to you
1. Go to Menu > Messages. Open the message from your provider about a new flowsheet. The flowsheet
is what you use to enter your readings in the Track My Health feature.
2. Open Track My Health by clicking the link in the message.

12
After you have set this up you can record your readings by going directly to Health > Track My
Health.
3. Click the flowsheet's name to open it, and then click Add New Data to begin recording your readings.
4. Enter your reading with the date and time and click Continue.
***The date and time will auto populate if you are using a mobile device***
5. Verify you have entered your reading correctly and click Submit.
6. If you need to change or remove a reading after you've submitted it, you can do so by clicking edit or
delete.
Track your readings over time in a table or graph
1. On the Track My Health page, click the flowsheet's name to view previous readings in a table.
2. From this page, you can:
Change the orientation of the table. Click the More Options link to choose whether dates appear as
rows or columns.
View the readings in a graph. Click Graph to change the display.
Customize the date range or the number of readings that appear. Change the From and To fields or
the Latest Values field and click Apply to update the display.

13
Messaging
View messages from your clinic
You can read any messages sent by your care team by going to your inbox (Messages > Message Center).
If you're looking for a specific message, enter key words in the search field on the Inbox
page.
Select to receive an email when new My UNC Chart messages are available
1. Go to Menu > Communication Preferences.
2. Expand the Messages section and select a notification option.

14
3. If needed, you can update your email address and mobile phone number at the bottom of the page.
Ask your care team for medical advice
If you have a non-urgent medical question that does not require an immediate response, you can send a
secure message to your healthcare team.
1. Go to Messages.
2. Click Send a message.
3. Click Ask a medical question.

15
4. Select Non-Urgent Medical Question.
5. Select a recipient from the list. This list might include your primary care provider or another provider
with whom you've recently had an office visit or upcoming visit within the next couple of months.
*** If no recipients are listed, you do not have any available for messaging. This may be the case if the
below conditions are not met.***
6. Select a subject for your message and enter your question.
7. When you are finished, click Send.
Someone at your clinic will respond to you within three business days. You can send messages to a provider
listed on your care team if one of the following conditions is met:
• You have had an appointment with this provider in the past 13 months.
• You have an upcoming appointment with this provider in the next 2 months.
• Provider is listed as your Primary Care Physician on your Care Team

16
Request a referral to see another provider
1. Go to Messages.
2. Click Send a message.
3. Click Ask a medical question.
4. Click Referral Request
5. Enter the provider you want to see, a reason for the referral, and a brief message explaining your
request.
6. When you are finished, click Send.
Someone at your clinic will respond to you within three business days. If you've opted to receive email
notification for new messages in your My UNC Chart account, you'll receive a message letting you know that
the clinic has responded to your request.
To view a message after you've sent it, go to Messages and select the conversation.

17
Upload an Image
There may be instances when you need to share an image with your care team. The instructions below
highlight how to upload an image (GIF, JPG, PNG, TIFF, BMP, TIF, JPEG, or PDF) to My UNC Chart through the
Desktop and Mobile App.
Uploading Photos to My UNC Chart Using a Laptop or PC
1. Go to Messages.
2. Click Send a message.
3. Click Ask a medical question.
4. Select the subject of your message from the list of options.
5. Select who should receive the message.
6. Enter a subject and compose your message then click the paperclip icon to attach an image.

18
7. Select the image to attach and click Open.
8. Once you see your attached image at the bottom of the window, click Send.
***You can attach up to three images***

19
Uploading Photos to My UNC Chart Using a Smartphone (Andriod or iPhone)
1. Select Messages icon from the homepage or under the Communications section of the Menu.
2. Click Send a message.
3. Select Ask a medical question.
4. Select the subject of your message from the list of options.

20
5. Select who should receive the message.
6. Enter a subject and compose your message then click the paperclip icon to attach an image.
7. Click Photo Library or Choose File or Take Photo to take a new picture.

21
8. Once you see your attached image at the bottom of the window, click Send.
***You can attach up to three images***

22
Visits
View your past or upcoming appointments
You can view your past or future appointments by going to Visits in the toolbar:
Select an upcoming scheduled appointment or click Details to see information such as:
The date, time, and location of the visit
Any pre-visit instructions from the clinic
Directions to your clinic
If an upcoming appointment is eligible for eCheck-In, you can use it to take care of the following tasks before
you arrive at the clinic:
Verify or update insurance and demographic information
Verify or update medications, allergies, and current health issues
Answer appointment-related questionnaires
Verify guarantor information
Electronically sign documents that may be available
Update emergency contacts
Pay visit copays
Pay pre-payments and balance payments

23
For past appointments, you can click View After Visit Summary® to see a summary of the care you received
during your visit. You also can view any of your provider’s visit notes that are shared with you by clicking View
notes.
Schedule or request an appointment
Depending on your provider and their clinic, you may be able to schedule your own appointment or request
an appointment with a particular provider or for a specific reason during a preferred date range.
To schedule an appointment:
1. Go to Visits > Schedule an Appointment.
2. Choose one of your providers listed or select a reason for scheduling an appointment.

24
3. Select the type of appointment you would like to schedule.
4. Choose a location that works for you (if applicable).
5. Select an appointment from the list of available dates and times.

25
6. Complete scheduling by verifying the appointment information including provider, date, time, and
location. Enter any information within the text box that you would like the provider to address during
your visit.
7. Click Schedule it.

26
To request an appointment:
1. Go to Visits > Schedule an Appointment.
2. Select Request an Appointment when prompted to choose which kind of appointment you wish to
schedule.
3. Review the location and provider and enter preferred dates and times you would like to have an
appointment. Within the text field, include pertinent details of what you would like to address during
your visit.
4. Click Send request.
After you submit your request, someone from the clinic will contact you to verify an appointment date and
time.

27
You can “favorite” an appointment to make it easy to schedule the same type of visit
again later with the same provider and/or department.
Cancel an appointment
Depending on the date and time of your next appointment, you might be able to cancel it through My UNC
Chart. Some appointments cannot be canceled online, and you will need to call the clinic to cancel your
appointment.
1. Go to Visits > Appointments and Visits. Select the appointment from the list or click Details.
2. Click Cancel, enter cancellation comments, and click Confirm Cancellation.
eCheck-In
Save time by updating your health information online before your visit.
1. Go to Visits from the top menu of the Welcome screen.
2. Navigate to the Upcoming Visits section.
3. Click eCheck-In.

28
Once you have clicked on eCheck-In, follow the prompts to update your information. You will be able to:
• Verify and update demographics
• Verify insurance and guarantor
• Verify and update contacts
• Verify and update medications, allergies, and current health issues
• Make pre-payments
• Answer questionnaires if any are needed
• Sign documents
The information you provide will be reviewed during your visit.
eCheck-In is available 7 days prior to your appointment. You will receive an email as soon as eCheck-In is
available for you to complete. The eCheck-in reminder will have the Check in online button.
Receive medical care online with an E-Visit
If your provider offers E-Visits, you can answer a questionnaire about your symptoms and send photos or
videos as needed for your provider to review. Your provider then can offer medical advice for at-home care or
let you know if you should schedule an appointment for treatment.
To submit an E-Visit:
1. Go to Menu > E-Visit.
2. Review the E-Visit Terms and Conditions, and click Accept.
3. Select the Country and State where you are currently located then click Confirm.
4. Based on your concern, choose from a list of symptoms, select a recipient, and click Continue.
5. Confirm your insurance and demographic information.
6. Proceed with the E-Visit by answering a series of questions related to your symptom selection.
7. Once submitted, your provider will contact you for next steps.
Have a video visit with your provider
You can schedule a video visit to have an online face-to-face interaction with your provider from the
convenience of your home or work. Video visits are scheduled in the same way as other appointments. For
more information about scheduling, refer to Schedule or request an appointment.
If you need care right away, you might be able to use an on-demand video visit to talk to
a provider now rather than scheduling a video visit appointment for later. Go to Menu >
Virtual Care Now to connect with an available provider.

29
Prepare for your video visit
To ensure a smooth connection, complete the following tasks well in advance of your video visit:
If using a computer:
• Make sure you have a webcam set up. This can be a webcam that is part of a laptop or a separate
USB webcam.
• Use one of the following internet browsers: Google Chrome, Microsoft Edge, Firefox or Safari
(Internet Explorer will not work with video visits).
• Ensure you are using a wired internet connection or Wi-Fi.
If using a smartphone:
• Ensure you have downloaded the My UNC Chart app and are able to sign into your account.
• Make sure you are connected to Wi-Fi as mobile data will not work for a video visit.
After you've done these things, you can do a test to make sure everything is working in My UNC Chart. You
should complete this test at least 30 minutes prior to your video visit start time.
30
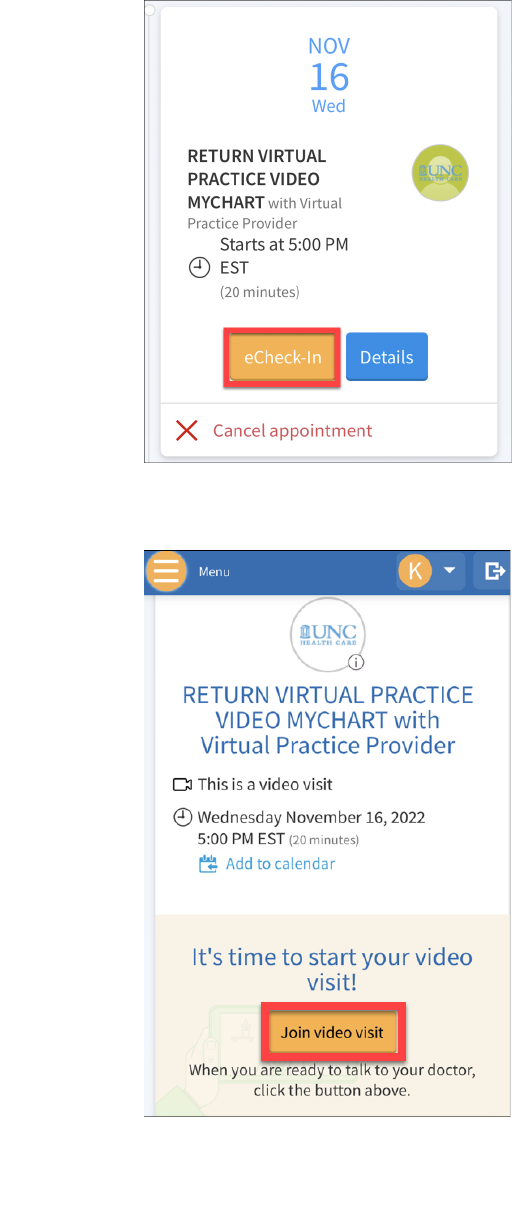
Accessing and connecting to your video visit
My UNC Chart mobile
1. Go to Visits > Appointments and Visits.
2. Locate the video visit and complete eCheck-In for your scheduled video visit.
3. Confirm insurance, demographic information and complete the Video Visit Questionnaire.
4. Click Join video visit.
5. Select Continue to test your microphone, speaker, and video.

31
6. Click Allow for microphone and camera use.
7. Enter a Display Name then click Join Call.
My UNC Chart Computer (Web Browser)
1. Your video visit appointment will be visible on the Welcome Page or within Visits> Upcoming Visits
2. Click eCheck-In, and complete your eCheck-In.
3. After completing eCheck-In, click Join video visit.

32
4. Click Continue to test your camera, microphone, and connection.
5. Select Allow to use your camera and microphone.
6. Click Join Call and wait for your provider to join the video session.
When it's time to connect to your video visit, an alert appears on the My UNC
Chart home page. You also can click the link in this alert to connect.
After you connect to the video visit, you might need to wait for your provider to connect.

33
Family Access
If you have access to your family members' medical records, you can view most of the information in their
records in the same way that you view your own. Some things that might be particularly useful include:
Viewing or printing your child's immunization record
Viewing your child's growth charts
Viewing a family member's test results
To submit a Proxy Access Request
1. Go to Menu > Proxy Access Request
2. Click Complete This Form under the applicable level of access
a. Parent/Legal Guardian Access to Minor Patient's Health Information in My UNC Chart
b. Authorization for Another Person to Have Access to My Health Information in My UNC Chart
c. Authorization for Health Care Power of Attorney or Legal Guardian to Access Health
Information in My UNC Chart
If you're a parent, you can have full access to your child’s record through age 12. For children ages 13 to 17,
the health information you will be able to view will be limited. When your child turns 18, your access will be
turned off completely. Your teenaged child can choose to give you full access in both cases by completing and
submitting the proper forms.
This section explains how to access a family member's record and how to access growth charts and
immunizations in a child's record.
Access a family member's record
After you've received permission, you can view a family member's records by clicking the photo or name for
that family member in My UNC Chart.
After you read the proxy access disclaimer, click Accept to continue to your family member's chart.

34
Invite someone else to access your record
1. Go to Menu > Sharing Hub
2. Select A family member, close friend, or caretaker.
3. Choose how you would like to share your health information. To invite someone to have continued
access, select Give ongoing access to your My UNC Chart account.

35
4. Select + Invite someone
5. Enter that person's name and email address, confirm the level of access, and click Send Invite. The
invitation then appears as Pending at the top of the page.
After you send the invitation, the recipient receives an email to notify them that you've invited
them to have access to your account. From this email, they can click a link and log into My UNC
Chart where they must enter your date of birth to confirm they know you and accept the invitation.
6. After the person you've invited accepts the invitation, you'll receive a message to let you know, and
the Pending label is removed next to that person's name on the Friends and Family Access page. You
can return to this page at any time to edit or revoke that person's access.

36
View and print your child's immunization record
1. When you are in your child's record in My UNC Chart, go to Menu > Health Summary.
2. Select the Immunizations tab. You can see the immunizations your child has received and the dates
your child received them.
3. Click View details to view the list of doses on file. Click on the immunization name to learn more.
To open a printer-friendly summary of your child's immunizations, click .
View your child's growth charts
To view your child's growth charts, open your child's record and go to Menu > Growth Charts.
You can customize the view of the growth chart by:
Choosing a different Chart Set. For example, you can switch between growth charts provided by the
Centers for Disease Control (CDC) and the World Health Organization (WHO).
Changing the Chart Type. For example, you can switch the view from length-for-age to weight-for-age
or Body Mass Index-for-age.
You also can view the growth chart with a different unit of measure (metric or standard) by selecting the
option for that unit of measure.
If you want a copy of the growth chart for your records, click .

37
Medical Record Access and Sharing
The My UNC Chart patient portal has several different features that allow you to access your health records
and share them with other people. For more information about accessing family members' records, refer to
Family Access.
View or download your medical record
You can save your health summary to a USB drive to carry with you in case of emergency. The portable
summary includes all the allergies, medications, current health issues, procedures, test results, and
immunizations you can see in My UNC Chart. If necessary, the information on your USB drive can be uploaded
into a personal health record or another healthcare organization's electronic health record.
1. Go to Menu > Document Center.
2. Click Visit Records, and select the Lucy Summary tab.
3. Click Download, and then click Request for the message that appears. You'll be notified when your
download is ready.
4. When you are prompted to save or open the file, click Save, and save it to an accessible location on
your computer.
5. Open the folder and extract the .zip file.
6. To view your medical record, open the PDF file in the folder.

38
View, download, or send visit records
You can view, download, or share your record for a specific visit or set of visits.
1. Go to Menu > Document Center and click Visit Records.
2. Select a visit on the Single Visit tab or use the Date Range tab or All Visits tab to select multiple visits.
Then:
Click View to view a copy of the visit summary.
Click Download to save a copy of the visit summary for your records.
Click Send to send a copy of your visit summary to another provider. This might be useful if you
need to keep another provider, such as a specialist who works outside of your clinic, informed
about your health.
Download medical records you've requested
If you've requested a copy of your medical record, you can download and view it from My UNC Chart rather
than having to wait for a paper copy to arrive in the mail.
1. Go to Menu > Document Center and click Medical Record Requests.
2. Locate the record you want to view and click Download.
3. You will receive a message if the record is password protected. Click Continue Download.
4. Click Save to save the file to your computer and then open it, or you can click Open to open it without
saving it to your computer.
5. If the record is password protected, click Show Password on the Requested Records page to view the
password you need to access the document and enter it to view the document.
To request new medical records click Request Medical Records from within the
Medical Record Requests activity:

39
Share your medical information with someone else
Share Everywhere is a way for you to share your medical information with the people who are taking care of
you. Using My UNC Chart, you can generate a share code and provide it to the person you want to share your
health data with. This might be a doctor, chiropractor, physical therapist, dentist, or school nurse, for example.
The share code recipient enters that code and your date of birth on the Share Everywhere website to receive
one-time, temporary access to your health information. The person who views your information can also write
a note back to your health system to help keep your care team informed of the care they provide.
1. Go to Menu > Share Everywhere.
2. Enter the name of the person who will be viewing your record and request the share code.
3. Tell that person to go to www.shareeverywhere.com to enter the code along with your date of birth.
See your medical information from other healthcare
organizations
If you've been seen at another healthcare organization, you might be able to view information from that
medical record in My UNC Chart. You can do this through a feature referred to as Care Everywhere. The
information you might see from other organizations includes:
Allergies
Care team
Health issues
Medications
Messages
Test results
Visits
To view this information, you must link your account. Go to Menu > Link My Accounts to get started. Then,
select your account from the list and click Link Account.
After you've linked your accounts, information from the other organization appears in My UNC Chart with an
icon.

40
For more information about how linked accounts work and what information you can see
from each healthcare organization:
1. Go to Menu>Link My Accounts
2. Under the Discover tab, click See more
3. Click the link for the FAQ page.

41
Billing and Insurance
View your outstanding balance
To view an outstanding account balance for any of your accounts, go to Menu > Billing Summary.
If you need immediate access to billing records for a patient, please contact the Billing
Call Center at 1-800-594-8624 or 984-974-2222 to request an itemized statement.
If you have any other questions or concerns about charges, please contact the My UNC
Chart Support Line: (888) 996-2767, M-F from 8 AM – 7 PM.
Make a payment for an outstanding account balance
1. Go to Menu > Billing Summary.
2. Click Pay Now to make a payment.
3. Enter the amount to pay along with your credit card or bank account information. Click Continue.
4. Review your payment information, and click Submit Payment.
If you can't pay your entire balance all at once, you can set up a payment plan to pay a
smaller amount each month. Start the process by applying online
, and we'll work with
you to determine a payment arrangement or offer financial assistance based on your
financial situation.
Sign up for paperless billing
1. From the Billing Summary page, click the paperless billing alert.
2. If you want to receive an email or text message when a new paperless statement is available online,
enter and verify your email address or mobile phone number, and select the corresponding check box
to receive notifications.
3. Select the I understand that I will no longer receive statements in the mail check box and click Sign
Me Up.
Get a price estimate for medical care
To help you plan for upcoming care, such as a surgery or other procedure, you can get an estimate from My
UNC Chart. The estimate is based on your insurance and what other patients have been charged in the past.
1. Go to Menu > Billing and click Create Estimates.
2. Answer the series of questions related to your health coverage.

42
3. Based on your selections you may be prompted to call the UNC Health Estimates Team at (984) 215–
6899, Monday – Friday, 8:30 AM – 4:30 PM (except major holidays). Have the following information
available when you call:
• Service name and CPT / procedure code
• Current insurance carrier and subscriber ID
• Insurance plan details, including your remaining deductible, coinsurance, and remaining maximum
out-of-pocket, if applicable
Request assistance with your medical bills
If you need help paying your medical bills, you can submit a financial assistance application to see what
resources are available to you. Go to Menu > Financial Assistance to get started. You'll need to provide the
following information to complete the application:
How many people live in your household
How much you receive from all sources of income
Supporting documents to verify the information you provide
You will be prompted to complete the Financial Assistance application and add your electronic signature and
date. After you submit your application, a Financial Assistance Specialist will contact you to follow up.
Review and update your insurance information
To review the insurance information your clinic has on file, go to Menu > Insurance Summary. Click View
coverage details for the payer or plan to see more information about the coverage, such as your deductible
and maximum out-of-pocket expenses.
To update your insurance information, make any of the following changes:
Request a change to an existing coverage.
Remove a coverage.
Add a new coverage. New coverages are submitted for verification when you log out of My UNC Chart.

43
Preferences and Administrative Features
Personalize My UNC Chart
There are three ways you can personalize how My UNC Chart appears for you and each of your family
members. For each account you have access to, you can:
Change the name that appears under that person's photo.
Add or change the photo. Note that photos you upload through My UNC Chart are visible to medical
staff, so you should only use a photo that shows each person's face.
1. Go to Menu > Personalize.
2. Click Edit.
3. Make any of the changes described above and then click Save.
Update your personal information
You can update your address, phone number, email address, and other personal details at any time so your
clinic always has the most up-to-date information in your record.
1. Go to Menu > Personal Information.
2. Click Edit in the section for the information you need to update.
3. Confirm that your updated information is correct, and then click Save Changes.
Customize your notification preferences
My UNC Chart can send you notification by email or text message when there is new information available in
your My UNC Chart account. You can specify your preferences for different types of notifications, including
new messages, test results, billing statements and letters, prescriptions, appointment updates, and more.
1. Go to Menu > Communication Preferences.
2. Select notification options for a group of notifications (for example, Appointments or Messages) or
expand a notification group to select options for individual notifications you want to receive.
3. Update your email address and mobile phone number if needed.
Change your My UNC Chart password or update your
security question and answer
To ensure that your medical information stays protected, consider changing your My UNC Chart password
periodically. To do so, go to Menu > Security Settings. From this page, you also can update the security
question and answer that are used when you forget your My UNC Chart username or password.

44
Protect your account with two-step verification
You can ensure your account stays secure even if someone else has your username or password by turning on
two-step verification. When this feature is turned on, you must enter a code that is sent to you by email or
text message to log in to My UNC Chart, in addition to using your username and password.
When you log in to My UNC Chart for the first time, you might be prompted to verify your email address and
phone number to enable two-step verification. If you decide to turn off two-step verification, you can turn it
on again later.
1. Go to Menu > Security Settings and click Turn on Two-Step Verification.
2. Confirm your email address or phone number, enter your My UNC Chart password, and then click
Continue.
3. Select whether you want to receive the security code to turn on two-step verification by email or text
message.

45
Mobile Apps
My UNC Chart for iOS and My UNC Chart for Android are portable versions of My UNC Chart you can use to
manage your health information on the go. The mobile apps contain many of the same features as the My
UNC Chart website, allowing you to do all the following, and more:
View test results
Send and receive messages
Schedule and confirm upcoming appointments and view visit summaries for past appointments
View your health summary, including allergies, immunizations, current health issues, and medications
View preventive care procedures and when they are due
Request and pay for medication refills
View billing statements and pay balances due and visit copays
Access family members' charts
If you have an iOS device, you can pair it with Apple Watch™. With My UNC Chart for Apple Watch, you can:
See alerts for new information in My UNC Chart
View upcoming appointments
Read messages
Review your medication list
Download the My UNC Chart app
To install the My UNC Chart app, go to the App Store or Google Play Store and search for "My Chart."
After you open the app, select your primary healthcare organization from the list of organizations. You can
search for your organization by name, state, or ZIP code. You can easily add or switch between your My UNC
Chart accounts at different healthcare organizations using the Switch Organizations button on the login
screen or the Switch Organization menu option after you've logged in.

46
Connect your My UNC Chart account to Apple Health
or Google Fit
If your provider has assigned you a patient-entered flowsheet for tracking your health data, you can connect
My UNC Chart to Apple Health or Google Fit to automatically pull in data from other health and fitness apps or
devices.
1. In the My UNC Chart mobile app, open the Track My Health activity.

47
2. Tap Connect to Health or Connect to Google Fit at the bottom of the screen.
3. Choose the data you want to share with My UNC Chart by tapping the toggle button for each type of
data.
4. Tap Done. At this point, any data that was already stored in Health or Google Fit is automatically
synced to My UNC Chart.

48
© 2020 Epic Systems Corporation. All rights reserved. PROPRIETARY INFORMATION - This item and its contents may not be accessed, used, modified, reproduced, performed,
displayed, distributed or disclosed unless and only to the extent expressly authorized by an agreement with Epic. This item is a Commercial Item, as that term is defined at 48
C.F.R. Sec. 2.101. It contains trade secrets and commercial information that are confidential, privileged and exempt from disclosure under the Freedom of Information Act and
prohibited from disclosure under the Trade Secrets Act. After Visit Summary, Analyst, App Orchard, ASAP, Beacon, Beaker, BedTime, Bones, Break-the-Glass, Bugsy, Caboodle,
Cadence, Canto, Care Everywhere, Charge Router, Chronicles, Clarity, Cogito ergo sum, Cohort, Colleague, Comfort, Community Connect, Cosmos, Cupid, Epic, EpicCare, EpicCare
Link, Epicenter, Epic Earth, EpicLink, EpicWeb, Garden Plot, Good Better Best, Grand Central, Haiku, Happy Together, Healthy Planet, Hyperspace, Kaleidoscope, Kit, Limerick,
Lucy, Lumens, My UNC Chart, OpTime, OutReach, Patients Like Mine, Phoenix, Powered by Epic, Prelude, Radar, Radiant, Resolute, Revenue Guardian, Rover, Share Everywhere,
SmartForms, Sonnet, Stork, System Pulse, Tapestry, Trove, Welcome, Willow, Wisdom, With the Patient at Heart, and WorldWise are registered trademarks, trademarks, or
service marks of Epic Systems Corporation in the United States of America and/or other countries. Other company, product, and service names referenced herein may be
trademarks or service marks of their respective owners. Patents Notice: www.epic.com/patents.
