
EditingVideoUsingMovieMaker
ConnectingCameratoComputer………………...2
ImportingRawVideo………………………………....3
EditingVideo……………………………………………..5
AddingTransitions…………………………………….8
AddingSpecialEffects………………………………10
SavingMovietoComputer………………………..12
SavingMovietoCDforStudent
Tchng/Methods/Cohort……………………….......14
BurningMovietoCD ...............................................16

2
Connecting Camera to Computer
Connect the fire wire cable to the back of the computer.
1. Connect the fire wire cable to the video camera.
2. Set the video camera to PLAY (VCR) mode.
Fire wire
cable.
Fire wire
cable.
PLAY (VCR).

3
Importing Raw Video
3. The window below will appear; select Capture Video using Windows Movie
Maker. Then click OK.
4. Microsoft Windows Movie Maker starts the Video Capture Wizard. On the
Capture Video File page, type a name for the video project. Then click Next.

4
6. On the Video Setting page, accept the default settings by clicking Next.
5. On the Capture Method page, click Next. It’s easiest to capture the entire tape at
once; if sections remain that will not be needed, they can be deleted later.

5
6. The Video Capture wizard rewinds the tape and then begins capturing it. The tape
will be captured in real time. The video will be playing in the Preview window
and the audio can be heard through the speakers/headphones. The wizard always
scans the entire tape, even if a few minutes of video have been recorded. When
the end of the video has been reached, click the Stop Capture button then click
Yes.
Movie Maker automatically breaks the movie into clips and adds the clips to a
video collection with the name provided. The video is now ready to edit if needed.
Editing video
1. Drag clips from the collection to the storyboard at the bottom of the window.

6
2. Select the clip that needs editing. Click the Play button on the Preview
Monitor.
3. Let the clip play until it gets to the point of editing. Next click the Split Clip
button on the Preview Monitor. This cuts the clip into two separate clips at the
current point in the video and adds the new clip to the story board.
Play Button

7
4. Delete the portion of the clip no longer needed by right-clicking it and then
clicking Delete.
5. Repeat this process for each clip. Clips can be split several times to use more than
one moment from a clip. If a lot of editing is necessary, it might be easier to use
the timeline view, which shows how long to play each clip. To use the timeline
view, click the Show Timeline button.
Split Clip
Button.
Show Timeline
b
utton

8
Adding Transitions
Transitions control the way one clip or picture in the movie moves to the next clip. Movie
Maker uses transitions to insert fades, flips, dissolves, and other dramatic shifts between
scenes.
1. In the Movie Tasks pane, under Edit Movie, click View video transitions.
Video
Transitions

9
2. Preview transitions by double-clicking them and watching the Preview Monitor.
Once a transition has been found, drag it to the box between two clips. This
inserts the transition between the two clips.
3. In the Preview Monitor, click the Video Transitions pane under the Play button
to watch the transition in action.
4. Transitions can be deleted by right clicking on the story board and click
Delete.

10
Note:
Transitions cause video clips to overlap by about one second, which means some
video could be lost between the transition. When filming, it is good to start the
camera a few seconds before the action starts and to keep filming for a couple of
seconds afterward so that there will be lapsed time between transitions. This also
helps to get a steadier shot. If extra time is not needed in a clip, it can be trimmed
from the clip in Movie Maker.
Adding Special Effects
• Special effects change the appearance of a video clip by rotating it, slowing it
down or speeding it up, or making it appear like old film footage. Like transitions,
special effects can be added easily by dragging the relevant special effect icon
onto the movie timeline.
1. In the Movie Tasks pane, under Edit Movie click View video effects.
Video Effects

11
3. Preview effects by double-clicking them and watching the Preview Monitor. Once
an effect has been found, drag it from the Video Effects pane to one of the
clips. This adds the effect to the clip, which can be seen by looking at the star in
the lower-left corner of the clip.
4. In the Preview Monitor, click the Play button to watch the effect in action. The
effect can be deleted by right clicking the star icon in the lower left corner of the
clip and click Delete Effects.

12
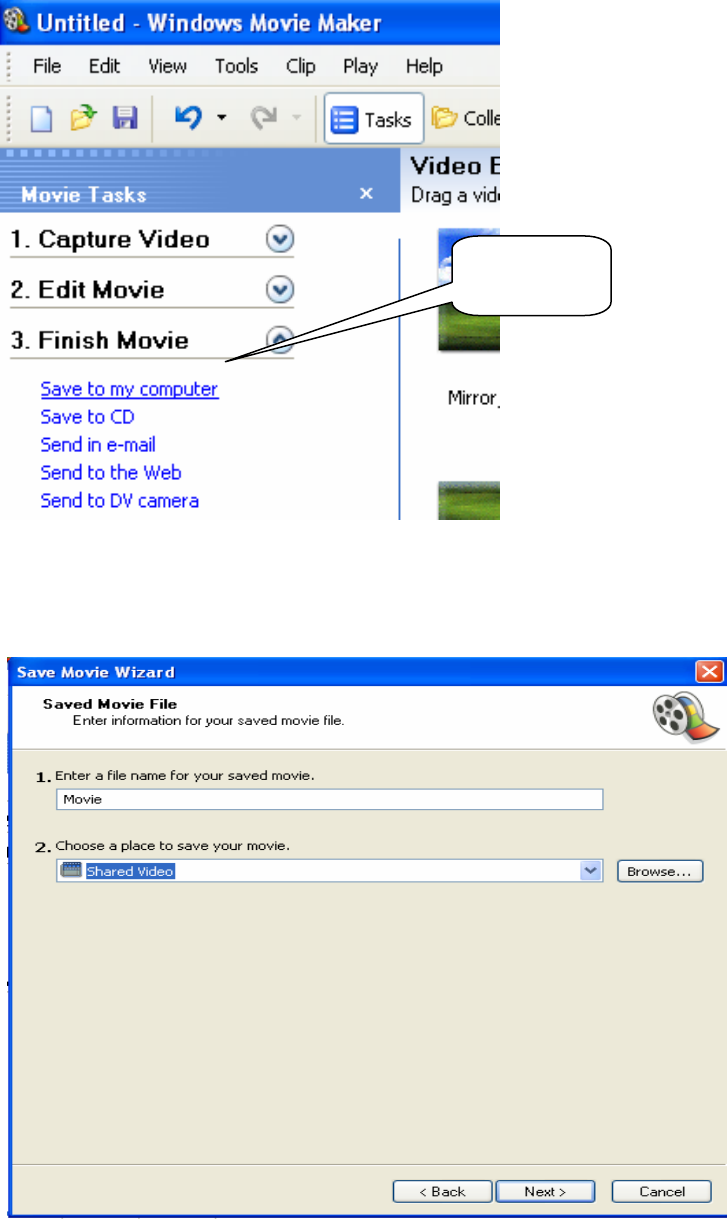
Saving Movie to Computer
1. In the Movie Tasks pane, under Finish Movie, click Save to my computer.
2. The Save Movie Wizard appears. On the Save Movie File page, type a name for
the movie then click Next.
Save to my
Computer

13
3. On the Movie Setting page, click Next to accept the default setting of Best
quality for playback on my computer.
4. Movie Maker saves the movie, which might take several minutes. On the
Completing the Save Movie Wizard page, click Finish. If Play movie when
click Finish was selected (it is selected by default), the movie will automatically
play in Windows Media Player.
14
Save your movie to a CD for Student
Teaching/Methods/Cohort
1. Insert a blank, recordable CD into the CD burner.
2. In the Movie Tasks pane, under Finish Movie, click Save to my computer.
3. The Save Movie Wizard appears. On the Save Movie File page, type a name for
the movie. You can also choose a folder to save it in by clicking the Browse
button, but Shared Videos (the default) is usually the best place to save the movie.
Click Next.
Save to my
Computer

15
4. On the Movie Setting page, click Show more choices, then select the Best fit to
file size option. Reduce the file size to 20MB by using the arrows and then click
Next.
5. Movie Maker saves the movie, which might take several minutes. On the
Completing the Save Movie Wizard, MAKE SURE to select Play movie when
I click Finish. The movie will automatically play in Windows Media Player.
Reduce the file
size to 20MB by
usin
g
the arrows
Select Best fit to file size.

16
Burning Movie to CD
1. Open CD drive on computer and insert CD.
2. At the Windows Media Player page, right click the movie under the Now
Playing List section and select Add to Burn list.
6. Click the Burn icon on the Windows Media Player tool bar, make sure the clip is
selected to be burned under Burn List and then click the Start Burn icon.
7. Windows Media Player will now burn your CD, this may take several minutes
and then your CD will be ejected.
Project is now complete
Start
Burn
icon
Make sure your clip is selected
Burn
MovieMaker tutorial created by Patrick Manyanza,
Carver Resource Center
,
Jul
y,
2007
